

Page 1
BC
ENGLISH
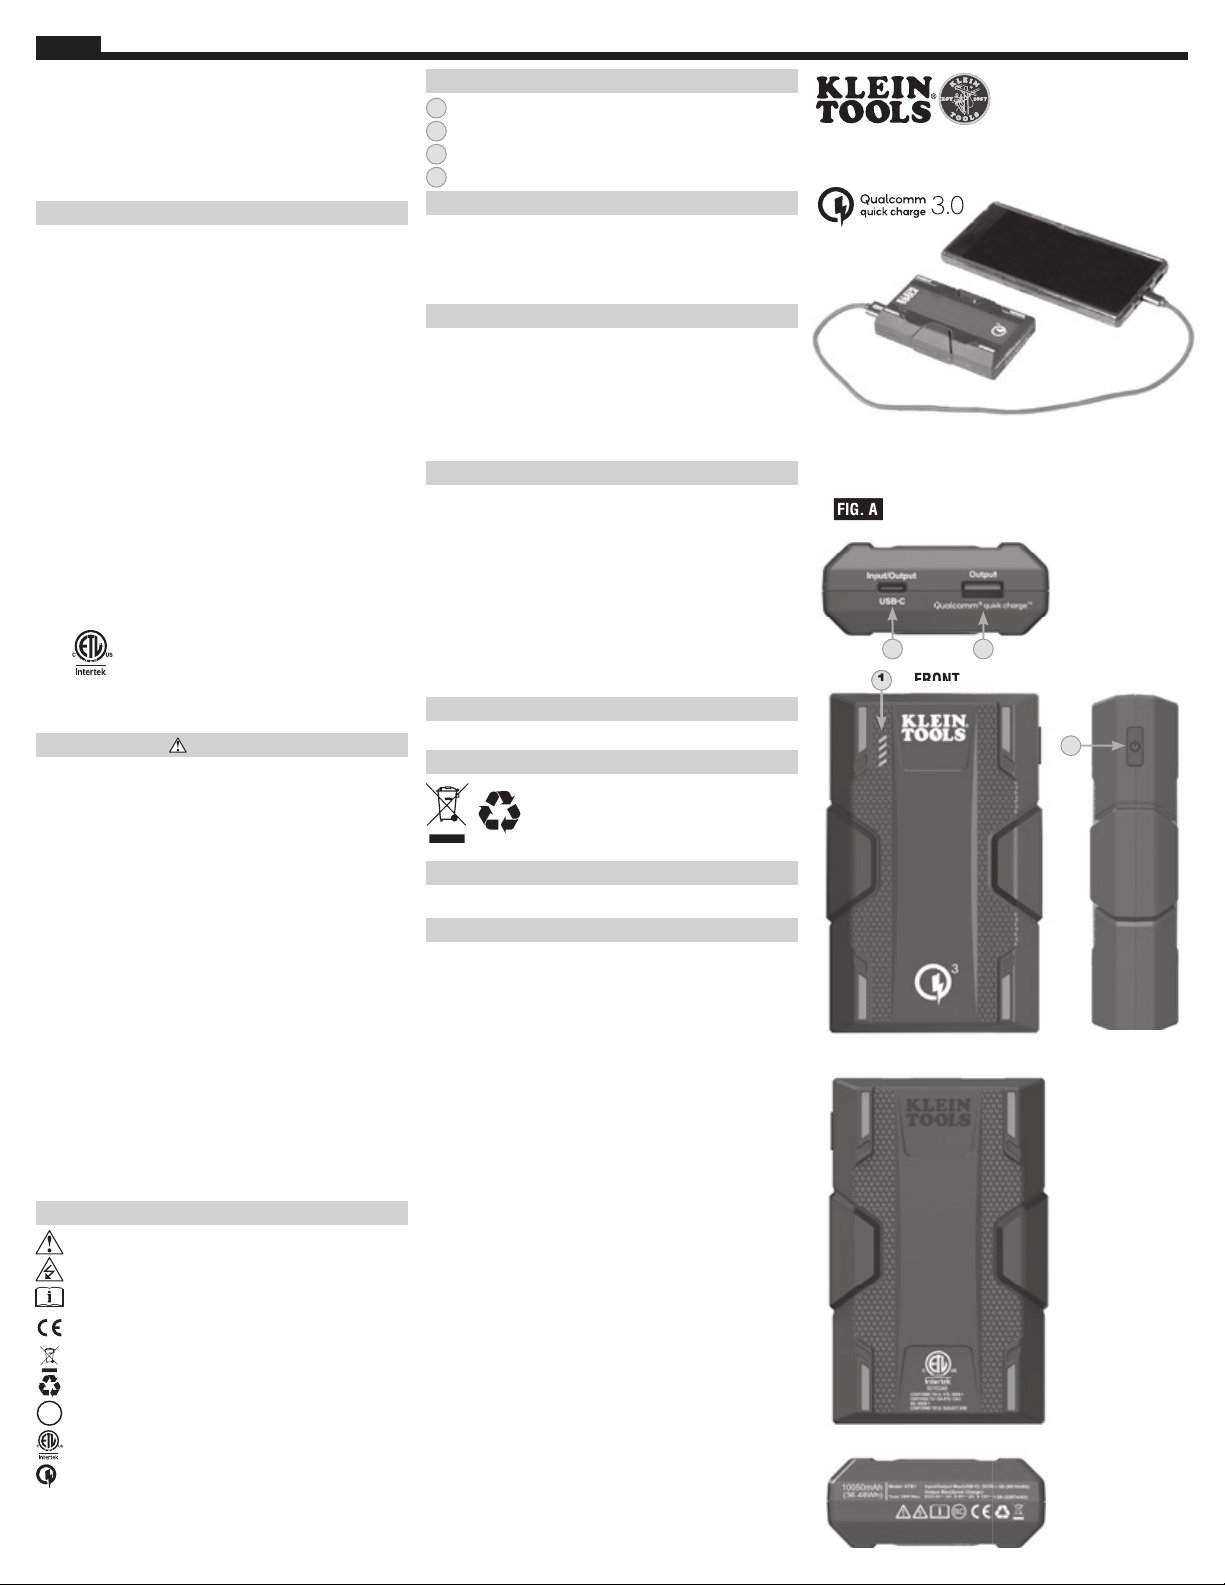
FIG. A
The Klein Tools KTB1 is a lithium-ion powered portable battery
(power bank) designed to charge common mobile devices like
cell phones, tablets, portable batteries, headphones, and other
smaller USB devices. The KTB1 is equipped with Qualcomm® Quick
ChargeTM technology, delivering up to 75% faster charging versus
conventional USB charging. The rugged, compact design with
impact resistant housing makes the KTB1 a versatile battery for
active, professional, and daily use.
GENERAL SPECIFICATIONS
• Cell Type: 18650
• Cell Chemstry: Li-Ion
• Output Capacity: 36Wh (10050 mAh)
• Charging Time: Full charge in 3 to 7 hours*
1
2
3
4
Be sure KTB1 is disconnected from all power sources and
devices. Use clean, dry, soft-lint-free cloth to wipe down the
entire unit.
DO NOT use abrasive cleaners or solvents. DO NOT use metal
objects to clean USB ports.
• Qualcomm Quick Charge 3.0 USB-A output (18W maximum):
• 5 - 6V DC: 3A • 6 - 9V DC: 2A • 9 - 12V DC: 1.5A
• USB-C input/output (15W maximum): 5V DC, 3A
• Total Maximum Output (all ports): 18W
• Shelf Life: Charge every 3 months
• Life Expectancy: Up to 300 cycles typical (depending on use
& care)
• Charging Requirements:
5V DC, 1A min. recommended
• Operating/Charging Temperature: 32° to 104°F (0° to 40°C)
Recharge as needed. There are no pre-designated intervals at
which to recharge as long as you are using regularly. Avoid
discharging completely on a regular basis, as this can impact
overall life.
Regularly inspect ports and charging cable for any debris, dirt,
damage, and corrosion. DO NOT attempt to fix. Replace KTB1 or
cable as needed.
• Storage Temperature: Up to 3 months: 14° to 104°F (-10° to
40°C)
• Storage Humidity: <75% Relative humidity
• Operating/Storage Altitude: 6562 ft. (2000 m)
• Dimensions: 2.5" x 4.1" x 1.1" (64 mm x 105 mm x 26 mm)
• Weight: 9.5 oz. (270 g)
• Relative Humidity: <85% non-condensing
• Drop Protection: 3.3 ft. (1 m)
• Standards:
UL2056: 2015, UL60950-1, EU 2015/863,
EC 1907/2006, EN55032:2015, EN61000-3-2:2014,
EN61000-3-3: 2013, EN55035: 2017, ICES – 003:2016,
IEC 60950-1: 2005, CAN ICES-3(B)/NMB-3(B)
5013348
*Charging time depends on charger output
If storing for more than 1 month, charge completely before
storage, and recharge approximately every 3 months to avoid full
discharge.
Store in cool temperatures, mild humidity, and away from direct
sunlight (See General specifications). Leaving in a vehicle or
other confined spaces in extreme hot temperatures can lead
to decrease in service life, overheating, or fire. Extreme cold
temperatures below the specified storage range can also harm
performance and service life.
Keep away from corrosive chemicals and gases.
After taking out of storage, inspect visually to make sure KTB1
and all accessories look satisfactory. Allow unit to return to
ambient conditions before recharging or charging other devices.
Specifications subject to change.
WARNINGS
Read, understand, and follow these instructions to ensure safe
operation. Failure to observe these warnings can result in risk of
fire, electric shock, serious injury and/or property damage.
•
Keep these instructions for future reference.
•
DO NOT use the power bank in excess of its output rating.
Overload outputs above rating may result in a risk of fire or
injury to persons.
•
Use of a power supply, charger, or cable not recommended or
sold by power pack manufacturer may result in a risk of fire
or injury to persons.
•
DO NOT use the power bank that is damaged or modified.
Damaged or modified batteries may exhibit unpredictable
behavior resulting in fire, explosion or risk of injury.
•
DO NOT subject to vibration, impacts, or drops. The housing
may not show signs of damage, but internal components may
have been compromised. It is advisable to replace the unit if
any such severe events occur.
•
DO NOT expose power bank to rain or snow.
•
Keep away from high voltage devices.
•
DO NOT attempt to repair battery or charging cable. There are
no user-serviceable parts.
•
Risk of Fire and Burns. Do Not Open, Crush, Heat Above
140°F (60°C), or Incinerate. Follow Manufacturer’s
Instructions.
SYMBOLS ON PRODUCT
Warning or Caution
Risk of Electrical Shock
Read instructions before using
Conformité Européenne. Conforms with European
Economic Area directives
WEEE – Battery disposal
Recyclable
Conforms with BCS regulations of California Energy
Commission
This product has been independently tested by Intertek and
meets applicable published standards
3
Qualcomm® Quick Charge technology
Qualcomm is a trademark of Qualcomm Incorporated, registered in the United States and
other countries.
Quick Charge is a trademark of Qualcomm Incorporated. All Qualcomm Incorporated
trademarks are used with permission.
Qualcomm Quick Charge is a product of Qualcomm Technologies, Inc. and/or its subsidiaries.
FEATURE DETAILS (FIG.A)
Battery status indicator
Power button
Auto-sensing Qualcomm® Quick Charge port (USB-A)
Auto-sensing Input/Output USB-C port
CLEANING
MAINTENANCE
STORAGE
Warranty
www.kleintools.com/warranty
DISPOSAL / RECYCLE
Do not place equipment and its accessories in the trash.
Items must be properly disposed of in accordance with
local regulations. Please see www.epa.gov or
www.erecycle.org for additional information.
OPERATING INSTRUCTIONS
SEE OTHER SIDE
CUSTOMER SERVICE
KLEIN TOOLS, INC.
450 Bond Street, Lincolnshire, IL 60069 1-877-775-5346
customerservice@kleintools.com www.kleintools.com
10050mAh PORTABLE BATTERY - INSTRUCTIONS
High-Speed Charging Powered By:
FIG. A
TOP
3 4
FRONT
1
2
BACK
BOTTOM
KTB1
SIDE
Page 2

ENGLISH
Type C
Micro-B
Micro-A
OPERATING INSTRUCTIONS
Read these instructions carefully before operating and keep for future
reference.
CHARGING KTB1
NOTE:
DO NOT attempt to insert other USB connector types into USB-A
or USB-C ports (FIG. B)
NOTE: Charge completely before using. To maximize Li-ion battery
life, see Maintenance and Storage sections (other side).
• Connect the included cable to the USB-C Input/Output port 3, then
connect the other end to any powered USB-A port.
• The battery level indicator LEDs 1 will illuminate (see Table 1).
• A full charge could take 4 to 8 hours, depending on the charger’s output.
TABLE 1
Not Illuminated Solid Green Blinking Green Solid Red Blinking Red
LED
Status % Charged
Bottom LED blinking red 0% to 10% charged
Bottom LED blinking green 11% to 25% charged
Bottom LED solid green
Next LED blinking green
Bottom 2 LEDs solid green
Next LED blinking green
Bottom 3 LEDs solid green
Next LED blinking green
All LEDs solid green 100% charged
BATTERY STATUS INDICATORS
Press the power button 2 to check KTB1's battery level (Table 2).
The indicator LEDs 1 will turn on, and will automatically turn off after
10 seconds if the power button is not pressed again, or if no device is
connected for charging. NOTE: If the battery malfunctioned, pressing
power button 2 will indicate error status (Table 3).
TABLE 2
Not Illuminated Solid Green Blinking Green Solid Red Blinking Red
LED
Status Charge Remaining
All LEDs solid green 76% to 100%
Bottom 3 LEDs solid green
26% to 50% charged
51% to 75% charged
76% to 99% charged
51% to 75%
OPERATING INSTRUCTIONS
CHARGING DEVICES
NOTE: For best results, use cable provided with your device.
Auto-Sensing ports: The outputs3, 4 will automatically turn on
when a device is connected. NOTE: Certain devices that require very low
current to charge may not be detected by the auto-sensing feature. For
such devices, press the power2 button to begin charging. The status
indicator light may shut-off, but charging will continue on such devices.
1. Connect the cable to your device.
2. Connect the charging cable to one of KTB1’s USB ports3, 4.
The battery status indicator LEDs1 illuminate and charging begins.
LEDs will remain illuminated as long as charging is occurring. The
device being charged should also provide indication that charging
has begun.
3. KTB1 will automatically shut down once charging is complete and
current is no longer being drawn by the device.
TROUBLESHOOTING
The KTB1 has built-in advanced protection to prevent damage to the
battery. The battery has protection for Output over-current, Shortcircuit, Voltage drop, and High/Low Temperature. If any of these occur,
refer to Table 3:
TABLE 3
Not Illuminated Solid Green Blinking Green Solid Red Blinking Red
LED
Possible Issue
Over-current or short circuit: KTB1 will automatically shut down.
Disconnect KTB1 from the charger or device being charged.
Wait for 5-seconds and then reconnect the device being charged
or battery charger. Press the power button to reset and begin
charging.
High or low temperature: If KTB1 senses abnormal operating
temperatures, high or low, it will shut down. It will not recharge or
charge until the battery returns to normal operating temperatures
(See Operating Temperature in General Specifications section). All
status LEDs will flash green if the power button is pressed. The LED
status will return to normal (See tables 1 & 2) ONLY after KTB1
senses normal temperatures. Disconnect KTB1 from all chargers
and devices.
Voltage drop: If KTB1's voltage level drops (discharge over time
or simply drained completely), it will enter Low Power Protection
Mode. The bottom LED will illuminate solid red for 2 seconds when
the power button is pressed. KTB1 will NOT support any device
charging at this time, and must be recharged to a minimum of 5%
before the output ports will activate for charging.
KTB1 will not recharge if:
1. The cable is not properly connected to charger output or battery input.
Check connection.
2. The charging cable is damaged.
3. The charging port or device is not able to supply the minimum voltage and
current for charging.
4. The connector on the charger or battery is damaged.
5. An internal battery fault has occurred inside KTB1, preventing the battery
from recharging. See scenarios above. If none apply, KTB1 may be damaged.
Contact Klein Tools Customer Service. DO NOT ATTEMPT TO REPAIR.
Replace with equivalent cable.
Connect to appropriate charging source.
Replace charger or battery.
Bottom 2 LEDs solid green 26% to 50%
Bottom LED solid green 11% to 25%
Bottom LED blinking red 1% to 10%
No LEDs illuminated 0%
FIG. B
Page 3

ESPAÑOL
BC
La KTB1 de Klein Tools es una batería portátil (cargador) de iones
de litio diseñada para cargar dispositivos móviles comunes como
teléfonos celulares, tabletas, baterías portátiles, audífonos y otros
dispositivos USB pequeños. La KTB1 está equipada con la tecnología
Quick ChargeTM de Qualcomm®, para proporcionar una carga 75%
más rápida que la convencional. El diseño resistente y compacto
con carcasa resistente a impactos convierte a la KTB1 en una batería
versátil para el uso diario, activo y profesional.
ESPECIFICACIONES GENERALES
• Tipo de celda: 18650
• Química de la celda: Iones de litio
• Capacidad de salida: 36Wh (10050mAh)
• Tiempo de carga: Carga completa en 3 a 7horas*
• Qualcomm Quick Charge 3.0 salida USB-A (máximo 18W):
• 5 - 6VCD: 3A • 6 - 9V CD: 2A • 9 - 12V CD: 1,5A
• Entrada/salida USB-C (máximo 15W): 5V CD, 3A
• Máximo total de salida (todos los puertos): 18W
• Vida útil de almacenamiento: Carga cada 3meses
• Vida útil esperada: hasta 300ciclos normales (dependiendodeluso y el
• Requisitos de carga:
• Temperatura de funcionamiento/carga: 32°F a 104°F (0°C a
40°C)
• Temperatura de almacenamiento: hasta 3meses: 14°F a 104°F
• Humedad de almacenamiento: <75% de humedad relativa
• Altitud para su correcto funcionamiento
y almacenamiento: 6562' (2000m)
• Dimensiones: 2,5" × 4,1" × 1,1" (64mm × 105mm × 26mm)
• Peso: 9,5oz (270g)
• Humedad relativa: <85%, sin condensación
• Protección ante caídas: 3,3' (1m)
• Normas:
5013348
*El tiempo de carga depende de la salida del cargador
cuidado)
5V CD, 1A mín. recomendado
(-10°C a 40°C)
UL2056: 2015, UL60950-1, EU 2015/863,
EC 1907/2006, EN55032:2015, EN61000-3-2:2014,
EN61000-3-3: 2013, EN55035: 2017, ICES – 003:2016,
IEC 60950-1: 2005, CAN ICES-3(B)/NMB-3(B)
Asegúrese de que la KTB1 está desconectada de cualquier fuente
de energía o dispositivo. Utilice un paño limpio y seco que no
deje pelusas para limpiar toda la unidad.
limpiadores abrasivos. NO utilice objetos metálicos para limpiar
los puertos USB.
Recargue según sea necesario. No hay intervalos predefinidos
según los cuales se deba recargar, siempre y cuando use la batería
regularmente. Evite descargarla completamente de manera regular, ya
que esto puede afectar su vida útil general.
Inspeccione regularmente los puertos y el cable de carga, verificando
que no tengan residuos, suciedad, daños y corrosión. NO intente
repararla. Reemplace la KTB1 o su cable, según sea necesario.
Si la almacena por más de 1mes, cárguela completamente antes de
almacenarla, y recárguela aproximadamente cada 3meses para evitar
que se descargue completamente.
Almacénela en un ambiente fresco, con humedad leve, y lejos
de la luz solar directa (ver Especificaciones generales). Si la deja
en un vehículo o en otros espacios reducidos bajo temperaturas
extremadamente altas, se puede reducir su vida útil, provocar
sobrecalentamiento o un incendio. Las temperaturas extremadamente
frías, por debajo del rango de almacenamiento especificado también
pueden afectar el rendimiento y la vida útil de la batería.
Manténgala alejada de gases y sustancias químicas corrosivas.
Después de retirarla del almacenamiento, realice una inspección
visual para asegurarse de que la apariencia de la KTB1 y de todos sus
accesorios es correcta. Permita que la unidad regrese a condiciones
de ambiente antes de recargarla o cargar otros dispositivos.
Especificaciones sujetas a cambios.
ADVERTENCIAS
Lea, comprenda y siga estas instrucciones para garantizar un
funcionamiento seguro. El incumplimiento de estas advertencias puede
provocar riesgo de incendio, choque eléctrico, lesiones personales y/o
daños materiales graves.
• Conserve estas instrucciones para consultarlas en el futuro.
• NO use la batería excediendo la capacidad de salida. Las sobrecargas de
salida por encima de la capacidad pueden provocar riesgo de incendio o
lesiones personales.
• Usar una fuente de alimentación, cargador o cable no recomendado ni
vendido por el fabricante de la batería puede provocar riesgo de incendio
o lesiones personales.
• NO use baterías dañadas o modificadas. Las baterías dañadas o
modificadas pueden presentar comportamientos impredecibles que
pueden provocar incendios, explosiones o riesgos de lesiones.
• NO la someta a vibraciones, impactos o caídas. La carcasa puede que no
muestre señales de daño, pero los componentes internos pueden haber
estado comprometidos. Se recomienda reemplazar la unidad si sufre
alguno de estos eventos de gravedad.
• NO exponga la batería a la lluvia ni a la nieve.
• Mantenga la unidad lejos de dispositivos de alto voltaje.
• NO intente reparar la batería o el cable de carga. No contiene piezas que
el usuario pueda reparar.
• Riesgo de incendio y quemaduras. No abra, aplaste, caliente por encima
de 140°F (60°C), o queme. Siga las instrucciones del fabricante.
SÍMBOLOS DEL PRODUCTO
Advertencia o precaución
Riesgo de choque eléctrico
Lea las instrucciones antes de usarlo
Conformité Européenne. Cumple con las normas del
ÁreaEconómica Europea
WEEE – Eliminación de la batería
Reciclable
Cumple con las normas BCS de la Comisión de
EnergíadeCalifornia
Este producto ha sido probado de manera independiente
porIntertek y cumple con las normas publicadas vigentes
3
Tecnología Quick Charge de Qualcomm
®
DETALLES DE LAS CARACTERÍSTICAS (FIG. A)
Indicador de estado de la batería
1
Botón de encendido
2
Puerto de detección automática Quick Charge (carga rápida)
3
deQualcomm® (USB-A)
Puerto de detección automática Input/Output (entrada/salida)
4
USB-C
Qualcomm es una marca registrada de Qualcomm Incorporated, registrada en los Estados Unidos
y otros países.
Quick Charge es una marca registrada de Qualcomm Incorporated. Todas las marcas registradas de
Qualcomm Incorporated se usan con permiso.
Qualcomm Quick Charge es un producto de Qualcomm Technologies, Inc. y/o sus subsidiarias.
LIMPIEZA
NO utilice solventes ni
MANTENIMIENTO
ALMACENAMIENTO
Garantía
www.kleintools.com/warranty
ELIMINACIÓN/RECICLAJE
No arroje el equipo ni sus accesorios a la basura. Los
elementos se deben desechar correctamente de acuerdo
con las regulaciones locales. Visite www.epa.gov o
www.erecycle.org para obtener más información.
INSTRUCCIONES DE FUNCIONAMIENTO
VER EN EL REVERSO
SERVICIO AL CLIENTE
KLEIN TOOLS, INC.
450 Bond Street, Lincolnshire, IL 60069 1-877-775-5346
customerservice@kleintools.com www.kleintools.com
KTB1
BATERÍA PORTÁTIL DE 10 050 MAH - INSTRUCCIONES
Carga rápida alimentada por:
FIG. A
VISTA SUPERIOR
3 4
VISTA FRONTAL
1
VISTA TRASERA
VISTA INFERIOR
VISTA
LATERAL
2
Page 4

Type C
Micro-B
Mini-B
Micro-A
Mini-A
ESPAÑOL
INSTRUCCIONES DE FUNCIONAMIENTO
Lea estas instrucciones con atención antes de usar la batería y consérvelas
para consultarlas en el futuro.
CARGAR LA KTB1
NOTA: NO intente insertar otro tipo de conector USB en los puertos
USB-A o USB-C (FIG. B)
NOTA: cárguela completamente antes de usarla. Para maximizar la vida
útil de la batería de iones de litio, vea las secciones Mantenimiento y
Almacenamiento (en el reverso).
• Conecte el cable incluido al puerto Input/Output (entrada/salida) USB-C 3,
después conecte el otro extremo del cable a cualquier puerto USB-A de
alimentación de energía.
1
• Los LED del indicador del nivel de la batería
(verTabla1).
se encenderán
• Una carga completa podría tomar de 4 a 8horas, dependiendo de la salida
del cargador.
TABLA1
No se
enciende
LED
Verde
j o
Estado Porcentaje de carga
LED del fondo en rojo intermitente 0% a 10% de carga
LED del fondo en verde intermitente 11% a 25% de carga
LED del fondo en verde fijo
El siguiente LED en verde intermitente
Los 2 LED del fondo en verde fijo
El siguiente LED en verde intermitente
Los 3 LED del fondo en verde fijo
El siguiente LED en verde intermitente
Todos los LED en verde fijo 100% de carga
Verde
intermitente
Rojo
j o
26% a 50% de carga
51% a 75% de carga
76% a 99% de carga
Rojo
intermitente
INDICADORES DE ESTADO DE LA BATERÍA
Presione el botón 2 para revisar el nivel de la batería de la KTB1
(Tabla 2). Los LED indicadores
automáticamente después de 10segundos si no se vuelve a presionar el
se encenderán, y se apagarán
1
botón de encendido, o si no se conecta ningún dispositivo para cargar.
NOTA: si la batería no funciona correctamente, al presionar el botón de
encendido
se indicará un estado de error (Tabla 3).
2
TABLA2
No se
enciende
LED
Verde
j o
Estado Carga restante
Todos los LED en verde fijo 76% a 100%
Los 3 LED del fondo en verde fijo
Verde
intermitente
Rojo
j o
51% a 75%
Rojo
intermitente
CARGAR DISPOSITIVOS
NOTA: para obtener mejores resultados, utilice el cable proporcionado
con su dispositivo.
Puertos de detección automática: Las salidas3, 4 se encenderán
automáticamente cuando se conecte un dispositivo. NOTA: ciertos
dispositivos que se cargan con poca corriente pueden no ser detectados
por la función de detección automática. Para dichos dispositivos, presione
el botón de encendido
estado puede apagarse, pero la carga continuará en dichos dispositivos.
1. Conecte el cable a su dispositivo.
2. Conecte el cable de carga a unos de los puertos USB
KTB1. Los LED indicadores del estado de la batería
y comenzará la carga. Los LED seguirán encendidos mientras se esté
cargando el dispositivo. El dispositivo que está cargando también debe
indicar que la carga ha comenzado.
3. La KTB1 se apagará automáticamente cuando haya completado la carga
y el dispositivo no extraiga más corriente.
La KTB1 cuenta con una protección avanzada incorporada para prevenir
daños a la batería. La batería cuenta con protección contra sobrecargas de
salida, cortocircuitos, caídas de voltaje y temperaturas altas/bajas. Si se
presenta alguno de estos eventos, consulte la Tabla3:
LED
La KTB1 no se recargará si:
1. El cable no está conectado adecuadamente a la salida del cargador o a la
2. El cable de carga está dañado.
3. El dispositivo o puerto de carga no puede proporcionar la corriente y el
4. El conector en el cargador o la batería está dañado.
5. Se ha producido una falla interna de la batería al interior de la KTB1, lo que
INSTRUCCIONES DE FUNCIONAMIENTO
para comenzar a cargar. La luz del indicador de
2
3, 4
de la
1
se encenderán
SOLUCIÓN DE PROBLEMAS
TABLA3
No se
enciende
entrada de la batería.
voltaje mínimos para cargar.
la batería.
evita que esta se recargue. Ver los casos anteriores. Si ninguno aplica,
la KTB1 puede estar dañada.
Klein Tools. NO INTENTE REPARARLA.
Verde
j o
Posible problema
Sobrecarga o cortocircuito: La KTB1 se apagará automáticamente.
Desconecte la KTB1 del cargador o del dispositivo que está
cargando. Espere 5segundos y luego vuelva a conectar el
dispositivo que está cargando o el cargador de la batería. Presione
el botón de encendido para reiniciar y comenzar a cargar.
Temperatura alta o baja: Si la KTB1 detecta temperaturas de
funcionamiento anormales, ya sean altas o bajas, se apagará. No
se recargará o cargará hasta que la batería vuelva a la temperatura
de funcionamiento normal (ver Temperatura de funcionamiento en
la sección Especificaciones generales). Todos los LED de estado
se encenderán en verde si se presiona el botón de encendido. El
estado de LED volverá a indicar condiciones normales (ver tablas 1
y 2) SOLO después de que la KTB1 detecte temperaturas normales.
Desconecte la KTB1 de todos los cargadores y dispositivos.
Caída de voltaje: Si cae el nivel de voltaje de la KTB1 (se descarga
con el tiempo o simplemente se agotó por completo), entrará
en modo de protección por baja energía. El LED del fondo se
encenderá en rojo fijo por 2segundos cuando se presiona el botón
de encendido. La KTB1 NO admitirá cargar ningún dispositivo en
este estado, y se debe recargar a un mínimo de 5% antes de que
se activen los puertos de salida para cargar.
Verde
intermitente
Revise la conexión.
Reemplácelo con un cable similar.
Conecte a una fuente de carga adecuada.
Comuníquese con el servicio al cliente de
Rojo
j o
Reemplace el cargador o
Rojo
intermitente
Los 2 LED del fondo en verde fijo 26% a 50%
LED del fondo en verde fijo 11% a 25%
LED del fondo en rojo intermitente 1% a 10%
Ningún LED encendido 0%
FIG. B
Page 5

FRANÇAIS
BC
Le chargeur portatifKTB1 de KleinTools, muni d’une batterie au lithiumion, est conçu pour charger les appareils mobiles courants, comme des
téléphones,
petits appareils alimentés par USB. Il est pourvu de la technologie Quick
ChargeTM de Qualcomm®, qui permet de charger les appareils jusqu’à 75%
plus rapidement qu’avec un chargeur USB standard. La conception robuste
et compacte du chargeurKTB1 et son boîtier résistant aux chocs en font
une source d’alimentation polyvalente convenant aux usages intensifs,
professionnels ou quotidiens.
des tablettes, des batteries portatives, des écouteurs et d’autres
CARACTÉRISTIQUES GÉNÉRALES
• Type d’élément: 18650
• Composition chimique de l’élément: Lithium-ion
• Capacité en sortie: 36Wh (10050mAh)
• Temps de charge: Charge complète en 3 à 7heures*
• Port de sortieUSB-A Quick Charge3.0 de Qualcomm (18W maximum):
• 5 à 6Vc.c.: 3A • 6 à 9Vc.c.: 2A • 9 à 12Vc.c.: 1,5A
• Port d’entrée et de sortieUSB-C (15W maximum): 5Vc.c., 3A
• Puissance de sortie totale maximale (tous les ports): 18W
• Durée de stockage: Charge tous les 3mois
• Durée de vie moyenne: Jusqu’à 300cycles courants
(selon l’entretien et l’utilisation)
• Exigences de charge:
• Température de fonctionnement et de charge: 0°C à 40°C (32°F à 104°F)
• Température d’entreposage: Jusqu’à 3mois: -10°C à 40°C (14°F à 104°F)
• Taux d’humidité pour le rangement: <75% d’humidité relative
• Altitude de fonctionnement ou d’entreposage: 2000m (6562pi)
• Dimensions: 64 mm x 105 mm x 26 mm (2,5po x 4,1po x 1,1po)
• Poids: 270g (9,5oz)
• Humidité relative: <85% sans condensation
• Protection contre les chutes: 1m (3,3pi)
• Normes:
EC1907/2006, EN55032:2015, EN61000-3-2:2014,
EN61000-3-3:2013, EN55035:2017, NMB003:2016,
IEC60950-1:2005, CAN ICES-3(B)/NMB-3(B)
5013348
*
Le temps de charge varie en fonction de la puissance de sortie du chargeur
5Vc.c., 1Aminimum (recommandé)
UL2056:2015, UL60950-1, EU2015/863,
Assurez-vous de débrancher le chargeurKTB1 de toute source
d’alimentation et de tout appareil. Utilisez un linge propre, sec
etnon pelucheux pour essuyer tout le chargeur.
N’utilisez PAS de nettoyant abrasif ou de solvant.
N’utilisezPASd’objetmétallique pour nettoyer les portsUSB.
Rechargez au besoin. Il n’y a aucune intervalle idéale établie pour
recharger
trop souvent décharger complètement l’appareil: vous risqueriez
d’écourter sa durée de vie.
Inspectez régulièrement les ports et le câble de chargement
pour déceler la présence de débris, de saleté, de dommages et
de corrosion. N’essayez PAS de réparer ce chargeur. Au besoin,
remplacez le chargeurKTB1 ou le câble de chargement.
Si le chargeur doit être entreposé pour plus d’un mois, chargez-le
complètement avant de le ranger et rechargez-le environ aux trois
moispour éviter une décharge complète.
Rangez-le au frais et au sec, loin de la lumière directe du soleil
(consultez la section Caractéristiques générales). Laisser le chargeur
dans un véhicule ou un autre espace clos soumis à des chaleurs
extrêmes risque d’écourter la durée de vie du chargeur, de le faire
surchauffer ou de causer un incendie. Les températures froides
inférieures à la plage recommandée pour l’entreposage peuvent
également écourter la durée de vie du chargeur et nuire à son
rendement.
Gardez l’appareil éloigné des produits chimiques et des gaz corrosifs.
Lorsque vous sortez le chargeurKTB1 de l’entreposage, inspectez
visuellement le chargeur et les accessoires pour vous assurer qu’ils
semblent dans un état satisfaisant. Laissez le chargeur reprendre
la température ambiante avant de le recharger ou de l’utiliser pour
charger d’autres appareils.
Les caractéristiques techniques peuvent faire l’objet de modifications.
AVERTISSEMENTS
Veuillez lire, comprendre et suivre ces instructions afin de garantir une
utilisation sécuritaire du chargeur. Le non-respect de ces avertissements
peut entraîner un risque d’incendie, de choc électrique, de blessures
graves ou de dommages matériels.
•
Conservez ces instructions à des fins de référence.
•
NE dépassez PAS la puissance de sortie du chargeur portatif.
Unesurcharge risque de causer un incendie ou des blessures.
•
L’utilisation d’une source d’alimentation, d’un chargeur ou d’un
câble autre que ceux recommandés ou vendus par le fabricant du
chargeur risque de causer un incendie ou des blessures.
•
N’utilisez PAS le chargeur portatif s’il est endommagé ou modifié.
Des batteries endommagées ou modifiées risquent de produire des
effets imprévisibles et de causer des incendies, des explosions ou
des blessures.
•
N’exposez PAS l’appareil à des vibrations, des chocs ou des
chutes. Le boîtier pourrait sembler intact même si les composants
internes sont endommagés. Il est recommandé de remplacer
l’appareil s’il est soumis à des conditions extrêmes.
•
N’exposez PAS le chargeur à la pluie ou à la neige.
•
Conservez l’appareil à l’écart de l’équipement électrique à haute tension.
•
N’essayez PAS de réparer la batterie ou le câble de chargement.
Cetappareil ne contient aucune pièce réparable par l’utilisateur.
•
Risque de flame et de brûllure. Veuillez ne pas ouvrir, écraser,
chauffer au-dessus de 60°C (140°F), ou incinérer. Suivez les
instructions du fabricant, s'il vous pilat.
450Bond Street, Lincolnshire, IL60069 1877775-5346
customerservice@kleintools.com www.kleintools.com
SYMBOLES SUR LE PRODUIT
Avertissement ou mise en garde
Risque de choc électrique
Lire les instructions avant d’utiliser le chargeur
Conformité européenne. Conforme aux directives de l’Espace
économique européen
DEEE– mise au rebut de la batterie
Recyclable
Conforme à la réglementation de la California Energy Commission
relativement aux systèmes de chargeurs de pile (BCS)
Ce produit a été testé de manière indépendante par Intertek et
répond aux exigences des normes applicables
3
Technologie Quick Charge de Qualcomm
®
CARACTÉRISTIQUES DÉTAILLÉES (FIG.A)
Indicateur d’état de la batterie
1
Bouton de mise en marche
2
Port à détection automatique Quick Charge de Qualcomm® (USB-A)
3
Port d’entrée et de sortieUSB-C à détection automatique
4
Qualcomm est une marque de commerce de QualcommIncorporated déposée aux États-Unis et
dans d’autres pays.
Quick Charge est une marque de commerce de QualcommIncorporated. Toutes les marques de
commerce de QualcommIncorporated sont utilisées avec autorisation.
Quick Charge est un produit de QualcommTechnologies, Inc. ou de ses filiales.
NETTOYAGE
ENTRETIEN
l’appareil, pourvu qu’il soit utilisé fréquemment. Évitez de
ENTREPOSAGE
Garantie
www.kleintools.com/warranty
MISE AU REBUT/RECYCLAGE
Ne mettez pas l’appareil et ses accessoires au rebut.
Ces articles doivent être éliminés conformément
aux règlements locaux. Pour de plus amples
renseignements, consultez les sites www.epa.gov
ouwww.erecycle.org.
INSTRUCTIONS D’UTILISATION
CONSULTER LE VERSO
SERVICE À LA CLIENTÈLE
KLEINTOOLS, INC.
KTB1
CHARGEUR PORTATIF DE 10 050 MAH – INSTRUCTIONS
Chargement haute vitesse alimentépar:
FIG. A
DESSUS
3 4
1
DESSOUS
AVANT
ARRIÈRE
CÔTÉ
2
Page 6

Type C
Micro-B
Mini-B
Micro-A
Mini-A
FRANÇAIS
INSTRUCTIONS D’UTILISATION
Veuillez lire attentivement les présentes instructions avant d’utiliser cet
appareil, et les conserver à des fins de référence.
RECHARGER LE CHARGEURKTB1
REMARQUE: N’essayez PAS d’insérer d’autres types de connecteursUSB
dans les ports USB-A et USB-C (FIG.B).
REMARQUE: Chargez complètement le chargeur avant de l’utiliser.
Pouroptimiser la durée de vie de la batterie au lithium-ion, consultez
lessections Entretien et Entreposage se trouvant au verso.
• Branchez le câble inclus au port d’entrée et de sortieUSB-C 3, puis
branchez l’autre extrémité à n’importe quel portUSB-A alimenté.
• Les voyantsDEL de l’indicateur d’état de la batterie
(voirletableau1).
• Une charge complète s’effectue habituellement en 4 à 8heures, selon la
puissance de sortie du chargeur.
TABLEAU1
Voyant
non allumé
DEL
Vert
continu
État % de charge
VoyantDEL inférieur en rouge clignotant
VoyantDEL inférieur en vert clignotant
VoyantDEL inférieur en vert continu
2evoyantDEL en vert clignotant
2voyantsDEL inférieurs en vert continu
3evoyantDEL en vert clignotant
3voyantsDEL inférieurs en vert continu
4evoyantDEL en vert clignotant
Tous les voyantsDEL en vert continu Chargé à 100%
Vert
clignotant
1
s’allument
Rouge
continu
Chargé de 0 à 10%
Chargé de 11 à 25%
Chargé de 26 à 50%
Chargé de 51 à 75%
Chargé de 76 à 99%
Rouge
clignotant
INDICATEUR D’ÉTAT DE LA BATTERIE
Appuyez sur le bouton de mise en marche 2 pour vérifier le pourcentage
de charge du chargeurKTB1 (tableau2). Les voyantsDEL de l’indicateur
d’état de la batterie
de 10secondes si personne n’appuie de nouveau sur le bouton de mise
s’allument, puis s’éteignent d’eux-mêmes au bout
1
en marche, ou si aucun appareil n’est branché aux fins de chargement.
REMARQUE: Si la batterie a connu un problème, appuyez sur le bouton de
mise en marche
Voyant
non allumé
DEL
pour voir l’état d’erreur (tableau3).
2
TABLEAU2
Vert
continu
État Charge restante
Tous les voyantsDEL en vert continu 76 à 100%
3voyantsDEL inférieurs en vert continu
2voyantsDEL inférieurs en vert continu
VoyantDEL inférieur en vert continu 11 à 25%
Vert
clignotant
Rouge
continu
51 à 75%
26 à 50%
Rouge
clignotant
CHARGEMENT D’APPAREILS
REMARQUE: Pour des résultats optimaux, utilisez le câble fourni avec
votre appareil.
Ports à détection automatique: Les ports de sortie 3 et 4 sont
automatiquement activés dès qu’un appareil est branché. REMARQUE: Les
appareils qui nécessitent un courant très faible pour charger ne sont parfois
pas détectés par la fonction de détection automatique. Lorsque cela se
produit, appuyez sur le bouton de mise en marche
chargeur et recommencer la charge. Il est possible que l’indicateur d’état de
la batterie s’éteigne, mais le chargement continue.
1. Branchez le câble à votre appareil.
2. Branchez le câble de chargement dans l’un des portsUSB du
3. Le chargeurKTB1 s’éteint automatiquement lorsque sa charge est
Le chargeurKTB1 est pourvu d’une protection intégrée sophistiquée qui
évite que la batterie soit endommagée. La batterie est munie de protections
contre la surintensité de sortie, les courts-circuits, la chute de tension et
les températures extrêmes. Si l’un de ces problèmes se présente, veuillez
consulter le tableau3:
INSTRUCTIONS D’UTILISATION
pour réinitialiser le
2
chargeurKTB1, soit
la batterie
1
demeurent allumés jusqu’à ce que le chargement soit terminé. L’appareil en
chargement devrait également indiquer que le chargement a commencé.
terminée et qu’il n’y a plus de courant acheminé à l’appareil.
Voyant
non allumé
DEL
Problème potentiel
Surintensité ou court-circuit: Le chargeurKTB1 s’éteint
automatiquement. Débranchez le chargeurKTB1 du chargeur ou de
l’appareil en train de charger. Attendez 5secondes, puis rebranchez
le tout. Appuyez sur le bouton de mise en marche pour réinitialiser
le chargeur et recommencer la charge.
Températures extrêmes: Lorsque le chargeurKTB1 détecte une
température anormale pendant son fonctionnement, soit trop
chaude ou trop froide, il s’arrête. Il cesse alors de se recharger ou
de charger un autre appareil jusqu’à ce que la batterie reprenne
une température de fonctionnement normale (voir la température
de fonctionnement indiquée dans la section Caractéristiques
générales). Si vous appuyez sur le bouton de mise en marche,
tous les voyantsDEL clignotent en vert. L’état des voyantsDEL
ne redevient normal (voir les tableaux1 et 2) QUE lorsque le
chargeurKTB1 détecte une température normale. Débranchez le
chargeurKTB1 de tous les chargeurs et appareils.
Chute de tension: Si le niveau de tension du chargeurKTB1 chute
(diminue graduellement ou se vide complètement), le chargeur entre
en mode économie d’énergie. Si vous appuyez sur le bouton de
mise en marche, les deux voyantsDEL inférieurs allument en rouge
continu pendant 2secondes. Dans ce cas, le chargeurKTB1 ne peut
PAS charger d’appareil: il doit être chargé d’au moins 5% avant que
les ports de sortie puissent être utilisés pour le chargement.
Le chargeur ne peut pas se recharger dans les cas suivants:
1. Le câble n’est pas correctement branché au port de sortie du chargeur ou
au port d’entrée de la batterie.
2. Le câble de chargement est endommagé.
3. Le port ou l’appareil de chargement n’est pas en mesure de fournir la
tension et le courant minimaux nécessaires pour le chargement.
le chargeur à une source de chargement appropriée.
4. Le connecteur du chargeur ou de la batterie est endommagé.
chargeur ou la batterie.
5. Une anomalie de la batterie à l’intérieur du chargeurKTB1 empêche
le chargeur de se recharger. Consultez les cas ci-dessus. Si aucun ne
s’applique, le chargeurKTB1 est peut-être endommagé.
avec le service à la clientèle de KleinTools. N’ESSAYEZ PAS DE
RÉPARER CE CHARGEUR.
ou 4. Les voyantsDEL de l’indicateur d’état de
3
s’allument et le chargement commence. Les voyantsDEL
DÉPANNAGE
TABLEAU3
Vert
continu
Vert
clignotant
Véri ez le branchement.
Rouge
continu
Remplacez-le par un câble équivalent.
Rouge
clignotant
Branchez
Remplacez le
Communiquez
VoyantDEL inférieur en rouge clignotant
Aucun voyantDEL allumé 0%
1 à 10%
FIG. B
 Loading...