

Page 1
Instructions for Hard Hats
• This protective headwear is designed to absorb some of the
energy of a blow through partial destruction of its component parts
and, even though damage may not be readily apparent, any
protective headwear subjected to severe impact should be replaced.
• This protective headwear must not be painted or cleaned with
solvents. Any decals applied to the protective headwear must be
compatible with the surface material and known not to affect
adversely the characteristics of the materials used in the protective
headwear. • Any addition or structural modification may reduce the
protective properties afforded by this protective headwear.
WARNING! BEFORE USE: READ ALL
INSTRUCTIONS OR RISK SERIOUS INJURY OR
DEATH. DO NOT REMOVE LABEL.
• Esta gorra de protección está diseñada para absorber parte de la energía
de un golpe a través de la destrucción parcial de sus componentes y,
aunque el daño no sea aparente, debe reemplazarse cualquier gorro de
protección que tenga un impacto severo. • Esta gorra de protección no
debe pintarse ni limpiarse con disolventes. Las calcomanías aplicadas a los
sombreros protectores deben ser compatibles con el material de la
superficie y se sabe que no afectan adversamente las características de los
materiales utilizados en los sombreros protectores.
• Cualquier adición o modificación estructural puede reducir las propiedades
protectoras proporcionadas por esta protección para la cabeza.
ADVERTENCIA! ANTES DE USAR: LEA TODAS LAS
INSTRUCCIONES O PELIGRO DE LESIONES GRAVES O LA
MUERTE. NO QUITE LA ETIQUETA.
• Ce casque de sécurité est conçu pour absorber une partie du choc
produit par un coup par la destruction partielle de ses composants. Même
si l'endommagement n'est pas visible, tout casque de sécurité qui a subi
un choc sévère devrait être remplacé. • Ce casque de sécurité ne doit
pas être peint ni nettoyé à l'aide de solvants. Toute décalcomanie
appliquée à ce casque doit être compatible avec le matériau de la calotte
et être reconnue inoffensive pour les matériaux entrant dans la
fabrication du casque. • Tout ajout au casque ou toute modification
structurale du casque peut en réduire les propriétés de protection.
ATTENTION. AVANT UTILISATION: LIRE TOUTES LES
INSTRUCTIONS OU RISQUE DE BLESSURES GRAVES OU DE
MORT. NE PAS ENLEVER L'ÉTIQUETTE.
1370537 Rev. 01/19 E
• This protective headwear is designed to absorb some of the
energy of a blow through partial destruction of its component parts
and, even though damage may not be readily apparent, any
protective headwear subjected to severe impact should be replaced.
• This protective headwear must not be painted or cleaned with
solvents. Any decals applied to the protective headwear must be
compatible with the surface material and known not to affect
adversely the characteristics of the materials used in the protective
headwear. • Any addition or structural modification may reduce the
protective properties afforded by this protective headwear.
WARNING! BEFORE USE: READ ALL
INSTRUCTIONS OR RISK SERIOUS INJURY OR
DEATH. DO NOT REMOVE LABEL.
• Esta gorra de protección está diseñada para absorber parte de la energía
de un golpe a través de la destrucción parcial de sus componentes y,
aunque el daño no sea aparente, debe reemplazarse cualquier gorro de
protección que tenga un impacto severo. • Esta gorra de protección no
debe pintarse ni limpiarse con disolventes. Las calcomanías aplicadas a los
sombreros protectores deben ser compatibles con el material de la
superficie y se sabe que no afectan adversamente las características de los
materiales utilizados en los sombreros protectores.
• Cualquier adición o modificación estructural puede reducir las propiedades
protectoras proporcionadas por esta protección para la cabeza.
ADVERTENCIA! ANTES DE USAR: LEA TODAS LAS
INSTRUCCIONES O PELIGRO DE LESIONES GRAVES O LA
MUERTE. NO QUITE LA ETIQUETA.
• Ce casque de sécurité est conçu pour absorber une partie du choc
produit par un coup par la destruction partielle de ses composants. Même
si l'endommagement n'est pas visible, tout casque de sécurité qui a subi
un choc sévère devrait être remplacé. • Ce casque de sécurité ne doit
pas être peint ni nettoyé à l'aide de solvants. Toute décalcomanie
appliquée à ce casque doit être compatible avec le matériau de la calotte
et être reconnue inoffensive pour les matériaux entrant dans la
fabrication du casque. • Tout ajout au casque ou toute modification
structurale du casque peut en réduire les propriétés de protection.
ATTENTION. AVANT UTILISATION: LIRE TOUTES LES
INSTRUCTIONS OU RISQUE DE BLESSURES GRAVES OU DE
MORT. NE PAS ENLEVER L'ÉTIQUETTE.
1370537 Rev. 01/19 E
Models / Modelos / Modèles :
60100, 60105, 60107RL, 60113RL,
60248, 60249, 60262, 60400,
60401, 60406RL, 60407RL
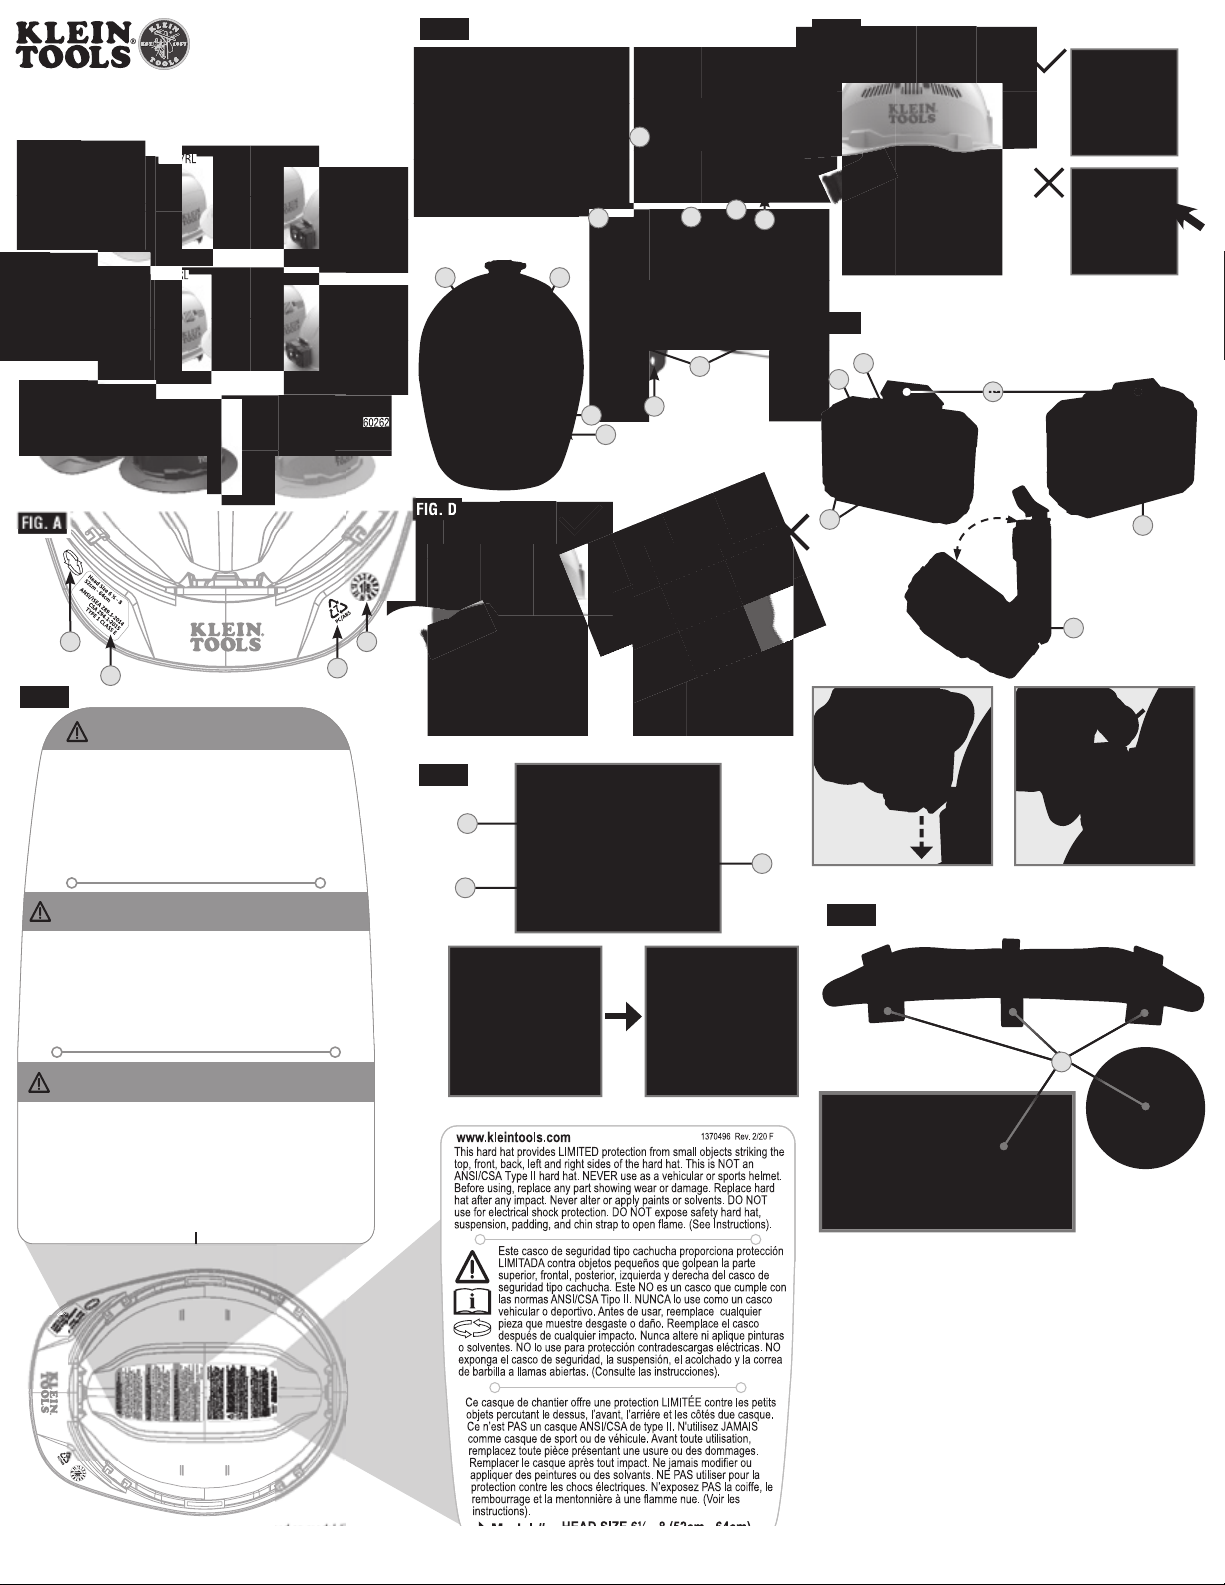
FIG. C
FIG. F
60100
60248
60107RL
60113RL60105
60249
60400
60401
FIG. A
1 4
2
FIG. B
60406RL
60407RL
3
60262
FIG. D
6
9
5
7
10
1413
FIG. G
15
12
8
20
21
19
11
22
23
64°
24
FIG. E
16
17
18
FIG. H
25
NOTE: This label is representative; contents will vary based on model #.
NOTA: esta etiqueta es representativa; los contenidos variarán según el n.º del modelo #.
REMARQUE: Cette étiquette est fournie à titre indicatif; son contenu varie en fonction du modèle #.
Find Quality Products Online at: [email protected]
www.GlobalTestSupply.com
1390408 Rev 04/20 B
Page 2
ENGLISH
GENERAL SPECIFICATIONS
• Standards: These Klein Tools Hard Hats comply with Type I ANSI/
ISEA Z89.1-2014, CSA Z94.1-15:
• Class E non-vented Hard hats have been tested up to 20kV.
EN397:2012+A1:2012 (Clauses listed only):
• 5.2.4-Lateral Deformation (LD)
EN12492:2012 (Listed clauses only):
• 4.2.1.2-Front Energy Absorption Capacity
• 4.2.1.3-Side Energy Absorption Capacity
• 4.2.1.4-Rear Energy Absorption Capacity
TOP: Z89.1/Z94.1
FRONT:
EN12492
• Fits: Head Sizes 6-1/2 to 8 (20-1/2 to 25 inches / 52 to 64 cm)
SYMBOLS ON PRODUCT (FIG. A)
Reverse donning logo
1
Compliant Standards, Class, Type, and Head Size information
2
Recycling Code and material type
3
Date of manufacture
4
There are two warning labels affixed to the inside of this hard hat.
Read, understand, and follow these instructions to ensure safe
operation. DO NOT REMOVE THESE LABELS.
WARNING LABELS (FIG. B)
BACK: EN12492
SIDES: EN12492
DEFORMATION: EN397
WARNINGS
READ ALL INSTRUCTIONS. FAILURE TO FOLLOW THESE WARNINGS
AND INSTRUCTIONS MAY RESULT IN SERIOUS BODILY INJURY OR
DEATH.
• This hard hat provides LIMITED protection from small objects
striking top, front, back, left and right sides of the hard hat. This is
NOT an ANSI/CSA Type II hard hat.
• DO NOT expose suspension and padding to open flame.
• ELECTRICAL WARNING: Avoid areas where the chance of electrical
shock exists. Non-vented versions meet Class E requirements by
providing limited electrical protection. Class C vented models provide
NO electrical protection.
• If the hard hat has sustained an impact, dispose of it IMMEDIATELY,
even if damage is not visible.
• NEVER alter, puncture, modify or engrave the shell or the
suspension.
• DO NOT use paints, solvents, chemicals, adhesives, gasoline or like
substances on this hard hat – doing so can lessen the protection
offered against impact and penetration.
• DO NOT use this hard hat as a vehicular or recreational hard hat.
store objects between the suspension and the shell, as the
• DO NOT
hard hat will not function as intended and can lessen the protection
from impact and penetration.
• Exposure to direct sunlight, corrosive environments, and/or extreme
temperatures below -40°F (-40°C) or above 120°F (49°C) can lessen
the ability of the hard hat to withstand impact and penetration.
MAINTENANCE
HARD HAT CLEANING AND STORAGE
• Clean the hard hat and suspension with mild soap and water only.
Rinse and wipe dry. Clean optional chin strap with damp cloth only.
Store in a cool place.
• See SWEATBAND AND TOP COMFORT PAD section of the operating
instructions (on other side) for additional maintenance information.
INSPECTION AND REPLACEMENT
Inspect the hard hat, including the suspension and shell, before and
after each use:
• Check the Hard Hat’s shell for any cracks, breakage, discoloration,
chalky appearance, or any other damage, excessive wear or
unusual condition. These conditions may indicate reduced impact
or penetration resistance and the Hard Hat must be replaced
IMMEDIATELY.
• The suspension and optional chin strap should be checked
for cracks, breaks, damaged stitching or any other damage,
excessive wear or unusual condition. If any of these conditions
exist, the suspension and optional chin strap must be replaced
IMMEDIATELY.
• Always use genuine Klein Tools replacement parts. This product
works as a system, and use of unauthorized suspensions may
reduce the protection you receive from this hard hat.
Find Quality Products Online at: [email protected]
SUSPENSION AND OPTIONAL CHIN STRAP: Must be replaced after
no more than 12 months of use.
ENTIRE HARD HAT: Entire Hard Hat must be replaced after no more
than 2 years of regular use, or 5 years from the date of manufacture,
whichever comes first.
These are MAXIMUM useful service life guidelines. Regular
inspection as detailed in the MAINTENANCE section above MUST be
performed, and may result in possible earlier replacement.
NOTE: This replacement schedule is a guideline that assumes
normal use and storage conditions for the hard hat. If the hard
hat is exposed to temperature extremes, persistent sunlight,
or chemicals, replacement may be required in a shorter time
frame.
ACCESSORIES AND REPLACEMENT PARTS
Klein Tools hard hat accessories and replacement parts are
available online or at major distributors:
• KHHSPN: Replacement Suspension
• KHHSWTBND: Sweatband (3-pack)
• KHHTOPPAD: Top Comfort Pad (3-pack)
• KHHSTRP: Chin Strap
• 56034: Rechargeable Auto-Off Headlamp (Spot/Flood)
• 56049: Rechargeable Light Array Headlamp (Flood only)
• 56062: Rechargeable Headlamp / Worklight (Spot/Flood)
• 56048: Rechargeable Auto-Off Headlamp (Spot/Flood)
• KHH56220: Headlamp / Magnetic Worklight (Spot/Flood)
NOTE: KLEIN TOOLS CANNOT GUARANTEE THAT THIRDPARTY ACCESSORIES WILL PERFORM OR FIT OPTIMALLY
WITH KLEIN TOOLS HARD HATS.
Do not place hard hat or its accessories in the trash. Items
must be properly disposed of in accordance with local
regulations. See www.epa.gov for additional information.
Universal accessory slots12Washable sweatband
5
Klein Tools accessory slots13Washable top comfort pad
6
Vents with shutter
7
(C-Class only)
Pivot adjustment
8
Size adjustment knob
9
Rear neck pad
10
Suspension strap
11
anchor slots
All hard hats come with suspension pre-installed at factory settings.
The suspension can be adjusted to ensure proper and secure fit to
your head for maximum protection. Follow the steps below:
STEP 1: Turn the size adjustment knob
loosen the fit. Position the rear pad on the back of your head, closer
to the neck. Dress any bandana knots or ponytails over the rear neck
pad 10.
STEP 2: Tighten by turning the
clockwise until the hard hat is comfortable and snug. Move
your head up, down and side-to-side gently, like you would
normally, and make sure the hard hat stays on. Make sure that
the hard hat is not angled forward or backward, but rests level
on your head.
If the hard hat does not fit properly at the factory settings, you
can further adjust the fit:
STEP 1: Free the suspension by turning the suspension
bracket16 approximately 90 degrees to free the bracket key
17
from the bracket key slots.
STEP 2: Determine which slot18 you want to reattach to.
Using the bracket slots deeper in the hard hat will move it
higher on the head and vice versa. Insert the bracket key
and turn the bracket16 approximately 90 degrees to lock into
place. Always match the settings on the left and right sides to
prevent the suspension from sitting at an angle.
www.GlobalTestSupply.com
USEFUL LIFE
DISPOSAL / RECYCLE
FEATURE DETAILS (FIG.C)
Suspension straps
14
Re ective sticker locations
15
Suspension bracket
16
Bracket key
17
Bracket key slots
18
FITTING (FIG. D)
9
counterclockwise to
size adjustment knob
ADJUSTMENTS (FIG. E)
ADJUSTMENTS (FIG. E)
STEP 3: Verify the hard hat fits properly. Follow the steps
in the FITTING section to ensure proper fit. Ensure that
accessories you plan to use fit and function properly while
maintaining the hard hat’s ability to perform its function
optimally. Check with a qualified safety expert, if unsure.
NOTE: The suspension strap lengths are xed and cannot be
adjusted. DO NOT attempt to alter.
REVERSE DONNING (FIG. F)
NOTE:
Some jobsites may not permit reverse donning - Check
with your jobsite's Safety Supervisor before changing your
hard hat to this con guration.
STEP 1: Place your forefinger under the strap anchor, and
your thumb over the anchor slot11. Push up with forefinger
using enough force to release the anchor from the slot.
Do this for all anchor slots (4 total).
NOTE: DO NOT pull
on the suspension straps to free the anchor. This could
permanently damage the straps, preventing them from
performing as intended.
STEP 2: Make any height adjustments for the suspension
before installation.
STEP 3: Push down each anchor until a click is heard and the
anchor cannot be pushed down any further. Do this for all 4
anchors.
NOTE: DO NOT use sharp tools that may damage
the anchors, or pull on the straps to secure the anchors.
STEP 4: Check proper installation by pushing up on all 4
anchor bases. The anchors should remain fully seated in their
slots. If not, repeat STEP 3.
STEP 5: Verify the hard hat fits properly. Follow the steps in
the FITTING section to ensure proper fit. Also ensure that
accessories you plan to use fit and function properly while
maintaining the hard hat’s ability to perform optimally.
SWEATBAND AND TOP COMFORT PAD (FIG.H)
Klein Tools hard hats come with an advanced sweatband
and top comfort pad designed to wick away sweat. They are
machine washable in a normal wash cycle. Do NOT wash with
bleach or with detergents containing bleach. Machine dry on
normal or low heat setting only.
The sweatband and top comfort pad can be easily removed and
reinstalled on the suspension:
• The top comfort pad is held in place by a single hook-and-
loop pad25.
• The sweatband is held in place by four suspension hooks
and three hook-and-loop pads 25,
remove, simply detach all hook-and-loop pads and slide the
sweatband off the suspension hooks.
on the side and front. To
VENTS (C-CLASS ONLY)
Klein Tools Class C hard hats have vents and shutters on both
sides. The vents can be adjusted by simply sliding the shutter
tabs7 up or down.
The vents and shutters will NOT prevent vapors, liquids,
or debris smaller than the vents from entering the hard hat.
56062 HEADLAMP (FIG.G)
The optional 56062 is a rechargeable headlamp designed
specifically for Klein hard hats that have the integrated front
and rear accessory slots. It functions as a spot light or flood
light, and has magnet to attach onto magnetic surfaces for
use as a worklight. Charging cable is included with models
that include rechargeable headlamps.
Release tab
19
On/Off/Mode button
9
20
Spot light
21
The 56062 can be attached to both the front and back of the hard hat
via the Klein Tools accessory slot. It can be tilted up to 64 degrees on
the hard hat and stand alone as a worklight.
To install the headlamp onto a Klein hard hat, align the pivoting
24
mount
with the Klein Tools accessory slot6 on the hard
hat and push down until the headlamp clicks securely into
place.
To remove the headlamp, press forward on the Release Tab
19
, and lift the headlamp out of the accessory slot.
Flood lights
22
Magnet
23
Pivoting mount
24
REFLECTIVE STICKERS (FIG. C)
Klein Tools hard hats come with four reflective stickers. For
optimal performance, affix only to the designated areas15.
17
Do NOT apply stickers in areas that will impede the functionality
of accessories or of the hard hat itself.
26
 Loading...