

Page 1

International
Side-by-Side
Refrigerator
Owner ’s Manual
Keep these instructions for future reference. Be sure this
manual stays with refrigerator.
®
Page 2
Contents
Electrical Requirements .............................................. 2
Service ........................................................................2
Proper Disposal of your Refrigerator ............................ 3
Installation Instructions
Installation Requirements......................................... 3
Removing Wooden Base ..........................................3
Removing Handles ................................................... 4
Connecting Water Supply ........................................ 5
Stabilize refrigerator and align doors ........................ 6
Use and Care Section
Controls ................................................................... 7
Refrigerator and Freezer Controls
(non electronic models)......................................... 7
Setting Controls.................................................... 7
T ouchmatic™ Electronic Controls
(some models)...................................................... 7
Installation Checklist................................................ 9
Refrigerator Features.............................................. 10
Refrigerator Shelves ............................................ 10
Chiller Fresh™ Zero Degree Deli Drawer
(some models).................................................... 10
Deli Fresh Drawer (Some models) ...................... 10
Garden Fresh™ Crispers .................................... 10
Dairy Center (some models) ............................... 1 1
T emperature Controlled Beverage
Chiller™ (some models) ..................................... 1 1
Door Buckets and Shelves.................................. 12
T all Package Retainer (some models)................. 12
Freezer Features ................................................... 12
Automatic Ice Maker (some models) .................. 12
Stor-Mor® System............................................... 12
Ice ‘N’ Water™ Dispenser (some models) .......... 13
Water Dispenser Operation................................. 13
Ice Dispenser Operation ..................................... 13
Removing Ice Bucket .......................................... 13
Dispenser Light................................................... 14
T aste and Odor ................................................... 14
Care and Cleaning.................................................. 14
General............................................................... 14
Odor Removal ..................................................... 14
Adhesives ........................................................... 14
Door Gaskets ..................................................... 14
Condenser Coils ................................................. 15
Glass Shelves .................................................... 15
Light Bulbs ......................................................... 15
Normal Operating Sounds ...................................... 16
Before Calling For Service ...................................... 17
Energy Tips...........................................................17
Vacation Tips.........................................................17
Electrical Requirements
Recognize this symbol
as a safety precaution.
WARNING
Install refrigerator on and earthed outlet with a separate
230 volt, 50 hz., 10A circuit.
Model Identification
Locate product information on the nameplate, found in
upper left corner of Fresh Food section. Record the
following information:
Model Number:
Manufacturing Number:
Serial or S/N Number:
Date of purchase:
Dealer’s name and address:
Keep a copy of sales receipt for future reference.
Service
Keep a copy of sales receipt for future reference or in
case warranty service is required. Contact appliance
supplier if service is required.
For more information visit our web site:
www.amana.com
2
Page 3
Proper Disposal of your
Refrigerator
IMPORTANT: Child entrapment and suf focation are not
problems of the past. Junked or abandoned refrigerators
are still dangerous—even if they will sit for “just a few
days.” If you are getting rid of your old refrigerator, please
follow the instructions below to help prevent accidents.
BEFORE YOU THROW AW A Y YOUR OLD
REFRIGERA TOR OR FREEZER:
• T ake off the doors.
• Leave the shelves in place so that children may
not easily climb inside.
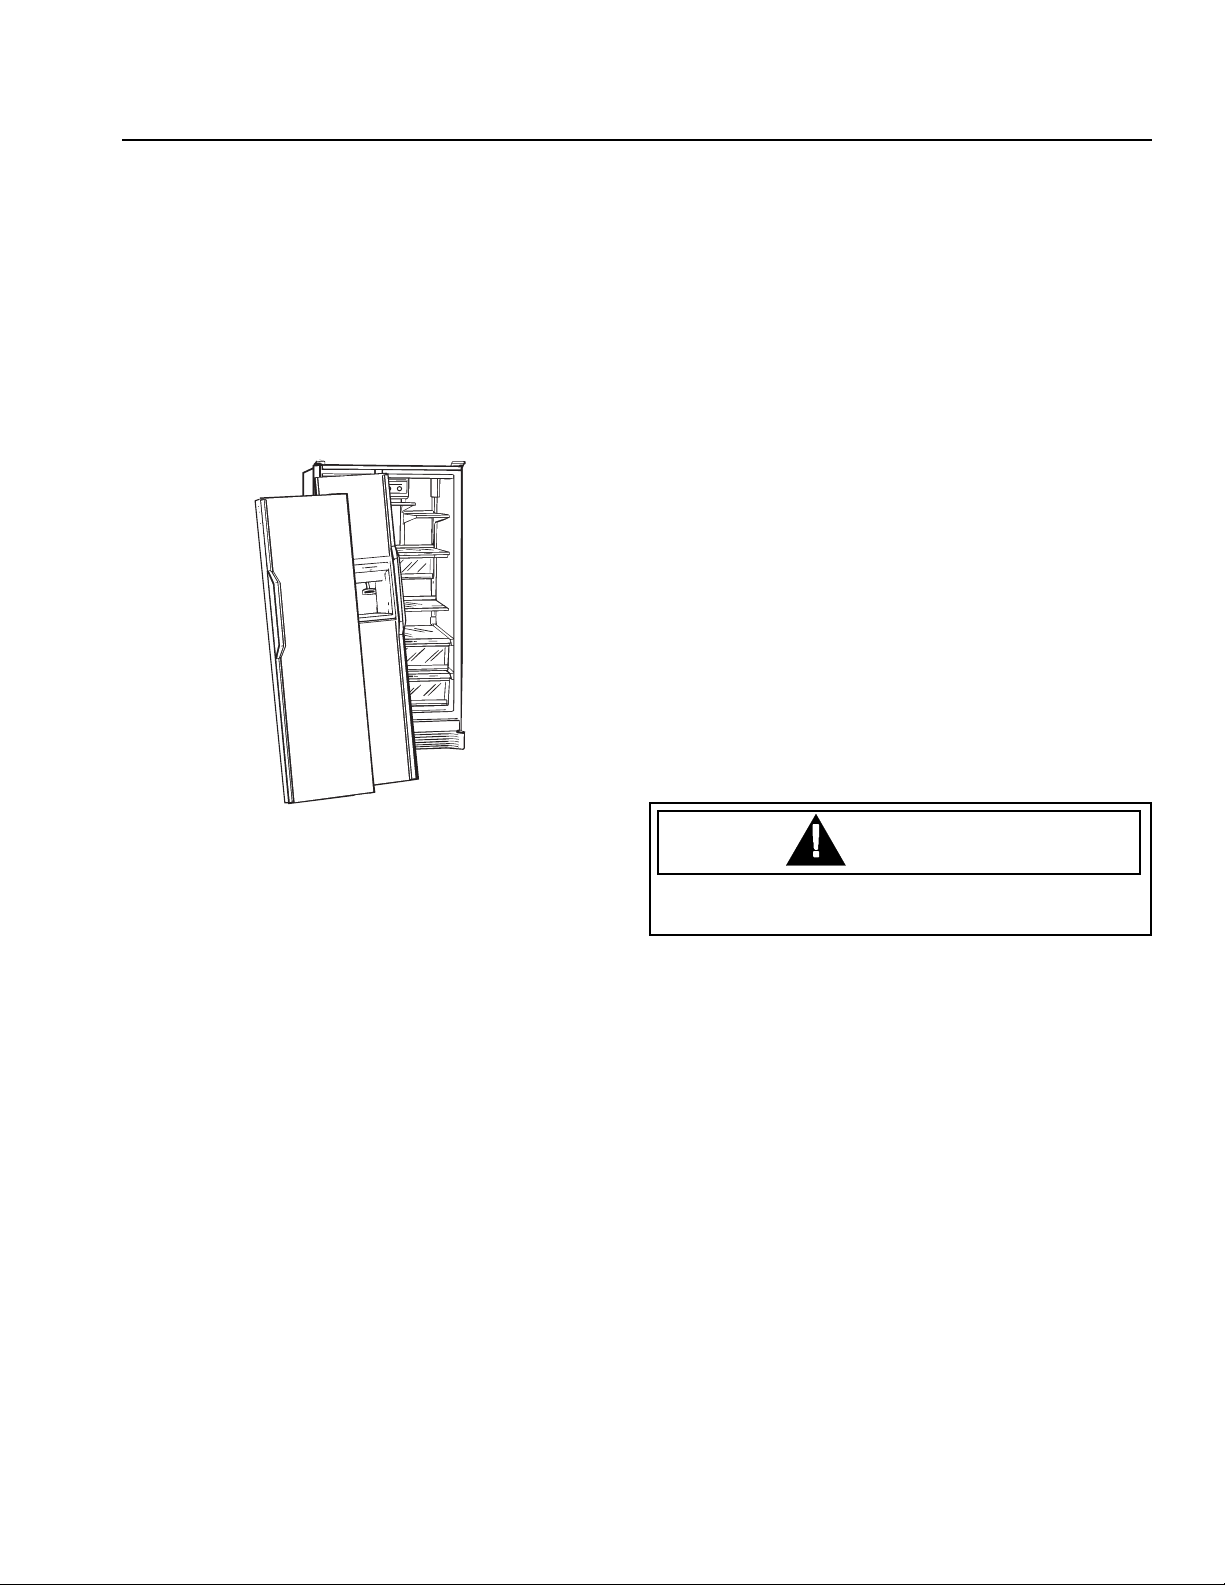
Installation Instructions
A qualified engineer must connect refrigerator in
accordance with these installation instructions.
Measure door opening and depth and width of refrigerator.
Remove handles or doors if required. Engineer must also
do the following:
1. Follow local water and electrical company connection
regulations.
2. Complete water supply connection before electrical
supply connection.
Service to or replacement of power cord must be
performed by a qualified servicer.
Installation Requirements
1. Install on an earthed outlet with a separate 230 volt,
50hz., 10A circuit.
2. Protect soft flooring with cardboard or rugs.
3. Install on a floor which supports up to 429 kg.
4. Provide 5 mm clearance at side of refrigerator and for
models more than 60 cm deep, provide 25 mm
clearance at top of refrigerator.
5. 60 cm deep models.
Trim corners of counter top to a 45° angle if counter
top has 25 mm overhang.
Removing Wooden Base
CAUTION
T o avoid personal injury or property damage, two
people must remove wooden base.
1. T ape doors shut to prevent doors from opening
unexpectedly.
2. Slide appliance cart under side of refrigerator.
3. Wrap refrigerator with blanket or pad. Thread strap
around refrigerator. Put foam shipping pads, located in
shipping carton, under strap. Tighten strap securely .
4. Lower appliance cart to floor with appliance cart
handles on bottom.
5. Remove top two bolts from skid.
6. Return refrigerator and appliance cart to an upright
position. Remove strap.
7. Slide appliance cart under opposite side of
refrigerator.
8. Repeat steps 3–5.
9. Remove wooden base.
10. Return refrigerator and appliance cart to an upright
position and remove appliance cart.
IMPORT ANT :
Do not leave refrigerator on its side longer than necessary
to remove bolts.
3
Page 4
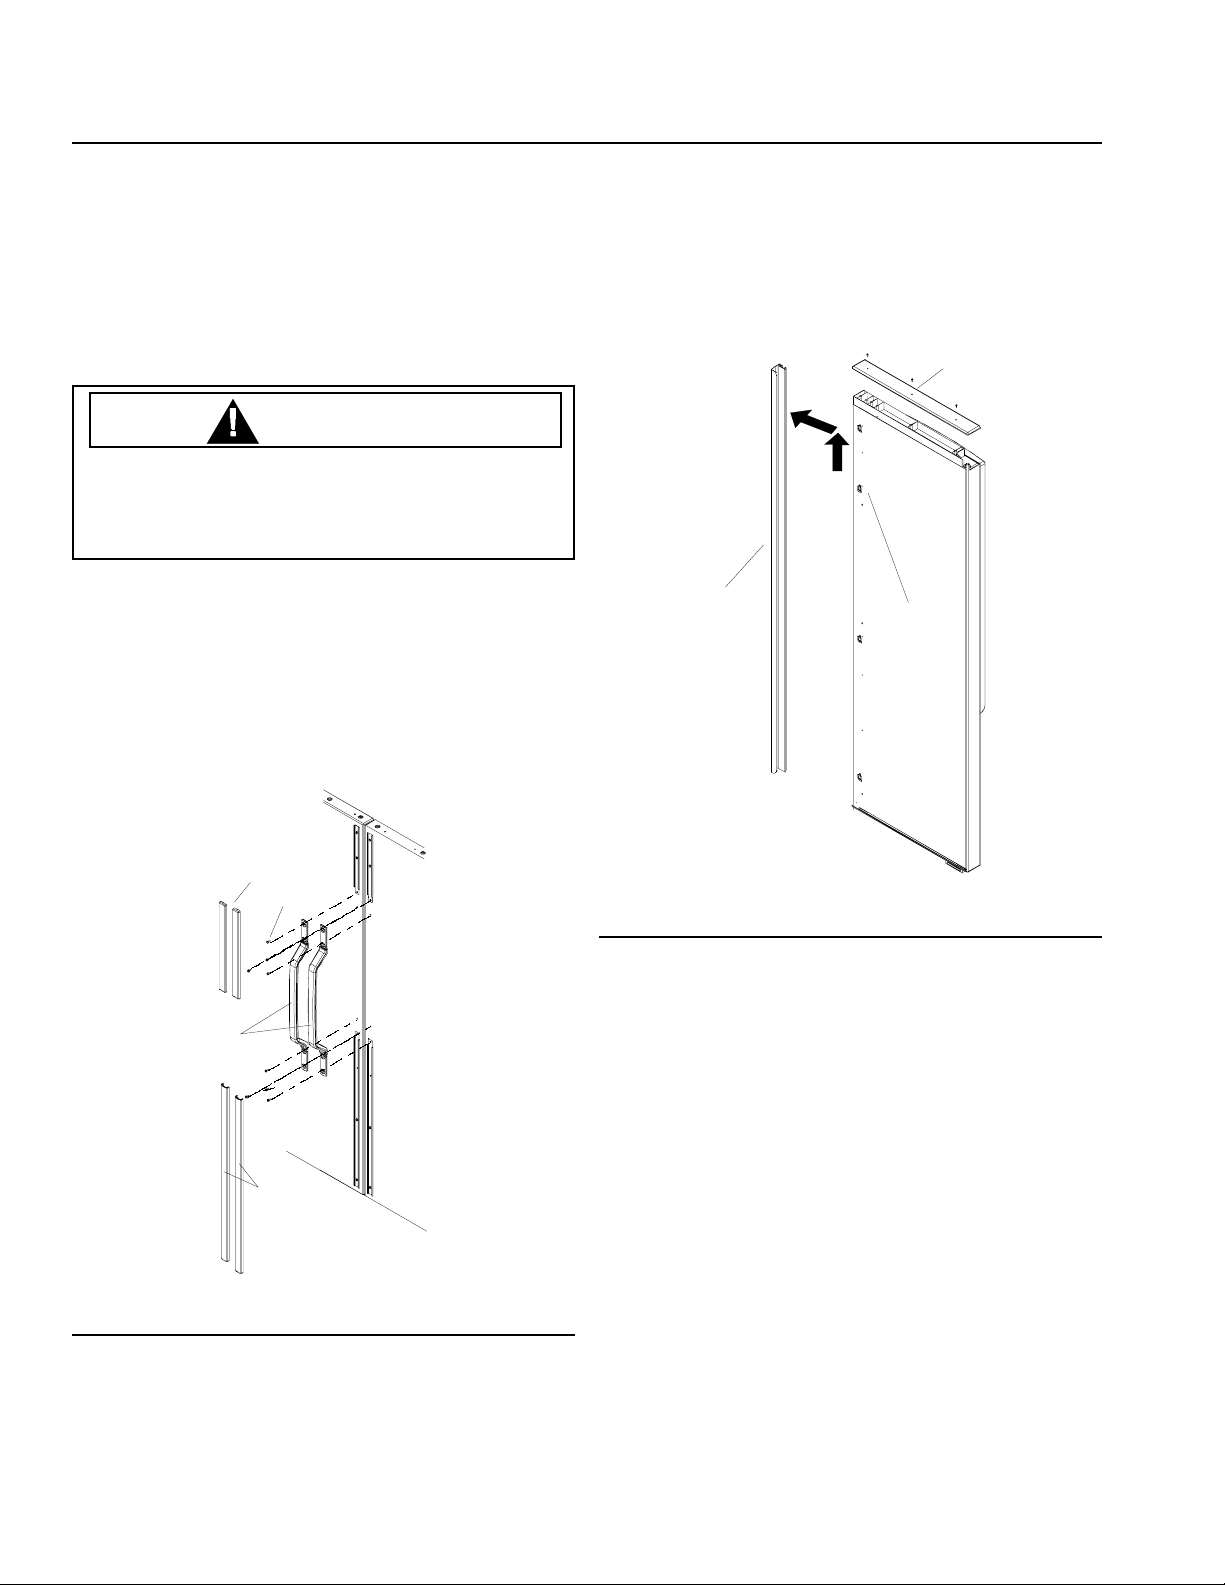
Removing Handles
Tools Required
Putty knife (blade covered by masking tape)
8 mm hex nut driver
9.5 mm hex nut driver
Phillips screwdriver
Blade screwdriver
WARNING
Disconnect power to refrigerator before removing doors
to avoid electrical shock which can cause severe
personal injury or death. After replacing doors, connect
power.
Models with full length extruded handles
• Remove top trim with phillips screwdriver (some
models). Remove handle cap.
• Lift handle up until it hits stop, pull handle away from
door. Clips on door slide out of notches on back of
handle.
A
Some installations may require handle removal to get the
refrigerator into the home. If so, perform the following
steps:
• Pry up edge of handle trim using a putty knife, with the
blade end covered in masking tape. Remove handle
from door by removing 2 mounting screws at each end
of handle.
A
B
C
A
C
B
A. Top trim B. Handle clip
C. Handle
Handle removal
• Reverse procedure to replace handle.
Connecting Water Supply
Connection of water supply is to be completed by a
qualified engineer.
Stabilize refrigerator and align doors
If refrigerator rocks or is not stable on floor perform
the following:
• Determine which rear corner is rocking.
• Remove toe grille to gain access to roller
adjustment screws.
A. Handle trim B. Handle screws
C. Handles
Handle removal
• Reverse procedure to replace handle.
4
Page 5
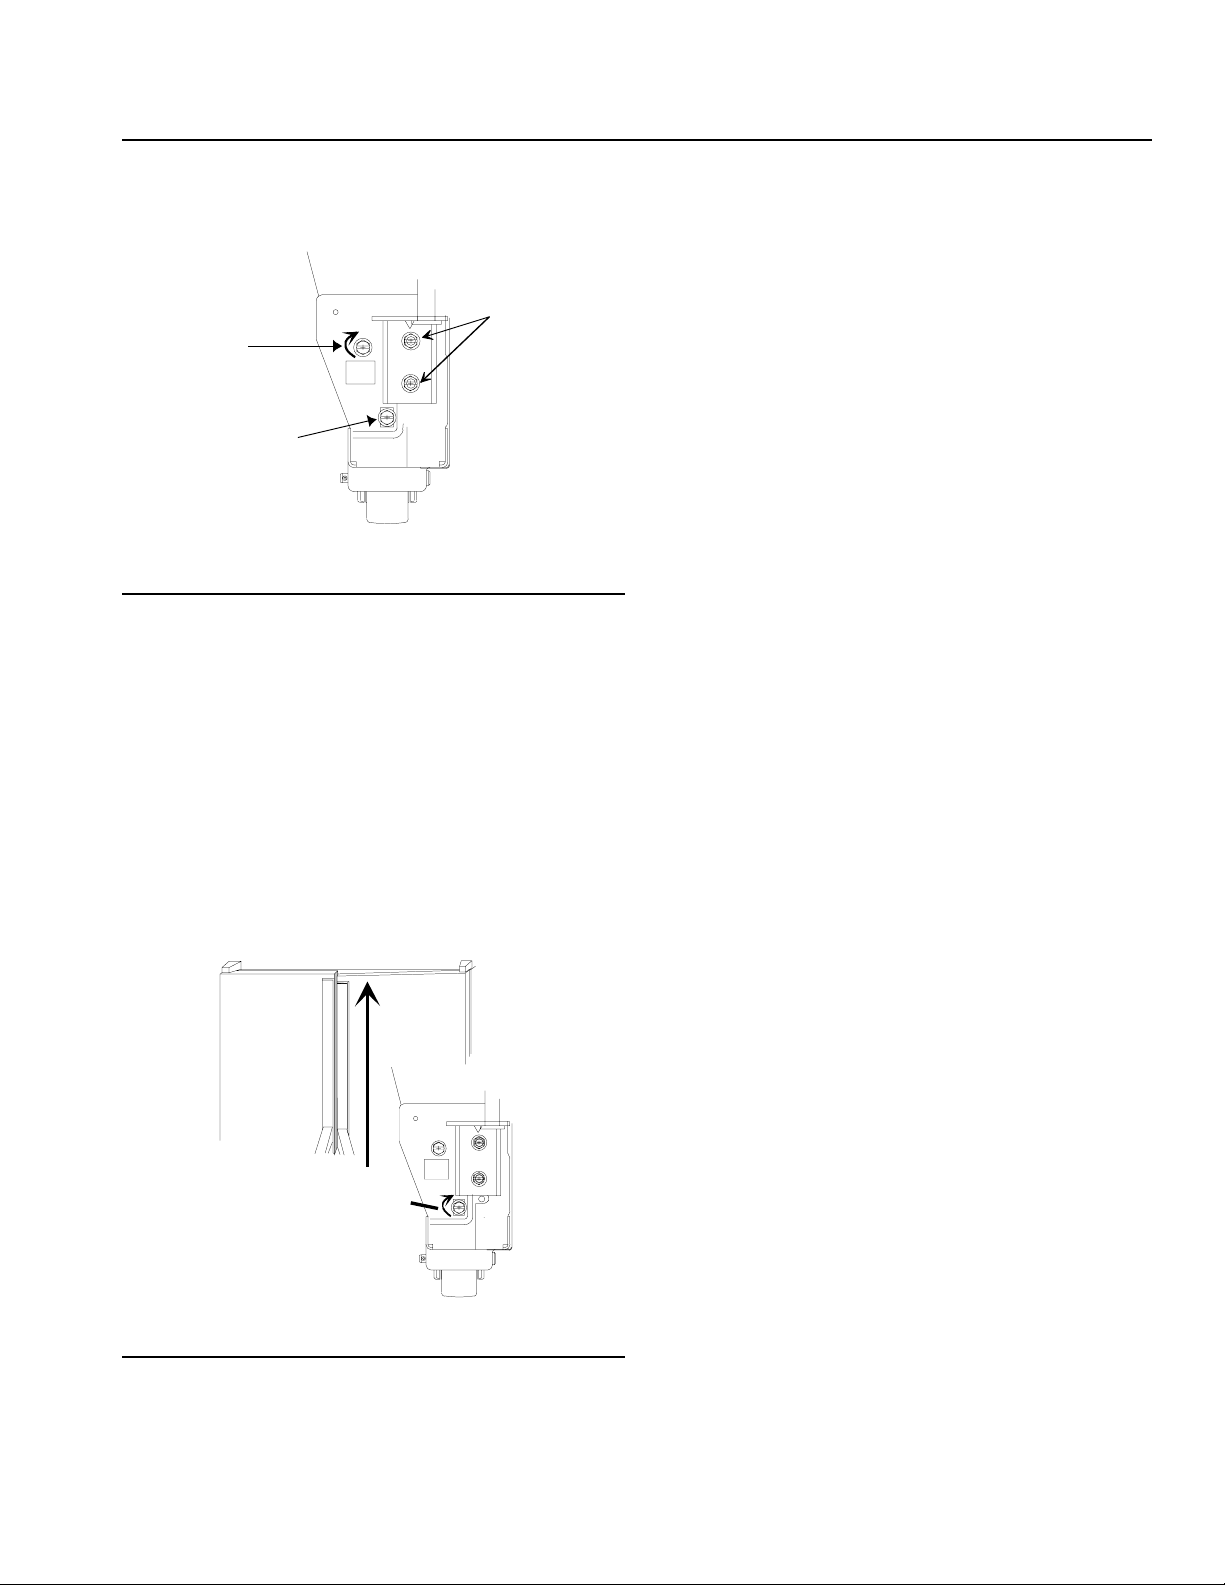
• Turn rear roller adjustment screw clockwise to raise
corner that is rocking.
B
A
C
A. Rear roller adjustment screw
B. Door hinge screws
C. Front roller adjustment screw
Stabilizing refrigerator
• Check alignment of top of doors. If doors are level
replace toe grille.
If tops of doors are not level perform the following
steps:
• Determine which door must be raised (if toe grille
has not been removed, remove at this time).
• Turn front roller adjustment screw clockwise to
raise front corner of door that needs to be raised.
Roller adjustment screw should be turned until
doors are level.
• Replace toe grille.
B
A
A. Turn roller adjustment screw clockwise to raise door.
B. Continue to turn screw clockwise until doors are level.
Leveling doors
7. Review “Installation Checklist” in Owner’s Manual with
consumer.
5
Page 6
Use and Care Section
Controls
This refrigerator is designed to operate at normal
household temperatures of 13° to 43°C.
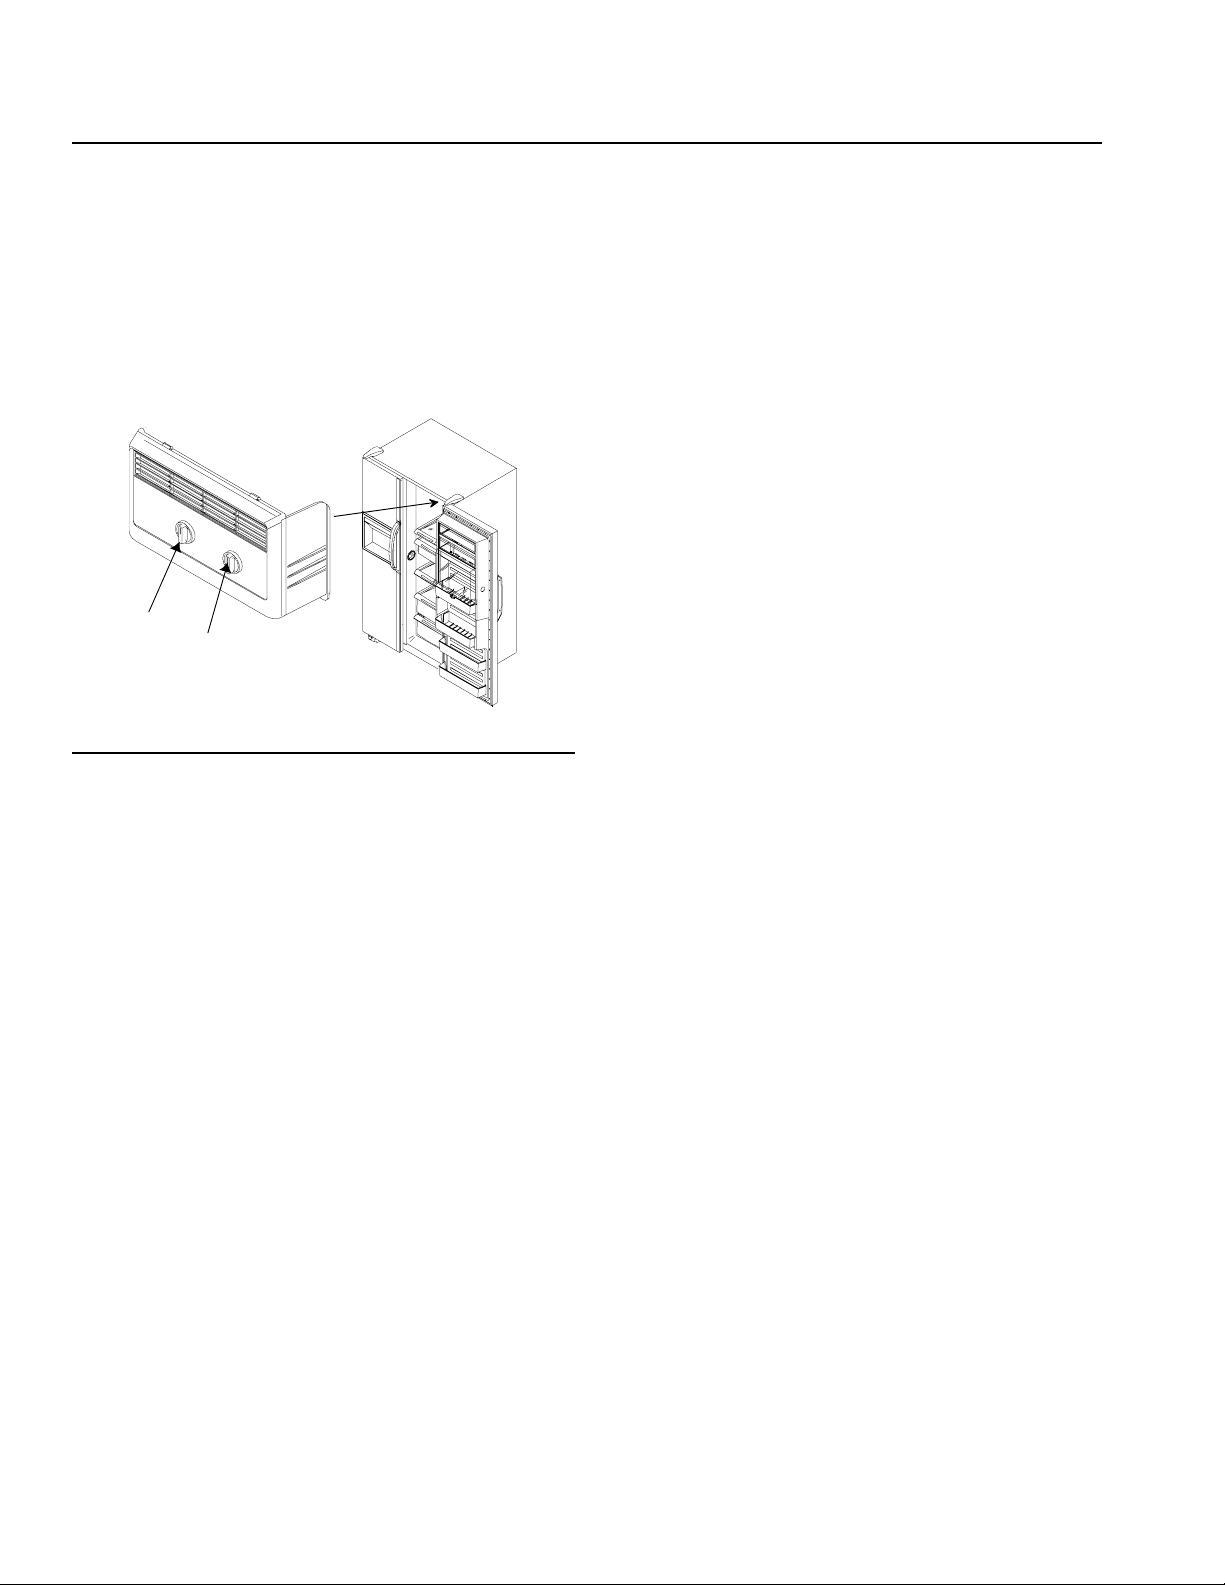
Refrigerator and Freezer Controls (non
electronic models)
Refrigerator and freezer controls are located on upper rear
wall of refrigerator section.
A
B
A. Freezer control
B. Refrigerator control
Controls
T ouchmatic™ Electronic Controls
(some models)
Locate power switch on right side of black box in center of
cabinet behind toe grille. Turn power switch on before
programming.
T ouchmatic™ electronic control is located on refrigerator
door adjacent to handles. Press * pad to activate control
panel. All other pads, except for alarm off pad, remain
inactive until * pad is pressed. Once activated, pads
remain programmable for at least 10 minutes.
Refrigerator and freezer controls are preset at 5. Wait 24
hours after connecting power for refrigerator and freezer
sections to reach desired temperatures. After 24 hours,
adjust controls as desired. 1 is warmest setting and 9 is
coldest. Refer to “Setting Controls” section to set controls
precisely .
• Adjust refrigerator or freezer temperatures by pressing
* pad then refrigerator temperature pad or freezer
temperature pad. Press warmer pad or colder pad to
adjust temperature setting 1 level at a time. Holding
down warmer pad or colder pad adjusts temperature
more than 1 level at a time.
• See the illustration on following page for electronic
controls pad descriptions.
When freezer control is turned
freezer sections will cool. Initially , set both controls to 4.
Wait 24 hours for refrigerator and freezer sections to
reach desired temperatures. 1 is warmest setting and 7 is
coldest.
off
, neither refrigerator nor
Setting Controls
Set controls with a household thermometer that includes
temperatures between -21° and 10°C.
Put thermometer snugly between frozen packages in
freezer section. Wait 5–8 hours. If freezer temperature is
not -18C, adjust control, 1 number at a time. Check again
after 5–8 hours.
Put thermometer in a glass of water in middle of
refrigerator section. Wait 5–8 hours. If refrigerator
temperature is not 3° to 4°C, adjust control, 1 number at a
time. Check again after 5-8 hours.
6
Page 7

Vacation Mode
Vacation mode defrosts refrigerator less often during
extended non-use periods. Activate vacation mode by
pressing * pad then Vacation pad. Indicator light will
glow. Repeat above to deactivate vacation mode.
Opening refrigerator or freezer door will also deactivate
vacation mode.
Maximum Cooling Mode
Max cool mode adjusts refrigerator temperature to coldest
setting. After 10 hours, refrigerator temperature
automatically returns to previous setting. Activate max
cool mode by pressing * pad then Max Cool pad.
Indicator light will glow. Repeat above to deactivate max
cool mode before automatic reset.
Fast Freeze Mode
Fast freeze mode adjusts freezer temperature to coldest
setting. After 24 hours, freezer temperature automatically
returns to previous setting. Activate fast freeze mode by
pressing * pad then Fast Freeze pad. Indicator light will
glow. Repeat above to deactivate fast freeze mode before
automatic reset.
Entry Tone
Entry tone indicates a pad was pressed and command
was read and accepted. Deactivate entry tone by
pressing and holding * pad for three to five seconds.
Three short beeps indicate instructions were accepted.
Repeat above to activate entry tone.
Door Open Alarm
Door open alarm sounds and glowing indicator light blinks
if either door is open for three minutes. Turn off door open
alarm by pressing Alarm Off pad or by closing either door.
Turn on door open alarm by pressing * pad then holding
Alarm Off pad for three to five seconds. Three short
beeps will sound. Repeat above to deactivate door open
alarm indefinitely.
Display Lights
Deactivate temperature display
lights by pressing * pad then
pressing Display Off pad.
Activate temperature display
lights by pressing any of top
five pads.
Clean Condenser Coil Light
Clean condenser coil light
glows once every three months
as a reminder to clean
condenser coil. Light
automatically cancels in 72
hours. Deactivate clean
condenser coil light before
automatic reset by pressing
Alarm Off pad.
Freezer
Temperature
Refrigerator
Temperature
Warmer
Colder
Vacation
Maximum
Cooling
Fast
Freeze
Alarm
Off
Display
Off
High Temperature Alarm
High temperature alarm sounds and indicator light glows if
refrigerator or freezer temperature is high for two hours. A
blinking light signals affected compartment. Deactivate
high temperature alarm by pressing Alarm Off pad. Alarm
discontinues when proper temperature is reached.
Thermistor Alarm
Thermistor alarm sounds and indicator lights scroll if
refrigerator or freezer thermistor is not operating properly.
Deactivate display by pressing Alarm Off pad.
If thermistor alarm sounds, contact an authorized servicer
immediately. If Alarm Off pad is pressed, thermistor
control retests to confirm situation has been corrected.
Alarm sounds again if thermistor is still not operating
properly.
7
Page 8

Installation Checklist
This checklist is for consumer's personal records only .
Consumer Installer
Doors
Doors are aligned with each other. (After food has been added to refrigerator ,
consumer should check door alignment).
Doors seal completely to refrigerator cabinet.
Handles are solidly attached to doors.
T ouchmatic™ Electronic and Ice ‘N Water™ Dispenser Models
If doors were removed to install refrigerator, top hinge wire connectors are
reconnected.
Leveling
Refrigerator is stable.
T oe grille is properly attached to refrigerator .
Ice Maker
Water supply to refrigerator is turned on.
Water leaks are not present at connection between household water supply and
refrigerator. (After 24 hours, consumer should check connection for water leaks.)
Ice maker arm is in on position for ice production. (It may take up to 24–48 hours
for first harvest of ice.)
Notes
Consumer's Signature
Product Literature
Owner's manual is reviewed including the following information.
• Refrigerator and freezer controls
• Chiller Fresh™ system
• Garden Fresh™ crispers
• normal operating sounds
Installer's Signature
DateInstaller's Company Name/Phone Number
8
Page 9

Refrigerator Features
Caution
T o avoid property damage, confirm shelf is secure
before placing items on shelf.
• Replace shelf by inserting hooks into metal track and
lowering front. Use slots 8 through 11 only. Replace
drawer by sliding in. Confirm boot is over air inlet in
side wall.
Refrigerator Shelves
Models feature either glass or wire shelves. Shelves
adjust up or down to meet individual storage needs. Some
models feature Spillsaver™ shelves. Spillsaver shelves hold
simple spills for easier cleaning.
Caution
T o avoid personal injury or property damage, handle
tempered glass shelves carefully . Shelves may break
suddenly if nicked, scratched, or exposed to sudden
temperature change.
• Remove shelves by lifting front, releasing hooks
from metal track then pulling out.
• Replace shelves by inserting hooks into metal track
and lowering front.
Some models also feature EasyGlide™ shelves that pull
forward for easy access of items in back.
Chiller Fresh™ Zero Degree Deli Drawer
(some models)
Chiller Fresh™ system features a drawer inside a sleeve.
Air circulates between drawer and sleeve. This system
keeps food fresh longer and up to 3°C colder than
refrigerator temperature.
Chiller Fresh control is located below front shelf trim.
Control adjusts amount of air circulating around drawer.
Slide control to
and to
coldest
form on drawer or food on
decrease refrigerator temperature. Refrigerator control
may need to be adjusted.
• Remove drawer by lifting and pulling out. Remove shelf
by lifting front, releasing hooks from metal track then
pulling out.
cold
for normal refrigerator temperature
for colder temperature. Ice crystals may
coldest
setting. Cold air can
A
Chiller Fresh
climate control
A. Chiller fresh control
Chiller Fresh System
Deli Fresh Drawer (Some models)
Some models feature a Deli Fresh Drawer. Deli Fresh
Drawer provides storage without a refrigerated sleeve. See
Chiller Fresh System instructions for drawer removal.
Garden Fresh™ Crispers
Garden Fresh crispers keep produce fresh longer. Wrap
produce tightly . Do not wash produce before placing in
crispers. Excess moisture could cause produce to spoil
prematurely . Do not line crispers with paper towels. Paper
towels will retain moisture.
Garden Fresh control is located below front shelf trim.
Control adjusts humidity in crispers. Slide control to
for produce with leaves such as lettuce, spinach or
cabbage. Slide control to
low
for produce with skins such
as cauliflower, corn or tomatoes.
Garde n Fresh
climate co ntr o l
high
A. Crisper Control
Garden Fresh Crisper
9
A
Page 10

Remove garden fresh crispers by completing the following
steps:
A
Caution
T o avoid personal injury or property damage, handle
tempered glass shelves carefully . Shelves may break
suddenly if nicked, scratched, or exposed to sudden
temperature change.
1. Remove crisper drawer by pulling out then lifting front
upward.
2. Remove crisper shelf by lifting front of shelf while
supporting underneath then pulling out.
3. Replace crispers and shelf by reversing steps 1–2.
Dairy Center (some models)
Dairy center provides convenient storage for items such
as butter, cheese, etc.
Dairy Center is adjustable to accommodate storage
needs. Dairy Center may also be removed for cleaning by
performing the following steps:
• Remove Dairy Center cover by opening cover. Push
cover inward at pivot points and pull cover out. Lift Dairy
Center up and pull out to remove.
• Replace Dairy Center by reversing procedure.
B
A. Refrigerator section left front wall
B. Temperature control
Beverage Chiller control illustration
Beverage Chiller position is adjustable to accommodate
storage needs. Beverage Chiller may also be removed for
cleaning. T o remove Beverage Chiller perform the following
steps:
• Grasp Beverage Chiller by sides lift up and pull out to
remove.
• T o replace, slide Beverage Chiller between desired
shelf rails in door liner and push Beverage Chiller down
into place.
Important
For proper operation of Beverage Chiller, one of the 3 cold
air intake holes must line up with notch in right door dike.
• If Beverage Chiller door track is cleaned, door track
must be lubricated with petroleum jelly for proper
operation of chiller door.
Dairy Center
Temperature Controlled Beverage
Chiller
T emperature Controlled Beverage Chiller keeps beverages
up to 3°C colder than refrigerator section. Air inlet allows
air from freezer section to pass to beverage chiller. Air
inlet is located on interior wall of refrigerator door.
Beverage chiller control is located on left front wall of
refrigerator section. Control adjusts amount of air
circulating in beverage chiller. T urn control to
normal refrigerator temperature and to
temperature.
™
(some models)
colder**
cold*
for
for colder
A
E
D
A. Door liner shelf rail
B. Notch in door dike must line up with one of Beverage Chiller
cold air intake holes.
C. Flange
D. Beverage Chiller
E. Beverage Chiller Door track
Beverage Chiller
C
10
B
Page 11

Door Buckets and Shelves
Door buckets adjust to meet individual storage needs.
• Remove door buckets by pushing bucket up and pulling
out.
• Replace door buckets by sliding bucket in between
shelf rails and pushing door bucket down into place.
Freezer Features
Caution
T o avoid property damage, confirm shelf is secure
before replacing items on shelf.
Automatic Ice Maker (some models)
• Confirm ice bucket is in place and ice maker arm is
down.
A
B
A. Off position B. On position
Ice maker operation
Door Buckets
Tall Package Retainer (some models)
T all package retainer keeps tall items secure. Retainer fits
in any door bucket. T all package retainers in refrigerator
door shelves are adjustable for two different heights.
To install, insert tall package retainer in holes in each side
of door bucket or shelf front.
• Install tall package retainer with knobs on retainer
facing outward for tall setting.
• For lower setting, install tall package retainer with
knobs on retainer facing inward. Knobs slide into slots
in retainer holes on inside front of bucket.
A
• After freezer section reaches normal temperature, ice
maker fills with water and begins operating. Allow 24–
48 hours after installation before first harvest of ice. Ice
maker produces 7 to 9 harvests of ice in a 24-hour
period under ideal conditions.
• After ice is formed, ice maker drops ice cubes into
ice storage bucket. During ice production, ice maker
arm raises and lowers. When ice storage bucket is full,
ice maker arm turns ice maker off. Discard first 3
harvests of ice after initially connecting refrigerator to
household water supply and after extended periods of
nonuse.
• Stop ice production by raising ice maker arm. A
definite click is heard when proper position is
reached. Ice maker arm will remain in
pushed down.
off
position until
Caution
T o avoid damage to ice maker , observe the following:
• Do not force ice maker arm down or up.
• Do not place or store anything in ice storage bucket.
Stor-Mor® System
Wire baskets slide out for easy access of items in back
and wire shelves (some models) can be rearranged to
meet individual storage needs.
A. Tall package retainer
Tall package retainer installation
11
Page 12

• Remove baskets by pulling out and lifting. Replace
baskets by placing baskets on side rails, slide baskets
right and back until round knob is behind stop on rail.
• Remove shelf by lifting right side of shelf out of clips
and pulling out of left side mounting holes. Reverse
procedure to reinstall shelf.
A
B
A. Wire shelves B. Wire baskets
Freezer baskets and shelf
Ice Dispenser Operation
Caution
T o avoid property damage, do not dispense ice directly
into thin glass, fine china, or delicate crystal.
• Select cubed or crushed mode by sliding lever on
dispenser panel. Dispense ice by pressing glass or cup
against ice dispenser bar.
Important
Reduce spraying of crushed ice by holding glass or
cup directly under ice chute and as high as possible
in dispenser area.
ICE
CUBED CRUSHED
Ice ‘N’ Water™ Dispenser
(some models)
Caution
T o avoid personal injury or property damage, observe
following instructions:
• Do not operate dispenser with freezer door open.
• Do not put fingers, hands, or any foreign object into
dispenser opening.
• Do not use sharp objects to break ice.
Water Dispenser Operation
It takes approximately 1 minute after pressing dispenser
bar the first time before water dispenses after initial
connection of water supply . Discard first 10 to 14
containers of water after first connecting refrigerator to
household water supply and after extended periods of
nonuse.
• Dispense water by pressing glass or cup against water
dispenser bar.
• Stop water dispensing by releasing pressure on bar. A
small amount of water may continue to fall. Spill shelf
is not self-draining. Large spills should be wiped dry .
Cup placement in dispenser
• Stop ice dispensing by releasing pressure on bar
before container is full. Some ice will continue to fall.
Do not remove container until last of ice falls.
If dispensing ice continuously, dispenser motor is
designed to shut off after 3 to 5 minutes. Motor resets
after 3 minutes and dispensing can continue.
A slight delay occurs when switching between cubed and
crushed modes. Pieces of crushed ice will vary in size
and shape. "Snow" may form on door and ice chute when
repeatedly dispensing crushed ice. Allow "snow" to
evaporate or wipe dry .
Dispenser operates only with cubes of proper size and
crescent shape. Do not add purchased ice cubes or other
shaped cubes to ice bucket.
Removing Ice Bucket
• Remove ice bucket by lifting bucket and pulling out.
• Replace ice bucket by sliding in until bucket locks in
place. Ice bucket must be locked in place for proper
ice dispensing. If freezer door does not close, bucket is
not in proper location.
12
Page 13

Dispenser Light
A light is activated when dispensing ice or water.
• Light can be turned on or off by pushing switch located
underneath dispenser and left of ice dispenser bar.
A
A. Dispenser light switch
Dispenser light switch location
Taste and Odor
Observe the following to minimize taste and odor
difficulties:
• Wrap foods in tightly sealed containers or moisture
proof bags.
• Contact local water treatment company for
specialized help if difficulties persist.
• If refrigerator has an external water filter replace water
filter cartridge, see
and Operating Instructions
Water Filtration System Installation
for replacement procedure.
Care and Cleaning
- abrasive or harsh cleaners, ammonia, chlorine
bleach, etc.
- concentrated detergents or solvents
- metal scouring pads
These items can scratch, crack and discolor
surfaces.
• Do not place buckets, shelves, etc. in dishwasher.
Odor Removal
1. Remove all food and disconnect power to refrigerator.
2. Clean all interior surfaces including ceiling, floor, and
walls according to “General” instructions. Pay special
attention to corners, crevices, and grooves. Include all
drawers, shelves, and gaskets.
3. Connect power to refrigerator and return food to
refrigerator. W ash and dry all bottles, containers and
jars. Wrap foods in tightly sealed containers to
prevent further odor. After 24 hours, check if odor was
eliminated.
Complete the following steps if odor was not eliminated.
4. Complete steps 1–2.
5. Place garden fresh crispers on top shelf of refrigerator
section. Pack refrigerator and freezer sections
including doors with crumpled sheets of black and
white newspaper.
6. Place charcoal briquettes randomly throughout
newspaper.
7. Close doors and let stand 24–48 hours.
8. Remove charcoal briquettes and newspapers.
9. Complete steps 2–3.
Contact Consumer Affairs Department, if odor was still not
eliminated. Refer to
number.
Model Identification
section for phone
WARNING
T o avoid electrical shock which can cause severe
personal injury or death, disconnect power to
refrigerator before cleaning. After cleaning, connect
power.
Caution
T o avoid personal injury or property damage, read and
follow all cleaning product manufacturer's directions.
General
1. Wash surfaces with a warm water and baking soda
solution. Use a soft clean cloth to clean surfaces.
2. Rinse surfaces with warm water. Dry surfaces with a
soft, clean cloth.
• Do not use the following items:
Adhesives
1. Remove glue residue by rubbing toothpaste into
adhesive with fingers until adhesive loosens.
2. Rinse surface with warm water. Dry surface with a
soft, clean cloth.
Door Gaskets
1. Keep gaskets clean at all times. Clean door gaskets
thoroughly every 3 months according to “General”
instructions.
2. Apply a light film of petroleum jelly to hinge side of
door gasket to keep gaskets pliable.
13
Page 14

Condenser Coils
Clean condenser coil every 3 months to ensure maximum
performance of refrigerator. Accumulated dust and lint
may cause the following:
• reduced cooling performance
• increased energy usage
• in extreme cases, premature compressor failure
1. Remove toe grille by holding ends and pulling forward.
2. Clean front surface of condenser coil with a vacuum
cleaner hose nozzle.
3. Replace toe grille by inserting clips in holes and
snapping in.
Caution
T o avoid property damage, protect soft vinyl or other
flooring with cardboard, rugs, or other protective
material.
4. Pull refrigerator away from wall. Run a vacuum
brush across condenser fan outlet grille on back
of refrigerator.
Glass Shelves
Caution
T o avoid personal injury or property damage, observe
the following:
• Allow light bulb to cool.
• Wear gloves when replacing light bulb.
Upper refrigerator and non dispensing models
freezer section
• Disconnect refrigerator from current before replacing
light bulb either by unplugging the refrigerator or
switching of the installation fuse.
• Remove light bulb cover by removing 6 mm hex screws.
See light housing for replacement bulb wattage.
• Replace light bulb cover by replacing 6 mm hex
screws.
A
Caution
T o avoid personal injury or property damage, handle
tempered glass shelves carefully . Shelves may break
suddenly if nicked, scratched, or exposed to sudden
temperature change.
Remove shelf by lifting front, releasing hooks from metal
track then pulling out. Place shelf on a towel. Allow shelf
to adjust to room temperature before cleaning.
Clean crevices by completing the following steps:
1. Dilute mild detergent and brush solution into crevices
using a plastic bristle brush. Let set for 5 minutes.
2. Spray warm water into crevices using faucet spray
attachment.
3. Dry shelf thoroughly and replace shelf by inserting
hooks into metal track and lowering front.
Light Bulbs
WARNING
T o avoid electrical shock which can cause severe
personal injury or death, disconnect from current before
replacing light bulb either by unplugging the unit or
switching off the installation fuse.
B
C
A. Light bulb B. Light bulb cover
C. Screws
Upper refrigerator light bulb removal
14
Page 15

Lower refrigerator section (Some models)
• Disconnect refrigerator from current before replacing
light bulb either by unplugging the refrigerator or
switching of the installation fuse.
• Remove light bulb cover by removing screw. See light
housing for replacement bulb wattage.
• Replace light bulb cover by placing cover over light
bulb. Insert and tighten screw.
A
B
C
A. Light bulb B. Light bulb cover
C. Screw
Lower refrigerator light bulb removal
Freezer section
• Disconnect refrigerator from current before replacing
light bulb either by unplugging the refrigerator or
switching of the installation fuse.
• Remove ice bucket by lifting bucket and pulling out.
• Remove light bulb cover by removing screw. See light
housing for replacement bulb wattage.
• Replace light bulb cover by holding cover in place over
light bulb. Insert and tighten screw.
• Replace ice bucket by sliding in until bucket locks in
place.
Light bulb is located between dispenser arms.
• Disconnect refrigerator from current before replacing
light bulb either by unplugging the refrigerator or
switching of the installation fuse.
• Remove light bulb by unscrewing light bulb. Replace
light bulb with a 6-watt, 250-volt bulb.
• Replace light bulb by inserting and tightening bulb.
Dispenser light bulb replacement
C
B
A. Light bulb cover B. Light bulb
C. Screw
Freezer section light bulb removal
Ice ‘N’ Water™ dispenser (Some models)
A
15
Page 16

Normal Operating Sounds
Before Calling For Service
This new refrigerator may be replacing a differently
designed, less efficient or smaller refrigerator. Today’s
refrigerators have new features and are more energy
efficient. As a result, certain sounds may be unfamiliar .
These sounds are normal and will soon become familiar.
These sounds also indicate refrigerator is operating and
performing as designed.
1. Freezer control clicks when starting or stopping
compressor.
2. Freezer fan air rushes and whirs.
3. Sealed system (evaporator and heat exchanger)
refrigerant flow gurgles, pops or sounds like boiling
water.
4. Defrost heater sizzles, hisses or pops.
5. Condenser fan air rushes and whirs.
6. Compressor has a high pitched hum or pulsating
sound.
7. Ice cubes from ice maker (some models) drop into
ice bucket.
8. Defrost heater sizzles, hisses or pops.
Ice auger (Ice ‘N’ Water™ Dispenser models) hums
as auger agitates ice during dispensing. Ice auger is
located in freezer door. (not shown)
Ice maker water valve hookup (some models)
buzzes when ice maker fills with water. This occurs
whether or not refrigerator is connected to water
supply . If refrigerator is not connected to water supply ,
stop sound by raising ice maker arm to off position.
Water valve hook up is located in back, bottom, left
hand corner. (not shown)
Foam insulation is very energy efficient and has
excellent insulating capabilities. However, foam
insulation is not as sound absorbent as previously
used fiberglass insulation. (not shown)
7
1
Refrigerator does not operate.
• Confirm freezer control is on.
• Confirm refrigerator is plugged in.
• Check fuse or circuit breaker. Plug in another item at
that wall outlet.
• Wait 40 minutes to see if refrigerator restarts. If
freezer control is on, lights work but 2 fans and
compressor are not operating, refrigerator may be in
defrost cycle.
Refrigerator still won’t operate.
• Unplug refrigerator. Transfer food to another unit
or place dry ice in freezer section to preserve food.
Warranty does not cover food loss. Check warranty
certificate for specific coverage.
• Call appliance provider for an authorized Amana
technician.
Food temperature appears too warm.
• See above sections.
• Allow time for recently added warm food to reach
refrigerator or freezer temperature.
• Check gaskets for proper seal.
• Clean condenser coils.
• Adjust refrigerator and/or freezer control.
• Confirm rear air grille is not blocked. Rear air grille is
located behind garden fresh crisper.
Chiller Fresh™ system temperature is too warm.
• Turn control to colder setting.
• Adjust freezer control to colder setting.
Food temperature is too cold.
• Clean condenser coils.
• Adjust refrigerator control.
• Adjust freezer control to warmer setting. Allow several
hours for temperature to adjust.
• One of 3 cold air intake holes in beverage chiller is not
aligned with notch in right side door dike.
Sound location
Refrigerator runs too frequently .
• It may be normal to maintain constant temperature.
• Doors may have been opened frequently or for an
2
3
4
6
8
5
extended period of time.
• Allow time for recently added warm food to reach
refrigerator or freezer temperature.
• Clean condenser coils.
• Adjust freezer control.
• Check gaskets for proper seal.
Water droplets form on inside of refrigerator .
• It is normal during high humidity periods or if doors
have been opened frequently .
• Check door gasket seal.
16
Page 17

Energy Tips
Water droplets form on outside of refrigerator .
• Check door gaskets for proper seal.
Garden Fresh™ crispers or Chiller Fresh™ system does
not close freely .
• Check for a package which may prevent drawer from
closing properly .
• Confirm drawer is in proper position.
• Clean drawer channels with warm, soapy water. Rinse
and dry thoroughly .
• Apply a thin layer of petroleum jelly to drawer
channels.
• Confirm refrigerator is level.
Refrigerator has an odor.
• See “Odor Removal” instructions in “Care and Cleaning”
section.
Refrigerator or ice maker make unfamiliar sounds or
seems loud.
• It may be normal. See “Normal Operating Sounds”
section.
Ice maker is not producing ice.
• Confirm ice maker arm is down.
• Confirm household water supply is reaching water
valve.
• Confirm ice maker wiring harness is completely
inserted into proper holes.
• Check for kinks in copper or plastic tubing.
Remove kinks or replace tubing.
• Check electrical connections to water valve coila n d
connector block on refrigerator cabinet.
• Confirm freezer section is operating at proper
temperature.
This refrigerator is designed to be one of the most energy
efficient refrigerators available. Reduce energy use by
observing the following.
• Operate in normal household temperatures of 13° to
43°C away from heat sources and direct sunlight.
• Set refrigerator, freezer , and Chiller Fresh™ system
controls no colder than necessary .
• Keep freezer section full.
• Keep door gaskets clean and pliable. Replace gaskets
if worn.
• Keep condenser coils clean.
Vacation Tips
Complete the following steps for short vacations.
1. Remove perishable foods. Warranty does not cover
food loss. Check warranty certificate for specific
coverage.
2. If an ice maker is installed, move ice maker arm up,
to off position.
Complete the following steps for long vacations.
1. Empty refrigerator and freezer sections.
2. Unplug refrigerator.
3. Clean refrigerator and door gaskets according to
“General” instructions in “Care and Cleaning” section.
4. Prop doors open, so air can circulate inside.
5. If an ice maker is installed, turn water supply to
refrigerator off and move ice maker arm up, to
position.
off
Ice cubes have an odor.
• See “Odor Removal” instructions in “Care and Cleaning”
section.
• Discard ice and clean ice bucket or trays more
frequently . Ice cubes are porous and absorb odors
easily .
Ice cubes stick together or ‘shrink’.
• Empty ice cube bucket or trays more frequently .
If used infrequently , ice cubes may stick together or
shrink.
Ice forms in inlet tube to ice maker.
• Check water pressure. Low water pressure will
cause valve to leak. Self-piercing valves cause low
water pressure. Amana recommends using copper
tubing to connect household plumbing to
refrigerator. Do not use self-piercing valve. Amana
is not responsible for property damage due to
improper installation or water connection.
17
 Loading...