

Page 1
COMMERCIAL WARRANTY
Full One Year Warranty
In addition to all statutory rights which you,
the Consumer, have under all the relevant
laws in respect of this appliance, during your
first one year of ownership as the purchaser
of the Kleenmaid VC 500 we guarantee that
any fault caused by faulty material or workmanship becoming apparent will be rectified
free of charge for parts or labour provided
that all service is performed during normal
working hours by Kleenmaid or their
designated Agent.
The Purchaser must pay the cost of transporting the appliance to and from the Service
Agent or the Agent’s travelling cost to and
from the Purchaser’s home.
Vacuum motor ............. min 1100 Watt
max 1300 Watt
Air flow.......................... 50 L/ s
Dust bag....................... 5,3 litres, 3-layer
Working width............... 308 mm
Brush drive................... tooth belt
Brush speed................. 2700 rpm
Floor adjustment.......... automatically
sensor advised
Cable............................ 10 m
Weight.......................... 7,4 kg
Protection..................... double insulated
Technical Details
06698 - 11.2003
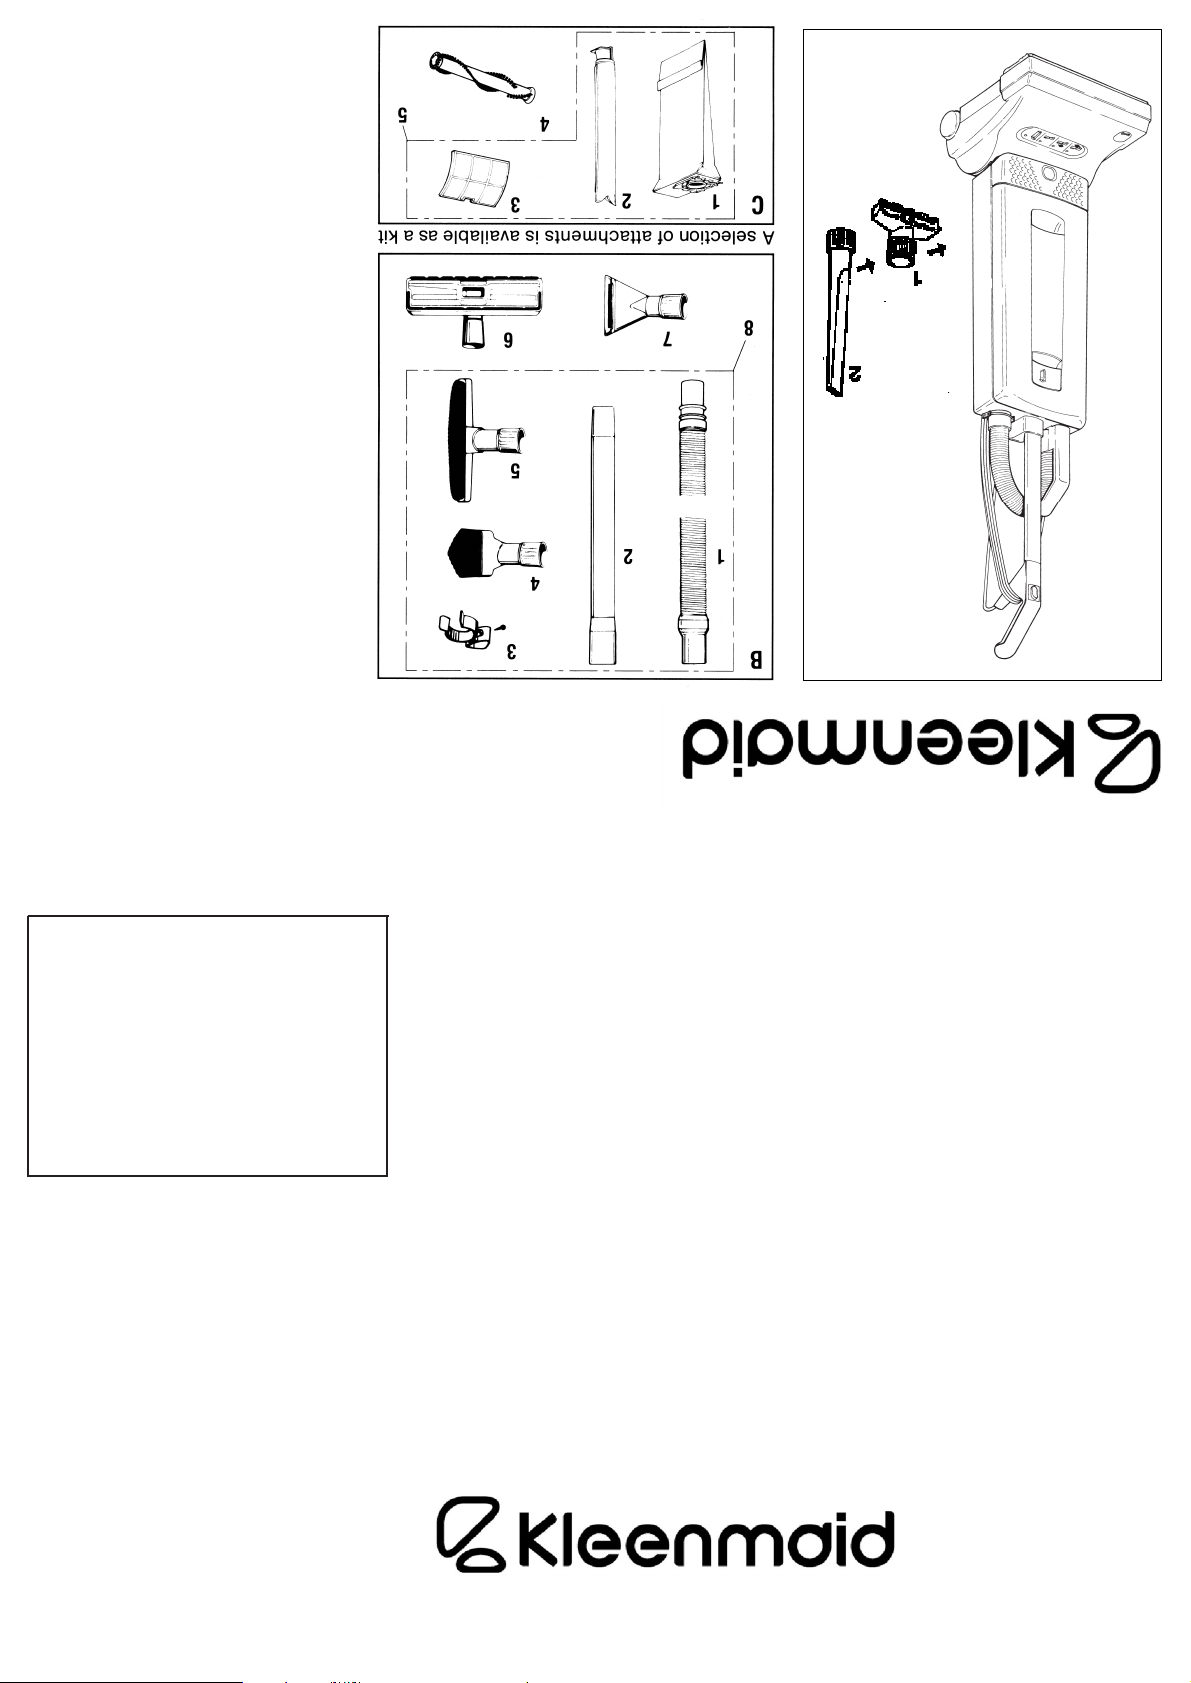
A Attachments
1 Upholstery Nozzle
2 Crevice Nozzle
B Optional Attachments
1 Extension Hose
2 Straight Tube
3 Clamp
4 Dusting Brush
5 Wall and Floor Brush
6 Combination Nozzle
7 Upholstery Nozzle, special
8 Attachment Box-Automatic
C Service Parts
1 Paper Bag
2 Micro-Hygiene-Filter
3 Exhaust Filter
4 Brush Roller
5 Service Box-Automatic
VACUUM CLEANER WARRANTY
DOMESTIC WARRANTY
Full Five Years Warranty
In addition to all statutory rights which you,
the Consumer, have under all the relevant
laws.In respect of this appliance, during your
first five years of ownership as the original
purchaser of the Kleenmaid VC 500, we
guarantee that any fault caused by faulty
material or workmanship, becoming apparent
will be rectified free of charge for parts or
labour provided that all service is performed
during normal working hours by Kleenmaid or
their designated Agent.
The Purchaser must pay the cost of transporting the appliance to and from the Service
Agent or the Agent’s travelling cost to and
from the Purchaser’s home.
A
automatic VC 5OO
What These Warranties Do Not Cover
We are not responsible for any damage or malfunction unless caused by a defect in material
or workmanship. This includes, but is not limited to, abuse, misuse, improper installation, and
transportation damage. We are not responsible for any consequential damages resulting from
any malfunction. These warranties do not cover paper bags, micro filters, motor filters or
brush rollers.
THE WORLD’S BEST
For service contact your nearest store on 131308 or our
After Sales Service on 1300 652 100
Page 2

automatic VC 5OO
1 Handle grip
2 On / Off switch
3 Handle assembly
4 Retaining ring
5 Cover release flap
6 Dust bag housing
7 Front cover
8 Housing release button
9 Base with brush
CAUTION – Safety advice
ELECTRICAL APPLIANCE
– Disconnect from mains before changing
brush, hag or filters.
– Keep away from liquid or moisture.
– Vacuum dry surfaces only.
THIS APPLIANCE HAS A ROTATING BRUSH:
– do not run over mains cable,
– do not leave plugged in and unattended,
– children must be strictly supervised,
– ensure machine is in upright position and
the brush is above level of floor when using
hose,
– do not place brush head over rug edges.
Please read this instruction manual before
using the machine and pay attention to the
safety advice.
10 Cable
11 Attachment tube handle
12 Hose
13 Carrying handle
14 Cable hook
15 Attachment tube
16 Crevice nozzle
17 Upholstery nozzle
18 Foot pedal
Some floorcoverings are not suitable for
uprights, eg. Berber carpets. Do not use
machine on unsuitable surfaces.
Do not wash filters.
Do not re-use bags.
Do not vacuum hot material such as ash.
Do not remove any screws.
The warranty will be invalidated if the above
advice is ignored.
The appliance is not intended for use by
young children or infirm persons without
supervision. Young children should be
supervised to ensure that they do not play
with the appliance.
IT IS THE USERS RESPONSIBILITY TO
OPERATE THIS APPLIANCE SAFELY AND
CAREFULLY.
INSTRUCTION MANUAL
Your Kleenmaid vacuum cleaner is designed
to give you excellent performance and long
life. Reading this manual will help you get the
most from its’ many features
Assembling the vacuum cleaner:
In the box you will find the machine in four
major parts. To assemble the machine, put the
swivel neck (20) and support lever ( 21 ) in the
upright position. Carefully place the dust bag
housing over them and push down until the
release button resets (8 ).
To lock the handle turn the handle catch (13)
at the handle joint of the filter bag housing (6)
forward, then slide the handle assembly (3) in
as far as possible and lock it with the handle
catch.
Push the black end of the hose into the
connecting tube ( 23 ) so that it clicks into place.
Insert the attachment tube (16) into the swivel
neck and push the handle (11) over the
projection (22).
The hose can be taken off by squeezing the
retaining ring (4).
IF THE MACHINE DOES NOT WORK, THEN
THE STEPS ABOVE HAVE NOT BEEN EXECUTED CORRECTLY. PLEASE ENSURE THE
PARTS ARE PROPERLY PUSHED TOGETHER.
Page 3

The machine has an information display on
the power head with four lights to monitor the
automatic functions.
The two green lights (a, b) indicate the brush
adjustments of the Active Height Control system.
The power head maintains the optimum brush
height continuously by activating the adjustment
wheel (41). The lights will flash intermittently as
the machine is moved over the floor. When the
machine is clicked into the upright position the
brush head automatically lifts from the floor.
The two red lights (c, d) are warning lights.
If red light “d“ is shining continuously, the bag is
full, the filters require replacement, or there is a
blockage. When the light is flashing the machine
has shut off to prevent overheating
If red light ”c“is on continuously the brush is
worn out. When the light flashes and the
machine has stopped, then the machine has
shut off because of a jammed brush or to
prevent carpet damage.
If the red light ”c“ flashes when using the hose
with the machine in the upright position, then it
is warning that the brush is making contact with
the floor. Avoid tilting the brush head on to the
floor when using the hose.
To release the machine from the upright position, press the foot pedal (19) down. With the
orange slider (20) an intermediate stop position can be added to lift the brush over obstacles. Then to lower the machine to the horizontal position, press the foot pedal again.
To use the telescopic hose system (12), put the
machine into the upright position, then lift the
tube from the machine and stretch out the hose
until it locks. When the tube is returned to the
machine, insure it is pushed down over the
projection (22) on the housing. The hose can be
used on its own when the tube is fitted to the
housing. The attachments (17, 18) fit either to
the end of the hose or the end of the tube.
CAUTION:
Do not run the brush over rug fringes.
Do not stand the machine over rug edges
or fringes when using the hose.
Do not tilt the brush head on to the floor
when using the hose. Unless clicked
upright the machine will brush the floor.
Some floor coverings and rugs are very
delicate and we advise using the attachment tube with an appropriate floor nozzle
attachment for these. On rough or uneven
hard floors take care to prevent contact between the floor and the bottom plate.
Never run over the cable with the brush.
Always carry the machine over steps and
sills.
Page 4

CAUTION - Always unplug machine at
mains outlet before dismantling any part
of machine.
Changing the paper bag:
The red bag light “d“ on the display indicates
that there is a reduced air flow. This is caused
either by a full paper bag, dirty filters, or a
blockage in the hose (12) or base (9) of the
machine. (To clear, refer to blockage section.)
The nature of the bags contents will effect the
point at which it needs changing. Fine dust may
require an earlier change even when the bag is
not filled to the top. Fluff or hair lets the air pass
through easily, so the bag may overfill.
To change the paper bag, lift the flap (5).
Then change the bag, as illustrated on its
front.
Please ensure that the bag top is located
properly on both sides of the holder (29) and
pushed in until it locks.
The used paper bag can be sealed with a cap,
which is included with each bag in the
KLEENMAID Filterbox and Service-Box (Part.No. 5093 ER and 5094 ER)
Changing the filters:
The KLEENMAID automatic VC 500 has two
additional filters, the microfilter and the exhaust
filter (Part.-No. 5036 ER and 5143). They are
also available together with ten paper bags in
the KLEENMAID Service-Box (Part.-No. 5094 ER).
The microfilter is located in the dust bag compartment. The front cover can only be closed
when the filter is fitted properly. Lift the metal
bar (31) to slide the filter in.
The exhaust filter is fitted on the base (9) below
a grill (34, filter cover), To remove the grill, push
back the catch (33).
The microfilter (30) needs to be changed when it
is dirty, or before using twenty paper bags.
We recommend changing the exhaust filter (32)
with the microfilter.
THE FILTERS MUST NOT BE WASHED.
Removing the brush roller:
To remove the brush roller (35) push the button
(36), remove the side plate (37), turn the brush
clockwise and pull the brush roller out.
To replace, slide the roller into the brush housing
and turn it until it locates into position. Push the
button (36) and press the side plate (37) back
into place.
We recommend vacuuming out the brush roller
ends periodically to prevent a build up of dust or
fibre. When cleaning hair, etc., from the brush
roller, do not cut into the bristles.
Replacing the hard floor strip:
Remove the side plate (37) and slide out the
strip. Slide new strip into the groove and refit
side plate.
Clearing blockages:
If the machine is not picking up, or the red bag
light “d“is on, but the bag is empty and the
filters are clean, then it is probably blocked.
First check the hose by placing your hand over
the end. If there is no, or very little suction, then
it is blocked. Take off the hose by squeezing the
retaining ring (4). Put it on the machine the
wrong way round. Place your hand over the free
end repeatedly with the machine on. Also check
that the tube is clear.
If the hose and tube are clear, check the swivel
neck (20) by looking down the neck where the
tube fits. Also check the trap door (38) underneath the machine. Ensure the passage between the trap door and the exit to the tube is
clear.
 Loading...