

Page 1

Cooking
Collection
Instructions for Use
and Warranty Details
TO901X - Single
TO951X - Double
Multi Function Pyrolytic Ovens - Stainless Steel
Page 2

congratulations
the best you can own.
Congratulations on the purchase of your new Kleenmaid professional series appliance. This
appliance has been designed and manufactured to give you years of reliable performance.
the kleenmaid story.
More than one million Australians enjoy using Kleenmaid appliances daily. Selected because of
their unique design, outstanding performance, excellent quality and unquestionable reliability,
each one is value-for-money, 100 per-cent guaranteed and at the top of its class.
attention to detail.
We are proud of our reputation for product innovation and service excellence. By dealing direct, we
can ensure that you consistently receive a high standard of customer service.
Free delivery, dedicated customer service and after-sales service team plus free kitchen design and
planning seminars are just a few of the ways we are setting new benchmarks for customer service
and experience.
satisfaction guaranteed.
Your new professional series appliance is covered by a written five-year parts and labour warranty,
no lemon guarantee, and a unique best value guarantee.
best results.
For best results, carefully read the enclosed instructions on how to install your new appliance.
Correct installation will avoid delays and unnecessary service calls.
This booklet provides you with comprehensive information to help you get to know the controls and
the features of your new appliance.
Page 3

Table of Contents
IMPORTANT SAFETY INSTRUCTIONS ...................................................................................................3
Product Features ...................................................................................................................................... 4
About Your Oven........................................................................................................................... 4
Cooling Fan................................................................................................................................... 4
Rack Positions .............................................................................................................................. 4
Baking Elements ........................................................................................................................... 5
Grilling Element............................................................................................................................. 5
Convection Element...................................................................................................................... 5
About Convection Ovens .............................................................................................................. 5
The Control Panels ................................................................................................................................... 6
Command Keys............................................................................................................................. 6
Display .......................................................................................................................................... 6
Knobs............................................................................................................................................ 6
Oven Modes............................................................................................................................................... 7
Convection Bake and Defrost ....................................................................................................... 7
Fast Preheat ................................................................................................................................. 7
Convection Grill............................................................................................................................. 7
Bake.............................................................................................................................................. 7
Convection Roast.......................................................................................................................... 7
Grill................................................................................................................................................ 7
General Oven Information........................................................................................................................ 8
General Oven Tips .................................................................................................................................... 9
Setting the Clock and Timer .................................................................................................................. 10
Selecting the Oven Mode ....................................................................................................................... 11
Time Oven Mode Operation ................................................................................................................... 12
Meat Probe............................................................................................................................................... 13
Bake Tips and Techniques..................................................................................................................... 14
Convection Bake Tips and Techniques ................................................................................................ 15
Convection Roast Tips and Techniques............................................................................................... 17
Convection Grill Tips and Techniques ................................................................................................. 18
Grill Tips and Techniques ...................................................................................................................... 19
Special Features ..................................................................................................................................... 20
Sabbath Mode Instruction...................................................................................................................... 21
Care & Cleaning ...................................................................................................................................... 22
Self-Cleaning Function........................................................................................................................... 23
Setting the Self-Clean Mode .................................................................................................................. 24
Do-it-Yourself Maintenance Oven Door Removal ................................................................................ 25
Replacing an Oven Light........................................................................................................................ 26
Solving Baking Problems....................................................................................................................... 27
Solving Operational Problems............................................................................................................... 28
If You Need Assistance or Service.............................................................................................. 28
Installation Introduction ......................................................................................................................... 29
Tools You Will Need.................................................................................................................... 29
Power Requirements................................................................................................................... 29
Choosing Oven Location............................................................................................................. 29
1
Page 4

Steps For Installation...................................................................................................................29
Technical Data ......................................................................................................................................... 30
Single Oven .................................................................................................................................30
Double Oven................................................................................................................................30
Wall Installation, Single Oven ................................................................................................................31
Wall Installation, Double Oven ...............................................................................................................32
Electrical Supply......................................................................................................................................33
Wiring Requirements ...................................................................................................................33
Connecting The Oven To The Mains...........................................................................................33
Final Check List .......................................................................................................................................34
Model Warranty........................................................................................................................................35
2
Page 5

IMPORTANT SAFETY INSTRUCTIONS
WARNING - when using this appliance, basic safety precautions should always be followed to reduce
The risk of fire, electric shock, and/or injury to persons, including the following:
1. Read all instructions before using the oven.
2. Installation - The installation must be carried out by an authorised person and in compliance
with current regulations in force. This appliance is envisaged for domestic use and conforms to
the Australian standards currently in force. The appliance is built for carrying out the following
function: Cooking and heating food; any other use is to be considered improper. The manufacturer
declines any responsibility should the appliance be usd for purposes other than those indicated.
Have the installer show you where the fuse or breaker box is located and how to turn off
the power to the oven.
3. Do not operate the oven if it is damaged or not working correctly including broken glass as
electric shock may occur. Disconnect it from the mains and call for service..
4. Never use your appliance for warming or heating the room.
5. Do not leave children alone while oven is in use - children should not be left alone or unattended
in area where the appliance is in use. They should never be allowed to sit or stand on any part of
the appliance.
6. Do not touch heating elements or interior surfaces of oven - heating elements may be hot
even though they are dark in colour. Interior surfaces of the oven, including racks become hot enough
to cause serious burns. Do not touch or let clothing or other flammable material come into contact
with the heating elements, interior surfaces, or racks of the oven during or immediately after use.
Allow the oven to cool.
7. Wear correct apparel - loose-fitting or hanging garments should never be worn while using the
appliance. Fabric may ignite and result in personal injury.
8. Use only dry oven gloves - moist or damp oven gloves on hot surfaces may result in burns from
steam. Do not let oven gloves touch hot heating elements. Do not use a towel or other bulky cloth.
9. User servicing - do not repair or replace any part of the appliance unless specifically recommended
In the manual. All other service should be referred to a qualified technician.
10. Storage in or on the appliance - flammable materials should not be stored in an oven or near
surface units.
11. Do not use water on grease fires - smother flame or use dry chemical or foam type extinguisher.
12. Use care when opening door - let hot air or steam escape before removing or replacing food.
13. Do not heat unopened food containers - build-up of pressure may cause the container to burst
and result in injury.
14. Keep oven vent ducts unobstructed.
15. Placement of oven racks - always place oven racks in desired location while oven is cool. If rack
must be moved while oven is hot, do not let the oven glove contact the hot heating element in the oven.
16. Do not clean the door gasket - the door gasket is essential for a good seal. Care should be taken
not to rub, damage, or move gasket.
17. Do not use oven cleaners - no commercial oven cleaner or oven liner protective coating of any
kind should be used in or around any part of the oven.
18. Clean only parts listed in manual.
19. Before using Self-Cleaning function in oven - remove oven racks and other utensils.
20. Check knobs are in off position when finished cooking - always check the position of the oven
control knobs when you have finished cooking to make sure they are all in the off positions.
21.
CAUTION - do not store items of interest to children in cabinets above the oven – children
climbing on the oven to reach items could be burned or seriously injured.
22. Always disconnect the electrical supply before servicing the oven.
23. Warning! The appliance is not intended for use by young children or infirm persons without
supervision.
3
Page 6
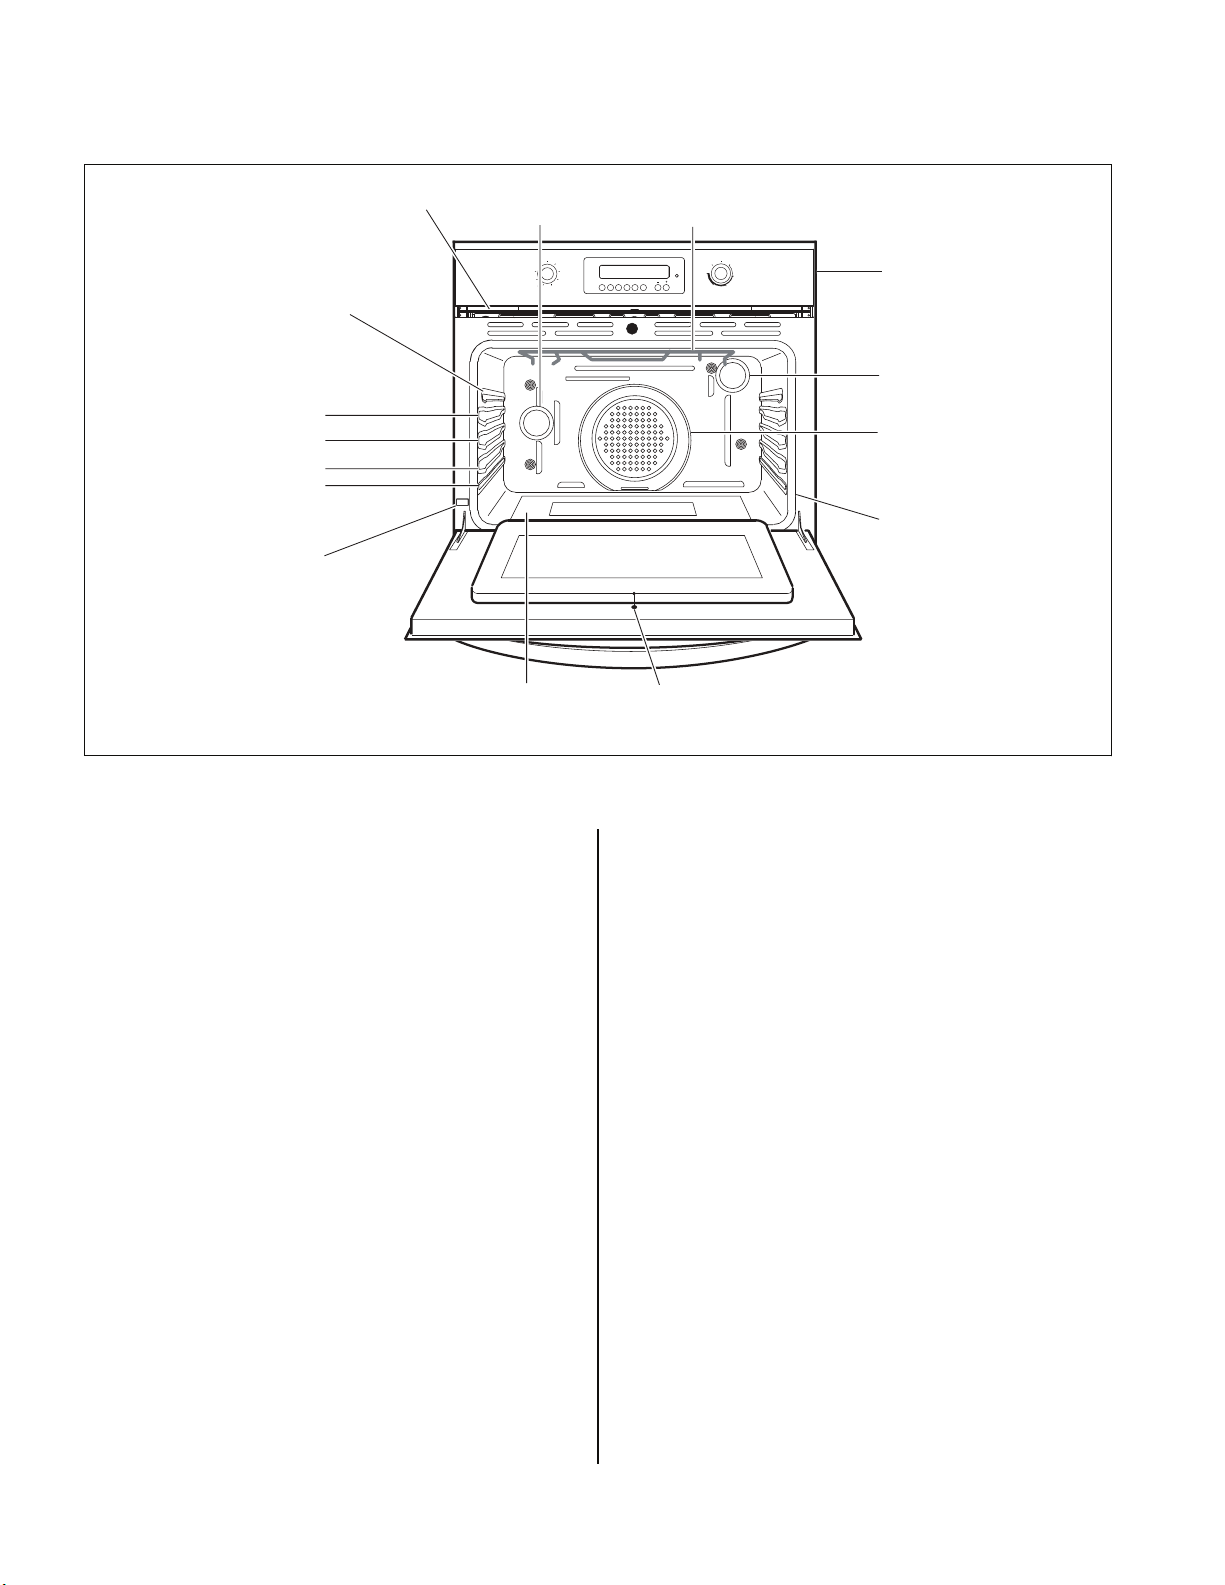
Product Features
Probe
Receptacle
Rack Levels
Model and Serial
# Plate
Cooling Vents
4
3
2
1
Halogen Light
SETTINGS
OFF
CONV.
CLEAN
BAKE
CONV.
DEHY.
BROIL
CONV.
BROIL
ROAST
FAST
BAKE
PREHEAT
Bake Element
(not visible)
TIMERCLOCK COOK
Grill Element
PREHEAT
STOP LIGHT LOCK
Door Lock
CLEAN
HI
TEMPERATURE
PRESET
LO
MED
Control panel
Halogen Light
Convection Fan
and Element
(not visible)
Door Gasket
2
B
3
9
1
4
1
1
Figure 1
About Your Oven
Above you will find an illustration of a Kleenmaid
oven showing the components of the oven.
Cooling Fan
The oven has a cooling fan to cool the control
panel.
You may hear this fan continue to run after
cooking and/or cleaning has been completed.
The fan will run as long as the oven is hot and the
oven’s function selector is turned to any position
other than “Off”.
This is normal operation.
Rack Positions
The oven has rack guides at four levels as shown
in the illustration.
Each level guide consists of paired supports
formed in the sidewalls on each side of the oven
cavity.
The rack should be positioned within the paired
supports.
Each oven is provided with the following parts
and utensils.
TO901X - single oven
TO951X - both upper and lower ovens
• 2 x wire shelves
• 1 x telescopic rack
• 1 x insert grill wire rack
• 1 x baking pan
Always be sure to position the oven racks, etc.
before turning the oven on.
Make sure that the rack(s) are level once they are
in position.
To remove oven rack from the oven, lift rack at
front and lift out. For telescopic rack see the
special sheet provided with it.
To replace oven rack:
1. Place rear of rack between the rack level
guides.
2. While lifting front of the rack, slide the rack in
all the way, then lower front. Please refer to
the illustration on the following page if there is
any question as to which side is the front of
the rack.
4
Page 7
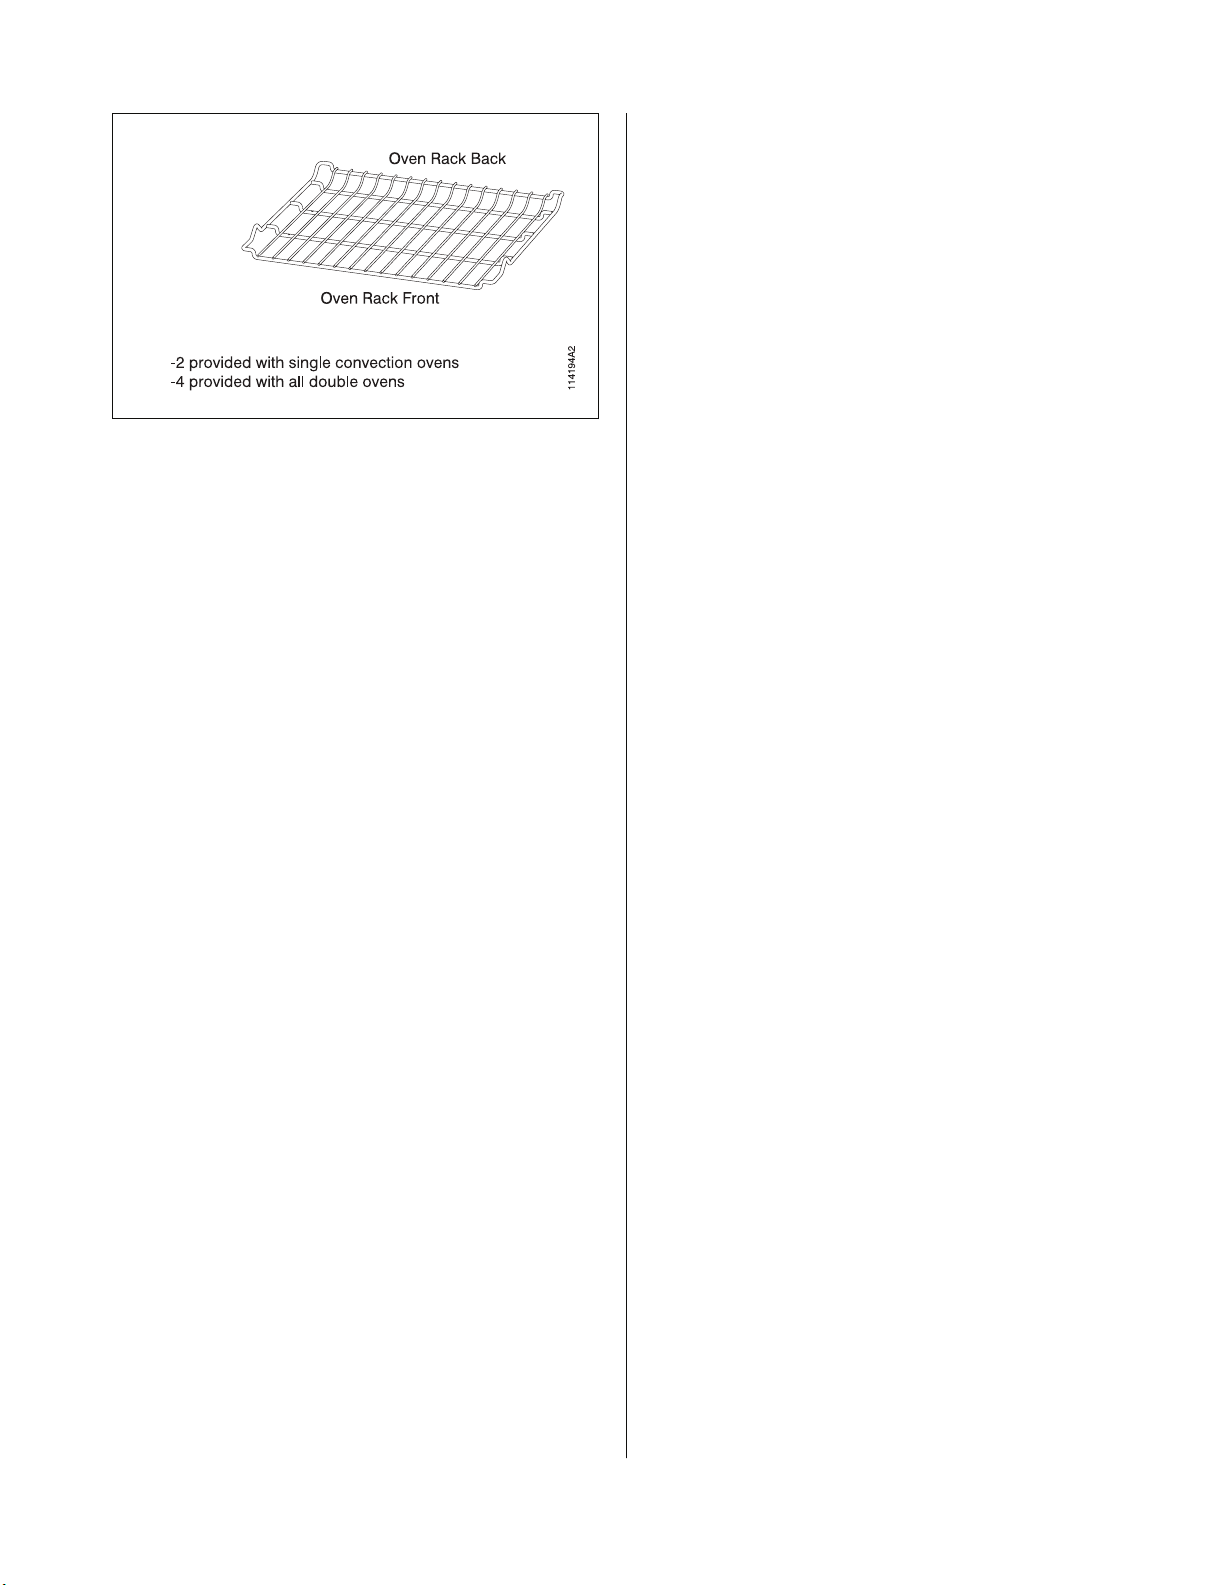
Figure 2
Baking Elements
The Kleenmaid oven uses two elements for
baking: one located at the top of the oven and the
second located below the floor of the oven cavity
to provide ease in cleaning the oven cavity.
Grilling Element
The grilling element of the oven is located at the
top of the oven cavity.
Do not touch the heating element or let oven
gloves touch the grilling element.
Never use a towel or bulky cloth for an oven
glove; they could catch on fire.
• Saves time and energy
• Baking on multiple levels at the same time
• Bakes whole meals at once with no flavour
transfer
• Defrosts evenly
Many of your own recipes have time and
temperature instruction for the regular bake cycle.
As a rule, most of these recipes can be cooked
with better results in one of the convection cycles.
In general, to convert standard recipes for use in
convection, you reduce the temperature by about
10 °C and check if cooked at the minimum
suggested cooking time.
When baking on more than 1 rack it may be
necessary to increase the cooking time a few
minutes for each additional rack. As individual
tastes vary, you may find you need to adjust the
time and temperature to achieve desired results.
You may feel your new oven cooks differently
than your old oven. We recommend you use the
various cooking cycles for a few months to
become more familiar with it.
We do not recommend you use oven
thermometers found at many grocery stores to
check oven temperature. They may be inaccurate
and are slow to respond to temperature changes.
Convection Element
The convection element (not visible) and fan are
located at the back of the oven cavity.
This element and fan combination performs the
cooking when in the convection bake mode.
When in any of the convection modes the fan is
on, see Table 1. The fan will only operate with
the door closed.
About Convection Ovens
Both the single oven and double oven are
convection ovens.
Although most people are familiar with the
operation of a conventional oven many are
unclear as to how a convection oven works or in
what ways it is superior to a conventional oven.
Below you will find a brief explanation of how a
convection oven works and its advantages. In
Kleenmaid Ovens, the European Convection
system (the 3 elements, fan and venting panel)
circulates even, heated air throughout the oven.
This process:
• Seals in juices and flavour
• Provides even baking and browning
5
Page 8
THE CONTROL PANELS
The user interface has the following features:
display, preheat light indicators, keys for
Command Keys
[SET CLOCK or CLOCK ]: to set or change
the time of day.
[TIMER]: set or clear the minute minder.
[COOK TIME or COOK]: press this key to set or
change the duration of a cooking activity.
[STOP TIME or STOP]: to set or change
the stop time in a timed or delayed cooking mode.
Whenever one of the former keys has been
pressed and the time digits are blinking, press
and/or hold the following keys to change the
values.
commands, cooking mode and temperature
selectors.
NEVO ELGNIS NEVO ELBUOD
3 erugiF
Four time digits (green), for time of day, minute
minder, automatic cooking. AM/PM indication is
also present.
Three temperature digits (red), for oven
temperature. Degree unit (°C or °F) indication is
present. It shows the temperature set-point for
the current cooking mode, in the selected cavity.
Box and lock icons to show which cavity is
currently selected and which door, if any, is fully
locked, while running in clean or cooling down
after a clean.
Text to indicate which function is active (steady)
or waiting for a user input (blink).
[LIGHT]: to switch the oven lights status.
The function of the following keys depends on
the oven model:
[TOP / BOTTOM] (double oven): press it to
select the upper cavity if none is selected.
If one of the two is already selected, simply
toggle to the other one.
[LOCK] (single oven): hold it together with [+] to
operate safety lock.
[INCREMENT] [+]: press to increase the value of
the currently selected variable.
[DECREMENT] [-]: press to decrease the value
of the currently selected variable.
Display
Preheat light (external).
Knobs
Cooking mode selector
Eight cooking modes + OFF position.
Temperature selector.
PRESET and CLEAN positions + continuous
range between LOW and HIGH values.
Multifunction knobs
Figure 4
6
Page 9
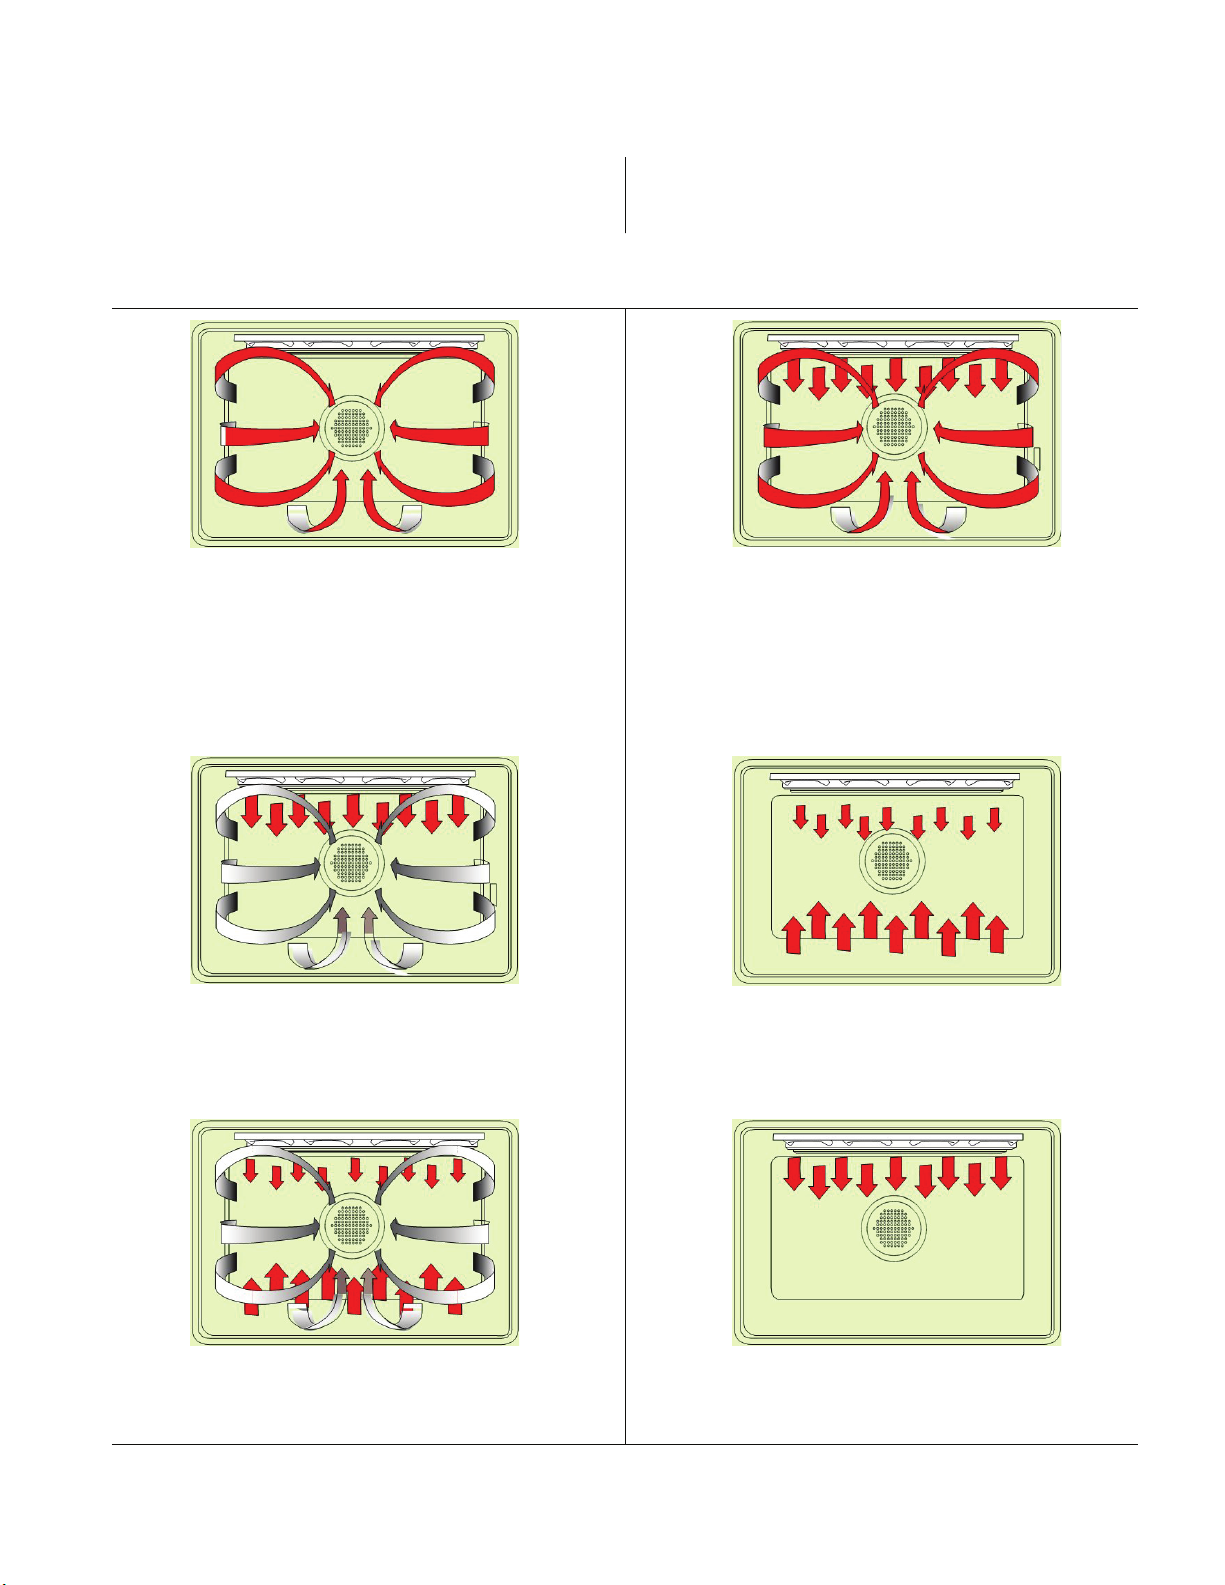
OVEN MODES
The following illustrations give an overview of
what happens in the oven with each mode
setting.
Table 1. Cooking function settings
Convection Bake and Defrost
Convection Bake cooks with heat from a third
element behind the back wall of the oven. The
heat is circulated throughout the oven by the
convection fan.
Defrost – Use for defrosting. No elements
operate, only the fan is ON.
The arrows represent the location of the heat
source during specific modes. The lower element
is concealed under the oven floor.
Fast Preheat
Fast Preheat uses the ring element and the
grill element to rapidly heat the cavity.
When the preheat tone is sounded and the red
light turns off, select the desired cooking mode.
Convection Grill
Convection Grill combines the intense heat from
the upper element with the heat circulated by the
convection fan.
Convection Roast
Convection Roast uses the top element, bottom
element and convection fan.
Bake
Is cooking with heated air. Both the upper and
lower element cycle to maintain the oven
temperature.
Grill
Grilling uses intense heat radiated from the upper
element.
7
Page 10

Before You Use Your Oven
Before using your oven for the first time remove
all packing and external materials from the oven(s).
Any material of this sort left in the oven(s) may
melt and/ or burn when the oven(s) is(are) used.
Turn oven on to high for 2 hours for burnoff.
Default Settings
The cooking modes automatically select a
suitable temperature when the selector is in the
preset position. These can be changed when a
different one is needed.
GENERAL OVEN INFORMATION
Flashing Symbols or Numbers
Signals an incomplete setting and calls for
another input.
Beeps
Signals that more information must be entered or
confirms the receipt of an entry.
Beeps also signal the end of a function or an
oven fault.
Fast Preheat
Whenever the oven must heat rapidly, turn the
cooking mode selector to fast preheat position.
As soon as the preheat tone is sounded and the
red light turns off, select the desired cooking
mode and put food inside.
Lock Symbol
It’s displayed when the door is locked, during the
Self-Clean mode or following cooling down.
The symbol flashes when the latch is moving to
lock or unlock the door. Do not attempt to open
the door. Door can be opened when the symbol
no longer appears.
F Failure Number Codes
These codes are displayed when the electronic
control detects a problem in the oven or in the
electronics.
Convection Fan
The convection fan operates during any
convection mode. When the oven is operating in
the convection mode, the fan will turn off
automatically when the door is opened. The
convection fan will run during the preheat time
too.
Component Cooling Fan
Activates during any cooking or self-cleaning
mode to cool inner components and outer door
surfaces. This air is exhausted through the vent
located above the oven door. It continues to run
until components have cooled sufficiently. The
cooling fan speed is high in self-clean and
whenever the internal components temperature
becomes high.
Safety door lock
The door latch mechanism is not only used to
lock the door in self-clean but also to lock the
door manually for safety reasons (to prevent
children from touching hot parts) during ordinary
cooking activities.
Single oven: hold both the INC (+) and LOCK
keys for 3 seconds.
The latch will lock the door. Repeat the same
operation to unlock.
The lock display will flash until locking process
complete.
Double oven: hold both the INC (+) and DEC (-)
keys for 3 seconds.
The latch will lock the door. Repeat the same
operation to unlock.
Power Failure
After the power returns to the oven, the clock
displays the time 12.00 .
AM
8
Page 11

GENERAL OVEN TIPS
Preheating the Oven
Preheat the oven when using the Bake,
Convection Bake and Convection Roast
modes.
Use fast preheat mode when a short time is
requested to preheat the oven.
Selecting a higher temperature does not
shorten the preheat time.·
Preheating is necessary for good results
when baking cakes, cookies, pastry and
breads.·
Preheating will help to sear roasts and seal in
meat juices.·
Place oven racks in their proper position
before preheating.·
During preheat, the selected cooking
temperature is always displayed.
A beep will confirm that the oven is preheated
and the preheat light will turn off.
Fast Preheat can be used when time is
crucial.
Operational Suggestions
Use the cooking charts as a guide.
Do not set pans on the open oven door.·
Use the interior oven light to view the food
through the oven door window rather than
opening the door frequently.
Utensils
Glass baking dishes absorb heat. Reduce
oven temperature 15 °C (25 °F) when baking
in glass.
Use pans that give the desired browning. The
type of finish on the pan will help determine
the amount of browning that will occur.
Shiny, smooth metal or light non-stick /
anodized pans reflect heat, resulting in lighter,
more delicate browning. Cakes and cookies
require this type of utensil.
Dark, rough or dull pans will absorb heat
resulting in a browner, crisper crust. Use this
type for pies.
For brown, crisp crusts, use dark non-stick /
anodized or dark, dull metal utensils or glass
bake ware. Insulated baking pans may
increase the length of cooking time.
Do not cook with the empty broiler pan in the
oven, as this could change cooking
performance. Store the broil pan outside of
the oven.
Oven Condensation and Temperature·
It is normal for a certain amount of moisture to
evaporate from the food during any cooking
process. The amount depends on the moisture
content of the food. The moisture may
condense on any surface cooler than the inside
of the oven, such as the control panel.
Your new oven has an electronic temperature
sensor that accurately maintains the
temperature selected. Your previous oven may
have had a mechanical thermostat that drifted
gradually over time to a higher temperature. It is
normal that you may need to adjust your
favourite recipes when cooking in a new oven.
High Altitude Baking
When cooking at high altitude, recipes and
cooking time will vary from the standard.
Oven Racks·
The oven has rack guides at four levels as
shown in the illustration on Page 4.
Rack positions are numbered from the bottom
rack guide (#1) to the top (#4).
Check cooking charts for best rack positions
to use when cooking.
Each level guide consists of paired supports
formed in the walls on each side of the oven
cavity.
Always be sure to position the oven racks
before turning on the oven. Make sure that
the racks are level once they are in position.
To remove oven rack from the oven, pull rack
forward, lift rack up at front and then remove it.
Make sure you do not force oven racks to avoid
damage to the enamel.
To replace an oven rack:
1. Place rear of rack between rack level guides.
2. While lifting front of rack, slide rack in all the
way while lowering the front.
Please refer to illustration on Page 5 if there is
any question as to which side is the front of the
rack.
The racks are designed to stop when pulled
forward to their limit.
CAUTION! Never use aluminum foil to cover
the oven racks or to line the oven. It can
cause damage to the oven liner if heat is
trapped under the foil.
9
Page 12
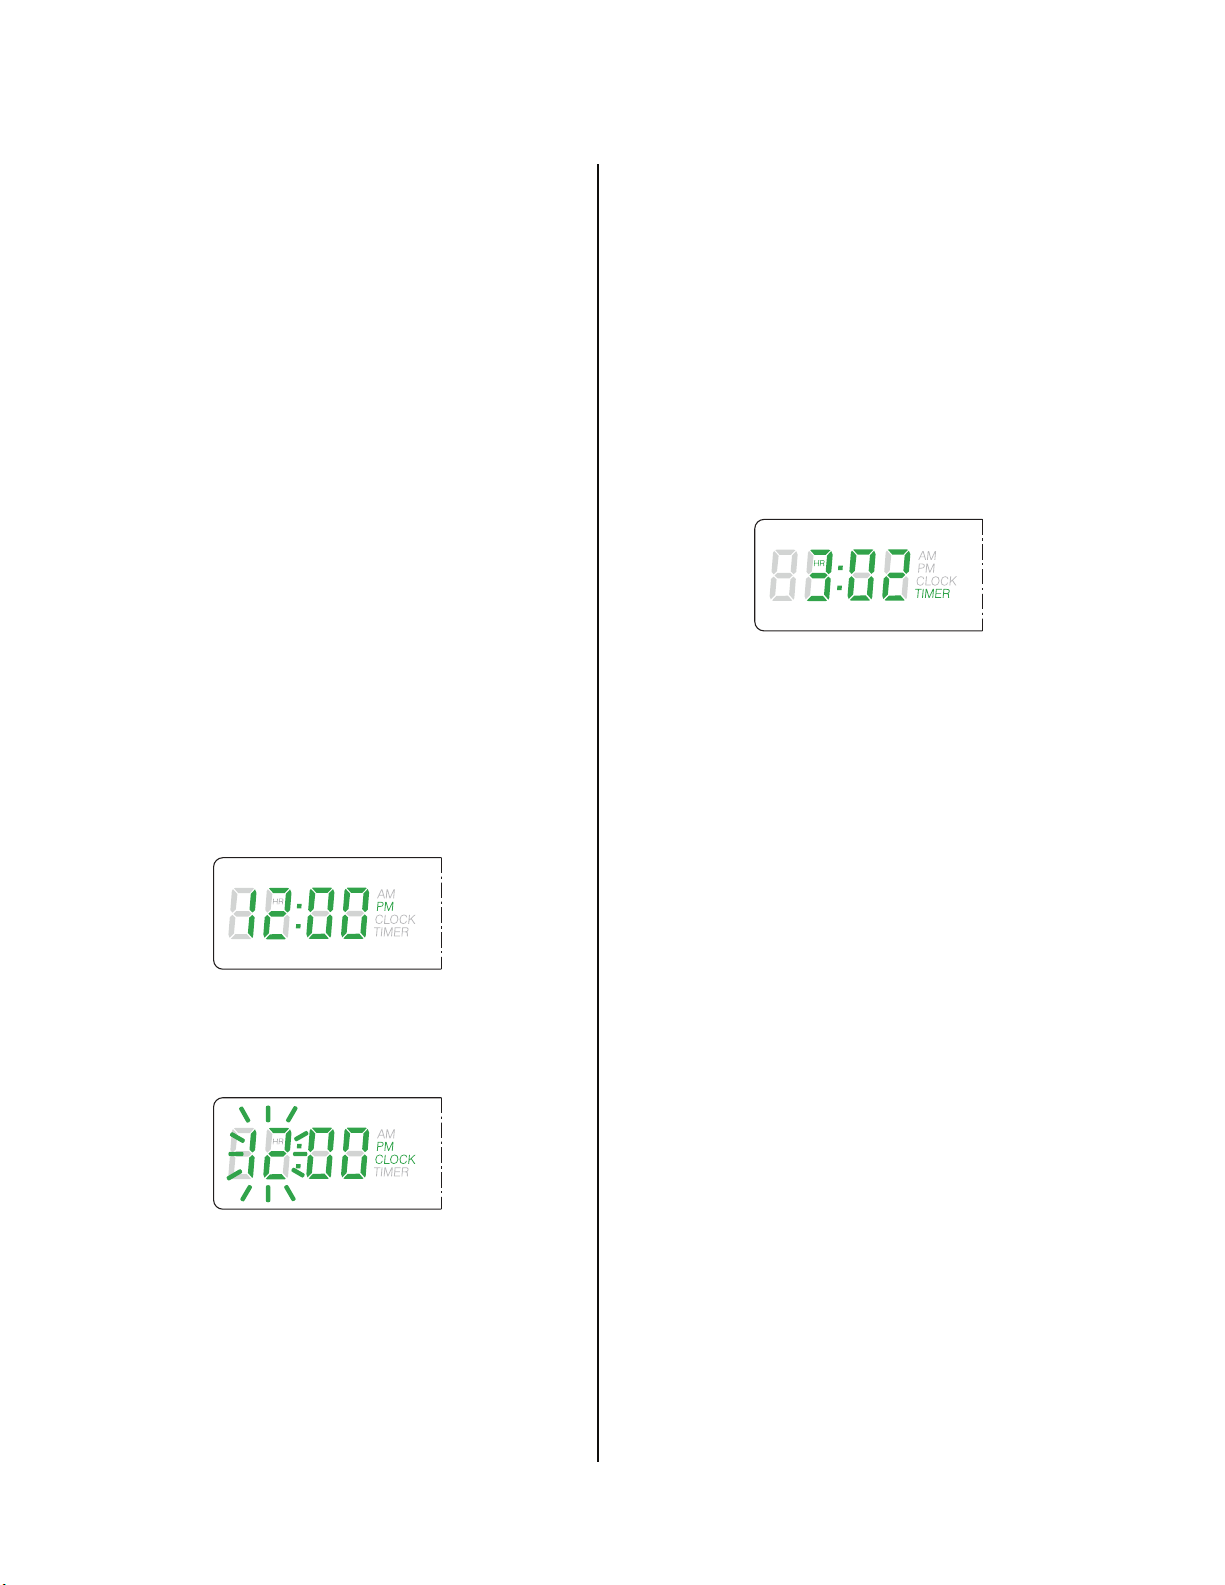
SETTING THE CLOCK AND TIMER
The time of day is displayed in hours and
minutes.
Always set the clock immediately after installation
or after a power failure. Once power returns to
the oven, the clock displays the time 12:00AM or
0:00 depending on the clock format.
The clock time will appear during all oven
operations except when the timer or a timed
cooking operation is running.
The oven is preset to a 12-hour clock and
indicates AM and PM. The clock can be changed
to 24hr mode. Refer to Page 20.
To Set the Clock
1. Press [CLOCK]. The hours will begin
flashing and the display will show the CLOCK
writing.
2. Press [+] or [-] to set the desired hour.
Continue until correct AM or PM is selected.
3. Press [CLOCK] again to confirm the hour
and minutes will start flashing.
4. Press [+] or [-] to set the desired minutes
value, hold the key to change by 10 minute
steps.
5. Press [CLOCK] again to confirm the time
or wait for 5 seconds.
5. Press [+] or [-] to set the desired minutes
value, hold the key to change by 10 minute
steps.
6. Press [TIMER] again to confirm the value or
wait for 5 seconds.
7. TIMER will start to countdown.
8. When the time ends, reminder beeps will
sound every 6 seconds for 15 minutes or until
the timer key is pressed.
9. Timer format is usually HR:MIN but it
switches to MIN:SEC during the last minute.
10. The displayed value is always rounded to the
lower minute
11. You can change the alarm audible volume.
This action can only be done at the end of a timed
function while the alarm is sounding.
Hold [+] or [-] keys until desired volume is reached.
The following appears when edit mode is active
to set or change the value.
To Set the Countdown Timer
1. Press [TIMER]. The timer and TIMER writing
will appear on the display.
2. Press [TIMER] again. The hours value will
start flashing.
3. Press [+] or [-] to set the desired hour.
4. Press [TIMER] again to confirm the hour and
minutes will start flashing.
10
Page 13

SELECTING THE OVEN MODE
To Set a Cooking Mode and Temperature
The following modes can be selected by
moving the cooking mode knob to the desired
position. To select Clean, the temperature
knob must also be moved into the appropriate
Clean position.
OFF
CONVECTION BAKE
CONVECTION GRILL
COVECTION ROAST
FAST PREHEAT
BAKE
GRILL
DEFROST
CLEAN
Select the desired temperature moving the
selector or leave it in the PRESET position if
the proposed value is fine.
The temperature can be changed by 5 °C
or 5 °F steps.·
As soon as one of the knobs is moved, the
control switches automatically to display the
value in the correspondent cavity.
The corresponding box will be displayed.
Cavity will begin to heat and oven light will
turn on.
Preheat light will turn on. When the oven has
preheated, it will beep and switch the red light
off.·
To change the temperature while cooking,
simply turn the temperature knob until the
display shows the desired value.
Press [UPPER/LOWER] to select the desired
cavity and check the related temperature or
time values, even is there’s no need to
change those.·
Move the cooking mode selector to OFF if
you intend to stop cooking.
Using Oven Lights
A single light key activates the lights in either
oven.·
If LIGHT key is touched when both ovens are
off, lights in both the upper and lower oven
will turn on.
Touch LIGHT key again, and both oven lights
will turn off.
Oven lights turn on and off automatically
when the door is opened and closed.·
When an oven is in use, oven lights turn on
automatically when a mode is started.
Oven lights will turn off automatically when
the oven mode is cancelled.
The lights do not operate in the Self-Clean
mode.
To manually control the interior oven lights in
either the upper or lower oven if one or both
ovens are in use:
1. Press UPPER/LOWER, the display will
indicate which oven is selected.
2. Press UPPER/LOWER to highlight the other
oven.
3. Press LIGHT to turn lights on or off.
11
Page 14

Page 15

MEAT PROBE
Insert the probe in its receptacle, (Figure1, Page 4)
and turn the settings knob to the desired function.
The display shows the preset meat probe
temperature on the left and the oven temperature
on the right.
Press [-] or [+] buttons to change the probe settemperature within the range from 50 °C (120 °F)
to 100 °C (215 °F). Turn the knob to set the oven
temperature, whereas 245 °C (475 °F) is the
maximum allowed.
The control sounds a beep and stops cooking as
soon as the meat temperature reaches the setpoint.
Turn the mode selector to “OFF” before re-using
the oven.
Automatic timed cooking functions are disabled
when using the probe.
The meat probe can be used with a few cooking
modes only.
The functions disabled are (CONVENTION
GRILL – GRILL – DEFROST – CLEAN).
In double ovens, the probe is available only in the
upper oven.
“F13 ERR” error message occurs when:
1. The meat probe is removed during cooking.
2. The probe is inserted when a forbidden mode
is running.
3. The meat probe is inserted and the function
is not enabled.
4. The probe sensor is shorted, broken or
internally disconnected (Call Service).
13
Page 16

BAKE TIPS AND TECHNIQUES
Baking is cooking with heated air. Both upper and
lower elements in the oven are used to heat the
air but no fan is used to circulate the heat.
Follow the recipe or convenience food directions
for baking temperature, time and rack position.
Baking time will vary with the temperature of
ingredients and the size, shape and finish of the
baking utensil.
General Guidelines
For best results, bake food on a single rack
with at least 1" - 1 ½” (2.5 – 3 cm) space
between utensils and oven walls.
Use one rack when selecting the bake mode.
Check for doneness at the minimum time.·
Use metal bake ware (with or without a non
stick finish), heatproof glass, glass-ceramic,
pottery or other utensils suitable for the oven.
When using heatproof glass, reduce
temperature by 15 °C (25 °F) from
recommended temperature.
Use baking sheets with or without sides or
jelly roll pans.
Dark metal pans or nonstick coatings will
cook faster with more browning.
Insulated bake ware will slightly lengthen the
cooking time for most foods.
For best results, bake food on a single rack
with at least 1" - 1 ½” (2.5 – 3 cm) space
between utensils and oven walls.
Do not use aluminum foil or disposable
aluminum trays to line any part of the oven.
Foil is an excellent heat insulator and heat will
be trapped beneath it.
This will alter the cooking performance and
can damage the finish of the oven.
Avoid using the opened door as a shelf to
place pans.·
Tips for Solving Baking Problems is found on
Page 27.
Bake Chart
FOOD ITEM RACK POSITION
TEMPERATURE °C (°F)
(PREHEATED OVEN)
TIME (MIN)
ekaC
91-71 )053( 571 2 sekacpuC
34-73 )053( 571 1 ekaC tdnuB
93-53 )053( 571 1 dooF legnA
eiP
55-54 )524-573( 022-091 2 "9 ,hserf ,tsurc 2
87-86 )573( 091 2 "9 ,tiurf nezorf ,tsurc 2
seikooC
11-6 )573-053( 091-571 2 raguS
31-8 )573-053( 091-571 2 pihC etalocohC
63-92 )053( 571 2 seinworB
sdaerB
22-81 )573( 091 2 5x9 ,faol daerb tsaeY
51-21 )004-573( 502-091 2 sllor tsaeY
51-11 )004-573( 502-091 2 stiucsiB
91-51 )524( 022 2 sniffuM
azziP
62-32 )054-004( 532-502 2 nezorF
51-21 )054-524( 532-022 2 hserF
14
Page 17

CONVECTION BAKE TIPS
AND TECHNIQUES
Reduce recipe baking temperatures by 15 °C
(25 °F).·
For best results, foods should be cooked
uncovered, in low-sided pans to take
advantage of the forced air circulation.
Use shiny aluminum pans for best results
unless otherwise specified.
Heatproof glass or ceramic can be used.
Reduce temperature by another 15 °C (25 °F)
when using heatproof glass dishes for a total
reduction of 30 °C (50 °F).
Dark metal pans may be used.
Note that food may brown faster when using
dark metal bake ware.
The number of racks used is determined by
the height of the food to be cooked.
Baked items, for the most part, cook
extremely well in convection.
Don’t try to convert recipes such as custards,
quiches, pumpkin pie, or cheesecakes, which
do not benefit from the convection-heating
process.
Use the regular Bake mode for these foods.
Multiple rack cooking for oven meals is done
on rack positions 1, 2 and 3.
All four racks can be used for cookies,
biscuits and appetizers.
Foods recommended for Convection Bake
mode:
Appetizers Biscuits Coffee Cakes
Cookies (2 to 4 racks) Yeast Breads
Cream Puffs
Popovers
Casseroles and One-Dish Entreés
Oven Meals (rack positions 1, 2, 3)
Air Leavened Foods (Soufflés, Meringue,
Meringue-Topped Desserts, Angel Food
Cakes, Chiffon Cakes)
– 2 Rack baking: Use positions 1 and 3.
– 3 rack baking: Use positions 2, 3 and 4.
– When baking four cake layers at the same
time, stagger pans so that one pan is not
directly above another. For best results,
place cake son front of upper rack and
back of lower rack (See graphic at right).
Allow 1" - 1 ½” (2.5 – 3 cm) air space
around pans.
Converting your own recipe can be easy.
Choose a recipe that will work well in
convection.
Reduce the temperature and cooking time if
necessary. It may take some trial and error to
achieve a perfect result. Keep track of your
technique for the next time you want to
prepare the recipe using convection.
Tips for Solving Baking Problems are found
on Page 27.
Figure 5
Quick and easy recipe tips:
Converting from standard
BAKE to CONVECTION BAKE:
Reduce the temperature by 15 °C (25 °F).
Use the same baking time as Bake mode if
under 10 to 15 minutes.
Foods with a baking time of less than 30
minutes should be checked for doneness 5
minutes earlier than in standard bake
recipes.
If food is baked for more than 40 to 45
minutes, bake time should be reduced by
25%.
15
Page 18

Convection Bake Chart
Reduce standard recipe temperature by 15 ºC
(25 °F) for Convection Bake.
Temperatures have been reduced in this chart.
This chart is a guide.
Follow recipe or package directions and reduce
temperatures appropriately.
FOOD ITEM RACK POSITION
Cake
Cupcakes 2 160 (325) 17-19
Bundt Cake 1 160 (325) 37-43
Angel Food 1 160 (325) 35-39
Pie
2 crust, fresh, 9" 2 175-205 (350-400) 45-55
2 crust, frozen fruit, 9" 2 175 (350) 68-78
Cookies
Sugar 2 160-175 (325-350) 6-11
Chocolate Chip 2 160-175 (325-350) 8-13
Brownies 2 160 (325) 29-36
Breads
Yeast bread loaf, 9x5 2 175 (350) 18-22
Yeast rolls 2 175-190 (350-375) 12-15
Biscuits 2 175-190 (350-375) 11-15
Muffins 2 205 (400) 15-19
Pizza
Frozen 2 190-220 (375-425) 23-26
Fresh 2 205-220 (400-425) 12-15
TEMPERATURE °C (°F)
(PREHEATED OVEN)
TIME (MIN)
16
Page 19

CONVECTION ROAST TIPS
AND TECHNIQUES
Preheat for Convection Roast.
Roast in a low-sided, uncovered pan.
When roasting whole chickens or turkey, tuck
wings behind back and loosely tie legs with
kitchen string.
Use the 2-piece baking pan for roasting
uncovered.
Use the probe or a meat thermometer to
determine the internal doneness on “END”
temperature (see cooking chart).
Double-check the internal temperature of
meat/poultry by inserting meat thermometer
into another position.
When roasting a large roast or turkey,
roasting pan may need to be rotated during
roasting time. This will allow for more even
cooking. Large birds may also need to be
covered with foil (and pan roasted) during a
portion of the roasting time to prevent overbrowning.
Quick and easy recipe tips:
Converting from standard
BAKE to CONVECTION ROAST:
Temperature does not have to be lowered.
Roasts, large cuts of meat and poultry
generally take 10-20% less cooking time.
Check doneness early.
Casseroles or pot roasts that are baked
covered in CONVECTION ROAST will cook
in about the same amount of time.
The minimum safe temperature for stuffing in
poultry is 75 °C (165 ºF).
After removing the item from the oven, cover
loosely with foil for 10 to 15 minutes before
carving.
While covered, roast temperatures increase
by 3° to 6 °C (5° to 10 °F).
Convection Roast Chart
MEATS
Rib Eye Roast, (boneless) 4-6 160 (325) 2 22-30 63 (145) medium rare
Rump, Eye, Tip, Sirloin (boneless) 3-6 160 (325) 2 22-28 63 (145) medium rare
Loin Roast (boneless or bone-in) 5-8 175 (350) 2 20-30 71 (160) medium
WEIGHT
(lb)
OVEN TEMP.
°C (°F)
RACK
POSITION
TIME
(min. per lb)
INTERNAL TEMP.
°C (°F)
feeB
muidem )061( 17 33-72
muidem )061( 17 33-72
muidem )061( 17 33-72
kroP
muidem )061( 17 53-52 2 )053( 571 6-3 redluohS
yrtluoP
)081( 28 12-81 2 )573( 091 4-3 elohw nekcihC
)081( 28 41-01 1 )523( 061 51-21 deffuts ton ,yekruT
)081( 28 11-9 1 )523( 061 02-61 deffuts ton ,yekruT
)081( 28 01-6 1 )523( 061 52-12 deffuts ton ,yekruT
)071( 77 02-51 1 )523( 061 8-3 tsaerB yekruT
)081( 28 latot 57-54 2 )053( 571 ½ 1-1 neH hsimoC
bmaL
muidem )061( 17 03-52 2 )523( 061 4-3 geL flaH
llew )071( 77 53-03
muidem )061( 17 03-52 1 )523( 061 8-6 geL elohW
llew )071( 77 53-03
erar muidem )541( 36 03-42 2 )523( 061 6-4 tsaoR biR
erar muidem )541( 36 52-51 2 )524( 022 3-2 tsaoR niolredneT
17
Page 20

CONVECTION GRILL TIPS
AND TECHNIQUES
Place rack in the required position needed
before turning on the oven.·
Use Convection Grill mode with the oven door
Use the 2-piece baking pan.
Turn meats once halfway through the cooking
time (see convection grill chart).
closed.·
Do not preheat oven.
Convection Grill Chart
FOOD AND THICKNESS
Beef
Steak (1-½" or more)
Medium rare 2 235 (450) 65 (145) 12-14 11-13
Medium 2 235 (450) 71 (160) 15-17 13-15
Well 2 235 (450) 77 (170) 18-20 16-17
Hamburgers (more than 1")
Medium 3 290 (550) 71 (160) 9-11 5-8
Well 3 290 (550) 77 (170) 11-13 8-10
Poultry
Chicken Quarters 3 235 (450) 82 (180) 16-18 14-16
Chicken Breasts 3 235 (450) 77 (170) 14-16 12-14
Pork
Pork Chops (1¼" or more) 2 235 (450) 71 (160) 12-14 13-15
Sausage - fresh 3 235 (450) 71 (160) 4-6 3-5
RACK
POSITION
BROIL SETTING
°C (°F)
INTERNAL
TEMP. °C (°F)
(thigh)
TIME
SIDE 1 (MIN.)*
TIME
SIDE 2 (MIN.)*
* Grill and convection grill times are approximate and may vary slightly.
18
Page 21

GRILL TIPS AND TECHNIQUES
Place rack in the required position needed
before turning on the oven.·
Use Grill mode with the oven door closed.
Do not preheat oven.
Meats may be brushed with cooking oil or
butter to prevent sticking.
Turn meats once halfway through the cooking
time (see grill chart).
Use the 2-piece baking pan.
Grill Chart
FOOD AND THICKNESS
Beef
Steak (3/4"-1")
Medium rare 3 5 63 (145) 5-7 4-6
Medium 3 5 71 (160) 6-8 5-7
Well 3 5 77 (170) 8-10 7-9
Hamburgers (3/4"-1")
Medium 3 5 71 (160) 7-9 5-7
Well 3 5 77 (170) 8-10 7-9
Poultry
Breast (bone-in) 3 3 77 (170) 14-16 14-16
Thigh (very well done) 3 3 82 (180) 28-30 13-15
Pork
Pork Chops (1") 3 5 71 (160) 7-9 5-7
Sausage - fresh 3 5 71 (160) 5-7 3-5
Ham Slice (½") 3 5 71 (160) 3-5 4-6
Seafood
Fish Filets, 1" 3 4 10-14
Buttered
Lamb
Chops (1")
Medium Rare 3 5 63 (145) 5-7 4-6
Medium 3 5 71 (160) 6-8 5-7
Well 3 5 77 (170) 8-10 7-9
Bread
Garlic Bread, 1" slices 4 5 2-2,30
Garlic Bread, 1" slices 3 5 4-6
RACK
POSITION
BROIL
SETTING
INTERNAL
TEMP. °C (°F)
Cook until
opaque & flakes
easily with fork
TIME
SIDE 1(MIN.)*
TIME
SIDE 2 (MIN.)*
Do not turn
* Grill and convection grill times are approximate and may vary slightly
19
Page 22

SPECIAL FEATURES
The Special Features function can be used to
select the following special oven features:
1. SAB => SABBATH MODE
(for religious faiths with “no work”
requirements on the Sabbath)
2. OFS => OVEN OFFSET
(used to calibrate the oven temperature)
3. dEG => °UNIT
(used to select Farenheit or Centigrade)
4. Hr => CLOCK FORMAT
(used to set the time of day format as 12
am/pm or 24 hr).
To select special features, follow the steps
below:
Touch and hold CLOCK and TIMER for at least 3
seconds.
Clock time disappears and the following display is
shown.
1. Press the [+] or the [-] key to scroll all
available options until the desired one is
found.
2. Press CLOCK key to enter the change mode.
3. The value will blink, change it by means of
[+] or [- ] keys.
In a double oven it’s possible to set a different
offset in each cavity.
Select the cavity with UPPER/LOWER key.
4. Hold the CLOCK key to confirm and go back
to the clock original screen.
20
Page 23

SPECIAL FEATURES
Sabbath Mode Instruction
Enter the user option menu holding CLOCK and
TIMER keys at the same time for 3 seconds.
Scroll the option list in the red digits field (dEG,
OFF, Hr, Sab), by pressing [+] / [-], until
Sabbath item is found.
1. Press CLOCK to enter edit mode: the
selected item switches to the green digits on
the left and its status in the red digits field
starts blinking.
2. Press again [+] / [-] keys to set Sabbath
mode ON or OFF (Default=OFF).
Press CLOCK to confirm and come back to
the option list.
Hold CLOCK key for 3 seconds to quit the
selection menu and go back to normal
operations.
The cooling fan must run in Sabbath mode.
Preheat lights are inhibited during Sabbath
mode.
The buzzer must always be silent, regardless
of any fault, end of activity, etc.
Maximum allowed cooking time must be 72
hours.
The user is allowed to stop the oven
manually, also during Sabbath, moving the
cooking mode selector to OFF position.
Oven Offset Instruction
1. Touch & hold CLOCK and TIMER for at least
3 seconds. Clock time disappears and the select
features menu is displayed.
2. Press [+] or [-] key to scroll to the OFS option.
3. Press CLOCK key to enter the change mode.
The value will blink - change it by means of
[+] or [- ] keys.
Oven temperature can be calibrated by
+/- 35ºF (+/- 20ºC) range.
4. Select the cavity with UPPER/LOWER key.
5. Hold the CLOCK key to confirm and return to
the original clock screen.
3. Once Sabbath mode is set, only BAKE and
OFF positions are available in the cooking
mode selector.
Move the selector to BAKE. Sabbath mode is
active. In a double oven, the upper/lower
cavity indications are still available.
Both boxes are on if both cavities are
working.
Oven lights status cannot be changed during
Sabbath time.
21
Page 24

CARE & CLEANING
The Kleenmaid line of ovens feature a pyrolytic selfcleaning function that eliminates the difficult and time
consuming manual scrubbing of the oven interior.
During self-cleaning the oven uses very high
temperature [approx. 470 °C (885 °F)] to burn away
soil and grease. The fumes produced during this
function of the oven are then filtered and expelled.
You will note however, that a powder ash residue will
be left on the bottom of the oven after completion of
self-cleaning. Once the oven has cooled sufficiently
the residue may be removed using a damp cloth or
sponge. See the instructions on use of the self-clean
(pyrolytic) function on page 23.
WARNING!
Make sure all controls are OFF and the oven is
cool before cleaning. Failure to do so can result
in burns or electrical shock.
For parts of the oven other than the oven cavity the
following cleaning methods are recommended:
Control Panel - Use warm soapy water or spray
glass cleaner to clean the control panel. With a
soft cloth or sponge wash, rinse and dry the
control panel thoroughly. DO NOT use abrasive
cleaners or steel wool pads. These will damage
the surface.
Stainless Steel - To clean, use a standard
cleaner designed for stainless steel. We
recommend Kleenmaid Stainless Steel Liquid
Cleaner CSSL or Kleenmaid Stainless Steel
Pump Pack Cleaner CSSPP.
Follow manufacture instructions.
DO NOT USE ABRASIVE MATERIALS SUCH
AS STEEL WOOL OR ROUGH SPONGES.
THEY WILL SCRATCH THE SURFACE.
Front of Oven Door(s) and Handle(s) - Use
warm, soapy water or spray glass cleaner to
clean the glass door surface.
With a soft cloth or sponge, rinse and dry the
door front(s) and handle(s) thoroughly.
DO NOT use abrasive cleaners or steel wool
pads. These will damage the surface.
Grill Pan and Rack(s) - Use warm soapy water.
With a steel wool pad wash, rinse and thoroughly
dry the pan and/or rack(s). DO NOT clean the
grill pans or racks by leaving them in the oven
when running the Self-Clean function.
Frame Outside Door Gasket Area - Make sure
oven is cool, then use warm soapy water. With a
non-abrasive plastic scrubbing pad, clean the
frame surface outside the door gasket area. This
area must be cleaned by hand because the area
outside the gasket does not get hot enough to
burn off the soil (see Figure 6).
Door Outside Gasket Area - Make sure oven is
cool, then use warm soapy water. With a nonabrasive, plastic scrubbing pad clean the area
outside the door gasket area. This area must be
cleaned by hand because the area outside the
gasket does not get hot enough to burn off the
soil (see Figure 6).
Hand clean frame
area outside gasket
DO NOT
hand clean gasket
Hand clean door
area outside gasket
Figure 6
SETTINGS
OFF
CONV.
CLEAN
BAKE
CONV.
DEHY.
BROIL
CONV.
BROIL
TIMERCLOCK COOK
ROAST
FAST
BAKE
PREHEAT
STOPLIGHT LOCK
TEMPERATURE
PRESET
CLEAN
LO
HI
PREHEAT
MED
Hand clean 1” (2 cm)
from rack guides
to from of oven cavity
Hand clean door
window
2
B
1
5
2
4
1
1
22
Page 25

SELF-CLEANING FUNCTION
Only one oven at a time can be set to Self-
Clean.
It is common to see smoke and/or an
occasional flame-up during the Self-Clean
cycle, depending on the content and amount
of soil remaining in the oven.
If a flame persists, turn off the oven and allow
it to cool before opening the door to wipe up
the excessive food soil.
The door latch is automatically activated after
selecting the Self-Clean cycle.
The door lock symbol will appear in the
display.
This ensures that the door cannot be opened
while the oven interior is at clean
temperatures.
The oven light does not operate during this
mode.
During Self-Clean, the kitchen should be well
ventilated to help eliminate odours associated
with Self-Clean.
Odours will lessen with use.·
Use a soapy sponge or plastic scrubber.
Hand-clean the oven door edge, oven front
frame and up to 1-½ “ (2-3 cm) inside the
frame with detergent and hot water.
Do not rub the gasket on oven. Hand clean
the oven door window.
Rinse all areas thoroughly then dry.
5. Be sure oven interior lights are turned off and
the light bulbs and lens covers are in place.
See Page 26.
Three hours is the preset length of cleaning.
The mode automatically stops at the end of
the clean hours.·
When the oven heat drops to a safe
temperature, the automatic door lock will
release and the door can be opened.
Preparing the Oven for Self-Clean
1. Remove all utensils and bakeware.
2. Remove oven racks. If oven racks are left in
the oven during the self-clean cycle, they will
permanently lose the shiny finish and change
to a dull dark finish.
See Care & Cleaning for proper care, see
page 22.
3. Wipe up any soft soil spills and grease with
paper towels.
Excess grease will cause flames and smoke
inside the oven during self-cleaning.
4. Review Figure 6 on page 22.
Some areas of the oven must be cleaned by
hand before the cycle begins.
They do not get hot enough during the
cleaning cycle for soil to burn away.
23
Page 26

SETTING THE SELF-CLEAN MODE
To Set the Self-Clean Mode
1. Press UPPER/LOWER key to select the
cavity to be cleaned, if the oven is a double.
2. Rotate both knobs into the clean position.
3. CLEAN & TIME appear.
4. The number of cleaning hours is displayed
automatically, standard cleaning time is 3
hours.
5. At the end of the programmed cleaning time,
the oven will automatically turn off.
6. To stop the cleaning mode at any moment,
move one of the two knobs from the cleaning
position.
Do not attempt to open the door while the door is
locked.
mechanism stops. Once the lock symbol stops
flashing & is displayed the door cannot be opened.
Check that the door has been locked and will
not open before starting the Self-Clean mode.
If door does not lock, rotate the cooking mode
knob into the OFF position and do not start selfclean; phone for service.
If the door is in the open position when this mode
is selected, the lock symbol will flash until the
door is closed. The latch doesn’t move.
To Change the Cleaning Time
1. To change the setting from 3 hours, select
2. To change the hours, touch the COOK key.
3. The number of hours for cleaning will flash.
4. Use [+] or [-] buttons to change the
The lock symbol will flash until the locking
either 2 hours for light soil or 4 hours for
heavy soil immediately before starting.
number of hours.
5. To change the minutes, touch the COOK
TIME key.
6. The number of minutes for cleaning will flash.
7. Use [+] or [-] buttons to change the number
of minutes. Hold the key to change by 10 minutes.
Press COOK TIME or wait a few seconds to
confirm the new value.
To Delay the Start of Cleaning
1. Follow steps 1 through 7 above.
2. Touch the STOP key and the hour to stop will
begin flashing.
3. Use the [+] or [-] buttons to change the stio hour.
4. To change the minutes, touch the STOP
TIME key.
5. The minutes to stop cleaning will flash.
6. Use [+] / [-] buttons to change the minutes.
Hold the key to change by 10 minutes.
7. Press STOP or wait a few seconds to
confirm the new value.
8. Oven door will lock and display shows
DELAY.
9. When the delay time ends, cleaning will start.
10. At the end of the programmed cleaning time,
the oven will automatically turn off.
11. END will appear on the display, CLEAN &
TIME will flash until any time key is touched
or the knob is moved to the OFF position.
TO CHECK CLEAN TIME OR STOP TIME
during a del
or STOP buttons.
ayed clean, simply press COOK
24
Page 27

DO-IT-YOURSELF MAINTENANCE OVEN DOOR REMOVAL
WARNING!
Make sure oven is cool and power to the
oven has been turned off before removing
the door.
Failure to do so could result in electrical
shock or burns.
The oven door is heavy and fragile.
Use both hands to remove the oven door.
The door front is glass.
Handle carefully to avoid breakage.
Grasp only the sides of the oven door.
Do not grasp the handle as it may swing in
your hand and cause damage or injury.
Failure to grasp the oven door firmly and
properly could result in personal injury or
product damage.
To Remove Door
1. Open the door completely.
2. Lift up the hinge bracket (1) into the slot (2).
3. Hold the door firmly on both sides using both
hands and close the door.
4. Hold firmly; the door is heavy.
5. Place the door in a convenient location.
To Replace Door
1. Insert the upper arms (3) of both hinges into
the upper slots (6) and the lower arms (4) into
the lower slots (7). The recesses (5) must
hook on the lips (8).
2. Move the hinge brackets (1) back down into
position.
3. Close and open the door slowly to assure that
it is correctly and securely in place.
Figure 7
25
Page 28

REPLACING AN OVEN LIGHT
Each oven is equipped with two halogen
lights located in the back wall of the oven.
The lights are switched on when the door is
opened or when the oven is in a cooking
cycle.
The oven lights are not illuminated during
SELF-CLEAN.
Each light assembly consists of a removable
lens, a light bulb as well as a light socket
housing that is fixed in place.
See Fgure 8.
Light bulb replacement is considered to be a
routine maintenance item.
To Replace a Light Bulb
1. Read WARNING on this page.
2. Turn off power at the main power supply (fuse
or breaker box).
3. In convection ovens, remove the fan cover by
unscrewing the four screws.
4. Remove the lens by unscrewing it.
5. Remove the light bulb from its socket by
pulling it.
6. Replace the bulb with a new one. Avoid
touching the bulb with fingers, as oils from
hands can damage the bulb when it becomes
hot.
7. The bulb is halogen 12 V - 20 W.
8. Screw the lens back on.
9. Replace the fan cover if it is provided with the
oven model.
WARNING!
Make sure the oven and lights are cool and
power to the oven has been turned off
before replacing the light bulb(s).
Failure to do so could result in electrical
shock or burns.
The lenses must be in place when using the
oven.
The lenses serve to protect the light bulb
from breaking.
The lenses are made of glass.
Handle carefully to avoid breakage.
Broken glass could cause an injury.
Turn power back on at the main power supply
(fuse or breaker box).
Figure 8
26
Page 29

SOLVING BAKING PROBLEMS
With either Bake or Convection Bake, poor
results can occur for many reasons other than a
malfunction of the oven.
Check the chart below for causes of the most
common problems.
Since the size, shape and material of baking
utensils directly affect the baking results, the best
Baking Problem Cause
Food browns unevenly
Food too brown on bottom
Food is dry or has shrunk excessively
Food is baking or roasting too slowly
Pie crusts do not brown on bottom or have
soggy crust
Cakes pale, flat and may not be done inside
Cakes high in middle with crack on top
Pie crust edges too brown
Oven not preheated
Aluminum foil on oven rack or oven bottom
Baking utensil too large for recipe
Pans touching each other or oven walls
Oven not preheated
Using glass, dull or darkened metal pans
Incorrect rack position
Pans touching each other or oven walls
Oven temperature too high
Baking time too long
Oven door opened frequently
Pan size too large
Oven temperature too low
Oven not preheated
Oven door opened frequently
Tightly sealed with aluminum foil
Pan size too small
Baking time not long enough
Using shiny steel pans
Incorrect rack position
Oven temperature is too low
Oven temperature too low
Incorrect baking time
Cake tested too soon
Oven door opened too often
Pan size may be too large
Baking temperature too high
Baking time too long
Pans touching each other or oven walls
Incorrect rack position
Pan size too small
Oven temperature too high
Edges of crust too thin
solution may be to replace old baking utensils
that have darkened and warped with age and
use.
Check the Baking Charts from page 14 to 19 for
the correct rack position and baking time.
27
Page 30

SOLVING OPERATIONAL PROBLEMS
Before calling for service, check the following to avoid unnecessary service charges.
Table 2
spetSgnivloSmelborPmelborPnevO
F03 or F04 Error appear in the
display window.
F12 Error appear in the display
window.
F13 Error appear in the display
window.
Other F__ Error appear in the
display window.
Cooling fan continues to run after
oven is turned off
Oven door is locked and will not
release, even after cooling
Oven is not heating Check the circuit breaker or fuse box to your house. Make sure there is proper electrical
Oven is not cooking evenly Check oven calibration. Adjust calibration if necessary. See To Set Temperature, Page
Oven temperature is too hot or too
cold
Oven light is not working properly Replace or reinsert the light bulb if loose or defective. See Page 26.
Oven light stays on Check for obstruction in oven door. Check to see if hinge is bent.
Cannot remove lens cover on light There may be a soil build-up around the lens cover. Wipe lens cover area with a clean
Oven will not Self-Clean properly Allow the oven to cool before running Self-Clean. Always wipe out loose soils or heavy
Clock and timer are not working
properly
Excessive moisture When using Bake mode, preheat the oven first. Convection Bake and Convection Roast
Porcelain chips When oven racks are removed and replaced, always tilt racks upward and do not force
A problem with latch mechanism occurred. Remove power and turn it back on again
after a few seconds.
The oven should run a latch auto–test. If condition persists, note the code number and
call an authorized service.
Let the oven ports cool down.
Operate correctly with the meat probe.
Remove power and turn it back on again after a few seconds. If condition persists, note
the code number and call an authorized service.
The fan turns off automatically when the oven temperature have cooled sufficiently.
Turn the oven off at the circuit breaker and wait a few seconds.
Turn breaker back on. The oven should reset itself and will be operable.
power to the oven. Make sure the oven temperature has been selected.
11. Refer to cook charts for recommended rack position. Always reduce recipe
temperature by 15 °C (25 °F) when baking with Convention Bake mode.
The oven thermostat needs adjustment.
See Calibrating Oven Temperature, Page 21.
Touching the bulb with fingers may cause the bulb to burn out.
dry towel prior to attempting to remove the lens cover.
spill-over before running Self-Clean. If oven is badly soiled, set oven for a four-hour SelfClean. See Preparing the Oven to Self-Clean, Page 23.
Make sure there is proper electrical power to the oven.
See the Clock and Timer sections on Page 10.
will eliminate any moisture in oven (this is one of the advantages of convection).
them to avoid chipping the porcelain.
If You Need Assistance or Service
If after reviewing Table 2, you decide that you do
require service for your oven, contact Kleenmaid
Service on 1300 652 100.
Do not attempt to repair the appliance yourself.
Any work performed by unauthorised personnel
may void the warranty.
You will find the model number and serial number
information on the rating plate located on the
frame, to the left of the oven opening (upper
cavity for double oven).
28
Page 31

INSTALLATION INTRODUCTION
Please read these instructions COMPLETELY
AND CAREFULLY.
They will save you time and effort and help to
ensure optimum oven performance.
Be sure to observe all WARNINGS.
These installation instructions are intended for
use by a qualified installer.
In addition to these instructions the oven must be
installed in compliance with the current Australian
Standard.
Tools You Will Need
The following tools are needed to install your new
oven:
Tape measure and straightedge or ruler
Pencil
Phillips screwdriver
Level
Wire cutters and wire stripper
1" hole saw
Hand or saber saw.
Steps For Installation
The following pages provide the necessary
information for proper installation of the oven
arranged as follows:
Technical Data
Installation Cutout Dimensions, Required
Clearances and Mounting instructions for:
- Wall Installation, Single Oven
- Wall Installation, Double Oven
Electrical Supply and Wiring Requirements
Electrical Connections for 3-Wire Circuit.
Final Checklist.
Power Requirements
The oven must be supplied with the proper
voltage and frequency. The oven is manufactured
to be connected to a three wire, single phase,
240 VAC, 50 Hz electrical supply.
The oven must be supplied with copper wires
ONLY.
A qualified electrician must perform the electrical
wiring and hook-up of your oven.
After installation is complete have the electrician
show you where the main disconnection is and
which of the circuit breakers/fuses are for the
oven.
Choosing Oven Location
Carefully select the location where the oven will
be placed.
The oven should be located for convenient use in
the kitchen, but away from strong drafts.
Strong drafts may be caused by open doors or
windows, or by heating and/or air conditioning
vents or fans.
Make sure that electrical power can be provided
to the location selected.
29
Page 32

TECHNICAL DATA
Single Oven
For cutout dimensions see following sections titled:
Preparing Location
Electrical Ratings
Single
Oven
Model
TO901X 240 50 15 3600
Maximum Nominal Connected Load
Volts Hertz
and
Amperes
@ 240 V
Watts @
240 V
Double Oven
For cutout dimensions see following sections titled:
Preparing Location
Electrical Ratings
Double
Oven
Model
TO951X 240 50 30 7200
Maximum Nominal Connected Load
Volts Hertz
and
Amperes
@ 240 V
Watts @
240 V
Table 3
30
Page 33

WALL INSTALLATION - SINGLE OVEN
.
n
i
m
5
2
55
0
min
g
n
i
t
n
h
e
g
i
p
e
o
h
5
8
5
.
n
i
m
5
opening
depth
565
579
depth
71
openin
0
g
width
5 width
74
t
h
g
i
e
h
0
9
5
NOTE : We recommend Flush Fitting : Refer to Kleenmaid Technical Specifications
Figure 9
Note:
6. Be careful when placing oven. DO NOT pinch
1. Do not slide oven across floor. Damage to
floor covering or floor could result.
2. The oven support surface must be a minimum
19 mm thick plywood platform, solid, level and
flush with the bottom of the cabinet cutout.
3. Use extreme caution when moving or
installing the oven. It is very heavy.
4. Be very careful when moving or installing the
oven to avoid damage to the oven frame or
damage to the cabinets.
Securely fasten oven to cabinet using the
screws provided. Failure to do so could result
in oven moving or tipping during use and
causing damage to the oven or cabinets or
personal injury.
5. Be sure to level oven. An oven that is not
level may provide poor or inconsistent baking
results.
Secure oven to cabinet using the screws
provided. Screws should be inserted
through the mounting holes in the
positions indicated in the frame (open
door to see frame and mounting holes).
Do not overtighten screws.
the wiring between the oven back or wall and
the inner cabinet wall or floor.
WARNING!
114223A2
31
Page 34

WALL INSTALLATION - DOUBLE OVEN
NOTE : We recommend Flush Fitting : Refer to Kleenmaid Technical Specifications
Figure 10
Note:
1. Do not slide oven across floor. Damage to
floor covering or floor could result.
2. The oven support surface must be a minimum
19 mm thick plywood platform, solid, level and
flush with the bottom of the cabinet cutout.
3. Use extreme caution when moving or
installing the oven. It is very heavy.
4. Be very careful when moving or installing the
oven to avoid damage to the oven frame or
damage to the cabinets.
5. Be sure to level oven. An oven that is not
level may provide poor or inconsistent baking
results.
6. Be careful when placing oven. DO NOT pinch
Securely fasten oven to cabinet using the
screws provided. Failure to do so could result
in oven moving or tipping during use and
causing damage to the oven or cabinets or
personal injury.
32
the wiring between the oven back or wall and
the inner cabinet wall or floor.
WARNING!
Page 35

ELECTRICAL SUPPLY
Before installing the oven have a qualified
electrician verify that your home is provided with
adequate electrical service and that the addition
of the oven will not overload the circuit on which it
is to be installed. A separate three-wire single
phase, 240 V, 50 Hz circuit is required.
WARNING!
ELECTRICAL SHOCK HAZARD
The electrical power to the oven circuit must be
shut off while line connections are being made.
Do not use an extension cord with this
appliance.
Electrical ground is required on this appliance.
The free end of the yellow/green wire (the
ground wire) must be connected to a suitable
ground. This wire must remain grounded to the
oven.
A qualified electrician must install the appliance.
The oven must be earthed in accordance with
the current Australian Standard.
The oven must be connected to the mains
through a multipole circuit breaker with a
contact-to-contact gap of a least 3 mm, marking
sure that the earth wire is not disconnected.
Failure to follow these instructions could result in
serious injury or death.
Wiring Requirements
Before making connections make sure the power
is off and read and observe the following:
A separate three-wire, single phase, 240 V,
50 Hz. circuit is required for the oven.
The oven must be connected with COPPER
WIRE ONLY.
The oven must be installed to conform with
the current Australian Standard.
Wire size (COPPER WIRE ONLY) and
connections must be suitable for the rating of
the appliance per the current Australian
Standard.
Connecting The Oven To The Mains
For connecting use a flexible rubber cable of the
H05BBF type (3x1.5 mm2 min for single oven,
3x4 mm2 min for double oven) remembering to
make it long enough to allow the oven to be
removed from its housing unit when maintenance
work is required. To connect the cable to the
oven proceed as follows (see fig. 11):
1. Remove the lid (1) by unfastening the three
screws (2). Unfasten the two screws (3) for
the cable holder and feed the cable through
the opening immediately below the cover.
2. Remove about 12 cm of the outside insulation
from the cable and shorten the two active
wires (live and neutral) to 6 cm, leaving long
the one to be connected to the main earth
terminal on the terminal block; remove about
1 cm of the main insulation from the three
wires and connect them correctly to the
terminal block, remembering to respect the
polarities.
3. Tighten the two screws (3) of the cable holder
and put the lid (1) back on with the three
screws (2).
Figure 11
33
Page 36

FINAL CHECK LIST
To prevent improper connections leading to
damage of electrical components and so voiding
the warranty, the following steps must be
performed:
1. Check the electrical requirements and make
sure you have the correct electrical supply
and that the oven is properly grounded.
2. Make sure all control knobs are in the off
position.
3. Turn on the power supply to the oven.
4. Check power at the junction box wires using a
voltmeter having a range of 0-250 VAC.
You should find that the voltage reading
between the brown and black wires should be
220 to 240 V.
5. Set the clock by following these steps:
Press [CLOCK] key.
Press [+](INC) or [-](DEC) keys to set
hours.
Press [CLOCK] key again to change
minutes.
Press [+](INC) or [-](DEC) keys to set
minutes, hold to change by ten (10)
minutes step.
Press [CLOCK] key or wait for a few
seconds.
6. Test the bake mode by following this step:
Move cooking mode knob to “BAKE”
position.
Cooling fan, oven lights, preheat led will
turn on.
A beep is sounded when the oven reaches
the preset 175 °C and the preheat light
turn off.
Move the knob back to “OFF” position to
stop cooking.
7. To check the other oven functions refer to the
previous pages.
8. If the oven is working properly turn the
selector knob(s) and the Temperature Control
knob(s) to their off positions.
LEAVE THIS MANUAL WITH THE OWNER.
Clock is now set.
34
Page 37

warranty
and service
domestic warranty - full five year warranty
In addition to all statutor y rights which you, the Consumer, have under the relevant laws in respect of this appliance,
during the first five years of ownership as the original purchaser of this Kleenmaid appliance, we guarantee that any
fault caused by faulty material or workmanship becoming apparent will be rectified free of charge for parts and labour,
provided that all service is performed during normal working hours by Kleenmaid or their designated Agents. Where
the appliance is installed outside the normal servicing area of the above, the Purchaser must pay for the cost of
transporting the appliance to and from the Agent or the Agent’s travelling cost to and from the Purchaser’s home.
commercial warranty - one year warranty
When this appliance is installed in a commercial application, you, the Consumer, have under the relevant laws in
respect of this appliance, during your first one year of ownership as the original purchaser of this Kleenmaid appliance,
we guarantee that any fault caused by faulty material or workmanship becoming apparent, will be rectified free of
charge for parts and labour, provided that all service is performed during normal working hours by Kleenmaid or their
designated Agents. Where the appliance is installed outside the normal servicing area of the above, the Purchaser
must pay for the cost of transporting the appliance to and from the Agent or the Agent’s travelling cost to and from
the Purchaser’s home.
what these warranties do not cover
We are not responsible for any damage or malfunction unless caused by a defect in material or workmanship. This
includes but is not limited to abuse, misuse, improper installation and transportation damage. We are not responsible
for any consequential damages from any malfunction.
The Consumer must make the appliance available for servicing and shall bear any costs incurred for any
de-installation and/or re-installation required to make the appliance available for servicing. Kleenmaid is not liable for
any consequential damage incurred during de-installation or reinstallation.
warranty does not cover replacement of light globes or glass breakage due
to impact
In case of fractured glass do not use your appliance.
warranty registration
Please complete warranty details below. Please retain together with your proof of purchase document. These
documents will need to be viewed by our a member of our Service team should you request in warranty service.
service assistance
To assist you when phoning our Customer Service number to arrange a service call please complete
the following details and have them ready when you call.
Model Number _____________________________________ Date of Purchase _______________________________
Kleenmaid Store Purchased From ______________________ Date of Installation ______________________________
KLEENMAID CUSTOMER SERVICE - 1300 652 100
Page 38

appliances available
in the Kleenmaid range
the best products we can find.
We search the globe for products that meet our high standards of functionality, style and quality and
are proud of our innovative range sourced from countries throughout the world.
This outstanding appliance from our professional series is proudly handed crafted in Italy.
Washing Machines
Dryers
Dishwashers
Ovens
Cooktops
Outdoor Cooking Centres
Built-In Coffee Machines
Rangehoods
Freestanding Ovens and Cooktops
Sinks
Waste Disposals
Taps
Cookware
Refrigerators
Wine Cellars
Vacuum Cleaners
To find your nearest Kleenmaid Showroom
telephone 13 13 08.
ZS1215 02/06
 Loading...