

Page 1

CookingCooking
c o l l e c t i o nc o l l e c t i o n
Instructions for Use
and
Warranty Details
TO900X - Multi Function Single Pyrolytic Oven - Stainless Steel
TO950X - Multi Function Double Pyrolytic Oven - Stainless Steel
Page 2

ongratulations on the purchase of your new
C
designed and manufactured to give you years
For best results, carefully read the instructions on
how to install your new appliance. Correct installation
will avoid delays and unnecessary service calls.
Once installation is complete, read this booklet
carefully and get to know the controls and the
We reserve the right to alter the specifications
appliance. This instruction manual cannot be
appliance. This appliance has been
of reliable performance.
features of your new appliance.
with no influence on the operation of the
reason for a claim.
Page 3

Table of Contents
Important Safety Instructions 3
Product Features 4
About Your Oven 4
Cooling Fan 4
Racks and Rack Positions 4
Baking Elements 5
Grilling Elements 5
Convection Element 5
About Convection Ovens 5
Oven Operation 6
Using Your Oven 6
Cooking Function Settings, Table 1 8
Pastry Baking Table 9
Roasting Table 10
Electronic Timer & Oven Programmer 11
Setting the Time of Day 11
Minute Minder 11
Immediate Operation/Automatic Shut-Off 11
Setting the Duration 11
Setting the Operation End Time 12
Delayed Start/Automatic/Shut-Off 12
Roast Probe 12
Pyrolytic Cleaning 13
Manual Mode 13
Cancelling or Changing Operations 13
Roast Probe Temperature Chart 14
Using the Oven Controls 15
Manual Operation of Oven 15
Care and Cleaning 16
Replacing an Oven Light 17
Oven Door Removal 18
Problem Solving Table 2 19
If You Need Assistance 20
Installation Introduction 21
Tools You Will Need 21
Power Requirements 21
Choosing Oven Location 21
Steps For Installation 21
Technical Data Table 3 22
Single Oven 22
Double Oven 22
Wall Installation 23
Single Oven 23
Double Oven 24
Electrical Supply 25
Wiring Requirements 25
3-Wire Circuit 25
Final Checklist 26
Model Warranty 27
Page 4

IMPORTANT SAFETY INSTRUCTIONS
WARNING - When using this appliance, basic safety precautions should always be followed to
reduce the risk of fire, electric shock, and/or injury to persons, including the following:
1. Read All Instructions before Using the Oven.
2. Proper Installation - Be sure your appliance is properly installed and grounded by a qualified
technician. Have the installer show you where the fuse or breaker box is located and how to turn
off the power to the oven.
3. Do Not Operate the Oven if it is Damaged or not working Properly.
4. Never Use Your Appliance for Warming or Heating the Room.
5. Do Not Leave Children Alone - Children should not be left alone or unattended in area where
the appliance is in use. They should never be allowed to sit or stand on any part of the
appliance.
6. Do Not Touch Heating Elements or Interior Surfaces of Oven - Heating elements may be hot
even though they are dark in colour. Interior surfaces of the oven, including racks become hot
enough to cause serious burns. Do not touch or let clothing or other flammable material come
into contact with the heating elements or interior surfaces or racks of the oven during or
immediately after use. Allow the oven to cool.
7. Wear Proper Apparel - Loose-fitting or hanging garments should never be worn while using the
appliance. Fabric may ignite and result in personal injury.
8. Use Only Dry Oven Gloves - Moist or damp oven gloves on hot surfaces may result in burns
from steam. Do not let oven gloves touch hot heating elements. Do not use a towel or other
bulky cloth.
9. User Servicing - Do not repair or replace any part of the appliance unless specifically
recommended in the manual. All other service should be referred to a qualified technician.
10. Storage in or on the Appliance - Flammable materials should not be stored in an oven or near
surface units.
11. Do Not Use Water on Grease Fires - Smother fire or flame or use dry chemical or foam type
extinguisher.
12. Use Care when Opening Door - Let hot air or steam escape before removing or replacing food.
13. Do Not Heat Unopened Food Containers - Build-up of pressure may cause the container to
burst and result in injury.
14. Keep Oven Vent Ducts Unobstructed.
15. Placement of Oven Racks - Always place oven racks in desired location while oven is cool. If
rack must be moved while oven is hot, do not let the oven glove contact the hot heating element
in the oven.
16. Do Not Clean the Door Gasket - The door gasket is essential for a good seal. Care should be
taken not to rub, damage, or move gasket.
17. Do Not Use Oven Cleaners - No commercial oven cleaner or oven liner protective coating of
any kind should be used in or around any part of the oven.
18. Clean Only Parts Listed in Manual
19. Before Self-Cleaning the Oven - Remove oven racks and other utensils.
20. Check Knobs are in Off Position When Finished Cooking - Always check the position of the
oven control knobs when you have finished cooking to make sure they are all in the off position.
21. Do not use aluminium to line the base of the oven. This will cause damage to the oven
enamel.
22. “CAUTION” - Do not store items of interest to children in cabinets above the oven – children
climbing on the oven to reach items could be burned or seriously injured.
23. Always Disconnect the Electrical Supply before Servicing the Oven.
24. Warning! The appliance is not intended for use by young children or infirm persons without
supervision.
3
Page 5
Product Features
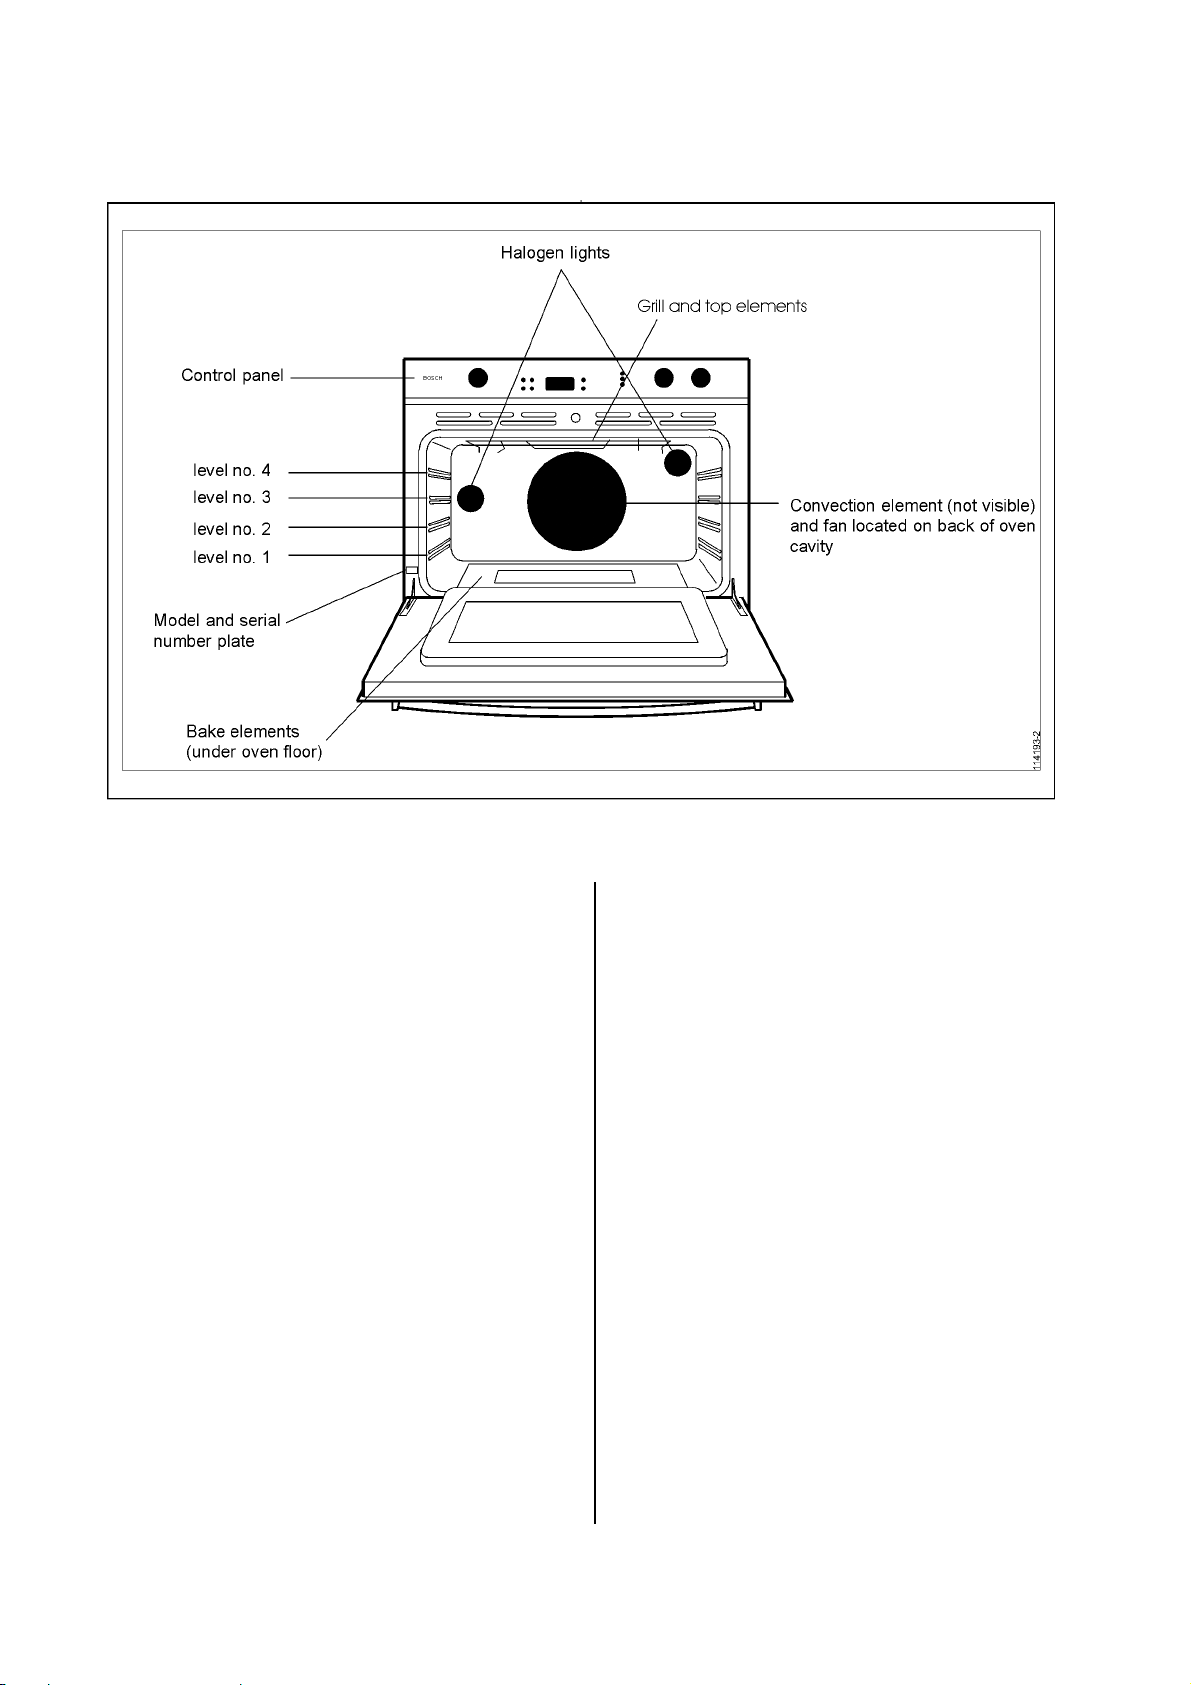
Figure 1
About Your Oven
Above you will find an illustration of a
Kleenmaid oven showing the components of
the oven.
Cooling Fan
The oven has a cooling fan to cool the control
panel.
You may hear this fan continue to run after
cooking and/or cleaning has been completed.
The fan will run as long as the oven is hot and
the oven’s function selector is turned to any
position other than “Off”. This is normal
operation.
Rack Positions
The oven has rack guides at four levels as
shown in the illustration.
Each level guide consists of paired supports
formed in the sidewalls on each side of the
oven cavity.
The rack should be positioned within the
paired supports. Each oven is provided with
the following parts and utensils.
TO900X - single oven
TO950X - both upper and lower ovens
• 2 x wire shelves
• 1 x telescopic rack
• 1 x insert grill wire rack
• 1 x baking pan
Always be sure to position the oven racks,
etc. before turning the oven on.
Make sure that the rack(s) are level once they
are in position.
To remove oven rack from the oven, lift rack
at front and lift out.
To replace oven rack:
1. Place rear of rack between the rack level
guides.
2. While lifting front of the rack, slide the rack
in all the way, then lower front. Please
refer to the illustration on the following
page if there is any question as to which
side is the front of the rack.
4
Page 6
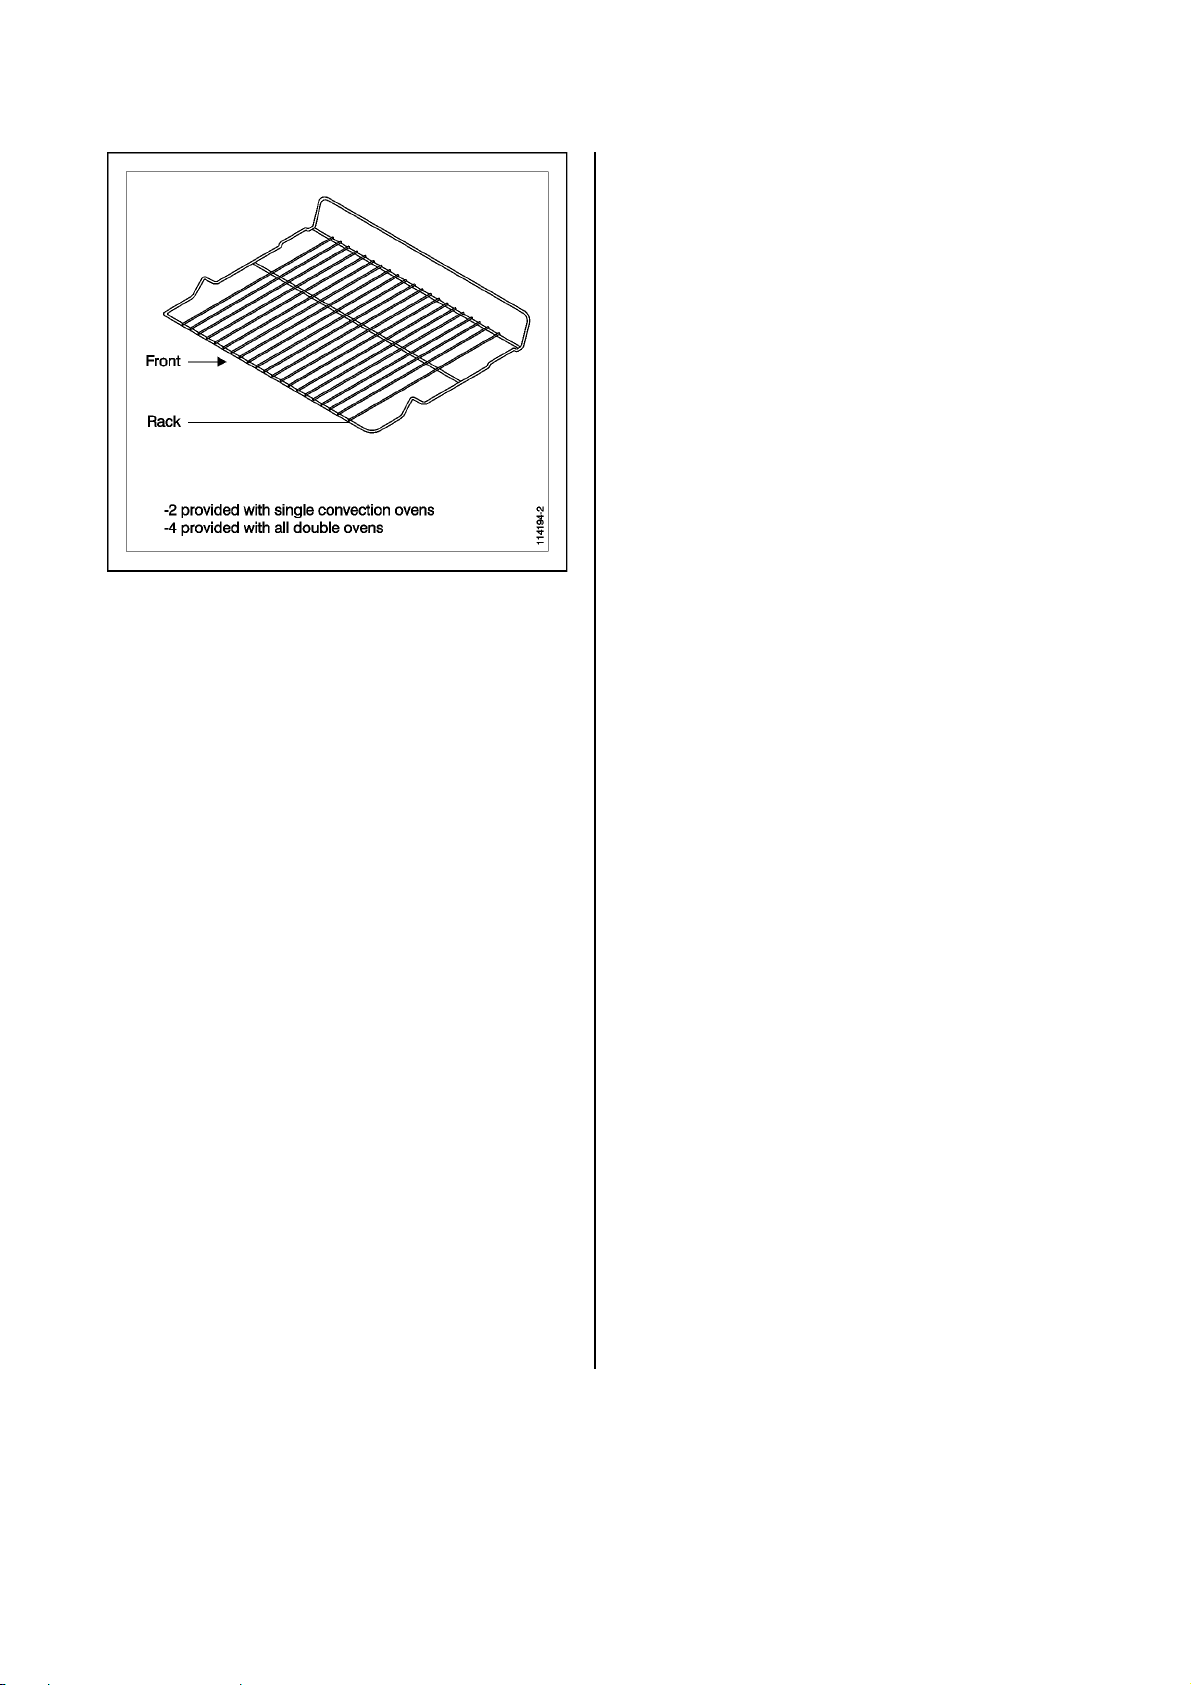
Figure 2
Baking Elements
The Kleenmaid oven uses two baking
elements: one located at the top of the oven
and the second located below the floor of the
oven cavity to provide ease in cleaning the
oven cavity.
Grilling Elements
The grilling elements of the oven are located
at the top of the oven cavity.
Do not touch the heating elements or let oven
gloves touch the grilling elements.
Never use a towel or bulky cloth for an oven
glove; they could catch on fire.
Convection Element
The convection element (not visible) and fan
are located at the back of the oven cavity.
This element and fan combination performs
the cooking when in the convection bake
mode.
When in any of the convection modes the fan
is on, see Table 1.
About Convection Ovens
Both the single oven and double oven are
convection ovens.
Although most people are familiar with the
operation of a conventional oven many are
unclear as to how a convection oven works or
in what ways it is superior to a conventional
oven.
Below you will find a brief explanation of how
a convection oven works and its advantages.
In Kleenmaid Ovens, the European
Convection system (the 3 elements, fan and
venting panel) circulates even, heated air
throughout the oven. This process:
• Seals in juices and flavour
• Provides even baking and browning
• Saves time and energy
• Baking on multiple levels at the same time
• Dehydrates herbs, fruits and vegetables
• Bakes whole meals at once with no
flavour transfer
• Defrosts evenly
Many of your own recipes have time and
temperature instruction for the regular bake
cycle. As a rule, most of these recipes can be
cooked with better results in one of the
convection cycles. In general, to convert
standard recipes for use in convection, you
reduce the temperature by about 10°C and
check if cooked at the minimum suggested
cooking time.
When baking on more than 1 rack it may be
necessary to increase the cooking time a few
minutes for each additional rack. As individual
tastes vary, you may find you need to adjust
the time and temperature to achieve desired
results.
You may feel your new oven cooks differently
than your old oven. We recommend you use
the various cooking cycles for a few months to
become more familiar with it.
We do not recommend you use oven
thermometers found at many grocery stores to
check oven temperature. They may be
inaccurate and are slow to respond to
temperature changes.
5
Page 7

Oven Operation
Using Your Oven
It is very important to learn how to properly
use your oven to obtain the best cooking
results.
Following you will find important information
for the safe and efficient use of your oven.
Before using for the First Time
Before using your Kleenmaid oven for the first
time remove all packing and foreign materials
from the oven(s). Any material of this sort left
in the oven(s) may melt and/or burn when the
oven(s) are used.
When you first use your oven, the oven will
need to ‘settle’. That is, it needs to burn off
production residues and dust. The metal used
will also expand slightly when first used. You
may experience some crackling sounds, a
strong smell and an emission of smoke. This
is perfectly normal.
The double oven control panel is the upper
panel shown in Figure 3 and the single oven
control panel is the lower panel shown.
Programmer Push-Buttons
The programmer push buttons are used to set
and program the oven. See sections
Electronic Timer and Programming the
Oven for explanation on how to use the
programmer push buttons.
Programmer Display
The programmer display performs many
functions.
When the electricity to your oven is first turned
on, the display will be blank. For information
on setting the display and its use as a timer or
for programmed cooking see sections
Electronic Timer and Programming the
Oven, following.
Timer/Manual Selector
The Timer/Manual selector knob is used to set
the oven(s) for Manual or Timer mode.
We advise you to anticipate this 'settling’ prior
to use. Using an empty oven select
Convection Roast and set at a temperature of
250°, allow the oven to ‘settle’ for ½ hour, turn
to Convection Bake and heat for a further ½
hour.
During this procedure ensure the room is
well ventilated.
Oven Control Panel
All the ovens have the following controls, as
shown in Figure 3 (Page 7) and Figure 4
(Page 9).
• Programmer push-buttons:
- Interval Time Button
- Duration Button
- Operation End Button
- Roast Probe Programmer
- Programming + / - Dial
• Programmer display
• On/Off light
• Heat light
• Door lock light
• Timer/Manual selector knob
• Temperature control knob(s)
• Mode selector knob(s)
On Light
The on light will be illuminated whenever the
oven is on.
6
Page 8
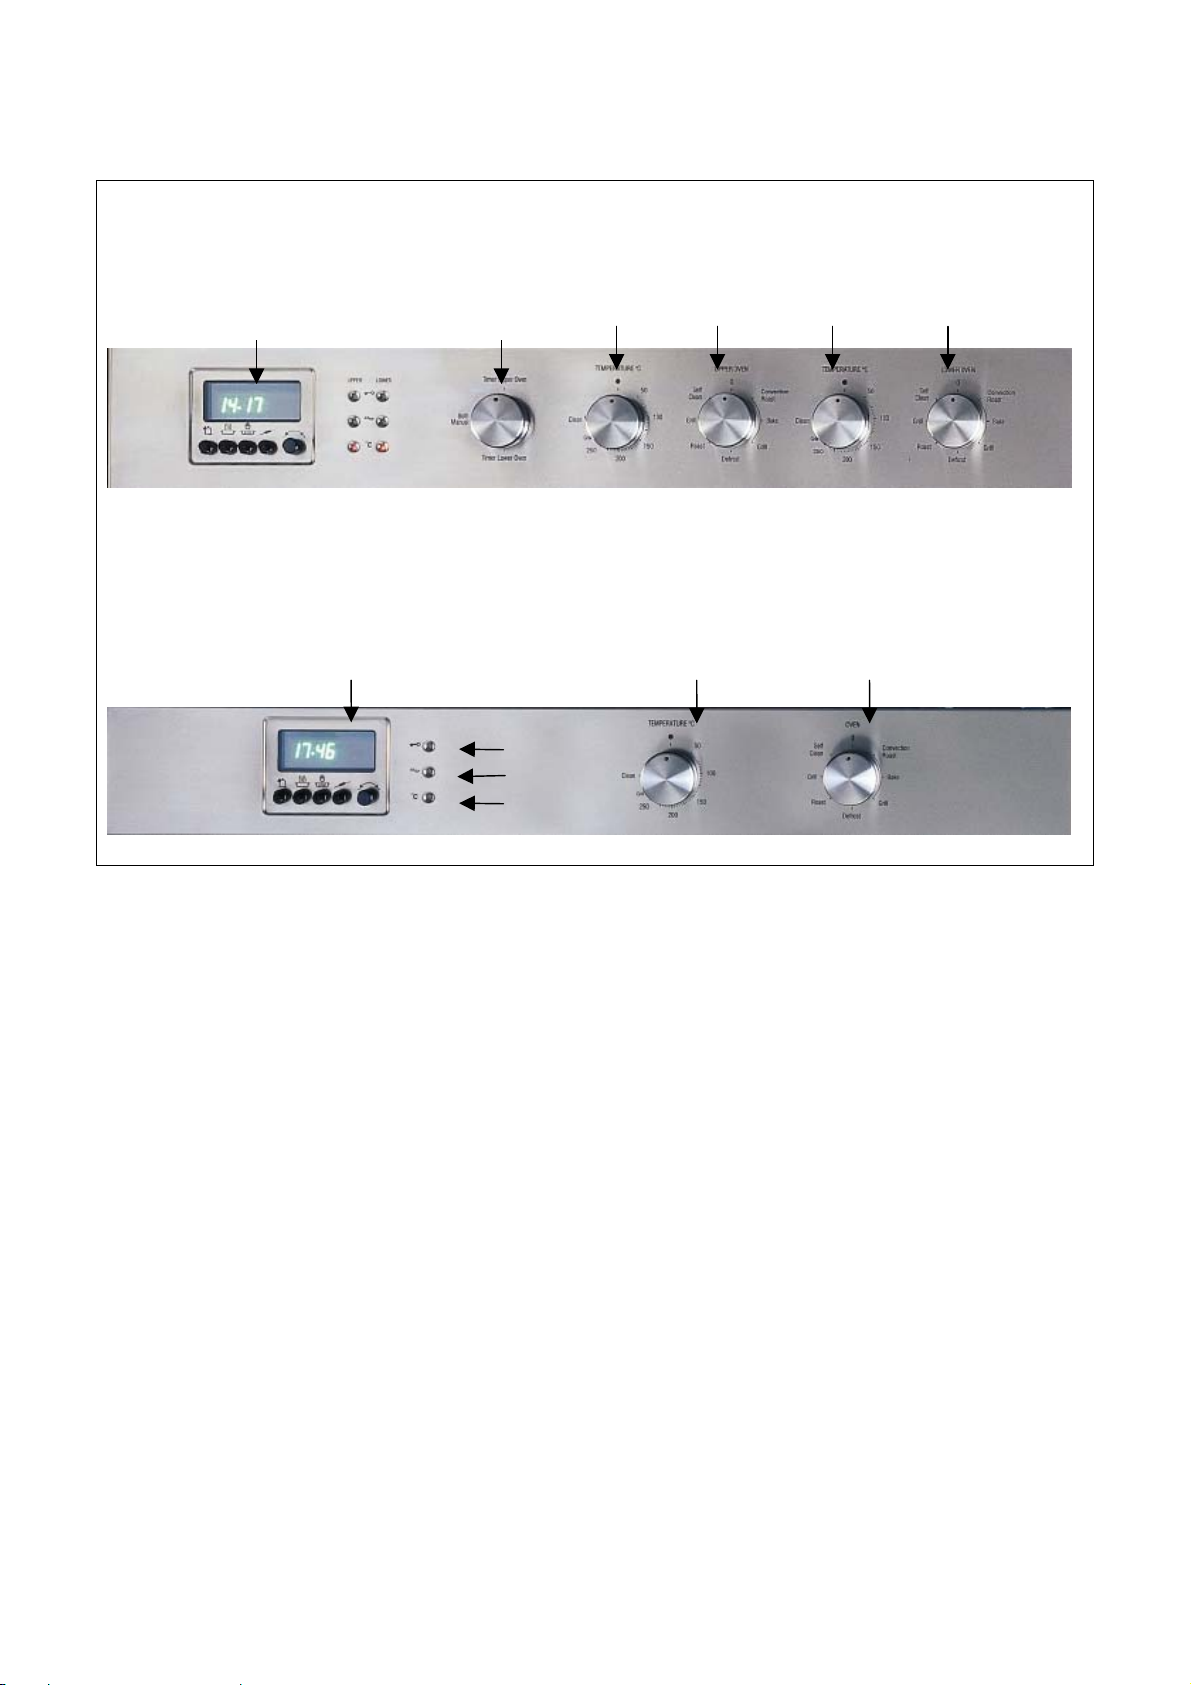
Double Oven Control Panel
Electronic
programmer
Single Oven Control Panel
Electronic
programmer
Timer
Manual
Temp Mode Temp Mode
Temp
Door Lock
On/Off
Heat Light
Figure 3
Heat Light
The heat light will be lit when you turn on your
oven. When the oven reaches the set
temperature the light will turn off to let you
know the oven is preheated. (Preheat time
should take approximately 12-15 minutes
when using 240 volts. If electrical supply is
less than 240 volts preheat times will be
longer). The light is connected to the cooking
elements and will turn off and on as the oven
cycles to maintain the set temperature.
Door Lock Light
The door lock light will be illuminated
whenever the oven is in the self-clean mode
and the door is locked.
Temperature Control Knob
The temperature control knob is marked in
Degrees Celcius (°C). This control knob is
used to adjust the oven temperature.
Mode Selector
The mode selector knob is used to set the
oven to Off, or for Self-Clean, or to select the
cooking function desired.
Please see Table 1, on Page 8 Cooking
Function Settings, for information on selecting
a cooking mode.
7
Page 9
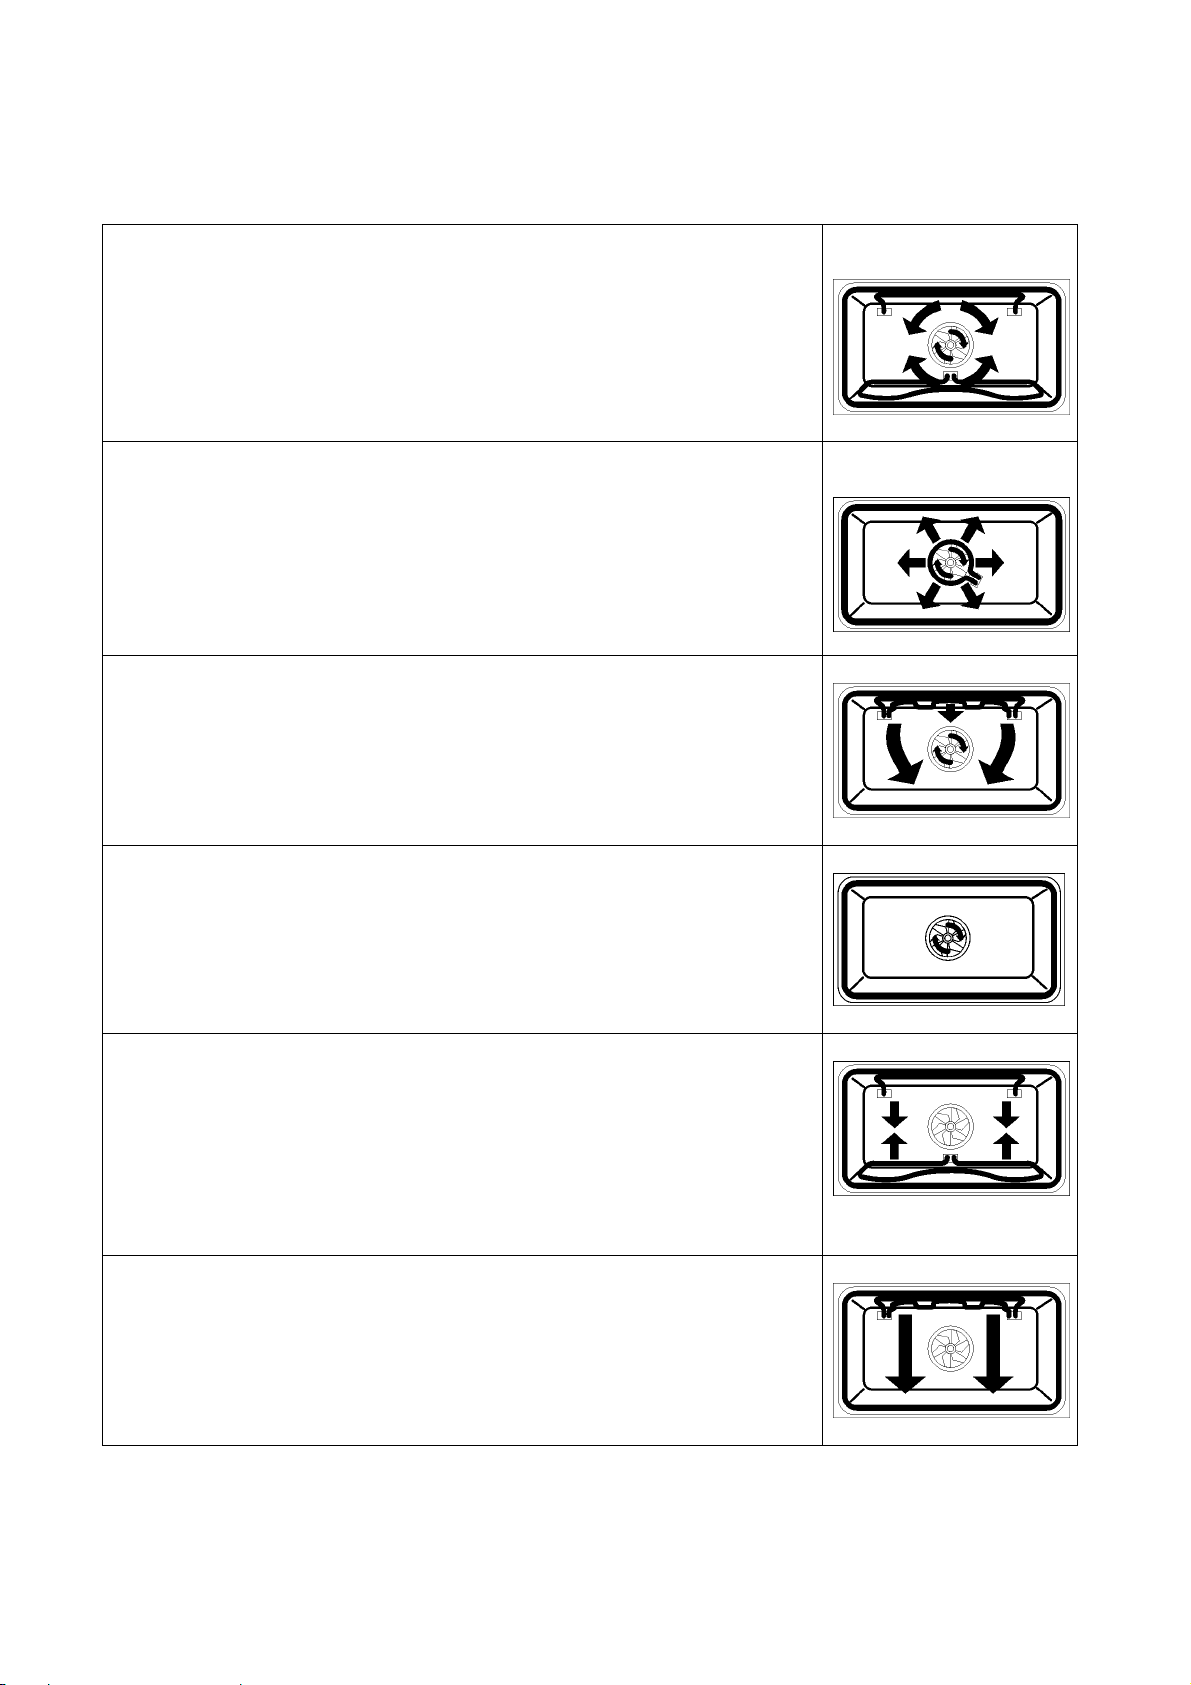
Cooking Function Settings
Convection Roast
Use for roasting. When set on Convection Roast the top element
and the bottom element operate whenever heating.
Fan operates.
Note: Lower element shown for clarity only. Lower element
actually is located below floor of cavity
Convection Bake
The most versatile mode for baking and heating a variety of
dishes. Also recommended for preparing large quantities of food
on several racks. When set on Convection the rear circular bake
element operates whenever heating. Fan operates.
Convection Grill
Use for fish and grilling thick cuts of meat. The door must be
closed when Convection Grilling. When set on Convection Grill,
top elements operate whenever heating. Fan operates.
Defrost
Use for defrosting. When set on Defrost no elements operate,
only the fan is on.
Roast
This mode is used for baking, roasting and heating of casseroles,
etc. When set on Bake the top element and the bottom element
operate whenever heating.
Note: Lower element shown for clarity only. Lower element
actually is located below floor of cavity
Grill
Used for grilling.
When set on Grill the top elements operate whenever heating.
May be used with door open or closed.
Table 1. Cooking Function Settings
8
Page 10

Pastry Baking Table
Type of pastry Guide level
(from down
upwards)
Sweet pastry
Raisin cake 2 160-170 2 150-160 55-70
Ring cake 2 160-170 2 150-160 60-70
Tree cake (tart form) 2 160-170 2 150-160 45-60
Cheese cake (tart
2 170-180 3 150-160 60-80
Temp.
(°C)
Convection
Bake
Guide level
(from down
upwards)
Temp.
(°C)
Convection
Roast
Baking
time
(in min.)
form)
Fruit cake 2 180-190 3 160-170 50-70
Fruit cake with icing 2 170-180 3 160-170 60-70
Sponge cake 2 170-180 2 150-160 30-40
Flake cake 3 180-190 3 160-170 25-35
Fruit cake, mix
3 170-180 3 150-160 50-70
dough
Cherry cake 3 180-200 3 150-160 30-50
Jelly roll 3 180-190 3 160-170 15-25
Fruit flan 3 160-170 3 150-160 25-35
Plait bun 2 180-200 3 160-170 35-50
Christmas cake 2 170-180 3 150-160 45-70
Apple pie 2 180-200 3 170-180 40-60
Puff pastry 2 170-180 3 150-160 40-60
Salted pastry
Bacon roll 2 180-190 3 170-180 45-60
Pizza 2 210-230 3 190-210 30-45
Bread 2 190-210 3 170-180 50-60
Rolls 2 200-220 3 180-190 30-40
Cookies
Caraway roll 3 170-180 3 150-160 15-25
Biscuits 3 170-180 3 150-160 20-30
Danish pastry 3 180-200 3 170-180 20-35
Flaky pastry 3 190-200 3 170-180 20-30
Cream puff 3 180-200 3 180-190 25-45
Deep frozen pastry
Apple pie, cheese
2 180-200 3 170-180 50-70
pie
Cheese cake 2 180-190 3 160-170 65-85
Pizza 2 200-220 3 170-180 20-30
Oven bake chips 2 200-220 3 170-180 20-35
Potato Wedges 2 200-220 3 170-180 20-35
9
Page 11

Roasting Table
Type of meat Weight
(in grams)
Guide level
(from bottom
up)
Temp.
(°C)
Convection
Roasting
time
(in min.)
Roast
Beef
Beef loin 1000 2 200 -220 100-120
Beef loin 1500 2 200-220 120-150
Roast beef, rare 1000 2 220-230 30-40
Roast beef, well done 1000 2 220-230 40-50
Pork
Pork roast with skin 1500 2 180-190 140-160
Flank 1500 2 190-200 120-150
Flank 2000 2 180-200 150-180
Pork loin 1500 2 200-220 120-140
Meat roll 1500 2 200-220 120-140
Pork cutlet 1500 2 180-200 100-120
Minced meat roast 1500 2 210-220 60-70
Veal
Veal roll 1500 2 180-200 90-120
Veal knuckle 1700 2 180-200 120-130
Lamb
Lamb prime ribs 1500 2 190-200 100-120
Mutton blade bone 1500 2 190-200 120-130
Venison
Hare ribs 1500 2 190-210 100-120
Hare blade bone 1500 2 190-210 100-120
Boar ham 1500 2 190-210 100-120
Poultry
Chicken, entire 1200 2 200-210 60-70
Hen 1500 2 200-210 70-90
Duck 1700 2 180-200 120-150
Goose 4000 2 160-170 180-200
Turkey 5000 2 150-160 180-240
Fish
Fish, entire 1000 2 200-210 50-60
Fish soufflé 1500 2 180-200 50-70
10
Page 12

Electronic Timer and
Programming the Oven
the timer should be switched over to
manual mode.
Minute Minder
Setting range: 0.01 . . . 99.00 (mm.ss)
Interval Time
Duration
Operation End
Roast Probe
Programming + / - Dial
Figure 4
Legend:
hh hours
mm minutes
ss seconds
Time of day
Setting range: 0.01 ... 24.00 (hh.mm)
• When power is applied, “0.00” the duration
and operation end indicators will
alternately flash in the LED display.
• Time-of-day has to be set before any
function is available.
• Press 1
The indicators will be displayed steadily.
• Simultaneously rotate the programming
+ / - dial until the actual time-of-day is
displayed (setting).
• When releasing the buttons, time-of-day
starts precisely to the second. Duration
and operation end indicators disappear,
the manual indicator flashes to show that
st
and 2nd button from left, “0.00”.
• Press Interval Time button (1
st
from left).
The time display will show “0.00“and the
indicator will illuminate.
• Rotate the Programming + / - Dial until the
desired interval time is set.
• On releasing the button, the run down of
the interval time starts precisely to the
second. The display reverts to time-of-day,
and the indicator is illuminated steadily.
• Once the interval time has elapsed, the
alarm sounds (max. 2min). The indicator
flashes.
• Press any button to stop the alarm. The
indicator will disappear.
Immediate Operation/Automatic ShutOff
Setting the Duration
Setting range: 0.01 . . . 23.59 (hh.mm)
• Press duration button (2
nd
from left). The
display shows “0.00” and duration
indicator steadily.
• Rotate the Programming + / - Dial until the
desired duration appears in the display.
• Releasing the button starts the run down
of time; time-of-day reappears. The
indicator is illuminated steadily. The
operation starts at once.
• After the preset duration has elapsed, the
alarm sounds (max. 2 min). The duration
indicator will disappear and the operation
end indicator and temperature display will
flash alternately. Stop the alarm by
pressing the operation end button (3
from left) once, press it again to switch the
oven manual mode. The indicators will
disappear.
Setting the Operation End Time
Setting range: 0.01 . . . 23.59 (hh.mm)
• Press the operation end button (3
left). Display shows “0.00“and the
operation end indicator are illuminated
steadily.
• Rotate the programming + / - dial until the
desired operation end is displayed.
11
rd
from
rd
Page 13

• Releasing the button starts the run down
of time, time-of-day reappears. The
indicator is illuminated steadily, the
operation starts at once.
• Once operation end time has been
reached, the alarm will sound (max. 2min).
The indicator and temperature display will
flash alternately. Stop the alarm by
pressing the operation end button once.
Press again to switch the oven into
manual mode. The indicator will
disappear.
Delayed Start/Automatic Shut-Off
The programmer may also be used to have
your oven start at a later time, cook for a
preset cooking period and shut itself off
automatically. This function is not
recommended for foods that contain baking
powder or yeast, as these foods will not rise
properly if cooked this way. Also, please keep
in mind that the time required for the oven to
come up to temperature must be included in
the cooking time. In most cases this means
that approximately 10 minutes should be
added to the cooking time. A preheat time is
usually not necessary for convection function,
but in all cases follow your recipe.
To use the programmer so that your cooking
will start at some later time and shut-off
automatically:
• First program duration, then operation end
time as described above.
• Releasing the operation end button starts
run down of time. If the programmed
operation end is not the actual time-of-day
plus the programmed duration. Duration
and operation end indicators are
illuminated steadily.
• When the calculated start time is reached,
the operation end indicator will disappear,
and the duration will run down.
• At the end of the cooking time the alarm
sounds (max. 2min). The operation end
indicator and the temperature display flash
alternately. Stop the alarm by pressing the
operation end button once, press again to
switch the oven into manual mode. The
indicator will disappear.
Roast Probe
Introduction: Setting range: 30°C - 99°C
The temperature display is activated on
inserting the roast probe into its socket in the
cavity. If temperatures below or above these
limits are set, this will be indicated by the limit
value being displayed steadily, whereas the
“°C” indication is flashing.
• Insert the roast probe. Temperature
display shows 60°C, the temperature
indicator flashes.
• Press roast probe button (4
°C” temperature is displayed steadily.
• Rotate programming + / - dial until the
desired food temperature between 30°C
and 99°C is displayed.
• Releasing the button starts the
temperature program. However, only the
actual temperature at the sensor is being
displayed. The pre-set temperature can be
displayed by pressing the temperature
button.
• On reaching the pre-set temperature, the
alarm sounds (max. 2min). Once the preset temperature is reached the
temperature display will flash and turn off
until a new higher temperature setting is
entered, if required.
• Unplug the meat probe. The temperature
display will disappear.
Caution:
The timer will accept only a valid
temperature setting. This means the
desired food temperature has to be higher
than the actual temperature! Invalid
settings are indicated by the flashing of the
temperature display. If this occurs, set the
temperature again to a valid value.
th
from left). “60
12
Page 14

OVEN ROAST PROBE
TYPE OF
MEAT
Beef 60 minutes per kg 170 – 200 60 - 65
Lamb 60 minutes per kg 170 – 200 65 - 75
Hogget 70 minutes per kg 170 – 200 75 - 85 Well-done
Pork 90 minutes per kg 170 - 200 80 - 85 Well-done
Veal 90 minutes per kg 170 - 200 65 - 75 Well-done
Whole
Chicken
APPROXIMATE
COOKING
TIME
90 minutes per kg 170 - 200 75 - 85 Well-done
TEMPERATURE °C
OVEN
ROAST PROBE
SET
TEMPERATURE °C
65 - 75
75 - 85
75 - 85
TENDERNESS
Rare
Medium
Well-done
Medium
Well-done
Note: These cooking times and temperatures are recommended using the Convection Roast mode.
Pork and Veal should normally be well done.
These Cooking Charts are intended as a guide only.
Temperatures and cooking times may be varied to suit individual tastes.
13
Page 15

Pyrolytic cleaning
Before using Self-Clean be sure to remove
the racks.
Note: If items are left in the oven during selfcleaning they may become damaged and
racks will become discoloured. Also, the racks
will become difficult to slide in and out.
• Clean soil from the frame around the door,
outside the door gasket (see Figure 6
Page 13). Do not clean the door gasket by
hand as this could move or damage the
gasket. The areas outside the gasket area
must be cleaned by hand because these
areas do not become hot enough during
Self-Clean to burn away the soiled spots.
• Also wipe up excess grease and other
food spills with a damp cloth. This will
minimise the amount of smoke created
during self-cleaning.
• Make sure that the oven door is
completely closed and the oven clock is
set to the correct time.
• Set the Timer/Manual Selector knob (see
Figure 3, Page 7) to Timer, for single
oven, or to Timer Upper Oven or Timer
Lower Oven, for double oven, so that
oven programmer is enabled for the oven
you wish to have self clean.
• Set the Function Selector to Self-Clean.
• Set the Temperature Control to Clean.
Setting range: P0.00 . . . P3.00 (hh.mm)
suggestion: P1.30
The time display shows the suggestion and
the operation period indicator steadily.
• Press operation period button (2
left) and rotate the programming + / - dial
to vary the cleaning period.
• The pyrolytic cleaning function can also be
used in the delay mode, see Delayed
Start/Automatic Shut-Off.
When changing the position of the oven
selector switch the time switch reverts to the
normal mode.
• As the oven heats past 290°C the
automatic door lock will operate to lock the
door of the oven that is in Self-Clean. The
Door Lock indicator light will become
illuminated to show that the door is locked.
Using the Oven Controls
nd
from
The door will remain locked and the
indicator light will remain on throughout
the self-cleaning process until the
temperature drops below the 290°C
temperature noted above.
• After the cleaning period has elapsed,
there is no alarm. The display will flash
“P0.00”, the duration indicator will
disappear and the oven will automatically
shut-off. Allow the oven to cool.
• Open the door. Then after making sure
that the oven has cooled to a safe
temperature, use a damp cloth or sponge
to clean out the powder ash residue left in
the oven. If white spots remain in the oven
they can be removed with a damp sponge.
These white spots are normally just salt
spots that cannot be removed by selfcleaning.
• Reinstall the oven racks and accessories.
Be sure to turn the selector knob and the
temperature knob to the Off position after the
electronic controlled self-cleaning has been
completed.
Manual mode
Pressing the operation end button will stop the
alarm. By pressing it again the time switch
goes into manual mode and the operation end
indicator will disappear.
Changing / Cancelling set programs
Changing
Set programs can be changed at any time by
pressing the corresponding button and
rotating the programming + / - dial.
Time-of-day cannot be changed when an
automatic program has been set.
Cancelling
Cancelling set programs is done by changing
to “0.00“.
Cancelling the duration will automatically
cancel an operation end and vice versa.
Cancelling a temperature program is done by
setting the oven selector switch to “off“.
The pyrolytic cleaning program is cancelled by
changing the position of the oven selector
switch.
14
Page 16

Figure 5. Double Oven Control Panel – TO950X
A
f
The oven controls can also be used to
operate the oven manually.
Manual Operation of the Oven
Before turning on your oven, position the
racks properly for their intended use. To
change the position of the racks, lift the rack
at the front and pullout and re-insert at the
desired level.
For manual operation of the oven set the
Timer/Manual Selector knob (see Figure 3) to
Manual. If you have a double oven, as shown
above (Figure 5) you have three setting
positions available:
• Timer Upper Oven - when on this setting
the programmer must be used to control
the upper oven while the lower oven may
be operated manually
• Both Manual - when on this setting both
ovens may be used manually.
• Timer Lower Oven - when on this setting
the programmer must be used to control
the lower oven while the upper oven may
be operated manually.
Once you have set the mode selector to
Manual or, if you have a double oven, decided
which oven you are going to use:
• Set Mode selector knob for the oven to the
cooking mode desired. Refer to Figure 3
and Table 1 if you are not sure which of
the knobs on your oven is the selector
knob or which function you wish the oven
to perform.
Note: The cooling fan will begin to run as
soon as the function selector knob is
turned from the Off position.
• Set the temperature control knob for the
oven to the temperature desired.
Note: If you have a convection oven and
have selected DEFROST it is not
necessary to set the temperature control
knob as no heating takes place in
DEFROST mode.
Once cooking has been completed be sure to
turn the selector knob and the temperature
knob to the Off position
WARNING!
When using delayed cooking, special
consideration must be given to avoid
potential sickness and spoiling of food:
1.
void using foods that will spoil while
placed in the oven waiting for cooking to
begin. In particular avoid using foods
containing eggs and dairy products in
delayed cooking. In addition unfrozen
cooked or uncooked meats, poultry and
fish should not be placed in the oven i
they will be there for more than two
hours.
2. Do not allow food to remain in the oven
more than one hour after the end of the
cooking cycle.
15
Page 17

Care & Cleaning
The Kleenmaid line of ovens feature a
pyrolytic self-cleaning function that eliminates
the difficult and time consuming manual
scrubbing of the oven interior.
During self-cleaning the oven uses very high
temperature (approx. 450°C) to burn away soil
and grease. The fumes produced during this
function of the oven are then filtered and
expelled.
You will note however, that a powder ash
residue will be left on the bottom of the oven
after completion of self-cleaning. Once the
oven has cooled sufficiently the residue may
be removed using a damp cloth or sponge.
See the instructions on use of the self-clean
(pyrolytic) function on Page 11.
WARNING!
Make sure all controls are Off and the
oven is cool before cleaning. Failure to
do so can result in burns or electrical
shock.
For parts of the oven other than the oven
cavity the following cleaning methods are
recommended:
• Control Panel
Use warm soapy water or spray glass
cleaner to clean the control panel. With a
soft cloth or sponge wash, rinse and dry
the control panel thoroughly. DO NOT use
abrasive cleaners or steel wool pads.
These will damage the surface.
• Front of Oven Door(s) and Handle(s)
Use warm, soapy water or spray glass
cleaner to clean the glass door surface.
With a soft cloth or sponge, rinse and dry
the door front(s) and handle(s) thoroughly.
DO NOT use abrasive cleaners or steel
wool pads. These will damage the surface.
• Grill Pan and Rack(s)
Use warm soapy water. With a steel wool
pad wash, rinse and thoroughly dry the
pan and/or rack(s). DO NOT clean the grill
pans or racks by leaving them in the oven
when running the Self-Clean function.
• Door & Frame Outside Door Gasket Area
Make sure oven is cool. Use warm soapy
water. With a non-abrasive plastic
scrubbing pad, clean the frame surface &
area outside the door gasket. This area
must be cleaned by hand because the
area outside the gasket does not get hot
enough to burn off the soil (see Figure 6).
• Do not rub or clean the door gasket.
The material of the gasket has an
extremely low resistance to abrasion. An
intact and well fitting oven door gasket is
essential for energy efficient oven
operation and good baking results. If you
notice the gasket becoming worn, frayed
or damaged you should have it replaced.
• Stainless Steel
To clean, use a standard cleaner
designed for stainless steel. We
recommend Kleenmaid Stainless Steel
Liquid Cleaner CSSL or Kleenmaid
Stainless Steel Pump Pack Cleaner
CSSPP. Follow manufacture instructions.
DO NOT USE ABRASIVE MATERIALS
SUCH AS STEEL WOOL OR ROUGH
SPONGES. THEY WILL SCRATCH THE
SURFACE.
Figure 6.
16
Page 18

Replacing an Oven Light
Each oven is equipped with two halogen lights
located in the back wall of the oven. The lights
are switched on when the door is opened or
when the oven is in a cooking cycle. The oven
lights are not illuminated during SELFCLEAN. Each light assembly consists of a
removable lens, a light bulb as well as a light
socket housing that is fixed in place, see
Figure 7. Light bulb replacement is considered
to be a routine maintenance item.
To replace a light bulb:
1. Read WARNING on this page.
2. Turn off power at the main power supply
(your fuse or breaker box).
WARNING!
Make sure the oven and lights are cool
and power to the oven has been turned
off before replacing the light bulb(s).
Failure to do so could result in electrical
shock or burns.
The lenses must be in place when using
3. In Multifunction ovens remove the fan
cover by unscrewing the four screws.
4. Remove the lens by unscrewing it.
5. Remove the light bulb from its socket by
pulling it.
6. Replace the bulb with a new one taking
care not to touch it with naked fingers.
Their grease can damage the bulb when it
becomes hot.
The bulb is halogen 12V-20W.
7. Screw the lens back on.
8. Replace the fan cover if the cavity is
provided with.
9. Turn the power back on at the main power
supply (your fuse or breaker box).
Figure 7.
17
Page 19

Oven Door Removal
The oven door can be removed for hand
cleaning if needed.
WARNING!
Make sure oven is cool and power to the
oven has been turned off before removing
the door.
Failure to do so could result in electrical
shock or burns.
The oven door is heavy and fragile. Use
both hands to remove the oven door. The
door front is glass. Handle carefully to
avoid breakage.
Broken glass could cause an injury.
Grasp only the sides of the oven door. Do
not grasp the handle as it may swing in
your hand and cause damage or injury.
Failure to grasp the oven door firmly and
properly could result in personal injury or
product damage.
After cleaning the door it can be replaced by
reversing the above procedure.
Be sure to slide the door straight into the
slots, as shown in Figure 9.
After moving the hinge brackets back down
into position, be sure to close and open the
door slowly to assure that it is correctly and
securely in place.
Figure 9.
To remove the door
1. Be sure to read the above WARNING
before attempting to remove oven door.
2. Open the door completely.
3. Lift up the hinge bracket on each hinge as
shown in Figure 8.
Figure 16.
4. Hold the door firmly on both sides using
both hands and pull the door straight out
of the hinge slots pressing it in the
direction of closing. Hold firmly; the door is
heavy.
5. Place the door in a convenient location for
cleaning.
Service and Repair
The Kleenmaid oven(s) require no special
care other than the care and cleaning noted
above.
If service becomes necessary, contact your
dealer or installer or the Kleenmaid
Authorised Service Contractor in your area.
Do not attempt to repair the appliance
yourself.
Any work performed by unauthorised
personnel may void the warranty.
If your appliance should fail to operate, before
calling for service please review Table 2 on
the following page titled “Problem Solving”.
You could save the cost of a service call.
18
Page 20

Problem Solving
Ovens may exhibit problems that are unrelated to a malfunction of the oven itself. Service calls for
such items, not covered by warranty, must be paid for by you. The following may serve to answer
your questions about a problem you are having.
PROBLEM POSSIBLE CAUSE SUGGESTION(S)
works
The oven
will not heat
Clock
displays
incorrect
time of day
Cooking
results are
not what
was
expected
not open
Oven
light(s) will
not work
.
A household fuse may have blown
or circuit
Power supply connections are
loose.
The Function Selector is in Off
position
The Temperature knob of the oven
is not turned up to a temperature.
Time of day not properly set. See section of this manual headed Setting
The oven is not levelled. Level oven. See Installation Instructions.
Oven temperature calibration
differs from your previous oven.
The oven was not preheated
before baking.
Incorrect cooking time, temperature
or rack position being used.
The recipe has not been tested or
is not from a reliable source.
The pan is not the correct type or
size.
Browning or baking results are not
like they used to be in the former
oven.
Oven is in SELF-CLEAN and the
oven temperature is above 290°C.
Oven has finished SELF-CLEAN
but oven temperature is still above
290°C.
Light bulb is burned out. Replace bulb as described in this manual in
Oven is operating in SELF-CLEAN. Lights do not come on in SELF-CLEAN.
Replace fuse or reset circuit breaker.Nothing
Have qualified electrician check
connections.
Turn the function selector to a cooking
function.
Set the Temperature knob to temperature
desired
Electronic Timer and Programming the
Oven on page 9.
The calibration of your old oven may have
drifted gradually over time, while your new
oven is more exact. Adjust oven
temperature settings as needed.
Preheat oven when recipe calls for
preheated oven.
Use only tested recipes from a reliable
source.
Refer to a reliable cookbook or recipe for
recommended pan size.
Change temperature settings in convection
bake as described on page 5 of this manual
and increase baking time accordingly.
Wait for oven to finish and cool down.Door will
Wait for oven to cool.
section titled Replacing an Oven Light.
Table 2.
19
Page 21

If You Need Assistance or Service
If after reviewing Table 2 you decide that you
do require service for your oven contact your
nearest Kleenmaid Store on 13 13 08 or
Authorised Kleenmaid Service Agent in your
area on 1300 652 100.
Do not attempt to repair the appliance
yourself. Any work performed by unauthorised
personnel may void the warranty.
You will find the model number and serial
number information on the rating plate located
on the frame, to the left of the oven opening,
as shown in Figure 10.
Figure 10.
20
Page 22

INSTALLATION INTRODUCTION
Please read these instructions COMPLETELY
AND CAREFULLY. They will save you time
and effort and help to ensure optimum oven
performance. Be sure to observe all
WARNINGS.
These installation instructions are intended for
use by a qualified installer. In addition to these
instructions the oven must be installed in
compliance with the current Australian
Standard.
TOOLS YOU WILL NEED
The following tools are needed to install your
new oven:
CHOOSING OVEN LOCATION
Carefully select the location where the oven
will be placed.
The oven should be located for convenient
use in the kitchen, but away from strong
drafts.
Strong drafts may be caused by open doors
or windows, or by heating and/or air
conditioning vents or fans.
Make sure that electrical power can be
provided to the location selected.
STEPS FOR INSTALLATION
The following pages provide the necessary
information for proper installation of the oven
arranged as follows:
• Tape measure and straightedge or ruler
• Pencil
• Phillips screwdriver
• Level
• Wire cutters and wire stripper
• 1" hole saw
• Hand or saber saw.
POWER REQUIREMENTS
The oven must be supplied with the proper
voltage and frequency. The oven is
manufactured to be connected to a three wire,
single phase, 240 volt, 50 Hz AC electrical
supply on a separate circuit.
A circuit breaker or time-delay fuse sized not
to exceed the circuit rating of the appliance
specified on the rating plate located on the
frame behind the door of the oven is
recommended.
The oven must be supplied with copper wires
ONLY.
A qualified electrician must perform the
electrical wiring and hook-up of your oven.
• Technical Data
• Installation Cutout Dimensions, Required
Clearances and Mounting instructions for:
- Wall Installation, Single Oven
- Wall Installation, Double Oven
• Electrical Supply and Wiring
Requirements
• Electrical Connections for 3-Wire Circuit.
• Final Checklist.
After installation is complete have the
electrician show you where the main
disconnection is and which of the circuit
breakers/fuses are for the oven.
21
Page 23

TECHNICAL DATA
SINGLE OVEN
For cutout dimensions see following section.
and Maximum Connected Load
Electrical Ratings
Single Oven
Volts
Model
TO900X 240 50 14 3300
DOUBLE OVEN
For cutout dimensions see following section.
And Maximum Connected Load
Double Oven
Volts
Model
TO950X 240 50 28 6600
Hertz Amperes
@ 240v
Electrical Ratings
Hertz Amperes
@ 240v
Watts
@ 240v
Watts
@ 240v
Table 3
22
Page 24

WALL INSTALLATION, SINGLE OVEN
Securely fasten oven to cabinet using the screws
provided. Failure to do so could result in oven moving
or tipping during use and causing damage to the oven
or cabinets or personal injury. Screws should be
inserted through the mounting holes in positions
indicated in frame (open door to see frame and
mounting holes). Do not overtighten screws
Figure 11
Note:
1. Do not slide oven across floor. Damage to
floor covering or floor could result.
2. The oven support surface must be a
minimum 19mm thick plywood platform,
solid, level and flush with the bottom of the
cabinet cutout.
3. Use extreme caution when moving or
installing the oven. It is very heavy.
4. Be very careful when moving or installing
the oven to avoid damage to the oven
frame or damage to the cabinets.
5. Be sure to level oven. An oven that is not
level may provide poor or inconsistent
baking results.
6. Be careful when placing oven. DO NOT
pinch the wiring between the oven back or
wall and the inner cabinet wall or floor.
23
Page 25

WALL INSTALLATION, DOUBLE OVEN
Figure 12
Note:
1. Do not slide oven across floor. Damage to
floor covering or floor could result.
2. The oven support surface must be a
minimum 19mm thick plywood platform,
solid, level and flush with the bottom of the
cabinet cutout.
3. Use extreme caution when moving or
installing the oven. It is very heavy.
4. Be very careful when moving or installing
the oven to avoid damage to the oven
frame or damage to the cabinets.
5. Be sure to level oven. An oven that is not
level may provide poor or inconsistent
baking results.
6. Be careful when placing oven. DO NOT
pinch the wiring between the oven back or
wall and the inner cabinet wall or floor.
WARNING!
Securely fasten oven to cabinet using the screws
provided. Failure to do so could result in oven
moving or tipping during use and causing damage
to the oven or cabinets or personal injury. Screws
should be inserted through the mounting holes in
positions indicated in frame (open door to see frame
and mounting holes). Do not overtighten screws.
WARNIN
24
Page 26

ELECTRICAL SUPPLY
Before installing the oven have a qualified
electrician verify that your home is provided
with adequate electrical service and that the
addition of the oven will not overload the
circuit on which it is to be installed. A separate
three-wire single phase, 240 Volt, 50 Hz
circuit is required.
WARNING!
ELECTRICAL SHOCK
HAZARD
• The electrical power to the oven
circuit must be shut off while line
connections are being made.
• Do not use an extension cord with
this appliance.
WIRING REQUIREMENTS
Before making connections make sure the
power is off and read and observe the
following:
• A separate three-wire, single phase, 240
Volt, 50 Hz. circuit is required for the oven.
• The oven must be connected with
COPPER WIRE ONLY.
• The oven must be installed to conform
with the current Australian Standard.
• Wire size (COPPER WIRE ONLY) and
connections must be suitable for the rating
of the appliance per the current Australian
Standard.
• The supply cable must be protected from
mechanical damage from the point of
entry into the oven cavity to where it
connection to the terminal block on the
oven and in accordance with the current
Australian Standard.
• Electrical ground is required on this
appliance. The free end of the green
wire (the ground wire) must be
connected to a suitable ground. This
wire must remain grounded to the
oven.
• A qualified electrician must install the
appliance.
• The oven must be earthed in
accordance with the current
Australian Standard.
Failure to follow these instructions could
result in serious injury or death.
25
Figure 13
Page 27

FINAL CHECK LIST
To prevent improper connections leading to
damage of electrical components and so
voiding the warranty, the following steps must
be performed:
1. Check the electrical requirements and
make sure you have the correct electrical
supply and that the oven is properly
grounded.
2. Make sure all control knobs are in the off
position.
3. Turn on the power supply to the oven.
When the oven is first turned on, the
display will come on showing all the callouts and then will become blank with the
Set Clock symbol in the upper right corner,
as shown below.
6. Turn the Mode Selector knob to Manual
position, the Selector knob to Bake and
turn the Temperature knob to 180°C. The
cooling fan, the oven lights and the heat
light should come on to indicate that the
oven is heating. The heat light will turn off
when the set temperature (180°C) is
reached. Turn Temperature knob to off. If
you have installed a double oven repeat
test for second oven.
7. To check the other oven functions refer to
the Using the Oven Controls section on
Page 12.
8. If the oven is working properly turn the
selector knob(s) and the Temperature
Control knob(s) to their off positions and
turn off the power supply to the oven.
9. Place the cover over the terminal block on
the oven and make sure the cover is
securely fastened and turn on the power
to the oven.
Figure 14
4. Check power at the junction box wires
using a voltmeter having a range of 0-250
VAC. If you have installed the oven for use
on 240-volt supply you should find that the
voltage reading between the brown and
black wires (Line to Line) should be 220 to
240 volts.
5. To set the time of day refer to Page 9
Manual for instructions on how to set the
electronic programmer.
26
Page 28

WARRANTY AND SERVICE
DOMESTIC WARRANTY - FULL FIVE YEAR WARRANTY
In addition to all statutory rights which you, the Consumer, have under the relevant laws in respect
of this appliance, during the first five years of ownership as the original purchaser of this Kleenmaid
appliance, we guarantee that any fault caused by faulty material or workmanship becoming
apparent will be rectified free of charge for parts and labour, provided that all service is performed
during normal working hours by Kleenmaid or their designated Agents. Where the appliance is
installed outside the normal servicing area of the above, the Purchaser must pay for the cost of
transporting the appliance to and from the Agent or the Agent’s travelling cost to and from the
Purchaser’s home.
COMMERCIAL WARRANTY - ONE YEAR WARRANTY
When this appliance is installed in a commercial application, you, the Consumer, have under the
relevant laws in respect of this appliance, during your first one year of ownership as the original
purchaser of this Kleenmaid appliance, we guarantee that any fault caused by faulty material or
workmanship becoming apparent, will be rectified free of charge for parts and labour, provided that
all service is performed during normal working hours by Kleenmaid or their designated Agents.
Where the appliance is installed outside the normal servicing area of the above, the Purchaser must
pay for the cost of transporting the appliance to and from the Agent or the Agent’s travelling cost to
and from the Purchaser’s home.
WHAT THESE WARRANTIES DO NOT COVER
We are not responsible for any damage or malfunction unless caused by a defect in material or
workmanship. This includes but is not limited to abuse, misuse, improper installation and
transportation damage. We are not responsible for any consequential damages from any
malfunction.
The Consumer must make the appliance available for servicing and shall bear any costs incurred for
any de-installation and/or re-installation required to make the appliance available for servicing.
Kleenmaid is not liable for any consequential damage incurred during de-installation or reinstallation.
WARRANTY DOES NOT COVER REPLACEMENT OF LIGHT
GLOBES OR GLASS BREAKAGE DUE TO IMPACT
In case of fractured glass do not use your appliance.
WARRANTY REGISTRATION
Please complete warranty details below. Please retain together with your proof of purchase
document. These documents will need to be viewed by our Service Representative should you
request in warranty service.
SERVICE ASSISTANCE
To assist you when phoning our After Sales Service number to arrange a service call please
complete the following details and have them ready when you call.
Model Number_____________________________Date of purchase____________________________
Kleenmaid Store purchased from_________________________Date of installation ________________
KLEENMAID AFTER SALES SERVICE
1300 652 100
27
Page 29

WARRANTY AND SERVICE
DOMESTIC WARRANTY - FULL FIVE YEAR WARRANTY
In addition to all statutory rights which you, the Consumer, have under the relevant laws in respect
of this appliance, during the first five years of ownership as the original purchaser of this Kleenmaid
appliance, we guarantee that any fault caused by faulty material or workmanship becoming
apparent will be rectified free of charge for parts and labour, provided that all service is performed
during normal working hours by Kleenmaid or their designated Agents. Where the appliance is
installed outside the normal servicing area of the above, the Purchaser must pay for the cost of
transporting the appliance to and from the Agent or the Agent’s travelling cost to and from the
Purchaser’s home.
COMMERCIAL WARRANTY - ONE YEAR WARRANTY
When this appliance is installed in a commercial application, you, the Consumer, have under the
relevant laws in respect of this appliance, during your first one year of ownership as the original
purchaser of this Kleenmaid appliance, we guarantee that any fault caused by faulty material or
workmanship becoming apparent, will be rectified free of charge for parts and labour, provided that
all service is performed during normal working hours by Kleenmaid or their designated Agents.
Where the appliance is installed outside the normal servicing area of the above, the Purchaser must
pay for the cost of transporting the appliance to and from the Agent or the Agent’s travelling cost to
and from the Purchaser’s home.
WHAT THESE WARRANTIES DO NOT COVER
We are not responsible for any damage or malfunction unless caused by a defect in material or
workmanship. This includes but is not limited to abuse, misuse, improper installation and
transportation damage. We are not responsible for any consequential damages from any
malfunction.
The Consumer must make the appliance available for servicing and shall bear any costs incurred for
any de-installation and/or re-installation required to make the appliance available for servicing.
Kleenmaid is not liable for any consequential damage incurred during de-installation or reinstallation.
WARRANTY DOES NOT COVER REPLACEMENT OF LIGHT
GLOBES OR GLASS BREAKAGE DUE TO IMPACT
In case of fractured glass do not use your appliance.
WARRANTY REGISTRATION
Please complete warranty details below. Please retain together with your proof of purchase
document. These documents will need to be viewed by our Service Representative should you
request in warranty service.
SERVICE ASSISTANCE
To assist you when phoning our After Sales Service number to arrange a service call please
complete the following details and have them ready when you call.
Model Number_____________________________Date of purchase____________________________
Kleenmaid Store purchased from_________________________Date of installation ________________
KLEENMAID AFTER SALES SERVICE
1300 652 100
25
Page 30

Other products available in the Kleenmaid
Range of appliances
Washers
Dryers
Dishwashers
Ovens
Cooktops
Outdoor Cooking Centres
Built In Espresso Coffee Machines
Rangehoods
Freestanding Ranges
Sinks
Waste Disposals
Taps
Cookware
Refrigerators
Freezers
Wine Cellars
Vacuum Cleaners
For sales information on the full range of quality appliances
Phone 13 13 08
09KL0760
03-391
 Loading...