

Page 1

Installation and
operating instructions
Professional Series Stretch Oven
TO851X
Cooking
Appliances
9111 TO851 Use and Care.indd 1 28/4/08 12:07:30 PM
Page 2

Contents
Dear customer 3
The first time you use the oven
3
Control panel functions
4
Instructions for use - Conventional Cooking
4
The control panel
6
The first time you use the oven
7
Setting the clock
7
Cooking functions
7
Cooking
8
Using the oven light
8
Child lock
8
Using the time display
9
Setting cooking time 1
0
Replacing the oven light
14
Electrical connections 1
5
Installation instructions 1
6
9111 TO851 Use and Care.indd 2 28/4/08 12:07:30 PM
Page 3
Dear customer
We thank you and congratulate you on your choice. This new carefully designed product, manufactured
with the highest quality materials, has been carefully tested to satisfy all your cooking demands. We would
therefore request you to read and follow these easy instructions which will allow you to obtain excellent results
right from the start.
!
The oven’s data plate is accessible even with the oven fully installed. The plate is
visible simply by opening the door. Always quote the details from it to identify the
appliance when ordering spare parts. The appliance becomes very hot during use.
Take great care not to touch the heating elements inside the oven.
WARNING: The appliance is not intended for use by young
children or infirm persons without supervision.
The first time you use the oven
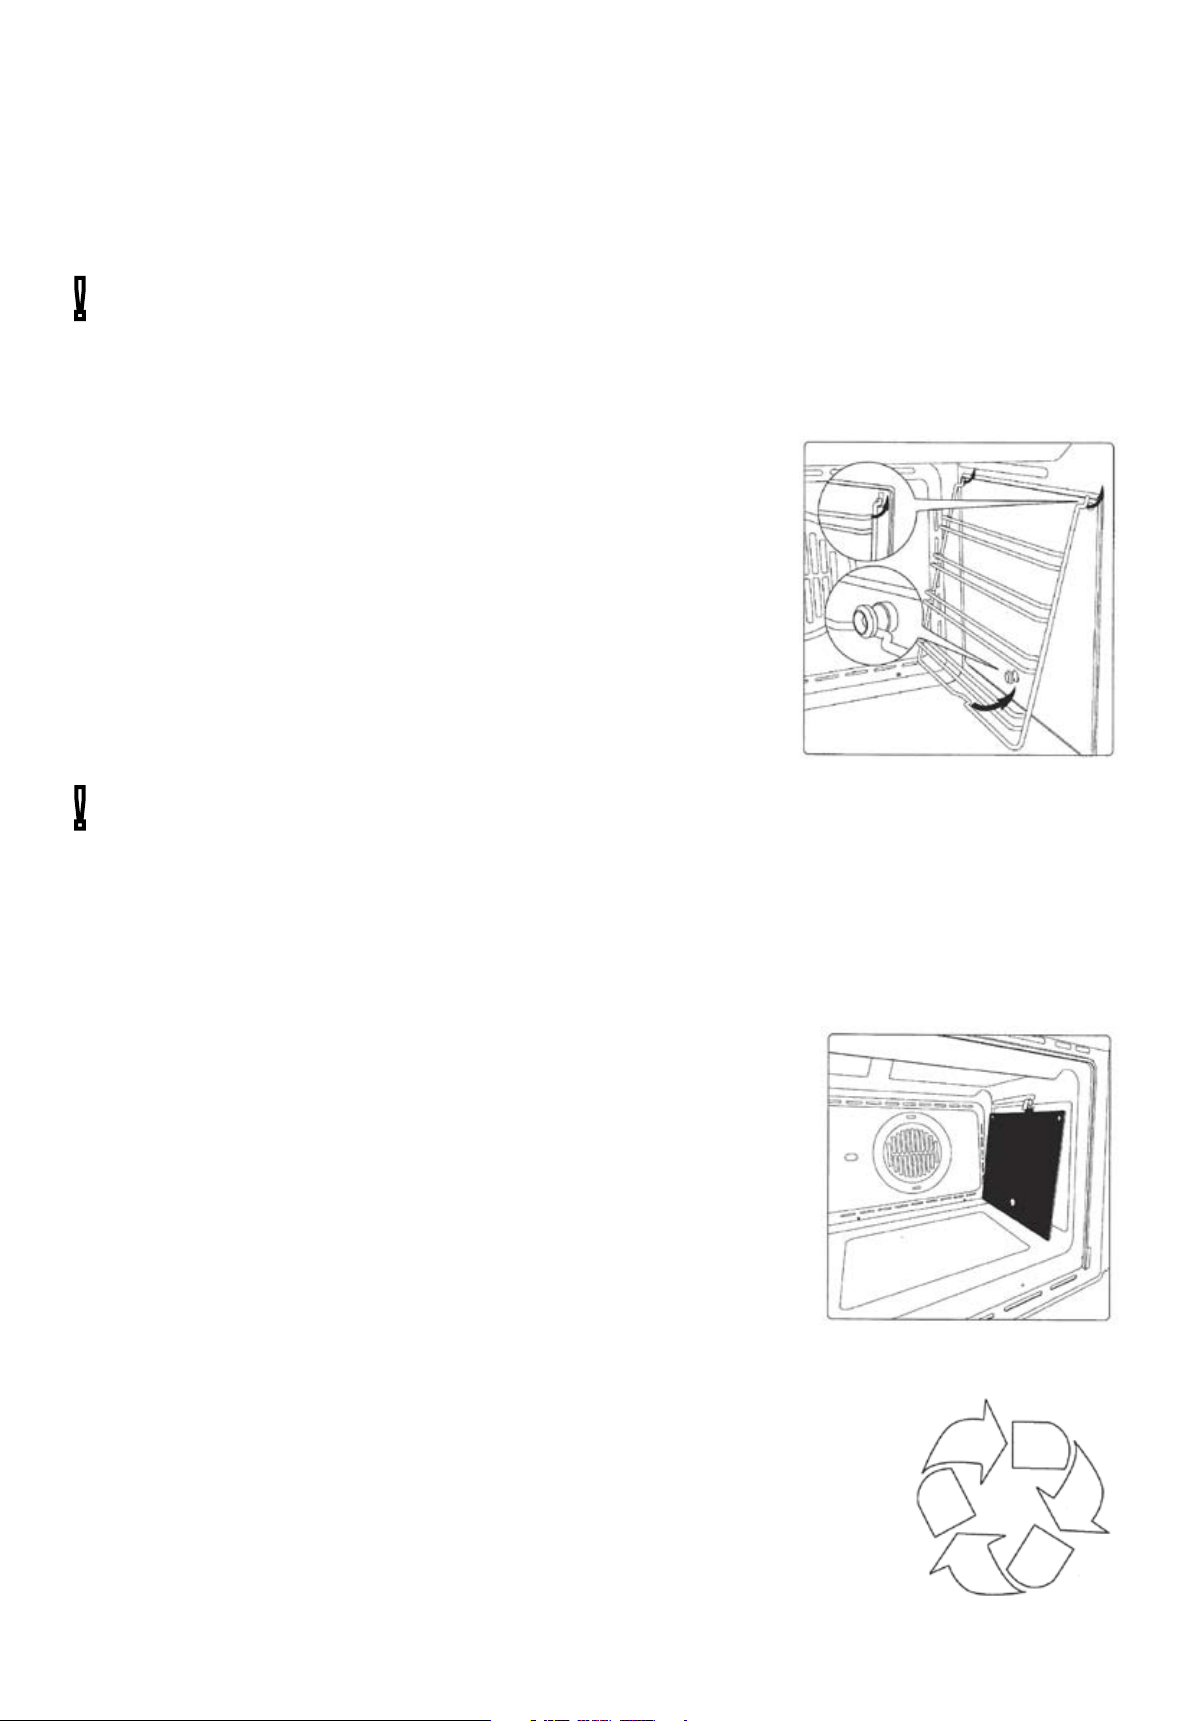
Clean the oven thoroughly with soapy water and rinse well. To remove the
lateral frames from smooth-walled ovens, proceed as shown in the figure.
Operate the oven for about 30 minutes at maximum temperature to burn
off all traces of grease which might otherwise create unpleasant smells
when cooking.
!
Important: As a safety precaution, before cleaning the
oven, always disconnect the plug from the power socket or the power cable from
the oven. Do not use acid or alkaline substances to clean the oven (lemon juice,
vinegar, salt, tomatoes etc.). Do not use chlorine based products, acids or abrasive
products to clean the painted surfaces of the oven. DO NOT USE STEAM
CLEANERS TO CLEAN THE OVEN. Never put aluminium foil on the bottom of the
oven, and do not place any crockery upon it. The oven
enamel may be damaged by the excessive heat.
Self-cleaning catalytic panels
Our smooth walled ovens can be fitted with self cleaning panels to cover
the inside walls. These special panels are simply hooked on to the walls
before the side frames are fitted. They are coated in a special, micro-porous
catalytic enamel which oxidises and gradually vaporises splashes of grease
and oil at cooking temperatures above 200° C. If the oven is not clean
after cooking fatty foods, operate the empty oven for 60 minutes (max.)
at maximum temperature. Never wash or clean self cleaning panels with
abrasive, acid, or alkaline products.
Respect for the environment
The documentation provided with this oven has been printed on chlorine free
bleached paper or recycled paper to show respect for the environment. The
packaging has also been designed to avoid environmental impact. Packaging
material is ecological and can be re-used or recycled. By recycling the packaging,
you will help save raw materials as well as reducing the bulk of domestic and
industrial waste.
9111 TO851 Use and Care.indd 3 28/4/08 12:07:31 PM
Page 4
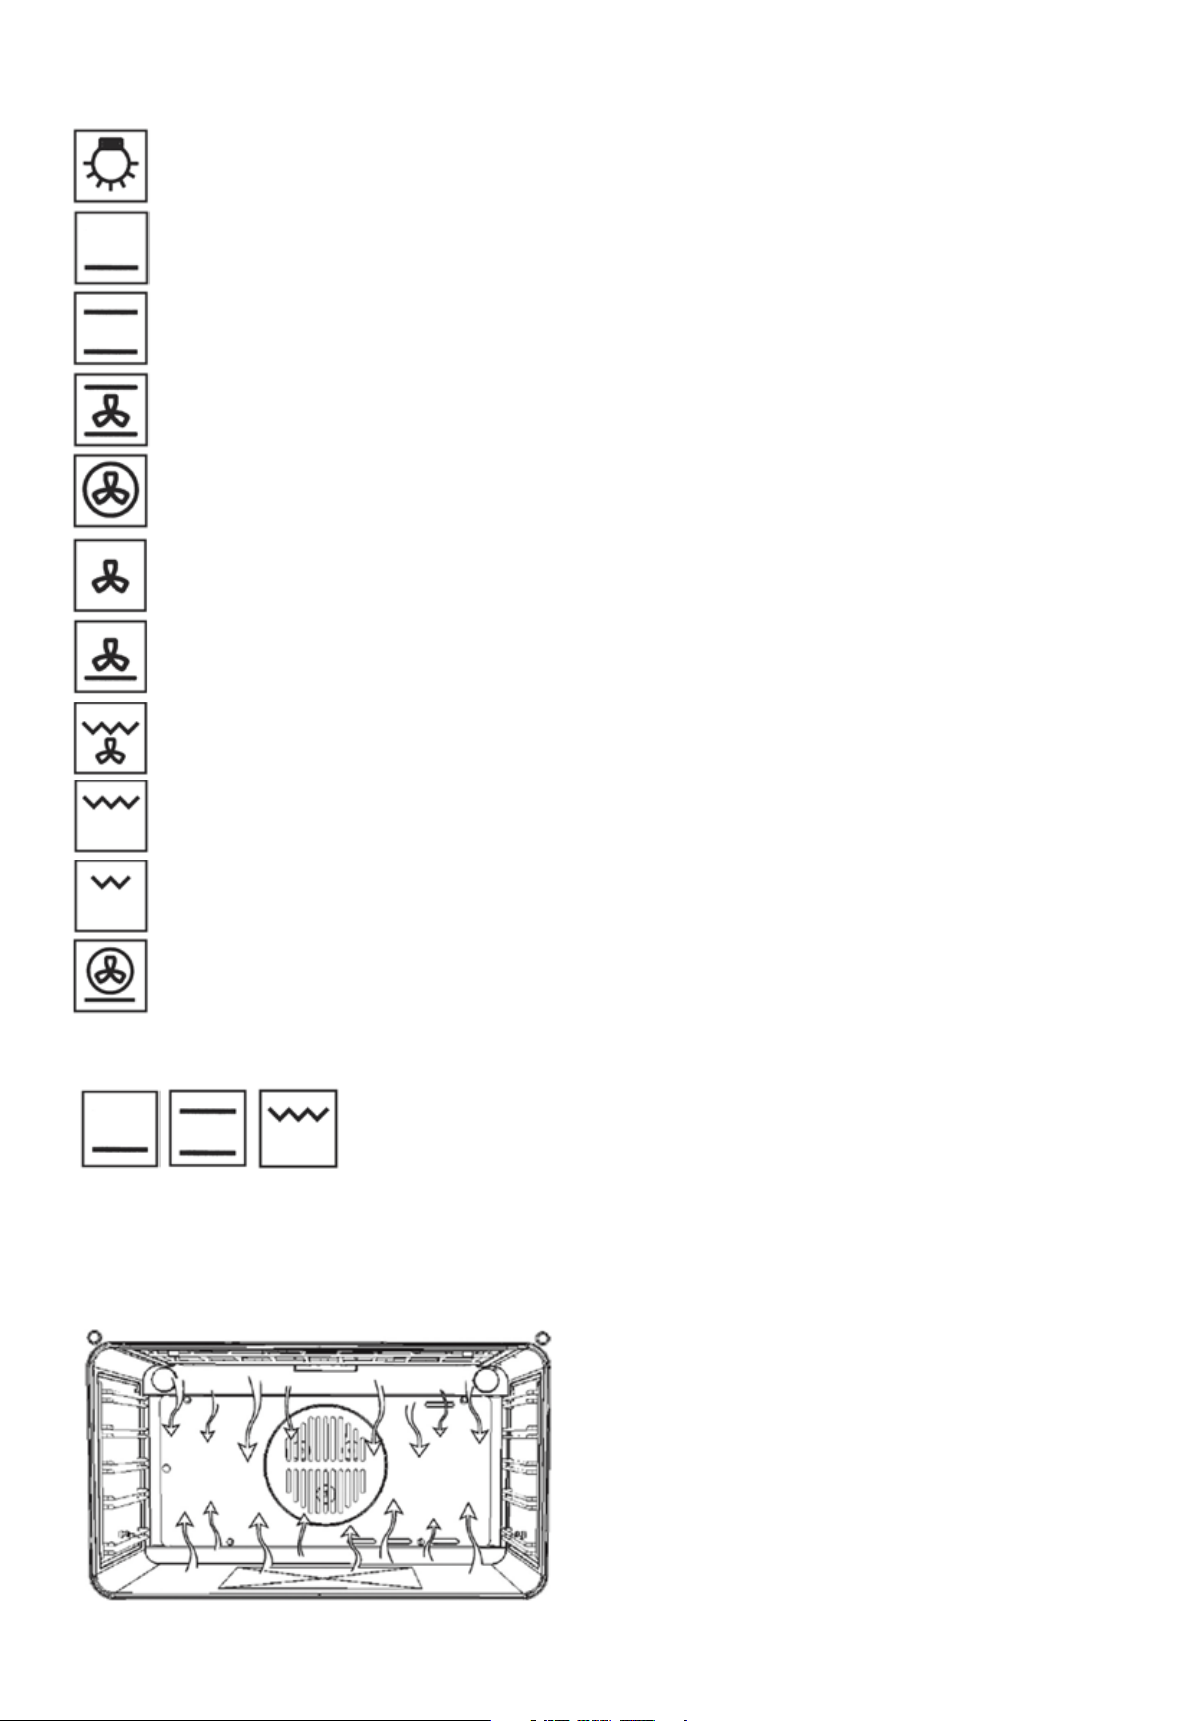
Control panel functions
Oven light (stays on while oven is in use).
Bottom heating element.Thermostat setting from 50°C to MAX.
Top and bottom heating elements. Thermostat setting from 50°C to MAX.
Top and bottom heating elements with fan. Thermostat setting from 50°C to MAX.
Circular heating element with fan. Thermostat setting from 50°C to MAX.
Fan for defrosting. Thermostat setting at 0°C.
Bottom heating element with fan. Thermostat setting from 50°C to MAX.
Double top heating element with fan ( large area grill). Thermostat setting from 50°C to 200°C.
Rotisserie function & Double top heating element (large area grill). Thermostat setting from 50°C to
200°C.
Top heating element (small, low power grill). Thermostat setting from 50°C to 200°C.
Bottom heating element + Circular heating element with fan. Thermostat setting from 50°C to MAX.
Instructions for use - Conventional Cooking
Conventional cooking uses top and bottom heat to cook a single dish. Place the food in the oven only once
cooking temperature has been reached, i.e. when the heating indicator goes out. If you want to increase top
or bottom temperature towards the end of the cooking cycle, set the temperature control to the right position.
It is advisable to open the oven door as little as possible during cooking.
9111 TO851 Use and Care.indd 4 28/4/08 12:07:33 PM
Page 5
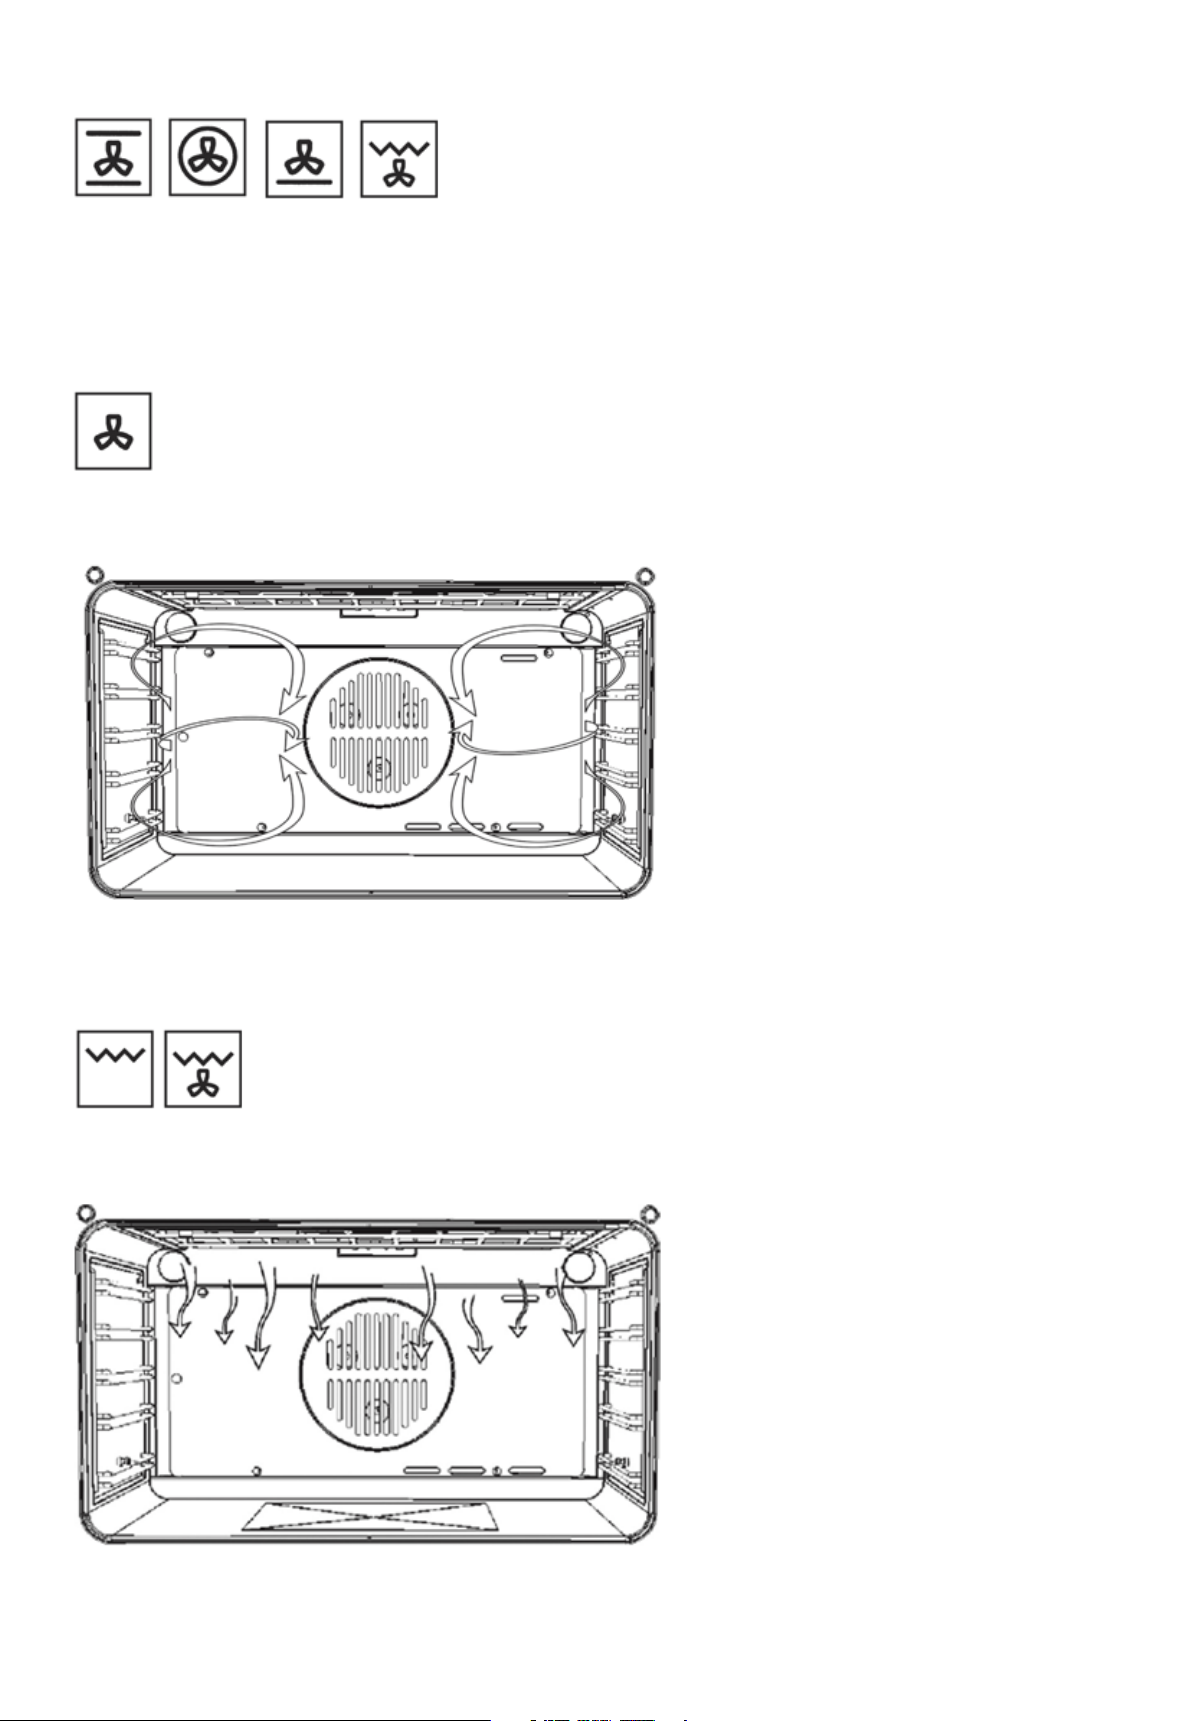
Fan cooking
For this type of cooking a fan positioned at the back allows the circulation of hot air inside the oven, creating
uniform heat. In this way cooking is more rapid than conventional cooking. It is a suitable method for cooking
dishes on more than one shelf, especially different types (fish, meat etc.)
Defrosting
By selecting one of the fan cooking functions and setting the thermostat to zero, the fan allows cold air to circulate inside the oven. In this way frozen food can be rapidly defrosted. It is not essential to preheat the oven,
but you are advised to do so when cooking pastries.
Grill cooking
Use the grill to grill or brown foods. Some ovens may be equipped with an electric motor, spit and skewers for
turning on the spit. Place the shelf with the food to be cooked in the 1st or 2nd position from the top. Pre-heat
the oven for 5 minutes. Turn the thermostat to a temperature between 50° and 200°
9111 TO851 Use and Care.indd 5 28/4/08 12:07:34 PM
Page 6
Using the Rotisserie
- Run meat through with spit and grip securely with forks.
- Balance the meat properly (to avoid unnecessary strain on motor)
- Insert spit into hole on left support on rotisserie rack and rest on right side and remove black screw handle
- Guide rotisserie rack into bottom oven side rails above pan; slide to rear of oven so that drive rod slots into
- hole at the left side rear of the oven
- Check spit and drive rod are inserted correctly
- Turnspit will activate on the selection of full grill only
Cooling fan
The fan is positioned on the upper part of the oven and creates a circle of cooling air on the inside of the oven
and through the door of the oven. It is turned on when the temperature of the outer shell of the oven reaches
60°C. By switching on the oven with the thermostat at 200°C the fan starts working after approx.10 min. It is
turned off when the temperature of the outer shell of the oven descends under 60°C. By switching off the oven
with the thermostat at 200°C the fan stops working after approx. 30 min.
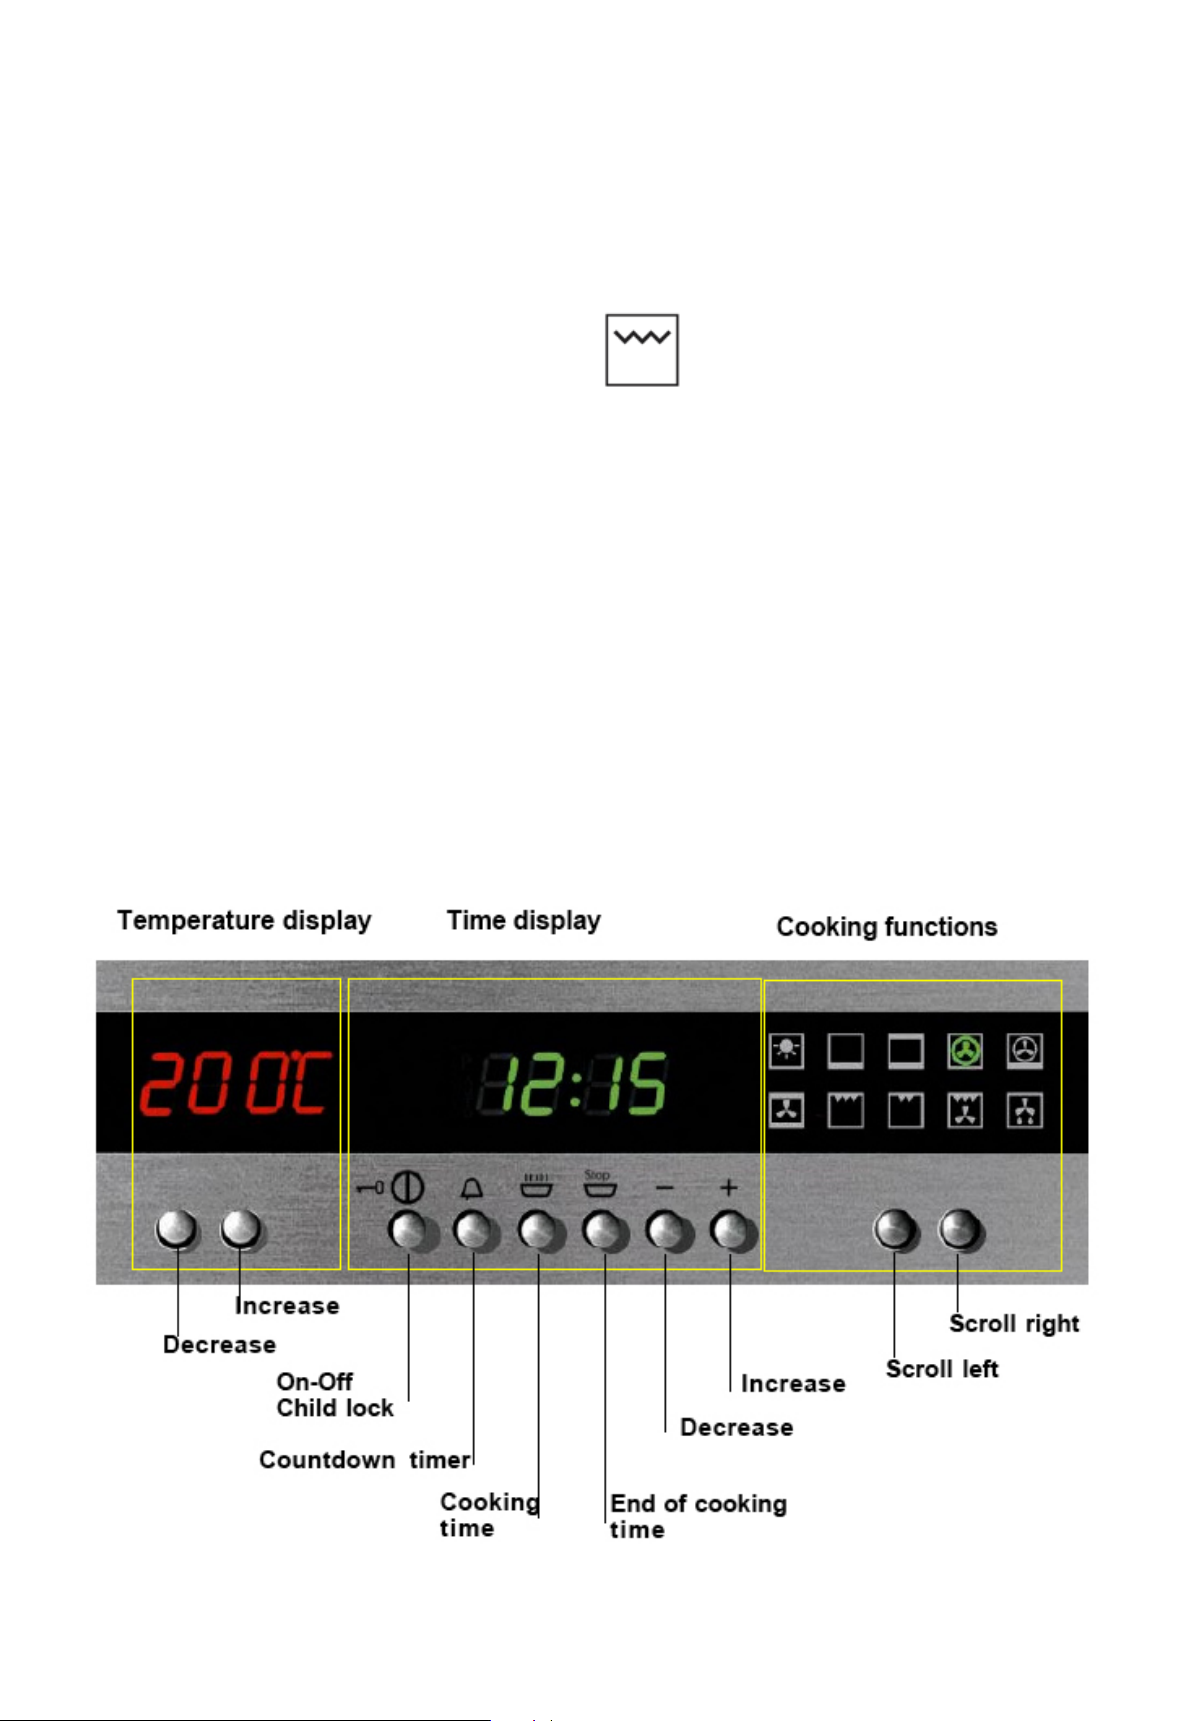
The control panel
The panel shown here is purely indicative and may not be identical to the panel on the
oven you have purchased. Depending on the model of oven you have purchased, the cooking functions and
temperature functions may be controlled by knobs instead of keys. The functions themselves are the same for
keyboard and knob control ovens.
9111 TO851 Use and Care.indd 6 28/4/08 12:07:35 PM
Page 7

The first time you use the oven
Three zeroes flash on the display the first time you connect the oven to the mains electricity supply, and every
time power returns after a power failure. This warns you that you must set the time on the clock before you
can select any cooking function.
!
You must set the time on the clock before you can use the oven.
Setting the clock
Press the two keys shown below simultaneously to enter clock mode.
The two dots separating the hours and minutes flash to show you are in clock mode.
Use one of the cooking functions to burn off any manufacturing residues from the heating elements and oven
walls before actually using the oven to cook food.
!
Important - If you change the time setting, you reset the timer and cancel all
cooking settings.
Cooking functions
For each cooking function, your new oven’s electronic controller suggests a default cooking temperature. This
is based on our own experience in obtaining the best results. You can nevertheless change the default value to
suit your own requirements.
The food types shown are purely indicative of the sort of meal you can prepare with that function. To discover
the tremendous versatility of this oven, feel free to experiment with all the functions on the basis of your own
cooking experience.
Press the + or - keys to increase or decrease the time.
After a few seconds the controller sets the time currently
displayed and the two dots stop flashing
9111 TO851 Use and Care.indd 7 28/4/08 12:07:36 PM
Page 8

Cooking
You can start cooking in just a few simple moves.
Switch on the oven.
Choose cooking function.
Change the default temperature if
you wish, or just wait 4 seconds to
accept the default temperature.
After 4 seconds the electronic controller automatically switches on the oven. The degrees centigrade symbol
flashes to show that the oven is warming up.
The cooking time symbol appears on
the display to show that the oven is
working.
The oven beeps and the degrees centigrade symbol stops flashing when the oven
reaches the set temperature. You can now put in the food you want to cook.
!
Important - The oven switches itself off automatically if you do not select a cooking
function within 8 seconds of switching the oven on. If this occurs, the time display
reads ‘OFF’ and the oven beeps to tell you that it has switched off.
Using the oven light
The oven is equipped with an intelligent light control to reduce electricity consumption. The light stays on while
the oven is warming up and for 3 minutes after set temperature is reached, and then switches off. Press any
key to check on the food in the oven. The light comes on for another 3 minutes.
Child lock
Your new electronic oven has a child lock function to prevent young children from tampering with it or
accidentally switching it on. You can activate the child lock at any time, even when the oven is switched off.
Activating the child lock
Press and hold the ‘On/Off’ key for at least 3 seconds.
The time display shows followed by
The electronic controller is now disabled. All you can do with the controls is switch the
9111 TO851 Use and Care.indd 8 28/4/08 12:07:37 PM
Page 9

oven off (if it is on) or use the countdown timer.
If you press any other key, a key symbol appears on the time display or temperature
display to inform you that the child lock is active.
!
Important - You must deactivate the child lock before you can use the oven again.
Deactivating the child lock
Press and hold the ‘On/Off’ key for at least 3 seconds.
The time display shows followed by
Using the time display
1. Using the countdown timer
The countdown timer works independently of all other timer functions, and can be used as a practical timer
with buzzer even when the oven is switched off.
Countdown timer key
The time display appears and the
dots separating the hours and
minutes flash. Use the ‘+’ and ‘-’
keys to set the countdown period,
then simply wait a few seconds for
the controller to start the countdown.
The normal time display returns with
the countdown symbol to show that
the countdown is running.
At the end of the countdown time the oven beeps twice at an interval of two seconds and the countdown
symbol flashes. Press any key to silence the buzzer. The oven beeps three times and the countdown symbol
disappears.
Countdown Timer
OFF
9111 TO851 Use and Care.indd 9 28/4/08 12:07:38 PM
Page 10

Setting cooking time
Use the cooking time function to set the duration of cooking starting from the present time. You must select a
cooking function before you can set cooking time (see the “Cooking” section).
Oven active: a cooking
functions has been
selected.
Press this key to set
cooking time
The time display appears and the
dots separating the hours and
minutes flash. Use the + and - keys
to set cooking time, then simply wait
a few seconds for the controller to
start timing the cooking period.
The normal time display returns with
the auto timer cooking symbol to
show that the oven is working.
At the end of the cooking time the oven beeps twice at an interval of two seconds and the symbols flash. Then
the temperature display, the time display and the heating elements switch off. Press any key to silence the
buzzer. The oven beeps three times and the symbols disappear.
!
If you select no other functions within 8 seconds from silencing the buzzer, the oven
automatically switches off.
9111 TO851 Use and Care.indd 10 28/4/08 12:07:39 PM
Page 11

1. Setting end of cooking time
Use the end of cooking time function to set the time at which you want cooking to finish. You must select a
cooking function before you can set end of cooking time (see the “Cooking” section).
Oven active: a cooking
functions has been
selected.
Press this key to set end
of cooking time
The time display
appears ad the dots
separating the hours
and minutes flash. Note
that you must set a
time different from the
present time!
Use the + and - keys to set end of
cooking time, then simply wait a few
seconds for the controller to register it.
The normal time display returns with
the auto timer cooking symbol to show
that the oven is working.
At the end of cooking time the oven beeps twice at an interval of two seconds and the symbols flash. Then the
temperature display, the time display and the heating elements switch off.Press any key to silence the buzzer.
The oven beeps three times and the symbols disappear.
!
If you select no other functions within 8 seconds from silencing the buzzer, the oven
automatically switches off.
9111 TO851 Use and Care.indd 11 28/4/08 12:07:39 PM
Page 12

2. Setting cooking start and end times
You can combine the cooking time and end of cooking time functions to set the start and end times for
cooking. In this way you can program your electronic oven to cook while you are out or to defrost foods ready
for you to cook when you get back. A great help in the kitchen!
The order in which you set the
two functions is not important.
Example:
We want to start cooking a dish 30 minutes before we get home so that it will be ready for us when we do.
Set a cooking time of
30 minutes.
(See section 2. Setting
cooking time)
Place the dish in the oven and
select the cooking function you
want (Grill + fan shown by way
of example only) Adjust the
default temperature as required.
9111 TO851 Use and Care.indd 12 28/4/08 12:07:40 PM
Page 13

Before you set end of cooking
time, note the present time.
When you set end of cooking
time, the timer display presents
time plus cooking time by
default.
Use the + key to set a tme E.g. 10 mins later.
The timer registers this new time after a few
seconds. The display switches off and the
oven enters standby mode. The present
time is displayed.
At 12:25 the oven switches on in Grill+fan
mode for 30 minutes and switches off at
12:55 according to our time settings.
!
HINT - This is a good time to activate the child lock to prevent young children from
tampering with or accidentally switching on the oven
9111 TO851 Use and Care.indd 13 28/4/08 12:07:40 PM
Page 14

Replacing the oven light
IMPORTANT:
The oven light must have these precise features:
a) it must be able to resist high temperatures (up to 300°C)
b) power supply: see V/Hz indicated on data plate.
c) power 25W.
d) E 14 connection.
Before proceeding, disconnect the appliance from the main electricity supply.
- to prevent damage, place a tea cloth in the oven
- unscrew the glass cover of the light
- unscrew the old light bulb and replace it with the new one
- put back the glass cover and remove the tea cloth
- connect the appliance to the main electricity supply.
Removing the oven door
The oven door can be removed quickly and easily.To do so, proceed as follows:
- Open the door fully.
- Lift the two levers shown in fig.
- Close the door as far as the first stop (caused by the raised levers).
- Lift the door upwards and outwards to remove it from its mountings.
To replace: fit the door, fit the hinges in their mountings and lower the two levers.
9111 TO851 Use and Care.indd 14 28/4/08 12:07:41 PM
Page 15

Electrical connections
Before connecting the oven to the mains power supply, make sure that:
- The supply voltage corresponds to the specifications on the data plate on the front of the oven.
- The mains supply has an efficient earth (ground) connection complying with all applicable laws and
- regulations. Correct earthing (grounding) is a legal requirement.
- The power cable should never reach a temperature 50° C above ambient temperature at any point along its
- length. If a fixed appliance is not provided with a power cable and plug, or some other device permitting it to
- be disconnected from the mains electricity supply, with a gap between the contacts big enough to guarantee
- class III Overvoltage protection, then such a device must be fitted to the power supply in compliance with the
- regulations governing electrical installations. The socket or switch must be easily reachable with the oven fully
- installed.
CABLE TYPES AND MINIMAL DIAMETERS
SASO
H05RR-F 3x1,5 mm² H05RR-F 3x2,5 mm²
H05VV-F 3x1,5 mm² H05VV-F 3x2,5 mm²
H05RN-F 3x1,5 mm² H05RN-F 3x2,5 mm²
H05V2V2-F 3x1,5 mm² H05V2V2-F 3x2,5 mm²
N.B. The manufacturer declines all responsibility for damage or injury if the above instructions and normal
safety precautions are not respected.
TECHNICAL FEATURES
MUFFLE SIZE Length (mm) 607
Height (mm) 335
Depth (mm) 390
CAVITY VOLUME
(conventional/fan assisted) 75 litres
The manufacturer declines all responsibility for possible inaccuracies contained in this pamphlet, due
to printing or copying errors. We reserve the right to make on our own products those changes to be
considered necessary or useful, without jeopardizing the essential characteristics.
HEATING ELEMENT POWER RATING
Roof element, external 1100 W
Roof element, internal 1750 W
Circluar element 2300 W
Bottom element 1300 W
9111 TO851 Use and Care.indd 15 28/4/08 12:07:42 PM
Page 16

ES NL PTDE
ES NL PTDE
Installation instructions
Flush fitting: The oven can be installed under a work top or in a cooking column. Figure shows the
installation dimensions. Make sure that surrounding materials are heat resistant. Align the oven centrally
with respect to the side walls of the units surrounding it and fix it in place with the screws and Allen screws
provided.
Built-under type
Vertical type
9111 TO851 Use and Care.indd 16 28/4/08 12:07:45 PM
Page 17

appliances available
in the Kleenmaid range
the best products we can find.
We search the globe for products that meet our high standards of functionality, style and quality and
are proud of our innovative range sourced from countries throughout the world.
Washing Machines
Dryers
Dishwashers
Ovens
Cooktops
Outdoor Cooking Centres
Built-In Coffee Machines
Rangehoods
Freestanding Ovens and Cooktops
Sinks
Waste Disposals
Taps
Cookware
Refrigerators
Wine Cellars
Vacuum Cleaners
To find your nearest Kleenmaid Showroom telephone 13 13 08
or visit www.kleenmaid.com
Warranty Registration
Please complete warranty details below. Please retain together with your proof of purchase
document. These documents will need to be viewed by our Service Representative should
you request in warranty service.
Service Assistance
To assist you when phoning our After Sales Service number to arrange a service call
please complete the following details and have them ready when you call.
Model Number______________________ Date of purchase___________________
Kleenmaid Store purchased from_________________Date of installation __________
KLEENMAID AFTER SALES SERVICE
Phone: 1300 652 100
Spare Parts: 1800 025 139
Email: service@kleenmaid.com
Postal: PO Box 5560
Maroochydore BC, QLD 4558
Warranty and Service
9111 TO851 Use and Care.indd 17 28/4/08 12:07:46 PM
 Loading...