

Page 1

OVEN
c o l l e c t i o n
Instructions for Use
and Warranty Details
Deluxe Multifunction Ovens
TO80S - Stainless Steel
TO81W - White
TO82B - Black
Page 2

C
ongratulations on the purchase of your
new Kleenmaid appliance. This appliance
has been designed and manufactured to
give you years of reliable performance.
For best results, carefully read the
instructions on how to install your new appliance. Correct
installation will avoid delays and unnecessary service calls.
Once installation is complete, read this booklet and get to
know the controls and the features of your new appliance.
If you need further information call our
Customer Care Centre
1300 652 100
We reserve the right to alter the specifications with no
influence on the operation of the appliance. This instruction
manual cannot be reason for claim.
Page 3

1
CONTENTS
General description...............................................2
Oven operation......................................................4
Programmer operation...........................................5
Spit roaster.............................................................8
Removing roasting trays ........................................9
Practical advice....................................................10
Tables ..................................................................12
Defrosting ............................................................14
Cleaning ..............................................................15
What to do if.........................................................17
Installation ...........................................................18
Wiring Diagram ...................................................19
Warranty and Service...........................................21
Before using the oven for the first time, it should be switched
on using the program at 250ºC for half hour.This will
eliminate any remains of grease from the manufacturing
process. Then, clean it with soap and water.
High temperatures are reached inside the oven during
cooking. Do not let children near it.
Technical data and oven identification information are given
on the data plate. This is located on the front of the oven. This
plate should be consulted before making any electrical
connections.
IMPORTANT: Electrical connections and repairs must be
made by a specialist familiar with the legal requirements and
standards in your State.
WARNING
Page 4
The controls can be hidden and revealed
simply by pressing them.
HIDDEN CONTROLS
Roasting and browing.
SPIT ROASTER
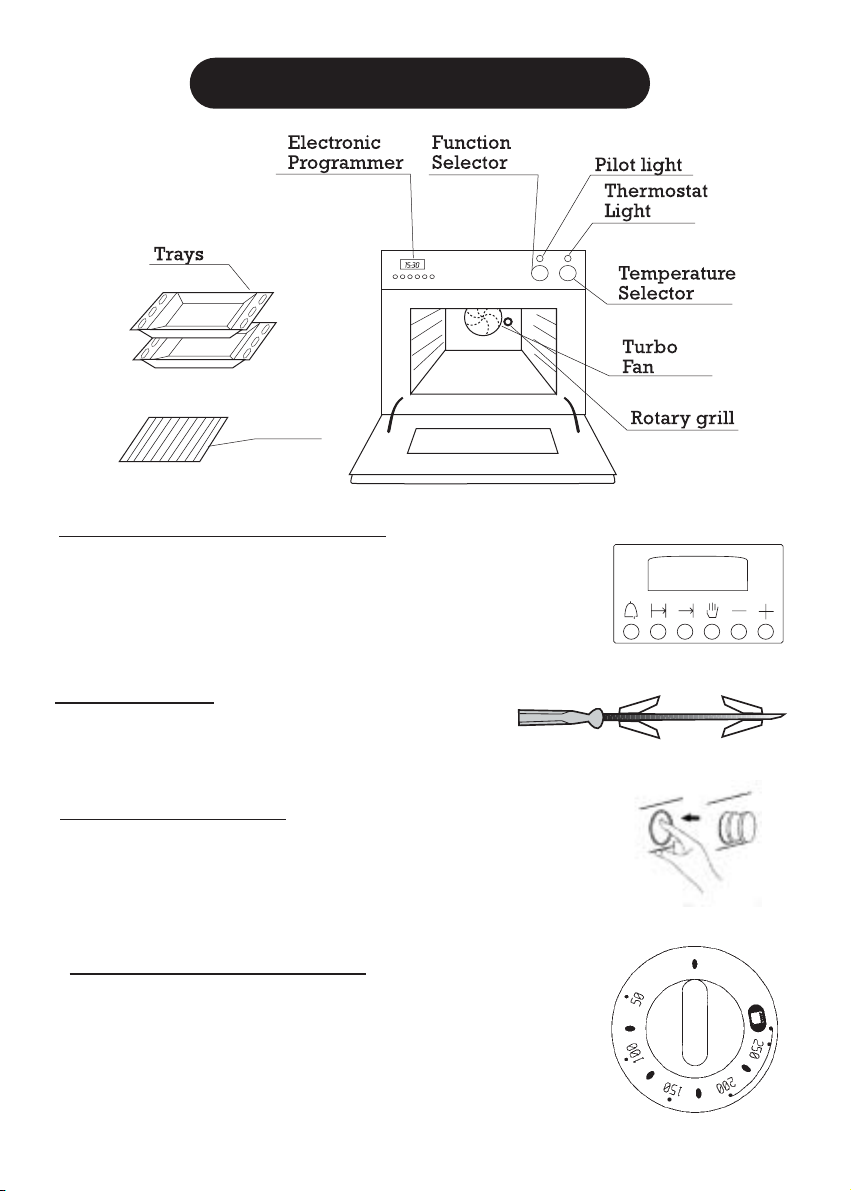
This is used to select the cooking temperature,
whether regular or grill (See tables).
The thermostat light switches off when the
temperature is reached and switches on and off
during cooking to maintain the chosen
temperature.
TEMPERATURE SELECTOR
GENERAL DESCRIPTION
Provides clock function plus the programming of
automatic cooking stop, automatic cooking start
and stop, manual cooking and warning functions.
ELECTRONIC PR
OGRAMMER
2
Shelf
23.58
Page 5

3
GENERAL DESCRIPTION
This allows you to select oven heating programmes (See tables).
The pilot light comes on when ever a programme is selected.
PROGRAMME SELECTOR
Defrosting: All elements heat to a very low temperature, allowing the
perfect defrosting of food.
Conventional heat:Heats from above and below, in the conventional way.
Traditional heat: Heats from below.
Half grill: For grilling only the centre of the
tray, for small items (plus rotary grill).
Full grill: For grilling from above over the
entire area of the tray (plus rotary grill).
Fan assisted grill: For grilling and roasting,
spreading the heat with a fan.
Fan forced plus traditional heat: Heats from below and in the centre,
spreading the heat with a fan.
Fan assisted conventional heat: Heats from above and below, spreading
the heat with a fan.
Page 6
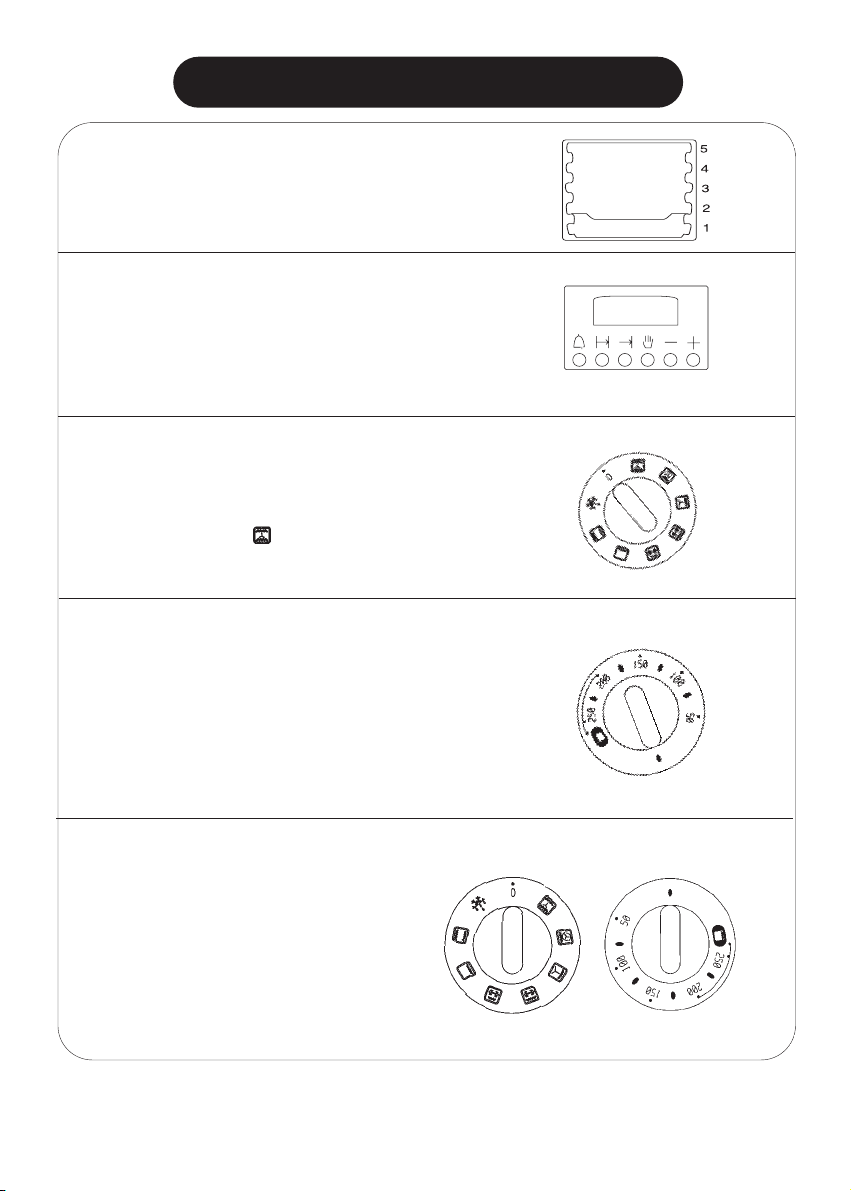
When cooking ends, set the
program and temperatures
selectors to zero.
OVEN OPERATION
Place the food into the oven on the
tray at the recommended height .
(See tables)
1
Use the programmer required. See
programmer operating instructions.
2
Select the heating method using
the program selector.
For example: (See tables).
3
NOTE: The oven must always be used with the door closed for all programmes, including grill.
Select the cooking temperature or the grill
temperature using the temperature selector.
For example: 150ºC (See tables).
4
5
•
•
••
( 0 and •)
4
23.58
Page 7
5
PROGRAMMER OPERATION
The programmer can be used to carry out cooking at a certain time, after which the
oven automatically switches off. Even when you´re not at home, the oven will
automatically switch on and then off again when cooking is finished.
In any case, if you do not wish to program the oven, it can be used normally without
the programmer.
The programmer can also be used as an alarm clock (without switching on the
oven) and as a clock.
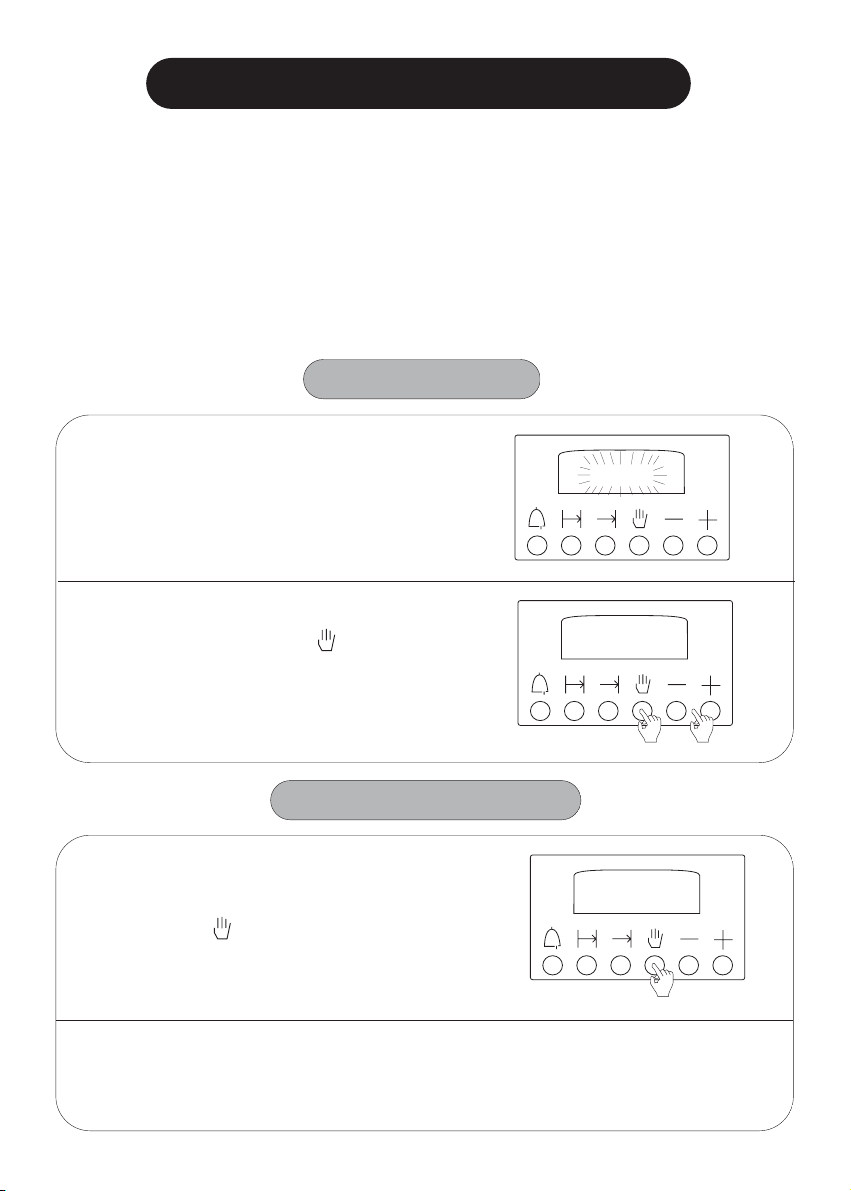
SETTING THE CLOCK
1
When the oven is installed, or after a
power cut, the display will show
0.00,
flashing.
2
Press and hold in the button and
use the - + buttons to set the time.
For example:
13.30
MANUAL OPERATION
To use the oven without programming,
press the button.
The oven may now be used as described in the "Oven Operation" section
.
Remember that the oven is operating without programming and that you will
need to switch it off when cooking is over.
0.00
13.30
Page 8
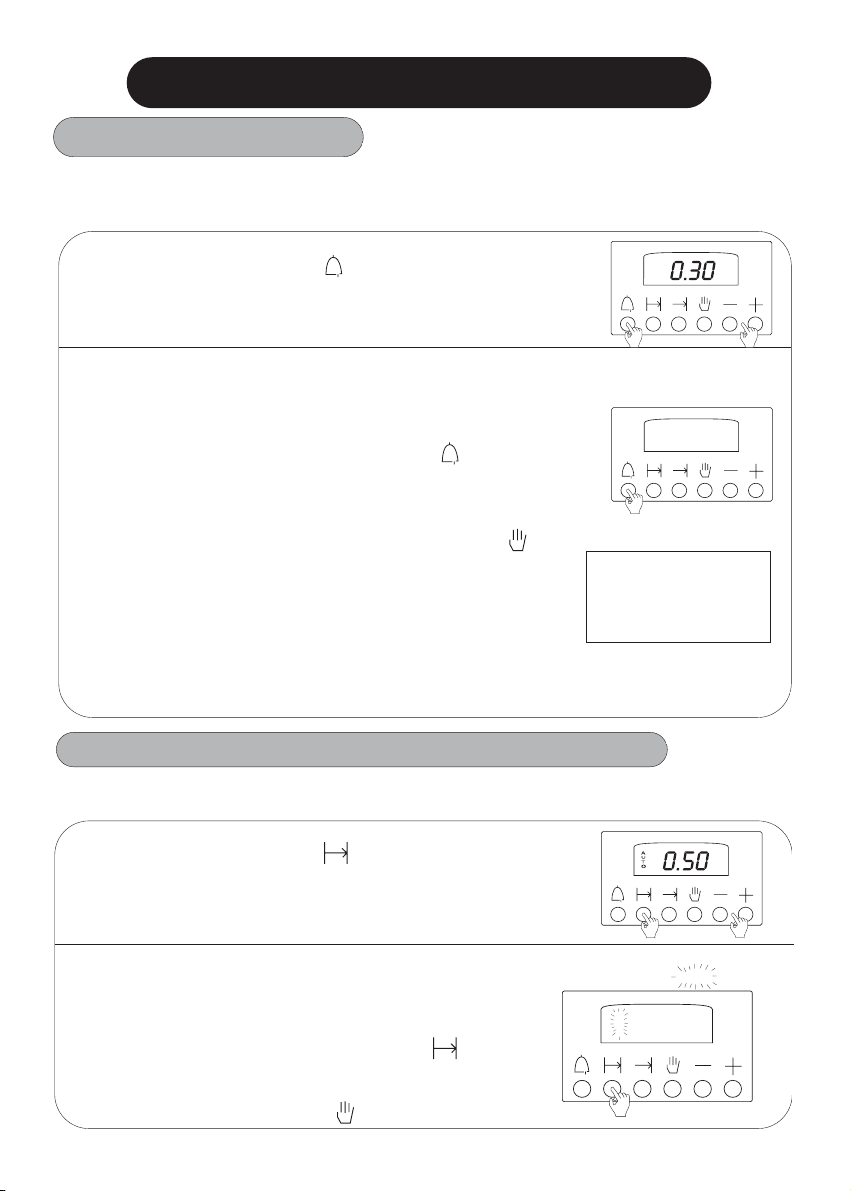
2
1
Press and hold in the button and use
the
- and + buttons to set the alarm time.
For example: 30min.
If you also want to use the oven, either manually or
with programming, follow the corresponding
instructions.
The alarm will start to sound when the time period
has elapsed; to silence it, press the button.
NOTE: The alarm has three (3) different tones
To change the tone, proceed as follows:
1. With the clock showing the time of day in
Manual Operation Mode displaying the
symbol, ie without any cycle or operation
functions.
2. Wait 10 seconds then press the minus (
-)button
once for each new tone. Continue until the
desired tone is reached.
This operation may be carried out in any program
when ever the alarm sounds.
2
Carry out the other starting operations
described in the "Oven Operations". The
alarm will start to sound when cooking
ends and the oven will be switched off. To
silence the alarm, press the button .
Do not forget to set the oven controls to
zero.Press the button to remove the
flashing AUTO display .
1
Press and hold in the and use - + buttons to
select the time. For example:50min.
AUTO appears on the display.
PROGRAMMER OPERATION
You can use the oven without the programmer switching it off but sometimes it´s
handy to be warned after a certain period of time has passed or even as an alarm
clock without cooking.
Remember that the
alarm does not
switch off the oven.
USING THE ALARM
This is used when you want cooking to start now but to stop automatically after a
certain period of time.
PROGRAMMING FOR AUTOMATIC SWITCHING OFF
A
U
T
O
BEEP
6
Page 9

7
NOTE:You can change the end time and the duration even when the oven is already
working, using the and buttons.
It is advisable, before programming the oven, to make a test programming.
To erase a program, press the button. If the oven controls are not set to zero, it
will continue to function.
Carry out the other starting operations
described in the "Oven Operation". The oven
is now programmed.
In this example, 50 minutes before 14.30, the
oven will switch on and will switch off at 14.30
automatically, at which point the alarm will
sound. Press the button to silence it.
Do not forget to set the oven controls to zero.
Press the button to remove the flashing
AUTO display.
Press and hold in the button and
use the
- + buttons to set the hour at
which you want cooking to end.
For example:
14.30
You don´t want to start cooking now - it´s too early and you have to go out, but you
want the oven to have done its work when you return and to have switched off
automatically.
PROGRAMMING FOR DELAYED COOKING
1
PROGRAMMER OPERATION
2
3
Now press and hold in the and
use the
- + to select the cooking time.
For example: 50 min.
AUTO appears on the display.
A
U
T
O
BEEP
14.30
Page 10

SPIT ROASTER
Fit the spit “A” into the spit
support “B”, as shown in Figure
1, and then fit it into the oven as
shown in Figure 2.
1
Skewer food on spit and
secure with sliding blades.
2
Insert spit point in orifice at back of
oven and rest outer end on bracket.
Insert oven tray at bottom shelf level.
Unscrew spit handle to close oven door.
3
Select grill setting and start (See
operation).
IMPORTANT: Always close oven door.
4
When finished roasting, screw spit handle
back on and remove spit. Release sliding
blades and withdraw spit from food.
5
•
1.
2.
8
Page 11

9
The shelf and tray assembly can be
placed in any of the four levels, taking
into account its position as shown in
the figure:
1. Shelf
2. Tray
First insert the tray carrier shelf
1 in the position shown in the
figure.
REMOVING ROASTING TRAYS
1
2
3
4
1
1
2
2
Then insert tray 2 in the upper part of
the shelf 1 in the position shown in the
figure.
Fit the assembly into the oven.
To remove the trays once cooking has
ended, pull the tray carrier shelf fully
outwards and then either:
1. Remove the tray from the shelf.
2. Remove the entire assembly by slightly
lifting the shelf over the stops that prevent
it from falling.
Page 12

Do not place food or containers directly on the
floor of the oven.
Always use the tray or shelf.
Place the tray under the grill for roasting and
baking. This way, all the juices will fall on the
tray and the oven will keep clean. The oven
should preferably be pre-heated for 10
minutes, especially for deserts and fish.
Always use the tables in this book as a reference
for programming your oven. Even if you are
cooking to your own recipe, the entry for a
similar type of food will help you to choose the
program, temperature and tray position.
The cooking times are guidelines and will be
longer if the food is placed into the oven directly
from the fridge.The times will also depend on
your own personal taste, on whether you prefer it
rare or well done.
Single piece and very large items require longer
times. The tables are designed for quantities for
4 persons.
Use the temperatures in the tables.
A temperature higher than that given may
cause excessive steam and smoke.
CONSULT THE
TABLES
GUIDELINE
TIMES
TABLES FOR 4
PERSONS
PRACTICAL ADVICE
10
Page 13

11
PRACTICAL ADVICE
With deserts, test cakes by pricking with a rod in
the centre. If no mix adheres to the rod when it is
withdrawn, the cake is ready.
If the mix sinks, use a temperature which is 10º
lower next tine.
If the underside of the cake is overdone, next
time place the cake on a higher level in the oven
By contrast, if the top of the cake is overdone,
next time place it on the level below.
In both cases, you should select a lower
temperature.
Allow meat and poultry to rest for 5 to 10 minutes
inside the oven, once cooking has finished.
Always use the grill with the oven closed. If the food does not occupy the
entire tray, place it in the centre.
Poultry will be browned well if basted.
DON’T USE ALUMINIUM FOIL ON THE BASE OF OVENS
The use of aluminium foil on the base of the oven to collect spills and
improve cleaning is not recommended. Foil or dishes with reflective
qualities must never be placed on the base of the oven during cooking as
the concentration of the direct and reflected heat will damage tne enamel
surface. Damage resulting from such use is not covered under the
provisions of the warranty.
-10ºC
-10ºC
Page 14

FOOD PROGRAMME
TEMPERATURE
TIME
POSITION
PRE-HEAT
ACCESSORIES
ENTREES AND VEGETABLES
Baked eggs 225 º 5 min NO
Cantaloupes 200 º 20 min NO
Paella 225 º 35-40 min NO
Baked cauliflower
225 º 10-12 min YES
Baked potatoes 225 º 45-50 min NO
Baked peppers 200 º 30-35 min NO
FISH AND SEAFOOD
Roast 210 º 15-18 min YES
Baked fish 250 º 7-10 min YES
Baked fish 225 º 10-15 min. YES
Roast fish 250 º 30-35 min NO
Trout 210 º 12-14 min YES
Baked bream 210 º 25-30 min YES
Sole 225 º 6-10 min YES
VARIOUS
Pizza 200 º 30-35 min NO
Turnover 200 º 25-30 min YES
Bread 225 º 25-30 min YES
Cakes 200 º 12-14 min YES
TABLES
12
Page 15

13
FOOD PROGRAMME
TEMPERATURE
TIME
POSITION
PRE-HEAT
ACCESSORIES
MEAT AND POULTRY
Whole sirloin 175 º 60-70 min NO
Beef ribs 150 º 90-110 min NO
Roast lamb 175 º 60-70 min NO
Rabbit in sauce 175 º 45-55 min NO
Roast beef 150 º 70-80 min NO
Ox tail 200 º 120-140 min NO
Roast pork, 1kg 150 º 50-60 min NO
Hamburgers 250 º 8-10 min YES
Sausages
250 º 9-12 min YES
Roast chicken
175 º 45-50 min NO
Roast turkey
190 º 140-160 min NO
Duck à l´orange
210 º 90-100 min NO
Roast quail
225 º 7-10 min YES
DESERTS
Apple pie 190 º 40-45 min NO
Pears in wine 225 º 45-50 min NO
Cream caramel 175 º 30-35 min NO
Soufflé 200 º 10-12 min YES
Biscuit 180 º 30 min YES
Baked apple 175 º 30-35 min NO
Pastry 175 º 30-35 min YES
TABLES
Page 16

Use the programme to defrost,
setting the temperature to 75ºC.
Always place food to be defrosted on the
shelf at level 2.
DEFROSTING
DEFROSTING TABLE
FOOD WEIGHT TIME PIECES
MEAT
Round 1,000 g. 90 min 1
Fillets 400 g. 20 min 4
Minced meat 1,000 g. 60 min 1
Chopped meat 1,000 g. 70 min 20
Whole chicken 1,200 g. 70 min 1
Chicken pieces 1,200 g. 40 min 20
Sausages 500 g. 25 min 12
Loin, pieces 1,000 g. 90 min 1
Loin in fillets 450 g. 40 min 8
Hake 800 g. 60 min 1
Fillets 480 g. 20 min 4
Small fish
(mullet) 700 g 30 min
Tuna in slices 1,200 g. 25 min 2
Prawns 1,000 g. 30 min 40
Mixed vegetables
400 g. 20 min
Bread, cakes, etc 250 g. 10 min
Pre-cooked food 500 g. 30 min
FISH
VARIOUS
••
14
Page 17

15
CLEANING
However, if there is heavy splashing,
panels must be washed.
To make cleaning easy, the side panels are
also removable. Cleaning can be made in
dishwasher or by hand, with warm water
and a non-metallic sponge.
Instructions to remove the side panels:
1) Push down the upper stick of guides
until it is released.
2) Turn the guides as shown in the picture
and pull out. The guides will be free.
3) Take the panel down.
Oven back can also be removed by loosening the screws.
NOTE: Do not use special sprays on
self-cleaning ovens.
All the panels inside the oven, except
for the floor and ceiling, are covered
with self-cleaning enamel.
These panels eliminate small splashes
of grease during cooking without the
need to clean them.
Some large splashes may not disappear
immediately; after removing the cooked
food, leave the oven at 250ºC for half
hour. (Do not let children near it).
Never use sandy or abrasive
detergents. Clean the oven exterior
with a soft damp cloth using soapy
water.
SCOURER
1/2 HOUR
Page 18

The door may also be removed to facilitate cleaning. Carefully follow
these steps in order not to cause a fault.
Open the door downward and
turn the latch of the hinges as
shown in the diagram.
CLEANING
Close the door smoothly until it
stops. Then, holding the door with
both hands, pull upward and
continue closing it until the hinges
come out from their slots. The door
will then be free.
To replace the door, fit the hinges
fully home in their slots, as shown
in the diagrams.
Open the door downward and turn
the latch to their original position.
The door is now installed.
16
Page 19

17
WHAT TO DO IF...
The oven des not switch on and the programmer´s display does not light up.
- Fuses blown. Replace them.
- If the fuses blow again, too many devices are running!
- If the oven still does not work, call Kleenmaid Customer Call Centre.
The light does not work even though the oven is on.
- Probably the light bulb has blown. When the oven is cold, unscrew
the lamp cover, remove the bulb and replace it with another (switch
off at the mains first, for safety reasons).
The oven fills with smoke coming from the oven itself.
- All ovens produce smoke to a greater or lesser extent.This is
normal, especially for roasts.
You can reduce the smoke by reducing the amount of fat or liquid in
the tray and by using the oven at a lower temperature from now on.
Do not use temperatures which are higher than those shown in the
tables.
- The grill element may be dirty, with grease from a previous roast.
When the grill is switched on, this grease will be burnt and much
smoke will be created for a few minutes. Try to keep the grill clean.
The oven does not switch on and the programmer is flashing 0.00.
- Probably there has been a power cut. Adjust the time on the
programmer and repeat the switching on of the oven.
INSTALLATION
UNPACKING
Carefully remove all the elements
protecting the apparatus. The two
brackets “A” in two parts of the oven
must also be removed, as shown in
the figure.
A
Page 20

INSTALLATION
The measurements of the holes
in the kitchen unit must be as
shown in the figures, for tower or
under bench mounted units.
It is very important to maintain
the ventilation holes at the back
in order that the oven operates
correctly.
See the Kleenmaid Technical
Specification Brochure for
specific instructions on mounting
underbench and tower
installation.
The electrical circuit must be
correctly earthed.
Once wiring is connected, fit the
oven into the unit, taking care not
to leave any excess cable lying
on top of the oven.
Fix the oven to the unit with 4
screws (included in the oven
packaging inclusions).
515
595
590
20
60
590
560
550
50
360
595
360
560
50
550
515
595
590
20
18
Page 21

19
WIRING DIAGRAM
Page 22

Page 23

21
WARRANTY AND SERVICE
DOMESTIC WARRANTY - FULL FIVE YEAR WARRANTY
In addition to all statutory rights which you, the Consumer, have under the relevant laws in
respect of this appliance, during the first five years of ownership as the original purchaser
of this Kleenmaid appliance, we guarantee that any fault caused by faulty material or
workmanship becoming apparent will be rectified free of charge for parts and labour,
provided that all service is performed during normal working hours by Kleenmaid or
their designated Agents.Where the appliance is installed outside the normal servicing
area of the above, the Purchaser must pay for the cost of transporting the appliance to and
from the Agent or the Agent’s travelling cost to and from the Purchaser’s home.
COMMERCIAL WARRANTY - ONE YEAR WARRANTY
When this appliance is installed in a commercial application, you, the Consumer, have
under the relevant laws in respect of this appliance, during your first one year of
ownership as the original purchaser of the Kleenmaid appliance, we guarantee that any
fault caused by faulty material or workmanship becoming apparent, will be rectified free
of charge for parts and labour, provided that all service is performed during normal
working hours by Kleenmaid or their designated Agents.Where the appliance is installed
outside the normal servicing area of the above, the Purchaser must pay for the cost of
transporting the appliance to and from the Agent or the Agent’s travelling cost to and from
the Purchaser’s home.
WHAT THESE WARRANTIES DO NOT COVER
We are not responsible for any damage or malfunction unless caused by a defect in
material or workmanship. This includes but is not limited to abuse, misuse, improper
installation and transportation damage.We are not responsible for any consequential
damages from any malfunction.
WARRANTY DOES NOT COVER REPLACEMENT OF LIGHT GLOBES OR
GLASS BREAKAGE DUE TO IMPACT
In case of fractured glass do not use your appliance.
WARRANTY REGISTRATION
Please complete the enclosed warranty card and post it to us or phone our Customer Call
Centre.
SERVICE ASSISTANCE
To assist you when phoning our Customer Call Centre number to arrange a service call
please complete the following details and have them ready when you call.
Model Number: Date of purchase:
Kleenmaid Store purchased from:
KLEENMAID CUSTOMER CALL CENTRE
CONTACT NUMBER
1300 652 100
Date of installation:
Page 24

Other products in Kleenmaid’s range
of world’s best appliances:
• Washers
• Dryers
• Vacuum Cleaners
• Dishwashers
• Cooktops
• Cookware
• Rangehoods
• Ovens
• Refrigerators & Freezers
• Sinks & Taps
• Waste Disposals
Kleenmaid Head Office:
PO Box 5560, Maroochydore Business Centre, Queensland 4558
For sales information on the full range of quality
kitchen and laundry appliances, phone 13 13 08
9-02
C60T072A3
Printed on recycled paper.
 Loading...