

Page 1

CookingCooking
c o l l e c t i o nc o l l e c t i o n
Instructions for Use
and
Warranty Details
TO701X - Multifunction Stainless Steel Pyrolytic Oven
Page 2

ongratulations on the purchase of your new
C
designed and manufactured to give you years
For best results, carefully read the instructions on
how to install your new appliance. Correct installation
will avoid delays and unnecessary service calls.
Once installation is complete, read this booklet
carefully and get to know the controls and the
We reserve the right to alter the specifications
appliance. This instruction manual cannot be
appliance. This appliance has been
of reliable performance.
features of your new appliance.
reason for a claim.
Page 3

Throughout this manual,
indicates safety recommendations,
indicates advice to help you make the
best use of your oven
Introduction
P.3
Your oven
H
ow it works P.4
A
ccessories
P.5-6
Safety recommendations
P.7
C
hild safety
P.
7
How to install your oven
Electrical connections P.8-9
Dimensions for installation use P.10-11
How to use your oven
The oven programmer
P.12-13
How to set the clock
P.14
How to cook straightaway
P.15
How to programme the cooking
P.16
How to delay cooking (pre-selected end time)
P.17
How to cook economically
P.18
How to use the Grill+ feature
P.19
How to use the timer
P.20
How to adjust the brightness of the display panel
P.21
Cooking methods
P.22-23
Cleaning the oven cavity
Pyrolysis explained P.24
When to clean by pyrolysis P.24
Starting pyrolysis straightway P.25
Delaying cleaning by pyrolysis P.26
Changing a bulb
P.26
Troubleshooting
P.27
How to contact us
P.28
2
C
ontents
99629211_GB_A.qxd 16/06/03 10:27 Page 2
Page 4
4
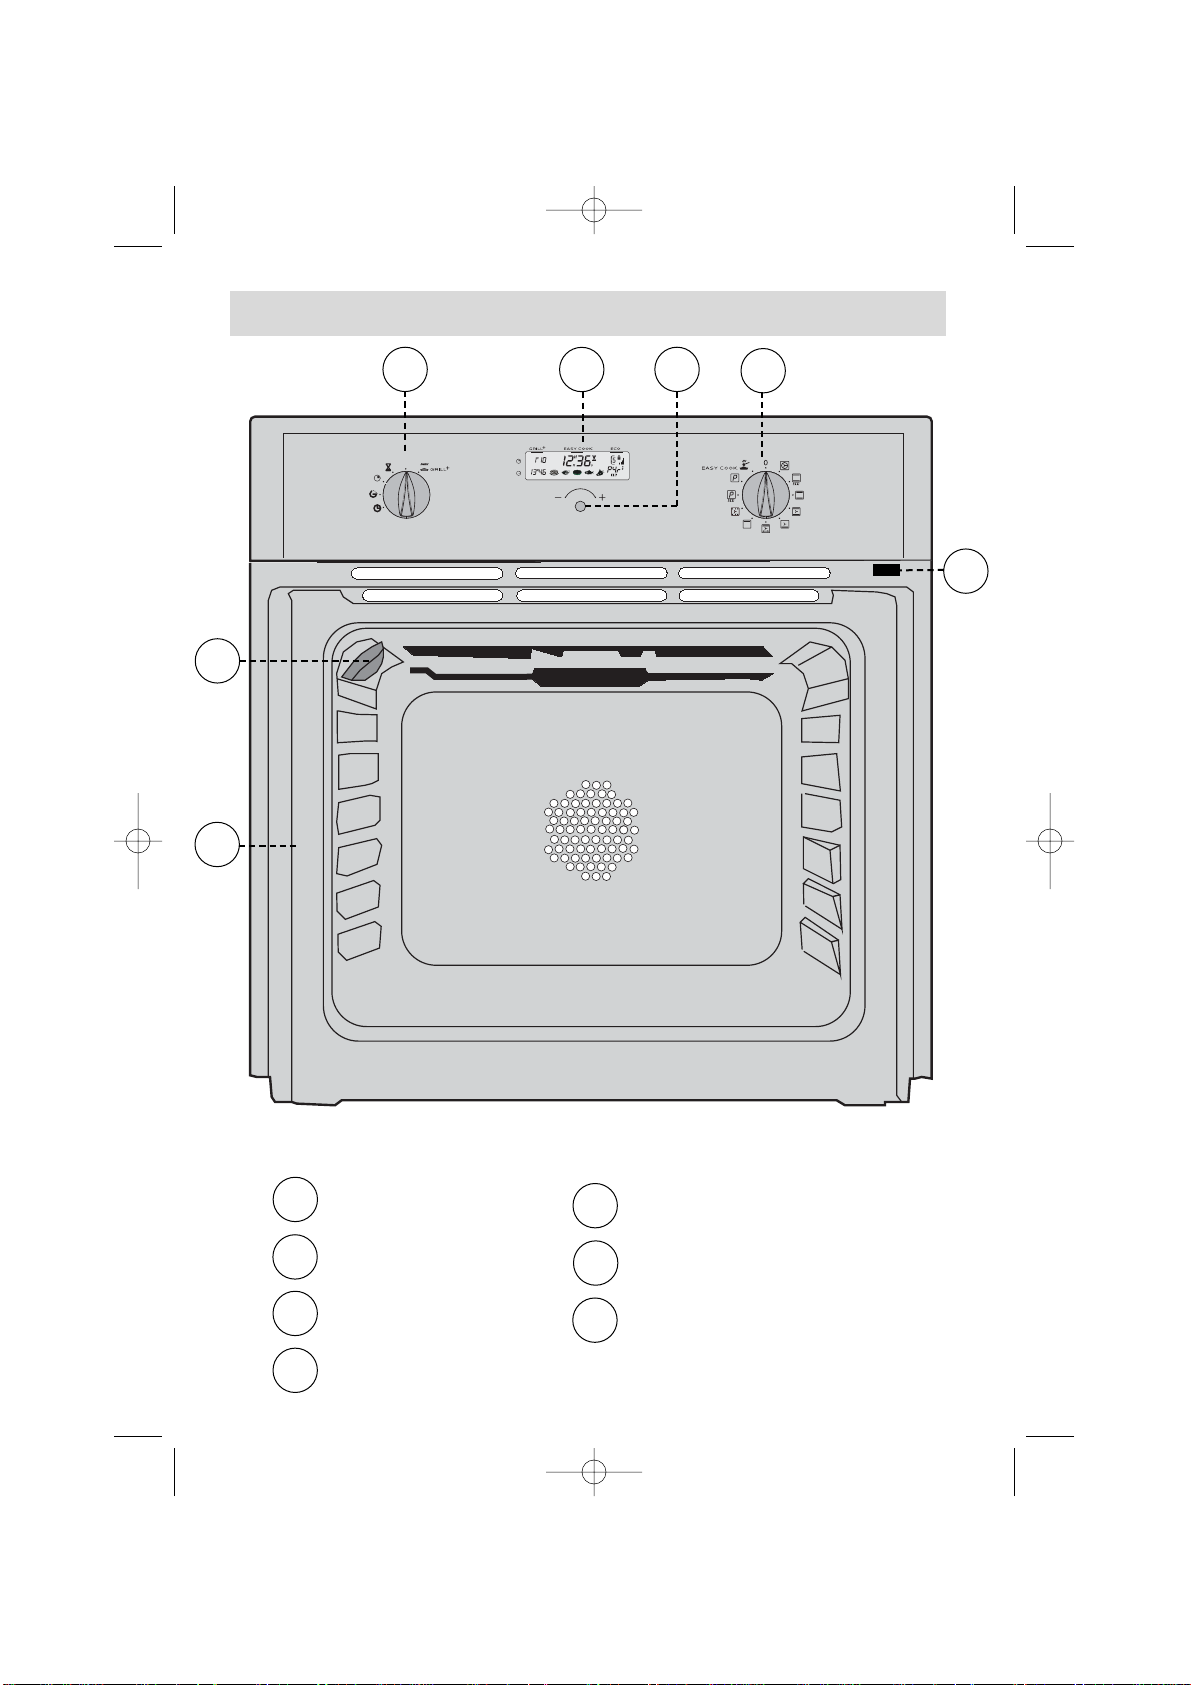
Y our oven
1
3
5
T˚
c
1 2 3
5
6
7
4
OVEN FEATURES
1
2
3
4
Programme selector
Programme display
Control knob
Function selector
5
6
7
Light
Rail positions
Door-open detector plate
99629211_GB_A.qxd 16/06/03 10:27 Page 4
Page 5
5
8
Anti-tip safety shelf
Food can either be placed on the shelf in a
dish or cake tin for cooking or browning, or
may be placed directly on the shelf itself.
Accessories
Inserted under the shelf, this pan catches cooking juices and fat from grilled
food. It can also be used half filled with water as a double boiler. Joints should
not be cooked in this tray uncovered because fat could spit over the oven sides.
Multi-purpose baking tray
(Cake tray or dripping pan)
The tray has a sloping edge can be used as
a cake dish and can be used for cooking
pastries and cakes such as cream puffs,
meringues, madeleines and puff pastry.
9
Deep Baking Tray
The tray can be used for collecting juices when
cooking with the grill element by itself or with
the oven set to fan assisted grill. It is
particularly useful as a large roasting tray for
meat and vegetables. Never cook with the GRILL
tray sitting on the bottom of the oven.
10
Pastry tray
(to be placed on the shelf
)
The pastry tray should be placed on the plate
support shelf. It is useful for cooking pastries,
tarts, pizzas, etc.
11
99629211_GB_A.qxd 16/06/03 10:27 Page 5
Page 6
6
Accessories
99629211_GB_A.qxd 16/06/03 10:27 Page 6
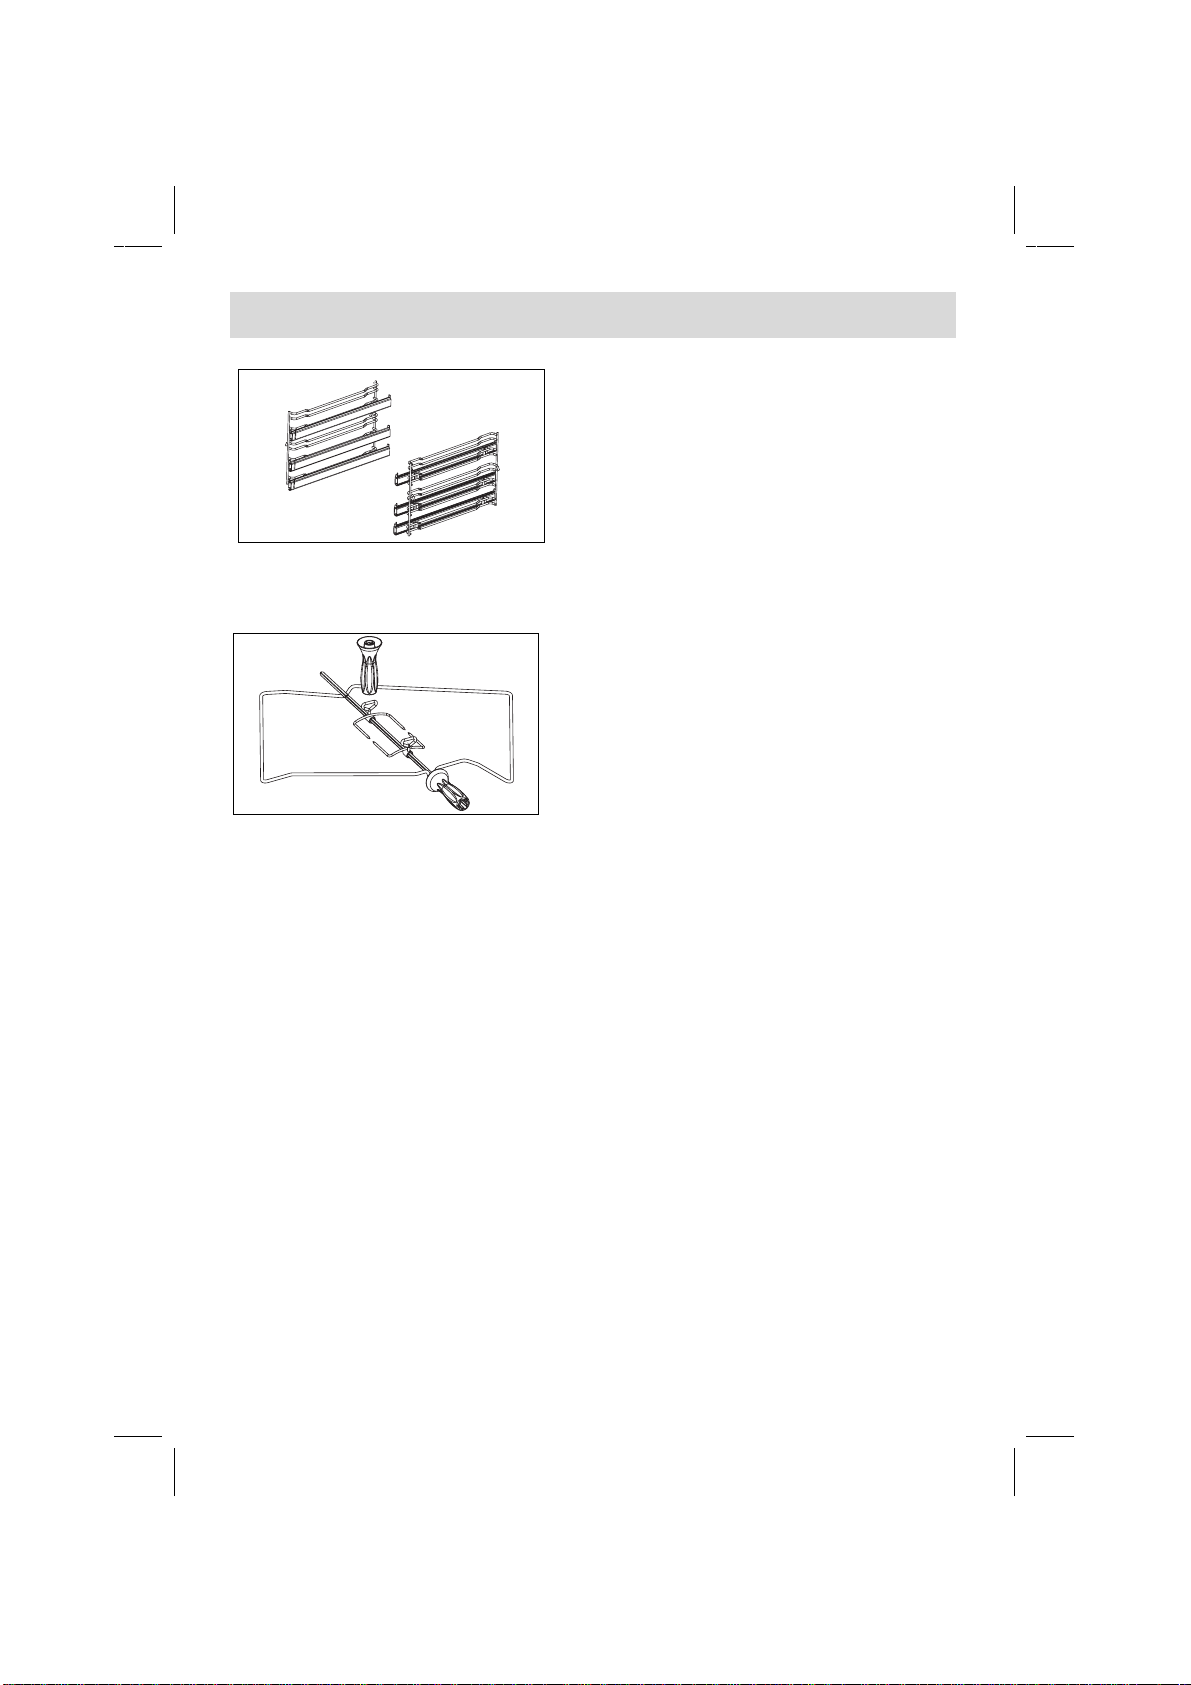
slide on the second fork; centre and tighten the two forks.
• Place the spit on its cradle.
• Push gently to locate the tip of the spit in the turning mechanism situated at the
back of the oven.
• Remove the handle by unscrewing it. After cooking, screw the handle back onto the
spit to take it out without burning yourself.
At the end of the handgrip, a depression enables you to unscrew the forks.
Rotisserie
To use it:
• Place the multi-purpose baking tray at
level no. 1 to collect the cooking juices or
on the bottom of the oven if the piece of
meat to be roasted is too big.
• Slide one of the forks onto the spit; put the
piece of meat to be roasted onto the spit;
Thanks to this system, you can totally
remove your enamelled dishes an
easily access your preparations
while they are cooking. It absolutely
must be removed during PYROLYSIS cycles.
Sliding system
Page 7
Safety recommendations
SAFETY MODE USING IN SAFETY MODE
To activate safety mode: When the security catch
Pull the catch towards you. is in use:
open the door and lift
the catch at the same time
T
o deactivate saf
ety mode:
Push the catch back.
When the saf
ety mode
is not activ
ated:
the door opens normally.
Please read these instructions before installing and using your oven.
The oven has been designed for domestic use only for cooking food. No asbestos
has been used in its construction.
USING FOR THE FIRST TIME:
Before you use your oven for the first time, leave it empty and, with the door
closed, turn it on to maximum temperature and let it heat up for 15 minutes. This
"runs the oven in". During this time there may be some smell from the mineral wool
that insulates the oven and there could be some smoke. This is perfectly
normal.
NORMAL USE:
- Always close the door properly. The oven is fitted with a seal designed to
work with a closed door.
- Never lean or let anyone sit on the oven door when it is open.
- The oven parts and accessories can become hot when the door is
left partially open and the grill on. Always keep children at a safe distance.
- When the oven is on it will get hot. Take care not to touch the heating
elements inside the oven.
- Always protect your hands with oven gloves or something similar when
removing food, accessories or containers from the oven.
- Do not line your oven with kitchen foil. The metal will increase the heat pro-
duced and could ruin the food and damage the enamel.
- Never use a spray or a high-pressure washer to clean the oven.
- During self-cleaning, surfaces can become hotter than in normal use.
Children must be kept at a distance.
During the action of pyrolysis, accessible surfaces become much hotter than during
normal cooking. Keep children at a distance.
Always check that the oven is off before you clean the inside.
- The appliance is not intended for use by young children and infirm
persons without supervision.
- Young children should be supervised to ensure that they do not
play with the appliance.
Child safety
1
2
3
1
2
3
7
Document1 23/02/04 17:27 Page 1
Page 8
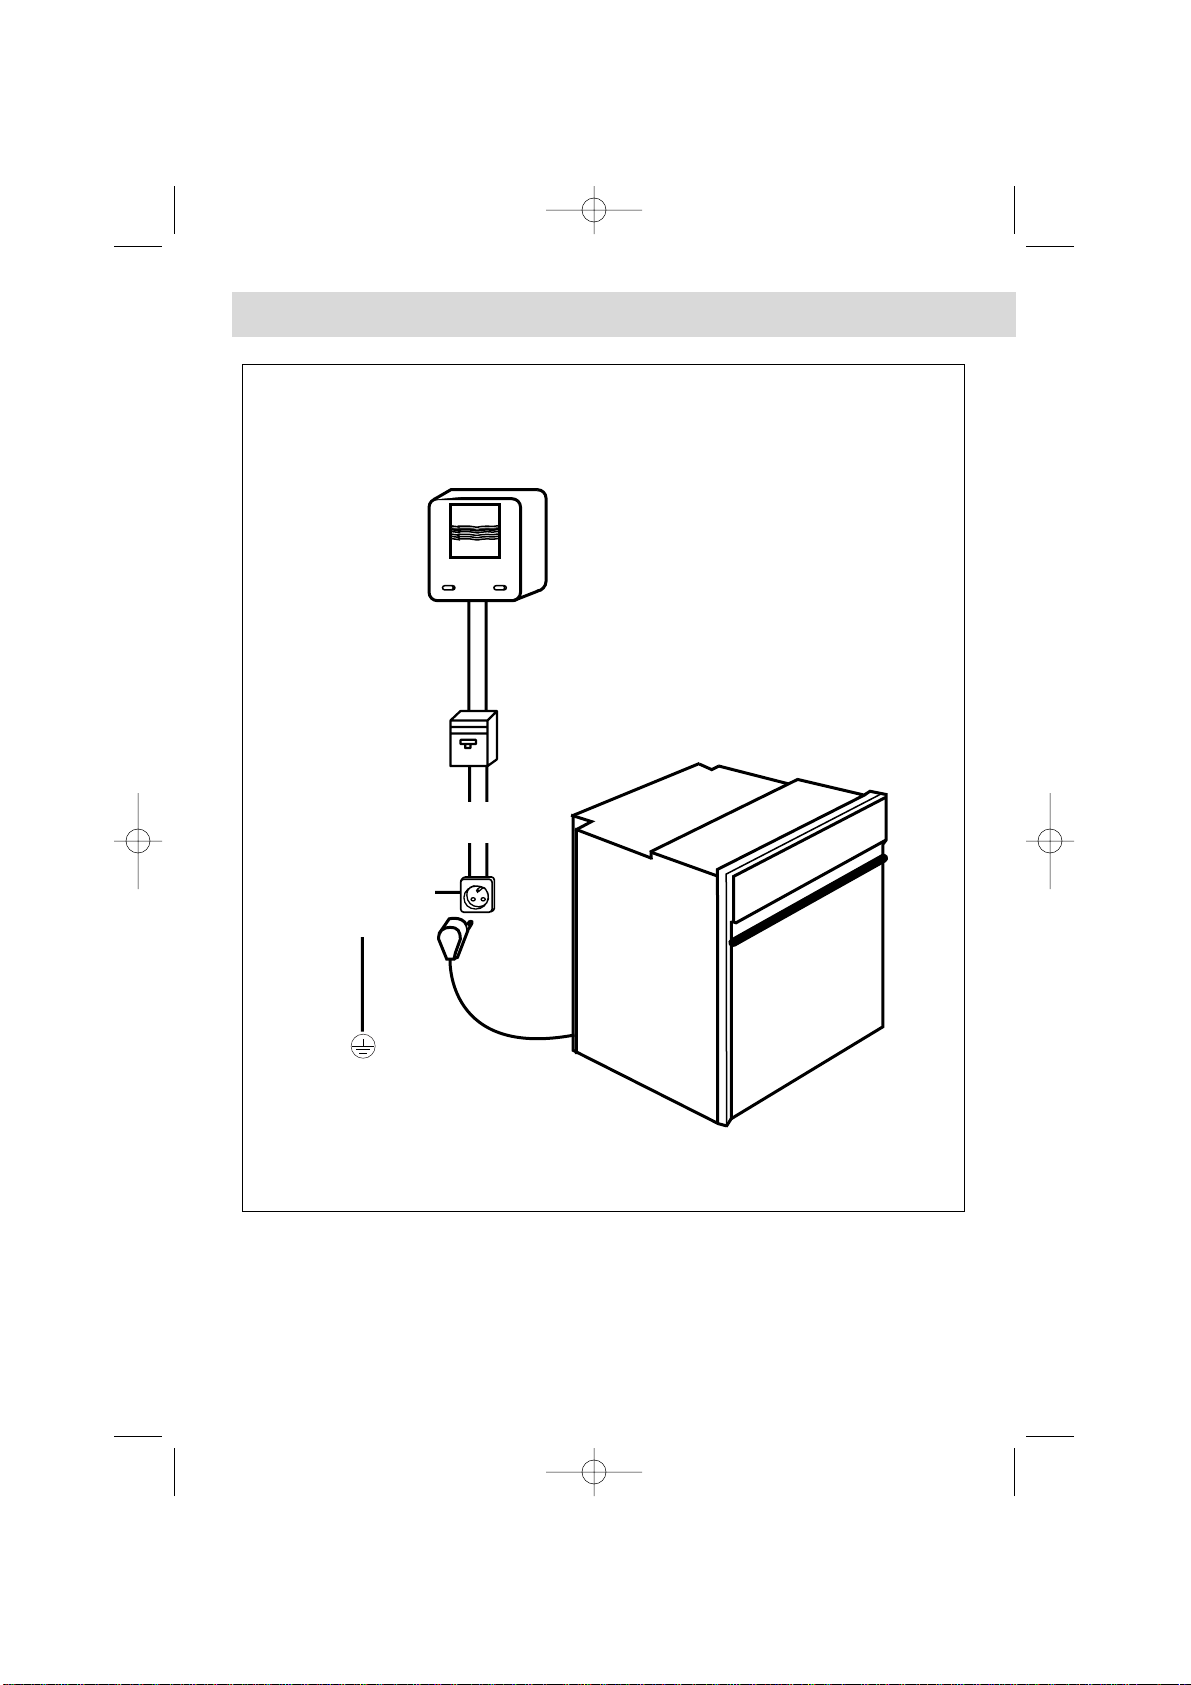
8
How to insta
Electricity meter (mains)
(20A, single-phase
220-240 V alternating
current 50 Hz)
Socket
2 -pin with earth
220-240 V single phase
alternating current supply
Electrical connections
Before connecting your oven, make sure you are using the correct size cable. The
cross-section should be the same as the cable connected to the oven. Use a 16amp fuse.
Connecting cable
approx 1.50 m.
long
Fused 16A or differential
circuit breaker
99629211_GB_A.qxd 16/06/03 10:27 Page 8
Page 9

9
ll your oven
We cannot accept any liability in the event of an accident
resulting from non-existent or faulty earthing.
• Open the trapdoor at the bottom right hand side at the back of the oven by
removing the 2 screws and swinging the door away.
• Remove the sheath from each wire in the new cable up to 12 mm.
• Twist the ends carefully together.
• Unscrew the terminal screws and remove the wires that need changing.
• Pass the new cable through the wire clamp to the right of the terminals.
• Connect the wires up in accordance with the markings on the terminals.
• Make sure all wires are trapped under the screws.
• The brown wire (live) going to terminal marked L.
• The green and yellow wire (earth) going to the one marked .
• The blue wire (neutral) going to the terminal marked N.
• Tighten the screws and check, by tugging on each wire, that they are firmly connected.
• Tighten the clamp to hold the cable.
• Close the trapdoor using the two screws.
The electrical connections are made before the oven is installed in its housing.
• The oven must be connected using an approved 3-core cable (live, neutral and
earth
) of sufficient size to carry the rated current of the oven. This should be
connected via a 3- pin socket (live, neutral, and earth to the main supply which
should be should be a 220-240V, alternating single-phase current. If the oven is
not connected using a plug and socket, it must be connected to a multi-pole switch
with a minimum gap of 3 mm between contacts. The earth wire (green and yellow)
should be connected to the terminal marked with the earth symbol on the
appliance and to the earth in the switch.
• Where the oven is connected using a separate plug and socket this must be
accessible after the oven has been installed.
• The neutral wire (blue) of the oven must be connected to the neutral in the main supply.
Fitting new wiring and/or changing cables.
99629211_GB_A.qxd 16/06/03 10:27 Page 9
Page 10

10
H o w t o i n s t a
Dimensions for installation
99629211_GB_A.qxd 16/06/03 10:27 Page 10
Page 11

11
The oven may be housed either under a work surface or built into a
column that is open* or closed with a suitable opening.
Your oven works at its best and produces excellent results when cooking and
cleaning itself, if the air circulation is not compromised:
• The oven must be centred in the unit so that there is a minimum distance of 5
mm between it and the surrounding unit.
• The housing unit or its outer surface must be capable of withstanding heat.
• To ensure the oven rests firmly in the housing, screw it to the housing unit using
the holes on the side uprights provided (see diagram).
To do this:
1) Remove the rubber stoppers masking the fixing holes.
2) To prevent the housing unit splintering, drill two holes 3 mm in diameter in the
wall of the housing unit opposite the fixing holes.
3) Attach the oven using the two screws.
4) Conceal the hole using the rubber stoppers. (These also help to cushion the
closing of the oven door).
(*) If the housing unit is open at the back, the gap must not be more
than 70 mm.
Your oven must be connected by a qualified electrician.
99629211_GB_A.qxd 16/06/03 10:27 Page 11
Page 12

12
H ow to use
1. The programme display
13
5
7
8
9
6
2
4
10
11
12
+
99629211_GB_A.qxd 16/06/03 10:27 Page 12
Page 13

your oven
13
Temperature increase indicator
ECO (economical) cooking indicator
Recommended shelf height for dish
EASY COOK indicator
Time display (time of day and timer)
Grill+ indicator
Length of cooking time
End of cooking time
EASY COOK dishes indicator
Control knob
Oven temperature and pyrolysis indicator
Door locked indicator
1
2
3
4
5
6
7
9
10
8
11
12
99629211_GB_A.qxd 16/06/03 10:27 Page 13
Page 14

14
a) When the oven is first
switched on at the mains
• Set the time of day by turning the knob (the
faster you turn the knob the quicker the time is
displayed).
• The oven assumes the time is correct a few
seconds after you stop turning the knob
-> The display stops blinking.
Time chosen is 12.30.
b) Altering the clock
• Turn the programme selector to the re-set position
• The time display blinks and you can alter the time.
• Turn the knob to obtain the correct time (back or
forwards).
• When the correct time is shown, turn the selector
to ”T°c” (temperature control) -> and the display
will stop blinking.
If you omit the last step, the oven will automatically assume the time
after a few seconds.
2. How to set the clock
99629211_GB_A.qxd 16/06/03 10:27 Page 14
T˚
c
T˚
c
Page 15

15
How to use your oven
The programme display only shows the time
of day. It should not be blinking.
• Choose how you want to cook your food:
Turn the dial until it is indicating your choice.
Example : position " ".
• Place your dish in the oven at the height
recommended in the display.
E.g" " -> means shelves 1 or 2.
• Your oven will suggest the best temperature
for the method chosen. In this case 200ºC.
However, you can override the suggestion by
using the knob below the display.
E.g " " is now at 190ºC.
After this, the oven heats up, the
temperature increase indicator is busy
and reflects how hot the oven is.
When the oven has reached the right temperature, it will sound 3 beeps.
After cooking the fan continues to work for a while to ensure
the elements cool right down.
3. How to cook straightaway
99629211_GB_A.qxd 16/06/03 10:27 Page 15
Page 16

16
How to use your oven
a) To delay cooking
• Choose the method of cooking and adjust the
temperature if necessary.
The example is " "
Temperature 200°C
• Turn the programme selector to
“”
The cooking time display shows 0:00 and blinks.
You can now set how long to cook for.
•
Turn the knob until the time is displayed.
E.g. 25 minutes
The oven will automatically assume this time is
correct after a few seconds
-> The display will stop blinking.
Immediately the display stops blinking the
countdown starts.
The time cooking will finish (start time + cooking
time) is shown in the display panel.
For this example:
cooking will end at 12:55 pm
After this, the oven heats up,
the temperature increase indicator is busy and reflects how hot
the oven is. When the oven has reached the right temperature, it will
sound 3 beeps.
At the end of the cooking time, the oven gives a series of beeps for some
minutes. To switch the beeps off, turn the programme selector to TºC and
the function selector to "0".
4. How to programme the cooking
99629211_GB_A.qxd 16/06/03 10:27 Page 16
T˚
c
Page 17

17
b) Delayed cooking with a pre-selected cooking time (you decide
when cooking will stop)
• As for a), choose the oven function mode and
the temperature and select the length of time to
cook for.
Now, immediately turn the programme selector
The end of cooking time will blink in the display
panel.
• To postpone this, turn the knob until the
time you want appears.
In the example shown, cooking will stop
at 1 pm (13:00)
When you have done this, cooking is delayed and will start later and finish at
13:00. When cooking finishes the oven gives a series of beeps until you turn the
function selection to “0”.
How to use your oven
After you have programmed in the times you can still:
- Change the length of cooking time
- Cancel the programme at any time by re-setting the cooking
time to 0:00
99629211_GB_A.qxd 16/06/03 10:27 Page 17
to " ".
T˚
c
Page 18

How to use your oven
5. H
ow to cook economically*
18
The programme display must be showing the
time of day without blinking.
• Turn the function selector to " " and the
ECO indicator will appear in the panel.
• Place your dish in the oven according to the
suggestion.
E.g " " -> means shelves 1 or 2 are the best
• Your oven will now display the best tempera-
ture to cook at for the method. E.g. 200ºC. If
you want to change this, use the knob beneath
the display panel.
The display shows " " at 190ºC.
After this, the oven heats up, the
temperature increase indicator is busy
and reflects how hot the oven is.
When the oven has reached the right temperature, it gives 3 beeps.
*This setting is designed to reduce the energy required for cooking by
up to 20%, while still producing the same results.
ECO means it is energy-efficient as stated on the label.
After cooking the fan continues to work for a while to ensure
the elements cool right down.
99629211_GB_A.qxd 16/06/03 10:27 Page 18
Page 19

19
How to use your oven
6.
How to use the Grill+ feature
You can either switch this function on or off during the main
cooking period. Simply turn the knob below the display.
You can also use this function during a delayed cooking cycle.
This feature enables you to brown the top of the dish after it has been cooked by
another method. For the last 5 minutes of cooking time, the grill switches on.
It will only operate in conjunction with the following functions: .
The feature is selected by adding 5 minutes to the cooking time or turning
the function selector to GRILL+ when
cooking ends.
• Set the cooking method and alter the
temperature if required.
• Turn the programme selector to GRILL+, the
cooking time will blink 0:05 (this is the minimum
time this feature operates for, when used with
another cooking method).
• Turn the knob to add the normal cooking time.
After a few seconds, the display will stop
blinking.
• When you have done all three, the oven will
warm up and a horizontal bar will light up in the
display panel under the word GRILL+ to indicate
it is working. 5 minutes after the main cooking ends the GRILL+ indicator will start
blinking.
Never place dishes too close to the grill element or the food will burn
rather than brown gently. Always use a shelf at the bottom of the oven
(1 or 2).
Sui
table dishes:
• Cheese-topped pasta, leeks in cheese sauce, fish in sauces, fruit crumble etc..
Typical example of this f
eature in use :
Cauliflower cheese sprinkled with extra cheese:
• 1.Select cooking method
• 2.Select temperature (180ºC)
• 3.Select GRILL+
• 4.Select time: 25 minutes.
The sauce will heat for 20 minutes and then the cheese topping will brown for 5.
99629211_GB_A.qxd 16/06/03 10:27 Page 19
T˚
c
Page 20

Your oven is fitted with a separate minute timer. It is not connected to the
oven's programmes. You can use it just like a kitchen timer.
This feature can be used even when the oven is working. Using the timer will
cause the time of day to disappear temporarily from the display.
• Turn the programme selector to “ ” -> the
display blinks and a small egg-timer lights up.
• Turn the knob until the time you want is
displayed (up to 59 minutes 59 seconds)
E.g.: 15 minutes 30 secs
A few seconds later the display stops blinking and you will see the countdown
taking place. When the timer reaches 0, it will beep to let you know.
7. How to use the timer
How to use your oven
You can alter or switch the timer off at any time.
20
99629211_GB_A.qxd 16/06/03 10:27 Page 20
T˚
c
Page 21

21
How to use your oven
8. How to adjust the brightness of the display panel
To adjust the brightness of the display panel:
• Set the time of day to 12:10
• Keep hold of the knob and continue turning
until the light is as you want it.
Once you have adjusted the brightness you
will need to reset the time of day.
99629211_GB_A.qxd 16/06/03 10:27 Page 21
Page 22

22
Cooking methods
F
an assisted oven
Food is cooked by a top and
bottom element and the fan.
C
onventional oven
Food is cooked by a top and
bottom element. No fan.
Fan assisted classic bake oven
The bottom element heats up
and the fan move the hot air
around to cook the food.
Warming oven
Upper element at a control temperature, warm air is circulated.
Variable grill
Only the top element heats up.
The fan is not used
.
Temperature rises rapidly. So
can be started off in a cold o
Pre-heating needed to reach
red temperature.
Stays warm
Warm up for 5 minutes.
Slide the grill pan onto the r
the grill.
Food is cooked from underne
Place the wire shelf on the lo
This programme allows abou
saving.
The ECO feature is used to l
oven.
Symbol
Function Description
C
onventional oven ECO
Food is cooked by a top and
bottom element. No fan.
F
an forced oven
A heater element at the back of
the oven and the fan help cook
the food.
No pre-heating necessary ex
food with a relatively short c
(e.g. small biscuits on severa
Fan grill
Cooking is done alternately by
the top element and by the fan.
No need to pre-heat.
Suitable for poultry and
succulent joints that have a
appearance.
*
*
99629211_GB_A.qxd 16/06/03 10:27 Page 22
Page 23

23
Recommended for MEAT, FISH and VEGE-
TABLES, preferably in a earthenware dish.
Recommended for food requiring slow,
careful cooking such as game and braising
joints. Ideal for sealing red meat joints
and simmering lidded casseroles whose
contents have been partially cooked on
the hob first.
Recommended for leaving breads to rise
(keeping temperature below 40ºC), keeping dishes warm and thawing food.
Recommended for grilling chops,
sausages, and large prawns and for
making toast.
Recommended for dishes with a lot of
liquid (quiches and fruit pies) as the pastry
base is cooked through. Use also for food
that rises (bread and cakes) and uncovered
soufflés.
Recommended to save energy. Cooking
time may be longer but less energy is
Recommendations
Cooking methods
rail beneath
Recommended to prevent meat drying
out, and for cooking vegetables and fish
and food placed on up to 3 shelves.
cooking time
To seal and cook through lamb chops
and sides of beef. To cook fish in
breadcrumbs.
spit-roasted
Cº Shown
min.
35°
used during cooking.
show
180°
max.
235°
min.
35°
show
200°
max.
275°
min.
35°
show
240°
max.
275°
min.
35°
show
200°
max.
275°
min.
35°
show
205°
max.
275°
min.
35°
show
200°
max.
230°
min.
35°
show
275°
min.
35°
show
80°
max.
100°
99629211_GB_A.qxd 16/06/03 10:27 Page 23
Page 24

24
- Your oven is self-cleaning. It does this by burning off the spatters and drips
produced, at high temperature. The smoke and smells that this produces are removed
as the air passes through a catalyst.
- It is not necessary to run the pyrolysis function after every use of the oven, simply
when the oven is dirty.
- To make it more efficient, this oven has 2 pyrolytic cleaning cycles.
- An energy-saving one (PYRO ECO) lasting 90 minutes (plus cooling down
time means the oven is locked for 2 hours) and consuming 25% less energy than
the standard cycle. Used after the second or third time you cook meat, this function
will ensure your oven stays clean.
- Standard cycle (PYRO) lasting 2 hours (plus cooling down time means the
oven is locked for 2½ hours) and suitable for cleaning a really dirty oven.
- As a safety measure, once the temperature is higher than normal use, the door
automatically locks. You cannot unlock it even by turning the pyrolysis function off.
1. Pyrolysis explained
C leaning the
2.
When to clean by pyrolysis
FOOD WITH LITTLE Biscuits, vegetables, cakes You do not need to use
SPATTERING quiches, soufflés pyrolysis function
FOOD THAT Meat, fish (in an open dish) Use the pyrolysis function
SPATTERS stuffed vegetables after 3 oven uses
FOOD THAT Large pieces of If a lot of spitting occurs,
SPITS BADLY meat on the spit run the pyrolysis function
afterwards.
If your oven smokes when the pre-heat function is on or if there is a lot of
smoke during a cooking cycle run the pyrolysis cycle. You can also use this
function if there is an unpleasant smell of cooking when the oven is cold.
Do not wait until the oven is coated in dirt before cleaning it.
99629211_GB_A.qxd 16/06/03 10:27 Page 24
Page 25

3. S
tarting pyrolysis straightway
25
Before embarking on pyrolytic cleaning, make sure there are no cooking
trays or containers in the oven and the two telescopic sliding systems
have been removed and you have wiped up any large splashes or drips.
• Check that the time of day is glowing steadily
in the display panel (not blinking).
• Turn the function selector to PYRO or
PYRO ECO.
The time for the pyrolysis to work is 2 hours
(PYRO ECO) or 2½ (PYRO). This includes the
cooling-down time until the door is unlocked.
The display will show you when you can use
your oven again.
When it shows
on the display, the pyrolytic
cycle (or the energy-saving pyrolytic cycle) is working.
During the cycle, a padlock
appears on the
display to remind you the door is locked.
At the end of the cycle the display
shows..........................................................
>
When the disappears you can open the door.
• Move the function selector back to 0.
• When the oven is completely cold use a damp
cloth to remove the white ash. The oven will
once more be ready for you to cook in.
99629211_GB_A.qxd 16/06/03 10:27 Page 25
Page 26

Changing a bulb
• The light bulb is housed in the ceiling of your oven.
a) Turn the shade a quarter of a turn
to the left.
b) Unscrew the bulb in the same
direction.
The bulb used is a:
- 15 W
- 220-240 V
- 300°C
- E 14 screw-fitting bulb
c) Change the bulb, replace the shade and switch your oven back on at the mains.
bulb fitting
unscrew
cover
It is easier to unscrew the shade and bulb if you wear a rubber glove.
Warning! Switch off the power at the main switch before
attempting to change the bulb. Leave the oven to cool if
necessary.
26
Follow the instruction on how to carry out a pyrolytic cleaning straightway then:
• Set the programme selector to “ ”.
The end of cooking time blinks and you can now
adjust the time.
• Turn the knob until the finish time is shown.
E.g. pyrolysis will finish at 4 am.
After this the start of pyrolytic cleaning is delayed
and will finish at 4 am.
When the cleaning is finished, turn all the
selectors to the off position.
4. Delaying cleaning by pyrolysis
99629211_GB_A.qxd 16/06/03 10:27 Page 26
T˚
c
Page 27

27
T roubleshooting
If you're not sure that your oven is working properly, it doesn't necessarily
mean that there's a problem.
In all cases, check the following points:
If you realise that..
Possible causes what should you do?
The oven isn't heating.
• The oven isn't connected to the
power supply.
• The fuse has blown.
• The temperature selected is too
low.
• The sensor is faulty
• The oven has overheated. It has
been put out of use for safety
reasons
- Connect to power supply.
- Change the fuse, checking that it is
16A.
- Increase the temperature selected.
- Contact the After-Sales Service.
- Contact the After-Sales Service.
- Contact the After-Sales Service.
The temperature light does not
go out.
• The door lock is faulty.
• The temperature sensor is faulty.
- Contact the After-Sales Service.
- Contact the After-Sales Service.
The light inside the oven isn't
working.
• The lamp is unusable.
• The oven isn't connected to the
power supply or the fuse has
blown.
- Change the bulb.
- Connect to power supply or
change fuse.
The cooling fan keeps working
after the oven is turned off.
• The fan can keep working for up
to an hour after the oven switches
off if it is over 125ºC.
• If it has not stopped after 1 hour.
- Open the door to help the oven
cool down more quickly.
- Contact the After-Sales Service.
Cleaning by pyrolysis has not
occurred.
• The door is not shut properly.
• The door-locking system is faulty.
• The temperature sensor is faulty.
• The plate that detects when the
door is shut is faulty.
- Check the door is properly closed.
- Contact the After-Sales Service.
- Contact the After-Sales Service.
- Contact the After-Sales Service.
99629211_GB_A.qxd 16/06/03 10:27 Page 27
Page 28

NOTES
Page 29

NOTES
Page 30

DOMESTIC WARRANTY - FULL FIVE YEAR WARRANTY
In addition to all statutory rights which you, the Consumer, have under the relevant laws in respect
of this appliance, during the first five years of ownership as the original purchaser of this
Kleenmaid appliance, we guarantee that any fault caused by faulty material or workmanship
becoming apparent will be rectified free of charge for parts and labour, provided that all service is
performed during normal working hours by Kleenmaid or their designated Agents. Where the
appliance is installed outside the normal servicing area of the above, the Purchaser must pay for
the cost of transporting the appliance to and from the Agent or the Agent’s travelling cost to and
from the Purchaser’s home.
COMMERCIAL WARRANTY - ONE YEAR WARRANTY
When this appliance is installed in a commercial application, you, the Consumer, have under the
relevant laws in respect of this appliance, during your first one year of ownership as the original
purchaser of this Kleenmaid appliance, we guarantee that any fault caused by faulty material or
workmanship becoming apparent, will be rectified free of charge for parts and labour, provided that
all service is performed during normal working hours by Kleenmaid or their designated Agents.
Where the appliance is installed outside the normal servicing area of the above, the Purchaser
must pay for the cost of transporting the appliance to and from the Agent or the Agent’s travelling
cost to and from the Purchaser’s home.
WHAT THESE WARRANTIES DO NOT COVER
We are not responsible for any damage or malfunction unless caused by a defect in material or
workmanship. This includes but is not limited to abuse, misuse, improper installation and
transportation damage. We are not responsible for any consequential damages from any
malfunction.
The Consumer must make the appliance available for servicing and shall bear any costs incurred
for any de-installation and/or re-installation required to make the appliance available for servicing.
Kleenmaid is not liable for any consequential damage incurred during de-installation or reinstallation.
WARRANTY DOES NOT COVER REPLACEMENT OF LIGHT
GLOBES OR GLASS BREAKAGE DUE TO IMPACT
In case of fractured glass do not use your appliance.
WARRANTY REGISTRATION
Please complete warranty details below and retain together with your proof of purchase document
These documents will need to be viewed by our Service Representative should you request in warranty
service.
SERVICE ASSISTANCE
To assist you when phoning our After Sales Service number to arrange a service call please complete
the following details and have them ready when you call.
Model Number_____________________________Date of purchase____________________________
Kleenmaid Store purchased from_________________________Date of installation ________________
KLEENMAID AFTER SALES SERVICE
1300 652 100
WARRANTY AND SERVICE
Page 31

Page 32

Other products available in the Kleenmaid
Range of appliances
Washers
Dryers
Dishwashers
Ovens
Cooktops
Outdoor Cooking Centres
Built In Espresso Coffee Machines
Rangehoods
Freestanding Ranges
Sinks
Waste Disposals
Taps
Cookware
Refrigerators
Freezers
Wine Cellars
Vacuum Cleaners
For sales information on the full range of quality appliances
Phone 13 13 08
99629217 April 04
 Loading...