

Page 1

CookingCooking
c o l l e c t i o nc o l l e c t i o n
Instructions for Use
and
Warranty Details
TO600X Designer Multifunction Electronic Touch Control Oven - Stainless Steel
TO600W Designer Multifunction Electronic Touch Control Oven - White
Page 2

ongratulations on the purchase of your new
C
designed and manufactured to give you years
For best results, carefully read the instructions on
how to install your new appliance. Correct installation
will avoid delays and unnecessary service calls.
Once installation is complete, read this booklet
carefully and get to know the controls and the
We reserve the right to alter the specifications
appliance. This instruction manual cannot be
appliance. This appliance has been
of reliable performance.
features of your new appliance.
with no influence on the operation of the
reason for a claim.
Page 3

Electric oven
This electric oven is manufactured for domestic
use only.
For best results, carefully read the instructions on
how to install your new appliance. Correct
installation will avoid delays and unnecessary
service calls.
Our appliances are packed in environmentally
friendly materials which may be recycled,
deposited or destroyed without any hazard to the
environment. Such packaging materials are also
labelled accordingly.
Once the life cycle of your appliance is over,
ensure you do not to pollute the environment.
Deliver it to an authorised collector of used
household appliances.
This instruction manual cannot be reason for a
claim.
Safety warnings are listed on page 4.
The first thing to do is to check if your appliance
has arrived undamaged. In case you find any
transport damages, please report it immediately to
your nearest Kleenmaid Store on 13 13 08.
We hope your oven will successfully serve its
purpose for many years.
Contents
Safety precautions ............................................4
Intended use
Cooling fan
Oven door delay switch
Description of the appliance.............................5
Control panel description..................................5
Prior first use.....................................................6
Oven
Tips for the use of the oven
General setting options of oven control...........7
Use of oven........................................................8
Alternatives with the oven off:
Selection and setting of oven temperature
Alarm timer
Safety sensor block
Programmed roasting with the meat probe
The oven may be controlled in two ways .......12
Switching between the two control modes
Food selection mode
Operation mode selection...............................13
Important warnings!
Modes of operation
Oven guide levels
Oven accessories
Telescopic slide guides
Grease filter
Baking pastry
Roasting
Grilling and browning (barbecue)
Preserving of fruit and vegetables
Defrosting
Cleaning and maintenance..............................24
Oven
Troubleshooting guide.....................................26
Important!
Replacement of parts......................................27
Other accessories
Oven light bulb
Instructions for installation and connection...27
Safety precautions for installation
Installation of electric oven............................28
Electric connection..........................................29
Technical information......................................30
After sale service............................................30
Repairs
Rating plate
Instructions for use, installation and connection
3
Page 4

Safety precautions
• To avoid any possible hazard, the appliance
must be installed by qualified personnel only.
• Any repairs by unqualified persons may result in
electric shock or short circuit. In order to avoid
possible injuries to your body or to the
appliance, do not attempt any repairs by
yourself. Such work should be carried out by
qualified service personnel.
Warning! The appliance is not intended for use
by young children or infirm persons without
supervision. Young children should be
supervised to ensure that they do not play with
the appliance
• Danger of burns! The oven and cooking
accessories may become very hot during
operation. Make sure children are kept out of
reach and warn them accordingly. To avoid burns
use kitchen clothes and gloves when handling
hot parts or utensils.
• Mains lead of adjacent appliances may be
damaged if trapped between the oven doors, and
may produce short circuit. Therefore keep them
at safe distance from the appliance.
• Never clean the oven with a high-pressure steam
cleaning device, as it may provoke a short
circuit.
• Oven door may become very hot during
operation. Therefore, some models are equipped
with a third glass to reduce the surface heat of
the outer glass, as an extra protection against
burns.
Cooling fan
(certain models only)
The appliance is equipped with a built-in cooling
fan, which cools the casing and the control panel
of the appliance.
The cooling fan can be operated by selecting any
of the oven operation modes.
Extended performance of cooling
fan
(applies to some models only)
Cooling fan works for some time after the oven is
turned OFF and thus additionally cools the
appliance.
Oven door delay switch
(certain models only)
The oven door is fitted with special delay switch
which turns the oven element off (only in hot air
heating mode) when the oven door is opened, and
restarts the heating when the oven door is closed
again.
Intended use
This appliance is intended for use in your
household. Never use the appliance for any other
purpose!
These instructions describe in detail all the
particulars and possibilities of its use.
4
Instructions for use, installation and connection
Page 5
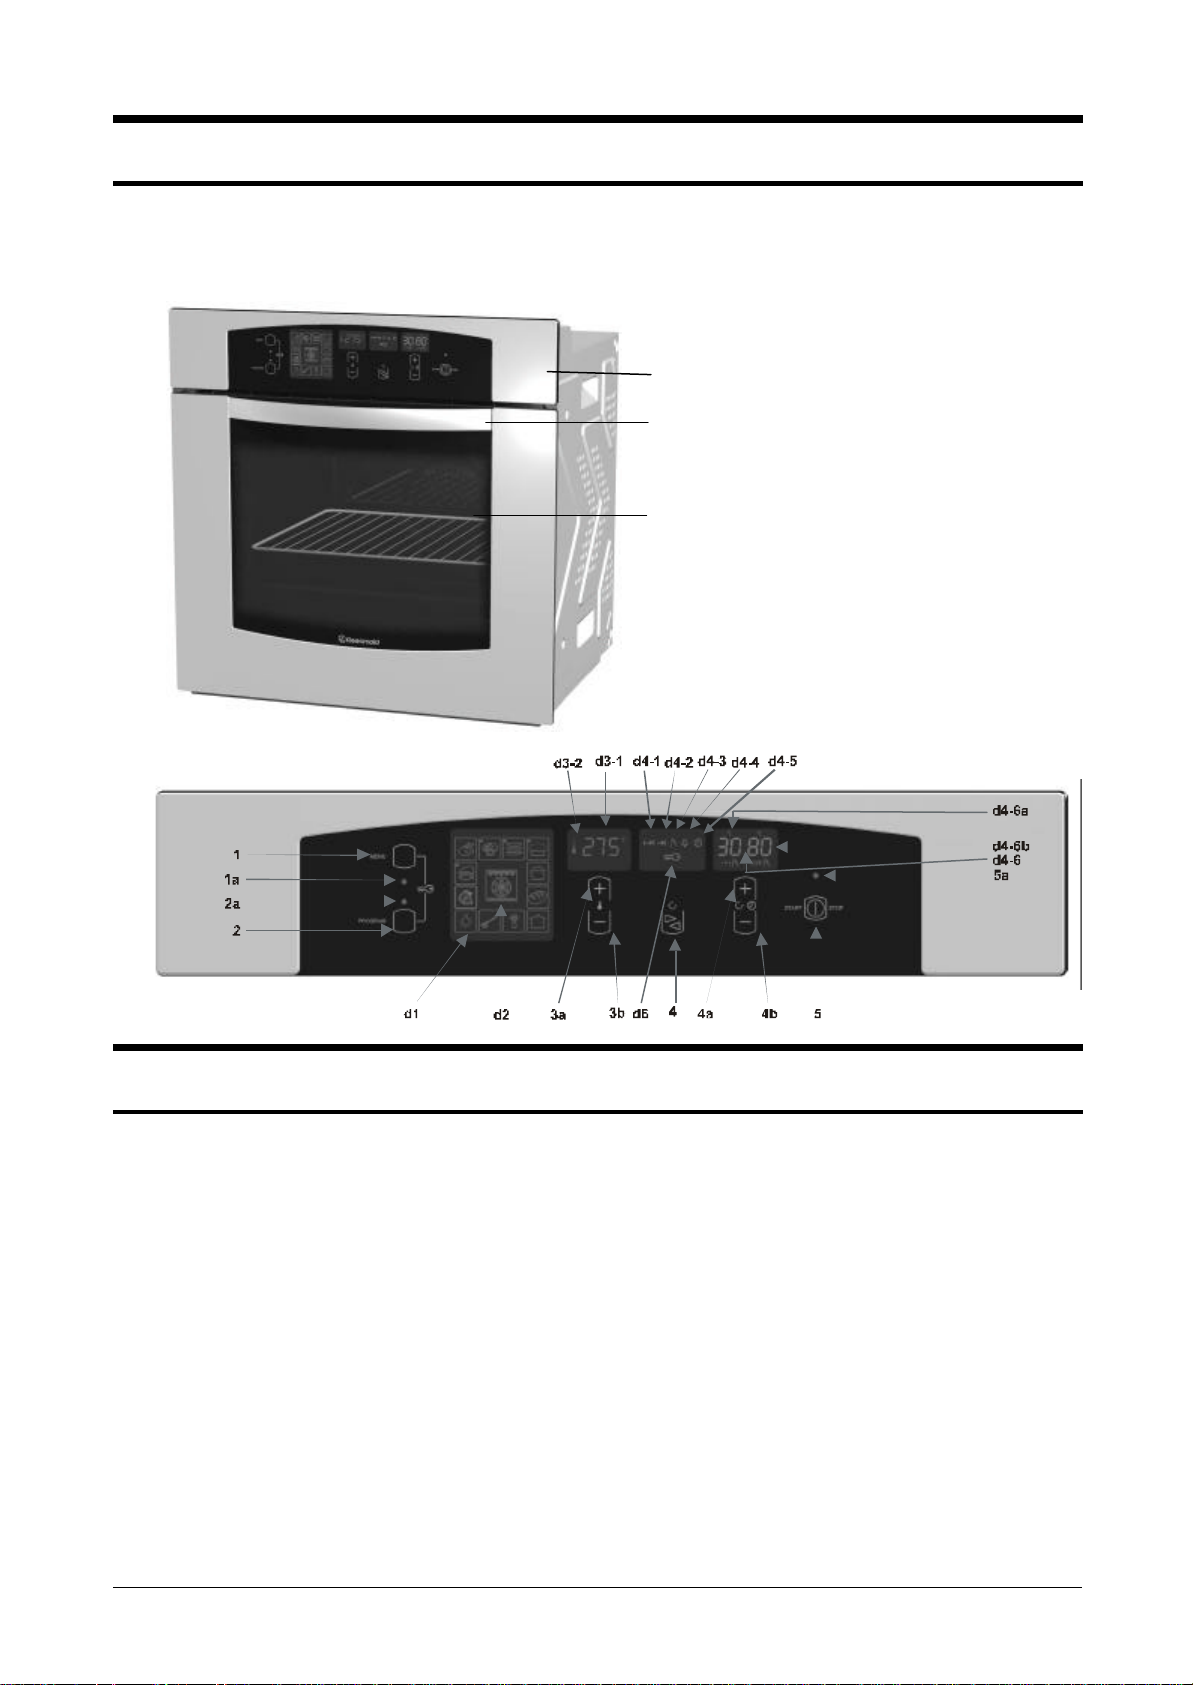
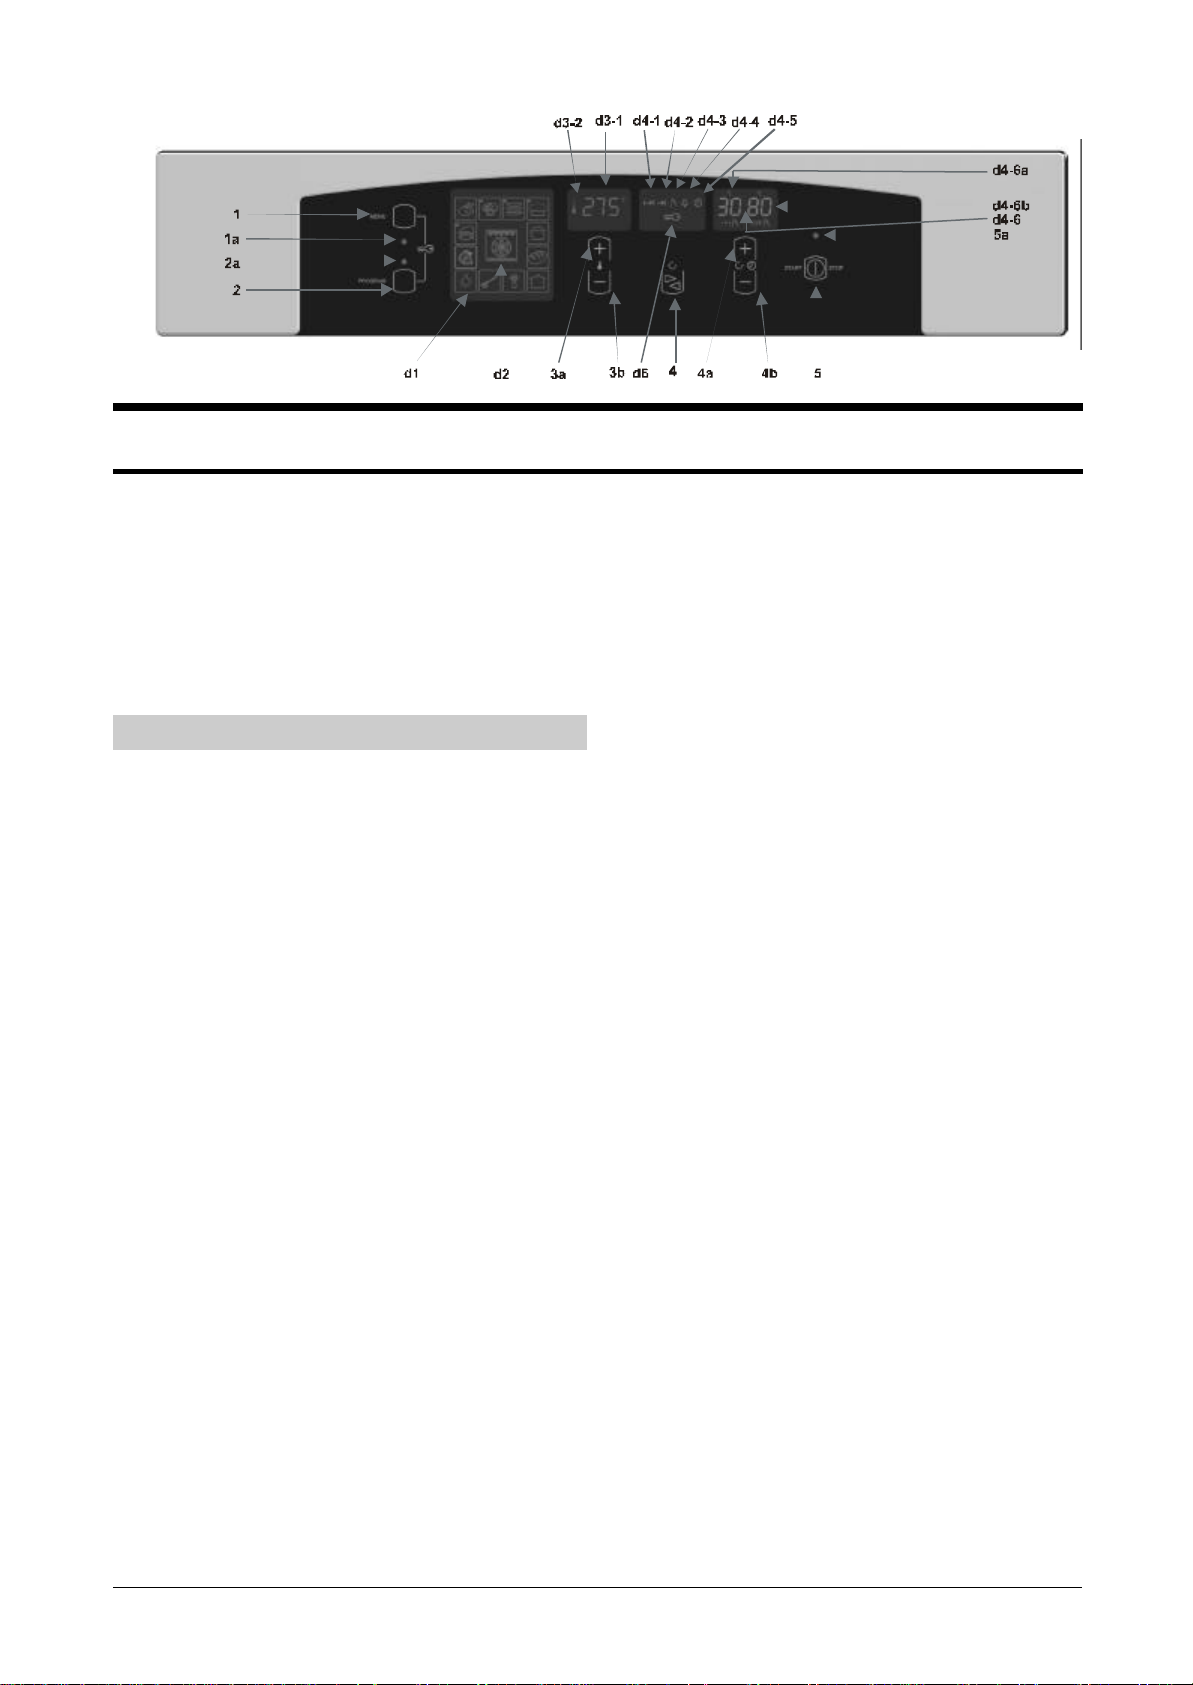
Description of the appliance
The figure shows one of the built-in models. These
instructions have been prepared for models with
different accessory options, so they may contain
certain functions and accessories your model
might not have.
Control panel
Oven door handle
Oven glass door
Control panel description
1 Food selection sensor; food selection display
(d1); signal lamp (green) (1a)
2 Mode selection sensor; mode selection display
(d2); signal lamp (red) (2a)
3 Oven temperature selection (3a, 3b);
temperature selection display (d3-1); oven
thermostat signal lamp (d3-2)
4 Selection sensor for symbols:
− oven operation period (d4-1);
− end of oven operation (d4-2);
− meat probe (d4-3);
Instructions for use, installation and connection
− alarm timer (d4-4);
− current time (d4-5);
− selection sensor display 4 (d4-6):
− meat probe temperature display (d4-6a);
− meat probe temperature setting display (end of
oven operation) (d4-6b);
− selection sensor value setting 4 (4a, 4b)
5 ON/OFF sensor; signal lamp (red) (5a);
blockage of operation display – activation by
simultaneous pressing of 1 and 2 for
approximately 5 seconds (d6).
5
Page 6

Prior first use
Oven
Take all the accessories out of the oven and clean
it with warm water and mild detergent. Never use
aggressive cleaners as they may cause scratches!
When you first use your oven, the oven will need to
‘settle’. That is, it needs to burn off production
residues and dust. The metal used will also
expand slightly when first used. You may
experience some crackling sounds, a strong smell
and an emission of smoke.
This is perfectly normal.
We advise you to anticipate this ‘settling’ prior to
use. To ‘settle’ the oven, using an empty oven
select fan forced and set at a temperature of 250º.
Allow the oven to ‘settle’ for ½ hour, and then turn
to traditional mode and heat for a further ½ hour.
During this procedure the room should be well
ventilated.
Tips for the use of the oven
• If possible use dark, silicone coated or enamel
baking pans, because of their excellent thermal
conductivity.
• Preheating of the oven is necessary only if
recommended by the recipe or if recommended
in the Baking Tables.
Heating of an empty oven consumes a lot of
energy. Save it by baking several pizzas or cakes
consecutively, one after the other, while the oven
is still warm. Towards the end of baking, the oven
may be switched off about 10 minutes before
completion, thereby making use of the remaining
residual heat.
6
Instructions for use, installation and connection
Page 7

General setting options of oven control
• Sound signal volume
− When no other function is active it is possible
to set the sound signal volume by touching the
sensor (4b). The display (d4-6) indicates
symbols of 4 volume levels.
• Sound signal duration:
− oven operation period sound signal (d4-1), end
of oven operation (d4-2) and meat probe (d4-3)
last 7 minutes;
− alarm timer sound signal (d4-4) lasts 3
minutes
− After the expiry of the indicated time the sound
signal goes off automatically.
• Each touch of the sensor is accompanied by
a beep.
• Increasing the speed of the display setting.
Pressing the sensor for a period of 5 seconds
continuously can increase the speed of the
displayed setting.
• Simultaneous pressing of (-) and (+) sensors
(3a/3b) ali (4a/4b)
Resets the settings to “0”, except for the
temperature setting display (d3-1) which is
changed to 30°C, and the end of operation
sensor (d4-2) which changes to indicate the time
of day.
In case the ON/OFF sensor (5) is not pressed
within 5 seconds, all settings are reset
automatically, except for the time of day and the
alarm timer.
In case of power failure less than 1 minute long,
all settings remain unchanged and the oven
resumes normal operation (if activated).
Instructions for use, installation and connection
7
Page 8
Use of oven
Alternatives with the oven on:
• Changing or setting the oven temperature
(d3-1)
• Changing or setting oven operation time (d4-1)
• Changing or setting end of oven operation
(d4-2)
• Changing or setting meat probe temperature (d4-
3) if the meat probe is connected
Alternatives with the oven off:
• By using the food selection sensor (1) or mode
selection sensor (2) you may select the type of
food (1) or function mode (2), and you may
change or set the oven temperature (d3-1), oven
operation time (d4-1), end of oven operation (d4-
2), meat probe (if the type of food or function
mode had been selected before) (d4-3) alarm
timer (d4-4) and the time of day (d4-5).
• changing or setting the alarm timer and the
current daily time (d4-4).
Setting the time of day
• After the appliance is connected to the mains
the display (d4-6) flashes »12.00« and the
symbol (d4-5).
• By touching the sensors (4a/4b) you may set
the exact daily time. Approximately 5 seconds
after the setting is finished the symbol (d4-5)
goes off and the display (d4-6) indicates the
correct daily time.
Changing the current daily time
The time of day may be changed at any time
(except when the end of operation mode (d4-2) is
activated) by doing the following:
• Touch the selection sensor (4) and select the
current time selection mode ((d4-5) is flashing).
• by means of sensors 4a/4b set the current time
(symbol (d4-5) and the time displayed are
flashing (d4-6))
• after 5 seconds the display indicates (d4-5)
correct current time (symbol (d4-5) goes off).
• in case of power failure shorter than 1 minute,
the current daily time remains unchanged.
Oven illumination
• When the oven is on, the lamp is also on,
regardless of the operation mode.
• If the oven is off, touch the sensor (1) and select
the symbol "Light" (1), then touch the light
ON/OFF sensor (5) turn the lamp on. Touching
the ON/OFF sensor again will turn the lamp off.
8
Instructions for use, installation and connection
Page 9
Selection and setting of oven
temperature
After selecting the type of food and oven function
mode, by pressing the sensors (3a/3b) you may
select the desired oven temperature in the range
from 30 – 250°C (depending upon the selected
operation mode) in 5°C intervals.
During the operation, oven temperature may
be randomly increased or decreased within
the permitted temperature range (see chart)
by pressing the sensors (3a/3b).
Table of data for operation mode (with a sensor 2)
Operation mode
Preset
temperature (°C)
Preset time
(h/min)
Possibility of max.
set temperature (°C)
200 160 200 170 250 160 160 150 -
- - - - - - - - -
250 250 250 250 250 220 220 200 -
Oven thermostat signal lamp (d3-2)
• Signal lamp is on; oven temperature is below the
setting and the oven is heating.
• Signal lamp is off; the temperature in the oven
has reached the set temperature.
• Signal lamp is flashing regularly; the oven is set
to the end of operation mode with the adequate
sensor (d4-2); the preparation of food has not
started as yet (the appliance automatically
computes the relevant moment of starting the
oven operation).
Setting the operation time
• The time of oven operation may be selected from
0 to 6 hours, in 1 minute intervals.
• After selecting the function mode and the
temperature, by pressing the sensor 4 you may
now select the operation time from 0 to 6 hours,
in 1 minute intervals.
• Touch the selection sensor (4), the display
(d4-1) starts flashing. By touching sensors
(4a/4b) set the desired operation time.
• Turn the oven on with the ON/OFF sensor (5).
• When the set time has elapsed, the oven is
switched off (signalled by the beep, oven
operation time symbol (d4-1) and the relevant
signal lamp (5a) are flashing).
• By touching any sensor (except the ON/OFF
sensor (5), which turns the sound signal off and
switches the oven on) you may switch the sound
signal off, otherwise it is turned off automatically
after 7 minutes.
Oven operation time may be changed during
the operation.
Setting the end of operation time
• This function is used when you wish to select
the end of operation (cooked food) at exactly the
pre-selected time.
• The function may be used only if the previously
set time of operation ((d4-1) is on).
• By touching the selection sensor (4) symbol (d4-
2) flashes, and the display (d4-6) flashes the
sum of daily current time and the oven operation
time. Use the sensor (4a) to set the desired end
of oven operation.
• Switch the oven on with the ON/OFF sensor (5).
The appliance awaits the start of operation (oven
thermostat signal lamp symbol flashes regularly
(d3-2), oven operation time symbol is on (d4-1)
and end of operation time symbol (d4-2) is also
on.)
• The starting time is now defined automatically.
At the moment the oven starts the operation, the
end of operation symbol (d4-2) goes off, oven
illumination is on, and the oven thermostat signal
lamp (d3-2) is on until the set temperature is
reached.
• Eventual immediate start of operation may be
forced by simultaneous pressing of sensors
(4a/4b) (for approximately 5 seconds).
Instructions for use, installation and connection
9
Page 10

Alarm timer
This function may be applied separately, and is
not in connection with the oven operation. It can be
used if you wish to be warned at a pre-selected
time.
• Touching the selection sensor (4) triggers
flashing of the alarm timer symbol (d4-4) (the
display (d4-6) flashes "»00:00«). Set the desired
time with sensors (4a/4b) in the range from 0 to
99 minutes in 1 minute intervals. The countdown
starts after approximately 5 seconds, the alarm
timer symbol (d4-4) is on, and the display (d4-6)
indicates the current time.
• By touching the selection sensor (4) you may
check and correct the remaining time indicated
on the display (d4-6).
• By simultaneous pressing of sensors (4a/4b)
(approximately 5 seconds) the remaining time
may also be set to »00:00«.
Safety sensor block
This function is activated in case you may wish to
block the oven operation control (safety of
children).
• It is activated by simultaneous pressing of the
food selection sensor (1) and the function mode
sensor (2) for approximately 5 seconds.
• The blocked operation symbol is on (d6).
• To deactivate blocked operation mode press
both sensors (the blocked operation symbol (d6)
goes off).
• By pressing the ON/OFF (5) sensor the oven
may be switched off at any time, despite the
activated blockage of operation.
Programmed roasting with the meat
probe
This function mode requires the setting of the
temperature to be developed within the centre of
the meat portion. The setting range is between
30°C and 99 °C. The temperature is controlled by
the meat probe.
Connection of the probe
Insert the meat probe plug into the socket and
push the probe into the meat. The socket is
located in the upper front left hand side of the
oven. It has a metal plug which must be pulled out
and reinserted after roasting.
WARNING
Be careful not to touch the heating element with
the probe during roasting!
This mode of roasting is suitable for appropriately
large portions of meat, preferably boneless, since
the bones impede the temperature control and
yield incorrect temperature readings. Chicken and
rabbits are not appropriate for meat probe roasting.
Recommended temperatures of meat core
Pork Roast 85°C
Roast Beef 80°C
Veal Roast 75°C
Beef Fillet 40-50°C
10
Instructions for use, installation and connection
Page 11

Procedure
• Connect the probe and push it into the meat.
• Select the appropriate roasting mode by the food
selection sensor (1) or by the function mode
sensor (2). The display (d4-6a) indicates the
actual meat temperature, while the display (d4-
6b) indicates the preset temperature of 80°C.
This value may be changed at any moment by
pressing sensors (4a/4b) in the temperature
range between 30 and 99°C in 1°C intervals.
• Switch the oven on with the ON/OFF sensor (5).
The meat probe starts measuring the core
temperature, which is increasing.
• Once the set temperature of the meat core is
obtained, the oven stops operating, and the
sound signal indicates the end of operation. The
beep may be turned off by touching any of the
sensors (except for the ON/OFF sensor (5),
which turns the sound signal off but switches the
oven back on).
• If the oven is not switched off it will switch
back on after some time (when the actual
temperature falls below the preset value).
This way the actual temperature of the food
is maintained.
• Pull the probe from the meat and pull the plug
from the socket. The display (d4-6) indicates the
actual current time of day.
Note
With the meat probe connected the display always
indicates the actual and the selected temperature
(except with the oven off, when no function mode
is selected).
In case you had already selected the particular
type of food with the food selection sensor (1) and
the preset operation time, the time setting will be
rendered void at the moment of connecting the
probe. This happens also with all other cases. The
time may of course be preset again.
If the oven is off and the meat probe is connected,
the meat probe symbol starts flashing (d4-3) as an
alert that the probe is active.
CAUTION
Use only the meat probe designed for this
particular oven.
Use of meat probe in combination
with the timer functions (for
experienced users)
When using the meat probe you may also set the
operation time or the end of operation, as
described in previous paragraphs. But always
remember:
• If you use the preset time operation mode
(d4-1) and set the desired period, the oven will
stop operating when the time elapses, irrelevant
of whether the actual temperature of the food has
reached the preset temperature. Therefore the
preset operation time must always be somewhat
longer that the time necessary for food to reach
the appropriate temperature.
• The same procedure is identical for the end of
operation function mode (d4-2).
• This combination is suggested once the user
has gained certain experience regarding the time
required for particular type and quantity of food to
be roasted, appropriately roasted at a preset
temperature.
• According to the information gained with
experienced use, you may set the oven
operation time (d4-1) somewhat longer than
required, thereby also successfully using the
end of operation mode (d4-2).
Instructions for use, installation and connection
11
Page 12

The oven may be controlled in two ways
1 By selecting the type of food
2 By selecting the function mode
Switching between the two control
modes
• The oven is off:
− If mode (1) is selected, you may switch to
mode (2) by pressing the sensor (2) twice (if
oven selector is on illumination only, one touch
of the sensor is enough). All settings relevant
to mode 1 are erased.
− Similarly you may switch from mode (2) to
mode (1) (in such cases touch sensor (1)
twice).
• The oven is on:
− Switching is not possible.
− If you still wish to change the function mode,
first switch the oven off by touching the
ON/OFF sensor (5) (the signal lamp (5a) is
flashing) and then select the desired function
mode.
Food selection mode
While the signal lamp (5a) is flashing, you
may change settings at random. If the oven is
not switched on in approximately 15 seconds
after the last touch of any sensor, it will switch
off automatically.
After the oven is switched on (signal lamp 5a
is lit) you may revoke the setting by
consequent touch of the ON/OFF sensor (5)
(signal lamp 5a is flashing) and the oven will
switch off automatically after approximately 5
seconds.
This mode is appropriate for the preparation of the
chosen food with automatic setting of mode,
temperature and operation time.
• Touch the food selection sensor and select the
type of food (appropriate symbol and relevant
function mode are lit, as well as the temperature
and operation time)
• Touch the ON/OFF sensor (5) to start the
operation. After the expiry of the set time the
oven is switched off automatically.
• In case of different quantity of food, you may still
use this mode, but you must change the
operation time and the temperature accordingly.
• You may however use the end of operation
function (see »End of oven operation« section).
12
Instructions for use, installation and connection
Page 13

Table of data for selected food (with a sensor 1)
Defrosting
Food type
Pork
chops
whole
Pork
chops
fish
ChickenPizza Biscuits
and
muffins
Function mode
Preset
temperature (°C)
Preset time
(h/min)
Possibility of max.
set temperature (°C)
Weight (in kg)
195 250 170 200 160 40 160 200 220 - 50
1:50 0:25 1:00 0:10 0:25 - 1:00 1:15 1:50 - 0:30
250 250 250 250 250 220 250 250 250 - 220
1 4x0,2 1 1x0,4 3x0,3 - 1,1 1 1 - -
Operation mode selection
This mode is used when you wish to prepare any
unspecific type and quantity of food. You may
select the function mode, oven temperature,
operation time, time when you wish the food to be
ready, or roasting with the meat probe and alarm
timer.
Once the desired function mode is selected,
and other settings regulated, the oven must
be switched on by pressing the ON/OFF
sensor (5) within 15 seconds, or else all
settings are rendered void.
Rising
of
dough
Raisin
cake
Bread Roast
beef
Cleanin
g
The appropriate function mode is selected by
pressing the mode selection sensor (2) (the
display indicates the selected function mode).
Instructions for use, installation and connection
13
Page 14

Table for cooking selected food
SymbolDish Temperatur
e
(°C)
Pork
chops
roast
Pork
chops,
fish
Chicken 170 1:00 1 3
Pizza 200 0:10 1x0,4 3
Biscuits,
brownies
Rising of
yeast
dough
Raisin
cake
Bread 200 1:15 1,5 3
Roast
beef
Defrosting - - - 3
Cleaning 50 0:30 0,4l vode 2
195 1:50 1 3
250 0:25 4x0,2 5
160 0:25 3x0,3 2,4 Preheating 5-6 minutes, roasting in shallow
40 - - 2
160 1:00 1 2
220 1:50 1 2
Time
h/min.)
Quantity
(kg)
Guide
(from below)
Caution
Roasting in small pan on the grid ( ).
Roasting on the grid (dripping pan is placed
one level below) with door close. Turn the
meat around halfway through roasting
( ).
Roasting on the grid in middle level guide,
dripping pan is placed one level below ( )
Preheating for 8 minutes, roasting in
shallow pan ( ).
pans at two levels simultaneously ( ).
Preheating for 3 minutes.
Dough rises in a bowl, placed on the grid
( ).
Baking in dark raisin cake mould on the grid
( ).
Baking in shallow pan. ( ).
Roasting or stewing of beef in covered
dish, placed on the grid. ( ).
Place the frozen food on the grid. Dripping
pan is placed in the guide below. ( ).
Pour water in deep pan. ( ).
Switch on the preheating in particular roasting/baking mode prior to its programming, because the preset
cooking time does not include preheating.
14
Instructions for use, installation and connection
Page 15

Important warnings!
• Never put aluminium foil on the bottom of the
oven, and do not place any crockery upon it. The
excessive heat may damage the oven enamel.
• Juices dripping from the baking pan may
produce stains on the enamel, which are very
hard to remove.
Operation
Oven is controlled by the
function knob and the
temperature selection
knob.
Temperature selection knob
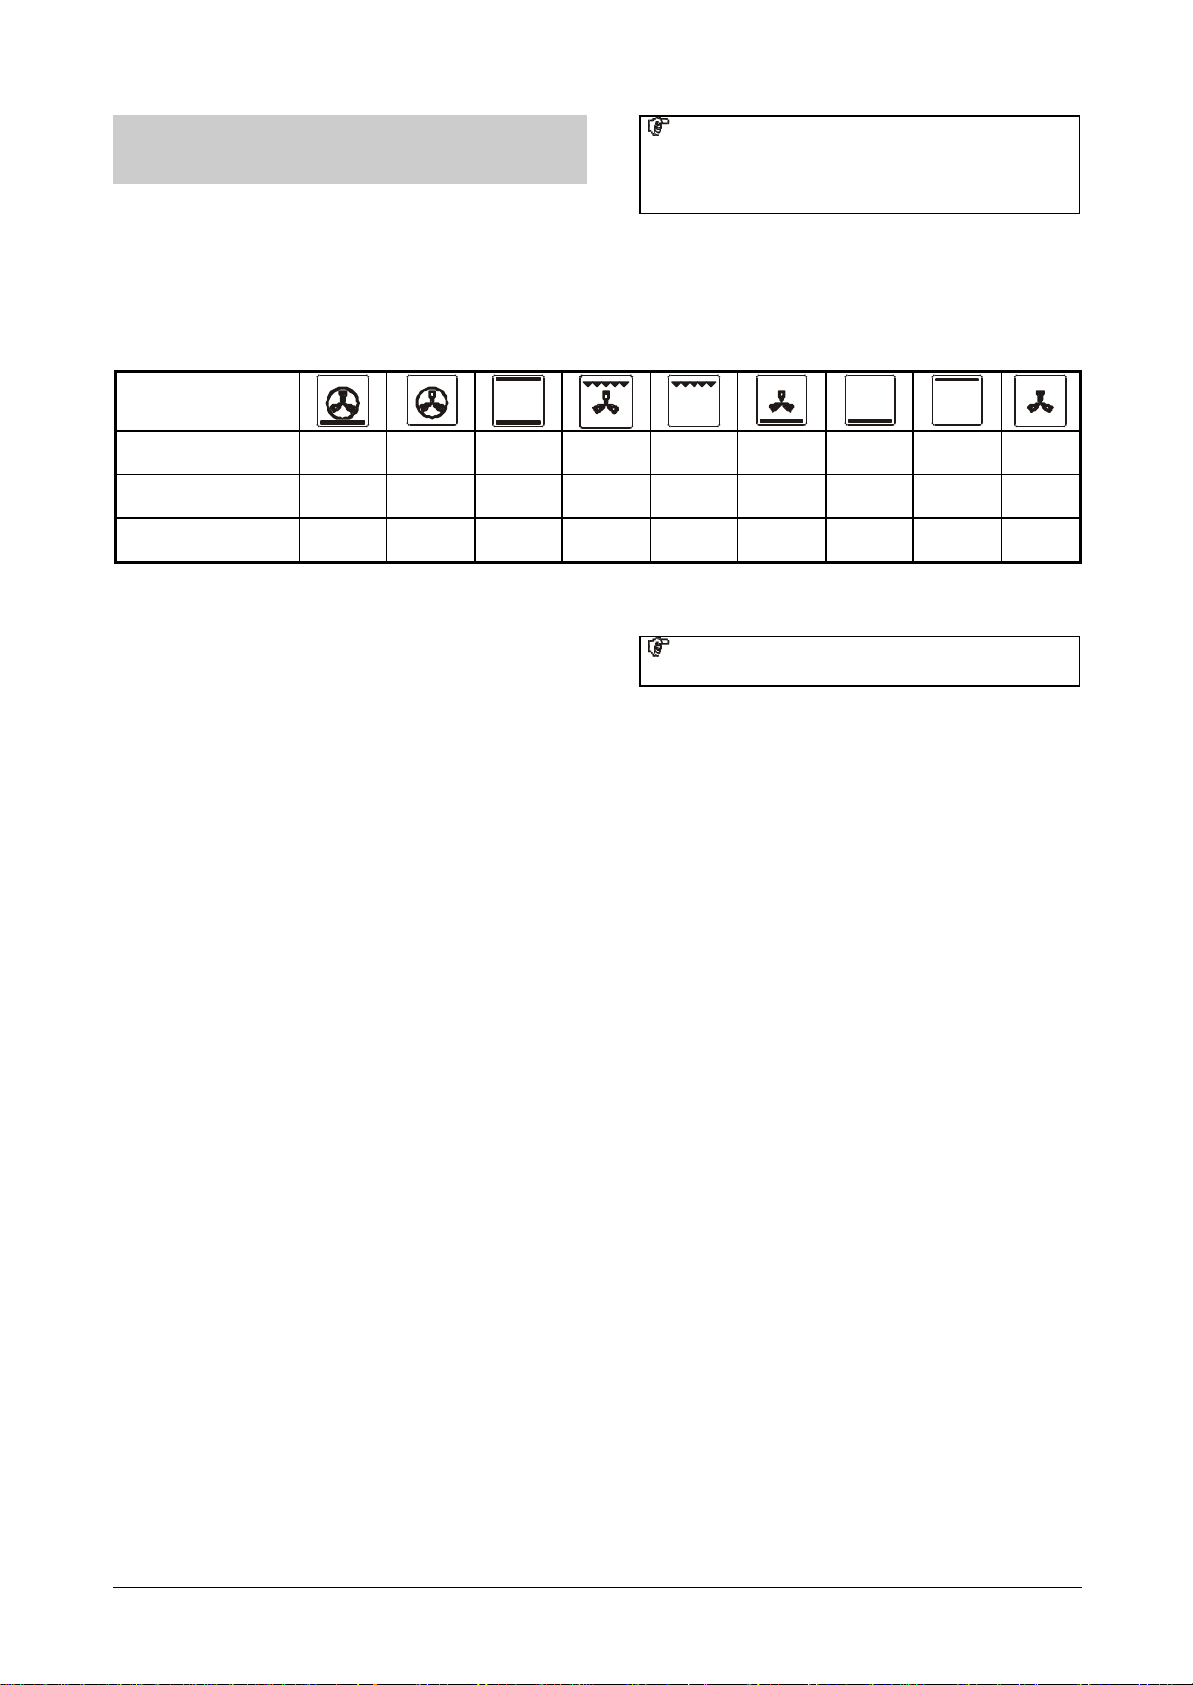
Grill
Heat comes directly from the grill element, located
at the oven ceiling. The grill function is especially
suitable for preparing steaks, sausages, T-bones,
pork chops, etc.
Fan Grill
Grill element and fan operate simultaneously. This
mode is appropriate for roasting and grilling of
larger portions of meat or poultry at one level. It
may also be used to obtain crisp skin on your
roast.
Function knob
Modes of operation
The oven may be used in the following modes.
Oven light
Some models have installed two lamps for oven
lighting; one at the top of the rear wall and the
second at the middle of the right-hand side wall.
The oven lights may be switched on
independently, without any other function.
This is handy during cleaning, or when switched off
and using the remaining oven heat.
During all other oven functions the illumination is
automatically switched on with the selection of a
particular function.
Conventional
Elements from the upper and the lower side
uniformly heat the exposed food.
Baking and roasting is possible only at single
level.
Fan Forced Plus Traditional
Both the lower element and hot air fan are in
operation. This mode is most appropriate for
baking pizza. It may also be used for baking moist
or heavy cakes at two levels, fruit cakes or cheese
soufflés.
Fan Forced
The fan at the rear forces the air around the roast
or pastry. It is suitable for roasting and baking at
more than one level.
Instructions for use, installation and connection
15
Page 16

Fan Defrost
This mode uses the fan and no element to
circulate air around the cavity. It is used for slow
defrosting of food.
Traditional with Fan
Both the lower element and fan are in operation.
This mode is useful for baking low pastry and
preparation of preserved fruit and vegetables.
Use the first guide level from the bottom, and not
too high pans, to allow the air to circulate along
the upper side of the food.
Oven guide levels
Baking pans and accessories (oven grid, grease
receptacle, baking tray, etc.) may be inserted into
the oven in 5 guiding levels.
Appropriate levels are indicated in the tables that
follow.
Always count levels from the bottom upwards!
Guides may be of three types, depending on the
model. Telescopic guides are inserted in the 2nd,
3rd and 5th level. In case of wire guides, the grid
and the baking pans must always be inserted in
the guide slides.
Oven accessories
Traditional/Aqua Clean
Heat is applied only at the bottom of the oven. Use
this option for browning the under side of food
(baking heavy, moist pastry with fruit dressing).
The temperature selection button in such cases
may be selected as required.
Lower element may also be used for cleaning the
oven. You will find details in the section Cleaning
and Maintenance.
(differ according to different models)
Oven grid shelf for placing pans and trays, or for
food to be prepared using the grill.
Flat biscuit tray for baking cake and biscuits.
Deep Baking Pan
For moist cakes, roasting or for intercepting
dripping of oil or grease.
Note! If the deep roasting pan is used for
intercepting the dripping juice and grease during
roasting, it should not be inserted into the first
bottom level guide.
The rear wall of the oven is coated with catalytic
coating which can be installed or removed by a
qualified technician only.
16
Instructions for use, installation and connection
Page 17

Telescopic slide guides
Baking pastry
(certain models only)
Note! Telescopic slide guides and other oven
accessories might get very hot! Use kitchen gloves
or other suitable protection!
Telescopic slide guides are located inside the oven
to the right and to the left in three different levels.
• To insert the grid, baking or roasting pan, first
slide out the telescopic guides for one particular
level.
• Place the tray or pan on the guides and push
them back completely into the oven.
Close the oven door only after you have pushed
the telescopic guides into the oven.
Grease filter
The removable grease filter at the rear panel of the
oven protects the fan, elements and interior cavity
of the oven from accidental staining with grease.
Always insert the filter when roasting or grilling,
and remove the filter when baking pastry. The
grease filter may cause unsuccessful baking of
some kinds of pastry.
The most appropriate position for baking is by
using both upper and lower elements.
Note! Grease filter must always be removed!
Warnings
• When baking pastry, strictly follow the
instructions regarding the selection of guide
level, temperature and baking time. Do not rely
on any previous experience, because information
indicated in the baking tables have been
determined and tested specifically for this
particular type of oven.
• If you are unable to determine the exact type of
cake in the tables, use the information available
for the next most similar type of cake.
Baking with Traditional Mode
• Use only a single guide level.
• This baking position is particularly suitable for
baking dry pastry, bread and teacakes. Use dark
baking pans. Light pans reflect heat and pastry
is not adequately browned.
• Always place baking pans on the wire rack.
Remove the wire rack only if baking in the flat
biscuit tray, supplied with the appliance.
• Preheating shortens the baking time. Do not put
the cake in the oven until proper temperature is
obtained, and until the red signal lamp goes off
for the first time.
Baking with Fan Forced Mode
• This mode of baking is especially suitable for
baking at multiple levels, for moist pastry and
fruitcakes.
• The temperature is usually lower than baking
with upper/lower element (see Baking Table).
• Moist pastry (i.e. fruitcake) may be baked at
maximum two levels at the same time, because
of excessive humidity.
• Different cakes may be baked together if the
necessary temperature is approximately the
same.
• Baking time may be different for different pastry,
so you may have to take one pan out before the
others.
• Cookies, like for example muffins, should be of
equal size and thickness. Uneven cookies are
baked unevenly.
• If you bake more than one cake at the same
time, it may produce excessive steaming in the
oven and condensation at the oven door.
Instructions for use, installation and connection
17
Page 18

Baking tips
Is pastry baked?
Pierce the cake with a skewer at the thickest part.
If the dough does not stick to it, the cake is
baked. You may switch off the oven and use the
residual heat.
Pastry has fallen
Check the recipe. Use less fluids next time.
Follow the mixing times, in particular when using
powered kitchen mixers.
Pastry is too light below
Use a dark baking pan next time, or place the pan
one level lower, or switch on the lower element a
short time before the completion.
Pastry Baking Table
Type of pastry Guide level
(from down
upwards)
Sweet pastry
Raisin cake 2 160-170 2 150-160 55-70
Ring cake 2 160-170 2 150-160 60-70
Tree cake (tart form) 2 160-170 2 150-160 45-60
Cheese cake (tart form) 2 170-180 3 150-160 60-80
Fruit cake 2 180-190 3 160-170 50-70
Fruit cake with icing 2 170-180 3 160-170 60-70
Sponge cake* 2 170-180 2 150-160 30-40
Flake cake 3 180-190 3 160-170 25-35
Fruit cake, mix dough 3 170-180 3 150-160 50-70
Cherrycake 3 180-200 3 150-160 30-50
Jelly roll* 3 180-190 3 160-170 15-25
Fruit flan 3 160-170 3 150-160 25-35
Plait bun 2 180-200 3 160-170 35-50
Christmas cake 2 170-180 3 150-160 45-70
Apple pie 2 180-200 3 170-180 40-60
Puff pastry 2 170-180 3 150-160 40-60
Salted pastry
Bacon roll 2 180-190 3 170-180 45-60
Pizza* 2 210-230 3 190-210 30-45
Bread 2 190-210 3 170-180 50-60
Rolls* 2 200-220 3 180-190 30-40
Cookies
Caraway roll 3 170-180 3 150-160 15-25
Biscuits 3 170-180 3 150-160 20-30
Danish pastry 3 180-200 3 170-180 20-35
Flaky pastry 3 190-200 3 170-180 20-30
Cream puff 3 180-200 3 180-190 25-45
Deep frozen pastry
Apple pie, cheese pie 2 180-200 3 170-180 50-70
Cheese cake 2 180-190 3 160-170 65-85
Pizza 2 200-220 3 170-180 20-30
Chips for oven* 2 200-220 3 170-180 20-35
Potato fries for oven 2 200-220 3 170-180 20-35
Temp.
(°C)
Cheesecake is undercooked
Next time reduce the baking temperature and
extend the baking time.
Warnings regarding the baking
tables:
• The tables indicate the temperature range.
Always select lower temperature first. You may
always increase the temperature in case pastry
needs more baking.
• Baking times are indicative only. They may vary
in dependence of individual characteristics.
• The asteric indicates that the oven requires
preheating.
Guide level
(from down
upwards)
Temp.
(°C)
Baking
time
(in min.)
18
Instructions for use, installation and connection
Page 19

Roasting
Best results are obtained with the engagement of
both upper and lower elements.
Note! When roasting always insert the grease
filter!
Tips regarding roasting pans
• Use light enamel pans, temperature resistant
glass pans, clay dishes or wrought iron dishes.
• Stainless steel dishes are not recommended
because they excessively reflect heat.
• Cover your roast or wrap it in foil. It will preserve
its juice and the oven will remain cleaner.
• If you leave the pan uncovered, the roast will be
cooked sooner. Roast large portions of meat
directly on the grid, with intercepting pan
underneath.
Attention when roasting!
Roasting tables indicate suggested temperatures,
guide level and roasting times. The roasting time
largely depends upon the type of meat, its size
and quality, therefore you may expect some
variations.
• Roasting of large portions of meat may produce
excessive steaming and dew formation at the
oven door. This is quite normal, and does not
affect the operation of the oven. However, after
the completion of roasting wipe the oven door
and the glass thoroughly.
• At approximately the middle of the indicated
time turn the roast around, especially if you use
the deep roast dish.
• When roasting on the grill grid, place the grid in
the deep roasting pan and insert both into the
sliding guide. The bottom pan will intercept
dripping fat.
• Never leave roast to cool in the oven, as it might
produce dew and corrosion of the oven.
OVEN ROAST PROBE
TYPE OF MEAT APPROXIMATE
COOKING TIME
Beef 60 minutes per kg 170 – 200 60 - 65
Lamb 60 minutes per kg 170 – 200 65 - 75
Hogget 70 minutes per kg 170 – 200 75 - 85 Well-done
Pork 90 minutes per kg 170 - 200 80 - 85 Well-done
Veal 90 minutes per kg 170 - 200 65 - 75 Well-done
Whole Chicken 90 minutes per kg 170 - 200 75 - 85 Well-done
Note: These cooking times and temperatures are recommended using the Fan Forced mode.
Pork and Veal should normally be well done.
OVEN
TEMPERATURE °C
ROAST PROBE SET
TEMPERATURE °C
65 - 75
75 - 85
75 - 85
TENDERNESS
Rare
Medium
Well-done
Medium
Well-done
These Cooking Charts are intended as a guide only.
Temperatures and cooking times may be varied to suit individual tastes.
Instructions for use, installation and connection
19
Page 20

Roasting Table
Type of meat Weight
(in grams)
Beef
Beef loin 1000 2 200 -220 2 180-190 100-120
Beef loin 1500 2 200-220 2 170-180 120-150
Roast beef, rare 1000 2 220-230 2 180-200 30-40
Roast beef, well done 1000 2 220-230 2 180-200 40-50
Pork
Pork roast with skin 1500 2 180-190 2 170-180 140-160
Flank 1500 2 190-200 2 170-180 120-150
Flank 2000 2 180-200 2 160-170 150-180
Pork loin 1500 2 200-220 2 160-170 120-140
Meat roll 1500 2 200-220 2 160-170 120-140
Pork cutlet 1500 2 180-200 2 160-170 100-120
Minced meat roast 1500 2 210-220 2 170-180 60-70
Veal
Veal roll 1500 2 180-200 2 170-190 90-120
Veal knuckle 1700 2 180-200 2 170-180 120-130
Lamb
Lamb prime ribs 1500 2 190-200 2 170-180 100-120
Mutton bladebone 1500 2 190-200 2 170-180 120-130
Venison
Hare ribs 1500 2 190-210 2 180-190 100-120
Hare bladebone 1500 2 190-210 2 170-180 100-120
Boar ham 1500 2 190-210 2 170-180 100-120
Poultry
Chicken, entire 1200 2 200-210 2 180-190 60-70
Hen 1500 2 200-210 2 180-190 70-90
Duck 1700 2 180-200 2 160-170 120-150
Goose 4000 2 160-170 2 150-160 180-200
Turkey 5000 2 150-160 2 140-150 180-240
Fish
Fish, entire 1000 2 200-210 2 170-180 50-60
Fish soufflé 1500 2 180-200 2 150-170 50-70
Guide level
(from bottom
up)
Temp.
(°C)
Guide level
(from bottom
up)
Temp.
(°C)
Roasting
time
(in min.)
20
Instructions for use, installation and connection
Page 21

Grilling and browning (barbecue)
• Take extra precautions when grilling.
Intensive heat from the grill element makes
the oven and accessories extremely hot.
Use protective gloves and barbecue
accessories!
• Piercing a roast may produce spurting of hot
grease (ie sausages). Use long grill tongs to
prevent skin burns and protect your eyes.
• Supervise the grill at all times. Excessive
heat may quickly burn your roast and
provoke a fire!
• Do not let the children in the vicinity of the
grill.
The grill element is in particular suitable for the
preparation of low-fat sausages, meat and fish
fillets, steaks, and browning and crisping the roast
skin.
Tips for grilling
• Grilling should be carried out with the oven
door closed.
• Grilling tables indicate the recommended
temperature, guide levels and grilling times,
which may vary according to the weight and
quality of meat.
• Always insert the grease filter when grilling.
• Grill element should be pre-heated for 3 minutes.
• Oil the grill grid before placing the food,
otherwise food may stick to the grid.
• Place the meat upon the grid, then place the grid
upon the grease interception pan. Insert both
trays into the oven guides.
• Turn the meat around after half of the roasting
time has expired. Thinner slices will require only
one turn, for larger portions you might need to
repeat the procedure. Always use barbecue
tongs to avoid losing excessive juice from meat.
• Dark beef meat is grilled quicker than lighter
pork or veal.
• Clean the grill, the oven and the accessories
after each use.
Instructions for use, installation and connection
21
Page 22

Grill table
28-33 (1. side)
23-28 (2. side)
Type of meat for grill Weight
(in grams)
Meat and sausages
2 beefsteaks, rare 400 5 250 - 7-9
2 beefsteaks, medium 400 5 250 - 10-14
2 beefsteaks, well done 400 5 250 - 16-20
2 pork scrag fillets 350 5 240 - 18-20
2 pork chops 400 5 240 - 18-20
2 veal steaks 700 5 240 - 16-20
4 lamb cutlets 700 5 240 - 10-14
4 grill sausages 400 5 240 - 8-10
2 slices of meat cheese 400 5 240 - 7-10
1 chicken, halved 1400 3 - 210-220
Fish
Salmon fillets 400 4 240 - 8-12
Fish in aluminium foil 500 4 - 220 10-13
Toast
4 slices of white bread 200 5 240 - 1-2
2 slices of wholemeal 200 5 240 - 1-2,5
Toast sandwich 600 5 240 - 1,5-3
Meat/poultry
Duck 2000 1 - 150-170 80-100
Chicken 1000 3 - 160-170 60-70
Pork roast 1500 3 - 140-160 90-120
Pork scrag 1500 3 - 140-160 100-180
Pork knuckle 1000 3 - 140-160 120-160
Roast beef/beef fillet 1500 3 - 170-180 40-80
Guide level
(from bottom up)
Temp.
(°C)
Temp.
(°C)
Grill time
(in min.)
22
Instructions for use, installation and connection
Page 23

Preserving of fruit and vegetables
Use the bottom element mode together with
the fan .
• Prepare the food for preserving and jars in the
usual manner. Use conventional jars with glass
cover and rubber gasket. Never use jars with
threaded or tin covers, or tins. Jars should be of
the same size, filled with the same type of food
and well tightened. You may place up to six onelitre jars.
• Use only fresh groceries.
• Pour approximately one litre of water into the
deep roasting pan, to produce the required
humidity. Place the jars into the oven without
touching the oven walls (see fig.). Cover the jars
with a wet paper to protect the rubber gaskets.
Preserving table
• Insert the pan with jars into the second guide
from bottom up. Set the temperature regulation
knob to 180°C. Pre-heating of the oven is not
necessary.
• Watch the jars all the time. Once the liquid in
the jars starts boiling, follow the instructions
from the Preserving Table.
Type of fruit or
vegetables
Fruit
Strawberry 6x1 litre around 30 min switch off 15 min
Stone Fruit 6x1 litre around 30 min switch off 30 min
Stewed fruit 6x1 litre around 40 min switch off 35 min
Vegetables
Pickles 6x1 litre 30 to 40 min switch off 30 min
Beans, carrots 6x1 litre 30 to 40 min reduce to 130°C 60 - 90 min 30 min
Defrosting
Defrosting of food may be accelerated by
circulating air within the oven. To do this, set the
oven to the position "Defrost" .
Note! In case of accidental engagement of the
temperature regulation knob the red light switches
on, but no element is active.
Quantity Bottom element and fan,
180°C, until boiling
After boiling Cooling
time
• You can defrost frozen cream cakes, butter
cream cake, biscuits, pastry, bread and rolls, as
well as deep frozen fruit.
• For reasons of hygiene do not defrost meat and
poultry in the oven.
• If possible, stir the food or turn it over for better
and more uniform defrosting.
Instructions for use, installation and connection
23
Page 24

Cleaning and maintenance
Never clean the appliance with a pressurised hot
steam cleaner!
Before cleaning switch the oven off and let it cool
down completely.
Front side of the casing
For cleaning of front part of the oven use the usual
cleaning agents and follow the manufacturer's
instructions.
Never use any aggressive cleaning agents or dish
cleaning accessories which may cause scratches.
Stainless steel front
(certain models only)
Clean the surface with mild detergent (soap) and a
soft sponge which will not scratch. Never use
aggressive cleaners or solvents, or else you may
damage the surface.
Enamel coated and plastic surfaces
(certain models only)
Clean the knobs and handles with a soft cloth and
liquid cleaners, intended for use on smooth
enamel surfaces.
Aluminium coated surfaces
Aluminium coated surfaces of the appliance (front)
should be cleaned with liquid non-abrasive agents
and a soft sponge. You may also use cleansing
agents intended for such surfaces, and follow the
manufacturer's instructions.
CAUTION: Such surfaces must never come in
contact with oven cleaning sprays, because they
visibly and permanently damage aluminium
surfaces.
Oven
The oven may be cleaned by conventional
methods (using oven cleaners and sprays).
The following procedure is recommended for
regular cleaning of the oven (after each use):
Turn the mode selection button to the position .
Set the temperature control button of the cold oven
to 50°C. Pour ¼ litre of water into the baking pan
and insert it into the bottom grid guide. After thirty
minutes the food residues on the enamel coating
will be softened, and can be easily wiped off with a
moist cloth.
Otherwise respect the following cleaning tips:
• Cool the oven completely before cleaning.
• The oven and accessories must be cleaned after
each use, or else stains may get burnt on.
• The interior glass should only be cleaned with a
non-abrasive oven cleaner.
• The seal surrounding the interior oven glass
should be free from any cleaner.
• Baking trays should NOT be placed in the
dishwasher. Wash in warm soapy water.
• Oven walls, sprayed with oil from roasting, are
best cleaned with warm water and a mild
detergent when the oven is still tepid.
• A hard and heavily stained oven should be
cleaned with special oven cleaning agents.
Rinse the cleaner thoroughly and remove any
detergent remaining before the next use.
• Never use aggressive cleaners, like polishing
agents, dish cleaning accessories, corrosion
inhibitors, or any other devices that might cause
scratches.
• Coated, stainless steel, zinc-coated surfaces or
aluminium parts must not come into contact with
oven sprays, as they may cause damage or
discolouration. The same goes for the
thermostat probe (if the oven is equipped with
one) and exposed elements on the oven ceiling.
• When purchasing cleaning agents remember the
environment, and strictly follow the
manufacturer's instructions.
Catalytic coating of the oven
• Catalytic enamel is soft and sensitive to rubbing.
Therefore we warn against the use of abrasive
cleaning agents and sharp objects.
• Rough catalytic enamel speeds up disintegration
of grease and other filth. Smaller stains that
remain after cooking usually disappear during
the next use of the oven. As a rule, the stains
disappear at temperatures above 220ºC, while at
lower temperatures their disappearance is only
partial.
• The self-cleaning power of catalytic liners
gradually deteriorates. We suggest replacement
of liners after a couple of years of regular use.
Some useful hints
• When roasting a large portion of fatty meat we
recommend that you wrap it in aluminium foil or
put it in a suitable roasting bag to prevent the
grease from splashing all over the oven.
• Place the drip pan underneath the grid when
using the grill.
24
Instructions for use, installation and connection
Page 25

Removing wire and telescopic guide
Removing oven door with a single
grids
Telescopic side racks or wire racks may be
removed to facilitate the cleaning of the oven. Side
racks are removed by swinging the bottom side
inwards and unhooking them.
Clean the side racks and telescopic guides only
with conventional detergents.
Telescopic racks must not be washed in a
dishwasher.
Note! Never lubricate the telescopic racks!
To reinsert, repeat the procedure backwards: slide
them into the holes and swing downwards.
Accessories
Accessories, like the biscuit tray, oven tray, etc.
are cleaned with hot water and the usual
detergent.
Special enamel
The oven, interior door lining, baking tray and
grease interception pan are coated with special
enamel, with smooth and resistant surface.
This special coating facilitates cleaning at room
temperature.
Grease filter
Clean the grease filter after each use with a soft
brush in hot water with some detergent, or wash it
in the dishwasher.
axe hinge
Open the door completely and turn the removable
locks backwards (see fig). Then close the door
slowly and let the locks fit to the notches. At an
angle of about 15° lift the door slightly up and pull
the door from the hinge supports (fig. 2).
For reinserting the door repeat the procedure
backwards. Insert the door at an angle of about 15°
into the hinge supports by pushing them forward
and downwards, so the hinges lock into their slots
(fig. 3). Check if the hinges are locked into their
respective slots.
Now open the door completely and turn the
removable locks into their original position. Close
the door slowly and check if they close properly (fig.
4). If you have trouble closing the door, check if the
hinges are properly inserted into their slots.
Attention! Never let the hinge locks spring out, as
the springs are strong and may cause injuries.
Instructions for use, installation and connection
25
Page 26

Troubleshooting guide
Any unskilled attempt to repair the appliance is
extremely dangerous as it can cause electric
shock and short circuit. To avoid such injuries any
repairs must be performed by qualified personnel
only.
However, there are some minor faults which may
be easily removed by the user, in accordance with
the instructions that follow.
Important!
If the malfunction of the appliance was caused by
improper use, the service visit during the warranty
period is not free of charge.
Following are some simple suggestions on how to
repair minor faults:
Program clock indicates faulty
values or switches on and off
intermittently…
Switch the oven off, disconnect it from the mains
for a few minutes (unlock the fuse or switch off the
main switch), then reconnect it to the mains and
set the correct daily time.
Oven does not heat up...
• is the mains power fuse burned?
• is the temperature regulator set correctly?
• did you set the oven to the conventional mode
after using it in the automatic mode
(programmed)? Switch the mode button to the
position "Manual mode".
Baking results are disappointing...
• did you remove the grease filter?
• did you follow the instructions and warnings from
the section "Baking"?
• did you strictly follow the information from the
baking table?
Program clock display is flashing…
There may have been a power failure, or the oven
has been connected to the mains for the first time.
All settings are erased. Set the correct time of day
to be able to activate the oven. After operating in
automatic mode, the oven switches off, the display
indicates time, and the beep is heard. Take the
food from the oven, set the temperature selection
knob and the mode knob into their original
positions. Select the "Manual mode", and use the
oven in a conventional mode (without
programming).
Signal lamp does not turn on....
• are all the required switches properly activated?
• is the mains power fuse burned?
• is the temperature regulator properly set?
Fuses often burn out...
• Call the serviceman or your electrician!
Oven light is not on....
• The replacement of oven bulb/s is described in
the section "Replacement of parts".
26
Instructions for use, installation and connection
Page 27

Replacement of parts
The oven light bulb casing is under tension.
Danger of electric shock!
Before replacing the oven bulb switch off the oven
and cut it from mains by removing the mains
power fuse or disconnect the protective device.
Remember that the bulb is regarded as
consumable item and is not covered by the
warranty.
Other accessories
The oven tray, biscuit tray, etc. may be ordered
from by contacting your nearest Kleenmaid Store
on 13 13 08. When ordering please quote the code
and the type or model of the appliance.
Control knobs are removed by pulling outwards
and replaced by pushing the new ones back in
place.
Oven light bulb
The bulb for
replacement should
meet the following
specifications:
E 14, 240 V, 25 W,
300°C.
Unscrew the glass
cover by turning it in an
anti-clockwise direction
and replace the bulb.
Screw the glass cover
back in place.
In case of side light
remove the glass cover
by inserting a
screwdriver into the slot
and move in the
direction of the arrow.
(see Fig.)
Remember that the bulb
is regarded as a
consumable item and is
not covered by the
warranty.
Instructions for installation and connection
Safety precautions for installation
• Installation must be carried out only by qualified
personnel.
• The electric installation shall be equipped with a
safety device, able to disconnect the appliance
from mains in all wires, with the distance
between contacts of not less than 3 mm in open
position. Good protection is provided by the LSswitches and/or fuses.
• The connection may be carried out by rubber
mains lead (type HO5RR-F with green/yellow
earth wire), PVC insulated mains lead (type
HO5VV-F with green/yellow earth wire) or other
cables of equal or better quality.
• Panels, glue and furniture lining from artificial
materials, adjacent to the appliance must be
temperature resistant (>75°C), otherwise they
may become warped or discoloured.
• Remove any packaging materials (foils, artificial
foam, nails, etc.) from the reach of children.
They present potential danger. Children may
swallow small parts or suffocate.
Instructions for use, installation and connection
27
Page 28

Installation of electric oven
• Panels and furniture lining of the kitchen cabinet
into which the oven is installed must be treated
with temperature resistant adhesives (100°C), or
else they may be discoloured or warped
because of inadequate temperature resistance.
• Before installation you must remove the rear
panel from the kitchen cabinet in the area of
installation.
• Follow the exact dimensions of the installation
opening, indicated on the illustration.
• The bottom of the kitchen cabinet (max 530 mm)
must always be shorter than the side panels in
order to provide adequate ventilation.
• Level the kitchen cabinet using a spirit level.
• The kitchen cabinet into which the oven is
installed must be fixed to the adjacent cabinet to
ensure adequate stability.
• Push the appliance into the cabinet so that
screw guides located in the oven frame holes
stay on the cabinet side panels. Be careful not
to tighten the screws excessively because you
may damage the cabinet sides or the enamel of
the appliance.
28
Instructions for use, installation and connection
Page 29

Electric connection
Electric connection must be carried out
by qualified service personnel only!
Wrong connection may
permanently
damage parts of the appliance and render
your warranty void!
Mains voltage of the user (240 V) must be verified
with the measuring device!
• Before attempting the connection, check
whether the voltage indicated on the rating plate
corresponds to the actual mains voltage.
• Mains lead should be minimum 1.5 m long, so
that it may be plugged into the socket before the
appliance is completely pushed to the wall.
• Earthing wire should be installed in such manner
to be the last one pulled out in case the safety
relief device of the mains lead should fail.
Connection
• Using a screwdriver open the connector cover at
the rear of the appliance. Release two locks
located at either side of the connector bottom.
• Mains lead must be led through the relief safety
device, protecting the mains lead cable from
disconnection.
• Tighten the relief device securely and close the
connector cover.
Colour code
L1, L2, L3 = exterior live wires, usually coloured
black, black, brown.
N = neutral
The colour is usually blue.
Beware of the correct N-connection!
PE = earthing wire
The colour is green/yellow.
Instructions for use, installation and connection
29
Page 30

Technical information
Type-model TO600X/A (EVP454-431E)
Dimensions of the appliance
(height/width/depth) (mm)
Dimensions for mounting
(height/width/depth) (mm)
Electric connection AC 240 V
Nominal voltage of elements 240 V, 50 Hz
Max. temperature 250°C
Oven
Temperature regulator/
function mode switch
Guide levels
(telescopic guides in 3 levels-only certain
models)
Top/bottom element (kW) 0,9/1,1
Grill element/ Grill element
with fan (kW)
Oven illumination: top/side* (W) 25/25*
Function modes
Top/bottom element (kW) 2,0
Top element (kW) 0,9
Bottom element (kW) 1,1
Grill element (kW) 2,0
Element adjacent to the fan (kW) 2,2
Fan motor adjacent to the element (W) 35
Turnspit motor* (W) 4
Cooling fan motor* (W) 11
Total connected power (kW) 3,4
Oven total (kW) 3,4
588x555x548
600x560x550
1/1
5
2,0/2,2
* depending on the equipment of the appliance
After sale service
Repairs
If your oven malfunctions and requires repair,
contact our nearest service centre and quote
the code and the type or model of the
appliance.
Important!
Before contacting the service centre, check if you
can repair the malfunction, using the instructions
from the Troubleshooting guide section.
WE RESERVE THE RIGHT TO ALTER THE SPECIFICATIONS WITH NO
INFLUENCE ON THE OPERATION OF THE APPLIANCE.
If the malfunction of the appliance was caused by
the improper use, the service visit during the
warranty period is not free of charge.
Save these instructions and keep them handy.
If you sell the appliance, give the instructions
to the new owner.
Rating plate
The rating plate is located at the bottom on the
side when you open the oven door.
30
Instructions for use, installation and connection
Page 31

WARRANTY AND SERVICE
DOMESTIC WARRANTY - FULL FIVE YEAR WARRANTY
In addition to all statutory rights which you, the Consumer, have under the relevant laws in respect
of this appliance, during the first five years of ownership as the original purchaser of this
Kleenmaid appliance, we guarantee that any fault caused by faulty material or workmanship
becoming apparent will be rectified free of charge for parts and labour, provided that all service is
performed during normal working hours by Kleenmaid or their designated Agents. Where the
appliance is installed outside the normal servicing area of the above, the Purchaser must pay for
the cost of transporting the appliance to and from the Agent or the Agent’s travelling cost to and
from the Purchaser’s home.
COMMERCIAL WARRANTY - ONE YEAR WARRANTY
When this appliance is installed in a commercial application, you, the Consumer, have under the
relevant laws in respect of this appliance, during your first one year of ownership as the original
purchaser of this Kleenmaid appliance, we guarantee that any fault caused by faulty material or
workmanship becoming apparent, will be rectified free of charge for parts and labour, provided that
all service is performed during normal working hours by Kleenmaid or their designated Agents.
Where the appliance is installed outside the normal servicing area of the above, the Purchaser
must pay for the cost of transporting the appliance to and from the Agent or the Agent’s travelling
cost to and from the Purchaser’s home.
WHAT THESE WARRANTIES DO NOT COVER
We are not responsible for any damage or malfunction unless caused by a defect in material or
workmanship. This includes but is not limited to abuse, misuse, improper installation and
transportation damage. We are not responsible for any consequential damages from any
malfunction.
The Consumer must make the appliance available for servicing and shall bear any costs incurred
for any de-installation and/or re-installation required to make the appliance available for servicing.
Kleenmaid is not liable for any consequential damage incurred during de-installation or reinstallation.
WARRANTY DOES NOT COVER REPLACEMENT OF LIGHT
GLOBES OR GLASS BREAKAGE DUE TO IMPACT
In case of fractured glass do not use your appliance.
WARRANTY REGISTRATION
Please complete warranty details below. Please retain together with your proof of purchase document.
These documents will need to be viewed by our Service Representative should you request in warranty
service.
SERVICE ASSISTANCE
To assist you when phoning our After Sales Service number to arrange a service call please complete
the following details and have them ready when you call.
Model Number_____________________________Date of purchase____________________________
Kleenmaid Store purchased from_________________________Date of installation ________________
KLEENMAID AFTER SALES SERVICE
1300 652 100
Page 32

Other products available in the Kleenmaid
Range of appliances
Washers
Dryers
Dishwashers
Ovens
Cooktops
Outdoor Cooking Centres
Built In Espresso Coffee Machines
Rangehoods
Freestanding Ranges
Sinks
Waste Disposals
Taps
Cookware
Refrigerators
Freezers
Wine Cellars
Vacuum Cleaners
For sales information on the full range of quality appliances
Phone 13 13 08
Rev 2. March 2005
 Loading...