

Page 1

C O O K I N G
c o l l e c t i o n
Instructions for Use
and Warranty Details
SOE102X - Built in Stainless Steel Steam Oven
Page 2

Enfocus Software - Customer Support
Page 3

Enfocus Software - Customer Support
Page 4

4
Table of Contents
Introduction p. 5
Steam cooking
Overview p. 6
What does your oven look like? p. 7
Accessories p. 8
How do you install your oven?
Electrical connection p. 9-10
Build-in p. 11
How do you program for immediate cooking? p. 12-13
Locking display p. 14
Water management p. 14
Cooking chart p. 15-16
Steam cooking p. 17-18
How do you care for your oven? p. 19
Cleaning the oven cavity p. 20-21
Changing the bulbs p. 22
What to do in case of malfunctions? p. 23
How to contact us? p. 23
Warranty and service p. 24
99634202_GB_A.qxd 14/01/05 16:24 Page 4
Page 5

indicates advice to help you make the
best use of your oven
5
Introduction
Throughout this manual,
indicates safety recommendations,
Dear Customer,
Thank you for buying a KLEENMAID oven.
Our design staff have produced a new generation of kitchen equipment, to help
you to give free rein to your culinary talents and to enjoy great food every day.
You will find that the clean lines and modern look of your KLEENMAID oven blends
in perfectly with your kitchen décor. It is easy to use and performs to a high
standard.
The KLEENMAID product range also includes a huge choice of cookers, hobs,
extractor hoods, dishwashers, microwave ovens and refrigerators ready to be built
in and coordinated with your new KLEENMAID oven.
Of course, we make every effort to ensure that our products meet all your
requirements, and our Customer Relations department is at your disposal, to
answer all your questions and to listen to all your suggestions (see back cover
of manual).
A specialist in the world of cooking equipment, KLEENMAID contributes to your
culinary success, shared pleasures and hospitality, bringing you products that are
ever more efficient, easy to use, environmentally friendly, attractive and reliable.
The KLEENMAID name.
99634202_GB_A.qxd 14/01/05 16:24 Page 5
Page 6

6
Steam cooking
Overview
Steam cooking presents nothing but advantages if you follow the instructions for use.
Healthy and natural, steam cooking preserves the full flavour of foods. A delicate sauce or
aromatic herb seasonings add that something extra that makes the difference.
This kind of cooking releases no odours. There is no need to season the cooking water with
herbs or spices; however, you can flavour fish by placing it on a bed of seaweed or make a
savoury poultry dish by adding a bunch of rosemary or tarragon.
You can simultaneously cook meat, fish and vegetables.
Steam cooking gently reheats pasta, rice and mashed potatoes with no risk of food sticking
or drying out.
It makes it easier to cook puddings, flans, rice pudding, etc. covered with aluminium foil,
the condensation water does not add moisture to the preparations.
There is no need to season before cooking--not even the steam water.
To make meat look more appetising, quickly brown it on all sides with hot butter in a pan.
Compared to boiling, steam offers nothing but advantages:
It is quick: cooking starts immediately, whereas for food in a water-filled dish, the cook time
only begins counting down once the water returns to a full boil.
It is healthy: vitamins (those that are water soluble) and minerals are well preserved
because they scarcely dissolve in the condensation water that touches the food.
Moreover, no fats are used for this type of cooking.
The steam maintains the taste of food. It does not add odours, nor the taste of the grill or
the pan. Furthermore, it takes nothing away because the food is not diluted in the water.
Words of advice: there is no point in using this cooking method to prepare fish that is not
fresh or vegetables left in the refrigerator for a week--the results are catastrophic!
The steam does not transfer flavours or aromas; therefore do not hesitate to save both time
and money by cooking items side by side, but without touching. For example, you can cook
fish next to a dessert.
Steam is also appropriate for blanching, defrosting and reheating or even holding warm,
especially sauces.
First use a very small amount of fat to heat meats like poultry, veal and pork so that they
take on an appetizing browned appearance. Then finish cooking them using the steam
method.
Cut into pieces, food cooks faster and more evenly than if left whole.
99634202_GB_A.qxd 14/01/05 16:24 Page 6
Page 7
7
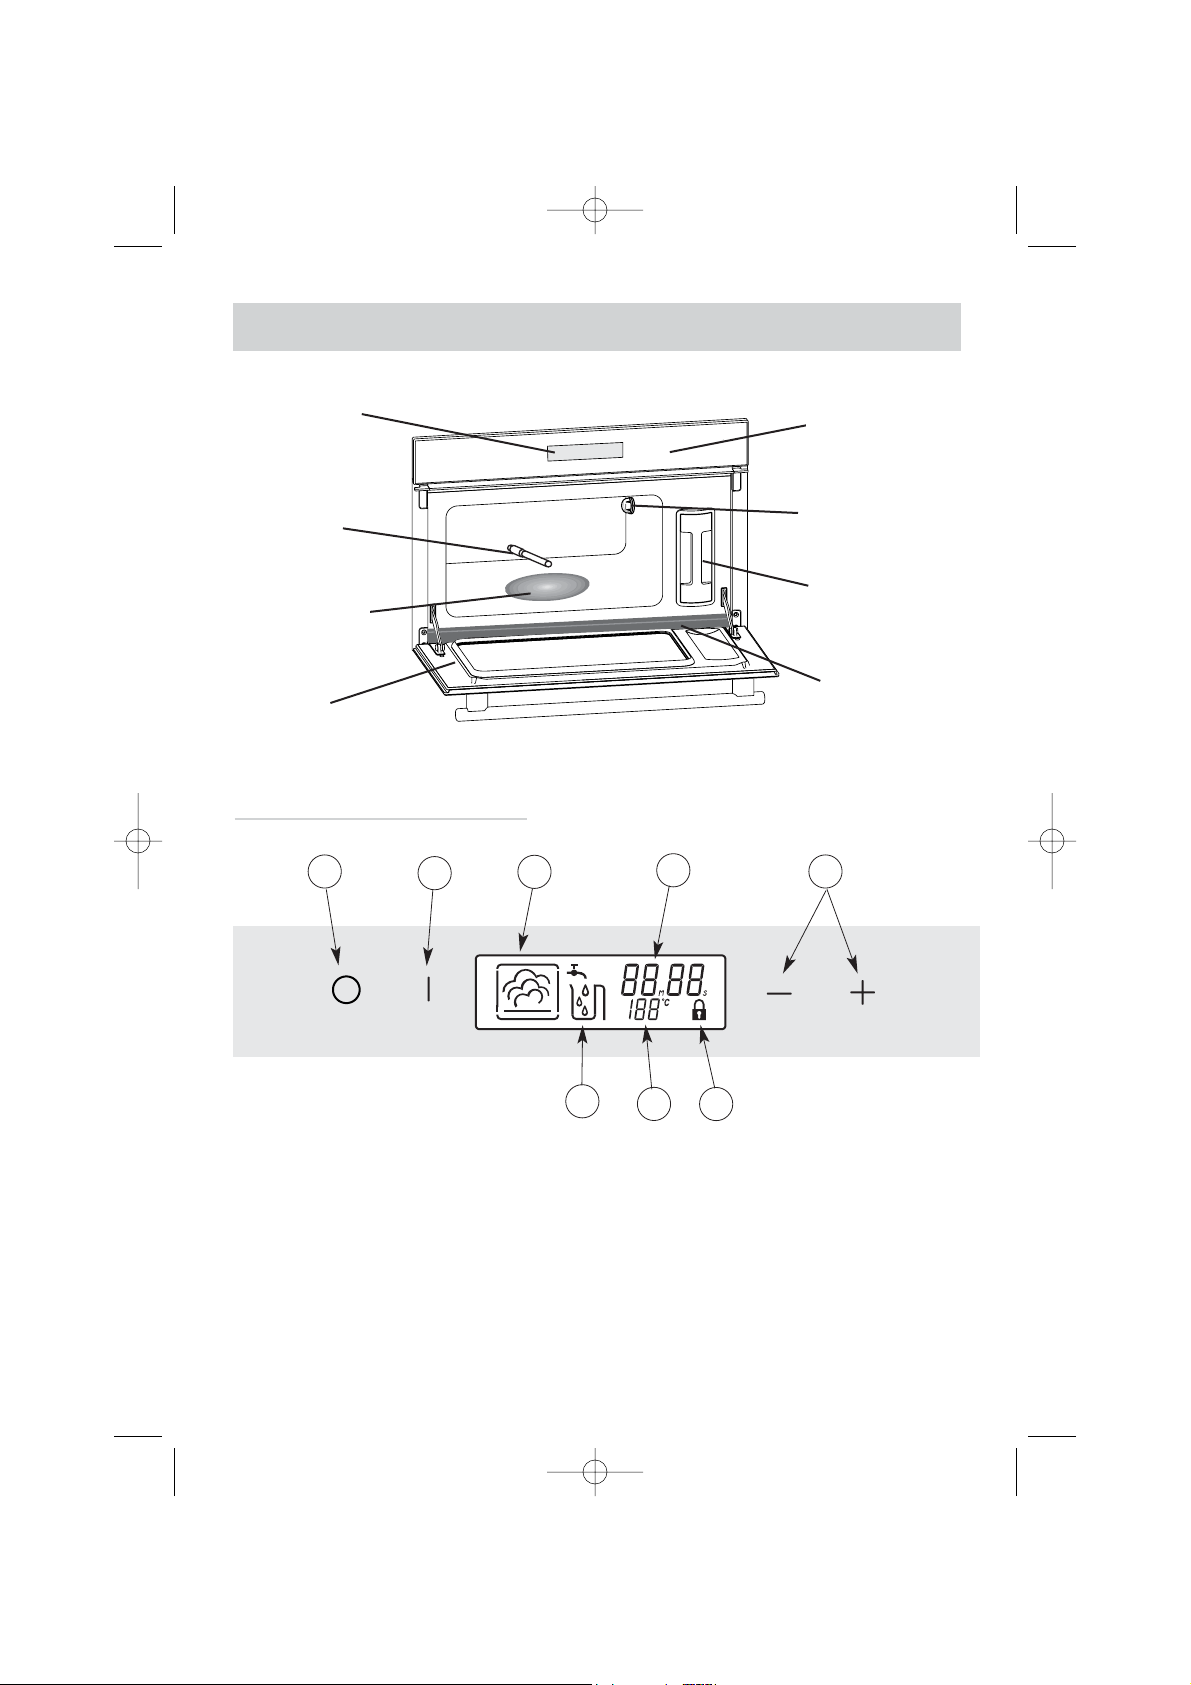
What does your oven look like?
Control
panel
Water
tank
Display
Steam
generator
Door seal
1. Off button
2. Start button
3. Steam cook symbol
4. Cook time display
5. + and - touch controls for time adjustment
6. Touch pad-locking mechanism
7. Temperature indicator
8. Water circuit problem indicator
1
2
3
5
8
Water
pipe
6
7
Close-up of control panel
Gutter
4
Light
99634202_GB_A.qxd 14/01/05 16:24 Page 7
Page 8
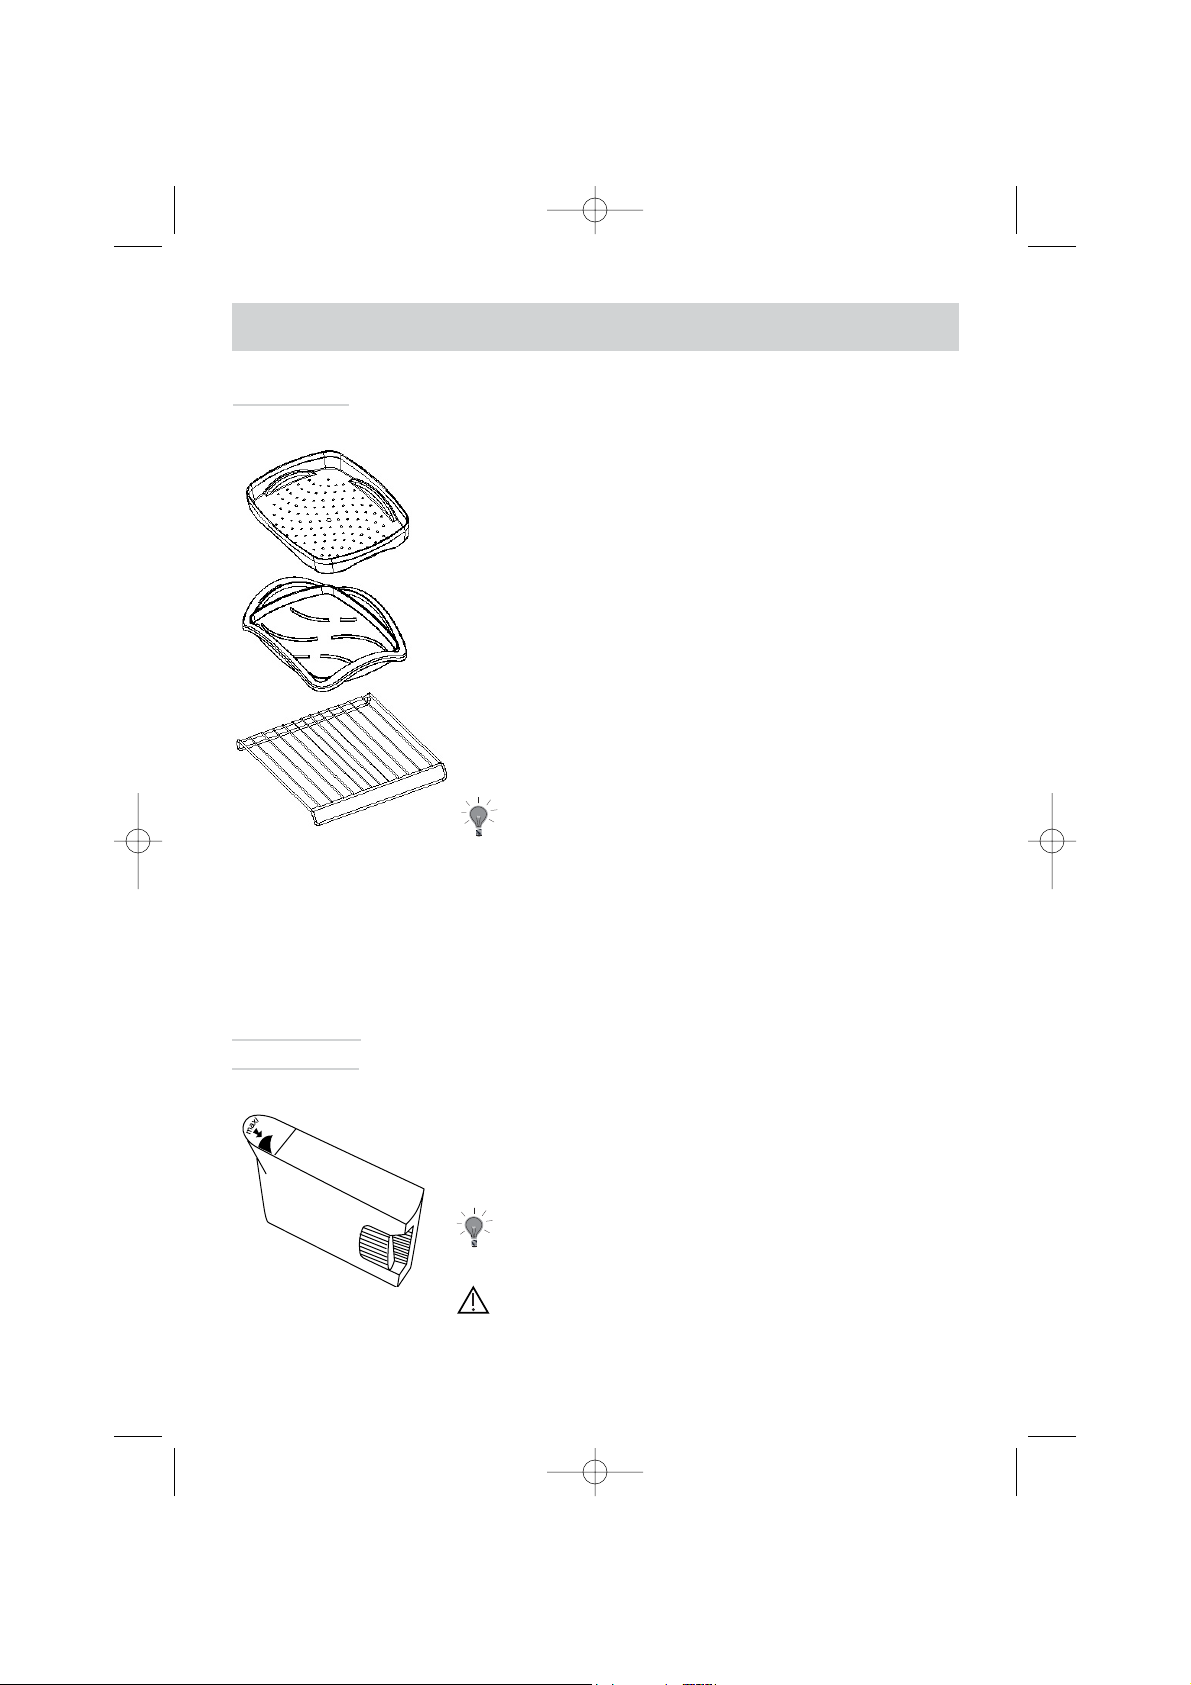
8
The water tank that allows for independent water
supply to the oven.
Its capacity is approximately one litre (maximum level).
(Optional Accessory)
SOK - Steam oven double dish kit which includes the following:
1 x high level support grid
1 x pierced cooking dish
1 x drip tray
Pierced cooking dish to prevent contact between food
and the condensation water.
Drip tray that makes it possible to recover the
condensation water.
Stainless steel removable support grid:
it must be placed in the oven.
Accessories
The cookware may be cleaned in the
dishwasher.
Removable
water tank
Cookware
Using water with a low level of lime will make it
easier to care for your oven.
Using demineralised water is forbidden (not for
human consumption).
99634202_GB_A.qxd 14/01/05 16:24 Page 8
Page 9

9
Electrical
connection
Before using
the appliance
for the first time
For permanent installation, be mindful to add a
standardised, compliant cut-off device in the
electrical conduit. Otherwise the appliance must
be positioned so that the electrical outlet is
accessible after the unit has been built-in.
You must use an electrical receptacle that contains
a ground wire and is connected in compliance with
applicable safety standards.
Your electrical installation must be equipped with
10-ampere thermal-sensitive protection.
Do not operate the oven if the power cable or its
plug are damaged. In this case, they must be
replaced by the manufacturer, its After Sales
Service department of a person of similar
qualifications so as to avoid any danger.
Remove all objects from the oven cavity and, if necessary,
any stickers and protective sheets placed on the
appliance.
Operating voltage ......................................................... 220-240 V ~ 50 Hz
Total oven power .......................................................................... 1.77 kW
Energy consumption
- heating up to and holding at 100°C for one hour ......................... 0.71 kWh
Internal dimensions of your oven
Width .......................................................................................... 38.5 cm
Height ......................................................................................... 18.2 cm
Depth .......................................................................................... 33.5 cm
Net capacity ............................................................................. 23.5 litres
How do you install your oven?
99634202_GB_A.qxd 14/01/05 16:24 Page 9
Page 10

10
Do not remove
the identification
plate!
Clean and dry the control panel, the drip pan, the shelf
and the steam generator using a mild detergent.
Safety
during use
The steam oven should be turned on for 10 minutes
before its first use. Ensure that the ventilation around the
appliance is adequate. If necessary use a rangehood. The
steam generator can lead to burns. When removing
cooked and hot food, you should use a dishcloth and wet
heat resistant gloves. Do not apply excess weight to the
open door. Do not sit or climb on it. It is possible to use
ceramic, porcelain or heat resistant plastic crockery. Never
use paper or cardboard plates or dishes as these will not
withstand humidity. Apart from the accessories supplied,
you should use only suitable heat resistant cooking
dishes. Be sure to observe the manufacturer's
recommendations. Do not use the pierced cooking dish
for rice, terrines or pasta dishes. For these dishes use a
non perforated recipient. After use, check that the
appliance is turned off properly. The appliance is not
intended for use by children or infirm persons without
supervision. Young children must be supervised to ensure
that they do not play with appliance.
99634202_GB_A.qxd 14/01/05 16:24 Page 10
Page 11

11
Build-in
1. Place the appliance in the nook.
The appliance must be horizontal. Check
the position.
2. For greater stability, attach the oven in
the cabinet with two screws through the
holes provided for this purpose on either
side of the front inner panels.
3. Make the electrical connection.
Ensure that the plug will be
accessible after installation.
99634202_GB_A.qxd 14/01/05 16:24 Page 11
380
50
560
550
378
405
544
20
386,5
595
Page 12

12
Steam
cooking
How do you program for immediate cooking?
Steam cooking at 100°C
Press the "Start" touch
control. A cooking time
of 25 minutes is suggested.
Set the desired length of time
(minimum is five minutes and
maximum is 60 minutes) by pressing
the + and - touch controls.
Enter by
pressing the
"Start" touch control.
You MUST fill the water tank to the Max. level before cooking. Return the
tank to its housing by firmly pushing ALL THE WAY until you feel the tank
LOCK INTO POSITION.
The symbol is activated. When the temperature has been reached, the 100°C
display stops flashing and a beep is emitted.
Operating
principle
The water contained in the tank arrives in the cavity via
a pipe. This water is transformed into steam when it
comes into contact with a hot surface located in the
lower part of the cavity: this is the steam generator.
There is no need to add water to the cooking dish. To
guarantee REAL STEAM COOKING, your oven is
furnished with specially designed cookware that will
allow for perfect cooking.
1 2 3
To avoid compromising the cooking results, do not open the appliance door
during cooking.
When in use, the appliance becomes hot. Hot steam will escape when you
open the door of the appliance. Keep children away.
4
99634202_GB_A.qxd 14/01/05 16:24 Page 12
Page 13

13
At the end
of a cooking
programme
Keeping
food warm
As soon as the steam removal phase has been
completed, you can keep dishes warm in the oven area.
Press the stop button. The audible signal and display are
then deactivated. Do not open the door. Dishes are kept
warm and the fan operates at the same time until the
door is opened.
0m00s is displayed. The display animation ceases.
Discontinuous beeps are emitted for three minutes.
To silence the beeps, press the Off touch control or open
the door.
The fan will continue operating for approximately
3 - 5 minutes after the door is opened.
You MUST empty the tank.
The dishes and plates used in the steam
cooking will be hot.
In order to guarantee good oven reliability, the fan continues to function
for a short period after cooking is complete.
Changing the
cooking time
Cancelling
cooking
in progress
During cooking, you can adjust the cooking time by
pressing the + or - touch controls.
You can stop the cooking at any time by pressing the Off
touch control (press and hold for approximately one
second).
If steam generation has not yet begun (approximately
one minute), the oven stops immediately and the time
disappears.
If steam generation has already begun, the time
converts to three minutes; a countdown begins and the
steam escapes before the door is opened.
99634202_GB_A.qxd 14/01/05 16:24 Page 13
Page 14

14
It is possible to lock the display. This feature cannot be
used during timed cooking programmes.
Locking
display
Press the "Off" touch
control for a few
seconds.
A beep is sounded and a
"padlock" appears on the
screen. From this moment on, no
touch control is active.
To unlock the display,
press the "Off" touch
control for a few seconds:
a beep is sounded and the
padlock disappears.
1 2 3
In the event of a water circuit-related problem during
cooking, the "no water" indicator appears and a beep is
emitted.
This error is specifically associated with:
- An empty tank.
- A poorly seated tank.
After checking these two items, cooking automatically
restarts as soon as the door is closed.
Water
management
99634202_GB_A.qxd 14/01/05 16:24 Page 14
Page 15

15
Artichokes (small)
Asparagus
Broccoli
Carrots
Celery root
Pumpkin
Mushrooms
Puff pastry
Courgettes
Chinese artichokes
Spinach
Endives
Fennel
Green beans
Turnips
Fresh peas
Leeks
Potatoes
Sea scallops
Mussels/periwinkles
Crabs
Lobsters
Crayfish
Apples/pears/
peaches
Compote
Puddings
40 to 45 min.
35 to 40 min.
18 min.
20 to 22 min.
25 to 30 min.
15 to 20 min.
15 min.
30 to 35 min.
22 min.
30 to 35 min.
10 to 15 min.
20 min.
20 min.
35 min
30 min.
22 min.
30 to 35 min.
15 to 20 min.
20 to 25 min.
25 min.
25 min.
40 to 45 min.
10 to 12 min.
20 to 25 min.
25 min.
30 to 35 min.
12 to 15 min.
10 to 15 min.
25 min.
10 min.
placed upside down in the dish
for tips decrease cooking time
in small bunches
in thin, round slices
in thin slices
in cubes
in thin strips
Brussels sprouts
Cauliflower in small bunches
Chopped green cabbage
in round slices
(fresh) stir while cooking
(frozen) " "
core removed, cut in half
lengthwise
cut in half
in cubes
/
cut in half
cut in round slices
whole
with seasoning
with seasoning
/
depending on weight
/
whole, peeled
fruit in strips
in ramekins
• These times are a
function of the
type, size and
freshness of the
vegetables. Follow
the indications that
appear in the
"Preparations"
column.
• The cooking time
remains the same
regardless of the
quantity to be
cooked.
Example:
1 or 4 artichokes
require the same
cooking time.
• To check if food
is cooked pierce
with the tip of a
knife. If there is no
resistance, the food
is cooked.
• Place the scallops
on the grid of the
glass dish, add
aromatic herbs.
• Place the
crustaceans on a
bed of seaweed.
• Times depend on
ripeness.
Cooking chart
SHELLFISH
TIMES PREPARATIONS NOTES
CRUSTACEANS
FRUITS-
PUDDINGS
TIMES PREPARATIONS NOTES
VEGETABLES
TIMES
PREPARATIONS NOTES
Regardless of quantity
99634202_GB_A.qxd 14/01/05 16:24 Page 15
Page 16

16
• *Steaks: Round
slices of fish of 2 to
3 cm in thickness
(180/200g) per
person.
• Insist on very
fresh products.
• Place whole fish
in the dish as is or
on bay leaves,
fennel or other
aromatic herbs.
• As soon as
cooking is
complete, remove
the skin, which will
detach easily.
• Then brown
under the grill in
another dish.
• Fluff with a fork
when cooking is
complete.
100 g rinsed rice - 20 cl milk -
2 T. sugar
200 g (1/4 litre water)
Rice pudding
Farina
Eggs
start with very
fresh eggs kept at
room temperature
Northern pike
Cod
Sea bream
Haddock
Herring
Pollack/black cod
Monkfish
Mackerel
Atlantic cod
Skate
Red mullet
Red mullet
Spotted dogfish
Salmon
Sole
Tuna
Trout,
whole
(1 kg)
25 to 30 min.
13 to 15 min.
20 to 25 min.
15 min.
20 min.
15 to 20 min.
15 min.
20 min.
15 min.
25 to 30 min.
15 min.
10 min.
20 min.
15 to 20 min.
10 to 12 min.
20 to 25 min.
20 to 25 min.
whole (1 kg)
steaks (180 g)*
whole (1kg)
filets
whole (200 g)
steaks (180 g)
depending on thickness
whole (250 g)
filets
whole (200 g)
filets
thick steaks (6 to 10 cm in length)
steaks (180/200 g)
filets
steaks (180/200 g)
whole (200 g) 13 to 15 min.
Beef
Pork (filet mignon)
Poultry
(breasts, filets)
(stuffed)
Sausages
Boudins
15 to 30 min.
25 min.
20 to 25 min.
25 min.
20 min.
10 to 15 min.
30 min.
20 min.
7 min.
5 to 6 min.
8 min.
10 to 12 min.
Roast 800 g: 55 to 60 min.
Chicken thighs: 35 to 40 min.
Roast turkey: 50 to 60 min.
400 g piece
MEATS/
TIMES PREPARATIONS NOTES
EGGS
FISH TIMES PREPARATIONS NOTES
Soft-boiled: placed directly on the grid.
Fried: broken in an individual dish placed on the grid
and covered with cooking wrap.
Medium-boi
led: placed directly on the grid.
Har
d-boiled / poached: see detailed recipes.
Place directly in a dish then cover with water or milk. The steam is not enough to saturate
these inflating foods. Place a sheet of aluminium foil on the dish to prevent water droplets
from falling in.
RICE, PASTA
TIMES PREPARATIONS NOTES
FARINA
99634202_GB_A.qxd 14/01/05 16:24 Page 16
Page 17

17
Steam cooking is not a recent invention, In Asian and particularly Chinese cooking,
delicate steam cooking has been practised for a long time. One of the advantages of
this type of cooking is that the foodstuffs do not remain in contact with the cooking
juices. Consequently, the vitamins and minerals are particularly well preserved, but
also the delicious taste of the food. The principle of steam cooking is simple: by
heating it up, water is transformed into steam and transmits its heat to the food
located in the cooking dish. Because the food is not placed directly in boiling water,
less is taken out of it. In other words, the loss of mineral elements and vitamins is
minimised. Consequently the taste of the food is also better preserved than with any
other cooking method. As a result, seasoning with salt can be considerably reduced.
Additionally, steam cooking does not require the use of fats. This therefore makes it
the ideal cooking method for those looking to enjoy healthy cookery. Even if steam
cooking is an extremely delicate method, the technique is the same as for other
cooking methods. The food must be prepared (especially vegetables) and then
washed, and finally cut into pieces just before steam cooking.
Steam cooking tips
Water is a liquid, well adapted to steam cooking. Fatty liquids such as stock or
sauces will stick and cling to the inside of the oven. Sauces can be
subsequently prepared using the cooking juices, and the dish can then be sprinkled
with 2-3 tablespoons of white wine etc. All foods can be slightly seasoned before
steam cooking. It is not necessary to use a great deal of salt as the taste of the food
already comes to the fore during steam cooking. Fresh herbs, finely chopped
vegetables or marinades can also be used to spice up dishes. Leftover rice, pasta,
potatoes and vegetables can be gently reheated using steam. Dishes covered with
sauces or stock can be given a new lease of life! The heating time is between 10 and
20 minutes according to the dishes. You can also use the steaming method to gently
defrost certain frozen products. Frozen vegetables, fish or meat can be defrosted
directly by steam. Place the ingredients as flat as possible on the cooking dish.
Cooking tips
Caution! Take care when opening the appliance during the steam cooking
process. The steam given off is hot and can burn you!
Cooking fish using steam
During steam cooking, fish remains juicy and firm, with the tastes and characteristics
of the various types of fish being particularly well conserved. Fillets and whole fish
are well suited to this cooking method. The cooking times using steam are very
short. The fish is cooked when the skin is no longer shiny and it can be cut using a
fork. Before use, you should slightly coat the inside of the cooking dish with butter
or oil to ensure that the tender skin of the fish does not stick. Fish is particularly
aromatic when the cooking dish is covered with a layer of fresh herbs (for example
sprigs of thyme or dill), finely chopped aromatic vegetables or condiments such as
finely chopped onions, garlic, sliced ginger or slices of lemon, etc. Additionally, we
Steam cooking
99634202_GB_A.qxd 14/01/05 16:24 Page 17
Page 18

18
recommend that you marinate the food before steam cooking. As examples, lemon
juice, olive oil, white wine or soya sauce all add plenty of taste to your fish dish.
Cooking meat using steam
Only the most tender pieces such as fillets of veal, pork or beef, or white chicken
meat (perfect for this type of preparation) can be steam cooked. They remain
particularly juicy when rolled in leaves (for example spinach) or cooked on a bed of
vegetables. Where meat is concerned, it is particularly important to avoid
overcooking it, which will lead to it becoming dry and hard. It is better to reduce the
cooking time indicated and check if the meat has already cooked sufficiently. It is
always possible to continue cooking for a little longer if you find the meat isn't done
enough but it is never possible to improve the quality when the meat is overcooked!
Steam cooked meat always requires a spicy seasoning to avoid it becoming bland.
For this reason, we recommend that you add a sauce.
Poaching food in the steam oven
Steam cooking (which will be new to many of you) can in certain cases also replace
the use of a double boiler. Preparing food using steam cooking is ideal for flans and
terrines. However, the ingredients should never be added directly into the cooking
dish but instead cooked in moulds. Porcelain and glass moulds resist heat well and
are particularly well suited, unlike plastic moulds. The cooking times can vary slightly
according to the size and material used for the moulds and/or their ability to conduct
heat.
Sterilisation in the steam oven
You can also use your steam oven to sterilise all the fruit and vegetables that you
have conserved up until now using classic methods in a sterilisation recipient or the
oven. You can simultaneously conserve the contents of 4 x 750 ml jars (height:
14 cm). Wash the jars carefully and use new elastic rings.
Vegetables: wash, prepare and blanch in the steam oven for around 10 to
15 minutes. Cool using ice cold water and place immediately in the glass jars (to a
level of 3 cm below the rim) and fill with a solution of salt (1 litre of water +
1 tablespoon of salt brought to boiling point) up to three quarters of the jar's height.
Fit a damp rubber ring and close using the cover and hook. Tomatoes should be
inserted raw. Add fresh herbs to carrots. Add a little lemon juice to apples and pears.
Fruit: wash, prepare and fill the jars up to a level of 3 cm below the rim. Fill using
a sugary solution (1 litre of water + 150 - 250 g of sugar, brought to boiling point)
up to two-thirds of the jars height. Fit a damp rubber ring and close using the cover
and hook. Once the sterilisation time is up, you should turn off the steam oven, open
the door for approximately 10 seconds and then leave to stand for around
30 minutes in the closed steam oven.
99634202_GB_A.qxd 14/01/05 16:24 Page 18
Page 19

19
Maintenance
Cavity (after each use)
Wipe the cavity with a dry cloth after the steam
generator has cooled or let the cavity air-dry by leaving
the door open.
Water pipe (once a month)
Remove the water pipe by pulling it towards you.
Remove any hard-water deposits that may be inside
(using a thin, pointed object such as a thick skewer or a
knitting needle).
Steam generator (once a month)
Pour 1/2 cup of white vinegar on the generator.
Let sit for a few minutes, then clean and rinse with
water. Do not use sponges or abrasive powders, nor
coffee maker cleaning agents.
Cleaning the
Gutter
Remove this gutter by pulling it upward. Wipe it off and
return it to its position using the three notches provided.
The oven should not be cleaned with a
steam cleaner.
How do you care for your oven?
99634202_GB_A.qxd 14/01/05 16:24 Page 19
Page 20

20
Cleaning the oven cavity
- During manual cleaning, ensure that the oven is sufficiently cool before touching any of the internal parts.
- Always keep your steam oven clean.
- Check that the door and frame seals are clean.
- You risk injuring yourself if you attempt to remove the
door from the hinge. Consequently, the assembly and
dismantling of the door should only be carried out by a
technician from the After Sales Service Department,
trained in this field.
- During cleaning, you must not use high-pressure or
steam cleaning appliances for reasons related to electrical safety.
Ensure that the oven cavity and the steam generator have
cooled sufficiently before touching them. Only the lighting
for the oven cavity can be turned on.
For hygiene reasons, it is recommended that you empty
and clean the interior of the oven, the drip channel and
the reservoir after each use. To do so, use a damp sponge.
You should subsequently wipe dry with a cloth (synthetic).
Remove any possible limescale deposits with vinegar.
Allow to act for a few minutes, clean and rinse with water.
The control panel and the front part of the door should be
cleaned using a mild detergent and then wiped.
Safety during
cleaning
Cleaning and
maintenance
During cleaning, you should not use steam
cleaning or high-pressure appliances for
reasons inherent to electrical safety.
You should not use chlorine-based products,
products designed to decalcify electrical
household appliances powders or sponges.
Ensure that your keep the surface of the
seals clean around the doors and its frame,
checking that this seal has not become
dislodged from its support.
99634202_GB_A.qxd 14/01/05 16:24 Page 20
Page 21

21
Cleaning the oven cavity
During cleaning, ensure that you do not wipe the surface
of the stainless steel in the wrong direction "the "grain"
runs horizontally).
Do not use circular movements!
Remove any slight impurities with the aid of a soft, clean
and damp cloth (microfibre cloths are particularly well
suited for this task).
Scraping tools or scouring products are not suitable.
In the event of major soiling, you can use household
cleaning products designed for stainless steel. Be sure to
observe the manufacturer's instructions when using these
cleaning and maintenance products.
99634202_GB_A.qxd 14/01/05 16:24 Page 21
Page 22

22
Changing the bulbs
You can replace any defective incandescent bulbs yourself.
You need to obtain bulbs able to withstand a temperature
of 300°C, 25 watts, 230 - 240 volts, E14, which can be
purchased from shops specialising in electrical items.
1. Turn the cover of the lamp to the left.
2. Turn and unscrew the incandescent lamp in an anti-
clockwise direction.
3. Replace the incandescent lamp.
4. Reinsert the cover, screwing it in a clockwise direction.
Before removing the bulbs from the housing, be sure to first turn
off the electrical supply to the appliance.
Turn off the oven and/or activate the cut-out or unplug the power
lead.
Caution!
Do not damage the seals!
Ensure that both seals are in the right place.
Caution!
The seals must be in perfect condition. In the event that the seals
are damaged, please contact the After Sales Service Department.
99634202_GB_A.qxd 14/01/05 16:24 Page 22
Page 23

23
What to do in case of malfunctions?
WHAT SHOULD
YOU DO?
POSSIBLE
CAUSES
Your display does not light up
Water or steam leak around
the door during cooking.
- Oven is not connected to
power source.
- Electronic board is not
functioning.
- Check that the appliance is
receiving electricity (good fuse).
- Call the After-Sales Service
Department.
- The door is not properly
closed.
- The door seal is defective.
- Call the After-Sales Service
Department.
The steam oven does not
work.
- A power supply problem.
- The electrical system is faulty.
- Put the plug into the plug socket.
- Check the cut-out.
- Call the After Sales Service
Department.
Water or steam comes out of
the appliance.
- The door is not properly
closed.
- The door seal has come away
from its support.
- The door seal is faulty.
- Close the door properly.
- Correctly insert the seal into its
support.
- Call the After Sales Service
Department.
There is residual water in the
oven cavity on the inner door
and the door seal.
This is normal. Dry with a cloth.
The drip channel fills with
water after every cooking
session.
- The seal on the tank is faulty.
- The seal on the door has
come away from its support.
- The seal on the door is faulty.
- The door is sloping.
- Replace the seal.
- Correctly insert the seal into its
support.
- Call the After Sales Service
Department.
- Call the After Sales Service
Department.
The light on the oven cavity
does not work.
The light is faulty. Replace the light.
YOU OBSERVE
THAT…
In all circumstances, if your efforts are not sufficient,
contact the After-Sales Service Department without delay.
Copy here the details that are on your oven manufacturer's plate:
How to contact us?
MADE IN FRANCE
220 - 240V ~ 50 Hz
BRANDT APPLIANCES SAS
7 rue Henri Becquerel
92500 RUEIL MALMAISON
99634202_GB_A.qxd 14/01/05 16:24 Page 23
Page 24

24
Enfocus Software - Customer Support
Page 25

Enfocus Software - Customer Support
Page 26

Enfocus Software - Customer Support
Page 27

Enfocus Software - Customer Support
Page 28

Enfocus Software - Customer Support
99636251 02/0599636251 02/05
 Loading...