

Page 1

CookingCooking
c o l l e c t i o nc o l l e c t i o n
Instructions for Use
and
Warranty Details
SOE100X - Built In Stainless Steel Steam Oven
SOE100A - Built In Aluminium Steam Oven
Page 2

ongratulations on the purchase of your new
C
designed and manufactured to give you years
For best results, carefully read the instructions on
how to install your new appliance. Correct installation
will avoid delays and unnecessary service calls.
Once installation is complete, read this booklet
carefully and get to know the controls and the
We reserve the right to alter the specifications
appliance. This instruction manual cannot be
appliance. This appliance has been
of reliable performance.
features of your new appliance.
reason for a claim.
Page 3

Introduction P.4
Your oven
Oven features P.5
Accessories P.6
Safety instructions
Before using the appliance for the first time P.7
Safety during use P.7
Child safety P.7
Installing your oven
Electrical connections P.8
Assembly P.8
Changing the bulbs P.9
T
echnical data P.9
Tips for installing your oven P.10
How to use your oven
The oven programmer P.11
Steam cooking P.12
Keeping food warm P.13
I
nterrupting the steam cooking process P.13
Displaying the water level/Refilling P.13
Reducing or extending cooking time during the cooking process P.14
Troubleshooting P.15-16
Cooking table
P.17-19
C
ooking tips P.20-22
Cleaning the oven cavity
Safety during cleaning P.23
Cleaning and maintenance P.23-24
How to contact us
P.24
Contents
3
Kleenmaid vapeur_GB.qxd 10/07/03 10:28 Page 3
Page 4

Throughout this manual,
indicates safety recommendations,
indicates advice to help you make the
best use of your oven
4
Introduction
Dear Customer,
Thank you for buying a KLEENMAID oven.
Our design staff have produced a new generation of kitchen equipment, to help
give you free rein to your culinary talents and to enjoy great food every day.
You will find that the clean lines and modern look of your KLEENMAID oven blends
in perfectly with your kitchen décor. It is easy to use and performs to a high
standard.
The KLEENMAID product range also includes a huge choice of ovens, cooktops,
rangehoods, dishwashers, microwave ovens and refrigerators ready to be built
in and coordinated with your new KLEENMAID Steam Oven.
Of course, we make every effort to ensure that our products meet all your
requirements, and our professional Sales Staff are at your disposal, to answer
all your questions and to listen to all your suggestions.
A specialist in the world of cooking equipment, KLEENMAID contributes to your
culinary success, shared pleasures and hospitality, bringing you products that are
ever more efficient, easy to use, environmentally friendly, attractive and reliable.
The KLEENMAID name.
Kleenmaid vapeur_GB.qxd 10/07/03 10:28 Page 4
Page 5
5
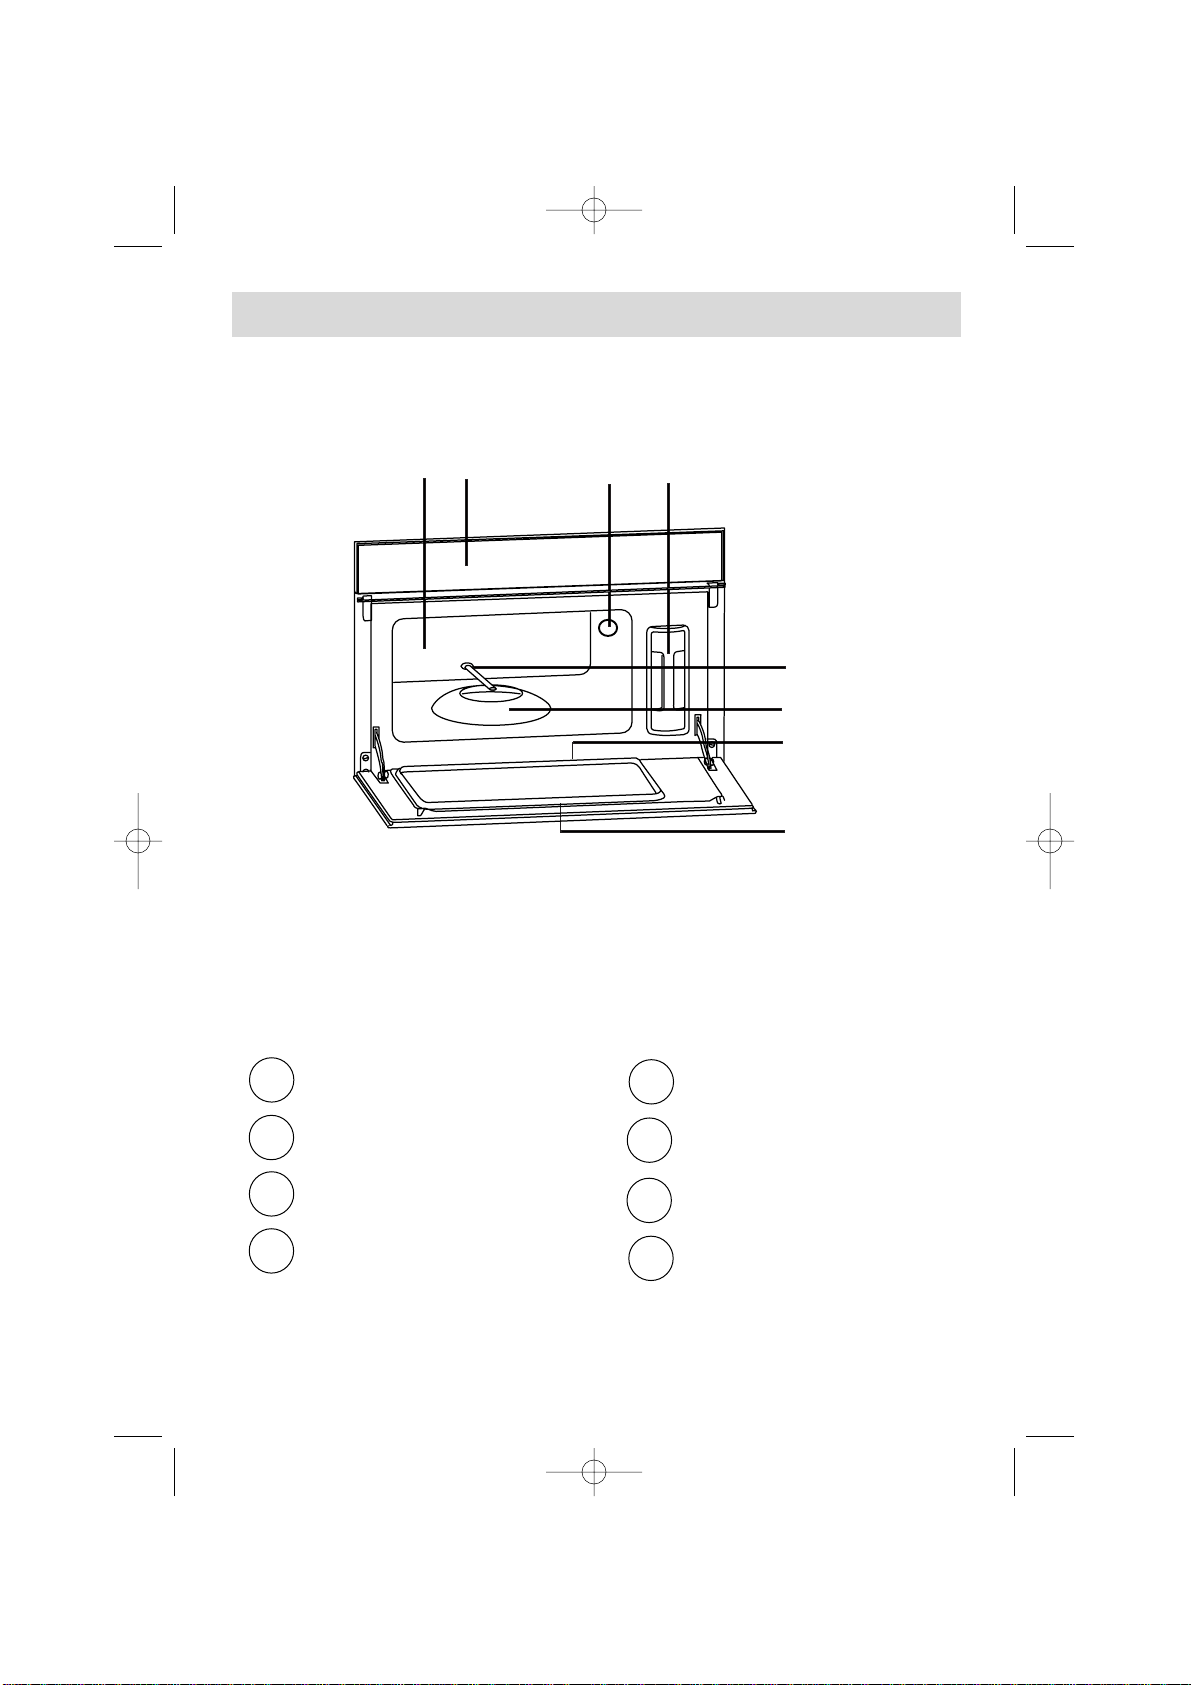
Your oven
1
2
5
6
7
3
4
OVEN FEATURES
Water pipe
Steam generator
Drip channel
Door seal
Oven cavity
Control panel
Oven cavity lighting
Water tank
8
Kleenmaid vapeur_GB.qxd 10/07/03 10:28 Page 5
2
1
34
5
6
7
8
Page 6
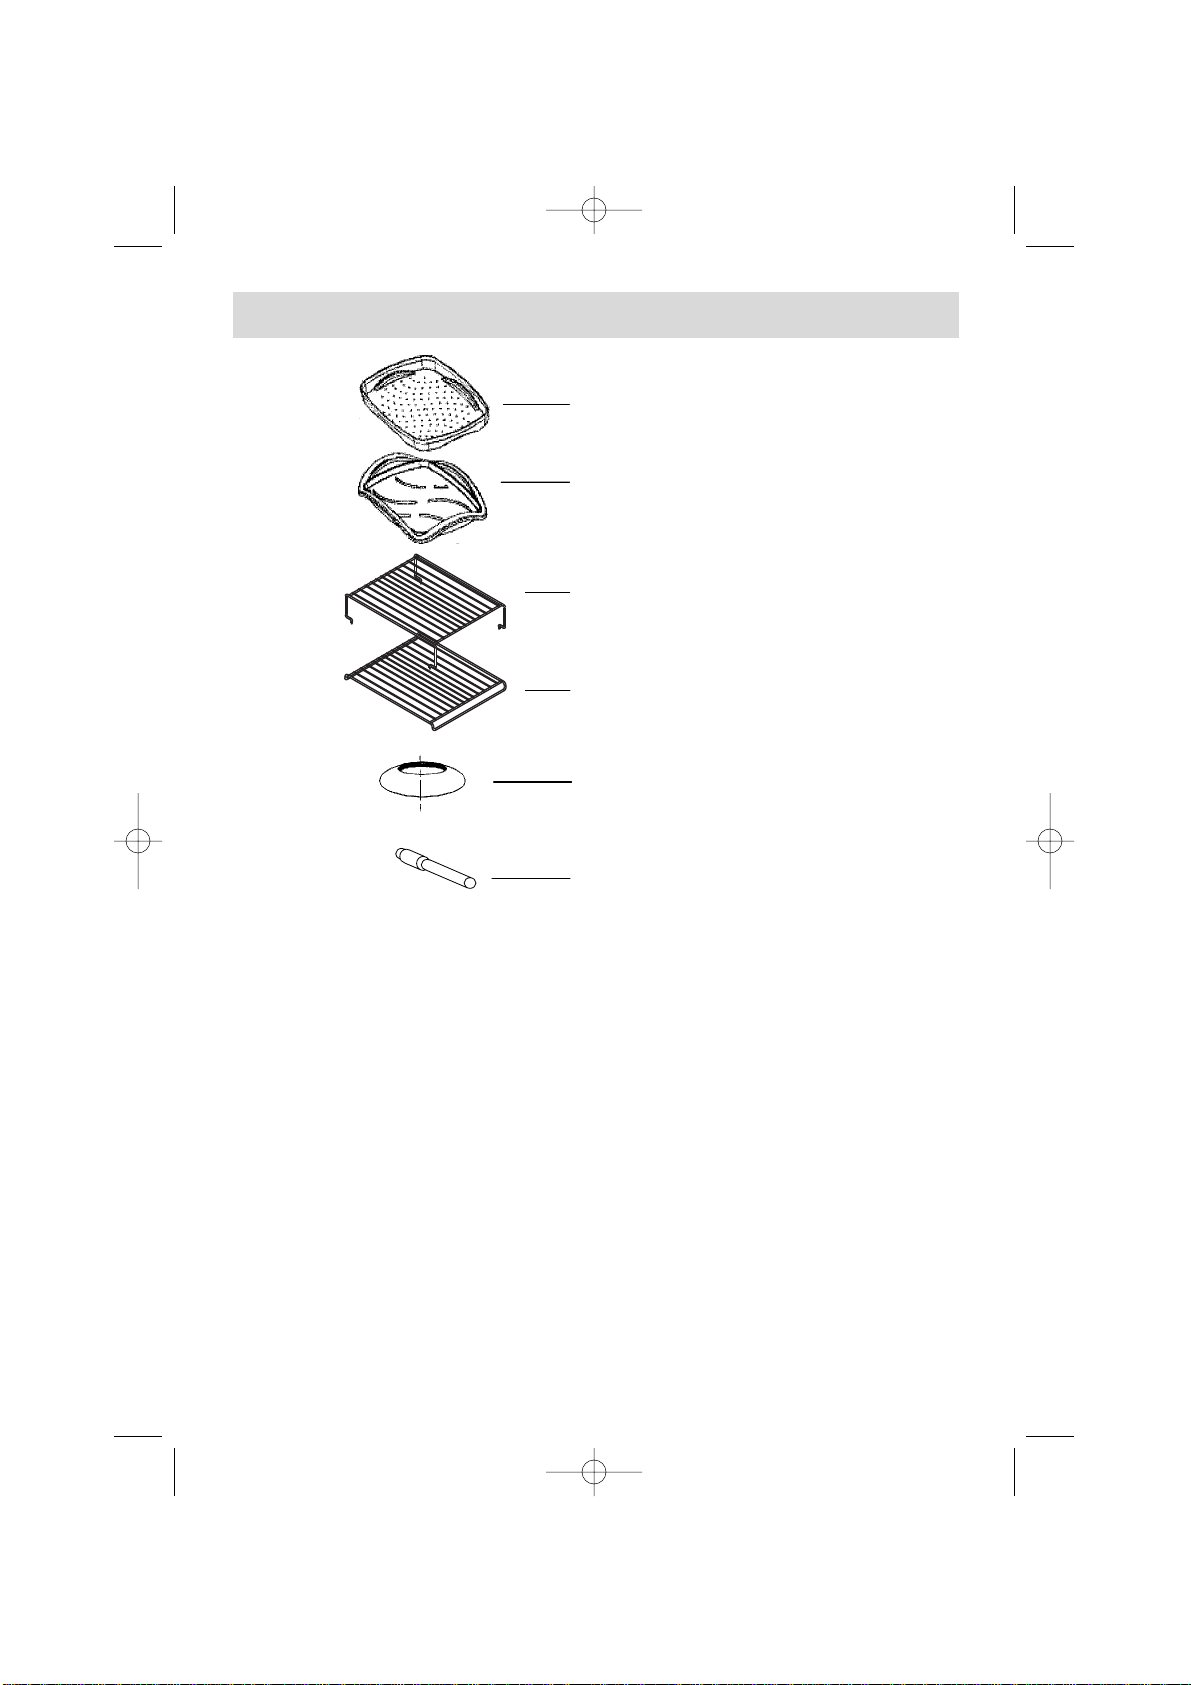
Steam cooking drainer
Steam cooking dripping
pan
Steam cooking shelf for
second level runner
(optional accessory)
Steam cooking shelf
Steam generator
Water pipe
Accessories
6
Cooking dishes
During cooking, you can use the accessories included with the steam oven.
- Place the food to be cooked in the drainer.
- Use the dripping pan to catch the cooking juices.
These can be used (for example) to make sauces.
Careful! At the end of cooking time the food and steam cooking dishes will be hot!
It is possible to use ceramic, porcelain or heat resistant plastic crockery. Be sure
to observe the manufacturer's recommendations.
For example, asparagus can be cooked on a plate placed in the steam oven and
then seasoned. Do not use the drainer for rice, terrines or pasta dishes. For these
dishes use a non-perforated recipient.
Never use paper or cardboard plates or dishes as these will not withstand humidity.
Kleenmaid vapeur_GB.qxd 10/07/03 10:28 Page 6
1
2
3
4
5
6
Page 7

7
Safety instructions
Remove all objects from the oven cavity and, if necessar y, any stickers and
protective sheets placed on the appliance.
Do not remove the identification plate!
Clean and dry the control panel, the oven cavity and the inside of the doors
using a cloth soaked in a mild detergent.
Clean the steam cooking drainer, the dripping pan, the shelf and the steam
generator using a mild detergent.
Before using the appliance for the first time
Child safety
When the appliance is turned off, it is
possible to activate the locking function by
pressing on the (S
TOP) button for 5 seconds.
An audible signal will be emitted and the
symbol appears on the screen.
To save energy, the display disappears
from the screen after 10 minutes. The
symbol reappears if any other buttons
are pressed.
When the locking function is activated,
it is not possible to turn on the
appliance.
To turn off the locking function, simply press
on the (START) button for 5 seconds.
An audible signal is emitted and the
symbol disappears from the screen.
The steam oven should be turned on for 10 minutes before its first use.
Ensure that ventilation around the appliance is adequate. If necessary use a rangehood.
The steam generator can lead to burns.
When removing cooked and hot food, you should use a dishcloth and wear heat
resistant gloves.
Do not apply excess weight to the open door. Do not sit or climb on it.
Apart from the accessories supplied, you should use only suitable heat resistant
cooking dishes. Be sure to observe the manufacturer's recommendations.
After use, check that the appliance is turned off properly.
Safety during use
Kleenmaid vapeur_GB.qxd 10/07/03 10:28 Page 7
The appliance is not intended for use by children or infirm persons
without supervision.
Page 8

8
Installing your oven
The appliance should only be connected by a professional electrician.
To ensure electrical safety, the equipment to be fitted must be inserted
in units fully adapted to this purpose and conforming to standards.
- Defective appliances should not be used. In the event of problems or defects
becoming apparent, turn off the appliance and/or activate the cutout.
- For safety reasons, any repairs to be carried out on appliances, particularly on
parts conducting electricity, must only be carried out by professional electricians
or technicians from the After Sales Service Department trained in this field, in
view of the risks for the user. In the event of a problem, please contact our After
Sales Service Department directly 1300 652 100.
- The appliance should only be used when it is fully installed. In this way you are
protected against contact with electrical components.
1. Place the appliance in front of the space into which it is to be installed and
plug it into the mains.
2. Insert the steam oven into the space set aside for it.
Ensure that the cable does not become trapped as you insert the appliance.
3. Attach the appliance in various places using a minimum of 2 screws.
Alternatively
If the steam oven is installed along with an oven or a microwave, it should
always be placed in the lowest position.
Electrical connections
Assembly
Kleenmaid vapeur_GB.qxd 10/07/03 10:28 Page 8
Connecting to the power supply :
- You should use an earthed plug to connect to the power supply. In case of a
direct connection, the main switch terminal should be at least 3 mm apart.
- The electric plug should remain accessible. Do not use an extension lead or
multiple plug.
- We cannot be held responsible for any incident caused by the machine
being badly earthed.
- The machine must be fitted in compliance with the applicable regulations in your
state as well as any extra instructions from the Electricity Company.
- When carrying out maintenance, be sure to unplug the appliance from the
mains!
Page 9
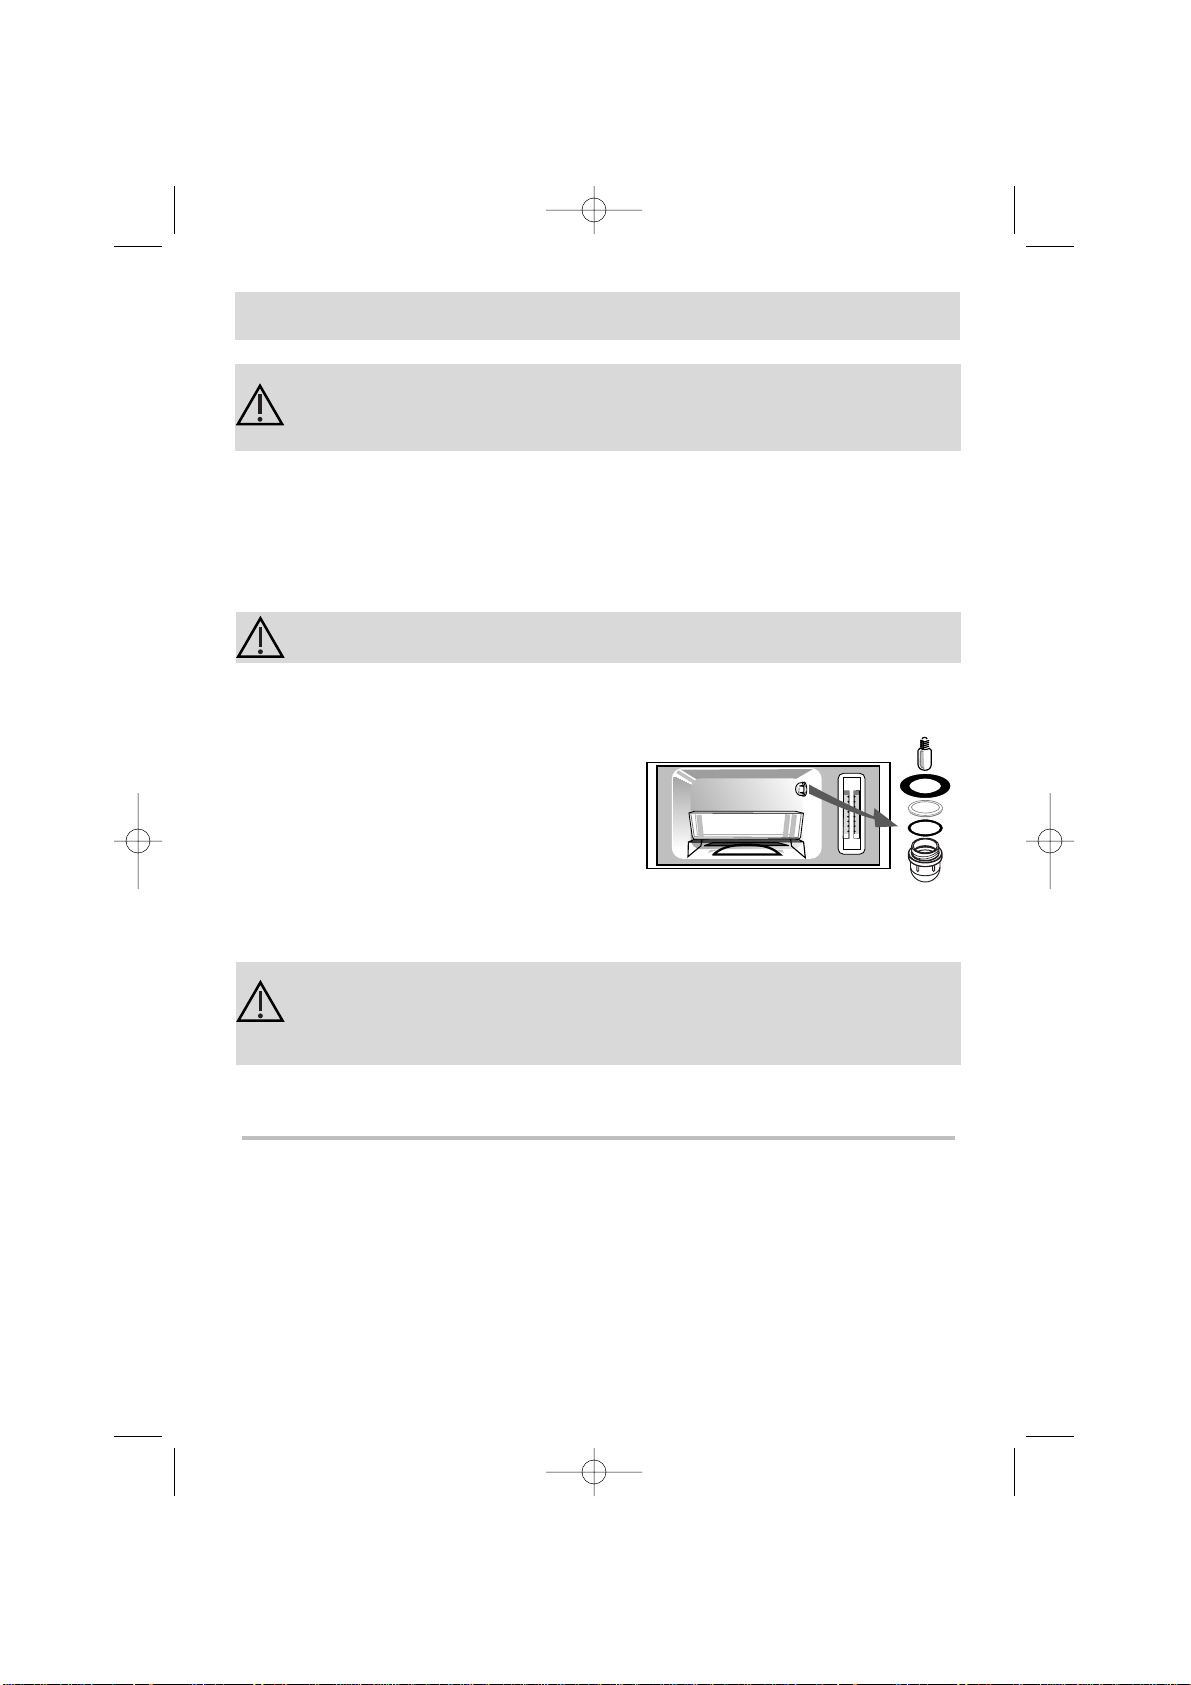
Changing the bulbs
Before removing the bulbs from the housing, be sure to first turn off
the electrical supply to the appliance.
Turn off the oven and/or activate the cutout or unplug the power lead.
9
You can replace any defective incandescent bulbs yourself.
You need to obtain bulbs able to withstand a temperature of 300º C, 25 watts,
230 - 240 volts, E14, which can be purchased from shops specialising in
electrical items.
Caution!
Do not damage the seals!
1. Turn the cover of the lamp to the left.
2. Turn and unscrew the incandescent
lamp in an anticlockwise direction.
3. Replace the incandescent lamp.
4. Reinsert the cover, screwing it in a
clockwise direction.
Ensure that both seals are in the right place.
Caution!
The seals must be in perfect condition. In the event that the seals
are damaged, please contact the After Sales Service Department.
Kleenmaid vapeur_GB.qxd 10/07/03 10:28 Page 9
Technical data
Appliance size
Width 595 mm
Depth 420 mm
Height 388 mm
Size of the space
Minimum width 560±568 mm
Minimum depth 500 mm
Minimum height 380±388 mm
Power consumed
Connection voltage 220-240 V ~50Hz (10 A)
Total power 2.03 kW
Page 10

10
The appliance should only be connected up by a professional
electrician.
Tips for installing your oven
Installing your oven
Kleenmaid vapeur_GB.qxd 10/07/03 10:28 Page 10
Page 11

11
How to use your oven
1. The oven programmer
1
3
4
5
6
2
Start/Stop button
Steam cooking mode display
Water level display
5
The cooking time display
Child safety display
Cooking time adjustment
button (+/-)
1 2 43 6
Kleenmaid vapeur_GB.qxd 10/07/03 10:28 Page 11
Page 12

12
1. Fill the water tank up to the maximum level.
2. Insert the tank until it clicks into place.
3. Place the food to be cooked in the steam
drainer and place this on the dripping pan
(place on the shelf).
4. Close the oven door.
5. Press the button (Start). The cooking time
symbol (25 mins) is displayed.
6. To adjust the cooking time, press on the +/buttons (between 10 and 60 mins).
Adjust the cooking time as per the cooking
table.
7. To start the cooking programme, press on
the button (START).
8. Three minutes before the end of the cooking
time, the water level display turns off and
the steam cooking symbol begins flashing.
The steam reduction phase is then displayed
in minutes and seconds.
9. The end of the process is announced by an
audible signal and by 0:00. The symbol
disappears when the doors are opened.
10. Remove your dishes from the oven.
11. Empty the tank. Dry the oven cavity, the
door and the drip channel.
2. Steam cooking
How to use your oven
If you are using hard tap water, we recommend that you use flat,
non-calcareous water obtained from shops. The fan will continue
operating for 3 to 5 minutes after the doors are opened. The dishes remain
warm in the appliance until the doors are opened.
Caution!
The dishes and plates used in the steam cooking will be hot.
Kleenmaid vapeur_GB.qxd 10/07/03 10:29 Page 12
Page 13

13
Keeping food warm
How to use your oven
As soon as the steam removal phase has been
completed, you can keep dishes warm in the
oven area.
Press on the button (STOP). The audible signal
and display are then deactivated.
The dishes are kept warm and the fan operates at the same time
until the door is opened. The fan continues to run for 2 to 3 minutes
after the door is opened.
The door remains closed (do not open).
Interrupting the steam cooking process
1. Press the (STOP) button.
The water level display begins flashing
and the steam evacuation phase will then
be shown in minutes and seconds.
2. After three minutes, it is possible to open
the door.
We recommend that you do not interrupt the steam cooking process.
If, however, you wish to do so, you should proceed as follows:
Displaying the water level/Refilling
When "recipient empty" begins flashing and an
audible signal is emitted, the cooking programme
is interrupted.
1. Open the door and fill the water tank.
2. Reinsert the filled tank until it clicks into place
and then close the door. As a result of this,
the flashing and audible signal are
interrupted.
3. Press the (START) button.
The cooking process continues and the
water level display appears on the screen.
The quantity of water contained in the tank is shown on the
screen.
Kleenmaid vapeur_GB.qxd 10/07/03 10:29 Page 13
Page 14

14
How to use your oven
Reducing or extending cooking time during the
cooking process
The time can be reduced to 10 minutes by pressing the button (-).
When the cooking programme is not in its steam evacuation phase, the time
can be extended up to a maximum of 60 mins by using the button (+).
Kleenmaid vapeur_GB.qxd 10/07/03 10:29 Page 14
Page 15

T
roubleshooting
15
I
f you realize that...
P
ossible causes
W
hat should you do?
The water level display
flashes although the tank
is full.
- The water tank is not
correctly installed.
- The seal located in the
water tank is faulty.
- The recognition system is
faulty.
- Set up the water tank
correctly.
- Replace the seal.
- Call the After Sales Service
Department.
The steam oven does not
work.
- A power supply problem.
- The electrical system is
faulty.
- Put the plug into the plug
socket.
- Check the cut-out.
- Call the After Sales Service
Department.
The light on the oven
cavity does not work.
The light is faulty. Replace the light.
Water or steam comes out
of the appliance.
- The door is not properly
closed.
- The door seal has come
away from its support.
- The door seal is faulty.
- Close the door properly.
- Correctly insert the seal
into its support.
- Call the After Sales Service
Department.
There is residual water in
the oven cavity on the
inner door and the door
seal.
This is normal.
Dry with a cloth.
The drip channel fills with
water after every cooking
session.
- The seal on the tank is
faulty.
-The seal on the door has
come away from its support.
- The seal on the door is
faulty.
- The door is sloping.
- Replace the seal.
- Correctly insert the seal
into its support.
- Call the After Sales Service
Department.
- Call the After Sales Service
Department.
Kleenmaid vapeur_GB.qxd 10/07/03 10:29 Page 15
Page 16

16
The audible signal on the
timer continues during the
cooking process.
You are hearing the
pump, this is normal.
-
The display lights up and
the cooking time goes by
but no steam cooking
takes place.
The demonstration
programme has
inadvertently been
activated.
Set to the standard
programme.
1. Turn off the appliance
using the (Stop) button.
2. Open and close the
door.
3. Press the (Start) button.
4. Select 29 minutes using
the (+) button.
5. Press the (Start) button
for 5 seconds.
6. The display will disap-
pear and an audible signal
will be emitted. The
appliance can once again
be used.
Troubleshooting
The locking symbol is
lit .
The child safety (lock) is
activated.
Deactivate the child safety.
I
f you realize that...
P
ossible causes
W
hat should you do?
There is a little water in
the drip channel after
cooking.
This is normal.
Dry with a cloth
Kleenmaid vapeur_GB.qxd 10/07/03 10:29 Page 16
Page 17

17
FOOD PREPARATION COOKING TIME
Artichoke Full, large 45 minutes
Cabbage Heads 15-18 minutes
Beans According to size and quantity 20-30 minutes
Broccoli Sprigs, short stems 12-15 minutes
Mushrooms Heads or large slices 10 minutes
Green peas Fresh 15-25 minutes
Frozen 10-12 minutes
Fennel Cut into two or four 20-30 minutes
depending on size
Cucumber Whole 15-18 minutes
Potatoes Small, completely peeled and
cut in half or into quarters 25-30 minutes
depending on size 20-25 minutes
Garlic Cloves to be peeled 15 minutes
Kohlrabi Small stalks or slices 20-25 minutes
Leek Stalks, 15-20 minutes
Rounds cut in half 10 minutes
Pepper Halved 20 minutes
Strips 15 minutes
Carrots New carrots, small, 25-30
completely peeled, stalks or minutes
slices 20-25 minutes
Salsify Stalks 20-25 minutes
Celery Quarters, depending on size 25-30 minutes
Slices 20 minutes
Green asparagus Whole, depending on thickness 18-25 minutes
White asparagus Whole, depending on thickness 25-35 minutes
Spinach Leaves 10 minutes
Tomatoes Whole 15 minutes
Halved 10 minutes
Whole, to be peeled 5 minutes
Savoy cabbage Quarters, without stems 30 minutes
Courgettes Not peeled, small stalks 15-20 minutes
Cooking table
Vegetables
Kleenmaid vapeur_GB.qxd 10/07/03 10:29 Page 17
Page 18

18
Cooking table
Terrines, egg custards
FOOD PREPARATION COOKING TIME
Vegetable terrine A one litre mould 25-30 minutes
Meat terrine A one litre mould 35-45 minutes
Sausage meat terrine A one litre mould 35-40 minutes
Fish terrine A one litre mould 25-35 minutes
Sweet egg custard 1 litre 25-30 minutes
200 ml 15 minutes
Spicy egg custard 200 ml 15 minutes
Soft boiled egg Soft 10-12 minutes
Hard boiled eggs Hard 12 minutes
Meats and fish
Important: Watch over the cooking of meat and fish, given that the indicated
cooking times vary according to the thickness of the piece of meat and/or fish, as well
as the desired cooking level. Over-cooking can lead to the quality of the dish being
reduced, unlike when cooking vegetables.
FOOD PREPARATION COOKING TIME
Chicken fillet Fairly large, 18-20 minutes
strips, cubes 10-12 minutes
Pork or veal fillet Medallions, for approx 60g 12-15 minutes
Veal fillet Pieces, 500g approx 25-30 minutes
Beef fillet Medallions, for approx 100g 12-15 minutes
Pieces, approx 500g 10 minutes
Lamb saddle fillet Pieces, approx 150g 12-15 minutes
Fish Fillets, slices, small rolls for
approx 150g 10-12 minutes
Pieces approx 300g 15-18 minutes
Pieces approx 600g 20 minutes
Pieces approx 1 to 1.2 kg 20-30 minutes
Kleenmaid vapeur_GB.qxd 10/07/03 10:29 Page 18
Page 19

Cooking table
The cooking times indicated are for information purposes only
Important: The glass pots must not come into contact with each other. Check the
tightness of the closures after cooling and after several days. If the tightness is not
perfect the glass must once again be sterilised or its contents consumed immediately.
Sterilisation Leave the steam oven
Time in minutes turned off
Time in minutes
Berries
Strawberries
Blueberries 45 30
Raspberries
Ripe gooseberries
Fruit with a stone
Firm skinned fruit
Pears 45 30
Quinces
Vegetables
Carrots 60 60
Mushrooms 55 60
Small vegetables steeped
in vinegar 60 30
Kohlrabi
Beans 60 60
Green peas
Asparagus
19
Kleenmaid vapeur_GB.qxd 10/07/03 10:29 Page 19
Page 20

Steam cooking
Steam cooking is not a recent invention. In Asian and particularly Chinese cooking,
delicate steam cooking has been practised for a long time. One of the advantages of
this type of cooking is that the foodstuffs do not remain in contact with the cooking
juices. Consequently, the vitamins and minerals are particularly well preserved, but
also the delicious taste of the food.
The principle of steam cooking is simple: by heating it up, water is transformed into
steam and transmits its heat to the food located in the cooking dish. Because the
food is not placed directly in boiling water, less is taken out of it. In other words, the
loss of mineral elements and vitamins is minimised. Consequently the taste of the
food is also better preserved than with any other cooking method. As a result,
seasoning with salt can be considerably reduced.
Additionally, steam cooking does not require the use of fats. This therefore makes it
the ideal cooking method for those looking to enjoy healthy cookery. Even if steam
cooking is an extremely delicate method, the technique is the same as for other
cooking methods. The food must be prepared (especially vegetables) and then
washed, and finally cut into pieces just before steam cooking.
Steam cooking tips
Water is a liquid well adapted to steam cooking. Fatty liquids such as stock or
sauces will stick and cling to the inside of the oven. Sauces can be
subsequently prepared using the cooking juices, and the dish can then be sprinkled
with 2-3 tablespoons of white wine etc.
All foods can be slightly seasoned before steam cooking. It is not necessary to use a
great deal of salt as the taste of the food already comes to the fore during steam
cooking. Fresh herbs, finely chopped vegetables or marinades can also be used to
spice up dishes.
Leftover rice, pasta, potatoes and vegetables can be gently reheated using steam.
Dishes covered with sauces or stock can be given a new lease of life! The heating
time is between 10 and 20 minutes according to the dishes.
You can also use the steaming method to gently defrost certain frozen products.
Frozen vegetables, fish or meat can be defrosted directly by steam. Place the
ingredients as flat as possible on the cooking dish.
C
ooking tips
Caution! Take care when opening the appliance during the steam
cooking process. The steam given off is hot and can burn you!
20
Kleenmaid vapeur_GB.qxd 10/07/03 10:29 Page 20
Page 21

Cooking fish using steam
During steam cooking, fish remains juicy and firm, with the tastes and characteristics
of the various types of fish being particularly well conserved. Fillets and whole fish
are well suited to this cooking method. The cooking times using steam are very
short. The fish is cooked when the skin is no longer shiny and it can be cut using a
fork.
Before use, you should slightly coat the inside of the cooking dish with butter or oil to
ensure that the tender skin of the fish does not stick. Fish is particularly aromatic
when the cooking dish is covered with a layer of fresh herbs (for example sprigs of
thyme or dill), finely chopped aromatic vegetables or condiments such as finely
chopped onions, garlic, sliced ginger or slices of lemon, etc. Additionally, we
recommend that you marinate the food before steam cooking. As examples, lemon
juice, olive oil, white wine or soya sauce all add plenty of taste to your fish dish.
Cooking meat using steam
Only the most tender pieces such as fillets of veal, pork or beef, or white chicken
meat (perfect for this type of preparation) can be steam cooked. They remain
particularly juicy when rolled in leaves (for example spinach) or cooked on a
bed of vegetables. Where meat is concerned, it is particularly important to avoid
overcooking it, which will lead to it becoming dry and hard. It is better to reduce the
cooking time indicated and check if the meat has already cooked sufficiently. It is
always possible to continue cooking for a little longer if you find the meat isn't done
enough but it is never possible to improve the quality when the meat is overcooked!
Steam cooked meat always requires a spicy seasoning to avoid it becoming bland.
For this reason, we recommend that you add a sauce.
Poaching food in the steam oven
Steam cooking (which will be new to many of you) can in certain cases also replace
the use of a double boiler. Preparing food using steam cooking is ideal for flans and
terrines. However, the ingredients should never be added directly into the cooking
dish but instead cooked in moulds. Porcelain and glass moulds resist heat well and
are particularly well suited, unlike plastic moulds. The cooking times can vary slightly
according to the size and material used for the moulds and/or their ability to conduct
heat.
Cooking tips
21
Kleenmaid vapeur_GB.qxd 10/07/03 10:29 Page 21
Page 22

Cooking tips
Sterilisation in the steam oven
You can also use your steam oven to sterilise all the fruit and vegetables that you
have conserved up until now using classic methods in a sterilisation recipient or the
oven.
- You can simultaneously conserve the contents of 4 x 750ml jars (height: 14 cm).
- Wash the jars carefully and use new elastic rings.
- Vegetables: wash, prepare and blanch in the steam oven for around 10 to 15
minutes. Cool using ice cold water and place immediately in the glass jars (to a
level of 3 cm below the rim) and fill with a solution of salt (1 litre of water + 1
tablespoon of salt brought to boiling point) up to three quarters of the jar's
height. Fit a damp rubber ring and close using the cover and hook. Tomatoes
should be inserted raw.
- Fruit: wash, prepare and fill the jars up to a level of 3 cm below the rim. Fill
using a sugary solution (1 litre of water + 150 -- 250 g of sugar, brought to
boiling point) up to two-thirds of the jar's height. Fit a damp rubber ring and
close using the cover and hook.
Once the sterilisation time is up, you should turn off the steam oven, open the door
for approximately 10 seconds and then leave to stand for around 30 minutes in the
closed steam oven.
- Add fresh herbs to carrots.
- Add a little lemon juice to apples and pears.
22
Kleenmaid vapeur_GB.qxd 10/07/03 10:29 Page 22
Page 23

23
Safety during cleaning
- During manual cleaning, ensure that the oven is sufficiently cool before
touching any of the internal parts.
- Always keep your steam oven clean.
- Check that the door and frame seals are clean.
- You risk injuring yourself if you attempt to remove the door from the hinge.
Consequently, the assembly and dismantling of the door should only be carried
out by a technician from the After Sales Service Department, trained in this field.
- During cleaning, you must not use high-pressure or steam cleaning
appliances for reasons related to electrical safety.
Cleaning the oven cavity
C
leaning and maintenance
Ensure that the oven cavity and the steam generator have cooled sufficiently
before touching them. Only the lighting for the oven cavity can be turned on.
During cleaning, you should not use steam cleaning or
high-pressure appliances for reasons inherent to electrical
safety.
You should not use chlorine-based products, products designed to
decalcify electrical household appliances and abrasive powders or
sponges.
According to the hardness of the water, limescale deposits may
form on the steam generator.
Remove the cover of the steam generator and the water pipe by
pulling it forward.
For hygiene reasons, it is recommended that you empty and clean the interior
of the oven, the drip channel and the reservoir after each use. To do so, use a
damp sponge. You should subsequently wipe dry with a cloth (synthetic).
Remove any possible limescale deposits with vinegar. Allow to act for a few
minutes, clean and rinse with water.
Ensure that you keep the surface of the seals clean around the
door and its frame, checking that this seal has not become
dislodged from its support.
The control panel and the front part of the door should be cleaned using a mild
detergent and then wiped.
Kleenmaid vapeur_GB.qxd 10/07/03 10:29 Page 23
Page 24

Cleaning the oven cavity
During cleaning, ensure that you do not
wipe the surface of the stainless steel in the
wrong direction (the "grain" runs
horizontally).
Do not use circular movements!
Remove any slight impurities with the aid of
a soft, clean and damp cloth (microfibre
cloths are particularly well suited for this
task).
Scraping tools or scouring products are not suitable.
In the event of major soiling, you can use household cleaning products
designed for stainless steel. Be sure to observe the manufacturer's instructions
when using these cleaning and maintenance products.
24
Copy here the details that are on your oven manufacturer's plate:
How to contact us
MADE IN FRANCE
220 - 240V ~ 50 Hz
Kleenmaid vapeur_GB.qxd 10/07/03 10:29 Page 24
Page 25

25
Kleenmaid vapeur_GB.qxd 10/07/03 10:29 Page 25
Page 26

26
Kleenmaid vapeur_GB.qxd 10/07/03 10:29 Page 26
DOMESTIC WARRANTY - FULL FIVE YEAR WARRANTY
In addition to all statutory rights which you, the Consumer, have under the relevant laws in respect
of this appliance, during the first five years of ownership as the original purchaser of this
Kleenmaid appliance, we guarantee that any fault caused by faulty material or workmanship
becoming apparent will be rectified free of charge for parts and labour, provided that all service is
performed during normal working hours by Kleenmaid or their designated Agents. Where the
appliance is installed outside the normal servicing area of the above, the Purchaser must pay for
the cost of transporting the appliance to and from the Agent or the Agent’s travelling cost to and
from the Purchaser’s home.
COMMERCIAL WARRANTY - ONE YEAR WARRANTY
When this appliance is installed in a commercial application, you, the Consumer, have under the
relevant laws in respect of this appliance, during your first one year of ownership as the original
purchaser of this Kleenmaid appliance, we guarantee that any fault caused by faulty material or
workmanship becoming apparent, will be rectified free of charge for parts and labour, provided that
all service is performed during normal working hours by Kleenmaid or their designated Agents.
Where the appliance is installed outside the normal servicing area of the above, the Purchaser
must pay for the cost of transporting the appliance to and from the Agent or the Agent’s travelling
cost to and from the Purchaser’s home.
WHAT THESE WARRANTIES DO NOT COVER
We are not responsible for any damage or malfunction unless caused by a defect in material or
workmanship. This includes but is not limited to abuse, misuse, improper installation and
transportation damage. We are not responsible for any consequential damages from any
malfunction.
The Consumer must make the appliance available for servicing and shall bear any costs incurred
for any de-installation and/or re-installation required to make the appliance available for servicing.
Kleenmaid is not liable for any consequential damage incurred during de-installation or reinstallation.
WARRANTY DOES NOT COVER REPLACEMENT OF LIGHT
GLOBES OR GLASS BREAKAGE DUE TO IMPACT
In case of fractured glass do not use your appliance.
WARRANTY REGISTRATION
Please complete warranty details below and retain together with your proof of purchase document
These documents will need to be viewed by our Service Representative should you request in warranty
service.
SERVICE ASSISTANCE
To assist you when phoning our After Sales Service number to arrange a service call please complete
the following details and have them ready when you call.
Model Number_____________________________Date of purchase____________________________
Kleenmaid Store purchased from_________________________Date of installation ________________
KLEENMAID AFTER SALES SERVICE
1300 652 100
WARRANTY AND SERVICE
Page 27

27
Kleenmaid vapeur_GB.qxd 10/07/03 10:29 Page 27
Page 28

99630101 07/03
Kleenmaid vapeur_GB.qxd 10/07/03 10:29 Page 28
Other products available in the Kleenmaid
Range of appliances
Washers
Dryers
Dishwashers
Ovens
Cooktops
Outdoor Cooking Centres
Built In Espresso Coffee Machines
Rangehoods
Freestanding Ranges
Sinks
Waste Disposals
Taps
Cookware
Refrigerators
Freezers
Wine Cellars
Vacuum Cleaners
For sales information on the full range of quality appliances
Phone 13 13 08
 Loading...