

Page 1

Rangehood
RHSGALA - 900mm Wall Mounted Canopy
Appliance Operation Manual
INCLUDING INSTALLATION AND CLEANING
Page 2

WELCOME TO ST GEORGE
St George is a proud Australian
company with a heritage of
innovation and quality.
Our success extends to
domestic and overseas markets,
confirming our reputation at the
forefront of appliance excellence.
The elegant simplicity and high
performance features of
St George designs, will
remain contemporary in
many years to come.
Page 3
Instructions on Mounting and Use
Fig. 1
Fig. 2
4
2
3
3
5
1
3
a
Fig. 3
Fig. 4
Page 4
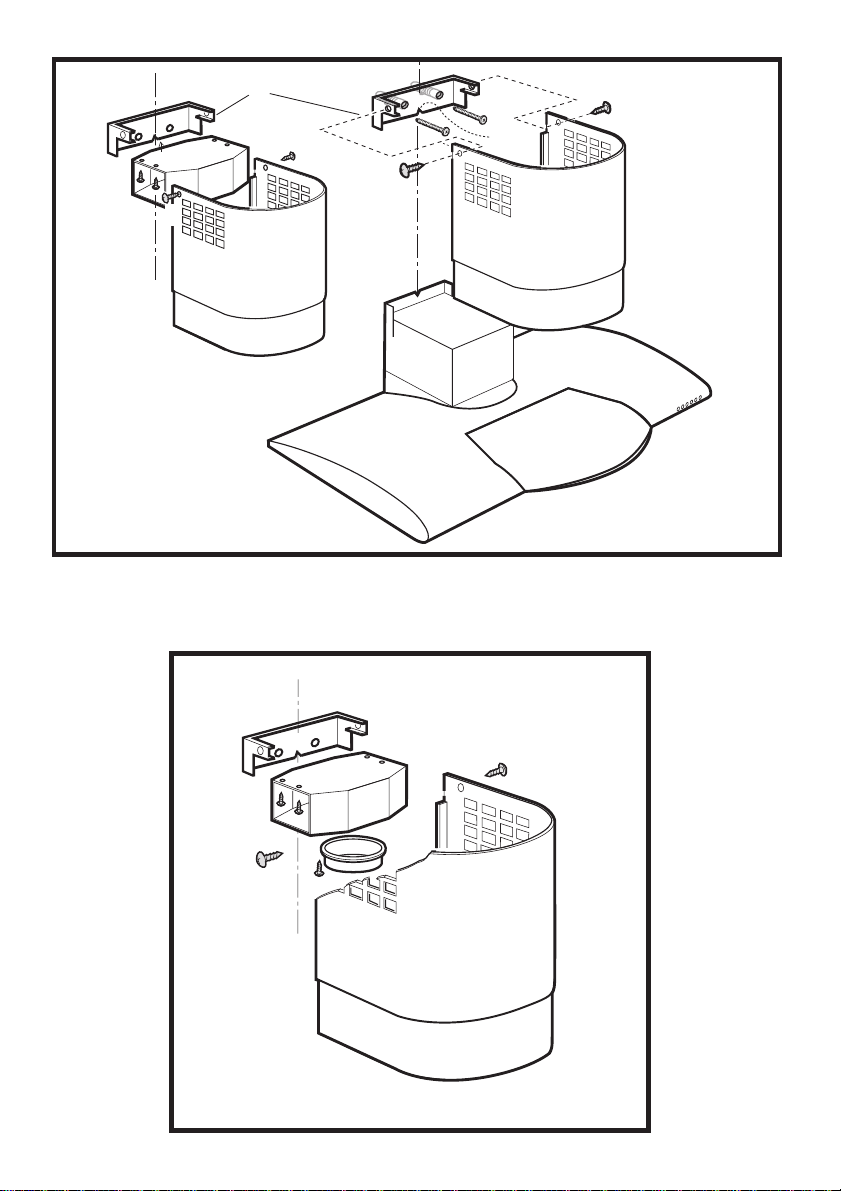
Fig. 5
R
M
R
L
R
P
R
Fig. 6
R
R
L
Q
Page 5

Fig. 7
a
b
Fig. 8
Fig. 9
Page 6

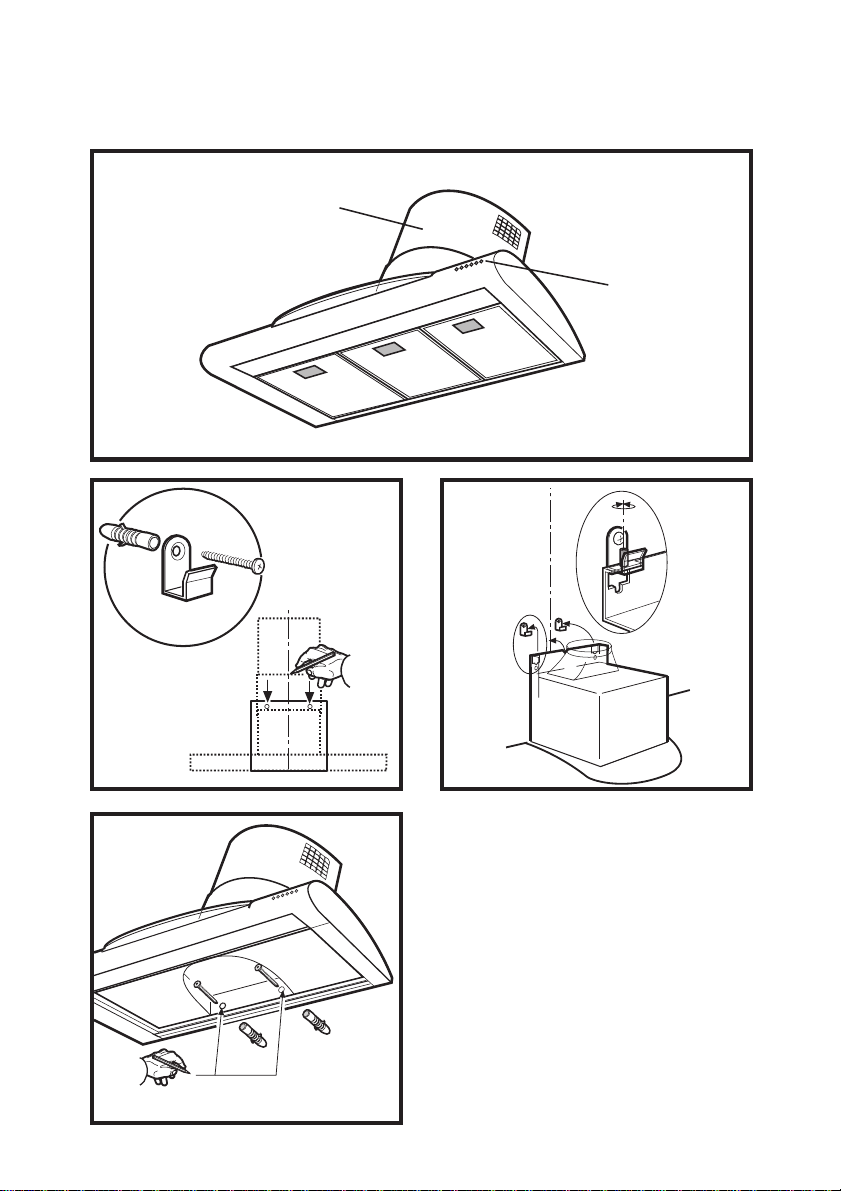
View of the
1. Control panel
2. Work-light
3. Grease filters
4. Telescopic chimney
5. Outlet (Only for Filter version)
Rangehood
Use:Two systems are available
- Fig. 1
If you intend to connect it directly to the electric
mains, remove the plug and fit an approved
bipolar switch with a minimum contact opening of
no less than 3mm.
If the plug is not accessible once it has been
inserted in the socket, it will be necessary
to fit an approved bipolar switch with a minimum
contact opening of no less than 3mm.
Exhaust mode
Vapours are extracted outside through an
exhausting pipe that is affixed to the connection
ring above the rangehood.
Diameter of the exhausting pipe must be equal to
that of the connection ring.
In the horizontal runs, the duct must be slightly
slanted (about 10°) and directed upwards to vent
the air easily from the room to the outside.
Attention!
If the rangehood is supplied with a carbon
filter, then it must be removed.
Filter version
The air is filtered through a carbon filter (for its
installation see paragraph "Carbon Filter")and
recirculated into the room through the grating on
the chimney.
Attention!
If the rangehood is not supplied with a carbon
filter, it must be ordered and mounted.
This version is used when there is no exhaust
duct for venting outdoors or when it is impossible
to install one.
Installation
The rangehood must be placed at a minimum
distance of 650mm above an electric, gas or
mixed cooktop. Please confirm this
measurement with your Local Building
Authority.
Electric connection
Before completing any connection, make sure the
house voltage corresponds with the voltage
indicated on the label affixed inside the rangehood.
It is advisable to call a qualified technician to make
the electrical connection.
Appliance fitted with a plug.
Connect it to a socket which conforms with
current regulations.
The manufacturers are not liable for any problems
caused by the user’s failure to observe the
above instructions.
Mounting on the wall
1. Rest the template correctly against thewall. The
lower corner of the template corresponds to the
lower corner of the rangehood. Fig. 2.
2.A cross is marked on the template to indicate
the centre. Mark this point on the wall. Fig. 2.
3.Drill two holes (Ø 8 mm) in the wall at the points
indicated, insert the stops (Ø 8 mm) and screw
in the hooks provided. Fig. 2.
4.Hang the rangehood and adjust its position
using the screws on the hooks. Fig. 3.
5.The reference point “a” marked on the body of
the rangehood must coincide with the line
you have drawn on the wall. Fig. 3.
6.Once the rangehood has been correctly
aligned, remove the grease filter.
7.From inside the rangehood, mark the final
points at which the hood has to be fixed to the
Fig. 4. To reach these points it will be
wall.
necessary to remove activated carbon filter
frame until the filter itself is replaced -
see Fig. 9.
8.Remove the rangehood.
9.Drill 2 holes (Ø 8 mm) and insert the plugs (Ø
8 mm). Fig. 4.
10. Hang the rangehood up again.
11. Fix the rangehood into its final position
using 2 screws (Ø 5x45 mm). Fig. 4.
12. Remove the telescopic chimney support M by
unscrewing the side screws R (one on each
side - these screws must be kept). Fig. 5.
13.Remove the air pipe L from the telescopic
chimney support M; to do this, unscrew the
4
Page 7

four screws (Ø 2,9 x 9,5 mm) fixing the air pipe
to the support (these screws must be kept).
Fig. 5.
14. Fit the telescopic chimney support to the wall,
at a point close to the ceiling. The telescopic
chimney support has a reference mark P,
which must coincide with the line that you
have already drawn on the wall. Fig. 5.
15. Using a pencil, mark the two holes required to
fix the support and drill the holes (Ø 8 mm).
Fig. 5.
16. Insert two plugs and fix the telescopic chimney
support M using 2 screws size (5x45 mm).
Fig. 5.
17. During installation the plug must not be
connected to the power supply.
18. Select the rangehood operating mode.
19.Exhaust mode:
If the connector ring has not yet been installed,
it must be fitted at this point (Q in Fig. 6, bayonet
connector). Turn it in a clockwise direction
and fix it to the air pipe L using a screw. Insert
the air pipe into the telescopic chimney support
and fix it with four screws (Ø 2.9 x 9.5 mm).
Fig. 6.
Fix the 150 mm diameter ABS pipe to the
rangehood outlet, and connect it to the air pipe
connector ring. Ensure that the other end
discharges into the open air.
Filter version:
20.The rangehood can now be connected to the
power supply.
21. If a non-return flap has been installed or
is required, ensure that it opens and closes
properly.
22. Fix the top part the telescopic outlet pipe to the
relative support, using the two 3 mm dia x 9 mm
screws R. Fig. 5/6.
23. Slide the bottom part of the telescopic outlet
pipe downward until it rests in its housing on
the top of the rangehood.
24. Replace the grease filters.
Functions
—The rangehood is provided with a motor with
several speeds. For the best performance
we recommend using the low speeds in normal
conditions and the high speeds in particular
cases of strong odour and vapour
concentration.
—We recommend starting up the rangehood a few
minutes before cooking and keeping it running
until all the odours have been eliminated.
Descriptions and functions of the
control panel
-The control panel is located on the front of the
rangehood.
=Lighting, on/off.
=Fan off
=Fast speed switch (P+ the led on the
bottom right side of the display flashes)
This speed should be used when the
concentration of cooking fumes or
odours is particularly strong (for
example when frying, cooking fish etc.).
The fast speed will run for about 5
minutes and then return to the speed
previously set automatically (1, 2 or 3),
or switch off if no speed was selected.
To turn off the fast speed, before the
end of the 5 minutes, press button
and
.
=Display showing fan speed (1-3-P),
change grease filters (grease filter
saturation indicator - F) and change
activated carbon filters (carbon filter
saturation indicator - C).
A lighted Led on the right bottom side
indicates the
rangehood is in stand-by mode.
.
5
Page 8

Warning!
The active carbon filter saturation
function is not activated.
In order to activate the carbon filter
saturation indicator, press buttons
and simultaneously for 3 seconds.
Initially, the letter F will be displayed,
then after the 3 seconds have passed,
letter C will be displayed as well,
indicating that the carbon filter
saturation control system is active.
To switch off the system, re-press the
same two buttons. The letter C will
appear on the display. After approx
3 seconds it will disappear and
the device will be switched off.
=Decrease fan speed button for
reducing speed of motor from 3 down
to speed 1.
=Increase fan speed button for
increasing speed of motor from 1 to 3.
rangehood fails to operate correctly,
If the
briefly disconnect it from the mains power supply
for approx. 5 sec. by pulling out the plug. Then plug
it in again and try once more before contacting the
Technical Assistance Service.
Always press the fan off button
disconnecting the
mains supply.
rangehood from the
before
Warning!
—This appliance is designed to be operated by
adults. Children should not be allowed to
tamper with the controls or play with the
appliance.
—The
rangehood cannot be connected to
flues of other appliances that run on energy
sources other than electricity.
—When the
time as other appliances that run on energy
sources other than electricity, provision must
be made for an adequate supply of air.
—No food must be cooked flambé underneath
the
flame is dangerous for the filters and could cause
a fire. Therefore, never use an open flame
under the rangehood. When frying foods,
never leave the pan unattended because the
cooking oil could flare up.
—Please, keep to the provisions of official
rangehood is used at the same
rangehood. The use of an unprotected
directives regarding the question of fume
discharge.
—The manufacturers refuse to accept any
responsibility for damage to the
or its catching on fire because of failure to
observe the above instructions.
rangehood
Maintenance
Before performing any maintenance operation,
isolate the
supply by switching off at the connector and
removing the connector fuse.
Or if the appliance has been connected through
a plug and socket, then the plug must be removed
from the socket.
Grease Filter (1 of 2 pieces)
It’s function is to retain the grease particles
The grease filter has an unlimited life span and
can be washed by hand or in the dishwasher
(65°) with suitable detergents.
When washed in the dishwasher the grease filter
may discolour but the filtration characteristics will
not be effected.
The grease filter must be washed at least once
a month or each time the letter F or alternatively
the selected velocity appearsTo disassemble
the grease filter use the appropriate handles
pull the handle back (a) and then down (b) Fig.
7.
Leave to dry without damaging the grease filter
before re-assembling.
After
the steps used to disassemble the grease filter in
order to reassemble.
Once the grease filters have been set in place
press button
three seconds until the letter F shown on display
disappears.
Carbon Filter
The carbon filter extracts odours emitted when
cooking into the flue.
It must be mounted on the inside of the
rangehood.
Under normal use the carbon filter must be washed
every two months, or each time the display
flashes the letter
or in the dishwasher at 65°c.
When washing it in the dishwasher it must be
washed without any dishes
rangehood from the electrical
washing the grease filter reverse
simultaneously for about
and
C and can be washed by hand
using a suitable
. First
6
Page 9

detergent.
Before remounting first gently wipe with a
sponge to remove excess water and dry
in the oven at a constant temperature of a
maximum of 100°C for 10 minutes.
The carbon filter must be changed every 2
years
1.Disconnect the rangehood from the
electrical point.
2.Remove the grease filter (Fig.7)
3.Unscrew the screws that hold the frame
(Fig 8.) and remove the carbon filter (in the
case of cleaning or substituting) insert the
carbon filter (in the case of first use).
4. Replace filter.
5.Replace the supports of the carbon filter with
the two screws of the frame (Fig 8).
6.Remount the grease filter
Once you have performed the maintenance
operation, press the buttons
similtaneously for 3 seconds until the letter
C flashes on the display.
If this is the first time a new carbon filter is being
inserted, once the grease filters have been
inserted check that the saturation indicator for the
carbon filter is active. (See paragraph “Functions
- Descriptions and functions of the control panel.”)
and
Replacing the light bulbs - Fig 9
1. Unplug from the power supply.
2.Remove the grease filter.
3.Remove the screws that protect the light
bulbs.
4.Remove the damaged light bulb and replace
with the same type max. 11watts (Light bulb
PL)
5.Replace and affix the light bulb cover.
6.Replace the grease filter
7.If the light does not function, before calling
technical assistance, check that the light bulb
has been fitted correctly.
Cleaning
To clean the outside of the rangehood use
a cloth moistened with denatured alcohol or neutral
liquid detergents. Never use products
containing abrasive detergents.
Wipe brushed stainless steel in the same direction
as the brushing to avoid scratching.
Clean the external surface of the
approximately once every 10 days.
rangehood
Attention
Failure to observe the rules for cleaning the
appliance and changing and cleaning the filters
may cause fires.
Therefore, we recommend observing these
instructions.
WARNING! The appliance is not intended for use by
young children or infirm persons without supervision.
7
Page 10

WARRANTY AND SERVICE
DOMESTIC WARRANTY - FULL FIVE YEAR WARRANTY
In addition to all statutory rights which you, the Consumer, have under the relevant laws in respect of this
appliance, during the first five years of ownership as the original purchaser of this St George appliance, we
guarantee that any fault caused by faulty material or workmanship becoming apparent will be rectified free of
charge for parts and labour, provided that all service is performed during normal working hours by St George
or their designated Agents. Where the appliance is installed outside the normal servicing area of the above,
the Purchaser must pay for the cost of transporting the appliance to and from the Agent or the Agent’s
travelling cost to and from the Purchaser’s home.
COMMERCIAL WARRANTY - ONE YEAR WARRANTY
When this appliance is installed in a commercial application, you, the Consumer, have under the relevant
laws in respect of this appliance, during your first one year of ownership as the original purchaser of this
St George appliance, we guarantee that any fault caused by faulty material or workmanship becoming
apparent, will be rectified free of charge for parts and labour, provided that all service is performed during
normal working hours by St George or their designated Agents. Where the appliance is installed outside the
normal servicing area of the above, the Purchaser must pay for the cost of transporting the appliance to and
from the Agent or the Agent’s travelling cost to and from the Purchaser’s home.
WHAT THESE WARRANTIES DO NOT COVER
We are not responsible for any damage or malfunction unless caused by a defect in material or workmanship.
This includes but is not limited to abuse, misuse, improper installation and transportation damage. We are
not responsible for any consequential damages from any malfunction.
The Consumer, must make the appliance available for servicing and shall bear any costs incurred for
any de-installation and/or re-installation required to make the appliance available for servicing.
St George are not liable for any consequential damage incurred during de-installation or re-installation.
WARRANTY DOES NOT COVER REPLACEMENT OF LIGHT
GLOBES OR GLASS BREAKAGE DUE TO IMPACT
In case of fractured glass do not use your appliance.
WARRANTY REGISTRATION
Please complete warranty details below. Please retain together with your proof of purchase document.
These documents will need to be viewed by our Service Representative should you request in warranty
service.
SERVICE ASSISTANCE
To assist you when phoning our After Sales Service number to arrange a service call please
complete the following details and have them ready when you call.
Model Number ________________________________________Date of purchase_____________________________
St George Store purchased from__________________________Date of installation ____________________________
ST GEORGE AFTER SALES SERVICE
1300 305 366
Page 11

A Tradition of Excellence
1300 305 366
 Loading...