

Page 1

RANGEHOOD
c o l l e c t i o n
Instructions for Use
and Warranty Details
Rangehoods RH9 - Canopy 900mm
Page 2
Instruction on mounting and use
Fig. 1
s
2 3
1
s
4
5
5
6
s
s
A
B
Fig. 2 Fig. 3
1
Page 3
h
C
Fig. 4 Fig. 5
D
Fig. 6
P
E
P
G
G
h
F
G
G
Fig. 7
2
Page 4

M
I
I
Fig. 8
1
Fig. 10
2
I
L
Fig. 11
I
Fig. 9
3
Page 5

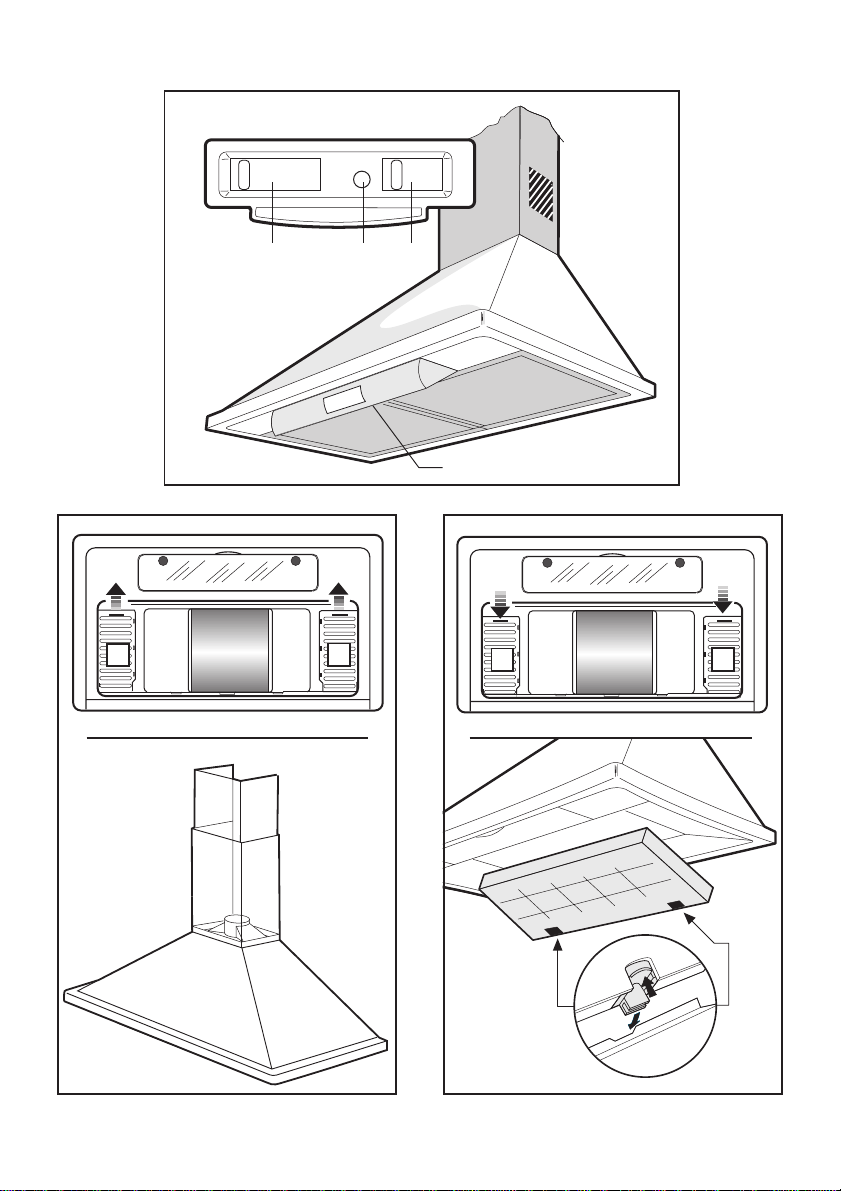
Hood Description - Fig. 1
1) Control panel
2) Motor speed button
3) Operating light
4) Light button
5) Exhaust grate
6) Work-light
Use
Two systems are available:
Exhaust version
The air is vented outdoors by a duct
which must be connected to connecting ring A (Fig. 2).
For 90cm. hood
Check if the internal shutter S are opened
before using the hood (Fig. 2).
Attention!
If the hood is supplied with carbon filter,
then it must be removed.
Filter version
The air is filtered through a carbon filter and
recirculated into the room through the grating on the lower side of the chimney.
This version is used when there is no exhaust duct for venting outdoors or when it
is impossible to install one.
To use the hood in this version, proceed as
follows:
— If no filter is supplied with the hood, ask
the technical assistance service or the
manufacturing company for one and
specify the hood model.
— Remove the grease filters (Fig. 10).
— To install the filter, fit it in the seat at the
front and fasten it at the back with the
two hooks B (Fig. 3).
For 90cm. hood
Attention! Close the shutter S before using
this version of the hood (Fig. 3).
— Refit the grease filter.
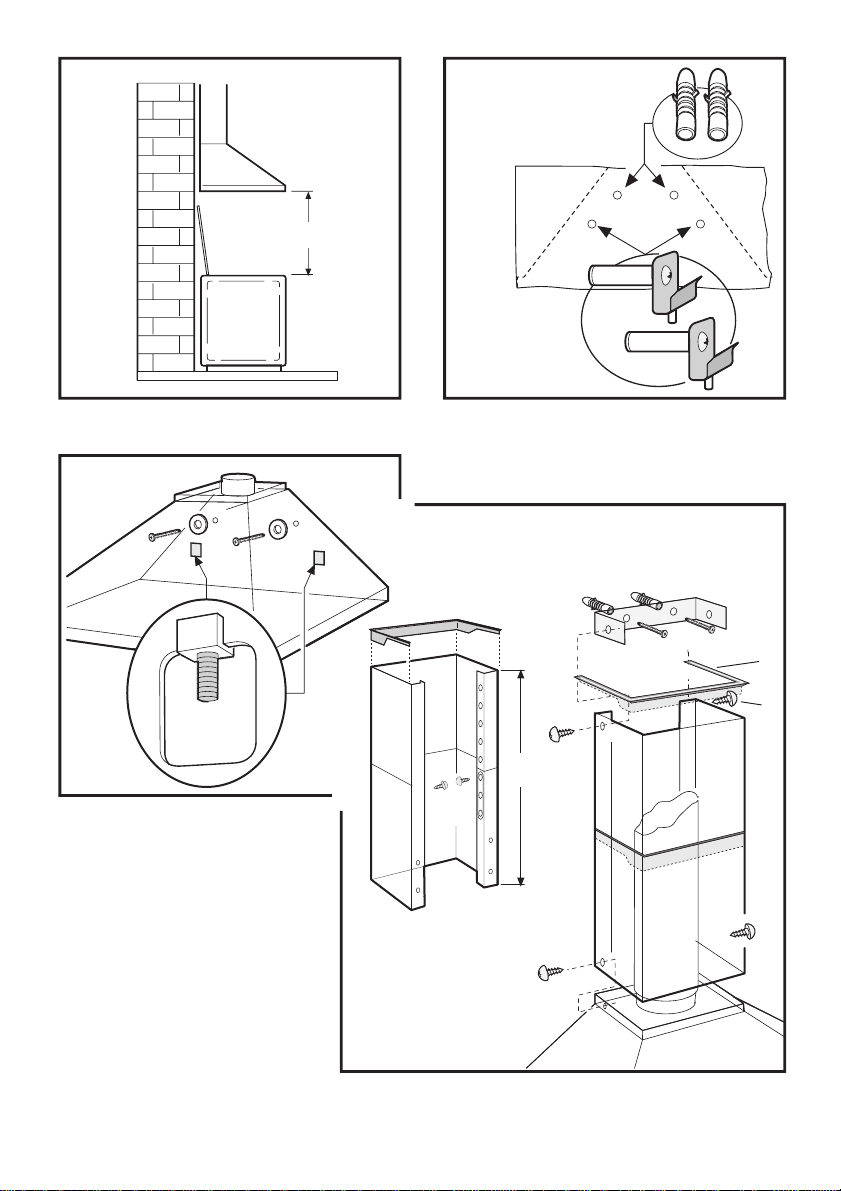
Installation
When installed, the hood must be not less
than 65 cm. above electric burners or 75
cm. above gas or mixed-fuel burners. (h,
Fig. 4).
In the vented exhaust version the fumes
outlet duct must be 120 mm. in diameter.
In the horizontal runs the duct must be
slightly slanted (about 10°) and directed
upwards to vent the air easily from the room
to the outside.
Electric connection
Before completing any connection, make
sure the house voltage corresponds with the
voltage indicated on the label affixed inside
the hood
It is advisable to call a qualified technician
to make the electrical connection.
Appliance fitted with plug.
Connect it to a socket which conforms with
current regulations.
If you intend to connect it directly to the electric mains, remove the plug and fit an approved bipolar switch with a minimum contact opening of no less than 3mm.
If the plug is not accessible once it has been
inserted in the socket, it will however be
necessary to fit an approved bipolar switch
with a minimum contact opening of no less
than 3mm.
Appliance without plug
Fit an approved plug or an approved bipolar switch with a minimum contact opening
of not less than 3mm.
The manufacturers are not liable for any
problems caused by the user’s failure to
observer the above instructions.
4
Page 6

Electrical Connection only for UK
WARNING!
This appliance must be earthed.
The manufacturers will not accept liability
for any problems however caused by the
failure of the user or installer to comply with
these instruction or with safety regulations.
It is recommended that installation is carried out by a qualified electrician.
This appliance is intended to be permanently connected to the electrical supply
trough a double-pole switched fused spur (disconnector) - fitted with a 3 or 5 amp fuse.
The opening distance between the switch
contacts shall not be less than 3 mm. The
installation must conform to the requirements of BS 7671.
The wires in the mains lead are coloured in
accordance with the following code:
Blue Neutral:
-To be connected to the supply terminal
marked ‘N’ or coloured Black.
Brown live:
-To be connected to the supply terminal
marked ‘L’ or coloured Red.
Yellow/Green earth:
-To be connected to the terminal marked
‘E’ or earth symbol or coloured green.
This appliance is not intended to be connected to the electrical supply through a
plug and socket, but if for any reason a plug
should be fitted, then it must be wired according to the colour code as shown above.
Warning
Ensure that the appliance is isolated from
the supply before carrying out installation.
Fastening the hood to the wall
— Place the template against the wall. The
lower edge of the template must match
the lower edge of the hood (Fig. 5).
— Drill two Ø 8mm holes and two Ø 12mm
holes (Fig. 5).
— Fit the two Ø 8mm plugs in the top holes
(Fig. 5).
— Fasten the two hooks C in the bottom
holes (Fig. 5).
— Remove the grease filters (Fig. 10).
— Hang the hood on the hooks and level it
with the screws D (Fig. 6).
— Secure it in place with the two 5x45 mm
screws and 5-20 mm diameter washers
in the top holes (Fig. 6).
— Refit the grease filter.
Installing the duct (exhaust version)
(Fig. 7)
— Fasten the top support E to the wall close
to the ceiling on the perpendicular of the
bottom connections. To do use the two
8mm diameter screws and plugs sup-
plied as standard equipment.
— Insert the plastic mould P on the duct.
— Take the measure h between the ceiling
and the hood top, and adjust the duct to
this height.
Fasten it with the screws F.
— Insert the duct with the slots downwards
and fasten it with the two top screws and
the two bottom screws G.
Installing the duct (filter version)
— Perform the same operations described
in the preceding paragraph.
With screws supplied, fasten the air con-
veyor M inside the duct (Fig. 8).
Fastening of shelves (optional)
Fasten the four side supports I to the adjacent cabinets and place the shelf on the
supports (Fig. 9).
5
Page 7

Using the hood
— The hood is provided with a motor with
several speeds. For the best performance, we recommend using the low
speeds in normal conditions and the high
speeds in particular cases of strong
odour and vapour concentration.
— We recommend starting up the hood a
few minutes before cooking and keeping
it running until all the odours have been
eliminated.
— To start the appliance, pull the control
panel downwards for access to the light
and motor switches.
The hood has a microswitch so that once
the motor speed has been selected and the
light switched on, the hood can be started
by simply pulling out the control panel.
When the panel is closed, the hood
switches off.
The control panel can be positioned at the
desired angle to light the cooking area.
Warning!
—This appliance is designed to be
operated by adults. Children should not
be allowed to tamper with the controls
or play with the appliance .
— The hood cannot be connected to flues
of other appliances that run on energy
sources other than electricity.
— When the hood is used at the same time
of other appliances that run on energy
sources other than electricity, provision
must be made for an adequate supply of
air.
—No food must be cooked flambé
underneath the hood.
The use of an unprotected flame is
dangerous for the filters and could cau-
se fires.
Therefore, never use an open flame
under the hood. When frying foods, never
leave the pan alone because the cooking
oil could flare up.
— Please, keep to the provisions of official
directives regarding the question of fume
discharge.
— The manufacturers refuse to accept any
responsibility for damage to the hood or
its catching on fire because of failure to
observe the above instructions.
Maintenance
Before performing any maintenance operation, isolate the hood from the electrical supply by switching off at the connector and
removing the connector fuse.
Or if the appliance has been connected
through a plug and socket, then the plug
must be removed from the socket.
Metal grease filter
This serves to hold the grease particles in
suspension.
The metal grease filter last forever and must
be washed at least once a month either by
hand or in the dishwasher (65°C) with suitable detergents. Let the metal grease filters
dry without damaging them before putting
them back into place.
Removing the metal grease filter (Fig.
10):
1 - push the grease filter handle backwards
2 - then pull downwards.
After having cleaned refit the metal filter on
its housing proceeding in reverse order.
Carbon filter
This filter dissolves cooking odours.
The carbon filter must never be washed.
It should be changed every 6 months in
normal use.
— Remove the grease filters.
— To remove the carbon filter, push the
push-buttons B inwards and pull the fil-
ter downwards (Fig. 3).
— Install the new carbon filter.
— Refit the grease filter.
Cleaning
To clean the outside of the hood use a cloth
moistened with denatured alcohol or neutral liquid detergents. Never use products
containing abrasive.
Wipe brushed stainless steel in the same
direction as the brushing to avoid
scratching.
6
Page 8

Clean the external surface of the cooker
hood almost once every 10 days.
Attention
Failure to observe the rules for cleaning the
appliance and changing and cleaning the
filters may cause fires.
Therefore, we recommend observing these
instructions.
Changing the lighting elements
— Disconnect the hood from the electricity.
— Open the light cover by turning the
latches L (Fig. 11).
— Replace the damaged part with one of
equal rating.
— Before calling for technical service be-
cause the light fails to work, make sure
the lamp is tightly fastened.
7
 Loading...