

Page 1

CookingCooking
c o l l e c t i o nc o l l e c t i o n
Instructions for Use
and
Warranty Details
RH1X - 600mm Slide Away Rangehood
RH3X - 900mm Slide Away Rangehood
Page 2

ongratulations on the purchase of your new
C
designed and manufactured to give you years
For best results, carefully read the instructions on
how to install your new appliance. Correct installation
will avoid delays and unnecessary service calls.
Once installation is complete, read this booklet
carefully and get to know the controls and the
We reserve the right to alter the specifications
appliance. This instruction manual cannot be
appliance. This appliance has been
of reliable performance.
features of your new appliance.
with no influence on the operation of the
reason for a claim.
Page 3
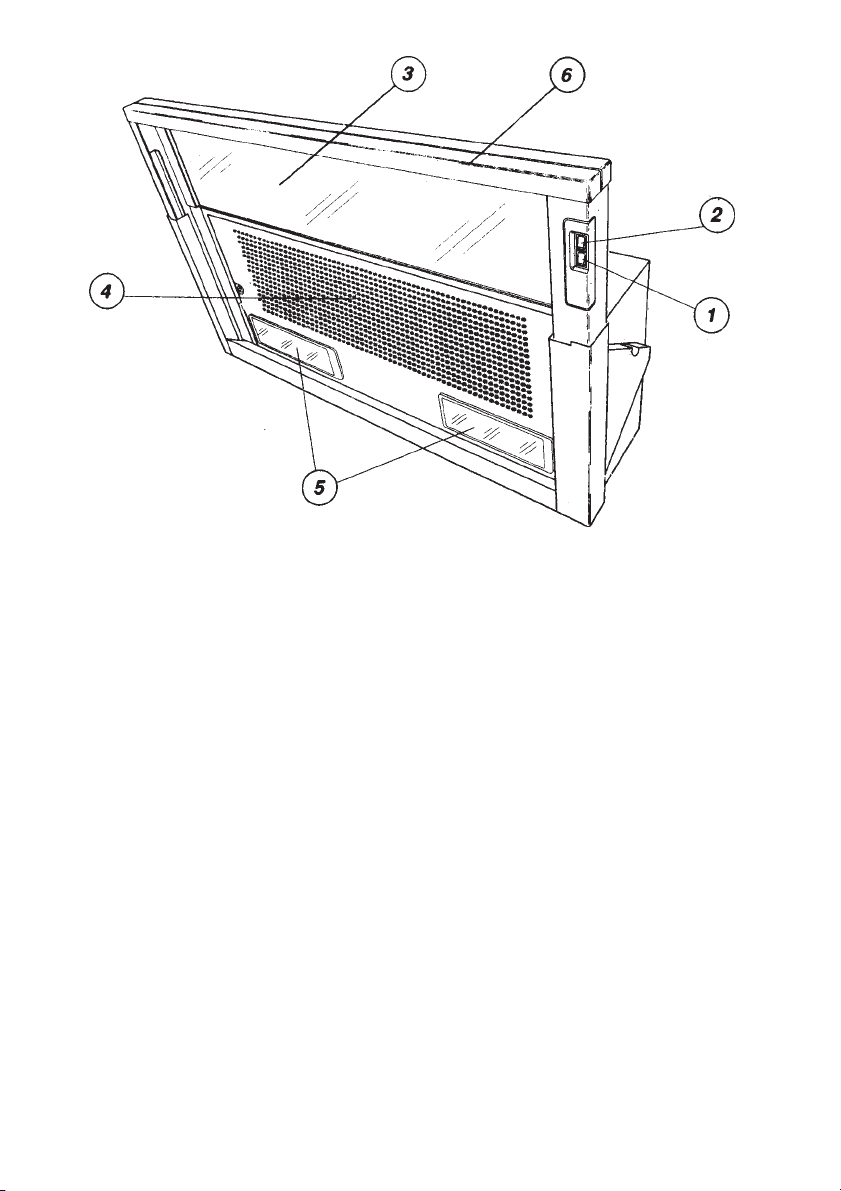
Figure A
1. Motor Speed Switch
2. Light Switch
3. Sliding Hood
4. Grease Filter
5. Cooking Surface Lighting
6. Removable Decor Trim
Page 4

Pipe size = 100mm
Not supplied
Page 5

SAFETY WARNING
§ Only qualified installers are authorised
to carry out installation. The installer is
responsible for commissioning the
appliance in accordance with the
current Australian standards and
requirements under law.
§ The appliance is intended solely for
domestic use. The manufacturer shall
not be held responsible for any
accident that may be caused because
of improper use.
§ Switch off the power supply to the
equipment before starting the
installation.
§ The plug to be connected to the
power supply cable and the relative
socket must be the same type and
must comply with current Australian
standards.
§ After installing the appliance make
sure that the plug is accessible to
allow the periodical check-up.
§ Always remember to remove all
plastic protection before using the
appliance.
§ Before using the appliance we
recommend reading this manual and
all the warnings it contains thoroughly.
§ In the event of a malfunction, do not
attempt to repair the appliance.
Disconnect the appliance from the
mains and contact your nearest
Kleenmaid service centre on
1300 652 100.
§ Do not pull out the plug by pulling the
cable.
§ The appliance cannot be connected to
flues of other appliances that run on
energy sources other than electricity.
§ When the appliance is used at the
same time as other appliances that
run on energy sources other than
electricity, provision must be made for
an adequate supply of air.
§ The electric installation shall be
equipped with a safety device, able to
disconnect the appliance from mains
in all wires, with the distance between
contacts of not less than 3 mm in
open position.
§ No food must be cooked flambé
underneath the appliance. The use of
an unprotected flame is dangerous for
the filters and could cause fires.
Therefore, never use an open flame
under the appliance.
§ When frying foods, never leave the
pan alone because the cooking oil
could flare up.
§ Please keep to current Local Building
Standards regarding fume discharge.
§ The identification plate, with the
technical data, serial number and
marking, can be found inside the
appliance. The plate must never be
removed.
§ The appliance is not intended for use
by young children or infirm persons
without supervision.
§ Never allow children to come near the
appliance or to play with it. Be careful
not to leave objects on the appliance
that may attract children’s attention.
Always keep children at a safe
distance from the appliance.
§ Discarded appliances must be
delivered solely to a specialised waste
collection centre.
§ Switch off the power supply to the
equipment before cleaning.
§ Do not clean the surfaces of the
appliance when they are still hot.
§ Do not use pressure or steam spray
guns to clean the appliance.
§ Failure to clean the appliance and
replace and clean the filters as
described in this manual will generate
a fire hazard. Please keep to the
instructions given.
The manufacturer shall not be held responsible for any injury or damage that may be
caused by failure to fully comply with the instructions and recommendations in this
manual, the tampering of any of the appliance components or the use of non-original
spares.
Page 6

USING THE HOOD
The hood can be used in the following ways:
1.External exhausting (with external
venting), and
2.Recycling (with carbon filter)
EXTERNAL
EXHAUSTING OPTION
Figure B
RECYCLING
CARBON FILTER OPTION
The air is exhausted out by means of pipes
connected to the coupling ring B (diag. 1).
To access the carbon filter, grease filter
and light, do the following:
1. Slide out hood – No. 3 (Figure A)
2. Turn slotted screws 90° - A (Diagram 2)
3. Remove grease filter – No. 4 (Figure A)
4. Remove carbon filter by rotating
anticlockwise as per (Diagram 3)
MAINTENANCE
Grease filter
The grease filter must be cleaned once a
month with a mild detergent.
Carbon filter
The carbon filter must be replaced every 6
months. The carbon filter is not washable
nor regenerative.
Cleaning the hood
The hood should be cleaned regularly
internally and externally. Use a soft cloth and
mild detergent. Avoid abrasive detergents.
Failure to carry out the basic standards of
cleaning of the rangehood and replacement
of the filters may cause a fire risk.
Light bulb replacement
Unscrew the damaged light bulb and replace
with an incandescent oval light bulb with a
maximum of 40W.
FITTING THE HOOD
The hood should be mounted over the centre
of the cooking area.
The space between the cooker and the
underside of the hood should be at least
650mm for electric and 650mm for gas
cookers.
Important: Please check these measurements
with your local electrical and gas regulations.
The air is filtered through a carbon filter and
then sent back into the room.
This option is used when there is no
possibility of installing an external vent.
If recycling the carbon filter must be fitted.
The carbon filter is not fitted to the unit when
packed. The filter must be replaced every
6 months. Filters can be purchased from
your nearest Kleenmaid Store or by
phoning 131308.
The unit is designed to be fitted in a cupboard
as per Diagram 4. Use the template supplied
and drill 5mm holes where indicated. Also
drill out the 110-115mm dia. hole to facilitate
venting that will lead either outside (externally
vented) or through the top of the cupboard
when utilising the carbon filter in the recycling
mode.
Ensure the flange is fitted as per Diagram 1.
Use the 4 screws provided to secure the
hood to the cupboard. Adjust the 90° angle
frame L (Diagram 4) using the screws E
(Diagram 2) and secure to the rear wall.
Page 7

WARRANTY AND SERVICE
DOMESTIC WARRANTY - FULL FIVE YEAR WARRANTY
In addition to all statutory rights which you, the Consumer, have under the relevant laws in respect
of this appliance, during the first five years of ownership as the original purchaser of this
Kleenmaid appliance, we guarantee that any fault caused by faulty material or workmanship
becoming apparent will be rectified free of charge for parts and labour, provided that all service is
performed during normal working hours by Kleenmaid or their designated Agents. Where the
appliance is installed outside the normal servicing area of the above, the Purchaser must pay for
the cost of transporting the appliance to and from the Agent or the Agent’s travelling cost to and
from the Purchaser’s home.
COMMERCIAL WARRANTY - ONE YEAR WARRANTY
When this appliance is installed in a commercial application, you, the Consumer, have under the
relevant laws in respect of this appliance, during your first one year of ownership as the original
purchaser of this Kleenmaid appliance, we guarantee that any fault caused by faulty material or
workmanship becoming apparent, will be rectified free of charge for parts and labour, provided that
all service is performed during normal working hours by Kleenmaid or their designated Agents.
Where the appliance is installed outside the normal servicing area of the above, the Purchaser
must pay for the cost of transporting the appliance to and from the Agent or the Agent’s travelling
cost to and from the Purchaser’s home.
WHAT THESE WARRANTIES DO NOT COVER
We are not responsible for any damage or malfunction unless caused by a defect in material or
workmanship. This includes but is not limited to abuse, misuse, improper installation and
transportation damage. We are not responsible for any consequential damages from any
malfunction.
The Consumer must make the appliance available for servicing and shall bear any costs incurred
for any de-installation and/or re-installation required to make the appliance available for servicing.
Kleenmaid is not liable for any consequential damage incurred during de-installation or reinstallation.
WARRANTY DOES NOT COVER REPLACEMENT OF LIGHT
GLOBES OR GLASS BREAKAGE DUE TO IMPACT
In case of fractured glass do not use your appliance.
WARRANTY REGISTRATION
Please complete warranty details below and retain together with your proof of purchase document
These documents will need to be viewed by our Service Representative should you request in warranty
service.
SERVICE ASSISTANCE
To assist you when phoning our After Sales Service number to arrange a service call please complete
the following details and have them ready when you call.
Model Number_____________________________Date of purchase____________________________
Kleenmaid Store purchased from_________________________Date of installation ________________
KLEENMAID AFTER SALES SERVICE
1300 652 100
Page 8

Other products available in the Kleenmaid
Range of appliances
Washers
Dryers
Dishwashers
Ovens
Cooktops
Outdoor Cooking Centres
Built In Espresso Coffee Machines
Rangehoods
Freestanding Ranges
Sinks
Waste Disposals
Taps
Cookware
For sales information on the full range of quality appliances
LI1UJC Ed. 12/03
Refrigerators
Freezers
Wine Cellars
Vacuum Cleaners
Phone 13 13 08
 Loading...