

Page 1
CookingCooking
c o l l e c t i o nc o l l e c t i o n
Instructions for Use
and
Warranty Details
RH12 - 1200mm Island Canopy Rangehood
Page 2

ongratulations on the purchase of your new
C
designed and manufactured to give you years
For best results, carefully read the instructions on
how to install your new appliance. Correct installation
will avoid delays and unnecessary service calls.
Once installation is complete, read this booklet
carefully and get to know the controls and the
We reserve the right to alter the specifications
appliance. This instruction manual cannot be
appliance. This appliance has been
of reliable performance.
features of your new appliance.
with no influence on the operation of the
reason for a claim.
Page 3
1
2
3
Fig. 2
5
4
Fig. 1
5
M
Fig. 3
Fig. 4
2
Page 4
Exhaust mode
Key
A: For extractor version
B: Reference mark on the upper side of the telescopic
structure, indicating the front of the hood (control panel
on the right).
C: Location for hood connection box.
F: For filter version only.
How to calculate the MAXIMUM ALLOWED extension
of the telescopic structure (operation 1):
a)measure the distance (in millimeters) from the ceiling
to the hob;
b)subtract 1000 mm from this measurement for gas or
combination hobs; for electric hobs subtract 1100
mm;
c)the measurement obtained is the MAXIMUM extension
of the telescopic structure.
Recirculation mode
3
Page 5

B
C
4
Page 6

5
Page 7

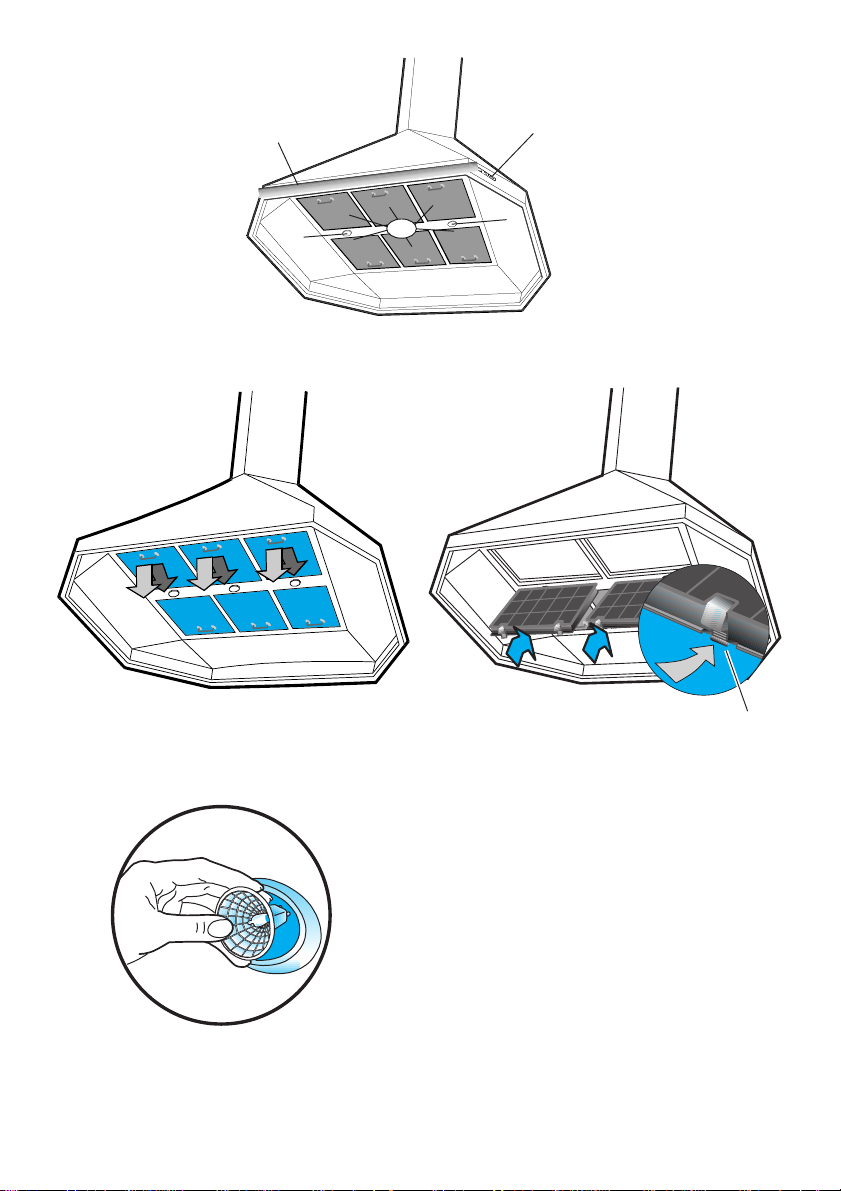
View of the hood - Fig. 1
1) Telescopic chimney
2) Kitchen utensil storage rail
3) Control panel
4) Metal grease filters
5) Halogen lamps
Use of the hood
It is advisable to switch on the extractor hood a
few minutes before starting cooking and then
to leave it running for approximately 5 minutes
afterwards to ensure that all odours are
extracted.
Use the slow speed in normal conditions and
the fast speed with heavy fumes or odours.
Electronic control panel
B
A
A – Motor OFF button
B – On button and motor speed selection
E – Speed 1 LED
F – Speed 2 LED and metal grease filter
C – Speed 3 LED and carbon filter saturation
D – Intensive speed LED
G – Intensive speed ON switch
H – OFF lamp button
I – ON lamp button
If the hood fails to operate correctly, briefly
disconnect it from the mains power supply for
almost 5 sec. by pulling out the plug. Then plug
it in again and try once more before contacting
the Technical Assistance Service.
E
F
button 1 - 2 - 3 - 1 - 2 - . . . .
saturation LED (flashes)
LED (flashes)
This speed should be used when the
concentration of cooking fumes or odours
is particularly strong (for example when
frying, cooking fish etc.). The fast speed
will run for about 5 minutes and then
return to the speed previously set
automatically (1, 2 or 3), or switch off if no
speed was selected. To turn off the fast
speed, before the end of the 5 minutes,
press button A or button B.
G
D
C
H
I
Maintenance
Before performing any maintenance operation,
isolate the hood from the electrical supply by
switching off at the connector and removing the
connector fuse.
Or if the appliance has been connected through
a plug and socket, then the plug must be
removed from the socket.
Metal grease filter
This holds back suspended grease particles.
The metal grease filter lasts forever and must
be washed either by hand or in the dishwasher
(65°C) with suitable detergents.
Let the metal filter dry without damaging it
before putting it back into place.
ìThe metal grease filters must be washed at
least once a month and anyhow whenever the
metal grease filter saturation led (Speed 2
LED) indicates the saturation of the filter.
This LED warns you when the metal grease
filter needs to be cleaned.
This LED flashes to warn you that the metal
grease filters must be cleaned.
Generally, these must be cleaned after 40
hours of use.
Once the grease filters have been cleaned,
press button A and button H at the same time
for about two seconds until you hear the acoustic
signal (beep): the grease filter saturation led F
will now stop flashing.
To remove the metal grease filter
filter handle towards the centre and then
downwards (Fig. 2).
Carry out the above steps in reverse order to
put the filters back after having washed them.
Carbon filter
(“recirculation mode only”, see next pages)
The carbon filter cannot be washed nor
regenerated.
The carbon filter should be replaced every 6
months under normal use and anyhow
whenever the carbon filter saturation led
indicates the saturation of the filter.
This LED indicates carbon filter needs to be
replaced.
This led flashes to warn you that the carbon
filter must be replaced.
This must be done after approximately 160
hours of use.
, push the
6
Page 8

Once you have replaced the carbon filter, press
button A and button B together for about two
seconds (see page 10) until you hear the
acoustic signal (beep).
The carbon filter saturation led C will now stop
flashing.
N.B.: the carbon filter saturation led will also
flash even if the hood is used in the exhausting
version (i.e. without carbon filter).
To stop the led flashing, press the two buttons
A and B as described above.
To fit the carbon filter - Fig. 3:
1. Remove the metal grease filters.
2. Insert the carbon filters in their seatings
(back part first, then the front), fixing them in
position using the two locking devices M
(red buttons) supplied with each carbon
filter.
3. Put the metal grease filter back into place.
To remove the carbon filter - Fig. 3:
To dismount the carbon filter, press the two
buttons M and pull downwards.
Cleaning
To clean the outside of the hood use a cloth
moistened with denatured alcohol or neutral
liquid detergents. Never use products
containing abrasive.
Wipe brushed stainless steel in the same
direction as the brushing to avoid scratching.
Attention
Failure to observe the instructions for cleaning
the appliance and changing and cleaning the
filters may cause fires.
Therefore, we recommend observing these
instructions.
Replacing the lamp - Fig. 4
— Unplug the appliance from the mains
— Remove the burnt lamp.
— Use only 20 W (max) halogen lamps.
— Fit the new lamp ensuring that the two male
contacts of the lamp fit perfectly into the
female contacts of the lamp holder.
— If the lighting is not operating, remember to
check that the lamps are fitted correctly
before calling your technician.
Warning!
— The hood cannot be connected to flues of
other appliances that run on energy sources
other than electricity.
— When the hood is used at the same time of
other appliances that run on energy sources
other than electricity, provision must be
made for an adequate supply of air.
— No food must be cooked flambé underneath
the hood.
The use of an unprotected flame is
dangerous for the filters and could cause
fires.
Therefore, never use an open flame under
the hood. When frying foods, never leave
the pan alone because the cooking oil could
flare up.
— Please, keep to the provisions of official
directives regarding the question of fume
discharge.
— The manufacturers refuse to accept any
responsibility for damage to the hood or its
catching on fire because of failure to observe
the above instructions.
— A constant maintenance guarantees a good
operation and good performance of the unit.
— The best performance of the unit is obtained
in the exhaust mode, therefore in the limits
of the possibilities it is advised to use the
cooker hood in this way.
— The best performances are obtained with
short pipes and with few curves.
— In order to eliminate loss of heat towards the
outside; in the winter period the unit can be
used in the recycling (filtering) mode.
— In the event of fire, disconnect immediately
the unit from the power supply remove the
source of fire (pots, etc.).
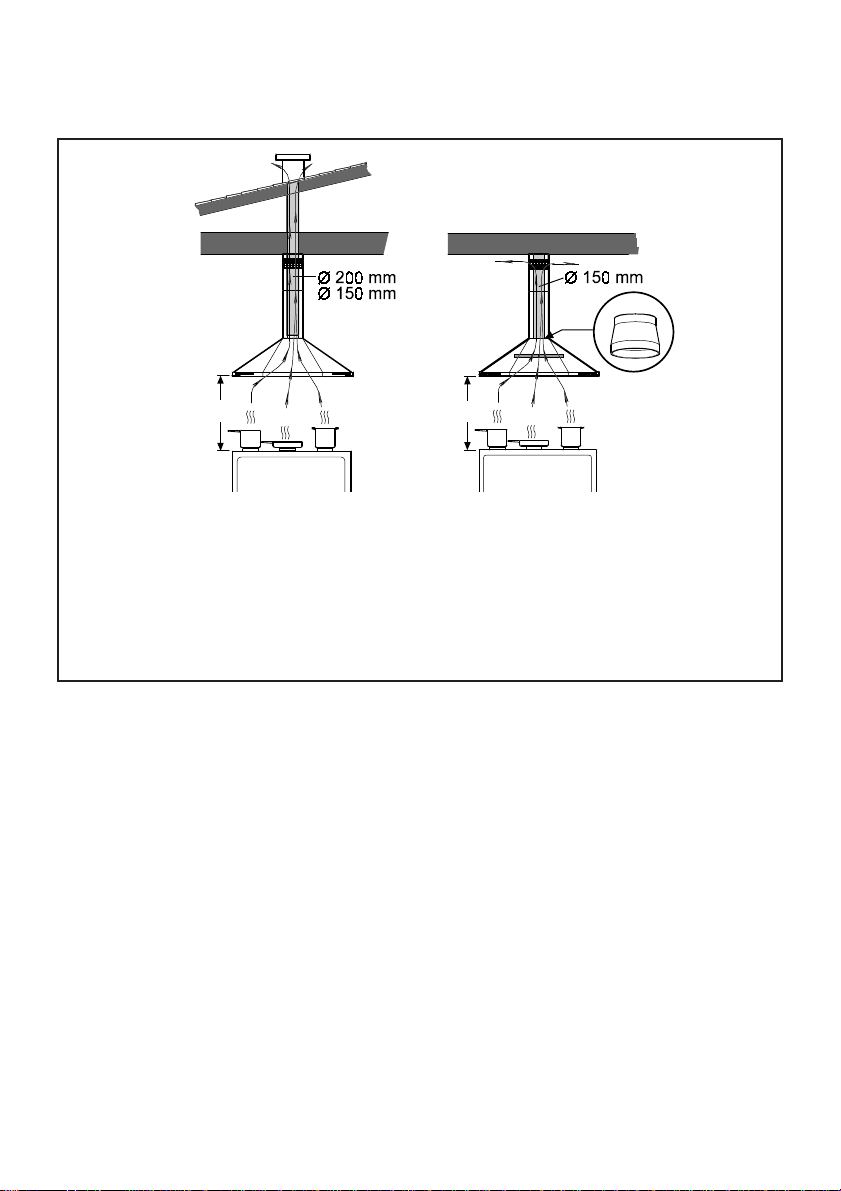
Installation
When installed, the distance between hood
and burners must be not less than 65 cm.
above electric burners or 65 cm. above gas or
mixed-fuel burners (Fig. 5, H).
The hood is fitted with wall plugs suitable for
many types of ceilings.
In any case consult a qualified technician in
order to know the rightmess of tools according
to the ceiling.
7
Page 9

Electric connection
Before completing any connection, make sure
the house voltage corresponds with the voltage
indicated on the label affixed inside the hood
It is advisable to call a qualified technician to
make the electrical connection.
Appliance fitted with plug.
Connect it to a socket which conforms with
current regulations.
If you intend to connect it directly to the electric
mains, remove the plug and fit an approved
bipolar switch with a minimum contact opening
of no less than 3mm.
If the plug is not accessible once it has been
inserted in the socket, it will however be
necessary to fit an approved bipolar switch with
a minimum contact opening of no less than
3mm.
Appliance without plug
Fit an approved plug or an approved bipolar
switch with a minimum contact opening of not
less than 3mm.
The manufacturers are not liable for any
problems caused by the user’s failure to
observer the above instructions.
Systems available
Two systems are available:
Exhaust mode
Vapours are extracted outside through an
exhausting pipe (not supplied) that is
affixed to the connection ring above the hood
(Fig. 5).
Diameter of the exhausting pipe must be equal
to that of the connection ring.
In the horizontal runs the duct must be slightly
slanted (about 10°) and directed upwards to
vent the air easily from the room to the outside.
Attention!
If the hood is supplied with carbon filter,
then it must be removed.
Recirculation mode
(F - See the installation diagram)
The air is filtered through a carbon filter and
recirculated into the room through the grid on
the higher part of the chimney (Fig. 5).
Attention!
If the hood is not supplied with carbon filter,
then it must be ordered and mounted.
8
Page 10

WARRANTY AND SERVICE
DOMESTIC WARRANTY - FULL FIVE YEAR WARRANTY
In addition to all statutory rights which you, the Consumer, have under the relevant laws in respect
of this appliance, during the first five years of ownership as the original purchaser of this
Kleenmaid appliance, we guarantee that any fault caused by faulty material or workmanship
becoming apparent will be rectified free of charge for parts and labour, provided that all service is
performed during normal working hours by Kleenmaid or their designated Agents. Where the
appliance is installed outside the normal servicing area of the above, the Purchaser must pay for
the cost of transporting the appliance to and from the Agent or the Agent’s travelling cost to and
from the Purchaser’s home.
COMMERCIAL WARRANTY - ONE YEAR WARRANTY
When this appliance is installed in a commercial application, you, the Consumer, have under the
relevant laws in respect of this appliance, during your first one year of ownership as the original
purchaser of this Kleenmaid appliance, we guarantee that any fault caused by faulty material or
workmanship becoming apparent, will be rectified free of charge for parts and labour, provided that
all service is performed during normal working hours by Kleenmaid or their designated Agents.
Where the appliance is installed outside the normal servicing area of the above, the Purchaser
must pay for the cost of transporting the appliance to and from the Agent or the Agent’s travelling
cost to and from the Purchaser’s home.
WHAT THESE WARRANTIES DO NOT COVER
We are not responsible for any damage or malfunction unless caused by a defect in material or
workmanship. This includes but is not limited to abuse, misuse, improper installation and
transportation damage. We are not responsible for any consequential damages from any
malfunction.
The Consumer must make the appliance available for servicing and shall bear any costs incurred
for any de-installation and/or re-installation required to make the appliance available for servicing.
Kleenmaid is not liable for any consequential damage incurred during de-installation or reinstallation.
WARRANTY DOES NOT COVER REPLACEMENT OF LIGHT
GLOBES OR GLASS BREAKAGE DUE TO IMPACT
In case of fractured glass do not use your appliance.
WARRANTY REGISTRATION
Please complete warranty details below and retain together with your proof of purchase document
These documents will need to be viewed by our Service Representative should you request in warranty
service.
SERVICE ASSISTANCE
To assist you when phoning our After Sales Service number to arrange a service call please complete
the following details and have them ready when you call.
Model Number_____________________________Date of purchase____________________________
Kleenmaid Store purchased from_________________________Date of installation ________________
KLEENMAID AFTER SALES SERVICE
1300 652 100
Page 11

Other products available in the Kleenmaid
Range of appliances
Washers
Dryers
Dishwashers
Ovens
Cooktops
Outdoor Cooking Centres
Built In Espresso Coffee Machines
Rangehoods
Freestanding Ranges
Sinks
Waste Disposals
Taps
Cookware
Refrigerators
Freezers
Wine Cellars
Vacuum Cleaners
For sales information on the full range of quality appliances
Phone 13 13 08
 Loading...