

Page 1

R e f r i g e r a t o r
c o l l e c t i o n
Instructions for Use
and
Warranty Details
RFS140 – 140 Litre Compact Bar Refrigerator
1
Page 2

Congratulations on the purchase of your
new appliance. This appliance has been
designed and manufactured to give you years
of reliable performance.
For best results, carefully read the instructions on
how to install your new appliance. Correct installation
will avoid delays and unnecessary service calls.
Once installation is complete, read this booklet
carefully and get to know the controls and the
features of your new appliance.
We reserve the right to alter the specifications
with no influence on the operation of the
appliance.
This instruction manual cannot be
reason for a claim.
2
Page 3

Instructions for Use
Refrigerator
This refrigerator is for domestic use only and is used for storing fresh foods
at the temperature of 0°C and higher.
Low temperature compartment with marking on the door is used for storing
frozen foods for shorter periods of time and for making and storing ice. Low
temperature compartment without marking is used only for making and
storing ice.
Before Putting Into Use 4-5
Placing and Installation 6
Description of the Appliance 7-8
Operation Controls 8
Use 9-10
Cleaning and Maintenance 11
Changing the Direction of
Opening the Door 12-13
Trouble-Shooting Guide 14-15
3
Page 4
Before Putting Into Use
• Before connecting the appliance to the mains supply leave it stand for
about 2 hours, which will reduce a possibility of malfunctions in the cooling
system due to transport handling.
• Clean the appliance, and be thorough, especially in the interior (See
Cleaning and Maintenance).
• If the interior accessories are not correctly placed, rearrange them as
described in chapter "Description of the Appliance" (accessories may vary
according to model).
Instructions for Use
These instructions for use are intended for the user. They describe the
appliance and its correct and safe use. They were prepared for various
types/models of appliances therefore you may find in it descriptions of some
functions and accessories that your appliance does not have.
We Care for the Environment
• Our appliances are distributed in packaging made of environmentally
friendly material which can safely be recycled, disposed of or destroyed,
with no effects on the enviroment whatsoever.
• These instructions are printed either on recycled paper or chlorine free
bleached paper.
• When you find your appliance is worn out and no longer needed, try not to
burden the environment with it. Call your nearest authorised "collecting
service for used appliances".
Tips for Energy Savings
• Try not to open the door too often, especially when the weather is wet and
hot. Once you open the door, close it as soon as possible.
• Every now and then check if the appliance is sufficiently ventilated
(adequate air circulation behind the appliance).
• Set thermostat from higher to lower settings as soon as possible (depends
on how loaded the appliance is, ambient temperature etc).
• Before loading the appliance with packages of fresh foods, make sure they
are cooled to ambient temperature.
• Ice and frost layers increase energy consumption, so clean the appliance
as soon as the layer is 3-5 mm thick.
Important
• If you have bought this appliance to replace an old one equipped with a
lock that cannot be opened from inside (lock, bolt), make sure that the lock
is broken. This will make it impossible for children to lock themselves
inside the appliance and suffocate.
4
Page 5

• The appliance must be correctly connected to the mains supply. (see:
Connecting to the Mains Supply).
• Do not touch the cooled surfaces while the appliance operates, especially
with wet hands, because the skin may stick to the cold surfaces.
• Do not freeze bottles containing liquid, especially soft drinks, such as
mineral water, sparkling wine, beer, cola etc., as liquid expands during
freezing and the glass bottle is very likely to break.
• If the food has strange smell or color, throw it away, because it is very likely
that it is spoiled and therefore dangerous to eat.
• Disconnect the appliance from the power supply before repairing it (only a
qualified technician should repair it), before cleaning and before replacing
the light bulb.
• Do not defrost the appliance with other electric devices (hair dryer etc.) and
never scrape the ice or frost layer with sharp tools.
• If the supply cord is damaged, it must be replaced by an authorised service
agent or a qualified person in order to avoid hazard.
• The rating plate is inside the appliance or outside on the rear wall
depending on the model.
• The appliance is not intended for use by young children or infirm persons
without supervision.
• Young children should be supervised to ensure that they do not play with
the appliance.
5
Page 6
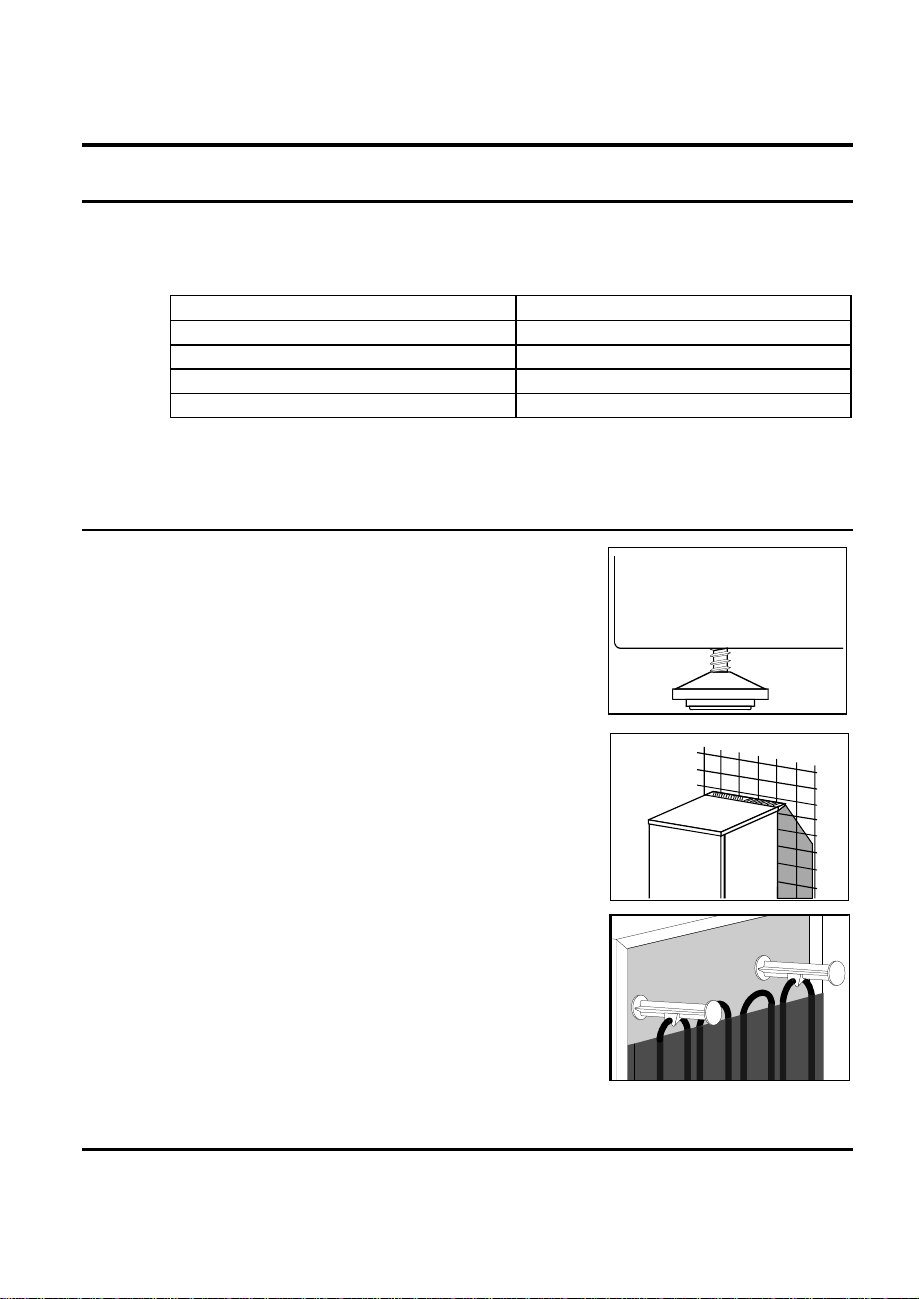
Placing and Installation
Choosing the Right Place
Place the appliance in a dry and regularly ventilated room. Allowed ambient
temperature depends on the model (class) of the appliance and is stated on
the rating plate of the appliance.
Class Ambient temparature
SN (sub-normal) from + 10°C to + 32°C
N (normal) from + 16°C to + 32°C
ST (sub-tropical) from + 18°C to + 38°C
T (tropical) from + 18°C to + 43°C
Never place the appliance near heat emitting devices (e.g. cooker, radiator,
water heater or similar devices) and do not expose it to direct sunlight.
Placing the Appliance
• Place the appliance firmly on a solid base.
Level it with the two adjustable feet, located on
the front.
• The appliance with ventilation grid may be
placed close to the wall. The grid enables
sufficient air circulation, required for adequate
ventilation of the rear wall.
• Two spacers attached to the appliance must
be fitted onto the upper edge of the condenser,
thus preventing the appliance from being
installed too close to the wall. Spacers are
manufactured for all-purpose function
depending on the distance of the condenser
from the wall. Therefore turn spacers
correspondingly and fix them to the appliance.
Connection to Power Supply
Connect the appliance with the cable and plug to the power supply socket.
This supply outlet must be 240V and earthed.
6
Page 7

Description of the Appliance
A Refrigerator 1 Defrost water tray
B Low temperature compartment 2 Shelf
Shelf
(number depends on the model)
Shelf can be optionally placed on the guides inside the appliance. It is
protected against pulling out. If you want to remove it, slightly lift up the back
part and pull it out.
Quickly perishable food should be stored on the back i.e. the coldest part of
the shelves.
7
Page 8

Door Liner
The door liner consists of various shelves. The upper shelf is used for storing
eggs, cheese, butter, yogurt and other smaller packages, the middle shelf is
used for storing small bottles jars and the lower shelf is used for storing large
bottles.
Illumination in the Interior of the Refrigerator
(models with interior illumination only)
The light for illuminating the interior of the appliance is on, when the door is
opened. The operation of the light does not depend on the position of the
thermostat knob.
Operation Control
The appliance is controlled with thermostat knob, situated in the right upper
part inside the appliance.
Turn the knob clockwise from STOP (0) position towards 7 position and
backwards.
Temperature Selection
• Higher settings on the knob (towards 7) mean lower
temperatures (colder) in the appliance. Temperature
in the interior of the appliance may even drop below
0°C. Use higher thermostat settings only when lower
cooling temperature is required or recommended.
When the ambient temperature is normal, we
recommend medium setting.
• Changes of the ambient temprature affect
temperature in the interior of the appliance (choose correct setting of the
thermostat knob).
• In STOP (0) position the appliance does not operate (the cooling system is
switched off), yet power supply is not interrupted (the light is on, when you
open the refrigerator door).
• Temperature in the refrigerator and in low temperature compartment
depends on how often you open the door and the position of the defrost
water tray.
8
Page 9

Use
Storing Fresh Foods
Foods to be stored in the refrigerator should be properly packed to prevent
mixing various moisture degrees and odors (in polyethylene bags or sheet,
aluminium foil, wax paper, or stored in covered containers or bottles).
• Never store inflammable, volatile or explosive substances.
• Don't use the refrigerator for storing substances with strong or unpleasant
odour, because they may spoil the food stored.
• Beverages with high alcohol percentage shall be stored in tightly sealed
bottles in vertical position.
• Food should not touch the rear wall of the refrigerator!
• Some organic solutions like volatile oils in lemon and orange peel, acid in
butter etc. can cause damage when in contact with plastic surfaces or
gaskets for longer period of time.
• Unpleasant odor inside the refrigerator is a sign that something is wrong
with foods or that your refrigerator needs cleaning. Unpleasant odor can be
eliminated or reduced by washing the interior of the refrigerator with a mild
solution of water and vinegar or vanilla “Fridge Wipe”.
Fresh Food Storage Time in the Refrigerator
Article of food Storage time (days)
1 2 3 4 5 6 7 8 9 10 11 12 13 14
Butter + + + + + + + = = = = =
Eggs + + + + + + + + + + = = = =
Meat: fresh uncut + + =
chopped + =
smoked + + + + + + + + + + = = = =
Fish + =
Marinade + + + + + + + + + + = = = =
Vegetable + + + + + + + + = = = = = =
Cheese + + + + = = = = = = = = = =
Sweets + + = = = =
Fruit + + = = = = = = = =
Prepared dishes + + = =
Legend: + reccomended storage ti me
= possible storage time
Storing Frozen Foods
Frozen foods can be stored in the low temperature compartment with
marking. The compartment cannot be used for freezing fresh foods, it can
only be used for storing frozen foods.
Storing time depends on the kind of food and on the temperature inside the
low temperature compartment.
9
Page 10

Marking on the door of low
temperature compartment
No marking
Commercially Frozen Foods
The storage time and the recommended temperature for storing
commercially frozen foods are indicated on the packaging. For storing and
using consider the manufacturer's instruction.
When shopping, be careful and choose only adequately packed foods
provided with complete data and stored in freezers where the temperature is
not higher than -18°C. Do not buy packages of food covered with frost layer.
This indicates that the package was thawed before at least once.
Be careful that packages don't start to thaw, as the rise in temperature
reduces the quality of foods.
Defrosting Frozen Food
Partially thawed or defrosted foods should be used as soon as possible. Cold
air preserves the food but it does not destroy microorganisms which rapidly
activate after defrosting and make foods perishable.
Partial defrosting reduces the nutritional value of foods, especially of fruits,
vegetables and ready-made meals.
Temperature in low
temperature compartment
The compartment is used for ice making only.
Under -6°C Up to one week
Under -12°C Up to two weeks
Storage time of frozen
foods
Ice Making
Recommended thermostat position for ice
making is on the middle setting.
Fill two thirds of the ice tray with cold
water or any other liquid convenient for
freezing. Insert the ice tray into the guides
or on the cooling plate. Time required for
the ice to form, largely depends on
ambient temperature, thermostat setting
and on how often you open the door. It
usually takes 2-6 hours (depends on which model of refrigerator you have).
With smaller refrigerators we recommend you make a stock of ice cubes
(store them in a separate plastic box). The easiest way to empty the ice tray
is to turn the tray around, pour it with cold water and slightly twist it (bend it).
10
Page 11

Maintenance and Cleaning
Manual Defrosting of the Low Temperature Compartment
When the frost and ice layer in the low temperature compartment is 3-5 mm
thick, you should clean the freezer.
• Turn the thermostat knob to STOP (0) position and disconnect the power
supply. Empty the compartment and take care that the packages remain
frozen.
• Put a suitable vessel under the defrost water tray (the tray should be in
normal position - its front edge should be levelled with the low temperature
compartment door) and pull out the plug on the tray to collect the defrost
water.
Leave the door of the compartment open to accelerate defrosting.
Cleaning the Appliance
Disconnect the power supply before cleaning the appliance.
Do not use coarse or agressive cleaning agents as you can damage the
surface.
Be careful to remove any cleaning agent remaining after cleaning.
• Clean the exterior with water and a
mild detergent.
• Wash the interior of the appliance with
lukewarm water, in which you added
one or two spoonfuls of vinegar.
• Every now and then wipe the
condenser on the rear wall. Use soft
non-metal brush or vacuum cleaner.
After cleaning, connect the appliance to
the power supply and reload the
packages.
Switch Off the Appliance When Not In Use
If you do not intend to use the appliance for a longer period, set the
thermostat knob to the STOP (0) position, disconnect the power supply, take
out the foods and defrost and clean the appliance. Leave the door slightly
open.
11
Page 12

Changing the Direction of Opening the Door
(models without the worktop)
If you find the direction of opening the door on your appliance inconvenient,
you can change it. Holes on the opposite side have already been prepared in
the factory and are now plugged.
• Remove the cover of the upper hinge, unscrew the upper hinge and take
off the door of the appliance.
• Unscrew the lower hinge with foot and washer.
• Fix the lower hinge with foot and washer to the opposite side and fix the
other foot on the place where previously was the hinge.
• Remove the fastener of the door corner with the hole and replace it to the
opposite side.
• Put the door on the lower hinge.
• Fix the upper hinge and cover it.
• Unscrew the handle and replace it to the opposite side (not for handles
mounted horizontally).
Some screws are covered with caps. Take them off before undoing the
screws.
• Plug the remaining holes with decorative caps.
• Check the gasket, it shouldn't be creased and it should seal well.
Should the seal not adhere to the casing of the appliance perfectly, it will
have to be heated from a suitable distance (by means of hair drier, for
example) and lightly stretched to the required height.
12
Page 13

1 Upper hinge cover 5 Foot
2 Upper hinge 6 Handle
3 Lower hinge with foot 7 Fastener of the corner with a hole
4 Lower hinge washer
13
Page 14

Trouble-Shooting Guide
During the service, you can come across some troubles that in most cases
result from improper handling of the appliance and can easy be eliminated.
The Appliance Fails to Operate After Connecting to the Mains
Supply
• Check the supply in the outlet socket and make sure the appliance is
switched on (thermostat knob in operating position).
Continuous Operation of the Refrigerating System
• The door was frequently opened or it was left opened for too long.
• The door is not properly closed (the door may sag, the gasket may be dirty
or damaged).
• Perhaps you have overloaded the appliance with fresh foods.
• The reason may be inadequate ventilation of the compressor and
condenser (assure adequate air circulation and wipe off the condenser).
Noise
Cooling in refrigerating-freezing appliances is enabled by the refrigerating
system with compressor, which produces noise. How noisy the appliance is
depends on where it is placed, how it is used and how old the appliance is.
• During the operation of the compressor the noise of liquid is heard and
when the compressor is not operating, the refrigerant flow is heard. This is
a normal condition and it has no influence whatsoever on the lifetime of the
appliance.
• After starting the appliance, the operation of the compressor and the
refrigerant flow may be louder, which does not mean that something is
wrong with the appliance and it has no influence on the lifetime of the
appliance. Gradually the noise is reduced.
• Sometimes unusual and louder noise is heard, which is rather unusual
for the appliance. This noise is often a consequence of inadequate placing.
− The appliance should be placed and levelled firmly on a solid base.
− It should not touch the wall or kitchen units standing next to it.
− Check the accessories in the interior of the appliance, they should be
placed correctly in their positions; also check the bottles, tins and other
items that might touch each other and rattle.
14
Page 15

Bulb Replacement
(for models with interior illumination only)
Before replacing the light bulb, disconnect
the appliance from the power supply.
Remove the plastic cover and replace the
bulb with a new one (E14, max. 15 W).
Light bulbs are not covered by
warranty.
WE RESERVE THE RIGHT TO ALTER THE SPECIFICATIONS
WITH NO INFLUENCE ON THE OPERATION OF THE
APPLIANCE.
15
Page 16

WARRANTY AND SERVICE
DOMESTIC WARRANTY - FULL FIVE YEAR WARRANTY
In addition to all statutory rights which you, the Consumer, have under the relevant laws in
respect of this appliance, during the first five years of ownership as the original purchas er
of this Kleenmaid appliance, we guarantee that any fault caused by faulty material or
workmanship becoming apparent will be rectified free of charge for parts and labour,
provided that all service is performed during normal working hours by Kleenmaid or their
designated Agents. W here the appliance is installed outside the normal servicing area of
the above, the Purchaser must pay for the cost of transporting the appliance to and from
the Agent or the Agent’s travelling cost to and from the Purchaser’s home.
COMMERCIAL WARRANTY - ONE YEAR WARRANTY
When this appliance is installed in a commercial application, you, the Consumer, have
under the relevant laws in respect of this appliance, during your firs t one year of ownership
as the original purchaser of this Kleenmaid appliance, we guarantee that any fault caused
by faulty material or workmanship becoming apparent, will be rectified free of charge for
parts and labour, provided that all service is performed during normal working hours by
Kleenmaid or their designated Agents. Where the appliance is installed outside the normal
servicing area of the above, the Purchaser must pay for the cost of transporting the
appliance to and from the Agent or the Agent’s travelling cost to and from the Purchaser’s
home.
WHAT THESE WARRANTIES DO NOT COVER
We are not responsible for any damage or malfunction unless caused by a defect in
material or workmanship. This includes but is not limited to abuse, misuse, improper
installation and transportation damage. We are not responsible for any consequential
damages from any malfunction. The Consumer must make the appliance available for
servicing and shall bear any costs incurred for any de-installation and/or re-installation
required to make the appliance available for servicing. Kleenmaid is not liable for any
consequential damage incurred during de-installation or re-installation.
WARRANTY DOES NOT COVER REPLACEMENT OF LIGHT
GLOBES OR GLASS BREAKAGE DUE TO IMPACT
In case of fractured glass do not use your appliance.
WARRA NTY REGISTRATION
Please complete warranty details below. Please retain together with your proof of purchase
document.
request in warranty service.
SERVICE ASSISTANCE
To assist you when phoning our After Sales Service number to arrange a service call please
complete the following details and have them ready when you call.
Model Number______________________Date of purchase____________________________
Kleenmaid Store purchased from_____________________Date of installation _____________
These documents will need to be viewed by our Service Representative should you
KLEENMAID AFTER SALES S ERVICE
1300 652 100
16
Page 17

Other products available in the Kleenmaid
Range of appliances
Washers
Dryers
Dishwashers
Ovens
Cooktops
Outdoor Cooking Centres
Built In Espresso Coffee Machines
Rangehoods
Freestanding Ranges
Sinks
Waste Disposals
Taps
Cookware
Refrigerators
Freezers
Wine Cellars
Vacuum Cleaners
For sales information on the full range of quality
appliances
Phone 13 13 08
HDVS 1451 544767/en/123
17
 Loading...