

Page 1
Page 2
Page 3

Dear Customer,
we would like to thank you and congratulate
you on your choice.
This new product has been carefully designed
and built using top quality materials, and
meticulously tested to ensure that it meets all
your culinary requirements.
Please read and observe these simple
instructions, which will enable you to achieve
excellent results from the very first time you
use it. This state-of-the-art appliance comes
to you with our very best wishes.
THE MANUFACTURER
THIS PRODUCT IS DESIGNED FOR DOMESTIC
USE.
THE MANUFACTURER DECLINES ALL
RESPONSIBILITY FOR DAMAGES TO THINGS
OR PEOPLE DERIVING FROM INCORRECT
INSTALLATION OR IMPROPER, ERRONEOUS
OR UNSUITABLE USE.
THE APPLIANCE MUST NOT BE USED BY
PEOPLE (INCLUDING CHILDREN) WITH
PHYSICAL, SENSORIAL OR MENTAL
IMPAIRMENTS, OR BY PEOPLE WITHOUT THE
NECESSARY EXPERIENCE OR KNOWLEDGE,
UNLESS THEY ARE SUPERVISED OR
INSTRUCTED IN THE USE OF THE APPLIANCE
BY A PERSON RESPONSIBLE FOR THEIR
SAFETY.
CHILDREN MUST BE SUPERVISED TO
ENSURE THAT THEY DO NOT PLAY WITH THE
APPLIANCE.
DO NOT PLACE TIN FOIL, PANS OR SIMILAR
IN CONTACT WITH THE INNER BASE OF THE
OVEN TO COOK. THE HEATING ACTION OF
THE LOWER RESISTANCE CAUSES THE
LOWER
LEADING TO DAMAGE AND EVEN SERIOUS
CONSEQUENCES (FIRE RISK) ALSO TO THE
UNIT IN WHICH THE OVEN IS INSTALLED.
PART OF THE OVEN TO OVERHEAT,
3
Page 4

Contents
User instructions, 5
First use, 5
Self-cleaning panel, 5
Control panel, 6
Instructions for use:
- conventional cooking, 6
- fan cooking, 6
- grill cooking, 7
Demo mode, 7
Regulating the clock, 8
Switching on the oven, 8
Main Functions, 8
View of front console, 8
Cooking functions, 8
Simple gestures for cooking, 9
Regulating the cooking temperature, 9
Residual heat, 9
The food probe, 10
Special functions: Boost and CLEAN, 12
Oven light control, 13
Programming the oven, 13
Programming the timer: cooking time, 13
Programming the timer: cooking end time, 14
Programming the timer: delayed cooking, 14
Programming the timer: minute counter, 14
Programming the timer: cancelling the programme, 15
IMPORTANT
The oven’s data plate is accessible even
with the oven fully installed. The plate is
visible simply by opening the door. Always
quote the details from it to identify the
appliance when ordering spare parts.
Safety, 33
Over lock function, 15
Light replacement, 15
Removing the oven door, 16
Installation instructions, 17
Flush fitting, 17
Electrical connections, 18
4
Page 5
User instructions
The first time you use the oven
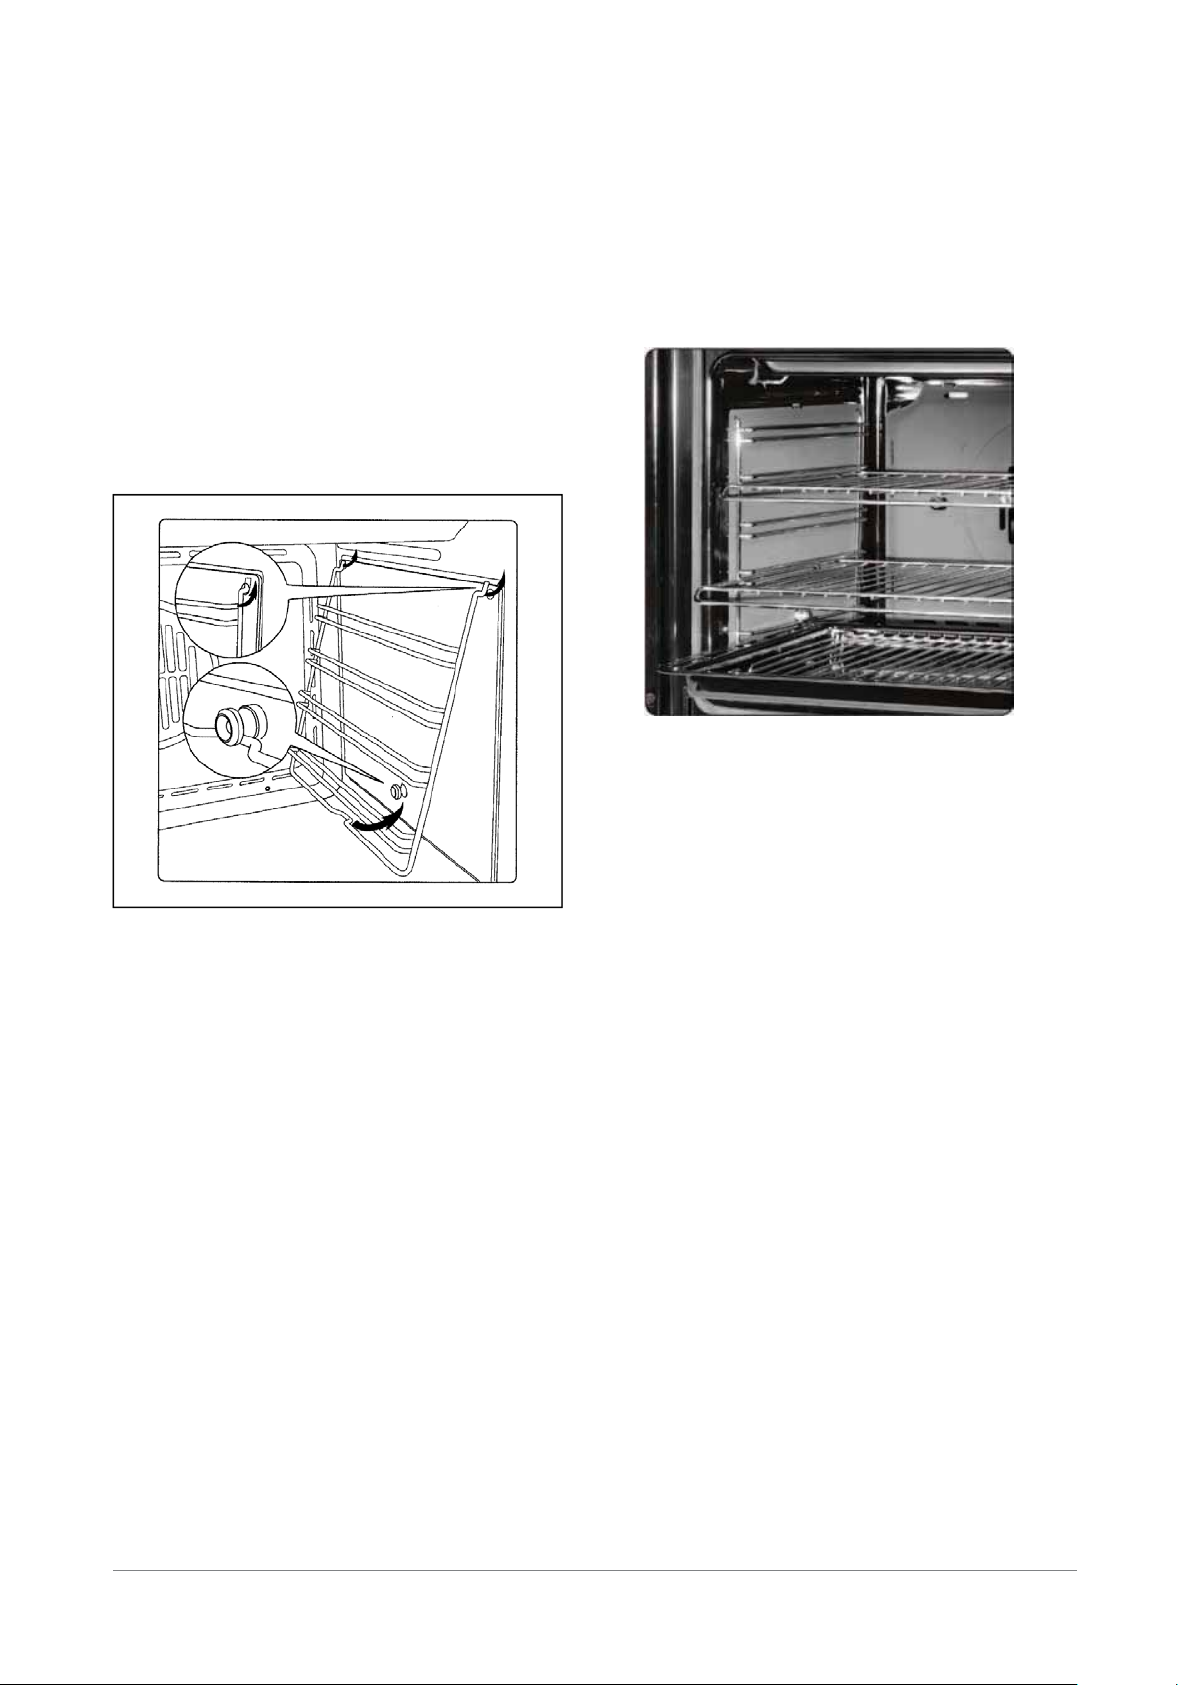
Clean the oven thoroughly with soapy water and rinse well.
To remove the lateral frames from smooth-walled ovens,
proceed as shown in the figure.
Operate the oven for about 30 minutes at maximum
temperature to burn off all traces of grease which might
otherwise create unpleasant smells when cooking.
Important:
As a safety precaution, before cleaning the oven, always
disconnect the plug from the power socket or the power
cable from the oven. Do not use acid or alkaline substances
to clean the oven (lemon juice, vinegar, salt, tomatoes etc.).
Do not use chlorine based products, acids or abrasive
products to clean the painted surfaces of the oven.
Self-cleaning catalytic panels
SELF-CLEANING PANELS
The CLEAN function activates the reaction that
causes cleaning
Our smooth walled ovens can be fitted with selfcleaning
panels to cover the inside walls.
These special panels are simply hooked on to the walls
before the side frames are fitted. They are coated in a
special, micro-porous catalytic enamel which oxidises and
gradually vaporises splashes of grease and oil at cooking
temperatures above 200° C.
If the oven is not clean after cooking fatty foods, operate the
empty oven for 60 minutes (max.) at maximum temperature.
Never wash or clean selfcleanin
acid, or alkaline products.
g panels with abrasive,
5
Page 6
Control panel functions
Function symbols on the selector
Instructions for use
Conventional cooking
Oven light (stays on while oven is in use).
Top and bottom heating elements.
Thermostat setting from 50°C to MAX.
Thermostat setting from 50°C to 200°C.
Bottom heating element. Thermostat setting
from 50°C to MAX.
Top heating element (small, low)
Double top heating element (large area grill).
Thermostat setting from 50°C to 200°C.
Double top heating element with fan (large
area grill). Thermostat setting from 50°C to
200°C.
Top and bottom heating elements with fan.
Thermostat setting from 50°C to MAX.
Circular heating element with fan. Thermostat
setting from 50°C to MAX.
Bottom heating element + Circular
heating element with fan. Thermostat
setting from 50°C to MAX.
Fan for defrosting. Thermostat setting at 0°C.
Double top heating element (large area grill).
Bottom heating element. Thermostat setting
from 50°C to MAX.
Conventional cooking uses top and bottom heat to cook a
single dish.
Place the food in the oven only once cooking temperature has
been reached, i.e. when the heating indicator goes out.
If you want to increase top or bottom temperature towards the
end of the cooking cycle, set the temperature control to the
right position. It is advisable to open the oven door as little as
.)llirg rewop wol ,llams( tnemele gnitaeh poT
possible during cooking.
Fan cooking
For this type of cooking a fan positioned at the back allows the
circulation of hot air inside the oven, creating uniform heat. In
this way cooking is more rapid than conventional cooking. It is
a suitable method for cooking dishes on more than one shelf,
especially when the food is of different types (fish, meat etc.).
Defrosting
.C°002 ot C°05 morf gnittes tatsomrehT
By selecting one of the fan cooking functions and setting the
thermostat to zero, the fan allows cold air to circulate inside the
oven. In this way frozen food can be rapidly defrosted.
It is not essential to preheat the oven, but you are advised to do
so when cooking pastries.
6
Page 7

Grill cooking
It is turned off when the temperature of the outer shell of the
oven descends under 60°C.
By switching off the oven with the thermostat at 200°C the fan
stops working after approx. 30 min.
Oven presentation
Your new oven is managed by an electronic card which
constantly monitors its operation in order to improve its allround performance.
The state-of-the-art, reliable and precise touch control system.
The elegant, orderly and discreet interface, more user-friendly
than ever before!
Just a few buttons, lots of functions and no difficult combination
or sequence of buttons. Simply concentrate on following the
recipe and the oven is ready with two movements!!!
Use the grill to grill or brown foods. Some ovens may be
equipped with an electric motor, spit and skewers for turning
on the spit.
Place the shelf with the food to be cooked in the 1st or 2nd
position from the top.
Pre-heat the oven for 5 minutes. Turn the thermostat to a
temperature between 50° and 200.
Cooling fan
TANGENTIAL COOLING
A forced air circulation system which contributes to
reducing the heat exchange temperature in the front
and lateral areas of the ovens.
The fan is positioned on the upper part of the oven and create
a circle of cooling air on the inside of the furniture and through
the door of the oven. It is turned on when the temperature of
the outer shell of the oven reaches 60°C.
By switching on the oven with the thermostat at 200°C the fan
starts working after approx.10 min.
Demo mode
This is the name of the mode usually implemented by the oven
every time the electricity supply fails and also when the oven
is first connected.
The aim is to display all the control potentials with a recorded
sequence of commands.
In this mode the oven is NEVER really activated, as
the heating elements are not switched on!!
The control panel is NOT ACTIVE so the oven does
not respond to commands!
5 sec.!!
To disable the demo mode, touch the light symbol for five
seconds: the controls will enter into standard operational mode
and the oven is ready to be switched on.
7
Page 8

Regulating the clock
The oven signals the connection to the electricity main with a
double beep.
To regulate the system time, press the TIMER FUNCTIONS
button for 5 sec.
Every control used is confirmed by a beep.
Main Functions
View of front console
Cooking functions
Special functions
Oven On/Off
Oven lock On/Off
Programming
the oven
Regulate the clock using the + and – buttons: the dividing dots
flash while the time is being set and stop flashing when the
time has been acquired.
Switching on the oven
The oven is switched on using the ON/OFF symbol shown in
the figure.
The control activates all the symbols, illuminating the
background.
Temperature
Oven lock
Clock
Cooking functions
The control makes a total of twelve specific cooking functions
available!
Every function has a set temperature chosen on the basis of
cooking tests using frequently used recipes and can easily be
adjusted to suit personal preference.
The following table contains the results of the cooking tests
carried out in our laboratories by a professional chef. However,
this is merely a guide and the values indicated are simply to
help you get started and try our your own recipes, always
achieving the best results!
The control will wait eight seconds after switch-on
for a cooking function to be chosen. Otherwise
it interprets the switch-on as accidental and
automatically switches off the oven for safety
reasons.
8
Page 9

Simple gestures for cooking
Two simple movements are all it takes to set a cooking
programme, thanks to the state-of-the-art control logic: switch
on the oven and select the best function for the dish you are
preparing. Simply select it and touch it!
The control proposes a temperature for every
function. It is possible to change it t any time, but if
you are happy with it, you don’t need to do anything
else. The oven will be automatically activated in a
few seconds!
Temperature Regulation
The control makes use of a temperature probe with a level of
precision of ±5°C offering maximum reliability of the cooking
times required.
To change the temperature simply use the plus and minus
symbols. The range of regulation varies from +50°C to +250°C.
It isn’t necessary to confirm the change, as the control is
automatically activated after just a few seconds.
During the heating process, the degrees centigrade symbol
(°C) symbol flashes,
indicating that the heat is being regulating to reach the
temperature required.
When the correct temperature is reached, you will hear a beep.
Residual heat
While cooking food, the structure of the oven stores heat. This
heat is kept isolated from the rest of the kitchen thanks to an
excellent insulation system and certain construction details.
The heat is gradually dispersed can be used as a further
cooking resource if managed appropriately: the control
indicates the interior temperature, after the oven has been
9
Page 10

switched off, until it reaches 50°C.
use this feature to keep food warm or to gently
complete the cooking process.
Food probe (or probe thermometer)
TEMPERATURE PROBE
Tenderness, taste and flavour are the result of
precise ad functional control.
The food probe is a thermometer which, when inserted into the
food, makes it possible to check the internal temperature and
use it to establish the end of cooking.
For example, meat may look like it is cooked on the outside,
but still be pink on the inside!
To prevent bacteria from multiplying, it is necessary to take the
following measures:
• Do not defrost food at room temperature, always in the
fridge or in the oven using the specific function. In the latter
case, cook the food immediately afterwards.
• Stuff chicken just before eating it. Never buy pre-packed
ready-stuffed chicken and only buy ready-cooked stuffed
chicken when you intend to eat it within 2 hours.
• Marinate food in the fridge, not at room temperature.
• Use a food probe to check the temperature of meat,
and
poultry if they are more than 5 cm thick, to ensure that the
minimum cooking temperatures are reached.
The greatest hazards are posed by poorly cooked chicken,
particularly at risk from Salmonella.
• Avoid interrupting the cooking process, i.e., partially
cooking food, storing it and completing the cooking process
later. This sequence encourages the growth of bacteria due
to the “warm” temperatures reached inside the food.
• Roast meat and poultry in the oven at temperatures of at
least 165°C.
Using the food probe
The food probe socket is
situated in the top front
corner of the oven cavity,
protected by a metal
cover.
Push the plug in as far as
it will go. If it is correctly
inserted, the control will
give off a double beep.
The temperature reached by food during cooking is closely
linked to problems relating to health and hygiene. Bacteria can
be contained in every kind of meat, poultry and fish, as well
as raw eggs.
Certain types of bacteria make food go off, while others, such
as Salmonella, Campylobacter jejuni, Listeria monocytogenes,
Escherichia coli and Staphylococcus aureus can be seriously
harmful to human health.
Bacteria multiply very quickly above a temperature of 4.4° up
to 60°C. Mince is particularly at risk from this point of view.
10
Page 11

Push the probe into
the centre of the food,
avoiding touching bones
or fatty areas.
Remember that the probe will not work if it is
connected when the oven is already switched on!
Switch on the oven!
FOOD
MINIMUM INTERNAL
Mince
Hamburger 71°C
Beef, veal, lamb, pork 74°C
Chicken, turkey 74°C
Beef, veal, lamb
Roasts and steaks:
The cooking temperature for
Rare
rare meat is not indicated by
the NFSD as it is unsafe for
health reasons
Medium-rare 63°C
Medium 71°C
TEMPERATURE
Select the best cooking function for your recipe.
After 5 sec. the temperature
display switches to indicate the
temperature of the food probe,
i.e., the temperature which must
be reached inside the food.
You can change the minimum internal temperature
value to suit requirements within an interval of
+30°C to +99°C , but we recommend that you
consult the table below, taken from THE NATIONAL
FOOD SAFETY DATABASE (USA).
17
Chops, roasts, ribs:
Pork
Medium 71°C
Well done 77°C
Fresh ham 71°C
Fresh sausages 71°C
Poultry
Well done 77°C
Whole chicken or chicken
pieces
82°C
Duck 82°C
Whole turkey (not stuffed) 82°C
Turkey breast 77°C
If the plug is removed after cooking begins, the control blocks
the oven and signals the error by beeping: plug the probe in
again to resume cooking!
11
Page 12

When cooking with the aid of the food probe, all
the pre-set temperatures are changed, to maintain
consistency with the philosophy of use, to 165°C:
they can be varied from a minimum of 120°C to
a maximum of 250°C. For the same reason, the
defrosting function is deactivated.
The end of cooking, established by reaching the internal
temperature set for the food probe. All the oven programming
functions (timer functions) are stopped, apart from the beeper
(minute counter).
When the food probe senses the temperature for which it has
been set, the oven is automatically deactivated and you will
hear a beep!
When the cooking time is up, remember to disconnect the food
probe and remove it from the oven.
CAUTION: the probe is very hot after cooking.
If the probe is left connected to the oven but not inside the
food, an error may be generated (ERR3) on the timer display.
The error will disappear when the probe is disconnected from
the oven.
Special functions
Boost (quick preheat)
BOOST – FAST TIMES
To shorten cooking times
with fast pre-heating
This special function can be activated after selecting a cooking
function and is used to reduce the time required to reach the set
cooking temperature.
This period of time is known as preheating, and is required in
practically all recipes.
It is possible to disconnect the turbo heat function or change
cooking function at any time.
Clean (quick cleaning)
ASSISTED CLEANING
High temperature cycle
(250°C), combined with
self-cleaning panels for
gentle, non-invasive
cleaning of the cooking
chamber.
Correct operation is combined with the use of the lateral
panels and catalytic fan cover: the oven is treated with special
enamel with a micro-porous structure, which breaks down the
fat projected thanks to a catalytic oxidisation process which
transforms residues into gaseous products.
The turbo clean function is only activated when no cooking
function has been selected, so: switch on the oven and touch
the symbol as shown in the figure for five seconds.
12
Page 13

5 sec.!!
The cleaning process takes place at a temperature
of 250°C and lasts one hour. Do not use it for
cooking food!!
The oven light is activated and can be switched off and on
again at any time.
All the self-cleaning panels will perform effectively for thirty
cleaning processes, after this limit the panels must be replaced.
The panels should be cleaned exclusively with tap water and
replacements can be ordered from your specialised dealer.
Oven light control
The light control is active on all the cooking functions and is
independent, meaning that it can be switched on or off to suit
your requirements, when you want!
The oven light is usually kept on throughout the heating time
and then for three minutes after reaching the temperature set.
From then on, the oven light switches off to save power.
To check the cooking, it may be necessary to switch on the
internal light. All you have to do is touch the light symbol:
the light will stay on for three minutes and then switch off
automatically. Naturally you can switch it off immediately by
touching the light symbol again.
Some models are equipped with a door control. This feature
uses sensor technology to detect the position of the door to
control the oven light: the opening of the door is indicated by
a beep and the light comes on. It switches off when the door
is closed again.
Programming the oven
The programming of the oven offers three modes for controlling
the cooking time. They are available with the standard cooking
functions. When the food probe is used, they are deactivated
(see specific chapter).
The functions can be selected in sequence, from left to right,
by touching the clock symbol: every time it is touched, a
symbol lights up in sequence.
Programming the timer: cooking time
Touch the timer symbol once. The relative symbol lights up.
The clock display will replace the indication of the current time:
The dividing dots flash to indicate that it is possible to
programme the cooking time.
Once the cooking time has been set, the
display will show the current time again
and the cooking time symbol will be lit.
13
Page 14

The count begins now. When the time is up, the oven will make
a beeping sound, the heating elements will be switched off and
cooking will stop.
The special symbol will flash, as will the duration which was
set on the clock display. Press any button to stop the beeping
sound.
After eight seconds, the oven switches off automatically unless
other cooking functions are programmed.
Programming the timer: cooking end time
Touch the timer symbol twice. The relative symbol lights up.
The dividing dots flash to indicate that it is possible to
programme the cooking end time.
what to do:
Prepare the roast for cooking and place
it in the oven.
Switch on the oven, select the cooking function and set the
temperature.
Now set the cooking time, let’s say two hours.
Now set the cooking end time: the control usually
adds the cooking time to the current time and
proposes the result as the cooking end time. In our
case it will propose 10:30 (8:30+2 hours).
Set the cooking end time by touching the + and – symbols.
Once the cooking end time has been
set, the display will show the current time
again and the cooking end symbol will be
lit.
The count begins now. When the set time is reached, the oven
will give off a beep, the heating elements will be switched off
and cooking will stop.
The special symbol will flash, as will the cooking end time
which was set on the clock display: press any button to stop
the beeping sound.
After eight seconds, the oven switches off automatically unless
other cooking functions are programmed.
Programming the timer: delayed cooking
Using the combination of the two cooking time and cooking
end time modes, it is possible to programme the oven to start
cooking at a later time than the current time.
For example, it is 8.30 a.m. and you’re about to leave home,
but you would like a roast to be ready for 1.00 p.m.. Here’s
Change the cooking end time to make it coincide with the time
you require. In our example this is 1.00 p.m.
The oven now enters into stand-by and the oven light switches
off. When it is time to start cooking, the light will not be
automatically switched on because it is logical to assume that
the delayed start coincides with your absence, so it is pointless
to leave the light on for no reason.
The control will automatically
activate the oven at 11:00 (1:00
p.m. –2 hours) and will switch it
off at 1.00 p.m., meaning that the
roast will be ready when you arrive
home!
Programming the timer: minute counter
The minute counter is a function of the timer which is
independent of the operation of the oven, meaning that it does
14
Page 15

not block the cooking and does not switch off the oven, but
acts as a beeper. You can set it at any time, as a reminder
to check cooking on the hob, as well as the oven, or for other
cooking activities.
This can also be used with the oven switched off. In this case
all you have to do is touch the timer function symbol.
If you use it with the oven switched on, you must touch the time
function symbol three times in a row.
Lock activated:
red padlock closed symbol on
the display Every action linked
to cooking is disabled.
Lock deactivated:
white padlock open symbol on
the display.
The dividing dots flash to indicate that it is possible to set the
value.
Set the minutes using the + and - symbols.
The count begins now. When the time indicated is up, the oven
will make a beeping sound and the special symbol will flash.
Press any button to interrupt the beeping sound.
Programming the timer: cancelling the programme
To cancel a programme, it is necessary to take the value
assigned previously to zero or switch off the oven.
Safety: oven switch-on lock
The control males a lock available on the console to prevent
the oven from being switched on or the cooking settings from
being interfered with.
It can be activated and deactivated at any time using the on/
off button.
Replacing the oven light
IMPORTANT:
The oven light must have these precise features: a) it must be
able to resist high temperatures (up to 300°C)
b) power supply: see V/Hz indicated on data plate.
c) power 25W.
d) E 14 connection. Before proceeding, disconnect the
appliance from the main electricity supply.
- To prevent damage, place a tea cloth in the oven;
- unscrew the glass cover of the light;
- unscrew the old light bulb and replace it with the new one;
- put back the glass cover and remove the tea cloth;
- connect the appliance to the main electricity supply;
3 sec.!!
Touch the on/off symbol for at least three seconds to activate
or deactivate, alternately, the oven lock.
15
Page 16

Removing the oven door
The oven door can be removed quickly and easily. To do so,
proceed as follows:
- Open the door fully.
- Lift the two levers shown in fig.
- Close the door as far as the first stop (caused by the raised
levers).
- Lift the door upwards and outwards to remove it from its
mountings.
To replace fit the door, fit the hinges in their mountings and
lower the two levers.
16
Page 17

Installation instructions
Flush fitting
The oven can be installed under a work top or in a cooking
column. Figure shows the installation dimensions.
Make sure that surrounding materials are heat resistant.
Align the oven centrally with respect to the side walls of
the units surrounding it and fix it in place with the screws
and Allen screws provided.
See the accompanying instructions for combining the
oven with multi-functional gas or gas-electric cookers.
595
50
510
595
50
510
560
560
540
594
594
535
21
540
594
535
594
21
17
Page 18

Electrical connections
Before connecting the oven to the mains power supply,
make sure that:
- The supply voltage corresponds to the specifications
on the data plate on the front of the oven.
- The mains supply has an efficient earth (ground)
connection complying with all applicable laws and
regulations. Correct earthing (grounding) is a legal
requirement.
The power cable should never reach a temperature 50°
C above ambient temperature at any point along its
length.
If a fixed appliance is not provided with a power cable
and plug, or some other device permitting it to be
disconnected from the mains electricity supply, with a
gap between the contacts big enough to guarantee
class III overvoltage protection, then such a device must
be fitted to the power supply in compliance with the
regulations governing electrical installations.
The socket or switch must be easily reachable with the
oven fully installed.
N.B. The manufacturer declines all responsibility for
damage or injury if the above instructionsntinfortunistiche
non vengano rispettate.
CABLE TYPES AND MINIMAL DIAMETERS
SASO
2
H05RR-F 3x1,5 mm
H05VV-F 3x1,5 mm
H05RN-F 3x1,5 mm
H05RR-F 3x2,5 mm2
2
H05VV-F 3x2,5 mm2
2
H05RN-F 3x2,5 mm2
H05V2V2-F 3x1,5 mm2 H05V2V2-F 3x2,5 mm2
18
Page 19

Page 20

 Loading...