

Page 1
Outdoor
Cooking Centres
Operating and assembly instructions
warranty details
Corner unit
Model OCCCNR
Page 2

the best you can own.
Congratulations on the purchase of your new Kleenmaid outdoor cooking centre. This
appliance has been designed and manufactured to give you years of reliable performance.
the kleenmaid story.
More than one million Australians enjoy using Kleenmaid appliances daily. Selected because of
their unique design, outstanding performance, excellent quality and unquestionable reliability,
each one is value-for-money, 100 per-cent guaranteed and at the top of its class.
attention to detail.
We are proud of our reputation for product innovation and service excellence. By dealing direct, we
can ensure that you consistently receive a high standard of customer service.
Free delivery, dedicated customer and after-sales service plus free kitchen design including
planning seminars are just a few of the ways we are setting new benchmarks for customer service
and experience.
satisfaction guaranteed.
Your new outdoor cooking centre is covered by a written five-year parts and labour warranty,
no lemon guarantee and a unique best value guarantee.
best results.
For best results, carefully read the enclosed instructions on how to assemble your new barbecue.
Correct assembly will avoid delays and unnecessary service calls.
This booklet provides you with comprehensive information to help you get to know the controls and
the features of your new outdoor cooking centre.
congratulations
Page 3

Before attempting to assemble this appliance, check that all the
necessary parts have been included using the parts list opposite.
Inspect parts as you proceed.
Contact your place of purchase for assistance regarding
replacement of any damaged or missing parts. Supplier contact
details are on the back cover of the instruction manual.
Do not assemble or operate an appliance that appears
damaged.
CHECK FOR ANY DAMAGE
PRE-ASSEMBLY
While it is possible for one person to assemble the
Corner Unit,
we recommend asking for the assistance
of another person when
manoeuvring some of the larger and heavier pieces.
GENERAL
Standard Phillips-head screwdriver.
TOOLS YOU WILL NEED
1. Flatten cardboard packaging and use this as a protective
work surface to assemble upon.
2. Some protective coating may need to be removed from
components prior to assembly.
3. Unless specified otherwise, do not tighten screws and nuts
until trolley is fully assembled.
4. Pre-screwing of connection points for securing the side
shelves will assist in securing shelves smoothly.
ASSEMBLY TIPS
Description Qty
Table 1
Upper / lower frame 2
Decoration panel – lower 1
Decoration panel – upper 1
Bracket A 2
Bracket B 4
Slide set 2
Slide set bracket 1
Pull-out tray assembly 1
Level adjuster 4
Door bracket 1
Door handle 1
Door 1
Side panel 2
Rear panel 2
Hardware pack 1
CARTON CONTENTS
GENERAL INFORMATION
3
3
Purchased from
Date purchased
Serial No.
NOTE: Sales docket must be kept as proof of purchase date.
FOR CUSTOMER REFERENCE
(Record and file in a safe place)
General Information 3
Pre-Assembly 3
Assembly 4-7
Maintenance 8
Parts Diagram / List 9
TABLE OF CONTENTS
Page 4
ASSEMBLY
4
4
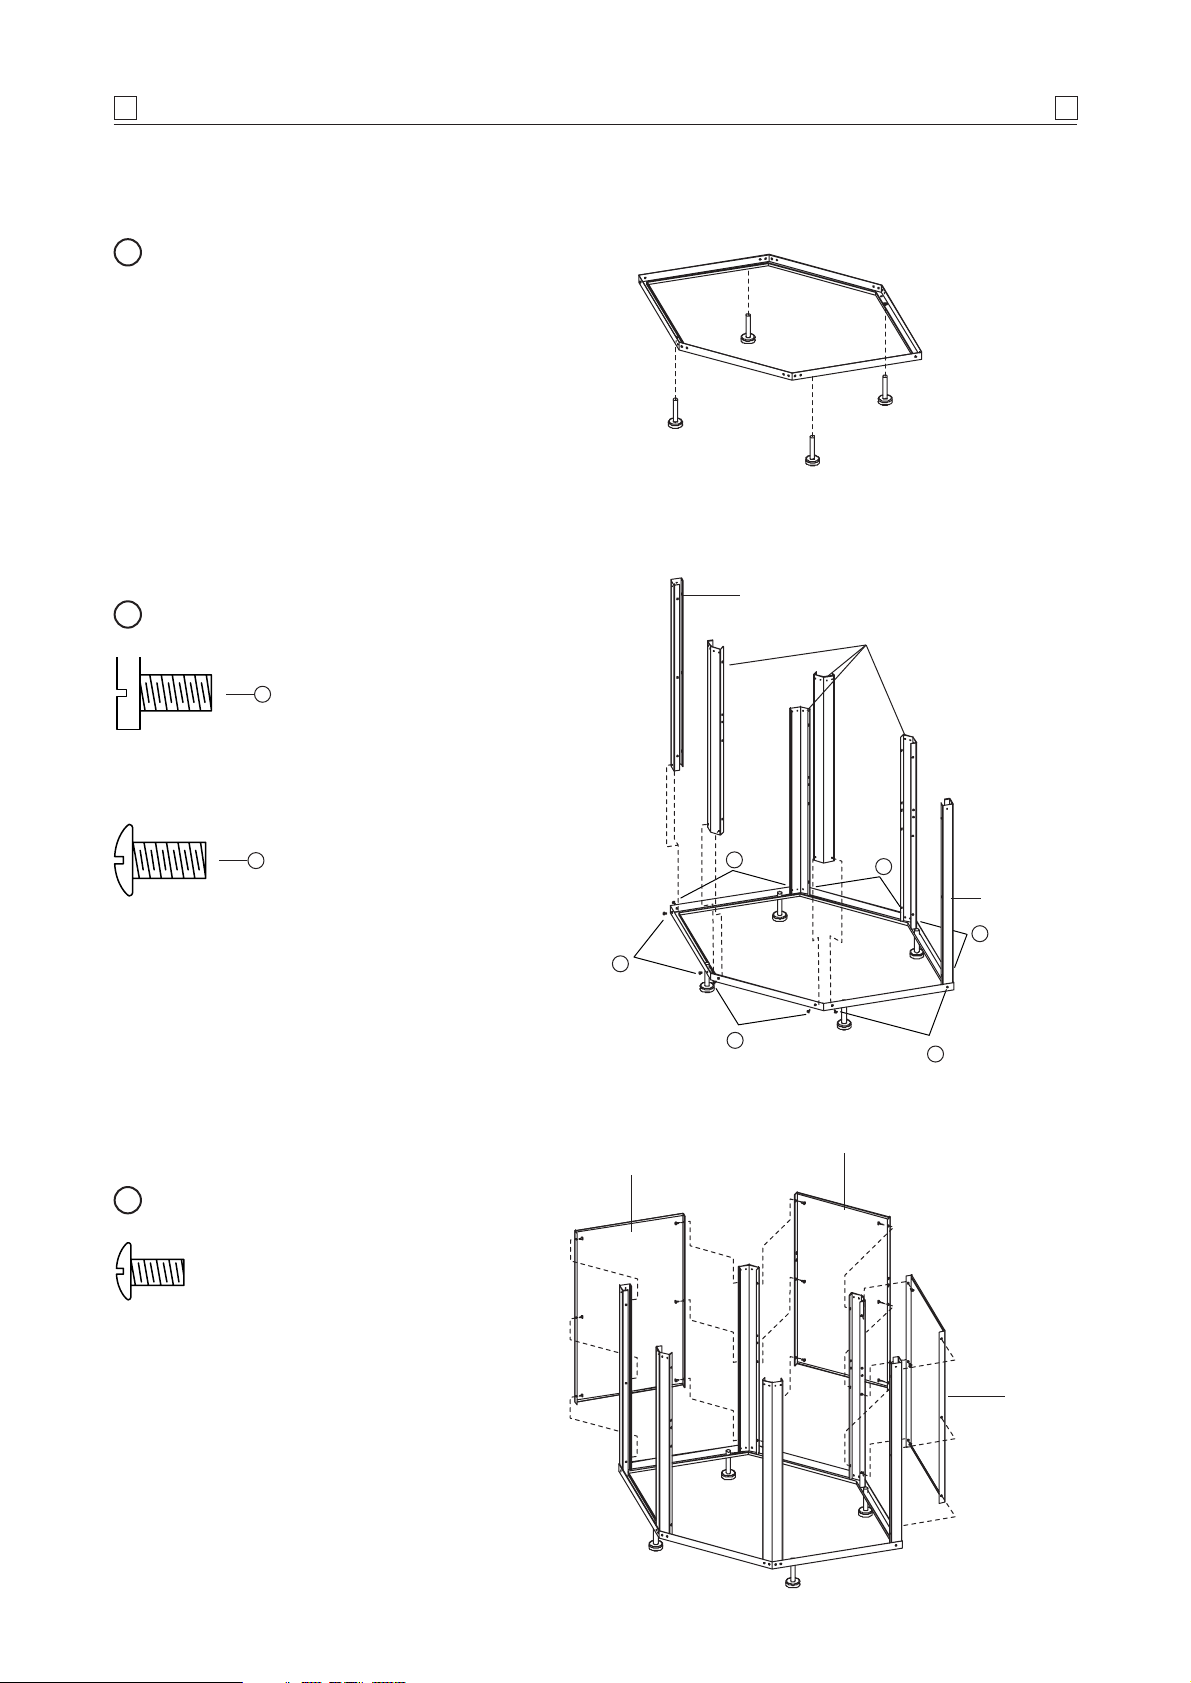
Attach level adjusters to bottom frame.
1
Attach brackets A and B to bottom shelf.
2
Rear panel
Side panel
Side panel
Bracket B
Bracket A
Bracket B
Phillips-head screw 3/16" x 3/8"
Qty: 6
Phillips flat-head screw 3/16" x 3/8"
Qty: 6
A
B
Attach side and rear panels.
3
Phillips-head screw 3/16" x 3/8"
Qty: 18
B
B
A
A
A
B
Page 5

ASSEMBLY
5
5
Attach slide set brackets.
4
Phillips-head screw 3/16" x 3/8"
Qty: 8
Attach slide set.
5
Phillips-head screw 3/16" x 3/8"
Qty: 4
Attach table frame.
6
Phillips-head screw 3/16" x 3/8"
Qty: 6
Phillips flat-head screw 3/16" x 3/8"
Qty: 6
A
B
Slide set brackets
Slide set brackets
B
B
A
A
A
B
Page 6

ASSEMBLY
6
6
Decoration panel -
lower
Attach table.
7
Phillips-head screw 3/16" x 3/8"
Qty: 5
Attach lower decoration panel.
8
Phillips-head screw 3/16" x 3/8"
Qty: 4
Attach door brackets, pull-out tray
assembly, door and door handle.
9
Phillips-head screw 3/16" x 1/4"
Qty: 6
Phillips flat-head screw 3/16" x 3/8"
Qty: 9
A
C
Flange nut 3/16"
Qty: 4
B
Door bracket
A
A
B
C
Page 7

ASSEMBLY
7
7
Push tenon down on one side and up on
the other side to unlock. Slide pull-out tray
assembly into the slide.
10
Page 8

We recommend that you minimise the exposure of the Corner
Unit to the elements.
High moisture content in the air (rain, mist, salt spray etc.)
can affect metal components and lead to material breakdown. If
left in an area subjected to high moisture content, we strongly
recommend that you observe the cleaning procedure on a regular
basis and cover the appliance whilst not in use.
Material breakdown from high moisture conditions can be
avoided if the appliance is well protected from the weather and
regular cleaning is performed.
STORAGE
Proper care and maintenance will keep your Corner Unit in top
operating condition and prolong its life. Follow these cleaning
procedures on a timely basis and your Corner Unit will stay clean
and operate with minimum effort.
CLEANING AND MAINTENANCE
Before initial use and periodically thereafter we suggest you wash
your Corner Unit using a mild soap and warm water solution. You
can use a wash cloth or sponge for this process. Do not use a
stiff wire or brass brush. These will scratch stainless steel and
chip painted surfaces
(varies by model) during the cleaning
process.
CLEANING EXTERIOR SURFACES
Stainless steel over time will be affected by ‘tea staining’ (the
brown discolouration of some stainless steel)
.
Tea staining can be reduced by washing the surface with
mild detergent and warm water and then rinsing with clean cold
water. We recommend the surface be wiped dry with a clean cloth.
CARE FOR STAINLESS STEEL
IN COASTAL AREAS, FREQUENT
CLEANING AND THE USE OF A COVER
IS RECOMMENDED TO PROLONG THE
LIFE OF THE APPLIANCE.
SALTY AIR WILL ADVERSELY AFFECT
EXPOSED PARTS.
DO NOT USE OVEN CLEANER TO CLEAN
THE CORNER UNIT.
SOME PROPRIETORY BARBECUE
CLEANERS MAY AFFECT / DAMAGE
SOME OF THE SURFACE COATINGS
USED ON THIS APPLIANCE.
READ THE CLEANER INSTRUCTIONS
CAREFULLY.
IT IS RECOMMENDED TO TEST FIRST IN
AN INCONSPICUOUS PLACE.
GENERALLY WE RECOMMEND ONLY
WARM SOAPY WATER FOR CLEANING
THIS APPLIANCE.
MAINTENANCE
8
8
Page 9

Ref Description Part # Qty
1AM2015100PelbaT1
2 Upper / lower fram P01010036C 2
3 Decoration panel – upper P02905061A 1
4 Decoration panel – lower P02905071A 1
5 Side panel – left / right P07601014A 2
6 Rear pane P07701074A 1
7 Bracket A P03304031C 2
8 Bracket B P03304032C 4
9 Slide set bracke P03304033C 2
10 Pull-Out tray assembl P03304034C 1
11 Slide se P05516055M 2
12 Door bracket (Left) P03304035C 1
13 Door handl P00214004A 2
1A53010340ProoD41
15 Level adjuster P05322037B 4
Hardware Pack P063220378 1
16 Door Bracket (Right) P03304036C 1
This diagram is provided to assist you identify
parts if replacement is necessary.
Contact the place of purchase or manufacture
to enquire about parts, availability and/or service.
Items included in the specication may dier
from parts list, depending on region or specic
dealer specication.
1
3
2
4
5
6
5
8
8
9
9
7
8
10
8
15
7
15
2
15
15
11
11
16
12
13
14
P A R T S D I A G R A M / L I S T
9 9
Page 10

10
10
Page 11

Warranty Period
Kleenmaid Professional Series Outdoor Cooking Centres
emitefiLStainless Steel Frames
emitefiLsrenruB leetS sselniatS
sraeY 5sevlaV
sraeY 5 metsyS noitingI
sraeY 5strap rehto llA
emitefiLRoasting Hood
emitefiL
Pedestal
Should any part fail due to defective workmanship or faulty
materials within the specified period from the date of purchase,
Kleenmaid will repair or replace the defective part free of charge.
LP Gas Tank
The cylinder manufacturer is responsible for the materials,
workmanship and performance of the cylinder. Contact your
dealer or the cylinder manufacturer.
Warranty Administration
Warranty is administered by Kleenmaid.
Domestic Warranty
In addition to all statutory rights which you, the consumer, have
under the relevant laws in respect to this appliance, during the first
five years of ownership as the original purchaser of this Kleenmaid
appliance, we guarantee that any fault caused by faulty material
or workmanship becoming apparent will be rectified free of charge
for parts and labour, provided that all service is performed during
normal working hours by Kleenmaid or their designated agents.
Storage
Exposure of the barbecue appliance to the elements should be
minimised. Once the unit has cooled and is cleaned, store the
barbecue under cover. Polyester/Vinyl covers are an optional
accessory that will ensure years of trouble free operation.
This warranty does not cover the purchaser or any other person for damage, malfunction or loss due to the following:
• Commercial use of the barbecue.
• Lack of maintenance, abuse, neglect, misuse, accident or improper installation of this appliance.
• Scratches, dents, corrosion or discolouring caused by heat, abrasive or chemical cleaners or chipping on porcelain parts.
• Corrosion or damage caused by exposure to the elements, grease fires, insects, weather or hail. Barbecues must be covered when not in use.
• Cleaning and normal wear and tear. Service calls of this nature are chargeable.
• Cooktops must be covered when not in use.
• Unauthorised repairs during the warranty period.
• Removal or re-installation costs.
• We are not responsible for any consequential damages from any malfunction.
Conditions of Warranty
Service Assistance
1. The consumer, must make the appliance available for servicing and shall bear any costs incurred for any de-installation and /or re-installation
required to make the appliance available for servicing. Kleenmaid are not liable for any consequential damage incurred during
de-installation and/or re-installation.
2. The appliance is delivered to the Kleenmaid service department or authorised service agent and freight charges both ways are paid
by the owner. No liability is accepted for loss or damage during transit.
3. The appliance is installed by a qualified person and operated and maintained in accordance with the instructions supplied.
Repairs or service must be carried out by an authorised person.
4. Installation must conform to the standards laid down by the local codes or, in the absence of local codes, with
AGA code AG:601 AS:5601:2002
5. No alterations or repairs have been carried out without obtaining Kleenmaid’s prior consent. Such repair or any replacement does not
extend the warranty period.
6. Where this warranty is inconsistent with any state laws, the statutory rights or the purchaser shall prevail.
7. Parts installed from other manufacturers products will nullify this warranty.
To assist you when phoning our After Sales Service Number to arrange a service call, please complete the following details and
have them ready when you call.
Model Number Serial Number
Kleenmaid store purchased from
Date of Purchase
Gas type: LPG NG
KLEENMAID AFTER SALES SERVICE: 1300 652 100
Date of Installation
TERMS OF WARRANTY
11
11
Page 12

appliances available
in the Kleenmaid range
P80140207A 03/2007
the best products we can find.
We search the globe for products that meet our high standards of functionality, style and quality and
are proud of our innovative range sourced from countries throughout the world.
This outstanding appliance from our professional series is proudly handed crafted in Italy.
Washing Machines
Dryers
Dishwashers
Ovens
Cooktops
Outdoor Cooking Centres
Built-In Coffee Machines
Rangehoods
Freestanding Ovens and Cooktops
Sinks
Waste Disposals
Taps
Cookware
Refrigerators
Wine Cellars
Vacuum Cleaners
To find your nearest Kleenmaid Showroom
telephone 13 13 08.
Technical specifications and product sizes can be varied
by the manufacturer without notice.
Any cutouts for appliances should only be physical
measurements. Drawings are not to scale.
All information supplied is for general reference purposes
only and is on the understanding that Kleenmaid Pty
Limited will not be liable for any loss, liability or damage
whatsoever arising as a result of reliance of such
information.
 Loading...