

Page 1

Rangehood
Collection
Instructions for Use
and Warranty Details
MINI OM
Wall Mounted Rangehood
Page 2

the best you can own.
Congratulations on the purchase of your new Kleenmaid
rangehood. This
has been designed and manufactured to give you years of reliable performance.
the kleenmaid story.
More than one million Australians enjoy using Kleenmaid appliances daily. Selected because of
their unique design, outstanding performance, excellent quality and unquestionable reliability,
each one is value-for-money, 100 per-cent guaranteed and at the top of its class.
attention to detail.
We are proud of our reputation for product innovation and service excellence. By dealing direct, we
can ensure that you consistently receive a high standard of customer service.
Free delivery, dedicated customer service and after-sales service team plus free kitchen design and
planning seminars are just a few of the ways we are setting new benchmarks for customer service
and experience.
satisfaction guaranteed.
Your new
appliance is covered by a written five-year parts and labour warranty,
guarantee, and a unique best value guarantee.
best results.
For best results, carefully read the enclosed instructions on how to install your new rangehood.
Correct installation will avoid delays and unnecessary service calls.
This booklet provides you with comprehensive information to help you get to know the controls and
the features of your new rangehood.
congratulations
rangehood
1
no lemon
Page 3
5
INSTRUCTION ON MOUNTING AND USE
6
CLICK!
3
2
1
1
4
2
3 4
Page 4

INSTRUCTION ON MOUNTING AND USE
Ø 125-120mm
Ø 150mm
11A
B
(5x18)
6
F
B
11F
4
4
10
5
(5x18)
6
5
3
7
8
2
9
1
5
Page 5

INSTRUCTION ON MOUNTING AND USE
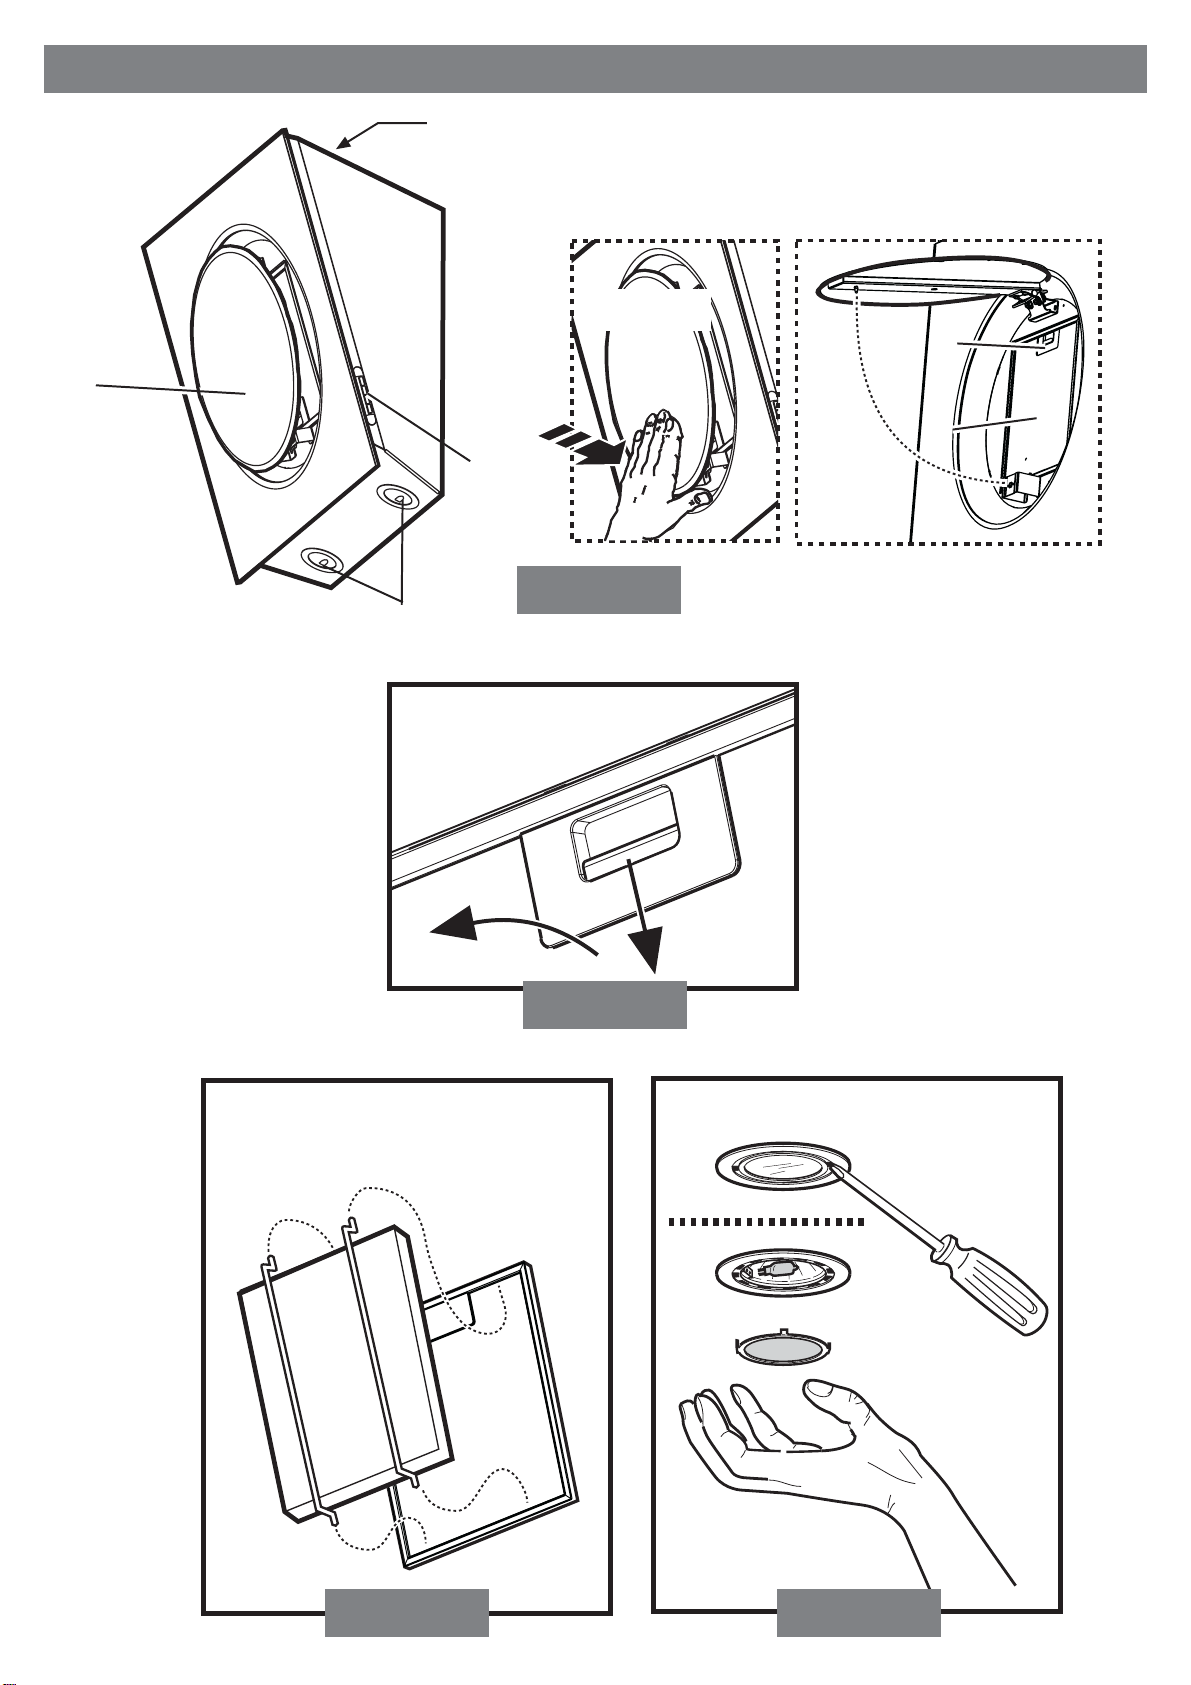
Description of the rangehood - Fig. 1
1 Control panel
2 Grease filter
3 Grease filter release handle
4 Halogen lamp
5 Vapour screen
6 Air outlet
7 Telescopic flue (optional)
Operation
Description of control panel and hood operation
D
C
B
A
Use the high suction speed in cases of concentrated kitchen
vapours. It is recommended that the rangehood suction is
switched on for 5 minutes prior to cooking and to leave in
operation during cooking and for another 15 minutes
approximately after terminating cooking.
Maintenance
A. on/off light switch
B. on/off aspiration switch and minimum power
selection
B+C. medium power selection aspiration switch
B+C+D. maximum power selection aspiration
switch
Opening - Fig. 1:
Press the lower part of the vapour screen firmly and pull it
forward.
Closing:
Accompany the vapour screen downwards and press
firmly.
Grease filter
This must be cleaned once a month using non aggressive
detergents, either by hand or in the dishwasher, which must
be set to a low temperature and a short cycle.
When washed in a dishwasher, the grease filter may
discolour slightly, but this does not affect its filtering capacity.
Removing the grease filters - Fig. 2
Open the steam screen.
Pull the handle downwards and extract the filter.
Charcoal filter (filter version only)
It absorbs unpleasant odours caused by cooking.
The charcoal filter can be washed once every two months
using hot water and a suitable detergent, or in a dishwasher
at 65°C (if the dishwasher is used, select the full cycle
function and leave dishes out).
Eliminate excess water without damaging the filter, then
remove the mattress located inside the plastic frame and put
it in the oven for 10 minutes at 100° C to dry completely.
Replace the mattress every 3 years and when the cloth is
damaged.
• Montage - Fig. 3
Open the steam screen and remove the grease filter.
Install the carbon filter on the back of the grease filter and
fix with two rods.
Attention! The rods are included in the carbon filter
packing and not on the rangehood.
• To dismantle the filter act in the reverse manner.
Prior to any maintenance operation ensure that the rangehood
is disconnected from the power supply.
Cleaning
The rangehood should be cleaned regularly internally and
externally.
For cleaning use a cloth moistened with denatured alcohol
or neutral liquid detergents. Avoid abrasive detergents.
Warning:
Failure to carry out the basic standards of the cleaning of the
rangehood and replacement of the filters may cause fire
risks.
Therefore we recommend oserving these instructions.
Vapour screen
The vapour screen must always be left closed and opened
only for maintenance (e.g. cleaning or changing filters).
Replacing lamps - Fig. 4
Firstly check that the lamps are well cooled prior to replacing
them.
Access the light compartment – extract the guard by levering
it off with a small screwdriver or similar tool.
Replace the damaged light bulb.
Only use halogen bulbs of 20W max (G4), making sure you
do not touch them with your hands.
Close the lamp cover (it will snap shut).
If the lights do not work, make sure that the lamps are
fitted properly into their housings before you call for
technical assistance.
Caution
Never use the hood without the grill mounted!
The hood must NEVER be used as a support unless
expressly indicated.
The appliance is not intended for use by young children or
Page 6

INSTRUCTION ON MOUNTING AND USE
infirm persons without supervision.
Young children should be supervised to ensure that they do
not play with the appliance.
The premises must have sufficient ventilation when the
kitchen hood is used at the same time as other apparatuses
fuelled by gas or other fuels.
The sucked air must not be conveyed in a conduit used for
discharging fumes produced by apparatuses fuelled by gas
or other fuels.
Cooking food on the flame under the hood is severely
prohibited.
The use of open flame damages the filters and can cause
a fire; it must therefore be avoided in any case.
Frying must be carried out under control in order to prevent
overheated oil catching fire.
Keep strictly to the regulations envisaged by the competent
local authority as far as the technical and safety measures
to adopt for discharging fumes are concerned.
The hood is to be cleaned frequently both internally and
externally.
Failure to observe the regulations about cleaning the hood
and substituting and cleaning the filters can lead to the risk
of fire.
Any responsibility is declined for possible
inconveniences, damage or fire caused to the apparatus
deriving from failure to observe the instructions
shown in this manual.
Installation - Fig. 5
Consult the designs in the front pages referenced in the text
by alphabet letters. Closely follow the instructions set
out in this manual. All responsibility, for any damages
or fires caused by not complying with the instructions in this
manual, are the responsibility of the user.
The minimum distance between the supporting surface for
the cooking vessels on the hob and the lowest part of the
range hood must be not less than 40cm from electric cookers
and 65cm from gas or mixed cookers.
If the instructions for installation for the gas hob specify a
greater distance, this must be adhered to.
The rangehood is supplied in the FILTERING version and
is used without an extracted fumes discharger conduit .
Fumes and steam are recycled through the F deflector (11F).
If you intend using the product in the SUCTION version, it
is necessary to have an evacuation conduit going from the
upper B exit to the extraction hole towards the exterior.
In this case a connection ring (11A) has to be installed on
the B extraction hole and the carbon filter removed.
A telescopic flue is available (as an accessory).
Preliminary information for installation of the
rangehood
Expansion wall plugs are provided to secure the rangehood
to most types of walls/ceilings. However, a qualified
technician must verify suitability of the materials in accordance
with the type of wall/ceiling. The wall/ceiling must be strong
enough to take the weight of the rangehood.
Do not tile, grout or silicone this appliance to the wall.
Surface mounting only.
In the case of the presence of panels and/or walls and/or
lateral wall units check that there is sufficient space to install
the rangehood and that access to the command panel is
easy.
Only for some models
An aesthetic flue can be purchased as an optional accessory.
Check with the assistance centre whether the model in your
possession envisages this possibility.
We advise installing the rangehood after having purchased
the flue to check with certainty the most suitable installation.
During electrical connection ensure the power supply is
disconnected at the domestic main switch.
• Trace a centre line on the wall to facilitate the montage
(1), position the hole template so that the middle line
printed on it corresponds to the centre line previously
drawn and that the lower side of the grill corresponds to
the lower part of the rangehood once mounted (2).
• Make two holes with the 8 mm Ø drill and fix the support
bracket with two dowels and wall screws (3).
• Open the steam screen and remove the grease filter (see
relative paragraph).
• Hang up the rangehood (4), adjust its position (5-6) and
mark 1 point from the inside of the rangehood for the
definitive fixing (7). Remove the rangehood and make
a Ø 8 mm hole with the drill (8), insert the wall dowel and
hang the rangehood up again and fix it definitively with
1 screw (9).
• Connect the electricity (10), but leave the rangehood
disconnected from the general electric panel of the
house.
• Install the supplied flange (11A –suction version– also
install a discharge tube of suitable dimensions) or the
deflector (11F – filtering version).
• Mount the grease filter and close the steam screen.
Attention! If the rangehood is to be used in the suction
version, remove, if supplied with the kit, the carbon filter
and the fixing rods (on the back of the grease filter – see
relative paragraph).
If the rangehood is to be used in the filtering version,
check that the carbon filter is already mounted on the
back of the grease filter or, in its absence, purchase it
and install it.
Electrical connection
The electrical tension must correspond to the tension noted
on the label placed inside the cooker hood. Connect the
electrical plug, where provided, to an easily accessible
outlet in conformity with local standards in force. Where an
electrical plug is not provided (for direct connection to
electrical network) or is not easily accessible, place a
standards approved bipolar switch that provide full
disconnection under overvoltage category III conditions, in
accordance with the wiring rules.
Attention: substituting the supply cable must be carried out
by the authorised technical assistance service.
Page 7

warranty
and service
domestic warranty - full five year warranty
In addition to all statutor y rights which you, the Consumer, have under the relevant laws in respect of this appliance,
during the first five years of ownership as the original purchaser of this Kleenmaid appliance, we guarantee that any
fault caused by faulty material or workmanship becoming apparent will be rectified free of charge for parts and labour,
provided that all service is performed during normal working hours by Kleenmaid or their designated Agents. Where
the appliance is installed outside the normal servicing area of the above, the Purchaser must pay for the cost of
transporting the appliance to and from the Agent or the Agent’s travelling cost to and from the Purchaser’s home.
commercial warranty - one year warranty
When this appliance is installed in a commercial application, you, the Consumer, have under the relevant laws in
respect of this appliance, during your first one year of ownership as the original purchaser of this Kleenmaid appliance,
we guarantee that any fault caused by faulty material or workmanship becoming apparent, will be rectified free of
charge for parts and labour, provided that all service is performed during normal working hours by Kleenmaid or their
designated Agents. Where the appliance is installed outside the normal servicing area of the above, the Purchaser
must pay for the cost of transporting the appliance to and from the Agent or the Agent’s travelling cost to and from
the Purchaser’s home.
what these warranties do not cover
We are not responsible for any damage or malfunction unless caused by a defect in material or workmanship. This
includes but is not limited to abuse, misuse, improper installation and transportation damage. We are not responsible
for any consequential damages from any malfunction.
The Consumer must make the appliance available for servicing and shall bear any costs incurred for any
de-installation and/or re-installation required to make the appliance available for servicing. Kleenmaid is not liable for
any consequential damage incurred during de-installation or reinstallation.
warranty does not cover replacement of light globes or glass breakage due
to impact
In case of fractured glass do not use your appliance.
warranty registration
Please complete warranty details below. Please retain together with your proof of purchase document. These
documents will need to be viewed by our a member of our Service team should you request in warranty service.
service assistance
To assist you when phoning our Customer Service number to arrange a service call please complete
the following details and have them ready when you call.
Model Number _____________________________________ Date of Purchase _______________________________
Kleenmaid Store Purchased From ______________________ Date of Installation ______________________________
KLEENMAID CUSTOMER SERVICE - 1300 652 100
6
Page 8

appliances available
in the Kleenmaid range
the best products we can find.
We search the globe for products that meet our high standards of functionality, style and quality and
are proud of our innovative range sourced from countries throughout the world.
Washing Machines
Dryers
Dishwashers
Ovens
Cooktops
Outdoor Cooking Centres
Built-In Coffee Machines
Rangehoods
Freestanding Ovens and Cooktops
Sinks
Waste Disposals
Taps
Cookware
Refrigerators
Wine Cellars
Vacuum Cleaners
To find your nearest Kleenmaid Showroom
telephone 13 13 08.
7 LI2X6A Ed. 08/06
 Loading...