

Page 1

CookingCooking
c o l l e c t i o nc o l l e c t i o n
Instructions for Use
and
Warranty Details
KEY 60 - 600mm Wall Mounted Canopy Rangehood
KEY 90 - 900mm Wall Mounted Canopy Rangehood
Page 2

ongratulations on the purchase of your new
C
designed and manufactured to give you years
For best results, carefully read the instructions on
how to install your new appliance. Correct installation
will avoid delays and unnecessary service calls.
Once installation is complete, read this booklet
carefully and get to know the controls and the
We reserve the right to alter the specifications
appliance. This instruction manual cannot be
appliance. This appliance has been
of reliable performance.
features of your new appliance.
with no influence on the operation of the
reason for a claim.
Page 3
Contents
Safety warnings ........................................................................................ 3
Description of the rangehood ................................................................... 4
Using the rangehood ................................................................................. 5
Maintenance and cleaning ........................................................................ 5
Installation ................................................................................................ 7
Warranty and Service.............................................................................. 10
Safety warnings
The appliance is not intended for use by young children or infirm persons without supervision. Young children
should be supervised to ensure that they do not play with the appliance.
This appliance is to be used solely as a household appliance. It has been manufactured according to the
international safety and quality standards. Note that the safety devices alone are not capable of eliminating all
accident risks.
It is therefore very important to carefully read all the operating instructions, recommendations and warnings
prior to installation and use of the appliance. Note in particular the text paragraphs with the danger triangle
design, to avoid damages to persons or objects.
Keep this instruction booklet in a safe place: this booklet should always accompany the appliance at such time
as it is sold or given to other persons for use.
Installation and service
Any electrical installation of the rangehood
must be carried out by a qualified electrician
and the rangehood itself must be installed by
someone with experience. Installation made by
an unqualified person can lead to loss of
function of the rangehood and possible damage
to person and and/or property.
The rangehood must be at least 650mm from
the cooking plane for electric, gas and mixed
cooktops. The recommended distance for
canopy or island is 750mm. Please confirm this
measurement with your Local Building
Authority. The rangehood can be installed
above these heights but for optimum performance it should be installed at the distance
quoted.
Ensure that the power cable is not damaged
during installation.
The rangehood is only in stand by mode unless
the plug or the fuse is disconnected.
The rangehood cannot be connected to flues of
other appliances that run on energy sources
other than electricity. Please, keep to the
provisions of official directives regarding fume
discharge.
Use of rangehood
This appliance is for domestic use only in a
normal household.
Never leave any deep-frying, melting fat,
paraffin or any other inflammable liquid
unattended on the hob. In the event of fire:
Immediately switch off the rangehood and the
cooker. Note! Cover the fire. Never use water.
Never do any flambé cooking underneath the
rangehood. It can cause a fire. Remember that
overheated fat may spontaneously ignite. Never
leave the frying pan unattended.
It is essential that the grease filter is regularly
cleaned to help avoid fat dripping on to the hot
zone and causing a fire. Read the section on
Maintenance and Cleaning in the instruction
book.
Disposal
Prevent accidents when disposing of your
rangehood. Disconnect the power plug from the
wall socket and cut the power cord at the
rangehood inlet.Contact your local authority for
information on where to dispose the rangehood.
3
Page 4
Description of the rangehood
Functions
There are two possible systems:
Extraction of air to the outside using an optio-
nal venting kit and evacuation duct.
Recirculation using an optional charcoal filter.
The air outlet must not be connected to
chimney flues or combustion gas ducts.
The air outlet must under no circumstances be
connected to ventilation ducts for rooms in
which fuel-burning appliances are installed.
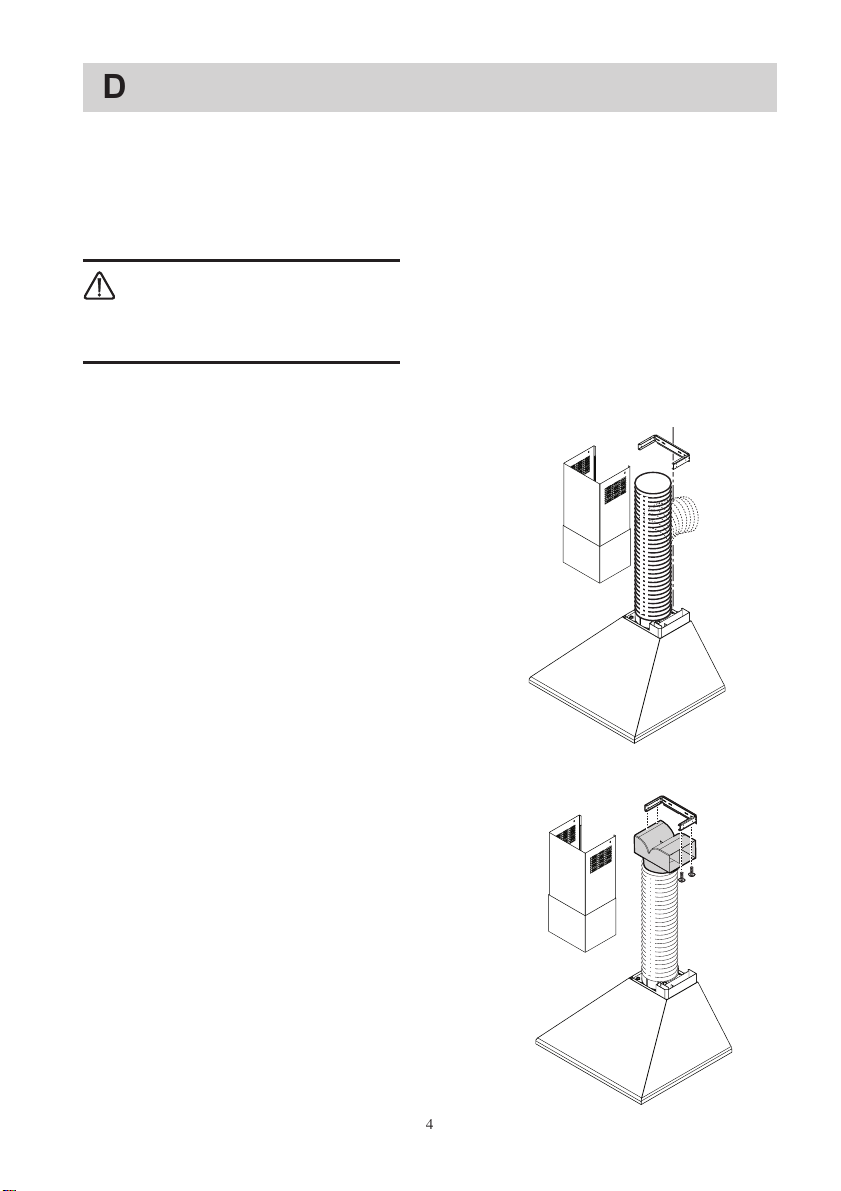
Extractor version
The air is discharged to the outside through a
pipe, which must be fitted to connection flange
A. Fig. 1.
In order to obtain the best performance the hose
should have a diameter equal to the outlet hole
(150 mm).
Filter Version
The air is filtered through an charcoal filter and
returned to the kitchen through the top grill of
the outlet pipe.
You will need an original charcoal filter for the
filtering function.
Fix the deflector using 4 screw. Fig. 2.
A
Fig. 1
Fig. 2
4
Page 5

Using the rangehood
The rangehood is fitted with one motor having
several speed. Best results are obtained by
using a low speed for normal conditions and
high speed when odours are more concentrated.
Turn the rangehood on a few minutes before
you start cooking then you will get an
underpressure in the kitchen. It should be left
on after cooking for about 15 minutes or until
all odours have disappeared.
The control switches are located on the units
front panel:
56
2
1
34
1- Motor OFF button
2- ON button and motor speed selection button 1 -
2 - 3 - 1 - 2 - . . . .
3- Speed 1 LED
4- Speed 2 LED and metal grease filter saturation
LED (in this latter case, the LED will flash See instructions on grease filter cleaning).
Once the grease filters have been cleaned, press
button 1 for about 3 seconds until you hear the
acoustic signal (beep): the LED 4 will now stop
flashing.
5- Speed 3 LED and active carbon filter saturation
(in this latter case, the LED will flash -
LED
See instructions on active carbon filter
replacement).
Once you have replaced the charcoal filter,
press button 1 for about 3 seconds until you
hear the acoustic signal (beep).
LED 5 will now stop flashing.
Warning!
The active carbon filter saturation LED is not
activated.
In order to activate the active carbon filter
saturation indicator, press buttons 2 and 7
simultaneously for 3 seconds. Initially, only
LED 4 will flash, then after the 3 seconds have
passed, LED 5 will also start flashing,
indicating that the active carbon filter saturation
control system is active.
To switch off the system, re-press the same two
buttons: after 3 seconds LED 5 will stop
flashing and the device will be switched off.
6 - Intensive speed LED
7 - Intensive speed ON switch
This speed should be used when the
concentration of cooking fumes or odours is
particularly strong (for example when frying,
7
89
cooking fish etc.). The fast speed will run for
about 5 minutes and then return to the speed
previously set automatically (1, 2 or 3), or
switch off if no speed was selected. To turn off
the fast speed, before the end of the 5 minutes,
press button 1 or button 2 .
8 - OFF lamp button
9 - ON lamp button
If the hood fails to operate correctly, briefly
disconnect it from the mains power supply for
approximately 5 seconds by switching off at the
wall and pulling out the plug. Then plug in again,
turn on the switch and try again before contact
your nearest authorised Kleenmaid Service Agent.
Correct ventilation
If the rangehood is to work correctly there must be
an underpressure in the kitchen. It is important to
keep the kitchen windows closed and have a
window in an adjacent room open.
Important to know
Not applicable for recirculation. Great care must
be taken if the rangehood is used at the same time
as a burner or fireplace (e.g. gas, diesel, coal or
wood heaters, water heaters, etc.), as the
rangehood will expel air which is required by
these other appliances. Attend to it by opening a
window. The negative pressure in the room must
not exceed 0,04 mbar to prevent fumes being
drawn back into the room by the rangehood.
5
Page 6

Maintenance and cleaning
Disconnect the rangehood from the power supply prior to cleaning the appliance, either by removing the
plug from the mains or removing the fuse.
Clean the filter regularly. The grease deposits in the filter and discharge tube are fire hazards where a
hotplate (or another heat source) is left on by error.
Cleaning the rangehood
Clean the outside of the rangehood using a damp
cloth and a mild detergent.
Never use corrosive, abrasive or flammable
cleaning products.
Cleaning the grease filters
Clean the filter every month or every other month
according to how much the rangehood is used.
The cleaner the filters, the more grease they
collect. To remove the filters, Fig. 3:
First of all, push the stop on the metal grease
filter back, and then extract the filter by pulling
downward.
The filter is made of aluminium wires on which
the grease collects. Clean the filter in hot water
using a detergent, or in a dishwasher. Let the filter
dry before putting it back.
When washed in a dishwasher, the grease filter
may discolour slightly, but this does not affect is
filtering capacity.
Charcoal filter
The charcoal filter should only be used if you
want to use the rangehood in the recirculation
function.
To do this you will need an original charcoal
filter.
This filter cannot be cleaned or reused.
As a general rule, the activated charcoal
filter should be changed once every four
months.
Fitting Fig. 4
Fit one charcoal filter on the left and one on the
right so to cover the plastic grids that protect
the fan wheel, check that the pins R on the
conveyor match with housing S on the charcoal
filter, then turn clockwise to fix it.
To remove proceed in the reverse order.
Always specify the rangehood model code
number and serial number when ordering
replacement filters. This information is shown
on the registration plate located on the inside of
the unit.
The charcoal filter can be ordered from
your local Kleenmaid Store or by
phoning 13 13 08.
Fig. 4
Fig. 3
R
S
R
S
6
Page 7

Changing the light bulb
Disconnect the unit from the mains power supply.
Firstly check that the lamps are well cooled prior to
replacing them.
Access the light compartment extract the guard by
levering it off with a small screwdriver or similar tool.
Replace the old bulb with a new one of the same type.
Use 20W (G4) bulb only.
Close the lamp cover (it will snap shut).
If the light does not come on, make sure the bulb has
been inserted correctly before contacting your authorised
Kleenmaid Service Agent.
Installation
Unpacking
Check that the rangehood is not damaged.
Transportation damages should immediately be
reported to the transport company. Damages, faults
and missing parts should immediately be reported
to the retailer.
Dispose carefully of the packaging material so that
it is out of the way of small children.
Position
The rangehood should be mounted freely hanging
on the wall. The rangehood must be at least 650mm
from the cooking plane for electric, gas and mixed
cooktops. The recommended distance for canopy or
island is 750mm. Please confirm this measurement
with your Local Building Authority. The rangehood
can be installed above these heights but for
optimum performance it should be installed at the
distance quoted.
Fig. 5
The rangehood cannot be connected to
flues of other appliances that run on
energy sources other than electricity.
Please, keep to the provisions of official
directives regarding fume discharge.
Electrical connection
The rangehood has a power cable with earth
connection and the rated voltage is 220-240V.
Assembling the chimney flue support/bracket (3
parts):
The three parts should be fixed with 4 screws, the
support extension is adjustable and should
correspond to the internal width of the telescopic
chimney flue.
=
=
X
X
Fig. 6
7
Page 8

Installation
Wall unit mounting
Position the template on the wall, mark the position, and drill the holes (Y).
Mount the two rawl plugs with the hooks.
Hang the rangehood on the hooks and level it with the adjustment screws.
Remove the grease filters and mark for the 4 screws (T-R).
!
Y
Template
Y
Adjustment
screws
T
Y
R
Rawl
plugs+hooks
T
Y
Fig. 7
Remove the rangehood and drill the holes (4 x Ø 8 mm).
Insert the rawl plugs and fit two screws on upper holes, do not tighten completely, they will serve as
additional hanging points.
R
Fig. 8
8
Page 9

Mount the chimney holder close to the ceiling with the rawl plugs and the screws.
S2
S3
Warning! Be careful that it is centered over the rangehood and horizontally aligned.
Chimney
holder
Fig. 9
Hang the rangehood on the wall again.
Additional
hanging points
Fig. 10
Centre line
Hooks
Secure it with the 2 lower screws (see Fig. 12).
Fitting the electronic control box
Fit the electronic box S2 in its housing and check that all
connections are well performed.
Fix definitively with one screw.
Connect the ribbon cable S3 from the hood to the male-connector
(use the wider one).
Electronic
control box
Fig. 11
9
Page 10

Fitting for ducting
Connect a tube between the rangehood air outlet and the wall or roof exhaust channel.
Fitting for recirculation
Mount the recirculation spigot with the 4 screws supplied.
Mounting the chimney
Connect the supply cord to the mains.
Place the chimney and fix it to the top chimney holder with the two screws supplied.
Lower the bottom part of the chimney to the top of the rangehood.
Chimney
fixing
points
Tube
Chimney
Chimney holder
Recirculation
spigot
Supply cord
Air outlet
Lower
screws
10
Fig. 12
Page 11

Page 12

Other products available in the Kleenmaid
Range of appliances
Washers
Dryers
Dishwashers
Ovens
Cooktops
Outdoor Cooking Centres
Built In Espresso Coffee Machines
Rangehoods
Freestanding Ranges
Sinks
Waste Disposals
Taps
Cookware
For sales information on the full range of quality appliances
LI2E9A Ed. 06/04
Refrigerators
Freezers
Wine Cellars
Vacuum Cleaners
Phone 13 13 08
 Loading...