

Page 1
INSTALLATION
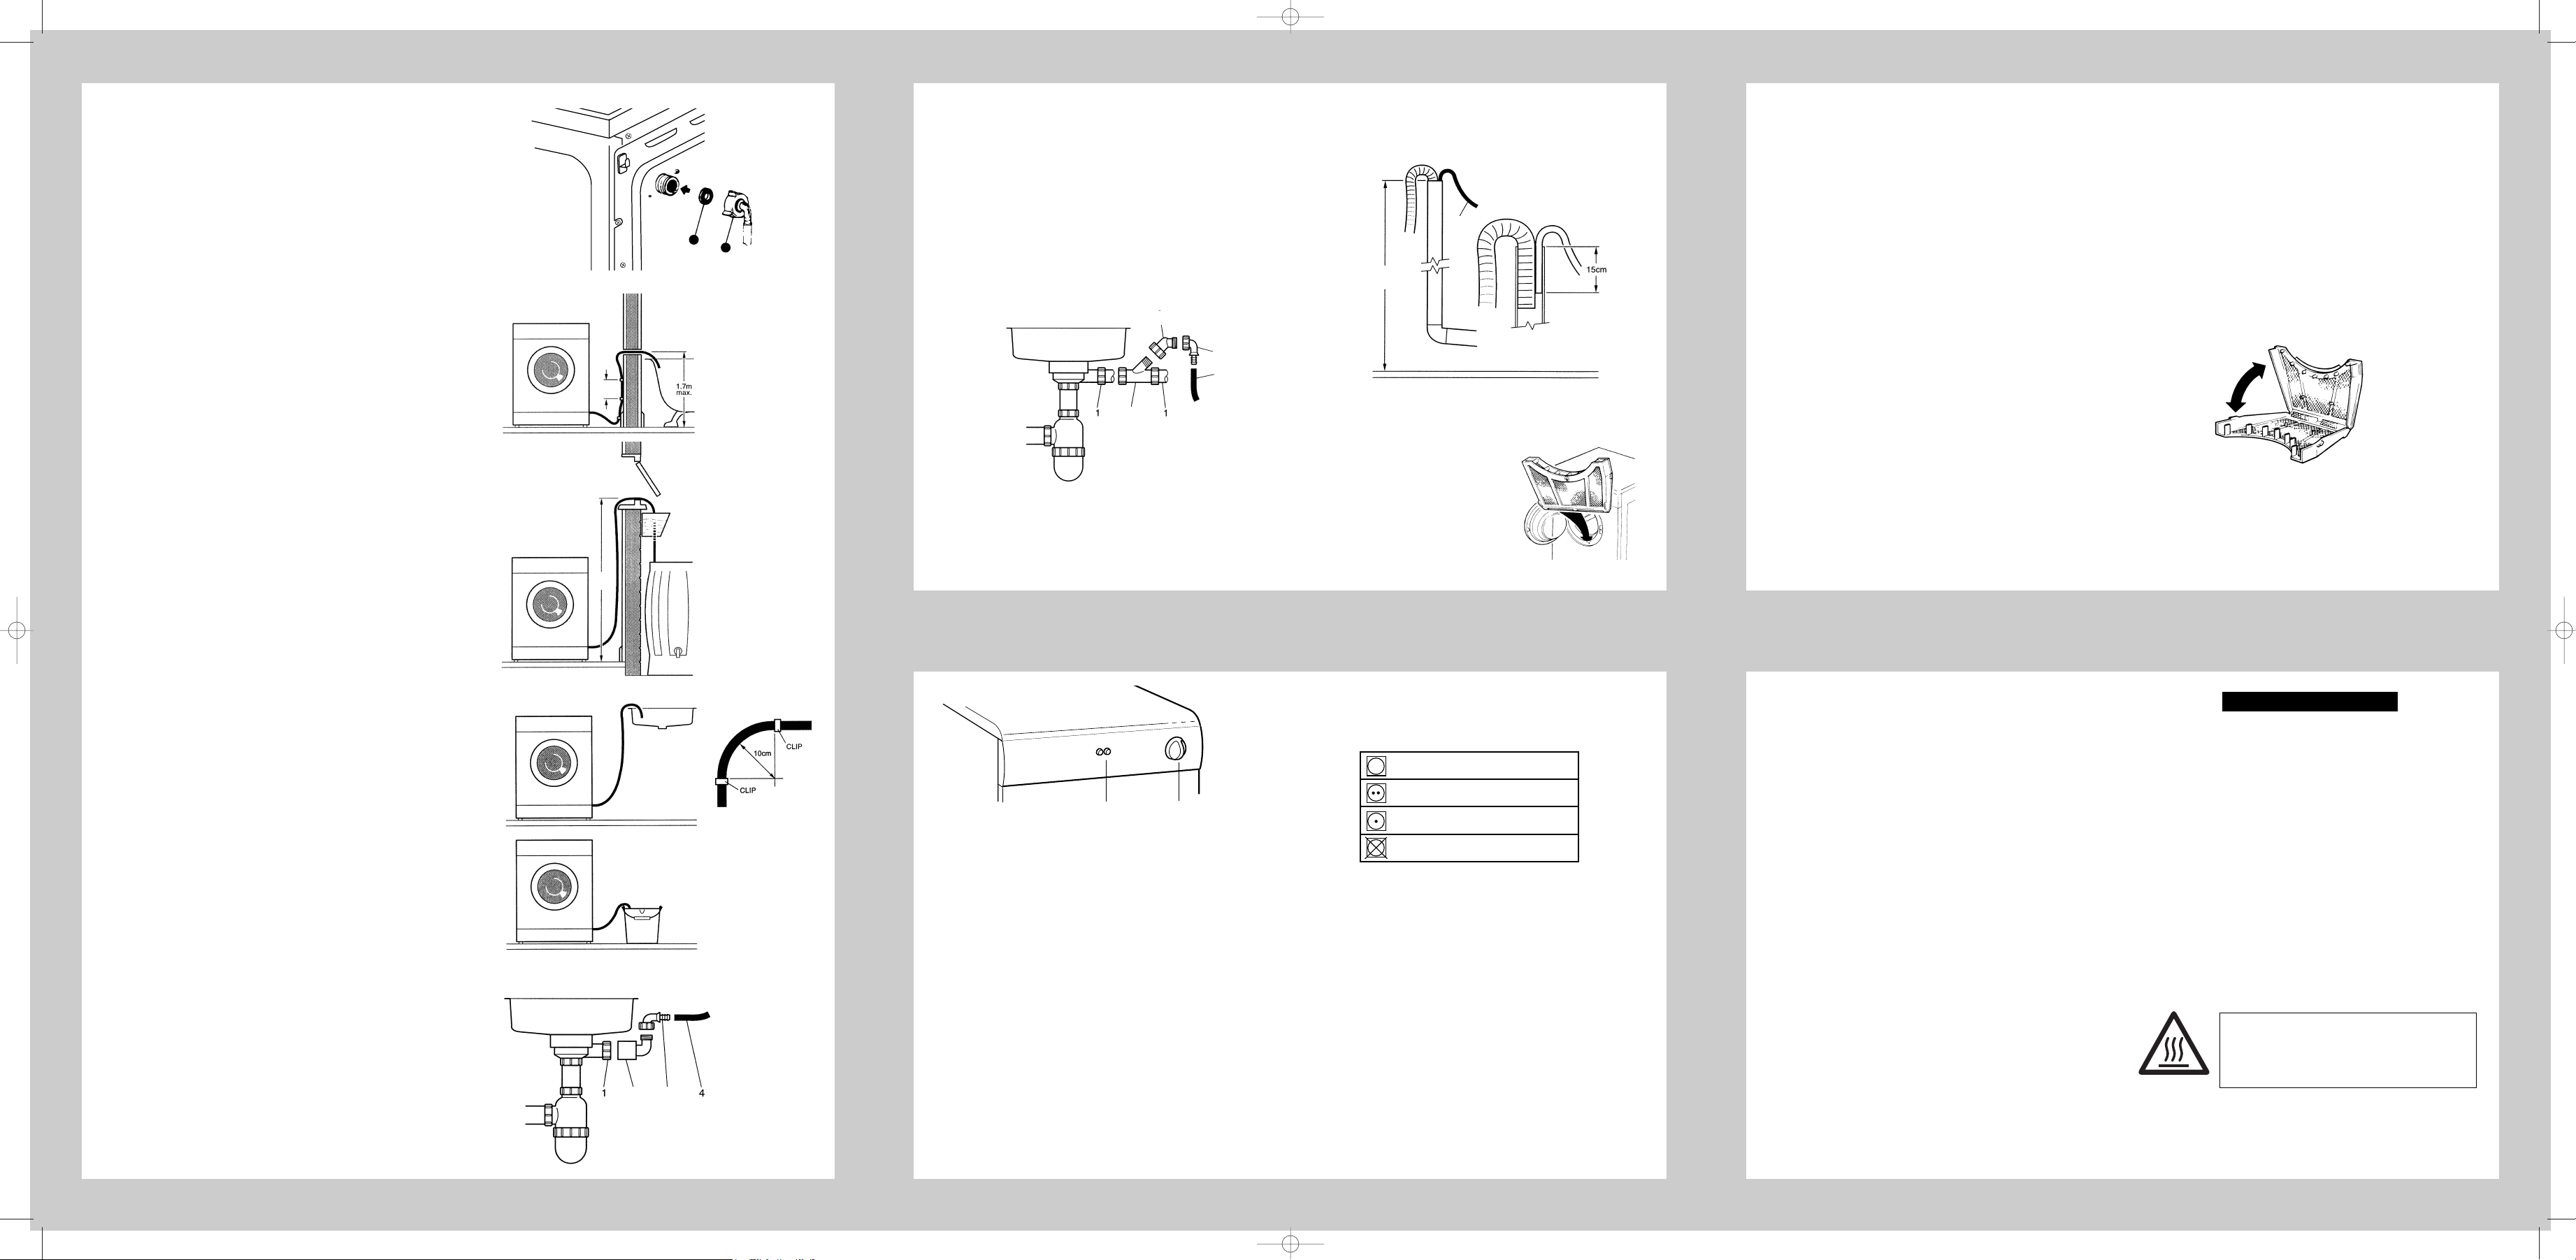
Connecting the Drain Kit
1. Unscrew the plastic nut J from the connector at the top,
rear of the machine. Keep the r ubber washer K.
3. Push the free end of the hose through the threaded end of
the nut and pull through so that the flange of the plastic
elbow, at the other end of the hose is seated against the
inside of the nut.
4. Insert the rubber washer K.
5. Screw the nut onto the connector on the back of the
machine and position the elbow ensuring the nut is tight.
Your dryer does not need to be installed adjacent
to a drain.
It can be positioned up to 4m from the drain using the kit
provided (this can be extended using additional hose if
required).The small bore flexible outlet pipe can easily run
behind existing units or along a skirting board.
If in doubt, consult an experienced plumber.
The outlet drain hose may be routed through a
wall, window or door frame. (The water can be re
used if collected) see figures 1 and 2.
Caution: When discharging during cold periods ensure that the
hose is protected from freezing in areas where the temperature
will drop below 4˚C.The hose must NOT be submerged in the
discharged water a gap of at least 10cm must be left between
the hose end and the surface of the water.
1. A 12mm hole can be drilled through the wall, window or
door frame, not more than 1.5m from the dryer base.
Check for pipes and wires before commencing drilling.
2. Feed outlet hose through the hole.
3. Fix outlet hose to the wall or skirting board with the clips
supplied at 50cm intervals.When fixing outlet hose around
corners, ensure a minimum radius of 10cm and fit two clips
as shown in Figure 3.
4. Cut outlet hose to the length required.
5. Check that the pipe is not kinked.
Drain your dryer into a sink or bucket, see
Figure 4.
1. Fix outlet hose to the wall or skirting board if required with
the clips supplied at 50cm intervals.When fixing outlet hose
around corners, ensure a minimum radius of 10cm and fit
two clips as shown in Figure 3.
2. Cut outlet hose to the length required.
Connect your dryer to an unused sink drain
outlet, see Figure 5.
If a blanking cap or plug is provided:
1. Remove cap/plug (1) and fit connector (2a) (not supplied).
2. Connect elbow (not supplied) (3a) to connector (2a).
3. Cut dryer hose (4) to length and insert into hole in plug.
4. After the first run check the installation for leaks.
5. If water appears under your dryer, check that the outlet
hose is not kinked, blocked or frozen.
Connect your dryer to a sink drain already
connected to a washing machine or dishwasher,
see Figure 6.
1. Remove washing machine/dishwasher drain connector (1).
2. Fit elbows (2b & 2c) (not supplied).
3. Connect elbow (3a) (not supplied).
4. Cut dryer hose (4) to length and connect to elbow (3a)
(not supplied).
5. Reconnect washing machine/dishwasher drain (1).
6. After the first run check the installation for leaks.
If water appears under your dryer, check that the outlet
hose is not kinked, blocked or frozen.
Connect your dryer to a washing machine
standpipe, see Figure 7.
40mm standpipe
1. Cut the drain hose (4) to the length required and insert into
the standpipe alongside the washing machine hose.
2. After the first run check the installation for leaks.
If water appears under your dryer, check that the outlet
hose is not kinked, blocked or frozen.
FINAL INSTALLATION
Push the filter into its operating position
as shown in the diagram.
If you wish to change the side on which
your door opens, see the instructions
on the back page.
Remove any dust by wiping the drum
and door with a damp cloth. Any initial
smell from the heater should disappear
after the first period of heating.
INSTALLATION
– Pull the filter upwards and away from the appliance.
– Remove any threads or fluff by hand or with a soft brush.
– Slide the filter back.
–Wash the filter occasionally in detergent solution using a soft
brush to remove small particles.
OPERATION
Open the door.
Load clothes loosely into the drum.
Load sheets first, starting with one corner.
Close the door.
Dry your hands.
Check that the timer is in the ‘0’ position.
Plug in the machine.
Select correct heat position (see programme chart on control
panel for recommendations).
Set the timer to the required time setting (see programme chart
on control panel for recommendations).
The drum will begin rotating. Reversing drum models will stop
every few minutes to rotate in the reverse direction for a shor t
time.
Should the clothes become dry before the cycle has finished, or
if an excessive programme time has been selected, the drum
will continue to rotate while the thermostat will automatically
switch the heater off to prevent over-drying and save energy.
There is an automatic 12 minute cool down period at the end of
every cycle, during which the heater is switched off.This helps to
minimise creasing.
NEVER SWITCH THE DRYER OFF AND LEAVE A
HOT LOAD IN THE DRUM.
When drying large items such as sheets, we suggest you
periodically stop the dryer to redistribute the load.
To stop the machine dur ing the middle of the programme simply
open the door; the drum will stop rotating automatically and
restart when you close the door.
To lengthen or shorten a timed programme, reset the timer
knob.
AFTER REMOVING THE DRIED CLOTHES:
ALWAYS CLEAN THE FILTER. Failure to do so could cause the
safety cut-out to operate.
THE CONTROLS PREPARATION
A. THE TIMER
Select the required dryer time based on the
recommendations on the control panel.
B. HEAT SWITCH(ES)
Select the required heat setting based on the
recommendations on the control panel.
Check care labels inside the garments.
CARE LABELS YOU MAY FIND ON YOUR
FABRICS
Do not tumble dry woollen or wool mixture articles unless the
article is labelled to be suitable due to a possibility of shrinkage.
Roll dripping wet articles in a towel to remove excess water.
Place delicate articles e.g. tights, scar ves, inside a pillowcase.
To avoid the need to iron easycare polyester/cotton items it is
better to only dry small loads (i.e half fill drum).
It is better to dry small and large articles together.
We suggest a fabric conditioner to be used to reduce static
electricity.
Do not overload the dryer or dry large bulky items such as duvets
or sleeping bags as it is important that the airflow through the
dryer is not obstructed.
Do not place items contaminated with inflammable substances in
the dryer, such as petrol, cleaning solvents, cooking oil, fat, or
hair lacquer.These can cause fires. For the same reason, do not
dry rubber, foam rubber, plastic or paper.
Suitable for tumble drying
Tumble dry using full heat
Tumble dry using half heat
Do not tumble dry
A
B
ADDITIONAL INFORMATION
Figure 1
Figure 2
Figure 4
Figure 5
Figure 6
Figure 7
Figure 3
ANY PROBLEMS
If the clothes are not dry after normal dr ying time:
– Check that you used the correct heat setting.
– Check that you have not set the timer within a cool down
period.
– Check that the lint filter has been cleaned.A blocked filter
will restrict the airflow.
– Check that the condenser unit and associated duct work are
clean. If blocked these will restrict the airflow.
– Check that your dryer is heating - below the door to the left
side, should feel warm to the touch after the first 10-15
minutes of its programme.Failure to heat may indicate the
safety cut-out has operated.To reset, simply press the red
button at the rear of the machine. If it has operated then a
sharp “click” will be heard. This cut-out only operates if the
airflow is severely restricted so make sure the filter is clean
and that all other restrictions are removed before re-starting.
If the cut-out continues to operate after checking the above
points, you should contact your service agent.
If your machine does not work check the following before
calling a service engineer:
– Check that there is a supply of electricity.
– Check that the door has been properly closed and the
machine is switched on.
– Check that the condenser has been pushed back into the
machine.
– Check the plug internal connections.
TECHNICAL DATA
OVERALL DIMENSIONS:
Height: 85 cm
Width: 59.5 cm
Depth: 58 cm
MAXIMUM DRY WEIGHT LOADS:
Cotton 6kg
(for minimum creasing 2kg)
Delicates 2kg
For electrical ratings see plate on back of dryer.
For Model No. see serial plate inside door (needed when
requesting service).
Room temperature range 5˚C to 30˚C.
Your washing machine should have a spin speed of not less
than 800rpm.
105
max.
1.5m
max.
50cm
K
J
1.5m
max
2a
3a
2b
2c
4
3a
4
THIS LABEL, POSITIONED ON THE
REAR OF YOUR DRYER, INDICATES
THE SURFACE IS HOT WHEN IN
OPERATION - AVOID TOUCHING
CAUTION
HOT SURFACE
10815 87801 A3 12pp Brdsht 7/2/03 11:51 AM Page 1
Page 2

– This tumble dr yer is intended for NORMAL DOMESTIC
USE ONLY.
– Please note it is not recommended that the dryer be
placed directly next to ovens or cookers, as the
performance of the dryer may be affected.
–Any electrical work required to install the appliance
should be carried out by a qualified person.
– It is important to clean the lint filter after each drying cycle
and the condenser every three or four months or the
restrictions to airflow will extend drying times and could
cause the safety cut-out to trip.
– Do not stack the tumble dryer on top of any other
appliances without the correct stacking kit.
– Under no circumstances should anything other than the
recommended articles be placed in the tumble dryer.
– The tumble dryer should be serviced by an appointed
service organisation and only genuine parts used.
– It is dangerous to alter or modify the product in any way
other than fitting authorised accessories.
–We recommend that the appliance is unplugged each
time after use.It should always be disconnected from the
electricity supply if it is to be left unattended for long
periods (i.e. weekends, holidays etc.)
– The rear of the dryer gets quite hot during use. Position
the dryer so that the back is not accessible while in
operation, but the sides have a space available to allow
air flow.
–It is important to clean fluff from the window of the dryer
and around the door seal after each drying cycle. Failure
to do so could result in water leaking.
– DO NOT use a two-way adaptor, or extension lead.The
dryer must be connected to its own socket.
– DO NOT block the air inlets at the front and back of your
dryer.
– DO NOT allow fluff to accumulate around the tumble
dryer.
– DO NOT exceed the recommended maximum load.
– DO NOT allow children to tamper with the controls and
keep them away from the dr yer when it is in operation.
– DO NOT place articles in the dr yer if anything other than
a water solution has been used in the cleaning process.
– DO NOT attempt to dry dripping wet articles or items
containing foam rubber or rubber-like materials.
– DO NOT use the tumble dryer if you suspect that it is
damaged in any way.Under no circumstances should you
attempt to repair the appliance yourself. Repairs carr ied
out by inexperienced persons may cause serious injury.
Consult your local appointed service engineer and insist
on genuine spare parts.
THIS APPLIANCE MUST BE
EARTHED
IMPORTANT USER INFORMATION
These notes are provided in the interest of safety.
You must read them before installing or using the appliance.
REVERSING THE DOOR OPENING
MII CONDENSER FPL ‘98 4213 094 87801
Dryers fitted with hinge cover:-
Dryers fitted without hinge cover:-
Your dryer is supplied with a reversible door. To change the direction of opening proceed as follows for your type of door.
Open the door. Undo screw
(A) remove switch strike (B)
and replace screw. Undo
screw (J) and remove buffer.
Remove screws (C) and latch
plate (D).Remove hinge cover
screw (E). Close the door.
Pull the hinge cover (F)
forwards to remove it.
Remove two outer screws
(G). Remove door. Fit latch
plate (D) with screws (C).
Reverse door and fit to dryer
in closed position. Refit
screws (G) and hinge cover
(F). Open the door.
Fit screw (E) to secure hinge
cover. Remove screw (H) at
top of door and refit switch
strike (B) as shown. Refit
buffer (J).
Open the door. Undo screw (A)
remove switch strike (B) and replace
screw. Undo screw (J) and remove
buffer. Remove screws (C) and latch
plate (D). Remove hinge block screws
(E). Remove door from hinge blocks.
Remove hinge screws
(F) and hinge (G) and
refit to opposite side as
shown.
Refit latch plate (D) with screws (C). Remove screw (H) at top of
door and refit switch strike (B) as shown.Refit buffer (J). Fit door
to hinge blocks and secure with screws (E).
INSTRUCTIONS FOR USE
IMPORTANT:
PLEASE READ THESE INSTRUCTIONS THOROUGHLY BEFORE USING THIS APPLIANCE.
KEEP THEM IN A SAFE PLACE FOR FUTURE REFERENCE.
GB
THE CONDENSER
The condenser and ducting should be cleaned 3 or 4 times a year
or more frequently if the dryer is in constant use. See “CLEANING
THE CONDENSER” opposite.
NOTE: The condenser will discolour through use.
REMOVING THE CONDENSER
– Firmly pull the condenser out.
RE-INST ALLING THE CONDENSER
– Carefully push the condenser back into the machine, until it is
pushed fully home and a “click” is heard.
– Ensure all lint and fluff is removed from around the grille seal
before closing or water may leak.
– IMPORTANT: The dryer may leak if the condenser is not
correctly re-installed.
CLEANING THE CONDENSER
CAUTION: For maximum efficiency, the plates are made from
very thin aluminium and are easily damaged. Do not try to poke
anything between the plates or use a hard object or tool for
cleaning. At all times, handle the condenser carefully and avoid
crushing the plates.
– Remove the condenser (see opposite).
– Flush the fluff from between the plates under running water
and carefully shake off excess water.
– Whilst the condenser is
removed, clean as much fluff
as possible from inside the
ducting by reaching a hand
into the machine.In particular,
keep the passage from the fan
clear (on the right hand side of
the condenser duct).
– After cleaning, re-install the condenser (see opposite).
10815 87801 A3 12pp Brdsht 7/2/03 11:51 AM Page 4
J
J
E
J
G
F
2
B
CD
H
3
E
C D
A
B
B
J
1
 Loading...