

Page 1

Freestanding
Oven
MODELS: FE904C, FE904C2, FED3B2, FED4A
Appliance Operation Manual
INCLUDING INSTALLATION AND CLEANING
Page 2

WELCOME TO ST GEORGE
St George is a proud Australian
company with a heritage of
innovation and quality.
Our success extends to
domestic and overseas markets,
confirming our reputation at the
forefront of appliance excellence.
The elegant simplicity and high
performance features of
St George designs, will
remain contemporary in
many years to come.
In the interests of product innovation, consumer safety and continual improvement, St George reserves the right to change accessories
and inclusions and alter specifications without notice.
Page 3

CONTENTS
1. KNOWING YOUR St George FREESTANDING OVEN........................................................................................ 3
1.1 Important Points ........................................................................................................................................ 3
1.2 Installation Checks and Warnings ............................................................................................................. 3
Accessories ............................................................................................................................................... 6
1.3 Features and Benefits ............................................................................................................................... 7
2. USING THE APPLIANCE FOR THE FIRST TIME ................................................................................................ 8
2.1 Power On ................................................................................................................................................... 8
2.2 Burning In .................................................................................................................................................. 8
3. CONTROL PANEL OPERATION.......................................................................................................................... 10
Diagrams.................................................................................................................................................... 10
3.1 One Handed Operation ............................................................................................................................. 10
3.2 Setting the Time of Day ............................................................................................................................. 10
3.3 Manual Operation ...................................................................................................................................... 10
3.4 Changing the Alarm Tone .......................................................................................................................... 10
3.5 Using the Alarm Timer ............................................................................................................................... 12
3.6 Mode Switch .............................................................................................................................................. 13
3.7 Oven Temperature Control ........................................................................................................................ 13
3.8 Grill Control ................................................................................................................................................ 13
3.9 Cooktop Controls ...................................................................................................................................... 14
3.10 Warming Control (FED and FE90 models) ................................................................................................ 14
3.11 BBQ Grill Controls (FED model only) ........................................................................................................ 15
3.12 Roast Probe Operation.............................................................................................................................. 15
4. COOKING MODES AND INSTRUCTIONS.......................................................................................................... 16
4.1 Roasting Hints and General Guide ............................................................................................................ 16
4.2 Preheating .................................................................................................................................................. 19
4.3 Oven Cooking Modes Guide ..................................................................................................................... 20
4.4 Defrost ....................................................................................................................................................... 21
4.5 Fan Oven ................................................................................................................................................... 22
4.6 Normal Oven .............................................................................................................................................. 23
4.7 Classic Bake .............................................................................................................................................. 24
4.8 Fan Assist .................................................................................................................................................. 24
4.9 High Bake .................................................................................................................................................. 26
4.10 Fan Grill...................................................................................................................................................... 28
4.11 Grill............................................................................................................................................................. 29
Page 4

CONTENTS
4.12 Normal Oven Cooking in Right Hand Oven (FED model) ......................................................................... 29
4.13 Grill in the Right Hand Oven (FED model)................................................................................................. 30
4.14 Automatic Programmed Cooking.............................................................................................................. 31
4.15 Cooktop Cooking ...................................................................................................................................... 34
4.16 BBQ Grill Cooking (FED model) ................................................................................................................ 36
5. CLEANING AND MAINTENANCE ....................................................................................................................... 37
5.1 Recommended Cleaners ........................................................................................................................... 37
5.2 Routine Cleaning ....................................................................................................................................... 39
5.3 Spills, Spatters and Accidents .................................................................................................................. 40
5.4 Cleaning the BBQ Grill (FED model) ......................................................................................................... 41
5.5 Removing Oven Door ................................................................................................................................ 41
5.6 Self Clean Oven Liners .............................................................................................................................. 44
5.7 Changing the Light Globe ......................................................................................................................... 44
5.8 Trouble Shooting Guide ............................................................................................................................. 45
6. CABINET INSTALLATION INSTRUCTIONS ........................................................................................................ 47
6.1 Measurements ........................................................................................................................................... 47
6.2 Preparing the Cupboard Cavity................................................................................................................. 47
6.3 Providing a Suitable Flue ........................................................................................................................... 49
6.4 Required Clearances ................................................................................................................................. 49
6.5 Securing the Oven ..................................................................................................................................... 50
7. GAS CONNECTION INSTRUCTIONS ................................................................................................................. 52
7.1 Gas Supply Connection ............................................................................................................................ 52
7.2 Injector sizes for Gas Cooktops ................................................................................................................ 53
7.3 Conversion from Natural Gas to ULPG ..................................................................................................... 53
8. ELECTRICAL CONNECTION INSTRUCTIONS AND WIRING DIAGRAMS ........................................................ 54
8.1 Wiring Rules and Warnings ....................................................................................................................... 54
8.2 Voltage Supply Connection ....................................................................................................................... 54
8.3 Electrical Loads ......................................................................................................................................... 55
9. SERVICING AND MINOR ADJUSTMENTS......................................................................................................... 56
9.1 Thermostat Adjustments ........................................................................................................................... 56
9.2 Setting Gas Pressure ................................................................................................................................. 56
9.3 Gas Simmer Flame Adjustment ................................................................................................................ 56
Page 5

KNOWING YOUR ST GEORGE ELECTRIC WALL OVEN
1. KNOWING YOUR ST GEORGE FREESTANDING OVEN
1.1 Important Points
Thank you for purchasing a St George appliance that we are sure will provide many years of great cooking
experiences. If you haven’t had the pleasure of cooking with St George previously, you may find that it has different
features and characteristics to your last appliance. It is essential you read this operation manual thoroughly to fully
understand all of the various functions and operations. The aim is to encourage you to experiment with your
cooking and take advantage of the features St George offers.
The versatility of your new appliance means most foods will cook successfully using alternative functions. The key
to achieving results that best suit your personal taste is experimentation.
This manual should be retained for future reference. Should ownership of the appliance be transferred, please
ensure that the manual is also passed onto the new owner.
1.2 Installation Checks and Warnings
In the interests of your safety and the care of your new appliance, please take time to carefully read this manual
before installing and using the appliance. In particular your attention is drawn to the following:-
Incorrect installation of the appliance as a result of not following the detailed specifications can affect the
appliances performance. Ovens incorrectly installed may invalidate the warranty and we strongly recommend
that the oven cavity, venting, wiring and gas connection be prepared as described in the specifications.
This is critical to appearance, oven performance and safety. For installation details, please refer to Cabinet
Installation Instructions.
A licensed electrician and licensed gas fitter with relevant qualifications must perform the electrical and gas work
when installing or servicing the appliance. The supply cable and fuse rating must be suitable for the appliance. You
must never repair or replace any part of the appliance unless specifically recommended in the operation manual.
For installation details, please refer to Gas Connection Instructions, and Electrical Connection Instructions
and Wiring Diagrams.
VENTILATION SLOTS AND AIR VENTS MUST NOT BE COVERED OR OBSTRUCTED IN ANY WAY.
DON’T USE ALUMINIUM FOIL ON THE BASE OF OVENS
The use of aluminium foil on the base of the oven to collect spills and improve cleaning is not recommended. The
bottom element of St George ovens is concealed under the base of the oven liner (not exposed). Foil or dishes
with reflective qualities must never be placed on the base of the oven during cooking as the concentration
of the direct and reflected heat will damage the enamel surface. Damage resulting from such use is not
covered under the provisions of the warranty. Refer to Cleaning and Maintenance for care instructions for
your new appliance.
3
Page 6

KNOWING YOUR ST GEORGE ELECTRIC WALL OVEN
INITIAL HEAT UP
Some smoke and smell may be noticed during the initial heat up cycle (see Using the Appliance for the First Time). This
should quickly dissipate. If abnormal levels of smoke are observed (i.e. it is not food that is burning) have the appliance
thoroughly checked.
DON’T USE THE GRILL PAN HANDLE FOR LIFTING
The grill pan handle provided should only be used to assist in sliding the grill pan in and out of the oven compartments. AT N O
TIME MAY IT BE USED FOR LIFTING THE GRILL PAN, ESPECIALLY WHEN THE PAN IS LADEN WITH FOOD.
DON’T USE THE APPLIANCE AS A SPACE HEATER
The appliance must never be used for warming or heating the surrounding room or for drying clothes or textiles or other items
not specifically recommended in the operation manual. Combustible materials or products must never be placed on or near
the appliance.
DO NOT LEAVE CHILDREN ALONE
Children must not be left unsupervised in the area where the appliance is in use. The appliance gets hot during use and retains
heat for some time after being turned off. Children must never be allowed to sit or stand on any part of the appliance.
DO NOT SPRAY AEROSOLS IN THE VICINITY OF THE APPLIANCE WHILE IT IS IN OPERATION
OVEN CARE – ACIDIC FOODS
Certain foods can cause severe corrosion of enamel and metal finishes if the oven surface is not completely cleaned after use.
This is particularly so around the joins in the oven liner and the chrome racks and shelves.
Examples of these are vinegar, sour milk, citrus fruits, olives, strong salt solutions and fruit juices. Regular inspection will
alleviate the likelihood of this type of damage occurring. Some oven cleaners can also have a detrimental effect on vitreous
enamel surfaces.
POLYUNSATURATED OILS
The excessive use of polyunsaturated oils in cooking can cause deposits of solidified oils on the inside surfaces of the oven
and are extremely difficult to remove from glass and enamel finishes. Their use, where possible should be minimised.
AEROSOLS
DO NOT SPRAY AEROSOLS IN THE VICINITY OF THIS APPLIANCE WHILE IT IS IN OPERATION.
The use of aerosol cans such as insect spray, deodorants, repellents, stove cleaners, hair spray, paint and food preservatives
etc., must be avoided in the proximity of your oven, especially near controls or switches. Some aerosols contain chemicals
that cause rapid corrosion of metals and enamels. This normally shows in the form of white staining of the vitreous enamel or
rusting. Damage of this kind is not covered in the appliance warranty.
OVEN CLEANERS
We recommend a non-caustic oven cleaner be used at all times. Any residue of oven cleaner should be thoroughly removed
to avoid corrosion of metal finishes.
4
Page 7

KNOWING YOUR ST GEORGE ELECTRIC WALL OVEN
• NEVER use the oven to dry out oven cleaners as they can produce a highly corrosive chemical reaction that will attack the
enamel.
• NEVER activate any element or burner on the appliance (except oven light) while there is oven cleaner in the oven
compartment.
WEAR PROPER APPAREL WHEN USING THE APPLIANCE
Loose fitting, hanging or highly flammable garments (such as synthetics) should never be worn while using the appliance.
USE ONLY DRY POT HOLDERS
Moist or damp pot holders on hot surfaces may result in burns from steam. Do not allow pot holders to touch hot heating
elements. Do not use a towel or bulky cloth when handling hot cooking utensils.
DON’T USE OVEN OR GRILL COMPARTMENTS FOR STORAGE
Items, particularly flammable materials, must never be stored in an oven or near surface units.
DO NOT USE WATER ON GREASE FIRES
Fats, oils or other substances will ignite if they become too hot. Fires or flames should be smothered using flame proof
material or extinguished using a dry chemical or another suitable fire retardant.
USE AUTOMATIC PROGRAMMED COOKING ONLY IN SUITABLE MODES
Automatic programmed cooking is available in the multi-function oven only and suitable only for Defrost, Fan Oven, Normal
Oven and Fan Grill modes.
DO NOT USE OVERSIZE COOKWARE OR PLACE COOKWARE OFF-CENTRE OVER BURNERS
Oversize cookware will deflect heat towards the cooktop and bench top surfaces. Cookware with large bases, especially if
placed off-centre over the burners, may cause deterioration of the cooktop and bench top surfaces. Such damage is not
covered under the provisions of the warranty. Follow the illustrations and examples in the Cooktop Cooking instructions.
NEVER USE AN ASBESTOS MAT BETWEEN COOKWARE AND COOKTOP
Use of an asbestos mat is both hazardous and will cause damage to the unit.
SELECT AND USE COOKWARE SUITABLE FOR THE CERAMIC COOKTOP (FEC model only)
Under certain conditions some enamel, copper based and aluminium saucepans can cause deterioration of the cooktop
surface. Stainless steel cookware should not react in this way. Aluminium cookware in particular is not recommended.
ONLY PLACE COOKWARE ON COOKING ZONES, PAN SUPPORTS OR OVEN SHELVES
Other surfaces of the appliance, for example trims, are not totally resistant to hard or sharp materials or direct heat and may
be damaged by such use.
NOTE: To ensure correct ventilation, freestanding ranges are fitted with thermostatically controlled ventilation fans. The ventilation
fan/s will automatically operate and may continue to operate (even with the controls in the off positions) until the temperature
falls below the operating limits.
5
Page 8
KNOWING YOUR ST GEORGE ELECTRIC WALL OVEN
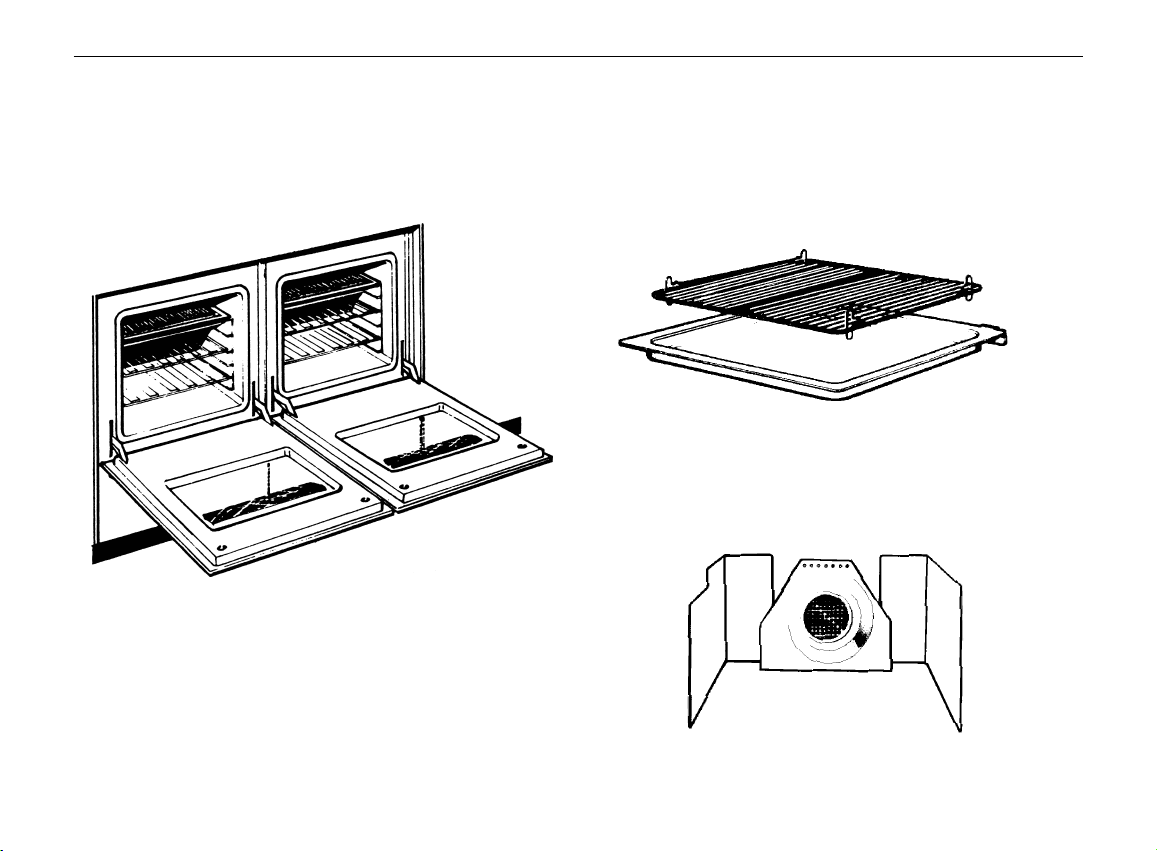
Accessories
Shelf Levels Grill & Pan Rack
(The 6 shelf levels assure the (Acts as an extra shelf and the pan is coated with vitreous enamel for
optimal use of the 93 litre oven) long life and easy cleaning)
Self Clean Oven Liners
Optional Extra — great to alleviate extra cleaning
requirements).
6
Page 9

KNOWING YOUR ST GEORGE ELECTRIC WALL OVEN
1.3 Features and Benefits
A range of cooking options is combined in your St George freestanding range. St George’s extra large ovens allow
you to cook everything from small simple dishes for one, to complete dinners for the whole family. The multifunction modes give you the ability to defrost delicate foods, bake either conventional or fan-forced, as well as
conventional grilling or fan grilling for excellent rotisserie style flavour.
The right hand oven (FED only) also offers conventional oven cooking and a variable heat grill. This allows you to
cook separate meals, bake entrees or desserts, or grill separately while the multi-function oven cooks a meal.
The control panel features a 24 hour electronic clock which incorporates an independent timer, useful for timing
household activities. The electronic oven clock allows manual operation or the ability to program cooking times,
giving you the freedom to cook meals to suit your own schedules.
NOTE: Automatic programmed cooking operates in the multi-function oven only.
Cleaning the oven interior is made simple with St George’s high quality vitreous enamel. The doors easily lift off
and the in-oven parts are removable. refer to Cleaning and Maintenance for complete care instructions)
If over heating occurs, however unlikely, there are safety systems which shut down the heating elements. The
power to the element/s resumes once the oven cools slightly.
7
Page 10

USING THE APPLIANCE FOR THE FIRST TIME
2. USING THE APPLIANCE FOR THE FIRST TIME
After installation remove all notification labels (not grill or electrical warning labels), advertising, tape, packaging,
etc. A quick diluted wash with Ammonia and water should rinse away any adhesive residue. Eucalyptus oil (small
amounts) is also good for removing adhesive residue. Thoroughly rinse cleaned surfaces and wipe them dry using
a clean, soft cloth.
Before using the ceramic glass cooktop (FEC model only) clean it thoroughly with a suitable cooktop cleaner (e.g.
Hillmark Ceramic Cooktop Cleaner) and rinse with a clean, warm, damp cloth or paper towel. To avoid cooked on
cleaner residue, wipe the glass dry with a soft cloth or paper towel.
NOTE: People with sensitivity to cleaning chemicals must take the necessary precautions. St George recommends wearing
protective gloves while cleaning the appliance.
NOTE: Unless otherwise noted, the instructions for oven operation apply to the multi-function oven (left hand oven for
FED model).
2.1 Power On
The time is displayed in digital 24 hour format (e.g. 18:00 is 6:00 pm). When power is first applied the time of day
(0:00) and AUTO flashes in the display. Pressing the Reset button cancels power-up mode and automatically
places the unit in manual mode.
2.2 Burning In
Before cooking in the appliance an initial pre-heat is required to burn off the fine oil film used to protect the
elements during shipping. The first time you heat up the oven (or grill) the oil will be given off as smoke (some
smell may also be noticeable), which is perfectly normal.
1. Set the Clock Timer for manual operation by pressing the Reset button.
2. Select Fan Oven on the mode switch and set the oven temperature to 180°C.
3. With the oven door closed, leave the oven on for approximately 1 hour or until the smoke has disappeared.
4. Change the selection on the mode switch to Fan Grill and leave for a further 20 minutes or until the smoke
has disappeared.
8
Page 11

USING THE APPLIANCE FOR THE FIRST TIME
Right Hand Oven (FED Model)
With the right hand door closed, set the right hand oven temperature to 180°C and leave on for approximately 1
hour or until the smoke has disappeared. Turn the oven control off and turn the right hand oven grill control to Hi
and leave for a further 10 minutes only.
BBQ Grill (FED Model)
Turn the BBQ grill controls to Hi and leave for approximately 10 minutes or until the smoke has disappeared.
Warmer Drawer (FED and FE90 Models)
Turn the warmer control to On and leave for approximately 10 minutes or until the smoke has disappeared.
After completing the above turn all controls off. The oven/s are now ready for cooking and grilling.
9
Page 12

CONTROL PANEL OPERATION
3. CONTROL PANEL OPERATION
3.1 One Handed Operation
The oven timer control has been designed so that it requires only one hand to operate any of it’s various functions.
To alter any of the functions or settings you need only to press the relevant button/s. The selected function will
remain active for a few moments allowing you to adjust the setting. The or buttons can be pressed to adjust
the displayed time.
When the or buttons are pressed singularly the time will change in 1 minute steps. If the or buttons are held
down the time will change more rapidly.
When you are finished the selection will be set and the time display will revert to the time of day.
NOTE: The AUTO symbol may flash and/or the symbol may be displayed if those functions have been inadvertently
set. To cancel any AUTO settings press the Reset button. To cancel the timer function, press the Timer button and
set the alarm time back to zero. If an alarm sounds, pressing any of the 4 left hand buttons will cancel it.
3.2 Setting the Time of Day
The time of day can be set at any time by pressing the Reset button. Once pressed the time can then be set by
pressing the or buttons. The unit will then commence timing from the selected time on the display.
NOTE: If the unit is in automatic mode, resetting the time of day will cancel any automatic settings.
3.3 Manual Operation
Pressing the Reset button at any time after turning power on (see 2.1 above) will cancel any automatic setting in
memory and allow the unit to be used manually. The indicator will be displayed to show manual operation has
been set.
3.4 Changing the Alarm Tone
The alarm tone can be changed to either one of 3 selections. Simply press the button singularly to cycle through
the available selections.
NOTE: This only works if no other function is active when the button is pressed.
<
<
<
<
<
<
<
<
<
<
10
Page 13
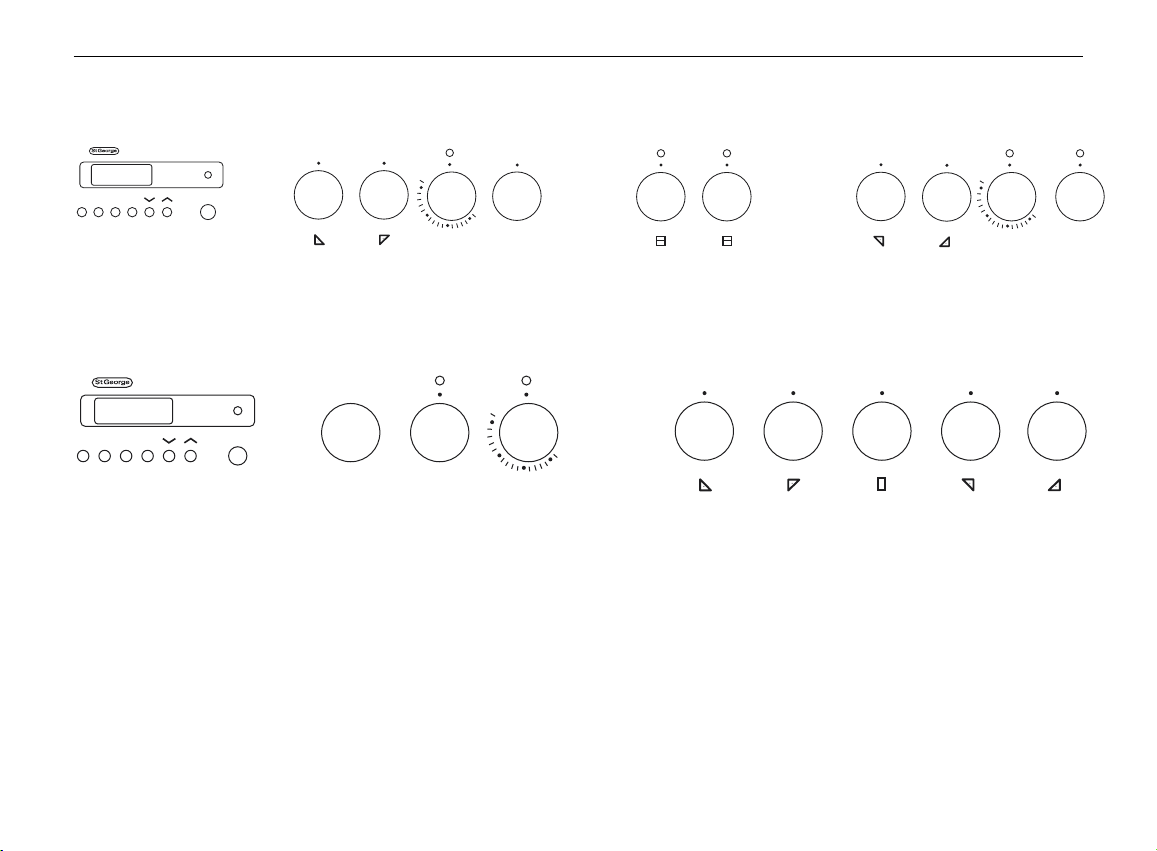
FED3B
Warmer
Timer Cook Stop Reset Off On
FE904B
Warmer
Timer Cook Stop Reset Off On
Hi
Hi
Lo
Fan
Grill
High
Bake
Lo
Grill
Light
Defrost
8
Normal
Oven
Classic
Fan
Bake
Oven
Fan
Assist
Mode Oven°C
CONTROL PANEL OPERATION
Grill
Light
150
Oven°C
Fan
Grill
High
Bake
100
Lo
250
2
4
250
200
Hi
6
Defrost
Normal
Oven
Classic
Fan
Bake
Oven
Fan
Assist
Mode
200
100
150
Lo
Hi
8
4
6
Hi
Lo
Hi
8
2
2
4
6
Hi
Lo
Lo
Hi
Lo
Hi
Lo
250
Hi
200
Lo
Hi
150
Oven°C
100
Hi
Lo
Lo
Hi
8
2
4
6
Grill
Lo
11
Page 14

CONTROL PANEL OPERATION
3.5 Using the Alarm Timer
The alarm timer can be used independently of other clock functions. Very handy for letting you know when to turn
food, when basting is required or when a batch of food (when cooking multiple batches) is ready without interrupting
the oven operation. The alarm timer is also very useful for timing other household activities.
To set the alarm timer press the Timer button to display the time remaining until the alarm sounds. The alarm time
can then be set by pressing the or buttons. The
set. When you are finished selecting an alarm time the display will revert back to the time of day. The remaining
time to the alarm can be displayed momentarily and altered using the Timer and buttons. To cancel the alarm
timer simply reset the alarm time to zero. The
time of day.
Once the alarm time has elapsed the alarm will sound. Pressing any of the four left-hand buttons will cancel the
alarm and the
cancel after a few minutes.
NOTE: Whilst the alarm time is displayed pressing the or buttons will change the alarm time setting.
If the Reset button is pressed to cancel any alarms, any automatic settings in memory will be cancelled and the
unit will return to manual operation.
indicator will no longer be displayed. If not manually cancelled the alarm will automatically
<
<
symbol will be displayed to show an alarm time has been
<
<
symbol will no longer show and the display will revert back to the
<
<
12
Page 15

CONTROL PANEL OPERATION
3.6 Mode Switch
This switch selects the mode of cooking you require and may be turned in either direction to give you the following
selections:
Light Defrost
Normal Oven (conventional oven)
Classic Bake Fan Assist
Fan Oven High Bake
Fan Grill Grill
The Light selection is included to assist when cleaning the oven interior. The oven illumination lamp will remain on
at all times on any selection except off. This provides an extra safety precaution to indicate that the oven has
been left on.
3.7 Oven Temperature Control
This control allows you to select the temperature to be maintained during cooking. Turn the control clockwise to
switch power on and select your required temperature. An indicator light will show when the oven is heating and
will cycle on and off as the temperature is maintained. The indicator light will operate this way when any oven
mode with temperature control is used (i.e. Fan Oven, Normal Oven and Fan Grill). The control can only be turned
anti-clockwise to the off position.
The oven temperature control for the right hand oven (FED Model) operates alone to control oven operation. This
control operates identically to the left hand oven temperature control.
3.8 Grill Control
FED Model
Grilling in the left hand oven is controlled by setting the Mode switch to Grill. The speed of cooking may be varied
by altering the grill pan and rack positions. The separate Grill control on the far right of the control panel is used
to select the heat desired for grilling in the right hand oven only. This control may be turned in either direction.
NOTE: For the FED model the right hand oven temperature control overrides the grill control if both controls are on at the
same time.
13
Page 16

CONTROL PANEL OPERATION
3.9 Cooktop Controls
3.9.1 Gas Burner Controls
The cooktop burners are ignited by the in-built electronic ignition controls. The controls must be turned anticlockwise to operate and can only be turned clockwise to the off position. Alternatively the burner may be ignited
manually using matches, cooktop gas lighters or similar devices, being careful not to risk injury or damage.
To operate the controls ensure the burners are correctly assembled and positioned over the gas burner outlets
and the pan supports are correctly positioned then:–
a) Start the gas flow by pressing down and turning the control knob corresponding to the burner you wish to
use. Pressing down on the control knob causes the igniter to spark.
b) Once the flame is established the knob needs to be pressed and held for approximately 3 seconds until the
thermocouple holds the gas flow open. The control can then be turned to your prequired setting.
3.10 Warming Control (FED and FE90 Models)
The drawer compartment below the oven (left hand oven only for FED) incorporates a heating element and is
perfect for keeping food warm and/or to warm plates and serving dishes. A pilot lamp situated above the Warmer
control indicates when the warming element is on. Allow approximately 10 minutes for the warmer compartment
to pre-heat prior to placing food in to keep warm. When using the drawer to warm plates and serving dishes these
should be placed in the drawer from cold to reduce the risk of breakage. Remember to turn the Warmer control
to the OFF position when the compartment is no longer required for warming.
NOTE: When not in use the drawers may be used to store cookware and utensils. Items which may deteriorate in storage
or with unintentional use of the warming element must never be placed in the compartment.
14
Page 17

CONTROL PANEL OPERATION
3.11 BBQ Grill Controls (FED model only)
The electric BBQ grill has individual controls for the front and rear grill zones to select the heat desired for
cooking. The controls may be turned in either direction. The indicator lights above the controls glow when the
corresponding element zone is operating.
3.12 Roast Probe Operation
WARNING: This mode of cooking is suitable only for Normal Oven, Classic Bake, Fan Assist, Fan Oven or High Bake
modes. Use of the probe sensor in either Grill or Fan Grill modes will damage the probe.
The roast probe operation shares the same digit display as does the timer functions and operates only in the main
oven. The roast probe must be plugged into its socket within the oven compartment to display the current
temperature of the roast probe sensor in the left-hand pair of digits. The Roast Probe Set Temperature (RPST) will
be displayed in the right hand pair of digits and can be adjusted by pressing the or buttons.
NOTE: The RPST can be set between 0°C and 99°C, however, it is not recommended to set the RPST above 85°C as this
gives inconsistent results and may result in the burning of food.
Once the temperature of the roast probe’s sensor reaches or exceeds the RPST the oven will automatically turn
off and the alarm will sound. The alarm can be cancelled by pressing any of the 4 left-hand buttons. If not
manually cancelled the alarm will self cancel after a few minutes. To cancel the roast probe function, remove the
roast probe from its socket.
For complete details refer to Roast Probe Cooking.
NOTE: Whenever the roast probe is plugged in, the RPST is re-set to 80°C.
The time is not displayed when the roast probe is plugged in. If the roast probe is disconnected the display
reverts back to the time of day.
Automatic programmed cooking can be used with the roast probe.
<
<
15
Page 18

COOKING MODES AND INSTRUCTIONS
4. COOKING MODES AND INSTRUCTIONS
4.1 Roasting Hints and General Guide
When roasting or baking, position food near the centre of the oven. This will vary on the size of the food to be
cooked or if other foods are to be cooked at the same time. Cooking times may vary slightly depending on, for
example, the size and thickness of meat or the presence of bone or stuffing.
The temperature for roasting meats and poultry will usually range between 170°C and 200°C. These cooking
temperatures will normally prevent excessive shrinkage and moisture loss. An exception is roast pork which is
placed in a hot oven (around 220°C to 230°C) for the first 15-25 minutes to obtain a crisp crackling, after which the
temperature is reduced to 180°C to 200°C for the remaining cooking time. Of course, these temperatures and
times will vary according to your own personal taste.
Bake meat and vegetables in baking dishes that allow the heat to circulate evenly and brown the food to your own
taste. When cooking more than one dish of food at the same time place cooking utensils so that they do not touch
each other or the sides of the oven. To allow free circulation of heat, do not arrange pans directly above each
other, stagger their positions if possible.
When using the oven to bake a complete meal at one time, for example meat, vegetables and dessert, place the
meat in the lower part of the oven and place the vegetables and dessert above. Note that the cooking times and
temperatures when cooking this way should be similar for each of the dishes. The oven temperature may also
need to be increased slightly to account for the larger volume of food being cooked. Please note that not all types
of food are suitable for cooking together. (e.g. some desserts are not suitable to be cooked with meat)
Make use of retained heat whenever possible. For example, after baking a dinner there should be sufficient
retained heat to dry herbs, bread crumbs and biscuits or fruit.
16
Page 19

COOKING MODES AND INSTRUCTIONS
OVEN TEMPERATURE °C GENERAL TIMES FOODS SUITABLE
130° and under Very Slow
130° – 150° Slow rich fruit cake
150° – 180° Moderate casseroles
180° – 200° Moderately Hot shallow butter cakes, sponges
200° – 230° Hot swiss roll, patty cakes
230° and over Very Hot scones, choux pastry
small meringues, pavlova,
baked custard, re-heating
light fruit cake
deep butter cakes
biscuits, meat loaf, baked fish
rock cakes, shortcrust pastry
These Cooking Charts are intended as a guide only.
Temperatures and cooking times may be varied to suit individual tastes.
17
Page 20

COOKING MODES AND INSTRUCTIONS
APPROXIMATE ROASTING TIMES FOR MEAT, POULTRY & FISH
TEMPERATURE GUIDE
TYPE OF MEAT CUTS OF MEAT TIME/KG
BEEF Standing Rib, Rolled Sirloin 60 mins per kg 180°–200°
VEAL Shoulder or leg (with bone
LAMB Leg, Shoulder (loin or rolled) 40-50 mins per kg 180°–200°
PORK Leg Loin 90 mins per kg 220°–230°/180°–200°
*Pork Legs should be cooked at higher temperature for first 15-25 minutes then reduced to lower
*temperature for remaining cooking time.
TYPE OF
POULTRY/FISH °C
CHICKEN Whole or Pieces 30 mins per 500g 180°–200°
DUCK 1.4 - 1.9kg 30 mins per 500g 180°–200°
TURKEY* 2.5 - 10.0kg 30 mins per 500g 180°–200°
*Turkeys should be well basted and turned during cooking.
FISH* Whole or Fillets 10 mins per 500g 170°–190°
*In Normal Oven mode, fish should be covered for the first 3/4 of the cooking time to help
*retain moisture
Bolar Blade, Corned Topside
Fillet, Scotch fillet 40 mins per kg 180°–200°
or rolled) 40-50 mins per kg 180°–200°
CUTS/SIZE TIME/500g
+ 35 mins extra
+ 35 mins extra
OVEN TEMPERATURE
°C
OVEN TEMPERATURE
These Cooking Charts are intended as a guide only.
Temperatures and cooking times may be varied to suit individual tastes.
18
Page 21

COOKING MODES AND INSTRUCTIONS
4.2 Preheating
Preheating the oven is not essential, but you will achieve better results if you do. Some foods, particularly cakes
and pastry, are better cooked in a preheated oven. Other foods, for example casseroles, cook just as well when
cooked in a non-preheated oven but may need longer cooking times.
To preheat the main oven:
1. Select the mode required for preheating.
2. Set the oven to the desired temperature.
PREHEATING GUIDE (for 180°C setting)
Cooking Mode Preheat time (mins)
Normal Oven 25-30
Fan Oven 15-20
High Bake 8-12
For your convenience use Fan Oven or High Bake modes for fast, efficient preheating of the main oven.
Please note that any food or other cooking utensils placed in the oven during preheating will affect the preheating
time. The preheat time may also vary with installations.
WARNING: When using an alternative cooking mode for faster preheat, be sure to turn the cooking mode to your
required setting before placing food in the oven.
HINT: To allow for heat loss while placing food into the oven, preheat the oven 10-20°C higher and then reduce the
temperature to your required cooking temperature.
Always preheat the oven when cooking multiple dishes at the same time.
To preheat the right hand oven (FED model only)
Turn the right hand oven temperature control to your desired setting. The oven will preheat to 180°C in 25-30
minutes.
19
Page 22

COOKING MODES AND INSTRUCTIONS
4.3 Oven Cooking Modes Guide
Oven Mode Main Oven Elements Mode Descriptions Cooking Suggestions
Defrost
Normal Oven
Only the Fan operates
Concealed bottom element and
top outer element
Classic Bake
Fan Assist
Concealed bottom element
Concealed bottom element, top
outer element and Fan
Fan Oven (Fan Forced)
High Bake
Fan element and Fan
Concealed bottom element, Fan
element and Fan
Fan Grill (Oven door
Grill element and Fan
remains closed on this
mode)
Grill (in main oven)
Grill element
(Oven door remains
closed on this mode)
This mode offers a clean and
healthy way to defrost frozen
foods
Single item cooking. Foods that
require long slow cooking
Blind baking
Used for multi-shelf purposes
Multi-shelf cooking
Multi-purpose general cooking
Foods that require a high heat
and a crisp base
Ideal for grilling all meats and
vegetables – the grill tray should
be placed in the middle of the
oven with the wire rack elevated
Straight quick grilling
All foods may be defrosted using this
mode
Fruit Cakes, Christmas Cakes,
Meringues, Breads, Crème Caramels,
Custards, Soufflés
Pastry cases, Quiche bases
Versatile in batch cooking, where one
dish must have a well cooked base and
another must be well browned
Cakes, Biscuits, Puddings,
Baking whole Fish, Roast meat and
vegetables
Pizza’s, Quiches, Pies and Scones
Roasts, Steak, Chops, Meatballs,
Hamburger patties
Toasted cheese sandwiches. Browning
food
20
Page 23

4.4 Defrost
The Defrost mode offers a clean and healthy means to defrost frozen food. Food left in the open is exposed to
contamination by pets and insects. With the Defrost setting, food placed in the oven defrosts without heat,
reducing the likelihood of growing bacteria. The circulation of air in the oven achieves effective thawing. The oven
does not provide any heat on this setting which prevents food extremities from over-thawing, or even cooking,
like they tend to do in a microwave.
All foods may be defrosted using this method but it is especially good for meat and fish fillets and delicate frozen
foods such as cream cheesecakes or cakes with cream filling, icing or frosting. The time taken to defrost foods
will vary, depending on the volume and weight of the food. As a general guide the defrosting time for meat should
be approximately 15-20 minutes per kg.
Using Defrost Mode
1. Adjust oven shelves to correct position (this mode is most effective when food is placed near the centre of the
oven).
2. Select Defrost on the mode switch.
3. When defrosting is complete, turn the oven off.
NOTE: A temperature cannot be set when Defrost mode is selected.
To prevent spoilage of food, do not use Defrost for longer than necessary (periodically check food during defrosting).
If food is not to be cooked immediately when defrosting is complete, remove the food from the oven and place
into a refrigerator until needed.
COOKING MODES AND INSTRUCTIONS
21
Page 24

COOKING MODES AND INSTRUCTIONS
4.5 Fan Oven
In this mode the oven fan circulates heat from an element concealed behind the fan cover to give more even
temperature throughout the oven. When cooking more than one tray of food on multiple shelves the even heat
provides similar cooking results throughout each portion of food. Temperatures for cooking foods in this oven
mode are generally the same as required by a conventional oven, however, when cooking foods that require
lengthy cooking cycles a fan forced oven normally cooks more quickly, saving both time and energy (e.g. rich fruit
cakes and large roasts).
Always place the food as near to the centre of the oven as possible. If cooking on more than one level, stagger the
positioning to allow for as much free circulation of heat within the oven as possible.
Using Fan Oven Mode
1. Adjust oven shelves to desired position/s.
2. Select Fan Oven on mode switch.
3. Set the oven to the desired temperature.
4. When cooking is complete turn the mode switch and thermostat off.
HINT: Always preheat the oven when cooking multiple dishes at the same time. Depending on the food, you may need
to rearrange the tray positions during cooking.
After cooking is complete the oven will retain heat for a period of time after being turned off. The retained heat can
be used to dry foods or to keep food warm prior to serving. Examples of foods that may be dried are breadcrumbs,
herbs or fruit. To prevent heat loss when using the oven in this way do not leave the oven door open or open the
door too often. Also remember to remove food from the oven to prevent spoilage.
22
Page 25

COOKING MODES AND INSTRUCTIONS
4.6 Normal Oven
In this mode the outside ring of the top oven element and a concealed element under the oven compartment
provides the oven heat. Normal Oven is most suitable when cooking on one rack only. For best results, arrange
the shelves so the top of the food is near the centre of the oven. This is usually the second or third shelf position
from the bottom. If cooking on more than one shelf, always preheat the oven and stagger the positions of baking
trays to allow free circulation of heat within the oven. Depending on the food, you may need to rearrange tray
positions during cooking.
Using Normal Oven Mode
1. Adjust oven shelves to desired position/s.
2. Select Normal Oven on mode switch.
3. Set the oven to the desired temperature.
4. When cooking is complete turn the mode switch and thermostat off.
HINT: If water is used in your cooking (such as water placed in a baking dish) the water evaporating during cooking may
cause condensation to escape and run down the front of your appliance. This should not cause any problem to
your appliance, however it is advisable to wipe away the condensation from the exterior of the oven with a very
warm damp cloth during cooking. The level of condensation will be reduced when cooking in Fan Oven mode
where excess moisture is circulated and evaporates during the cooking cycle.
NOTE: Always stand clear of the oven when opening the oven door/s as built up steam may escape rapidly.
23
Page 26

COOKING MODES AND INSTRUCTIONS
4.7 Classic Bake
On the Classic Bake selection, heat is provided only by the concealed element under the oven compartment. This
mode is ideal where food must have a well-cooked base or where minimal browning is desired.
Using Classic Bake Mode
1. Adjust oven shelves to desired position/s.
2. Select Classic Bake on mode switch.
3. Set the oven to the desired temperature.
4. When cooking is complete turn the mode switch and thermostat off.
4.8 Fan Assist
In Fan Assist mode, heat is provided by the outside ring of the top oven element and the concealed element
under the oven compartment in conjunction with the oven fan. Fan Assist is versatile in batch cooking (where
even temperature is essential), where one dish must have a well-cooked base and another must be well browned.
Using Fan Assist Mode
1. Adjust oven shelves to desired position/s.
2. Select Fan Assist on mode switch.
3. Set the oven to the desired temperature.
4. When cooking is complete turn the mode switch and thermostat off.
HINT: Always preheat the oven when cooking multiple dishes at the same time.
24
Page 27

4.9 High Bake
The High Bake mode uses the concealed elements behind the fan cover and under the oven in combination. With
the addition of the forced convection of the oven fan, quick and consistent heat is evenly distributed throughout
the oven. High Bake has the advantage of excellent cooking results for pastry foods such as hors d’oeuvres and
especially Pizza.
The results are quick, not unlike a microwave oven. With the circulation of heat, foods cooked with High Bake
mode retain a crisp, dry texture on the outside. Especially Pizza, pastry and other foods where you want the base
to be well cooked. High Bake is also excellent for re-heating.
Using High Bake Mode
1. Adjust oven shelves to desired position/s.
2. Select High Bake on mode switch.
3. Set the oven to the desired temperature.
4. When cooking is complete turn the mode switch and thermostat off.
COOKING MODES AND INSTRUCTIONS
25
Page 28

COOKING MODES AND INSTRUCTIONS
4.10 Fan Grill
Fan grilling is a combination of direct heat and circulated hot air which gives the appearance and flavour similar
to rotisserie cooking – a crunchy exterior with succulent meat – which is ideal for single level roasts. In this mode
the direct infrared heat from the grill element is also circulated by the fan to cook the food. Note that the food
should be positioned as near to the centre of the oven as possible.
With the added benefit of the circulated air, more even cooking can be achieved giving excellent results. The Fan
Grill mode has been developed to replace grilling with the door open and has the following advantages over
conventional grilling:–
1. Food is generally more moist.
2. Improved rotisserie style flavour.
3. Most cooking fumes from grilling pass through the oven vent.
4. Reduced spatter when cooking fatty meats.
For even browning, St George recommends turning food once only.
Using Fan Grill Mode
1. OVEN DOOR MUST BE CLOSED IN Fan Grill MODE
2. Place food on grill rack and pan supplied (ensure grill rack is inverted to the high position to allow best
circulation of air).
3. Place grill pan on shelf carrier so that the food is positioned as close as possible to the centre of the oven.
4. Select Fan Grill on mode switch.
5. Set the oven to the desired temperature. (see Note below and refer to Fan Grill Temperature Guide)
6. When cooking is complete turn the mode switch and thermostat off.
NOTE: Large grill pans or roasting dishes can restrict the circulation of air in the oven. To prevent moisture condensing in
the cooler lower sections of the oven, preheat the oven for approximately 10 minutes using Normal Oven or High
Bake modes prior to fan grilling.
NOTE: The temperature setting in Fan Grill mode must not exceed 200°C (390°F).
The grill element has a safety shutdown at approximately 200°C (390°F). Once the temperature in the oven has
reached this limit the element will be switched off. The element will switch back on once the oven cools slightly.
WARNING: The grill pan handle provided should only be used to assist in sliding the grill pan in and out of the oven
compartments. AT NO TIME MAY IT BE USED FOR LIFTING THE GRILL PAN, ESPECIALLY WHEN THE
26
PAN IS LADEN WITH FOOD.
Page 29

COOKING MODES AND INSTRUCTIONS
Fan Grill TEMPERATURE GUIDE
OVEN
TYPE OF MEAT/POULTRY/FISH TEMPERATURE °C APPROXIMATE COOKING TIME
Chicken Whole 175–185 30 mins per 500g
Pieces 185–195 15-20 mins
Lamb Loin/Rack 175–185 25 mins per 500g
Chops, medium/rare 175–185 10-12 mins
Chops, medium 175–185 14–16 mins
Beef Steak, rare 175–185 6-8 mins
Steak, medium 175–185 10–12 mins
Steak, well-done 175–185 12-15 mins
Pork Chops, medium/rare 190–200 6-10 mins
Chops, medium 175–185 10-12 mins
Chops, well-done 175–185 12–15 mins
Bacon 190–200 5-6 mins
Sausages Thin 175–185 8–10 mins
Thick 175–185 12-14 mins
Fish Fillets, rolled 175–185 10–12 mins
Fillets, thick 175–185 10–12 mins
Whole 190–200 15-30 mins
Sliced vegetables 180-190 20-30 mins
Tomato halves 190–200 6–8 mins
Sauce-based recipes with
breadcrumb toppings 175–185 20-30 mins
Pasta dishes 175–185 20-30 mins
These Cooking Charts are intended as a guide only.
Temperatures and cooking times may be varied to suit individual tastes.
27
Page 30

COOKING MODES AND INSTRUCTIONS
4.11 Grill (in multi-function oven)
This mode of cooking uses the infrared heat of the top inner element to cook foods to your requirements. For the
FED model, the cooking can be varied by lowering or raising the grill pan and rack position in the oven. For the
FED model, this oven grilling facility is additional to the separate grill in the right hand oven.
This method of grilling in the oven is recommended for short duration (5 minutes or less) grilling only
which is ideal for toasting (see note below). Foods with higher fat content or foods which require more than
5 minutes grilling time must be grilled using the Fan Grill mode. The Fan Grill mode has been developed to
generally replace grilling with the door open (see Fan Grill for details on Fan Grill mode).
When in Grill mode the oven door should be closed. If the door is not closed, discoloration may occur to the
control panel. IT IS RECOMMENDED THAT THE MULTI-FUNCTION OVEN Grill MODE IS NOT OPERATED WHEN
RESIDUAL HEAT REMAINS IN THE OVEN.
Using Multi-function Oven Grill Mode
1. Commence grilling from a cold oven only.
2. Place food on grill rack and pan supplied (use grill rack in low position).
3. Place grill pan on shelf carrier position of your preference.
4. For the FED model select Grill on mode switch.
5. For the FED model, the oven has a preset temperature for the Grill mode. The oven temperature control
cannot override this preset temperature.
6. When cooking is complete turn all controls to the off position.
NOTE: The grill element has a safety shutdown at approximately 200°C (390°F). Once the temperature in the oven has
reached this limit the element will switch off until the oven cools slightly at which time the element will resume
heating. (This temperature is generally reached after approximately 10 minutes)
WARNING: The grill pan handle provided should only be used to assist in sliding the grill pan in and out of the oven
compartments. AT NO TIME MAY IT BE USED FOR LIFTING THE GRILL PAN, ESPECIALLY WHEN
THE PAN IS LADEN WITH FOOD.
28
Page 31

COOKING MODES AND INSTRUCTIONS
4.12 Normal Oven Cooking in Right Hand Oven (FED Model)
In this mode the outside ring of the top oven element and a concealed element under the oven compartment
provides the oven heat. For best results, arrange the shelves so the top of the food is near the centre of the oven.
This is usually the second or third shelf position from the bottom. If cooking more than one dish, always preheat
the oven and stagger the positions of baking trays to allow free circulation of heat within the oven. Depending on
the food, you may need to rearrange tray positions during cooking.
Using Normal Oven Mode in the Right Hand Oven
1. Adjust oven shelves to desired position/s.
2. Set the right hand oven temperature control to the desired temperature.
3. When cooking is complete turn the right hand oven temperature control off.
HINT: If water is used in your cooking (such as water placed in a baking dish) the water evaporating during cooking may
cause condensation to escape and run down the front of your appliance. This should not cause any problem to
your appliance, however it is advisable to wipe away the condensation from the exterior of the oven with a very
warm damp cloth during cooking.
NOTE: Always stand clear of the oven when opening the oven door/s as built up steam may escape rapidly.
For the FED model the oven temperature control for the right hand oven overrides the grill controls if both controls
are on at the same time.
29
Page 32

COOKING MODES AND INSTRUCTIONS
4.13 Grilling in the Right Hand Oven (FED Model)
This mode of cooking uses the infrared heat of the top inner element to cook foods to your requirements. The grill
control for the right hand oven has a full range of heat settings from Lo to Hi (full).
This method of grilling in the oven is recommended for short duration (5 minutes or less) grilling only
which is ideal for toasting (see note below). Foods with higher fat content or foods which require more than
5 minutes grilling time must be grilled using the Fan Grill mode of the left hand multi-function oven. The
Fan Grill mode has been developed to generally replace grilling with the door open (see Fan Grill for details on
Fan Grill mode).
When in Grill mode the oven door should be closed. If the door is not closed, discoloration may occur to the
control panel. IT IS RECOMMENDED THAT THE OVEN Grill MODE IS NOT OPERATED WHEN RESIDUAL HEAT
REMAINS IN THE OVEN.
Using the Grill in the Right Hand Oven
1. Commence grilling from a cold oven only.
2. Place food on grill rack and pan supplied (use grill rack in low position).
3. Place grill pan on shelf carrier position of your preference.
4. Select the heat desired for grilling using the right hand oven Grill control.
5. When cooking is complete turn the right hand oven Grill control to the off position.
NOTE: The grill element has a safety shutdown at approximately 200°C. Once the temperature in the oven has reached
this limit the element will switch off until the oven cools slightly at which time the element will resume heating.
(This temperature is generally reached after approximately 10 minutes)
WARNING: The grill pan handle provided should only be used to assist in sliding the grill pan in and out of the oven
compartments. AT NO TIME MAY IT BE USED FOR LIFTING THE GRILL PAN, ESPECIALLY WHEN THE
PAN IS LADEN WITH FOOD.
NOTE: For the FED model the oven temperature control for the right hand oven overrides the grill control if both controls
are on at the same time.
30
Page 33

COOKING MODES AND INSTRUCTIONS
4.14 Automatic Programmed Cooking
The multi-function oven can be set to turn on and off automatically. Using automatic settings normally implies
that food will be left unattended in the oven. It is important to select food that:-
does not have to be supervised during cooking;
will last safely for possibly long periods in the oven prior to cooking;
will last safely in the oven after cooking is complete.
When calculating cooking times, remember to take into account the retained heat after the oven turns off (particularly
if the oven will be unattended when it turns off) and (if applicable) any pre-heating time.
NOTE: Automatic cooking is available in the multi-function oven only and suitable only in Defrost, Fan Oven, Normal
Oven and Fan Grill modes.
Once the oven is programmed:-
The remaining cooking and finish times can be momentarily displayed and altered by using the Start/Cook, Stop
<
and buttons.
<
To cancel the automatic settings press the Reset button. The settings will be erased and the AUTO symbol will no
longer be displayed.
NOTE: If the times are set or altered such that the finish time is less than the present time plus the cooking time an alarm
will sound. Check the set times and correct them or press the Reset button to erase the settings then re-enter the
appropriate automatic settings.
If the Reset button is pressed to cancel any alarms, any automatic settings in memory will be cancelled and the
unit will be set for manual operation.
31
Page 34

COOKING MODES AND INSTRUCTIONS
4.14.1 Setting the Oven to Stop Automatically
This function is used to start cooking immediately and cook for a selected length of time or until a selected time
of day.
To set a cooking duration time (i.e. cook for a selected length of time) press the Start/Cook button to display the
remaining cooking time. The cooking time can be set using the or buttons.
OR
To set a finish time (i.e. cook until a selected time of day) press the Stop button to display the current finish time.
The finish time can then be set using the or buttons.
The AUTO and
of day. Select the mode of cooking and the temperature you require. The oven will commence operation immediately
and will cook for the selected cooking duration time or until the selected finish time.
Once the program is complete the oven will automatically turn off and the alarm will sound. The AUTO indicator
will flash and the symbol will no longer be displayed. Pressing any of the 4 left-hand buttons will cancel the
alarm. If not manually cancelled the alarm will self cancel after a few minutes.
Remember to ensure all oven controls are OFF if no further cooking is required.
symbols will be displayed to show a program has been set and the display will revert to the time
<
<
<
<
32
Page 35

4.14.2 Setting Oven to Start and Stop Automatically
This mode is used to cook for a selected length of time and finish cooking at a selected time. The cooking time
and the finish time can be programmed in any order, however, in the following description the cooking time is set
first.
To set the cooking time press the Start/Cook button to display the remaining cooking time. The cooking time can
then be set using the or buttons. The AUTO and
and the display will revert to the time of day.
To set the finish time, press the Stop button to display the current finish time (i.e. the current time of day plus the
set cooking time). The finish time can then be set using the or buttons. If a delayed start has been set, the time
of day and the AUTO symbol will be displayed.
Select the mode of cooking and the temperature you require. The electronic timer will calculate the difference
between the set finishing time and the selected cooking time to achieve the correct time that the oven will
commence operation. The oven will turn on at the calculated time, the
will cook until the selected finish time.
Once the finish time is reached the oven will automatically turn off and the alarm will sound. The AUTO indicator
will flash and the
alarm. If not manually cancelled the alarm will self cancel after a few minutes
Remember to ensure all oven controls are OFF if no further cooking is required.
<
<
symbol will no longer be displayed. Pressing any of the 4 left-hand buttons will cancel the
COOKING MODES AND INSTRUCTIONS
symbols will be displayed to show a program has been set
<
<
symbol will be displayed and the oven
33
Page 36

COOKING MODES AND INSTRUCTIONS
4.15 Cooktop Cooking
To achieve the best possible cooking results, the following points are recommended:-
* Make sure that both the cooktop surface and the bottom of your cookware is clean and dry before cooking.
Clean and dry surfaces will help prevent scratches and stains on your cooktop and cookware.
* Use good quality saucepans with thick ground bases (preferably 5 mm thick) that effectively cover the heating
area. Pans which have smooth, slightly concave or flat bases when cold will expand and become flat when hot.
Thin, warped, dented or ridged bases can cause irregular heat distribution resulting in uneven heating of food.
Quality stainless steel pans are recommended.
* The size of the pan should closely match the size of the cooking zone to be used - not much wider or narrower.
If the diameter of the base of the cookware is much smaller than the diameter of the cooking zone, you will
waste energy and increase the risk of burning spills. If the cookware is too large for the burner boiling times will
be delayed.
* Use a set of twin or triple saucepans or saucepans with dividers when individually cooking several vegetables
at the same time using only one burner.
* When steaming, use saucepans with close fitting lids.
* When cooking food such as cut vegetables or fruit, cut the food into pieces of uniform size to obtain even
cooking.
* When cooking vegetables use a minimum amount of hot water to obtain a crisp texture and prevent over
cooking. The quantity of water will depend on the type, quantity and quality of the vegetables being cooked.
With the exception of frying, etc., always cook with the lid on the saucepan at the correct heat level to prevent
boilovers.
WARNING: Oversize cookware will deflect heat towards the cooktop and bench top surfaces. Cookware with large
bases, especially if placed off-centre over the burners, may cause deterioration of the cooktop and bench
top surfaces. Such damage is not covered under the provisions of the warranty.
34
Page 37

Gas Cooktop
COOKING MODES AND INSTRUCTIONS
HEAT DEFLECTED
TOWARDS BENCHTOP
HEAT EXTENDED
BEYOND BASE OF PAN
35
Page 38

COOKING MODES AND INSTRUCTIONS
4.16 BBQ Grill Cooking (FED Model)
The electric BBQ grill has two heating zones (front and rear) with individual controls to select the heat desired for
cooking. Both controls have a full range of settings and can be used independently or together.
Using the BBQ Grill
1. Raise the BBQ’s stainless steel lid or remove it entirely.
2. Select the area/s you wish to cook on (front, rear or both) and turn on the relevant control/s to your required
settings. Allow approximately 5-10 minutes for the volcanic rock and grill grids to reach cooking temperature.
3. Commence cooking.
4. When cooking is complete make sure all controls are turned to the off position. Allow the unit to cool to room
temperature before lowering or re-fitting the stainless steel lid.
WARNING: The appliance must never be left unattended when cooking with the BBQ grill as built up cooking fats in the
unit may ignite during use. (see Cleaning and Maintenance for cleaning requirements for the BBQ grill)
The BBQ’s stainless steel lid must be in the up position when the grill is in operation.
36
Page 39

CLEANING AND MAINTENANCE
5. CLEANING AND MAINTENANCE
Proper cleaning and maintenance of your appliance will provide you with years of pleasant use. To maintain the
appearance and durability of your appliance we encourage you to read and follow the instructions, hints and
warnings included throughout this manual. Care must always be taken to prevent scratches on your appliance
from hard or sharp objects.
NOTE: People with sensitivity to cleaning chemicals must take the necessary precautions. St George recommends
wearing protective gloves while cleaning the appliance. Routine cleaning of the appliance should only be performed
when the appliance is at room temperature.
DO NOT USE ANY ACIDIC OR CAUSTIC CLEANERS, ABRASIVE POWDERS OR SCOURERS ON THE
INTERIOR OR EXTERIOR OF THE APPLIANCE. Substances or items with these properties may discolour or
damage the finishes of your appliance. If any abrasive, acidic or caustic substance or cleaning agent should
come into contact with the appliance, rinse off immediately with water, taking special care to avoid injury if
surfaces are hot.
5.1 Recommended Cleaners
Mild detergents and warm water together with a clean, soft, non-abrasive cloth achieve good results for normal
cleaning.
Diluted washes with Ammonia and water should rinse away any adhesive residue or gummy deposits on the
appliance surfaces. Eucalyptus oil (small amounts) is also good for removing adhesive residue. Alcohol based
products (e.g. Methylated Spirit, etc.) are not recommended.
Brand name cream cleansers and concentrates, without abrasive qualities, can be used in small amounts to
break down greasy deposits and dirt.
After cleaning make sure cleaned surfaces are thoroughly rinsed to prevent any risk of baked on cleaner residues
and wiped dry with a clean, soft cloth.
NOTE: When cleaning stainless steel surfaces St George recommend 3M brand or Advance (by Cleaveland Cleaning
Supplies) stainless steel cleaner. Other reputable brand cleaners specifically formulated for cleaning stainless
steel may also be acceptable. Do not use steel soap pads or abrasive scourers of any kind. The abrasive qualities
of these pads will ruin the even brushed finish of the stainless steel and any residual metal fibres may corrode
causing a rusty/dull appearance. Metal polishes with abrasive qualities are also not recommended.
37
Page 40

CLEANING & MAINTENANCE
DO NOT USE ANY ACID OR CAUSTIC
CLEANSERS OR ABRASIVE POWDERS
OR SCOURERS ON THE INTERIOR
OR EXTERIOR OF THE APPLIANCE
caustic sprays
Burner Cap
Gas outlets should be
free of obstructions
abrasive powder
oven spray
Polished Aluminium Dress Ring
abrasive sponge
38
steel wool
Page 41

5.2 Routine Cleaning
If possible, the oven and/or cooktop should be wiped down after each use to prevent dirt and grease build up.
Ensure all controls are off and the appliance is cool before cleaning. To clean the exterior, wipe the control panel,
handles, glass, stainless steel and enamel surfaces regularly using a warm, damp, non-abrasive cloth. Mild
detergents may be safely used on all of these surfaces. When wiping stainless steel surfaces which have a
brushed finish, wipe in the same direction as the brushing. The pan supports (all models except FEC) easily lift off
and are dishwasher safe.
Cleaning the oven is made simple with St George’s high quality vitreous enamel. To clean the oven interior
remove the door/s (see Removing Oven Door) for better access while cleaning. The shelves and shelf guides
can be lifted out for cleaning by removing the relevant thumb screws. The shelves and shelf guides can be
washed by hand or by dishwasher. The fan cover can be lifted out for cleaning separately by removing the
fasteners retaining it in place. The fan blade can also be removed for cleaning if necessary. Note that the fan
blade nut has a left handed thread.
Wipe out the compartment/s with a warm, damp, non-abrasive cloth. Mild detergents may be safely used on the
oven interiors. Do not forget the inside top and back of the oven/s and the back of the oven door/s. If using
commercial oven cleaners, choose only non-caustic cleaners and follow the manufacturer’s instructions. Avoid
contact with elements, rubber door seals and exterior surfaces.
After cleaning make sure all surfaces are thoroughly rinsed and then wiped dry with a clean, soft cloth.
CLEANING AND MAINTENANCE
39
Page 42

CLEANING AND MAINTENANCE
5.3 Spills, Spatters and Accidents
When using the appliance, it may be soiled by food spills and spatters or foreign items such as plastics accidentally
coming into contact with warm or hot surfaces. Some foods, such as fruit juices (especially citrus juices like
lemon juice) and vinegar’s (i.e. acidic substances) or sugar or foods containing sugar can discolour or damage
enamel finishes.
The enamel interior of your St George appliance has a hard durable finish which is resistant to wear and
discoloration. However, to maintain the appearance and durability of the finish any spills must be wiped off
immediately. This should be done as soon as possible and necessary precautions must be taken to avoid injury
from hot surfaces. Once cool the affected area should be thoroughly cleaned and rinsed using non-abrasive, mild
cleaning detergents and water.
WARNING: USE OF ALUMINIUM FOIL IN OVENS
The use of aluminium foil on the base of the oven to avoid spillage and improve cleaning is not recommended.
The bottom element of St George ovens is concealed under the base of the oven liner (not exposed). Foil or
dishes with reflective qualities must never be placed on the base of the oven during cooking as the
concentration of the direct and reflected heat will damage the enamel surface. Damage resulting
from such use is not covered under the provisions of the warranty.
NOTE: To fully preserve the enamelled finish of the grill pan supplied with your appliance, make sure that it is properly
lined (e.g. with aluminium foil) when used for grilling or baking fish and other foods with high acid content such as
fatty meats and fruits.
40
Page 43

CLEANING AND MAINTENANCE
5.4 Cleaning the BBQ Grill (FED Model)
The BBQ grill plates, element, volcanic rocks and smokeless grill tray are removable for cleaning. The grill plates
and tray are dishwasher safe and the fixed grill box (in the unit) can be easily wiped clean.
WARNING: Built up cooking fats in the unit may ignite during use. To avoid the build up of cooking fats the BBQ unit
must be regularly cleaned. Volcanic rocks are absorbent and may entrap cooking fats within the rock pores.
When cleaning the unit, the rocks should be removed and cleaned by soaking in warm soapy water and
then thoroughly rinsed with hot water. The best way to avoid fat build up in addition to cleaning is to
periodically replace the BBQ rocks. With normal usage it is recommended that the rocks be replaced every
six months. The rocks may need to be replaced at different intervals depending on the unit’s usage.
5.5 Removing Oven Door (downward opening door models only)
The oven door can be easily removed for better access while cleaning. To remove the oven door:–
1. Open the door fully and pull the clips toward you onto the hooks.
2. Raise the door slightly and, holding the sides of the door about half way up and making sure the clips stay on
the hooks, lift the door gently. This should disconnect the hinges from the oven frame.
3. Remove the door by continuing to raise it while pulling the door away from the oven. When handling the door
be careful not to dislodge the clips off the hooks. If so the hinge will have to be closed by hand and the clip re
engaged onto the hook before re-fitting onto the oven.
To re-fit the oven door:-
1. Holding the door at an angle to the oven, slide the hinges into the oven frame, making sure that on each side
the top, curved arm fits into the top slot and the lower arm fits into the bottom slot.
2. Make sure the hinges are pushed in as far as they will go and the lower arm engages into the plate mounted in
the oven frame.
3. Open the door completely and disengage the clips from the hooks. You may need to push the clips down with
your finger if they do not fall away from the hooks by themselves. The door can now be opened and closed as
normal.
41
Page 44

CLEANING & MAINTENANCE
Hook
Clip
Lower Hinge
Arm
REMOVAL & REPLACEMENT OF OVEN DOOR
(DOWNWARD OPENING DOORS ONLY)
Top Hinge
Arm (curved)
42
Page 45

5.5.1 Door Glass Removable
The piece of glass on the back of the door can be removed for cleaning. To remove the glass from the door back:
1. Open the oven door fully
2. Use a coin or screwdriver to loosen the 2 fixing screws.
Side Opening Doors: Take care the glass does not fall when loosening the screws.
3. The glass can be removed for cleaning.
Do not lose the silicon washer and sleeve, these parts are there to protect the door back and glass from damage.
Installation is the reverse of removal. Ensure that the silicon washer and sleeve are replaced. The fixing screws
need only be firmly finger tight. Do not over tighten.
CLEANING AND MAINTENANCE
43
Page 46

CLEANING AND MAINTENANCE
5.6 Self Clean Oven Liners
An Optional Self Clean Oven Liner Kit is available as an accessory which,when fitted into the oven, catalyses
cooking fats which come into contact with their surfaces during oven operation.The fats burn and flake to the
oven floor so a quick brush out when the oven is cool is all that’s required. The non-liner surfaces in the oven can
then be wiped down for brilliantly simple results. For extra cleaning action, heat the empty oven at 230°C for 15
to 20 minutes.
Be very careful not to scratch the surfaces of the liners. Large spills should be removed by sponging the liners
using warm water and a soft sponge. If large areas of the catalytic coated liners are covered with cooking fats the
self cleaning action may not be as effective. The catalytic liners can be cleaned by removing them from the oven
and rinsing with clear hot water only. Cleansing agents or oven cleaners must never be used on the self-clean
liners.
5.7 Changing the Light Globe
The oven illumination lamp/s are located in the side wall/s of the oven compartment/s. The light globe is located
behind the glass cover and is a screw-in type.
Ensure that the appliance is switched off before replacing the lamp to avoid the possibility of electric shock.
To change a light globe:-
1. Gently lever out the glass cover from the rear edge.
2. Unscrew the light globe and screw in a replacement globe.
3. Replace the glass cover making sure it fits correctly into place.
44
Page 47

CLEANING & MAINTENANCE
5.8 TROUBLE SHOOTING GUIDE
SYMPTOM REMEDY
No power supplied to appliance Has the mains been disconnected. Check meter box,
has the mains fuse or circuit breaker blown or tripped.
Oven power is on but appliance Oven may be set on Automatic
does not operate. (See Automatic Programmed Cooking)
Oven power is on but there Oven may be set on Automatic.
is no heat Mode may be on incorrect selection.
Rubber seal has gap/s at bottom and ends Correct — some doors sealed this
do not meet. way for oven venting purposes.
Display is flashing, is only partly illuminated or is Turn power supply to appliance off,
cycling through various displays wait 30 seconds and turn power back on. Wait 90
seconds before resetting clock and using appliance.
IF YOU HAVE A PROBLEM WITH YOUR ST GEORGE APPLIANCE WHICH CANNOT BE OVERCOME USING THE
INFORMATION PROVIDED IN THIS MANUAL AND REQUIRE A SERVICE CHECK, PLEASE CONTACT THE RELEVANT
OFFICE IN YOUR STATE — for contact details see over.
To ensure prompt and efficient service please have the following details ready before making your call:–
Model Number Date and Place of Purchase
Serial Number Warranty Registration Number (if applicable)
45
Page 48

CABINET INSTALLATION INSTRUCTIONS
FED
FE90
46
Page 49

CABINET INSTALLATION INSTRUCTIONS
6. CABINET INSTALLATION INSTRUCTIONS
Your safety and the proper care of your appliance is extremely important. Incorrect installation of the
appliance as a result of not following the detailed specifications can affect the appliances performance.
Ovens incorrectly installed may invalidate the warranty and we strongly recommend that the oven cavity,
venting, wiring and gas connections be prepared as described in the specifications. This is critical to
appearance, oven performance and safety.
WARNING: Installation must comply with Standards Australia (within Australia) Wiring Rules as well as your local electrical
and building codes and regulations and any other applicable requirements.
Your appliance must be properly installed and grounded by a qualified technician.
This appliance must be installed according to the installation requirements of the local gas authority and the
appropriate installation code issued by the A.L.P.G.A and A.G.A (reference code AG601) and the building
authorities requirements and any other applicable requirements.
6.1 Measurements
Unless otherwise noted, all dimensions provided are in millimetres (mm). The sizes allow for only a small degree
of error so all cut outs must be precise and square. To ensure the cabinetry is well finished the cut edges must
also be square and care taken to ensure the cut edges are free of chips.
6.2 Preparing the Cupboard Cavity
Freestanding ranges may be fitted within cupboard surrounds or at the end of a cabinet arrangement.
Refer to the installation diagrams and Required Clearances for the various mounting options and necessary
clearances applicable.
47
Page 50

CABINET INSTALLATION INSTRUCTIONS
REQUIRED CLEARANCES
Required Clearance Dimension
A 600mm +
B 200mm + for Wok
C 150mm +
D 100mm +
E 13mm +
Adjustable feet provided on all
corners. 600mm depth includes
spacing for air circulation at rear.
All dimensions in mm.
Handles protrude forward by up
to an additional 50mm.
48
Page 51

6.3 Providing a Suitable Flue
Ventilation is provided by thermostatically controlled ventilation fans which expel oven vented air through slots
below the control panel.
6.4 Required Clearances
(Required Clearances Around Domestic Cooking Appliances - Extract from AG601)
All cooktops, rangehoods and/or exhaust fans shall be installed in accordance with the manufacturer’s
instructions. However, in no case shall the clearance between the top of the highest burner on the cooktop
to the lowest extruding part of the rangehood or exhaust fan (A) be less than 600 mm. (Clause 5.6.1.5)
Any other combustible materials less than 600 mm above the top of the highest burner shall be protected
for the full width and depth of the cooking surface in accordance with Clause 5.6.1.2. However, in no case
shall this clearance be less that 450 mm.
If (B) is less than 200 mm (275 mm for wok burner), any surrounding vertical combustible material shall be
protected in accordance with Clause 5.6.1.4 to a height (C) of not less than 150 mm above the burners for
the full dimension (length or width) of the cooktop.
Protection of the rear wall is required if the appliance is fitted without a splashback.
If (D), the distance to a horizontal combustible material from the periphery of the nearest burner is less
than 200 mm (275 mm for Wok burners), then (E) shall not be less than 13 mm (Clause 5.6.1.3). The dimension
(E) is measured from the hob down to the horizontal surface.
CABINET INSTALLATION INSTRUCTIONS
49
Page 52

CABINET INSTALLATION INSTRUCTIONS
6.5 Securing the Oven
For FECOMBI and FECOMBIWOK models an anti-tilt bracket is supplied which must be secured to the floor in a
position which allows the rear feet of the appliance to locate into the bracket slots when the unit is pushed back
into the installed position.
For gas appliances, the final gas connection shall be made using a flexible hose or annealed copper tubing of
sufficient length to permit the insertion and removal of the appliance. For gas appliances connected using flexible
hose, a resticking chain must be attached to the anchor point adjacent to the connection to limit movement to
80% of the hose length. Hose to be type A, 65°C rated with
1
/2
’’ BSP connections.
For appliances fitted with flexible electrical lead and plug, the general purpose outlet and switch must not be
installed within the appliance recess and must be readily accessible without having to remove the appliance.
Move the appliance into position in front of the opening and ensure rear edge of the appliance is parallel to the
front fascia of the enclosure. Slide the appliance far enough into the cavity to be able to make the final gas and
electrical connections ensuring the gas and electricity are turned off. After all connections have been made, slide
the unit back fully into the recess and secure as necessary.
NOTE: The height of the unit can be altered, if necessary, by adjusting the feet before sliding into the recess.
50
Page 53

Gas and Electrical Connection
CABINET INSTALLATION INSTRUCTIONS
A
C
gas connection
point
B
D
electrical connection
cable entry
MODEL A B C D
FED 820 550 220 60
FE90 650 430 450 60
All dimensions are in Millimetres
51
Page 54

ELECTRICAL CONNECTION INSTRUCTIONS
7. GAS CONNECTION INSTRUCTIONS
7.1 Gas Supply Connection
WARNING: This appliance must be installed according to the installation requirements of the local gas authority
and the appropriate installation code issued (within Australia) by the A.L.P.G.A and A.G.A (reference
code AG601) and the building authorities requirements and any other applicable requirements.
1. Check the gas type of the appliance which is identified by a sticker attached to the appliance.
2. Ensure the location of the gas sup-ply and routing of the gas line is appropriate for the appliance (see installation
diagrams for gas connection location details).
3. A manual shut-off valve must be installed in the gas supply line, in an accessible position external to the appliance,
such that the gas supply to the appliance can be shut off in the event of an emergency or for servicing without
having to remove the appliance.
4. For LPG models, the gas supply for the appliance must be regulated to a pressure of 2.75 kPa (11” W.G.). The
gas inlet is fitted with an adapter incorporating a pressure test point and has a
For Natural Gas models, the gas supply is connected to the regulator supplied with the appliance which has a
1
/2
’’ female BSP thread. IT IS ESSENTIAL THAT THE REGULATOR ON THE APPLIANCE BE HELD FIRMLY
1
/2
’’ female BSP thread.
WITH A SPANNER WHEN CONNECTING THE SUPPLY. DO NOT OVERTIGHTEN. THE REGULATOR MUST
NOT BE CONNECTED TO APPLIANCE OR THE GAS SUPPLY WITHOUT THREAD SEALANT/LUBRICATION
AS DRY CONNECTION MAY PERMANENTLY BIND THREADS. The regulated pressure for Natural Gas is 1.0
kPa (4’’ W.G.).
5. After installing the gas supply and making all connections, the supply line connections must be checked for
possible leaks. With all controls of the appliance in the off position, open the gas supply valve and using a soap
and water solution check each gas connection one at a time by brushing the solution over the connection. The
formation of bubbles indicates a leak. Tighten the fitting and recheck for leaks. If it is not possible to correct the
leak by tightening, replace the fitting. Matches or lighters must never be used to check for leaks.
6. Turn on each burner control and light in turn. Check for a clear blue flame without excessive yellow tipping. If
burners show any abnormal combustion check they are correctly located. Sometimes burners may not ignite
immediately and may seem to ‘‘blow’’ slightly when they do ignite. This is usually due to air in the gas line, which
should clear itself.
7. If, after following the instructions, satisfactory performance cannot be obtained, contact the local gas authority
for advice and assistance.
8. For minor adjustments see Servicing and Minor Adjustments.
9. A two (2) yearly inspection of the appliance by an authorised service agent will ensure many years of trouble free
52
service (Note: This is not provided under warranty).
Page 55

7.2 Injector Sizes for Gas Cooktops
ELECTRICAL CONNECTION INSTRUCTIONS
MODEL BURNER
INJECTOR DIAMETER MJ/h INJECTOR DIAMETER MJ/h
mm mm
FED SEMI-RAPID 1.18 6.0 0.65 5.4
RAPID 1.6 12 0.92 11.0
WOK x 2 1.8 14.5 0.95 12.0
FE90 AUXILIARY 0.9 4.0 0.50 3.2
SEMI-RAPID 1.18 6.0 0.65 5.4
RAPID 1.6 12 0.92 11.0
WOK 1.8 14.5 0.95 12.0
FISH BURNER 1.4 9.5 0.85 10.0
7.3 Conversion from Natural Gas to ULPG
THE FOLLOWING MUST BE CARRIED OUT BY AN AUTHORISED PERSON
General Information
The Hob is supplied pre-adjusted for Natural Gas.
1. The injectors required for adapting this Appliance to ULPG are supplied in the Conversion Kit P/N 51587 for FED and P/N 51586.
2. When the appliance has been converted to ULPG tick the box on the injector information label P/N 51589 for FED P/N 51588 for FE90.
3. Change the Black Natural Gas labels to the Red ULPG labels.
Conversion
1. Remove the Pan Supports, Burner Caps, Burner Ring/dress Rings.
2. Remove the fitted injectors one by one and replace with the ULPG injector sized as the label 51589 (FED) or 51588 (FE90) attached to
the appliance and also in the Users Manual.
3. Fit the Test Point Adaptor at the Gas Inlet.
4. Replace all the Burner parts ensuring that they are correctly keyed to the mating part.
5. After fully leak testing and working on each burner in turn, remove the control knob and light the burner and then adjust the minimum
flame via the adjustment screw in the centre of the Gas Cock shaft. With the gas cock set in the low flame position, turn the adjustment
screw clockwise to reduce the flow to the required level. Two burners should be full on while adjusting a burner.
6. Replace the Control Knobs and Pan Supports.
NATURAL GAS LPG
53
Page 56

ELECTRICAL CONNECTION INSTRUCTIONS
8. ELECTRICAL CONNECTION INSTRUCTIONS AND WIRING DIAGRAMS
8.1 Wiring Rules and Warnings
WARNING: All aspects of the installation must conform with the requirements of the Standards Australia (within
Australia) Wiring Rules as well as your local electrical and building codes and regulations and any
other applicable requirements and conditions of your Local Power Supply Authority.
A licensed electrician must perform the electrical work when installing this appliance. The supply
cable and fuse rating must be suitable for the appliance.
WARNING: To avoid mains borne interference, this appliance must be installed individually on a separate and distinct
final sub-circuit.
NOTE: To the Electrician – please ensure sufficient supply cable is provided to allow the appliance to be removed from
the cavity should any servicing be necessary. This will also allow easy connection of the supply.
8.2 Voltage Supply Connection
To connect the electrical supply:-
1. Ensure the supply cable and fuse rating are suitable for the appliance (see Electrical Loads).
2. For models not fitted with a flexible lead and plug, remove the cover plate by undoing the screws.
3. Fit a suitable entry bush to the conduit entry bracket and feed the fixed wiring through.
4. Connect the wiring to the terminal block using the screw connections provided. Ensure the wires are properly
secured to prevent any high resistance electrical connection.
For the FED model, the supply can be single or 2 phase. For 2 phase connection the link between A1 and A2
must be removed.
5. Replace the cover plate and secure in position using the screws making certain that all wiring is clear of any
metal work and the screws.
WARNING
TO AVOID MAINS BORNE INTERFERENCE, THIS APPLIANCE MUST BE INSTALLED
INDIVIDUALLY ON A SEPARATE AND DISTINCT FINAL SUBCIRCUIT
54
Page 57

ELECTRICAL CONNECTION INSTRUCTIONS
8.3 Electrical Loads
MULTI-FUNCTION OVEN FED FE90
NORMAL OVEN 2400W 3000W
FAN OVEN 2200W 2200W
GRILL 2700W 3500W
FAN & LIGHT 200W 100W
WARMER DRAWER 500W 500W
BBQ GRILL 2800W –
SMALL HOTPLATE – –
MED HOTPLATE – –
LARGE HOTPLATE – –
RIGHT HAND OVEN
OVEN 2400W –
GRILL 2700W –
TOTAL 10.0 kW 4.8 kW
When connected to a subcircuit protected by a circuit breaker, the current drawn by an oven may cause the
cuircuit breaker to trip in some cases. It is recommended that the following installation procedures are used.
Model kW Rating Maximum Current Recommendation
(Amperes) Cable Size Circuit Breaker
FED 10.0 42 4.0 mm
FE90 4.8 20 2.5 mm
2
2
45 Amp
25 Amp
55
Page 58

9. SERVICING AND MINOR ADJUSTMENTS
9.1 Thermostat Adjustments
The oven thermostat is factory set and calibrated over the whole temperature range and is not adjustable.
9.2 Setting Gas Pressure
A pressure test point is provided on the pressure regulator (for Natural Gas models) or on the inlet adapter (for
LPG models) at the gas connection point of the appliance. The pressure should be set with one burner fully on.
The set pressure should be 1 kPa for Natural Gas or 2.75 kPa for LPG.
9.3 Gas Simmer Flame Adjustment
The minimum gas flow for each burner is factory set but can be adjusted if necessary. The minimum flow can be
increased or decreased by removing the control knob and:–
For all models, turning the adjustment screw in the centre of the control shaft using a small flat bladed screw
driver. Take care not to damage the head of the screw.
Pressure Adjustment
Screw
SERVICING AND MINOR ADJUSTMENTS
Pressure test
Point
By pass
Screw
Adjustment
Via
Centre
56
Shaft
Page 59

Printed by PETER JONES PRINTING SERVICES PTY. LTD. Phone: 9533 9700
Page 60

AUSTRALIA
St. George Appliances
South Sydney Corporate Park
Letterbox No. 3
184 Bourke Road
Alexandria NSW 2015
Phone: 1300 652 100
NEW ZEALAND
The Applico Group Ltd
120 Captain Springs Road
Onehunga, Auckland
New Zealand
Phone: (09) 574 1050
Fax: (09) 574 1051
Kleenmaid Pty Ltd
ACN 001 905 808
Trading As
St George Appliances
A Tradition of Excellence
5 Year Warranty
Proudly Australian Made
CANADA
Euro-Line Appliances
2150 Winston Park Drive
Oakville, Ontario L6H 5V1
Phone: (905) 829 3980
Fax: (905) 829 3985
# 52122
 Loading...