

Page 1

Instructions for Use
and Warranty Details
Dishwasher DW27I
DISHWASHER
collection
▼▼
Page 2

• 2 •
Page 3

Page
Safety advice 4
Installation 5-6
Adding rinse aid 6
Adjusting the water softener 7
Loading the dishwasher 8
Adding washing detergent 9
Choice of programmes 10
Starting the machine 11
Glassware, Pots and Silverware 12
Cutlery, China and Woodware 12
Technical characteristics 13
Installation the door panel 13
Instructions for cleaning and maintenance 14
Troubleshooting 15
Illustrations 1 - 3 16
Illustrations 5 - 15 17
Instructions for laboratory tests 18-19
Warranty and Service
BEFORE READING THESE EXPLANATIONS, CONSULT THE ILLUSTRATIONS
ON THE PAGES 16-17 OF THIS INSTRUCTION MANUAL
——————
CONTENTS
• 3 •
Page 4

• 4 •
Please read the instructions in this booklet
carefully. You will find instructions necessary for
security, installation and using your machine as
well as the guarantees. We advise you to keep
the booklet and pass it on if you sell the
machine.
We cannot accept responsibility if the
instructions below are not followed :
- Please destroy the packaging in an
appropriate way and in compliance with
environmental protection legislation.
- If the machine is visibly damaged, do not
connect it and contact your dealer.
- It should be placed in a frost-free area. In case
of frost, the hydraulic systems may be
damaged.
- The water supply and evacuation pipes must
be connected according to instructions.
Incorrect connections may cause damage.
- To ensure proper stability, built-in machines
should be installed below a continuous work
surface fixed to the adjoining cabinets.
- You should not stand or lean on the open
dishwasher door. The machine could tip over
or be damaged.
- The machine is intended to wash dishes and
should not be put to other uses.
- Using solvents to clean or maintain your
machine is highly unsuitable.
You should store dishwasher products as well as
other cleaning products out of the reach of
children. These products have a corrosive effect
on the mouth and pharynx if they are
swallowed.
- If the machine malfunctions due to other
causes than those mentioned in this booklet,
disconnect the machine (remove the plug) or
break the circuit concerned and contact our
after-sales service.
- The machine complies with applicable safety
regulations. Any repairs should only be carried
out by qualified technicians. Repairs or
changes that do not conform may be
dangerous for the user. In case of replacement,
only use original parts.
- Broken machines should be taken to the
closest recycling centre. Destroy the door
closing system so it no longer works (children
may close themselves in whilst playing and
suffocate). Cut the electric cable after having
removed the plug from the socket.
- You are strongly advised to disconnect the
machine after use and turn off the water
supply.
- Do not let children play with the machine or
touch it.
- The water inside the machine is not suitable
for drinking.
- When the machine is running, do not open
the door. This may provoke steam leakage or
splattering of water.
SAFETY ADVICE
This appliance is not intended for use by young
children or infirm persons unless they have been
adequately supervised by a responsible person
to ensure that they can use the appliance safely.
Dishwasher detergents are strongly alkaline.
They can be extremely dangerous if swallowed.
Avoid contact with the skin and eyes and keep
children away from the dishwasher when the
door is open. Check that the detergent
receptacle is empty after completion of wash
cycle
Page 5

• 5 •
Fitting the door panel :
There are two ways of fitting the front of your
machine :
1 - A cabinet door + false drawer
2 - A complete front panel
Consult page 13 of this manual for this
operation and use the assembly template and
accessories supplied with your machine.
Adjust the springs to set the door, see Fig. 15.
You will find this easier with the door closed.
Important
: This machine best operates
equipped with door panels.
Plumbing :
1 . Water Connection
• This Kleenmaid “Super Silent System”
Dishwasher can be connected to cold water or
hot water not exceeding 65 °C.
• We recommend that the Dishwasher is
connected to a cold water supply.
NOTE : Connection to a hot water supply will
change the length of the wash cycles
and can reduce the drying efficiency of
the dishwasher.
2 . Water Supply (Fig. 2)
a . The water supply to the Dishwasher should
not be less than 12 mm domestic water pipe.
A readily accessible tap must be installed in
the supply pipe.
b . The inlet connection hose supplied is fitted
to a 3/4" BSP male thread, which must have
an adequate sealing face for the washers
supplied.
c . If the Dishwasher is connected to a hot water
supply, then the water temperature at the
Dishwasher must never exceed 65 °C.
d . The water supply pressure is to be between
0.2 MPa (3.0 psi) minimum and 0.7 MPa
(100 psi) maximum.
If pressure is greater 100 psi, it is recommended
to fit a pressure limiting valve to prevent
damage from rises and increased pressure of
peak demand.
INSTALLATION
IMPORTANT ! :KLEENMAID RECOMMENDS THAT
YOUR DISHWASHER BE INSTALLED BY AN
AUTHORISED Kleenmaid INSTALLER OR SERVICE
AGENT !!
Before you start :
1 . These instructions are intended as a guide
only. It is the responsibility of the Plumber and
Electrician to ensure that each installation
complies with local by-laws.
2 . Connection to cold water is recommended.
3 . This Dishwasher must not be connected to a
water supply where the temperature of the
water exceeds 65 °C. If this Dishwasher is to be
connected to a system where there is no
temperature control, a temperature control
valve, limiting the water temperature must be
fitted.
4 . When installing the Dishwasher, check that
the drain hose does not become restricted or
kinked.
Levelling : Adjusting the feet :
Make sure that the machine is properly upright
and stable. The four feet may be altered, adjust
them if necessary using a wrench or a
screwdriver. Badly adjusted feet may move the
door off centre and make the machine unstable.
Poor adjustment of the levelling feet can cause
the dishwasher to leak.
IMPORTANT : Do not connect the dishwasher to
the power or water supply before completing
installation.
If you are installing your dishwasher on carpet,
adjust the feet so that you leave space for air to
circulate underneath the machine.
Fitting your machine into your kitchen :
The building in sizes for the machine are given in
the “technical characteristics” chapter on
page 13.
Glue the steam protector supplied with your
machine underneath your worktop.
To maintain stability and proper alignment, you
should attach your machine to the work surface
using a bracket.
Page 6

• 6 •
Protection against water damage :
Your machine is equipped with systems that
protect you from flooding.
- Anti-overflowing mechanism. This system
activates the waste pump if the water level in
the tub reaches an abnormal level.
- Anti-leakage device. This system interrupts the
water supply if a leak is detected underneath
the machine.
If one of these mechanisms is started, contact
the after-sales service to put it back into
working order.
Your machine is equipped with a antibursting pipe.
Evacuating waste water (Fig. 3)
Connect the waste pipe
A. Either to the ventilated siphon. The waste
pipe must be free in the siphon and should
be no deeper than 20 cm.
B. Or on the sink siphon. Be careful not to
forget to remove the siphon cover.
Be careful to fix the waste pipe down with a tie
to avoid any flooding. In any case, the end of
the pipe must be between 60 cm and 1 m high.
Avoid folding the pipe when installing.
- Horizontal drain lines should not exceed 5 m
length.
- Ensure that the drain hose is fully extended
and not restricted in any way.
NOTE : Do not connect drain hose directly to a
waste disposal unit as blocking with food
waste will occur.
Connecting to the power supply :
You should use an earthed plug to connect to
the power supply. In case of a direct connection,
the main switch terminal should be at least
3 mm apart.
The electric plug should remain accessible. Do
not use an extension lead or multiple plug.
• We cannot be held responsible for any
incident caused by the machine being badly
earthed.
In any case, the machine must be fitted in
compliance with the applicable regulations in
your state as well as any extra instructions from
the Electricity Company. The machine’s approval
and model are indicated on the sticker fixed to
the left-hand side of the door. The machine
must be turned off when connecting to the
electric circuit.
Replacing the electric lead
WARNING : In the interests of safety, the
electrical supply lead should ONLY be replaced by
the manufacturer’s after-sales staff or a similarly
qualified person.
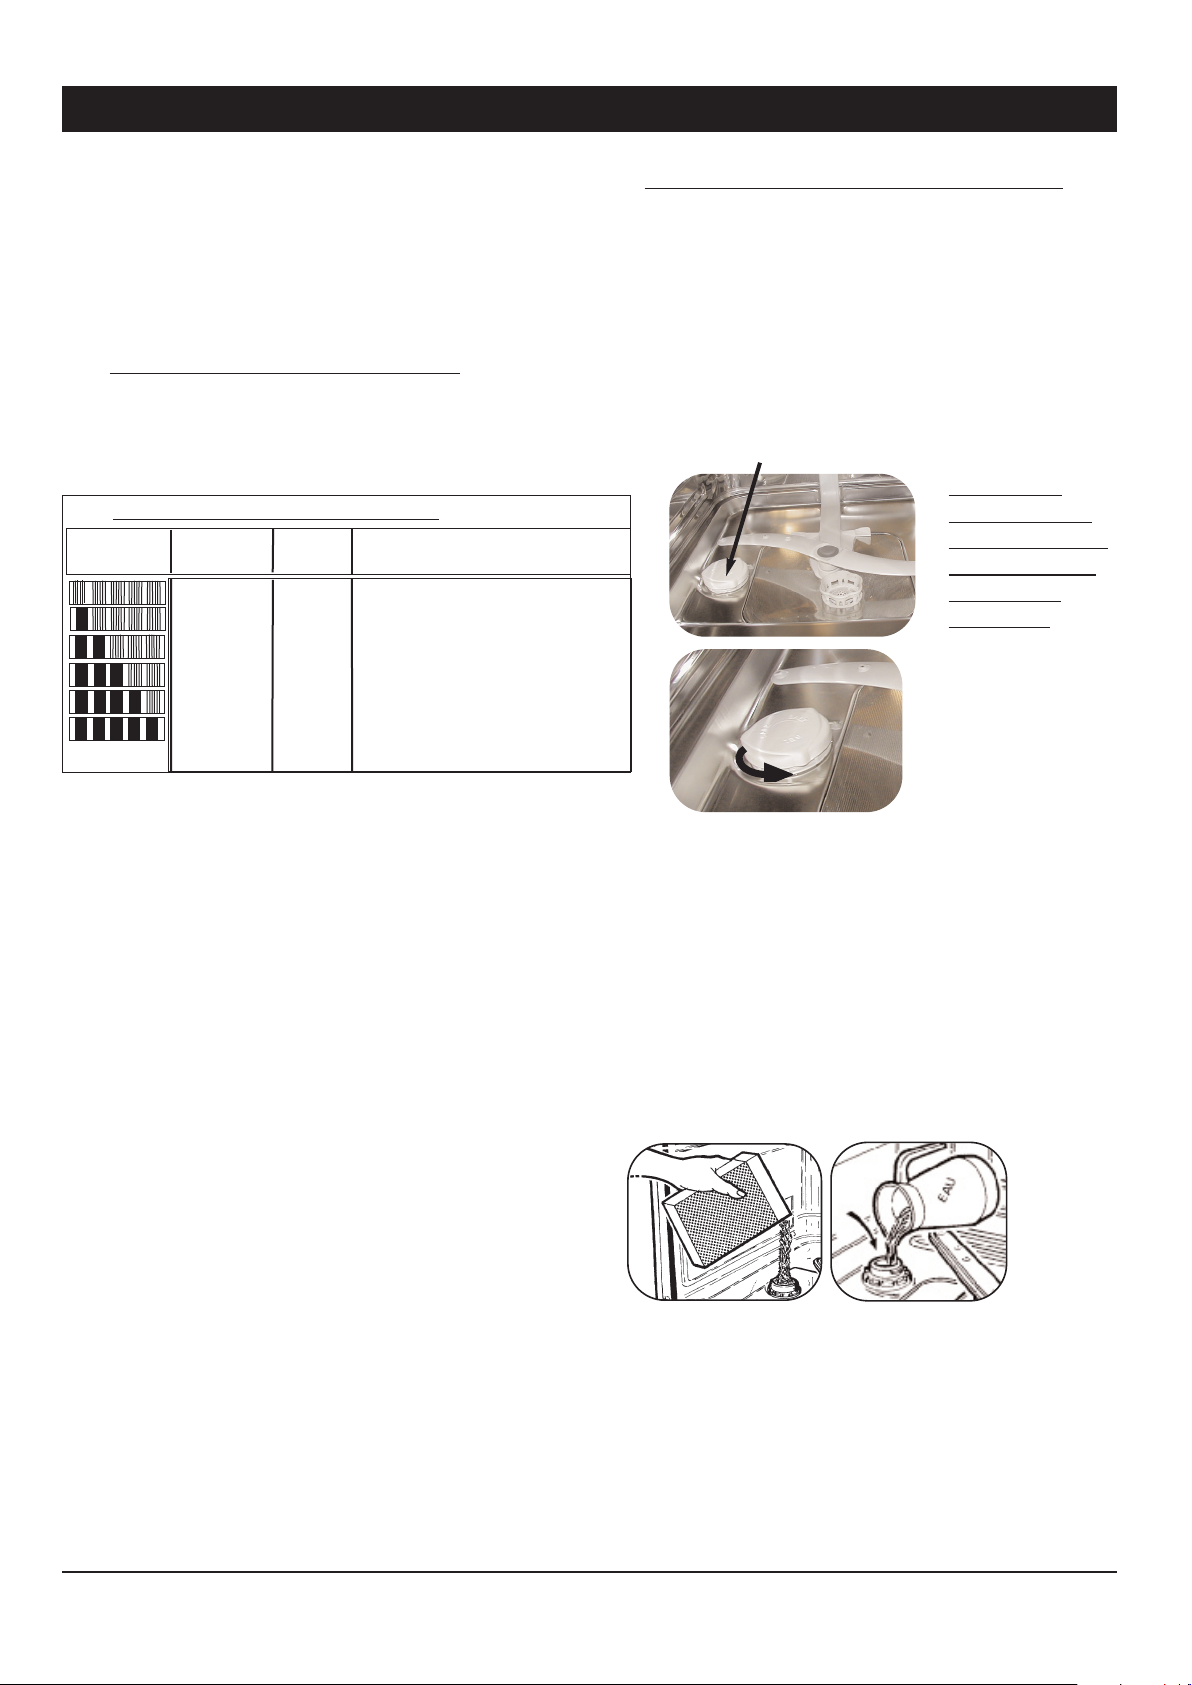
Rinse aid is necessary as it avoids stains on the
dishes and makes drying easier.
IMPORTANT ! Only use products intended for
dishes and NOT detergents intended for hand
washing !
Filling and adjusting the rinse aid container
(Fig. 5-6) :
Put the door in a horizontal position when
filling the container and unscrew the cap in the
door counter clockwise.
Fill to just below the adjusting lever.
If the product overflows on filling, remove the
excess with a sponge to avoid any foam
forming.
If you experience stains or bad drying after
several cycles, you may adjust the dosage using
the selector :
Soft water : level 1 to reduce the dose
Hard water : level 3 to increase it.
Finding the level of the rinse aid :
A light on the control panel comes on when
you need to add rinse aid.
For child safety :
Dishwashing detergent and rinse aid should be
treated as poisons and stored where they are
not accessible to children.
ADDING RINSE AID
INSTALLATION CONTINUED
Page 7
• 7 •
The water softener must be adjusted correctly
to ensure no streaks after washing and drying.
Your dishwasher is fitted with a water softening
system that operates using regenerating salt.
You must set the water softener according to
the hardness of the water in your area.
➀➀
-
Measuring the water hardness
To do this: contact your local water supplier to
find out the water hardness level and adjust on
the machine as described below.
While holding down the “Auto” button, press
the “Start” button: the “Soak” or “Intensive”
programme light will illuminate –and either
flash or be permanently lit – to show the water
softener’s setting in accordance with the above
table.
When the machine is first switched on, the
setting is 10 - 25°F (“Soak” light permanently
lit).
To change the setting, press the “Auto” button
repeatedly until you reach the water softener
setting recommended by the testing strip.
You must fill the salt reservoir with water
before using the machine, even if the water
softener setting selected does not require
any regenerating salt.
If you move house and take the
dishwasher with you, you will need to
check the water hardness and adjust
accordingly.
For good wash results it is very important
to set the dishwasher to the correct level
of water hardness and to set the correct
level of rinse aid (see page 6)
③③
Filling the regenerating salt reservoir
You must fill this, with water just before
starting your first wash then add the salt:
Filling with salt is essential to obtain a good
wash with no streaks. The salt regenerates
the resins, which soften the water by removing
its limestone content unless the water is already
sufficiently soft (see “Adjusting the water
softener”).
ADJUSTING THE WATER SOFTENER
➁➁
-
Setting on the control panel
“Soak” light permanently lit
“Soak” light permanently lit
“Intensive” light permanently lit
“Soak” light flashing
Salt
required
0 - 10°F
10 - 18°F
18 - 25°F
25 - 40°F
40 - 55°F
55 - 70°F
NO
YES
YES
YES
YES
YES
Water softener
setting
Water
hardness
Testing
strip
“Intensive” light flashing
“Soak” light permanently lit
> 70°F
YES
“Intensive” light flashing
Never put
detergent in
this reservoir:
this will ruin
the water
softener.
Salt reservoir
- Unscrew the salt reservoir’s stopper and
remove it.
- Use the funnel to introduce the salt.
available from the after-sales department
under reference : 31X3964.
- Fill the reservoir with regenerating salt
specially designed for dishwashers.
- On the first time, add water until it
reaches the edge of the reservoir.
- Screw the salt reservoir’s stop back in fully.
Do not use kitchen salt.
Should any regenerating salt overflow
when filling, we recommend that you
remove the loose salt crystals to avoid
oxidising the tub.
If the water is especially soft and does not
require the use of any regenerating salt,
the salt light remains lit.
SALT
Page 8

• 8 •
F
or best washing results, be careful before loading
dishes to remove food residue. Any burned or stuck
leftovers should be removed.
Your dishwasher has two baskets for 12 place
settings (132 pieces) according to AS 2007 (Fig. A-
B-C see page 19). Always turn the inside of the
dishes towards the bottom. Be sure that no dish
hides others and the spray jet is not obstructed.
Check that the spray arm is free to rotate.
Lower basket (Fig. 7-9-10)
Place the dishes so that water may circulate
freely and spray all the utensils. (Avoid
attaching and piling dishes up).
This basket is especially intended to hold:
plates, cutlery, dishes, frying pans, saucepans.
Dishes and frying pans can be placed on the
right-hand side or even in the front.
Avoid mixing plates and soup dishes. You should
preferably place same-sized plates together.
Place soup dishes at the back, in the high pin
area.
Make sure nothing obstructs the rotation of the
lifting arm (saucepan handles, cutlery or large
dishes).
Collapsible racks on the front and back of the
basket facilitate storing large recipients.
The cutlery baskets are sliding and can be
placed in any area of the lower basket meaning
that you can change the layout according to the
type of dishes you are washing.
Removable grids are adaptable to cutlery
baskets allowing you to arrange cutlery,
especially small spoons, as you wish.
For optimum washing, you can use the
separation grids.
Cutlery (Fig. 8)
• Place handles downwards.
• It is preferable to place small spoons in the
separating grids.
• Avoid washing wooden, bone or hollow
handled cutlery in the machine.
• Separate silverware from other metals using
the separating grid.
Important note
: For reasons of safety, we
recommend you place sharp-ended table knives
blade down in the cutlery basket.
Long-bladed cutlery and other sharp utensils
should be placed flat in the upper basket.
Dropping knives point first will cause damage
to the basket and will not be covered under
warranty.
Upper basket (Fig. 10-11)
This basket is particularly intended to hold
glasses, cups, ramekins, small salad bowls, bowls,
saucers etc…
Place glasses so that they do not touch and tip
them sufficiently so that they do not retain any
water. Place the hollow end of glasses, cups
and bowls facing downwards. Arrange the
dishes methodically to gain space (rows of glass,
cups, and bowls).
You can also stack cups, ladles, etc. on the racks.
You can place a cutlery basket in the upper
basket.
If your cutlery or your plates are too large,
adjust the height of the upper basket
The “Mezzanine” (Fig. 12) wire shelf enables
you to load cutlery of any size. You can place it
either in the upper or lower basket.
The upper basket should be adjusted to the HIGH
position when loading large plates in the lower
basket..
Setting the HIGH POSITION
Slowly lift the basket until you hear a
click on each side.
Setting the LOW POSITION
Lift the basket completely on both sides
(click) and then follow it downwards.
Make sure that the two runners are adjusted
to the same level.
LOADING THE DISHWASHER
①①
②②
Page 9

• 9 •
The washing product dispenser has been
placed in front of the upper basket to make
the machine easier to fill. This means that you
can load the washing powder without
bending down or completely opening the
door. Use washing products specifically
designed for dishwashers, either tablets,
powder or liquid detergent.
We recommend using the Finish range of
Dishwasher detergents.
Before running a programme :
• Put the tablet in the outside compartment.
OR
• Pull the dispenser out to fill with powder,
liquid or tablet. Minimum and maximum
levels are marked on the inside of the
dispenser and represent approximately 5-25
grams or 2-5 teaspoons. Amount required to
be used for each load may vary according to
the conditions such as dirtiness of the dishes,
water hardness and detergent type.
Close the dispenser
See the manufacturers’ recommendations on
the packet as well as the advice for use below.
ADDING WASHING DETERGENT
For child safety
Warning - Dishwasher detergents are strongly alkaline. They can be extremely dangerous if
shallowed. Avoid contact with skin and eyes and keep chidren away from the dishwasher when the
door is open.
Check that the detergent dispenser is empty after completion of the wash cycle !
tablet
powder or liquid
Page 10

• 10 •
CHOICE OF PROGRAMMES
For information purposes :
Duration Water Electricity
_____________________________________________________________
Normal 105 min 16L 1.10 kWh
The control band in the upper section of the door is visible when open.
Press the On/OFF button to switch on the machine
Select the programme and delay start or options if necessary.
Select the Start / Cancel button to confirm your selection
The meaning of the symbols is listed on the sticker attached in the document folder.
The sticker can be placed above the control panel on the inside of the door.
An automatic programme adapted to the quantity of items and any amount of residue. Your
dishwasher optimises the results by prioritising the length of the program.
Pre-wash
Very short cycle, without detergent, rinses dishes before washing the next day or the day after.
Intensive 65°C
Recommended for very dirty or greasy dishes (difficult stains: fat, sauce, cooking or frying stains...).
Normal 55°C
Recommended for normally dirty dishes (daily stains).
Delicate 45°C
A gentle programme perfect for fragile, delicate glassware and dishes with a small degree of
resistance to stains. Is also suitable for china that does not resist high temperatures.
+ Quick
A rapid wash programme recommended for slightly dirty, non greasy but fragile dishes.
OPTION
Delayed start (between 3 and 6 hours) :
To delay washing by 3 hours, press the button once and twice to delay 6 hours.
These values refer to normal conditions of
use. They may vary depending on the load,
the temperature, the hardness of the water
or the supply voltage.
Page 11

• 11 •
STARTING THE MACHINE
Immediate start
Make sure that “Delayed Start” is not selected
and the 3 h and the 6 hr lights are turned off.
The programme chosen will start on closing the
door.
For optimal washing, avoid opening the door
when the programme is running.
Delayed start
The programme selected will start after
confirmation, when the time chosen has
elapsed.
Programme termination
The end of the programme is signalled by a
ringing. After opening the door, the “Start /
Cancel” light goes out.
Note : The ringing is deactivated automatically
when a delayed start is selected (option most
used at night).
Cancelling the ringing signal
You can cancel this ringing by holding the
“Prewash” button down whilst pressing the
“Start / Cancel” button.
A simple beep confirms the operation. If you
want to restore this function repeat the same
operation. It will be confirmed by a double
beep.
Cancelling or modifying the programme and the
options.
The programme and options selected remain
memorised at the end of the cycle.
Press one of the four programme buttons to
modify your choice.
The option is cancelled by pressing the button
chosen again.
To cancel a programme and the options you
should press the “Start / Cancel” button for
three consecutive seconds. All lights will go out
with the exception of the selected programme.
The programme and option indicator lights
Illuminate once the machine is powered on and
tell you that you have chosen a programme.
They remain illuminated as long as you delay
selection.
The rinse aid indicator light :
It only illuminates when the machine is powered
on.
It illuminates when you need to add rinse aid
(for filling see page 6).
The salt product indicator light :
This illuminates showing salt needs to be added.
After you have refilled the salt reservoir, the
light may still remain illuminated until the salt
has dissolved sufficiently, generally after one
cycle.
If the water is especially soft and does not
require the use of any regenerating salt, the
SALT light remains illuminated.
Economical and ecological washing
Do not prewash you dishes by hand.
Use your dishwasher to the full. Washing will be
economical and environmentally friendly.
Always choose the programme best adapted to
the type of dishes and according to the degree
of dirt.
Avoid overdosing detergents and rinsing liquid.
Observe the recommendations in this manual
(pages 6-7-9) as well as the instructions on the
product packaging.
Page 12

• 12 •
Glassware
Most glassware is dishwasher safe. We do not
recommend washing crystal items in the
dishwasher, as crystal is not dishwasher safe.
Pots and Saucepans
쐽 Pots and saucepans can be washed in the
dishwasher. Scrape off food scraps and put
items in the baskets upside-down.
쐽 Stainless steel can be washed in the
dishwasher.
쐽 As when hand washed, aluminium is dulled
by being washed in the dishwasher.
Silverware
쐽 All silverware should be rinsed immediately
after use to prevent discolouration caused by
some foods.
The “Prewash” programme is useful for this
situation.
쐽 Old silverware and hollow handle knives with
adhesives securing the handles should be
washed by hand.
GLASSWARE, POTS AND SILVERWARE
Cutlery
쐽 Stainless steel and silver should not be
allowed to come into contact with each
other, as this can stain the silver.
쐽 Remove sterling and silver plated cutlery
from the dishwasher and hand dry it
immediately after the programme has
finished.
쐽 Wooden, bone and plastic handles can be
sensitive to higher water temperatures. The
appearance of these items may change over
time if washed in the dishwasher.
Decorated China and Tableware
쐽 Most current china patterns are dishwasher
safe. However, we advise checking with the
manufacturer.
쐽 Older items with the design over the glaze,
ie. gold rims and hand-painted China may be
more sensitive to machine washing. If in
doubt, wash these items by hand.
Woodware
Generally wooden items are sensitive to heat
and water.
Regular use in the diswasher may alter their
appearence. We suggest you wash wooden
items by hand.
Remember, if in doubt about any aspect
concerning materials washed in the dishwasher,
follow manufacturer's instructions or wash the
item by hand.
CUTLERY, CHINA AND WOODWARE
Page 13

• 13 •
Voltage : 230-240 V – 50 Hz – Fuses : 10 A
Power : 2150-2300 W
Capacity : 12 place settings
Water pressure : 3 psi/0.2 MPa min
100 psi/0.7 MPa max
Water evacuation pipe height : 60 cm - 1 m
The dishwasher can only use hot water pipe up
to 65°C.
The maximum height does not include the
height of the feet.
TECHNICAL CHARACTERISTICS
INSTALLATION OF THE PANEL DOOR
1) If you use the door and false drawer, mount
the door using the plans supplied with the
machine.
Fix the false drawer equipped with an opening
handle to the top of the door using the 4 screws
supplied in the plastic bag (Fig. A).
The false drawer may be mounted level with the
door (Fig. B) or slightly raised (Fig. C) but should
not overlap by more than 3 mm maximum.
The handle on the false drawer fixing screw
heads must be flushed with the false drawer.
2) If using a one-piece panel, assemble using the
provided template.
Do not forget to add the 4 fixing screws
supplied in the plastic bag to the door.
Be careful to respect the 3 mm minimum
overlap between the top of the door and the
decorative panel (Fig. C).
Mount the door using the instructions and
template supplied with the machine.
3 mm
Max
Fig. B Fig. C
Dishwasher
door
Door panel
False drawer
635mm - 715mm
(panel 715 mm maximum)
Fig. A
4 fixing screws supplied in the plastic bag
Page 14

• 14 •
INSTRUCTIONS FOR CLEANING AND MAINTENANCE
Cleaning the waste filters
The filtration system consists of several
components:
A – The two-part waste filter
B – The main filter
C – The micro-filter
The filters are located in the middle of the tub
and must be cleaned regularly to ensure
optimum washing results.
A
A - Two-part waste filters.
➀➀
Before removing the filters, remove any
waste from the main filter with a sponge to
avoid the waste blocking the sprinkling arms.
➁➁
Unscrew the waste filter a quarter turn and
remove it.
③③
Remove the main filter
④④
Remove the micro-filter.
Important: Do not
forget to lock the
waste filter by turning it a
quarter turn.
B
C
⑤⑤
Carefully clean all the filters
under running water.
To re-insert the filters
Follow the above instructions
in reverse.
C
Clean as necessary
• Underneath the filters, around the door and
the door joint with a damp sponge to remove
any deposit.
• Use only soap and water for the body and
control panel.
• Do not clean with abrasive powders, scouring
pads, spirit-based products or solvents.
Preferably use a cloth or a sponge.
• If you have a stainless steel door you may use
products adapted for stainless steel. See the
manufacturer’s instructions for advice on their
use.
We recommend using CSSPP - Stainless Steel
Liquid Pump cleaner. Please contact our After
Sales Service on 1300 652 100 or your nearest
store on 13 13 08.
Every year
To maintain your machine in perfect working
order you should clean it once or twice a year.
Run on “Intensive 65°C” programme with the
machine empty and a special dishwasher
cleaning product available from any reputable
dealer.
Pr
olonged period of non-use
Clean your machine completely then unplug the
electricity supply and close the water tap.
Page 15

Page 16

• 16 •
ILLUSTRATIONS
The photograph above, with lower basket removed, shows you the main parts
described in this instruction manual.
2
A B
3
min 60 cm - max 1 m
min 60 cm - max 1 m
Regenerating
salt reservoir
Waste filters
Washing product
container
Rinse aid
container
Lower sprinkling
arm
Information
Rating-Plate
(After-Sales
service
reference)
Drying valve
(depending on
the model)
Upper basket
Main filter
Control strip
Anti-blocking size
wire (depending
on the model)
mini : 0,60 m
mini : 0,60 m
Page 17

• 17 •
5
6
9
7
10
8
15
To make loading easier, move the tray to position ➊and then return
it to position ➋.
12
11
Page 18

• 18 •
ENERGY EFFICIENCY TESTS ACCORDING TO AS/NZS 2007 PROGRAMME : NORMAL
Arrange items as shown in Figures A – B – C (see IEC load)
Washing capacity : 12 IEC standardised place setting
Detergent dose : 30 g of detergent
Detergent dispenser : 3
Setting of upper basket : Low position
The water softener MUST be set to 0 - 10°F (“Soak” light permanently lit - see page 7) to deactivate
the device. No salt is required.
For more information on the comparison tests in accordance with AS/NZS 2007, please contact the
manufacturer of the machine before commencing testing.
INSTRUCTIONS FOR LABORATORY TESTS
INSTRUCTIONS FOR LABORATORY TESTS : IEC LOAD
A
1 2 3 4 5
1
2
5
4
3
B
5
55
5
5
5
5
5
5
5
5
Page 19

• 19 •
INSTRUCTIONS FOR LABORATORY TESTS : AS/NZS LOAD
B
A
1
2
4
3
5
5
5
5
5
5
5
5
5
5
5
5
1 2 3 4 5
Page 20

YOUR NOTES
• 20 •
Page 21

• 21 •
WARRANTY AND SERVICE
DOMESTIC WARRANTY - FULL FIVE YEAR WARRANTY
In addition to all statutory rights which you, the Consumer, have under the relevant laws in respect
of this appliance, during the first five years of ownership as the original purchaser of this Kleenmaid
appliance, we guarantee that any fault caused by faulty material or workmanship becoming
apparent will be rectified free of charge for parts and labour, provided that all service is performed
during normal working hours by Kleenmaid or their designated Agents. Where the appliance is
installed outside the normal servicing area of the above, the Purchaser must pay for the cost of
transporting the appliance to and from the Agent or the Agent’s travelling cost to and from the
Purchaser’s home.
COMMERCIAL WARRANTY - ONE YEAR WARRANTY
When this appliance is installed in a commercial application, you, the Consumer, have under the
relevant laws in respect of this appliance, during your first one year of ownership as the original
purchaser of the Kleenmaid appliance, we guarantee that any fault caused by faultly material or
workmanship becoming apparent, will be rectified free of charge for parts and labour, provided that
all service is performed during normal working hours by Kleenmaid or their designated Agents.
Where the appliance is installed outside the normal servicing area of the above, the Purchaser must
pay for the cost of transporting the appliance to and from the Agent or the Agent’s travelling cost to
and from the Purchaser’s home.
WHAT THESE WARRANTIES DO NOT COVER
We are not responsible for any damage or malfunction unless caused by a defect in material or
workmanship. This includes but is not limited to abuse, misuse, improper installation and
transportation damage. We are not responsible for any consequential damages from any
malfunction.
The Consumer, must make the appliance available for servicing and shall bear any costs incurred for
any de-installation and/or re-installation required to make the appliance available for servicing.
Kleenmaid are not liable for any consequential damage incurred during de-installation or reinstallation.
WARRANTY DOES NOT COVER REPLACEMENT OF LIGHT GLOBES OR GLASS
BREAKAGE DUE TO IMPACT
In case of fractured glass do not use your appliance.
WARRANTY REGISTRATION
Please complete the enclosed warranty card and retain this as a record of purchase.
SERVICE ASSISTANCE
To assist you when phoning our After Sales Service number to arrange a service call please complete
the following details and have them ready when you call.
Model Number :
—————————————————————————————————————————
Kleenmaid Store purchased from :
———————————————————————————
Date of purchase :
———————————
Date of installation :
—————————
KLEENMAID AFTER SALES SERVICE
CONTACT NUMBER
1 300 652 100
Page 22

20291C-03/05
Other products in Kleenmaid’s
range of world’s best appliances :
Washers
Dryers
Dishwashers
Ovens
Cooktops
Outdoor Cooking Centres
Built-In Coffee Machines
Rangehoods
Sinks
Waste Disposals
Taps
Cookware
Refrigerators
Freezers
Wine Cellars
Vacuum Cleaners
For sales informations on the full range of quality
kitchen and laundry appliances, phone 13 13 08
Kleenmaid Head Office :
PO Box 5560 MAROOCHYDORE BC QLD 4558
 Loading...