

Page 1

cooking collection
Instructions for use and warranty details
BBQ Cooktop Deep Fryer
Model No.: DCTBBQ Model No.: DCTDF
Page 2

Congratulations on the purchase
of your new Kleenmaid appliance.
Your new Kleenmaid appliance has been
designed and manufactured to give you
years of reliable performance.
For best results, carefully read the
instructions on how to install your new
appliance. Correct installation will avoid
delays and unnecessary service call costs.
Once installation is complete, please read
this entire instruction manual carefully and
get to know the controls and the features
of your new Kleenmaid appliance.
Again, congratulations and thank you for
choosing Kleenmaid.
2
Page 3

Dear Customer,
We would like to thank you and congratulate
you on your choice. This new product has
been carefully designed and built using top
quality materials, and meticulously tested
to ensure that it meets all your culinary
requirements. Please read and observe
these simple instructions, which will enable
you to achieve excellent results from the
very first time you use it. This state-of-theart appliance comes to you with our very
best wishes.
THE MANUFACTURER
THIS PRODUCT IS DESIGNED FOR DOMESTIC
USE. THE MANUFACTURER DECLINES ALL
RESPONSIBILITY FOR PERSONAL INJURY
OR PROPERTY DAMAGE DERIVING FROM
INCORRECT INSTALLATION OR IMPROPER,
ERRONEOUS OR UNSUITABLE USE. THE
APPLIANCE MUST NOT BE USED BY PEOPLE
(INCLUDING CHILDREN) WITH PHYSICAL,
SENSORIAL OR MENTAL IMPAIRMENTS,
OR BY PEOPLE WITHOUT THE NECESSARY
Technical data
Power 230 V
Power (Barbecue) 2400 W
Power (Fryer) 2300 W
Power supply cable H05RR-F ( 3X1.5 mm²)
H05RN-F (3X1.5 mm²)
EXPERIENCE OR KNOWLEDGE, UNLESS
THEY ARE SUPERVISED OR INSTRUCTED
IN THE USE OF THE APPLIANCE BY A
PERSON RESPONSIBLE FOR THEIR
SAFETY. CHILDREN MUST BE SUPERVISED
TO ENSURE THAT THEY DO NOT PLAY WITH
THE APPLIANCE.
3
Page 4
User instructions
Installation
All installation operations (electrical connection) must
be carried out by people qualified in compliance with
the laws in force. For specific instructions, see the
installation section.
Use
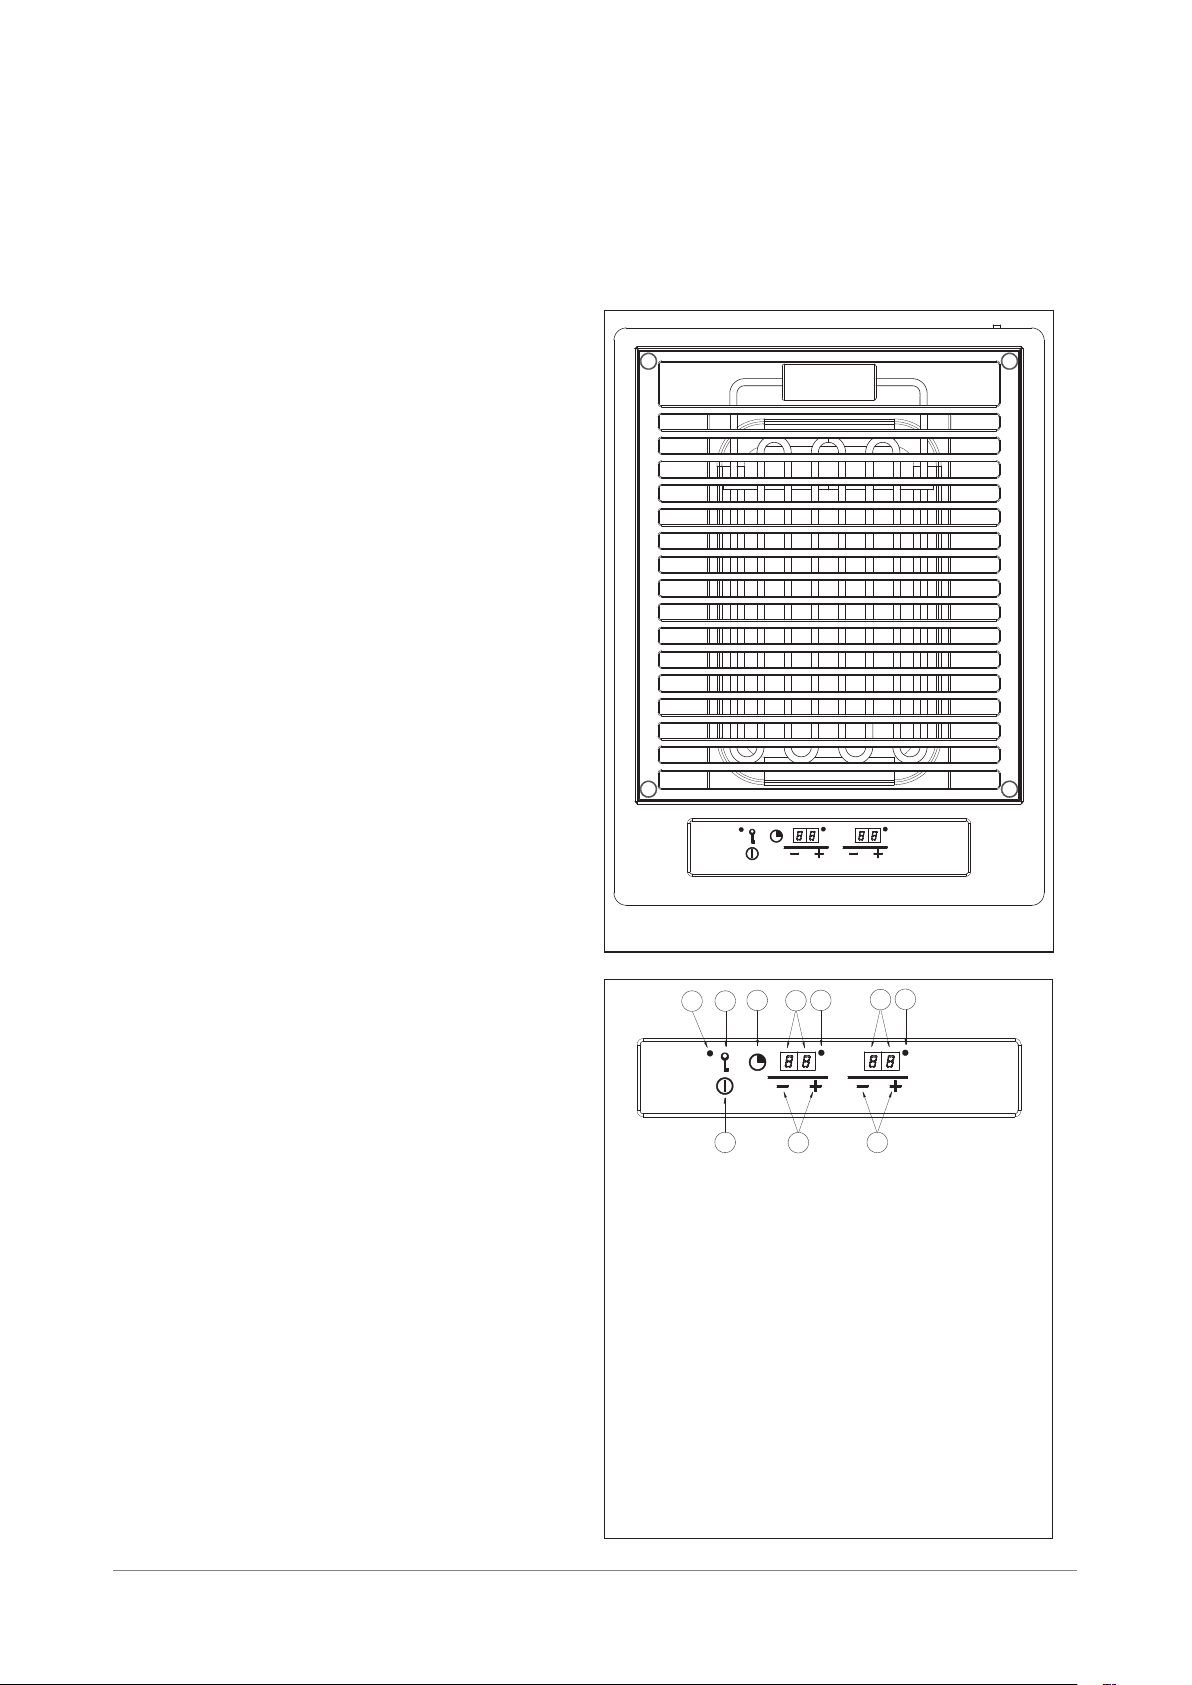
Barbecue (Fig. 1)
The barbecue is used for quick cooking on the grill.
Pressing the Touch Control commands turns on the
heating element (see the paragraph “Touch Control
instructions”), which can cook more or less quickly
depending on the level chosen from 1 a 12.
To use the grill, select power level 12.
This doesn’t mean that you can’t achieve excellent
results cooking on the grill even with the intermediate
power levels. These levels are recommended for cooking
delicate foods or when you want uniform cooking of the
food even inside.
The lava rocks in the tray absorb the drops of oil or
grease that are produced during cooking; Plus, they
accumulate heat as the heating elements are warming
up and, thus, provide more uniform grilling, similar to
the effect of cooking over charcoal briquettes. You
can put water in the tray, in place of the lava rocks (we
recommend a layer 3 cm deep).
Water in the tray eliminates unpleasant odours without
affecting the performance of the barbecue in any way.
So, for best results, we recommend pre-heating the lava
rocks for at least 10 minutes at level 1.
This is especially recommended when you turn on the
appliance for the first time because it decreases the
risk that the food will absorb the odours that the heating
element produces the first time it is turned on.
Fig. 1
4
11
10
9
8
5
7
1
2
3
Legend:
1 ON/OFF
2 Increase/decrease timer minutes (from 0 to 99)
Increase/decrease the power level (from 0 to
3
12)
4 Operating indicator light
5 Power level display
7 Timer running light
8 Timer display
9 Start timer
10 Lock keypad
11 Lock keypad indicator light
Fig. 1a
4
Page 5

Use
Fryer (Fig. 2)
The appliance is operated using the Touch Control
commands (see the paragraph “Touch Control“) which
can set a temperature between 80 and 200 °C.
The fryer has a probe that keeps the oil at a constant
temperature. In addition, if the main probe is not working
properly, a safety thermostat intervenes, at about 220°
C, to keep the oil from getting too hot. This device is very
easy to use but, to obtain the best results, you should
follow a few simple rules:
- Before putting oil in it for the first time, carefully clean
the steel parts and the heating elements to eliminate
any residues from the manufacturing process.
- Never turn the appliance on with the heating elements
turned outside the tub.
- Never turn the appliance on without oil in the tub.
- Always use vegetable oil suitable for frying: oils made
from sunflower and other seeds are not recommended.
- The quantity of oil in the tub can vary from a minimum
of 2 to a maximum of 2.7 litres. If the level of oil drops
below the minimum during frying, you must add fresh
oil. We recommend that you add the same type of oil.
The maximum and minimum levels are etched on the
vertical wall of the tub.
- The oil can be reused several times but we recommend
that you filter it between one use and the next to
remove any food residues.
- In any case, the
because, even if it is well filtered, small food residues
can catch fire during frying.
- Make sure that the food is perfectly dry before putting
in the fryer. Wait until the oil has reached the desired
temperature.
- We recommend that frozen foods be thawed at a low
temperature and then fried at a high temperature. The
temperature setting can vary with the quantity of food
to be cooked and the user’s personal taste but, in
general, you should keep the following chart in mind:
- During cooking, it is often necessary to add salt or
flavouring:
oil should be changed very often
Maintenance
Unplug the appliance before performing any maintenance.
To increase the life of the appliance, it is essential to
periodically perform a general cleaning, keeping the
following in mind:
- the steel parts must be cleaned with a suitable product
(available in stores) that is not abrasive or corrosive.
Avoid products that contain chlorine (bleach, etc.);
- avoid leaving acid or alkaline substances on the work
surface (vinegar, salt, lemon juice, etc.).
Fig. 2
Temperature Level Food
160° C chicken thighs and wings
170° C fritters, fish
180° C croquettes
190° C French fries
to the extent possible, avoid doing this directly in the fryer
because salt falling in the oil reduces its quality.
- If the fryer malfunctions, before asking for service, try
to reset the thermostat by pressing the little button that
you can see on the inside of the front wall, after you
remove the oil tub and unscrew the protection plug.
5
Page 6

4
11
10
9
1
7
8
2
5
6
3
Legend
1 ON/OFF
2 Increase/decrease timer minutes (from 0 to 99)
Increase/decrease the temperature of the oil in
3
°C (from 40 to 200)
4 Operating indicator light
5 Display the oil temperature
Indicator that the set temperature has been
6
reached
7 Timer running light
8 Timer display
9 Start timer
10 Lock keypad
11 Lock keypad indicator light
Fig. 2a
Touch Control Instructions
Barbecue (Fig. 1)/Fryer (Fig. 2):
Power-on (barbecue)
1 Touch the button (1) to turn on the control: the level
indicator (5) displays “00” and the LED (4) is on.
2 Press the next button within 10 seconds or the device
will automatically turn off.
Power-on (fryer)
1 Touch the button (1) to turn on the control: the level
indicator (5) displays “000” and the led (4) is on.
2 Press the next button within 10 seconds or the device
will automatically turn off.
Operating indicator light (barbecue)
When you turn on the control with the button (1), the
operating indicator light (4) turns on and stays on until
you touch the button (1) again.
Operating indicator lights (fryer)
When you turn on the control with the button (1), the
operating indicator light (4) turns on and stays on until
you touch the button (1) again.
In addition, when you set a certain temperature level,
the indicator light (6) flashes until the oil reaches the
temperature setting; when the temperature setting is
reached, the indicator light stays on without flashing.
Power control (barbecue)
1 Use the “+” and “-” buttons (3) to adjust the power
between level 0 and level 12. Holding down one of
these buttons, lowers or raises the level setting.
Temperature control (fryer)
1 Use the “+” and “-” buttons (3) to adjust the temperature
of the oil from 80 °C to 200 °C. The temperature can
be changed in steps of 10 °C. Holding down one of
these buttons, lowers or raises the level setting.
Turning off the heating element (barbecue/fryer)
1 Lower the setting to 0 using the “-” button (3). The
heating element will turn off after 3 seconds.
Press the “+” and “-” buttons at the same time (3).
Fast turn-off of the heating elements (barbecue/
fryer)
1 To turn the heating element off automatically, press
the “+” and “-” buttons (3) at the same time.
Residual heat (“H”) indicator (barbecue/fryer)
When the appliance is off, the display (5) shows the
symbol “H” (residual heat).
This indicator will remain on for about 40 minutes.
Turning off the appliance (barbecue/fryer)
The appliance can be turned off at any time using the
on/off button (1)
Locking the keypad (key) (barbecue/fryer)
1 The entire appliance can be locked with the keypad
lock or button (10) to prevent unintended operation.
This function also protects children. As long as the
lock is active, touching the buttons has no effect
except to turn off the appliance (1). When the lock is
active, the LED (11) remains lit.
Safety power-off (barbecue/fryer)
1 If the heating element is inadvertently turned on,
the control system automatically turns it off after
the power-on limit has elapsed. In this case, “H” is
displayed. The power-on limit varies depending on
the level set at that time and varies proportionally
from a minimum of 1 hour at the maximum level, to a
maximum of 6 hours at the minimum level.
6
Page 7

Timer function (barbecue/fryer)
This function simplifies cooking by allowing the cooking
cycle to continue without your presence. When you set
the timer, the heating element is automatically turned off
after the set time has elapsed. If the heating element is
set to 0, the timer just counts minutes (see the chapter
“using the timer to count minutes”).
Turning on the timer function (barbecue)
1 Select a power level between 1 and 12
2 Touch the timer button (9), the timer display (8) shows
“00” and the indicator light (7) turns on.
3 Select the cooking time in minutes (from 0 to 99)
using the “+” and “-” buttons (2). The timer function
will turn on in a few seconds and the indicator light (7)
starts flashing to indicate that the function is on. You
can quickly set the cooking time by holding down the
“+” or “-” button (2).
Turning on the timer function (fryer)
1 Select an oil temperature level between 80 °C and
200 °C.
2 Touch the timer button (9), the timer display (8) shows
“00” and the indicator light (7) turns on.
3 Select the cooking time in minutes (from 0 to 99)
using the “+” and “-” buttons (2). The timer function
will turn on in a few seconds and the indicator light (7)
starts flashing to indicate that the function is on. You
can quickly set the cooking time by holding down the
“+” or “-” button (2).
Fast turn-off of the heating element and timer
function (barbecue/fryer)
1 When you touch the “+” and “-” buttons (3) at the
same time, the heating element immediately turns off
and the timer function is cancelled.
Turning on the timer function to count minutes
(barbecue/fryer)
If the heating element is set to level 00, the timer can be
used to count minutes
Setting the timer to count minutes (barbecue)
If the appliance is off:
4 Touch the on/off key (1);
5 Touch the timer button (9);
6 Set the desired time using the “+” e “-” buttons (2)
If the appliance is on and the heating element is set to a
temperature level higher than 000:
4 Set the temperature to 000;
5 Touch the timer button (9);
6 Set the desired time using the “+” e “-” buttons (2)
Turning off the minute-counter function (barbecue/
fryer)
When the time has elapsed, a buzzer sounds for 2
minutes.
To cancel the buzzer early, just touch any button.
If you want to interrupt the timer before it runs down:
1 Touch the timer button (9)
2 Zero the time by holding down the “-” button (2)
Quickly turning off the minute-counter function
(barbecue/fryer)
Press the “+” and “-” buttons (2) at the same time.
Error messages
- AL0 (BARBECUE/FRYER) If a button is pressed for
more than 90 seconds, the buzzer will sound and AL0
will appear on the 3-digit display.
- AL1 (FRYER) If the probe has a short circuit, AL1 will
appear on the 3-digit display.
- AL2 (FRYER) If the probe is not connected, AL2 will
appear on the 3-digit display after it is on for about 5
minutes.
- AL3 (BARBECUE/FRYER) If the temperature of the
electronic board reaches 85°, AL3 will appear on the
3-digit display.
Setting the timer to count minutes (barbecue)
If the appliance is off:
1 Touch the on/off button (1);
2 Touch the timer button (9);
3 Set the desired time using the “+” e “-” buttons (2)
If the appliance is on and the heating element is set to a
power level higher than 00:
1 Set the power to 00;
2 Touch the timer button (9);
3 Set the desired time using the “+” e “-” buttons (2)
7
Page 8

Installation instructions
Installation
These instructions are provided for qualified installers as
a guide to installation, adjustment and maintenance in
conformity with current laws and standards. Service must
always be performed with the appliance disconnected
from the electricity.
Operation (Fig. 3 and 4)
The appliance is designed to be built in to a work surface
as shown in the figure. Prepare the edge of the hob with
the sealant provided (Fig. 5).
Electrical connection
Before connecting to the electricity, make sure that:
- the characteristics of the system match the data on
the bottom of the hob;
- the system has an effective earth connection
compliant with current standards and laws. An earth
connection is required by law.
- If the appliance has no cable and/or plug, use
material suitable for the absorption indicated on the
registration plate and for the working temperature.
The cable must not reach a temperature higher than
50 °C above room temperature in any point.
If you want a direct connection to the mains, you must
install an omnipolar switch with a minimum opening
between the contacts of 3 mm, dimensioned for the
load indicated on the plate, and conforming to current
standards (the yellow/green wire must not be interrupted
by the switch). The omnipolar socket or switch must be
easy to reach when the appliance is installed.
Note: The manufacturer declines all liability if the
usual accident prevention standards and the above
instructions are not followed.
8
Page 9

Mod: DCTBBQ
1
77
R 1
1
510
Mod: DCTDF
181
R
11
380
380
1.5
R 1
2
0
+1
511
381
360
+1
0
0
+1
490
+1
0
Fig. 3
1
1.5
R
1
2
381
+1
0
0
+1
510
511
+1
0
360
0
+1
490
Fig. 4
Fig. 5
9
Page 10

Page 11

Warranty and Service
Domestic Warranty – Full two year warranty
In addition to all statutory rights which you, the Purchaser, have under relevant laws in respect of this
appliance, during the first two years of ownership as the original purchaser of this Kleenmaid appliance,
Compass Capital Services trading as Kleenmaid guarantee that any fault caused by defective material
or workmanship becoming apparent will be rectified free of charge with reference to parts and labour,
provided that all service is performed during normal working hours by Kleenmaid or their designated
Agents. Where the appliance is installed outside the normal servicing area of the above, the Purchaser
must pay for the cost of transporting the appliance to and from the Agent or the Agent’s travel cost to
and from the purchaser’s home.
Commercial Warranty – One year warranty
When this appliance is installed in a commercial application, in addition to all statutory rights which
you, the Purchaser, have under relevant laws in respect of this appliance, during the first one year of
ownership as the original purchaser of this Kleenmaid appliance, Compass Capital Services trading as
Kleenmaid guarantee that any fault caused by defective material or workmanship becoming apparent
will be rectified free of charge with reference to parts and labour, provided that all service is performed
during normal working hours by Kleenmaid or their designated Agents. Where the appliance is installed
outside the normal servicing area of the above, the Purchaser must pay for the cost of transporting the
appliance to and from the Agent or the Agent’s travel cost to and from the purchaser’s home.
What these warranties do not cover
Compass Capital Services trading as Kleenmaid is not responsible for any damage or malfunction
unless caused by a defect in material or workmanship. This includes but is not limited to abuse,
misuse, improper installation and transportation damage. Compass Capital Services trading as
Kleenmaid is not responsible for consequential damages from any malfunction.
This warranty does not cover consumable items, replacement of light globes or glass breakage due
to impact. In case of fractured glass do not use your appliance.
Purchaser’s responsibility
The Purchaser must make the appliance available for servicing and shall bear any costs incurred
for any de-installation and/or re-installation required to make the appliance available for servicing.
Compass Capital Services trading as Kleenmaid is not liable for any consequential damage incurred
during de-installation or re-installation.
Warranty registration and Proof of Purchase.
Please complete warranty details below and retain together with your proof of purchase document.
When requesting service under this warranty the Purchaser agrees that Proof of Purchase of their
Kleenmaid appliance will be necessary in order to make the warranty valid. Inability to provide Proof
of Purchase even though this warranty is in place will not bind Compass Capital Services trading as
Kleenmaid to repair the appliance at no charge under this warranty and will require the Purchaser to
pay for the service costs in full.
Model Number Date of purchase
For service assistance visit
www.kleenmaid-appliances.com.au
Page 12

Other products available in the
Kleenmaid range of appliances
|
Washing machines
|
Clothes dryers
|
Dishwashers
|
Ovens
|
Cooktops
|
Steam ovens
|
Microwave ovens
|
Built in espresso
coffee machines
|
Rangehoods
|
Freestanding ranges
|
|
Sinks
Taps
Compass Capital Services Pty Limited
trading as Kleenmaid
ABN 96138214525
Level 29, Chifley Tower,
2 Chifley Square,
Sydney NSW, 2000
E: help@kmaid.com.au
www.kleenmaid-appliances.com.au
 Loading...