

Page 1
CH805CE-1 - 800mm Touch Control Ceramic Cooktop
Page 2
Page 3
Built-in ceramic-glass cooktop
Dear customer !
Instructions for use
Installation instructions
Rating plate
The built-in ceramic-glass cooktop is intended for household use
only.
Materials used for packaging are nature friendly and may be
recycled, deposited or destroyed without any threats to the
environment.
In order to recognize these features, all packing materials are
marked with relevant symbols.
Once your appliance has become obsolete and you do not
intend to use it any longer, take adequate care not to litter the
environment. Deposit your old appliance with the authorized
depot dealing with used household appliances.
Instructions for use have been prepared for the user, and
describe the particulars and handling of the appliance. These
instructions apply to different models from the same family of
appliances, therefore you may fi nd information and descriptions
that may not apply to your particular appliance.
The appliance should be connected to the power supply in
accordance with the instructions from the chapter “Electrical
connections” and in line with the standing regulations and
standards.
The connections should be carried out by a qualifi ed personnel
only.
The rating plate with basic information is located underneath the
appliance.
Fire hazard protection
Appliances are allowed to be mounted on one side next to a
high kitchen cabinet, the height of which may exceed that of the
appliance. On the opposite side however, only a kitchen cabinet
of equal height as the appliance is allowed.
Built-in ceramic-glass cooktop .................................. 3
Important warnings ..................................................... 4
Ceramic-glass cooktop ............................................... 5
Energy saving tips....................................................... 7
Glass ceramic hob control elements ......................... 8
Cleaning and maintenance of ceramic-glass hob .. 15
Connection to the power supply .............................. 16
Mounting the built-in cooktop .................................. 17
Technical information ............................................... 19
172736
3
172731_en.indd 3172731_en.indd 3 9.1.2007 14:51:489.1.2007 14:51:48
Page 4
Important warnings
• The appliance may be built-in and connected to the power supply only by a qualifi ed technician.
• Particular areas of the cooktop surface (adjacent to the hotplates) are hot during operation.
Prevent the children to hang around the appliance and warn them properly against the danger of
burns.
• Hot oil ignites readily, so be sure have the preparation of such food (fries) under constant control.
• Hotplates may not be left in operation empty, without any dishes on top.
• Never use the appliance for heating the ambience.
• Never use the ceramic-glass cooktop as a working surface. Sharp objects may damage the
cooktop surface.
• Preparation of food in aluminum or plastic cookware is not allowed. Never place any plastic
objects or aluminum foil upon the cooktop surface.
• In case any other appliances are plugged in the electric mains close to the cooktop, prevent the
contact of the plug cable with the hot cooking zones.
• Never keep any fl ammable or temperature sensitive objects, like cleaning agents, sprays,
detergents, etc., below the appliance.
• Never use cracked or broken ceramic-glass cooktop. In case you notice any visible cracks on the
surface, cut the power supply immediately.
• In case of any malfunctions, disconnect the appliance from the power supply and call service
department.
• Do not use high-pressure steam cleaner or hot steam to clean the appliance.
The symbol on the product or on its packaging indicates that this product may not
be treated as household waste. Instead it shall be handed over to the applicable
collection point for the recycling of electrical and electronic equipment. By ensuring
this product is disposed of correctly, you will help prevent potential negative
consequences for the environment and human health, which could otherwise be caused by
inappropriate waste handling of thisproduct. For more detailed information about recycling
of this product, please contact your local city offi ce, your household waste disposal service
or the shop where you purchased the product.
172736
4
172731_en.indd 4172731_en.indd 4 9.1.2007 14:51:599.1.2007 14:51:59
Page 5
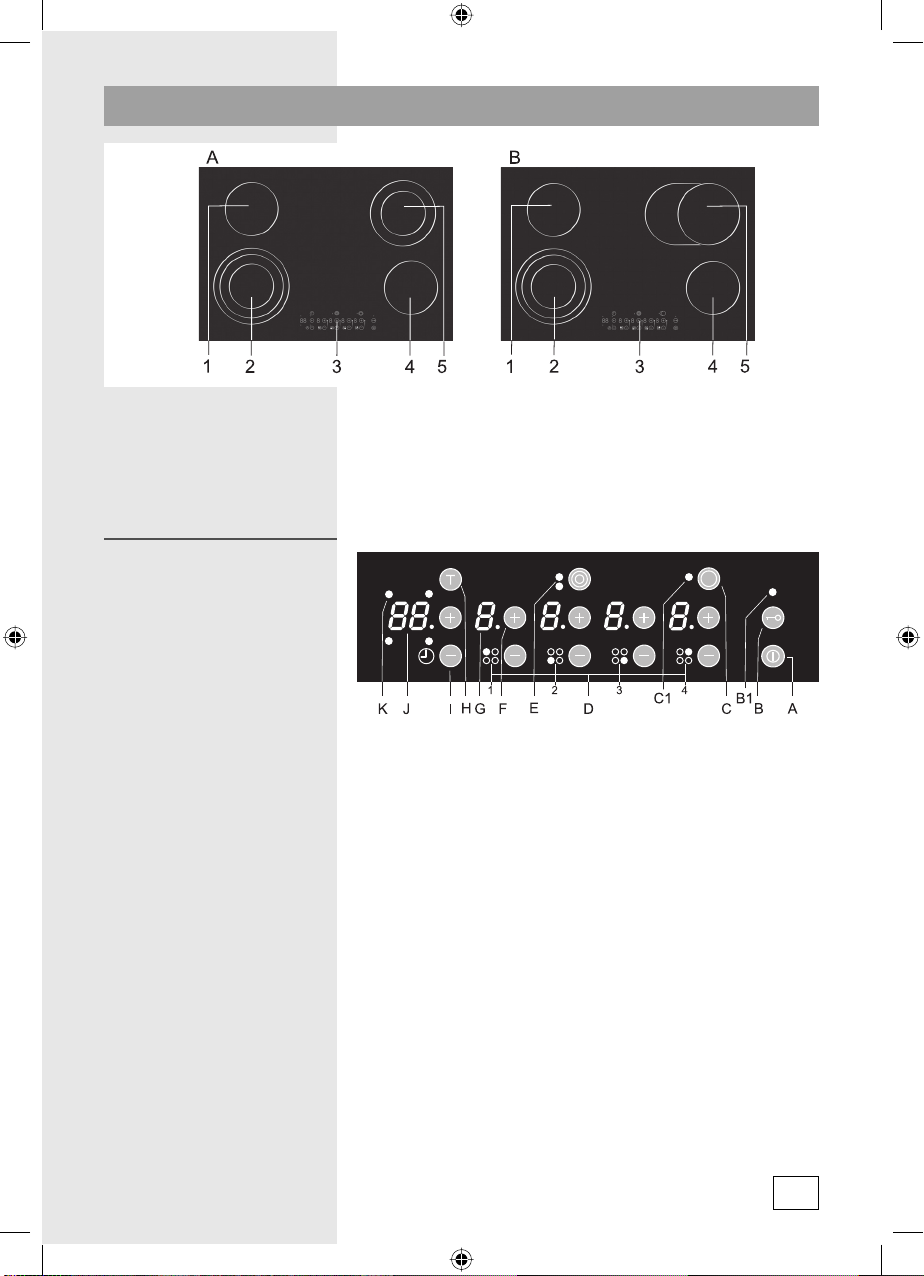
Ceramic-glass cooktop
1. Rear left hotplate
2. Front left hotplate
3. Hob control module
4. Front right hotplate
5. Rear right hotplate
Control panel
A Ceramic hob main switch sensor
B Blocked operation sensor
B1 Blocked operation control lamp
C Extended hotplate ring ON/OFF sensor
C1 Second hotplate LED signal lamp (hotplate 4)
D Hotplate
E Second and third hotplate LED signal lamp (hotplate 2),
certain models
F Sensor (+)
G Heating power setting indicator (0...9), remaining heat
display “H” and automated cooking signal “•”
H Timer sensor
I Sensor (-)
J Timer clock display
K Timer controlled hotplate signal lamp
172736
5
172731_en.indd 5172731_en.indd 5 9.1.2007 14:52:009.1.2007 14:52:00
Page 6
Ceramic-glass cooktop is equipped with four hotplates designed
as cooking zones. The surface of the hob is fl at, without any
edges for eventual gathering of dirt. Cookware may easily be
moved about along the hob surface.
• Hotplates quickly reach the selected heating power while the
adjacent area around the hotplates remains cool.
• The cooktop is resistant to temperature changes.
• The cooktop is also impact resistant. Cookware may be placed
upon the surface rather fi rmly without any consequences.
• Avoid using the hob as a working surface. Sharp objects may
produce scratches.
• Never attempt to prepare food in aluminum or plastic
cookware. Never place any plastic objects or aluminum foil
upon the hot cooking hob.
• Avoid making coffee in traditional Turkish coffee kettle since
the diameter of the bottom is too small and the hotplate may
be damaged.
CAUTION !
• Never use cracked or broken ceramic-glass cooking hob.
Sharp edged objects, falling upon the surface of the hob
may cause cracking. The consequences may be visible
immediately or only after a while. In case any visible cracks
are observed cut the power supply immediately.
• In case sugar or other heavily sweetened substance is spilled
on the hotplate, wipe it immediately and remove the sugar
Cookware
Use only high quality cookware with fl at and fi rm bottom.
• Position the pot at the center of the hotplate during cooking.
• When using the fi reproof and temperature resistant glass
cookware observe the instructions of the producer.
• If the pressure cooker is used to prepare food, have it
under constant control throughout the cooking until proper
pressure has been obtained. In such cases start the cooking
at maximum power of the hotplate, and reduce the power
subsequently according to the instructions of the producer.
• When using high radiation (bright metal surface) crockery, or
thick bottom dishes for preparing food on the glass ceramic
hob, the period of reaching the boiling point may be prolonged
for certain time (up to 10 minutes). Consequently, if you need
to boil considerable amount of liquid, it is recommended to use
the dark, fl at bottom pot.
172736
6
172731_en.indd 6172731_en.indd 6 9.1.2007 14:52:019.1.2007 14:52:01
Page 7
Energy saving tips
Hotplate may be damaged:
• if it is left in operation without any cookware being placed on
top, or if covered with empty cookware;
• if improper cookware is used: unevenly fl at bottom or small
diameter (traditional Turkish coffee kettle).
• the use of terra-cotta (clay) cookware is likely to produce
scratches upon the ceramic-glass surface.
• Before placing any cookware upon the cooktop thoroughly
wipe the bottom dry, thereby improving the heat conduction
and protecting the hotplate from damage
• The inside bottom of the cookware should be slightly concave
for optimum heat transfer.
• Diameter of the cookware bottom should always match the
diameter of the hotplate. If the pot is too small it may cause
loss of energy and damage the hotplate.
• Whenever possible use the cookware lid to cover the pot.
• The size of the cookware should fi t the quantity of food to be
prepared. Cooking small quantities of food in large pots results
in the loss of energy.
• Food requiring long preparation should be cooked in the
pressure cooker.
• Various vegetables, potatoes, etc. may be boiled in reduced
quantity of water. This way food is cooked faster, provided the
lid is tightly closed. Once the boiling point is reached, reduce
the cooking power and select the slow cooking level.
172736
7
172731_en.indd 7172731_en.indd 7 9.1.2007 14:52:029.1.2007 14:52:02
Page 8
Glass ceramic hob control elements
• Once the glass ceramic hob is connected to the mains
(including the power failure), the appliance carries out the
harmonization with the conditions of the exterior in order to
provide most effi cient sensor function and render the best
control environment.
• After the successful accommodation to the environment, the
indicators show the mark “-” for a moment which eventually
disappear. The sound signal confi rms the appliance is ready
for use.
• Do not place any objects upon the sensor surface during
the accommodation period, otherwise you may provoke
error mode. In such cases the process is interrupted and the
appliance signals error. The hob fails to respond to commands.
• The hob is equipped with electronic sensors which are
switched on by touching or pressing the sensor surface with
your fi ngertip. Each sensor reaction is confi rmed by the beep.
• Always take care to touch only one sensor at the time for a
short period of time (approximately 1 second). If more than
one sensor is pressed at the same time the relevant command
is not accepted. If the touch is prolonged it provokes error
mode and the appliance is switched off.
• Do not place any objects upon the sensor surface (error mode)
nor any hot dishes which may damage the sensors. Keep the
sensor surface clean at all times.
Switching the hob on
172736
• When the hob is turned off all the hotplates are off and
indicator LED’s are off.
• To switch the hob on, touch the ON/OFF sensor. The hob is
activated and all power displays indicate “0” for a period of
10 seconds. Using the (+) or (-) sensor you may select the
desired cooking power of a particular hotplate (see Power
Regulation).
• Next setting of a particular hotplate should be selected within
ten seconds, otherwise the hob will automatically be switched
off and a short warning beep is heard.
8
172731_en.indd 8172731_en.indd 8 9.1.2007 14:52:029.1.2007 14:52:02
Page 9

Switching the hotplates
on
• Once the hob is switched on with the ON/OFF sensor, within
the next ten seconds, while the indicators are illuminated, you
have to switch on a particular hotplate by touching the (-) or (+)
sensors for the selected hotplate and set the desired heating
power. If the power setting is not selected within the next
ten seconds, the “0” indicator turns off and the hotplate will
automatically be switched off.
Setting of cooking level
• As long as the indicators are lit the heating power (1...) may
be selected and altered accordingly by pressing the (-) or (+)
sensor. By the (+) sensor the power is gradually increased to
the maximum level (9), while with the (-) sensor it is reduced
back to “0” (hotplate is switched off). In case you start the
setting by pressing the (-) sensor, the heating power starts
from the level “4”, and if you start the setting by pressing the
(+) sensor, the heating power starts from the maximum level
“9•”, simultaneously starting the automatic cooking mode
(see Automatic cooking mode). When one hotplate is on, the
“0” sign on other hotplate indicators is off. If you wish to start
another hotplate, press either the (-) or (+) sensor, and the “0”
mark appears on the indicator. Now press the (-) or (+) sensor
again and select the heating power.
Automatic cooking mode
• When the automatic cooking mode is activated the hotplate
will operate at maximum power for a limited period of time
(depending upon the power level required for continuation)
and then automatically switch to the reduced power level to
resume cooking (see chart). It may be switched on in any of
the hotplates for all power settings except for maximum setting
“9”.
• By touching the hotplate (+) sensor switch the hotplate on. The
display indicates power setting “9” and the decimal dot (•).
Within the next ten seconds press the (-) sensor and select the
power setting (8...1) for cooking. The decimal dot is on for the
entire time this function is on. By touching the (-) or (+) sensor
you may vary the heating power at any desired moment. If no
power setting for further cooking is selected within the next 10
seconds the automatic cooking mode is switched off and the
decimal dot disappears.
• Once the time from the above chart expires, the function is
switched off and the decimal dot disappears.
Cooking automatics can be tupned off at any time with (-)
sensor, by setting cooking level to “0”.
172736
9
172731_en.indd 9172731_en.indd 9 9.1.2007 14:52:029.1.2007 14:52:02
Page 10

Power setting Maximum power time
182
2 164
3 246
4 328
5 410
682
7 164
8 164
(in seconds)
Switching the extended
hotplate rings on
(hotplates 2 and 4)
• Switch the relevant hotplate ( 2 or 4) and consequently
switch the extended hotplate ring by pressing the relevant
sensor (see the control element board illustration). The LED
signal lamp above the indicator displays the extended ring is
on. Now select the random heating power for both hotplate
rings together. Extended ring may be switched off either by
consequent pressing the sensor or by reducing the heating
power to “0”, as well as by simultaneous pressing of both the
(-) and (+) sensor. It may of course be switched off also by
switching off the entire hob.
Switching the second hotplate ring on
• The rear right hotplate (4) is equipped with the extended
hotplate ring, which is switched on by pressing the special
second ring sensor. The signal lamp above the indicator
displays the ring is on.
Switching the third hotplate ring on
(certain models)
• The front left hotplate (2) is equipped with two extended
hotplate rings. To switch the second ring on, press the special
second ring sensor (top left). The LED signal lamp above the
indicator displays the ring is on. To switch on the third ring
press the same sensor once again, another LED signal lamp is
on. Both extended rings are switched off by repeated pressing
the sensor. They may also be switched off by switching off the
relevant hotplate or the entire hob.
172736
10
172731_en.indd 10172731_en.indd 10 9.1.2007 14:52:029.1.2007 14:52:02
Page 11

Switching the hotplate
off
• Particular hotplate is switched off either by pressing the sensor
(-) to bring the heating power to “0”, or by simultaneously
pressing both the (+) and (-) sensor. Hotplate is switched
off automatically after the set timer period elapses. Display
indicates “0” for a short time, then the hotplate is switched off
and the indicator displays the remaining heat “H”.
Remaining heat display
Switching the complete
hob off
• Immediately after a particular hotplate is switched off, or in
case the complete hob is switched off, the indicator shows
the letter “H” as a warning that the “hotplate is hot”. The
period of this warning signal is calculated in accordance with
the working time and the power setting of the hotplate. When
the warning signal is on do not touch the hotplate or place any
temperature sensitive objects on the relevant hotplate. Danger
of burns!
• When the indicator goes off, the hotplate surface is cool
enough to be touched safely.
• In case of mains interruption, the warning signal »H«
reappears when the power comes back, and remains
displayed until the calculated time from the last appearance
has expired. It is therefore possible that the “H” indication is
still on if the power failure took long time, although the hotplate
is completely cold, but it may also be still hot in case the power
failed for only a short period.
• The hob is switched off by pressing the main ON/OFF sensor.
The sound signal beeps and all indicators go off, except for
those hotplates which are still hot and display the warning “H”
sign as an indication of the remaining heat. When all hotplates
indicate power level “0”, or when this is the result of the preset
timer operation, the complete hob is switched off after a 10
second lapse, with only the remaining heat warning “H” still
illuminated.
172736
11
172731_en.indd 11172731_en.indd 11 9.1.2007 14:52:039.1.2007 14:52:03
Page 12

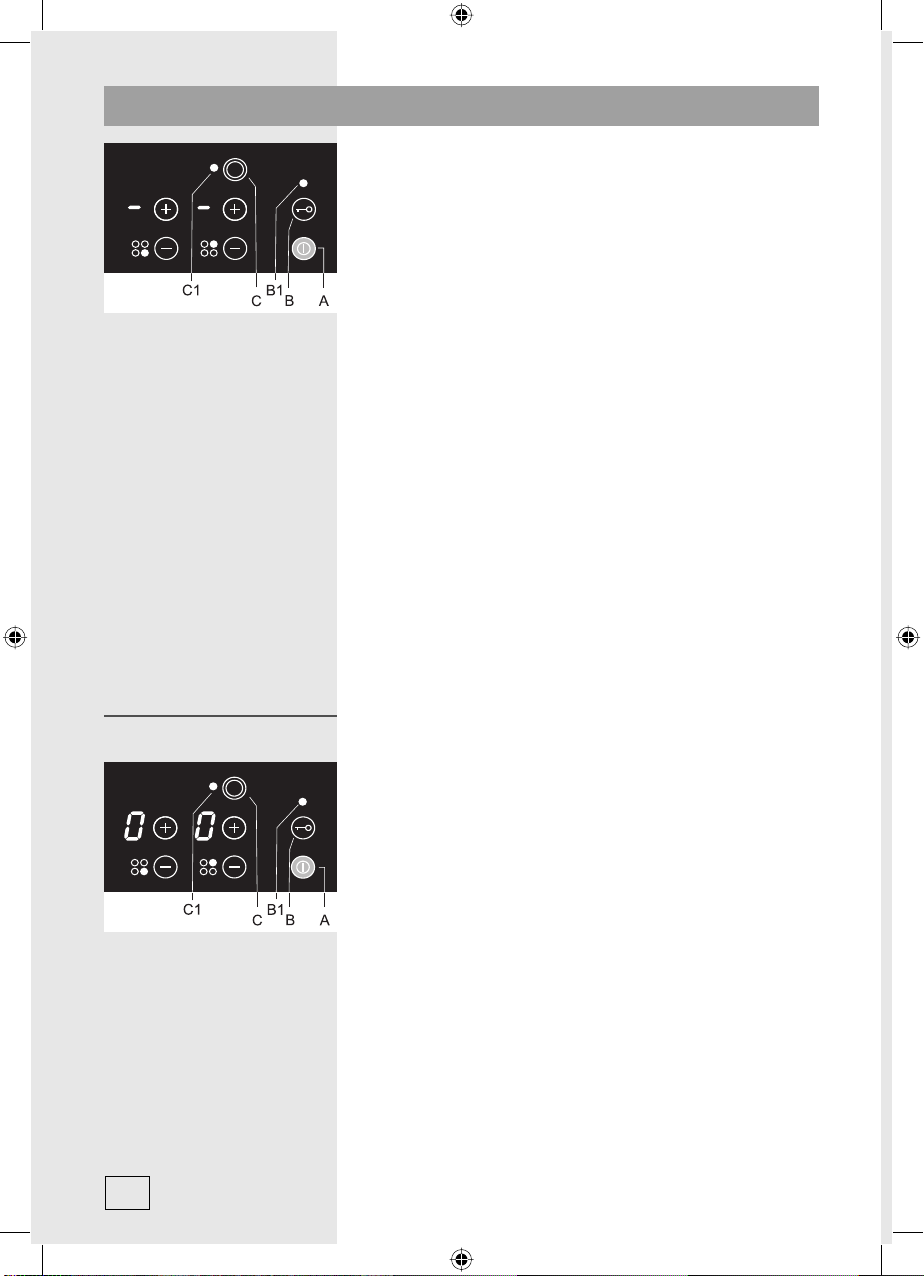
Blocking the hob
operation
Timer function
• This function protects the hob from accidental activation
or change of power level by children or pets. Child lock is
activated by pressing the relevant sensor for about 3 seconds,
and signaled by the signal LED above the sensor which
illuminates for a few seconds. Child lock may be activated with
the hob in the on or off mode. The lock prevents activation of
any sensors except for the main switch sensor and the child
lock sensor. Once the hob is locked, a particular hob may be
switched off only by pressing both the (+ and -) sensor, or
by using the main switch to switch off all hotplates, while the
lock remains active. If you try to activate any sensor during
the lock mode, the child lock signal LED will illuminate for a
few seconds. If any hob is in the automatic timer mode, the
countdown setting runs normally, and when the time elapses
the hob is switched off and a beep is heard. Child lock may be
deactivated at any moment by pressing the relevant sensor,
followed by a short beep. Signal LED above the sensor goes
off.
Once the hob is on you have two timer operation alternatives:
1 time countdown without the switch off function
2 setting the timer controlled period of operation for a
particular hotplate
• Timer is activated by pressing the timer sensor, the display
indicates “00”. Set the time between 1 and 99 minutes: this
setting may be altered at any time in 1 minute intervals by
pressing the (+) or (-) sensor. Constant press of either sensor
changes the setting faster, in 5 minute intervals.
Countdown of preset time
• By activating the timer with the display indicating ‘’00’’ you
started the countdown of preset time. By pressing the (+)
sensor the display starts from one minute and continues in
one minute steps. By pressing the (-) sensor the display is
set at ‘’99’’ minutes. Select the desired time by pressing (+) or
(-) sensor. Time setting may be changed randomly during the
operation.
• When the time elapses a beep is heard and display indicates
fl ashing ‘’00’’ which may be switched off by pressing any timer
sensor.
172736
12
172731_en.indd 12172731_en.indd 12 9.1.2007 14:52:039.1.2007 14:52:03
Page 13

Timer controlled period of operation for a particular
hotplate
• In this mode you are able to select the exact operation time
for any hotplate. After the time has elapsed the hotplate
automatically turns off. Time may be preset parallel for one
hotplate which must be switched on. First switch the timer
on by pressing the timer sensor. Next touch of the timer
sensor brings the decimal dot on the time indicator showing
which hotplate is being preset. If more than one hotplate is
in operation you may select the particular hotplate by several
consequent pressing on the timer sensor until your desired
hotplate is indicated with the decimal dot. Now set the desired
preset time by pressing the (+) or (-) sensor.
• Once the preset time has elapsed the selected hotplate is
automatically switched off, time indication fl ashes for a while
and the beep is heard. Power regulation display indicates “0”
and the remaining heat warning “H” appears.
• Other hotplates without the preset operation time continue with
normal operation.
Limited time of operation
This function is incorporated for safer operation of your hob.
Each hotplate is equipped with the time limit switch. The period
of operation is calculated in accordance with the last selected
power setting of a particular hotplate.
If the power setting is not changed for a while, the hotplate
will be switched off automatically after a certain period of time,
depending upon the power setting level (higher power setting
– shorter time - see chart).
Power setting Maximum operation time in hrs
110
25
35
44
53
62
72
82
91
172736
13
172731_en.indd 13172731_en.indd 13 9.1.2007 14:52:049.1.2007 14:52:04
Page 14

Safety functions and
error display
• If both the (+) and (-) sensor are preset together the hotplate is
switched off.
• If all the hotplates indicate the “0” power setting, the hob is
switched off after 10 seconds.
• If any of the sensors is activated for more than 10 seconds
the hob is switched off, the beep sounds, and the indicator
displays the fl ashing “F” signal.
• If the sensors are covered with an object, or the surface is
covered with spilt liquid, the hob is switched off.
• Error may occur also during the period of initial
synchronization or during the operation. In such cases the
display indicates relevant combination of symbols. If the fault
can not be removed, call the after sale assistance.
• In case an error occurs during the operation, the hob is
automatically switched off. Flashing “F” appears on the
indicator relevant to the hotplate where the error occurred. The
sound signal is repeated at 30 second intervals for a period of
15 minutes when it goes off automatically.
172736
14
172731_en.indd 14172731_en.indd 14 9.1.2007 14:52:049.1.2007 14:52:04
Page 15

Cleaning and maintenance of ceramic-glass hob
Ceramic glass hob should be cleaned only when completely
cooled down, preferably after each use, otherwise even the
slightest stains remaining after cooking may burn into the hob
surface with each following use.
For regular maintenance of ceramic-glass hob use special
cleansing agents, produced in such way to create protective fi lm
upon the surface.
Before each use, wipe the dust and other particles from the hob
fi g. 1
- they may scratch the surface (Fig. 1).
Caution: use of steel wool, abrasive cleaning sponges, and
abrasive detergents can scratch the surface of the hob. The
surface may also be damaged by the use of aggressive sprays
and inappropriate liquid chemicals (Fig.1 and 2).
Pattern marks can be erased by the use of aggressive cleansing
agents or rough and damaged cookware bottoms (Fig. 2).
Minor stains are removed with moist soft cloth; after that the
surface should be wiped dry (Fig. 3).
fi g. 2
Water stains are removed with gentle vinegar solution, but you
must not wipe the frame with it (certain models only), since it
may lose its glow. Never use any aggressive sprays or limestone
removers (Fig. 3).
Major stains are removed with special ceramic-glass cleansers.
Follow strictly the manufacturer’s instructions.
Be careful to remove any remains of cleansing agent from the
hob surface, otherwise they will be heated during the next use
and can damage the hob (fi g. 3).
fi g. 3
Stubborn and burnt stains are removed with special ceramicglass scraper. Be careful, however, not to touch the hotplate
surface with the scraper handle (Fig. 4).
Handle the scraper with utmost care to avoid injuries!
Sugar and sugar containing food may permanently damage the
ceramic-glass hob surface (Fig.5), so the remains of sugar and
sugar containing food must be scraped off from the hob surface
immediately, when the hotplates are still hot (Fig. 4).
Discoloring of ceramic-glass hob has no effect whatsoever
fi g. 4
on its operation and stability. In most cases, it appears as the
consequence of burnt in food remains, or as a result of dragging
pots and pans (especially aluminum or copper bottom cookware)
across the surface, and such discoloring is rather hard to
remove.
Note: All described faults are mostly esthetical and do not affect
directly the operation of the appliance. Remedy of such faults is
not covered by warranty.
fi g. 5
172736
15
172731_en.indd 15172731_en.indd 15 9.1.2007 14:52:049.1.2007 14:52:04
Page 16

Connection to the power supply
• Connections may be carried out by a qualifi ed technician only. The earthing protection must
comply with the standing regulations.
• Connection terminals are revealed when the connection box cover is removed.
• Prior any attempted connection check that the voltage indicated on the rating plate is in line with
your home power supply.
• The rating plate is located underneath the appliance.
• The appliance is manufactured for use with the power supply voltage AC 230 V.
• The electric wiring should be equipped with a circuit breaker able to isolate the appliance from
the mains in all points, with the distance between terminals of at least 3 mm in open position.
This may be done by means of fuses, safety switches, etc.
• The connection should be selected in accordance with the declared charge capacity of the mains
and the fuse power.
• Such appliances are allowed to be mounted on one side next to a high kitchen cabinet, the
height of which may exceed that of the appliance. On the opposite side however, only a kitchen
cabinet of equal height as the appliance is allowed.
• Upon the completion of installation, live wires and isolated cables must be adequately protected
against accidental touching.
• Distance between the cooktop surface and the cooking hood must be such as indicated in the
instructions for use of the hood.
• Kitchen cabinets may not be mounted underneath the built-in ceramic-glass cooktop.
Basic adjustment of
sensors to the ambience
172736
16
Upon each connection to the power supply the sensors of the
appliance are automatically adjusted to the environment to
ensure their proper function. All displays indicate the sign “-”.
Once the successful adjustment is completed it is signaled with
a beep, all displays are switched off and your cooktop is ready
for use.
During the adjustment procedure the sensors must be free of any
objects, otherwise the adjustment procedure will be interrupted
until such objects are removed from the sensor surface. During
this period the regulation of the cooktop is impossible.
ATTENTION !
Before attempting any repairs on the appliance, disconnect
the power supply. In accordance with the mains voltage the
appliance should be connected in line with the attached diagram.
The earthing wire (PE) must be connected to the terminal
marked with the earthing symbol
The connection cable must lead through the relief safety device,
protecting it from accidental pulling out.
Upon the completion of installation switch all the hotplates on for
about 3 minutes to check the proper functioning.
.
172731_en.indd 16172731_en.indd 16 9.1.2007 14:52:059.1.2007 14:52:05
Page 17

Installation diagram
NOTE: In some connection boxes the connector bridges are placed between contacts 4 and 5,
and in the others they are stored at a designated place within the box. These boxes have the
connection screws already in open position so they need not be unscrewed. During the tightening
procedure you will hear a faint “click”, meaning that the tightening screw should be fastened tightly
all the way.
Connection may be carried out by means of:
- rubber coated connection cables, model H05 RR-F 4x1,5 with yellow-green earthing cable;
- PVC insulated connection cables, model H05 VV-F 4x1,5 with yellow-green earthing cable; or
- any other suitable cables.
A
B
Mounting the built-in cooktop
Caution !
172731_en.indd 17172731_en.indd 17 9.1.2007 14:52:059.1.2007 14:52:05
• To avoid any possible hazard, the appliance may be installed
by qualifi ed personnel only.
• Panels and furniture lining of the kitchen cabinet receiving
the hob must be treated with temperature resistant adhesives
(100°C), otherwise they might be discoloured or deformed
because of inadequate temperature resistance.
• The cooking hob is intended for building into the worktop
above the kitchen element of 600 mm width or more.
• After the installation of built-in hob make sure that there is free
access to the two fi xing elements in front.
• Suspended kitchen elements above the cooktop must
be installed at such distance to provide enough room for
comfortable working process.
• The distance between the worktop and the hood must be at
least such as indicated in the instructions for installation of the
kitchen hood, but in no case it may be less than 650 mm.
• The smallest distance between the edge of the appliance and
17
172736
Page 18

Dimensions of the builtin hob opening
the adjacent high kitchen cabinet is 40 mm.
• The use of hard wood decorative borders around the worktop
behind the appliance is allowed, in case the minimum distance
remains as indicated on the installation illustrations.
• Minimum distance between the built-in cooktop and rear wall
is indicated at the illustration for the installation of the built-in
cooktop.
• The appliance may be installed in any worktop with a thickness
from 30 mm to 50 mm.
Installation procedure
172736
• Worktop must be placed absolutely horizontal.
• Suitably protect the edges of the cut aperture.
• By means of the supplied screws 4 (or 6 by some models)
fasten the supplied tightening brackets 4 (or 6 by some
models) fasten to the front and the rear side of the cooking
hob and to the prepared aperture.
• Connect the cooking hob to the mains power supply (see
instructions for the connection of the cooking hob to mains
power supply).
• Insert the hob into the cut aperture.
• Press the hob fi rmly towards the worktop from above.
18
172731_en.indd 18172731_en.indd 18 9.1.2007 14:52:069.1.2007 14:52:06
Page 19

Technical information
Type CH805CE-1 (SVK72TS)
Electrical connection 2N AC 400 V
Working voltage 230 V, 50 Hz
Type of switch Electronic sensors
Cooking zones (ø mm/kW) HL=Hi-light cooking zone
Forward left
Rear left
Rear right
Forward right
Total power (kW) 6,4
210/175/120/2,3/HL
145/1,2/HL
180/120/1,7/HL
145/1,2/HL
WE RESERVE THE RIGHT TO ALTER THE
SPECIFICATIONS WITH NO INFLUENCE TO THE
OPERATION OF THE APPLIANCE.
172736
19
172731_en.indd 19172731_en.indd 19 9.1.2007 14:52:069.1.2007 14:52:06
Page 20

172731_en.indd 20172731_en.indd 20 9.1.2007 14:52:069.1.2007 14:52:06
Page 21

172731_en.indd 21172731_en.indd 21 9.1.2007 14:52:069.1.2007 14:52:06
Page 22

172731_en.indd 22172731_en.indd 22 9.1.2007 14:52:069.1.2007 14:52:06
Page 23

WARRANTY AND SERVICE
DOMESTIC WARRANTY - FULL FIVE YEAR WARRANTY
In addition to all statutory rights which you, the Consumer, have under the relevant laws in respect
of this appliance, during the first five years of ownership as the original purchaser of this
Kleenmaid appliance, we guarantee that any fault caused by faulty material or workmanship
becoming apparent will be rectified free of charge for parts and labour, provided that all service is
performed during normal working hours by Kleenmaid or their designated Agents. Where the
appliance is installed outside the normal servicing area of the above, the Purchaser must pay for
the cost of transporting the appliance to and from the Agent or the Agent’s travelling cost to and
from the Purchaser’s home.
COMMERCIAL WARRANTY - ONE YEAR WARRANTY
When this appliance is installed in a commercial application, you, the Consumer, have under the
relevant laws in respect of this appliance, during your first one year of ownership as the original
purchaser of this Kleenmaid appliance, we guarantee that any fault caused by faulty material or
workmanship becoming apparent, will be rectified free of charge for parts and labour, provided that
all service is performed during normal working hours by Kleenmaid or their designated Agents.
Where the appliance is installed outside the normal servicing area of the above, the Purchaser
must pay for the cost of transporting the appliance to and from the Agent or the Agent’s travelling
cost to and from the Purchaser’s home.
WHAT THESE WARRANTIES DO NOT COVER
We are not responsible for any damage or malfunction unless caused by a defect in material or
workmanship. This includes but is not limited to abuse, misuse, improper installation and
transportation damage. We are not responsible for any consequential damages from any
malfunction.
The Consumer must make the appliance available for servicing and shall bear any costs incurred
for any de-installation and/or re-installation required to make the appliance available for servicing.
Kleenmaid is not liable for any consequential damage incurred during de-installation or reinstallation.
WARRANTY DOES NOT COVER REPLACEMENT OF LIGHT
GLOBES OR GLASS BREAKAGE DUE TO IMPACT
In case of fractured glass do not use your appliance.
WARRANTY REGISTRATION
Please complete warranty details below. Please retain together with your proof of purchase document.
These documents will need to be viewed by our Service Representative should you request in warranty
service.
SERVICE ASSISTANCE
To assist you when phoning our After Sales Service number to arrange a service call please complete
the following details and have them ready when you call.
Model Number_____________________________Date of purchase____________________________
Kleenmaid Store purchased from_________________________Date of installation ________________
KLEENMAID AFTER SALES SERVICE
1300 652 100
Page 24

 Loading...