

Page 1

COOKTOP
collection
Instructions for Use
and Warranty Details
Domino
Vitroceramic Hob
CH300CW
CH300CX
Page 2
ongratulations on the purchase of your new
Kleenmaid appliance. This appliance has been
designed and manufactured to give you years
of reliable performance. For best results,
carefully read the instructions on how to install
your new appliance. Correct installation will avoid delays and
unnecessary service calls.
Once installation is complete, read this booklet and get to
know the controls and the features of your new appliance.
We reserve the right to alter the specifications with no
influence on the operation of the appliance. This instruction
manual cannot be reason for a claim.
PRODUCT LABEL
This cooktop has been designed and constructed in accordance with the following
codes and specifications:
AS/NZS 3350-1 General Requirements for Domestic electrical appliances
AS/NSZ 3350-2-6 Particular Requirements for Domestic electrical cooking appliances
AS/NSZ 1044 Electromagnetic Compatibility Requirements.
2
Page 3
IMPORTANT PRECAUTIONS AND RECOMMENDATIONS FOR
USE OF ELECTRICAL APPLIANCES
Use of any electrical appliance implies the necessity to follow a series of fundamental
rules. In particular:
■ The appliance is not intended for use by young children or infirm persons
without supervision
■ Young children should be supervised to ensure that they do not play with
the appliance
IMPORTANT PRECAUTIONS AND RECOMMENDATIONS
■ When unpacking the appliance make sure that it is not damaged. If you
have any doubts, do not use the appliance but consult your supplier or an
engineer.
■ The packing materials (plastic bags, expanded polystyrene, nails, bands etc.)
must not be left within easy reach of children, because they are a possible
source of danger.
■ The packaging material is recyclable and is marked with the recycling
symbol .
■ Do not try to alter the technical properties of the appliance, because this
could be dangerous.
■ The manufacturer cannot be considered responsible for damage caused by
improper, incorrect or irresponsible use of the appliance.
■ Before disposing of any unwanted appliances it is recommended that all
potentially hazardous parts be made non hazardous.
■ Electrical connection must be carried out by a specialist familiar with the laws
and official regulations governing such installation in your State and following the manufacturer's instructions.
■ During and after use of the cooktop, certain parts will become very hot. Do
not touch hot parts.
■ Keep children away from the cooking hob when it is in use.
■ After use, ensure that the knob is in the off position.
■ Some appliances are supplied with a protective film on steel and aluminium
parts. This film must be removed before using the hob.
■ Do not carry out maintenance operations on the appliance without having
previously disconnected it from the electric power supply.
TIPS FOR THE USER
■ During and after use of the cooktop, certain parts will become very hot. Do
not touch hot parts.
■ Keep children away from the cooking hob when it is in use.
■ Before any cleaning or maintenance, switch off the electricity to the cooktop.
3
Page 4
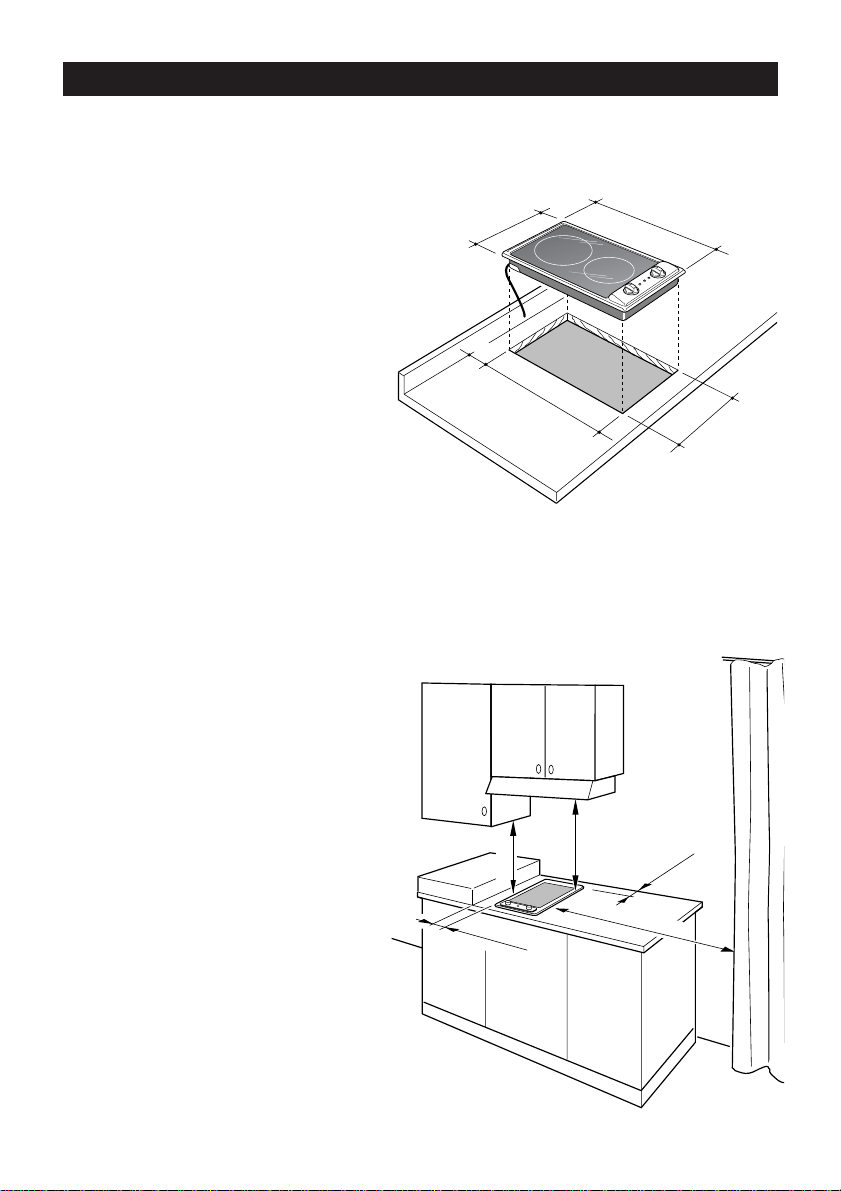
INSTALLATION
650 mm
50 mm min
50 mm min
500 mm
450 mm
490
510
270
288
+ 0
– 2
+ 0
– 2
50
TECHNICAL INFORMATION
FOR THE INSTALLER
Before installing the cooktop, remove
the protective film.
This cooktop can be built into a
working surface 30 to 40 mm thick
and 600 mm deep.
In order to install the ceramic griddle
into the kitchen fixture, a hole with
the dimensions shown in fig. 1 has
to be made, keeping in consideration the following:
✓ within the fixture, between the
bottom side of the ceramic griddle
and the upper surface of any
other appliance or internal shelf
there must be a clearance of at
least 30 mm;
✓ the ceramic hob must be kept no
less than 50 mm away from any
side wall;
✓ the rear wall must be at least 50
mm from the ceramic griddle and
must withstand a temperature of
150°C.
✓ there must be a distance of at least
650 mm between the hob and
any wall cupboard or extractor
hood positioned immediately
above (see fig. 2)
✓ the coatings of the walls of the
unit or appliances near the
cooktop must be heat resistant.
✓ Do not install the appliance near
inflammable materials (eg.
curtains).
Figure 1
Figure 2
4
Page 5
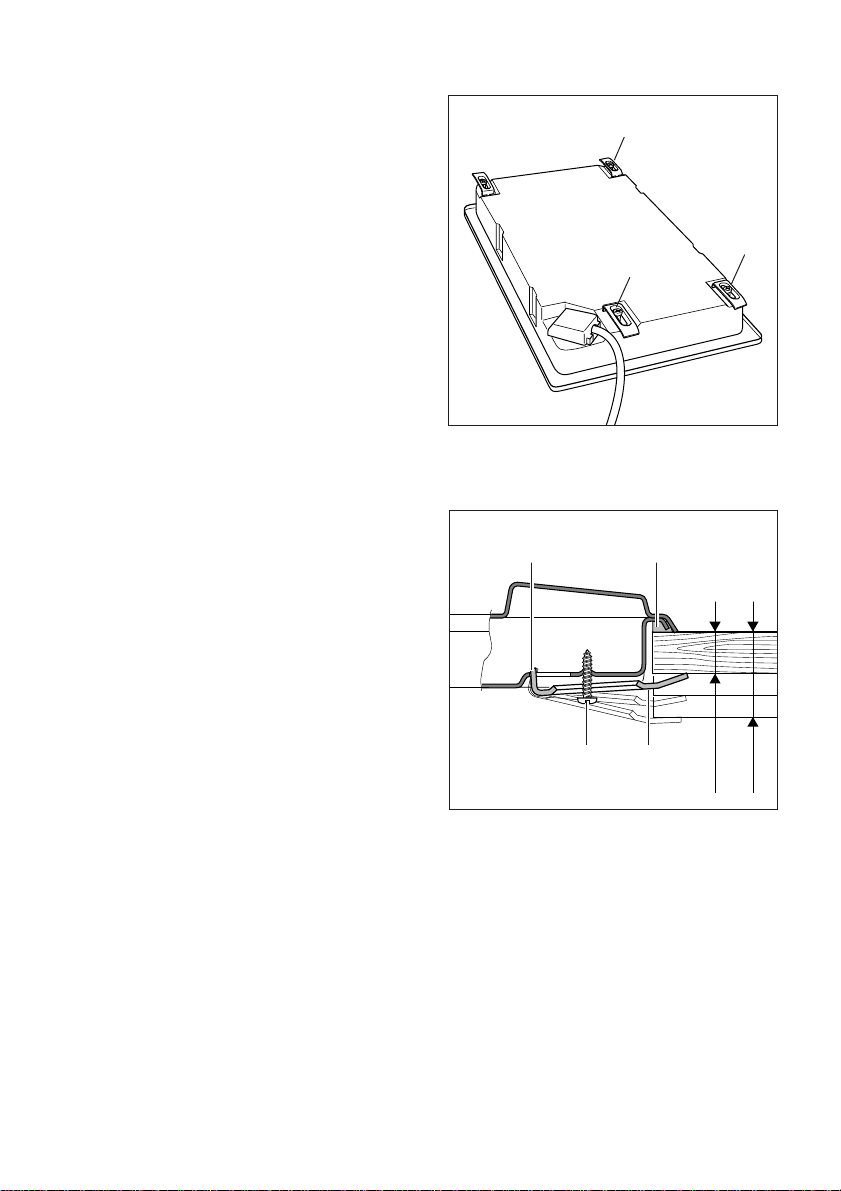
FASTENING THE APPLIANCE
20 mm min.
40 mm max.
Each ceramic griddle is supplied with
a set of tabs and screws to be fastened
onto the units.
✓ Cut the unit (as shown in figure 1).
✓ Stretch gasket “D” over the edge of
the hole made, being careful to
overlay the junction edges.
✓ Turn the ceramic griddle over and
put tabs “A” into the mountings, only
tighten screws “B” a few turns (fig.
4).
Make sure that the tabs are mounted
correctly as shown in the figures.
Turn the tabs so that the cooktop
can be put into the hole.
✓ Put the cooktop into the hole cut
into the unit and position it correctly.
✓ Put tabs “A”; into place, tooth “C” of
the tabs should go into the hole (fig.
4).
✓ Tighten screws “B” until the cooktop
is completely secured.
✓ Using a sharp tool cut off the part
of gasket “D” which protrudes from
the cooktop.
Figure 3
A
A
A
A
Figure 4
C
D
B
A
5
Page 6

ELECTRICAL SECTION
ELECTRICAL REQUIREMENTS
■ The appliance must be connected to the mains checking that the voltage
corresponds to the value given in the rating plate and that the electrical
cable sections can withstand the load specified on the plate.
■ The wires in the power cable are coloured in accordance with the following
code:
Green/Yellow = Earth, Blue = Neutral, Brown = Active.
If the colours of the wires in the power cable to the appliance do not
correspond with the coloured markings identifying the terminals in the
junction terminal, proceed as follows:
1.The wire which is coloured green and yellow must be connected to the
terminal marked E (Earth) or coloured Green.
2.The wire which is coloured blue must be connected to the terminal marked
N (Nuetral) or coloured Black.
3.The wire which is coloured brown must be connected to the terminal
marked L (Live) or A (Active) or coloured Red.
■ The appliance must be connected directly to the mains placing a two pole
switch with minimum opening between the contacts of 3 mm between the
appliance and the mains.
■ The power supply cable must not touch the hot parts and must be
positioned so that it does not exceed 50°C above ambient.
■ Once the appliance has been installed, the switch or socket must always be
accessible.
■
If the supply cord is damaged it must be replaced by the manufacturer or it’s
Service Agent or a similarly qualified person in order to avoid a hazard.
N.B. The connection of the appliance to earth is mandatory.
If the installation requires alterations to the domestic electrical system call a qualified
electrician.
He should also check that the socket cable section is suitable for the power drawn
by the appliance.
Replacing the power cord must be done by a qualified electrician in
accordance with the instructions supplied by the manufacturer and in
compliance with established electrical regulations.
6
Page 7

Before carrying out any work on
the electrical section of the appliance, it must be disconnected
from the mains.
Figure 5
REPAIRS
Replacing the supply cable
Turn the cooktop over and unhook the
terminal board cover by inserting a
screwdriver into the two hooks “A”.
Open the cable gland by unscrewing
screw “F”, unscrew the terminal screws
and remove the cable.
The new supply cable, of suitable type
and section, is connected to the terminal board following the diagrams
shown below.
SECTION OF THE SUPPLY
CABLE
Use H05RR-F cables
230-240 V ~ 50/60 Hz
section: 3 x 1,5 mm
2
A
Figure 6
F
Connection to a good earth
wiring system is absolutely
essential.
The manufacturer accepts no
responsibility for any inconvenience caused by failure to comply with this rule.
Figure 7
230 V
L
1 (L )2
N
PE
7
Page 8

ELECTRIC DIAGRAM
Figure 8
L
N
M
P1
3
12 4
P3
5
9
4
P2
3
7
2
P1
1
ELECTRIC DIAGRAM KEY
T
P2
12 43
S2 S1 S3
F1 F2
P3
5
9
4
P2
3
7
2
P1
1
1131091
F1/2 Switches
S1 Line pilot lamp
S2/3 Residual heat pilot lamp
P1 Radiant heater 1700W-230V
P2 Radiant heater 1200W-230V
MTerminal block
T Earth connection
8
Page 9

VITROCERAMIC HOB
Figure 9
SCHOTT
1
2
4
6 7 5
3
FEATURES
- Electrical insulation Class I.
GENERAL FEATURES
1. 3 circuits hotplate Ø 180 - 1700 W
2. 3 circuits hotplate Ø 145 - 1200 W
CONTROL PANEL DESCRIPTION
3. Hotplate 1 control knob
4. Hotplate 2 control knob
5. Residual heat indicator (Hotplate 1)
6. Residual heat indicator (Hotplate 2)
7. Power indicator light
9
Page 10

How to use your Ceramic Hob
2
1
0
6
5
4
3
HOW TO USE THE COOKER
TOP
The main characteristic of this pyroceram
cooker top is that it permits rapid vertical
transmission of the heat from the heating
elements below to the saucepans on top.
The heat does not spread horizontally,
therefore the glass stays cold only a few
centimetres from the hob.
The cooking plates are shown by dark
disks on the ceramic surface.
Check that the hob is clean and then
switch on by turning the control knob
(fig. 10).
When the top is working, the pilot light
will be on.
When the hob temperature is above
60°C, the corresponding indicator light
will come on to indicate that the hob is
hot.
This light will stay on even after the hob
has been switched off to indicate that the
hob is still hot.
The residual heat persists for some time
after the hob has been switched off.
3 circuit radiant hotplate
The heating element consists of 3 electrical resistances which can operate
together or separately according to the
setting of the 7-position switch. It reaches the required temperature very quickly.
During this time avoid touching the hob
and take particular care if there are children nearby.
The light will go out automatically when
the hob temperature drops below 60°C.
10
Figure 10
Page 11

Figure 11
Cooking plate controlled by a 7
position switch
1
2
3
4
5
6
Heating
Cooking
Roasting-frying
Position
of switch
0
1
2
2
3
3
4
4
4
5
6
TYPE OF COOKING
Switched OFF
For melting operations
(butter, chocolate).
To keep food hot and to
heat small quantities of liquid (sauces, eggs).
To heat bigger quantities; to
whip creams and sauces.
(vegetables, fruits, soups).
Slow boiling, i.e.: boiled
meats, spaghetti, soups,
steam cooking of roasts,
stews, potatoes.
For every kind of frying, cutlets, uncovered cooking,
i.e.: risotto.
Browning of meats, roasted
potatoes, fried fish,
omelettes, and for boiling
large quantities of water.
Fast frying, grilled steaks,
etc.
Do not scratch the cooktop with cutting or sharp objects.
Do not use the cooktop as a work surface.
Caution! The cooking hob becomes very hot during operation.
Keep children well out of reach.
11
Page 12

COOKING HINTS:
–To speed up the cooking time, turn
the knob to maximum when you
switch the cooktop on.
Wait a short time and then set the
knob to the required cooking position.
– Use saucepans with flat bottoms.
The bottom of the saucepan should
be the same diameter (or slightly larger) as the hob to ensure optimum
energy consumption.
– As the hob stays hot for a consider-
able period of time after the cooktop
has been switched off, the hob can
be switched off a few minutes before
the end, leaving the residual heat to
complete the cooking.
HINTS FOR SAFE USE OF
THE HOBS
– Before switching on, check which
knob controls the required hob. You
are advised to place the saucepan on
the hob before switching on and to
take it off after switching off.
– Use saucepans with an even flat bot-
tom (be careful of cast iron
saucepans). Uneven bottoms can
scratch the pyroceram surface. Check
that the bottom is clean and dry.
– Check that the saucepan handle does
not protrude from the top to avoid
knocking it over. This precaution also
makes it more difficult for children to
reach the saucepan.
– Do not use the cooktop if the surface
is broken or damaged.
If you note a crack in the cooktop,
switch the appliance off immediately
and call the After-Sales Service.
– Do not bend over the hobs when
they are on.
12
Figure 12
– Do not leave aluminium foil, grease-
proof paper or plastic etc. on the hob
when it is hot.
– Remember that the hobs stay hot for
quite a long time (approx. 30 min.)
after they have been switched off.
– Scrupulously follow the cleaning
instructions.
– Do not drop heavy or sharp objects
on the glass ceramic cooktop.
– Never cook the food directly on the
glass ceramic cooktop, but in special
pans or containers.
– Do not place saucepan lids on cook-
top surface. Extreme pressure can
build up while cooling and cause the
cooktop to crack.
Page 13

Cleaning and Maintenance
GENERAL TIPS
■
Before you begin cleaning, you
must ensure that the hob is
switched off.
■
It is advisable to clean when the
appliance is cold, especially when
cleaning the enamelled parts.
■
Avoid leaving alcaline or acidic substances (lemon juice, vinegar, etc.) on
the surfaces.
■
Avoid using cleaning products with a
chlorine or acidic base.
■
Do not use a steam cleaner because
the moisture can get into the appliance and make it unsafe.
ENAMELLED PARTS
■
All the enamelled parts must be
cleaned with a sponge and soapy
water or other non-abrasive products.
■
Dry preferably with a chamois leather.
If acid substances such as lemon
juice, tomato conserve, vinegar etc.
are left on the enamel for a long
time they will etch it, making it
opaque.
STAINLESS STEEL PARTS
■
Clean with special products which
are available on the market.
■
Dry preferably with chamois leather.
CONTROL KNOB
■
The control knob may be removed
for cleaning but care should be taken
not to damage the seal.
13
Page 14

CLEANING THE CERAMIC
HOB
Make sure that the cooktop is
switched off before cleaning it.
■
Remove any encrustation.
■
Remove dust with a damp cloth.
■
Detergents can be used, but they
must not be abrasive or corrosive.
■
Any remaining detergent must be
completely removed with a damp
cloth.
■
Do not put any objects on the cooktop which can melt with heat, such
as plastic objects, aluminium foil,
sugar or sugar products.
■
If any object melts on the cooktop,
remove it immediately (while the
cooktop is still hot) using a special
scraper, to prevent any irreversible
damage to the glass ceramic surface.
■
Do not use knives or sharp objects
which could damage the cooktop
surface.
■
Do not use abrasive sponges or pads
which could irreversibly damage the
glass ceramic surface.
ATTENTION: MOST IMPORTANT!
If cleaning the glass ceramic hob
using a special tool (i.e. scraper)
take extra care to avoid damage
to seal the edges of the glass
ceramic surface.
CAUTION: Any abrasive substances and non-neutral detergents are absolutely not to be
used as these can cause permanent damage to these elements.
14
Figure 13
Descriptions and illustrations in this booklet are given
as simply indicative. The manufacturer reserves the
right, considering the characteristics of the models
described here, at any time and without notice, to
make eventual necessary modifications for their
construction or for commercial needs.
Page 15

Warranty and Service
DOMESTIC WARRANTY - FULL FIVE YEAR WARRANTY
In addition to all statutory rights which you, the Consumer, have under the relevant laws in
respect of this appliance, during the first five years of ownership as the original purchaser of
this Kleenmaid appliance, we guarantee that any fault caused by faulty material or workmanship
becoming apparent will be rectified free of charge for parts and labour, provided that all service
is performed during normal working hours by Kleenmaid or their designated Agents. Where
the appliance is installed outside the normal servicing area of the above, the Purchaser must
pay for the cost of transporting the appliance to and from the Agent or the Agent’s travelling
cost to and from the Purchaser’s home.
COMMERCIAL WARRANTY - ONE YEAR WARRANTY
When this appliance is installed in a commercial application, you, the Consumer, have
under the relevant laws in respect of this appliance, during your first one year of ownership as the original purchaser of this Kleenmaid appliance, we guarantee that any
fault caused by faulty material or workmanship becoming apparent, will be rectified
free of charge for parts and labour, provided that all service is performed during normal
working hours by Kleenmaid or their designated Agents. Where the appliance is installed
outside the normal servicing area of the above, the Purchaser must pay for the cost
of transporting the appliance to and from the Agent or the Agent’s travelling cost to
and from the Purchaser’s home.
WHAT THESE WARRANTIES DO NOT COVER
We are not responsible for any damage or malfunction unless caused by a defect in material
or workmanship. This includes but is not limited to abuse, misuse, improper installation and
transportation damage. We are not responsible for any consequential damages from any malfunction. The Consumer, must make the appliance available for servicing and shall bear any
costs incurred for any de-installation and/or re-installation required to make the appliance available for servicing. Kleenmaid St George are not liable for any consequential damage incurred
during de-installation or re-installation.
WARRANTY DOES NOT COVER REPLACEMENT OF LIGHT
GLOBES OR GLASS BREAKAGE DUE TO IMPACT
In case of fractured glass do not use your appliance.
WARRANTY REGISTRATION
Please complete the enclosed warranty card and retain it together with your proof of purchase
document. These documents will need to be viewed by our Service Representative should you
request in warranty service.
SERVICE ASSISTANCE
To assist you when phoning our After Sales Service number to arrange a service call please
complete the following details and have them ready when you call.
Model Number: ..................................................... Date of purchase:.............................
Kleenmaid Store purchased from:........................... Date of installation:..........................
KLEENMAID AFTER SALES SERVICE
1300 652 100
15
Page 16

•1102048 •
ß3
 Loading...