

Page 1

COOKTOP
c o l l e c t i o n
Instructions for Use
and Warranty Details
Ceramic Cooktop
CH16 - Ceramic 600 mm
Page 2

C
ongratulations on the purchase of your
new Kleenmaid appliance.This appliance
has been designed and manufactured to
give you years of reliable performance.
For best results, carefully read the
instructions on how to install your new appliance. Correct
installation will avoid delays and unnecessary service calls.
Once installation is complete, read this booklet and get to
know the controls and the features of your new appliance.
If you need further information call our
Customer Care Centre
1300 652 100
We reserve the right to alter the specifications with no
influence on the operation of the appliance.This instruction
manual cannot be reason for claim.
Page 3

1
CONTENTS
General description ........................................................... 2
Using the controls.................................................................. 2
Using pans................................................................................. 3
Cleaning ................................................................................... 4
Installation
............................................................................ 5,6
Wiring diagram
...................................................................... 7
Warranty and service
........................................................... 9
WARNINGS
• Repair of any fault in your hob must be carried out only by an
Authorized Repair Agent, otherwise the guarantee is not
valid.
• The technical details and identification of the appliance are
shown on the specifition plate.
Consult this plate before proceeding with electrical
connection.
• Electrical connection must be carried out by a specialist
familiar with the laws and official regulations governing such
installation in your State.
Page 4
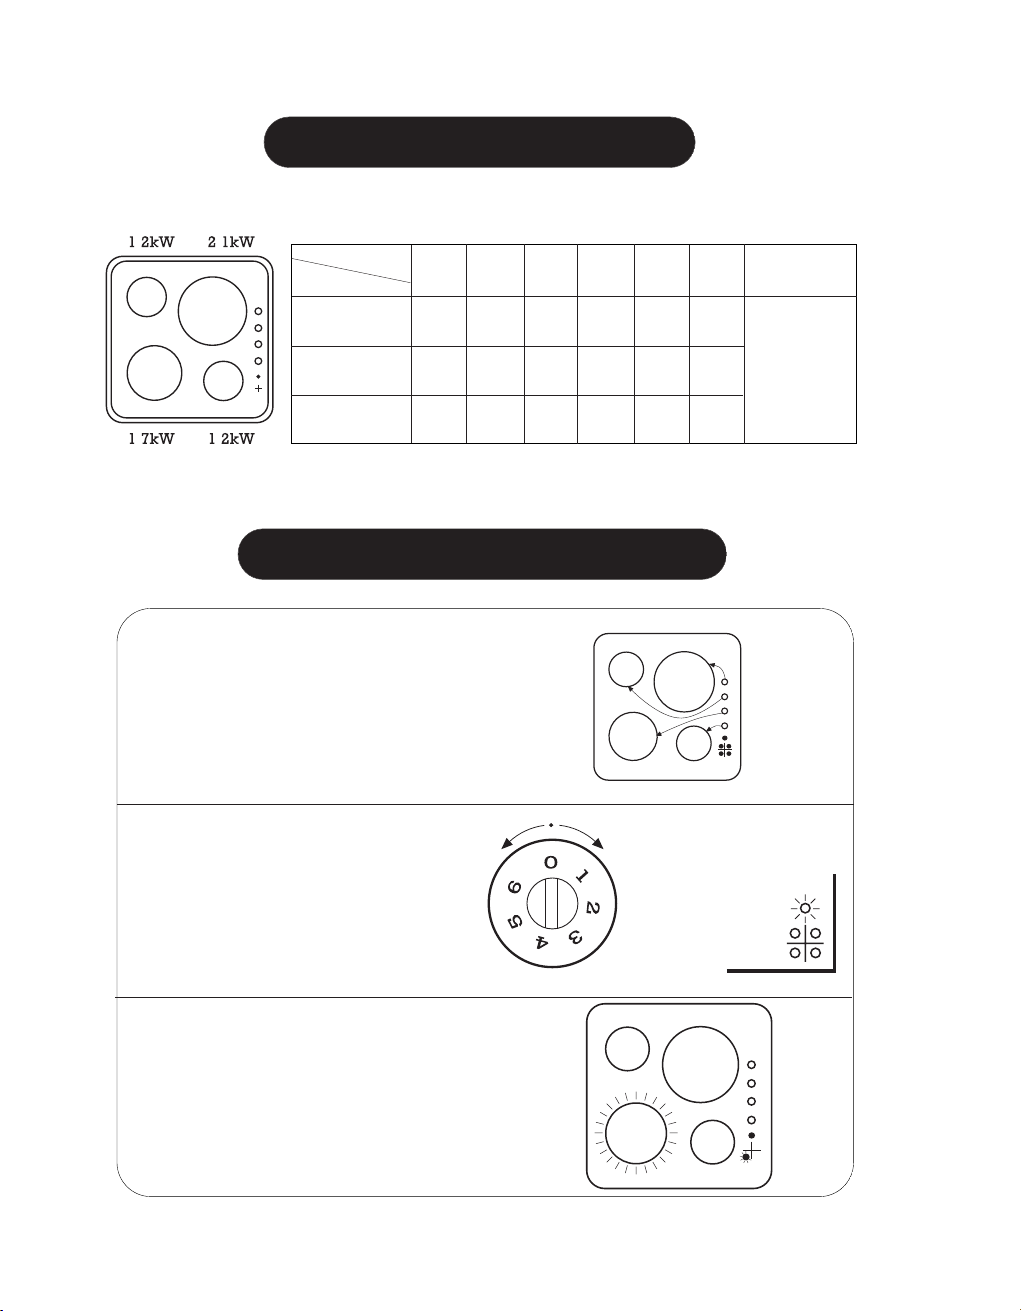
USING THE CONTROLS
Make sure that you turn on the right
controls for the burner you wish to
use.
Model CH16
As soon as a hotplate gets warm, the
corresponding residual heat warning
light will come on. After switching off,
the light will remain on until the
hotplate cools (approximately 30
minutes).
1
2
3
Turn the selector knob to the
desired setting: Setting 1:
MINIMUM.
The ON light will come on.
2
GENERAL DESCRIPTION
..
..
123456
REMARKS
LARGE HOTPLATE
(2.1 kW)
MEDIUM HOTPLATE
(1.7 kW)
SMALL HOTPLATE
(1.2 kW)
CONTROL SETTING
TYPE OF HOTPLATE
DIFFERENT
ELEMENTS COME
INTO PLAY
DEPENDING ON
SETTING
220 W 350 W 550 W 950 W 1.500 W 2.100 W
180 W 280 W 450 W 750 W 1.200 W 1.700 W
130 W 200 W 325 W 500 W 825 W 1.200 W
Page 5

3
USING PANS
Most stainless steel, enamel, iron,
ceramic and copper pans can be used
on vitroceramic hobs.
Aluminium pans are not recommended
as they may stain the vitreous surface,
unless they have stainless-steel covered
bottoms.
(Consult manufacturer of the aluminium
cookware before using on the ceramic
cooktop)
Hotplates should not be switched on
without a pan on top.The base of the
pan should be flat and dry. Pans that
have been used on gas cookers are not
normally flat and absorb heat poorly.
Make sure that the diameter of the pan
is at least that of the hotplate.
Avoid scraping pans over the
vitroceramic surface,as it may become
scratched. Always lift the pan.
Never use tinfoil or plastic containers.
They will melt and fuse permanently
with the vitroceramic surface.
STAINLESS STEEL
ENAMEL
CERAMIC
COPPER
ALUMÍNIUM ALUMÍNIUM
STAINLESS STEEL
YES
Page 6

4
IMPORTANT: If the vitroceramic surface breaks or you notice cracks in it, disconnect the
equipment. Call Kleenmaid Customer Call Centre for service assistance.
CLEANING
Clean the vitroceramic surface
frequently, when it is cool. Never use
abrasive products or pads. Clean
with a damp cloth and soapy water.
Once a week, clean thoroughly with
specific products that preserve and
protect vitroceramic hobs. Scrape off
hard stuck dirt with the scraper
(Included in accessory bag).
If sugar (or sugary matter) or plastic
is accidentally burnt on the hob,
remove at once with the scraper
while still hot. Otherwise the spill
may leave a permanent mark.
Do not use the hob as a work surface.
Be particulary careful with dirt like
soil or dust from vegetables, cleaning
powders, etc. which may scratch the
surface when pans are placed over it.
IMMEDIATELY
SOAP + WATER
SCOURER
Page 7

5
INSTALLATION
Place the hob face down on a
table. Remove the backing paper
and affix the sealing gasket all
round the perimeter.
1
2
Cut out a piece of the worktop following
the dimensions provided below.
Minimum distance between hole and
sidewall 100 mm.
Minimum distance between hole and
rearwall 50 mm.
Page 8

6
INSTALLATION
3
Place the hob alongside the cavity in
the worktop and connect the power
cable to the electrical socket.
IMPORTANT: Carry out connection
with the power disconnected.There
must be a good grounding
connection. Kleenmaid will not accept
responsability for installations carried
out other than as directed here.
The cooktop is equipped with a power input cable
for high temperatures and must be installed with
this cable.
4
Next insert the hob in the worktop
cavity, pressing down firmly to ensure a
good seal.
5
NOTE: This equipment complies with EMC Standards.
Fix the 4 clamps underneath the hob to
the 4 corners of the cavity.
(Clamps, brackets and nuts are
supplied in acessory bag).
Page 9

7
WIRING DIAGRAM
TERMINAL
TERMINAL
TERMINAL
BLACK
RED
BROWN
WHITE
GREEN - YELLOW
BLUE
RED
Page 10

9
WARRANTY AND SERVICE
DOMESTIC WARRANTY - FULL FIVE YEAR WARRANTY
In addition to all statutory rights which you, the Consumer, have under the relevant laws in
respect of this appliance,during the first five years of ownership as the original purchaser
of this Kleenmaid appliance, we guarantee that any fault caused by faulty material or
workmanship becoming apparent will be rectified free of charge for parts and labour,
provided that all service is performed during normal working hours by Kleenmaid or
their designated Agents.Where the appliance is installed outside the normal servicing
area of the above, the Purchaser must pay for the cost of transporting the appliance to and
from the Agent or the Agent’s travelling cost to and from the Purchaser’s home.
COMMERCIAL WARRANTY - ONE YEAR WARRANTY
When this appliance is installed in a commercial application, you, the Consumer, have
under the relevant laws in respect of this appliance, during your first one year of
ownership as the original purchaser of the Kleenmaid appliance, we guarantee that any
fault caused by faulty material or workmanship becoming apparent, will be rectified free
of charge for parts and labour, provided that all service is performed during normal
working hours by Kleenmaid or their designated Agents.Where the appliance is installed
outside the normal servicing area of the above, the Purchaser must pay for the cost of
transporting the appliance to and from the Agent or the Agent’s travelling cost to and from
the Purchaser’s home.
WHAT THESE WARRANTIES DO NOT COVER
We are not responsible for any damage or malfunction unless caused by a defect in
material or workmanship. This includes but is not limited to abuse, misuse, improper
installation and transportation damage.We are not responsible for any consequential
damages from any malfunction.
WARRANTY DOES NOT COVER REPLACEMENT OF LIGHT GLOBES OR
GLASS BREAKAGE DUE TO IMPACT
In case of fractured glass do not use your appliance.
WARRANTY REGISTRATION
Please complete the enclosed warranty card and post it to us or phone our Customer Call
Centre.
SERVICE ASSISTANCE
To assist you when phoning our Customer Call Centre number to arrange a service call
please complete the following details and have them ready when you call.
Model Number: Date of purchase:
Kleenmaid Store purchased from:
KLEENMAID CUSTOMER CALL CENTRE
CONTACT NUMBER
1300 652 100
Date of installation:
Page 11

Other products in Kleenmaid’s
range of world’s best appliances:
• Washers
• Dryers
• Vacuum Cleaners
• Dishwashers
• Cooktops
• Cookware
• Rangehoods
• Ovens
• Refrigerators & Freezers
• Sinks & Taps
• Waste Disposals
Kleenmaid Head Office:
PO Box 5560, Maroochydore Business Centre, Queensland 4558
For sales information on the full range of quality
kitchen and laundry appliances, phone 13 13 08
10-00
C60T015A1
Printed on recycled paper.
 Loading...