

Page 1

International
Bottom Freezer
Refrigerator
Owner's Manual
BX521VE BX521VW
Keep these instructions for future reference. Be sure this
manal stays with refrigerator .
Page 2

ongratulations on the purchase of your new appliance. This appliance
has been designed and manufactured to give you years of reliable
C
install your new appliance. Correct installation will avoid delays and
unnecessary service calls.
Once installation is complete, read this booklet carefully and get to know the
controls and the features of your new appliance.
We reserve the right to alter the specifications with no influence on the
operation of the appliance. This instruction manual cannot be reason for
claim.
performance. For best results, carefully read the instructions on how to
For appliance please phone
1300 652 100
Kleenmaid St George Store
131308
Page 3

Contents
!
!
Parts and Accesories.................................................................... 2
Electrical Requirements ................................................................ 2
Model Identification........................................................................ 2
Service ......................................................................................... 2
Proper Disposal of Y our Refriger ator.............................................. 3
Space Requirements..................................................................... 3
Instructions for Installation............................................................. 4
T o Remov e Doors and Hinges .................................................. 4
T o Replace Doors ..................................................................... 4
Connect Ice Maker Water Supply Line (some models)............... 5
Leveling Refrigerator ..................................................................... 6
Installation Checklist ..................................................................... 7
Controls ........................................................................................ 8
Fresh Food and Freezer Controls ............................................. 8
Setting Controls......................................................................... 8
Fresh Food Features .................................................................... 8
Fresh Food Shelves.................................................................. 8
Beverage Organizer.................................................................. 8
Adjustable Deli Drawer
Garden Fresh
Chiller Fresh
Storage Rack (some models)...................................................10
Covered Storage Bucket (some models)..................................10
Dairy Center (some models) .................................................... 10
Door Buckets ........................................................................... 11
T all P ackage Retainer .............................................................. 11
Door Shelves ...........................................................................11
Adjustable Divider (some models) ............................................11
Bottle Holder ............................................................................11
Freezer Features.........................................................................12
Frost-Free System...................................................................12
Automatic Ice Maker (some models) ........................................12
Ice Service Rack (some models) .............................................12
Slideout Shelf (some models) ................................................... 12
V ertical Shelf Divider (some models) ........................................12
Fixed Wire Shelf (some models)...............................................12
Wire Basket (some models) .....................................................13
Ice Bin (some models) .............................................................13
Vertical Basket Divider .............................................................1 3
Tilt-Out Bin (some models).......................................................13
Pullout Drawer Baskets (some models)....................................13
Ice Shield (some models) .........................................................13
Care and Cleaning .......................................................................14
General Cleaning .....................................................................14
Stainless Steel Cleaning ...........................................................1 4
Adhesives ................................................................................14
Door Gaskets .......................................................................... 14
Condenser Coils ......................................................................14
Glass Shelves..........................................................................14
Odor Removal..........................................................................14
Light Bulb Replacement ............................................................15
Vacation Tips................................................................................1 5
Energy Tips..................................................................................15
Normal Operating Sounds ............................................................16
Before Calling For Service............................................................17
Note: T r anslation may sometimes cause variations in meaning. In all
cases where meaning varies, the most accurate meaning will be the
English version of this document.
TM
TM
Recognize this symbol as a safety precaution.
TM
Crisper ............................................................ 9
System (some models) ..................................... 9
(some models)................................... 9
Parts and Accessories
Purchase replacement parts and additional accessories
(e.g. refrigerator shelves) over the phone. To order
accessories for your product, call 1-800-843-0304 inside
U.S.A. or 319-622-5511 outside U.S.A., or contact us on
the internet at www.amana.com.
Electrical Requirements
WARNING
To avoid electrical shock which can cause severe
personal injury or death do not cut or remove the round
grounding prong from the plug. Refrigerator must be
grounded at all times. Do not remove warning tag from
power cord.
Do not use a two-prong adapter. Do not use an
extension cord.
This refrigerator is equipped with a three-prong
(grounding) plug for protection against possible
shock hazards. If a two-prong wall receptacle
is encountered, contact a qualified
electrician and have the two-prong wall
receptacle replaced with a properly grounded
three-prong wall receptacle in accordance
with the National Electrical Code.
Refrigerator is designed to operate on a separate 230
volt, 10 amp., 50 Hz line.
Model Identification
Thank you for purchasing this Amana® refrigerator. Please
read this Owner's Manual thoroughly. This manual
provides proper maintenance information. Any questions,
call the Consumer Affairs Department at 1-800-843-0304
inside U.S.A. and 1-319-622-5511 outside the U.S.A., or
contact us on the internet at www.amana.com.
When contacting Amana , provide product information.
Product information is on the serial plate, located on the
ceiling of fresh food section. Record the following
information.
Model Number: _________________________
Manufacturing Number: _________________________
S/N or Serial Number: _________________________
Date of Purchase: _________________________
Dealer's name and address: ________________________
________________________________________________
Service
Keep a copy of sales receipt for future reference or in
case warranty service is required. Any questions or to
locate an authorized servicer, call 1-800-NAT-LSVC
(1-800-628-5782) inside U.S.A. 319-622-5511 outside
U.S.A. Warranty service must be performed by an
authorized servicer. Amana also recommends contacting
an authorized servicer if service is required after warranty
expires.
2
Page 4
!
DANGER
!
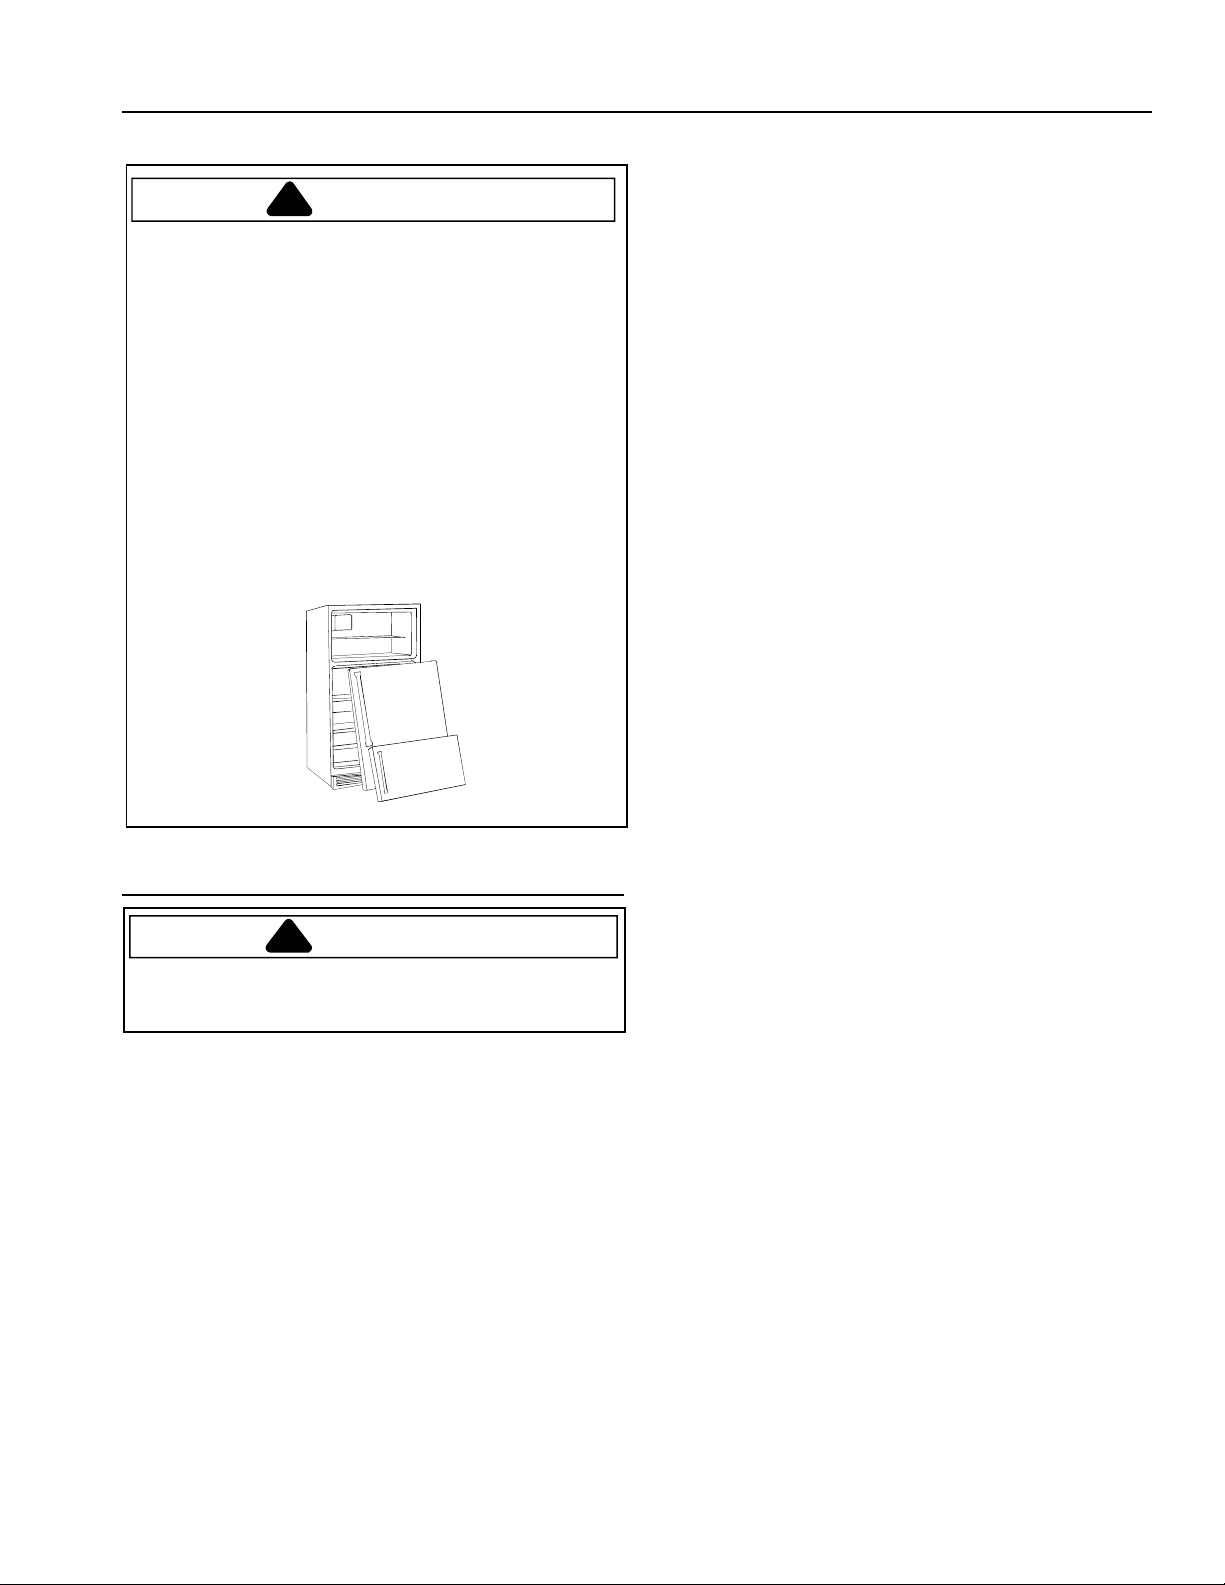
Proper Disposal of Your Refrigerator
IMPORTANT: Child entrapment and suffocation
are not problems of the past. Junked or abandoned
refrigerators are still dangerous-even if they will sit for "just a few days." If you
discard an old refrigerator, please follow the
instructions below to help prevent accidents.
BEFORE BEFORE
BEFORE
BEFORE BEFORE
REFRIGERAREFRIGERA
REFRIGERA
REFRIGERAREFRIGERA
• Take off the doors.
• Leave the shelves in place so that children may
not easily climb inside.
YY
OU OU
THRTHR
OO
Y
OU
THR
YY
OU OU
THRTHR
TT
OR OR FREEZER:OR OR FREEZER:
T
OR OR FREEZER:
TT
OR OR FREEZER:OR OR FREEZER:
O
OO
W AW A
W A
W AW A
WW
W
WW
AA
A
AA
Y Y
Y
Y Y
YY
Y
YY
OUR OLDOUR OLD
OUR OLD
OUR OLDOUR OLD
Space Requirements
WARNING
Keep flammable materials and vapors, such as
gasoline, away from refrigerator. Failure to do so can
result in death, explosion, fire, or burns.
• To ensure proper ventilation for your refrigerator, allow
for a 1"(2.5 cm) for 33" wide models, or ½"(1.3 cm) for
30" wide models, at the top of your refrigerator.
• If your refrigerator has an ice maker, make sure you
leave some extra space at the back to allow for the
water line connection. The refrigerator can be flush with
the back wall if you do not have an ice maker installed.
• If you are installing your refrigerator next to a fixed wall,
leave 2 ½" minimum on hinge side (depending on your
model) to allow for the door to swing open 90°.
NOTE: Do not install the refrigerator near an oven,
radiator, or other heat source. Do not install the
refrigerator in a location where the temperature will fall
below 55°F (13° C).
3
Page 5
!
Instructions for Installation
Proper installation will ensure this
refrigerator operates most efficiently.
Amana cannot be held responsible for
improper installation.
Tools Required
Putty knife
Masking tape ¼" hex nut driver
3
/8" hex nut driver Phillips screwdriver
IMPORTANT:
• Save all screws for reuse.
• For plug removal requiring use of flat blade screwdriver
or putty knife, blade of tool must be covered with
masking tape to avoid damage to refrigerator
finish. For plugs using a screwdriver or nut driver style
head, use appropriate tool to avoid damage to plugs.
5
/16" hex nut driver
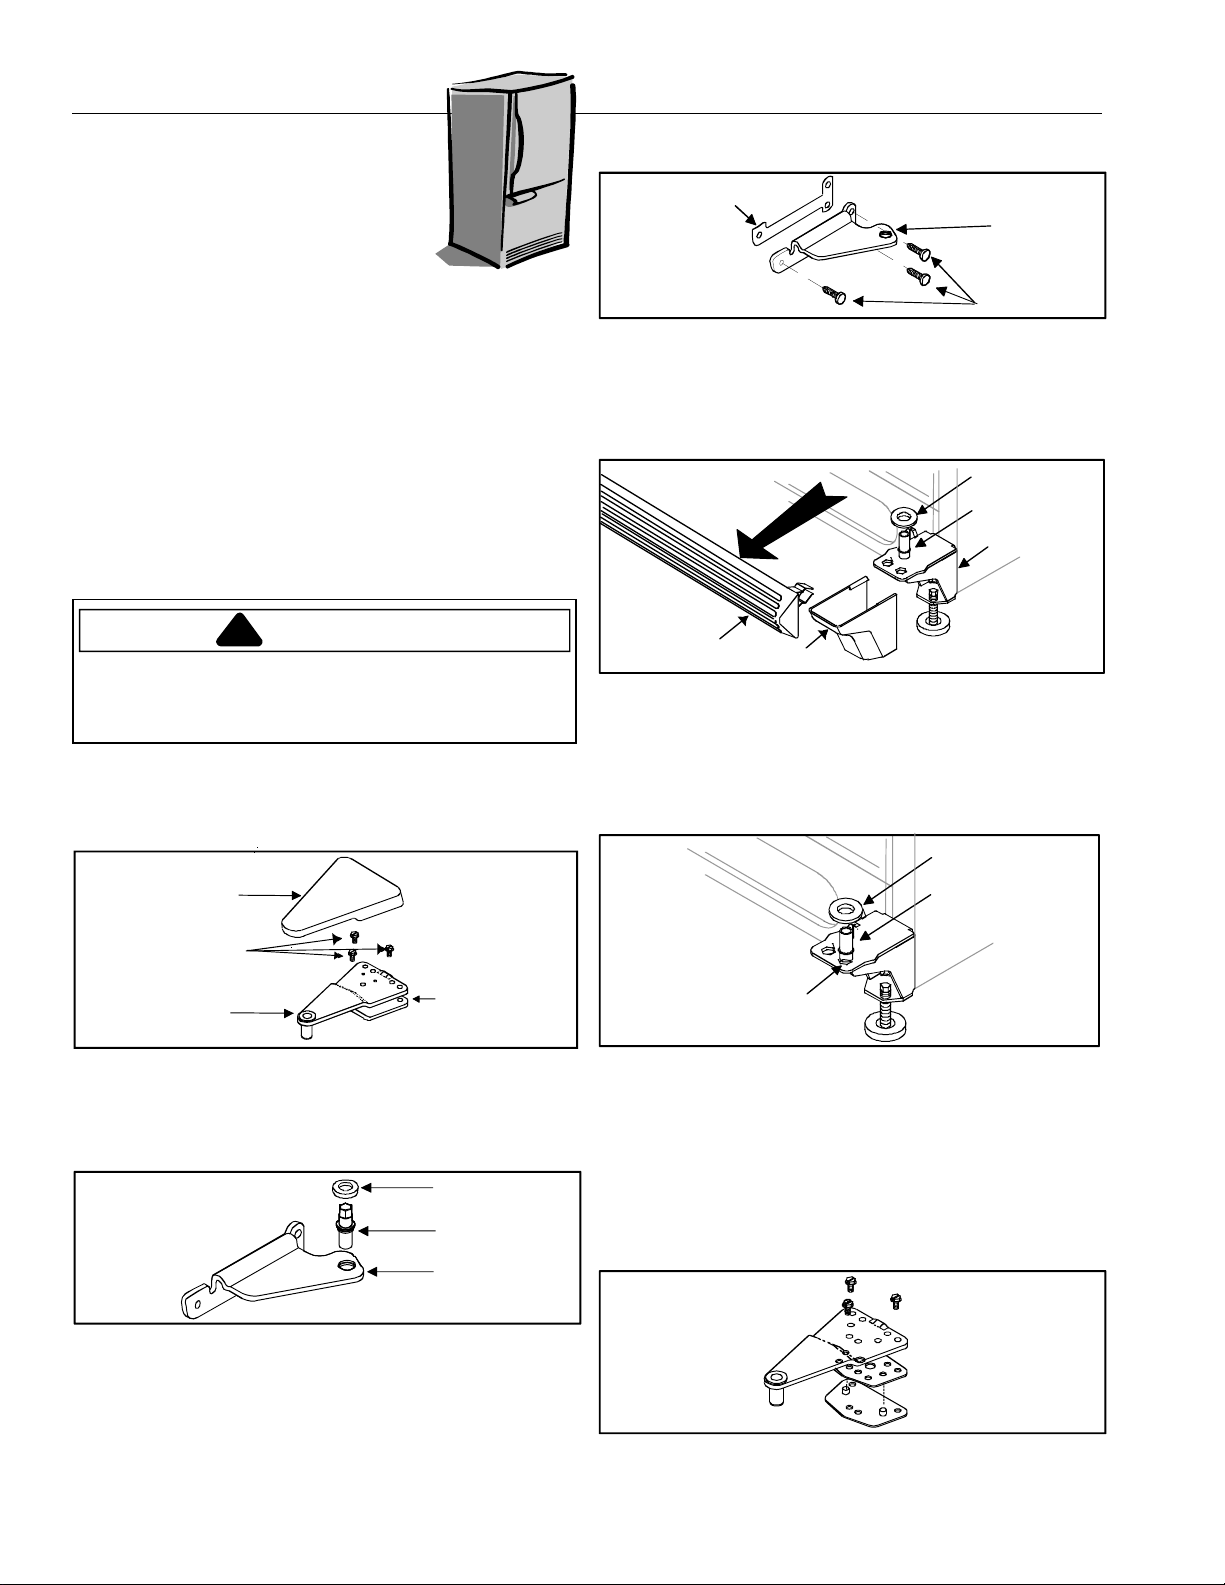
To Remove Doors and Hinges
Some installations may require door and hinge removal to
transport unit to final location.
WARNING
To avoid electrical shock which can cause severe
personal injury or death, disconnect power to
refrigerator before removing doors. After replacing
doors, connect power.
(A)
1. Remove top hinge cover
off. While supporting refrigerator door, remove top
(B)
hinge
remove screws
and shim
(D)
(C)
.
. Top hinge cover snaps
using 5/16" hex nut driver to
5. Remove center hinge bracket
(C)
removing screws
using Phillips screwdriver.
(A)
and shim
(B)
by
B
A
C
6. Remove toe grille
snap off.
7. Remove bottom hinge
driver. Remove hinge pin
round washer shims
A
(A)
and bottom hinge cover
and shim
(D)
(E)
, if present.
(C)
. Remove and retain all
B
(B)
with 3/8" hex nut
E
D
C
To Replace Doors
1. Replace bottom hinge and shims with 3/8" hex nut
screws from hinge removal.
(A)
2. Replace bottom hinge pin
(B)
hole
shims
toward outside of cabinet. Replace all washer
(C–some models)
in hinge bracket
.
C
. Both
A
D
C
B
2. Lift refrigerator door off center hinge.
3. While supporting freezer door, remove center hinge pin
(A)
from center hinge bracket
driver. Remove and retain all round washer shims
some models)
.
(B)
with 5/16" hex nut
(C–
C
A
B
4. Remove freezer door by lifting door off bottom hinge.
A
B
3. Replace center hinge and shims with Phillips screws
from hinge removal.
4. Place freezer door on bottom hinge pin.
5
5. Replace center hinge pin with
Make sure fit is tight. Replace all washer shims
(some models)
6. Assemble top hinge, hinge shim, and positioning
shim together. Attach loosely to opposite side of
cabinet to allow for door clearance.
.
/16" hex nut driver.
4
Page 6
7. Place refrigerator door on center hinge. Tighten down
!
!
top hinge to securely hold door.
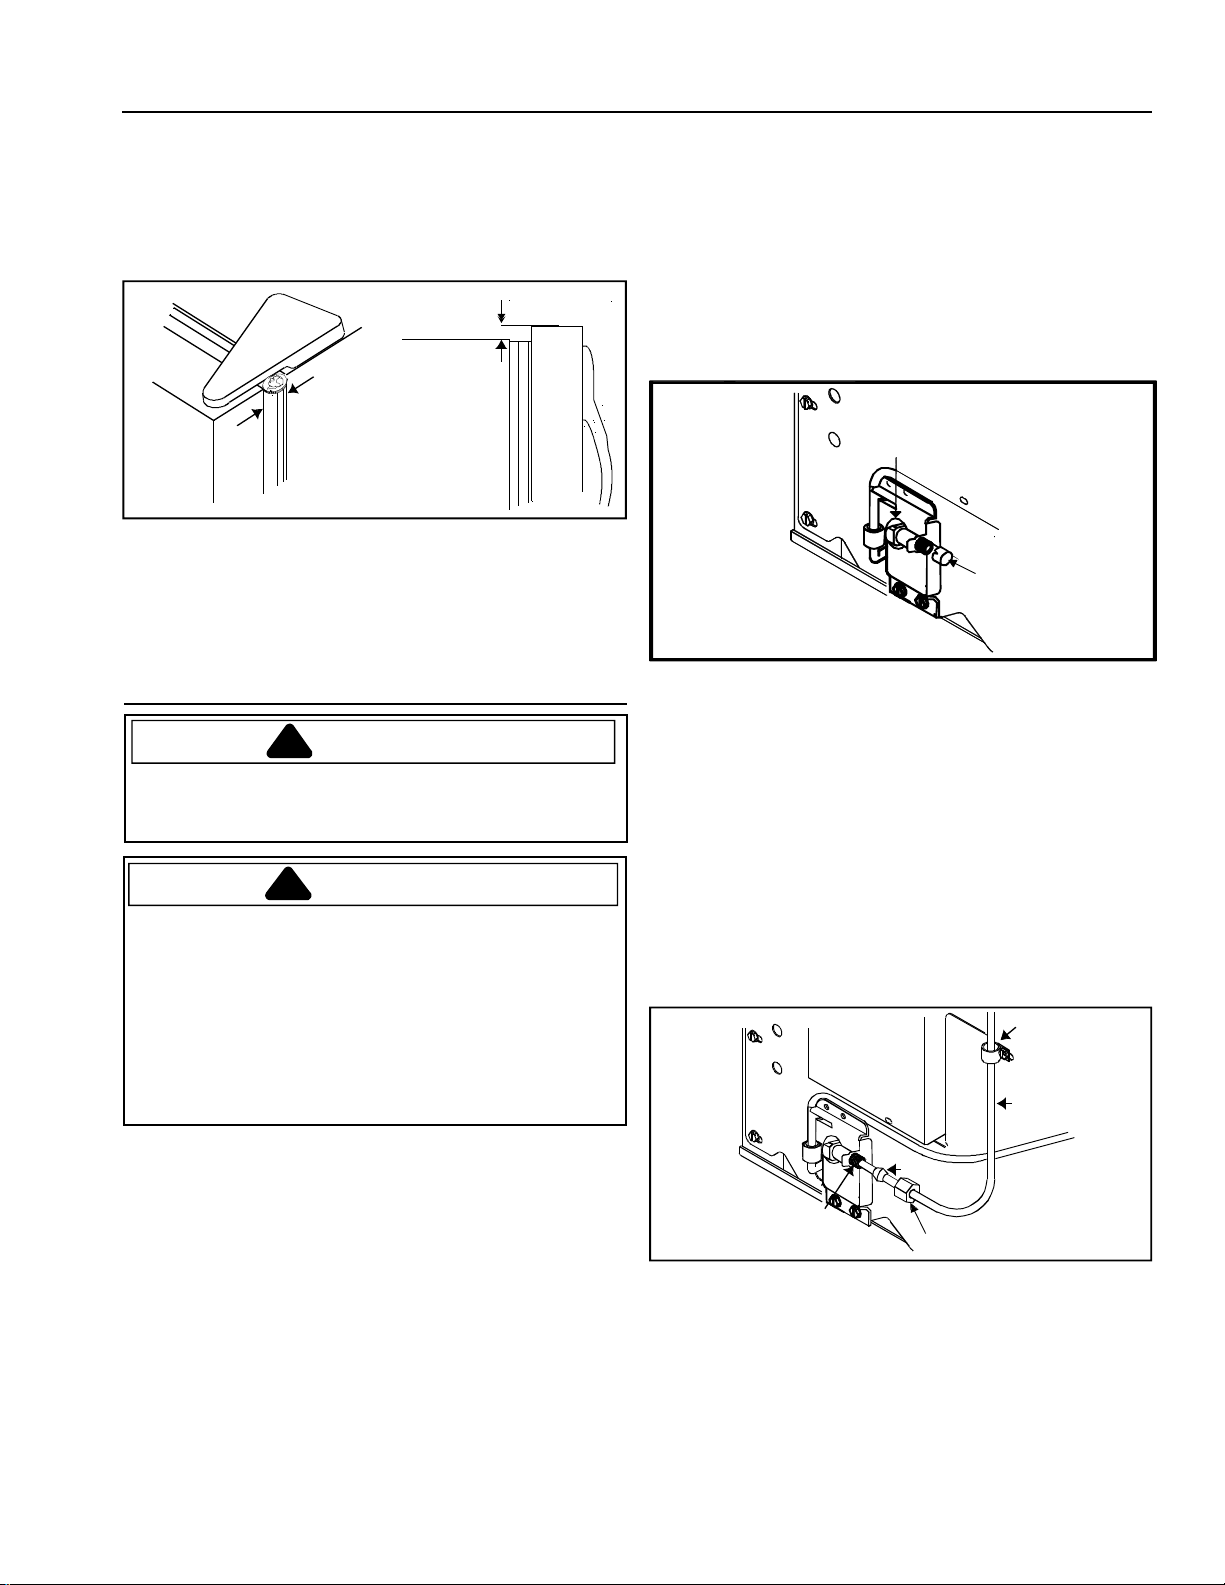
8. Use a dime at top to space door
cabinet. Handle side of door should be approximately
1
/8" (3 mm) higher than hinge side. Door will become
level when it is loaded with food.
11
/16"(18 mm) from
1/8"
(3 mm)
11/16"
(18 mm)
9. Replace hinge cover.
Note: If automatic ice maker water supply is
required, procede to
Supply Line
Leveling Refrigerator
. If not, procede to section entitled
Connect Ice Maker Water
.
Connect Ice Maker Water Supply Line
(some models)
DANGER
To avoid electrical shock which can cause severe
personal injury or death. Disconnect power to
refrigerator before connecting water supply.
CAUTION
Observe the following to avoid property damage:
• Raise stabilizing leg before moving unit.
• Make sure water pressure to water valve is
between 20 and 100 pounds per square inch.
• Tighten adapter fitting and nuts with pliers and
wrenches. Do not overtighten.
• Check for water leaks and correct if necessary
before returning refrigerator to normal location. After
24 hours check again for leaks.
Important
• Before connecting water supply, contact a plumber to
connect coper tubing to household plumbing in
compliance with local codes and ordinances.
• DO NOT use piercing type or
Both reduce water flow, become clogged with time and
in addition, may cause leaks if repair is attempted. The
correct type–a shut-off valve–requires a ¼" hole to be
drilled in the water supply pipe before valve attachment.
3
/16" saddle valves!
Materials Required
¼" O.D. (6 mm) flexible copper tubing
½" open end wrench
Length of copper tubing must reach from water supply
connection to water valve inlet port on back of
refrigerator, plus additional 8 ft. (2 m) of tubing for a
service loop. A service loop will allow refrigerator to be
pulled away from the wall without disconnecting tubing.
Procedure
1. Remove plastic cap
(A)
from water valve inlet port
B
A
2. Place brass nut
tubing
(C)
literature packet.). Insert copper tubing into water
valve inlet port
tubing to water valve inlet port. Make sure copper
tubing is secure by pulling on copper tubing.
3. Turn on water supply to refrigerator and check for
leaks. Correct any leaks at connection. Be careful not
to overtighten connection.
4. Create a service loop using extreme care to avoid
kinks. Secure copper tubing to refrigerator cabinet
with a "P" clamp
tubing to refrigerator to avoid leaks when pushing
refrigerator back into opening.
(A)
and brass sleeve
(Brass nut and sleeve are found in your
(D)
. Connect brass nut on copper
(E)
. It is important to secure copper
(B)
on copper
E
C
B
D
A
5. Proceed to
placement.
Leveling Refrigerator
for final refrigerator
(B)
.
• Do not install copper tubing in area where temperatures
drop below 32°F (0°C).
5
Page 7
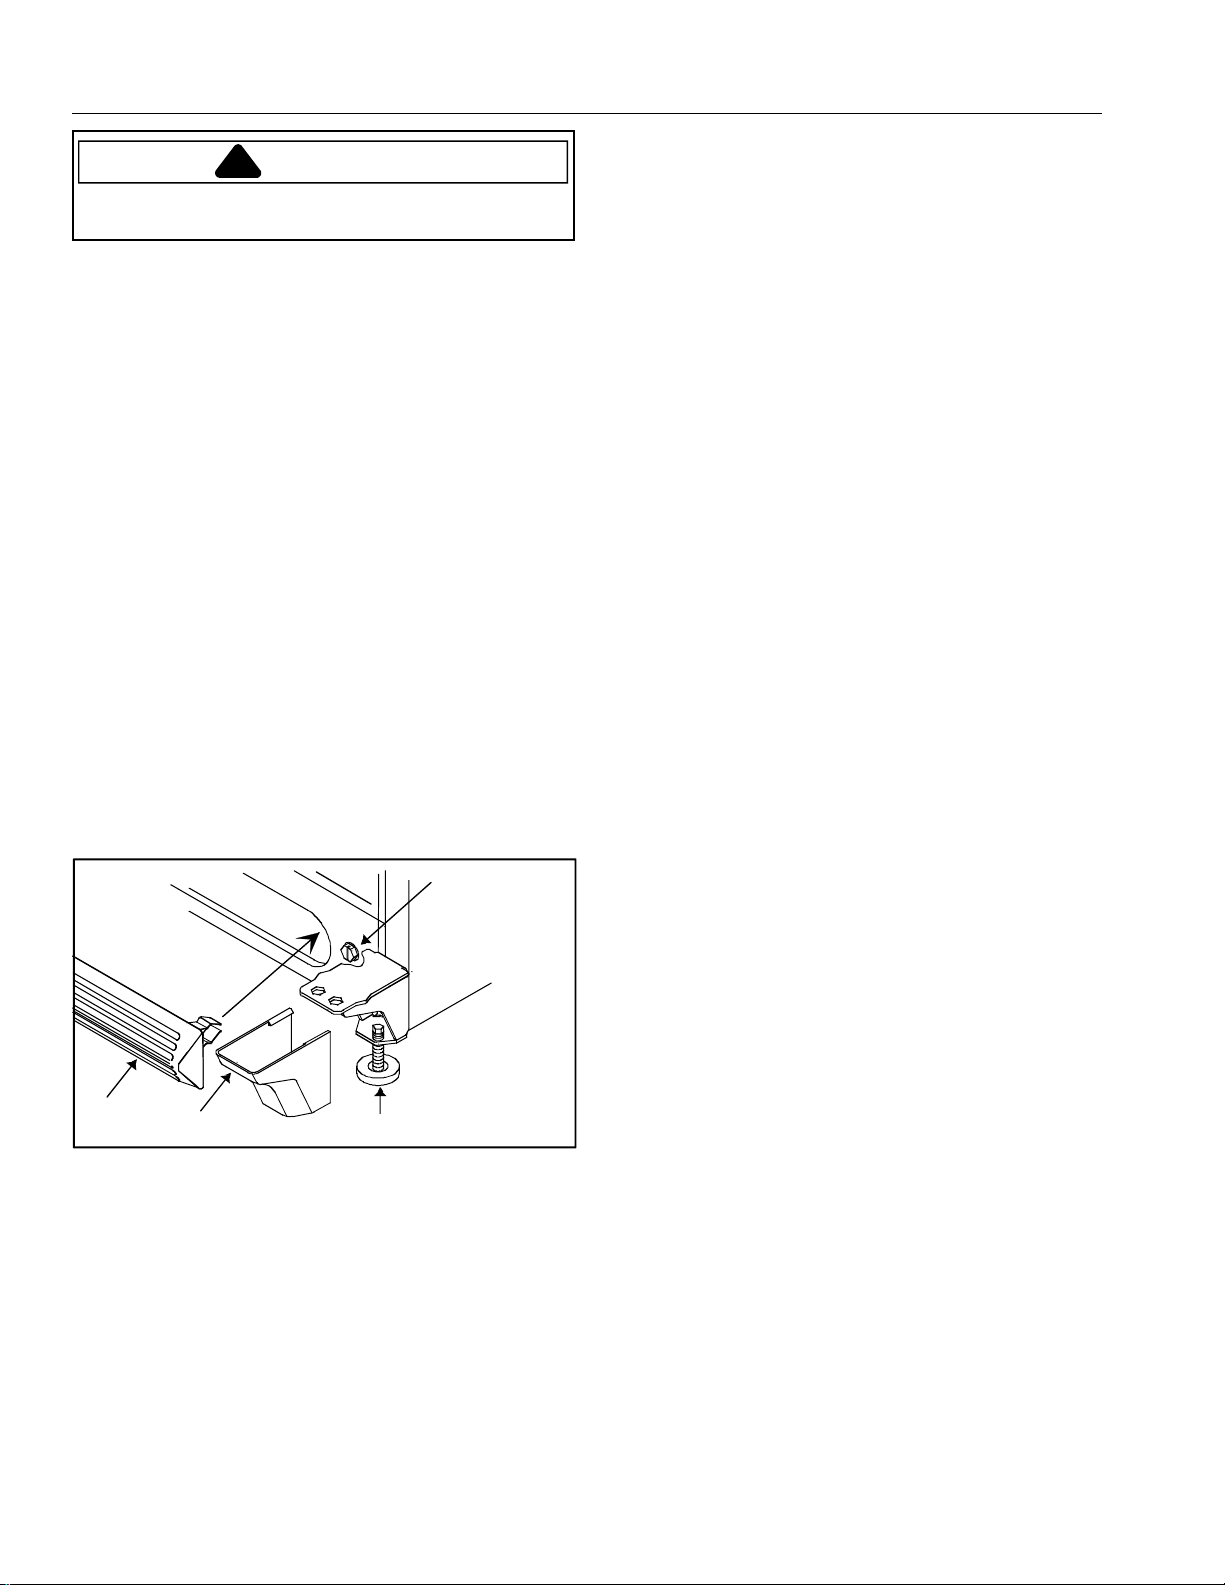
Leveling Refrigerator
!
CAUTION
Protect soft vinyl or other flooring with cardboard, rugs
or other protective material to avoid property damage.
If your refrigerator requires an ice maker water supply
connection, proceed to
section before lev eling your refrigerator.
1. Plug in power cord.
2. Move refrigerator into final location.
3. Level refrigerator using a level placed on top of the
refrigerator.
• Remove toe grille
cover
(B)
.
• T urn roller adjustment screws
refrigerator cabinet. F ront of refrigerator must be
¼" (6 mm), or ½ bubble on your level, higher than
the back of your refrigerator .
• Make sure refrigerator cabinet is level from side to
side by adjusting left and right roller adjustment
screw
(C)
.
• T urn stabilizing leg
floor.
4. Replace toe grille
markings on inside of toe grille to insure proper
placement.
• Snap top portion into place first. Press down on
lower part of grille until bottom portion snaps into
place.
Connect ice maker water supply
(A)
. Remove bottom hinge
(C)
to raise or lower
(C)
clockwise until firmly against
(A)
and bottom hinge cover
(B)
. See
A
5. Review
consumer.
B
Installation Checklist
C
D
in Owner's Manual with
6
Page 8

Installation Checklist
This checklist is for personal records only.
Consumer Installer
Doors
Handles are solidly attached to doors.
Handle side of door is 1/8" (3 mm) higher than hinge side. (Door lowers when
loaded with food.)
Doors seal completely to refrigerator cabinet.
Leveling
Refrigerator is tilted 1/4" (6 mm) from front to rear.
T oe grille is properly attached to refrigerator .
Product Literature
Owner's manual is reviewed including the following information.
• product registration card
• Fresh f ood and freezer controls
• Humidity-controlled crispers
• normal operating sounds
Notes
Consumer's Signature
Installer's Signature
DateInstaller's Company Name/Phone Number
7
Page 9

Controls
!
!
This refrigerator is designed to operate at normal
household temperatures of 55° to 110°F (13° to 43°C).
CAUTION
Fresh Food and Freezer Controls
Fresh food control is located on upper rear wall of fresh
food section.
4
3
5
2
Freezer control is located on left front ceiling of freezer
section.
Cold Coldest
4
6
7
1
Deepfreeze Control
Handle tempered glass shelves carefully to avoid
personal injury or property damage. Shelves ma y
break suddenly if nicked, scratched, or exposed to
sudden temperature change.
• Remove shelves
hooks
(B)
from metal track
(A)
by lifting up shelf front,releasing
(C),
then pulling out.
• Replace shelves by inserting hooks into metal track
and lowering front of shelf.
C
A
B
Easy Glide™ shelves pull forward for easy access to
items in back.
Setting Controls
When freezer control is set to OFF, neither refrigerator nor
freezer sections will cool. Initially, set both controls to 4.
Wait 24 hours for refrigerator and freezer sections to
stabilize temperatures. After 24 hours, adjust controls,
one number at a time, as desired. One is warmest setting
and seven is coldest.
Set controls precisely using a household thermometer
with a temperature range between -5° to 50°F
(-21° to 10°C).
Put thermometer snugly between frozen packages in
freezer section. Wait 5–8 hours. If freezer temperature is
not 0° to 2°F (-17° to -16°C), adjust freezer control one
number at a time. Check again after 5–8 hours.
Put thermometer in a glass of water in middle of fresh
food section. Wait 5–8 hours. If fresh food temperature is
not 38° to 40°F (3° to 4°C), adjust fresh food control one
number at a time. Check again after 5–8 hours.
Fresh Food Features
Fresh Food Shelves
Shelves adjust to meet individual storage needs. Some
models feature Spillsaver TM Shelves and Easy Glide TM
shelves. Spillsaver TM Shelves hold minor spills for easier
cleaning.
Beverage Organizer (some models)
The beverage organizer slides out from underneath the
glide-out shelf. This may hold 12 cans or other desired
beverages.
• Before removing organizer, empty contents.
(A)
• Remove organizer
it catches on grooves
front and pull out.
• To replace, guide organizer
forward movement is stopped by groove
organizer front and ease organizer toward back of unit.
by pulling organizer forward until
(B)
in shelf rail
(A)
(C)
. Lift organizer
into shelf rails
(B)
(C)
. Lift
until
B
C
CAUTION
Make sure shelf is secure before replacing items on
shelf to avoid property damage.
C
A
8
Page 10

!
Adjustable Deli Drawer™ (some models)
!
• Refer to instructions entitled Spillsaver ™ Shelves for
removing and replacing shelf.
• Remove drawer and sleeve by lifting and pulling out.
• Replace drawer by sliding into place.
Garden Fresh™ Crispers
Garden Fresh ™ crispers keep produce fresh longer. Wrap
produce tightly. Do not wash produce before placing in
crispers. Excess moisture could cause produce to spoil
prematurely. Do not line crispers with paper towels. Paper
towels retain moisture.
Garden Fresh ™ crisper control is located below front
shelf trim. Control adjusts humidity in crisper drawers.
Slide control to high for produce with leaves such as
lettuce,spinach or cabbage. Slide control to low for
produce with skins such as cauliflower, corn or tomatoes.
To remove or clean crisper drawer assembly for 33"
wide units:
1. Remove crisper drawer on handle side of unit.
CAUTION
Handle tempered glass shelves carefully to avoid
personal injury or proper ty damage. Shelves may
break suddenly if nicked, scratched, or exposed to
sudden temperature change.
2. Remove glass crisper top by gently pushing up from
underneath. Tilt one end up and pull out.
6. Replace crispers and shelves by performing steps
2 through 5 in reverse order.
Note: Be sure to hook shelf frame over notch on top
of support post when replacing shelf frames.
7. Slide crisper glass into place.
To remove or clean crisper drawer assembly for 30"
wide units:
1. Open refrigerator door as wide as possible and
remove crisper drawers.
CAUTION
Handle tempered glass shelves carefully to avoid
personal injury or proper ty damage. Shelves may
break suddenly if nicked, scratched, or exposed to
sudden temperature change.
2. Remove glass crisper top by gently pushing up from
underneath. Tilt one end up and pull out.
2
2
1
3. Lift front of crisper shelf frame and remove.
4. Lift front of remaining crisper assembly and remove
support post from center of refrigerator floor.
3
4
5. To avoid interference with door, move remaining
crisper assembly to opposite wall and remove.
1
3. Raise front of crisper frame free of refrigerator cabinet
rail assembly and pull out of unit.
3
4. Replace crispers and shelf by performing steps 2
through 3 in reverse order.
5. Slide crisper glass into place.
Chiller FreshTM System (some models)
The Chiller FreshTM System features a drawer inside a
sleeve. Freezer air circulates between drawer and sleeve.
This systems keeps food fresh longer and up to 5°F (3°C)
colder than refrigerator temperature.
5
9
Page 11

Chiller FreshTM control
Control adjusts amount of air circulating around drawer.
Slide control to
and to
form on drawer or food on
entering the Chiller Fresh
refrigerator temperature. Fresh food control may need to
be adjusted to a lower number to compensate for colder
air.
Chiller Fresh
right side of the refrigerator compartment to accomodate
different storage needs.
To install on left side, see Figure 1. To install on right
side, see Figure 2
1. Remove drawer
2. Remove plastic cap
3. Rotate boot
4. Insert plastic cap in hole
5. Replace shelf by inserting hooks into metal track and
6. Replace drawer by sliding in. Make sure boot fits
COLDER
TM
drawer can be moved from the left to the
(C)
shelf
metal track
section by placing a knife covered with masking tape
underneath cap and pulling forward.
food section. Confirm cap is snugly in place. Cold air
may cause food to freeze if cap is not replaced.
lowering the front. Use slots 4 though 6 only.
snugly over air inlet in back wall.
by lifting from front, releasing hooks from
(A)
is located below front shelf trim.
COLD
for normal refrigerator temperature
for colder temperature. Ice crystals may
COLDER
TM
drawer can decrease
(B)
by lifting and pulling out. Remove
(D)
, then pulling out.
(E)
from back wall of fresh food
(F)
180° to opposite side.
setting. Cold air
(G)
opposite side of fresh
D
Storage Rack (some models)
Storage rack
bottle, eggs, etc.
• Hang rack by hooking over side of shelf.
(A)
provides convenient storage for a large
A
Covered Storage Bucket (some models)
The covered storage bucket has a lid and removable egg
tray. When tr ay is removed, b uc k et will accept standard
egg carton, ice, etc.
C
1
F
G
E
Dairy Center (some models)
A
D
B
G
E
F
C
The dairy center provides convenient storage for b utter,
cheese, etc.
• Remove dairy center by lifting door
tabs
(B)
of shelf down on both sides, and pulling out.
(A)
, pushing
• Replace dairy center by sliding in until tabs lock
into place, then lower door .
2
B
A
A
B
10
Page 12

Door Buckets
Door buckets adjust to meet individual storage needs.
• Remove door buckets by pushing tabs
sides of shelves toward center and pulling bucket
out.
• Replace door buckets by sliding in until tabs lock
into place.
A
(A)
on both
Tall Package Retainer (some models)
T all pac kage retainer
fits on front edge of any refrigerator door bucket or door
shelf.
(A)
keeps tall items secure. Retainer
Adjustable Divider (some models)
Adjustable divider keeps items in place and adjusts to
meet individual storage needs. Divider fits in any door
bucket or door shelf.
Bottle Holder (some models)
Bottle holder keeps items in place and adjusts to meet
individual storage needs. Bottle holder fits in any door
bucket or door shelf.
A
Door Shelves
• Remove door shelves by lifting ends and pulling
out.
• Replace door shelves by placing shelf on glides
and sliding down.
A
(A)
11
Page 13

!
Freezer Features
Frost-Free System
The fresh food and freezer sections are completely frostfree. Defrosting is automatic under normal conditions.
Automatic Ice Maker (some models)
• Make sure ice bucket is in place and ice maker arm
is down
• After freezer section reaches normal temperature, the
ice maker fills with water and begins operating. For
optimum ice production, it is recommended that freezer
section be at least half full. Allow 24–48 hours after
installation before first harvest of ice. Ice maker
produces 7 to 9 harvests of ice in a 24-hour period
under ideal conditions.
• After ice is formed, ice maker drops ice cubes into ice
storage bucket. During ice production, ice maker arm
raises and lowers. When ice storage bucket is full, ice
maker arm turns ice maker off
Note: Discard first 3 harvests of ice so any impurities left
in the water line after installation are not consumed.
• If you wish to stop automatic ice production lift ice
maker arm
position is reached. Ice maker arm will remain in that
position until pushed down.
(C)
.
C
(A)
.
(A)
. A definite click is heard when proper
B
(B)
A
(B)
Slideout Shelf (some models)
Slide out shelf pulls forward for easy access to items in
back.
• Remove slideout shelf by sliding forward until ball
(B)
point
groove.
• Grasp shelf by center rail, pull up, and remove.
• Slide in until ball point falls into molding groove.
beneath center rail
(A)
catches in molding
A
B
Vertical Shelf Divider (some models)
Install vertical shelf divider by completing the following
steps:
1. Slide prongs of shelf divider beneath desired grill
work, slightly off-center from center rail.
2. Press top of divider down and slide hook assembly
beneath center rail.
2
1
Ice Service Rack (some models)
Install ice service rack
washers
(B)
and sliding down.
(A)
by placing ice service rack on
B
A
CAUTION
Make sure shelf is secure before placing items on
shelf to avoid property damage.
Fixed Wire Shelf (some models)
• Remove wire shelf by pulling out. A sharp tug may
be necessary.
• Replace wire shelf by sliding in until back locks in
place.
12
Page 14

Wire Basket
Wire basket
back.
• Remove wire basket by lifting and pulling out.
• Replace wire basket by sliding in.
(A)
slides out for easy access to items in
A
Ice Bin (some models)
Ice bin
(A)
sits below the ice service rack on the wire
freezer shelf.
A
Tilt-Out Bin (some models)
The tilt-out bin
food items in freezer door and tilts forward for easy
access of those items.
(A)
provides convenient storage for frozen
A
Pullout Drawer Baskets (some models)
(Door assembly of drawer removed from illustration for
visual clarity)
To remove and replace top basket:
• Remove basket by pulling basket out to its full
extension and lift out.
• Replace basket by sliding into upper compartment of
freezer.
To remove and replace bottom basket:
• Remove basket by lifting basket from rail guides.
• Replace basket by placing into rail guides.
Vertical Basket Divider
Install vertical basket divider
following steps:
1. Align clips on side of divider with rungs in basket
wall.
2. Press top of divider down until divider meets bottom
of basket
To remove divider:
1. Grasp top of divider and pull straight up.
A
(A)
by completing the
Ice Shield (some models)
The ice shield is mounted at the back of the pullout
drawer to prevent ice from falling behind the basket
assemblies.
To remove and replace ice shield:
• Slide ice shield to the right to release hooks
vertical wire rungs.
(B)
• To replace, slide tab
B
13
into place as shown.
A
(A)
from
Page 15

!
!
Care and Cleaning
!
!
WARNING
Disconnect power to refrigerator before cleaning to
avoid electrical shock which can cause severe
personal injury or death. After cleaning, restore power .
CAUTION
Read and follow all manuf acturer’s cleaning directions
to avoid personal injury or property damage.
General
See section on Stainless Steel Cleaning if doors are
stainless steel.
1. Wash surfaces with 4 tablespoons baking soda
dissolved in 1 quart warm water and a soft, clean
cloth.
2. Rinse surfaces with warm water. Dry surfaces with a
soft, clean cloth.
• Do not use the following items:
- abrasive or harsh cleaners, ammonia,
chlorine bleach, etc.
- concentrated detergents or solvents
- metal scouring pads
These items can scratch, crack and discolor
surfaces.
• Do not place buck ets, shelves, etc. in dishwasher.
Stainless Steel Cleaning
Damage to stainless steel finish due to improper use
of cleaning products, or using non-recommended
cleaining products, is not covered under warranty .
For Amana recommended products, call our Consumer
Affairs division at 1(800) 843-0304, or contact us on the
internet at www.amana.com.
1. Wash surfaces with warm soapy w ater and a soft,
clean cloth or sponge.
2. Rinse surfaces with warm water. Dry surfaces with a
soft, clean cloth.
• Do not use the following harsh cleaners:
- abrasive or acidic cleaners(ammonia, chlorine
bleach, vinegar-based product, etc.
- citrus-based cleaners
- scouring pads(metal, textured plastic, etc.)
These items can scratch, discolor, or permanently
tarnish surfaces.
3. Follow up rinsing by immediately drying with a soft,
clean cloth. This will av oid water spotting on
stainless steel finish.
Adhesives
1. Remove adhesive residue from refrigerator surfaces
by rubbing toothpaste into adhesive with fingers until
adhesive loosens.
2. Rinse surface with warm water. Dry surface with a
soft, clean cloth.
Door Gaskets
1. Clean door gaskets every 3 months according to
General Cleaning instructions. Clean any spills
immediately .
Condenser Coil
Clean condenser coil behind toe grille every 3 months to
ensure maximum performance of refrigerator .
Accumulated dust and lint may cause the following:
• reduced cooling performance
• increased energy usage
• premature part failure
1. Remove toe grille by holding ends and pulling away
from refrigerator.
2 . Clean front surface of condenser coil with a vacuum
cleaner hose nozzle.
3. Replace toe grille by inserting clips in holes and
snapping in. See
4. Raise stabilizing legs (some models) by turning
counterclockwise.
Leveling Refrigerator
section.
CAUTION
Protect soft vinyl or other flooring with cardboard, rugs
or other protective material to avoid property damage.
5. Pull refrigerator away from wall. Run a vacuum
brush across grille on back of refrigerator.
Glass Shelves
CAUTION
Handle tempered glass shelves carefully to avoid
personal injury or property damage. Shelves ma y
break suddenly if nicked, scratched, or exposed to
sudden temperature change.
Remove shelf by lifting front, releasing hooks from metal
track then pulling out. Place shelf on a towel. Allow shelf
to adjust to room temperature before cleaning.
Clean crevices by completing the following:
1. Dilute mild detergent and brush solution into crevices
using a plastic bristle brush. Let sit for 5 minutes.
2. Spray warm water into crevices using faucet spray
attachment.
3. Dry shelf thoroughly and replace shelf by inserting
hooks into metal track and lowering it from the front.
Odor Removal
1. Remove all food and disconnect power to refrigerator .
2. Clean all interior surfaces including ceiling, floor, and
walls according to General Cleaning instructions
above. Pay special attention to corners, crevices, and
grooves. Include all drawers, shelves, and gaskets.
3. Connect power to refrigerator and return food to
refrigerator. W ash and dry all containers. Wrap foods
in tightly sealed containers to prevent further odor .
14
Page 16

After 24 hours, check if odor has been eliminated.
!
!
Complete steps 4–9 if odor has not been eliminated.
4. With unit unplugged, place crispers on top shelf of
refrigerator section. P ack refrigerator and freezer
sections, including doors, with crumpled sheets of
newspaper.
5. Place charcoal briquettes randomly throughout
newspaper.
6. Close doors and let stand 24–48 hours.
7. Remove charcoal briquettes and newspapers.
8. Complete steps 2–3.
If odor is still not eliminated, contact a customer service
representative with the number located in the Model
Identification section.
Light Bulb Replacement
WARNING
Disconnect power to refrigerator before replacing light
bulb to avoid electrical shock which can cause severe
personal injury or death. After replacing light bulb ,
restore power .
CAUTION
Observe the following to avoid personal injury or
property damage.
• Allow light bulbs to cool
• Wear gloves when replacing light bulb .
Fresh Food Light
• Remove light bulb cover
screws
than 25 watts.
• Replace light bulb cover by replacing ¼" hex nut
screws.
(A)
. Replace with appliance bulb no greater
(B)
by removing ¼" hex nut
A
Freezer Light
• Remove light bulb cover
screws
than 25 watts.
• Replace light bulb cover by replacing ¼" hex nut
screws.
(A)
. Replace with appliance bulb no greater
(B)
by removing ¼" hex nut
A
B
Vacation Tips
Complete the following steps f or short vacations.
1. Remove perishable foods.
2. If an ice maker is installed, move ice maker arm to
Off
position. (See “Automatic Ice Maker” section)
Complete the following steps for long vacations.
1. Empty refrigerator and freezer sections.
2. Unplug refrigerator .
3. Clean refrigerator and door gaskets according to
General Cleaning instructions in “Care and Cleaning”
section.
4. Prop doors open, so air can circulate inside.
5. If an ice maker is installed, turn off water supply to
refrigerator and move ice maker arm to
position. (See “Automatic Ice Maker” section page 12)
Off
Energy Tips
This refrigerator is designed to be one of the most energy
efficient refrigerators available. Reduce energy use by
observing the following.
• Operate in household temperatures of 55° to 110°F (13°
B
to 43°C) away from heat sources and direct sunlight.
• Set refrigerator, freez er, and temperature controlled
meat drawer system controls no colder than necessary .
• Keep freez er section full.
• Keep door gask ets clean and pliable. Replace gask ets
if worn.
• Keep condenser coils clean.
15
Page 17

Normal Operating Sounds
This new refrigerator may be replacing a differently
designed, less efficient or smaller refrigerator. T oda y’ s
refrigerators have new features and are more energy
efficient. As a result, certain sounds may be unf amiliar.
These sounds are normal and will soon become familiar
to you. They also indicate refrigerator is operating and
performing as designed.
1. Freezer control clicks when starting or stopping
compressor.
2. Freezer fan air rushes and whirs.
3. Sealed system (evaporator and heat exchanger)
refrigerant flow gurgles, pops or sounds like boiling
water.
4. Defrost heater sizzles, hisses or pops.
8
5. Defrost timer sounds like an electric clock and
snaps in and out of defrost cycle.
6. Condenser fan air rushes and whirs.
7. Compressor has a high pitched hum or pulsating
sound and cycles on and off.
8. Ice cubes from ice maker (some models) drop into
ice bucket.
9. Ice maker water valve hookup (some models)
buzzes when ice maker fills with w ater. This occurs
whether or not refrigerator is connected to water
supply . If refrigerator is not connected to w ater
supply, stop sound by raising ice mak er arm to
position. Ice maker water valve hookup is located
behind condenser fan in back of refrigerator .
Note: Foam insulation is very energy efficient and
has excellent insulating capabilities. How ev er , f oam
insulation is not as sound absorbent as
previously used fiberglass insulation.
Off
1
6
5
2
3
4
7
16
Page 18

Before Calling For Service
Problem Solution
Refrigerator does not
operate.
Refrigerator still will not
operate.
Food temperature appears
too warm.
Chiller Fresh™ System
temperature is too warm.
Food temperature is too
cold.
Refrigerator runs too
frequently.
•
Make sure freezer control is on.
• Make sure refrigerator is plugged in. If not, firmly plug the cord into a live outlet
with proper voltage.
• Check fuse or circuit breaker. Plug in another item at that wall outlet. If outlet
does not work, replace the fuse or reset the circuit.
• If freezer control is on, light works but 2 fans and compressor are not
operating, refrigerator may be in defrost cycle. Wait 40 minutes to see if
refrigerator restarts.
• Unplug refrigerator. Transfer food to another refrigerator or place dry ice in
freezer section to preserve food. Call for service.
• See above sections.
• Allow time for recently added warm food to reach refrigerator or freezer
temperature. Adding food warms the refrigerator. It can take a few hours for the
refrigerator to return to normal temperature.
• Check gaskets for proper seal. Gaskets should seal tightly to cabinet.
• Clean condenser coil. See “Condenser Coil” instructions in “Care and
Cleaning” section.
• Adjust refrigerator and or freezer control. See “Setting Controls” instructions in
“Controls” section.
• Freezer or refrigerator light stays on. If light stays on, call service.
• Return air vents behind crisper are blocked restricting airflow. Locate return air
vent behind crispers and remove any debrisis that blocks vents or restricts
airflow.
• Slide control to colder setting.
• Adjust freezer control to colder setting. See “Setting Controls” instructions of
“Controls” section.
• Verify Chiller Fresh™ System cap has been moved if drawer has been moved
from left to right side of cab inet. See “Chiller Fresh™ System” section.
• Clean condenser coil. See “Condenser Coil” instructions in “Care and Cleaning
section.
• Adjust refrigerator control. See “Setting Controls” instructions in “Controls”
section.
• Adjust freezer control to warmer setting. See “Setting Controls” instructions in
“Controls” section. Allow several hours for temperature to adjust.
Verify plastic cap is in place near Chiller Fr esh™ System. See “Chiller Fresh™
•
System” section.
•
It may be normal to maintain constant temperature.
• Doors have been opened frequently or for an extended period of time. When
the door is opened warm humid air is allowed into the refrigerator. The more
the door is opened the more warm air the refrigerator must cool.
Allow time for recently added warm food to reach refrigerator or freezer
•
temperature. It can take a few hours for the refrigerator to return to normal
temperature.
• Clean condenser coil. See “Condenser Coil” instructions in “Care and
Cleaning” section.
• Adjust freezer control. See “Setting Controls” instructions in “Controls” section.
• Check gaskets for proper seal. Gaskets should seal tightly to cabinet.
• Freezer light stays on. If light stays on, call service
• Make sure refrigerator is level. See “Leveling Refrigerator” section of
Installation Instructions.
17
Page 19

Pro b le m Solu tio n
Water droplets form on inside of
refrigerator.
•
It is normal during high humidity periods or if doors have been opened
frequently.
•
Wrap food tightly and wipe off damp containers prior to storing in the
refrige ra to r to av o id moisture a c c u mulation .
Water droplets form on outside
of refrigerator.
• Check door seals for proper seal. Gaskets should seal tightly to cabinet.
• It is normal during high humidity periods or if doors have been opened
frequently.
Chille r F re s h ™ Sys te m or
crisper drawer does not close
freely (some models).
• Check for a package that may prevent drawer from closing properly.
• Con firm draw e r is in p roper position.
• Clean drawer channels with warm, soapy water. Rinse and dry thoroughly.
• Apply a thin layer of petroleum jelly to drawer channels.
• Con firm refrigera to r is le v e l.
Refrigerator has an odor. •
Refrig e ra to r makes u n fa miliar
See “Odor Removal” instructions in “Care and Cleaning” section.
• It may be normal. See “Normal Operating Sounds” section.
sounds or seems too loud.
Ice cubes have an odor.
• See “Odor Removal” instructions in “Care and Cleaning” section.
•
Ice maker w a s re c e n tly in s ta lle d . D is c a rd firs t fe w b a tc h e s o f ic e to a v o id
disc o lo re d o r off-fla v o re d ic e .
• Food has not been wrapped tightly in either refrigerator or freezer
compartment. Rewrap foods since odors may migrate to the ice if food is not
wrapped properly.
• Discard ice and clean ice bucket or trays more frequently. Ice cubes are
porous and absorb odors easily.
• Water supply contains minerals such as sulfur. In some situations a filter ma y
need to be installed to eliminate taste and odor problems.
Ice cubes stick together or
“shrink”.
Ice maker is not producing ice.
•
Empty ice cube bucket or trays more frequently. If used infrequently, ice cubes
may stick together or shrink.
• Wa te r p re s s u re may be to lo w o r h ig h . Ic e maker re q u ire s a w a te r p re s s u re o f
20-100 psi to function properly.
• Con firm ice m a k e r a rm is down. See “Autom a tic Ic e Maker” s e c tio n .
• Con firm household water supply is reaching water valve. Make sure the water
valve shut off is fully turned on.
• Piercing type or
and may become clogged with time. Replace these valves with correct type of
saddle valve requiring ¼” hole to b e drille d in water supply pipe prior to valve
attachment.
•
Con firm ice m a k e r wiring ha rn e s s is in s e rte d co mpletely in p roper holes.
• Check for kinks in copper or plastic tubing. Remove kinks or replace tubing.
• Che c k e le c tric a l c onnections to water valve coil and connector block on
refrigerator cabinet.
•
If a wa te r filte r h a s been installed on the water line outside the refrigerator,
che c k th e filte r fo r c log s o r improper installation of the filter.
Ice maker is not producing
enough ice.
• Ice maker has just recently been installed or a large amount of ice has just
been used. Wait 24 hours for ice production to begin and for ice maker to
resto c k a fte r e mptied.
• Con firm household water supply is reaching water valve. Make sure the water
valve shut off is fully turned on.
• Piercing type or
and may become clogged with time. Replace these valves with correct type of
saddle valve requiring ¼” hole to b e drille d in water supply pipe prior to valve
attachment.
• Check for kinks in copper or plastic tubing. Remove kinks or replace tubing
• Con firm freeze r s e c tio n is operating at proper temperature and that freezer is,
at lea s t, h a lf-fu ll. F re e z e r must be c o ld enough to produce ice. See ‘Setting
Con tro ls ” s e c tio n .
Ice forms in inlet tube to ice
maker.
•
Che c k water pre s s u re. L o w water p re s s u re c a u s e s v a lv e s to le a k .
•
Piercing type or
and may become clogged with time. Replace these valves with correct type of
saddle valve requiring ¼” hole to b e drille d in water supply pipe prior to valve
attachment.
3
/16” saddle valve was used for hookup. Both reduce water flow
3
/16” saddle valve was used for hookup. Both reduce water flow
3
/16” saddle valve was used for hookup. Both reduce water flow
18
Page 20

WARRANTY AND SERVICE
DOMESTIC WARRANTY- FULL FIVE YEAR WARRANTY
In addition to all statutory rights which you, the Consumer, have under the relevant laws in
respect of this appliance, during the first five years of ownership as the original purchaser of
this Kleenmaid appliance, we guarantee that any fault caused by faulty material or
workmanship becoming apparent will be rectified free or charge for parts and labour,
provided that all service is performed during normal working hours by Kleenmaid or their
designated Agents. Where the appliance is installed outside the normal servicing area of the
above, the Purchaser must pay for the cost of transporting the appliance to and from the
Agent or the Agent’s travelling cost to and from the Purchaser’s home.
COMMERCIAL WARRANTY - ONE YEAR WARRANTY
When this appliance is installed in a commercial application, in addition to all statuory rights
which you, the Consumer, have under the relevant laws in respect of this appliance, during
your first one year of ownership as the original purchaser of the Kleenmaid appliance, we
guarantee that any fault caused by faulty material or workmanship becoming apparent, will
be rectified free of charge for parts and labour, provided that all service is performed during
normal working hours by Kleenmaid or their designated Agents. Where the appliance is
installed outside the normal servicing area of the above, the Purchaser must pay for the cost
of transporting the appliance to and from the Agent or the Agent’s travelling cost to and from
the Purchaser’s home.
WHAT THESE W ARRANTIES DO NOT COVER
We are not responsible for any damage or malfunction unless caused by a defect in material
or workmanship. This includes but is not limited to abuse, misuse, improper installation and
transportation damage. We are not responsible for any consequential damages from any
malfunction.
WARRANTY DOES NOT COVER REPLACEMENT OF LIGHT
GLOBES OR GLASS BREAKAGE DUE TO IMP ACT
In case of fractured glass do not use your appliance.
WARRANTY REGISTRA TION
Please complete the enclosed warranty card and retain it together with your proof of
purchase document. These documents will need to be viewed by our service
representative should you request in warranty service.
SERVICE ASSIST ANCE
T o assist you when phoning our After Sales Service number to arrange a service call please
complete the following details and have them ready when you call.
Model Number:........................................................... Date of purchase:....................................
Kleenmaid Store purchased from:............................... Date of installation:.................................
Your Postcode
:...................................................
Page 21

Other products in Kleenmaid St George
range of world’s best appliances:
Washers
Dryers
Dishwashers
Ovens
Cooktops
Rangehoods
Sinks
Waste Disposals
Taps
Cookware
Refrigerators
Freezers
Vacuum Cleaners
For sales information on the full range of quality kitchen and laundry
appliances, phone 13 13 08.
For service related enquires, phone 1300 652 100
 Loading...