

Page 1

International
Bottom Freezer
Refrigerator
Owner's Manual
Keep these instructions for future reference. Be sure this
manal stays with refrigerator .
English........................................................................ 2
Dansk ....................................................................... 15
Deutsch .................................................................... 28
Еллзнйкб ................................................................ 41
Españo ..................................................................... 54
Français.................................................................... 67
Italiano ...................................................................... 80
Nederlands ............................................................... 93
Norsk ...................................................................... 106
Português ................................................................119
Suomi ..................................................................... 132
Svenska .................................................................. 145
Page 2

Contents
Electrical Requirements
Electrical Requirements .............................................. 2
Installation Instructions................................................3
Model Identification ..................................................... 2
Cutout Dimensions...................................................... 3
Installation Checklist ................................................... 5
Controls
Fresh Food and Deepfreeze® Controls......................6
Setting Controls ....................................................... 6
Fresh Food Features
Spillsaver™ Shelves .................................................. 6
Deli Port™................................................................ 7
Drawers ................................................................... 7
Crisper T ote™........................................................... 7
Covered Storage Bucket .......................................... 8
Dairy Centers........................................................... 8
Door Buckets........................................................... 8
Door Shelf................................................................ 8
Adjustable Dividers .................................................. 9
T all Package Retainer .............................................. 9
Deepfreeze® Features
Deepfreeze® Shelf .................................................... 9
Wire Basket............................................................. 9
Wire Divider ............................................................. 9
Pivot Bin™................................................................ 9
Care and Cleaning
General .................................................................. 10
Odor Removal ........................................................ 10
Adhesives .............................................................. 10
Door Gaskets......................................................... 10
Condenser Coils .................................................... 1 0
Glass Shelves........................................................ 1 0
Light Bulbs............................................................. 1 1
Energy Tips............................................................... 1 1
V acation Tips ............................................................ 1 1
Normal Operating Sounds ......................................... 12
Before Calling For Service ......................................... 13
Warranty ................................................................... 14
Recognize this symbol as a safety
precaution.
!
WARNING
Refrigerator is designed to operate on a
!
separate 230 volt, 50 hertz., 10A circuit.
Model Identification
Product information is on the serial plate, located on
ceiling of Fresh Food section. Record the following
information:
Model Number:
Manufacturing Number:
S/N or Serial Number:
Date of purchase:
Dealer’s name and address:
Keep a copy of sales receipt for future reference.
Enjoy this new Amana® refrigerator.
2
Page 3
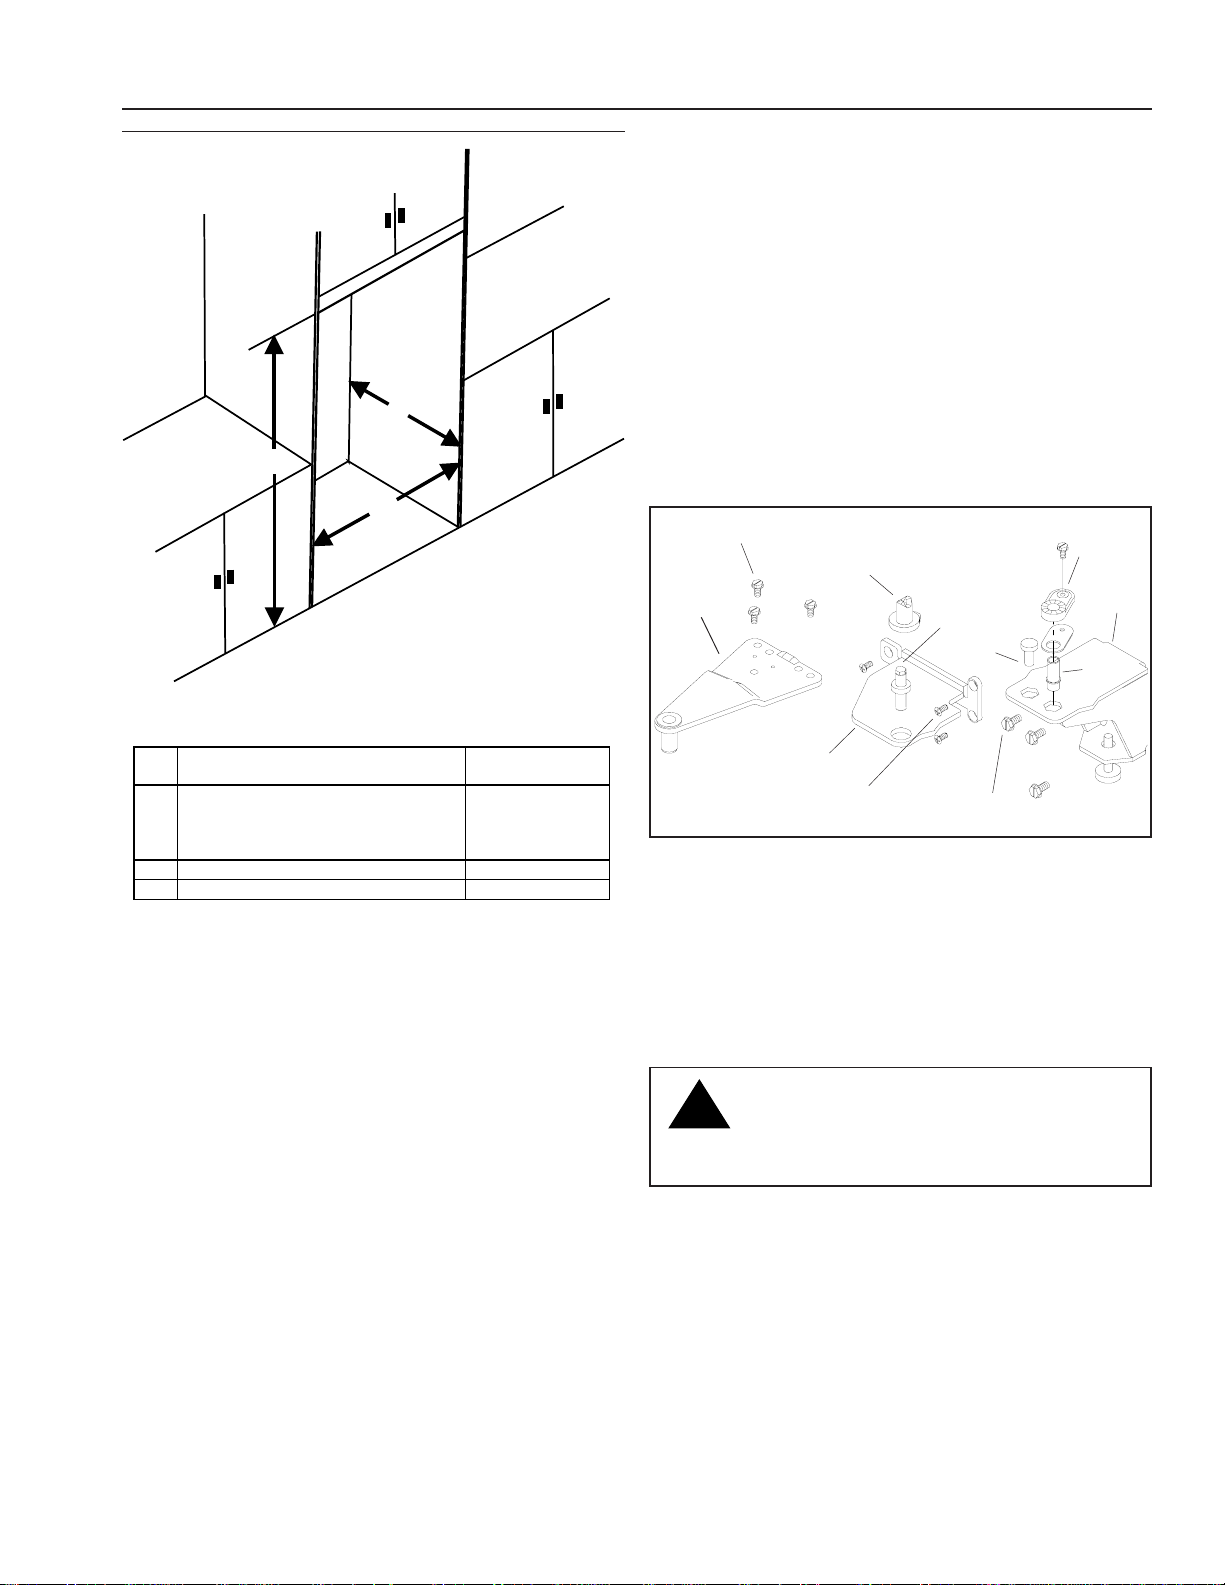
Cutout Dimensions
g
g
Installation Instructions
Introduction
A qualified engineer must connect refrigerator in
accordance with these installation instructions. Measure
door opening and depth and width of refrigerator. Remove
handles or doors as required. Engineer must follow local
electrical company connection regulations
Proper installation will ensure that this refrigerator
operates most efficiently . Amana Refrigeration, Inc.
cannot be responsible for improper installation.
D
H
W
Single Installation Double
H 175.3 cm with 30.5 cm deep
cabinets above refri
177.8 cm with 61.0 cm deep
cabinets above refri
W 91.4 cm 184.8 cm
D 61.0 cm 61.0 cm
• See BID trim kit for specifications.
erator.
erator.
Installation
• See HTK530 International Handle and Trim Kit for
installation of door handles and trim.
1. Remove doors if necessary.
8 mm screws
Door closure
Top hinge
Center hinge
Phillips
screws
a. Remove top hinge cover. Remove top hinge.
b. Remove Fresh Food door.
c. Lift door closure off center hinge pin. Remove center
hinge pin.
d. Remove Deepfreeze® door. An internal support rod
may slide out. Replace rod prior to hanging door .
e. Remove center hinge bracket.
f. Remove toe grille. Remove bottom hinge(s).
Center hinge
pin
Plug
9 mm screws
Door
closure
Bottom
hinge
Pin
Caution
T o avoid property damage, protect soft vinyl or
!
other flooring with cardboard, rugs, or other
protective material when moving refrigerator.
g. Slide appliance cart under side of refrigerator. W rap
refrigerator with blanket or pad. Thread cart strap
around refrigerator and tighten. Do not overtighten
strap. Move refrigerator in front of final location.
h. Reverse doors if necessary .
• Replace internal support rod in hinge side of
Deepfreeze® door prior to hanging door.
• Move bottom hinge pin and door closure from
right bottom hinge to left bottom hinge. Move
plastic plug from left bottom hinge to right
bottom hinge using a needle nose pliers. Pinch
tabs from underside of hinge to remove.
3
Page 4
i. Rehang doors by reversing steps a-f.
• Space door 18 mm from cabinet.
• Handle side of door should be approximately
3 mm higher than hinge side.
18 mm
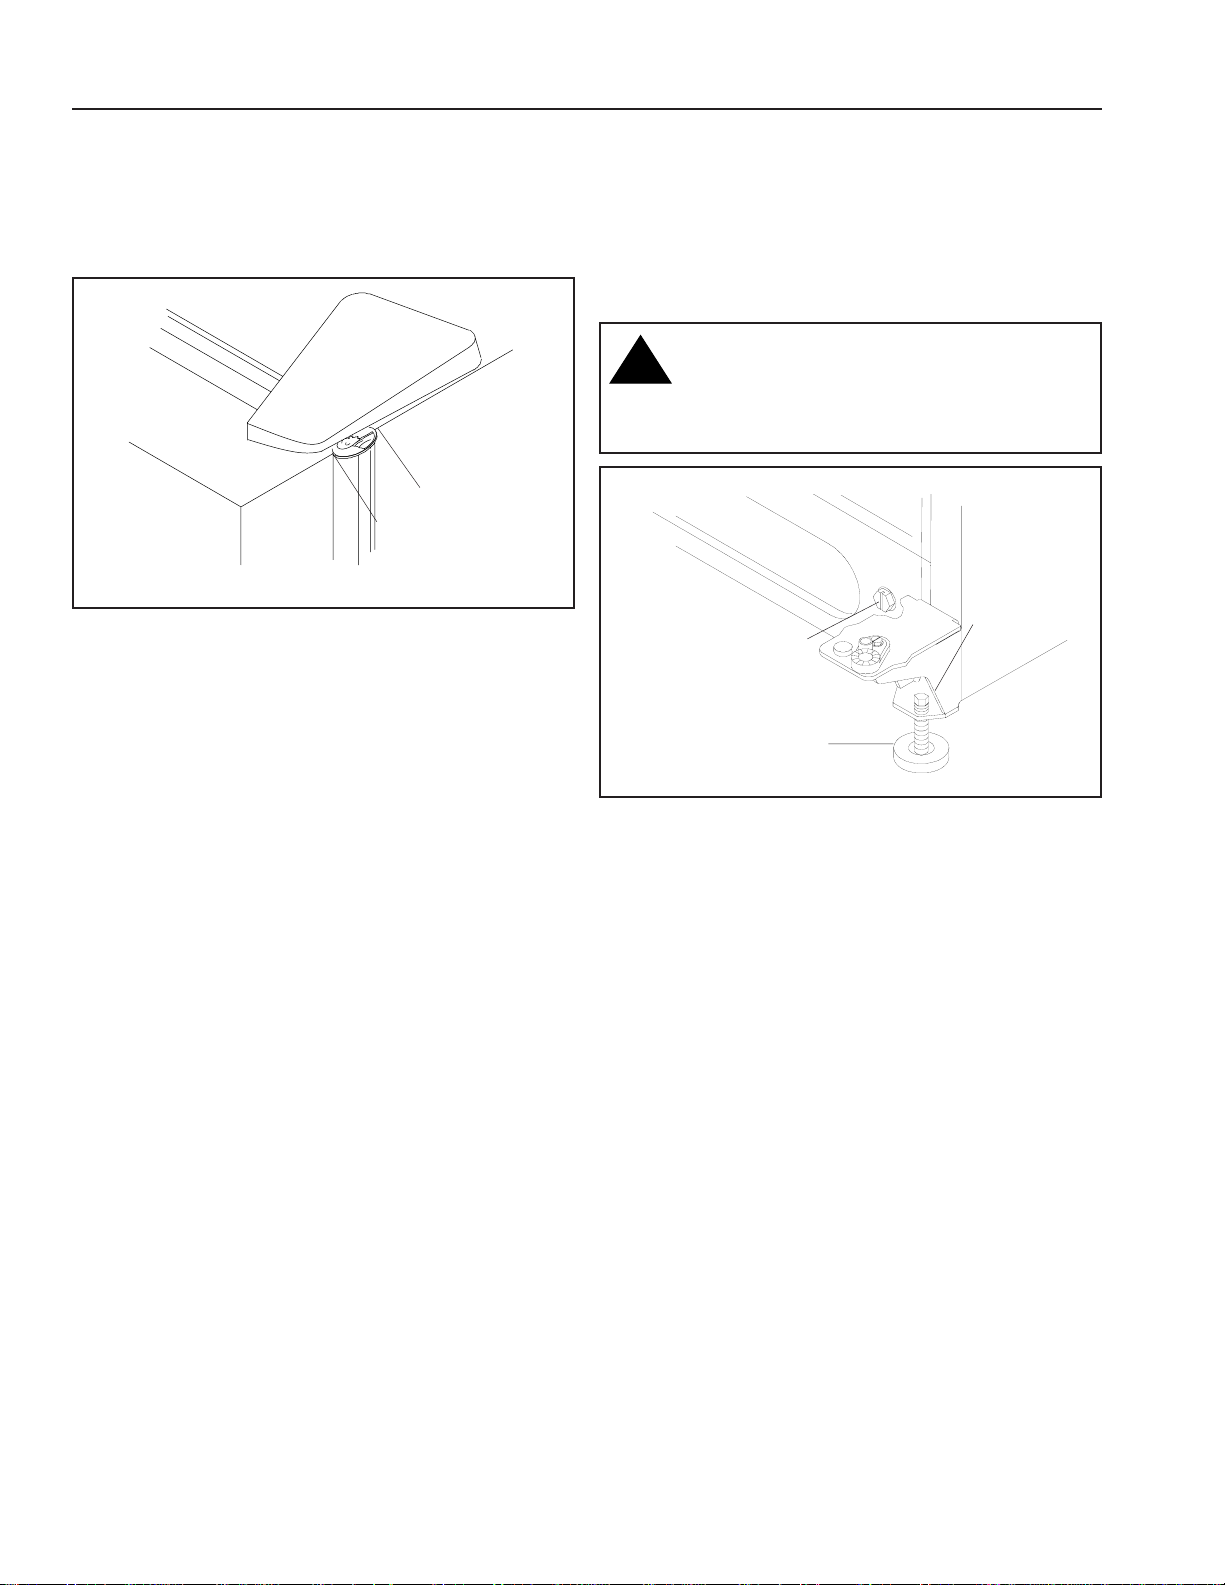
4. Level refrigerator .
a. Remove toe grille.
b. Turn roller adjustment screw to raise or lower rear of
refrigerator.
c. Turn stabilizing legs clockwise to raise or
counterclockwise to lower front of refrigerator.
Stabilizing legs must be firmly against floor.
Caution
!
T o avoid personal injury or property damage
caused by refrigerator tipping, stabilizing legs
must be firmly against floor.
2. Plug in power cord.
• This equipment, including power cord, must be
serviced only by qualified service personnel. Special
tools are required to service equipment. Contact
nearest authorized service facility for examination,
repair or adjustment.
3. Move refrigerator into final location.
Rear roller adjustment
1/4" hex head
screw
Stabilizing leg
4
Page 5

Installation Checklist
This checklist is for personal records only .
Consumer Installer
Doors
Handle side of door is 3 mm higher than hinge side of door. (Door lowers when
loaded with food.)
Doors seal completely to refrigerator cabinet.
Leveling
Refrigerator is tilted 6 mm from front to rear.
Stabilizing legs are against floor.
T oe grille is properly attached to refrigerator .
Product Literature
Owner's manual is reviewed including the following information:
• Fresh Food and Deepfreeze® controls
• humidity controlled crisper drawer
• temperature controlled drawer
• normal operating sounds
Notes
Consumer's Signature
Installer's Signature
DateInstaller's Company Name/Phone Number
5
Page 6

Controls
Fresh Food Features
This refrigerator operates most efficiently in normal
household temperatures of 13°C to 43°C.
Fresh Food and Deepfreeze® Controls
Fresh Food control is located on upper rear wall of Fresh
Food section.
Deepfreeze® control is located on right front ceiling of
Deepfreeze® section.
When Deepfreeze® control is set " ", neither Fresh Food
nor Deepfreeze® sections will cool. Initially , set both
controls to 4. Wait 24 hours for Fresh Food and
Deepfreeze® sections to reach desired temperatures.
After 24 hours, adjust controls, one number at a time, as
desired. 1 is warmest setting and 7 is coldest.
Setting Controls
Set controls precisely using a household thermometer
that includes temperatures between -21°C to 10°C.
Put thermometer snugly between frozen packages in
Deepfreeze® section. Wait 5-8 hours. If Deepfreeze
temperature is not -17°C to -16°C, adjust control, one
number at a time. Check again after 5-8 hours.
®
Caution
T o avoid property damage, confirm shelf
!
is secure before placing items on shelf.
Spillsaver™ Shelves
Spillsaver™ shelves adjust to meet individual storage
needs and hold simple spills for easier cleaning.
Caution
T o avoid personal injury or property
!
damage, handle tempered glass shelves
carefully . Shelves may break suddenly if
nicked, scratched, or exposed to sudden
temperature change.
• Remove shelves by lifting front, releasing hooks
from metal track then pulling out.
• Replace shelves by inserting hooks into metal track
and lowering front.
Put thermometer in a glass of water in middle of Fresh
Food section. Wait 5-8 hours. If Fresh Food temperature
is not 3°C to 4°C, adjust control, one number at a time.
Check again after 5-8 hours.
EasyGlide™ shelves pull forward for easy access of items
in back.
6
Page 7

Deli Port
Deli Port™ provides space saving storage underneath
Spillsaver™ shelf and pulls forward for easy access.
• Remove shelf by pulling forward until shelf stops.
Push tabs on sides of shelf in and pull shelf forward.
• Replace shelf by inserting shelf into track and sliding
back.
™
Tab
Remove shelf and drawers by completing the following
steps.
1. Open left* drawer. *For doors hinged on left, open
right drawer.
Caution
T o avoid personal injury or property
!
damage, handle tempered glass shelves
carefully . Shelves may break suddenly if
nicked, scratched, or exposed to sudden
temperature change.
2. Remove shelf by gently pushing up from underneath.
Tilt one end up then pull out.
3. Remove left* drawer by lifting front while supporting
underneath then pulling out. *For doors hinged on left,
remove right drawer .
4. Remove support post at recess in bottom center of
Fresh Food section by lifting.
5. Remove other crisper by sliding to opposite wall. Lift
front while supporting underneath then pull out.
6. Replace drawers and shelf by reversing steps 1-5.
Drawers
Humidity Controlled Crisper Drawer
The right drawer is humidity controlled. This drawer keeps
produce fresh longer. W rap produce tightly . Do not wash
produce before placing in drawer. Excess moisture could
cause produce to spoil prematurely . Do not line drawer
with paper towels. Paper towels will retain moisture.
Humidity control is located below front shelf trim. Control
adjusts humidity in drawer . Slide control to right for
produce with leaves such as lettuce, spinach or cabbage.
Slide control to left for produce with skins such as
cauliflower , corn or tomatoes.
Temperature Controlled Drawer
The left drawer is temperature controlled. This drawer
keeps food fresh longer and up to 3°C colder than Fresh
Food temperature. Use this drawer for deli storage or
additional produce storage.
T emperature control is located below front shelf trim.
Control adjusts amount of air circulating around drawer.
Slide control to left for normal Fresh Food temperature
and to right for colder temperature. Ice crystals may form
on drawer or food on coldest setting. Cold air can
decrease Fresh Food temperature. Fresh Food control
may need to be adjusted.
Crisper Tote
Crisper T ote™ provides easy access and protection for
small produce such as cherry tomatoes, lemons,
mushrooms, etc. in the humidity controlled crisper drawer.
™
7
Page 8

Covered Storage Bucket
Storage bucket has a lid and removable egg tray . When
tray is removed, bucket will accept items such as a
standard egg carton, ice, etc.
Dairy Centers
Dairy centers provide convenient storage for items such
as butter , cheese, etc.
• Remove dairy centers by lifting door, pushing tabs
toward center and pulling out.
• Replace dairy centers by sliding in until tabs lock into
place and lowering door.
Door Buckets
Door buckets adjust to meet individual storage needs.
• Remove door buckets by pushing tabs towardcenter
and pulling out.
• Replace door buckets by sliding in until tabs lock
into place.
Tab
Door Shelf
• Remove door shelf by lifting ends and pulling out.
• Replace door shelf by placing shelf on glides and
sliding down.
Glide
8
Page 9

Deepfreeze® Features
Adjustable Dividers
Adjustable dividers keep items in place and adjust to
meet individual storage needs. Divider fits in any Fresh
Food door bucket or door shelf.
Tall Package Retainer
T all package retainer keeps tall items secure. Retainer fits
in any Fresh Food door bucket or door shelf.
Caution
T o avoid property damage, confirm shelf
!
is secure before placing items on shelf.
This refrigerator features an ice bucket, ice cube trays,
ice service rack and slide out wire shelf.
• Remove ice service rack by lifting rack off plastic
washers then pulling out.
• Replace ice service rack by placing rack on washer
and sliding down until secure.
Washer
Deepfreeze® Shelf
• Remove Deepfreeze® shelf by pulling out. A sharp tug
may be necessary .
• Replace Deepfreeze® shelf by sliding in until back
locks in place.
Wire Basket
Wire basket slides out for easy access of items in back.
• Remove wire basket by lifting and pulling out.
• Replace wire basket by sliding in.
Wire Divider
Wire divider organizes storage space. Divider can be
moved left or right.
Pivot Bin
Pivot Bin™ provides convenient storage for frozen food
items in Deepfreeze® door and tilts forward for easy
access of those items.
™
Pivot Bin
9
™
Page 10

Care and Cleaning
WARNING
To avoid electrical shock which can cause
!
severe personal injury or death, disconnect
power to refrigerator before cleaning. After
cleaning, connect power.
Caution
T o avoid personal injury or property damage,
!
read and follow all cleaning product
manufacturer's directions.
General
1. Wash surfaces with 4 tablespoons baking soda
dissolved in 1 liter warm water and a soft, clean cloth.
2. Rinse surfaces with warm water. Dry surfaces with a
soft, clean cloth.
• Do not use the following items:
- abrasive or harsh cleaners, ammonia, chlorine
bleach, etc.
- concentrated detergents or solvents
- metal scouring pads
These items can scratch, crack and discolor
surfaces.
• Do not place buckets, shelves, etc. in dishwasher.
Adhesives
1. Remove glue residue by rubbing toothpaste into
adhesive with fingers until adhesive loosens.
2. Rinse surface with warm water . Dry surface with a
soft, clean cloth.
Door Gaskets
1. Clean door gaskets every 3 months according to
“General” instructions.
2. Apply a light film of petroleum jelly to keep gaskets
pliable.
Condenser Coils
Clean condenser coil every 3 months to ensure maximum
performance of refrigerator . Accumulated dust and lint
may cause the following:
• reduced cooling performance
• increased energy usage
• premature part failure
1. Remove toe grille by holding ends and pulling forward.
2. Clean front surface of condenser coil with a vacuum
cleaner hose nozzle.
3. Replace toe grille by inserting clips in holes and
snapping in.
Odor Removal
1. Remove all food.
2. Clean all interior surfaces including ceiling, floor, and
walls according to “General” instructions. Pay special
attention to corners, crevices, and grooves. Include all
drawers, shelves, and gaskets.
3. Wash and dry all bottles, containers and jars before
returning food to refrigerator. Wrap foods in tightly
sealed containers to prevent further odor. After 24
hours, check if odor was eliminated.
Complete the following steps if odor was not eliminated.
4. Complete steps 1-2.
5. Place garden fresh crispers on top shelf of Fresh
Food section. Pack Fresh Food and Deepfreeze
sections including doors with crumpled sheets of
black and white newspaper.
6. Place charcoal briquettes randomly throughout
newspaper.
7. Close doors and let stand 24-48 hours.
8. Remove charcoal briquettes and newspapers.
9. Complete steps 2-3.
®
Glass Shelves
Caution
T o avoid personal injury or property damage,
!
handle tempered glass shelves carefully.
Shelves may break suddenly if nicked,
scratched, or exposed to sudden temperature
change.
Remove shelf by lifting front, releasing hooks from metal
track then pulling out. Place shelf on a towel. Allow shelf
to adjust to room temperature before cleaning.
Clean crevices by completing the following steps:
1. Dilute mild detergent and brush solution into crevices
using a plastic bristle brush. Let set for 5 minutes.
2. Spray warm water into crevices using faucet spray
attachment.
3. Dry shelf thoroughly and replace shelf by inserting
hooks into metal track and lowering front.
10
Page 11

Energy Tips
Light Bulbs
WARNING
T o avoid electrical shock which can cause
!
severe personal injury or death, disconnect
power to refrigerator before replacing light bulb.
After replacing light bulb, connect power.
Caution
T o avoid personal injury or property
damage, observe the following:
!
• Access light bulbs by removing 2 outside back
screws. Back of light bulb cover drops down. Replace
light bulbs with 25-watt appliance bulbs.
• Replace light bulb cover by holding cover against
ceiling. Insert and tighten screws.
• Allow light bulb to cool.
• Wear gloves when replacing light bulb.
6 mm screws
This refrigerator is designed to be one of the most energy
efficient refrigerators available. Reduce energy use by
observing the following.
• Operate in normal household temperatures of 13°C to
43°C away from heat sources and direct sunlight.
• Set Fresh Food, Deepfreeze®, and drawer controls no
colder than necessary .
• Keep Deepfreeze® section full.
• Keep door gaskets clean and pliable. Replace
gaskets if worn.
• Keep condenser coils clean.
Vacation Tips
Complete the following steps for short vacations.
1. Remove perishable foods. Warranty does not cover
food loss. Check warranty certificate for specific
coverage.
2. If an ice maker is installed, move ice maker arm to off
position.
Complete the following steps for long vacations.
1. Empty Fresh Food and Deepfreeze® sections.
2. Unplug refrigerator.
3. Clean refrigerator and door gaskets according to
“General” instructions in “Care and Cleaning” section.
4. Prop doors open, so air can circulate inside.
5. If an ice maker is installed, turn water supply to
refrigerator off and move ice maker arm to off
position.
11
Page 12

Normal Operating Sounds
This new refrigerator may be replacing a differently
designed, less efficient or smaller refrigerator . T oday’s
refrigerators have new features and are more energy
efficient. As a result, certain sounds may be unfamiliar.
These sounds are normal and will soon become familiar.
These sounds also indicate refrigerator is operating and
performing as designed.
• Deepfreeze® control clicks when starting or
stopping compressor.
• Deepfreeze® fan air rushes and whirs.
• Sealed system (evaporator and heat exchanger)
refrigerant flow gurgles, pops or sounds like boiling
water.
• Defrost heater sizzles, hisses or pops.
• Condenser fan air rushes and whirs.
• Compressor has a high pitched hum or pulsating
sound.
• Ice cubes from ice maker (some models) drop into
ice bucket.
• Ice maker water valve hookup (some models)
buzzes when ice maker fills with water. This occurs
whether or not refrigerator is connected to water
supply . If refrigerator is not connected to water supply ,
stop sound by raising ice maker arm to off position.
• Foam insulation is very energy efficient and has
excellent insulating capabilities. However, foam
insulation is not as sound absorbent as
previously used fiberglass insulation.
12
Page 13

Before Calling For Service
Refrigerator does not operate.
• Confirm Deepfreeze® control is on.
• Confirm refrigerator is plugged in.
• Check fuse or circuit breaker. Plug in another item at
that wall outlet.
• Wait 40 minutes to see if refrigerator restarts. If
Deepfreeze® control is on, lights work but 2 fans and
compressor are not operating, refrigerator may be in
defrost cycle.
Refrigerator still won’t operate.
• Unplug refrigerator. T ransfer food to another unit
or place dry ice in Deepfreeze® section to preserve
food. Warranty does not cover food loss. Check
warranty certificate for specific coverage.
Food temperature appears too warm.
• See above sections.
• Allow time for recently added warm food to reach
Fresh Food or Deepfreeze® temperature.
• Check gaskets for proper seal.
• Clean condenser coils.
• Adjust Fresh Food and/or Deepfreeze® control.
T emperature controlled drawer temperature is too warm.
• Slide control to colder setting.
• Adjust Deepfreeze® control to colder setting.
Drawers do not close freely .
• Check for a package which may prevent drawer
from closing properly .
• Confirm drawer is in proper position.
• Clean drawer channels with warm, soapy water.
Rinse and dry thoroughly .
• Apply a thin layer of petroleum jelly to drawer
channels.
• Confirm refrigerator is level.
Refrigerator has an odor.
• See “Odor Removal” instructions in “Care and
Cleaning” section.
Food temperature is too cold.
• Clean condenser coils.
• Adjust Fresh Food control.
• Adjust Deepfreeze® control to warmer setting. Allow
several hours for temperature to adjust.
Refrigerator runs too frequently.
• It may be normal to maintain constant temperature.
• Doors may have been opened frequently or for an
extended period of time.
• Allow time for recently added warm food to reach
Fresh Food or Deepfreeze® temperature.
• Clean condenser coils.
• Adjust Deepfreeze® control.
• Check gaskets for proper seal.
Water droplets form on inside of refrigerator .
• It is normal during high humidity periods or if doors
have been opened frequently .
Water droplets form on outside of refrigerator .
• Check door gaskets for proper seal.
13
Page 14

Warranty
First Year
Raytheon Appliances will provide a free replacement part, f.o.b. Amana, Iowa, U.S.A., for any part which
is defective due to workmanship or materials.
Second through Fifth Years
Raytheon Appliances will provide a free replacement part, f.o.b. Amana, Iowa, U.S.A., for any compressor
which is defective due to workmanship or materials.
Limited One Y ear Warranty
Limited Five Year W arranty on Compressor
Warranty Limitations
• Begins at date of original purchase.
• Service must be performed by an authorized
Amana technician.
Warranty Is Void If
• Serial plate is defaced.
• Product is used on a commercial, rental or leased
basis.
• Product has defect or damage due to product
accident, alteration, connection to an improper
electrical supply , fire, flood, lightning, shipping and
handling, or other conditions beyond the control of
Amana.
• Product is improperly installed or used.
Any questions regarding the above or to locate an authorized servicer, contact appliance supplier or:
Owner's Responsibilities
• Provide proof of purchase (sales receipt).
• Provide normal care and maintenance.
Replace owner replaceable items where
directions appear in Owner's Manual.
• Make product reasonably accessible for
service.
• Pay premium service costs for service outside
technician's normal business hours.
• Pay for service calls related to product
installation or usage.
In no event shall Raytheon Appliances be
liable for incidental or consequential damages
including food loss*.
International Division
Raytheon Appliances
2800 220th Trail
PO Box 8901
Amana, IA 52204-0001
USA
T elephone 1-319-622-551 1
Facsimilie 1-319-622-2180
14
 Loading...