

Page 1
9960-4103 - 11/98 - 87X1192
use / installation
MANUFACTURER’S REF.
214
Type BI 80-.
220/240V∼∼50/60Hz 5600W
BI 80
INDUCTION
Page 2
USES
1/2 VERY LOW melting butter, chocolate,
keeping warm
sauces, custards...
3/4/5 LOW rice pudding
reheating
6/7/8 MEDIUM purée, pulses, soups,
jam, compotes
9/10 HIGH pasta, boiled rice,
boiling milk
11 VERY HIGH steaks, fast frying, pancakes
12 MAXIMUM deep frying, fast boiling
Page 3

1
•
Congratulations on choosing an induction hob, a system which is
revolutionising cooking. With your hob, because the heat required to cook the
food is produced directly in the interior of the pan, the ceramic top barely
becomes hot for it receives ONLY the heat from the pan placed on it.
Compared to a standard hob your induction hob is:
MORE ECONOMICAL: when a pan is removed the heating zone switches off
instantly.
FASTER: output of 2800 W available instantly on the heating zone
MORE PRECISE: the hob reacts instantly to the controls
SAFER: the temperature of the ceramic top remains low
•
Operating principle:
The “induction” currents instantly heat the pan* which transfers its heat to the
food it contains.
*Enamelled steel, cast iron or stainless steel pans suitable for induction
cooking.
How induction works
For the user
Electronic circuit
Electrical supply
Pan
Inducted currents
Page 4
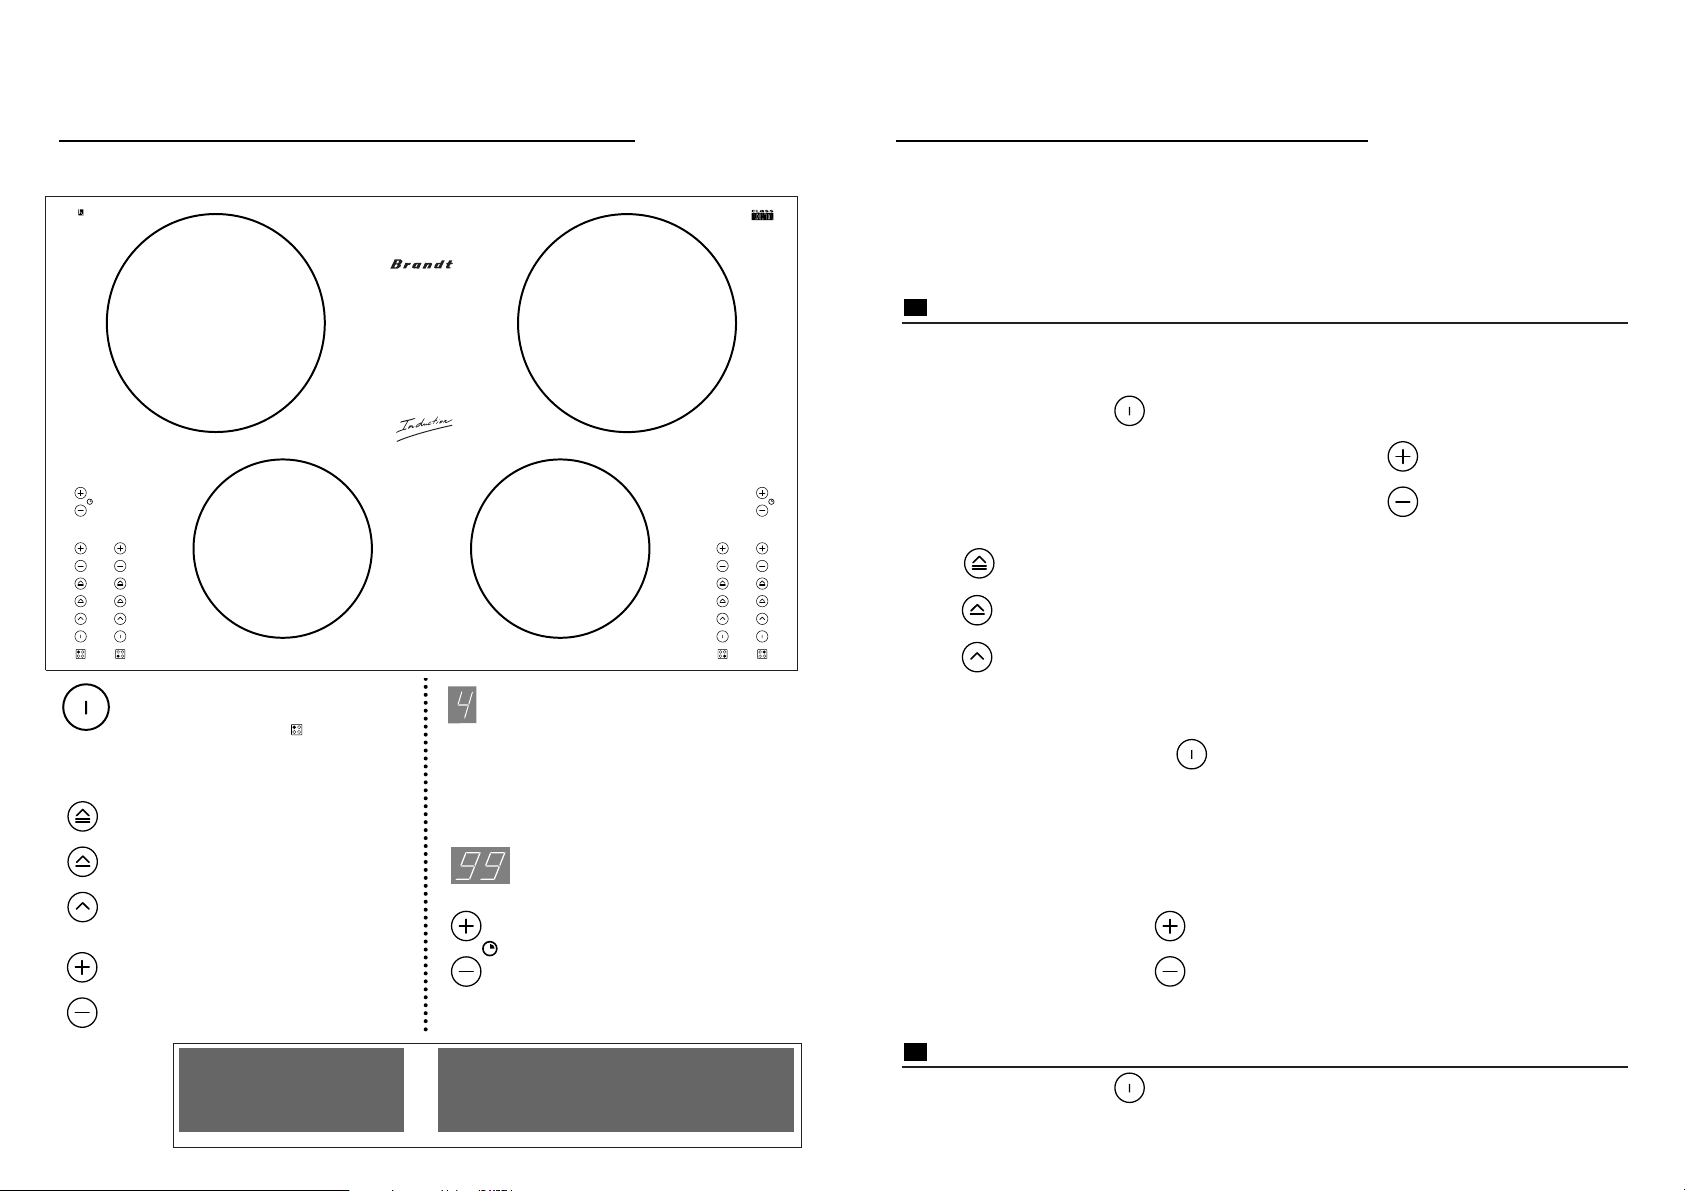
To use a touch control...
Place your finger flat on the touch control selected.
Turning on a cooking zone
Locate the touch controls on the keypad which correspond to the cooking
zone on which you have placed your pan.
•
Press the touch control.
•
Set the power level required
- For quick setting, keep your finger on one of the touch controls.
- The touch control enables MAXIMUM setting to be obtained directly
- The touch control enables HIGH setting to be obtained directly
- The touch control enables MEDIUM setting to be obtained directly
Once you have pressed the touch control, if you do not select a power
level, the instruction will be cancelled automatically after 10 seconds.
•
Adjust the power level during cooking
You can adjust the power level from 1 to 12 (from 50 W to 2800 W) at any
time
during cooking using the touch controls.
Turning off a cooking zone
•
Press the touch control of the zone concerned.
2 3
Ø 220 mm
Ø 220 mm
Ø 180 mm
Ø 180 mm
On/off touch control for each
heating zone ( the symbol
indicates the heating zone on the
hob).
For example: rear left zone
Direct access touch control: MAX power (12)
Direct access touch control: HIGH power (10)
Direct access touch control: MEDIUM power (6)
Power setting for each heating
zone.
Display showing (1 to 12) the
power level set for each
heating
zone.
Timers on rear heating zones only
Timer display
Timer setting
Layout
For the user
Introduction
For the user
Cooking zones
Ø 180
Ø 220
Minimum Diameter of the sauce pans
120
160
Page 5

4 5
Check regularly that there are no objects (tea towel, paper, etc.) which might block the air
inlet located below your hob (see Building in).
•
“Overheat” safety feature
A sensor constantly monitors the temperature of your hob’s components. If their
temperature becomes too high the power supplied by the hob will be reduced.
•
“Empty pan” safety feature
Each heating zone is fitted with a sensor which constantly monitors its temperature, so no more danger of overheating caused by empty pans.
•
Detection of an object or a pan on a heating zone
A small object such as a fork, a spoon or even a ring left on the hob is not
detected as a saucepan. The display flashes and no heating power is produced.
The safety system acts in the same way when it detects a pan which is not suitable for cooking by induction.
IMPORTANT: If an oven is located under your hob (see installation options) the
thermal safety devices on the hob will prevent its simultaneous use when the
oven is in pyrolysis mode.
For the attention of wearers of pacemakers
and active implants:
The functioning of the hob is in conformity with current standards on electromagnetic interference.
Your induction hob also fully complies with the legal requirements (EC directives
89/336/EEC). It has been designed not to interfere with the operation of other
electrical appliances as long as these comply with the same legislation.
Your induction hob generates magnetic fields in its immediate area.
So that there is no interference between your hob and a pacemaker, the latter
must be designed in conformity with the relevant regulations.
In this respect, we can only guarantee the conformity of our own product.
Insofar as the conformity of the pacemaker or any incompatibility is concerned,
you should consult its manufacturer or your doctor.
Using the timers
Both rear cooking zones are equipped with a timer (maximum duration
99 minutes). However, they can operate without the timer.
•
Select a cook setting (from 1 to 12)
•
Press the touch control for the timer
As soon as you press this touch control, the timer switches on and the cook
time selected (in minutes) appears on the display . Keep your finger on the
touch control until the required cook time
appears.
NB
The illuminated display shows the cook time remaining.
When the time has run out, the cooking zone turns off, the power indicator goes
out and the timer flashes at “0”. You will then hear some intermittent "beeps".
Press any touch control for the cooking zone to turn them off.
•
Changing the cook time
You can alter the cook time at any point during cooking by pressing
the touch control.
•
Switching off the timer during cooking
To switch off the timer press the minus ( -) sign on the touch control until
0 appears.
The heating zone continues to function without the timer.
Using 2 cooking zones simultaneously
These two zones have a total of 2800 W of power available, distributed
automatically between the front and rear zones.
This means that when one zone is being used at maximum, the power of the other
is automatically reduced.
The most recent instruction always takes priority.
Use
For the user
For the user
Safety
Page 6

Precautions for use
•
The ceramic surface is very strong, however, it is not unbreakable: do not
drop pans onto it.
•
Saucepans with damaged bases may trap and transfer materials which
could cause staining or scratching of the hob.
•
Do not drag saucepans across the hob surface as in the long term this will
damage the design on the ceramic top.
These faults, which do not prevent operation or use of the hob, are
not covered by the guarantee.
The hob must not be used as a storage area.
•
Do not store CLEANING products or any products which might be INFLAM-
MABLE in the unit located under your hob.
•
When plugging electrical appliances into a socket nearby, make sure that
the power cable does not come into contact with the cooking zones.
If a crack appears in the ceramic top,
disconnect the appliance
from the power supply immediately
by removing the fuses or activating the circuit breaker.
Do not use any part of the hob until the ceramic top has been
6 7
Advice on cooking
•
Do not leave an empty pan on a heating zone.
•
The pan should be centred on the heating zone.
•
Never heat up an unopened tin, it may explode; this advice applies to all
cooking systems.
•
When you use a pan with a non-stick lining (Teflon type) to cook with no
fat or very little, preheat it at setting 9 or 10 for a moment.
Never use setting 12:
you may damage your saucepan
•
You are advised not to place metal cooking utensils, cutlery, knives and
similar metal objects on the hob. They may become hot if they are near a
functioning cooking zone.
•
Using a pan which is smaller than the size of the cooking zone indicated
on the ceramic top is quite acceptable and does not result in a loss of
energy, unlike other, standard hobs (electricity, gas).
When cooking, never use aluminium foil
and never place products wrapped in aluminium foil
directly on the induction hob.
The aluminium will melt and damage your appliance irreparably.
For the user
Useful advice
For the user
Useful advice
Page 7

98
Which types of pan are most suitable?
You probably already have some suitable pans.
•
PANS MADE OF ENAMELLED STEEL WITH OR WITHOUT NON-STICK COATING.
•
CAST IRON PANS WITH OR WITHOUT ENAMELLED BASE
To prevent the ceramic top on your hob from being scratched you are advised
to choose a pan with an enamelled base.
•
STAINLESS STEEL PANS DESIGNED FOR INDUCTION COOKING
Most stainless steel pans are suitable for induction cooking (casseroles, saucepans, frying pan, deep fryer, etc.).
•
ALUMINIUM PANS WITH SPECIAL BASE
C
HOOSE PANS WITH A HEAVY BASE, WHICH WILL ENSURE MORE EVEN COOKING RESULTS(THE HEAT IS
BETTER DISTRIBUTED
).
•
NB. E
VEN PANS WHICH DO NOT HAVE A COMPLETELY FLAT BASE MAY BE SUITABLE, HOWEVER, THEY
MUST NOT BE TOO MISSHAPEN
.
This hob carries the symbol.
By choosing a pan bearing the same symbol, you will be assured of its complete compatibility with your hob, under normal conditions of use.
To help you in your choice, a list of utensils is supplied with this instruction book.
Which materials are incompatible?
P
ANS MADE OF GLASS, CERAMIC OR EARTHENWARE, OR OF ALUMINIUM WITHOUT A SPECIAL BASE OR OF COPPER
,
OR OF CERTAIN TYPES OF NON-MAGNETIC STAINLESS STEEL
.
The “pan” test
Your induction hob is capable of recognising most types of pan.
Place your pan on a heating zone at power setting 4; if the display does not
flash your pan is compatible, if it flashes then your pan cannot be used for
induction cooking.
You can also use a magnet: if it does not “stick” to the pan, then the pan is not
suitable for induction cooking.
TYPE OF STAIN
Minor
Accumulated burnt-on
stains
Rings and traces of limescale
Burnt-on stains following
sugar spillage, melted
aluminium or plastic.
Soak the area to be cleaned
thoroughly with hot water,
then wipe clean
Cleaning sponges
Soak the area to be cleaned
thoroughly with hot water, use
a special ceramic hob scraper
to remove the worst, finish off
with the rough side of a
scouring sponge, then wipe
clean.
Cleaning sponges
special ceramic hob
scraper
- Apply hot white spirit
vinegar to the stain, leave to
act then wipe off with a soft
cloth.
- Or use a commercial
cleaner.
Special ceramic hob
cleaning paste
- Apply a special ceramic hob
cleaner to the surface,
preferably one which contains
silicone (protective action).
Special ceramic hob
cleaner
WHAT TO DO
PRODUCTS /
ACCESSORIES
REQUIRED
For the user
Choice of pans
For the user
Cleaning
INDUCTION
Page 8

1110
Precautions
Please comply scrupulously with the following points:
●
The walls above the worktop and immediately next to the hob must be heat-resistant.
●
Laminated surfaces and the adhesives used to fix them must be heat-resistant to avoid any deterioration.
● The cool air gap located underneath and to the rear of the hob is there to increase its
reliability by ensuring that it remains cool in all types of fitting arrangement.
●
The hob must not be installed above a dishwasher, washing machine, refrigerator or
freezer.
● Protection from heating is Type Y in accordance with IEC 335-2-6
Fitting the hob into the worktop
● Make a cut-out in the worktop with the dimensions required.
The minimum distance of 40 should be measured from the wall and any side
walls (rear and/or sides).
Protecting the cut-out
The chipboard used in the manufacture of worktops swells relatively quickly when in
contact with humidity. Apply a varnish or a specialist glue to the edge of the cut-out to
protect it from any steam or condensation which may originate from under the top of the
hob.
Call your After Sales Service.
Check the connections and the mains
connection are correct.
This is quite normal
The electronic circuit is malfunctioning.
Your hob has been wrongly connected.
Your hob has been wrongly connected.
This is caused by the distribution of power between two induction cooking
zones.
The electronic system is being cooled.
See section on selecting pans.
The pan you are using is unsuitable for
cooking by induction or has a diameter less than 12 cm.
Inspect the fuses and the circuit
breaker.
The appliance has no power. Either
the power supply or the connection is
faulty.
The hob does not work, the timer is displaying another message.
When you switch the appliance on, your
mains cuts out.
When you switch it on, only one side of your
hob functions.
Your hob makes a slight clicking noise.
The fan continues operating for a few minutes after your hob is switched off.
After having switched on a heating zone, the
lights on the keypad continue to flash.
Press any touch control and the
“BEEP” will stop.
Clean up or remove the object and
restart cooking.
- The pre-set time has elapsed.
- A pan has boiled over or an object is
blocking the control panel keypad.
The hob has stopped working during use and is
sounding an intermittent “BEEP”.
The hob does not work. The lights on the
keypad stay off.
The timer is displaying the message
F7
F7
The electronic circuits have overheated.
Check that your hob has been correctly installed.
The electronic system is on standby,
as with any other electronic appliance
(TV, transformer).
The top of your hob is always slightly warm (even
when off)
... this does not necessarily mean there is a fault.
Always check the following points first.
WHAT
TO DO
POSSIBLE
CAUSES
YOU NOTICE
THAT...
NOTHING: see section with notes on
connection
Normal operation
When you switch the appliance on a display
lights
40 min.
750
490
40 min.
40 min.
Protecting the cut-out:
The chipboard used in the manufacture of worktops
swells relatively quickly when in contact with humidity.
Apply a varnish or a specialist glue to the edge
of the cut-out to protect it from any steam
or condensation which may originate from
under the work surface.
Make a cut-out in the worktop
with the dimensions required.
The minimum distance of
40 should be measured from
the wall and any side walls
(rear and/or sides).
See “how induction works”
This is quite normal
For the user
You are worried that your hob is not
functioning properly...
For the installer
Building in
Page 9

1312
Your oven carries the BRANDT label, it has an upper ventilation system and the hob
can therefore be fitted directly into the worktop above the oven in the higher position.
● It is essential that an air inlet of 30 cm
2
be made in the left or right wall of the oven
housing unit.
Reminder: the hob’s thermal safety devices prevent its simultaneous use with an oven
in pyrolysis mode.
30 cm2
Building in above an oven
Example shows air inlet through the rear
right
It is essential that you install an insulation kit between the oven and the hob (available
from your dealer’s After Sales Service). This arrangement restricts installation of the
oven to the lower position in the unit.
30 cm
,
,
,
5 cm
air
gap
,
,
80mm
FRONT OF UNIT
AIR OUTLET
AIR INLET
Above an empty unit or drawer
Above an oven of another make
Above an oven of the same make
30 cm
2
air inlet
75X 1652
Installation options
● above an empty unit or drawer
● above an oven of another make
● above an oven of the same make
Your induction hob must always be well-ventilated.
Make sure that the flow of air through the ventilation grille at the back is completely
unobstructed.
Page 10

14 15
Technical data
Operating voltage 220/240 V ∼ 50/60 Hz
Total power consumption 5600 W
Dimensions of unit cut-out
Width 750 mm
Depth 410 mm
Maximum space required under the worktop 58 mm
Overall dimensions under
the worktop
Width 745 mm
Depth 488 mm
Overall dimensions above
the worktop
Width 810 mm
Depth 510 mm
Weight 15,3 kg
Manufacturer N°214
Neutral
Earth
Live
N L
- 220/240 V single phase
Connect the three wires to your mains supply,
in accordance with the colour of the wires.
Remarks
- When your hob is first connected to the power supply or after a long power cut, a code lights up on the keypad. It disappears automatically after about 30 seconds or the first
time any of the touch controls on the keypad is pressed. This display is normal and reserved for the use, as required, of your After Sales Service.
When connecting to a 400 V 2N three phase mains supply, if your hob malfunctions,
check that the neutral wire has been connected properly. These precautions will also
protect your other electronic appliances.
Neutral
Earth
Live 2
Live 1
N
L1
L2
NB
separate the 2
live wires L1, L2
before
connecting
Blue
Blue
Green / yellow
Blue sleeve
Black
Black sleeve
- 400 V 2N three phase
Connect the four wires to your mains supply,
in accordance with the colour of the wires.
Your mains fuse must be: 32 amp
Green / yellow
Blue
Blue
Blue sleeve
Black
Black sleeve
Electrical Connection
These hobs are supplied with an 05 VVF power supply cable (cross-section 1.5 mm2),
with 5 cores (of which one for the earth: yellow/green) and should be connected to the
mains by a socket which complies with the EEC 7 regulations or by using a double-pole
circuit breaker with a contact gap of at least 3 mm.
If this power supply cable is damaged, or if you wish to change it, it can only be replaced by your After Sales Service as this requires specialist tools.
•
To benefit from the guarantee on your hob, do not forget to have your “Guarantee
Certificate” dated and signed by your retailer-installer.
•
All repairs must be carried out by a qualified technician. The distributors of our
make are the only people who:
- H
AVE COMPLETE KNOWLEDGE OF YOUR APPLIANCE
AND ITS OPERATION
,
- F
ULLY EMPLOY OUR TECHNIQUES OF ADJUSTMENT, MAINTENANCE AND REPAIR
,
- U
SE EXCLUSIVELY GENUINE SPARE PARTS
•
Any repair carried out as a result of installation or use which is not in conformity
with the instructions in this booklet will not be accepted under the
terms of the manufacturer's guarantee which will be terminated.
•
In the event of a complaint or to order spare parts from your distributor, give him
the complete reference details for your appliance (appliance model and type and
full serial number). This information appears on the back of your instruction
book.
•
The descriptions and technical data which appear in this booklet are
for information only and are not legally binding. In the interests of product quality,
we reserve the right to carry out any necessary changes and
improvements without prior notice.
•
GENUINE SPARE PARTS: ask your dealer to ensure only CERTIFIED GENUINE SPARE
PARTS
are used in any repair.
For the installer
After Sales Service
Page 11

16
For the user
Personal notes
 Loading...