

Klearbar Mini Installation & User Manual
KLEARBAR hot/cold countertop filter water dispenser
INSTALLATION/USER MANUAL
1
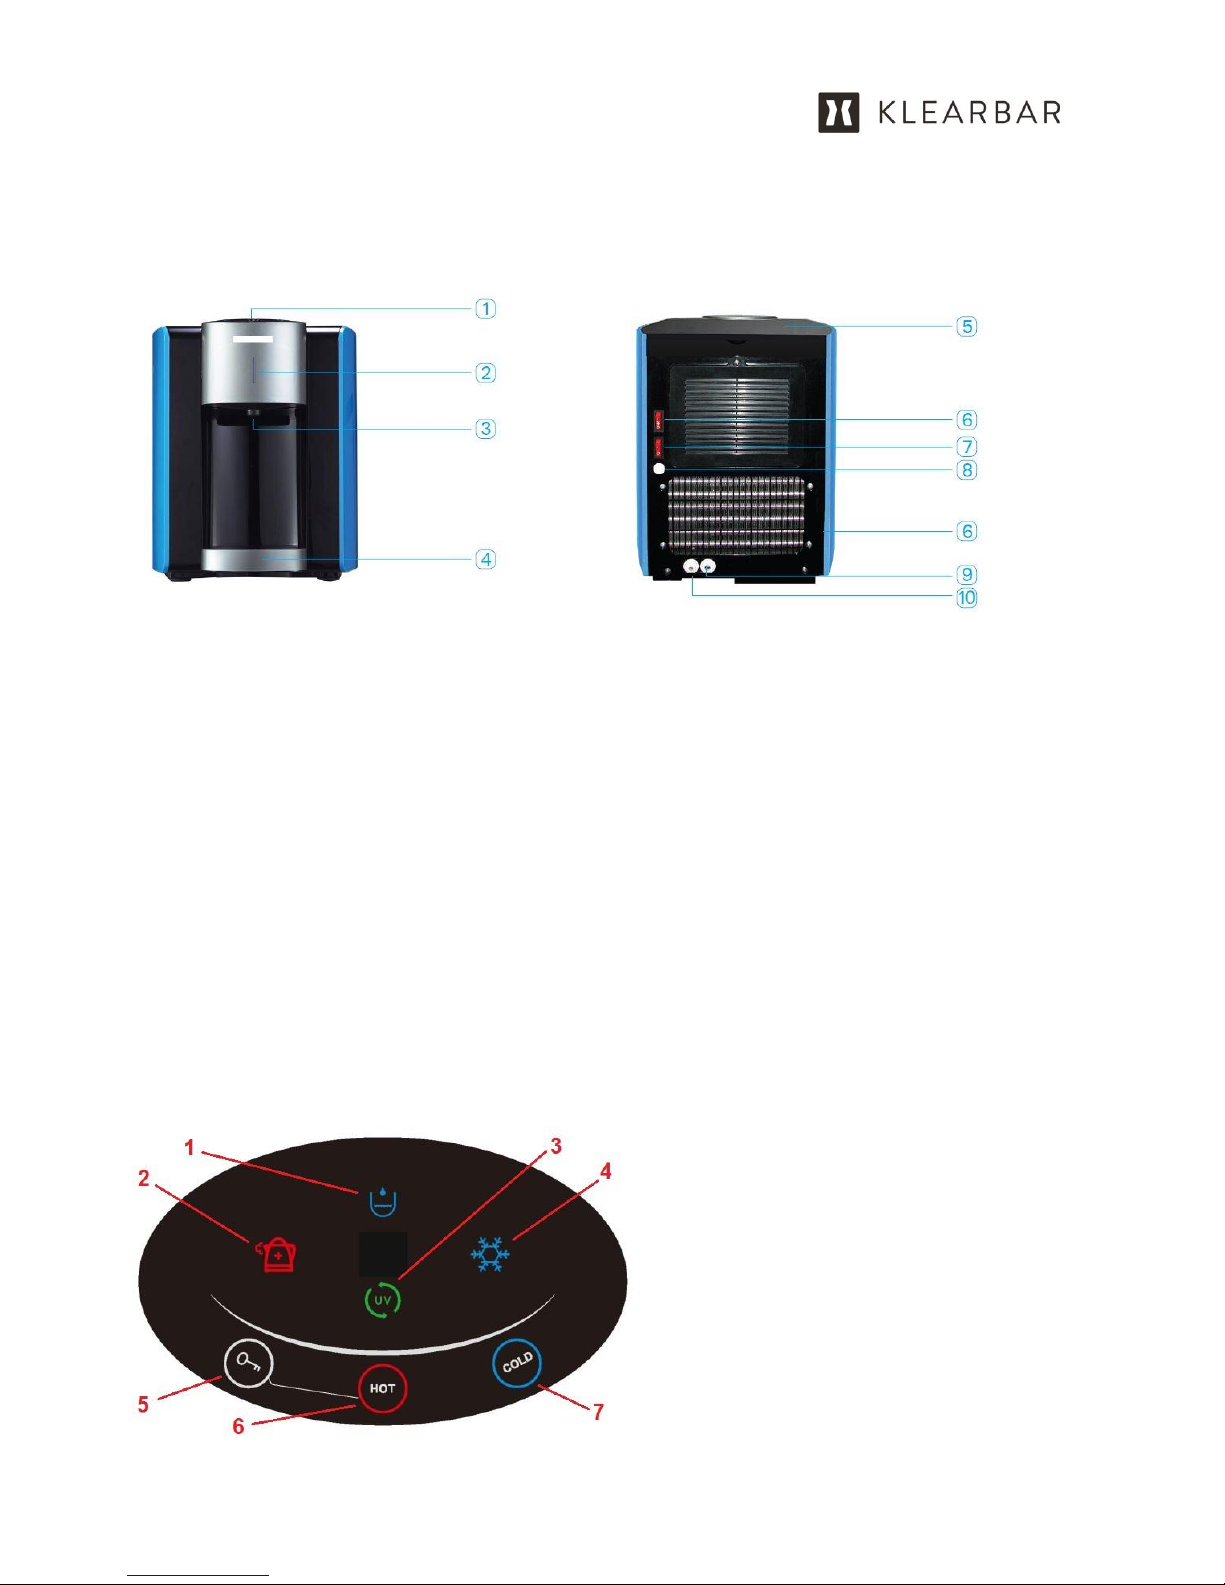
1. Touchscreen operation panel
2. Front panel indicator light:
Blue - COLD water
Red - HOT water
Purple - ENERGY SAVE mode (Energy
save mode will start after 4 hours of
non-use. Touch any key to bring
system to normal operation
condition)
3. Faucet
4. Removable drip tray
1. Tank refill activation icon
2. Hot water activation icon
3. UV light activation icon (Mini2 only)
4. Cold water activation icon
For HOT water dispense touch and release #5,
then touch and hold #6
For COLD water dispense touch and hold #7
5. Removable top panel
6. On/Off cold water compressor and
delivery pump
7. On/Off hot water tank
8. Water overflow line outlet
9. Water line inlet (inset included 1/4
stem elbow here)
Overview & Diagram
\
----------------------------------------------------------------------------------------------
Touch screen instructions/user guide
2
Installation & Maintenance
Your Klearbar Mini comes standard with virtually everything you need for a simple water line
connection:
Installation/User manual
15 feet of food grade, 1/4 polyethylene tubing
45 psi pressure reducer (pre-installed inside water dispenser)
Angle stop valve (mains connector)
1/4 union tee (install if using existing ice maker water line connection)
1/4 stem elbow (install at water line inlet)
You may also need the following items to assist your installation:
Adjustable wrench to install angle stop valve
Teflon plumbers tape (use when installing angle stop valve)
Plastic tubing cutter or scissors
3/8 inch drill bit and drill (if needed to drill hole in cabinetry to hide water line)
ALWAYS PLUG KLEARBAR MINI ELECTRICAL CORD INTO A GFCI PROTECTED POWER OUTLET
There are multiple ways to connect your Klearbar Mini but regardless of your choice it is recommended
to follow local plumbing codes or consider hiring a licensed plumber. But should you decide to DIY (do it
yourself) we have provided a basic blueprint to get you on your way.
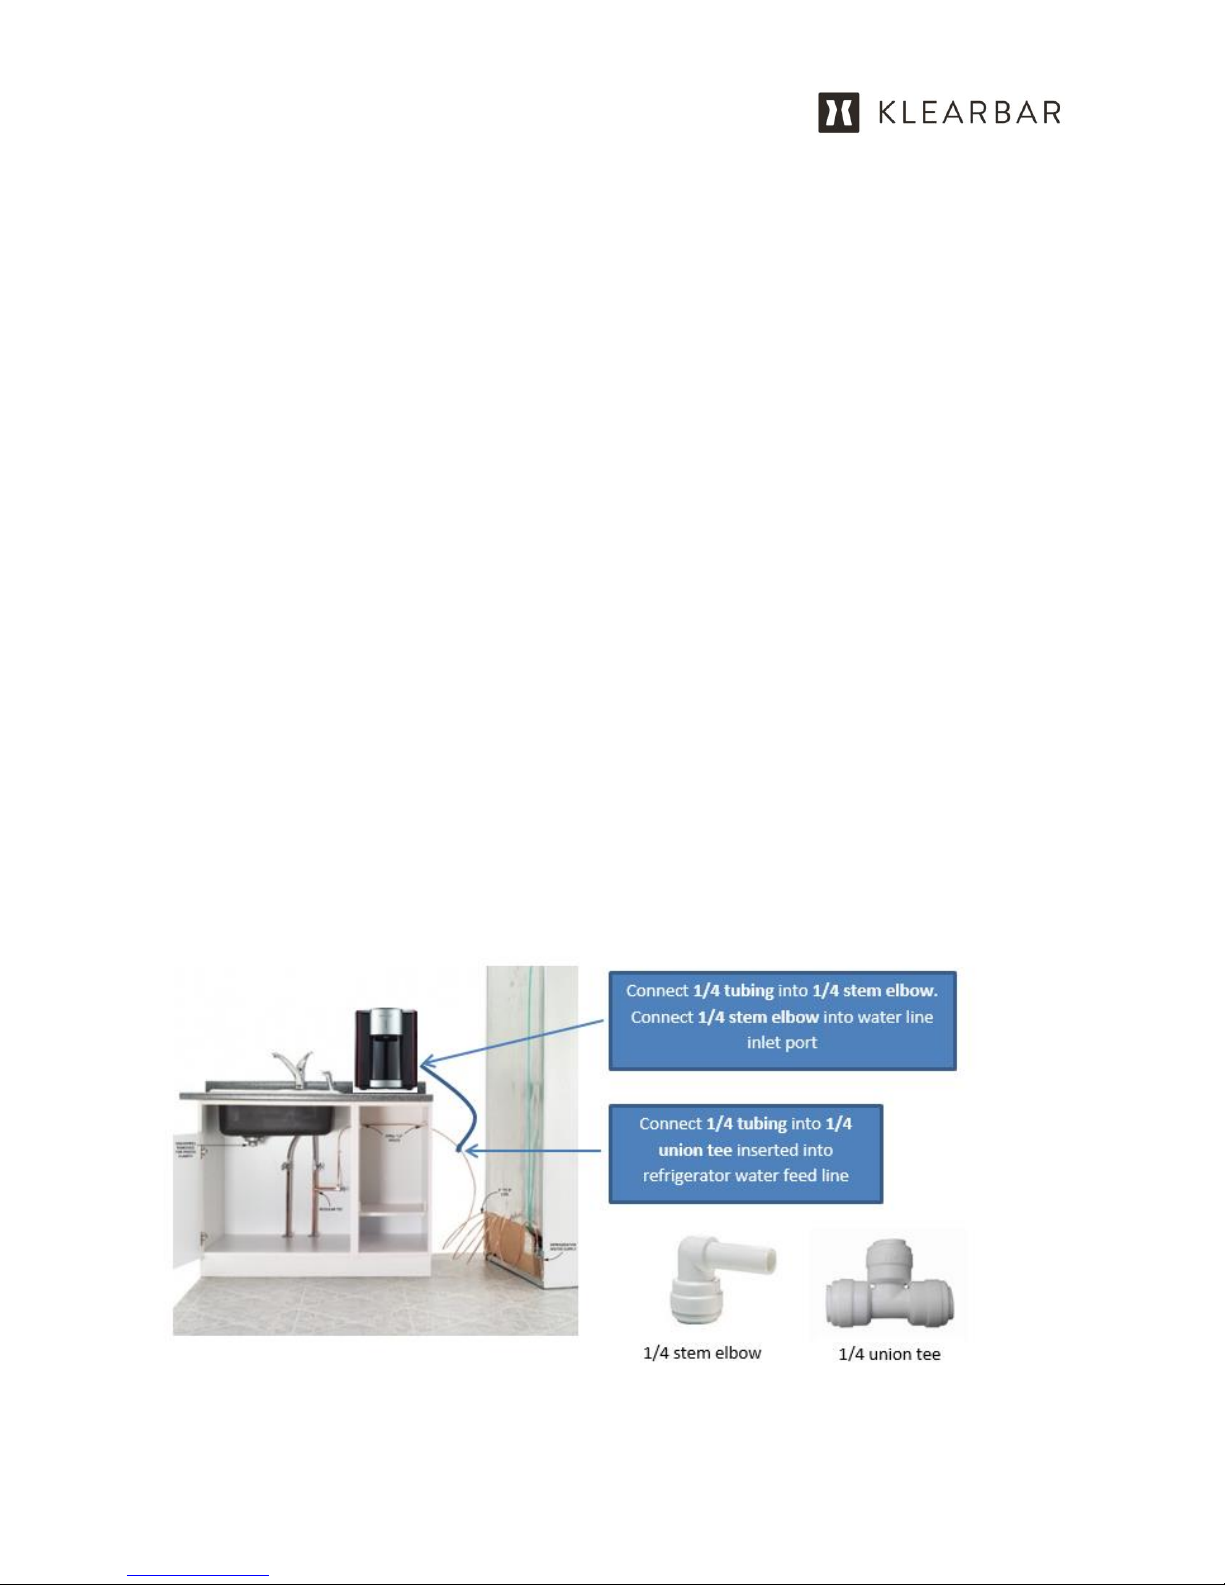
Perhaps the easiest connection is to an existing water line already provided by your refrigerator ice
maker. Use a 1/4 union tee for this connection.
3
Connect To Existing Refrigerator Ice Maker Water Line—use the included 1/4 union tee when
connecting to a 1/4 water mains connection or, use a brass compression union tee if desired (always use
a plastic compression ferrule when connecting polyethylene tubing using a brass union—a brass
compression ferrule may cut into the plastic tubing and cause a leak).
1. BEFORE PLUGGING IN TO ELECTRICITY turn off water line supply to refrigerator ice maker.
2. Using a plastic tube or copper line cutter, make a square cut of the existing ice maker water line
no closer than 12 inches from where the water line originates from the floor or wall, and insert
the 1/4 union tee here. It may be good to have a large towel nearby as a small amount of
residual water may spray and drain out once the line is cut. Connect the included 1/4
polyethylene water line (tubing) to the union tee.
3. Place the Klearbar Mini within a few feet of an available GFCI electrical socket and connect the
included 1/4 stem elbow into the water inlet port on the back of the unit (be careful not to
connect to the optional overflow port). Now connect the remaining 1/4 polyethylene water line
into the 1/4 elbow behind the Klearbar Mini. Trim off extra water line as needed for a
professional look.
4. Consider installing an optional 1/4 turn ball valve (not included; available at most hardware
stores) about 12 inches from the 1/4 stem elbow enabling easy water on/off access without
having to pull the refrigerator away from the wall. This is very convenient should you ever need
to remove the Klearbar Mini for cleaning or should you discover a leak.
5. Position the Klearbar no closer than three inches from the wall to allow sufficient air flow.
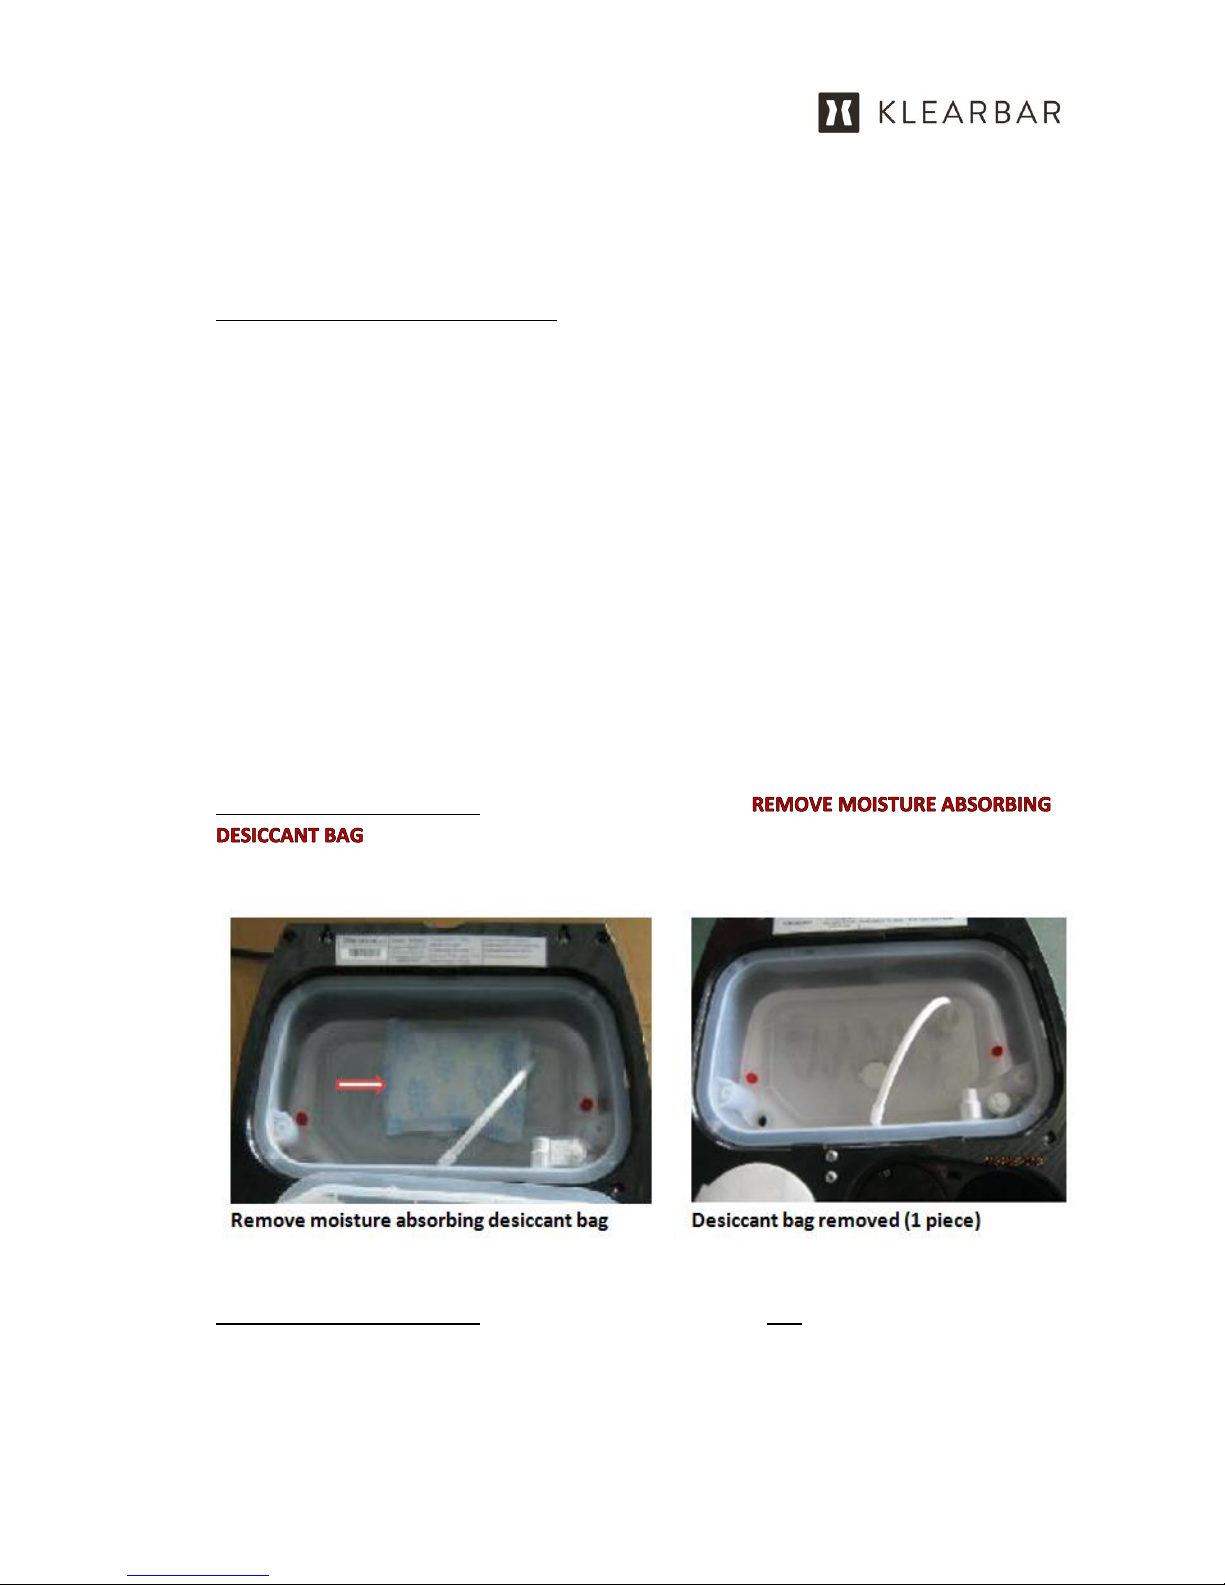
6. BEFORE TURNING ON WATER LIFT RESERVOIR COVER THEN
FROM INSIDE RESERVOIR.
7. BEFORE TURNING ON WATER PLACE HOT WATER SWITCH TO OFF POSITION and then plug the
Klearbar Mini into a GFCI receptacle. Open the water connection and allow to completely fill.
Once full prime the water pump by dispensing 10 ounces of water from the cold and hot tanks.
4
 Loading...