

Page 1

Snoopy
Mini-Kühlschrank
Mini fridge
Mini réfrigérateur
Mini frigorí co
Mini frigorifero
10032854 10032855 10032856 10034548 10034549
Page 2

Page 3
Sehr geehrter Kunde,
wir gratulieren Ihnen zum Erwerb Ihres Gerätes. Lesen Sie
die folgenden Hinweise sorgfältig durch und befolgen Sie
diese, um möglichen Schäden vorzubeugen. Für Schäden,
die durch Missachtung der Hinweise und unsachgemäßen
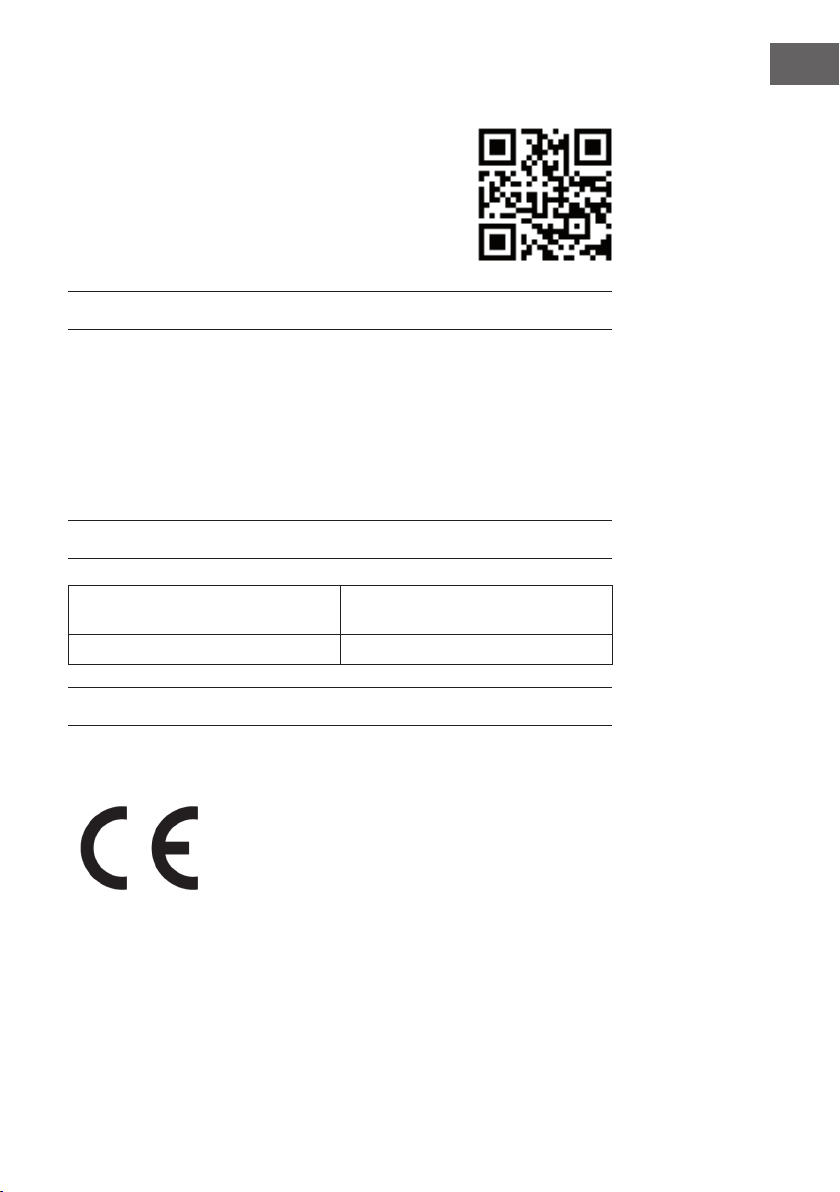
Gebrauch entstehen, übernehmen wir keine Haftung. Scannen
Sie den folgenden QR-Code, um Zugriff auf die aktuellste
Bedienungsanleitung und weitere Informationen rund um das
Produkt zu erhalten:
INHALTSVERZEICHNIS
DE
Sicherheitshinweise4
Geräteübersicht5
Türdrehung6
Bedienung9
Reinigung und Pege10
Fehlersuche und Fehlerbehebung11
Hinweise zur Entsorgung12
TECHNISCHE DATEN
Artikelnummer
Stromversorgung 220-240 V ~ 50/60 Hz
10032854, 10032855, 10032856.
10034548, 10034549
KONFORMITÄTSERKLÄRUNG
Hersteller:
Chal-Tec GmbH, Wallstraße 16, 10179 Berlin, Deutschland.
Dieses Produkt entspricht den folgenden Europäischen
Richtlinien:
2014/30/EU (EMV)
2014/35/EU (LVD)
2011/65/EU (RoHS)
643/2009/EG (ErP)
1060/2010/EU (ErP)
English 13
Français 23
Español 33
Italiano 43
3
Page 4

DE
SICHERHEITSHINWEISE
• Achten Sie darauf, dass der Lüfter nicht blockiert oder abgedeckt wird, andernfalls
kann sich das Gerät aufheizen und in Brand geraten. Legen Sie keine Handtücher
oder Kleidungsstücke darauf ab.
• Versichern Sie sich, dass die Steckdose fest verankert ist. Lose Steckdosen können
dazu führen, dass sich Stecker und Kabel erhitzen und kaputt gehen.
• Halten Sie das Gerät fern von leicht brennbaren Stoffen und Gegenständen, um
Bränden und Explosionen vorzubeugen.
• Bauen Sie das Gerät nicht auseinander und modi zieren Sie es nicht.
• Spülen Sie das Gerät nicht mit Wasser ab.
• Drehen Sie das Gerät nicht auf den Kopf.
• Lassen Sie das Gerät nicht fallen und vermeiden Sie Erschütterungen.
Besondere Hinweise
• Kinder im Alter von 3 bis 8 Jahren dürfen Kühlgeräte beladen und entladen.
• Achten Sie bei der Positionierung des Gerätes darauf, dass das Netzkabel nicht
eingeklemmt oder beschädigt ist.
• Achten Sie darauf, dass sich keine Mehrfachsteckdosen oder Netzteile auf der
Rückseite des Geräts be nden.
Um eine Kontamination von Lebensmitteln zu vermeiden, beachten Sie bitte die
folgenden Anweisungen:
• Ein längeres Öffnen der Tür kann zu einem deutlichen Temperaturanstieg in den
Fächern des Gerätes führen.
• Reinigen Sie regelmäßig Ober ächen, die mit Lebensmitteln in Berührung kommen
können. Reinigen Sie Regelmäßig den Wasserablauf.
• Lagern Sie rohes Fleisch und Fisch in geeigneten Behältern im Kühlschrank, damit
Fleisch und Fisch nicht mit anderen Lebensmitteln in Berührung kommt oder auf
diese tropft.
WARNUNG
Achten Sie bei Gebrauch, Wartung und Entsorgung des Gerätes auf
das linke Symbol, das sich auf der Rückseite oder am Kompressor des
Gerätes be ndet. Dieses Symbol warnt vor möglichen Bränden. In den
Kältemittelleitungen und im Kompressor be nden sich brennbare Stoffe.
Halten Sie das Gerät bei Gebrauch, Wartung und Entsorgung von
Feuerquellen fern.
4
Page 5
Dieses Gerät enthält das Kältemittel Isobutan (R600a), ein Naturgas mit hoher
Umweltverträglichkeit, aber brennbar. Obwohl es brennbar ist, schädigt es nicht
die Ozonschicht und verstärkt nicht den Treibhauseffekt. Die Verwendung dieses
Kältemittels führt zu einer etwas höheren Geräuschentwicklung des Gerätes.
Zusätzlich zum Kompressorgeräusch können Sie den Fluss des Kältemittels hören.
Dies ist unvermeidlich und hat keine negative Wirkung auf die Leistung des Gerätes.
Seien Sie während des Transports vorsichtig, so dass der Kältemittelkreislauf nicht
beschädigt wird. Kältemittellecks können die Augen reizen.
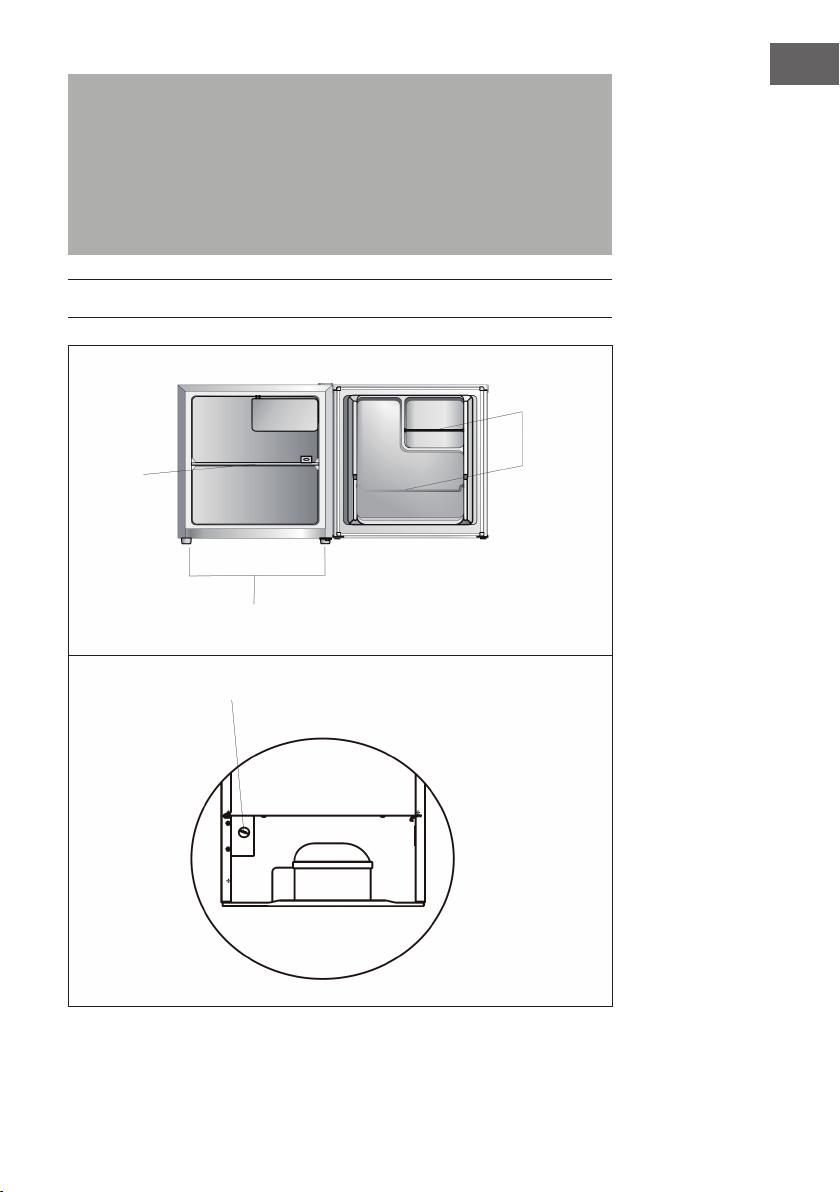
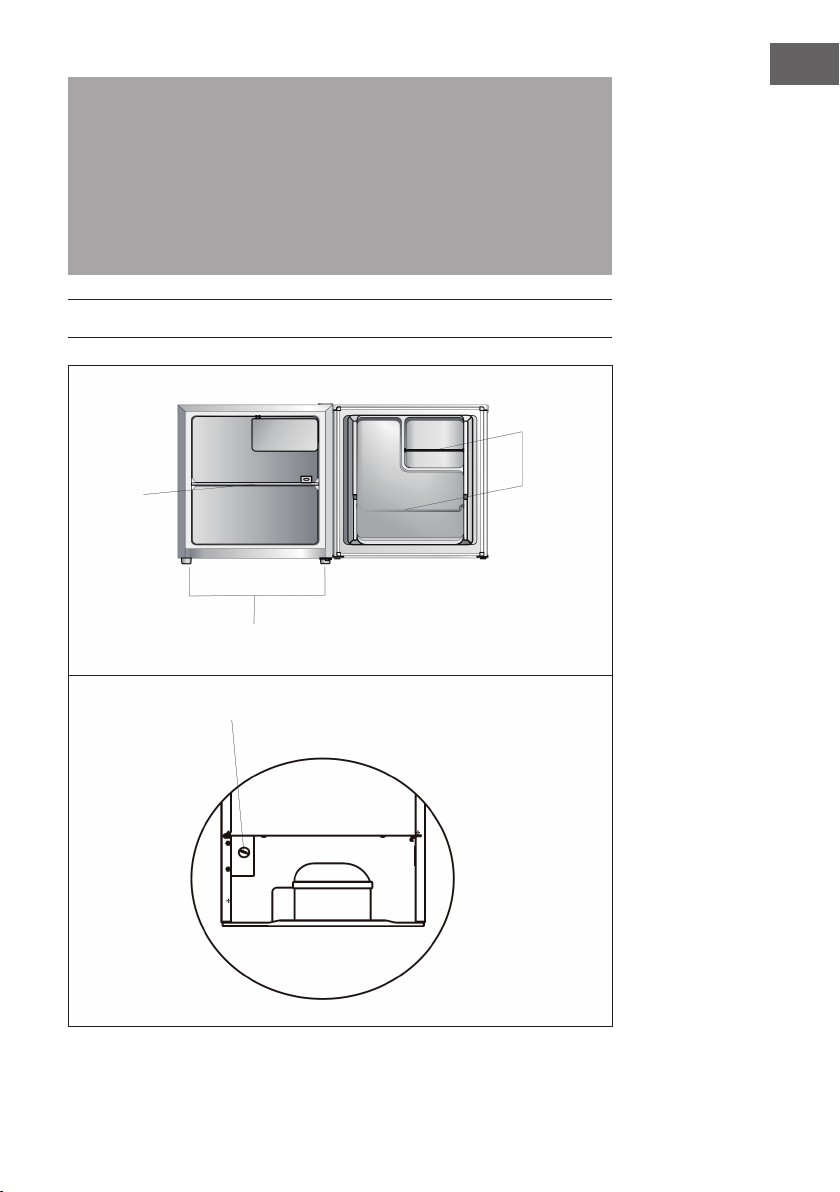
GERÄTEÜBERSICHT
Türfächer
Regal
Einstellbare Füße
DE
Thermostat
5
Page 6
DE
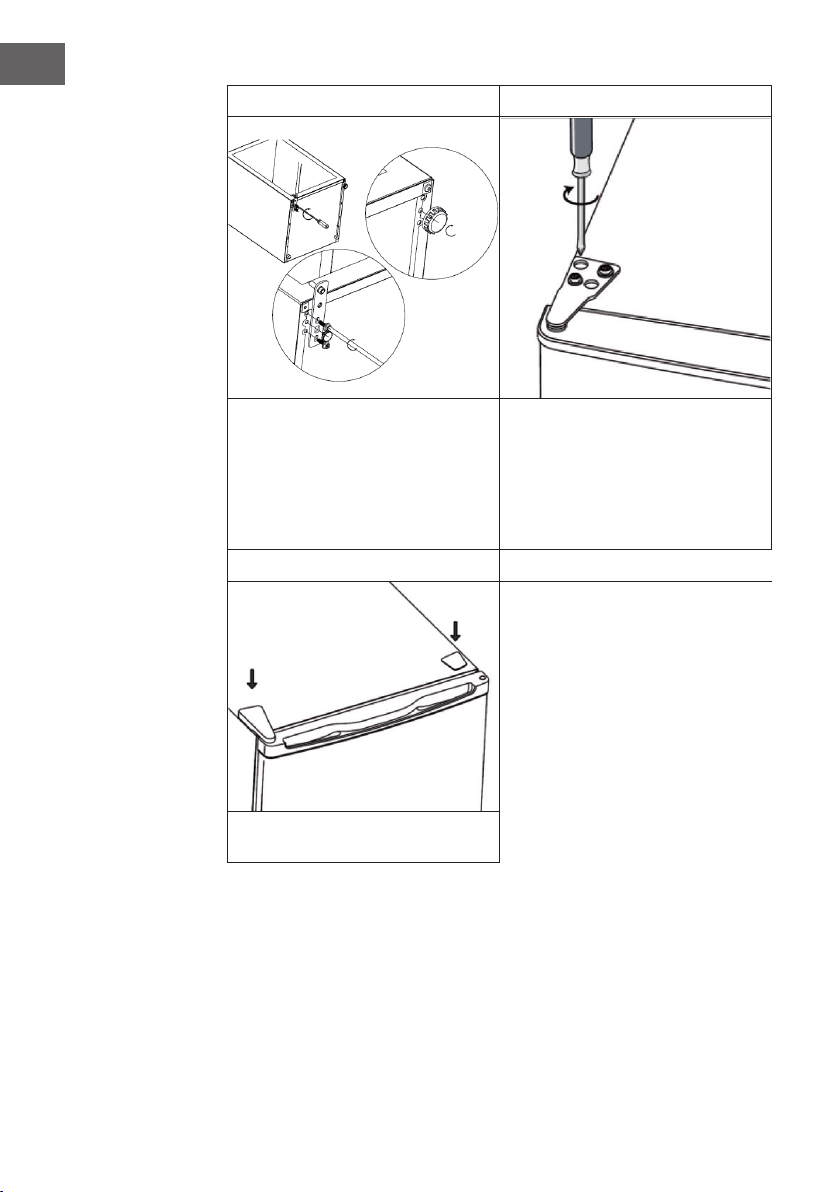
TÜRDREHUNG
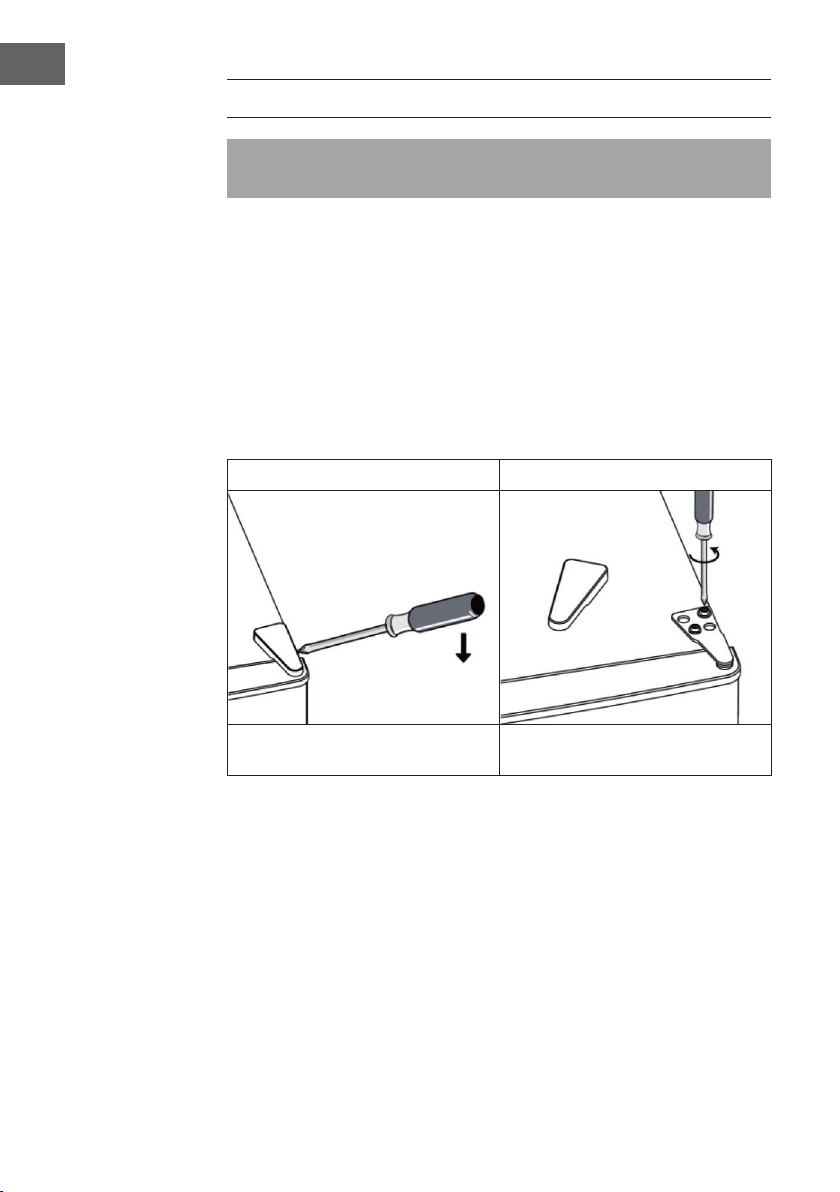
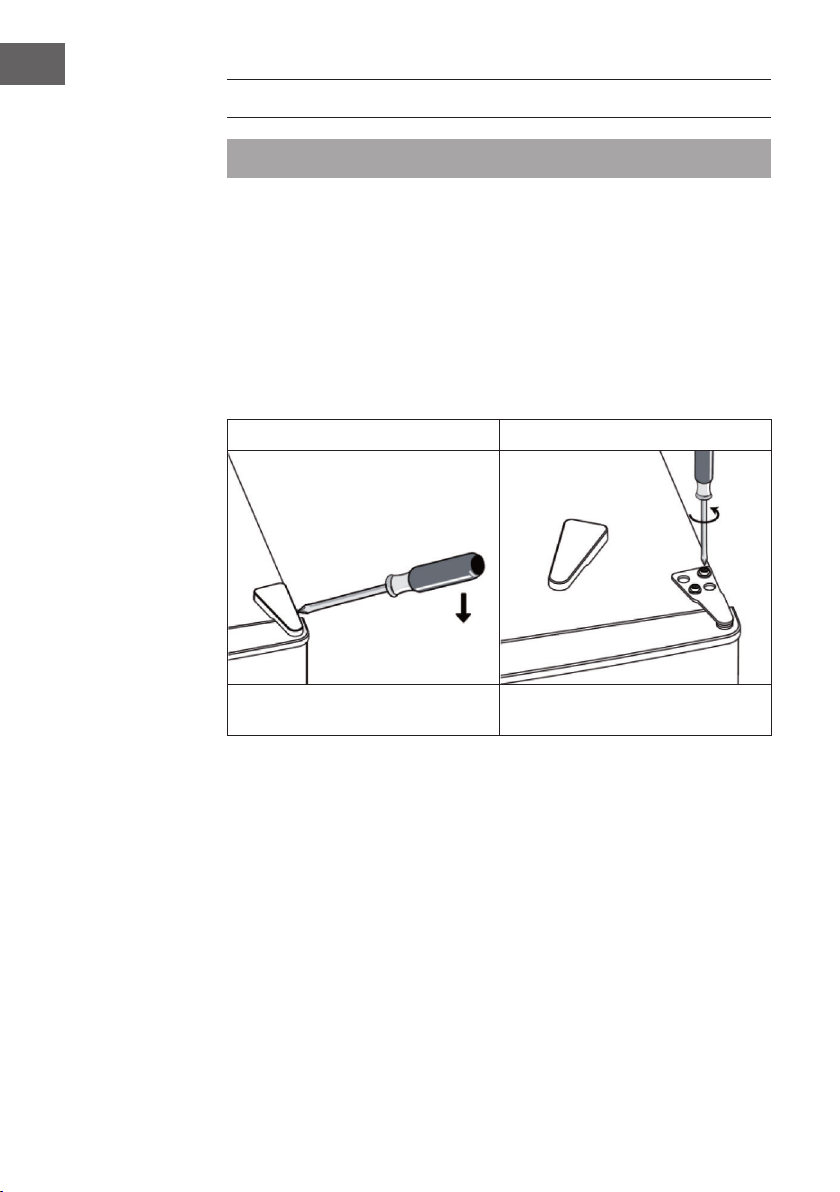
Sie benötigen: Kreuzschlitzschraubenzieher, Flacher Schraubenzieher,
Sechskantschlüssel.
Wichtige Hinweise
• Vergewissern Sie sich, dass das Gerät ausgesteckt und leer ist.
• Zum Abnehmen der Tür muss das Gerät nach hinten gekippt werden.
• Sie sollten das Gerät auf etwas Festes stellen, so dass es beim Kippen nicht
verrutscht.
• Alle entfernten Teile müssen für den Wiedereinbau der Tür aufbewahrt werden.
• Legen Sie das Gerät nicht ach hin, da dies das Kühlsystem beschädigen kann.
• Es ist besser, wenn 2 Personen das Gerät während der Montage halten.
Türdrehung
1 2
Entfernen Sie die Abdeckung. Lösen Sie die Schrauben und entfernen
Sie die Aufhängung.
6
Page 7
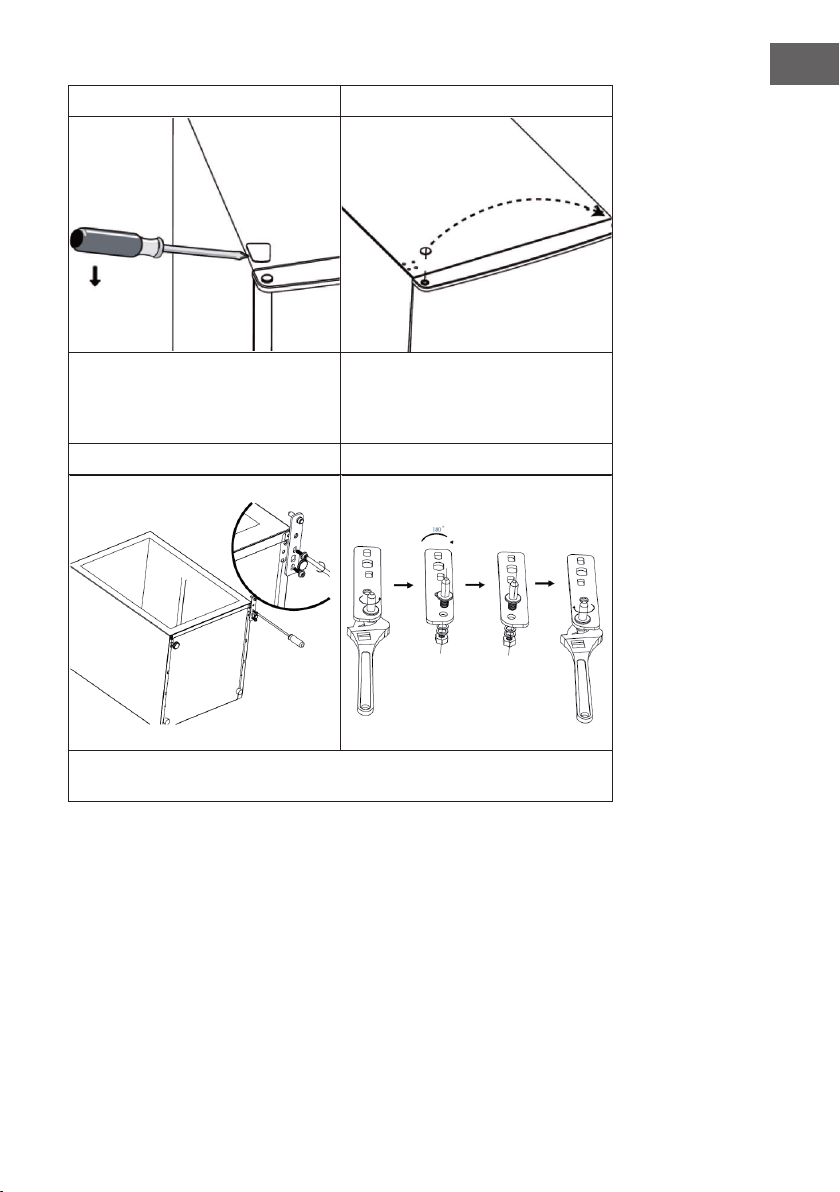
3 4
DE
Lösen Sie die Schrauben-Abdeckung auf
der linken Seite.
5.1 5.2
Schrauben Sie die untere Aufhängung ab und entfernen Sie den Stift. Drehen Sie sie
die Aufhängung um 180° und befestigen Sie den Stift wieder.
Versetzen Sie Kern-Abdeckung auf
die rechte Seite. Heben Sie die Tür
an und legen Sie sie auf eine weiche
Oberäche, damit sie nicht zerkratzt.
7
Page 8
DE
6 7
Montieren Sie die untere Aufhängung
und setzen Sie beide Stellfüße wieder
ein.
8
Befestigen Sie zum Schluss die
Abdeckungen.
Setzen Sie die Tür wieder auf. Stellen
Sie sicher, dass die Tür horizontal und
vertikal so ausgerichtet ist, dass die
Dichtungen allseitig geschlossen sind.
Setzen Sie die obere Aufhängung ein
und schrauben Sie sie bei Bedarf mit
einem Schraubenzieher fest.
8
Page 9
BEDIENUNG
• Das Gerät sollte weit entfernt von Wärmequellen, wie Heizkörpern, Kesseln und
direkter Sonneneinstrahlung aufgestellt werden.
• Stellen Sie sicher, dass die Luft auf der Rückseite des Gehäuses frei zirkulieren kann.
• Um die beste Leistung zu gewährleisten muss der Mindestabstand zwischen der
Oberseite des Gerätes und einem Hängeschrank mindesten 100 mm betragen. Im
Idealfall sollte das Gerät jedoch nicht unter einem Hängeschrank aufgestellt werden.
• Gleichen Sie kleine Unebenheiten im Boden mit den verstellbaren Füßen aus, damit
der Schrank gerade steht.
Vor dem ersten Gebrauch
Waschen Sie vor der ersten Benutzung des Gerätes den Innenraum und das gesamte
Innenzubehör mit lauwarmem Wasser und etwas neutraler Seife ab, um den typischen
Geruch eines neuen Produktes zu entfernen. Trocknen Sie das Gerät anschließend
gründlich ab.
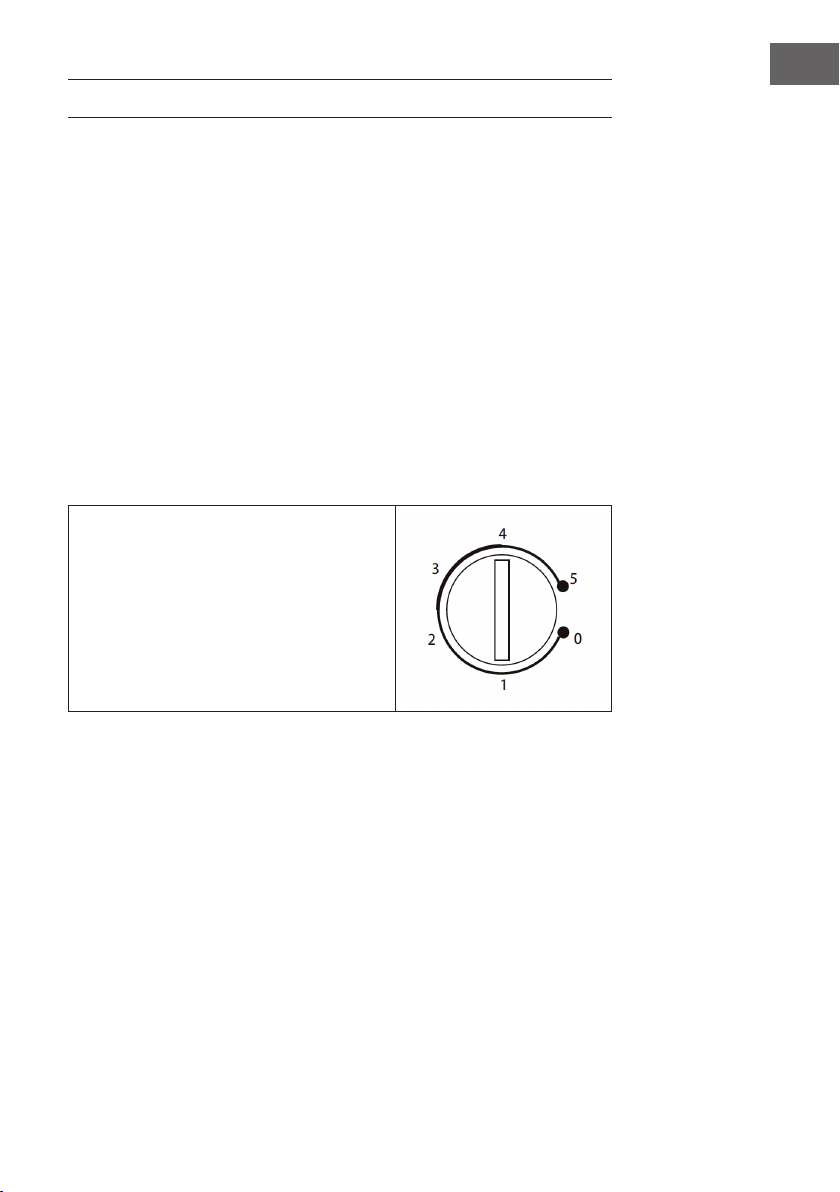
Temperatur einstellen
• Schließen Sie Ihr Gerät an. Die
Innentemperatur wird über einen Thermostat
geregelt. Je nach Modell gibt es 6 (8)
Einstellungen. 1 ist die wärmste Einstellung
und 5 (7) ist die kälteste Einstellung. Bei 0 ist
der Kühlschrank aus.
• Hinweis: Wenn es besonders heiß ist oder
wenn Sie die Tür häug öffnen kann es sein,
dass die gewünschte Kälte nicht erreicht wird.
DE
9
Page 10

DE
REINIGUNG UND PFLEGE
Aus hygienischen Gründen sollte der Geräteinnenraum einschließlich des
Innenzubehörs regelmäßig gereinigt werden.
VORSICHT
Verletzungsgefahr! Das Gerät darf während der Reinigung nicht an das
Stromnetz angeschlossen werden. Schalten Sie vor der Reinigung das
Gerät aus und ziehen Sie den Netzstecker oder schalten Sie den
Hauptschalter aus. Reinigen Sie das Gerät niemals mit einem
Dampfreiniger. Feuchtigkeit kann sich in elektrischen Bauteilen
ansammeln und einen elektrischen Schlag verursachen.! Heiße Dämpfe
können zur Beschädigung von Kunststoffteilen führen. Das Gerät muss
trocken sein, bevor es wieder in Betrieb genommen wird.
• Verwenden Sie zur Reinigung keine ätherischen Öle und organische Lösungsmittel.
Sie können Kunststoffteile angreifen. Gleiches gilt für Zitronensaft oder den Saft aus
Orangenschalen, Buttersäure und Reinigungsmittel, die Essigsäure enthalten. Lassen
Sie solche Stoffe nicht mit den Geräteteilen in Berührung kommen.
• Verwenden Sie keine Scheuermittel.
• Reinigen Sie das Gerät und das Innenzubehör mit einem Tuch und lauwarmem
Wasser. Wischen Sie die Teile nach der Reinigung mit frischem Wasser ab und
reiben Sie sie trocken.
• Staubansammlungen am Kondensator erhöhen den Energieverbrauch. Reinigen Sie
deshalb den Kondensator an der Geräterückseite einmal im Jahr sorgfältig mit einer
weichen Bürste oder einem Staubsauger
• Nehmen Sie das Gerät erst dann wieder in Betrieb, wenn alles trocken ist.
Abtauen
Der Verdampfer wird jedoch nach und nach mit Frost bedeckt. Dieser sollte entfernt
werden. Verwenden Sie niemals scharfe Metallwerkzeuge, um Frost abzukratzen, da
die Ober ächen sonst beschädigt werden könnten. Gehen Sie beim Abtauen wie folgt
vor:
• Ziehen Sie den Stecker aus der Steckdose.
• Entfernen Sie alle Lebensmittel, wickeln Sie sie in mehrere Lagen Zeitungspapier ein
und bewahren Sie sie an einen kühlen Ort auf.
• Halten Sie die Tür offen und stellen Sie ein Gefäß unter das Gerät, um das
Tauwasser aufzufangen.
• Trocknen Sie den Innenraum nach dem Abtauen gründlich ab.
• Stecken Sie den Stecker in die Steckdose, um das Gerät wieder zu starten.
10
Page 11
FEHLERSUCHE UND FEHLERBEHEBUNG
Problem Mögliche Ursache Lösungsansatz
Das Gerät läuft nicht. Der Thermostat steht auf 0. Drehen Sie den Thermostat
auf die gewünschte Stufe.
Der Stecker ist nicht
eingesteckt oder lose.
Die Sicherung ist raus oder
Kaputt.
Das Essen ist warm. Die Temperatur ist nicht
richtig eingestellt
Die Tür wurde häug
geöffnet.
Eine große Menge
warmer Lebensmittel
wurde in den Kühlschrank
gegeben.
Das Gerät steht neben
einer Wärmequelle.
Das Gerät kühlt zu stark. Die Temperatur ist nicht
richtig eingestellt
Ungewöhnliche
Geräusche
Das Gerät steht nicht
eben.
Das Gerät berührt eine
Wand oder einen anderen
Gegenstand.
Eine Gerätekomponente
berührt einen anderen Teil
des Geräts.
Stecken Sie den Stecker
fest in die Steckdose.
Prüfen Sie die Sicherung.
Stellen Sie die Temperatur
auf eine kühlere Stufe.
Öffnen Sie die Tür so
selten, wie möglich.
Stellen Sie die Temperatur
auf eine kühlere Stufe.
Stellen Sie das Gerät an
einem anderen Ort auf.
Stellen Sie die Temperatur
auf eine weniger kühle
Stufe.
Stellen Sie die Füße richtig
ein.
Achten Sie darauf, dass
das Gerät frei steht.
Falls möglich versuche
sie die Komponente leicht
wegzudrehen.
DE
11
Page 12
DE
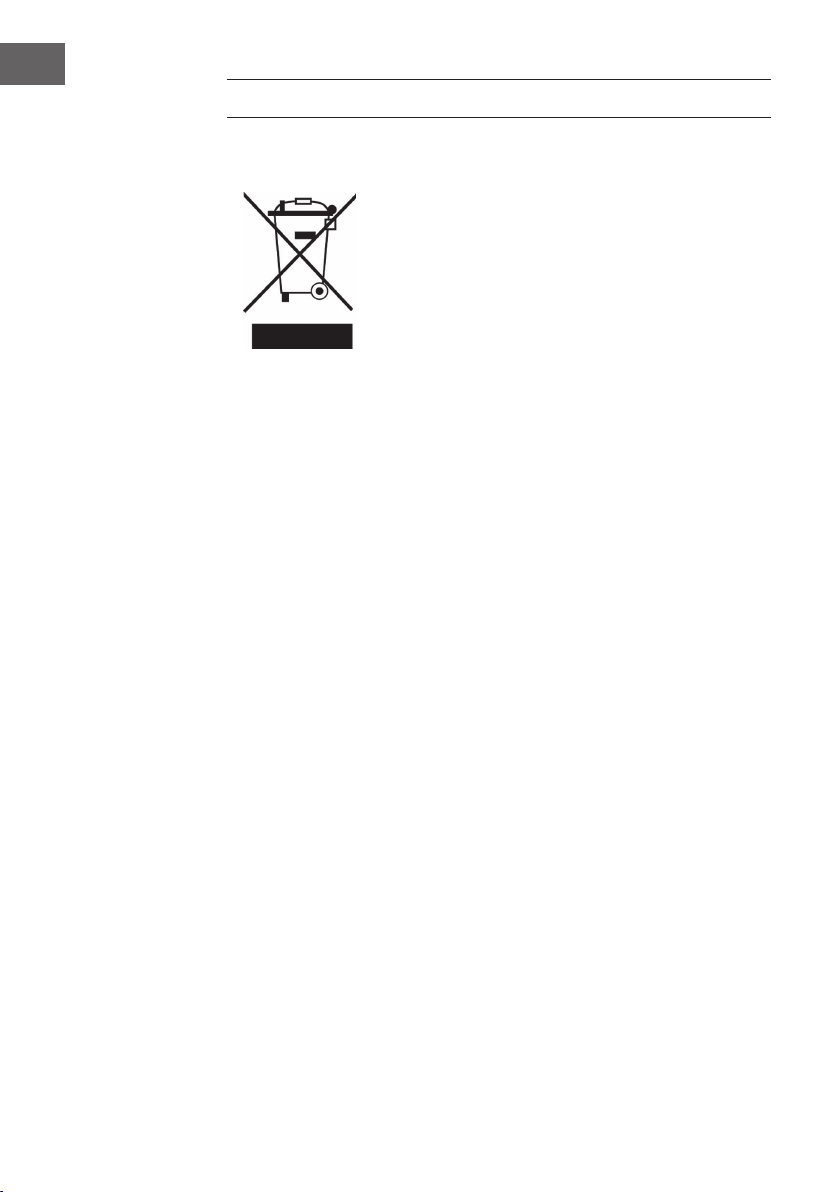
HINWEISE ZUR ENTSORGUNG
Bendet sich die linke Abbildung (durchgestrichene Mülltonne
auf Rädern) auf dem Produkt, gilt die Europäische Richtlinie
2012/19/EU. Diese Produkte dürfen nicht mit dem normalen
Hausmüll entsorgt werden. Informieren Sie sich über die
örtlichen Regelungen zur getrennten Sammlung elektrischer
und elektronischer Gerätschaften. Richten Sie sich nach
den örtlichen Regelungen und entsorgen Sie Altgeräte nicht
über den Hausmüll. Durch die regelkonforme Entsorgung
der Altgeräte werden Umwelt und die Gesundheit ihrer
Mitmenschen vor möglichen negativen Konsequenzen
geschützt. Materialrecycling hilft, den Verbrauch von
Rohstoffen zu verringern.
12
Page 13
Dear Customer,
Congratulations on purchasing this equipment. Please read
this manual carefully and take care of the following hints to
avoid damages. Any failure caused by ignoring the items and
cautions mentioned in the instruction manual is not covered
by our warranty and any liability. Scan the QR code to get
access to the latest user mannual and other information about
the product
CONTENT
Safety Instructions14
Product Overview15
Reverse Door16
Operation19
Cleaning and Care20
Troubleshooting21
Hints on Disposal22
TECHNICAL DATA
EN
Item number
Power supply 220-240 V ~ 50/60 Hz
10032854, 10032855, 10032856.
10034548, 10034549
DECLARATION OF CONFORMITY
Producer:
Chal-Tec GmbH, Wallstraße 16, 10179 Berlin, Germany.
This product is conform to the following European
Directives:
2014/30/EU (EMC)
2014/35/EU (LVD)
2011/65/EU (RoHS)
643/2009/EC (ErP)
1060/2010/EU (ErP)
13
Page 14

EN
SAFETY INSTRUCTIONS
• Make sure that the fan is not blocked or covered, otherwise the unit may heat up
and catch re. Do not place any towels or clothing on it.
• Make sure the power outlet is securely anchored. Loose sockets can cause the plug
and cable to heat up and break.
• Keep the appliance away from easily ammable materials and objects in order to
prevent res and explosions.
• Do not disassemble or modify the unit.
• Do not rinse the appliance with water.
• Do not turn the appliance upside down.
• Do not drop the appliance and avoid vibrations.
Special Notes
• Children between the ages of 3 and 8 are allowed to load and unload
refrigerators.
• When positioning the unit, make sure that the power cord is not pinched or
damaged.
• Make sure that there are no multiple sockets or power supplies on the back of the
unit.
To avoid contamination of food, please follow the instructions below:
• A prolonged opening of the door can lead to a signi cant rise in temperature in the
compartments of the appliance.
• Regularly clean surfaces that may come into contact with food. Clean the water
drain regularly.
• Store raw meat and sh in suitable containers in the refrigerator so that meat and
sh do not come into contact with or drip on other foods.
WARNING
When using, servicing and disposing of the unit, pay attention to the left
symbol on the rear of the unit or on the compressor. This symbol warns
of possible res. There are ammable substances in the refrigerant lines
and in the compressor. Keep the appliance away from sources of re
during use, maintenance and disposal.
14
Page 15
This appliance contains the coolant isobutane (R600a),a natural gas which
is environmentally friendly. Although it is ammable, it does not damage the
ozone layer and does not increase the greenhouse effect. The use of this coolant
has,however,led to a slight increase in the noise level of the appliance. In addition to
the noise of the compressor,you might be able to hear the coolant owing around the
system. This is unavoidable,and does not have any adverse effect on the performance
of the appliance. Care must be taken during the transportation and setting up of the
appliance that no parts of the cooling system are damaged. Leaking coolant can
damage the eyes
PRODUCT OVERVIEW
Rack
bars
Shelve
Levelling feet
EN
Thermostat
15
Page 16
EN
REVERSE DOOR
Tool required: Philips screwdriver, Flat bladed screwdriver, Hexagonal spanner.
Important Notes
• Ensure the unit is unplugged and empty.
• To take the door off, it is necessary to tilt the unit backwards. You should rest the unit
on something solid so that it will not slip during the door reversing process.
• All parts removed must be saved to do the reinstallation of the door.
• Do not lay the unit at as this may damage the coolant system.
• It‘ s better that 2 people handle the unit during assembly.
Reverse Door
1 2
Remove the top right hinge cover. Undo the screws. Then remove the hinge
bracket.
16
Page 17

3 4
Remove the top left screw cover. Move the core cover from left side to
right side. And then lift the upper door
and place it on a padded surface to
prevent it from scratching.
5.1 5.2
EN
Unscrew and remove the bottom hinge pin, turn the bracket over and replace it.
17
Page 18

EN
6 7
Ret the bracket tting the bottom hinge
pin. Replace both adjustable
feet.
8
Put the hinge cover and the screw cover
back.
Place the door back on. Ensure the door
is aligned horizontally and vertically
so that the seals are closed on all sides
before nally tightening the top hinge.
Insert the hinge bracket and screw it
to the top of the unit. Use a spanner to
tighten it if necessary.
18
Page 19

OPERATION
• The appliance should be installed well away from sources of heat such as radiators,
boilers, direct sunlight etc.
• Ensure that air can circulate freely around the back of the cabinet. To ensure best
performance, if the appliance is positioned below an overhanging wall unit, the
minimum distance between the top of the cabinet and the wall unit must be at
least 100 mm. Ideally, however, the appliance should not be positioned below
overhanging wall units.
• Accurate leveling is ensured by one or more adjustable feet at the base of the
cabinet.
Before rst Use
Before using the appliance for the rst time, wash the interior and all internal accessories
with lukewarm water and some neutral soap so as to remove the typical smell of a
brand new product, then dry thoroughly.
Temperature Setting
• Plug on your appliance. The internal
temperature is controlled by a thermostat.
Depending on the model there are 6 (8)
settings. 1 is warmest setting and 5 (7) is
coldest setting and 0 is off.
• Note: The appliance may not operate at the
correct temperature if it is in a particularly hot
or if you open the door often.
EN
19
Page 20

EN
CLEANING AND CARE
For hygienic reasons the appliance interior, including interior accessories, should be
cleaned regularly.
CAUTION
Risk of Injury! The appliance may not be connected to the mains during
cleaning. Danger of electrical shock! Before cleaning switch the
appliance off and remove the plug from the mains, or switch off or turn
out the circuit breaker or fuse. Never clean the appliance with a steam
cleaner. Moisture could accumulate in electrical components, danger
of electrical shock! Hot vapors can lead to the damage of plastic parts.
The appliance must be dry before it is placed back into service.
• Ethereal oils and organic solvents can attack plastic parts, e.g. lemon juice or the
juice formorange peel, butyric acid, cleanser that contain acetic acid. Do not allow
such substances to come into contact the appliance parts.
• Do not use any abrasive cleaners
• Switch the appliance off and remove the plug from the mains, or switch off or turn
out the circuit breaker of fuse.
• Clean the appliance and the interior accessories with a cloth and lukewarm water.
After cleaning wipe with fresh water and rub dry.
• Accumulation of dust at the condenser increases energy consumption. For this
reason carefully clean the condenser at the back of the appliance once a year with
a soft brush or a vacuum cleaner.
• After everything is dry place appliance back into service.
20
Defrosting
The evaporator, however, will become progressively covered with frost. This should
be removed. Never use sharp metal tools to scrape off frost from the evaporator as
you could damage it. However, when the ice becomes very thick on the evaporator,
complete defrosting should be carried out as fellows:
• Pull out the plug from the socket.
• Remove all stored food, wrap it in several layers of newspaper and put it in a cool
place.
• Keep the door open, and placing a basin underneath of the appliance to collect the
defrost water.
• When defrosting is completed, dry the interior thoroughly.
• Replace the plug in the power socket to run the appliance again.
Page 21

TROUBLESHOOTING
Problem Possible cause Solution
Appliance does not work. Temperature regulation
knob is set at number “0”.
Mains plug is not plugged
in or is loose
Fuse has blown or is
defective
The food is too warm. Temperature is not
properly adjusted.
Door was open for an
extended period.
A large quantity of warm
food was placed in the
appliance within the last
24 hours.
The appliance is near a
heat source.
Appliance cools too much. Temperature is set too
cold.
Unusual noises. Appliance is not level. Re-adjust the feet.
The appliance is touching
the wall or other objects.
A component, e.g. a
pipe, on the rear of the
appliance is touching
another part of the
appliance or the wall.
Set the knob at other
number to switch on the
appliance.
Insert mains plug.
Check fuse, replace if
necessary.
Please look in the initial
Temperature Setting
section.
Open the door only as
long as necessary.
Turn the temperature
regulation to a colder
setting temporarily.
Please look in the
installation location
section.
Turn the temperature
regulation knob to
a warmer setting
temporarily.
Move the appliance
slightly.
If necessary, carefully
bend the component out
of the way.
EN
21
Page 22

EN
HINTS ON DISPOSAL
According to the European waste regulation 2012/19/EU this
symbol on the product or on its packaging indicates that this
product may not be treated as household waste. Instead it should
be taken to the appropriate collection point for the recycling of
electrical and electronic equipment. By ensuring this product is
disposed of correctly, you will help prevent potential negative
consequences for the environment and human health, which
could otherwise be caused by inappropriate waste handling of
this product. For more detailled information about recycling of
this product, please contact your local council or your household
waste disposal service.
22
Page 23

Chère cliente, cher client,
Toutes nos félicitations pour l’acquisition de ce nouvel appareil.
Veuillez lire attentivement et respecter les instructions de ce mode
d’emploi an d’éviter d’éventuels dommages. Nous ne saurions
être tenus pour responsables des dommages dus au non-respect
des consignes et à la mauvaise utilisation de l’appareil. Scannez
le QR-Code pour obtenir la dernière version du mode d‘emploi
et à d‘autres informations concernant le produit :
SOMMAIRE
Consignes de sécurité24
Aperçu de l‘appareil25
Modication du sens d‘ouverture26
Utilisation29
Nettoyage et entretien30
Identication et résolution des problèmes31
Informations sur le recyclage32
FICHE TECHNIQUE
FR
Numéro d’article
Alimentation 220-240 V ~ 50/60 Hz
10032854, 10032855, 10032856.
10034548, 10034549
DÉCLARATION DE CONFORMITÉ
Fabricant :
Chal-Tec GmbH, Wallstraße 16, 10179 Berlin, Allemagne.
Ce produit est conforme aux directives européennes
suivantes:
2014/30/UE (CEM)
2014/35/UE (LVD)
2011/65/UE (RoHS)
643/2009/CE (ErP)
1060/2010/UE (ErP)
23
Page 24

FR
CONSIGNES DE SÉCURITÉ
• Veiller à ce que le ventilateur ne soit pas bloqué ou recouvert pour éviter que
l’appareil ne surchauffe et prenne feu. Ne pas poser de serviette ou de vêtement
dessus.
• S’assurer que la prise électrique est bien xée. Les prises de courant lâches peuvent
provoquer le réchauffement de la che et du câble et les endommager.
• Tenir l’appareil à l’écart des substances et objets facilement in ammables, pour
éviter tout incendie ou toute explosion.
• Ne pas démonter l’appareil et ne pas le transformer.
• Ne pas rincer l’appareil avec de l’eau.
• Ne pas retourner complètement l’appareil.
• Ne pas faire tomber l’appareil et éviter les secousses.
Remarques particulières
• Les enfants âgés de 3 à 8 ans sont autorisés à charger et décharger les
réfrigérateurs.
• Lors du positionnement de l‘appareil, assurez-vous que le cordon d‘alimentation
n‘est pas pincé ou endommagé.
• Assurez-vous qu‘il n‘y a pas de prises multiples ou d‘alimentations multiples à
l‘arrière de l‘appareil.
Pour éviter la contamination des aliments, veuillez suivre les instructions ci-dessous :
• Une ouverture prolongée de la porte peut entraîner une augmentation signi cative
de la température dans les compartiments de l‘appareil.
• Nettoyer régulièrement les surfaces qui peuvent entrer en contact avec les aliments.
Nettoyez régulièrement l‘évacuation d‘eau.
• Entreposer la viande et le poisson crus dans des contenants appropriés au
réfrigérateur a n que la viande et le poisson n‘entrent pas en contact avec d‘autres
aliments ni ne s‘égouttent.
24
MISE EN GARDE
Lors de l‘utilisation, de l‘entretien et de la mise au rebut de l‘appareil,
faites attention au symbole de gauche à l‘arrière de l‘appareil ou sur le
compresseur. Ce symbole avertit d‘un éventuel incendie. Il y a des
substances in ammables dans les conduites de uide frigorigène et
dans le compresseur. Tenez l‘appareil à l‘écart de toute source
d‘incendie pendant son utilisation, son entretien et son élimination.
Page 25

Cet appareil contient du liquide réfrigérant Isobutane (R600a), un gaz naturel très
respectueux de l’environnement mais inammable. Bien qu’il soit inammable, il ne
détruit pas la couche d’ozone et ne renforce pas l’effet de serre. L’utilisation de ce
liquide réfrigérant provoque toutefois un niveau sonore de l’appareil légèrement
plus élevé. Outre les bruits du compresseur, vous pouvez percevoir le ux du liquide
réfrigérant. Cela est inévitable et n’a aucune inuence négative sur la puissance de
l’appareil. Faites attention pendant le transport an de ne pas endommager le circuit
réfrigérant. Les fuites de liquide réfrigérant peuvent irriter les yeux.
APERÇU DE L‘APPAREIL
Compartiments
de porte
Clayette
Pieds réglables
FR
Thermostat
25
Page 26

FR
MODIFICATION DU SENS D‘OUVERTURE
Il vous faut : un tournevis cruciforme, un tournevis plat, une clé Allen.
Remarques importantes
• Assurez-vous que l‘appareil est débranché et vide.
• Pour démonter la porte, l‘appareil doit être basculé un peu en arrière.
• Posez l‘appareil sur un support solide, pour qu‘il ne glisse pas lorsque vous
l‘inclinerez.
• Conservez toutes les pièces retirées pour le remontage de la porte.
• Ne couchez pas l‘appareil, car cela pourrait endommager le système de
refroidissement.
• Il est préférable que 2 personnes tiennent l‘appareil pendant l‘assemblage.
Modication du sens d‘ouverture
1 2
26
Retirez les caches. Desserrez les vis et retirez le support.
Page 27

3 4
FR
Retirez les caches des vis du côté
gauche.
5.1 5.2
Dévissez la suspension inférieure et retirez la goupille. Tournez la suspension de 180°
et xez à nouveau la goupille.
Déplacez le cache central vers la droite.
Soulevez la porte et placez-la sur une
surface douce pour qu'elle ne se raye
pas.
27
Page 28

FR
6 7
Montez la suspension inférieure et
remettez en place les deux pieds.
8
Puis remettez les caches.
Remettez la porte en place. Assurez-vous
qu'elle est alignée horizontalement et
verticalement an que les joints soient
étanches de tous les côtés. Insérez la
suspension supérieure et serrez-la avec
un tournevis si nécessaire.
28
Page 29

UTILISATION
• L‘appareil doit être placé loin des sources de chaleur telles que les radiateurs, les
chaudières et les rayons directs du soleil.
• Assurez-vous que l‘air peut circuler librement à l‘arrière du boîtier.
• Pour assurer les meilleures performances, la distance minimale entre le dessus
de l‘appareil et un élément haut doivent être d‘au moins 100 mm. Idéalement,
cependant, l‘appareil ne doit pas être placé sous un élément haut.
• Compensez les petites inégalités du sol avec les pieds réglables pour que le
meuble soit droit.
Avant la première utilisation
Avant d‘utiliser l‘appareil pour la première fois, lavez l‘intérieur et l‘ensemble des
accessoires intérieurs avec de l‘eau tiède et un peu de savon neutre pour enlever
l‘odeur typique d‘un nouveau produit. Ensuite, séchez soigneusement l‘appareil.
Réglage de la température
• Connectez votre appareil. La température
interne est contrôlée par un thermostat. Selon
le modèle, il y a 6 (8) réglages. 1 est le
réglage le plus chaud et 5 (7) est le réglage
le plus froid. À 0, le réfrigérateur est éteint.
• Remarque : S‘il fait particulièrement chaud
ou si vous ouvrez fréquemment la porte, il se
peut que le réfrigérateur ne refroidisse pas
selon vos souhaits.
FR
29
Page 30

FR
NETTOYAGE ET ENTRETIEN
Pour des raisons d‘hygiène, il est nécessaire de nettoyer régulièrement l‘intérieur de
l‘appareil, y compris les accessoires.
ATTENTION
Risque de blessure ! L‘appareil ne doit pas être branché au secteur
pendant le nettoyage. Avant de le nettoyer, éteignez l‘appareil et
débranchez la che secteur ou éteignez l‘interrupteur principal. Ne
nettoyez jamais l‘appareil avec un nettoyeur à vapeur. L‘humidité peut
s‘accumuler dans les composants et provoquer un choc électrique. Les
vapeurs chaudes peuvent endommager les pièces en plastique.
L‘appareil doit être sec avant d‘être remis en service.
• N‘utilisez pas d‘huiles essentielles ni de solvants organiques pour le nettoyage. Ils
attaquent les pièces en plastique. Il en va de même pour le jus de citron ou le zeste
d‘orange, l‘acide butyrique et les détergents qui contiennent de l‘acide acétique.
Ne laissez pas de telles substances entrer en contact avec les parties de l‘appareil.
• N‘utilisez pas d‘abrasifs.
• Nettoyez l‘appareil et les accessoires intérieurs avec un chiffon et de l‘eau tiède.
Après le nettoyage, rincez les pièces avec de l‘eau fraîche et essuyez-les.
• L‘accumulation de poussière sur le condenseur augmente la consommation
d‘énergie. Par conséquent, nettoyez le condenseur à l‘arrière de l‘appareil une fois
par an avec une brosse douce ou un aspirateur.
• Ne redémarrez pas l‘appareil tant qu‘il n‘est pas entièrement sec.
Dégivrage
30
Cependant, l‘évaporateur est progressivement recouvert de givre. Il est nécessaire de le
supprimer. N‘utilisez jamais d‘outils métalliques tranchants pour gratter le givre, sinon
les surfaces pourraient être endommagées. Procédez comme suit pour le dégivrage :
• Débranchez la che.
• Retirez tous les aliments, enveloppez-les dans plusieurs couches de papier journal
et rangez-les dans un endroit frais.
• Laissez la porte ouverte et placez un récipient sous l‘appareil pour récupérer la
condensation.
• Séchez soigneusement l‘intérieur après le dégivrage.
• Branchez la che dans la prise pour redémarrer l‘appareil.
Page 31

IDENTIFICATION ET RÉSOLUTION DES
PROBLÈMES
Problème Cause possible Solution
L'appareil ne fonctionne
pas.
Les aliments sont chauds. La température est mal
L'appareil refroidit trop. La température est mal
Bruits inhabituels L'appareil n'est pas posé
Le thermostat est réglé
sur 0.
La che n'est pas
branchée ou mal
branchée.
Le fusible s'est déclenché
ou est endommagé.
réglée
La porte a été trop souvent
ouverte.
Une grande quantité
d'aliments chauds a
été rangée dans le
réfrigérateur.
L'appareil est près d'une
source de chaleur.
réglée
bien droit.
L'appareil est en contact
avec le mur ou un autre
objet.
Un élément de l'appareil
touche un autre élément.
Tournez le thermostat pour
le régler au niveau désiré.
Branchez correctement la
che dans la prise.
Contrôlez le fusible.
Réglez une température
plus fraîche.
Ouvrez la porte aussi peu
que possible.
Réglez une température
plus fraîche.
Installez l'appareil ailleurs.
Réglez une température
moins froide.
Réglez les pieds du
réfrigérateur.
Veillez à ce que l'appareil
soit en pose libre.
Si possible, essayez
d'éloigner légèrement le
composant.
FR
31
Page 32

FR
INFORMATIONS SUR LE RECYCLAGE
Vous trouverez sur le produit l’image ci-contre (une poubelle
sur roues, barrée d‘une croix), ce qui indique que le produit
se trouve soumis à la directive européenne 2012/19/
UE. Renseignez-vous sur les dispositions en vigueur dans
votre région concernant la collecte séparée des appareils
électriques et électroniques. Respectez-les et ne jetez pas
les appareils usagés avec les ordures ménagères. La mise
en rebut correcte du produit usagé permet de préserver
l’environnement et la santé. Le recyclage des matériaux
contribue à la préservation des ressources naturelles.
32
Page 33

Estimado cliente,
Le felicitamos por la adquisición de este producto. Lea
atentamente el siguiente manual y siga cuidadosamente las
instrucciones de uso con el n de evitar posibles daños. La
empresa no se responsabiliza de los daños ocasionados por
un uso indebido del producto o por haber desatendido las
indicaciones de seguridad.
ÍNDICE
Instrucciones de seguridad34
Vista general del equipo35
Apertura de la puerta36
Funcionamiento39
Limpieza y mantenimiento40
Búsqueda y resolución de problemas 41
Indicaciones sobre la retirada del aparato42
DATOS TÉCNICOS
ES
Número de artículo
Alimentación 220-240 V ~ 50/60 Hz
10032854, 10032855, 10032856.
10034548, 10034549
DECLARACIÓN DE CONFORMIDAD
Fabricante:
Chal-Tec GmbH, Wallstraße 16, 10179 Berlín, Alemania
Este producto cumple con las siguientes directivas
europeas:
2014/30/EU (EMV)
2014/35/EU (LVD)
2011/65/EU (RoHS)
643/2009/EG (ErP)
1060/2010/EU (ErP)
33
Page 34

ES
INDICACIONES DE SEGURIDAD
• Asegúrese de que el ventilador no se bloquee ni se cubra; de lo contrario, puede
calentar el aparato y desencadenar un incendio. No deposite pañuelos ni prendas
de ropa encima.
• Asegúrese de que la toma de corriente está bien instalada. Las tomas de corriente
sueltas pueden provocar el calentamiento y posterior avería del enchufe y cable.
• Mantenga el aparato lejos de materiales y objetos in amables para evitar
incendios y explosiones.
• No desmonte el aparato ni lo transforme.
• No limpie el aparato con agua.
• No voltee el aparato.
• No deje que el aparato caiga y evite exponerlo a vibraciones.
Notas especiales
• Los niños de entre 3 y 8 años pueden cargar y descargar refrigeradores.
• Cuando coloque la unidad, asegúrese de que el cable de alimentación no esté
pellizcado ni dañado.
• Asegúrese de que no haya varias tomas o fuentes de alimentación en la parte
posterior de la unidad.
Para evitar la contaminación de los alimentos, siga las siguientes instrucciones:
• Una apertura prolongada de la puerta puede provocar un aumento signi cativo
de la temperatura en los compartimentos del aparato.
• Limpie regularmente las super cies que puedan entrar en contacto con los
alimentos. Limpie el desagüe regularmente.
• Almacene la carne y el pescado crudos en recipientes adecuados en el
refrigerador para que la carne y el pescado no entren en contacto con otros
alimentos ni goteen sobre ellos.
34
ADVERTENCIA
Cuando utilice, repare y elimine la unidad, preste atención al símbolo
izquierdo en la parte posterior de la unidad o en el compresor. Este
símbolo advierte de posibles incendios. Hay sustancias in amables en las
líneas de refrigerante y en el compresor. Mantenga el aparato alejado de
fuentes de fuego durante su uso, mantenimiento y eliminación.
Page 35

Este aparato contiene el refrigerante isobutano (R600a), un gas natural con una
alta compatibilidad medioambiental pero inamable. Aunque es inamable,
no daña la capa de ozono y no aumenta el efecto invernadero. El uso de este
refrigerante resulta en un nivel de ruido ligeramente superior de la unidad. Además
del ruido del compresor, se puede oír el ujo del refrigerante. Esto es inevitable y no
tiene ningún efecto negativo en el rendimiento de la unidad. Tenga cuidado durante
el transporte para que el circuito de refrigeración no esté dañado. Las fugas del
refrigerante pueden irritar los ojos.
VISTA GENERAL DEL EQUIPO
compartimentos
de las puertas
Estante
Pies ajustables
ES
Termostato
35
Page 36

ES
APERTURA DE LA PUERTA
Usted necesita: Destornillador phillips, destornillador plano, llave de cabeza
hexagonal.
Informaciones importantes
• Asegúrese de que el dispositivo esté desenchufado y vacío.
• Para retirar la puerta, el dispositivo debe estar inclinado hacia atrás.
• Usted debe poner la unidad sobre una supercie rme para que no resbale al
inclinarla.
• Todas las piezas desmontadas deben ser guardadas para la reinstalación de la
puerta.
• No coloque la unidad en una posición horizontal, ya que esto puede dañar el
sistema de refrigeración.
• Es mejor si 2 personas mantienen el dispositivo durante la instalación.
Rotación de la puerta
1 2
36
Quitar la cubierta Aoje los tornillos y retire la suspensión.
Page 37

3 4
ES
Aoje la tapa de los tornillos del lado
izquierdo.
5.1 5.2
Desenrosque la suspensión inferior y retire la espiga. Gire la suspensión de 180° y
vuelva a colocar la espiga.
Mueva la cubierta del centro hacia
el lado derecho. Levante la puerta y
colóquela sobre
una supercie blanda para evitar que
se raye.
37
Page 38

ES
6 7
Monte la suspensión inferior y vuelva a
insertar ambos pies regulables.
8
Finalmente, coloque las tapas.
Vuelve a poner la puerta. Asegúrese de
que la puerta esté alineada horizontal
y verticalmente de tal forma que las
juntas estén cerradas por todos los lados.
Inserte la suspensión superior y apriétela
con un destornillador si es necesario.
38
Page 39

FUNCIONAMIENTO
• El aparato debe ser instalado lejos de fuentes de calor como radiadores, calderas
y luz solar directa.
• Asegúrese de que el aire pueda circular libremente por la parte trasera de la
carcasa.
• Para garantizar el mejor rendimiento, la distancia mínima entre la parte superior
de la unidad y un armario de pared debe ser de al menos 100 mm. Lo ideal, sin
embargo, es que el dispositivo no esté instalado debajo de un armario de pared.
• Nivele los pequeños irregularidades en el piso con los pies ajustables para que el
frigoríco quede recto.
Antes del primer uso
Antes de usar la unidad por primera vez, lave el interior y todos los accesorios
interiores con agua tibia y un poco de jabón neutro para eliminar el olor típico de un
producto nuevo. A continuación, seque bien el aparato.
Ajustar la temperatura
• Conecte su dispositivo. La temperatura
interna es controlada por un termostato.
Dependiendo del modelo, hay 6 (8) ajustes.
1 es el ajuste más caliente y 5 (7) es el ajuste
más frío. En cero, la nevera está apagada.
• Nota: Si hace mucho calor o si usted abre la
puerta con mucha frecuencia, es posible que
no pueda alcanzar el frío deseado.
ES
39
Page 40

ES
LIMPIEZA Y MANTENIMIENTO
Por razones higiénicas, el interior de la unidad, incluyendo los accesorios interiores,
debe ser limpiado regularmente.
ATENCIÓN
Peligro de lesiones! La unidad no debe estar conectada a la fuente de
alimentación durante la limpieza. Antes de la limpieza, apague el
aparato y desconecte el enchufe de la red o el interruptor principal.
Nunca limpie la unidad con una limpiadora a vapor. La humedad
puede acumularse en los componentes eléctricos y provocar una
descarga eléctrica! Los vapores calientes pueden dañar las piezas de
plástico. La unidad debe estar seca antes de volver a ponerla en
funcionamiento.
• No utilice aceites esenciales ni disolventes orgánicos para la limpieza. Estos
pueden atacar las piezas de plástico. Lo mismo ocurre con el zumo de limón o
el zumo de naranja, el ácido butírico y los productos de limpieza que contienen
ácido acético. No deje que estas sustancias entren en contacto con las piezas del
aparato.
• No utilice productos abrasivos.
• Limpie la unidad y los accesorios interiores con un paño y agua tibia. Después de
la limpieza, limpie las piezas con agua fresca y séquelas.
• La acumulación de polvo en el condensador aumenta el consumo de energía. Por
lo tanto, limpie cuidadosamente el condensador en la parte posterior de la unidad
una vez al año con un cepillo suave o una aspiradora.
• No vuelva a poner la unidad en funcionamiento hasta que todo esté seco.
40
Descongelación
El evaporador se cubre gradualmente con escarcha. Esto debe ser removido. Nunca
utilice herramientas metálicas a ladas para raspar la escarcha, ya que esto podría
dañar las super cies. Para descongelar, proceda de la siguiente manera:
• Desconecte el enchufe de la toma de corriente.
• Retire todos los alimentos, envuélvalos en varias capas de papel periódico y
guárdelos en un lugar fresco.
• Mantenga la puerta abierta y coloque un contenedor debajo de la unidad para
recoger la condensación.
• Seque bien el interior después de descongelar.
• Conecte el enchufe a la toma de corriente para volver a poner en marcha el
aparato.
Page 41

BÚSQUEDA Y RESOLUCIÓN DE PROBLEMAS
Problema Posible causa Solución de problemas
La unidad no funciona. El termostato está ajustado
a 0.
El enchufe no está
enchufado o suelto.
El fusible se apagó o se
rompió.
La comida está caliente. La temperatura no está
ajustada correctamente.
La puerta fue abierta
frecuentemente.
Una gran cantidad de
comida caliente fue
metida en el frigoríco.
La unidad está situada
al lado de una fuente de
calor.
La unidad refrigera
demasiado.
Ruidos extraños El dispositivo no está
La temperatura no está
ajustada correctamente.
nivelado.
La unidad toca una pared
u otro objeto.
Un componente del
aparato toca otra parte
del aparato.
Ajuste el termostato al
nivel deseado.
Conecte el enchufe
rmemente en la toma de
corriente.
Revise el fusible.
Ajuste la temperatura a un
nivel más frío.
Abra la puerta lo menos
posible.
Ajuste la temperatura a un
nivel más frío.
Mueva la unidad a un
lugar distinto.
Ajuste la temperatura a un
nivel menos frío.
Ajuste los pies
correctamente.
Asegúrese de que el
dispositivo esté en una
posición libre.
Si es posible, intente
girar ligeramente el
componente hacia otro
lado.
ES
41
Page 42

ES
INDICACIONES SOBRE LA RETIRADA DEL
APARATO
Si la gura de la izquierda (contenedor de basura con
ruedas tachado) se encuentra en el producto, se aplica la
Directiva Europea 2012/19/UE. Estos productos no deben
ser desechados junto con los residuos domésticos habituales.
Infórmese sobre la normativa local para la recogida selectiva
de aparatos eléctricos y electrónicos. Siga las regulaciones
locales y no deseche los electrodomésticos viejos junto con la
basura doméstica. Llévelo a un centro de recolección ocial
para su reciclaje. De esta forma, ayudará a proteger el medio
ambiente y la salud de los demás seres humanos de posibles
consecuencias negativas. El reciclaje de materiales ayuda a
reducir el consumo de materias primas.
42
Page 43

Gentile Cliente,
La ringraziamo per aver acquistato il dispositivo. La preghiamo
di leggere attentamente le seguenti istruzioni per l’uso e di
seguirle per evitare possibili danni tecnici. Non ci assumiamo
alcuna responsabilità per danni scaturiti da una mancata
osservazione delle avvertenze di sicurezza e da un uso
improprio del dispositivo.
INDICE
Avvertenze di sicurezza44
Descrizione del dispositivo45
Invertire il lato di apertura dello sportello46
Utilizzo49
Pulizia e manutenzione 50
Ricerca e risoluzione degli errori 51
Smaltimento52
DATI TECNICI
IT
Numero articolo
Alimentazione 220-240 V ~ 50/60 Hz
10032854, 10032855, 10032856.
10034548, 10034549
DICHIARAZIONE DI CONFORMITÀ
Produttore:
Chal-Tec GmbH, Wallstraße 16, 10179 Berlino, Germania.
Questo prodotto è conforme alle seguenti direttive
europee:
2014/30/UE (EMC)
2014/35/UE (LVD)
2011/65/UE (RoHS)
643/2009/CE (ErP)
1060/2010/UE (ErP)
43
Page 44

IT
AVVERTENZE DI SICUREZZA
• Assicurarsi che la ventola non sia bloccata o coperta per evitare che il dispositivo si
surriscaldi e prenda fuoco. Non coprire il dispositivo con asciugamani o indumenti.
• Assicurarsi che la presa non sia allentata. Una presa allentata può comportare il
surriscaldamento e il danneggiamento della spina e del cavo.
• Tenere il dispositivo lontano da materiali facilmente in ammabili per evitare il
pericolo di incendi ed esplosioni.
• Non smontare il dispositivo e non apportare modi che.
• Non risciacquare il dispositivo con acqua.
• Non capovolgere il dispositivo.
• Non far cadere il dispositivo e non scuoterlo.
Note speciali
• I bambini tra i 3 e gli 8 anni possono caricare e scaricare i frigoriferi.
• Quando si posiziona l‘unità, assicurarsi che il cavo di alimentazione non sia
schiacciato o danneggiato.
• Assicurarsi che non vi siano prese multiple o alimentatori sul retro dell‘unità.
Per evitare la contaminazione degli alimenti, seguire le seguenti istruzioni:
• Un‘apertura prolungata dello sportello può portare ad un signi cativo aumento
della temperatura nei vani dell‘apparecchio.
• Pulire regolarmente le super ci che possono venire a contatto con gli alimenti.
Pulire regolarmente lo scarico dell‘acqua.
• Se l‘apparecchio contiene un serbatoio dell‘acqua, pulirlo se non è stato utilizzato
per 48 ore. Sciacquare il serbatoio se non è stata rimossa l‘acqua per 5 giorni.
• Conservare la carne e il pesce crudo in appositi contenitori in frigorifero in modo
che la carne e il pesce non entrino in contatto con altri alimenti o non gocciolino su
altri alimenti.
44
AVVERTENZA
Durante l‘uso, la manutenzione e lo smaltimento dell‘unità, prestare
attenzione al simbolo a sinistra sul retro dell‘unità o sul compressore.
Questo simbolo avverte di possibili incendi. Ci sono sostanze
in ammabili nelle linee frigorifere e nel compressore. Tenere
l‘apparecchio lontano da fonti di incendio durante l‘uso, la
manutenzione e lo smaltimento.
Page 45

Questo dispositivo contiene il refrigerante isobutano (R600a), un gas naturale
ecocompatibile ma inammabile. Anche se è inammabile, non danneggia lo strato
di ozono e non aumenta l’effetto serra. Tenere presente che l’utilizzo di questo
refrigerante comporta rumori del dispositivo. Oltre al rumore del compressore si può
sentire anche il usso del liquido refrigerante. Ciò è inevitabile e non ha un effetto
negativo sulle prestazioni del dispositivo. Trasportare il dispositivo con cautela per
evitare di danneggiare il circuito di refrigerazione. Le perdite di liquido refrigerante
possono causare irritazioni agli occhi.
DESCRIZIONE DEL DISPOSITIVO
Vani
sportello
Ripiano
Piedi d’appoggio
regolabili
IT
Termostato
45
Page 46

IT
INVERTIRE IL LATO DI APERTURA DELLO
SPORTELLO
Sono necessari: cacciavite a croce, cacciavite a taglio, chiave a brugola.
Avvertenze importanti
• Assicurarsi che il dispositivo sia spento e vuoto.
• Per rimuovere lo sportello, il dispositivo deve essere inclinato all’indietro.
• Posizionare il dispositivo su un fondo solido, in modo che non scivoli quando viene
inclinato.
• Tutti i componenti rimossi devono essere conservati per poter rimontare lo sportello.
• Non poggiare il dispositivo di piatto, in quanto potrebbe venire danneggiato il
sistema refrigerante.
• Si consiglia di essere in 2 a tenere il frigorifero durante il montaggio.
Invertire il lato di apertura dello sportello
1 2
46
Rimuovere il coperchio. . Svitare le viti e rimuovere l’aggancio.
Page 47

3 4
IT
Svitare le viti della copertura sul lato
sinistro.
5.1 5.2
Svitare l’aggancio inferiore e rimuovere il perno. Ruotare l’aggancio di 180° e ssare
di nuovo il perno.
Spostare la copertura sul lato destro.
Sollevare lo sportello e poggiarlo su
una supercie morbida per evitare che
si graf.
47
Page 48

IT
6 7
Montare l’aggancio inferiore e inserire
entrambi i piedi d’appoggio.
8
Fissare inne le coperture.
Riposizionare lo sportello. Assicurarsi
che lo spor-tello sia ben posizionato
in verticale e in orizzonta-le e che le
guarnizioni siano chiuse su tutti i lati.
Posizionare l’aggancio superiore e
avvitarlo con un cacciavite secondo
necessità.
48
Page 49

UTILIZZO
• Il dispositivo deve essere posizionato lontano da fonti di calore, come caloriferi,
caldaie e irradiazione solare diretta.
• Assicurarsi che vi sia libera circolazione d’aria sul retro del dispositivo.
• Per garantire le migliori prestazioni, la distanza minima tra il lato superiore del
dispositivo e un mobile pensile deve essere di 100 mm. Idealmente, tuttavia, il
dispositivo non viene posizionato sotto a un mobile pensile.
• Regolare i piedi d’appoggio secondo necessità per fare in modo che il dispositivo
sia diritto.
Prima del primo utilizzo
Prima di iniziare a utilizzare il dispositivo, lavare il vano interno e tutti gli accessori
interni con acqua tiepida e sapone neutro, per eliminare il tipico odore dei prodotti
nuovi. Procedere poi ad asciugare per bene il dispositivo.
Impostare la temperatura
• Collegare il dispositivo. La temperatura
interna viene regolata da un termostato. In
base al modello ci sono 6 (8) regolazioni.
1 è la regolazione più calda e 5 (7) è la più
fredda. Su 0 il frigorifero è spento.
• Avvertenza: se fa particolarmente
caldo o se lo sportello viene aperto di
frequente, può capitare che la temperatura
di raffreddamento desiderata non venga
raggiunta.
IT
49
Page 50

IT
PULIZIA E MANUTENZIONE
Pulire regolarmente il vano interno e gli accessori per motivi igienici.
ATTENZIONE
Pericolo di lesione! Il dispositivo non deve essere collegato alla rete
elettrica durante la pulizia. Spegnere il dispositivo e staccare la spina o
spegnere l’interruttore principale prima di eseguire la pulizia. Non
pulire mai il dispositivo con un pulitore a vapore. L’umidità può
accumularsi in componenti elettrici e causare folgorazioni! I vapori
bollenti possono danneggiare i componenti in plastica. Il dispositivo
deve essere asciutto prima di rimetterlo in funzione.
• Non utilizzare oli eterici o solventi organici per la pulizia, in quanto possono
intaccare i componenti in plastica. Lo stesso vale per succo di limone, il succo di
scorza d’arancia, acido butirrico o detergenti che contengono acidi acetici. Non
lasciare che tali sostanze entrino in contatto con i componenti del dispositivo.
• Non utilizzare prodotti abrasivi.
• Pulire il dispositivo e gli accessori interni con un panno e acqua tiepida. Sciacquare
con acqua fresca dopo la pulizia e asciugare.
• Gli accumuli di polvere sul condensatore incrementano il consumo energetico.
Pulire per bene il condensatore sul retro una volta all’anno con una spazzola
morbida o un aspirapolvere.
• Rimettere in funzione il dispositivo solo quando è tutto asciutto.
Sbrinare
50
L’evaporatore verrà progressivamente coperto dal ghiaccio. Questo deve essere
rimosso. Non utilizzare utensili metallici af lati per grattare via il ghiaccio, altrimenti
la super cie potrebbe venire danneggiata. Procedere come segue per sbrinare il
dispositivo:
• Staccare la spina.
• Rimuovere tutti gli alimenti, avvolgerli in diversi strati di carta di giornale e porli in
un luogo fresco.
• Tenere lo sportello aperto e posizionare un contenitore sotto al dispositivo per
raccogliere l’acqua di sbrinamento.
• Asciugare per bene il vano interno dopo lo sbrinamento.
• Ricollegare la spina per riprendere il funzionamento.
Page 51

RICERCA E RISOLUZIONE DEGLI ERRORI
Problema Possibile causa Soluzioni
Il dispositivo non funziona. Il termostato è su 0. Posizionare il termostato
sul li-vello desiderato.
La spina non è inserita
bene nel-la presa o è
staccata.
Il fusibile è fuori posizione
o gua-sto.
Gli alimenti sono caldi. La temperatura non è
impostata correttamente.
Lo sportello è stato aperto
di frequente.
Sono stati messi nel
frigorifero numerosi
alimenti caldi.
Il dispositivo è vicino a
una fonte di calore.
Il dispositivo raffredda
troppo.
Rumori insoliti. Il dispositivo non è diritto. Regolare i piedi
La temperatura non è
impostata correttamente.
Il dispositivo è in contatto
con una parete o un altro
oggetto.
Un componente del
dispositivo è in contatto
con un altro com-ponente.
Collegare bene la spina.
Controllare il fusibile.
Impostare la temperatura
su un livello più freddo.
Aprire lo sportello il meno
possi-bile.
Abbassare la temperatura.
Spostare il dispositivo.
Impostare la temperatura
su un livello meno freddo.
d’appoggio.
Assicurarsi che il
dispositivo non sia in
contatto con nulla.
Se possibile cercare di
distanzia-re i componenti
leggermente.
IT
51
Page 52

IT
SMALTIMENTO
Se sul prodotto è presente la gura a sinistra (il bidone dei
riuti con le ruote), si applica la direttiva europea 2012/19/
UE. Questi prodotti non possono essere smaltiti con i riuti
normali. Informarsi sulle disposizioni vigenti per la raccolta
di dispositivi elettrici ed elettronici. Attenersi alle disposizioni
vigenti e non smaltire i vecchi dispositivi con i riuti domestici.
Grazie al corretto smaltimento dei vecchi dispositivi si tutela
il pianeta e la salute delle persone da possibili conseguenze
negative. Il riciclo di materiali aiuta a diminuire il consumo di
materie prime
52
Page 53

Page 54

 Loading...