

Page 1

Luminance Prime
Mikrowelle
Microwave
Microondas
Micro-onde
Microonde
10012351
Page 2

Page 3
Sehr geehrter Kunde,
wir gratulieren Ihnen zum Erwerb Ihres Gerätes. Lesen Sie
die folgenden Hinweise sorgfältig durch und befolgen Sie
diese, um möglichen Schäden vorzubeugen. Für Schäden,
die durch Missachtung der Hinweise und unsachgemäßen
Gebrauch entstehen, übernehmen wir keine Haftung. Scannen
Sie den folgenden QR-Code, um Zugriff auf die aktuellste
Bedienungsanleitung und weitere Informationen rund um das
Produkt zu erhalten:
INHALTSVERZEICHNIS
DE
Technische Daten3
Konformitätserklärung3
Sicherheitshinweise4
Geräteübersicht6
Hinweise zum Kochgeschirr7
Bedienung8
Auto Cook Modus11
Reinigung und Pege12
Hinweise zur Entsorgung13
TECHNISCHE DATEN
Artikelnummer 10012351
Stromversorgung 230-240 V ~ 50 Hz
KONFORMITÄTSERKLÄRUNG
Hersteller:
Chal-Tec GmbH, Wallstraße 16, 10179 Berlin, Deutschland.
Dieses Produkt entspricht den folgenden Europäischen
Richtlinien:
2014/30/EU (EMV)
2014/35/EU (LVD)
2011/65/EU (RoHS)
English 15
Español 27
Français 39
Italiano 51
3
Page 4

DE
SICHERHEITSHINWEISE
Lesen Sie sich alle Hinweise sorgfältig durch und bewahren Sie die Bedienungsanleitung
zum Nachschlagen gut auf. Um die Gefahr eines Stromschlags bei einer Störung oder
Fehlfunktion zu verringern, muss das Gerät an eine geerdete Steckdose angeschlossen
werden. Schließen Sie das Gerät nur an Steckdosen an, die der angegeben Spannung
des Geräts entsprechen.
Um die Gefahr von Bränden im Garraum zu reduzieren:
• Überhitzen Sie das Essen nicht.
• Entfernen Sie Metallverschlüsse und Klammern von Papier- oder Plastiktüten, bevor
Sie sie in Mikrowelle legen.
• Erhitzen Sie kein Öl oder Frittierfett in der Mikrowelle, da sich die Temperatur nur
schwer kontrollieren lässt.
• Reinigen Sie die Mikrowelle nach jeder Benutzung mit einem feuchten Lappen und
wischen Sie mit einem trockenen Lappen nach, um Schmutz und Fettspritzer zu
entfernen. Angesammelte Schmutzreste könnten sich überhitzen und entzünden.
• Sollten sich Materialien in der Mikrowelle entzünden oder rauchen, lassen Sie die
Mikrowellentür geschlossen, schalten Sie das Gerät aus und entfernen Sie den
Stecker.
• Wenn Sie Essen in Plastikbehältern erhitzen, lassen Sie es nicht aus den Augen, falls
sich das Essen entzündet.
Um die Explosionen oder nachträglichem Sieden vorzubeugen:
• Erhitzen Sie Flüssigkeiten nicht in verschlossenen Behältern, da diese zur Explosion
neigen. Dazu zählen auch Babyäschchen mit einem Schaubverschluss.
• Benutzen Sie zum Kochen Gefäße mit einer weiten Öffnung und entfernen Sie
heiße Flüssigkeiten nicht sofort. Warten sie etwas, bis Sie sie aus der Mikrowelle
entnehmen, damit Sie sich nicht an nachträglich siedenden Flüssigkeiten verbrühen.
• Kartoffeln, Würstchen und Maronen sollten vor dem Erhitzen geschält oder
eingeschnitten werden. Rohe und hartgekochte Eier in der Schale dürfen nicht in
der Mikrowelle gegart werden, da Sie selbst nach dem Erhitzen noch explodieren
können.
• Mischen Sie den Inhalt von Babyäschchen und Gläsern mit Babybrei gut durch
und überprüfen Sie vor dem Füttern die Temperatur, um Verbrennungen zu
vermeiden.
• Falls das Netzkabel beschädigt ist, muss es vom Hersteller, einem autorisierten
Fachbetrieb oder einer ähnlich qualizierten Person ersetzt werden.
• Nach dem Kochen ist der verwendete Behälter sehr heiß. Benutzen Sie
Ofenhandschuhe, wenn Sie ihn entnehmen, damit Sie sich nicht an austretendem
Wasserdampf verbrühen.
• Öffnen Sie Deckel von Essen und Popcorntüten auf der von ihnen abgewandten
Seite, damit sie sich nicht ihr Gesicht verbrennen.
4
Page 5

Um den Drehteller vor Glasbruch zu schützen:
• Lassen Sie den Drehteller abkühlen, bevor Sie ihn reinigen.
• Stellen Sie kein heißes Essen oder heiße Behälter auf den kalten Drehteller.
• Stellen Sie kein gefrorenes Essen oder gefrorene Behälter auf den heißen Drehteller.
Allgemeine Sicherheitshinweise
• Achten Sie darauf, dass das Kochgeschirr die Wände der Mikrowelle nicht berührt.
• Benutzen Sie nur Behälter, die mikrowellentauglich sind.
• Verstauen Sie kein Essen oder andere Dinge in der Mikrowelle.
• Benutzen Sie die Mikrowelle nicht ohne Inhalt, andernfalls könnte sie Schaden
nehmen.
• Wenn Sie die Mikrowelle benutzen, lassen Sie sie in Anwesenheit von Kindern nicht
unbeaufsichtigt.
• Benutzen Sie nur vom Hersteller angegebene Zubehörteile.
• Benutzen Sie die Mikrowelle nur in Innenräumen.
• Wenn die Tür oder die Dichtungen beschädigt sind, benutzen Sie die Mikrowelle
nicht weiter, sondern lassen Sie sie von einem Fachbetrieb reparieren.
• Versuchen Sie nicht das Gerät selbst zu reparieren. Reparaturen dürfen nur von
geschulten Fachkräften durchgeführt werden.
• Falls Rauch entsteht, ziehen Sie den Stecker und halten Sie die Tür der Mikrowelle
geschlossen, um mögliche Flammen zu ersticken.
• Das Erhitzen von Flüssigkeiten kann zu plötzlichem Sieden führen. Passen Sie auf,
wenn Sie den Behälter entnehmen.
• Benutzen Sie zur Reinigung der Tür keine Scheuermittel oder Metallschaber, damit
Sie das Glas nicht zerkratzen oder zersplittern.
• Benutzen Sie das Gerät nicht mit einem externen Timer oder einer ferngesteuerten
Steckdose.
• Das Gerät ist nicht für den kommerziellen Gebrauch, sondern nur für den Gebrauch
im Haushalt und in ähnlichen Umgebungen vorgesehen.
• Das Gerät dient dazu, Essen und Getränke zu erhitzen. Das Erwärmen von
Kleidung, Hausschuhen, Wärmekissen und Schwämmen kann zu Verletzungen,
Bränden oder Feuer führen.
• Kinder, psychisch und körperlich eingeschränkte Menschen sollten das Gerät nur
benutzen, wenn sie vorher von einer Aufsichtsperson ausführlich mit den Funktionen
und den Sicherheitsvorkehrungen vertraut gemacht wurden. Achten Sie darauf,
dass Kinder nicht mit dem Gerät spielen.
• Verwenden Sie zur Reinigung keinen Dampfstrahler.
• Fassen Sie Geräteteile, Tür und Heizelemente im Inneren während des Betriebs
nicht an, sie können sehr heiß werden.
DE
5
Page 6

DE
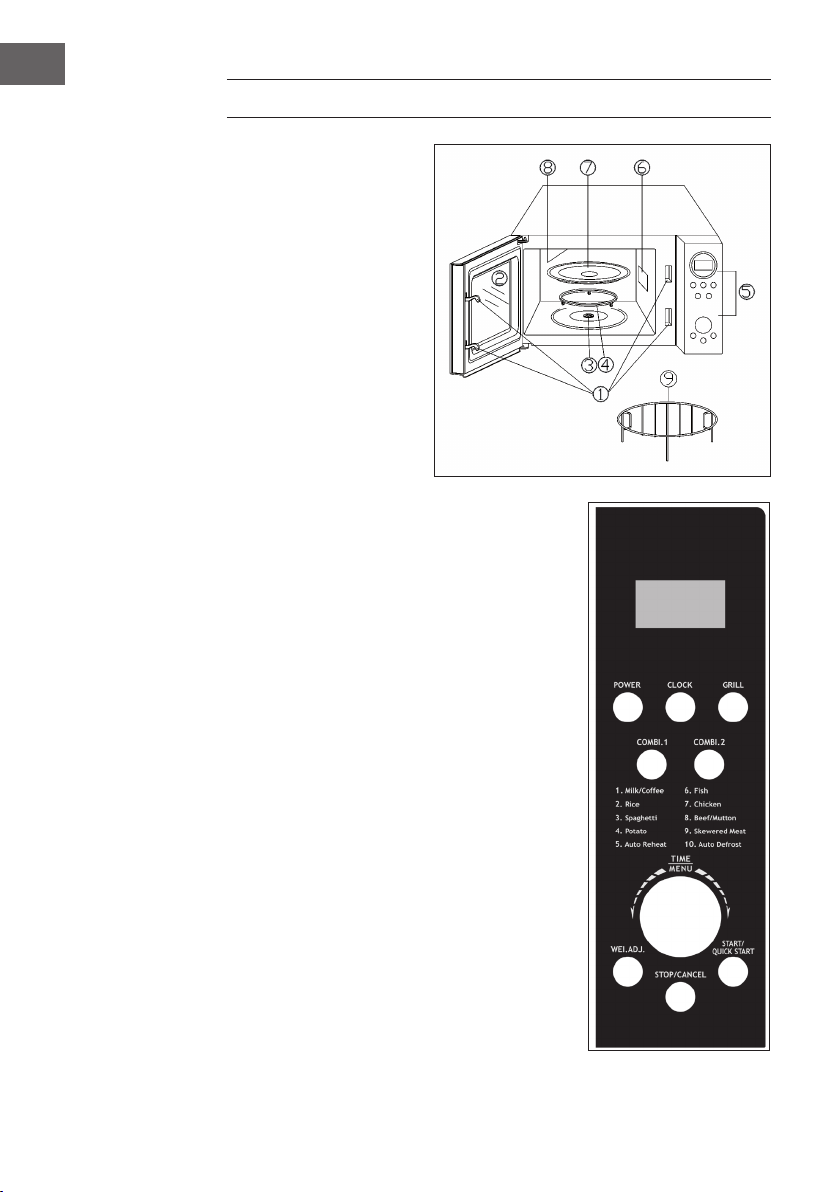
GERÄTEÜBERSICHT
Mikrowelle
1 Türverriegelung
2 Fenster
3 Antrieb
4 Drehring
5 Bedienfeld
6 Wellenleiter
7 Glasteller
8 Grillheizung
9 Grillrost
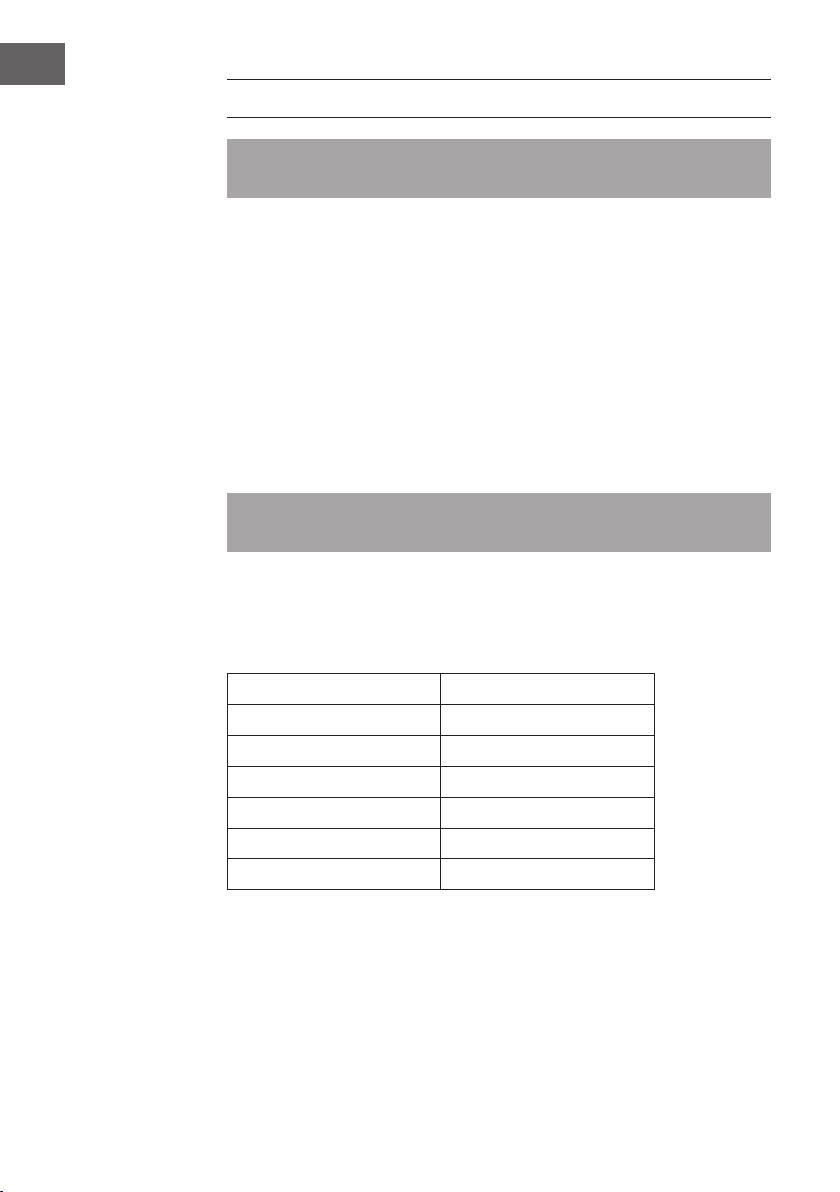
Bedienfeld
• Display: Menü- und Betriebsanzeige. Garzeit,
Leistung, Betrieb, und Uhrzeit werden angezeigt.
• Power: Die gewünschte Leistung der Mikrowelle
einstellen.
• Clock: Einstellung der Uhr. Zum Beenden
abermals drücken.
• Wei.Adj.: Nach der Wahl eines Auto-Programms
können Sie hier das Gewicht der Speisen oder die
Anzahl der Portionen angeben.
• Grill: Grill-Programm einstellen.
• Combi.1/Combi.2: Garen mit der Kombination
aus Grill und Mikrowelle.
• Menu/Time: Garzeit und Uhrzeit einstellen.
Drehen Sie den Regler um ein Automatik-
Programm auszuwählen.
• Start/Quick Start: Gar-Programm starten.
Drücken Sie die Taste einige Male, um die GarZeit einzustellen und das Erhitzen auf höchster
Leistung zu beginnen.
• Stop/Cancel: Programm abbrechen und
Einstellungen vor dem Start des Garens
zurücksetzen. 1Mal drücken pausiert das Garen.
2Mal drücken bricht den Gar-Vorgang ab. Die
Taste wird auch zum Einstellen der Uhr verwendet.
6
Page 7
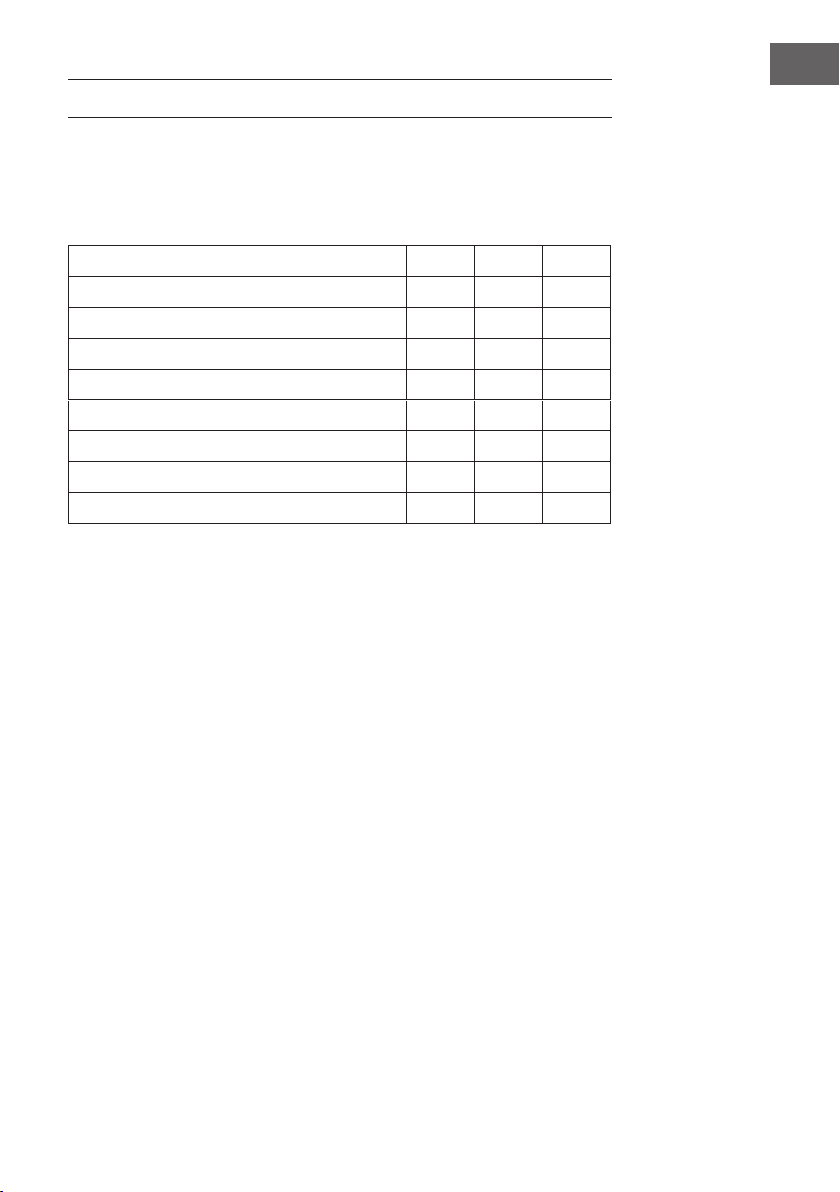
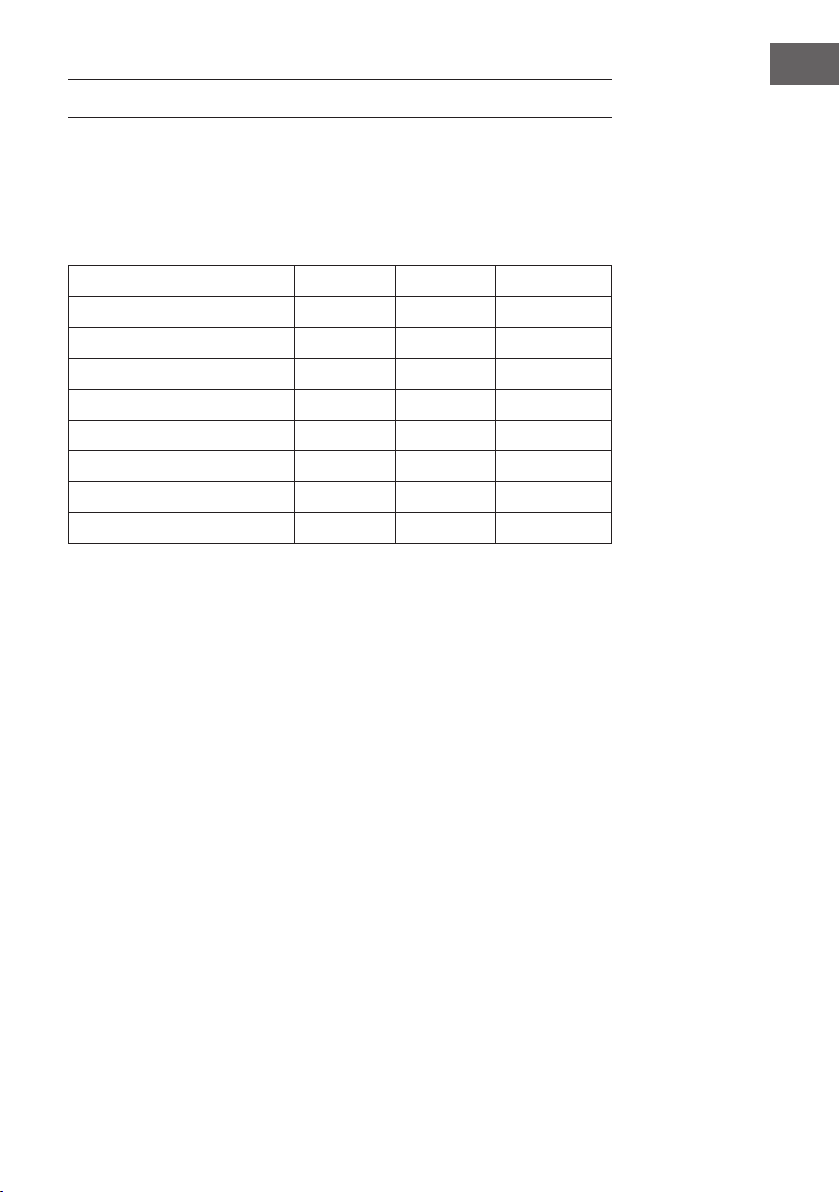
HINWEISE ZUM KOCHGESCHIRR
Wir raten Ihnen, nur Behälter zu benutzen, die für die Mikrowelle geeignet sind.
Dazu zählen Behälter aus hitzebeständiger Keramik, Glas und mikrowellentaugliche
Plastikbehälter. Benutzen Sie zum Garen und Grillen keine Metallbehälter, da sie
Funken schlagen können. Halten Sie sich beim Geschirr an die folgende Tabelle.
Material Mikro Grill Kombi
Hitzebeständiges Glas Ja Ja Ja
Nicht hitzebeständiges Glas Nein Nein Nein
Hitzebeständige Keramik Ja Ja Ja
Hitzebeständiges Plastik Ja Nein Nein
Küchenpapier Ja Nein Nein
Metallbehälter Ja Nein Nein
Grillrost Nein Ja Nein
Aluminiumfolie und Folienbehälter Nein Ja Nein
DE
7
Page 8
DE
BEDIENUNG
Hinweis: Jedes Mal wenn ein Knopf gedrückt wird, ertönt ein Piep-Ton um die
Eingabe zu bestätigen.
Die Uhr einstellen
Die Uhrzeit wird entweder im 12- oder 24-Stunden-Modus angezeigt. Drücken Sie zur
Auswahl einfach die CLOCK-Taste.
Um die Uhr beispielsweise auf 8:30 zu stellen, müssen sie folgende Schritte ausführen:
1 Drücken Sie im Standby-Modus die CLOCK-Taste ein oder zwei Mal, um den 12-
oder 24-Stunden-Modus auszuwählen.
2 Drehen Sie den MENU/TIME-Regler, um die Zeit auf 8 Uhr zu stellen.
3 Drücken die CLOCK-Taste.
4 Drehen sie den MENU/TIME-Regler, um die Minutenzahl auf 30 zu stellen.
5 Drücken Sie die CLOCK-Taste, um die Einstellungen zu bestätigen.
Hinweis: Sie können die Uhrzeit auch während des Garens einsehen, indem Sie die
CLOCK-Taste drücken.
Garen mit der Mikrowelle
Die längste einstellbare Garzeit beträgt bei der Mikrowelle 60 Minuten. Sie können die
Leistung einstellen, indem Sie den POWER LEVEL-Knopf drücken.
Power Level drücken Mikrowellen-Leistung
1 Mal 100%
2 Mal 80%
3 Mal 60%
4 Mal 40%
5 Mal 20%
6 Mal 0%
8
Page 9

Um beispielsweise eine Minute bei 60% Mikrowellen-Leistung zu garen, müssen Sie
folgende Schritte ausführen:
1 Drücken Sie im Standby-Modus wiederholt die POWER LEVEL-Taste, um die
Mikrowellen-Leistung auszuwählen.
2 Drehen Sie den MENU/TIME-Regler auf 1:00.
3 Drücken Sie die START/QUICK START-Taste.
Hinweis: Sie können die eingestellte Mikrowellen-Leistung während des Garens
überprüfen indem Sie die POWER LEVEL-Taste drücken.
Grill
Die längste einstellbare Garzeit beträgt beim Grill 60 Minuten. Der Grill ist besonders
zum Garen dünner Fleischscheiben, Steaks, Buletten, Würstchen und Huhn geeignet.
Auch für heiße Sandwiches und Gratins bietet er sich an. Um beispielsweise 12 Minuten
lang zu grillen, müssen Sie folgende Schritte ausführen:
1 Drücken Sie im Standby-Modus die GRILL-Taste.
2 Drehen Sie den MENU/TIME-Regler auf 12:00.
3 Drücken Sie die START/QUICK START-Taste.
Kombination 1
Die längste einstellbare Garzeit beträgt 60 Minuten. 30% der Zeit wird mit Mikrowellen
gegart. 70% der Zeit per Grill. Dieser Modus ist beispielsweise für Fisch und für Gratins
geeignet. Um die Kombination 1 beispielsweise 25 Minuten lang zu nutzen, müssen Sie
folgende Schritte ausführen:
DE
1 Drücken Sie im Standby-Modus die COMBI.1-Taste.
2 Drehen Sie den MENU/TIME-Regler auf 25:00.
3 Drücken Sie die START/QUICK START-Taste.
Kombination 2
Die längste einstellbare Garzeit beträgt 60 Minuten. 55% der Zeit wird mit Mikrowellen
gegart. 45% der Zeit per Grill. Dieser Modus ist beispielsweise für Omeletts,
gebackene Kartoffeln und Geügel geeignet.
1 Drücken Sie im Standby-Modus COMBI.2-Taste.
2 Drehen Sie den MENU/TIME-Regler auf 12:00.
3 Drücken Sie die START/QUICK START-Taste.
9
Page 10

DE
Quick Start
Der Ofen wird beim Quick Start auf 100% der Leistung betrieben. Die längste Garzeit
beträgt 10 Minuten. Drücken Sie im Standby-Modus die START/QUICK START-Taste
einige Male, um die Garzeit einzustellen. Der Ofen startet automatisch bei voller
Leistung.
Auftauen
Der Ofen kann zum Auftauen von Speisen verwendet werden. Die Auftau-Dauer und
die Leistungsstufe werden automatisch anhand der angegebenen Speise-Sorte und des
Gewichts eingestellt. Das Gewicht der aufzutauenden Speisen kann zwischen 100g
und 1800g betragen. Um beispielsweise 600g Shrimps aufzutauen, müssen Sie
folgende Schritte ausführen:
1 Drehen Sie im Standby-Modus den MENU/TIME-Regler gegen den Uhrzeigersinn
auf „10“.
2 Drücken Sie die WEIGHT ADJUST-Taste wiederholt, bis 600g eingestellt sind.
3 Drücken Sie die START/QUICK START-Taste.
Hinweis: Das Gerät wird den Betrieb pausieren und einen Signal-Ton von sich
geben, um Sie daran zu erinnern, die Speisen zu wenden.
Kindersicherung
Die Kindersicherung verhindert eine unbeaufsichtigte Bedienung durch Kinder.
• So aktivieren Sie die Kindersicherung: Im Standby-Modus wechselt der Ofen
ohne Bedienung innerhalb von einer Minute in den Kindersicherungsmodus. Im
verriegelten Zustand kann der Ofen nicht betrieben werden.
• So deaktivieren Sie die Kindersicherung: Durch Öffnen oder Schließen der Ofentür
kann der Kindersicherungsmodus abgebrochen werden.
10
Page 11
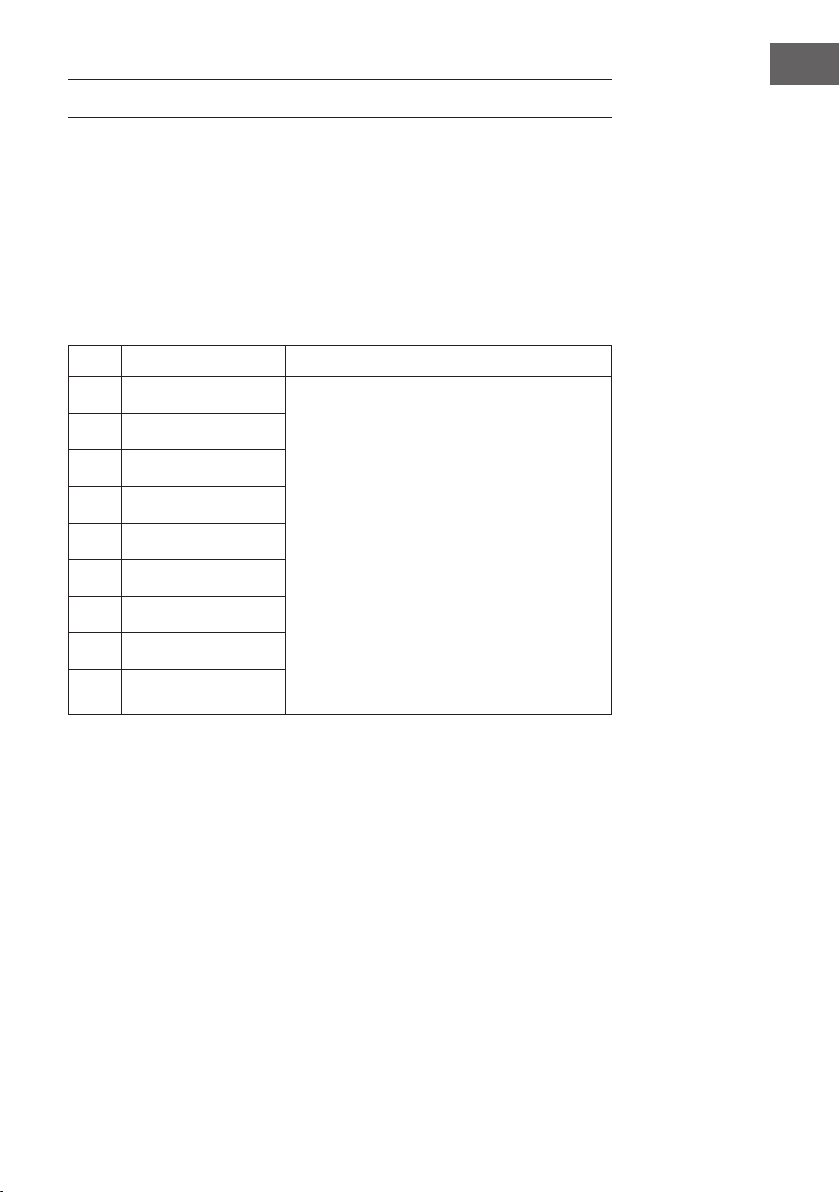
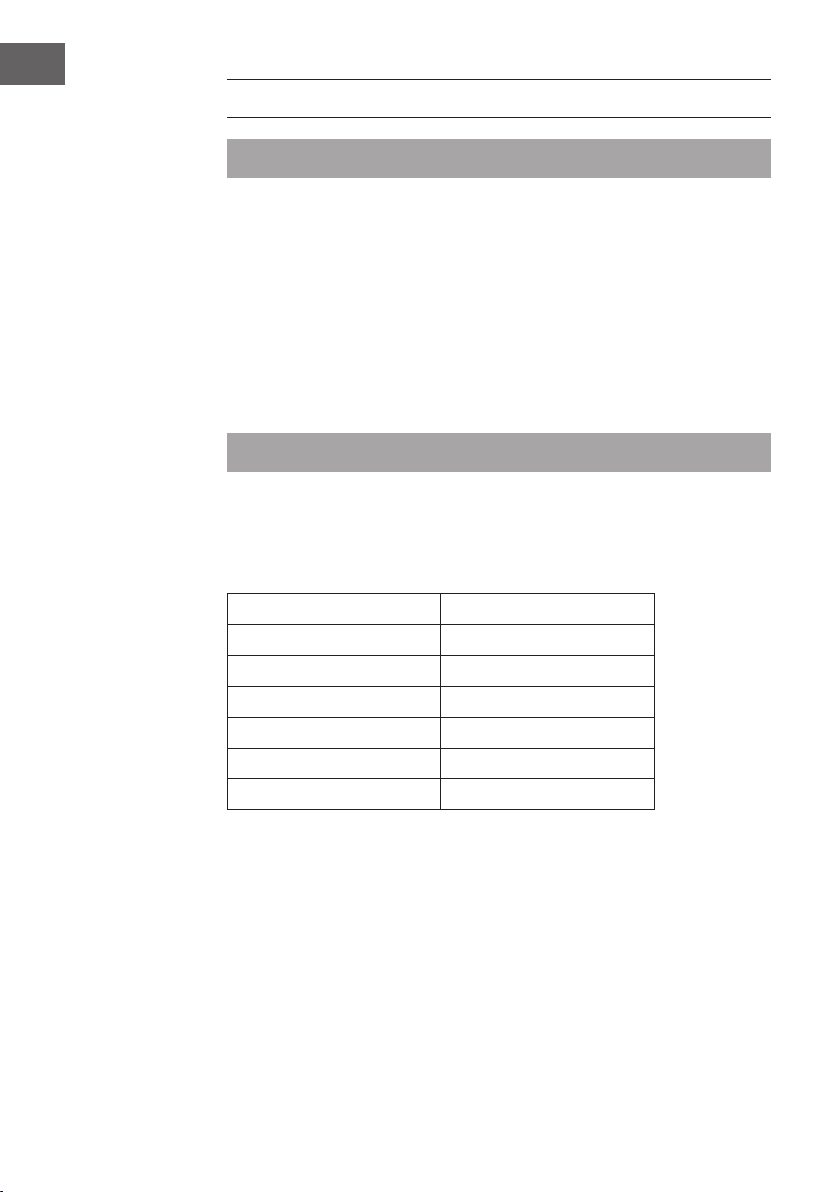
AUTO COOK MODUS
Für die folgenden Speisen brauchen Sie keine Leistungsstufe oder Garzeit einzustellen.
Konzentrieren Sie sich ganz darauf, was sie erhitzen möchten und geben Sie an, wie
viel die Speisen wiegen.
1 Drehen Sie im Standby-Modus den MENU/TIME-Regler gegen den Uhrzeigersinn,
um die der Speise entsprechende Nummer einzugeben.
2 Drücken Sie die WEIGHT ADJUST-Taste einige Male, um das Gewicht oder die
Anzahl der Portionen anzugeben.
3 Drücken Sie die START/QUICK START-Taste.
Code Programm Hinweise
1 Milch/Kaffee (200 ml)
2 Reis (g)
3 Spaghetti (g)
4 Kartoffeln (jeweils 230g)
5 Wiedererhitzen (g)
6 Fisch (g)
7 Hähnchen (g)
8 Fleisch, Rind, Hammel (g)
9 Fleischspieße (g)
1 Das Ergebnis des automatischen Kochens
hängt von Faktoren wie der Form und Größe
des Essen ab. Ebenso von Ihren persönlichen
Vorlieben beim Garpunkt und sogar von der
gelungenen Platzierung der Speisen im Ofen.
Falls Sie mit dem Ergebnis nicht zufrieden sein
sollten, passen Sie die Garzeit etwas an.
2 Bei Milch/Kaffee und Kartoffeln wird nicht
das Gewicht auf dem Display angezeigt,
sondern die Anzahl der Tassen bzw. die
Stückzahl.
3 Bei Rind-, Hammel-, oder Hähncheneisch
pausiert der Ofen den Garprozess und
erinnert Sie mit einem Piep-Ton daran, die
Speisen für ein gleichmäßiges Garen zu
wenden.
DE
11
Page 12

DE
REINIGUNG UND PFLEGE
Reinigen Sie das Gerät regelmäßig und entfernen Sie alle Essensrückstände.
• Ziehen Sie vor der Reinigung immer den Stecker aus der Steckdose.
• Tauchen Sie das Gerät nie komplett in Wasser oder andere Flüssigkeiten.
• Unregelmäßiges Reinigen führt zu Verschleiß und einer verkürzter Lebensdauer des
Geräts.
• Benutzen Sie zur Reinigung keine scharfen Reiniger, Benzin, Scheuerpulver oder
Metallschwämme.
• Entfernen Sie niemals die Abdeckung.
So beseitigen Sie unangenehme Gerüche
Wenn Sie das Gerät eine Weile benutzt haben, kann es zu unangenehmen Gerüchen
kommen. Mit den folgenden 3 Methoden lassen sich unangenehme Gerüche beseitigen:
1 Scheiden Sie eine Zitrone in Stücke und erhitzen Sie die Stücke in einer Tasse
2-3Minuten lang auf höchster Stufe in der Mikrowelle.
2 Stellen Sie eine Tasse roten Tee in die Mikrowelle und erhitzen Sie sie auf höchster
Stufe.
3 Stellen Sie Orangenschalen in die Mikrowelle und erhitzen Sie sie 1 Minute lang
auf höchster Stufe.
Außenseite:
Wischen Sie die Außenseite mit einem weichen, feuchten Lappen ab.
Tür und Dichtung:
Wischen Sie Tür, Fenster, Dichtung und alle angrenzenden Teile mit einem weichen,
feuchten Lappen ab, um Spritzer und Flecken zu entfernen.
Funktionstasten:
Reinigen Sie die Funktionstasten mit einem leicht feuchten Lappen.
Innenwände:
Reinigen Sie den Innenraum mit einem weichen, feuchten Lappen. Wischen Sie auch die
Abdeckung für den Wellenleiter ab, um Essensspritzer zu entfernen.
Drehteller, Drehring und Drehachse:
Waschen Sie die Teile mit Wasser und einem milden Reinigungsmittel ab und lassen Sie
sie vollständig trocknen.
12
Page 13

HINWEISE ZUR ENTSORGUNG
Bendet sich die linke Abbildung (durchgestrichene Mülltonne
auf Rädern) auf dem Produkt, gilt die Europäische Richtlinie
2012/19/EU. Diese Produkte dürfen nicht mit dem normalen
Hausmüll entsorgt werden. Informieren Sie sich über die
örtlichen Regelungen zur getrennten Sammlung elektrischer
und elektronischer Gerätschaften. Richten Sie sich nach
den örtlichen Regelungen und entsorgen Sie Altgeräte nicht
über den Hausmüll. Durch die regelkonforme Entsorgung
der Altgeräte werden Umwelt und die Gesundheit Ihrer
Mitmenschen vor möglichen negativen Konsequenzen
geschützt. Materialrecycling hilft, den Verbrauch von
Rohstoffen zu verringern.
DE
13
Page 14

Page 15
Dear Customer,
Congratulations on purchasing this equipment. Please read
this manual carefully and take care of the following hints to
avoid damages. Any failure caused by ignoring the items and
cautions mentioned in the instruction manual is not covered
by our warranty and any liability. Scan the QR code to get
access to the latest user manual and other information about
the product:
CONTENT
Technical data15
Declaration of conformity15
Safety instructions16
Product description18
Utensils guideline19
Operation20
Auto cook mode23
Care and cleaning24
Hints on disposal25
TECHNICAL DATA
Item number 10012351
Power supply 230-240 V ~ 50 Hz
EN
DECLARATION OF CONFORMITY
Producer:
Chal-Tec GmbH, Wallstraße 16, 10179 Berlin, Germany.
This product is conform to the following European
Directives:
2014/30/EU (EMC)
2014/35/EU (LVD)
2011/65/EU (RoHS)
15
Page 16

EN
SAFETY INSTRUCTIONS
Read all the safety and operating instructions carefully and retain them for future
reference. Make sure the voltage in your living area corresponding to the one shown on
the rating label of the appliance. And the wall socket is properly grounded.
To reduce the risk of re in the oven cavity:
• Do not overcook the food.
• Remove wire twist ties from paper or plastic bags before placing bags in the oven.
• Do not heat oil or fat for deep drying as the temperature of oil cannot be controlled.
• After use wipe the waveguide cover with a damp cloth, followed by dry cloth to
remove any food splashes and grease.
• Built up grease may overheat and begin to cause smoke or catch re.
• If materials inside the oven should smoke or ignite, keep oven door closed, turn
oven off and disconnect the power supply.
• When heating food in plastic or paper containers, keep an eye on the oven due to
the possibility of ignition.
To reduce the risk of explosion and sudden boiling:
• Liquids and other foods must not be heated in sealed container since they are liable
to explode; Baby bottles tted with a screw cap or teat are considered to be sealed
containers.
• Use the wide mouthed container to cook liquid, and the cooked liquid should not
be removed out immediately. Several moments should be waited before removing.
In order to avoid possible hazards caused by delayed eruptive boiling of liquids.
• Potatoes, sausage and chestnut should be peeled or pierced before cooking. Eggs
in their shell, whole hard boiled eggs should not be heated in microwave ovens
since they may explode, even after microwave heating has ended.
• The contents of feeding bottles and baby food jars are to be stirred or shaken and
the temperature is to be checked before consumption, in order to avoid burns.
• If the supply cord is damaged, it must be replaced by the manufacturer or its service
agent or a qualied technician in order to avoid a shock hazard.
• After cooking, the container is very hot. Using gloves to take out the food and avoid
steam burns by directing steam away from the face and hands.
• Slowly lift the furthest edge of dishes cover and microwave plastic wrap and
carefully open popcorn and oven cooking bags away from the face.
16
Page 17

To prevent the turntable from breaking:
• Let the turntable cool down before cleaning.
• Do not place hot foods or utensils on the cold turntable.
• Do not place frozen foods or utensils on the hot turntable.
General Instructions
• Make sure the utensils do not touch the interior walls during cooking. Only use
utensils that are suitable for use in microwave ovens. Do not store food or any other
things inside the oven.
• Do not operate the oven without any liquid or food inside the oven. This would do
damage the oven.
• When the appliance is operated in the combination mode, children should only use
the oven under adult supervision due to the temperatures generated.
• Any accessories not recommended by the manufacturer may cause injuries to
persons.
• Do not use outdoors.
• If the door or door seals are damaged or the oven is malfunctioned, the oven must
not be operated until it has been repaired by a competent person;
• It is hazardous for anyone other than a competent person to carry out any service or
repair operation that involves the removal of a cover which gives protection against
exposure to microwave energy.
• If smoke is emitted, switch off or unplug the appliance and keep the door closed in
order to stie any ames.
• Microwave heating of beverages can result in delayed eruptive boiling; therefore
care must be taken when handling the container.
• Do not use harsh abrasive cleaners or sharp metal scrapers to clean the oven door
glass since they can scratch the surface, which may result in shattering of the glass.
• The appliances are not intended to be operated by means of an external timer or
separate remote control system.
• This appliance is intended to be used in household and similar applications, such
as: Staff kitchen areas in shops, ofces and other working environments; Farm
houses; By clients in hotels, motels and other residential environments; Bed and
breakfast type environments.
• The microwave oven is intended for heating food and beverages. Drying of food or
clothing and heating of warming pads, slippers, sponges, damp cloth and similar may
lead to risk of injury, ignition or re.
• This appliance can be used by children aged from 8 years and above and persons
with reduced physical, sensory or mental capabilities or lack of experience and
knowledge if they have been given supervision or instruction concerning use of the
appliance in a safe way and understand the hazards involved. Children shall not
play with the appliance.
• A steam cleaner is not to be used.
• The door or the outer surface may get hot when the appliance is operating.
• During use the appliance becomes hot. Care should be taken to avoid touching
heating elements inside the oven.
EN
17
Page 18
EN
PRODUCT DESCRIPTION
Mikrowave
1 Door Safety Lock System
2 Oven Window
3 Shaft
4 Roller Ring
5 Control Panel
6 Wave Guide
7 Glass Tray
8 Grill Heater
9 Metal Rack
Control Panel
• Menu Action Screen: Cooking time, power,
action indicators, and clock time are displayed.
• Level: Touch this button a number of times to set
microwave cooking power level.
• Clock: Start setting the oven clock and ending by
touching it again.
• Wei.Adj.: After choosing an auto-cooking
menu, use it to specify food weights or number of
servings.
• Grill: Set a grill-cooking program.
• Combi.1/Combi.2: Cooking with combined
microwave and grill power.
• Menu/Time: Turn the dial to set the oven clock
time and input cooking time. Turn the dial to select
an auto cook menu.
• Start/Quick Start: Touch to start a cooking
program. Simply touch it a number of times to set
cooking time and cook immediately at full power
level.
• Stop/Cancel: Press to cancel setting or reset
the oven before setting a cooking program.
Press once to temporarily stop cooking, or twice
to cancel cooking altogether. It is also used for
setting child lock.
18
Page 19
UTENSILS GUIDELINE
It is strongly recommended to use the containers which are suitable and safe for
microwave cooking. Generally speaking, the containers which are made of heatresistant ceramic, glass or plastic are suitable for microwave cooking. Never use the
metal containers for microwave cooking and combination cooking as spark is likely to
occur. You can take the reference of below table.
Cookware Microwave Grill Combination
Heat-Resistant Glass Yes Yes Yes
Non Heat-Resistant Glass No No No
Heat-Resistant Ceramics Yes Yes Yes
Microwave-Safe Plastic Dish Yes No No
Kitchen Paper Yes No No
Metal Tray No Yes No
Baking Plate No Yes No
Aluminum Foil & Foil Container No Yes No
EN
19
Page 20
EN
OPERATION
Note: Each time a button is touched, a beep will sound to acknowledge the touch.
Setting Clock Time
The clock works in 12- or 24-hour cycle, just press the CLOCK button to select.
Suppose you want to set the oven clock time to 8:30.
1 In standby mode, press CLOCK button once or twice to set the clock in 12- or 24-
hour cycle.
2 Turn the MENU/TIME dial to set 8 o’clock.
3 Press the CLOCK button.
4 Turn the MENU/TIME dial to set 30 min.
5 Press the CLOCK to conrm the setting.
Note: You can check the clock time during cooking by pressing CLOCK button.
Microwave Cooking
For microwave cooking, the longest cooking time is 60 minutes. You can select power
level by pressing the POWER LEVEL button.
Press Power Level Power
1 time 100%
2 times 80%
3 times 60%
4 times 40%
5 times 20%
6 times 0%
20
Page 21

For example, suppose you want to cook for 1 minute at 60% of microwave power.
1 In standby mode, press the POWER LEVEL button repeatedly to select cooking
power.
2 Turn the MENU/TIME dial to 1:00.
3 Press START/QUICK START button.
Note: You can check the cooking power during cooking by pressing the POWER
LEVEL button.
Grill
The longest cooking time is 60 minutes. The grill cooking is particularly useful for thin
slices of meat, steaks, chops, kebabs, sausages of piece of chicken. It is also suitable
for hot sandwiches and au gratin dishes. For example, suppose you want to grill for
12minutes:
1 In standby mode, press the GRILL button.
2 Turn the MENU/TIME dial to 12:00.
3 Press START/QUICK START button.
Combination 1
The longest cooking time is 60 minutes. 30% of time for microwave cooking, 70% for
grill cooking. Use for sh or au gratin. Suppose you want to set combination 1 cooking
for 25 minutes:
EN
1 In standby mode, press the COMBI.1 button.
2 Turn the MENU/TIME dial to 25:00.
3 Press the START/QUICK START button.
Combination 2
The longest cooking time is 60 minutes. 55% of time for microwave cooking, 45% for
grill cooking. Use for puddings omelettes, baked potatoes and poultry. Suppose you
want to set combination 2 cooking for 12 minutes:
1 In standby mode, press the COMBI.2 button.
2 Turn the MENU/TIME dial to 12:00.
3 Press the START/QUICK START button.
21
Page 22

EN
Quick Start
The oven will operate at 100% power output for Quick Start program. The longest
cooking time is 10 minutes. In standby mode, press the START/QUICK START button a
number of times to set cooking time, the oven starts working automatically at full power.
Auto Defrost
The oven can be used to defrost food based on the weight you entered. The defrosting
time and power level are automatically set once the food category and the weight are
programmed. The frozen food weight ranges from 100g to1800g. Suppose you want
to defrost 600g of shrimp:
1 In standby mode, turn the MENU/TIME dial counterclockwise to select “10”.
2 Press the WEIGHT ADJUST button repeatedly to indicate weight 600g.
3 Press START/QUICK START button.
Note: The oven will pause and signal during defrosting process to remind user to turn
over food.
Child Lock
The child lock prevents unsupervised operation by children.
• To set the child lock: In standby mode, without any operation within one minutes the
oven will enter child lock mode. In the lock state, the oven can’t be operated.
• To cancel the child lock: In child lock mode, open or close the oven door can
cancel the program.
22
Page 23

AUTO COOK MODE
For the following foods or cooking operation, you do not need to input cooking power
and time. Try to focus on telling the oven what you want to cook and how much the food
weighs. Steps:
1 In standby mode, turn the MENU/TIME dial counterclockwise to select food code.
2 Press the WEIGHT ADJUST button a number of times to indicate food weight or
number of servings.
3 Press the START/QUICK START button.
Code Program Notes
1 Milk/Coffee (200 ml)
EN
2 Rice (g)
3 Spaghetti (g)
4 Potato (each 230g)
5 Auto Reheat (g)
6 Fish (g)
7 Chicken (g)
8 Beef/Mutton (g)
9 Skewered Meat (g)
1 The result of automatic cooking depends on
factors such as the shape and size of food,
your personal preference for the cooking point
and even on the successful placement of the
food in the oven. If you nd the result at any
rate not quite satisfactory, please adjust the
cooking time a little bit accordingly.
2 For milk/coffee and potato, parameters on
display are not weight but number of servings.
3 For chicken, beef/mutton and steaks, the oven
pauses and beeps during cooking to remind
you to turn food over for uniform cooking.
23
Page 24

EN
CARE AND CLEANING
• The oven should be cleaned regularly and any food deposits removed.
• Remove the power cord from the wall outlet before cleaning. Don‘t immerse the
appliance in water or other uids when cleaning.
• Failure to maintain the oven in a clean condition could lead to deterioration of the
surface that could adversely affect the life of the appliance and possibly result in a
hazardous situation
• Never use hard detergent, gasoline, abrasive powder or metal brush to clean any
part of the appliance
• Do not remove the waveguide cover
How get rid of strange odors
When the microwave oven has been used for a long time, there may be some strange
odors exist in oven, Following 3 methods can get rid of them:
1 Place several lemon slices in a cup, then heat with high Micro Power for 2-3 min.
2 Place a cup of red tea in oven, then heat with high micro power.
3 Put some orange peel into oven, and then heat them with high Micro Power for
1minute.
Exterior:
Wipe the enclosure with a dampened soft cloth.
Door:
Using a dampened soft cloth, wipe clean the door and window Wipe the door seals
and adjacent parts to remove any spill or spatter.
24
Control panel:
Wipe the control panel with a slightly dampened soft cloth
Interior walls:
Wipe clean the cavity with a dampened soft cloth. Wipe clean the waveguide cover to
remove any food splashed
Turntable / Rotation ring / Rotation axis:
Wash with mild soap water. Rinse with clean water and allow drying thoroughly.
Page 25

HINTS ON DISPOSAL
According to the European waste regulation 2012/19/
EU this symbol on the product or on its packaging indicates
that this product may not be treated as household waste.
Instead it should be taken to the appropriate collection point
for the recycling of electrical and electronic equipment. By
ensuring this product is disposed of correctly, you will help
prevent potential negative consequences for the environment
and human health, which could otherwise be caused by
inappropriate waste handling of this product. For more
detailed information about recycling of this product, please
contact your local council or your household waste disposal
service.
EN
25
Page 26

Page 27

Estimado cliente,
Le felicitamos por la adquisición de este producto. Lea
atentamente las siguientes instrucciones y sígalas para evitar
posibles daños. No asumimos ninguna responsabilidad por los
daños causados por el incumplimiento de las instrucciones y el
uso inadecuado. Escanee el siguiente código QR para obtener
acceso a la última guía del usuario y más información sobre el
producto:
ÍNDICE
Datos técnicos27
Declaración de conformidad27
Indicaciones de seguridad28
Descripción del aparato30
Indicaciones sobre la batería de cocina31
Utilización32
Modo auto cook35
Limpieza y cuidado36
Retirada del aparato37
DATOS TÉCNICOS
ES
Número de artículo 10012351
Fuente de alimentación 230-240 V ~ 50 Hz
DECLARACIÓN DE CONFORMIDAD
Fabricante:
Chal-Tec GmbH, Wallstraße 16, 10179 Berlín, Alemania.
Este producto cumple con las siguientes directivas
europeas:
2014/30/UE (EMC)
2014/35/UE (baja tensión)
2011/65/UE (refundición RoHS)
27
Page 28

ES
INDICACIONES DE SEGURIDAD
Lea atentamente todas las indicaciones y conserve este manual para consultas
posteriores. Para reducir el riesgo de una descarga eléctrica producido por una avería
o un fallo en el funcionamiento, el aparato deberá conectarse a una toma de corriente
con toma de tierra. Conecte el aparato solamente a tomas de corriente que se adecuen
a la tensión del mismo.
Para reducir el riesgo de incendios en el interior del aparato:
• No sobrecaliente los alimentos.
• Retire los cierres de metal y las pinzas de las bolsas de plástico y papel antes de
colocar el microondas.
• No caliente aceite ni grasa para freír en el microondas, pues la temperatura no
puede controlarse fácilmente.
• Limpie el microondas con un paño húmedo y pase un paño seco a continuación
después de cada uso para eliminar la suciedad y las salpicaduras de grasa. Los
restos de suciedad acumulados pueden sobrecalentarse y entrar en combustión.
• Si los materiales entran en combustión o humean dentro del microondas, deje la
puerta del mismo cerrada, apague el aparato y desconecte el enchufe.
• Si calienta la comida en recipientes de plástico, manténgala bajo supervisión para
evitar que entre en combustión.
Para evitar explosiones y una ebullición posterior:
• No caliente los líquidos en recipientes cerrados, pues tienden a explotar. Entre
estos se encuentran los biberones y los tapones de rosca.
• Para la cocción, utilice recipientes con una abertura amplia y no retire los líquidos
enseguida. Espere un poco antes de retirar la comida del microondas para no
quemarse con los líquidos que tengan una ebullición tardía.
• Las patatas, salchichas y castañas deben pelarse y cortarse antes de calentarse.
Los huevos crudos y duros en su cáscara no deben introducirse en el microondas,
pues pueden explotar tras el calentamiento.
• Mezcle bien el contenido de los biberones y vasos con papilla y compruebe antes
de alimentar al bebé la temperatura para evitar quemaduras.
• Si el cable de alimentación está dañado, deberá ser sustituido por el fabricante, un
servicio técnico autorizado o una persona igualmente cualicada.
• Tras la cocción, el recipiente utilizado estará muy caliente. Utilice guantes de
protección cuando lo retire para evitar escaldarse con el vapor de agua generado.
• Abra la tapa de la comida y las bolsas de palomitas por el lado opuesto a usted
para evitar escaldarse el rostro.
28
Page 29

Para proteger el plato giratorio de roturas:
• Deje que el plato giratorio se enfríe por completo antes de limpiarlo.
• No coloque alimentos o recipientes muy calientes sobre el plato giratorio frío.
• No coloque comida o recipientes congelados sobre el plato giratorio caliente.
Advertencias generales de seguridad
• Asegúrese de que la vajilla no toque las paredes del microondas.
• Utilice solamente recipientes aptos para microondas.
• No guarde alimentos ni otros objetos en el microondas.
• No utilice el microondas sin contenido; de lo contrario, podría sufrir daños.
• Si utiliza el microondas, no lo deje sin supervisión en presencia de niños.
• Utilice solamente recambios originales indicados por el fabricante.
• Utilice el microondas solamente en espacios interiores.
• Si la puerta o las juntas están dañadas, no continúe utilizando el microondas,
contacte en su lugar con un servicio técnico para su reparación.
• No intente reparar el aparato usted mismo. Las reparaciones deberán ser
realizadas por personal técnico cualicado.
• Si se forma humo, desconecte el enchufe y mantenga la puerta del microondas
cerrada para evitar alimentar a posibles llamas.
• El calentamiento de líquidos puede provocar una ebullición repentina. Tome
precauciones al retirar el recipiente.
• Para la limpieza de la puerta, no utilice productos abrasivos o rascadores de metal
para evitar rascar o astillar el cristal.
• No conecte el aparato a tomas de corriente manejadas por control remoto ni con
temporizador.
• Este aparato no ha sido concebido para un uso comercial, sino doméstico o para
entornos similares.
• El aparato ha sido concebido para calentar alimentos y bebidas. Calentar prendas
de ropa, zapatos, bolsas de agua y esponjas puede provocar lesiones, incendios
o fuego.
• Los niños y las personas con discapacidades físicas o psíquicas solamente podrán
utilizar el aparato si han sido previamente instruidas sobre su uso y conocen las
indicaciones de seguridad. Asegúrese de que los niños no jueguen con el aparato.
• No utilice productos a vapor para la limpieza.
• No toque las piezas del aparato, la puerta ni la resistencia durante su
funcionamiento, alcanza temperaturas muy elevadas.
ES
29
Page 30

ES
DESCRIPCIÓN DEL APARATO
Microondas
1 Cierre de la puerta
2 Ventana
3 Motor
4 Anilla giratoria
5 Panel de control
6 Guía de ondas
7 Plato de cristal
8 Resistencia del grill
9 Parrilla para el grill
Panel de control
• Display: Indicador de menú y funcionamiento.
Aparece el tiempo de cocción, la potencia, el
tipo de funcionamiento y la hora.
• Power: Ajusta potencia deseada del microondas.
• Clock: Ajuste de la hora. Para nalizar, pulsar
de nuevo.
• Wei.Adj.: Tras seleccionar un programa
automático, puede introducir el peso del alimento
o el número de porciones.
• Grill: Ajustar el programa del grill.
• Combi.1/Combi.2: Cocinar con combinación
de grill y microondas.
• Menu/Time: Ajustar la hora y el tiempo de
cocción. Gire el regulador para seleccionar un
programa automático.
• Start/Quick Start: Iniciar programa de cocción.
Pulse unas cuantas veces para congurar el
tiempo de cocción e iniciar el calentamiento a
máxima potencia.
• Stop/Cancel: Interrumpir programa y
restablecer ajustes antes del inicio de la cocción.
Pulsar 1 vez para pausar la cocción. Pulsar 2
veces para interrumpir el proceso de cocción. El
botón también se utiliza para ajustar la hora.
30
Page 31

INDICACIONES SOBRE LA BATERÍA DE COCINA
Le recomendamos utilizar solo recipientes aptos para microondas. Entre ellos, se
encuentran los recipientes de cerámica resistente al calor, cristal y plástico apto para
microondas. No utilice recipientes metálicos para calentar y para el grill, podrían
provocar chispas. Cíñase a la tabla de vajilla siguiente.
Material Micro Grill Combi
Vidrio resistente al calor Sí Sí Sí
Vidrio no resistente al calor No No No
Cerámica resistente al calor Sí Sí Sí
Plástico resistente al calor Sí No No
Papel de cocina Sí No No
Recipientes metálicos Sí No No
Parrilla para el grill No Sí No
Papel de aluminio o recipientes de aluminio No Sí No
ES
31
Page 32

ES
UTILIZACIÓN
Nota: Cada vez que se pulse un botón, suena un pitido de conrmación para
conrmar los datos.
Congurar la hora
La hora puede mostrarse en el modo de 12 o de 24 horas. Pulse el botón CLOCK para
la selección.
Para ajustar por ejemplo la hora para las 8:30, debe seguir estos pasos:
1 Pulse el botón CLOCK en el modo standby una o dos veces para elegir entre el
formato de 12 o de 24 horas.
2 Gire el regulador MENU/TIME para ajustar la hora a las 8.
3 Pulse el botón CLOCK.
4 Gire el regulador MENU/TIME para ajustar los minutos a 30.
5 Pulse el botón CLOCK para conrmar los ajustes.
Nota: También puede visualizar la hora durante la cocción pulse el botón CLOCK.
Cocinar con el microondas
El tiempo máximo de cocción ajustable es de 60 minutos. Puede regular la potencia
pulsando el botón POWER LEVEL.
32
Pulsar power level Potencia del microondas
1 vez 100%
2 veces 80%
3 veces 60%
4 veces 40%
5 veces 20%
6 veces 0%
Page 33

Para, por ejemplo, cocinar un minuto a 60% de potencia, siga estos pasos:
1 Pulse el botón POWER LEVEL varias veces con el aparato en modo standby para
seleccionar la potencia del microondas.
2 Gire el regulador MENU/TIME hasta 1:00.
3 Pulse el botón START/QUICK START.
Nota: Puede comprobar la potencia seleccionada del microondas durante la
cocción pulsando el botón POWER LEVEL.
Grill
El tiempo máximo de cocción ajustable en grill es de 60 minutos. El grill está
especialmente indicado para cocinar letes de carne nos, chuletas, albóndigas,
salchichas y pollo. También puede utilizarse para sándwiches y gratinados. Para, por
ejemplo, activar el grill durante 12 minutos, siga estos pasos:
1 Pulse el botón GRILL con el aparato en modo standby.
2 Gire el regulador MENU/TIME hasta 12:00.
3 Pulse el botón START/QUICK START.
Combinación 1
El tiempo máximo de cocción ajustable es de 60 minutos. 30% del tiempo para
cocción con el microondas. 70% del tiempo con grill. Este modo es apto, por ejemplo,
para pescado y gratinado. Para, por ejemplo, activar la Combinación 1 durante
25minutos, siga estos pasos:
ES
1 Pulse el botón COMBI.1 en modo standby.
2 Gire el regulador MENU/TIME hasta 25:00.
3 Pulse el botón START/QUICK START.
Combinación 2
El tiempo máximo de cocción ajustable es de 60 minutos. 55% del tiempo para
cocción con el microondas. 45% del tiempo con grill. Este modo está indicado para
tortillas, patatas al horno y carne de ave.
1 Pulse el botón COMBI.2 en modo standby.
2 Gire el regulador MENU/TIME hasta 12:00.
3 Pulse el botón START/QUICK START.
33
Page 34

ES
Inicio rápido
El microondas funciona al 100% de potencia con el inicio rápido. El tiempo máximo
de cocción ajustable es de 10 minutos. Pulse el botón START/QUICK START en
modo standby varias veces para ajustar el tiempo de cocción. El microondas se inicia
automáticamente a plena potencia.
Descongelar
El microondas puede utilizarse para descongelar alimentos. La duración de
descongelación y los niveles de potencia se seleccionan de manera automática en
función del tipo de alimento y de su peso. El peso del alimento a descongelar puede
estar comprendido entre 100g y 1800g. Para descongelar, por ejemplo, 600g de
gambas, debe seguir estos pasos:
1 Gire en el modo standby el regulador MENU/TIME en el sentido contrario de las
agujas del reloj hasta “10”.
2 Pulse el botón WEIGHT ADJUST repetidamente hasta alcanzar los 600g.
3 Pulse el botón START/QUICK START.
Nota: El aparato pausará el funcionamiento y sonará una señal para recordarle que
debe voltear el alimento.
Bloqueo para niños
El bloqueo para niños evita un control sin supervisión por parte de niños.
34
• Cómo activar el bloqueo para niños: En modo standby, el horno cambia al modo
de bloqueo para niños en el transcurso de un minuto sin pulsar ningún botón. Con
el aparato bloqueado, el microondas no puede ponerse en marcha.
• Cómo desactivar el bloqueo para niños: Abriendo o cerrando la puerta del
microondas se puede interrumpir el modo del bloqueo de niños.
Page 35

MODO AUTO COOK
Para los siguientes alimentos no necesitará indicar el nivel de potencia o tiempo de
cocción. Concéntrese solamente en lo que desea calentar e introduzca el peso del
alimento.
1 Gire el regulador MENU/TIME con el aparato en modo standby en el sentido
contrario de las agujas del reloj para añadir el peso correspondiente del alimento.
2 Pulse el botón WEIGTH ADJUST varias veces para añadir el peso o el número de
porciones.
3 Pulse el botón START/QUICK START.
Código Programa Comentarios
1 Leche/café (200 ml)
2 Arroz (g)
3 Espaguetis (g)
4 Patatas (230 g cada una)
5 Recalentar (g)
6 Pescado (g)
7 Pollo (g)
8 Carne, ternera, cordero (g)
9 Espetón de carne (g)
1 El resultado de la cocción automática
depende de factores como la forma y
el tamaño del alimento. También de sus
gustos personales en cuanto al grado
de cocción e incluso a la colocación del
alimento dentro del microondas. Si no
queda satisfecho con el resultado, ajuste
un poco el tiempo de cocción.
2 Con leche/café y patatas, no aparece el
peso en el display, sino el número de tazas
o unidades.
3 Para la carne de ternera, carnero o pollo el
microondas pausa el proceso de cocción y
le recuerda con un pitido que debe voltear
el alimento para una cocción homogénea.
ES
35
Page 36

ES
LIMPIEZA Y CUIDADO
Limpie el aparato regularmente y retire todos los restos de comida.
• Desconecte el enchufe antes de limpiar el aparato.
• No sumerja el aparato completamente en agua u otro líquido para limpiarlo.
• Una limpieza irregular conlleva el desgaste y la reducción de la vida útil del
aparato.
• No utilice productos alados, gasolina, polvos abrasivos ni esponjas metálicas
para la limpieza.
• Nunca retire la cubierta.
Cómo acabar con los malos olores
Si ha estado utilizando el aparato un tiempo, pueden producirse malos olores. Con los
siguientes 3 métodos podrá hacer desaparecer los malos olores::
1 Corte un limón en pedazos y caliéntelos en una taza durante 2-3 minutos a
máxima potencia en el microondas.
2 Coloque una taza con té rojo en el microondas y caliéntela a máxima potencia.
3 Coloque unas cáscaras de naranja en el microondas y caliéntelas a máxima
potencia durante 1 minuto.
Parte exterior:
Limpie la parte exterior con un paño húmedo y suave.
Puerta y junta:
Limpie la puerta, ventana, junta y todas las piezas limítrofes con un paño húmedo y
suave para eliminar las manchas y gotas.
36
Botones de función:
Limpie los botones de función con un paño húmedo.
Paredes interiores:
Limpie el interior con un paño húmedo y suave. Limpie la cubierta del emisor de ondas
para retirar las salpicaduras de alimentos.
Plato giratorio, anilla giratoria y eje giratorio:
Lave las piezas con agua y un producto de limpieza neutro y deje que se sequen por
completo.
Page 37

RETIRADA DEL APARATO
Si el aparato lleva adherida la ilustración de la izquierda (el
contenedor de basura tachado) entonces rige la normativa
europea, directiva 2012/19/UE. Este producto no debe
arrojarse a un contenedor de basura común. Infórmese sobre
las leyes territoriales que regulan la recogida separada
de aparatos eléctricos y electrónicos. Respete las leyes
territoriales y no arroje aparatos viejos al cubo de la basura
doméstica. Una retirada de aparatos conforme a las leyes,
contribuye a proteger el medio ambiente y a las personas a
su alrededor frente a posibles consecuencias perjudiciales
para la salud. El reciclaje ayuda a reducir el consumo de
materias primas.
ES
37
Page 38

Page 39

Chère cliente, cher client,
Toutes nos félicitations pour l’acquisition de ce nouvel appareil.
Veuillez lire attentivement et respecter les instructions de ce mode
d’emploi an d’éviter d’éventuels dommages. Nous ne saurions
être tenus pour responsables des dommages dus au non-respect
des consignes et à la mauvaise utilisation de l’appareil. Scannez
le QR-Code pour obtenir la dernière version du mode d‘emploi
et des informations supplémentaires concernant le produit :
SOMMAIRE
Fiche technique39
Déclaration de conformité39
Consignes de sécurité40
Aperçu de l‘appareil42
Remarques sur les ustensiles de cuisson43
Utilisation44
Mode auto cook47
Nettoyage et entretien48
Informations sur le recyclage49
FICHE TECHNIQUE
FR
Numéro d'article 10012351
Alimentation 230-240 V ~ 50 Hz
DÉCLARATION DE CONFORMITÉ
Fabricant :
Chal-Tec GmbH, Wallstraße 16, 10179 Berlin, Allemagne.
Ce produit est conforme aux directives européennes
suivantes :
2014/30/UE (CEM)
2014/35/UE (LVD)
2011/65/UE (RoHS)
39
Page 40

FR
CONSIGNES DE SÉCURITÉ
Lisez attentivement toutes les instructions et conservez le mode d‘emploi pour
référence ultérieure. Pour réduire les risques d‘électrocution en cas de panne ou de
dysfonctionnement, l‘appareil doit être branché sur une prise de courant mise à la terre.
Ne branchez l‘appareil que sur des prises correspondant à la tension spéciée de
l‘appareil.
An de réduire les risques d‘incendie dans le volume de cuisson :
• Ne surchauffez pas les aliments.
• Retirez les fermetures métalliques et les agrafes des sacs en papier ou en plastique
avant de les mettre au micro-ondes.
• Ne faites pas chauffer de l‘huile ou de la graisse de friture dans le four micro-ondes
car il est difcile d‘en contrôler la température.
• Après chaque utilisation, nettoyez le four micro-ondes avec un chiffon humide
et essuyez-le avec un chiffon sec pour éliminer les impuretés et la graisse. Les
impuretés accumulées pourraient surchauffer et s‘enammer.
• Si des matériaux dans le four micro-ondes s‘enamment ou dégagent de la fumée,
laissez la porte du four micro-ondes fermée, éteignez l‘appareil et débranchez la
che.
• Si vous chauffez des aliments dans des récipients en plastique, surveillez-les au cas
où les aliments prendraient feu.
Pour éviter les explosions ou les ébullitions post-cuisson :
• Ne chauffez pas de liquides dans des récipients fermés, car ceux-ci ont tendance à
exploser. Cela inclut les biberons avec une fermeture vissée.
• Pour la cuisson, utilisez des récipients à large ouverture et ne retirez pas les liquides
chauds immédiatement. Attendez pour les retirer du micro-ondes an de ne pas
vous brûler avec des liquides en ébullition.
• Les pommes de terre, les saucisses et les châtaignes doivent être pelées ou percées
avant d‘être chauffées. Les œufs crus et durs en coquille ne doivent pas être cuits au
micro-ondes, ils peuvent exploser même après réchauffage.
• Mélangez bien le contenu des biberons et des pots de bouillie pour bébé et vériez
la température avant de faire manger votre enfant pour éviter les brûlures.
• Si le cordon d‘alimentation est endommagé, il doit être remplacé par le fabricant,
par un spécialiste agréé ou par une personne de même qualication.
• Après la cuisson, le récipient utilisé est très chaud. Utilisez des gants de cuisine pour
le retirer an de ne pas vous brûler avec la vapeur d‘eau qui s‘échappe.
• N‘ouvrez pas vers vous les couvercles des sacs de nourriture et de maïs soufé
pour ne pas vous brûler le visage.
40
Page 41

Pour protéger le plateau de verre tournant contre la casse :
• Laissez refroidir le plateau tournant avant de le nettoyer.
• Ne placez pas d‘aliments chauds ou de récipients chauds sur le plateau tournant
froid.
• Ne placez pas d‘aliments congelés ou de récipients congelés sur le plateau
tournant chaud.
Consignes générales de sécurité
• Assurez-vous que les ustensiles de cuisson ne touchent pas les parois du four microondes.
• Utilisez uniquement des récipients adaptés aux micro-ondes.
• Ne conservez pas d‘aliments ni d‘autres objets dans le micro-ondes.
• N‘utilisez pas le micro-ondes à vide, il pourrait être endommagé.
• Lorsque vous utilisez le micro-ondes, ne le laissez pas sans surveillance en présence
d‘enfants.
• Utilisez uniquement les accessoires spéciés par le fabricant.
• Utilisez le micro-ondes à l‘intérieur uniquement.
• Si la porte ou les joints sont endommagés, arrêtez d‘utiliser le four à micro-ondes et
faites-le réparer par un spécialiste.
• N‘essayez pas de réparer l‘appareil vous-même. Les réparations ne doivent être
effectuées que par des spécialistes qualiés.
• S‘il y a de la fumée, débranchez l‘appareil et laissez la porte du micro-ondes
fermée pour étouffer les ammes.
• Chauffer des liquides peut provoquer une ébullition soudaine. Faites attention
lorsque vous retirez le récipient.
• N‘utilisez pas d‘abrasifs ni de grattoirs en métal pour nettoyer la porte, an de ne
pas la rayer ni la briser.
• N‘utilisez pas l‘appareil avec une minuterie externe ou une prise de courant
commandée à distance.
• L‘appareil n‘est pas destiné à un usage commercial, mais uniquement à un usage
domestique et à des environnements similaires.
• L‘appareil sert à réchauffer des aliments et des boissons. Réchauffer des vêtements,
pantoues, coussins chauffants et éponges peut causer des blessures, un feu ou un
incendie.
• Les enfants et les personnes handicapées physiques ou mentales ne doivent utiliser
l‘appareil que s‘ils ont été familiarisés à l‘avance avec les fonctions et les mesures
de sécurité par un responsable. Assurez-vous que les enfants ne jouent pas avec
l‘appareil.
• N‘utilisez pas de nettoyeur à vapeur pour nettoyer l‘appareil.
• Ne touchez pas l‘intérieur de l‘appareil, la porte et les éléments chauffants pendant
le fonctionnement, ils peuvent devenir très chauds.
FR
41
Page 42

FR
APERÇU DE L‘APPAREIL
Micro-ondes
1 Verrouillage de porte
2 Vitre
3 Moteur
4 Anneau tournant
5 Panneau de commande
6 Plaque mica
micro-ondes
7 Plateau de verre
8 Gril
9 Grille de cuisson
Panneau de commande
• Ecran : Menu et témoin de fonctionnement. Le
temps de cuisson, la puissance, le fonctionnement
et l‘heure sont afchés.
• Puissance : Réglez la puissance micro-ondes
souhaitée.
• Clock : réglage de l‘horloge. Appuyez à nouveau
pour quitter.
• Wei.Adj. : Après avoir choisi un programme
automatique, vous pouvez ajuster ici le poids de
l‘aliment ou le nombre de portions.
• Grill : programme de gril déni.
• Combi.1 / Combi.2 : Cuisson avec gril et micro-
ondes combinés.
• Menu / heure : dénissez l‘heure et le temps de
cuisson. Tournez le bouton pour sélectionner un
programme automatique.
• Start / quick start : pour commencer le
programme de cuisson. Appuyez plusieurs fois
sur cette touche pour régler le temps de cuisson et
commencer à chauffer à puissance maximale.
• Stop / Cancel : Annulez le programme et
réinitialisez les réglages avant le début de la
cuisson. Appuyez une fois pour mettre en pause
la cuisson. Appuyez deux fois pour arrêter la
cuisson. Le bouton sert également pour régler
l‘horloge.
42
Page 43

REMARQUES SUR LES USTENSILES DE CUISSON
Nous vous conseillons d‘utiliser uniquement des récipients adaptés au micro-ondes.
En font partie les récipients en céramique, en verre résistant à la chaleur et en plastique
allant au micro-ondes. N‘utilisez pas de récipients en métal pour la cuisson et les
grillades car ils pourraient provoquer des étincelles. Suivez les indications du tableau
ci-dessous.
Matériau Micro Gril Combiné
Verre résistant à la chaleur Oui Oui Oui
Verre non résistant à la chaleur Non Non Non
Céramique résistante à la chaleur Oui Oui Oui
Plastique résistant à la chaleur Oui Non Non
Essuie tout Oui Non Non
Récipient en métal Oui Non Non
Grille de cuisson Non Oui Non
Papier d‘aluminium et récipient souple Non Oui Non
FR
43
Page 44

FR
UTILISATION
Remarque : Chaque fois que vous appuyez sur un bouton, un bip retentit pour
conrmer la saisie.
Réglage de l‘heure
L‘heure est afchée en mode 12 heures ou 24 heures. Appuyez simplement sur la touche
CLOCK pour sélectionner.
Par exemple, pour régler l’horloge à 8h30, vous devez procéder comme suit :
1 En mode veille, appuyez une ou deux fois sur la touche CLOCK pour sélectionner
le mode 12 ou 24 heures.
2 Tournez le bouton MENU / TIME pour régler l’heure sur 8 heures.
3 Appuyez sur le bouton CLOCK.
4 Tournez le bouton MENU / TIME pour régler le nombre de minutes sur 30.
5 Appuyez sur la touche CLOCK pour conrmer les réglages.
Remarque : Vous pouvez également consulter l‘heure pendant la cuisson en
appuyant sur la touche CLOCK.
Cuisson au micro-ondes
Le plus long temps de cuisson réglable pour le micro-ondes est de 60 minutes. Vous
pouvez régler la puissance en appuyant sur le bouton POWER LEVEL.
44
Appuyer sur le réglage de la puissance Puissance du micro-ondes
1 fois 100%
2 fois 80%
3 fois 60%
4 fois 40%
5 fois 20%
6 fois 0%
Page 45

Par exemple, pour cuire une minute à 60% de la puissance du micro-ondes, procédez
comme suit :
1 En mode veille, appuyez plusieurs fois sur la touche POWER LEVEL pour
sélectionner la puissance du micro-ondes.
2 Tournez le bouton MENU / TIME sur 1:00.
3 Appuyez sur le bouton START / QUICK START.
Remarque : Vous pouvez vérier la puissance dénie du four à micro-ondes
pendant la cuisson en appuyant sur la touche POWER LEVEL.
Gril
Le temps de cuisson le plus long est de 60 minutes pour le gril. Le gril est
particulièrement adapté à la cuisson de nes tranches de viande, de steaks,
d‘escalopes, de saucisses et de poulet. Il sert également pour les sandwichs chauds
et les gratins. Par exemple, pour gratiner pendant 12 minutes, vous devez procéder
comme suit :
1 En mode veille, appuyez sur la touche GRILL.
2 Tournez le bouton de réglage MENU/TIME sur 12:00.
3 Appuyez sur la touche START/QUICK START.
Combinaison 1
Le temps de cuisson le plus long est de 60 minutes. 30% de la cuisson se fait au microondes. 70% de la cuisson en mode gril. Ce mode convient aux poissons et aux gratins,
par exemple. Par exemple, pour utiliser la combinaison 1 pendant 25 minutes, vous
devez procéder comme suit :
FR
1 En mode veille, appuyez sur la touche COMBI.1.
2 Tournez le bouton de réglage MENU/TIME sur 25:00.
3 Appuyez sur la touche START/QUICK START.
Combinaison 2
Le temps de cuisson le plus long est de 60 minutes. 55% de la cuisson se fait au microondes. 45% de la cuisson en mode gril. Ce mode convient par exemple aux omelettes,
aux pommes de terre au four et à la volaille.
1 En mode veille, appuyez sur la touche COMBI.2.
2 Tournez le bouton de réglage MENU/TIME sur 12:00.
3 Appuyez sur la touche START/QUICK START.
45
Page 46

FR
Démarrage rapide (quick start)
En démarrage rapide, le four fonctionne à 100%. Le temps de cuisson le plus long est
de 10 minutes. En mode veille, appuyez plusieurs fois sur la touche START / QUICK
START pour régler le temps de cuisson. Le four démarre automatiquement à pleine
puissance.
Décongélation
Le four peut être utilisé pour décongeler des aliments. La durée de la décongélation et le
niveau de puissance sont dénis automatiquement en fonction du poids et de la qualité
des aliments spéciés. Le poids de l‘aliment à décongeler doit être compris entre 100g
et 1800g. Par exemple, pour décongeler 600g de crevettes, procédez comme suit :
1 En mode veille, tournez le bouton de réglage MENU / TIME sur «10» dans le
sens inverse des aiguilles d‘une montre.
2 Appuyez plusieurs fois sur WEIGHT ADJUST jusqu‘au réglage 600g.
3 Appuyez sur la touche START / QUICK START.
Remarque : L’appareil se met en pause et émet un signal sonore pour vous rappeler
de retourner les aliments.
Verrouillage parental
Le verrouillage parental empêche un fonctionnement sans surveillance par des enfants.
• Pour activer le contrôle parental : en mode veille, le four entre en mode de contrôle
parental au bout d‘une minute. Une fois verrouillé, le four ne peut pas être utilisé.
• Pour désactiver le contrôle parental : vous pouvez annuler le mode de contrôle
parental en ouvrant ou en fermant la porte du four.
46
Page 47

MODE AUTO COOK
Il n‘est pas nécessaire de dénir un niveau de puissance ou un temps de cuisson pour
les plats suivants. Concentrez-vous sur ce que vous voulez chauffer et entrez simplement
le poids de l‘aliment.
1 En mode veille, tournez le bouton de réglage MENU / TIME dans le sens inverse
des aiguilles d‘une montre pour entrer le numéro correspondant à l‘aliment.
2 Appuyez plusieurs fois sur WEIGHT ADJUST pour entrer le poids ou le nombre de
portions.
3 Appuyez sur la touche START / QUICK START.
Code Programme Remarques
1 Lait / café (200 ml)
2 Riz (g)
3 Spaghetti (g)
Pommes de terre (230g
4
pièce)
5 Réchauffage (g)
6 Poisson (g)
7 Poulet (g)
8 Viande, bœuf, mouton (g)
9 Brochettes de viande (g)
1 Le résultat de la cuisson automatique
dépend de facteurs tels que la forme et la
taille de l‘aliment. Il en va de même pour
leurs préférences personnelles concernant la
durée de cuisson et même pour le placement
adéquat des aliments dans le four. Si vous
n‘êtes pas satisfait du résultat, modiez
légèrement le temps de cuisson.
2 Pour le lait / café et les pommes de terre, ce
n‘est pas le poids qui est afché à l’écran,
mais le nombre de tasses ou le nombre de
pièces.
3 Pour le bœuf, le mouton ou le poulet, le four
met la cuisson en pause et vous rappelle,
par un bip, que vous devez retourner les
aliments pour une cuisson uniforme.
FR
47
Page 48

FR
NETTOYAGE ET ENTRETIEN
Nettoyez l‘appareil régulièrement et éliminez tout résidu d‘aliments.
• Retirez toujours la che de la prise avant le nettoyage.
• Ne plongez jamais l‘appareil complètement dans de l‘eau ou dans d‘autres
liquides.
• Un nettoyage irrégulier favorise l‘usure et réduit la durée de vie de l‘appareil.
• N‘utilisez pas de nettoyants puissants, d‘essence, de poudre à récurer ou
d‘éponges métalliques pour le nettoyage.
• Ne retirez jamais le capot.
Pour éliminer les odeurs désagréables
Si vous utilisez l‘appareil depuis un certain temps, des odeurs désagréables peuvent
apparaître. Les 3 méthodes suivantes pourront éliminer les odeurs désagréables :
1 Coupez un citron en morceaux et faites-les chauffer dans une tasse pendant
2-3minutes au micro-ondes, sur la partie la plus élevée.
2 Mettez une tasse de thé rouge au micro-ondes et faites-la chauffer au maximum.
3 Mettez un zest d‘orange au micro-ondes et chauffez pendant 1 minute au
maximum.
Partie externe :
Essuyez l‘extérieur avec un chiffon doux et humide.
Porte et joint :
Essuyez la porte, la vitre, le joint et toutes les pièces adjacentes avec un chiffon doux et
humide pour enlever les taches et les éclaboussures.
48
Touches de fonction :
Nettoyez les touches de fonction avec un chiffon légèrement humide.
Parois intérieures :
Nettoyez l‘intérieur avec un chiffon doux et humide. Essuyez également la plaque mica
de micro-ondes pour éliminer les éclaboussures de nourriture.
Plateau tournant, anneau tournant et axe de rotation :
Lavez les pièces à l‘eau et avec un savon doux et laissez sécher complètement.
Page 49

INFORMATIONS SUR LE RECYCLAGE
Vous trouverez sur le produit l’image ci-contre (une poubelle
sur roues, barrée d‘une croix), ce qui indique que le produit
se trouve soumis à la directive européenne 2012/19/
UE. Renseignez-vous sur les dispositions en vigueur dans
votre région concernant la collecte séparée des appareils
électriques et électroniques. Respectez-les et ne jetez pas
les appareils usagés avec les ordures ménagères. La mise
en rebut correcte du produit usagé permet de préserver
l’environnement et la santé. Le recyclage des matériaux
contribue à la préservation des ressources naturelles.
FR
49
Page 50

Page 51

Gentile cliente,
La ringraziamo per aver acquistato il dispositivo. La preghiamo
di leggere attentamente le seguenti istruzioni per l’uso e di
seguirle per evitare possibili danni. Non ci assumiamo alcuna
responsabilità per danni scaturiti da una mancata osservazione
delle avvertenze di sicurezza e da un uso improprio del
dispositivo. Scansionare il codice QR seguente, per accedere
al manuale d’uso più attuale e per ricevere informazioni sul
prodotto:
INDICE
Dati tecnici51
Dichiarazione di conformità51
Avvertenze di sicurezza52
Descrizione del dispositivo54
Indicazioni sulle stoviglie55
Utilizzo56
Modalità auto cook59
Pulizia e manutenzione60
Smaltimento61
DATI TECNICI
IT
Numero articolo 10012351
Alimentazione 230-240 V ~ 50 Hz
DICHIARAZIONE DI CONFORMITÀ
Produttore:
Chal-Tec GmbH, Wallstraße 16, 10179 Berlino, Germania.
Questo prodotto è conforme alle seguenti direttive
europee:
2014/30/UE (EMC)
2014/35/UE (LVD)
2011/65/UE (RoHS)
51
Page 52

IT
AVVERTENZE DI SICUREZZA
Leggere attentamente tutte le avvertenze e conservare il manuale per future
consultazioni. Per ridurre il rischio di folgorazioni dovuto a guasti o malfunzionamenti,
la spina deve essere collegata a una presa elettrica con messa a terra. Collegare il
dispositivo solo a prese elettriche con tensione corrispondente a quella del dispositivo.
Per ridurre il rischio di incendi nel vano di cottura:
• Non surriscaldare gli alimenti.
• Rimuovere tutte le chiusure metalliche e le mollette da sacchetti di plastica e carta
prima di metterli nel microonde.
• Non scaldare olio o grasso per friggere nel microonde, dato che è difcile
controllare la temperatura.
• Pulire il microonde dopo ogni utilizzo con un panno umido e passare poi un panno
asciutto, in modo da rimuovere polvere e schizzi di grasso. Accumuli di sporco
possono surriscaldarsi e prendere fuoco.
• Se alcuni materiali all’interno del microonde dovessero prendere fuoco ed emettere
fumo, lasciare chiuso lo sportello, spegnere il dispositivo e staccare la spina.
• Se si scaldano alimenti in contenitori di plastica, non perderli di vista, in caso
dovessero prendere fuoco.
Per evitare esplosioni o ebollizione postuma:
• Non scaldare liquidi in contenitori chiusi, dato che tendono ad esplodere, ad
esempio biberon con chiusura a vite.
• Per la cottura, utilizzare contenitori con un’apertura ampia e non rimuovere
immediatamente liquidi bollenti. Attendere prima di toglierli dal microonde, in
modo da non ustionarsi con liquidi che iniziano a bollire successivamente.
• Patate, salsicce e castagne devono essere sbucciate o incise prima di essere
scaldate. Uova crude e sode non possono essere cotte nel microonde, in quanto
possono esplodere anche dopo essere state scaldate.
• Mescolare per bene il contenuto di biberon e barattoli con passati per neonati e
controllarne la temperatura prima di darlo ai bebè, in modo da evitare ustioni.
• Se il cavo è danneggiato, deve essere sostituito dal produttore, da un’azienda
tecnica autorizzata o da una persona con qualica equivalente.
• Dopo la cottura, il contenitore utilizzato è molto caldo. Utilizzare guanti da forno
per toglierlo dal microonde, in modo da non bruciarsi con il vapore che fuoriesce.
• Girarsi dall’altro lato quando si aprono contenitori di cibo o sacchetti di popcorn,
in modo da non scottarsi il viso.
52
Page 53

Per evitare che il piatto girevole si rompa:
• Lasciare raffreddare il piatto prima di pulirlo.
• Non mettere cibo o contenitori bollenti sul piatto freddo.
• Non mettere cibo o contenitori congelati sul piatto caldo.
Avvertenze di sicurezza generiche:
• Assicurarsi che le stoviglie utilizzate non tocchino le pareti del microonde.
• Utilizzare solo contenitori adatti al microonde.
• Non conservare cibo o oggetti nel microonde.
• Non utilizzare il microonde se è vuoto, altrimenti potrebbe danneggiarsi.
• Quando si utilizza il microonde, non lasciare i bambini privi di controllo.
• Utilizzare solo accessori consigliati dal produttore.
• Utilizzare il microonde solo in locali chiusi.
• Se lo sportello o le guarnizioni sono danneggiati, non utilizzare il microonde, ma
farlo riparare da un’azienda tecnica.
• Non cercare di riparare il dispositivo in modo autonomo. Eventuali riparazioni
devono essere realizzate da tecnici specializzati.
• Se si forma del fumo, staccare la spina e tenere chiuso lo sportello per estinguere
eventuali amme.
• Il riscaldamento di liquidi può causare l’improvvisa ebollizione. Fare attenzione
quando si rimuovono i contenitori.
• Non utilizzare prodotti abrasivi o raschietti metallici per pulire lo sportello, in modo
da non grafare o scheggiare il vetro.
• Non utilizzare il dispositivo con timer esterni o prese elettriche con comando a
distanza.
• Il dispositivo non è adatto a utilizzi commerciali, ma solo casalinghi e in ambienti
simili.
• Il dispositivo serve a scaldare cibo e bevande. Il riscaldamento di indumenti,
pantofole, cuscini riscaldanti e panni può causare lesioni e incendi.
• Bambini e persone con limitate capacità siche e psichiche possono utilizzare il
dispositivo solo dopo essere stati istruiti in modo esaustivo sulle funzioni e sulle
procedure di sicurezza da una persona responsabile del loro controllo. Assicurarsi
che i bambini non giochino con il dispositivo.
• Non utilizzare pulitori a vapore per pulire il dispositivo.
• Non toccare componenti del dispositivo, sportello ed elementi riscaldanti all’interno
durante il funzionamento, dato che possono diventare estremamente caldi.
IT
53
Page 54

IT
DESCRIZIONE DEL DISPOSITIVO
Microonde
1 Blocco sportello
2 Finestrella
3 Trazione
4 Anello rotante
5 Pannello di controllo
6 Conduttore delle onde
7 Piatto in vetro
8 Griglia di riscaldamento
9 Griglia
Pannello di controllo
• Display: indicazione menu e funzionamento.
Mostra tempo di cottura, potenza e ora.
• Power: impostare la potenza desiderata.
• Clock: impostare l’ora. Per terminare premere di
nuovo.
• Wei.Adj.: dopo aver selezionato un programma
automatico, è possibile inserire il peso degli
alimenti o il numero di porzioni.
• Grill: impostare il programma grill.
• Combi 1/Combi 2: cuocere combinando grill e
microonde.
• Menu/Time: impostare ora e tempo di cottura.
Ruotare la manopola per selezionare un
programma automatico.
• Start/Quick Start: avviare il programma di
cottura. Premere più volte per impostare il tempo
di cottura e iniziare il riscaldamento alla massima
potenza.
• Stop/Cancel: interrompere il programma e
resettare le impostazioni prima di avviare il
programma. Premere 1 volta per mettere in pausa
la cottura. Premere 2 colte per interrompere la
cottura. Il tasto serve anche a impostare l’ora.
54
Page 55

INDICAZIONI SULLE STOVIGLIE
Consigliamo di utilizzare solo stoviglie adatte a forni a microonde. Tra queste: ceramica
termoresistente, vetro e plastica adatta al microonde. Non utilizzare contenitori metallici
per cuocere e grigliare, in quanto possono generare scintille. Rispettare le indicazioni
relative alle stoviglie contenute nella seguente tabella.
Materiale Microonde Grill Combo
Vetro termoresistente Sì Sì Sì
Vetro non termoresistente No No No
Ceramica termoresistente Sì Sì Sì
Ceramica non termoresistente Sì No No
Carta da cucina Sì No No
Contenitori in metallo Sì No No
Griglia No Sì No
Carta alluminio e contenitore di stagnola No Sì No
IT
55
Page 56

IT
UTILIZZO
Nota: ogni volta che si preme un tasto, viene emesso un segnale acustico per
confermare l’immissione.
Impostare l’orologio
L’ora viene mostrata in modalità 12 o 24 ore. Premere CLOCK per selezionare.
Per impostare l’ora ad es. su 8:30, procedere in questo modo:
1 Premere CLOCK in standby una o due volte per selezionare la modalità 12 o
24ore.
2 Ruotare la manopola MENU/TIME per impostare le ore su 8.
3 Premere CLOCK.
4 Ruotare la manopola MENU/TIME per impostare i minuti su 30.
5 Premere CLOCK per confermare.
Nota: l’ora può essere visualizzata anche durante la cottura premendo CLOCK.
Cuocere con il microonde
La durata di cottura massima impostabile per il microonde è di 60 minuti. La potenza
può essere impostata premendo POWER LEVEL.
56
Premere Power Level Potenza microonde
1 volta 100%
2 volte 80%
3 volte 60%
4 volte 40%
5 volte 20%
6 volte 0%
Page 57

Ad esempio, per cuocere per un minuto al 60% della potenza, procedere in questo
modo:
1 Premere più volte POWER LEVEL in modalità standby per selezionare la potenza
del microonde.
2 Ruotare la manopola MENU/TIME su 1:00.
3 Premere START/QUICK START.
Nota: è possibile controllare la potenza impostata durante la cottura premendo
POWER LEVEL.
Grill
La durata massima di cottura del grill è di 60 minuti. Il grill è particolarmente adatto per
cuocere fettine sottili di carne, bistecche, polpette, salsicce e pollo. Inoltre, è utilizzabile
anche per panini caldi e gratin. Ad esempio, per grigliare per 12 minuti, procedere in
questo modo:
1 Premere GRILL in modalità standby.
2 Ruotare la manopola MENU/TIME su 12:00.
3 Premere START/QUICK START.
Combi 1
La durata massima di cottura è di 60 minuti. La cottura avviene per il 30% del tempo
con microonde e per il 70% con il grill. Questa modalità è adatta per pesce e gratin.
Ad esempio, per utilizzare la combo 1 per 25 minuti, procedere come segue:
IT
1 Premere COMBI.1 in modalità standby.
2 Ruotare la manopola MENU/TIME su 25:00.
3 Premere START/QUICK START.
Combi 2
La durata massima di cottura è di 60 minuti. La cottura avviene per il 55% del tempo
con microonde e per il 45% con il grill. Questa modalità è adatta per omelette, patate
al forno e pollame.
1 Premere COMBI.2 in modalità standby.
2 Ruotare la manopola MENU/TIME su 12:00.
3 Premere START/QUICK START.
57
Page 58

IT
Quick Start
Con Quick Start, il forno funziona con potenza al 100%. La durata massima di cottura
è di 10 minuti. Premere diverse volte START/QUICK START in standby per impostare la
durata. Il forno si avvia automaticamente alla massima potenza.
Scongelare
Il forno può essere utilizzato per scongelare pietanze. La durata di scongelamento e il
livello di potenza vengono regolati automaticamente in base al tipo di pietanza indicato
e al peso. Il peso della pietanza da scongelare deve essere compreso tra 100g e
1800g. Ad esempio, per scongelare 600g di gamberetti, procedere come segue:
1 In standby, ruotare la manopola MENU/TIME in senso antiorario su “10”.
2 Premere WEIGHT ADJUST ripetutamente no a impostare 600 g.
3 Premere START/QUICK START.
Nota: il dispositivo interrompe il funzionamento ed emette un segnale acustico per
ricordarvi di girare le pietanze.
Sicura per i bambini
La sicura impedisce ai bambini di utilizzare il dispositivo senza controllo.
• Come attivare la sicura: in standby, il forno passa automaticamente in modalità
sicura per bambini se non vengono premuti tasti per 1 minuto. A sicura attivata non
è possibile utilizzare il forno.
• Come disattivare la sicura: aprendo o chiudendo lo sportello si disattiva la
modalità sicura per bambini.
58
Page 59

MODALITÀ AUTO COOK
Per le seguenti pietanze non è necessario impostare potenza o durata di cottura.
Concentrarsi solo su ciò che si desidera scaldare e inserire il peso delle pietanze.
1 In standby, ruotare MENU/TIME in senso antiorario per inserire il numero
corrispondente della pietanza.
2 Premere diverse volte WEIGHT ADJUST per inserire il peso o il numero di porzioni.
3 Premere START/QUICK START.
Codice Programma Note
1 Latte/caffè (200 ml)
2 Riso (g)
3 Spaghetti (g)
4 Patate (230 g cad.)
5 Riscaldare (g)
6 Pesce (g)
7 Pollo (g)
8 Carne, manzo, montone (g)
9 Spiedini di carne (g)
1 Il risultato della cottura automatica
dipende da fattori come forma e
dimensioni delle pietanze. Inoltre,
inuiscono anche le preferenze sul
grado di cottura e anche il corretto
posizionamento delle pietanze in forno.
2 In caso di latte/caffè e patate, il peso
non viene mostrato sul display, bensì il
numero di tazze o patate.
3 In caso di manzo, montone o pollo, il
forno interrompe la cottura ed emette
un segnale acustico per ricordarvi di
girare le pietanze e garantire una cottura
omogenea.
IT
59
Page 60

IT
PULIZIA E MANUTENZIONE
Pulire regolarmente il dispositivo e rimuovere i residui di alimenti.
• Staccare sempre la spina prima della pulizia.
• Non immergere mai il dispositivo completamente in acqua o altri liquidi.
• Una pulizia non regolare comporta usura e accorcia la vita utile del dispositivo.
• Non utilizzare detergenti aggressivi, benzina, polvere abrasiva o spugne
metalliche.
• Non togliere mai la copertura.
Come elimina re odori spiacevoli
Se non si utilizza il dispositivo per un certo tempo, possono comparire odori spiacevoli.
Con i 3 seguenti metodi è possibile eliminarli:
1 Tagliare un limone a pezzi e scaldarli per 2-3 minuti in una tazza nel microonde a
massima potenza.
2 Mettere una tazza di tè rosso nel microonde e scaldarla a massimo livello.
3 Mettere della scorza d’arancia nel microonde e scaldare per 1 minuti al massimo
livello.
Esterno:
Pulire l’esterno con un panno morbido inumidito.
Sportello e guarnizione:
Pulire sportello, nestrella, guarnizione e tutti i componenti adiacenti con un panno
morbido inumidito, in modo da rimuovere spruzzi e macchie.
60
Tasti funzione:
Pulire i tasti funzione con un panno leggermente inumidito.
Interno:
Pulire il vano interno con un panno morbido inumidito. Pulire anche la copertura del
conduttore di onde, in modo da rimuovere schizzi.
Piatto rotante, anello rotante e asse rotante:
Pulire i componenti con acqua e un detergente delicato e lasciarli asciugare
completamente.
Page 61

SMALTIMENTO
IT
Se sul prodotto è presente la gura a sinistra (il cassonetto
mobile sbarrato), si applica la direttiva europea 2012/19/
UE. Questi prodotti non possono essere smaltiti con i riuti
normali. Informarsi sulle disposizioni vigenti sulla raccolta
separata di dispositivi elettrici ed elettronici. Non smaltire
i vecchi dispositivi con i riuti domestici. Grazie al corretto
smaltimento dei vecchi dispositivi si proteggono il pianeta e
la salute delle persone da possibili conseguenze negative.
Il riciclo di materiali aiuta a diminuire il consumo di materie
prime.
61
Page 62

Page 63

Page 64

 Loading...