

Page 1

Ice Volcano 2G
Eiswürfelmaschine
Ice Cube Maker
Máquina de hielo
Machine à glaçons
Fabbricatore di cubetti di ghiaccio
IJsblokjesmachine
Ledomat
10030844 10030848 10030849
Page 2

Page 3

Sehr geehrter Kunde,
wir gratulieren Ihnen zum Erwerb Ihres Gerätes. Lesen Sie
die folgenden Hinweise sorgfältig durch und befolgen Sie
diese, um möglichen Schäden vorzubeugen. Für Schäden,
die durch Missachtung der Hinweise und unsachgemäßen
Gebrauch entstehen, übernehmen wir keine Haftung. Scannen
Sie den folgenden QR-Code, um Zugriff auf die aktuellste
Bedienungsanleitung und weitere Informationen rund um das
Produkt zu erhalten:
INHALTSVERZEICHNIS
DE
Sicherheitshinweise4
Geräteübersicht6
Inbetriebnahme und Bedienung 8
Fehlerbehebung12
Reinigung und Pege 13
Hinweise zur Entsorgung14
TECHNISCHE DATEN
Artikelnummer 10030844, 10030848, 10030849
Stromversorgung 220-240 V ~ 50/60 Hz
KONFORMITÄTSERKLÄRUNG
Hersteller:
Chal-Tec GmbH, Wallstraße 16, 10179 Berlin, Deutschland.
Dieses Produkt entspricht den folgenden Europäischen
Richtlinien:
2014/30/EU (EMV)
2014/35/EU (LVD)
2011/65/EU (RoHS)
English 15
Español 27
Français 39
Italiano 51
Nederlands 63
Český 75
3
Page 4

DE
SICHERHEITSHINWEISE
• Schließen Sie das Gerät nur an geerdete Steckdosen an, die der Spannung des
Geräts entsprechen.
• Wenn Sie das Gerät bewegen benutzen Sie die Griffe.
• Stellen Sie das Gerät auf einen ebenen Untergrund.
• Benutzen Sie das Gerät nur in Innenräumen.
• Benutzen Sie das Gerät nicht in der Nähe einer Badewanne oder eines
Swimmingpools.
• Ziehen Sie den Stecker aus der Steckdose wenn Sie das Gerät nicht benutzen.
• Tauchen Sie das Netzkabel und den Stecker niemals in Wasser oder andere
Flüssigkeiten.
• Benutzen Sie nur Zubehör, das vom Hersteller ausdrücklich für dieses Gerät
empfohlen wird.
• Stellen Sie das Gerät nicht direkt unter einer Steckdose auf.
• Lassen Sie das Netzkabel nicht von der Arbeitsäche hängen, damit Kinder nicht
daran ziehen können.
• Überfüllen Sie das Gerät nicht, andernfalls kann es zu Kurzschlüssen und
Stromschlägen kommen.
• Achten Sie darauf, dass der Deckel während des Betriebs immer geschlossen ist.
• Ziehen sie den Stecker nicht am Kabel aus der Steckdose, sondern halten Sie ihn
beim Abziehen mit der Hand fest.
• Für Schäden, die durch Missachtung der Hinweise und unsachgemäßen Gebrauch
entstehen, übernehmen wir keine Haftung.
• Benutzen Sie das Gerät nur im Haushalt.
• Schließen Sie das Gerät nicht an eine Zeitschaltuhr oder ferngesteuerte Steckdose an.
• Tauchen Sie das Gerät nicht in Wasser.
• Falls das Netzkabel oder der Stecker beschädigt sind, müssen sie vom Hersteller,
einem autorisierten Fachbetrieb oder einer ähnlich qualizierten Person ersetzt
werden.
• Halten Sie sich bei der Entsorgung an die örtlichen Vorschriften zur Entsorgung von
Geräten mit entzündlichem Gas.
• Bewahren Sie keine leichtentzündlichen oder explosiven Stoffe im Gerät auf.
• Befüllen Sie das Gerät nur mit Wasser.
• Kinder ab 8 Jahren, physisch und körperlich eingeschränkte Menschen sollten das
Gerät nur benutzen, wenn sie vorher von einer Aufsichtsperson ausführlich mit den
Funktionen und den Sicherheitsvorkehrungen vertraut gemacht wurden.
Dieses Gerät enthält das Kältemittel Isobutan (R600a), ein Naturgas mit hoher
Umweltverträglichkeit, aber brennbar. Obwohl es brennbar ist, schädigt es nicht
die Ozonschicht und verstärkt nicht den Treibhauseffekt. Die Verwendung dieses
Kältemittels führt zu einer etwas höheren Geräuschentwicklung des Gerätes.
Zusätzlich zum Kompressorgeräusch können Sie den Fluss des Kältemittels hören.
Dies ist unvermeidlich und hat keine negative Wirkung auf die Leistung des Gerätes.
Seien Sie während des Transports vorsichtig, so dass der Kältemittelkreislauf nicht
beschädigt wird. Kältemittellecks können die Augen reizen.
4
Page 5

WARNUNG
Gefahr durch Feuer/brennbare Materialien. Bitte beachten Sie die
örtlichen Vorschriften zur Entsorgung von Geräten mit brennbaren
Kältemitteln und Gasen.
• Halten Sie Lüftungsöffnungen im Gerätegehäuse frei von Hindernissen.
• Beschädigen Sie nicht den Kältemittelkreislauf.
• Verwenden Sie keine mechanischen Vorrichtungen oder andere Mittel, um den
Auftauprozess oder den Eisgewinnungsprozess zu beschleunigen
• Verwenden Sie keine anderen Arten von Elektrogeräten im Inneren der
Eiswürfelmascine.
Besondere Hinweise
• Achten Sie bei der Positionierung des Gerätes darauf, dass das Netzkabel nicht
eingeklemmt oder beschädigt ist.
• Achten Sie darauf, dass sich keine Mehrfachsteckdosen oder Netzteile auf der
Rückseite des Geräts be nden.
Um eine Kontamination von Lebensmitteln zu vermeiden, beachten Sie bitte die
folgenden Anweisungen:
• Reinigen Sie regelmäßig Ober ächen, die mit Lebensmitteln in Berührung kommen
können. Reinigen Sie Regelmäßig den Wasserablauf.
• Sollte das Gerät einen Wassertank enhalten, reinigen Sie ihn wenn das Gerät 48
Stunden lang nicht benutzt wurde. Spülen Sie den Tank, wenn 5 Tage lang kein
Wasser entnommen wurde.
DE
WARNUNG
Achten Sie bei Gebrauch, Wartung und Entsorgung des Gerätes auf
das linke Symbol, das sich auf der Rückseite oder am Kompressor des
Gerätes be ndet. Dieses Symbol warnt vor möglichen Bränden. In den
Kältemittelleitungen und im Kompressor be nden sich brennbare Stoffe.
Halten Sie das Gerät bei Gebrauch, Wartung und Entsorgung von
Feuerquellen fern.
5
Page 6

DE
GERÄTEÜBERSICHT
Wasser-Tropfwanne
1
Abdeckung der Tropfwanne und
2
Auage für den Eiswürfelbehälter
Wasserablauf-Stopfen
3
Luftauslass
4
Oberes Fenster
5
Eiswürfel-Druckfeder
6
Bedienfeld
7
Vernebler
8
Seitentür
9
Wassertank und MAX-Anzeige
10
6
Page 7

A Display
1 Timer/Durchlaufzeit-
Anzeige
2 Eiswürfelgröße: klein
3 Eiswürfelgröße: groß
4 Eiswürfelherstellung:
Es werden Eiswürfel
produziert.
5 Wasserauslass: Das Wasser
wird gerade abgelassen.
6 Fehlercode 1, 2 oder 3
7 Zu wenig Wasser: Erscheint
die Anzeige muss Wasser
nachgefüllt werden.
8 Gerät ist voll mit Eiswürfeln
9 AN/AUS-Anzeige: Wir
das Gerät ausgeschaltet
blinkt die Anzeige, wird
das Gerät eingeschaltet
leuchtet sie durchgängig.
A Display
B Taste zur
Eiswürfelherstellung
C Taste zum Wasser zapfen
D Gerät ein/ausschalten
E Taste zum Auswählen der
Eiswürfelgröße und zum
Einstellen der verlängerten
Durchlaufzeit
F Taste zum Einstellen des
Ein- oder Aus-Timers
DE
7
Page 8

DE
INBETRIEBNAHME UND BEDIENUNG
Vor dem ersten Betrieb
• Entfernen Sie das gesamte Verpackungsmaterial und überprüfen Sie ob die
Lieferung vollständig ist. Sollten Teile fehlen, wenden Sie sich umgehend an unseren
Kundendienst.
• Entfernen Sie alle Aufkleber und Klebestreifen. Öffnen Sie das transparente Fenster,
und entnehmen Sie die Zubehörteile.
• Reinigen Sie den Innenraum (Wassertank, Eiswürfel-Druckfeder) mit einem weichen
Lappen und lauwar- mem Wasser.
• Stellen Sie das Gerät auf eine ebene Arbeitsplatte, fern von direktem Sonnenlicht
und Wärmequellen. Las- sen Sie um das Gerät herum mindestens 15 cm Platz,
damit die Luft ausreichend zirkulieren kann.
• Warten Sie vor dem Einschalten mindestens 1 Stunde, damit sich das Kühlmittel
verteilen kann.
• Achten Sie darauf, dass der Stecker jederzeit frei zugänglich ist.
Wichtig: befüllen Sie das Gerät nur mit Trinkwasser!
Bedienung
1. Öffnen Sie die linke Seitentür und füllen Sie Wasser ein. Achten Sie darauf, dass
das eingefüllte Wasser die MAX-Markierung nicht überschreitet.
2. Stecken Sie den Stecker in die Steckdose. Im Display blinkt das Symbol
8
.
Page 9

3. Drücken Sie auf die ON/OFF-Taste am Bedienfeld, um die Eiswürfelherstellung
zu starten. Das Symbol leuchtet nun dauerhaft im Display. Gleichzeitig beginnt
das Symbol zu blinken. Als Grundeinstellung für die Eiswürfelgröße ist „groß“
eingestellt. Falls Sie die Größe ändern möchten, drücken Sie auf die SELECT-Taste
und wählen Sie zwischen großen Eiswürfeln oder kleinen Eiswürfeln .
Falls die Eiswürfel immer noch nicht die gewünschte Größe haben, können Sie die
Durchlaufzeit des Zubereitungszyklus verlängern. Während die Eiszubereitung läuft,
halten Sie die ON/OFF-Taste 5 Sekunden lang gedrückt. Die Zahl [0] erscheint
oben in der Timer/Durchlaufzeit-Anzeige im Display. Die Zahl [0] steht für die
Standard-Durchlaufzeit. benutzen Sie die SELECT-Taste, um zu [1], [2] und wieder
zurück zu [0] zu wechseln. Wenn Sie [1] wählen verlängert sich die Durchlaufzeit
um 1 Minute, wenn Sie [2] wählen um 2 Minuten. Wenn Sie das Gerät ausund wieder einschalten, ist automatisch wieder die Standard-Durchlaufzeit [0]
eingestellt.
4. Die Herstellung der Eiswürfel dauert etwa 6-12 Minuten, abhängig von der
ausgewählten Größe und der Umgebungstemperatur.
5. Das Gerät überwacht während des Betriebs den Wasserstand. Falls die
Wasserpumpe kein Wasser mehr pumpt, stoppt das Gerät automatisch und das
Symbol erscheint im Display und das Pfeilsymbol blinkt. Füllen Sie in diesem
Fall umgehend Wasser nach. Wir empfehlen Ihnen zuerst die ON/OFF-Taste zu
drücken bevor Sie das Wasser nachfüllen. Drücken Sie dann erneut die ON/OFF-
Taste, um das Gerät erneut zu starten. Falls sie Wasser einfüllen ohne das Gerät
anzuhalten dauert die Eiswürfelherstellung länger. Warten Sie vor dem Einschalten
3 Minuten, damit sich das Kühlmittel erneut verteilen kann.
Wenn das Gerät voll mit Eiswürfeln ist
6. Wenn das Gerät voll mit Eiswürfeln ist, hält das Gerät automatisch an und das
Symbol wird im Display angezeigt.
DE
So entnehmen Sie die Eiswürfel
7. Stellen Sie den Eiswürfelbehälter auf die Auage Abdeckung der Tropfwanne und
drücken Sie auf die ICE-Taste am Bedienfeld. Das Symbol erscheint im Display
und die Eiswürfel-Druckfeder beginnt sich zu drehen. Die Eiswürfel fallen daraufhin
nach und nach aus dem Eisauslass in den Eiswürfelbehälter. Drücken Sie erneut auf
die ICE-Taste, das Symbol verschwindet wieder vom Display und die Feder
hört auf sich zu drehen. Es fallen keine Eiswürfel mehr aus dem Eisauslass in den
Behälter.
9
Page 10
DE
So zapfen Sie Wasser ab
8. Die voreingestellte Fließzeit beträgt 10 Sekunden. Stellen Sie einen Becher unter
den Wasserauslass und drücken Sie einmal auf die WATER-Taste. Das Wasser
ießt mittig aus dem Wasserauslass, das Symbol erscheint im Display und im
Timerfeld erscheint die Anzeige [10 S]. Nachdem die 10 Sekunden abgelaufen
sind, erlischt das Symbol und es kommt kein Wasser mehr aus dem Auslass. Falls
Ihnen die die Fließzeit zu kurz oder lang ist, können Sie sie beliebig anpassen.
Halten Sie die WATER-Taste mindestens 5 Sekunden lang gedrückt, im Timerfeld
erscheint die Anzeige [10 S]. Drücken Sie auf die SELECT-Taste, um die Zeit von
7-25 Sekunden anzupassen. Warten Sie 5 Sekunden und die neu eingestellte zeit
erscheint im Timerfeld. Wenn Sie das nächste Mal Wasser zapfen, merkt sich das
Gerät die neu eingestellte Zeit.
So lassen Sie Restwasser aus dem Gerät ab
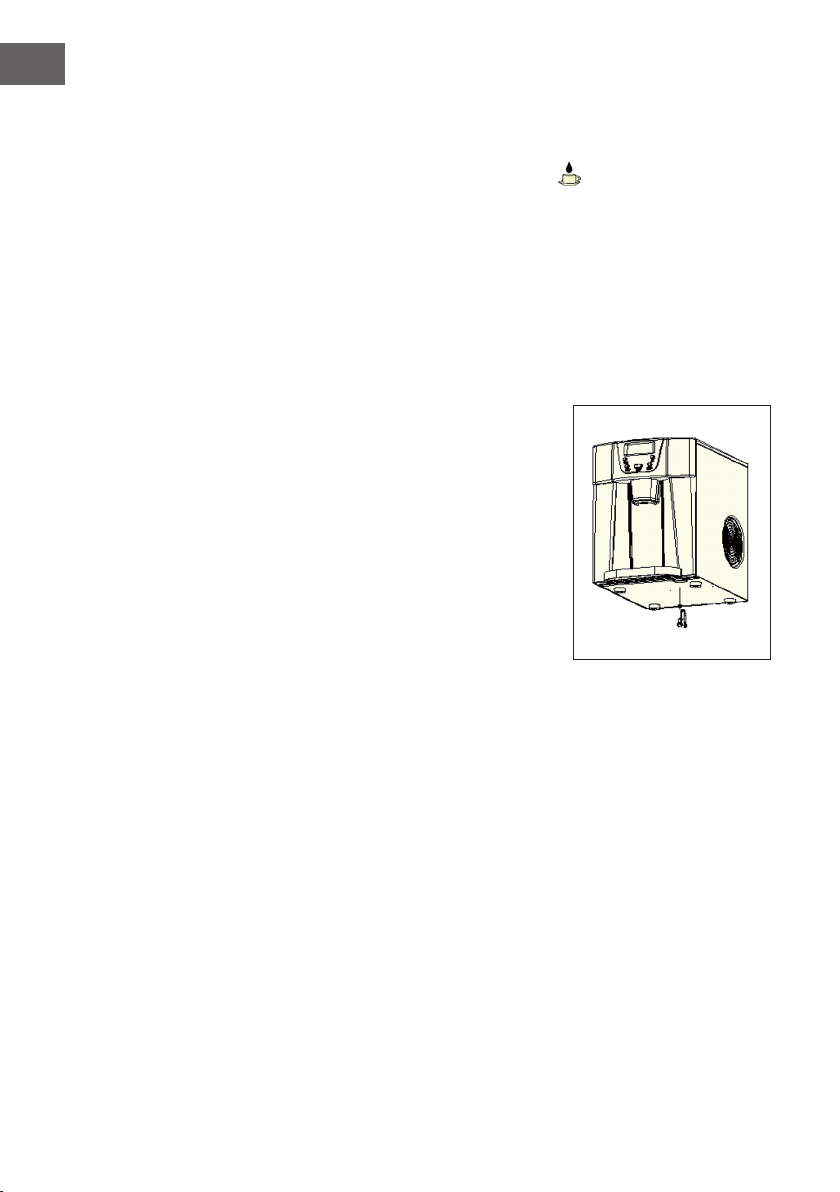
9. Wenn Sie das Gerät reinigen oder das Wasser
austauschen wollen, müssen Sie das Restwasser
aus dem Tank ablassen. Ziehen Sie dazu den
Wasserablauf-Stopfen unten aus dem Gerät und
das Wasser ießt aus dem Gerät. Falls ihr gerät
mit einem Schlauch ausgestattet ist, schließen
Sie den Schlauch an den Wasserablauf an, um
das Wasser bequem abzulassen.
10. Wechseln Sie das Wasser im Tank alle 24
Stunden, um sicherzugehen, dass das Wasser
frisch ist. Falls Sie das Gerät länger nicht
benutzen, lassen Sie das Wasser vorher
komplett ab.
Timer einstellen
• Die einstellbare Zeit für den Timer beträgt 0,5-19,5 Stunden. Die voreingestellte
Zeit ist 1 Stunde.
• Wenn das Gerät läuft, können Sie einen Ausschalt-Timer einstellen, nach dessen
Ablauf das Gerät automatisch ausgeht.
• Wenn sich das Gerät im Standby-Modus bendet können Sie einen Einschalt-Timer
einstellen, nachdem das Gerät automatisch angeht. So haben Sie immer dann Eis
zur Verfügung wenn Sie es gerade brauchen, z. B. wenn Sie nach Hause kommen
oder ein Dinner veranstalten.
10
Page 11

Time einschalten
Drücken Sie zuerst auf die TIMER-Taste, die voreingestellte Zeit beträgt 1 Stunde und
wird im Timerfeld im Display angezeigt. Drücken Sie auf die SELECT-Taste, um die
gewünschte zeit einzustellen. Jedes Mal wenn Sie auf die SELECT-Taste drücken wird
die Zeit um eine halbe Stunde erhöht. Halten Sie die SELECT-Taste gedrückt, um die Zeit
schneller zu verstellen. Wenn Sie die Zeit eingestellt haben warten Sie 5 Sekunden, der
Buchstabe [H] im Timerfeld hört auf zu blinken und wird konstant angezeigt. Der Timer
ist nun aktiv.
Timer ausschalten
Wenn Sie einen Timer eingestellt haben, drücken Sie auf die TIMER-Taste, die
eingestellte Zeit und das Symbol [H] erlöschen. Der Timer ist nun ausgeschaltet.
1 = Eingestellte Timerzeit
2 = Symbol für die Stunde (hour) und eingestellten Timer
DE
11
Page 12
DE
FEHLERBEHEBUNG
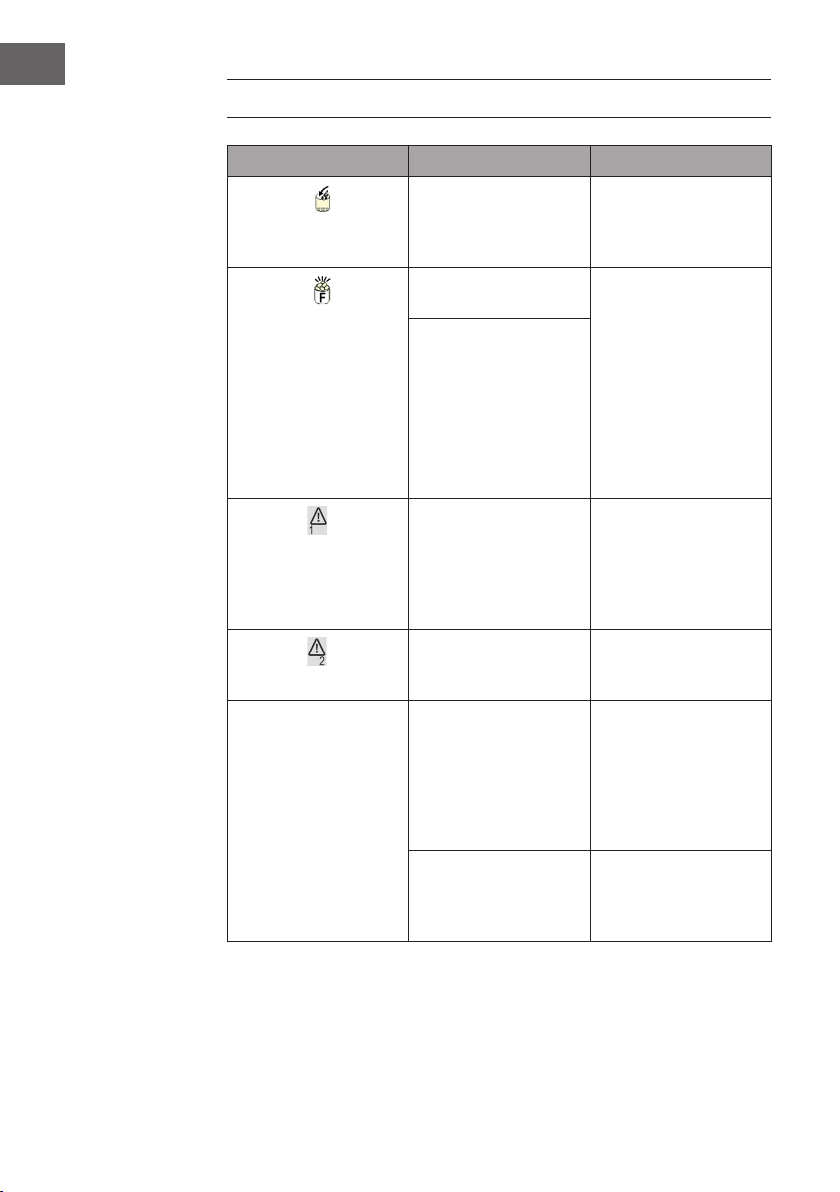
Fehler Mögliche Ursache Lösung
Das Symbol
und der Pfeil blinkt.
Das Symbol
und [F] blinkt.
Fehlercode
Fehlercode
Die Eiswürfel kleben am
Vernebler fest.
erscheint
erscheint
Zu wenig Wasser im Tank. Schalten Sie das Gerät
aus, füllen Sie Wasser
nach und schalten Sie das
Gerät danach wieder ein.
Zu viele Eiswürfel im
Innenraum.
Keine Eiswürfel im
Innenraum.
Der Sensor für die
Raumtemperatur ist kaputt.
Das Gerät lässt sich nicht
resetten.
Der Herstellungszyklus ist
zu lang.
Die Temperatur im
Wassertank ist zu niedrig.
Entfernen Sie alle
Eiswürfel oder Hindernisse
aus dem Innenraum und
reinigen Sie ihn. Falls die
Eisherstellung immer noch
nicht funktioniert, drücken
Sie länger als 5 Sekunden
auf die SELECT-Taste,
um die Eisherstellung für
maximal 10 Zyklen erneut
zu starten.
Das Gerät läuft zwar
noch, Sie sollten aber
dennoch Kontakt zu einem
Fachbetrieb aufnehmen
und den sensor
austauschen lassen.
Wenden Sie sich zur
Überprüfung des Fehlers
an einen Fachbetrieb.
Schalten Sie das Gerät
aus und schalten Sie es
wieder ein, nachdem die
Eiswürfel geschmolzen
sind. Wählen Sie die
Einstellung für kleine
Eiswürfel.
tauschen Sie das Wasser
aus. Das eingefüllte
Wasser sollte zwischen
7-32 °C warm sein.
12
Page 13
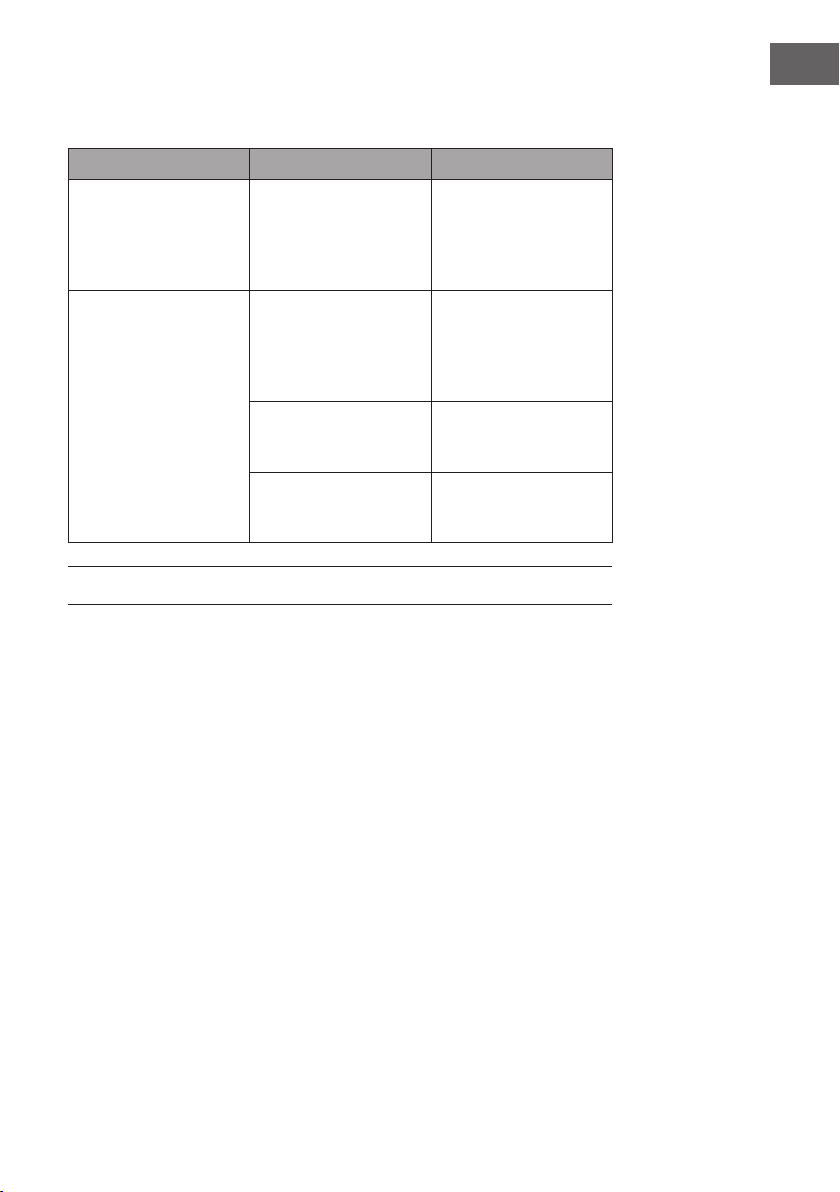
Fehler Mögliche Ursache Lösung
Es benden Sich Eiswürfel
im gerät, aber sie werden
nicht ausgegeben, wenn
Sie auf die ICE-Taste
drücken.
Der Eiszyklus läuft durch
aber es wird kein Eis
produziert.
Der Ausgabeschacht für
die Eiswürfel ist blockiert.
Die Umgebungstemperatur oder die Wassertemperatur im Innern ist zu hoch.
Kühlmittel läuft aus. Lassen Sie das Gerät
Ein Schlauch im Kühlsys-
tem ist gebrochen.
Lassen Sie die ICE-Taste
los und drücken Sie sie
nach 3 Sekunden erneut.
Verwenden Sie das Gerät
nur in Räumen mit einer
Raumtemperatur unter 32
°C und füllen Sie kühles
Wasser ein.
von einem Techniker
überprüfen.
Lassen Sie das Gerät
von einem Techniker
überprüfen.
REINIGUNG UND PFLEGE
Bevor Sie das Gerät erstmal benutzen, empfehlen wir Ihnen es gründlich zu reinigen.
Ziehen Sie immer zuerst den Stecker aus der Steckdose, bevor Sie das Gerät reinigen.
DE
1. Entnehmen Sie das Zubehör aus dem Innenraum.
2. Reinigen Sie den Innenraum mit etwas Spülmittel, warmem Wasser und einem
weichen Lappen. Füllen Sie dazu etwas warmes Wasser mit etwas Spülmittel in den
Wassertank und wischen Sie die äußere Oberäche mit dem Lappen ab.
3. Reinigen Sie dann den Innenraum und lassen Sie das Wasser danach über den
Wasserablauf ab.
4. Reinigen Sie die Außenseite regelmäßig mit einem feuchten Lappen und etwas
Spülmittel.
5. Trocknen Sie die Außenseite und den Innenraum mit einem trockenen Lappen oder
einem Geschirrtuch ab.
6. Wenn Sie das Gerät länger nicht benutzen, lassen Sie das restwasser komplett
ablaufen.
13
Page 14
DE
HINWEISE ZUR ENTSORGUNG
Bendet sich die linke Abbildung (durchgestrichene Mülltonne
auf Rädern) auf dem Produkt, gilt die Europäische Richtlinie
2012/19/EU. Diese Produkte dürfen nicht mit dem normalen
Hausmüll entsorgt werden. Informieren Sie sich über die
örtlichen Regelungen zur getrennten Sammlung elektrischer
und elektronischer Gerätschaften. Richten Sie sich nach
den örtlichen Regelungen und entsorgen Sie Altgeräte nicht
über den Hausmüll. Durch die regelkonforme Entsorgung
der Altgeräte werden Umwelt und die Gesundheit ihrer
Mitmenschen vor möglichen negativen Konsequenzen
geschützt. Materialrecycling hilft, den Verbrauch von
Rohstoffen zu verringern.
14
Page 15

Dear Customer,
Congratulations on purchasing this equipment. Please read
this manual carefully and take care of the following hints to
avoid damages. Any failure caused by ignoring the items and
cautions mentioned in the instruction manual is not covered
by our warranty and any liability. Scan the QR code to get
access to the latest user mannual and other information about
the product
CONTENT
Safety Instructions16
Product Overview18
Use and Operation 20
Troubleshooting24
Cleaning and Care 25
Hints on Disposal26
TECHNICAL DATA
Item number 10030844, 10030848, 10030849
Power supply 220-240 V ~ 50 Hz
EN
DECLARATION OF CONFORMITY
Producer:
Chal-Tec GmbH, Wallstraße 16, 10179 Berlin, Germany.
This product is conform to the following European
Directives:
2014/30/EU (EMC)
2014/35/EU (LVD)
2011/65/EU (RoHS)
15
Page 16

EN
SAFETY INSTRUCTIONS
• Check that the mains voltage corresponds to the rating of the appliance before
operating.
• Use handles or knobs when moving. Place on a at stable surface for use. Do not
use outdoors.
• Do not use near or in the immediate vicinity of a bath or swimming pool or any
source of liquid.
• Unplug from socket outlet when not in use.
• To protect against electric shock, do not immerse cord or plug in water or any other liquid.
• The use of accessory attachments not recommended by the appliance
manufacturer, may cause injury.
• Do not locate this appliance immediately below a socket outlet.
• Do not allow cord to overhang the counter top where it can be easily pulled by
children.
• Do not use this appliance for anything else other than its intended use.
• Do not overll as this may cause a hazard. Ensure lid is closed when in operation
• To remove plug from outlet, do not pull on supply cord. Grasp plug rmly and pull
to remove.
• No liability can be accepted for any damage caused by non compliance with
these instructions or any other improper use or mishandling. This appliance is for
household use only
• This appliance is not intended to be operated by means of an external timer or
separate remote control system.
• This appliance is not intended to be immersed in water.
• If the supply cord is damaged, it must be replaced by the manufacturer or its service
agent or a similarly qualied person in order to avoid a hazard.
• Please according to local regulations regarding disposal of the appliance for its
ammable blowing gas.
• Do not store explosive substances such as aerosol cans with a ammable propellant
in this appliance.
• Fill with potable water only.
• This appliance is not intended for use by persons (including children) with reduced
physical, sensory or mental capabilities, or lack of experience and knowledge,
unless they have been given supervision or instruction concerning use of the
appliance by a person responsible for their safety. Children should be supervised to
ensure that they do not play with the appliance.
This appliance contains the coolant isobutane (R600a),a natural gas which
is environmentally friendly. Although it is ammable, it does not damage the
ozone layer and does not increase the greenhouse effect. The use of this coolant
has,however,led to a slight increase in the noise level of the appliance. In addition
to the noise of the compressor,you might be able to hear the coolant owing
around the system. This is unavoidable,and does not have any adverse effect on the
performance of the appliance. Care must be taken during the transportation and
setting up of the appliance that no parts of the cooling system are damaged. Leaking
coolant can damage the eyes.
16
Page 17

WARNING
Danger from re/ ammable materials. Please observe the local
regulations for the disposal of units with ammable refrigerants and
gases.
• Keep ventilation openings in the unit housing free of obstacles.
• Do not damage the refrigerant circuit.
• Do not use any mechanical devices or other means to accelerate the defrosting
process or the ice recovery process.
• Do not use other types of electrical appliances inside the ice cube machine.
Special Notes
• When positioning the unit, make sure that the power cord is not pinched or
damaged.
• Make sure that there are no multiple sockets or power supplies on the back of the
unit.
To avoid contamination of food, please follow the instructions below:
• Regularly clean surfaces that may come into contact with food. Clean the water
drain regularly.
• If the appliance contains a water tank, clean it if it has not been used for 48 hours.
Rinse the tank if no water has been removed for 5 days.
WARNING
When using, servicing and disposing of the unit, pay attention to the left
symbol on the rear of the unit or on the compressor. This symbol warns
of possible res. There are ammable substances in the refrigerant lines
and in the compressor. Keep the appliance away from sources of re
during use, maintenance and disposal.
EN
17
Page 18

EN
PRODUCT OVERVIEW
Water drip tray
1
Water drip tray cover and support
2
of the ice-cube container
Water drain plug
3
Hot Air outlet
4
Top window
5
Ice cube pushing spring
6
Control Panel
7
Evaporator
8
Side door
9
Water reservoir and the MAX
10
level
18
Page 19

A Display
1 TIMER setting delay time
2 Ice-cube size displaying:
Small size.
3 Ice-cube size displaying:
Large size.
4 Ice-cube obtaining symbol:
with this symbol, the ice-
cube will be pushed out.
5 Water dispensing symbol:
with this symbol, water is
owing out now.
6 Error code.
7 Lack of water in reservoir
symbol: With this symbol,
the unit will stop running,
need to pour water in.
8 Ice-full symbol: when it
display, means the ice
storage area is full of ice-
cube.
9 ON/OFF symbol: if the
unit has been turned off,
this symbol will ash; And
if the unit is turned on, this
symbol will always display.
EN
A Display
B Ice-cube obtaining button
C Water dispenser button
D ON/OFF Button: to turn
on/off the unit
E SELECT Button: to select the
size of the ice cube and the
number code of all kinds of
delay time
F TIMER Button: to setting
the timer-on or timer-off
program
19
Page 20

EN
USE AND OPERATION
Before rst Use
• Remove the exterior and interior packaging, Then check all the accessories are
included. If any parts are missing, please contact our customer service.
• Remove all the tapes on the unit. Open the transparent window, take out the
accessory parts inside.
• Clean the interior (such as water reservoir, Ice cube pushing spring etc.) with
lukewarm water and a soft cloth.
• Locating your ice maker on a level counter table far from direct sunlight and other
sources of heat (i.e.: stove, furnace, radiator). Maker sure that there is at least 15
centimeters between the back and sides of your ice maker with the wall.
• Allow one hour for the refrigerant uid to settle down before plugging your ice
maker in.
• The power plug must be accessible directly.
Note: ll with potable water only. Only use drinking water!
Operation
1. Open the left side door, pour potable water into reservoir. Keep water level below
the “MAX” water level mark.
20
2. Plug your ice-maker into the main power outlet, then the
display window.
symbol will ash in LCD
Page 21

3. Press “ON/OFF” button on the control panel to begin the ice making cycle. After
this, the symbol will change to light on always in LCD display window, and
symbol will ash on in the mean time. The default size of ice-cube is Large. If
you want to select the size of the ice cube, just press the “SELECT” button to select
between Large size and Small size . If you still think the ice cube size is not
t for you, you can add the each ice-making cycle time by “SELECT” button. During
the unit ice-making running, always press the “ON/OFF” button for more than
5 seconds, digit “0” will appear in the TIMER delay time displaying area of LCD
window, which means the standard time of the once ice-making process, continue
to press the “SELECT” button, the digit will change from 0 to 1, again 2, then return
0. After 5 seconds, the setting will complete and the digit will disappear and be
remembered by the controller. With digit 1 setting, it will add 1 minute to standard
duration time of each ice-making cycle, and the digit 2 setting, the added time will
be longer more. And if the unit is plugged on again, it will recover to the digit 0
setting with standard time.
4. The ice making cycle lasts 6 to 12 minutes, depending on the size of the ice cube
selection and the ambient temperature.
5. While the ice-maker is on, verify water level periodically. If water pump can’t pump
out water, the ice maker will stop automatically, and the symbol will light on
LCD displaying window and the arrow symbol will ash. Need to pour water into
the water reservoir inside. We suggest you should press “ON/OFF” button to turn
off the unit rst, then ll water up to the MAX level mark, again press “ON/OFF”
button to restart the unit. If you only ll the water in, but doesn’t press any button,
you will need to wait some time to desire the ice-cube. Allow the refrigerant liquid
inside the compressor at least 3 minutes to settle before restarting.
When Ice Full indicator is on
EN
6. The ice maker automatically stops working when the ice-cube is full inside and the
ice full” symbol on LCD displaying window will be indicated.
How to obtain the ice-cube
7. Put your ice-cube container on drip tray, press the “ICE” button one time on control
panel (Button B in above illustration), the symbol will light on the LCD window,
then the ice cube pushing spring start to rotate, the ice-cube will fall down into your
ice-cube container from the ice-cube tap. And press the “ICE” button again, the
symbol will disappear in the LCD window, the internal pushing spring will stop
rotating and the ice-cube will not ow out again.
21
Page 22

EN
How to dispense the water
8. Default time of water owing: 10 S. Put your water cup on drip tray, press the
“WATER” button once on control panel (Button C in above illustration), the water
will ow out from middle water tap, and the symbol will light on and the “10
S” will display in the TIMER delay time displaying area of LCD window, with the
time pass, after 10 seconds, the symbol disappears and water dispensing will
nish and water will not ow out again. If the water owing time is too short or
too long, you can set it again yourself. Always press the “WATER” button for more
than 5 seconds, “10 ” will appear in the TIMER delay time displaying area of LCD
window, continue to press the “SELECT” button to select the suitable time which
range is from 7 seconds to 25 seconds. After 5 seconds, the setting will complete
and the new digit will disappear and be remembered by the controller. Next time, if
you want to dispense the water, it will work according to the new set time.
How to drain out the water inside the unit
9. When you clean the unit internal parts or change
the drinkable water, need to drain out the left
water in the water reservoir, just unplug the
water drain cap which located at the bottom of
the unit and near the water drip tray, the water
will ow out from the unit completely. If the unit
is supplied with the plastic soft tube, connect this
soft tube with the water drain port, it can help
you drain out the water easily.
10. Change water in the water reservoir every 24
hours to ensure a reasonable hygiene level. If
the unit isn’t to be used, drain all water & dry the
water reservoir.
22
Timer Setting
• Timer Delay Time Range: 0.5-19.5 hours. Default Delay Time: 1 hour.
• When the unit is running, you can set the unit with OFF-TIMER to let the unit stop
running after your set delay time.
• And when the unit is on standby, you can set the unit with ON-TIMER to let the unit
start to run automatically after your set delay time, then when you go back home or
have a dinner, you can enjoy the happy life that this ice-maker give to you.
Page 23

How to set the timer
Press the TIMER button rst, the default delay time is 1.0 hour displayed delay time in
LCD display window, then press the SELECT button to select your desired delay time.
Each press SELECT button one time, the delay time will increase 0.5 hour, but if you
always press the SELECT button, the delay time will change very quickly. During the
process of delay time adjusting, the letter “H” will ash, then after 5 seconds ashing
wit- hout pressing, the “H” letter will change from ashing to always displaying, means
the timer program has been completed.
How to cancel the timer
When the unit has been set with the timer, press the TIMER button, then the delay time
digit and “H” letter display will disappear, mean the timer set has been canceled.
1 = Timer delay time
2 = Means Hour, and timer setting duration
EN
23
Page 24

EN
TROUBLESHOOTING
Problem Possible Cause Solution
symbol is lightening on
and the arrow ashes.
symbol is lightening
and letter “F” ashes.
Errorcode
Errorcode
Ice cubes on the evaporator stick together.
Lack of Water. Stop the ice maker, ll
water, and press “ON/
OFF” button again to
restart the unit.
There is too much ice. Suggest you to obtain the
ice-cube.
No ice cube inside. Remove the probable
obstacle inside or clean
the inside wall of the ice
storage, if still can’t start
to ice making process,
press “SELECT” for more
than 5 seconds to run the
ice making for 10 cycles
at most.
Ambient temperature
sensor breakdown
The ice-making box can
not reset normally.
The ice cycle is too long. Stop the ice maker,
Water temperature in inner
tank is too low.
The unit can still work,
but suggest to call the
manufacturer service man
or electrical technician to
change to a new sensor.
Call the manufacturer
service man or qualied
technician to check the
problem.
and restart it after the
ice blocks melt. Select
the small size ice cube
selection.
Change the water in the
inner Tank. Temperature of
water is better set between
7℃-32℃ .
24
Page 25

Problem Possible Cause Solution
There are ice-cube inside
the unit, but can’t dispense
the ice-cube when you
push the “ICE” button.
Ice making cycle is normal
but no ice is made.
Moving shaft for the Icecube is blocked.
Ambient temperature or
water temperature in inner
tank is too high.
Refrigerant liquid leakage. Verify by a qualied
Pipe in the cooling system
is blocked.
Release the button for
ice-cube for 3 seconds,
then again push the “ICE”
button.
Please run the ice maker
below 32℃ and pour
colder water into tank.
technician.
Verify by a qualied
technician.
CLEANING AND CARE
Before using your ice maker, it is strongly recommended to clean it thoroughly. Unplug
the unit before cleaning or making any maintenance.
1. Take out the accessory parts under top window.
2. Clean the interior with diluted detergent, warm water and a soft cloth. First pour the
warm water with diluted detergent into the internal water reservoir and the space
below the transparent window, then use the soft cloth to wipe the surface.
3. Again use the water to rinse the inside parts, and drain out the water by unplugging
the drain cap on the bottom.
4. The outside of the ice maker should be cleaned regularly with a mild detergent
solution and warm water.
5. Dry the interior and exterior with a soft cloth.
6. When the machine is not in use for a long time, open water drain cap to drain out
water completely from water reservoir.
EN
25
Page 26

EN
HINTS ON DISPOSAL
According to the European waste regulation 2012/19/EU this
symbol on the product or on its packaging indicates that this
product may not be treated as household waste. Instead it should
be taken to the appropriate collection point for the recycling of
electrical and electronic equipment. By ensuring this product is
disposed of correctly, you will help prevent potential negative
consequences for the environment and human health, which
could otherwise be caused by inappropriate waste handling of
this product. For more detailled information about recycling of
this product, please contact your local council or your household
waste disposal service.
26
Page 27

Estimado cliente:
Le felicitamos por la adquisición de este producto. Lea
atentamente el siguiente manual y siga cuidadosamente las
instrucciones de uso con el n de evitar posibles daños. La
empresa no se responsabiliza de los daños ocasionados por
un uso indebido del producto o por haber desatendido las
indicaciones de seguridad. Escanee el código QR para obtener
acceso al manual de usuario más reciente y otra información
sobre el producto:
ÍNDICE DE CONTENIDOS
Indicaciones de seguridad28
Visión general del aparato30
Puesta en marcha y uso 32
Resolución de problemas36
Limpieza y cuidado 37
Retirada del aparato38
DATOS TÉCNICOS
ES
Número de artículo
Suministro eléctrico
10030844, 10030848, 10030849
220-240 V ~ 50/60 Hz
DECLARACIÓN DE CONFORMIDAD
Fabricante:
Chal-Tec GmbH, Wallstraße 16, 10179 Berlín (Alemania).
Este producto cumple con las siguientes directivas
europeas:
2014/30/UE (EMC)
2014/35/UE (baja tensión)
2011/65/UE (refundición RoHS)
27
Page 28

ES
INDICACIONES DE SEGURIDAD
• Conecte el aparato solamente a tomas de corriente con toma de tierra que se
adecuen a la tensión del mismo.
• Si desea desplazar el aparato, utilice las asas.
• Coloque el aparato en una supercie plana y estable.
• Utilice este aparato solamente en espacios interiores.
• No utilice el aparato cerca de bañeras ni piscinas.
• Desconecte el enchufe de la toma de corriente cuando no utilice el aparato.
• No sumerja el cable de alimentación ni el enchufe en agua ni en ningún otro
líquido.
• Utilice exclusivamente los accesorios recomendados por el fabricante.
• No coloque el aparato justo bajo una toma de corriente.
• No deje que el cable de alimentación quede colgando de la supercie de trabajo
para evitar que los niños puedan tirar de él.
• No sobrecargue el aparato; de lo contrario, pueden producirse cortocircuitos y
descargas eléctricas.
• Asegúrese de que la tapa esté cerrada durante el funcionamiento.
• Para desconectar el aparato no tire del cable, sino del cuerpo del enchufe.
• La empresa no se responsabiliza de los daños ocasionados por un uso indebido
del producto o por haber desatendido las indicaciones de seguridad.
• Utilice el aparato solamente en entornos domésticos.
• No conecte el aparato a tomas de corriente manejadas por control remoto ni con
temporizador.
• No sumerja el aparato en agua.
• Si el cable de alimentación o el enchufe están dañados, deberán ser sustituidos por
el fabricante, un servicio técnico autorizado o una persona igualmente cualicada.
• Cuando deseche el aparato, siga las disposiciones vigentes de reciclaje de
dispositivos con gases inamables.
• No almacene sustancias altamente explosivas dentro del aparato.
• Llene el aparato solamente con agua.
• Los niños mayores de 8 años y las personas con discapacidades físicas o psíquicas
solamente podrán utilizar el aparato si han sido previamente instruidas sobre su
uso y conocen las indicaciones de seguridad.
28
Este aparato contiene refrigerante isobutano (R600a), un gas natural que no es
nocivo para el medioambiente pero sí inamable. Aunque sea inamable, no es
perjudicial para la capa de ozono ni aumenta el efecto invernadero. La utilización
de este refrigerante provoca un aumento de ruido del aparato. Además del ruido
del compresor, podrá escuchar también el ujo del refrigerante. Este hecho es
inevitable y no produce ningún efecto negativo en el rendimiento del aparato.
Durante el transporte, tenga cuidado para evitar dañar el circuito de refrigeración.
Las fugas de líquido refrigerante pueden irritar los ojos.
Page 29

ADVERTENCIA
Peligro por fuego/materiales in amables. Tenga en cuenta las normas
locales para la eliminación de aparatos que contengan refrigerantes y
gases in amables.
• Mantenga las aberturas de ventilación de la carcasa del aparato libres de
obstáculos.
• No dañar el circuito de refrigeración.
• No utilice dispositivos mecánicos u otros medios para acelerar el proceso de
descongelación o recuperación de hielo.
• No utilice otros tipos de aparatos eléctricos dentro de la máquina de hielo.
Notas especiales
• Cuando coloque la unidad, asegúrese de que el cable de alimentación no esté
pellizcado ni dañado.
• Asegúrese de que no haya varias tomas o fuentes de alimentación en la parte
posterior de la unidad.
Para evitar la contaminación de los alimentos, siga las siguientes instrucciones:
• Limpie regularmente las super cies que puedan entrar en contacto con los
alimentos. Limpie el desagüe regularmente.
• Si el aparato contiene un depósito de agua, límpielo si no se ha utilizado durante
48 horas. Enjuague el tanque si no se ha eliminado el agua durante 5 días.
ADVERTENCIA
Cuando utilice, repare y elimine la unidad, preste atención al símbolo
izquierdo en la parte posterior de la unidad o en el compresor. Este
símbolo advierte de posibles incendios. Hay sustancias in amables en las
líneas de refrigerante y en el compresor. Mantenga el aparato alejado de
fuentes de fuego durante su uso, mantenimiento y eliminación.
ES
29
Page 30

ES
VISIÓN GENERAL DEL APARATO
Bandeja antigoteo
1
Cubierta de la bandeja antigoteo
y soporte para el recipiente de
2
los cubitos
Tapón del desagüe
3
Salida de aire
4
Ventana superior
5
Resorte para los cubitos
6
Panel de control
7
Pulverizador
8
Puerta lateral
9
Depósito de agua e indicador
10
MAX
30
Page 31

A Display
1 Temporizador / tiempo
congurado
2 Tamaño de los cubitos de
hielo: pequeño
3 Tamaño de los cubitos de
hielo: grande
4 Fabricación de los cubitos
de hielo: se producen
cubitos de hielo.
5 Desagüe: el agua está
saliendo.
6 Código de error 1, 2 o 3
7 Agua insuciente: el
indicador muestra que
debe añadir agua.
8 El aparato está lleno de
cubitos de hielo
9 Indicador ON/
OFF: si el aparato se
apaga, el indicador
parpadea y cuando se
encienda, se iluminará
permanentemente.
A Display
B Botón para la producción
de cubitos de hielo
C Botón para dispensar agua
D Encender / apagar
aparato
E Botón para seleccionar el
tamaño de los cubitos de
hielo y para congurar
el tiempo de posposición
F Botón para ajustar el
temporizador de apagado
o encendido
ES
31
Page 32

ES
PUESTA EN MARCHA Y USO
Antes del primer uso
• Retire todo el material de embalaje y compruebe que el envío esté completo. Si
falta alguna pieza, contacte directamente con nuestro servicio de atención al
cliente.
• Retire todos los adhesivos. Abra la ventana transparente y retire los accesorios.
• Limpie el interior (depósito de agua, resorte para los cubitos) con un paño suave y
agua tibia.
• Coloque el aparato en una supercie plana y estable, alejada de la luz directa del
sol y de fuentes de calor. Deje al menos 15 cm de distancia alrededor del aparato
para que el aire pueda circular correctamente.
• Espere al menos una hora a encender el aparato para que el líquido refrigerante
pueda distribuirse.
• Asegúrese de que el enchufe no quede atrapado.
Importante: llene el aparato solamente con agua potable.
Utilización
1. Abra la parte lateral izquierda y rellene el agua. Asegúrese de que el agua no
supere la marca máxima de capacidad.
32
2. Conecte el enchufe en la toma de corriente. En el display parpadea el símbolo
.
Page 33

3. Pulse el botón ON/OFF en el panel de control para iniciar la producción de
cubitos de hielo. El símbolo se ilumina permanentemente en el display.
Simultáneamente, el símbolo comienza a parpadear. Como conguración
estándar para el tamaño de los cubitos, aparece seleccionado «grande». Si desea
cambiar el tamaño, pulse SELECT y escoja entre el tamaño grande y el
pequeño . FSi los cubitos de hielo aún no tienen el tamaño deseado, puede
alargar el ciclo de preparación. Mientras se producen los cubitos, mantenga
pulsado el botón ON/OFF durante 5 segundos. El número [0] aparece en la
parte superior del display, en el indicador Temporizador/tiempo de posposición.
El número [0] indica el tiempo estándar del proceso. Utilice el botón SELECT para
elegir entre [1], [2] y de nuevo [0]. Si selecciona [1], el tiempo de funcionamiento
se alarga 1 minuto, y 2 minutos si selecciona [2]. Si apaga y vuelve a encender el
aparato, se utilizará como tiempo de funcionamiento estándar [0].
4. La producción de cubitos de hielo dura entre 6 y 12 minutos, dependiendo del
tamaño seleccionado y de la temperatura ambiente.
5. El aparato controla el nivel de agua durante el funcionamiento. Si la bomba de
agua no puede bombear más agua, el aparato se detiene automáticamente y el
símbolo aparece en el display y el símbolo de la echa parpadea. En ese caso,
añada agua inmediatamente. Primero, le recomendamos pulsar el botón ON/
OFF antes de rellenar más agua. Pulse el botón ON/OFF de nuevo para iniciar el
aparato. Si rellena agua sin detener el aparato, la producción de cubitos durará
más tiempo. Espere 3 minutos antes de volver a encender el aparato para que el
líquido refrigerante pueda distribuirse.
Cuando el aparato está lleno de cubitos de hielo
6. Si el aparato está lleno de cubitos de hielo, se detiene automáticamente y el
símbolo aparece en el display.
ES
Cómo retirar los cubitos de hielo
7. Coloque el recipiente para los cubitos sobre la bandeja antigoteo y presione el
botón ICE del panel de control. El símbolo aparece en el display y el resorte
para los cubitos comienza a moverse. Los cubitos comenzarán a caer por el oricio
de salida al recipiente correspondiente. Pulse de nuevo el botón ICE, el símbolo
vuelve a desaparecer del display y el resorte se detiene. Ya no caerán más
cubitos por el oricio de salida hacia el recipiente.
33
Page 34

ES
Cómo dispensar el agua
8. El tiempo de ujo predeterminado es de 10 segundos. Coloque un recipiente
sobre la bandeja antigoteo y pulse el botón WATER una vez. El agua uirá por el
grifo central, el símbolo aparece en el display y en el panel del temporizador
aparece el indicador [10 S]. Cuando hayan transcurrido 10 segundos, el símbolo
desaparece y dejará de salir agua por el grifo. Si el tiempo de dispensación es
demasiado corto o largo, puede ajustarlo como desee. Mantenga pulsado el
botón WATER durante 5 segundos para que el campo del temporizador aparezca
en el display [10 S]. Pulse el botón SELECT para ajustar el tiempo entre 7 y 25
segundos. Espere 5 segundos y el nuevo tiempo congurado aparecerá en el
display. Cuando vuelva a dispensar agua de nuevo, recuerde el último ajuste
realizado.
Cómo drenar los restos de agua del aparato
9. Cuando limpie el aparato o desee cambiar
el agua, debe drenar el agua del interior del
depósito. Para ello, quite el tapón del desagüe
situado en la parte inferior del aparato y el
agua se drenará. Si su aparato está equipado
con un conducto, conéctelo al desagüe para
drenar el agua cómodamente.
10. Cambie el agua cada 24 horas para asegurarse
de que se mantiene fresca. Si no utiliza el
aparato durante un periodo prolongado de
tiempo, vacíe el agua.
34
Ajustar el temporizador
• El tiempo ajustable para el temporizador es de 0,5 - 19,5 horas. El tiempo
predeterminado es de 1 hora.
• Si el aparato está en marcha, puede ajustar el temporizador de apagado para
apagar el aparato automáticamente transcurrido un periodo concreto de tiempo.
• Si el aparato está en modo standby, puede ajustar el temporizador de encendido
para encender el aparato automáticamente transcurrido un periodo concreto de
tiempo. Así tendrá los cubitos disponibles para cuando los necesite, por ejemplo
cuando llegue a casa o cuando organice una cena.
Page 35

Activar el temporizador
Pulse primero el botón TIMER, el tiempo predeterminado es de 1 hora y se mostrará en
el campo del tempo- rizador. Pulse el botón SELECT para ajustar el tiempo como desee.
Cada vez que pulse el botón SELECT, el tiempo aumentará media hora. Mantenga
pulsado el botón SELECT para congurar el tiempo más rápidamen- te. Cuando haya
congurado el tiempo, espere 5 segundos, la letra [H] aparece en el campo del
temporizador y deja de parpadear para aparecer permanentemente. El temporizador
estará activado.
Desactivar el temporizador
Si ha congurado el temporizador, pulse el botón TIMER y el tiempo selecciona- do y
el símbolo [H] desaparecerán. El temporizador estará
1 = tiempo seleccionado del temporizador
2 = símbolo para las horas y temporizador congurado
ES
35
Page 36

ES
RESOLUCIÓN DE PROBLEMAS
Problema Posibles causas Solución
Aparece el símbolo
la echa parpadea.
Aparece el símbolo
[F] parpadea.
Código de error
Código de error
Los cubitos se quedan
pegados en el pulverizador.
Agua insuciente en el
y
depósito.
Demasiados cubitos en el
y
recipiente.
No hay cubitos en el
recipiente.
El sensor de la temperatura ambiente está
averiado.
El aparato no puede
resetearse.
El ciclo de producción es
demasiado largo.
La temperatura en el
depósito de agua es
demasiado baja.
Apague el aparato,
llene agua y vuelva a
encenderlo.
Retire todos los cubitos u
obstáculos del interior y
límpielo. Si la producción
de cubitos continúa sin
funcionar, pulse el botón
SELECT durante más de
5 segundos para volver a
iniciar la producción de
cubitos para un máximo
de 10 ciclos.
El aparato continúa en
funcionamiento, debe
contactar con un servicio
técnico para que sustituya
el sensor.
Contacte con un servicio
técnico para comprobar
el error.
Apague el aparato y
vuelva a encenderlo cuan-
do se hayan derretido
los cubitos. Seleccione
el tamaño pequeño de
cubitos.
Cambie el agua. El agua
rellenada debe tener una
temperatura de entre 7 y
32 °C.
36
Page 37

Problema Posibles causas Solución
Si hay cubitos de hielo en
el interior pero no pueden
extraerse, pulse el botón
ICE.
El ciclo de hielo está en
marcha pero no se produce hielo.
El oricio de salida para
los cubitos está bloqueado.
La temperatura ambiente
o la temperatura del agua
interior es demasiado alta.
Fuga del líquido refrigerante.
Rotura de un conducto del
sistema de refrigeración.
Suelte el botón ICE y manténgalo pulsado durante 3
segundos.
Utilice el aparato solamente en estancias a una
temperatura inferior a 32
°C y rellene agua fresca.
Contacte con un servicio
técnico.
Contacte con un servicio
técnico.
LIMPIEZA Y CUIDADO
Antes de utilizar el aparato por primera vez, le recomendamos limpiarlo por completo.
Antes de limpiar el aparato, apáguelo y desconéctelo de la toma de corriente.
1. Retire los accesorios del interior.
2. Limpie el interior con un poco de lavavajillas, agua tibia y un paño suave. Rellene
un poco de agua tibia con lavavajillas en el depósito de agua y frote la supercie
exterior con el paño.
3. A continuación, limpie el interior y desagüe el agua por el conducto
correspondiente.
4. Limpie el exterior regularmente con un paño húmedo y un poco de lavavajillas.
5. Seque el exterior y el interior con un paño seco o un paño de cocina.
6. Si no utiliza el aparato durante un periodo prolongado de tiempo, desagüe el
agua por completo.
ES
37
Page 38

ES
RETIRADA DEL APARATO
Si el aparato lleva adherida la ilustración de la izquierda (el
contenedor de basura tachado) entonces rige la normativa
europea, directiva 2012/19/UE. Este producto no debe
arrojarse a un contenedor de basura común. Infórmese
sobre las leyes territoriales que regulan la recogida separada
de aparatos eléctricos y electrónicos. Respete las leyes
territoriales y no arroje aparatos viejos al cubo de la basura
doméstica. Una retirada de aparatos conforme a las leyes
contribuye a proteger el medio ambiente y a las personas a
su alrededor frente a posibles consecuencias perjudiciales
para la salud. El reciclaje ayuda a reducir el consumo de
materias primas.
38
Page 39

Cher client,
Toutes nos félicitations pour l’acquisition de ce nouvel
appareil. Veuillez lire attentivement les instructions suivantes de
branchement et d’utilisation an d’éviter d’éventuels dommages.
Le fabricant ne saurait être tenu pour responsable des dommages
dus au non-respect des consignes de sécurité et à la mauvaise
utilisation de l’appareil. Scannez le QR-Code pour accéder à
la dernière version du mode d‘emploi et à d‘autres informations
concernant le produit:
SOMMAIRE
Consignes de sécurité40
Aperçu de l‘appareil42
Mise en marche et utilisation44
Résolution des problèmes48
Nettoyage et entretien 49
Conseils pour le recyclage50
FICHE TECHNIQUE
FR
Numéro d'article
Alimentation
10030844, 10030848, 10030849
220-240 V ~ 50/60 Hz
DÉCLARATION DE CONFORMITÉ
Fabricant :
Chal-Tec GmbH, Wallstraße 16, 10179 Berlin, Allemagne.
Ce produit est conforme aux directives européennes
suivantes :
2014/30/UE (CEM)
2014/35/UE (LVD)
2011/65/UE (RoHS)
39
Page 40

FR
CONSIGNES DE SÉCURITÉ
• Brancher uniquement l’appareil à une prise de terre dont la tension correspond à
celle de l’appareil.
• Utiliser les poignées pour déplacer l’appareil.
• Placer l’appareil sur une surface plane.
• Utiliser l’appareil uniquement en intérieur.
• Ne pas utiliser l’appareil à proximité d’une baignoire ou d’une piscine.
• Débrancher l’appareil après utilisation.
• Ne jamais plonger l’appareil et la che d’alimentation dans l’eau ou tout autre liquide.
• Utiliser uniquement des accessoires recommandés par le fabricant spéciquement
pour cet appareil.
• Ne pas placer l’appareil directement sous une prise électrique.
• Ne pas laisser le cordon d’alimentation pendre d’un plan de travail pour éviter que
les enfants ne tirent dessus.
• Ne pas trop remplir l’appareil pour éviter tout court-circuit et toute électrocution.
• S’assurer que le couvercle est toujours fermé pendant le fonctionnement de
l’appareil.
• Ne pas débrancher la prise en tirant sur le câble mais en maintenant fermement le
corps de la che.
• Le fabricant ne saurait être tenu pour responsable des dommages dus au non-
respect des consignes de sécurité et à la mauvaise utilisation de l’appareil.
• Utiliser l’appareil uniquement à domicile.
• Ne pas connecter l’appareil à une minuterie externe ou à une prise télécommandée.
• Ne jamais plonger l’appareil dans l’eau.
• Si le cordon et la che d‘alimentation sont endommagés, les faire remplacer par
le fabricant, une entreprise spécialisée habilitée ou une personne présentant une
qualication analogue.
• Se conformer aux réglementations en vigueur dans la région pour la mise au rebut
des appareils contenant des gaz inammables.
• Ne pas stocker de substances facilement inammables ou explosives dans l’appareil.
• Remplir l’appareil uniquement avec de l’eau.
• Les enfants de plus de 8 ans ainsi que les personnes dont les capacités physiques
et mentales sont réduites doivent utiliser l’appareil uniquement après avoir été
entièrement sensibilisés aux consignes de sécurité et aux fonctions de l’appareil par
une personne responsable de leur sécurité.
40
Cet appareil contient du liquide réfrigérant Isobutane (R600a), un gaz naturel très
respectueux de l’environnement mais inammable. Bien qu’il soit inammable, il ne
détruit pas la couche d’ozone et ne renforce pas l’effet de serre. L’utilisation de ce
liquide réfrigérant provoque toutefois un niveau sonore de l’appareil légèrement
plus élevé. Outre les bruits du compresseur, vous pouvez percevoir le ux du liquide
réfrigérant. Cela est inévitable et n’a aucune inuence négative sur la puissance de
l’appareil. Faites attention pendant le transport an de ne pas endommager le circuit
réfrigérant. Les fuites de liquide réfrigérant peuvent irriter les yeux.
Page 41

MISE EN GARDE
Danger d‘incendie/de matières in ammables. Veuillez respecter les
réglementations locales concernant l‘élimination des appareils
contenant des uides frigorigènes et des gaz in ammables.
• Veillez à ce que les ouvertures de ventilation dans le boîtier de l‘appareil soient
libres d‘obstacles.
• Ne pas endommager le circuit frigori que.
• N‘utilisez pas de dispositifs mécaniques ou d‘autres moyens pour accélérer le
processus de dégivrage ou de récupération de la glace.
• N‘utilisez pas d‘autres types d‘appareils électriques à l‘intérieur de la machine à
glaçons.
Remarques particulières
• Lors du positionnement de l‘appareil, assurez-vous que le cordon d‘alimentation
n‘est pas pincé ou endommagé.
• Assurez-vous qu‘il n‘y a pas de prises multiples ou d‘alimentations multiples à
l‘arrière de l‘appareil.
Pour éviter la contamination des aliments, veuillez suivre les instructions ci-dessous :
• Nettoyer régulièrement les surfaces qui peuvent entrer en contact avec les aliments.
Nettoyez régulièrement l‘évacuation d‘eau.
• Si l‘appareil contient un réservoir d‘eau, nettoyez-le s‘il n‘a pas été utilisé depuis
48 heures. Rincer le réservoir si aucune eau n‘a été retirée depuis 5 jours.
FR
MISE EN GARDE
Lors de l‘utilisation, de l‘entretien et de la mise au rebut de l‘appareil,
faites attention au symbole de gauche à l‘arrière de l‘appareil ou sur le
compresseur. Ce symbole avertit d‘un éventuel incendie. Il y a des
substances in ammables dans les conduites de uide frigorigène et
dans le compresseur. Tenez l‘appareil à l‘écart de toute source
d‘incendie pendant son utilisation, son entretien et son élimination.
41
Page 42

FR
APERÇU DE L‘APPAREIL
Bac de récupération de l’eau
1
Couvercle du bac de
récupération et support pour le
2
récipient à glaçons
Bouchon d’évacuation de l’eau
3
Sortie d’air
4
Trappe du haut
5
Ressort à pression pour glaçons
6
Panneau de commande
7
Nébuliseur
8
Porte latérale
9
Réservoir d’eau et indicateur
10
MAX
42
Page 43

A Afchage
1 Afchage du minuteur/
cycle
2 Taille des glaçons : petit
3 Taille des glaçons : grand
4 Fabrication de glaçons : les
glaçons sont en cours de
fabrication.
5 Sortie d’eau : de l’eau est
en train d’être évacuée.
6 Message d’erreur 1, 2, 3
7 Trop peu d’eau : si cette
image s’afche, il est
nécessaire de rajouter de
l’eau dans le réservoir.
8 L’appareil est plein de
glaçons.
9 Afchage ON/OFF :
l’afchage clignote lorsqu’il
est éteint, il s’allume en
continu lorsqu’il est allumé.
A Afcheur
B Touche de fabrication des
glaçons
C Touche de débit d’eau
D Allumer/éteindre l’appareil
E Touche de sélection de
la taille des glaçons et
de réglage des cycles de
durée prolongée
F Touche d’activation/
désactivation du minuteur.
FR
43
Page 44

FR
MISE EN MARCHE ET UTILISATION
Avant la première utilisation
• Retirer tous les éléments d’emballage et vérier que le contenu de l’emballage est
au complet. Si des pièces sont manquantes, contacter immédiatement le service
client.
• Retirer tous les autocollants et les rubans adhésifs. Ouvrir la porte transparente et
sortir tous les accessoires.
• Nettoyer l’intérieur de l’appareil (réservoir, ressort à pression pour glaçons) à l’aide
d’une éponge douce et avec un peu d’eau tiède.
• Placer l’appareil sur un plan de travail plat, à l’écart de la lumière directe du soleil
et des sources de chaleur. Laisser un espace d’au moins 15 cm tout autour de
l’appareil an que l’air puisse circuler convenablement.
• Attendre au moins une heure avant d’allumer l’appareil pour la première fois an
que le liquide réfrigérant se répartisse de manière homogène.
• Veiller à ce que la che soit accessible à tout moment.
Important : remplir l’appareil uniquement avec de l’eau potable !
Utilisation
1. Ouvrir la porte latérale gauche et remplir le réservoir d’eau. Veiller à ce que l’eau
remplie ne dépasse pas l’indicateur MAX.
44
2. Brancher la che à la prise. Le symbole
clignote sur l’afcheur.
Page 45

3. Appuyer sur la touche ON/OFF du panneau de commande pour démarrer la
fabrication de glaçons. Le symbole ls’allume en continu sur l’afcheur. Dans
le même temps, le symbole se met à clignoter. L’appareil règle par défaut la
taille des glaçons sur « grand ». Pour modier la tailler des glaçons, appuyer sur la
touche SELECT et choisir entre grands glaçons ou petits glaçons . Si les
glaçons n’ont toujours pas la taille escomptée, il est possible de prolonger la durée
du cycle de fabrication. Pendant la préparation des glaçons, rester appuyer sur la
touche ON/OFF pendant 5 secondes. Le chiffre [0] apparaît en haut de l’écran au
niveau de l’afchage du minuteur/cycle. Le chiffre [0] indique la durée d’un cycle
standard. Utiliser la touche SELECT pour passer à [1], [2] ou revenir à [0]. Si [1] est
sélectionné, la durée du cycle est prolongée de 1 minute, si c’est [2], elle l’est de
2 minute. Si l’appareil est éteint est rallumé, la durée de cycle standard [0] est de
nouveau sélectionnée.
4. La fabrication de glaçons dure environ 6-12 minutes, en fonction de la taille
sélectionnée et de la température ambiante.
5. L’appareil surveille le niveau de l’eau pendant son fonctionnement. Si la pompe à
eau ne pompe plus d’eau, l’appareil s’arrête automatiquement et le symbole
apparaît à l’écran et le symbole d’une èche se met à clignoter. Dans ce cas, il
est nécessaire de rajouter de l’eau immédiatement. Il est recommandé d’appuyer
tout d’abord sur la touche ON/OFF avant de rajouter de l’eau dans le réservoir.
Puis appuyer de nouveau sur la touche ON/OFF pour redémarrer l’appareil. Si
l’utilisateur ajoute de l’eau sans éteindre l’appareil, la fabrication de glaçons
peut durer plus longtemps. Attendre 3 minutes avant d’allumer l’appareil an de
permettre au liquide réfrigérant de se répandre de nouveau de manière homogène.
Si l’appareil est plein de glaçons
6. Si l’appareil est plein de glaçons, l’appareil s’éteint automatiquement et le symbole
s’afche.
FR
Comment retirer les glaçons
7. Placer un récipient pour glaçons sur le support au-dessus du bac de récupération
de l’eau et appuyer sur la touche ICE du panneau de commande. Le symbole
apparaît sur l’afcheur et le ressort à pression pour glaçons commence sa rotation.
Les glaçons tombent alors les uns après les autres par le bec d’éjection dans le
récipient à glaçons. Appuyer de nouveau sur la touche ICE pour faire disparaitre le
symbole et arrêter la rotation du ressort. Les glaçons s’arrêtent de tomber hors
du bec d’éjection dans le récipient.
45
Page 46

FR
Comment faire couler de l’eau
8. La durée d’écoulement par défaut de l’eau est de 10 secondes. Placer un gobelet
sous la sortie d’eau et appuyer une fois sur la touche WATER. L’eau s’écoule au
milieu de l’évacuation d’eau, le symbole s’afche à l’écran et le champ du
minuteur indique l’afchage [10 S]. Une fois les 10 secondes écoulées, le symbole
disparaît et l’eau ne sort plus de la sortie d’eau. Si le temps d’écoulement paraît
trop court ou trop long, il est possible de le modier. Rester appuyer sur la touche
WATER pendant au moins 5 secondes pour que l’afchage [10 S] apparaisse sur le
champ du minuteur. Appuyer sur la touche SELECT pour ajuster le temps de 7 à 25
secondes. Attendre 5 secondes avant que le nouveau temps paramétré ne s’afche
sur le champ du minuteur. Lors du prochain débit d’eau, l’appareil aura enregistrée
le nouveau temps paramétré.
Comment évacuer le surplus d’eau de l’appareil
9. Pour nettoyer l’appareil ou en changer
l’eau, il est nécessaire de laisser le surplus
d’eau s’écouler du réservoir. Pour cela, tirer
sur le bouchon d’évacuation de l’eau situé
sous l’appareil ; l’eau s’écoule alors hors de
l’appareil. Si l’appareil est équipé d’un tuyau,
raccorder le tuyau au trou d’évacuation pour
permettre à l’eau de s’écouler.
10. Changer l’eau du réservoir toutes les 24 heures
pour s’assurer que l’eau reste fraîche. En cas
d’inutilisation prolongée de l’appareil, évacuer
entièrement l’eau de l’appareil.
46
Régler le minuteur
• La durée paramétrable du minuteur est de 0,5-19,5. La durée par défaut est de 1
heure.
• Quand l’appareil fonctionne, il est possible de régler un minuteur d’éteinte après
lequel l’appareil s’éteint automatiquement.
• Si l’appareil se trouve en mode veille, il est possible de régler une durée d’allumage
après lequel l’appareil s’allume automatiquement. Cela permet d’avoir les glaçons
n prêts au moment souhaité, par exemple au moment de rentrer à la maison ou au
moment du dîner.
Page 47

Allumer le minuteur
Appuyer tout d’abord sur la touche TIMER, la durée par défaut est de 1 heure et
s’afche à l’écran dans le champ du minuteur. Appuyer sur la touche SELECT pour régler
le temps souhaité. Chaque pression sur la touche SELECT augmente la durée d’une
heure. Rester appuyer sur la touche SELECT pour régler plus rapidement l’heure. Lorsque
la durée a été réglée, attendre 5 secondes, la lettre [H] s’arrête de clignoter à l’écran et
s’afche en continu. Le minuteur est à présent actif.
Éteindre le minuteur
Une fois que le minuteur est paramétré, appuyer sur la touche TIMER, le temps
paramétré et le symbole [H] disparaissent alors. Le minuteur est à présent dé- sactivé.
1 = durée paramétrée du minuteur
2 = symbole des heures et du minuteur paramétré
FR
47
Page 48

FR
RÉSOLUTION DES PROBLÈMES
Problème Cause possible Solution
Le symbole
la èche clignote.
Le symbole
[F] clignote.
Message d’erreur
Message d’erreur
Les glaçons collent au
nébuliseur.
s’afche et
s’afche et
Pas assez d’eau dans le
réservoir.
Trop de glaçons dans
l’appareil.
Pas de glaçon dans
l’appareil.
Le capteur de température
ambiante est cassé.
Impossible de redémarrer
l’appareil.
Le cycle de fabrication est
trop long.
La température du réservoir est trop basse.
Éteindre l’appareil, remplir
le réservoir d’eau puis
rallumer l’appareil.
Retirer tous les glaçons ou
les obstacles se trouvant
à l’intérieur de l’appareil
ou nettoyer celui-ci. Si la
fabrication de glaçons ne
fonctionne toujours pas,
appuyer plus de 5 secondes sur la touche SELECT
pour redémarrer la fabrication de glaçons pour 10
cycles au maximum.
L’appareil continue de fon-
ctionner, mais il faudrait
contacter une entreprise
spécialisée et faire remplacer le capteur.
Contacter une entreprise
spécialisée pour inspec-
tion de l’appareil.
Éteindre l’appareil et le
rallumer une fois que les
glaçons ont fondu. Sélectionner le réglage pour
petits glaçons.
Changer l’eau. La température de l’eau de rem-
plissage doit être comprise
entre 7 et 32 °C.
48
Page 49

Problème Cause possible Solution
L’appareil contient des
glaçons mais ne les éjecte
pas lorsque la touche ICE
est appuyée.
Le cycle de fabrication des
glaçons s’effectue jusqu’au
bout mais aucun glaçon
n’est fabriqué.
La fente d’éjection des
glaçons est bloquée.
La température ambiante
ou la température de l’eau
à l’intérieur de l’appareil
est trop élevée.
Du liquide réfrigérant fuit. Faire réviser l’appareil par
Un tuyau du circuit de
refroidissement est cassé.
Relâchez la touche ICE et
appuyer dessus de nouveau après 3 secondes.
Utiliser l’appareil uniquement dans des pièces de
température ambiante
inférieure à 32 °C et le
remplir d’eau fraiche.
un technicien.
Faire réviser l’appareil par
un technicien.
NETTOYAGE ET ENTRETIEN
Avant d’utiliser l’appareil pour la première fois, il est recommandé de le nettoyer en
profondeur. Débrancher préalablement l’appareil avant de le nettoyer.
1. Sortir les accessoires de l’intérieur de l’appareil.
2. Nettoyer l’intérieur de l’appareil avec un peu de liquide vaisselle, de l’eau chaude
et une éponge douce. Rem- plir le réservoir avec un peu d’eau chaude et de
liquide vaisselle et essuyer les surfaces externes de l’appareil.
3. Nettoyer ensuite l’intérieur de l’appareil et laisser ensuite l’eau s’écouler par le trou
d’évacuation.
4. Nettoyer régulièrement les surfaces externes de l’appareil avec une éponge humide
ou un torchon de vais- selle.
5. Sécher les surfaces externes et internes de l’appareil avec une éponge sèche ou un
torchon de vaisselle.
6. En cas d’inutilisation prolongée de l’appareil, laisser le surplus d’eau s’écouler.
FR
49
Page 50

FR
CONSEILS POUR LE RECYCLAGE
Le pictogramme ci-contre apposé sur le produit signie que
la directive européenne 2012/19/UE s‘applique (poubelle
à roues barrée d’une croix). Ces produits ne peuvent être
jetés dans les poubelles domestiques courantes. Renseignezvous concernant les règles appliquées pour la collecte
d’appareils électriques et électroniques. Conformez-vous
aux réglementations locales et ne jetez pas vos anciens
produits avec les ordures ménagères. Le respect des règles
de recyclage des vieux produits aide à la protection de
l’environnement et de la santé de votre entourage contre
les conséquences négatives possibles. Le recyclage des
matériaux aide à réduire l’utilisation des matières premières.
50
Page 51

Gentile cliente,
La ringraziamo per aver acquistato il dispositivo. La preghiamo
di leggere attentamente le seguenti istruzioni per l’uso e di
seguirle per evitare possibili danni tecnici. Non ci assumiamo
alcuna responsabilità per danni scaturiti da una mancata
osservazione delle avvertenze di sicurezza e da un uso
improprio del dispositivo. Scansionare il codice QR seguente,
per accedere al manuale d’uso più attuale e per ricevere
informazioni sul prodotto.
INDICE
Avvertenze di sicurezza52
Panoramica del dispositivo54
Messa in funzione e utilizzo56
Risoluzione degli errori60
Pulizia e manutenzione 61
Smaltimento62
DATI TECNICI
IT
Numero Articolo
Alimentazione
10030844, 10030848, 10030849
220-240 V ~ 50/60 Hz
DICHIARAZIONE DI CONFORMITÀ
Produttore:
Chal-Tec GmbH, Wallstraße 16, 10179 Berlino, Germania.
Questo prodotto è conforme alle seguenti direttive
europee:
2014/30/UE (EMC)
2014/35/UE (LVD)
2011/65/UE (RoHS)
51
Page 52

IT
AVVERTENZE DI SICUREZZA
• Leggere attentamente tutte le istruzioni e conservare il presente libretto per
consultazioni future.
• Per garantire il corretto funzionamento, il dispositivo deve essere collegato ad una
presa dotata di messa a terra. Consultare un elettricista se non si è sicuri che la
presa a disposizione corrisponda ai requisiti richiesti.
• Collegare il dispositivo solo a prese che corrispondano al voltaggio indicato.
• Non conservare materiali esplosivi o pericolosi nel dispositivo, così come liquidi
acidi o alcalini.
• Nel caso in cui il cavo di rete sia danneggiato, questo deve essere sostituito dal
produttore, da una azienda autorizzata o da una persona qualicata.
• Non staccare mai la spina dalla presa tirando il cavo ma staccare la spina alla
base.
• Non posizionare il dispositivo in luoghi nei quali c’è fuoriuscita di gas.
• Staccare sempre la spina prima di pulire il dispositivo o effettuarne la
manutenzione.
• Il presente dispositivo è destinato alla produzione cubetti di ghiaccio. Non
utilizzarlo per raffreddare alimenti o bevande in quanto potrebbe danneggiarsi.
• Non vaporizzare liquidi inammabili nelle vicinanze del dispositivo per evitare
incendi.
• Prima di spostare il dispositivo, staccare la spina per non danneggiare il sistema di
raffreddamento.
• Non aprire la parte interna, le riparazioni devono essere effettuate da personale
specializzato.
• Utilizzare il dispositivo solo per lo scopo al quale è destinato. I bambini, le persone
con disabilità siche e mentali non dovrebbero utilizzare il dispositivo, a meno
che un supervisore abbia prima illustrato loro il funzionamento e le avvertenze di
sicurezza.
• I bambini possono utilizzare il dispositivo esclusivamente sotto il controllo di un
supervisore.
• Il dispositivo è destinato unicamente a un utilizzo domestico e non commerciale.
52
Questo dispositivo contiene il refrigerante isobutano (R600a), un gas naturale
ecocompatibile ma inammabile. Anche se è inammabile, non danneggia lo strato
di ozono e non aumenta l´effetto serra. Tenere presente che l´utilizzo di questo
refrigerante comporta rumori del dispositivo. Oltre al rumore del compressore si può
sentire anche il usso del liquido refrigerante. Ciò è inevitabile e non ha un effetto
negativo sulle prestazioni del dispositivo. Trasportare il dispositivo con cautela per
evitare di danneggiare il circuito di refrigerazione. Le perdite di liquido refrigerante
possono causare irritazioni agli occhi.
Page 53

AVVERTENZA
Pericolo di incendio/materiali in ammabili. Osservare le norme locali
per lo smaltimento di apparecchi contenenti refrigeranti e gas
in ammabili.
• Mantenere libere da ostacoli le aperture di ventilazione nell‘alloggiamento
dell‘apparecchio.
• Non danneggiare il circuito frigorifero.
• Non utilizzare dispositivi meccanici o altri mezzi per accelerare lo sbrinamento o il
recupero del ghiaccio.
• Non utilizzare altri tipi di apparecchi elettrici all‘interno della macchina per cubetti
di ghiaccio.
Note speciali
• Quando si posiziona l‘unità, assicurarsi che il cavo di alimentazione non sia
schiacciato o danneggiato.
• Assicurarsi che non vi siano prese multiple o alimentatori sul retro dell‘unità.
Per evitare la contaminazione degli alimenti, seguire le seguenti istruzioni:
• Pulire regolarmente le super ci che possono venire a contatto con gli alimenti.
Pulire regolarmente lo scarico dell‘acqua.
• Se l‘apparecchio contiene un serbatoio dell‘acqua, pulirlo se non è stato utilizzato
per 48 ore. Sciacquare il serbatoio se non è stata rimossa l‘acqua per 5 giorni.
AVVERTENZA
Durante l‘uso, la manutenzione e lo smaltimento dell‘unità, prestare
attenzione al simbolo a sinistra sul retro dell‘unità o sul compressore.
Questo simbolo avverte di possibili incendi. Ci sono sostanze
in ammabili nelle linee frigorifere e nel compressore. Tenere
l‘apparecchio lontano da fonti di incendio durante l‘uso, la
manutenzione e lo smaltimento.
IT
53
Page 54

IT
PANORAMICA DEL DISPOSITIVO
Vaschetta raccogligocce
1
Coperchio vaschetta
raccogligocce e supporto
2
contenitore cubetti
Tappo scarico acqua
3
Uscita aria
4
Finestra superiore
5
Molla a compressione cubetti di
6
ghiaccio
Pannello dei comandi
7
Evaporatore
8
Sportello laterale
9
Serbatoio acqua e spia livello
10
MAX
54
Page 55

A Display
1 Timer/indicatore tempo
2 Grandezza cubetti: piccolo
3 Grandezza cubetti: grande
4 Produzione cubetti di
ghiaccio: vengono prodotti
i cubetti di ghiaccio
5 Uscita acqua: l´acqua
viene rilasciata
6 Errore codice 1, 2 o 3
7 Troppa poca acqua:
se la spia si accende,
aggiungere acqua
8 Contenitore cubetti pieno:
il contenitore è pieno di
cubetti di ghiaccio
9 Spia ON/OFF: se il
dispositivo si spegne,
la spia lampeggia; se il
dispositivo si accende, la
spia rimane accesa.
A Display
B Tasto per la produzione di
cubetti di ghiaccio
C Tasto scarico acqua
D Accendere/spegnere il
dispositivo
E Tasto per selezionare la
grandezza dei cubetti e
per impostare il ciclo di
produzione prolungato
F Tasto per impostare lo
spegnimento/accensione
del timer
IT
55
Page 56

IT
MESSA IN FUNZIONE E UTILIZZO
Avvertenze per il primo utilizzo
• Rimuovere completamente il materiale di imballaggio e vericare che tutti i
componenti siano inclusi nella consegna. In caso manchino dei componenti,
rivolgersi al servizio clienti.
• Rimuovere tutti gli adesivi. Aprire la nestra trasparente e togliere gli accessori.
• Pulire la parte interna (serbatoio, molla a compressione dei cubetti di ghiaccio) con
un panno morbido e acqua tiepida.
• Collocare il dispositivo su una supercie piana, lontano dalla luce diretta del sole
e da fonti di calore. Lasciare intorno al dispositivo almeno 15 cm di spazio libero
afnché l´aria possa circolare liberamente.
• Attendere almeno 1 ora prima di accendere il dispositivo afnché il refrigerante si
possa distribuire.
• Assicurarsi che la spina sia sempre facilmente raggiungibile.
Importante: versare nel dispositivo solo acqua potabile!
Utilizzo
1. Aprire lo sportello laterale sinistro e versare l´acqua senza superare il segno MAX.
56
2. Inserire la spina nella presa. Sul display lampeggia il simbolo
.
Page 57

3. Premere il tasto ON/OFF sul pannello dei comandi per avviare la produzione dei
cubetti di ghiaccio. Il simbolo rimane acceso sul display. Contemporaneamente
il simbolo inizia a lampeggiare. L´impostazione predenita per la grandezza
dei cubetti è “grande”. Per modicare la grandezza premere il tasto SELECT e
scegliere tra cubetti grandi o piccoli . Tuttavia se i cubetti non sono
ancora della grandezza desiderata, è possibile prolungare la durata del ciclo di
produzione. Durante il processo di preparazione del ghiaccio, tenere premuto il
tasto ON/OFF per 5 secondi. La cifra [0] appare in alto sul display del timer/
indicatore del tempo e sta per ciclo di produzione standard. Utilizzare il tasto
SELECT per passare da [1] a [2] e a [0]. Se si seleziona [1], la durata del ciclo
di produzione aumenta di 1 minuto, se si seleziona [2] aumenta di 2 minuti. Se si
accende e si spegne il dispositivo, viene reimpostato automaticamente il ciclo di
produzione standard [0].
4. La produzione dei cubetti di ghiaccio dura circa 6-12 minuti in base alla grandezza
selezionata e alla temperatura ambiente.
5. Durante la produzione dei cubetti il dispositivo monitora il livello dell´acqua. In
caso di arresto della pompa dell´acqua, il dispositivo si ferma automaticamente,
il simbolo appare sul display e il simbolo freccia lampeggia. In questo caso
aggiungere immediatamente l´acqua. Si consiglia di premere il tasto ON/
OFF prima di versare l´acqua. Premere di nuovo il tasto ON/OFF per riavviare
il dispositivo. Tenere presente che se si versa l´acqua senza prima arrestare
il dispositivo, la produzione dei cubetti dura più a lungo. Attendere quindi 3
minuti prima di accendere il dispositivo in modo che il liquido refrigerante possa
distribuirsi nuovamente.
Contenitore cubetti pieno
6. Il dispositivo si arresta automaticamente se il contenitore dei cubetti è pieno. Inoltre
sul display appare il simbolo .
IT
Rimuovere i cubetti
7. Collocare il contenitore dei cubetti sul supporto della vaschetta raccogligocce
e premere il tasto ICE sul pannello dei comandi. Il simbolo compare sul
display, la molla a compressione inizia a ruotare e i cubetti cadono a poco a poco
dall´apposita uscita nel contenitore dei cubetti. Premere di nuovo il tasto ICE, il
simbolo si spegne e la molla a compressione si arresta. I cubetti non cadono
più nel contenitore.
57
Page 58

IT
Far deuire l´acqua
8. Il tempo predenito per il deusso dell´acqua è di 10 secondi. Mettere un
recipiente sotto l´apposita uscita dell´acqua e premere una volta il tasto WATER.
L´acqua scorre al centro dall´apposita uscita, il simbolo appare sul display
e sul display del timer appare [10 S]. Allo scadere dei 10 secondi, il simbolo
si spegne e non fuoriesce più acqua. Se il tempo di deusso è troppo breve o
troppo lungo, regolarlo a piacimento. Tenere premuto per 5 secondi il tasto
WATER: sul display appare [10 S]. Premere il tasto SELECT per regolare un tempo
compreso tra 7 e 25 secondi. Attendere 5 secondi e il tempo impostato appare di
nuovo sul display del timer. Tenere presente che il dispositivo memorizza l´ultima
impostazione per l´utilizzo successivo.
Far fuoriuscire l´acqua restante dal dispositivo
9. Prima di pulire il dispositivo oppure se si
intende sostituirlo, far deuire l´acqua dal
serbatoio. Tirare il tappo di scarico in basso
e far fuoriuscire l´acqua dal dispositivo.
Se il dispositivo è dotato di tubo, collegare
quest´ultimo allo scarico per far deuire
l´acqua.
10. Cambiare l´acqua nel serbatoio ogni 24 ore.
In caso di inutilizzo prolungato, far deuire
completamente l´acqua.
Impostare il timer
58
• Il tempo impostabile del timer è compreso tra 0,5 e 19,5 ore. Il tempo predenito è
di 1 ora.
• Quando il dispositivo è in funzione, è possibile impostare il tempo di spegnimento.
Allo scadere del tempo il dispositivo si spegne automaticamente.
• In modalità standby è possibile il tempo di accensione: il dispositivo si accende
automaticamente in base al tempo selezionato.
Page 59

Accendere il timer
Premere per prima cosa il tasto TIMER, il tempo predenito è di 1 ora e appare sul
display del timer. Premere il tasto SELECT per impostare il tempo desiderato. Ogni
volta che si preme il tasto SELECT, il tempo aumenta di mezz´ora. Tenere premuto il
tasto SELECT per impostare il tempo più rapidamente. Dopo aver impostato il tempo,
attendere 5 secondi, la lettera [H] sul display del timer smette di lampeggiare e rimane
accesa. Il timer ora è attivo.
Disattivare il timer
Se è stato impostato il timer, premere il tasto TIMER: il tempo impostato e il sim- bolo [H]
scompaiono. Il timer ora è spento.
1 = timer impostato
2 = simbolo ora (hour) e timer impostato
IT
59
Page 60

IT
RISOLUZIONE DEGLI ERRORI
Problema Possibile Causa Possibile soluzione
Appare il simbolo
freccia lampeggia.
Appare il simbolo
[F] lampeggia.
Codice di errore
Codice di errore
I cubetti di ghiaccio si
incollano all´evaporatore.
e la
e
L´acqua nel serbatoio è
troppa poca.
Troppi cubetti di ghiaccio
nel contenitore.
Non ci sono cubetti di
ghiaccio nel contenitore.
Il sensore della temperatura ambiente è rotto.
Non è possibile resettare il
dispositivo.
Il ciclo di produzione è
troppo lungo.
La temperatura nel serbatoio dell´acqua è troppo
bassa.
Spegnere il dispositivo e
aggiungere l´acqua. Ora
accendere di nuovo il
dispositivo.
Rimuovere tutti i cubetti
di ghiaccio o eventuali
ostruzioni nel contenitore
e pulire quest´ultimo.
Se la produzione del
ghiaccio continua a non
funzionare, premere per
più di 5 secondi il tasto
SELECT per avviare di
nuovo la produzione del
ghiaccio per un massimo
di 10 cicli.
Il dispositivo funziona,
tuttavia rivolgersi ad un
tecnico competente per far
sostituire il sensore.
Rivolgersi ad un tecnico
competente.
Spegnere il dispositivo
e accenderlo di nuovo
dopo che i cubetti di
ghiaccio si sono sciolti.
Modicare la grandezza
dei cubetti selezionando
l´impostazione cubetti
piccoli.
Cambiare l´acqua.
L´acqua versata deve
avere una temperatura
compresa tra i 7 e i 32
°C.
60
Page 61

Problema Possibile Causa Possibile soluzione
Ci sono cubetti di ghiaccio
nel dispositivo ma non
fuoriescono nonostante si
premi il tasto ICE.
Il ciclo del ghiaccio è in
funzione ma non viene
prodotto ghiaccio.
L´uscita dei cubetti di
ghiaccio è bloccata.
La temperatura ambiente o
la temperatura dell´acqua
all´interno è elevata.
Perdita di liquido refrigerante.
Un tubo nel sistema di
raffreddamento è rotto.
Rilasciare il tasto ICE e
premerlo di nuovo dopo 3
secondi.
Utilizzare il dispositivo
solo ad una temperatura
ambiente inferiore ai
32°C e versare acqua
fresca.
Far controllare il dispositivo da un tecnico
competente.
Far controllare il dispositivo da un tecnico
competente.
PULIZIA E MANUTENZIONE
Prima di utilizzare il dispositivo per la prima volta, si consiglia di pulirlo a fondo.
Staccare sempre la spina dalla presa prima di eseguire qualsiasi operazione di pulizia.
IT
1. Rimuovere gli accessori all´interno.
2. Pulire la parte interna con un po´ di detersivo, acqua calda e un panno umido.
Versare un po´ di acqua calda e aggiungere un po´ di detersivo nel serbatoio e
lavare le superci esterne con un panno.
3. Pulire la parte interna e far deuire l´acqua tramite lo scarico.
4. Pulire regolarmente la parte esterna con un detergente e acqua calda.
5. Asciugare la parte interna ed esterna con un panno morbido.
6. In caso di inutilizzo prolungato, far deuire completamente l´acqua rimanente.
61
Page 62

IT
SMALTIMENTO
Se sul prodotto è presente la gura a sinistra (il cassonetto
dei riuti mobile sbarrato), si applica la direttiva europea
2012/19/UE. Questi prodotti non possono essere smaltiti con
i riuti normali. Informarsi sulle disposizioni vigenti in merito
alla raccolta separata di dispositivi elettrici ed elettronici.
Non smaltire i vecchi dispositivi con i riuti domestici. Grazie
al corretto smaltimento dei vecchi dispositivi, si proteggono
il pianeta e la salute delle persone da possibili conseguenze
negative. Il riciclo di materiali aiuta a ridurre il consumo di
materie prime.
62
Page 63

Geachte klant,
Wij feliciteren u met de aankoop van uw apparaat.
Lees de volgende instructies zorgvuldig door en volg
ze op om mogelijke schade te voorkomen. Wij zijn niet
aansprakelijk voor schade als gevolg van het negeren van
de gebruiksaanwijzing en oneigenlijk gebruik. Scan de
volgende QR-code om toegang te krijgen tot de meest recente
bedieningsinstructies en verdere informatie over het product:
INHOUDSOPGAVE
Veiligheidsinstructies64
Overzicht apparaat66
Ingebruikname en bediening 68
Foutmeldingen en oplossingen72
Reiniging en onderhoud 73
Instructies voor afvoer74
TECHNISCHE GEGEVENS
Artikelnummer 10030844, 10030848, 10030849
Stroomvoorziening 220-240 V ~ 50-60 Hz
NL
CONFORMITEITSVERKLARING
Fabrikant
Chal-Tec GmbH, Wallstraße 16, 10179 Berlijn, Duitsland.
Dit product voldoet aan de volgende Europese
richtlijnen:
2014/30/UE (EMC)
2014/35/UE (LVD)
2011/65/UE (RoHS)
63
Page 64

NL
VEILIGHEIDSINSTRUCTIES
• Sluit het apparaat alleen aan op geaarde stopcontacten die overeenkomen met de
spanning van het apparaat.
• Gebruik de handgrepen bij het verplaatsen van het apparaat.
• Plaats het apparaat op een vlakke ondergrond.
• Gebruik het apparaat alleen binnenshuis.
• Gebruik het apparaat niet in de buurt van een badkuip of zwembad.
• Haal de stekker van het apparaat uit het stopcontact wanneer het niet in gebruik is.
• Dompel het netsnoer nooit onder in water of andere vloeistoffen.
• Gebruik alleen accessoires die door de fabrikant voor dit toestel worden
aanbevolen.
• Plaats het apparaat niet direct onder een stopcontact.
• Laat het netsnoer niet aan het werkoppervlak hangen om te voorkomen dat
kinderen eraan trekken.
• Vul de apparatuur niet te vol, omdat dit kortsluiting en elektrische schokken tot
gevolg kan hebben.
• Zorg ervoor dat het deksel tijdens het gebruik altijd gesloten is.
• Trek de stekker niet aan de kabel uit het stopcontact, maar houd hem bij het
verwijderen met de hand vast.
• Wij zijn niet aansprakelijk voor schade veroorzaakt door het negeren van de
gebruiksaanwijzing en oneigenlijk gebruik.
• Gebruik het apparaat alleen in het huishouden.
• Sluit het apparaat niet aan op een timer of op een stopcontact met
afstandsbediening.
• Dompel het apparaat niet onder in water.
• Als het netsnoer of de stekker beschadigd is, moet deze worden vervangen door de
fabrikant, een geautoriseerde vakman of een soortgelijk gekwaliceerd persoon.
• Volg bij het afvoeren de plaatselijke voorschriften voor het afvoeren van
ontvlambare gastoestellen.
• Bewaar geen licht ontvlambare of explosieve materialen in het apparaat.
• Vul het apparaat alleen met water.
• Kinderen ouder dan 8 jaar, lichamelijk en lichamelijk gehandicapten mogen
het apparaat alleen gebruiken als ze door een supervisor goed vertrouwd zijn
gemaakt met de functies en veiligheidsmaatregelen.
64
Dit apparaat bevat het koelmiddel isobutaan (R600a), een aardgas met een
hoge milieuvriendelijkheid, maar ontvlambaar. Hoewel het ontvlambaar is, tast
het de ozonlaag niet aan en versterkt het broeikaseffect niet. Het gebruik van dit
koudemiddel resulteert in een iets hoger geluidsniveau van het apparaat. Naast
het compressorgeluid kunt u ook de stroming van het koudemiddel horen. Dit is
onvermijdelijk en heeft geen negatief effect op de prestaties van het apparaat. Wees
voorzichtig tijdens het transport, zodat het koelmiddelcircuit niet beschadigd raakt.
Koelmiddellekken kunnen de ogen irriteren.
Page 65

WAARSCHUWING
Gevaar door brandgevaarlijke/brandbare materialen. Neem de
plaatselijke voorschriften voor de afvoer van brandbare
koudemiddelen en gassen in acht.
• Houd de ventilatieopeningen in de behuizing van het apparaat vrij van obstakels.
• Beschadig het koelmiddelcircuit niet.
• Gebruik geen mechanische apparaten of andere middelen om het ontdooiproces
of het ijsherstelproces te versnellen.
• Gebruik geen andere soorten elektrische apparaten in de ijsblokjesmachine.
Speciale instructies
• Zorg er bij het plaatsen van het apparaat voor dat het netsnoer niet bekneld of
beschadigd raakt.
• Zorg ervoor dat er geen meervoudige contactdozen of voedingen aan de
achterkant van het apparaat zitten.
Volg de onderstaande instructies om besmetting van levensmiddelen te voorkomen:
• Reinig regelmatig oppervlakken die met levensmiddelen in contact kunnen komen.
Reinig de waterafvoer regelmatig.
• Als het apparaat een waterreservoir bevat, maak het dan schoon als het 48 uur niet
is gebruikt. Spoel de tank af als er gedurende 5 dagen geen water is verwijderd.
WAARSCHUWING
Bij gebruik, onderhoud en afvoer van het apparaat dient u rekening te
houden met het linker symbool op de achterkant van het apparaat of
op de compressor. Dit symbool waarschuwt voor mogelijke branden. Er
bevinden zich brandbare stoffen in de koelmiddelleidingen en in de
compressor. Houd het apparaat tijdens gebruik, onderhoud en
verwijdering uit de buurt van brandhaarden.
NL
65
Page 66

NL
OVERZICHT APPARAAT
Lekbak
1
Afdekking lekbak en ondergrond
2
voor de ijsemmer
Waterafvoerstop
3
Luchtafvoer
4
Bovenste venster
5
Drukveer ijsblokjes
6
Bedieningspaneel
7
Vernevelaar
8
Zijdeur
9
Watertank en MAX indicator
10
66
Page 67

A Display
1 Timer / doorlooptijd
2 IJsblokjesformaat: klein
3 IJsblokjesformaat: groot
4 IJsblokjesproductie: in
productie
5 Waterafvoer: wordt
afgevoerd
6 Foutmelding: 1, 2 of 3
7 Te weinig water: water
navullen s v p 8 Apparaat
is vol met ijsblokjes
9 Aan / Uit weergave:
Wanneer het apparaat
wordt uitgeschakeld
knippert de melding
Wanneer het ap- paraat
aangezet wordt blijft het
branden
A Display
B Toets voor de
ijsblokjesproductie
C Toets voor water tappen
D Apparaat aan / uit
E Toets voor het selecteren
van het ijsblokjesformaat en
voor het instellen van een
verlengde doorlooptijd
F Toets voor het instellen van
de timer (aan of uit)
NL
67
Page 68

NL
INGEBRUIKNAME EN BEDIENING
Voor het eerste gebruik
• Verwijder al het verpakkingsmateriaal en verzeker uzelf ervan dat de levering
compleet is. Als er onderdelen ontbreken wendt u zich per omgaande tot onze
klantenservice.
• Verwijder alle stickers en kleefstrips. Open het transparante venster en neem de
accessoires uit.
• Reinig de interne ruimtes (watertank, drukveer ijsblokjes) met een zachte doek en
lauwwarm water.
• Plaats het apparaat op een stabiel oppervlak, ver van direct zonlicht en
warmtebronnen. Laat rondom het apparaat tenminste 15 cm vrij zodat de lucht
voldoende kan circuleren.
• Wacht voor het inschakelen minimaal 1 uur zodat het koelmiddel zich kan
verdelen.
• Let erop dat de stekker op elk moment vrij toegankelijk is.
Attentie: vul het apparaat uitsluitend met drinkwater!
Bediening
1. Open de linker zijdeur en vul met water. Let erop dat het gevulde water de MAX
markering niet overschrijdt.
68
2. Steek de stekker in het stopcontact. In het display knippert het symbool
.
Page 69

2. Steek de stekker in het stopcontact. In het display knippert het symbool .
3. Druk de ON/OFF toets op het bedieningsdisplay om de ijsblokjesproductie te
starten. Het symbool knippert nu continue in het display. Tegerlijkertijd begint
het symbool te knipperen. Als basisinstelling voor de ijsblokjes is het formaat
“groot” ingesteld. Wanneer u dit wilt wijzigen drukt u op de SELECT toets en
kiest u tussen grote ijsblokjes en kleine ijsblokjes . Wanneer de ijsblokjes
nog steeds niet de gewenste grootte hebben kunt u de doorlooptijd van de
bereidingscyclus verlengen. Terwijl de ijsblokjesproductie loopt houdt u de ON/
OFF toets 5 seconden ingedrukt. Het getal [0] verschijnt boven in de timer/
doorlooptijd weergave in het display. Het getal [0] staat voor de standaard
doorlooptijd. Gebruik de SELECT toets om tussen [1], [2] en [0] te wisselen.
Wanneer u [1] kiest verlengt u de doorlooptijd met 1 minuut, wanneer u [2] kiest
met 2 minuten. Wanneer u het apparaat uit- en weer inschakelt is automatisch weer
de standaard doorlooptijd [0] van toepassing.
4. Het produceren van ijsblokjes duurt circa 6-12 minuten, afhankelijk van het
geselecteerde formaat en de omgevingstemperatuur.
5. Het apparaat bewaakt tijdens de productie de waterstand. Wanneer de
waterpomp geen water meer pomp stopt het apparaat automatisch en het symbool
verschijnt in het display samen met de pijl. Druk de ON/OFF toets in en vul
direct water bij. Druk vervolgens opnieuw op de ON/OFF toets om het apparaat
weer op te starten. Wanneer u water bijvult zonder het apparaat uit te schakelen
duurt de productie van ijsblokjes langer. Wacht voor het inschakelen 3 minuten
zodat het koelmiddel zich opnieuw kan verdelen.
Wanneer het apparaat vol met ijsblokjes is
6. Wanneer het apparaat volledig met ijsblokjes is gevuld stopt het automatisch en
wordt het symbool weergegeven in het display.
NL
Zo neemt u de ijsblokjes eruit
7. Plaats de ijsemmer op de afdekking van de lekbak en druk op de ICE toets op
het bedieningspaneel. Het symbool verschijnt in het display en de ijsblokjes
drukveer begint te draaien. De ijsblokjes vallen stuk voor stuk uit de ijsafvoer in
de ijsemmer. Druk opnieuw op de ICE toets en het symbool verdwijnt van
het display en de veer houdt op met draaien. Er vallen geen ijsblokjes meer uit de
ijsafvoer.
69
Page 70

NL
Zo tapt u water af
8. De vooraf ingestelde doorstroomtijd is 10 seconden. Plaats een beker onder de
waterafvoer en druk eenmaal op de WATER toets. Het water stroomt in het midden
uit de waterafvoer, het symbool verschijnt in het display en in de timersectie
verschijnt de weergave [10 S]. Nadat de 10 seconden voorbij zijn verdwijnt het
symbool en komt er geen water meer uit de afvoer. Wanneer u van mening bent
dat de doorstroomtijd te kort of te lang is kunt u deze naar eigen inzicht aanpassen.
Houdt de WATER toets minstens 5 seconden ingedrukt. In de timersectie verschijnt
de weergave [10 S]. Druk nu op de SELECT toets om de tijd tussen 7-25 seconden
aan te passen. Wacht 5 seconden en de nieuw ingestelde tijd verschijnt in de
timersectie. De volgende keer dat u water aftapt hanteert het apparaat de nieuw
ingestelde tijd.
Het afvoeren van het resterende water in het apparaat
9. Wanneer u het apparaat wilt reinigen of het
water wilt verversen dient u het resterende
water af te laten vloeien. Trek hiervoor de
waterafvoerstoppen uit het apparaat en het
water stroomt vanzelf uit het apparaat. Wanneer
uw apparaat voorzien is van een slang sluit u
de slang aan op de waterafvoer om het water
comfortabel te laten afvloeien.
10. Wissel het water in de tank om de 24 uur om er
zeker van te zijn dat het water vers is. Wanneer
u het apparaat langere tijd niet gebruikt laat u
het van tevoren leeglopen.
70
Timer instellen
• De in te stellen tijd voor de timer bedraagt 0,5 - 19,5 uur. De vooraf ingestelde tijd
is 1 uur.
• Wanneer het apparaat in gebruik is kunt u een deactiveringstimer instellen die het
apparaat na aoop automatisch uitschakelt.
• Wanneer het apparaat zich in standby-modus bevindt kunt u een activeringstimer
instellen die het apparaat automatisch inschakelt. Zo heeft u dan ijsblokjes tot uw
beschikking wanneer u die nodig heeft, bijv. bij thuiskomst of wanneer u een diner
organiseert.
Page 71

Timer inschakelen
Druk eerst op de TIMER toets, de vooraf ingestelde tijd is 1 uur en wordt in de
timersectie weergegeven. Druk op de SELECT toets om de gewenste tijd in te stellen.
Elk keer wanneer u op de SELECT toets drukt wordt de tijd met een half uur verlengd.
Houdt de SELECT toets ingedrukt wanneer u de tijd sneller wilt verlengen. Wan- neer u
de tijd ingesteld heeft wacht u 5 seconden. De hoofdletter [H] in de timersectie stopt met
knipperen en wordt continue weergegeven. De timer is nu actief.
Timer uitschakelen
Wanneer u de timer geactiveerd heeft drukt u op de TIMER toets. De ingestelde tijd en
het symbool [H] verdwijnen. De timer is nu uitgeschakeld.
1 = ingestelde timertijd
2 = symbool voor het uur (hour) en de ingestelde timer
NL
71
Page 72

NL
FOUTMELDINGEN EN OPLOSSINGEN
Probleem Mogelijke oorzaak Oplossing
Het symbool
en de pijl knippert.
Het symbool
verschijnt en [F] knippert
Foutmelding
Foutmelding
De ijsblokjes kleven aan
de vernevelaar
verschijnt
Te weinig water in de tank. Schakel het apparaat uit
en vul water bij. Schakel
het apparaat daarna
weer in.
Te veel ijsblokjes in het
interieur
Geen ijsblokjes in het
interieur
De sensor voor de ruimtelijke temperatuur is stuk
Het apparaat laat zich
niet resetten
De productiecyclus is te
lang
De temperatuur in de
watertank is te laag
Verwijder alle ijsblokjes of
hindernissen uit het interieur en reinig dit. Wanneer
de ijsproductie nog niet
wil opstarten drukt u meer
dan 5 seconden op de
SELECT toets om de ijspro-
ductie voor max. 10 cycli
opnieuw te starten
Het apparaat doet het weliswaar nog maar beter is
contact met een vakbedrijf
op te nemen en de sensor
te laten vervangen
Neem ter controle van
deze foutmelding contact
op met een vakbedrijf
Schakel het apparaat uit
en weer in nadat de ijsblo-
kjes zijn gesmolten. Kies
de instelling voor kleine
ijsblokjes
Vervang het water. Het
water in de watertank
mag tussen 7-32°C zijn
72
Page 73

Probleem Mogelijke oorzaak Oplossing
Er zitten ijsblokjes in het
apparaat maar ze worden
niet afgegeven wanneer u
op de ICE toets drukt
De ijscyclus loopt door
maar er wordt geen ijs
geproduceerd
De afvoerschacht voor de
ijsblokjes is geblokkeerd
De omgevingstem-peratuur of de watertemperatuur
is te hoog
Er lekt koelmiddel Laat het apparaat door
Een slang in het koelsysteem is gebroken
Laat de ICE toets los
en druk na 3 seconden
opnieuw
Gebruik het apparaat
alleen in ruimtes met een
ruimtelijke temperatuur
van minder dan 32°C en
voeg koel water toe
een technicus controleren
Laat het apparaat door
een technicus controleren
REINIGING EN ONDERHOUD
Voordat u het apparaat voor de eerste keer gebruikt raden wij aan het grondig te
reinigen. Neem allereerst de stekker uit het stopcontact voordat u begint.
1. Neem alle accessoires uit het interieur.
2. Reinig het interieur met wat afwasmiddel, warm water en een zachte doek. Vul
hiervoor de watertank met wat warm water en afwasmiddel en neem het exterieur
met de doek af.
3. Reinig vervolgens het interieur en laat het water daarna weglopen middels de
waterafvoer.
4. Reinig het exterieur regelmatig met een vochtige doek en wat afwasmiddel.
5. Droog het exterieur en het interieur met een droge doek of een theedoek af.
6. Wanneer u het apparaat langere tijd niet gebruikt laat u het resterende water
volledig wegstromen.
NL
73
Page 74

NL
INSTRUCTIES VOOR AFVOER
Wanneer het hier links afgebeelde symbool zich op het
product bevindt (doorgestreepte vuilcontainer op wielen)
dan geldt de Europese richtlijn 2012/19/EU. Deze
producten mogen niet met het reguliere huisvuil worden
afgevoerd. Informeer naar de correcte regeling aangaande
de gescheiden inzameling van elektrische en elektronische
apparaten in uw gemeente. Voer oude apparaten niet af via
het huisvuil. Door een correcte afvoer van oude apparaten
conform de regels wordt zowel het milieu als de gezondheid
van uw medemens beschermd tegen de mogelijke negatieve
gevolgen. Materiaalrecycling helpt het verbruik van ruwe
grondstoffen te verminderen.
74
Page 75

Vážený zákazníku,
Blahopřejeme vám k zakoupení zařízení. Pečlivě si přečtěte
následující pokyny a postupujte podle nich, abyste zabránili
možnému poškození. Nepřebíráme žádnou odpovědnost
za škody způsobené nedodržením pokynů a nesprávným
použitím. Chcete-li získat přístup k nejnovějšímu manuálu a
dalším informacím o produktu, naskenujte následující kód QR:
OBSAH
Bezpečnost76
Přehled přístroje78
Uvedení do provozu a obsluha 80
Řešení problémů84
Čištění a péče 85
Likvidace86
TECHNICKÁ DATA
Číslo položky 10030844, 10030848, 10030849
Napájení 220-240 V ~ 50-60 Hz
CZ
PROHLÁŠENÍ O SHODĚ
Výrobce:
Chal-Tec GmbH, Wallstraße 16, 10179 Berlín,
Německo.
Tento produkt je v souladu s následujícími
evropskými směrnicemi:
2014/30/EU (EMV)
2014/35/EU (LVD)
2011/65/EU (RoHS)
75
Page 76

CZ
BEZPEČNOST
• Přístroj připojujte pouze k uzemněným zásuvkám, které odpovídají napětí přístroje.
• Při pohybu používejte rukojeti.
• Umístěte přístroj na rovný povrch.
• Používejte přístroj pouze uvnitř.
• Nepoužívejte přístroj v blízkosti vany nebo bazénu.
• Odpojte zástrčku ze zásuvky, pokud ji nepoužíváte.
• Napájecí kabel a zástrčku nikdy neponořujte do vody nebo jiných kapalin.
• Pro toto zařízení používejte pouze příslušenství doporučené výrobcem.
• Neumísťujte zařízení přímo do elektrické zásuvky.
• Nenechávejte přívodní šňůru viset na pracovní ploše, aby ji děti nemohly táhnout.
• Nepřeplňujte zařízení, jinak může dojít ke zkratu a úrazu elektrickým proudem.
• Během provozu musí být víko vždy zavřené.
• Neodtahujte zástrčku ze zásuvky za kabel, ale při vyjímání ji držte rukou.
• Nepřebíráme žádnou odpovědnost za škody způsobené nedodržením pokynů a
nesprávným použitím.
• Přístroj používejte pouze v domácnosti.
• Nepřipojujte zařízení k časovači nebo dálkově ovládané zásuvce.
• Přístroj neponořujte do vody.
• Pokud je napájecí kabel nebo zástrčka poškozena, musí být vyměněna výrobcem,
autorizovaným odborníkem nebo podobně kvalikovanou osobou.
• Při likvidaci dodržujte místní předpisy pro likvidaci hořlavých plynových zařízení.
• Neskladujte v přístroji hořlavé nebo výbušné látky.
• Zařízení plňte pouze vodou.
• Děti ve věku 8 let a více, osoby s tělesným a tělesným postižením by měly přístroj
používat pouze tehdy, jsou-li důkladně informovány školitelem o jejich funkcích a
bezpečnostních opatřeních.
Toto zařízení obsahuje isobutan (R600a), zemní plyn s vysokým dopadem na
životní prostředí, ale hořlavý. Ačkoliv je hořlavý, nepoškozuje ozonovou vrstvu a
nezvyšuje skleníkový efekt. Použití tohoto chladiva vede k mírně vyšší hladině hluku
zařízení. Kromě hluku kompresoru můžete slyšet průtok chladiva. To je nevyhnutelné
a nemá negativní vliv na výkon zařízení. Při přepravě buďte opatrní, aby nedošlo k
poškození okruhu chladiva. Úniky chladiva mohou dráždit oči.
76
Page 77

VAROVÁNÍ
Nebezpečí požáru / hořlavých materiálů. Dodržujte místní předpisy
pro likvidaci zařízení s hořlavými chladivy a plyny.
• Udržujte větrací otvory v krytu přístroje bez překážek.
• Nepoškozujte okruh chladiva.
• Nepoužívejte žádná mechanická zařízení nebo jiné prostředky k urychlení procesu
rozmrazování nebo procesu výroby ledu
• Ve stroji na kostky ledu nepoužívejte jiné typy elektrických spotřebičů.
Zvláštní poznámky
• Při umisťování zařízení se ujistěte, že napájecí kabel není ucpaný nebo poškozený.
• Ujistěte se, že na zadní straně jednotky nejsou žádné zásuvky nebo napájecí
adaptéry.
Aby se zabránilo kontaminaci potravin, dodržujte prosím následující pokyny:
• Povrchy, které mohou přijít do styku s potravinami, pravidelně čistěte. Pravidelně
čistěte odtok vody.
• Pokud jednotka obsahuje nádrž na vodu, vyčistěte ji, pokud nebyla používána po
dobu 48 hodin. Opláchněte nádrž, pokud není po dobu 5 dnů odstraněna voda.
VAROVÁNÍ
Při používání, údržbě a likvidaci zařízení věnujte pozornost levému
symbolu na zadní straně nebo kompresoru přístroje. Tento symbol
varuje před možnými požáry. Trubky chladiva a kompresor obsahují
hořlavé látky. Během používání, údržby a likvidace uchovávejte přístroj
mimo dosah zdrojů ohně.
CZ
77
Page 78

CZ
PŘEHLED PŘÍSTROJE
Odkapávací miska na vodu
1
Kryt odkapávací misky a
podložka pro nádobu na ledové
2
kostky
Zátka odtoku vody
3
Výpusť vzduchu
4
Horní okénko
5
Tlačná pružina na kostky ledu
6
Obslužný panel
7
Rozprašovač
8
Boční dvířka
9
Nádrž na vodu a max
10
78
Page 79

A Displej
1 Časovač / Ukazatel času
během
2 Velikost ledových kostek:
malé
3 Velikost ledových kostek:
velké
4 Výroba ledových kostek:
Ledové kostky se vyrábějí.
5 Odtok vody: Voda se právě
vypouští.
6 Kód chyby 1,2 nebo 3
7 Příliš málo vody: Pokud se
objeví tento ukazatel, voda
se musí doplnit.
8 Přístroj je plný ledových
kostek.
9 Zapnuto / Vypnuto-
ukazatel: Pokud se přístroj
vypne, bliká tento ukazatel,
pokud se přístroj zapne,
svítí univerzální.
A Displej
B Tlačítko pro výrobu
ledových kostek
C Tlačítko pro čepování vody
D Zapnutí / Vypnutí přístroje
E Tlačítko pro výběr velikosti
ledových kostek a pro
nastavení prodlouženého
času průběhu
F Tlačítko pro zapnutí nebo
vypnutí časovače
CZ
79
Page 80

CZ
UVEDENÍ DO PROVOZU A OBSLUHA
Před první provozem:
• Odstraňte švetok obalový materiál a zkontrolujte, zda je dodávka úplná. Pokud by
chyběly části, obraťte se okamžitě na naši zákaznickou službu.
• Odstraňte nálepky a lepicí pásky. Otevřete průhledné okénko a vyberte
příslušenství.
• Vyčistěte vnitřní prostor (nádrž na vodu, tlačnou pružinu na kostky ledu) měkkým
hadříkem a vlažnou vodou.
• Postavte přístroj na rovnou pracovní desku, daleko od slunečního světla a zdrojů
tepla. Nechte kolem přístroje nejméně 15 cm místa, aby mohl vzduch dostatečně
cirkulovat.
• Počkejte před zapnutím nejméně 1 hodinu, aby se chladicí kapalina mohla rozdělit.
Důležité: Plňte přístroj jen pitnou vodou! Obsluha
1. Otevřete levé boční dvířka a naplňte vodu. Dbejte na to, aby naplněna voda
nepřekročila značení MAX.
80
2. Zastrčte zástrčku do zásuvky. Na displeji zabliká symbol .
Page 81

3. Stiskněte tlačítko ON / OFF na obslužném panelu, abyste spustili výrobu ledových
kostek. Symbol nyní svítí trvale na displeji. Zároveň začne blikat symbol
Jako základní nastavení pro velikost ledových kostek je nastaveno „velké“. V
případě, že byste chtěli velikost změnit, stiskněte tlačítko SELECT a zvolte mezi
velkými ledovými kostkami nebo malými ledovými kostkami . V případě,
že ledové kostky stále nemají požadovanou velikost, můžete čas průběhu
výrobního cyklu prodloužit. Zatímco výroba ledu běží, držte 5 sekund stisknuté
tlačítko ON / OFF. Číslice (0) se objeví nahoře na ukazateli Časovače / času
průběhu na displeji. Číslice (0) znamená standardní čas průběhu. Použijte tlačítko
SELECT, abyste změnili na (1), (2) a znovu zpět na (0). Když zvolíte (1), prodlouží
se čas průběhu o 1 minutu, když zvolíte (2), o 2 minuty. Když přístroj vypnete a
opět zapnete, automaticky je opět nastaven standardní čas průběhu.
4. Výroba ledových kostek trvá asi 6-12 minut, v závislosti na zvolené velikosti a
teploty okolí.
5. Přístroj monitoruje během provozu stav vody. V případě, že čerpadlo už nepumpuje
žádnou vodu, přístroj automaticky zastaví a symbol se objeví na displeji a bliká
symbol šipky. V tomto případě okamžitě doplňte vodu. Doporučujeme Vám nejprve
stisknout tlačítko ON / OFF předtím, než doplníte vodu. Stiskněte potom znovu
tlačítko ON / OFF, abyste přístroj znovu nastartovaly. V případě, že doplňujete
vodu bez zastavení přístroje, trvá výroba ledových kostek déle. Počkejte před
zapnutím 3 minuty, aby se chladicí kapalina znovu mohla rozdělit
Když je přístroj plný ledových kostek
6. Když je přístroj plný ledových kostek, přístroj automaticky zastaví a symbol se
ukáže na displejibol wird im Display
Takto odeberete ledové kostky
CZ
7. Položte nádobu na ledové kostky na podložku (kryt) odkapávací misky a stiskněte
tlačítko ICE na obslužném panelu. Symbol se objeví na displeji a tlačná
pružina na kostky ledu se začne otáčet. Ledové kostky padají postupně z výpusti
ledu do nádoby na ledové kostky. Stiskněte znovu tlačítko ICE, symbol . Zmizí
opět z displeje a pružina se přestane otáčet. Už nepadají žádné ledové kostky z
výpusti ledu do nádoby
81
Page 82

CZ
Takto odčerpáte vodu
8. Přednastavený čas výtoku je 10 sekund. Postavte sklenici pod výpusť vody a
stiskněte jednou tlačítko WATER. Voda teče centrálně z výpusti vody, symbol
se objeví na displeji a v poli časovače se objeví ukazatel (10S). Poté, co uběhlo
10 sekund, zmizí symbol a už nejde žádná voda z výpusti. V případě, že Vám
je čas výtoku příliš krátký nebo dlouhý, můžete si ho jakkoliv přizpůsobit. Držte
stisknuté tlačítko WATER nejméně 5 sekund, v poli časovače se objeví ukazatel
(10S). Stiskněte tlačítko SELECT, abyste přizpůsobili SAS od 7-25 sekund. Počkejte
5 sekund a novy čas se objeví v poli časovače. Když budete příště čepovat vodu,
přístroj si všimne novy čas.
Takto vypustíte zbytkovou vodu z přístroje
9. Když chcete přístroj čistit nebo vyměnit vodu,
musíte vypustit zbytkovou vodu z nádrže.
Vytáhněte na to zátku odtoku vody dolů z
přístroje a voda teče z přístroje. V případě, že
Váš přístroj je vybaven hadicí, připojte hadici na
odtok vody, abyste vodu pohodlně vypustili.
10. Vyměňujte vodu v nádrži každých 24 hodin,
abyste se ujistili, že voda je čerstvá. V případě,
že přístroj déle nepoužíváte, vypusťte předtím
vodu zcela
Nastavení časovače
• Nastavitelný čas pro časovač je 0,5-19,5 hodiny. Přednastavený čas je 1 hodina.
• Když přístroj běží, lze nastavit časovač vypnutí, po jehož uplynutí přístroj
automaticky vypne.
• Když se přístroj nachází v režimu Standby, můžete nastavit časovač zapnutí, po
kterém se přístroj automaticky zapne. Tak máte pak led vždy k dispozici, když ho
právě potřebujete, např. když přijdete domů nebo pořádáte večeři
82
Page 83

Zapnutí časovače
Stiskněte nejprve tlačítko TIMER, přednastavený čas je 1 hodina a ukáže se v poli
časovače na displeji. Stiskněte tlačítko SELECT, abyste nastavili požadovaný čas.
Pokaždé, když stisknete tlačítko SELECT, zvýší se čas o půl hodiny. Držte tlačítko SELECT
stisknuté, abyste představili čas rychleji. Když jste čas nastavili, počkejte 5 sekund,
písmeno (H) v poli časovače přestane blikat a bude zobrazeno konstantně. Časovač je
nyní aktivní.
Vypnutie časovača
Když jste časovač nastavili, stiskněte tlačítko TIMER, nastavený čas a symbol (H) zmizí.
Časovač je nyní vypnutý.
1 = Nastavený čas časovače
2 = Symbol pro hodinu (hour) a nastavený časovač.
CZ
83
Page 84

CZ
ŘEŠENÍ PROBLÉMŮ
Problém Možná příčina Řešení
Symbol
šipka bliká
Symbol
bliká (F).
Kód chyby
Kód chyby
Ledové kostky
se lepí pevně na
rozprašovač.
se objeví a
se objeví a
Příliš mnoho ledových
kostek v nádrži.
Příliš mnoho ledových
kostek ve vnútor.priestore
Žádné ledové kostky ve
vnitřním prostoru
Senzor pro pokojovou
teplotu je zkažený.
Přístroj nelze resetovat. Pro zkontrolování chyby
Výrobní cyklus je příliš
dlouhý.
Teplota v nádrži na vodu
je příliš nízká.
Vypněte přístroj, doplňte
vodu a zapněte potom
přístroj znovu.
Odstraňte všechny ledové
kostky nebo překážky
z vnitřního prostoru a
vyčistěte ho. V případě,
že výroba ledu stále nefunguje, stiskněte déle než
5 sekund tlačítko SELECT,
abyste výrobu ledu pro
maximálně 10 cyklů znovu
nastartovaly.
Přístroj sice ještě běží,
ale měli byste přece
konaktovať odbornou
provoz a senzor nechat
vyměnit
se obraťte na odborníka.
Vypněte přístroj a znovu
ho zapněte, Pak jak se
kostky roztají
Vyměňte vodu. Doplněna
voda by měla být teplá
7-32 stupňů Celsia.
84
Page 85

Problém Možná příčina Řešení
V přístroji se nacházejí kostky, ale nejsou
vypouštěny, když stisknete
tlačítko ICE.
Cyklus výroby ledu
probíhá, ale není vyráběn
led.
Výpustná šachta pro ledové kostky je blokována.
Teplota okolí nebo vody
uvnitř je ríliš vysoká.
Chladicí kapalina uniká. Nechte přístroj zkontrolo-
Hadice v chladícím
systému je zlomená.
Uvolněte tlačítko ICE a
stiskněte ho znovu po 3
sekundách.
Používejte přístroj v
prostorách s pokojovou
teplotou pod 32 stupňů
Celsia a doplňujte chlaze-
nou vodu.
vat odborníkem.
Nechte přístroj zkontrolovat odborníkem.
ČIŠTĚNÍ A PÉČE
Předtím, než přístroj poprvé použijete, doporučujeme Vám ho důkladně vyčistit.
Vytáhněte vždy nejprve zástrčku ze zásuvky předtím, než budete přístroj čistit.
1. Vyjměte příslušenství z vnitřního prostoru.
2. Vyčistěte vnitřní prostor s trochou saponátu, teplou vodou a měkkým hadříkem.
Doplňte k tomu trochu teplé vody s trochou saponátu do nádrže na vodu a otřete
vnější povrch s hadříkem.
3. Vyčistěte potom vnitřní prostor a vypusťte potom vodu přes odtok vody.
4. Čistěte vnější stranu pravidelně s vlhkým hadříkem a trochou saponátu.
5. Vysušte vnější stranu a vnitřní prostor suchým hadříkem nebo hadrem na nádobí.
6. Když přístroj déle nepoužíváte, nechte zbytkovou vodu zcela odtéci.
CZ
85
Page 86

CZ
LIKVIDACE
Pokud se nachází obrázek vlevo (přeškrtnutá nádoba na
odpadky na kolech) na výrobku, platí Evropská směrnice
2002/96/ EU. Tyto výrobky nemohou likvidovat s normálním
domovním odpadem. Informujte se o místních předpisech
o odděleném sběru elektrických a elektronických zařízení.
Orientujte se podle místních předpisů a nelikvidujte staré
přístroje přes komunální odpad. Prostřednictvím likvidace
starých přístrojů v souladu s předpisy se chrání životní
prostředí a zdraví obyvatel před možnými negativními
následky. Recyklace materiálů napomáhá snižovat spotřebu
surovin.
86
Page 87

Page 88

 Loading...