

Page 1

Coolzone 130
Kühlschrank
Fridge
Frigoríco
Réfrigérateur
Frigorifero
10030104
Page 2

Page 3
Sehr geehrter Kunde,
wir gratulieren Ihnen zum Erwerb Ihres Gerätes. Lesen Sie
die folgenden Hinweise sorgfältig durch und befolgen Sie
diese, um möglichen Schäden vorzubeugen. Für Schäden,
die durch Missachtung der Hinweise und unsachgemäßen
Gebrauch entstehen, übernehmen wir keine Haftung. Scannen
Sie den folgenden QR-Code, um Zugriff auf die aktuellste
Bedienungsanleitung und weitere Informationen rund um das
Produkt zu erhalten:
INHALTSVERZEICHNIS
DE
Sicherheitshinweise4
Geräteübersicht6
Türanschlag drehen6
Installation8
Inbetriebnahme und Bedienung13
Reinigung und Pege14
Fehlerbehebung15
Hinweise zur Entsorgung16
TECHNISCHE DATEN
Artikelnummer 10030104
Stromversorgung 220-240 V ~ 50/60 Hz
KONFORMITÄTSERKLÄRUNG
Hersteller:
Chal-Tec GmbH, Wallstraße 16, 10179 Berlin, Deutschland.
Dieses Produkt entspricht den folgenden Europäischen
Richtlinien:
2014/30/EU (EMV)
2014/35/EU (LVD)
2011/65/EU (RoHS)
643/2009/EG (ErP)
1060/2010/EU (ErP)
English 17
Español 31
Français 45
Italiano 59
3
Page 4

DE
SICHERHEITSHINWEISE
• Prüfen Sie vor der Benutzung die Spannung auf der Geräteplakette. Schließen Sie
das Gerät nur an Steckdosen an, die der Spannung des Geräts entsprechen.
• Kinder ab 8 Jahren, physisch und körperlich eingeschränkte Menschen dürfen
das Gerät nur benutzen, wenn sie vorher von einer für Sie verantwortlichen
Aufsichtsperson ausführlich mit den Funktionen und den Sicherheitsvorkehrungen
vertraut gemacht wurden. Achten Sie darauf, dass Kinder nicht mit dem Gerät
spielen. Die Reinigung darf von Kindern nur unter Aufsicht durchgeführt werden.
• Achten Sie darauf, dass die ventilationsöffnung frei sind und reinigen Sie sie
regelmäßig.
• Benutzen Sie keine mechanischen Geräte, um den Abtau-Prozess zu beschleunigen.
• Stellen Sie keine elektrischen Geräte, z. B. Eismaschinen in den Kühlschrank.
• Achten Sie darauf, den Kühlmittel-Kreislauf nicht zu beschädigen.
• Falls das Netzkabel oder der Stecker beschädigt sind, müssen sie vom Hersteller,
einem autorisierten Fachbetrieb oder einer ähnlich qualizierten Person ersetzt
werden.
• Überprüfen Sie das Netzkabel regelmäßig auf Schäden. Benutzen Sie das Gerät
nicht mit beschädigtem Netzkabel.
• Fassen Sie das Gerät, den Stecker und das Netzkabel nicht mit nassen Händen an.
• Verwenden Sie nach Möglichkeit kein Verlängerungskabel Falls Sie doch eines
verwenden, achten Sie darauf, dass der Amperewerte des angeschlossenen Geräts
den maximalen Amperewert des Netzkabels nicht überschreitet.
• Lassen Sie um das Gerät herum mindestens 5 cm Platz zu den Seiten und 10 cm
Platz nach hinten, damit die Luft ausreichend zirkulieren kann.
• Stellen Sie keine heißen Lebensmittel in das Gerät. Lassen Sie sie erst auf
Zimmertemperatur abkühlen.
• Schließen Sie die Tür möglichst schnell nachdem Sie Lebensmittel hinzugeben,
damit die Kälte nicht entweicht.
• Stellen Sie das Gerät auf einen festen, ebenen Untergrund. Stellen Sie es nicht auf
einen weichen Untergrund, z. B. einen Teppich.
• Stellen Sie keine Gegenstände auf das Gerät.
• Lagern sie keine entzündlichen oder explosiven Substanzen im Gerät.
• Benutzen Sie das Gerät nicht im Freien.
• Ziehen sie den Stecker nicht am Kabel aus der Steckdose, sondern halten Sie ihn
beim Abziehen mit der Hand fest.
• Achten Sie darauf, dass das Netzkabel keine heißen Oberächen berührt.
• Schließen Sie das Gerät nur an geerdete Steckdosen an.
• Schließen Sie das Gerät nicht an Steckdosen, an die bereits andere Küchengeräte
angeschlossen sind.
• Tauen Sie das Gefrierfach regelmäßig ab.
• Wenn der Kühlschrank ausgeht, ausfällt oder ausgeschaltet wird, warten Sie 5
Minuten bevor Sie ihn wieder einschalten, andernfalls könnte der Kompressor
Schaden nehmen.
4
Page 5

Dieses Gerät enthält das Kältemittel Isobutan (R600a), ein Naturgas mit hoher
Umweltverträglichkeit, aber brennbar. Obwohl es brennbar ist, schädigt es nicht
die Ozonschicht und verstärkt nicht den Treibhauseffekt. Die Verwendung dieses
Kältemittels führt zu einer etwas höheren Geräuschentwicklung des Gerätes.
Zusätzlich zum Kompressorgeräusch können Sie den Fluss des Kältemittels hören.
Dies ist unvermeidlich und hat keine negative Wirkung auf die Leistung des Gerätes.
Seien Sie während des Transports vorsichtig, so dass der Kältemittelkreislauf nicht
beschädigt wird. Kältemittellecks können die Augen reizen.
Besondere Hinweise
• Kinder im Alter von 3 bis 8 Jahren dürfen Kühlgeräte beladen und entladen.
• Achten Sie bei der Positionierung des Gerätes darauf, dass das Netzkabel nicht
eingeklemmt oder beschädigt ist.
• Achten Sie darauf, dass sich keine Mehrfachsteckdosen oder Netzteile auf der
Rückseite des Geräts be nden.
Um eine Kontamination von Lebensmitteln zu vermeiden, beachten Sie bitte die
folgenden Anweisungen:
• Ein längeres Öffnen der Tür kann zu einem deutlichen Temperaturanstieg in den
Fächern des Gerätes führen.
• Reinigen Sie regelmäßig Ober ächen, die mit Lebensmitteln in Berührung kommen
können. Reinigen Sie Regelmäßig den Wasserablauf.
• Lagern Sie rohes Fleisch und Fisch in geeigneten Behältern im Kühlschrank, damit
Fleisch und Fisch nicht mit anderen Lebensmitteln in Berührung kommt oder auf
diese tropft.
DE
WARNUNG
Achten Sie bei Gebrauch, Wartung und Entsorgung des Gerätes auf
das linke Symbol, das sich auf der Rückseite oder am Kompressor des
Gerätes be ndet. Dieses Symbol warnt vor möglichen Bränden. In den
Kältemittelleitungen und im Kompressor be nden sich brennbare Stoffe.
Halten Sie das Gerät bei Gebrauch, Wartung und Entsorgung von
Feuerquellen fern.
5
Page 6
DE
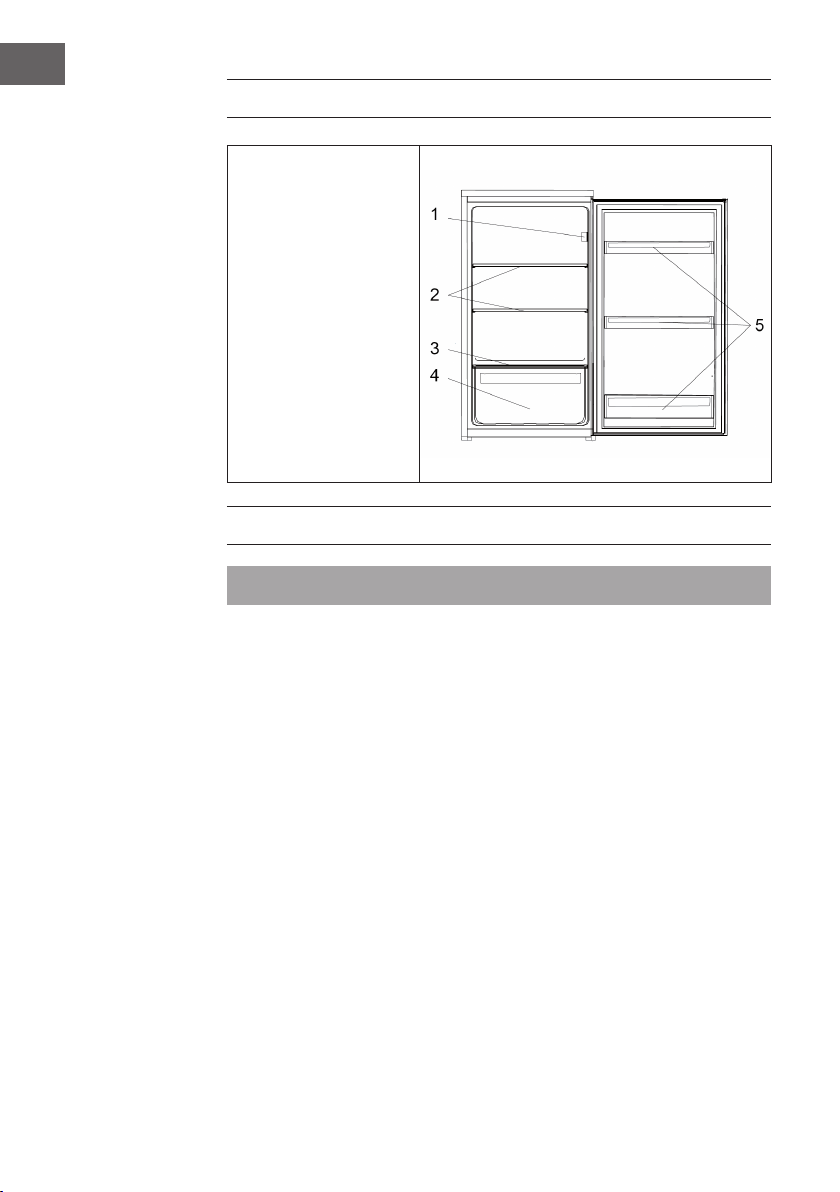
GERÄTEÜBERSICHT
1 Thermostat und Licht
2 Glasregale
4 Gemüsefach-
Abdeckung
5 Gemüsefach
6 Türfächer
TÜRANSCHLAG DREHEN
Benötigte Werkzeuge: Kreuzschlitzschraubenzieher und acher Schraubenzieher
• Versichern Sie sich, dass das Gerät leer ist und ziehen Sie den Stecker aus der
Steckdose.
• Wenn Sie die Tür entfernen müssen Sie das Gerät zurückneigen. Lehnen Sie das
Gerät an eine stabile Wand, von der es nicht wegrutschen kann.
• Heben Sie alle Zubehörteile auf, Sie brauchen die Teile wenn Sie die Tür wieder
installieren.
• Legen Sie das Gerät nicht ach auf den Boden, da das Kühlsystem sonst beschädigt
werden könnte.
• Führen Sie den Türwechsel immer mit 2 Personen durch.
6
Page 7
1 2
DE
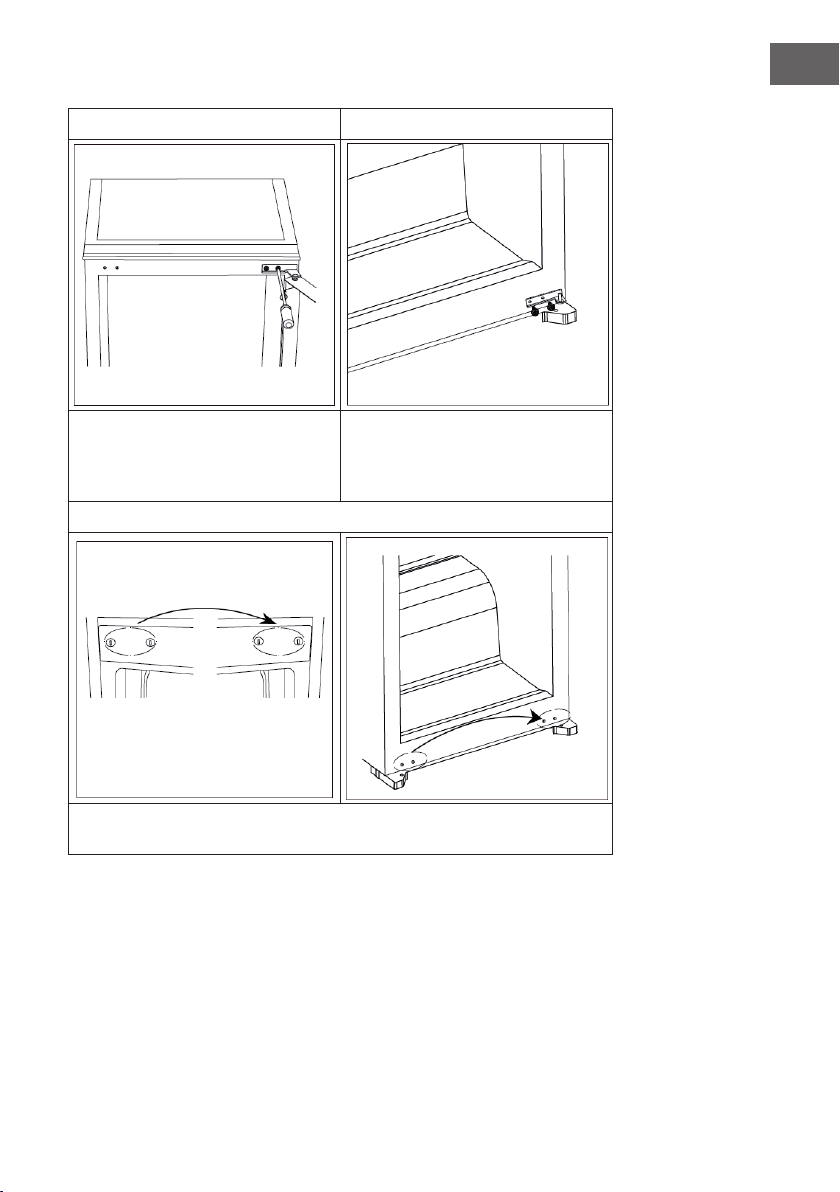
Schrauben Sie die obere Aufhängung ab.
Heben Sie die Tür an und stellen Sie sie
auf einen weichen Untergrund, um Kratzer zu vermeiden.
Schrauben Sie die obere und untere Lochabdeckung ab und befestigen Sie sie an den
gegenüberliegenden Seiten.
Schrauben Sie die untere Aufhängung ab.
3
7
Page 8
DE
4 5
Drehen Sie die obere Aufhängung um,
und befestigen Sie sie unten auf der linken
Seite.
INSTALLATION
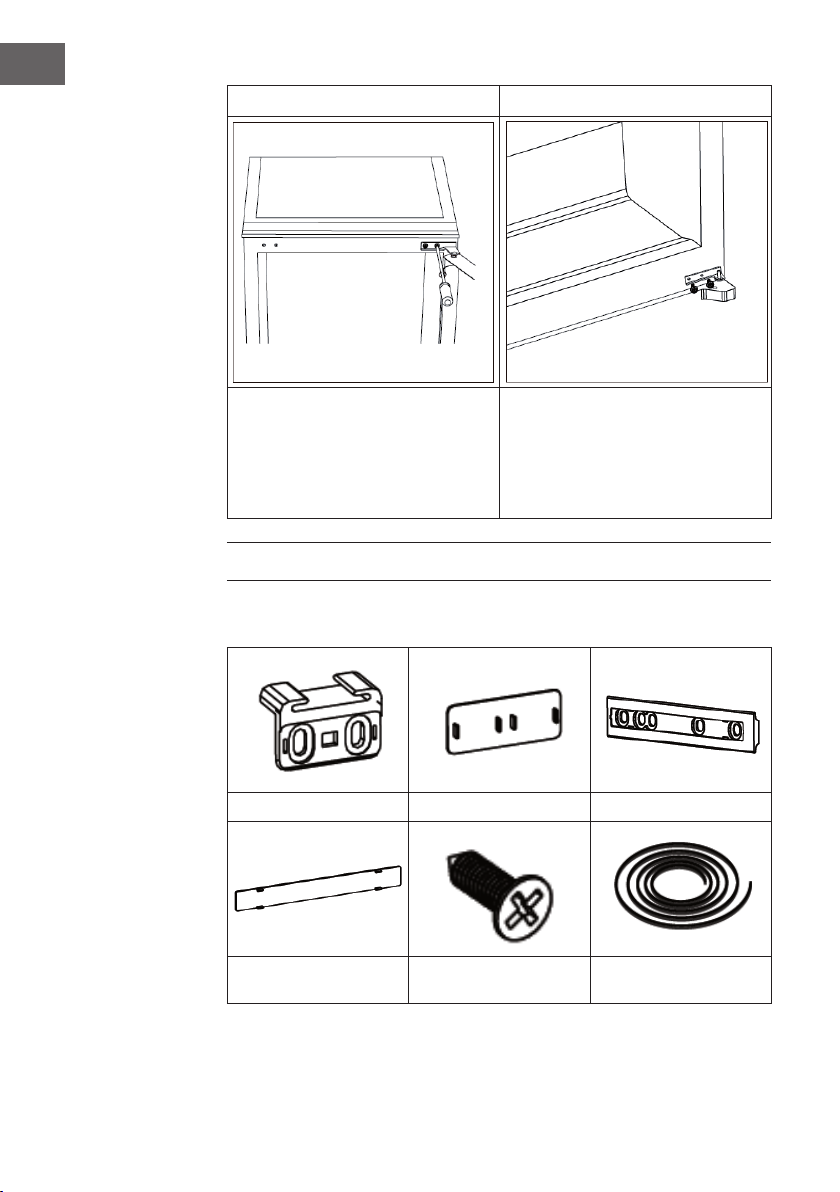
Mitgeliefertes Zubehör
Führung 2x Abdeckung 2x Gleiter 2x
Abdeckung 2x Schrauben 15x
inkl. 2x Ersatz
Befestigen Sie die Tür wieder. Versichern
Sie sich, dass die Tür horizontal und vertikal richtig ausgerichtet ist, so dass die
Dichtung an allen Seiten schließt. Drehen
Sie dann die untere Aufhängung um und
befestigen Sie sie links oben.
Dichtung 1x
8
Page 9
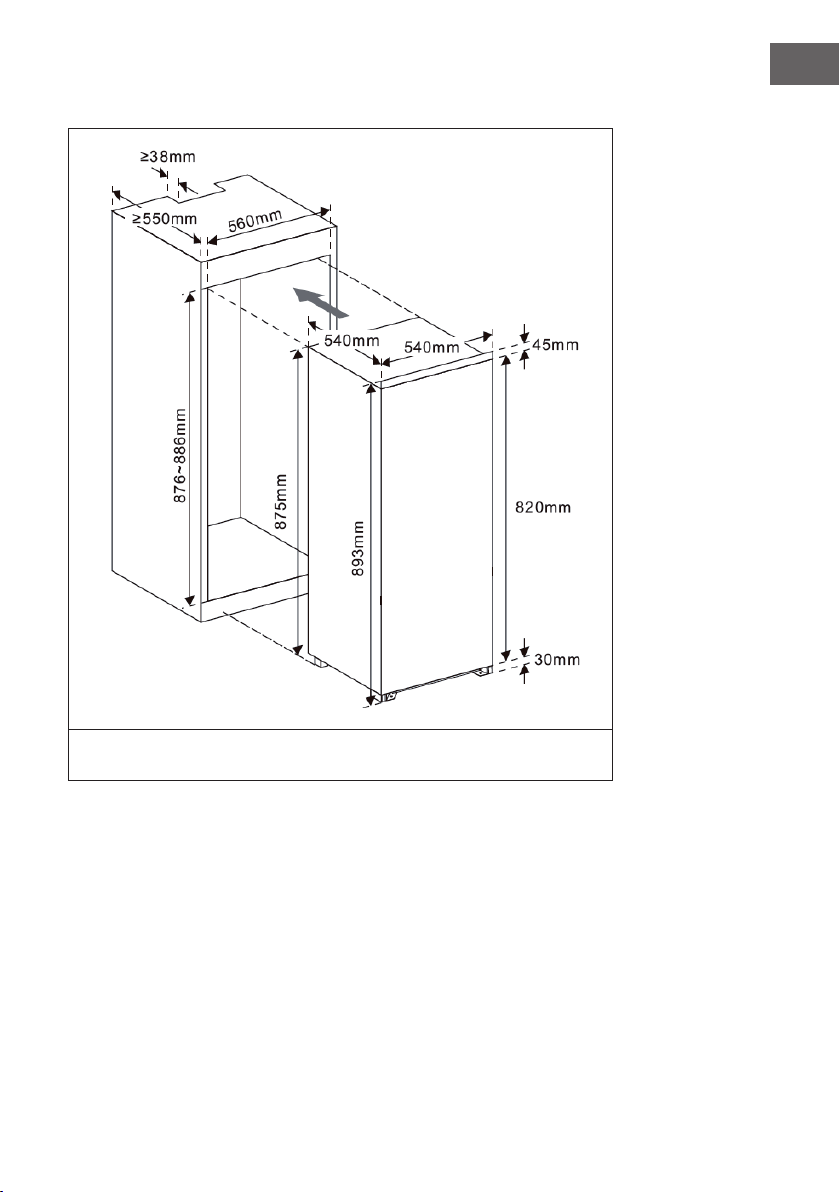
Einbauanleitung
DE
Schritt 1: Versichern Sie sich, dass der Einbauschrank groß genug ist und
ausreichende Belüftung bietet.
9
Page 10

DE
Schritt 2
Schieben Sie das Gerät vorsichtig in den Einbauschrank. Stellen Sie sicher, dass die Öffnungsseite
so nah wie möglich an der Schrankwand ist.
Schritt 3
Falls sich Schrauben an der Fronttür benden entfernen Sie sie. Schrauben Sie eine Führung an die
Kühlschranktür. Schieben Sie eine Gleiter in die Führung und öffnen und schließen Sie den Kühlschrank
einmal komplett, um zu prüfen, ob sich die Holztür
des Einbauschranks komplett schließen lässt.
Schritt 4
Öffnen Sie die Gerätetür und die Holztür gemeinsam und markieren Sie die Position des Gleiters bei
komplett geöffneter und fast geschlossener Tür. Nehmen Sie den Gleiter aus der Führung und befestigen
Sie ihn mit 2 Schrauben an der Holztür. Befestigen
Sie dann die Abedeckung auf dem Gleiter. Schrauben Sie die Führung wieder ab und wiederholen Sie
die Schritte mit dem anderen Gleiter.
Schritt 5
Befestigen Sie die 2 Führungen an den Gleitern und
xieren Sie sie mit Schrauben. Befestigen Sie dann
die Abdeckungen.
10
Page 11

Schritt 6
Schritt 7
Schritt 8
DE
Überprüfen Sie ob sich die problemlos öffnen und
schließen lässt und die Dichtungen das Gerät ordentlich abdichten. Falls nicht, justieren Sie das Gerät nach. Befestigen Sie die unteren Klammern zum
Schluss mit Schrauben am Einbauschrank.
Befestigen Sie die oberen Klammern ebenfalls mit
Schrauben am Einbauschrank.
Benutzen Sie die Gummidichtung, um den Spalt
zwischen Kühlschrank und Einbauschrank auf der
Seite, auf der sich die Tür öffnet, abzudichten.
11
Page 12

DE
Standort
Stellen Sie das Gerät an einem Standort auf, der mit der angegeben Klimaklasse
übereinstimmt. Die Angaben nden Sie auf der Geräteplakette:
Klimaklasse Raumtemperatur
SN +10 °C - +32 °C
N +16 °C - +32 °C
ST +16 °C - +38 °C
T +16 °C - +43 °C
• Halten Sie das Gerät fern von Wärmequellen, wie Radiatoren, Öfen. Boilern oder
direktem Sonnenlicht.
• Stellen Sie das Gerät so auf, dass der Netzstecker jederzeit erreichbar ist.
• Um die Gefahr eines Stromschlags bei einer Störung oder Fehlfunktion zu
verringern, muss das Gerät an eine geerdete Steckdose angeschlossen werden.
Falls Sie sich nicht sicher sind, ob Ihre Steckdose den Anforderungen entspricht,
lassen Sie sich von einem Elektriker beraten. Schließen Sie das Gerät nur an
Steckdosen an, die der angegeben Spannung des Geräts entsprechen.
12
Page 13

INBETRIEBNAHME UND BEDIENUNG
Vor dem ersten Betrieb
• Entfernen Sie vor der Benutzung zuerst alle Packmaterialien, einschließlich der
Bodenpolsterung, Schaumstoffkissen und Klebstreifen im Inneren des Kühlschranks.
• Reißen Sie die Schutzfolie auf der Kühlschranktür und auf dem Gehäuse ab.
• Halten Sie das Gerät von Hitze und direktem Sonnenlicht fern. Stellen sie das Gerät
nicht an feuchten oder nassen Orten auf, um Rost zu vermeiden.
• Besprühen oder waschen Sie den Kühlschrank nicht und stellen Sie ihn nicht an
feuchten Orten auf, wo er Wasserspritzern ausgesetzt ist. Dies kann die elektrischen
Isolationseigenschaften beeinträchtigen.
• Der Kühlschrank muss an einem gut belüfteten Ort aufgestellt werden, wo
der Boden ach und fest ist. Benutzen Sie die verstellbaren Füße um leichte
Unebenheiten auszugleichen.
• Der Freiraum zur Decke soll mindestens 30 cm betragen und das Gerät sollte
mit einem Abstand von mehr als 10 cm an eine Wand gestellt werden, damit die
Wärme abgeleitet werden kann.
• Lassen Sie den Kühlschrank vor der ersten Inbetriebnahme mindestens eine halbe
Stunde lang stehen, bevor Sie ihn an den Strom anschließen.
• Lassen Sie den Kühlschrank 2-3 Stunden laufen, bevor Sie frische oder gefrorene
Lebensmittel hineingeben. Wenn die Außentemperatur hoch ist, lassen Sie ihn vor
der Befüllung mindestens 4 Stunden laufen.
• Lassen Sie genug Platz frei, um die Schübe und Türen bequem öffnen zu können.
Positionierung der Regale und Türfächer
Der Kühlschrank ist mit mehreren Regalen ausgestattet, die beliebig positioniert werden
können. Um die Lagerung von Lebensmittelverpackungen unterschiedlicher Größe zu
ermöglichen, können die Türfächer in verschiedenen Höhen angebracht werden. Ziehen
Sie den Balkon dafür in Richtung der Pfeile, bis er sich löst und positionieren Sie ihn
dann nach Bedarf.
DE
13
Page 14

DE
REINIGUNG UND PFLEGE
Abtauen
• An der Innenseite des Gerätes kann sich Frost ansammeln, der während des
Kompressorzyklus automatisch abtaut.
• Das Wasser wird über die Ablauföffnung in die Auffangwanne oberhalb des
Kompressors geleitet, wo es verdampft.
• Stellen Sie sicher, dass das Ablauoch regelmäßig gereinigt wird, damit das
Wasser aus dem Staufach austreten kann.
Reinigung des Gerätes
• Entfernen Sie alle Regale und das Gemüsefach. Entfernen Sie zuerst das untere
Türfach, damit die das Gemüsefach entnehmen können.
• Wischen Sie das Innere des Gerätes mit einem feuchten Lappen und etwas
Spülmittel ab. Wischen Sie anschließend mit klarem, warmem Wasser nach.
• Waschen Sie die Regale und das Gemüsefach in Wasser mit Spülmittel an und
trocknen Sie die Teile ab, bevor Sie sie wieder ins Gerät setzen. Reinigen Sie die
Außenseite des Gerätes mit einem feuchten Lappen.
• Das Gitter des Kondensators auf der Rückseite des Gerätes und die angrenzenden
Bauteile können mit einem weichen Bürstenaufsatz abgesaugt werden.
Reinigungstipps
Auf der Außenseite des Gerätes kann sich Kondenswasser bilden. Dies kann auf eine
Änderung der Raumtemperatur zurückzuführen sein. Wischen Sie das Kondenswasser
ab. Wenn das Problem weiterhin besteht, wenden Sie sich bitte einen qualizierten
Techniker.
Wartung
• Wenn Sie das Gerät bewegen, halten Sie es an den Seiten oder am Boden fest.
Halten sie es nicht an den Kanten der Oberseite fest.
• Das Gerät sollte von einem autorisierten Techniker gewartet werden und es sollten
nur Original-Ersatzteile verwendet werden. Versuchen Sie auf keinen Fall, das
Gerät selbst zu reparieren. Reparaturen durch unerfahrene Personen können zu
Verletzungen oder schweren Funktionsstörungen führen.
• Wenn das Gerät längere Zeit nicht benutzt wird, trennen Sie es vom Stromnetz.
Entnehmen Sie alle Lebensmittel und reinigen Sie das Gerät. Lassen Sie die Tür
offen, um unangenehme Gerüche zu vermeiden.
14
Page 15

FEHLERBEHEBUNG
Problem Mögliche Ursache Lösungsansatz
Das Gerät läuft nicht. Der Stecker ist nicht
eingesteckt oder lose.
Die Sicherung ist raus oder
Kaputt.
Das Essen ist warm. Die Temperatur ist nicht
richtig eingestellt
Die Tür wurde häug
geöffnet.
Eine große Menge warmer
Lebensmittel wurde in den
Kühlschrank gegeben.
Das Gerät steht neben
einer Wärmequelle.
Das Gerät kühlt zu stark. Die Temperatur ist nicht
richtig eingestellt
Ungewöhnliche
Geräusche
Das Gerät steht nicht eben. Stellen Sie die Füße richtig
Das Gerät berührt eine
Wand oder einen anderen
Gegenstand.
Eine Gerätekomponente
berührt einen anderen Teil
des Geräts.
Stecken Sie den Stecker
fest in die Steckdose.
Prüfen Sie die Sicherung.
Stellen Sie die Temperatur
auf eine kühlere Stufe.
Öffnen Sie die Tür so
selten, wie möglich.
Stellen Sie die Temperatur
auf eine kühlere Stufe.
Stellen Sie das Gerät an
einem anderen Ort auf.
Stellen Sie die Temperatur
auf eine weniger kühle
Stufe.
ein.
Achten Sie darauf, dass
das Gerät frei steht.
Falls möglich versuche
sie die Komponente leicht
wegzudrehen.
DE
15
Page 16

DE
HINWEISE ZUR ENTSORGUNG
Bendet sich die linke Abbildung (durchgestrichene Mülltonne
auf Rädern) auf dem Produkt, gilt die Europäische Richtlinie
2012/19/EU. Diese Produkte dürfen nicht mit dem normalen
Hausmüll entsorgt werden. Informieren Sie sich über die
örtlichen Regelungen zur getrennten Sammlung elektrischer
und elektronischer Gerätschaften. Richten Sie sich nach
den örtlichen Regelungen und entsorgen Sie Altgeräte nicht
über den Hausmüll. Durch die regelkonforme Entsorgung
der Altgeräte werden Umwelt und die Gesundheit ihrer
Mitmenschen vor möglichen negativen Konsequenzen
geschützt. Materialrecycling hilft, den Verbrauch von
Rohstoffen zu verringern.
16
Page 17

Dear Customer,
Congratulations on purchasing this equipment. Please read
this manual carefully and take care of the following hints to
avoid damages. Any failure caused by ignoring the items and
cautions mentioned in the instruction manual is not covered
by our warranty and any liability. Scan the QR code to get
access to the latest user mannual and other information about
the product
CONTENT
Safety Instructions18
Product Overview20
Reverse Door20
Installation 22
Operation27
Care and Maintenance28
Troubleshooting29
Hints on Disposal30
TECHNICAL DATA
Item number 10030104
Power supply 220-240 V ~ 50/60 Hz
EN
DECLARATION OF CONFORMITY
Producer:
Chal-Tec GmbH, Wallstraße 16, 10179 Berlin, Germany.
This product is conform to the following European
Directives:
2014/30/EU (EMC)
2014/35/EU (LVD)
2011/65/EU (RoHS)
643/2009/EC (ErP)
1060/2010/EU (ErP)
17
Page 18

EN
SAFETY INSTRUCTIONS
• Check that the voltage of the power supply in your home is the same as the voltage
shown on the rating label of this product.
• This appliance can be used by children aged from 8 years and above and persons with
reduced physical, sensory or mental capabilities or lack of experience and knowledge if
they have been given supervision or instruction concerning use of the appliance in a safe
way and understand the hazards involved. Children shall not play with the appliance.
Cleaning and user maintenance shall not be made by children without supervision.
• Keep ventilation opening, in the appliance enclosure or in the built-in structure,
clear of obstruction.
• Do not use mechanical devices or other means to accelerate the defrosting process,
other than those recommended by the manufacturer.
• Do not use electrical appliances inside the food storage compartments of the
appliance, unless they are of the type recommended by the manufacturer.
• Do not damage the refrigerant circuit.
• If the supply cord is damaged, it must be replaced by the manufacturer or its service
agent or a similarly qualied person in order to avoid a hazard.
• It is recommended to check regularly the supply cord for any sign of possible
deterioration, and the appliance should not be used if the cable is damaged.
• To avoid injury or death from electrical shock, do not operate the appliance with
wet hands, while standing on a wet surface.
• It is not recommended to use this refrigerator with an extension cord or power
board. Please ensure that the appliance is plugged directly into the electrical outlet.
• When positioning the appliance, ensure that there is at least a 5 cm clearance at
the sides and a 10 cm clearance at the back as this is the main outlet for heat. This
will allow for adequate ventilation.
• Do not place hot food or drink into the refrigerator before it cools down to room temperature.
• Close the door immediately after putting in any items so the inside temperature will
not rise dramatically.
• Keep appliance away from any heat source or direct sunlight.
• To x stably, the appliance must be placed on a at and solid surface. It should not
be laid on any soft material.
• Do not place any other appliance on top of the refrigerator, and do not wet it.
• Do not store something like ether, methanol, gasoline, which is easy to evaporate
burn or explode.
• Do not use outdoors or in wet conditions.
• Never pull the cord to disconnect it from the outlet. Grasp the plug and pull it from
the outlet.
• Keep the cord away from heated surfaces.
• This appliance has been incorporated with a grounded plug. Please ensure the wall
outlet in your house is well earthed.
• Connect your refrigerator to an independent electrical socket and use a safe
ground wire.
• Defrost the freezer at least once a month because too much frost may affect refrigeration.
• Turn on electricity only 5 minutes later after electricity goes off. Otherwise, the
compressor may be damaged.
18
Page 19

This appliance contains the coolant isobutane (R600a), a natural gas which
is environmentally friendly. Although it is ammable, it does not damage the
ozone layer and does not increase the greenhouse effect. The use of this coolant
has,however,led to a slight increase in the noise level of the appliance. In addition to
the noise of the compressor,you might be able to hear the coolant owing around the
system. This is unavoidable,and does not have any adverse effect on the performance
of the appliance. Care must be taken during the transportation and setting up of the
appliance that no parts of the cooling system are damaged. Leaking coolant can
damage the eyes.
Special Notes
• Children between the ages of 3 and 8 are allowed to load and unload
refrigerators.
• When positioning the unit, make sure that the power cord is not pinched or
damaged.
• Make sure that there are no multiple sockets or power supplies on the back of the
unit.
To avoid contamination of food, please follow the instructions below:
• A prolonged opening of the door can lead to a signi cant rise in temperature in the
compartments of the appliance.
• Regularly clean surfaces that may come into contact with food. Clean the water
drain regularly.
• Store raw meat and sh in suitable containers in the refrigerator so that meat and
sh do not come into contact with or drip on other foods.
EN
WARNING
When using, servicing and disposing of the unit, pay attention to the left
symbol on the rear of the unit or on the compressor. This symbol warns
of possible res. There are ammable substances in the refrigerant lines
and in the compressor. Keep the appliance away from sources of re
during use, maintenance and disposal.
19
Page 20

EN
PRODUCT OVERVIEW
1 Thermostat and Light
2 Glass Shelves
4 Crisper Cover
5 Crisper
6 Balconies
REVERSE DOOR
Tool required: Philips screwdriver, Flat bladed screwdriver.
• Ensure the unit is unplugged and empty.
• To take the door off, it is necessary to tilt the unit backwards. You should rest the unit
on something solid so that it will not slip during the door reversing process.
• All parts removed must be saved to do the reinstallation of the door.
• Do not lay the unit at as this may damage the coolant system.
• It’s better that 2 people handle the unit during assembly.
20
Page 21

1 2
EN
Unscrew the top hinge. Then lift the door
and place it on a padded surface to
avoid scratching.
Unscrew and move screw holes at top and bottom of cabinet from left to right.
Unscrew bottom hinge.
3
21
Page 22

EN
4 5
Turn over the top hinge and install it at
bottom of left side.
INSTALLATION
Kits for installation
Guide 2x Cover 2x Slider 2x
Cover 2x Screws 15x
incl. 2 spare parts
Place the door back on. Ensure the door
is aligned horizontally and vertically so
that the seal are closed on all sides before
nally tightening the hinge. Then turn over
removed bottom hinge and inert it and
screw it to the top front of the unit.
Rubber Seal 1x
22
Page 23

Install the Appliance
EN
Step 1: Ensure the size of cabinet and ventilation are enough.
23
Page 24

EN
Schritt 2
Slowly and carefully push the appliance into the
cabinet. Ensure the opening side is as close to the
cabinet wall as possible.
Schritt 3
If screws in front of door are present, remove them
rst. Screw a guide to holes in the side of appliance
door. Insert the slider into the guide, then fully open
and close appliance door and wooden door to
check whether wooden door can
close totally and smoothly.
Schritt 4
Open appliance door and wooden door together
and mark the position of slider when the slider can
function well at all angle during door closes or
opens. Take slider out of guide and x slider with
wooden door by two screws. Then x slider cover
onto the slider. Unscrew the guide from appliance
door. Repeat steps to 5 to x another slider and
cover.
Schritt 5
24
Fit two guides with sliders and x them with screws.
Then x guide covers with guides.
Page 25

Schritt 6
Schritt 7
Schritt 8
EN
Double check the door can close and open smoothly and appliance is sealed well. If not, slightly adjust the unit. Then x bottom bracket with wooden
cabinet
Fix top bracket with wooden cabinet.
Attached rubber seal to the gap between unit and
wooden cabinet at door open side.
25
Page 26

EN
Positioning
Install this appliance at a location where the ambient temperature corresponds to the
climate class indicated on the rating plate of the appliance:
Climate class Ambient temperature
SN +10 °C - +32 °C
N +16 °C - +32 °C
ST +16 °C - +38 °C
T +16 °C - +43 °C
The appliance should be installed well away from sources of heat such as radiators,
boilers, direct sunlight.
It must be possible to disconnect the appliance from the mains power supply.
This appliance must be grounded. This oven is equipped with a cord having a grounding
wire with a grounding plug. It must be plugged into a wall receptacle that is properly
installed and grounded. In the event of an electrical short circuit, grounding reduces risk
of electric shock by providing an escape wire for the electric current.
26
Page 27

OPERATION
Before rst Use
• Before use, remove all packing materials, including bottom cushions, foam pads
and tapes inside of the refrigerator; tear off the protective lm on the doors and the
refrigerator body.
• Keep away from heat and avoid direct sunlight. Do not place the unit in moist or
watery places to prevent rust or reduction of insulating effect.
• Do not spray or wash the refrigerator; do not put the refrigerator in moist places
easy to be splashed with water so as not to affect the electrical insulation properties
of the refrigerator.
• The refrigerator is placed in a well-ventilated indoor place; the ground shall be at,
and sturdy (rotate left or right to adjust the wheel for levelling if unstable).
• The top space of the refrigerator shall be greater than 30 cm, and The refrigerator
should be placed against a wall with a free distance more than 10 cm to facilitate
heat dissipation.
• Before initial start, keep the refrigerator still for half an hour before connecting it to
power supply.
• Before putting any fresh or frozen foods, the refrigerator shall have run for 2-3
hours, or for above 4 hours in summer when the ambient temperature is high.
• Spare enough space for convenient opening of the doors and drawers.
Positioning of shelves and door compartments
The refrigerator is equipped with several shelves that can be positioned as required. To
enable the storage of food packaging of different sizes, the door compartments can
be mounted at different heights. To do this, pull the balcony towards the arrows until it
detaches and then position it as required.
EN
27
Page 28

EN
CARE AND MAINTENANCE
Defrosting
• Frost may accumulate on the inside of the unit and defrost automatically during the
compressor cycle.
• The water is led through the drain opening into the collecting tray above the
compressor where it evaporates.
• Make sure that the drain hole is cleaned regularly so that the water can escape
from the storage compartment.
Cleaning the Unit
• Remove all shelves and the vegetable compartment. First remove the lower door
compartment so that you can remove the vegetable compartment.
• Wipe the inside of the appliance with a damp cloth and a little detergent. Then
wipe with clear, warm water.
• Wash the shelves and the vegetable compartment in water with detergent and
dry them before putting them back into the appliance. Clean the outside of the
appliance with a damp cloth.
• The condenser grille on the back of the unit and the adjacent components can be
vacuumed with a soft brush attachment.
Cleaning Tips
Condensation may form on the outside of the unit. This may be due to a change in the
room temperature. Wipe off the condensation water. If the problem persists, contact a
qualied technician.
28
Maintenance
• When you move the unit, hold it by the sides or oor. Do not hold it by the edges
of the top.
• The unit should be serviced by an authorized technician and only original spare
parts should be used. Do not attempt to repair the unit yourself. Repairs by
inexperienced persons may result in injury or serious malfunction.
• If the unit is not to be used for an extended period of time, disconnect it from the
power supply. Remove all food and clean the appliance. Leave the door open to
prevent unpleasant odours.
Page 29

TROUBLESHOOTING
Problem Possible cause Solution
Appliance does not work. Mains plug is not plugged
in or is loose
Fuse has blown or is
defective
The food is too warm. Temperature is not properly
adjusted.
Door was open for an
extended period.
A large quantity of warm
food was placed in the
appliance within the last
24 hours.
The appliance is near a
heat source.
Appliance cools too much. Temperature is set too cold. Turn the temperature
Unusual noises. Appliance is not level. Re-adjust the feet.
The appliance is touching
the wall or other objects.
A component, e.g. a
pipe, on the rear of the
appliance is touching
another part of the
appliance or the wall.
Insert mains plug.
Check fuse, replace if
necessary.
Please look in the initial
Temperature Setting
section.
Open the door only as
long as necessary.
Turn the temperature
regulation to a colder
setting temporarily.
Please look in the
installation location
section.
regulation knob to a
warmer setting temporarily.
Move the appliance
slightly.
If necessary, carefully
bend the component out of
the way.
EN
29
Page 30

EN
HINTS ON DISPOSAL
According to the European waste regulation 2012/19/EU this
symbol on the product or on its packaging indicates that this
product may not be treated as household waste. Instead it should
be taken to the appropriate collection point for the recycling of
electrical and electronic equipment. By ensuring this product is
disposed of correctly, you will help prevent potential negative
consequences for the environment and human health, which
could otherwise be caused by inappropriate waste handling of
this product. For more detailled information about recycling of
this product, please contact your local council or your household
waste disposal service.
30
Page 31

Page 32

 Loading...