

Page 1

Airex 360°
Standventilator
Stand Fan
Ventilador de pie
Ventilateur sur pied
Ventilatore verticale
10030415
Page 2

Page 3

Sehr geehrter Kunde,
wir gratulieren Ihnen zum Erwerb Ihres Gerätes. Lesen Sie die folgenden Hinweise sorgfältig durch und befolgen Sie diese, um möglichen Schäden vorzubeugen. Für Schäden, die durch Missachtung der Hinweise und
unsachgemäßen Gebrauch entstehen, übernehmen wir keine Haftung.
Inhaltsverzeichnis
Technische Daten 2
Sicherheitshinweise 2
Geräteübersicht 3
Inbetriebnahme und Bedienung 4
Reinigung und Pflege 6
Hinweise zur Entsorgung 7
Konformitätserklärung 7
Technische Daten
Artikelnummer 10030415
Stromversorgung 220-240 V ~ 50 Hz
Leistung 65 W
Sicherheitshinweise
• Reparaturen dürfen nur von Fachpersonal ausgeführt werden. Nehmen Sie das Gerät nicht auseinander, Sie
gefährden damit Ihre Sicherheit.
• Fassen Sie den Stecker nicht mit nassen Händen an, Stromschlaggefahr!
• Stecken Sie keinen Gegenstände auf Metall durch in den Luftein- und -auslass. Sie könnten zu einem Kurzschluss führen und das Gerät beschädigen.
• Verwenden Sie in der Nähe des Geräts keine Insektensprays, sie könnten das Gerät beschädigen.
• Setzen Sie Kleinkinder nicht direkt vor das Gerät, sie könnten sich sonst erkälten.
• Wenn Sie den Stecker rausziehen, ziehen Sie ihn nicht am Kabel auf der Steckdose, andernfalls könnten Sie es
beschädigen. Achten Sie darauf, dass keine Gegenstände auf dem Kabel stehen und der Stecker fest eingesteckt ist.
• Wenn das Gerät merkwürdige Geräusche macht oder nicht ordnungsgemäß funktioniert, schalten Sie es
umgehend aus und ziehen Sie den Stecker aus der Steckdose.
• Falls das Netzkabel oder der Stecker beschädigt sind, müssen sie vom Hersteller oder einem autorisierten
Fachbetrieb oder einer ähnlich qualifizierten Person ersetzt werden.
• Achten Sie darauf, dass das Netzkabel nicht abgeknickt wird, andernfalls könnte es beschädigt werden.
• Reinigen Sie das Gerät nicht mir Wasser, es könnte einen Kurzschluss auslösen und das Produkt beschädigen.
• Stellen Sie das Gerät neben einen Pools oder Sprinkler. Halten Sie um das Gerät herum genug Abstand zu
Wänden, Vorhängen und leichtentzündlichen Materialien.
• Falls Sie das Gerät länger nicht benutzen, ziehen Sie den Stecker aus der Steckdose.
• Lassen Sie das Gerät in Anwesenheit von Kindern und Haustieren nicht unbeabsichtigt.
• Prüfen Sie vor der Benutzung die Spannung auf der Geräteplakette. Schließen Sie das Gerät nur an Steckdosen an, die der Spannung des Geräts entsprechen.
3
Page 4
• Dieses Gerät darf von Kindern ab 8 Jahren und Personen mit eingeschränkten körperlichen, sensorischen
und geistigen Fähigkeiten und Kenntnissen verwendet werden, wenn sie in die sichere Verwendung des
Gerätes eingewiesen wurden und die damit verbundenen Gefahren verstehen. Kinder dürfen nicht mit dem
Gerät spielen.
• Die Reinigung und Wartung darf von Kindern nicht ohne Aufsicht durchgeführt werden. Halten Sie das Gerät
und das Kabel außerhalb der Reichweite von Kindern, die jünger als 8 Jahre sind.
•
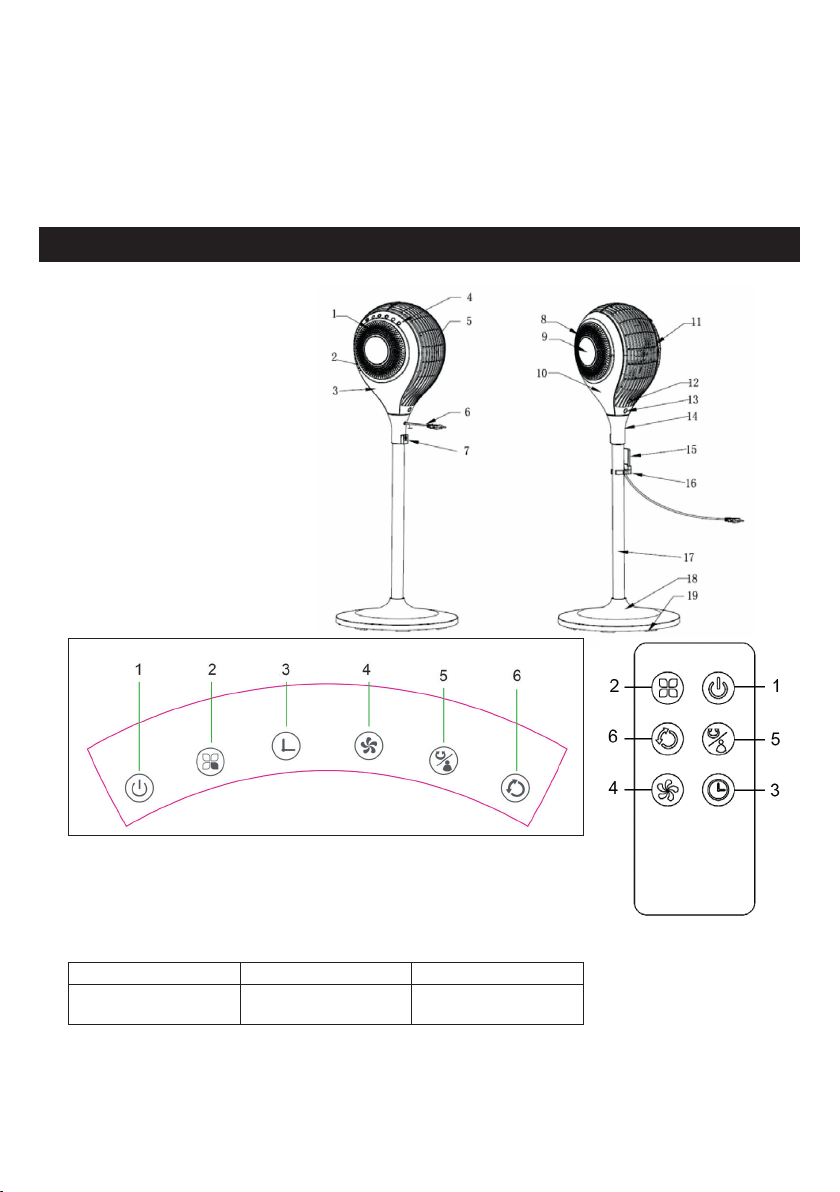
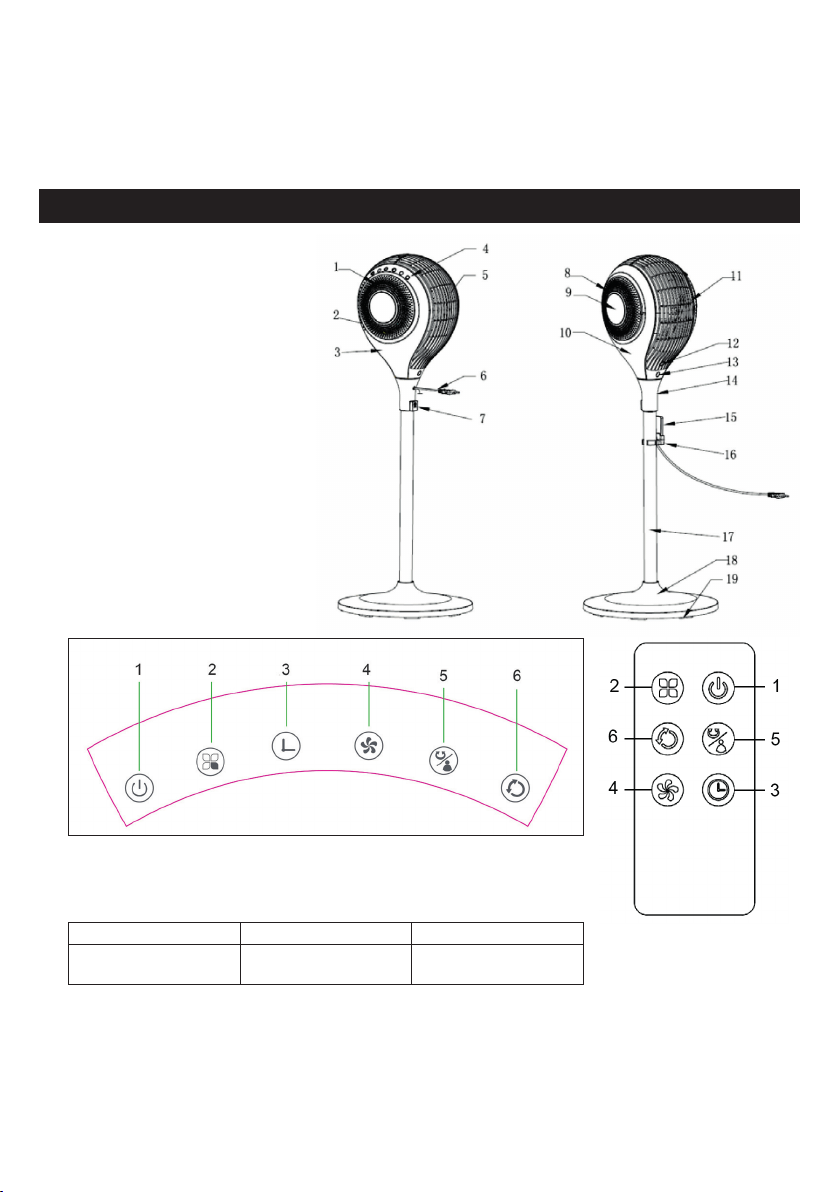
Geräteübersicht
1 Rechter Lufteinlass
2 LED Kontrollleuchte
3 Rechte Seitenblende
4 Bedienfeld
5 Hinteres Gehäuse
6 Netzkabel
7 Unterstützungs-Mutter
8 Linker Lufteinlass
9 Dekorative Abdeckung
10 Linke Seitenblende
11 Vorderes Gehäuse
12 Körper-Sensor
13 Fernbedienungs-Sensor
14 Schwenk-Basis
15 Fernbedienung
16 Fernbedienugs-Halter
17 Ständer
18 Basis
19 Gewicht
Bedienfeld und Fernbedienung
1 Ein/Aus/Standby 2 Modus 3 Timer
4 Geschwindigkeit 5 Horizontal schwenken/
Körper-Sensor-Funktion
4
6 Vertikal schwenken
Page 5

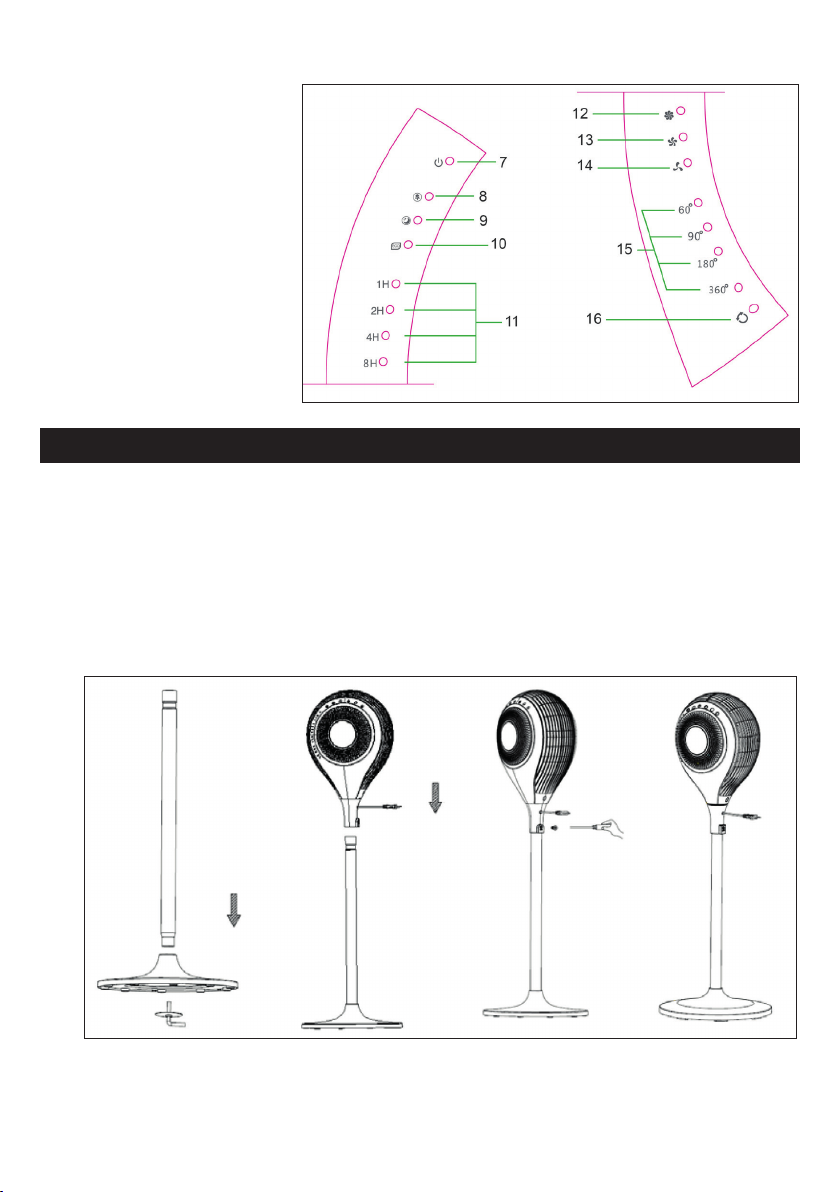
Display und Kontrollleuchten
7 Ein/Aus/Standby
8 Natürlicher Modus
9 Schlaf-Modus
10 Öko-Modus
11 Timer
12 Hohe Geschwindigkeit
13 Mittlere Geschwindigkeit
14 Niedrige Geschwindigkeit
15 Schwenkwinkel horizontal
16 Schwenken vertikal
Inbetriebnahme und Bedienung
Aufbau
1. Legen Sie sich alle teile zurecht.
2. Ziehen Sie das Netzkabel durch das Loch an der Basis, setzen Sie den Ständer auf die Basis und ziehen Sie
ihn mit einer Schraube fest. (Bild 1)
3. Setzen Sie den Ventilator auf den Ständer (Bild 2).
4. Lösen Sie den Gewindestift und befestigen Sie den Ventilator am Ständer (Bild 3).
5. Nachdem Sie das Gerät zusammengebaut haben, stellen Sie das Gerät auf einen ebenen Untergrund und
stecken Sie den Stecker in die Steckdose.
5
Page 6

Bedienung
Das Gerät ist mit einem Bedienfeld ausgestattet, über dessen tasten sich die einzelnen Funktionen steuern lassen. HINWEIS: Wenn die den Stecker einstecken ertönt ein Piepton und alle Symbole leuchten für 2 Sekunden
auf und gehen dann automatisch wieder aus. Das Gerät befindet sich dann im Standby-Modus.
Standby-Modus
Im Standby-Modus sind die Tasten gesperrt. Drücken Sie auf STAND-BY, um das Gerät einzuschalten. Das
Gerät startet im Normal-Modus mit geringer Geschwindigkeit und die entsprechende Kontrollleuchte geht an.
Die Schwenkfunktion und der Timer sind im Normal-Modus inaktiv.
Wenn Sie das Gerät erstmal einschalten ist die Körper-Sensor-Funktion aktiv. Das Gerät merkt sich alle ihre
Einstellungen solange, sie den Stecker eingesteckt lassen. Wenn Sie das Gerät dann ein zweites Mal starten,
läuft es mit den letzen vorgenommenen Einstellungen. Gestellte Timer und der Schlafmodus werden nicht
gespeichert.
Geschwindigkeit
Drücken Sie während des Gerät läuft auf die Taste für die Geschwindigkeit und wählen Sie zwischen niedrig,
mittel und hoch. Die entsprechende Kontrollleuchte geht an.
Timer
Normalerweise ist kein Timer gestellt. Drücken Sie auf die TIMER-Taste, um den Timer in der folgenden Reihenfolge einzustellen: 1 Stunde > 2 Stunden > 4 Stunden > 8 Stunden. Die entsprechende Kontrollleuchte geht
an.
Horizontal schwenken / Körper-Sensor-Funktion
• Drücken Sie auf die Horizontalschwenk-Taste, um den Schwenkwinkel in der folgenden Reihenfolge einzustellen: 0 (kein Schwenken) > 60° > 90° > 180° > 360°. Die entsprechende Kontrollleuchte geht an.
• Halten Sie die Taste 2-3 Sekunden gedrückt, um die Körper-Sensor-Funktion zu aktivieren. Es ertönt ein
zweifacher Piepton. Der Infrarot-Sensor dreht sich einmal um 360°, um den besten Schwenk-Winkel in
Bezug auf den Standort der Person zu ermitteln. Falls die Person ihren Standort verändert, ermittelt der
Sensor automatisch erneut den besten Winkel.
Vertikal schwenken
Drücken Sie auf die Vertikalschwenk-Taste, um die vertikale 90° Schwenkfunktion zu aktivieren. Drücken Sie
die Taste erneut, um die Funktion zu deaktivieren.
6
Page 7
Modus
Das Gerät startet im Normal-Modus. Drücken Sie auf die Modus-Taste, um zwischen den folgenden Modi zu
wechseln: Normal > Natürlich > Schlaf > Öko. Die entsprechende Kontrollleuchte geht an. Alle Modi bis auf den
Normal-Modus haben einen eigene Kontrollleuchte auf dem Display.
Funktionen und optionale Einstellungen der einzelnen Modi
Normal Hohe Geschwindigkeit
Mittlere Geschwindigkeit
Niedrige Geschwindigkeit
Natürlich Durch Schwenken wird eine natürliche Brise erzeugt (bei hoher, mittlerer und niedriger
Geschwindigkeit.
Schlaf Hohe Geschwindigkeit: 30 Minuten starker, natürlicher Wind > 30 Minuten mittlerer,
natürlicher Wind > Danach läuft das Gerät bei niedriger Geschwindigkeit weiter.
Mittlere Geschwindigkeit: 30 Minuten mittlerer, natürlicher Wind > Danach läuft das Gerät
bei niedriger Geschwindigkeit weiter.
Niedrige Geschwindigkeit: Das Gerät läuft konstant bei niedriger Geschwindigkeit
Öko Wenn die Raumtemperatur unter 25 °C liegt, läuft das Gerät mit niedriger Geschwindigkeit.
Speichern Solange sich das Gerät im Standby-Zustand befindet und nicht vom Strom getrennt wird,
Auto dimmen Die Kontrollleuchte dimmt automatisch herunter, falls länger als 1 Minute keine weitere
Wenn Die Raumtemperatur zwischen 25-29 °C steigt, läuft das Gerät mit mittlerer
Geschwindigkeit. Die Geschwindigkeits-Taste und die zugehörigen Kontrollleuchten sind in
diesem Modus inaktiv.
werden die letzten Einstellungen (Geschwindigkeit, Schwenken, Modus) gespeichert.
Gestellte Timer und der Schlafmodus werden nicht gespeichert.
Einstellung vorgenommen wird. Die Display ist dann nur noch schwach beleuchtet. Falls Sie
eine Taste drücken leuchtet das Display wieder mit voller Helligkeit.
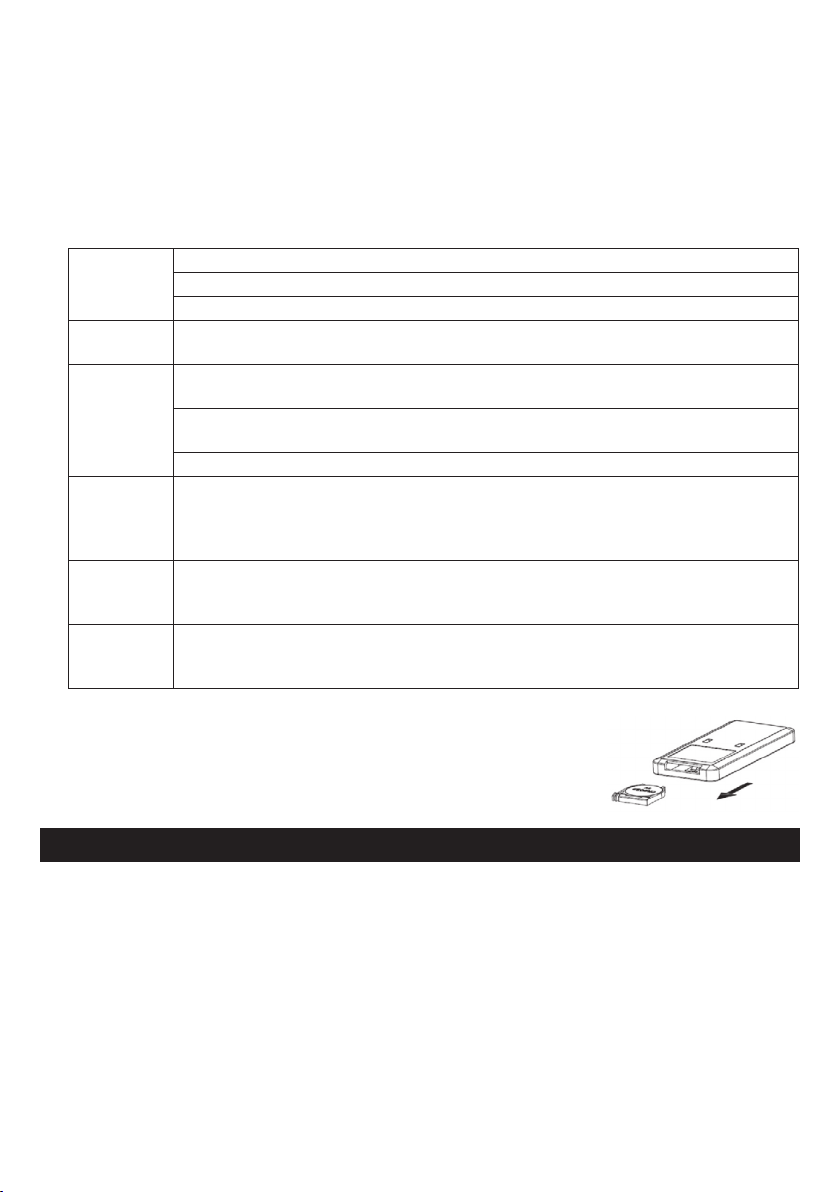
Batterien in die Fernbedienung einlegen
Für die Fernbedienung wird eine Knopfbatterie (CR2032 3V) benötigt. Achten
Sie darauf die Batterie richtig herum einzulegen. Falls Sie die Fernbedienung
länger nicht benutzen, entnehmen Sie die Batterie.
Reinigung und Pflege
Wenn der Ventilator sehr verstaubt ist, arbeitet er nicht mehr so effizient. Wir empfehlen Ihnen daher den
Ventilator mindestens einmal im Monat zu reinigen.
• Ziehen Sie vor der Reinigung immer den Stecker aus der Steckdose, um Stromschläge oder Beschädigungen
zu vermeiden.
• Wischen Sie alle Teile mit einem weichen Lappen ab. Benutzen Sie keine Mittel wie Benzin oder Verdünner.
7
Page 8
Reinigung der Oberfläche
• Achten Sie darauf, dass kein Wasser oder Wasserdampf ins Gerät eindringt.
• Benutzen Sie keine Scheuer- oder Lösemittel.
• Ziehen Sie vor der Reinigung den Stecker aus der Steckdose.
Gerät verstauen
• Ziehen Sie den Stecker aus der Steckdose und verpacken Sie das Gerät, damit es nicht einstaubt.
• Bewahren Sie das Gerät an einem trockenen, gut belüfteten Ort auf.
Hinweise zur Entsorgung
Befindet sich die linke Abbildung (durchgestrichene Mülltonne auf Rädern) auf dem Produkt, gilt die Europäische Richtlinie 2012/19/EU. Diese Produkte dürfen nicht mit dem normalen Hausmüll entsorgt werden. Informieren Sie sich über die örtlichen Regelungen zur
getrennten Sammlung elektrischer und elektronischer Gerätschaften. Richten Sie sich nach
den örtlichen Regelungen und entsorgen Sie Altgeräte nicht über den Hausmüll. Durch die
regelkonforme Entsorgung der Altgeräte werden Umwelt und die Gesundheit ihrer Mitmenschen vor möglichen negativen Konsequenzen geschützt. Materialrecycling hilft, den
Verbrauch von Rohstoffen zu verringern.
Das Produkt enthält Batterien, die der Europäischen Richtlinie 2006/66/EG unterliegen und nicht mit dem
normalen Hausmüll entsorgt werden dürfen. Bitte informieren Sie sich über die örtlichen Bestimmungen zu
gesonderten Entsorgung von Batterien. Durch regelkonforme Entsorgung schützen Sie die Umwelt und die
Gesundheit ihrer Mitmenschen vor negativen Konsequenzen.
Konformitätserklärung
Hersteller: Chal-Tec GmbH, Wallstraße 16, 10179 Berlin, Deutschland.
Dieses Produkt entspricht den folgenden Europäischen Richtlinien:
2014/30/EU (EMV)
2011/65/EU (RoHS)
2014/35/EG (LVD)
2009/125/EG (ErP)
8
Page 9
Dear Customer,
Congratulations on purchasing this equipment. Please read this manual carefully and take care of the following
hints to avoid damages. Any failure caused by ignoring the mentioned items and cautions mentioned in the
instruction manual are not covered by our warranty and any liability.
Contents
Technical Data 8
Safety Instructions 8
Product Description 9
Use and Operation 10
Cleaning and Care 12
Hints on Disposal 13
Declaration of Conformity 13
Technical Data
Item number 10030415
Power supply 220-240 V ~ 50 Hz
Power consumtion 65 W
Safety Instructions
• In the event of appliance failing to operate, all repairs must be undertaken by service center. Do not touch
the power cord with wet hands. Risk of electric shock!
• Do the sticks, metal sticks and other objects into the inlet and outlet. Will lead to leakage, short circuit and
possible damage to the product.
• Do not spray pesticides and flammable sprays around the product. May cause product damage
• Avoid prolonged product outlet, air directly to young children. Can cause illness or affect the health of children.
• When unplugging the power cord, do not pull on the cord. Will cause the power cord is damaged, leakage
and other dangers. Make sure the power cord is not sticking foreign objects, and the plug is fully inserted
Can cause dangerous leakage. When the product has unpleasant smell, abnormal sound in use, stop using it
immediately and disconnect the power.
• If the power lines are exposed or damaged, do not use. Will result in a short circuit and cause leakage fire.
• If the power cord is damaged, in order to avoid dangerous, must be replaced by professionals in their maintenance department or similarly be replaced by the manufacturer.
• Do not fold or place heavy objects on the power cord. Can cause dangerous leakage
• Do not rinsed with water body. Will lead to leakage, short circuit and possible damage to the product
• Do not use the machine around the tub, sprinkler or the pool. Never leave the machine placed directly below
a power outlet using. Keep the unit away from the walls, curtains and other combustible materials when
using to avoid fire。If go out for a long time or do not use, the machine must be shut down and unplug the
power cord from the outlet.
• When you have children, animals or the mobility of people present lack of self-control and unattended, you
should avoid using the machine. Power outlet should meet the requirements of eligibility by checking. Must
ensure that the supply voltage and the voltage specified on the nameplate is consistent.
9
Page 10
• This appliance can be used by children aged from 8 years and above and persons with reduced physical,
sensory or mental capabilities or lack of experience and knowledge if they have been given supervision or
instruction concerning use of the appliance in a safe way and understand the hazards involved. Children
shall not play with the appliance. Cleaning and user maintenance shall not be made by children without
supervision.
Product Description
1 Right Wind Inlet
2 LED Indicator Light
3 Right Side Panel
4 Touch Control Panel
5 Back Housing
6 Power Cord
7 Nut Support
8 Left Wind Inlet
9 Decoration Cover
10 Left Side Panel
11 Front Housing
12 Body Sensor
13 Remote Control Receiver
14 Oscillation Base
15 Remote Control
16 Remote Control Holder
17 Column
18 Base
19 Weight Balance of Base
Control Panel and Remote Control
1 On/Off/Standby 2 Mode 3 Timer
4 Speed 5 Horizontal Oscillation/
Body Sensor
10
6 Vertikal Oscillation
Page 11
Display and Indicator Lights
7 On/Off/Standby
8 Natural Mode
9 Sleep Mode
10 ECO Mode
11 Timer
12 HI Speed
13 MED Speed
14 LOW Speed
15 Horizontal Oscillation
16 Vertikal Oscillation
Use and Operation
Installation
1. Take out parts for assembling.
2. Put the power cord through the hole of base, stand the support on the base and fix them tightly by screw
(Picture 1).
3. Place the machine body into the tube-shape pillar (Picture 2).
4. Then, take out the grub screw and cross screwdriver to fix the body on the tube-shape pillar (Picture 3).
5. After the below installation, plug in and operate according to the following instructions when placing on the
flat ground (Picture 4).
11
Page 12

Operation
Touch screen control technic has been used in this unit, all of unit’s function can be operated by touch the
display window signs slightly. NOTE: When plug in, the machine shows proper insert on the condition that all
LED lights turn on for 2 seconds and BIBI sounds; then, all LED lights turn off and leave it on Standby; besides
the STAND-BY, no button is workable.
Standby Mode
Under standby state, no button is workable but STAND-BY; The machine starts to work by press STAND-BY,
which shows the the initial wind mode as “Normal” and wind speed stays on “Low”, having accordingly LED
light show; without timer and swing function.
On the other hand, under standby state, when plug in for the first time, the body sensor function is available;
the working instructions like wind speed。mode and oscillation for the last time will all be conserved on the
condition that the power is on and the machine starts for at least for the second time. (Timing hours will not
be conserved under sleeping mode)
Speed
While working , press this button for LOW, MIDDLE and HIGH speed selection. The indicators show on the
display accordingly.
Timer
There is no timer and related display show under the initial conditions. Press the TIMER button, you can set the
running time for this fan, Time setting as: 1H- 2H- 4H- 8H. When setting, the indicator and the figure shows
on the display.
Horizontal Oscillation / Body Sensor
• Press this button for horizontal oscillation selection, with the following set rules: 0 represents no horizontal
oscillation and 60°。90°。180°。360°show accordingly horizontal oscillation angle, The indicators show on the
display accordingl.。Press this button for 2.5 seconds to start infrared body sensor function, with two “BI”
sounds.
• Infrared body sensor function: 360° horizontal oscillation once starts, to figure out the suitable angle for
people stand and swing according to this angle for the following work; on the other hand, the machine
would restart to search angle if the human signal is changed.
Vertical Oscillation
To set the vertical angle by pressing this button; Press once to start the 90° vertical oscillation and stop it for
on the second time.
12
Page 13

Mode
The initial wind mode remains on “Normal” , press MODE button to switch between “ Normal” – “Natural” – “
Sleeping” – “ ECO”, the LED indicator changes accordingly.。All mode have its accordingly LED indicator on the
panel, but the Normal mode.。
Running conditions for different modes
Normal HI Speed
MED Speed
LOW Speed
Natural Oscillogram for 3 natural wind (HI, MED, LOW).
Sleep HI: 30 minutes “HI” natural wind—30 minutes “MED” natural wind—Remain “LOW”
natural wind speed
MED: 30 minutes “MED” natural wind—Remain “LOW” natural wind
LOW: Remain “LOW” natural wind speed
ECO Under this mode, the machine works in Low speed when ambience temperature < 25。; in
Hi speed when > 29。; in Med speed when 25。~29。.(“Speed” button and the indicator for
speed will not work under this mode.)
Connservation When in standby mode, wind speed。mode and oscillation will all be conserved. (But
timing and sleeping mode will not be conserved)
Auto dimming The indicator would dim automatically if no operation for above 1 minute; showing 30%
of original Brightness.If press the button at this moment,the indicator will light up again.
Usage for remote control:
One button battery (CR2032 3V) has been used in our remote control. Please
insert the battery to remote control tightly based on the direction of the polarity. If it does not use for a long time, please pull the battery out from the
remote control.
Cleaning and Care
If there is too much dust or dirt on the front grid cover of the fan, the performance of air-out would be affected,
so we suggest clean the fan once per month at least.
• Always remember unplug the fan before cleaning, or may cause electric shock or product damage.
• Wipe all parts with a soft cloth. Do not use any of the following as a cleaner: gasoline, thinner, benzine.
13
Page 14

Unit surface cleaning
• Do not allow water and steam to drip on .
• Do not use corrosive detergent or solvent cleaning。
• Always unplug the fan before cleaning.
Product storage
• Unplugged and packed to prevent dust from entering the body if not use for a long time.
• Placed in a dry well ventilated place after packed.
Hints on Disposal
According to the European waste regulation 2012/19/EU this symbol on the product or
on its packaging indicates that this product may not be treated as household waste. Instead it should be taken to the appropriate collection point for the recycling of electrical
and electronic equipment. By ensuring this product is disposed of correctly, you will help
prevent potential negative consequences for the environment and human health, which
could otherwise be caused by inappropriate waste handling of this product. For more detailled information about recycling of this product, please contact your local council or your
household waste disposial service.
Your product contains batteries covered by the European Directive. 2006/66/EC, which cannot be disposed
of with normal household waste. Please check local rules on separate collection of batteries. The correct disposal of batteries helps prevent potentially negative consequences on the environment and human health.
Declaration of Conformity
Producer: Chal-Tec GmbH, Wallstraße 16, 10179 Berlin, Germany.
This product is conform to the following European Directives:
2014/30/EU (EMC)
2014/35/EU (LVD)
2011/65/EU (RoHS)
2009/125/EC (ErP)
14
Page 15

Estimado cliente,
Le felicitamos por la adquisición de este producto. Lea atentamente el siguiente manual y siga cuidadosamente las instrucciones de uso con el fin de evitar posibles daños. La empresa no se responsabiliza de los daños
ocasionados por un uso indebido del producto o por haber desatendido las indicaciones de seguridad.
Índice
Datos técnicos 14
Indicaciones de seguridad 14
Descripción del aparato 15
Puesta en marcha y uso 16
Limpieza y cuidado 18
Indicaciones para la retirada del aparato 19
Declaración de conformidad 19
Datos técnicos
Número de artículo 10030415
Suministro eléctrico 220-240 V ~ 50 Hz
Potencia 65 W
Indicaciones de seguridad
• Las reparaciones deberán ser realizadas por personal técnico cualificado. Nunca desmonte el aparato, podría
poner en peligro su seguridad.
• No toque el enchufe con las manos mojadas, existe riesgo de descarga eléctrica.
• No introduzca objetos de metal en la entrada y salida de aire. Podría provocar un cortocircuito y dañar el aparato.
• No utilice sprays inflamables cerca del aparato, podría averiarlo.
• No exponga a los niños directamente al aparato, podrían resfriarse.
• Cuando desconecte el enchufe, no tire del cable; de lo contrario, podría dañarlo. Asegúrese de que no hay
objetos sobre el cable y de que el enchufe encaje completamente.
• Si el aparato no funciona correctamente o detecta sonidos extraños, apáguelo y desconecte el enchufe de
la toma de corriente inmediatamente.
• Si el cable de alimentación o el enchufe están dañados, deberán ser sustituidos por el fabricante, un servicio
técnico autorizado o una personal igualmente cualificada.
• Cerciórese de que el cable de alimentación no se dobla; de lo contrario, podría dañarse.
• No limpie el aparato con agua, podría provocar un cortocircuito y dañar el aparato.
• No coloque el aparato junto a una piscina o aspersor. Mantenga el aparato a distancia suficiente de paredes,
cortinas y materiales fácilmente inflamables.
• Si no utiliza el aparato durante un periodo prolongado de tiempo, desconecte el enchufe de la toma de
corriente.
• No deje el aparato en presencia de niños o mascotas que no se encuentren bajo supervisión.
• Antes de utilizar el aparato, compruebe la tensión en la placa técnica del mismo. Conecte el aparato solamente a tomas de corriente que se adecuen a la tensión del mismo.
15
Page 16

• Los niños mayores de 8 años y las personas con discapacidades físicas, psíquicas o sensoriales o carentes
de la experiencia y conocimiento necesarios no podrán utilizar el aparato salvo que estén bajo supervisión o
hayan sido previamente instruidas sobre su utilización y las indicaciones de seguridad y se hayan familiarizadocon sus funciones. Los niños no deben jugar con el aparato. La limpieza y mantenimiento no debe ser
realizada por niños si estos no se encuentran bajo supervisión.
Descripción del aparato
1 Entrada de aire derecha
2 Indicador luminoso LED
3 Panel lateral derecho
4 Panel de control
5 Carcasa trasera
6 Cable de alimentación
7 Tuerca de soporte
8 Entrada de aire izquierda
9 Cubierta decorativa
10 Panel lateral izquierdo
11 Estructura delantera
12 Sensor corporal
13 Sensor del mando a distancia
14 Base oscilante
15 Mando a distancia
16 Soporte del mando a distancia
17 Soporte
18 Base
19 Peso
Panel de control y utilización
1 On/off/Standby 2 Modo 3 Temporizador
4 Velocidad 5 Oscilación horizontal/
función sensor corporal
16
6 Oscilación vertical
Page 17

Display e indicadores luminosos
7 On/off/Standby
8 Modo natural
9 Modo noche
10 Modo Eco
11 Temporizador
12 Velocidad alta
13 Velocidad media
14 Velocidad baja
15 Grado de oscilación
horizontal
16 Oscilación vertical
Puesta en marcha y uso
Montaje
1. Extraiga todas las partes para montarlas.
2. Pase el cable de alimentación por el orificio de la base, coloque el soporte sobre la base y atorníllelo con un
tornillo. (imagen 1)
3. Encaje el ventilador al soporte (imagen 2).
4. Suelte la vara de la rosca y fije el ventilador al soporte (imagen 3).
5. Cuando haya montado el aparato, colóquelo sobre una superficie plana y conecte el enchufe a la toma de
corriente.
17
Page 18

Utilización
El aparato está equipado con un panel de control con el que podrá controlar cada una las funciones. ADVERTENCIA: cuando conecte el enchufe, el aparato emitirá un pitido y todos los símbolos se iluminan durante 2
segundos y a continuación se apagan automáticamente. El aparato se encuentra entonces en modo standby.
Modo standby
En el modo standby los botones están bloqueados. Pulse Standby para encender el aparato. El aparato se
inicia en el modo normal a velocidad baja y el indicador luminoso correspondiente se enciende. La función de
oscilación y el temporizador están inactivos en el modo normal.
Cuando encienda el aparato por primera vez, la función del sensor corporal se encontrará activada. El aparato
detecta todos sus movimientos mientras el enchufe esté conectado. Cuando encienda el aparato una segunda
vez, funcionará con la última configuración utilizada. El tiempo seleccionado y el modo noche no se guardarán.
Velocidad
Pulse el botón de velocidad con el aparato en marcha y elija la opción baja, media o alta. La luz correspondiente
se enciende.
Temporizador
Normalmente no hay ningún temporizador configurado. Pulse el botón TIMER para configurar el temporizador
en el siguiente orden: 1 hora > 2 horas > 4 horas > 8 horas. La luz correspondiente se enciende.
Oscilación horizontal/ función sensor corporal
Pulse el botón de oscilación horizontal para configurar el grado de oscilación en el siguiente orden: 0 (sin oscilación) > 60° > 90° > 180° > 360°. La luz correspondiente se enciende.
Mantenga pulsado el botón durante 2-3 segundos para activar la función de sensor corporal. Escuchará dos
pitidos. El sensor infrarrojo gira 360 °C para proporcionar el mejor grado de oscilación en relación a la ubicación
de la persona. Cuando la persona cambie su ubicación, el sensor volverá a detectar automáticamente el mejor
ángulo.
Oscilación vertical
Pulse el botón de oscilación vertical para activar esta función en un ángulo de 90 °C. Pulse de nuevo el botón
para desactivar la función.
18
Page 19

Modo
El aparato se inicia en modo normal. Pulse el botón de Modo para elegir entre los siguientes modos: normal
> natural > modo noche > eco. La luz correspondiente se enciende. Todos los modos excepto el modo normal
cuentan con su propio indicador luminoso en el display.
Funciones y ajustes opciones de cada uno de los modos
Normal Velocidad alta
Velocidad media
Velocidad baja
Aire natural Con la oscilación se generará una brisa natural (a velocidad alta, media y baja).
Noche Velocidad alta: 30 minutos a velocidad alta, aire natural > 30 minutos a velocidad media,
aire natural > a continuación el aparato continuará funcionando a velocidad baja.
Velocidad media: 30 minutos a velocidad media, aire natural > a continuación el aparato
continuará funcionando a velocidad baja.
Velocidad baja: El aparato funciona constantemente a velocidad baja.
Eco Si la temperatura ambiente se sitúa por debajo de 25 °C, el aparato funcionará a velocidad
baja. Cuando la temperatura ambiente si sitúe entre 25-29 °C, el aparato funcionará
a velocidad media. El botón de velocidad y los indicadores luminosos permanecen
desactivados en este modo.
Conservación Cuando el aparato se encuentre en modo standby y no esté desconectado del suministro
eléctrico, se conservará la última configuración (velocidad, oscilación, modo). El tiempo
seleccionado y el modo noche no se guardarán.
Atenuación
automática
Los indicadores luminosos se atenúan automáticamente si no realiza ninguna acción en
un minuto. El display solo quedará iluminado de manera tenue. Cuando pulse de nuevo un
botón, el display volverá a iluminarse por completo.
Colocación de las pilas en el mando a distancia
Para el mando a distancia necesitará una pila de botón (CR2032 3V). Asegúrese de colocar correctamente las pilas. Si no utiliza el mando a distancia durante un periodo de tiempo prolongado, retire la pila.
Limpieza y cuidado
Si el ventilador tiene mucho polvo, no funcionará de una manera eficiente. Por tanto, le recomendamos limpiar el ventilador al menos una vez al mes.
• Desconecte el enchufe antes de limpiar el aparato para evitar descargas eléctricas y averías.
• Limpie todas las piezas con un paño suave. No utilice productos como gasolina o disolventes.
19
Page 20

Limpieza de la superficie
• Asegúrese de que no se filtre agua ni vapor de agua al interior del aparato.
• No utilice productos abrasivos.
• Desconecte el enchufe antes de limpiar el aparato.
Guardar el aparato
• Desconecte el enchufe y embale el aparato para evitar que se llene de polvo.
• Guárdelo en un lugar seco y bien ventilado.
Indicaciones para la retirada del aparato
Si el aparato lleva adherida la ilustración de la izquierda (el contenedor de basura tachado)
entonces rige la normativa europea, directiva 2012/19/UE. Este producto no debe arrojarse
a un contenedor de basura común. Infórmese sobre las leyes territoriales que regulan la
recogida separada de aparatos eléctricos y electrónicos. Respete las leyes territoriales y no
arroje aparatos viejos al cubo de la basura doméstica. Una retirada de aparatos conforme a
las leyes contribuye a proteger el medio ambiente y a las personas a su alrededor frente a
posibles consecuencias perjudiciales para la salud. El reciclaje ayuda a reducir el consumo
de materias primas.
El producto contiene pilas sujetas a la Directiva Europea 2006/66/CE, según la cual estas no pueden depositarse en los contenedores destinados a la basura común. Compruebe la normativa de su país con respecto al
reciclaje de las pilas usadas. Una gestión adecuada de estos residuos previene consecuencias potencialmente
negativas para el medio ambiente y la salud de las personas.
Declaración de conformidad
20
Fabricante: Chal-Tec GmbH, Wallstraße 16, 10179 Berlín (Alemania).
Este producto cumple con las siguientes directivas europeas:
2014/30/UE (EMC)
2014/35/UE (baja tensión)
2011/65/UE (refundición RoHS)
2009/125/CE (ErP)
Page 21

Chère cliente, cher client,
Toutes nos félicitations pour l’acquisition de ce nouvel appareil. Veuillez lire attentivement et respecter les
instructions de ce mode d’emploi afin d’éviter d’éventuels dommages. Nous ne saurions être tenus pour responsables des dommages dus au non-respect des consignes et à la mauvaise utilisation de l’appareil.
Sommaire
Fiche technique 20
Consignes de sécurité 20
Aperçu de l’appareil 21
Mise en marche et utilisation 22
Nettoyage et entretien 24
Information sur le recyclage 25
Déclaration de conformité 25
Fiche technique
Numéro d’article 10030415
Alimentation électrique 220-240 V ~ 50 Hz
Puissance 65 W
Consignes de sécurité
• Les réparations doivent être effectuées uniquement par un personnel spécialisé. Ne pas démonter l’appareil
pour ne pas mettre se mettre en danger.
• Ne pas toucher la fiche d’alimentation avec des mains humides, risques d’électrocution !
• Ne pas introduire d’objet métallique dans l’entrée et la sortie d’air. Cela pourrait provoquer un court-circuit et
endommager l’appareil.
• Ne pas utiliser de bombe insecticide à proximité de l’appareil, cela pourrait l’endommager.
• Ne pas placer de jeunes enfants juste devant l’appareil, ils pourraient prendre froid.
• Pour débrancher la fiche d’alimentation de la prise, ne pas tirer sur le câble pour ne pas l’endommager. Veiller
à ce qu’aucun objet ne soit posé sur le cordon et que la fiche est bien enfoncée dans la prise.
• Si l’appareil produit des bruits inhabituels ou s’il ne fonctionne pas correctement, l’éteindre immédiatement
et le débrancher.
• Veiller à ne pas tordre le cordon d’alimentation pour ne pas l’endommager.
• Ne pas nettoyer l’appareil à l’eau pour empêcher tout court-circuit et tout dégât sur l’appareil.
• Ne pas placer l’appareil à proximité d’un bassin ou d’un arrosoir. Ménager un écart suffisant entre l’appareil et
les murs, rideaux et tissus facilement inflammables.
• Débrancher l’appareil après utilisation.
• Ne pas laisser l’appareil sans surveillance en présence d’enfants et d’animaux domestiques.
• Avant utilisation, vérifier la tension de l’appareil sur la plaque signalétique. Brancher l’appareil uniquement à
des prises dont la tension correspond à celle de l’appareil.
• Les enfants ainsi que les personnes dont les capacités physiques, mentales ou sensorielles sont réduites, ou
qui présentent une expérience et/ou des connaissances insuffisantes, doivent utiliser l’appareil uniquement
21
Page 22

s’ils sont surveillés par la personne responsable de leur sécurité, ou s’ils ont assimilé les consignes d’utilisation de l’appareil que cette personne leur a fournies. Les enfants ne doivent pas jouer avec l’appareil. • Les
enfants ne doivent pas nettoyer et entretenir l’appareil sans surveillance.
Aperçu de l’appareil
1 Entrée d’air de droite
2 Voyant lumineux LED
3 Cache latéral de droite
4 Panneau de commande
5 Boîtier arrière
6 Cordon d’alimentation
7 Écrou de soutien
8 Entrée d’air de gauche
9 Cache décoratif
10 Cache latéral de droite
11 Boîtier avant
12 Détecteur de mouvement
13 Capteur pour télécommande
14 Socle pivotant
15 Télécommande
16 Support pour télécommande
17 Pied
18 Socle
19 Poids
Panneau de commande et télécommande
1 Marche / arrêt / veille 2 Mode 3 Minuteur
4 Vitesse 5 Oscillation horizontale /
fonction de détecteur
corporel
22
6 Oscillation verticale
Page 23

Affichage et témoins lumineux
7 Marche / arrêt / veille
8 Mode naturel
9 Mode sommeil
10 Mode éco
11 Minuteur
12 Vitesse élevée
13 Vitesse moyenne
14 Vitesse basse
15 Degré d’oscillation horizontale
16 Degré d’oscillation verticale
Mise en marche et utilisation
Montage
1. Disposer toutes les pièces devant soi avant le montage.
2. Faire passer le cordon d’alimentation dans le trou du socle, installer le pied sur le socle et le fixer en le vissant
(image 1).
3. Placer le ventilateur sur le pied (image 2).
4. Sortir la tige filetée et fixer le ventilateur au pied (image 3).
5. Une fois l’appareil assemblé, le placer sur une surface plane et le brancher à une prise de courant.
23
Page 24

Utilisation
L’appareil est équipé d’un panneau de commande dont les touches permettent de sélectionner chaque fonction. REMARQUE : lorsque l’appareil vient d’être branché, un bip retentit et tous les symboles s’allument pendant 2 secondes puis s’éteignent de nouveau. L’appareil se trouve alors en mode veille.
Mode veille
Les touches sont verrouillées en mode veille. Appuyer sur STAND-BY pour allumer l’appareil. L’appareil démarre en mode normal à faible vitesse et le voyant lumineux correspondant s’allume. La fonction d’oscillation
et le minuteur sont inactifs en mode normal.
Lorsque l’appareil vient d’être allumé, la fonction de détecteur corporel est activée. L’appareil mémorise tous
les réglages tant que la fiche est branchée. Lors du second démarrage de l’appareil, celui-ci fonctionne avec les
derniers réglages effectués. Le minuteur et le mode sommeil ne sont pas enregistrés.
Vitesse
Appuyer sur la touche de vitesse pendant le fonctionnement de l’appareil et faire sa sélection entre bas, moyen
et élevé. Le témoin lumineux correspondant s’allume.
Minuteur
Le minuteur n’est pas activé par défaut. Appuyer sur la touche TIMER pour régler le minuteur selon l’ordre suivant : 1 heure > 2 heures > 4 heures > 8 heures. Le témoin lumineux correspondant s’allume.
Oscillation horizontale / fonction détecteur corporel
• Appuyer sur la touche d’oscillation horizontale pour régler le degré d’oscillation selon l’ordre suivant : 0 (pas
d’oscillation) > 60 ° > 90 ° > 180 ° > 360 °. Le témoin lumineux correspondant s’allume.
• Rester appuyer pendant 2-3 secondes sur la touche pour activer la fonction de détecteur corporel. Un
double bip sonore retentit. Le capteur infrarouge tourne une fois à 360 ° pour déterminer le meilleur angle
d’oscillation en fonction du positionnement de la personne. Si la personne change d’emplacement, le capteur détermine de nouveau automatiquement le meilleur angle.
Oscillation verticale
Appuyer sur la touche d’oscillation verticale pour activer la fonction d’oscillation verticale à 90 °. Appuyer de
nouveau sur cette touche pour désactiver cette fonction.
24
Page 25

Mode
L’appareil démarre en mode normal. Appuyer sur la touche mode pour passer d’un mode à l’autre : Normal >
Naturel > Sommeil > Éco. Le témoin lumineux s’allume. Tous les modes ont un témoin lumineux spécifique à
l’écran à l’exception du mode normal.
Fonctions et options de réglage de chaque mode
Normal Vitesse élevée
Vitesse moyenne
Vitesse basse
Naturel L’oscillation produit une brise naturelle (à vitesse élevée, moyenne et basse)
Sommeil Vitesse élevée : 30 minutes de vent fort, naturel > 30 minutes de vent moyen, naturel >
puis l’appareil poursuit à vitesse basse.
Vitesse moyenne : 30 minutes de vent moyen, naturel > puis l’appareil poursuit à vitesse
basse.
Vitesse basse : l’appareil fonctionne constamment à faible vitesse.
Éco Lorsque la température ambiante est inférieure à 25 °, l’appareil fonctionne à faible vitesse.
Lorsque la température ambiante se situe entre 25 et 29 ° ; l’appareil fonctionne à vitesse
moyenne. La touche de vitesse et les témoins lumineux correspondants sont inactifs dans
ce mode.
Mémorisation Tant que l’appareil se trouve en mode veille et qu’il n’est pas débranché, les derniers réglages
sont mémorisés (vitesse, oscillation, mode). Les réglages du minuteur et du mode sommeil
ne sont pas mémorisés.
Atténuation
auto
Les témoins lumineux sont automatiquement atténués lorsqu’aucun réglage n’est effectué
pendant plus de 1 minute. La luminosité de l’affichage s’estompe alors. L’écran regagne en
luminosité si une touche est de nouveau activée.
Introduire les piles dans la télécommande
La télécommande nécessite une pile bouton (CR2032 3V). Veiller à introduire
les piles dans le bon sens. En cas d’inutilisation prolongée de la télécommande, en retirer les piles.
Nettoyage et entretien
Le ventilateur fonctionne moins efficacement s’il est empoussiéré. C’est pourquoi il est recommandé de le
nettoyer au moins une fois par mois.
• Toujours débrancher l’appareil avant de le nettoyer pour éviter toute électrocution ou dégât.
• Essuyer toutes les pièces avec une éponge douce. Ne pas utiliser de produit comme de l’essence ou du
diluant.
25
Page 26

Nettoyage en surface
• Veiller à éviter toute infiltration d’eau ou de vapeur d’eau dans l’appareil.
• Ne pas utiliser de produit abrasif ou de solvant.
• Débrancher la fiche de la prise avant de nettoyer l’appareil.
Rangement de l’appareil
• Débrancher l’appareil et emballer l’appareil dans un carton pour qu’il ne s’empoussière pas.
• Stocker l’appareil dans un endroit sec et bien ventilé.
Information sur le recyclage
Vous trouverez sur le produit l’image ci-contre (une poubelle sur roues, barrée d‘une croix),
ce qui indique que le produit se trouve soumis à la directive européenne 2012/19/UE. Renseignez-vous sur les dispositions en vigueur dans votre région concernant la collecte séparée des appareils électriques et électroniques. Respectez-les et ne jetez pas les appareils
usagés avec les ordures ménagères. La mise au rebut correcte du produit usagé permet de
préserver l’environnement et la santé. Le recyclage des matériaux contribue à la préservation des ressources naturelles.
Ce produit contient des piles qui sont soumises à la directive européenne 2006/66/CE selon laquelle elles
ne doivent pas être éliminées avec les ordures ménagères. Renseignez-vous sur les dispositions en vigueur
concernant la mise en rebut séparée des piles. La mise en rebut correcte du produit usagé permet de préserver
l’environnement et la santé.
Déclaration de conformité
26
Fabricant : Chal-Tec GmbH, Wallstraße 16, 10179 Berlin, Allemagne.
Ce produit est conforme aux directives européennes suivantes :
2014/30/UE (CEM)
2014/35/UE (LVD)
2011/65/UE (RoHS)
2009/125/CE (ErP)
Page 27

Gentile cliente,
La ringraziamo per aver acquistato il nostro dispositivo. La preghiamo di leggere attentamente le seguenti istruzioni e di seguirle per evitare eventuali danni. Non ci assumiamo alcuna responsabilità per danni derivati da una
mancata osservazione delle avvertenze di sicurezza e da un uso improprio del dispositivo.
Indice
Dati tecnici 26
Avvertenze di sicurezza 26
Descrizione del prodotto 27
Messa in funzione e utilizzo 28
Pulizia e manutenzione 30
Smaltimento 31
Dichiarazione di conformità 31
Dati tecnici
Numero articolo 10030415
Alimentazione 220-240 V ~ 50 Hz
Potenza 65 W
Avvertenze di sicurezza
• Le riparazioni devono essere eseguite esclusivamente da un tecnico competente. Non smontare il dispositivo: pericolo di lesioni.
• Non toccare la spina con le mani bagnate: pericolo di scosse elettriche!
• Non introdurre oggetti in metallo nelle prese d’aria: ciò può comportare il pericolo di corto circuito e può
danneggiare il dispositivo.
• Non utilizzare spray per insetti vicino al dispositivo.
• Tenere lontano i bambini piccoli dal dispositivo.
• Non tirare il cavo di alimentazione per staccare la spina, non collocare oggetti sul cavo di alimentazione e
assicurarsi che la spina sia inserita correttamente.
• In caso di rumori insoliti o di malfunzionamento, spegnere immediatamente il dispositivo e staccare la spina
dalla presa.
• Se il cavo di alimentazione o la spina sono danneggiati, farli sostituire dal produttore o da un tecnico qualificato.
• Non piegare il cavo di alimentazione altrimenti potrebbe danneggiarsi.
• Non lavare il dispositivo con acqua per evitare il pericolo di scosse elettriche o di danneggiare il dispositivo.
• Non collocare il dispositivo vicino ad una piscina. Assicurarsi che ci sia una distanza adeguata tra il dispositivo
e le pareti. Mantenere il dispositivo lontano da materiali infiammabili.
• In caso di inutilizzo prolungato del dispositivo, staccare la spina dalla presa.
• Non lasciare incustodito il dispositivo in presenza di bambini e di animali domestici.
• Prima dell’utilizzo, verificare la tensione indicata sulla targhetta identificativa. Collegare il dispositivo solo a
prese che corrispondono alla tensione indicata.
27
Page 28

• Questo dispositivo può essere utilizzato da bambini di età superiore agli 8 anni solo se un supervisore ha
prima spiegato loro le funzioni e come utilizzare il dispositivo.
• Non lasciare che i bambini giochino con il dispositivo.
• La pulizia e la manutenzione possono essere eseguite dai bambini solo sotto sorveglianza. Tenere il dispositivo e il cavo di alimentazione fuori dalla portata dei bambini di età inferiore agli 8 anni.
Descrizione del prodotto
1 Ingresso aria destro
2 Spia luminosa a LED
3 Pannello laterale destro
4 Pannello dei comandi
5 Alloggiamento posteriore
6 Cavo di alimentazione
7 Dado di supporto
8 Ingresso aria sinistro
9 Coperchio decorativo
10 Pannello laterale sinistro
11 Alloggiamento anteriore
12 Sensore corpo
13 Sensore telecomando
14 Base oscillante
15 Telecomando
16 Porta telecomando
17 Asta
18 Base
19 Peso
Pannello dei comandi e telecomando
1 On / off / standby 2 Modalità 3 Timer
4 Velocità 5 Oscillazione orizzontale /
funzione sensore corpo
28
6 Oscillazione verticale
Page 29

Display e spie luminose
7 On / Off / Standby
8 Modalità naturale
9 Modalità notturna
10 Modalità eco
11 Timer
12 Velocità alta
13 Velocità media
14 Velocità bassa
15 Oscillazione orizzontale
16 Oscillazione verticale
Messa in funzione e utilizzo
Montaggio
1. Rimuovere i componenti dalla confezione per assemblarli.
2. Far passare il cavo di alimentazione attraverso il foro situato sulla base, posizionare l’asta sulla base e fissarla
utilizzando una vite. (Figura 1).
3. Posizionare il ventilatore sull’asta (Figura 2).
4. Svitare la vite e fissare il ventilatore sull’asta (Figura 3).
5. Dopo aver assemblato il ventilatore, collocarlo su una superficie piana e stabile e inserire la spina nella presa.
29
Page 30

Utilizzo
Il dispositivo è dotato di un pannello dei comandi i cui tasti regolano le diverse funzioni. NOTA: appena si inserisce la spina nella presa, il dispositivo emette un segnale acustico e tutti i simboli si accendono per 2 secondi e
si spengono di nuovo automaticamente. In seguito il dispositivo passa in modalità standby.
Modalità standby
In modalità standby i tasti sono bloccati. Premere STANDBY per accendere il dispositivo. In modalità normale,
il dispositivo si avvia a velocità ridotta e la spia luminosa corrispondente si accende. Inoltre in questa modalità,
la funzione di oscillazione e il timer sono inattivi.
Alla prima accensione, la funzione sensore corpo è attiva. Il dispositivo memorizza tutte le impostazioni fintanto che la spina è inserita nella presa. In caso di riavvio del dispositivo, vengono mantenute le ultime impostazioni. Tuttavia il timer impostato e la modalità notturna non vengono memorizzati.
Velocità
Premere il tasto per la velocità mentre il dispositivo è in funzione e scegliere un livello di velocità (bassa, media
e alta). La spia luminosa corrispondente si accende.
Timer
Il timer non è attivo all’accensione. Premere il tasto TIMER per impostare il timer nella sequenza seguente: 1 ora
> 2 ore > 4 ore > 8 ore. La spia luminosa corrispondente si accende.
Oscillazione orizzontale / funzione sensore corpo
• Premere il tasto di oscillazione orizzontale per impostare l’angolo di oscillazione nella sequenza seguente: 0
(nessuna oscillazione) 60° > 90° > 180° > 360°. La spia luminosa corrispondente si accende.
• Tenere premuto per 2-3 secondi questo tasto per attivare la funzione sensore corpo. Il dispositivo emette
un doppio segnale acustico. Il sensore a infrarossi ruota una volta di 360° per individuare il miglior grado di
oscillazione in base alla posizione dell’utente. Se l’utente cambia posizione, il sensore individua di nuovo
automaticamente l’angolo migliore.
Oscillazione verticale
Premere il tasto di oscillazione verticale per attivare la funzione di oscillazione verticale di 90°. Premere di
nuovo il tasto per disattivare la funzione.
30
Page 31

Modalità
All’accensione il dispositivo si trova in modalità normale. Premere il tasto Modus per selezionare una modalità:
normale > naturale > notturna > eco. La spia luminosa corrispondente si accende. Tutte le modalità, ad eccezione della modalità normale, dispongono di una spia corrispondente sul display.
Funzioni e impostazioni opzionali delle singole modalità
Normale Velocità alta
Velocità media
Velocità bassa
Naturale L’oscillazione produce una brezza naturale (a velocità alta, media e bassa).
Notturna Velocità alta: 30 minuti di flusso d’aria forte, naturale > in seguito il dispositivo funziona a
velocità bassa.
Velocità media: 30 minuti di flusso d’aria forte, naturale > in seguito il dispositivo funziona a
velocità bassa.
Velocità bassa: il dispositivo funziona costantemente a bassa velocità.
Eco Se la temperatura ambiente si trova sotto i 25°C, il dispositivo funziona a bassa velocità.
Se la temperatura ambiente è compresa tra i 25 e i 29°C, il dispositivo funziona a velocità
media. In questa modalità, il tasto della velocità e la spia luminosa corrispondente sono
inattivi.
Memorizzare Fino a quando il dispositivo si trova in modalità standby e non viene disinserita la spina dalla
presa, le ultime impostazioni selezionate (velocità, oscillazione) vengono memorizzate. Il
timer impostato e la modalità notturna non vengono memorizzati.
Auto dim-
ming
La spia di controllo si smorza automaticamente dopo 1 minuto di inattività. L’illuminazione
del display si attenua. Se si preme un tasto, il display si illumina di nuovo.
Inserire le pile nel telecomando
Per il telecomando è necessaria una pila a bottone (CR2032 3V). Assicurarsi di
aver inserito la pila correttamente. In caso di inutilizzo prolungato del telecomando, rimuovere la pila.
Pulizia e manutenzione
La polvere influisce negativamente sulle prestazioni del ventilatore. Si consiglia pertanto di pulire il ventilatore
almeno una volta al mese.
• Prima di eseguire qualsiasi operazione di pulizia, staccare la spina dalla presa per evitare il pericolo di scosse
elettriche o di danni.
• Pulire tutti i componenti con un panno morbido. Non utilizzare mai benzina o diluenti.
31
Page 32

Pulizia delle superfici
• Prestare attenzione che l’acqua o il vapore acqueo non penetrino nel dispositivo.
• Non utilizzare prodotti abrasivi o solventi.
• Staccare sempre la spina dalla presa prima di qualsiasi operazione di pulizia.
Conservare il dispositivo
• Staccare la spina dalla presa e riporre il dispositivo nella confezione originale per proteggerlo dalla polvere.
• Conservare il dispositivo in un luogo asciutto e ben arieggiato.
Smaltimento
Se sul prodotto è presente la figura a sinistra (il cassonetto dei rifiuti mobile sbarrato), si
applica la direttiva europea 2012/19/UE. Questi prodotti non possono essere smaltiti con i
rifiuti normali. Informarsi sulle disposizioni vigenti in merito alla raccolta separata di dispositivi elettrici ed elettronici. Non smaltire i vecchi dispositivi con i rifiuti domestici. Grazie al
corretto smaltimento dei vecchi dispositivi, si proteggono il pianeta e la salute delle persone da possibili conseguenze negative. Il riciclo di materiali aiuta a ridurre il consumo di
materie prime.
Il prodotto contiene batterie che in base alla direttiva europea 2006/66/CE non possono essere smaltite con
i normali rifiuti domestici. Informarsi sulle disposizioni vigenti relative alla raccolta differenziata delle batterie.
Grazie al corretto smaltimento dei vecchi dispositivi, si proteggono il pianeta e la salute delle persone da possibili conseguenze negative.
Dichiarazione di conformità
32
Produttore: Chal-Tec GmbH, Wallstraße 16, 10179 Berlino, Germania.
Questo prodotto è conforme alle seguenti direttive europee:
2014/30/UE (EMC)
2014/35/UE (LVD)
2011/65/UE (RoHS)
2009/125/CE (ErP)
Page 33

Page 34

Page 35

Page 36

 Loading...