

Page 1

Turmventilator
Tower Fan
Ventilador de torre
Ventilateur tour
Ventilatore a torre
10032435 10032436
Page 2

Page 3
Sehr geehrter Kunde,
wir gratulieren Ihnen zum Erwerb Ihres Gerätes. Lesen Sie die folgenden Hinweise
sorgfältig durch und befolgen Sie diese, um möglichen Schäden vorzubeugen. Für
Schäden, die durch Missachtung der Hinweise und unsachgemäßen Gebrauch
entstehen, übernehmen wir keine Haftung.
INHALTSVERZEICHNIS
DE
Technische Daten 3
Konformitätserklärung 3
Sicherheitshinweise4
Geräteübersicht5
Zusammenbau6
Inbetriebnahme und Bedienung7
Verwendung der Fernbedienung9
Reinigung und Pege10
Hinweise zur Entsorgung10
TECHNISCHE DATEN
Artikelnummer 10032435, 10032436
Stromversorgung 220-240 V ~ 50-60 Hz
Leistung 40 W
Geräuschpegel ≤ 50 dB (A)
KONFORMITÄTSERKLÄRUNG
Hersteller:
Chal-Tec GmbH, Wallstraße 16, 10179 Berlin, Deutschland.
Dieses Produkt entspricht den folgenden Europäischen
Richtlinien:
English 11
Español 19
Français 27
Italiano 35
2014/30/EU (EMV)
2014/35/EU (LVD)
2011/65/EU (RoHS)
206/2012/EU (ErP)
3
Page 4

DE
SICHERHEITSHINWEISE
• Dieses Gerät kann von Kindern ab 8 Jahren und Personen mit eingeschränkten
physischen, sensorischen und mentalen Fähigkeiten oder mangelnden Erfahrungen
und Wissen verwendet werden, wenn diese von einer für Sie verantwortlichen
Person in das Gerät eingewiesen wurden und dessen Verwendung und die mit der
Verwendung verbundenen Gefahren verstanden haben. Kinder dürfen nicht mit
dem Gerät spielen. Reinigung und Wartung des Geräts sollte von Kindern nur unter
Aufsicht eines Erwachsenen durchgeführt werden.
• Sollte das Netzstromkabel beschädigt sein, muss es vom Hersteller, dem
Kundendienst oder einer in ähnlicher Wiese qualizierten Person ersetzt werden,
um Sach- und/oder Personenschäden zu vermeiden.
• Überprüfen Sie vor der Verwendung des Geräts, ob die auf dem Typenschild
angegebene Stromspannung mit der Stromspannung der Steckdose übereinstimmt.
• Schalten Sie das Gerät nicht ein, wenn der Ventilator nicht zusammengebaut ist.
• Schalten Sie das Gerät aus bevor Sie es bewegen.
• Ziehen Sie den Netzstecker nicht mit nassen Händen aus der Steckdose, um
Elektrizierung und Stromschlagrisiko zu vermeiden.
• Stecken Sie keine Finger oder scharfen Gegenstände in das Gerät.
• Achten Sie darauf, dass Sie das Gerät nicht heißen Temperaturen und hoher
Luftfeuchtigkeit aussetzen und das sich Säure, Alkali, Öl, Insektizide, Vorhänge und
andere Gegenstände außerhalb der Reichweite des Geräts benden, so dass diese
nicht eingesaugt werden können.
• Babys und ältere Menschen sollten nicht direkt vor dem Ventilator sitzen oder
liegen.
• Stellen Sie den Ventilator nur auf ebene Oberächen, da dieser ansonsten umfallen
könnte.
• Überprüfen Sie vor der Verwendung des Geräts immer, ob das Netzstromkabel
oder der Netzstromstecker beschädigt sind. Sollte das Netzstromkabel beschädigt
sein, muss es vom Hersteller, dem Kundendienst oder einer hierfür geeigneten
Person ausgetauscht werden, um Sach- und/oder Personenschäden zu vermeiden.
• Schalten Sie das Gerät aus, wenn Sie den Raum verlassen oder wenn Sie es für
einen längeren Zeitraum nicht verwenden. Ziehen Sie den Netzstromstecker aus der
Steckdose, um einen Kurzschluss zu vermeiden.
• Stellen Sie das Gerät nicht an Orte, an denen Vorhänge etc. vom Gerät eingesaugt
werden könnten oder das Gerät bedeckt werden könnte.
• Das Gerät ist nicht dafür ausgelegt, von Personen mit eingeschränkten körperlichen
Fähigkeiten (Kinder eingeschlossen) verwendet zu werden.
• Achten Sie darauf, dass der Ventilator während Transport, Zusammenbau
und Lagerung nirgends angestoßen oder gequetscht wird. Insbesondere die
Ventilatorügel müssen ordnungsgemäß aufbewahrt werden, so dass diese nicht
deformiert werden, da dadurch die Leistung des Ventilators eingeschränkt werden
könnte.
4
Page 5
• Sollten während der Verwendung des Geräusch seltsame Geräusche, Geruch,
Rauch oder andere Phänomene auftreten, schalten Sie das Gerät sofort aus
und ziehen Sie den Netzstecker aus der Steckdose. Setzen Sie sich mit dem
Kundendienst in Verbindung und schicken Sie gegebenenfalls das Gerät zur
Wartung ein.
• Achten Sie darauf, dass die Windrichtung des Ventilators nicht auf den Herd oder
Gas gerichtet ist.
• Verwenden Sie das Gerät nur für seinen vorgesehenen Verwendungszweck, wie in
der Bedienungsanleitung beschrieben.
• Achten Sie darauf, dass der Ventilator ausgeschaltet und der Netzstecker aus der
Steckdose gezogen wurde, bevor Sie das Schutzgehäuse abnehmen.
Hinweis zum Überhitzungsschutz
Überhitzungsschutz: Im Motor des Ventilators wurde eine Thermosicherung installiert.
Sollte der Motor aus einer Vielzahl von Gründen überhitzen und eine sehr hohe
Temperatur erreichen, wird die Thermosicherung aktiviert, welche das Gerät automatisch
abschaltet.
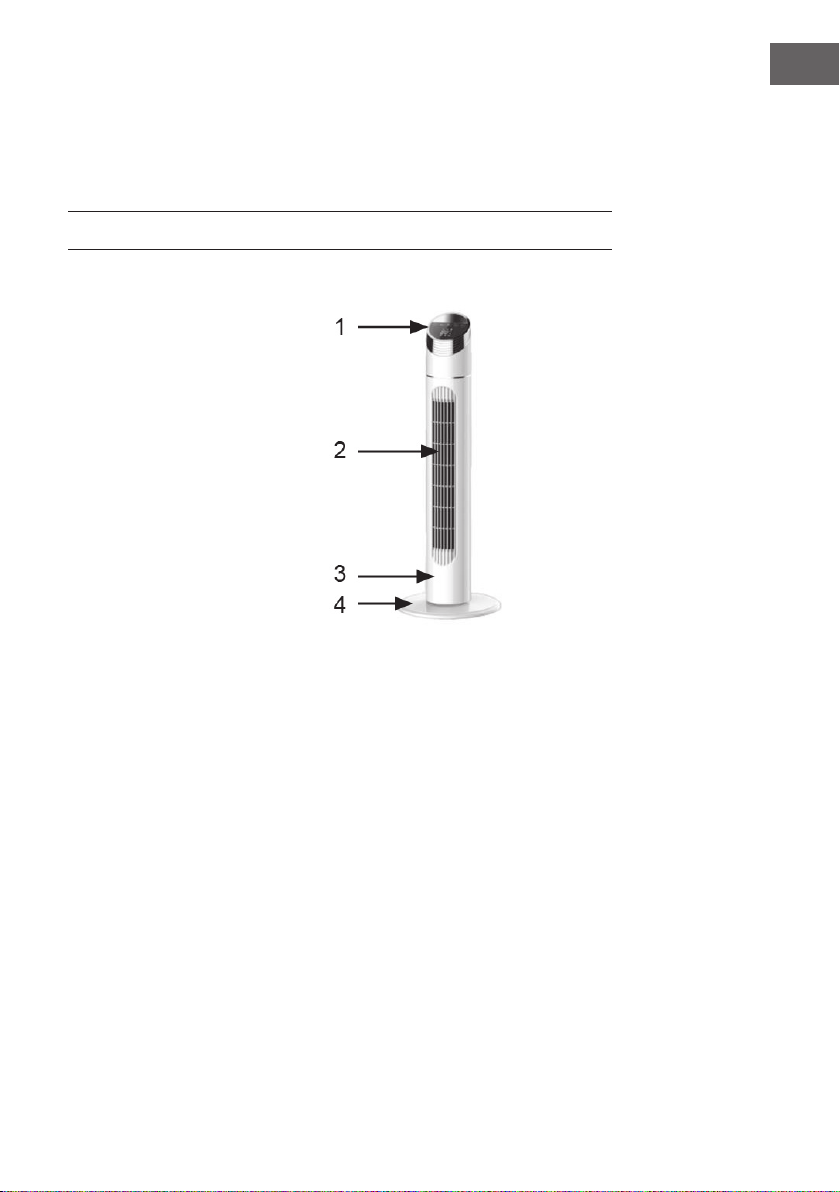
GERÄTEÜBERSICHT
DE
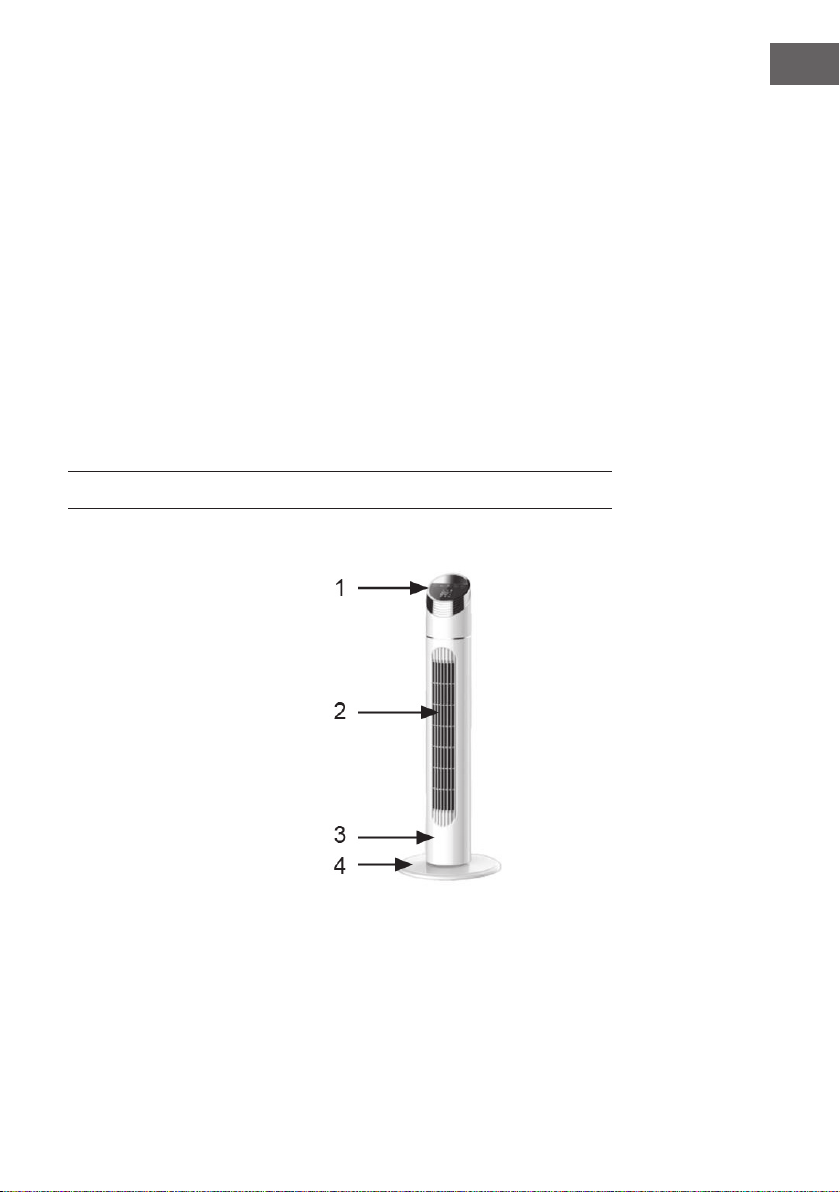
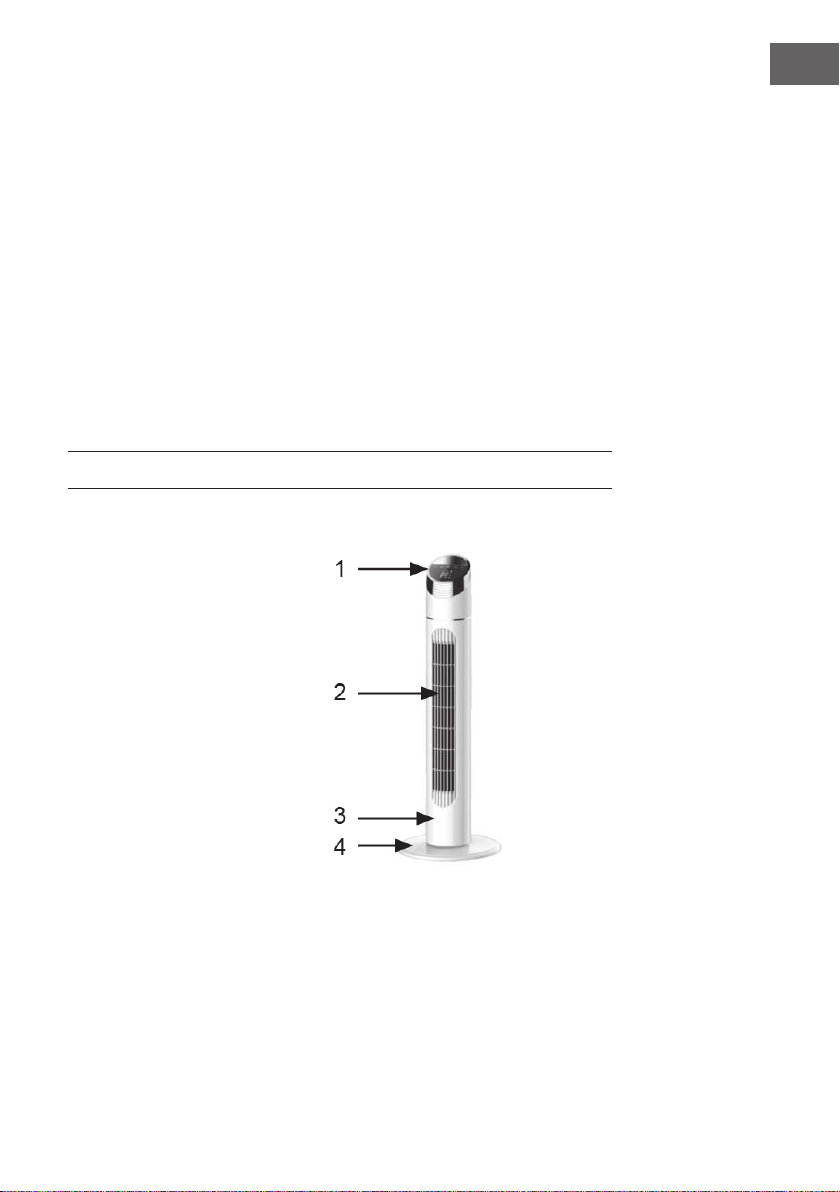
1 Bedienfeld
2 Luftaustrittsöffnung
3 Ventilatorgehäuse
4 Gerätebasis
5
Page 6
DE
ZUSAMMENBAU
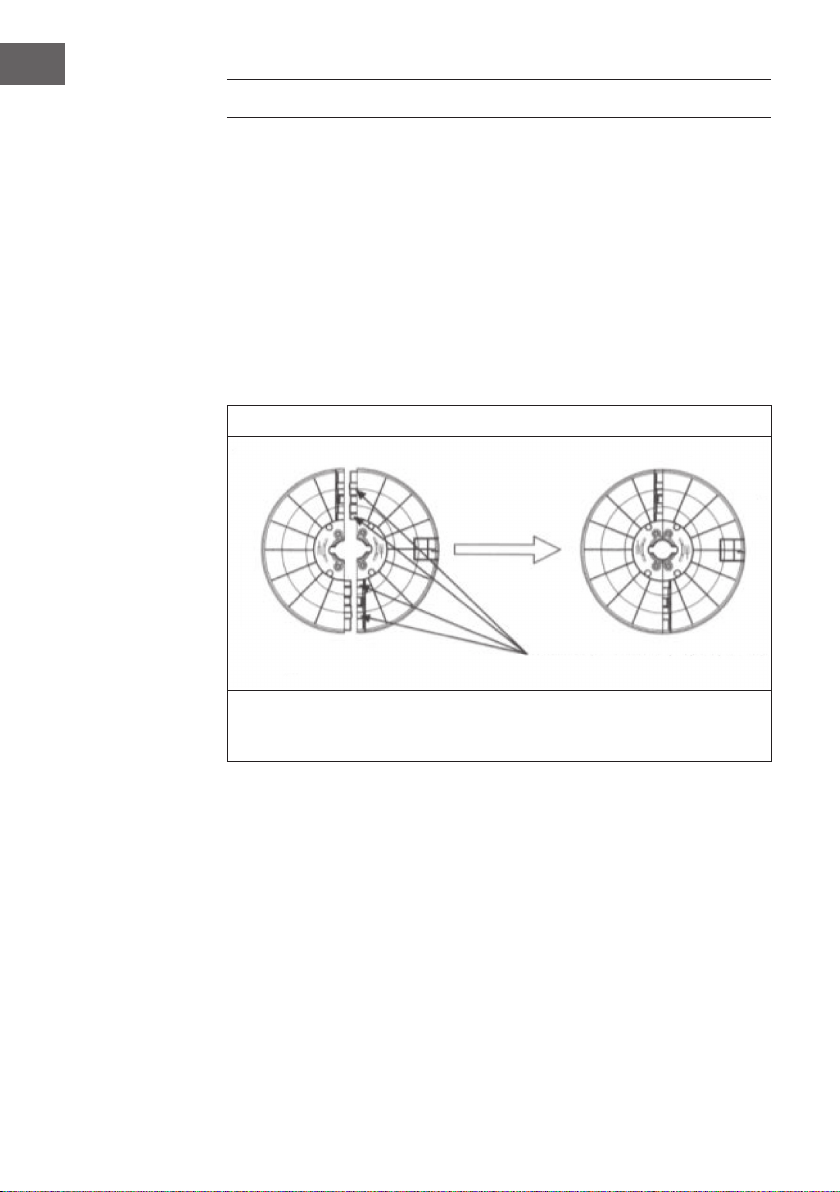
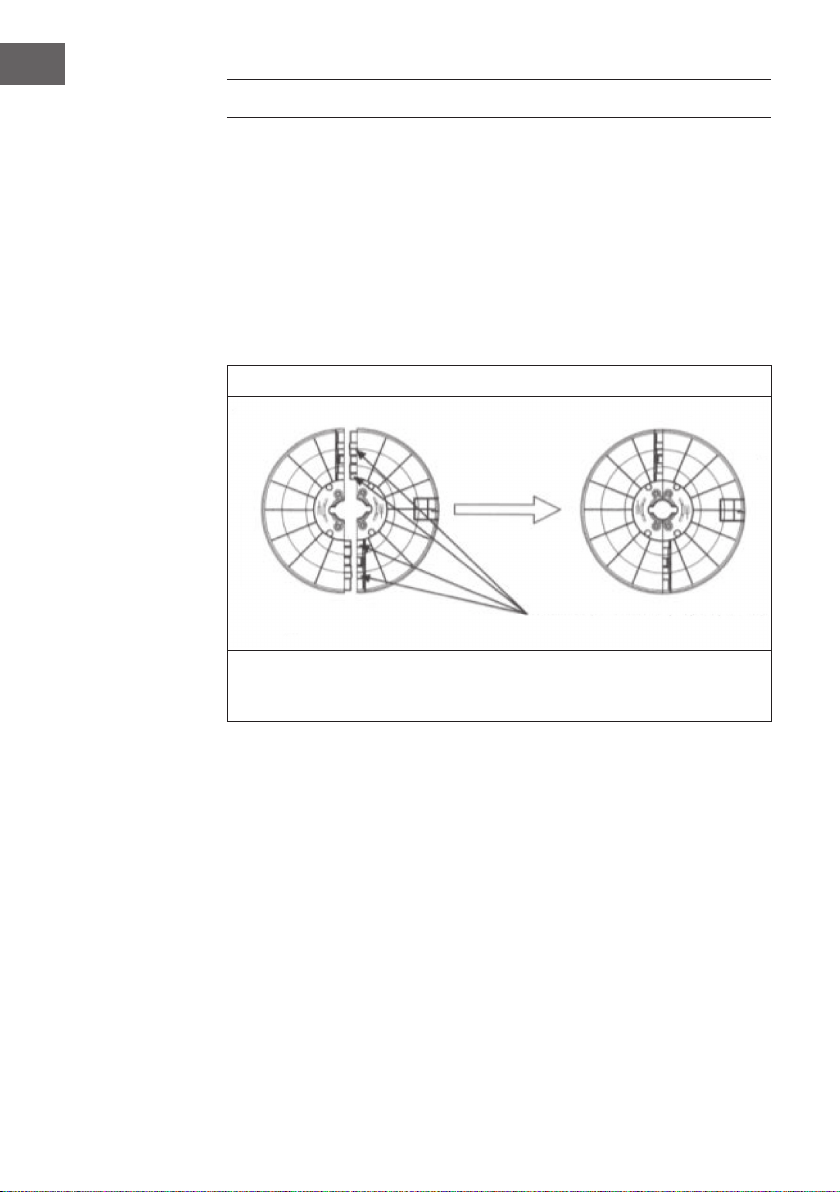
1. Entnehmen Sie die beiden Bestandteile der Gerätebasis aus dem Karton und richten
Sie diese so aus, dass die zu einer vollständigen Gerätebasis zusammengefügt
werden können (vgl. Abb.1).
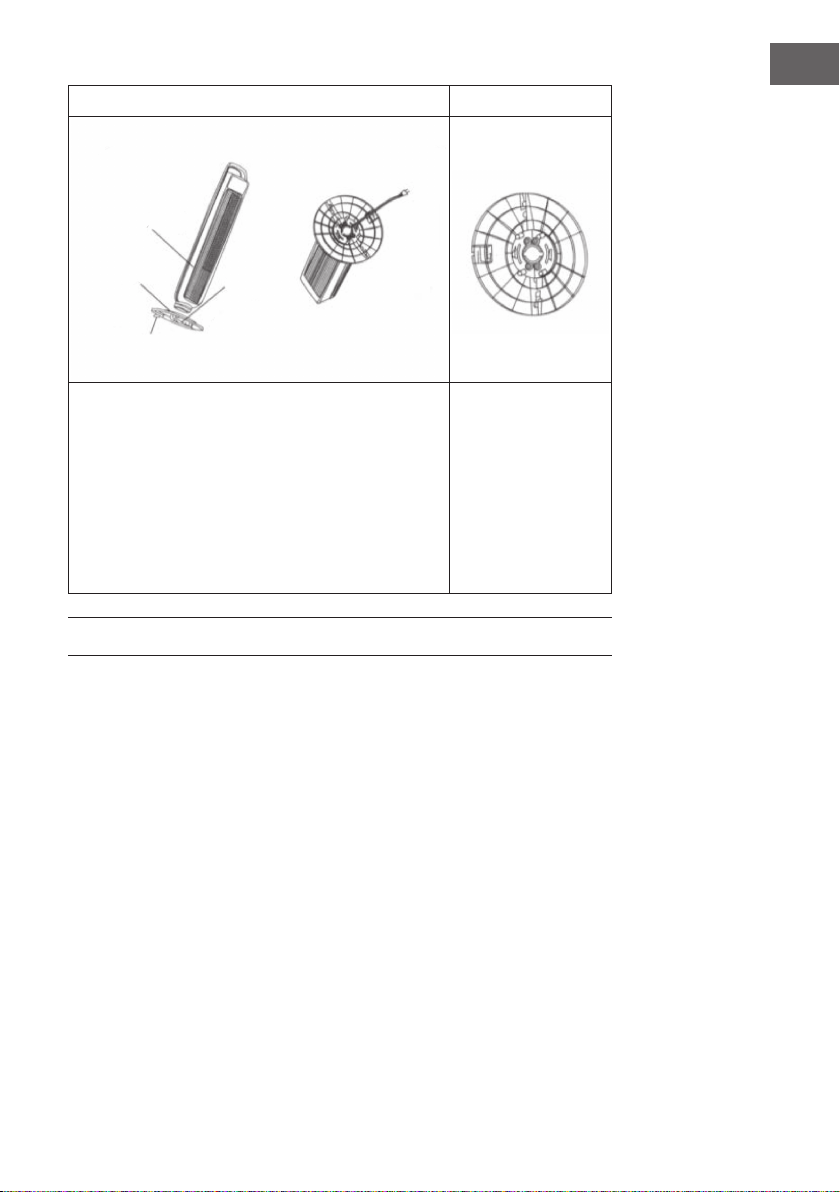
2. Ziehen Sie das Netzstromkabel durch das Loch in der Gerätebasis hindurch
und bringen Sie das Loch der Gerätebasis auf gleiche Höhe mit den Löchern im
Ventilatorgehäuse. Sichern Sie das Netzstromkabel mit der Klammer unter der
Gerätebasis, um die Gerätebasis mit dem Ventilatorgehäuse zu verbinden (vgl.
Abb.2).
3. Wenn die Gerätebasis demontiert ist, drehen Sie zunächst die Schrauben heraus
und nehmen Sie dann die Gerätebasis auseinander (vgl. Abb.3).
1
Wenn die vier Stellen jeweils auf einer Höhe miteinander und festgemacht sind,
lassen Sie die Vorderseite des Gehäuses einrasten (ein Geräusch ist zu hören).
Wenden Sie die gleiche Methode auf der Rückseite an.
6
Page 7
Gehäuse
DE
2 3
Basis
Stromkabel
Nachdem Sie die Gerätebasis auf dem Ventilatorgehäuse
angebracht ist, folgen Sie dem Schema um das
Stromkabel an der Klammer unterhalb der Gerätebasis zu
xieren und ziehen Sie anschließend die Schrauben fest.
Fixier-
schraube
Halten Sie die
Klammer fest und
ziehen Sie die
Gerätebasis kraftvoll
heraus. Wenn sich
die Klammer gelöst
hat, wenden Sie die
gleiche Methode zum
Entfernen der zweiten
Klammer an.
INBETRIEBNAHME UND BEDIENUNG
Wenn Sie das Gerät mit einer Fernbedienung verwenden (jede Taste der Fernbedienung
entspricht den Tasten auf dem Ventilator):
On/Off
• Wenn diese Taste gedrückt wird, geht der Ventilator an und startet mit niedriger
Geschwindigkeit.
• Wenn Sie diese Taste erneut drücken, geht der Ventilator aus.
7
Page 8

DE
Timing Selection
Wenn Sie während der Ventilator in Betrieb ist diese Taste drücken, wird der Timer
aktiviert und die voreingestellte Zeit, bis das Gerät automatisch ausgeschaltet wird,
beträgt eine Stunde. Sie können die Zeit bis zum Abschalten von 1-12 Stunden
auswählen.
Wenn Sie die Taste, nachdem Sie den Timer auf 12 Stunden eingestellt haben, erneut
drücken, wird die Funktion abgeschaltet und der Ventilator läuft im normalen Betrieb
weiter. Beim Drücken der Taste werden die eingestellten Stunden bis zum Abschalten in
folgenden Schritten verändert:
1 Stunde > 2 Stunden > 3 Stunden > 4 Stunden > 5 Stunden >
6 Stunden > ... > 12 Stunden > Timer aus.
Selection of Wind
Mit dieser Taste wird der Windmodus ausgewählt. Wenn diese Taste wiederholt
gedrückt wird, wechselt der Windmodus abwechselnd von „normal wind“ (normaler
Wind) zu „natural wind“ (natürlicher Wind) zu „sleep wind“ (sanfter Wind) wieder hin
zu „normal wind“. Die drei verschiedenen Windmodi haben folgende Eigenschaften:
1 Normal wind: In diesem Windmodus können die Ventilatorgeschwindigkeiten
niedrig, „mittel und hoch ausgewählt werden.
2 Natural wind: Dieser Windmodus wechselt willkürlich zwischen den
verschiedenen Geschwindigkeitsstufen hin und her, wie es beim Wind in der freien
Natur der Fall sein würde. Der Modus „natural wind“ verfügt, wie der Modus
„normal wind“ über drei Windgeschwindigkeitsstufen.
3 Sleep wind: In diesem Windmodus können Sie ebenfalls drei
Windgeschwindigkeitsstufen einstellen. Die Windgeschwindigkeit ändert sich, je
nach eingestellter Geschwindigkeitsstufe, folgendermaßen:
• Hohe Windgeschwindigkeit: Die Luft strömt für eine halbe Stunde mit hoher
Windgeschwindigkeit aus dem Gerät. Nach einer halben Stunde wechselt die
Windgeschwindigkeit für eine halbe Stunde auf mittlere Stufe und anschließend
fällt die Windgeschwindigkeit auf die niedrigste Geschwindigkeitsstufe ab.
• Mittlere Windgeschwindigkeit: Die Luft strömt für eine halbe Stunde mit
mittlerer Windgeschwindigkeit aus dem Gerät und anschließend fällt die
Windgeschwindigkeit auf die niedrigste Geschwindigkeitsstufe ab.
• Niedrige Windgeschwindigkeit: Die Luft strömt so lange mit niedriger
Windgeschwindigkeit aus dem Gerät, bis der Timer abgelaufen ist oder das
Gerät abgeschaltet wird.
8
Page 9
Wind Speed
Wenn diese Taste gedrückt wird, können drei verschiedene Windgeschwindigkeiten
(niedrig, mittel, hoch) eingestellt werden.
Oszillation
Wenn diese Taste gedrückt wird, beginnt der Ventilator die Luft zu oszillieren. Wenn Sie
die Taste erneut drücken, stoppt der Ventilator die Oszillation.
Hinweise zur Bedienung
• Sie können alle oben genannten Modi ebenfalls über das Bedienfeld des
Ventilators einstellen. Die Vorgehensweise ist die Gleiche.
• Der Ventilator kann nur Wind machen, wenn die Taste ON/OFF gedrückt wurde.
VERWENDUNG DER FERNBEDIENUNG
• Achten Sie bei der Verwendung der Fernbedienung darauf, dass das vordere Ende
der Fernbedienung in Richtung des Empfängers am Ventilator zeigt.
• Die Fernbedienung kann bis zu einer Distanz von 5 Metern verwendet werden,
wenn der Winkel nicht mehr als 30° Grad beträgt.
• Vermeiden Sie direkte Sonneneinstrahlung auf den Empfänger, da dieser dadurch
beeinträchtigt werden kann.
• Entnehmen Sie die Batterien aus dem Batteriefach der Fernbedienung, wenn diese
über einen längeren Zeitraum nicht verwendet wird.
DE
Legen Sie vor der Verwendung der Fernbedienung die Batterien ins Batteriefach ein. Für
die Fernbedienung wird eine Lithiumbatterie benötigt. Legen Sie diese auf folgende Art
und Weise ein:
1. Öffnen Sie die Batteriefachabdeckung.
2. Legen Sie eine neue Batterie ein. Achten Sie auf die Polarität der Batterie (+ und -).
3. Schließen Sie das Batteriefach.
9
Page 10
DE
REINIGUNG UND PFLEGE
• Schalten Sie das Gerät vor der Reinigung aus und ziehen Sie den Netzstecker aus
der Steckdose.
• Verwenden Sie zur Reinigung der elektrischen Komponenten (wie beispielsweise
Netzteil, Motor etc.). Die elektrischen Komponenten können mit einem sauberen
Tuch abgerieben werden.
• Verwenden Sie zur Reinigung keine Scheuermittel oder aggressive Reinigungsmittel,
da die Oberäche des Geräts dadurch beschädigt werden könnte. Sie können
die Oberäche mit einem feuchten Tuch und etwas Spülmittel abwischen und
anschließend mit einem trockenen Tuch abreiben.
• Bauen Sie das Gerät nicht auseinander und modizieren Sie es nicht. Es wird
empfohlen, das Gerät jährlich warten zu lassen, um dessen Lebensdauer zu
verlängern.
HINWEISE ZUR ENTSORGUNG
Bendet sich die linke Abbildung (durchgestrichene Mülltonne
auf Rädern) auf dem Produkt, gilt die Europäische Richtlinie
2012/19/EU. Diese Produkte dürfen nicht mit dem normalen
Hausmüll entsorgt werden. Informieren Sie sich über die
örtlichen Regelungen zur getrennten Sammlung elektrischer
und elektronischer Gerätschaften. Richten Sie sich nach
den örtlichen Regelungen und entsorgen Sie Altgeräte nicht
über den Hausmüll. Durch die regelkonforme Entsorgung
der Altgeräte werden Umwelt und die Gesundheit ihrer
Mitmenschen vor möglichen negativen Konsequenzen
geschützt. Materialrecycling hilft, den Verbrauch von
Rohstoffen zu verringern.
Das Produkt enthält Batterien, die der Europäischen Richtlinie
2006/66/EG unterliegen und nicht mit dem normalen
Hausmüll entsorgt werden dürfen. Bitte informieren Sie sich
über die örtlichen Bestimmungen zu gesonderten Entsorgung
von Batterien. Durch regelkonforme Entsorgung schützen
Sie die Umwelt und die Gesundheit ihrer Mitmenschen vor
negativen Konsequenzen.
10
Page 11
Dear Customer,
Congratulations on purchasing this equipment. Please read this manual carefully and
take care of the following hints to avoid damages. Any failure caused by ignoring the
mentioned items and cautions mentioned in the instruction manual are not covered by
our warranty and any liability.
CONTENT
Technical Data11
Declaration of Conformity11
Safety Instructions12
Product Description13
Assembly14
Use and Operation15
Usage of the Remote Control 17
Care and Cleaning18
Hints on Disposal18
TECHNICAL DATA
Artikelnummer 10032435, 10032436
Stromversorgung 220-240 V ~ 50-60 Hz
Leistung 40 W
Geräuschpegel ≤ 50 dB (A)
EN
DECLARATION OF CONFORMITY
Producer:
Chal-Tec GmbH, Wallstraße 16, 10179 Berlin, Germany.
This product is conform to the following European
Directives:
2014/30/EU (EMC)
2014/35/EU (LVD)
2011/65/EU (RoHS)
206/2012/EU (ErP)
11
Page 12

EN
SAFETY INSTRUCTIONS
• This appliance can be used by children aged from 8 years and above and persons
with reduced physical, sensory or mental capabilities or lack of experience and
knowledge if they have been given supervision or instruction concerning use of
the appliance in a safe way and understand the hazards involved. Children shall
not play with the appliance. Cleaning and user maintenance shall not be made by
children without supervision.
• If the supply cord is damaged, it must be replaced by the manufacturer, its service
agent or similarly qualied persons in order to avoid a hazard.
• Before use, check that the voltage used is the same as the one identied on the unit.
• When the fan is not assembled, do not turn on the power, and turn off the power
when moving the fan.
• Do not use wet hands to remove the power plug, to avoid the risk of electrication
or electric shock.
• Do not insert your ngers or sharp objects into the guard when the fan is running.
• Use the fan away from high temperature, high humidity, acid and alkali oil,
insecticide, curtains and other articles that are easy to be sucked in.
• Babies and the elderly should not be directly under high wind for a long time.
• Do not place the fan on uneven oor to prevent the fan from overturning.
• Before use, it is necessary to rst check any damage with the power cord and the
plug. If the power cord is damaged, in order to avoid danger, it must be replaced
by professional workers from the manufacturer’s maintenance department or similar
department.
• When leaving the machine or when the machine is not used for a long time, turn off
the power and remove the power plug, so as to avoid the circuit failure.
• Do not place it in a place where curtains, etc. may be sucked in or covered.
• Do not cover any items when used.
• The fan is not intended for extended use by persons (including children) with
reduced physical capabilities.
• During the transport, assembly and storage, observe not to collide and squeeze the
fan, especially the blade must be properly kept, resulting in no deformation, so as
not to affect the performance of the fan.
• In case of any abnormal noise, smell, smoke and other phenomena during the use,
lose no time to shut off the power and send to our after-sales service department for
maintenance.
• Do not blow against the stove or gas.
• Before removing the protective housing, make sure that the fan is disconnected from
the power supply.
12
Page 13
Fan overheating protection
There is a thermal fuse installed in the fan motor, when the motor is overheated due to a
variety of accidents, and the motor temperature reaches the level to activate the thermal
fuse, the fuse will be blown out to cut off the power.
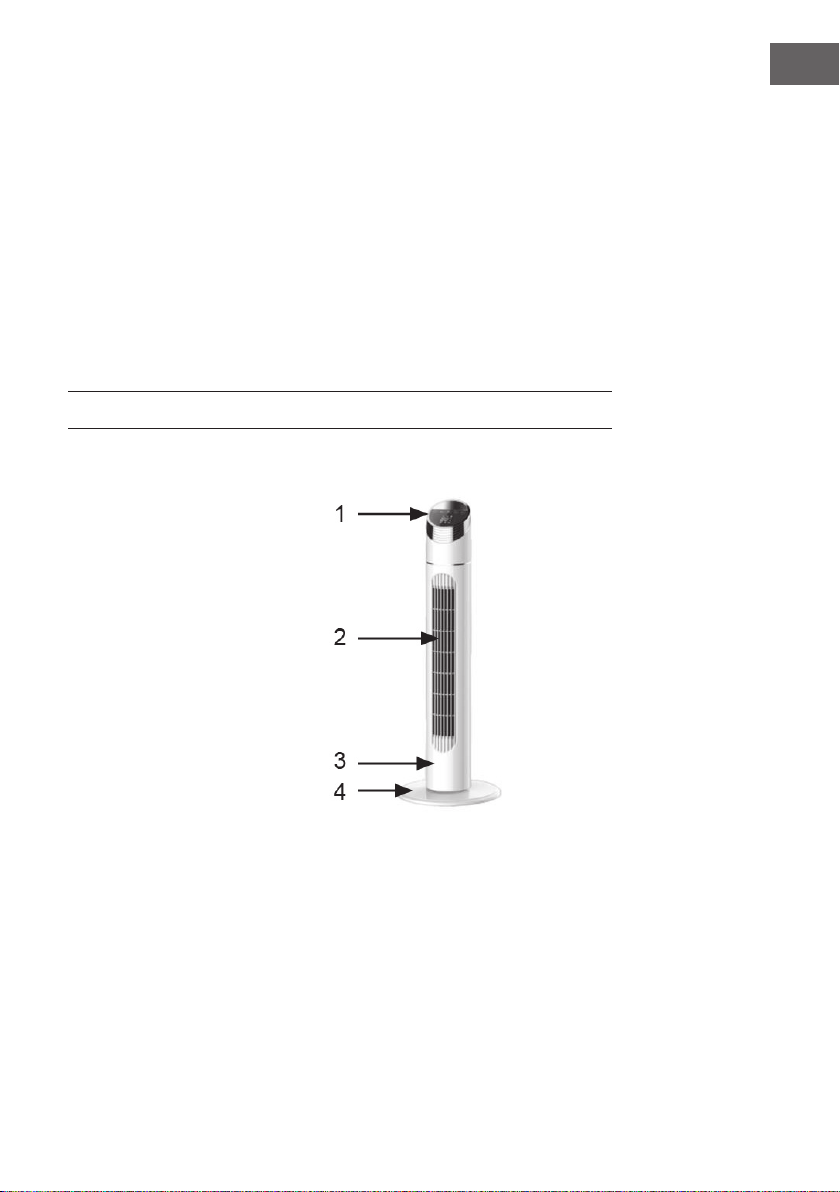
PRODUCT DESCRIPTION
1 Control Panel
2 Air outlet
3 Fan body
4 Base
EN
13
Page 14
EN
ASSEMBLY
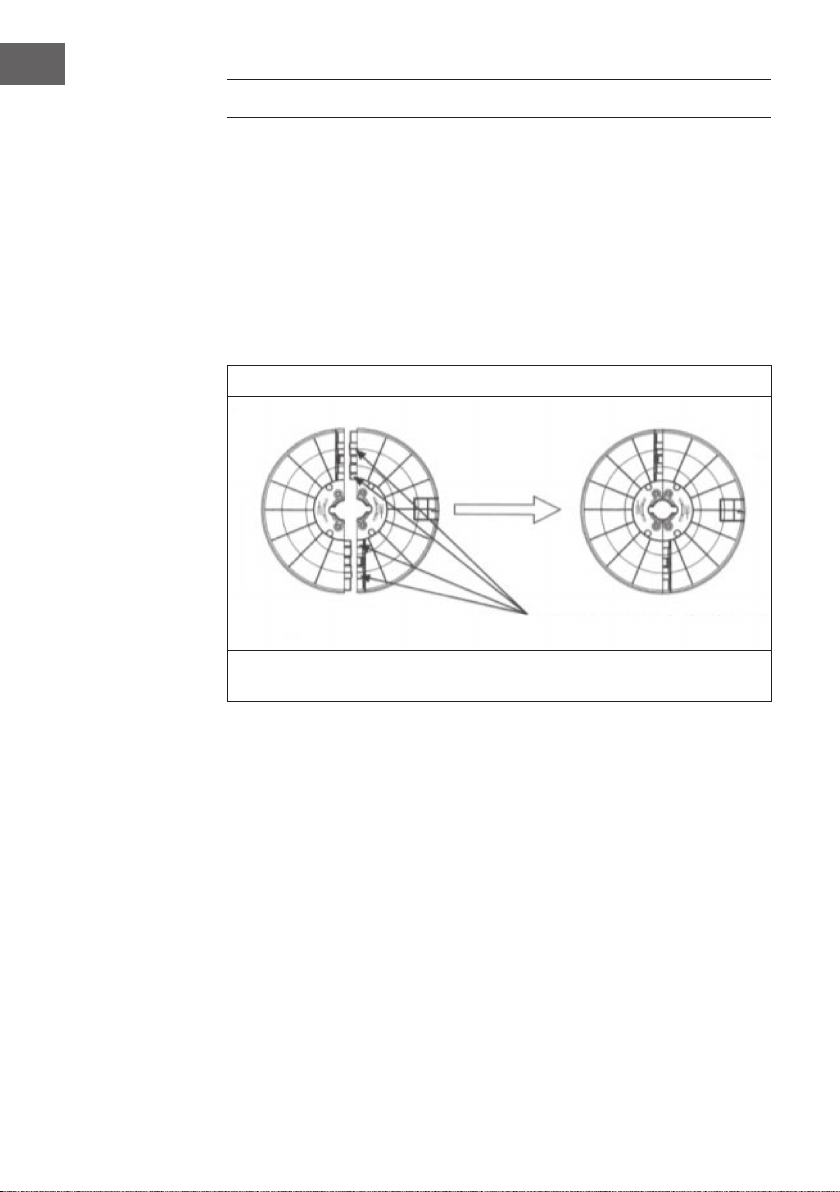
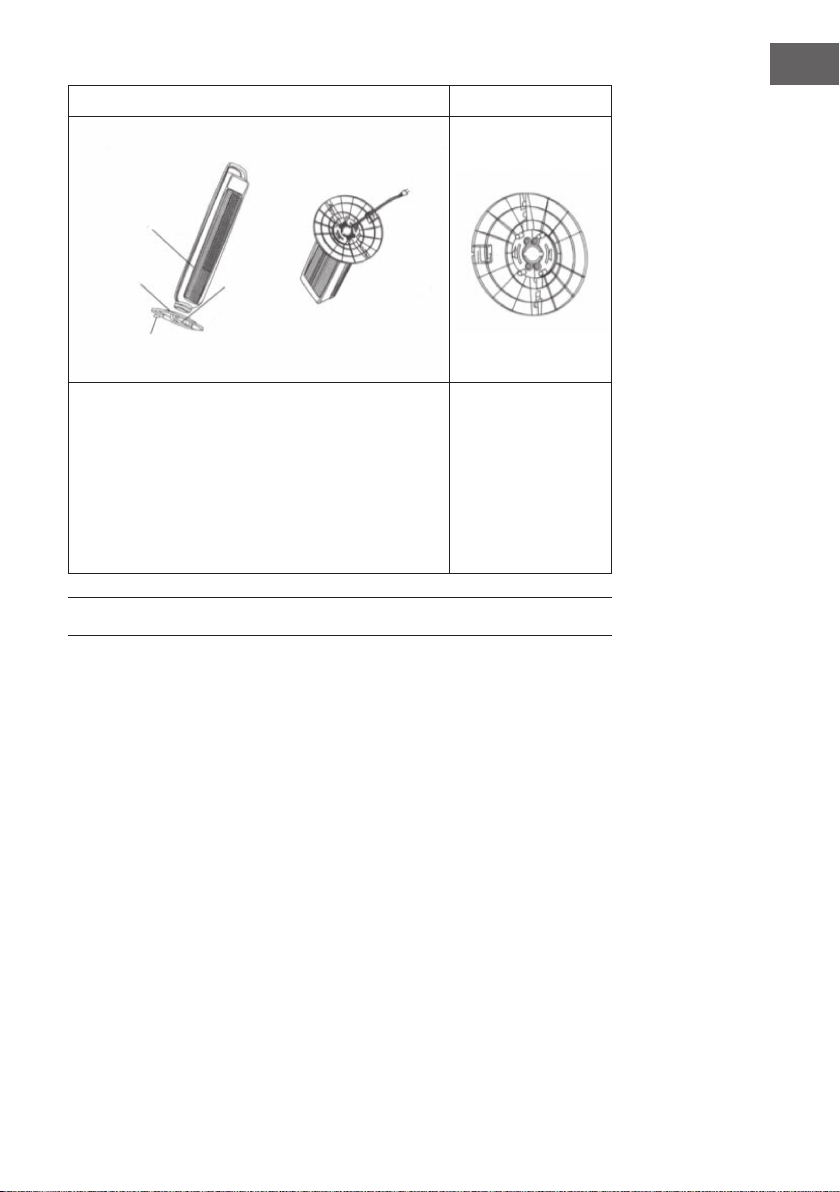
1. Remove the two parts of the base from the box, so that the holes of the two-part
base are aligned and the two parts are formed into a complete base. (As shown in
Fig. 1)
2. Run the power cord through the base, align the base with the holes on the fan body,
then secure the power cord under the base clip to tighten the base with the fan
body. (As shown in Fig. 2)
3. When the base is disassembled, screw out the screws rst, then take the base out.
(The method to disassemble the base is as shown in Fig. 3)
1
After the four posts are aligned and wrapped, rmly snap the base front inward (a
sound can be heard), then use the same method to snap the base back.
14
Page 15
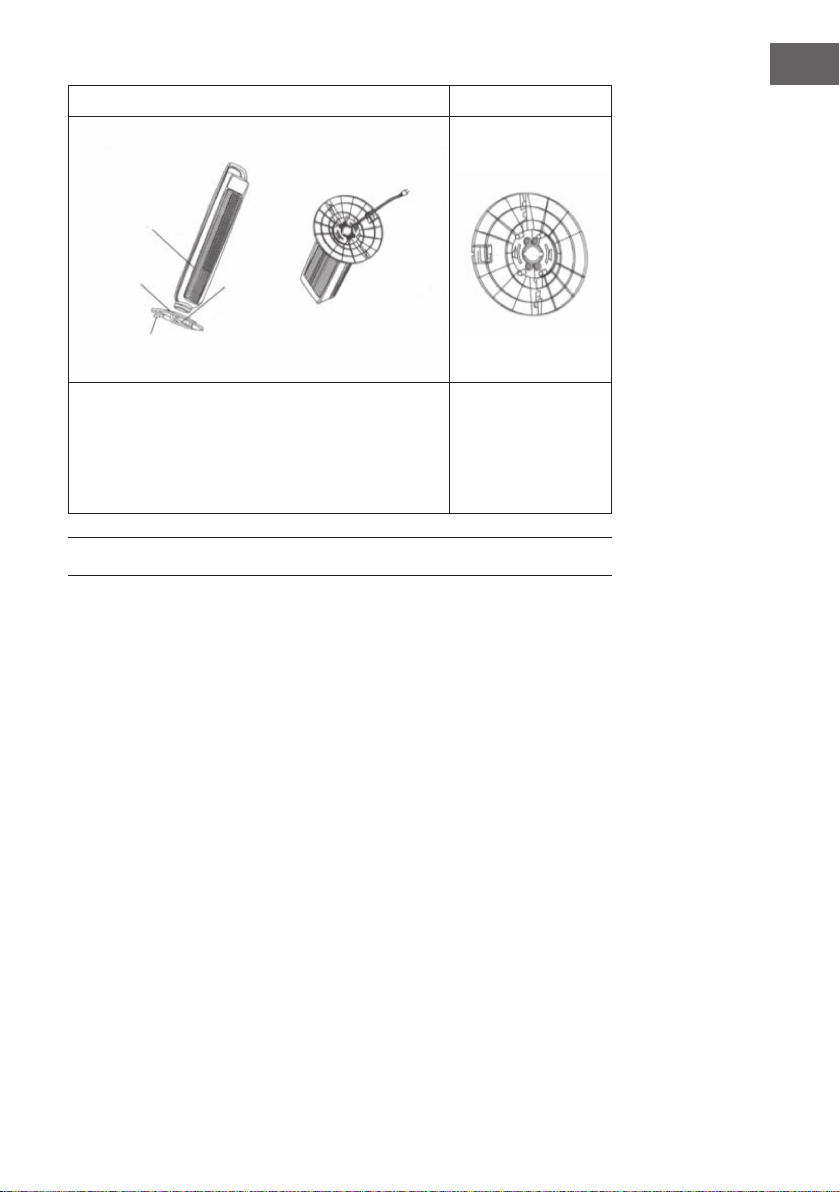
Fan body
EN
2 3
Basie
Power cord
After the base is put on the fan body, follow the schematic
to secure the power cord under the base clip, then tighten
the screws.
Fixing
screw
Hold the clip and
forcibly pull the
base out, after the
clip comes out, use
the same method to
remove another clip.
USE AND OPERATION
Operate using a remote control (each button on the remote control is the same as
that of an actual fan):
On/Off
• When this button is pushed, the fan will start at a low speed.
• By pressing this button again, the fan will stop working.
15
Page 16

EN
Timing Selection
When the fan is under working, if this button is pushed, it will enter timing status
and the setting at this time is 1 hour. The timing can be selected from 1h to 12h.
When the timer is set to 12h, if this button is pushed, the timing selection will be
canceled. The timing hours change as per the way shown below:
1 hour > 2 hour > 3 hour > 4 hour > 5 hour > 6 hour > ... > 12 hour > Timer cancled.
Selection of Wind
This button is to select the wind mode. When this button is repeatedly pushed, the wind
mode will change from normal wind, natural wind, sleep wind and normal wind in turns;
the three different wind modes have following features:
1 Normal wind: the normal wind mode is simply the Low, Medium & High fan speed
speeds.
2 Natural wind: the natural wind mode automatically selects wind speed randomly
as you would nd outdoors. The natural wind also has low, medium and high
speeds.
3 Sleeping wind: the sleeping wind allows you to set a speed at low, medium and
high. The wind speed of these three sleeping wind modes changes as below:
• High sleeping wind: the air ows with high speed for half an hour, then drops
to medium speed for half an hour, and nally drops to low speed.
• Medium sleeping wind: the air ow begins with medium speed for half an
hour and nally drops to low speed.
• Low sleeping wind: the air ows at a low natural wind speed, till the preset
time is reached or the fan is turned off.
16
Page 17
Wind speed
When this button is pushed, three different wind speeds of low, medium and high can be set.
Oscillation
When this button is pushed, the fan starts to oscillate the wind,by pressing this button
again, the fan stops oscillate the wind.
Notes on Use
• The above operation can also be carried out on the control panel of the fan body,
with the method same as the one described above.
• Only when “ON/OFF” is pushed, the fan can send wind.
USAGE OF THE REMOTE CONTROL
• When the remote control is used, make sure that the head of the front of the remote
control is aligned with the receiving window on the fan body.
• The remote control can be about 5m from the front of the fan body; it can be
normally operated if the deviation is within 30 degrees.
• Avoid direct sunlight on the receiving window, so as not to affect the effect of the
receiver.
• If the remote control is not used for a long time, remove the battery and handle it
properly.
EN
When using the remote control, install the battery. The remote control operates on one
lithium battery, with the insertion method as shown below:
1. Open the battery cover.
2. Insert a new battery, pay attention to the polarity of the battery (+ and -).
3. Close the battery cover.
17
Page 18
EN
CARE AND CLEANING
• Before cleaning this product, make sure that the power is turned off rst.
• Do not use water or other liquid to clean the electrical components (such as
switching power supply, motor, etc.) and the electrical components can be wiped
clean with a clean cloth.
• Do not use any grinding tools and solvents that can damage the surface to clean
the product. You can wash the product with detergent and wipe dry with a clean
cloth.
• Do not take the product apart for modication. It is recommended to inspect and
clean the product annually as to extend its service life.
HINTS ON DISPOSAL
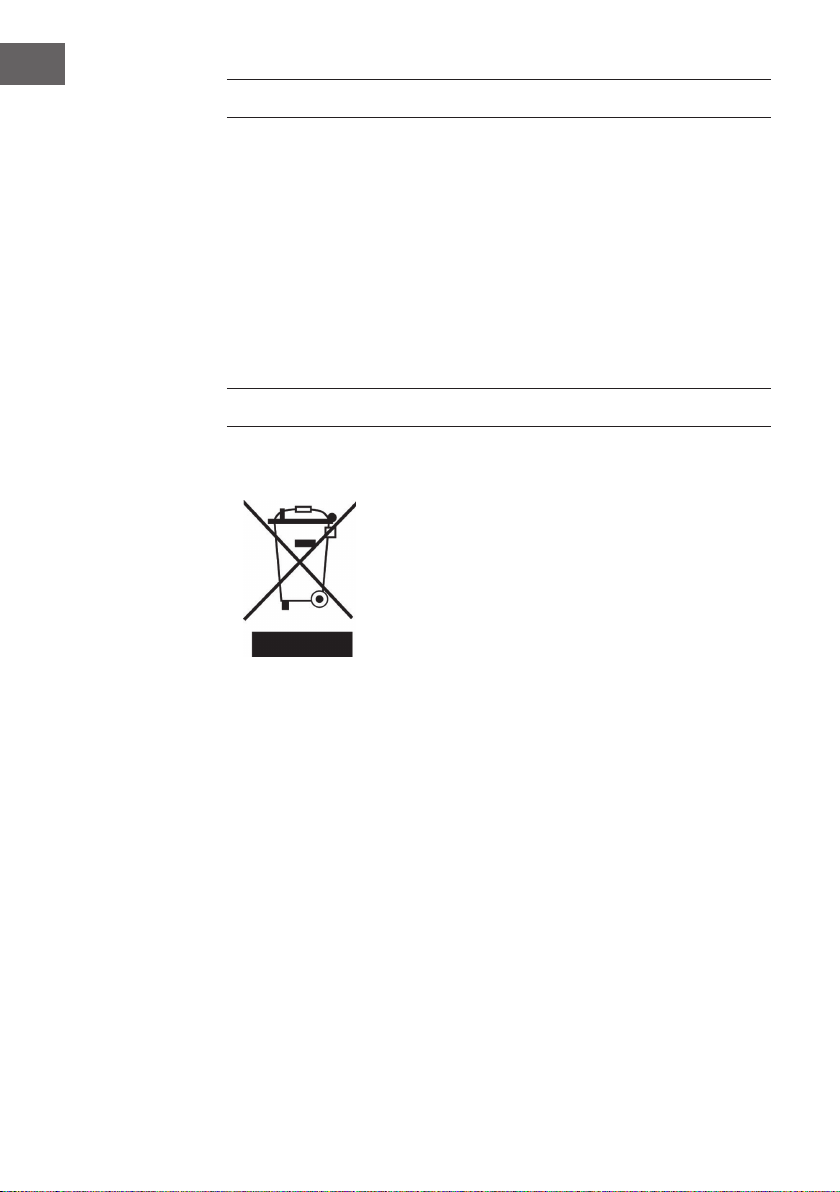
According to the European waste regulation 2012/19/EU this
symbol on the product or on its packaging indicates that this
product may not be treated as household waste. Instead it should
be taken to the appropriate collection point for the recycling of
electrical and electronic equipment. By ensuring this product is
disposed of correctly, you will help prevent potential negative
consequences for the environment and human health, which
could otherwise be caused by inappropriate waste handling of
this product. For more detailled information about recycling of
this product, please contact your local council or your household
waste disposal service.
Your product contains batteries covered by the European
Directive. 2006/66/EC, which cannot be disposed of with
normal household waste. Please check local rules on separate
collection of batteries. The correct disposal of batteries helps
prevent potentially negative consequences on the environment
and human health.
18
Page 19
Estimado cliente:
Le felicitamos por la adquisición de este producto. Lea atentamente el siguiente manual
y siga cuidadosamente las instrucciones de uso con el n de evitar posibles daños.
La empresa no se responsabiliza de los daños ocasionados por un uso indebido del
producto o por haber desatendido las indicaciones de seguridad.
ÍNDICE DE CONTENIDOS
Datos técnicos19
Declaración de conformidad19
Indicaciones de seguridad20
Características del aparato21
Montaje22
Puesta en marcha y funcionamiento23
Uso del mando a distancia25
Limpieza y cuidado26
Indicaciones sobre la retirada del aparato26
DATOS TÉCNICOS
Número de artículo 10032435, 10032436
Suministro eléctrico 220-240 V ~ 50-60 Hz
Potencia 40 W
Nivel de ruido ≤ 50 dB (A)
ES
DECLARACIÓN DE CONFORMIDAD
Fabricante:
Chal-Tec GmbH, Wallstraße 16, 10179 Berlín (Alemania).
Este producto cumple con las siguientes directivas
europeas:
2014/30/UE (EMC)
2014/35/UE (baja tensión)
2011/65/UE (refundición RoHS)
206/2012/EU (ErP)
19
Page 20

ES
INDICACIONES DE SEGURIDAD
• Este aparato puede ser usado por niños a partir de 8 años y personas con
capacidades físicas o psíquicas reducidas, con poca experiencia o conocimientos
si han sido supervisadas o instruidas por una persona responsable de su seguridad.
Los niños no deben jugar con el aparato. Los niños solo deben realizar la limpieza
y mantenimiento del aparato bajo la supervisión de un adulto.
• Si el cable de corriente está dañado debe ser sustituido por el fabricante, el
servicio de atención al cliente o un profesional cualicado para evitar daños
materiales o personales.
• Antes de usar el aparato, compruebe que la tensión indicada en el cuadro de
características coincide con la del enchufe.
• No encienda el ventilador hasta que no esté montado.
• Apague el aparato antes de moverlo.
• No retire el cable de alimentación con las manos mojadas para evitar el riesgo de
descarga eléctrica.
• No introduzca los dedos u objetos alados en el aparato.
• No coloque el aparato en lugares con altas temperaturas o mucha humedad y
tenga cuidado de que no tenga cerca ácidos, álcali, aceite, insecticidas, cortinas y
otros objetos para que no sean succionados.
• Los bebés y personas mayores no deben sentarse o tumbarse directamente delante
del ventilador.
• Coloque el ventilador solo en supercies planas ya que de lo contrario se podría
caer.
• Antes del uso compruebe siempre que el cable o enchufe no están dañados. Si el
cable de corriente está dañado debe ser sustituido por el fabricante, el servicio
de atención al cliente o un profesional cualicado para evitar daños materiales o
personales.
• Apague el aparato cuando salga de la habitación o cuando no va a usarlo
durante un largo periodo de tiempo. Desenchufe el cable para evitar un
cortocircuito.
• No coloque el aparato en lugares en los que las cortinas, etc. puedan ser
succionadas o tapar el aparato.
• El aparato no está previsto para ser usado por personas con capacidades físicas o
sensoriales reducidas (niños incluidos).
• Asegúrese de que el ventilador no sea golpeado o aplastado durante el
transporte, montaje y almacenamiento. Especialmente las aspas deben ser
almacenadas correctamente para que no se deformen, ya que esto podría
disminuir la potencia del ventilador.
20
Page 21
• Si durante el uso se formasen olores, ruidos, humo u otros fenómenos, apague el
aparato inmediatamente y desenchúfelo. Contacte con el servicio de atención al
cliente y envíe el aparato a mantenimiento.
• Asegúrese de que la dirección del viento del ventilador no está dirigida a un horno
o gas.
• Use solo el aparato para su uso provisto, como se describe en el manual de
instrucciones.
• Asegúrese de que el ventilador está apagado y desenchufado antes de retirar la
carcasa de protección.
Avisos acerca del sobrecalentamiento
Protección contra sobrecalentamiento En el motor del ventilador se ha instalado
un fusible térmico. Si el ventilador se sobrecaliente por algún motivo y alcanza
una temperatura muy alta, el fusible térmico se activa y el aparato se apaga
automáticamente.
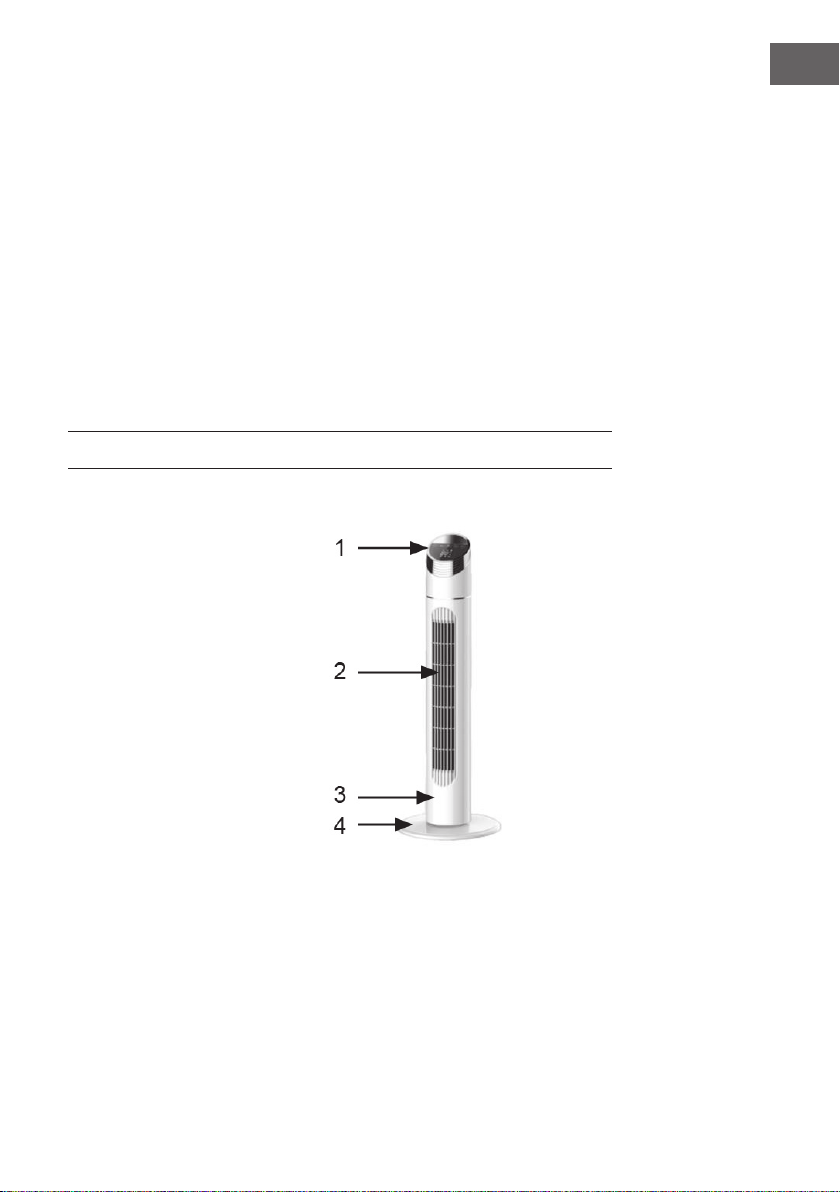
CARACTERÍSTICAS DEL APARATO
1 Panel de control
ES
2 Apertura de salida del aire
3 Carcasa del ventilador
4 Base del aparato
21
Page 22
ES
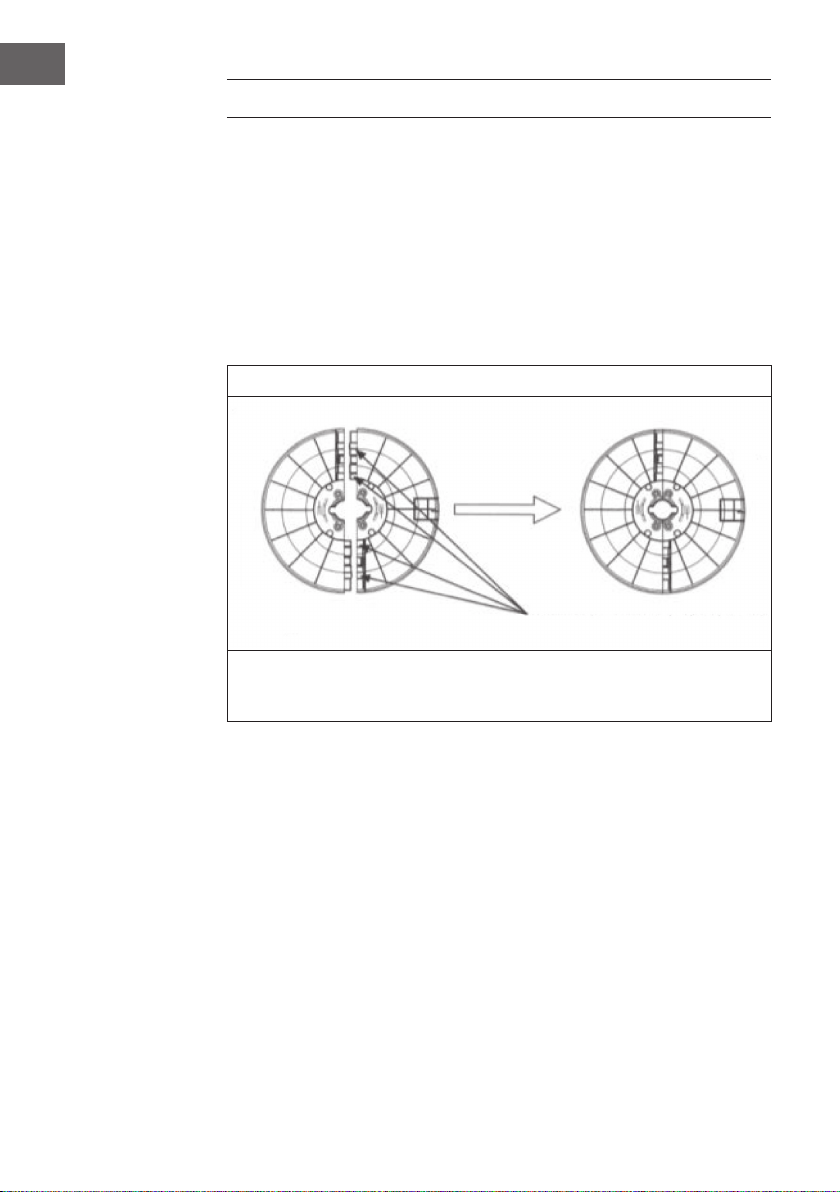
MONTAJE
1. Retire ambas partes de la base del aparato de la caja y colóquelas de manera que
puedan juntarse para formar una base completa para el dispositivo (vea la g. 1).
2. Tire del cable de alimentación a través del oricio de la base y lleve el oricio de
la base a la misma altura que los oricios de la carcasa del ventilador. Asegure
el cable de alimentación con la abrazadera debajo de la base del aparato para
conectar la base a la carcasa del ventilador (vea la g.2).
3. Cuando la base del dispositivo está desmontada, desatornille los tornillos y luego
separe la base del dispositivo (vea g. 3).
1
22
Cuando las cuatro ubicaciones estén niveladas entre sí y aseguradas, encaje la parte
frontal de la carcasa (se escuchará un sonido). Use el mismo método en la parte
trasera.
Page 23
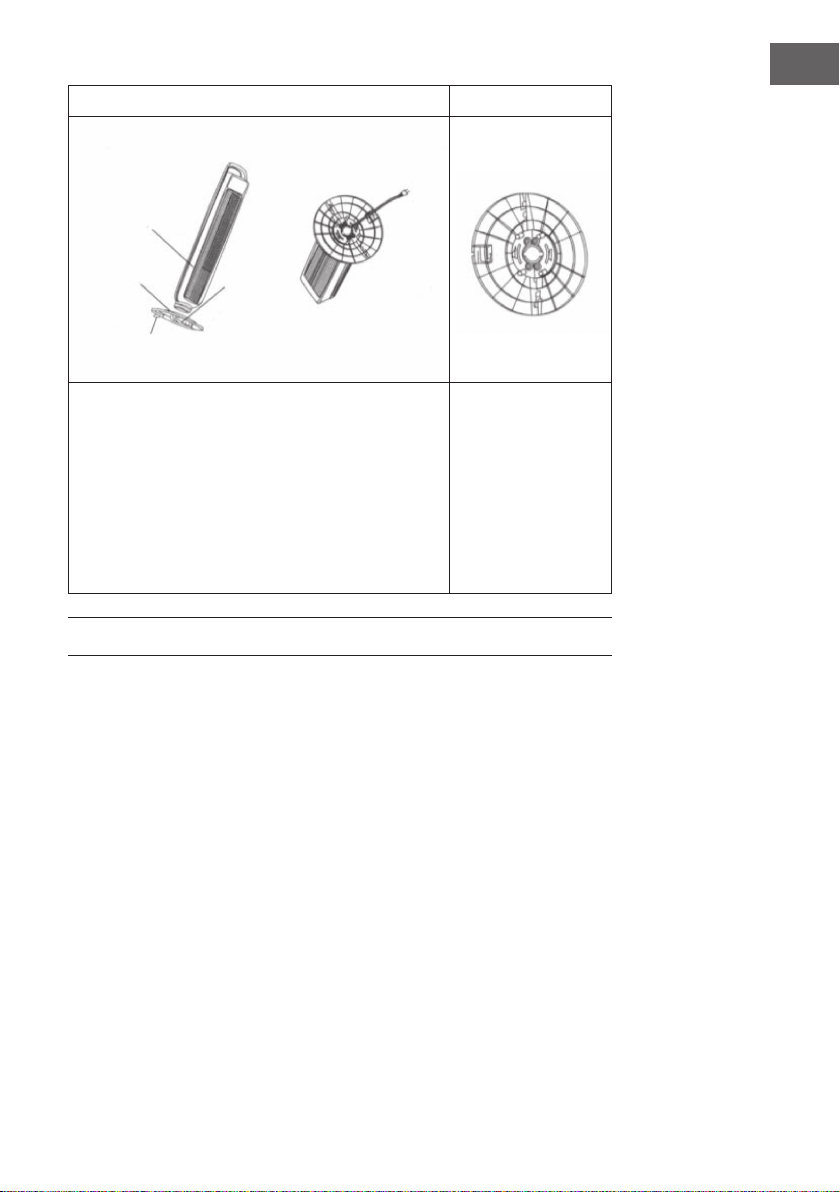
Carcasa
ES
2 3
Base
Cable de
corriente
Tras colocar la base del ventilador a la carcasa
siga el siguiente esquema para jar el cable de corriente
a la abrazadera bajo la base para jarla y luego apriete
los tornillos.
Tornillo de
jación
Sujete las
abrazaderas
rmemente y tire de
la base con fuerza
hacia fuera. Cuando
ha aojado la
abrazadera use el
mismo método para
quitar la segunda
abrazadera.
PUESTA EN MARCHA Y FUNCIONAMIENTO
Si usa el aparato con un mando a distancia (cada botón del mando se corresponde
con una del ventilador)
On/Off
• Si pulsa este botón, el ventilador se enciende con la velocidad mínima.
• Si lo pulsa de nuevo, el ventilador se apaga.
23
Page 24

ES
Timing Selection
Si pulsa este botón mientras el ventilador está en funcionamiento, se activa el
temporizador. El tiempo precongurado hasta que se apaga es de una hora. Puede
seleccionar el tiempo hasta el apagado entre 1 y 12 horas.
Si pulsa de nuevo el botón después de congurar el temporizador en 12 horas, la
función se apaga y el ventilador sigue funcionando en modo normal. Al pulsar el botón
se cambian las horas conguradas hasta el apagado en los tramos:
1 hora > 2 horas > 3 horas > 4 horas > 5 horas > 6 horas > ... > 12 horas >
temporizador apagado.
Selection of Wind
Con este botón se selecciona el modo de viento. Cuando se pulsa este botón, se
cambia al modo de viento de „normal wind“ (viento normal) a „natural wind“ (viento
natural) a „sleep wind“ (viento suave) y de nuevo a „normal wind“. Los tres modos de
viento tienen las siguientes características:
1 Normal wind: En este modo se puede seleccionar la velocidad del viento a baja,
media y alta.
2 Natural wind: Este modo de viento alterna al azar entre los distintos niveles de
velocidad, como lo haría en el viento en la naturaleza. El modo natural y el modo
normal disponen de tres niveles de velocidad.
3 Sleep wind: En este modo también se pueden congurar tres niveles de velocidad.
La velocidad se cambia según los niveles de la siguiente manera:
24
• Velocidad alta: El aire sale del dispositivo durante media hora a alta
velocidad. Después de media hora, la velocidad del viento cambia a media
durante media hora y luego baja a la velocidad más baja.
• Velocidad media: El aire sale de la unidad durante media hora a velocidad
media y luego la velocidad del viento baja al nivel de velocidad más bajo.
• Velocidad baja: El aire uirá a baja velocidad hasta que el temporizador
haya terminado o la unidad se apague.
Page 25

Wind Speed
Si pulsa este botón se pueden congurar las tres distintas velocidades (baja, media,
alta).
Oscilación
Si pulsa este botón, el ventilador comienza a oscilar. Si lo pulsa de nuevo, el ventilador
para la oscilación.
Advertencia de uso
• Puede seleccionar todos los modos mencionados a través del panel de control del
ventilador. El procedimiento es el mismo.
• El ventilador solo puede producir viento si ha pulsado el botón ONN/OFF.
USO DEL MANDO A DISTANCIA
• Al usar el mando a distancia compruebe que el extremo delantero del mando
apunta en dirección al receptor del ventilador.
• El mando puede ser usado hasta una distancia de 5 metros, a un ángulo máximo
de 30 grados.
• Evite exponer el receptor a los rayos solares, ya que podrían afectarle.
• Retire la batería del mando a distancia cuando no vaya a usarlo durante un largo
periodo de tiempo.
Antes del uso coloque la batería en el compartimento del mando a distancia. Para el
mando se requiere una batería de litio. Colóquela de la siguiente manera:
ES
1 Abra la tapa del compartimento de la batería.
2 Coloque una batería nueva. Preste atención a la polaridad (+ y -).
3 Cierre el compartimento.
25
Page 26
ES
LIMPIEZA Y CUIDADO
• Antes de la limpieza, retire el cable de alimentación del enchufe.
• Para la limpieza de los componentes eléctricos (por ejemplo, fuente de
alimentación, motor, etc.) Los componentes eléctricos se pueden limpiar con un
paño limpio.
• No use productos abrasivos o limpiadores agresivos, ya que la supercie del
aparato podría dañarse. Puede limpiar la supercie con un paño húmedo y un
poco de detergente y nalmente secarlo con un paño.
• No desmonte el aparato ni lo modique. Se recomienda llevar el aparato a
mantenimiento una vez al año para alargar su vida útil.
INDICACIONES SOBRE LA RETIRADA DEL
APARATO
Si el aparato lleva adherida la ilustración de la izquierda (el
contenedor de basura tachado) entonces rige la normativa
europea, directiva 2012/19/UE. Este producto no debe
arrojarse a un contenedor de basura común. Infórmese sobre
las leyes territoriales que regulan la recogida separada de
aparatos eléctricos y electrónicos Respete las
leyes territoriales y no arroje aparatos viejos al cubo de la
basura doméstica. Una retirada de aparatos conforme a
las leyes, contribuye a proteger el medio ambiente y a las
personas a su alrededor frente a posibles consecuencias
perjudiciales para la salud. El reciclaje ayuda a reducir el
consumo de materias primas.
26
Este producto contiene pilas que según la Normativa europea
2006/66/EG no deben ser arrojadas al cubo de la basura
común. Infórmese sobre las leyes territoriales que regulan la
recogida separada de aparatos eléctricos y electrónicos Una
retirada de aparatos conforme a las leyes,
contribuye a proteger el medio ambiente y a las personas a
su alrededor frente a posibles consecuencias perjudiciales
para la salud.
Page 27
Cher client,
Toutes nos félicitations pour l’acquisition de ce nouvel appareil. Veuillez lire attentivement
les instructions suivantes de branchement et d’utilisation an d’éviter d’éventuels
dommages. Le fabricant ne saurait être tenu pour responsable des dommages dus au nonrespect des consignes de sécurité et à la mauvaise utilisation de l’appareil.
SOMMAIRE
Fiche technique27
Déclaration de conformité27
Consignes de sécurité28
Aperçu de l‘appareil29
Assemblage30
Mise en service et utilisation31
Utilisation avec la télécommande33
Nettoyage et entretien34
Conseils pour le recyclage34
FICHE TECHNIQUE
Numéro d’article 10032435, 10032436
Alimentation 220-240 V ~ 50-60 Hz
Puissance 40 W
Niveau sonore ≤ 50 dB (A)
FR
DÉCLARATION DE CONFORMITÉ
Fabricant :
Chal-Tec GmbH, Wallstraße 16, 10179 Berlin, Allemagne.
Ce produit est conforme aux directives européennes
suivantes :
2014/30/UE (CEM)
2014/35/UE (LVD)
2011/65/UE (RoHS)
206/2012/UE (ErP)
27
Page 28

FR
CONSIGNES DE SÉCURITÉ
• Les enfants à partir de 8 ans ainsi que les personnes dont les capacités physiques,
mentales ou sensorielles sont réduites peuvent utiliser l’appareil à condition
d’avoir assimilé au préalable les consignes d’utilisation et de sécurité de l’appareil
transmises par une personne responsable de leur sécurité, et d‘avoir compris
les dangers liés à l‘utilisation de l‘appareil. ne laissez pas les enfants jouer avec
l‘appareil. Les enfants sont autorisés à nettoyer l’appareil uniquement sous la
surveillance d‘un adulte.
• Si le câble secteur ou la che sont endommagés, faites-les remplacer par le
fabricant un service professionnel agréé ou une personne de qualication
équivalente, pour éviter des dommages éventuels aux personnes ou aux objets.
• Avant l’utilisation, vériez la que tension indiquée sur la plaque signalétique de
l’appareil correspond à celle de votre prise de secteur.
• N‘allumez pas l‘appareil tant que le ventilateur n‘est pas entièrement assemblé.
• Eteignez l‘appareil avant de le déplacer.
• Ne débranchez pas la che avec les mains mouillées pour éviter de vos
électrocuter et de prendre une décharge.
• N‘insérez ni vos doigts si des objets pointus dans l‘appareil.
• Veillez à ce que l‘appareil ne soit pas exposé à de fortes températures ou à
l‘humidité, et à ce que les acides, alcalins, l‘huile, les insecticides, les rideaux et
autres objets soient hors de portée de la machine an qu‘ils ne soient pas aspirés
par celle-ci.
• Les bébés et les personnes âgées ne doivent pas être placés assis ou couchés
directement devant le ventilateur.
• Placez le ventilateur sur une surface plane uniquement, pour qu‘il ne tombe pas.
• Avant d‘utiliser l‘appareil, vériez toujours le bon état du câble secteur et de la
che. Si le câble secteur est endommagé, faites-le remplacer par le fabricant, le
service client ou une personne qualiée pour cela an d‘éviter des dommages
éventuels aux personnes ou aux objets.
• Eteignez l‘appareil lorsque vous quittez la pièce ou si vous ne l‘utilisez pas pendant
une période prolongée. débranchez la che de la prise pour éviter un court-circuit.
• N‘installez pas l‘appareil dans un endroit où il pourrait aspirer des rideaux voilages
etc, ou bien risquer d‘être recouvert.
• L‘appareil n‘est pas destiné à être utilisé par des personnes aux capacités
physiques réduites (enfants inclus).
• Veillez à ce que le ventilateur ne prenne aucun coup et ne soit pas écrasé pendant
le transport, l‘assemblage ou l‘entreposage. Les pales du ventilateur en particulier
doivent être rangées consciencieusement pour ne pas les déformer, ce qui pourrait
limiter l‘efcacité du ventilateur.
28
Page 29
• S‘il se produit des bruits inhabituels pendant l‘utilisation ou si l‘appareil dégage
une odeur, de la fumée, ou que d‘autres phénomènes se produisent, éteignez
immédiatement l‘appareil et débranchez la che de la prise. Mettez-vous en
relation avec le service client, et envoyez le cas échéant votre appareil en révision.
• Veillez à ce que la direction du vent du ventilateur ne soit pas dirigée vers une
cuisinière ou vers le gaz.
• Utilisez l‘appareil exclusivement aux ns prévues et décrites dans ce mode
d‘emploi.
• Veillez à ce que le ventilateur soit éteint et à ce que la che soit débranchée avant
de retirer le châssis de protection.
Conseil concernant la protection anti surchauffe
Anti surchauffe : le moteur du ventilateur comprend un thermo fusible.
Si le moteur pour une raison ou pour une autre surchauffe ou atteint sa température
maximale de fonctionnement, le thermo fusible est activé ce qui arrête automatiquement
l‘appareil.
APERÇU DE L‘APPAREIL
1 Panneau de commande
FR
2 Sortie d‘air
3 Boîtier du ventilateur
4 Base de l‘appareil
29
Page 30
FR
ASSEMBLAGE
1. Retirez du carton les deux éléments de la base de l‘appareil et alignez-les an de
pouvoir former avec eux la base complète de l‘appareil (voir schéma 1).
2. Faites passer le câble d‘alimentation à travers le trou de la base de l‘appareil et
amenez le trou de la base de l‘appareil à la même hauteur que ceux du boîtier du
ventilateur. Bloquez le câble d‘alimentation ave la pince sous la base de l‘appareil,
pour connecter celle-ci au boîtier du ventilateur (voir schéma 2).
3. Si vous souhaitez démonter la base de l‘appareil, desserrez d‘abord les vis et
séparez ensuite les deux parties de la base de l‘appareil (voir schéma 3).
1
30
Lorsque vous avez aligné les quatre emplacements les uns avec les autres à la bonne
hauteur et que vous les avez xés, enclenchez la face avant du boîtier (vous pouvez
entendre un petit bruit). Utilisez la même méthode au dos.
Page 31
Châssis
FR
2 3
Base
Câble
secteur
Une fois que la base de l'appareil est installée sur le
châssis du ventilateur, aidez-vous du schéma pour xer
le câble d'alimentation sur la pince sous la base de
l'appareil puis serrez les vis.
Vis de
xation
Maintenez bien les
pinces de xation
et serrez la base
de l'appareil avec
force. Si la pince s'est
desserrée, utilisez la
même méthode pour
retirer la deuxième
pince.
MISE EN SERVICE ET UTILISATION
Si vous utilisez l‘appareil avec une télécommande (chaque bouton de la télécommande
correspond à un bouton sur le ventilateur):
On/Off
• Lorsque vous appuyez sur cette touche, le ventilateur démarre avec la vitesse la
plus lente.
• Si vous appuyez de nouveau sur cette touche, le ventilateur s‘éteint.
31
Page 32

FR
Sélection de la durée
Si vous appuyez sur cette touche alors que le ventilateur est en marche, la minuterie est
activée et la durée par défaut avant l‘arrêt automatique de l‘appareil est d‘une heure.
Vous Pouvez choisir une durée avant arrêt automatique de l‘appareil allant de 1 à 12
heures.
Si vous appuyez de nouveau sur la touche après avoir réglé la minuterie sur 12 heures,
vous quittez la fonction et le ventilateur repasse en fonctionnement normal. Lorsque vous
appuyez sur la touche, vous modiez la durée réglée en heures évolue dans l‘ordre
suivant :
1 heure > 2 heures > 3 heures > 4 heures > 5 heures > 6 heures > ... > 12 heures >
minuterie éteinte.
Sélection du vent
Avec cette touche vous pouvez choisir le mode de vent. Si vous appuyez plusieurs fois
sur cette touche, le mode vent passe de „normal wind“ (vent normal) à „natural wind“
(vent naturel) puis „sleep wind“ (brise douce) et retourne ensuite à „normal wind“. Voici
les caractéristiques des trois modes :
1 Normal wind : dans ce mode de vent vous pouvez sélectionner la vitesse du
ventilateur entre faible, moyenne ou rapide.
2 Natural wind : ce mode de vent change arbitrairement la vitesse du vent comme
si vous étiez dans la nature. Le mode „natural wind“ dispose tout comme le mode
„normal wind“ de trois vitesses de vent.
3 Sleep wind : dans ce mode de vent vous pouvez aussi choisir l‘une des trois
vitesses. La vitesse du vent change en fonction de celle que vous avez choisie, de la
manière suivante :
32
• Vent fort : l‘appareil soufe l‘air à grande vitesse pendant une demi-heure. Au
bout d‘une demi-heure, la vitesse passe au niveau moyen, pour une nouvelle
demi-heure, puis l‘appareil passe à faible vitesse.
• Vent moyen : l‘appareil soufe l‘air à vitesse moyenne pendant une demi-
heure puis l‘appareil passe à faible vitesse.
• Vent faible : l‘appareil soufe l‘air à faible vitesse jusqu‘à ce que la durée de
la minuterie soit écoulée ou que vous éteigniez l‘appareil.
Page 33

Wind Speed
Lorsque vous appuyez sur cette touche, vous pouvez régler l‘une des trois vitesses de
vent (faible, moyenne, forte).
Oscillation
Lorsque vous appuyez sur cette touche, le ventilateur commence à faire osciller le ux
d‘air. Si vous appuyez à nouveau sur la touche, le ventilateur coupe l‘oscillation.
Conseils d‘utilisation
• Vous pouvez également régler tous les modes ci-dessus à l‘aide de la
télécommande du ventilateur. La procédure est la même.
• Le ventilateur ne peut produire du vent que si la touche ON/OFF est activée.
UTILISATION AVEC LA TÉLÉCOMMANDE
• Lorsque vous utilisez la télécommande, assurez-vous que l‘avant de la
télécommande soit dirigé vers le récepteur du ventilateur.
• La télécommande peut être utilisée jusqu‘à une distance de 5 mètres lorsque l‘angle
ne dépasse pas 30 degrés.
• Évitez les rayons directs du soleil sur le récepteur car cela pourrait l‘affecter.
• Retirez les piles du compartiment à piles de la télécommande si vous ne l‘utilisez
pas pendant une longue période.
Insérez les piles dans le compartiment des piles avant d‘utiliser la télécommande. La
télécommande utilise une batterie au lithium. Insérez-les de la manière suivante :
1. Ouvrez le cache du compartiment à piles.
2. Insérez une nouvelle pile. Soyez attentif à la polarité de la pile (+ et -).
3. Refermez le compartiment à piles.
FR
33
Page 34
FR
NETTOYAGE ET ENTRETIEN
• Eteignez l‘appareil avant de le nettoyer et débranchez la che d‘alimentation de la
prise.
• Pour nettoyer les parties électriques, n‘utilisez ni eau ni produit liquide (pour
l‘adaptateur secteur, le moteur, etc.). Vous pouvez essuyer les composants
électriques avec un chiffon propre.
• N‘utilisez pas de produits abrasifs ou de nettoyants agressifs pour le nettoyage car
cela pourrait endommager la surface de l‘appareil. Vous pouvez essuyer la surface
avec un chiffon humide et un peu de produit vaisselle, puis essuyer avec un chiffon
sec.
• Ne pas démonter ou modier l‘appareil. Il est recommandé de faire réviser
l‘appareil une fois par an pour prolonger sa durée de vie.
CONSEILS POUR LE RECYCLAGE
Le pictogramme ci-contre apposé sur le produit signie que
la directive européenne 2012/19/UE s‘applique (poubelle
à roues barrée d’une croix). Ces produits ne peuvent être
jetés dans les poubelles domestiques courantes. Renseignezvous concernant les règles appliquées pour la collecte
d’appareils électriques et électroniques. Conformez-vous
aux réglementations locales et ne jetez pas vos anciens
produits avec les ordures ménagères. Le respect des règles
de recyclage des vieux produits aide à la protection de
l’environnement et de la santé de votre entourage contre
les conséquences négatives possibles. Le recyclage des
matériaux aide à réduire l’utilisation des matières premières.
34
Le produit contient des piles qui sont soumises à la directive
européenne 2006/66/CE et ne doivent pas être jetées dans
les poubelles à ordures ménagères. Veuillez-vous informer sur
les réglementations locales en vigueur pour le recyclage des
piles. En respectant les règles de recyclage vous participez
activement à la protection de l’environnement et à la
préservation de la santé de vos proches.
Page 35
Gentile cliente,
La ringraziamo per aver acquistato il nostro prodotto. La preghiamo di leggere
attentamente le seguenti istruzioni e di seguirle per evitare eventuali danni. Si declina
ogni responsabilità per danni derivati da una mancata osservazione delle avvertenze di
sicurezza e da un uso improprio del dispositivo.
INDICE
Dati tecnici35
Dichiarazione di conformità35
Avvertenze di sicurezza36
Descrizione del prodotto37
Montaggio38
Messa in funzione e utilizzo39
Utilizzo del telecomando41
Pulizia e manutenzione42
Avviso di smaltimento42
DATI TECNICI
Numero articolo 10032435, 10032436
Alimentazione 220-240 V ~ 50-60 Hz
Potenza 40 W
Livello di rumorosità ≤ 50 dB (A)
IT
DICHIARAZIONE DI CONFORMITÀ
Produttore:
Chal-Tec GmbH, Wallstraße 16, 10179 Berlino, Germania.
Questo prodotto è conforme alle seguenti direttive
europee:
2014/30/UE (EMC)
2014/35/UE (LVD)
2011/65/UE (RoHS)
206/2012/EU (ErP)
35
Page 36

IT
AVVERTENZE DI SICUREZZA
• Il dispositivo può essere utilizzato da bambini a partire da 8 anni, persone con
limitate capacità siche, sensoriali e mentali e persone con insufciente conoscenza
e esperienza solo dopo essere stati informati da parte di una persona responsabile
del loro controllo riguardo al funzionamento del dispositivo e ai rischi connessi.
Assicurarsi che i bambini non giochino con il dispositivo. I bambini a partire da 8
anni possono pulire il dispositivo o realizzare opere di manutenzione solo con il
dovuto controllo di un adulto.
• Se il cavo di alimentazione è danneggiato, deve essere sostituito dal produttore,
dal servizio di assistenza ai clienti o da una persona con qualica equivalente, in
modo da evitare danni a cose o persone.
• Prima dell’utilizzo, controllare che la tensione indicata sulla targhetta del dispositivo
corrisponda a quella della presa elettrica.
• Non attivare il dispositivo se il ventilatore non è montato completamente.
• Spegnere il dispositivo prima di spostarlo.
• Non staccare la spina con le mani bagnate, in modo da evitare folgorazioni.
• Non inserire dita o oggetti aflati nel dispositivo.
• Assicurarsi che il dispositivo non sia esposto a temperature estremamente elevate
o ad alti livelli di umidità. Inoltre, per evitare che vengano risucchiati, tenere acidi,
alcali, olio, insetticidi, tende e altri oggetti fuori dalla portata del dispositivo.
• Bebè e anziani non devono stare seduti o sdraiati direttamente davanti al
ventilatore.
• Posizionare il ventilatore su superci piane, in modo che non cada.
• Prima di ogni utilizzo, controllare che cavo di alimentazione e spina non siano
danneggiati. Se il cavo di alimentazione è danneggiato, deve essere sostituito
dal produttore, dal servizio di assistenza ai clienti o da una persona con qualica
equivalente, in modo da evitare danni a cose o persone.
• Spegnere il dispositivo se si lascia la stanza o se non viene utilizzato per tempi
prolungati. Staccare la spina dalla presa elettrica per evitare cortocircuiti.
• Non posizionare il dispositivo in punti in cui tende o altri oggetti potrebbero essere
risucchiati dal dispositivo o potrebbero coprirlo.
• Il dispositivo non è progettato per essere utilizzato da persone con limitate capacità
siche (bambini inclusi).
• Assicurarsi che durante trasporto, montaggio e stoccaggio il ventilatore non venga
schiacciato o fatto sbattere. In particolare le pale devono essere conservate in
modo adeguato, per evitare che si deformino, comportando una diminuzione delle
prestazioni del dispositivo.
36
Page 37
• Se durante l’utilizzo dovessero sorgere strani rumori, odori, fumo o altri eventi,
spegnere immediatamente il dispositivo e staccare la spina dalla presa elettrica.
Contattare il servizio di assistenza ai clienti e, se necessario, spedire il dispositivo
per opere di manutenzione.
• Assicurarsi che il ventilatore non sia indirizzato su fornelli o gas.
• Utilizzare il dispositivo solo per gli scopi previsti, come descritto nel manuale d’uso.
• Assicurarsi che il ventilatore sia spento e la spina scollegata dalla presa elettrica,
prima di togliere l’alloggiamento protettivo.
Avvertenze sulla protezione da surriscaldamento
Protezione da surriscaldamento: nel motore del ventilatore si trova un termofusibile. Se
il motore dovesse surriscaldarsi per una serie di motivi e raggiungere una temperatura
molto elevata, il termofusibile viene attivato e il dispositivo si spegne automaticamente.
DESCRIZIONE DEL PRODOTTO
1 Pannello di controllo
2 Aperture di uscita dell’aria
IT
3 Alloggiamento del ventilatore
4 Base del dispositivo
37
Page 38
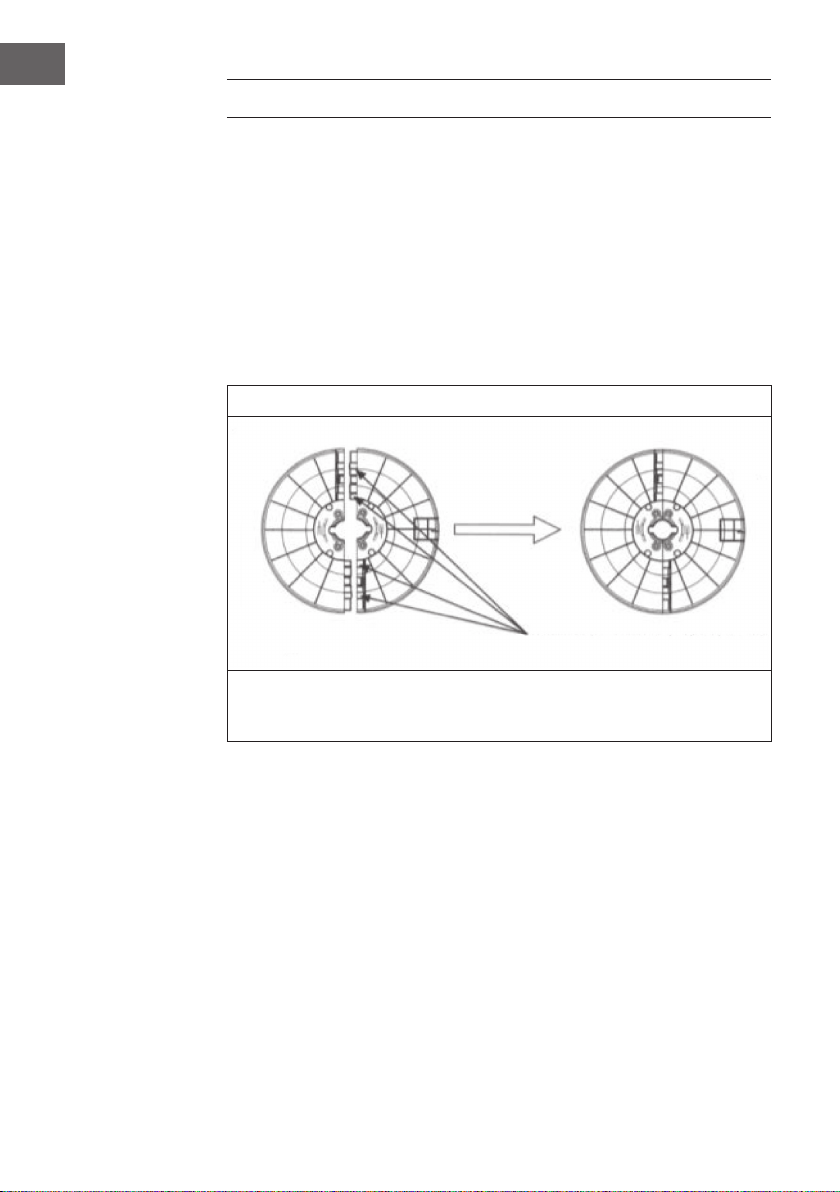
IT
MONTAGGIO
1. Togliere i due componenti della base del dispositivo dall’imballaggio e posizionarli
in modo da poter essere uniti per formare l’intera base del dispositivo (cfr.
immagine 1).
2. Far passare il cavo di alimentazione dal foro sulla base del dispositivo e portare il
foro sulla base alla stessa altezza dei fori sull’alloggiamento del dispositivo. Fissare
il cavo di alimentazione con i morsetti sotto alla base del dispositivo, in modo da
collegarla con l’alloggiamento del ventilatore (cfr. immagine 2).
3. Quando la base del dispositivo è smontata, svitare le viti e smontare la base del
dispositivo (cfr. immagine 3).
1
38
Quando i quattro punti sono alla stessa altezza e sono ssati, è possibile agganciare
la parte anteriore dell’alloggiamento del dispositivo (si sente un rumore). Procedere
con lo stesso metodo per la parte posteriore.
Page 39
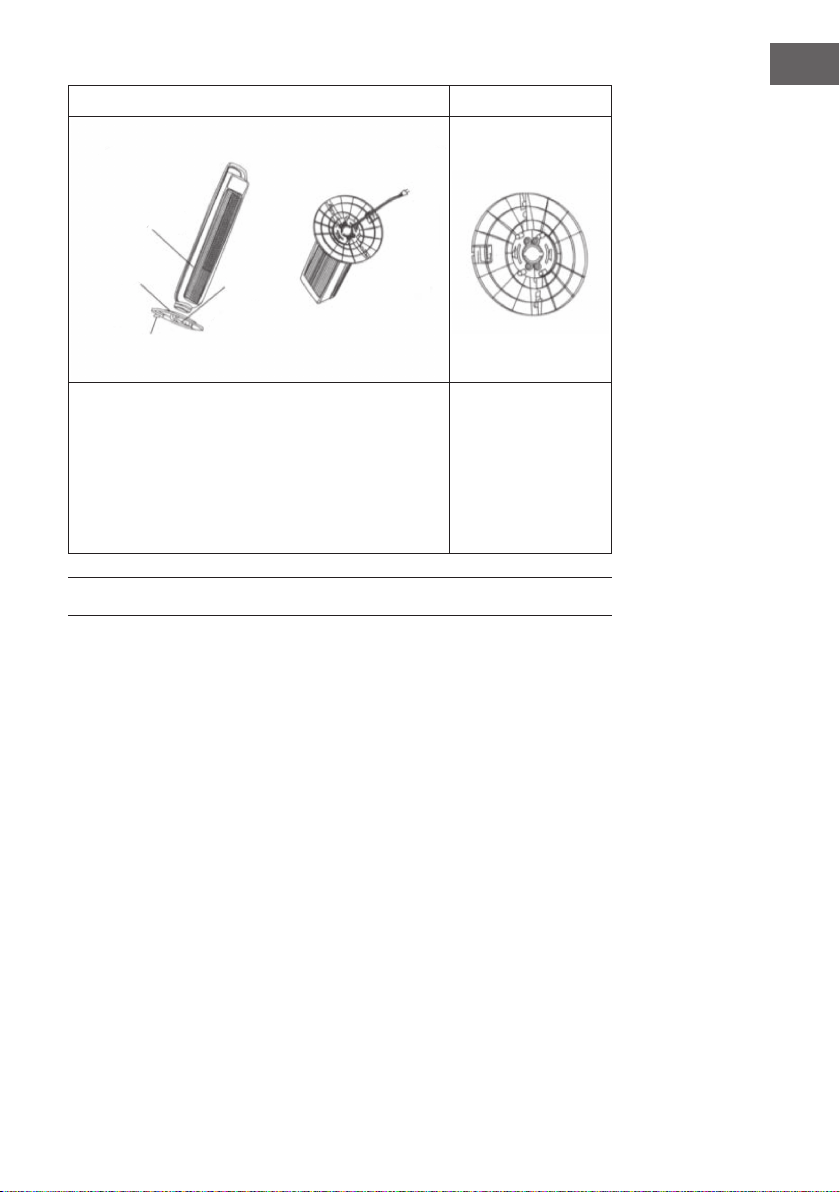
Alloggiamento
IT
2 3
Base
Cavo di
alimentazione
Dopo aver collegato la base all’alloggiamento, seguire
lo schema per ssare il cavo di alimentazione al morsetto
sotto alla base e procedere dunque a stringere le viti.
Vite di
ssaggio
Tenere saldamente il
morsetto e tirare fuori
con forza la base del
dispositivo. Quando
il morsetto è smollato,
utilizzare lo stesso
metodo per rimuovere
l’altro morsetto.
MESSA IN FUNZIONE E UTILIZZO
Se si utilizza il dispositivo con un telecomando (ogni tasto del telecomando corrisponde
a un tasto sul ventilatore):
On/Off
• Premendo questo tasto, il ventilatore si attiva a bassa velocità.
• Premendo nuovamente questo tasto, il ventilatore si spegne.
39
Page 40

IT
Timing Selection
Premendo questo tasto mentre il ventilatore è in funzione, il timer viene attivato e il
tempo predenito per lo spegnimento del dispositivo corrisponde a un’ora. Il tempo per
lo spegnimento può essere impostato tra 1 e 12 ore.
Premendo nuovamente il tasto dopo aver impostato il timer su 12 ore, la funzione viene
spenta e il ventilatore procede con il normale funzionamento. Premendo il tasto, le ore
impostate cambiano seguendo i seguenti intervalli:
1 ora > 2 ore > 3 ore > 4 ore > 5 ore > 6 ore > ... > 12 ore > Timer off.
Selection of Wind
Con questo tasto si sceglie la modalità di ventilazione. Premendo ripetutamente il tasto,
la modalità di ventilazione cambia da “normal wind” (vento normale) a “natural wind”
(vento naturale) a “sleep wind” (vento delicato) e torna poi a “normal wind”. Le tre
modalità di ventilazione presentano le seguenti caratteristiche:
1 Normal wind: in questa modalità, la velocità del ventilatore può essere regolata
su livello basso, medio e alto.
2 Natural wind: in questa modalità, la ventilazione cambia casualmente tra i diversi
livelli di velocità, proprio come il naturale comportamento del vento. La modalità
“natural wind” è dotata di tre livelli di velocità come la modalità “normal wind”.
3 Sleep wind: anche in questa modalità è possibile selezionare tre livelli di velocità.
In base al livello impostato, la velocità del vento cambia come segue:
40
• Velocità elevata: l’aria viene emessa dal dispositivo a velocità elevata per
mezz’ora. Dopo mezz’ora passa alla velocità media per un’altra mezz’ora e
inne passa al livello più basso.
• Velocità media: l’aria viene emessa dal dispositivo a velocità media per
mezz’ora e poi passa al livello più basso.
• Velocità bassa: l’aria viene emessa dal dispositivo a velocità bassa no allo
scadere del timer o no allo spegnimento del dispositivo.
Page 41
Wind Speed
Premendo questo tasto, è possibile impostare i tre livelli di velocità (alto, medio, basso).
Oscillazione
Premendo questo tasto, il ventilatore comincia a far oscillare l’aria. Premendo
nuovamente il tasto, l’oscillazione viene arrestata.
Avvertenze sull’utilizzo
• Tutte le modalità sopradescritte possono essere impostate anche dal pannello di
controllo del ventilatore. Il modo di procedere è il medesimo.
• Il ventilatore produce aria, solo se è stato premuto il tasto On/Off.
UTILIZZO DEL TELECOMANDO
• Quando si utilizza il telecomando, assicurarsi che l’estremità anteriore sia diretta al
ricevitore del ventilatore.
• Il telecomando può essere utilizzato a una distanza di 5 metri, se l’angolo non
supera i 30°.
• Evitare che i raggi solari colpiscano direttamente il ricevitore, altrimenti le sue
funzioni vengono limitate.
• Se il telecomando non viene utilizzato per lunghi periodi, togliere le pile
dall’apposito vano.
Prima di utilizzare il telecomando, inserire le pile nell’apposito vano. Il telecomando
necessita di una pila al litio. Inserirla come indicato di seguito:
IT
1. Aprire il coperchio del vano per le pile.
2. Inserire una nuova pila. Fare attenzione alla polarità della pila (+ e -).
3. Chiudere il vano per le pile.
41
Page 42
IT
PULIZIA E MANUTENZIONE
• Prima della pulizia, spegnere il dispositivo e staccare sempre la spina dalla presa
elettrica.
• Per la pulizia dei componenti elettrici (come trasformatore, motore ecc.) utilizzare
un panno pulito.
• Non utilizzare prodotti abrasivi o detergenti aggressivi, in modo da non
danneggiare la supercie. La supercie può essere pulita con un panno umido e un
po’ di detergente e in seguito asciugata con un panno asciutto.
• Non smontare o modicare il dispositivo. Si consiglia di sottoporre il dispositivo
annualmente a opere di manutenzione, in modo da prolungare la sua vita utile.
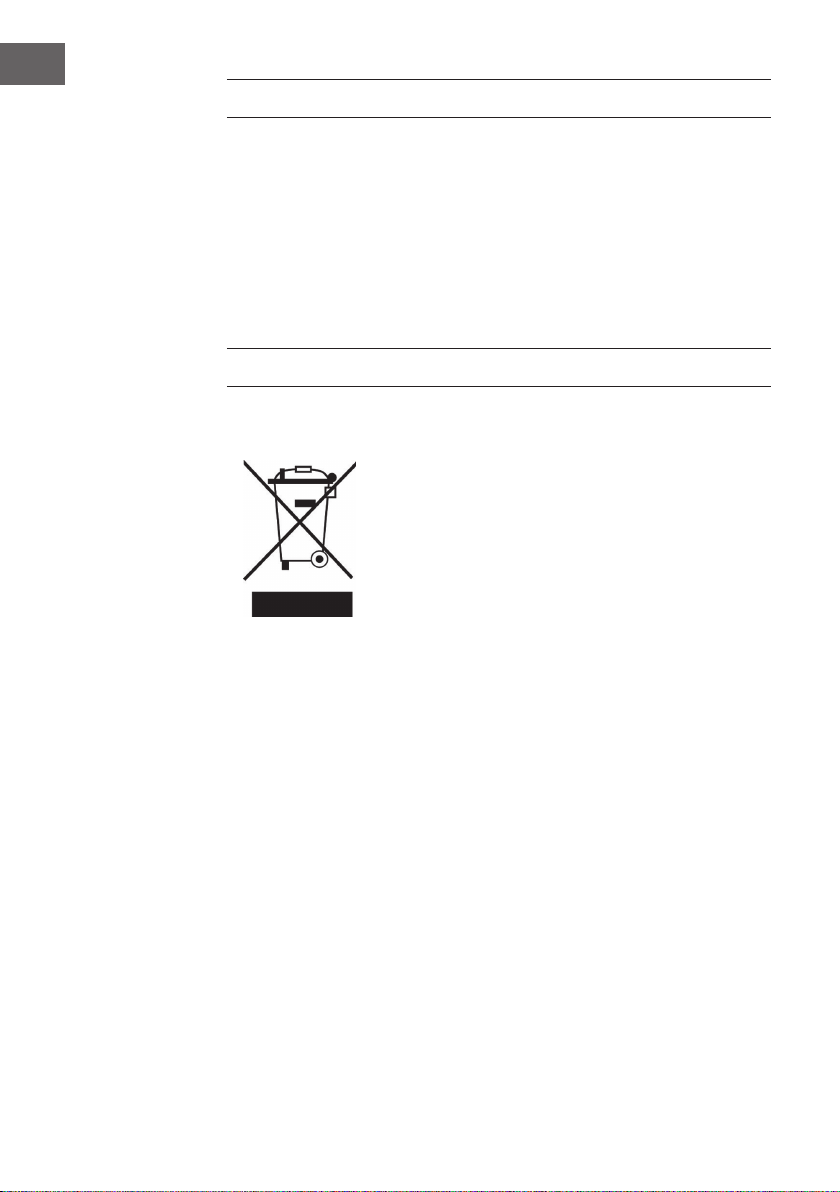
AVVISO DI SMALTIMENTO
Se sul prodotto è presente la gura a sinistra (il bidone dei
riuti con le ruote), si applica la direttiva europea 2012/19/
UE. Questi prodotti non possono essere smaltiti con i riuti
normali. Informarsi sulle disposizioni vigenti per la raccolta
di dispositivi elettrici ed elettronici. Attenersi alle disposizioni
vigenti e non smaltire i vecchi dispositivi con i riuti domestici.
Grazie al corretto smaltimento dei vecchi dispositivi si tutela
il pianeta e la salute delle persone da possibili conseguenze
negative. Il riciclo di materiali aiuta a diminuire il consumo di
materie prime.
42
Il prodotto contiene batterie che sono soggette alla direttiva
europea 2006/66/EG e non possono essere smaltite
con i normali riuti domestici. Preghiamo di informarvi sulle
regolamentazioni vigenti sullo smaltimento delle batterie.
Grazie al corretto smaltimento dei vecchi dispositivi si
tutela l’ambiente e la salute delle persone da conseguenze
negative.
Page 43

Page 44

 Loading...