

Page 1

10032101
Brotbackautomat
Bread Maker
Panicadora
Machine à pain
Macchina del pane
Page 2

Page 3
3
DE
Sehr geehrter Kunde,
wir gratulieren Ihnen zum Erwerb Ihres Gerätes. Lesen Sie die folgenden Hinweise
sorgfältig durch und befolgen Sie diese, um möglichen Schäden vorzubeugen. Für
Schäden, die durch Missachtung der Hinweise und unsachgemäßen Gebrauch
entstehen, übernehmen wir keine Haftung.
INHALTSVERZEICHNIS
Technische Daten 3
Konformitätserklärung 3
Sicherheitshinweise4
Geräteübersicht5
Anzeigen und Funktionstasten6
Inbetriebnahme7
Bedienung9
Menü und Programme10
Spezielle Funktionen12
Reinigung und Pege14
Fehlersuche und Fehlerbehebung15
Hinweise zur Entsorgung16
Anhang: Programmzeiten17
TECHNISCHE DATEN
Artikelnummer 10032101
Stromversorgung 230 V ~ 50 Hz
Leistung 650 W
KONFORMITÄTSERKLÄRUNG
Hersteller:
Chal-Tec GmbH, Wallstraße 16, 10179 Berlin, Deutschland.
Dieses Produkt entspricht den folgenden Europäischen
Richtlinien:
2014/30/EU (EMV)
2014/35/EU (LVD)
2011/65/EU (RoHS)
English
Español
Français
Italiano
Page 4

4
DE
SICHERHEITSHINWEISE
• Kinder über 8 Jahren, physisch und körperlich eingeschränkte Menschen sollten
das Gerät nur benutzen, wenn sie vorher von einer Aufsichtsperson ausführlich mit
den Funktionen und den Sicherheitsvorkehrungen vertraut gemacht wurden.
• Falls das Netzkabel oder der Stecker beschädigt sind, müssen sie vom Hersteller,
einem autorisierten Fachbetrieb oder einer ähnlich qualizierten Person ersetzt
werden.
• Fassen Sie während des Betriebs keine heißen Oberächen an. Benutzen Sie nur
die Regler. Lassen Sie das Netzkabel nicht von der Arbeitsäche hängen.
• Schließen Sie das Gerät nicht an eine externen Timer oder eine ferngesteuerte
Steckdose an.
• Reinigen Sie alle Oberäche, die in Kontakt mit Lebensmitteln kommen.
• Prüfen Sie vor der Benutzung die Spannung auf der Geräteplakette. Schließen Sie
das Gerät nur an Steckdosen an, die der Spannung des Geräts entsprechen.
• Tauchen Sie das Gerät zur Reinigung nie komplett in Wasser oder andere
Flüssigkeiten.
• Ziehen Sie den Stecker wenn sie das Gerät länger nicht benutzen, bevor Sie Teile
anbauen oder abnehmen und bevor Sie es reinigen.
• Stellen Sie das Gerät nicht in die Nähe von Herden oder Öfen.
• Bewegen Sie das Gerät sehr vorsichtig, wenn es heißes Öl oder heiße Flüssigkeiten
enthält.
• Fassen Sie während des Betriebs keine Teile an, die sich bewegen.
• Schalten Sie das Gerät nicht ein, wenn sich keine Zutaten in der Brotform benden.
• Schlagen Sie nicht auf die Brotform oder den Rand, um das Brot zu entfernen, Sie
könnten die Form beschädigen.
• Bringen Sie zuerst das Kabel am Gerät an, bevor Sie den Stecker in die Steckdose
stecken. Schalten Sie das Gerät zuerst aus, bevor Sie den Stecker später wieder
aus der Steckdose ziehen.
• Schalten Sie das Gerät nicht ein, wenn sich die Brotform nicht im Gerät bendet,
andernfalls könnte das Gerät beschädigt werden.
Page 5
5
DE
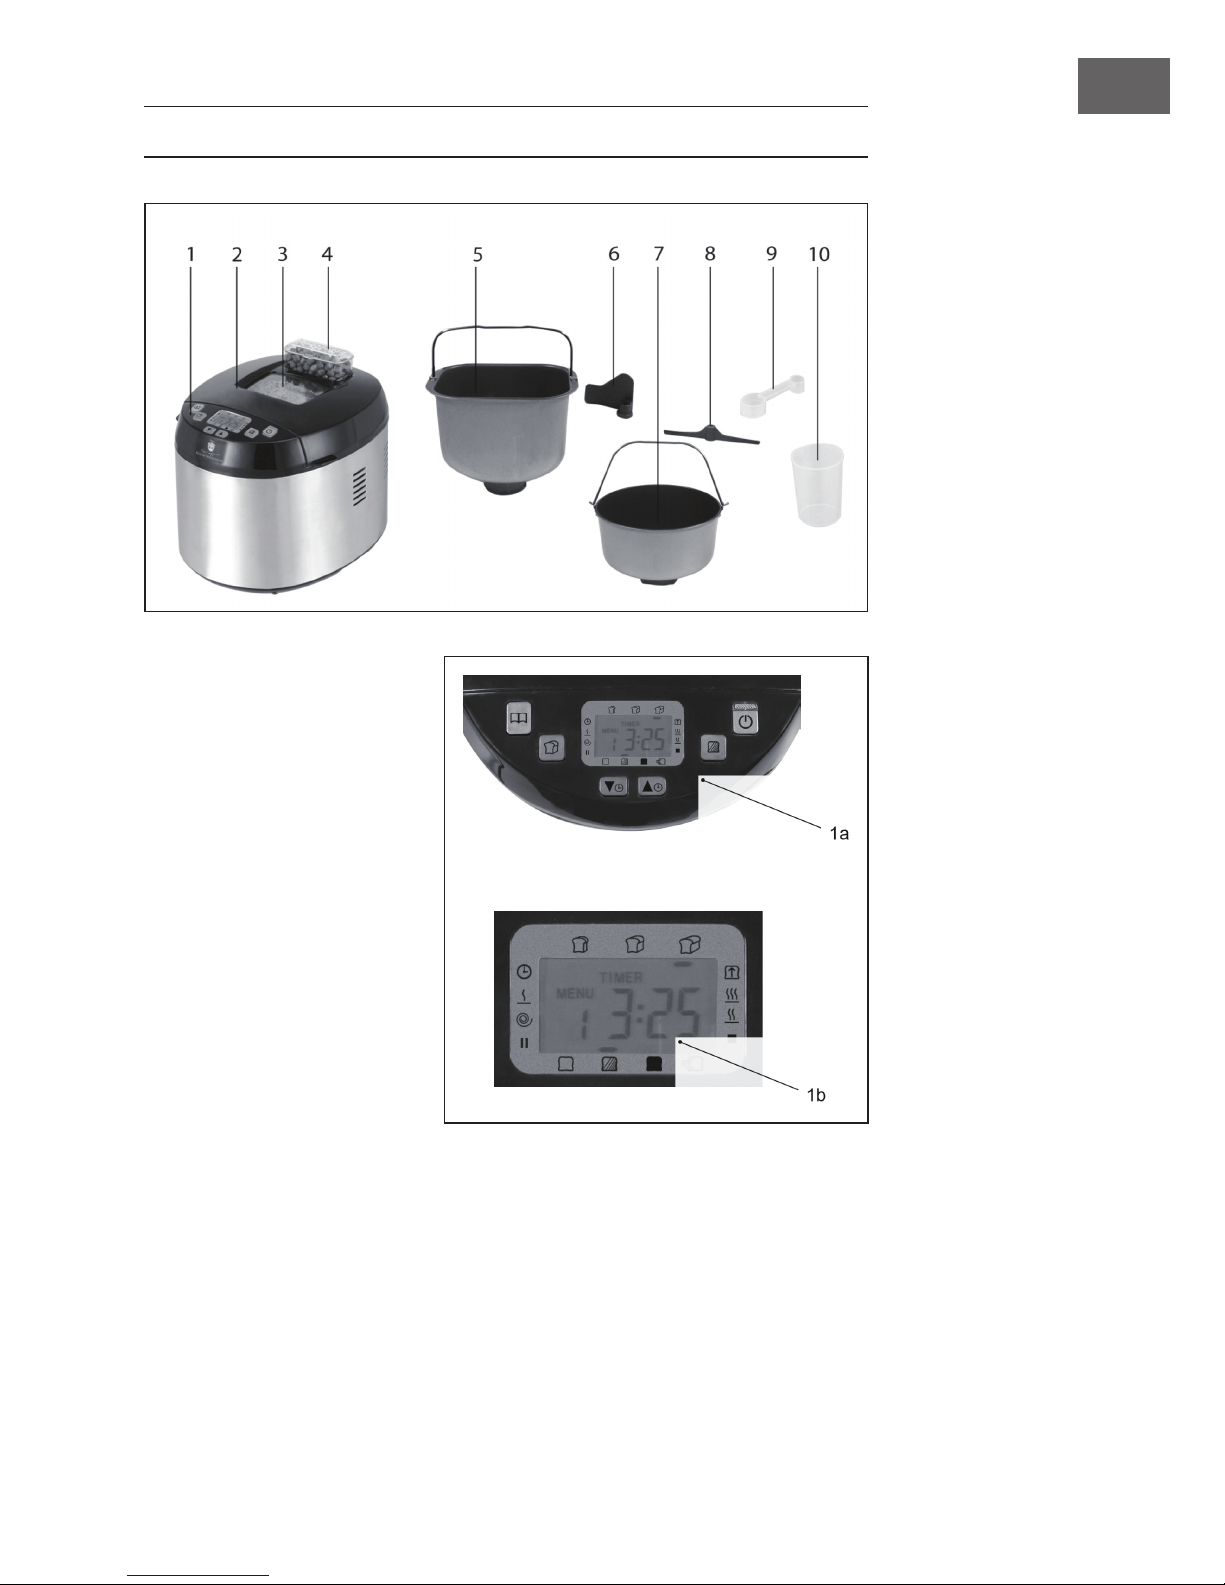
GERÄTEÜBERSICHT
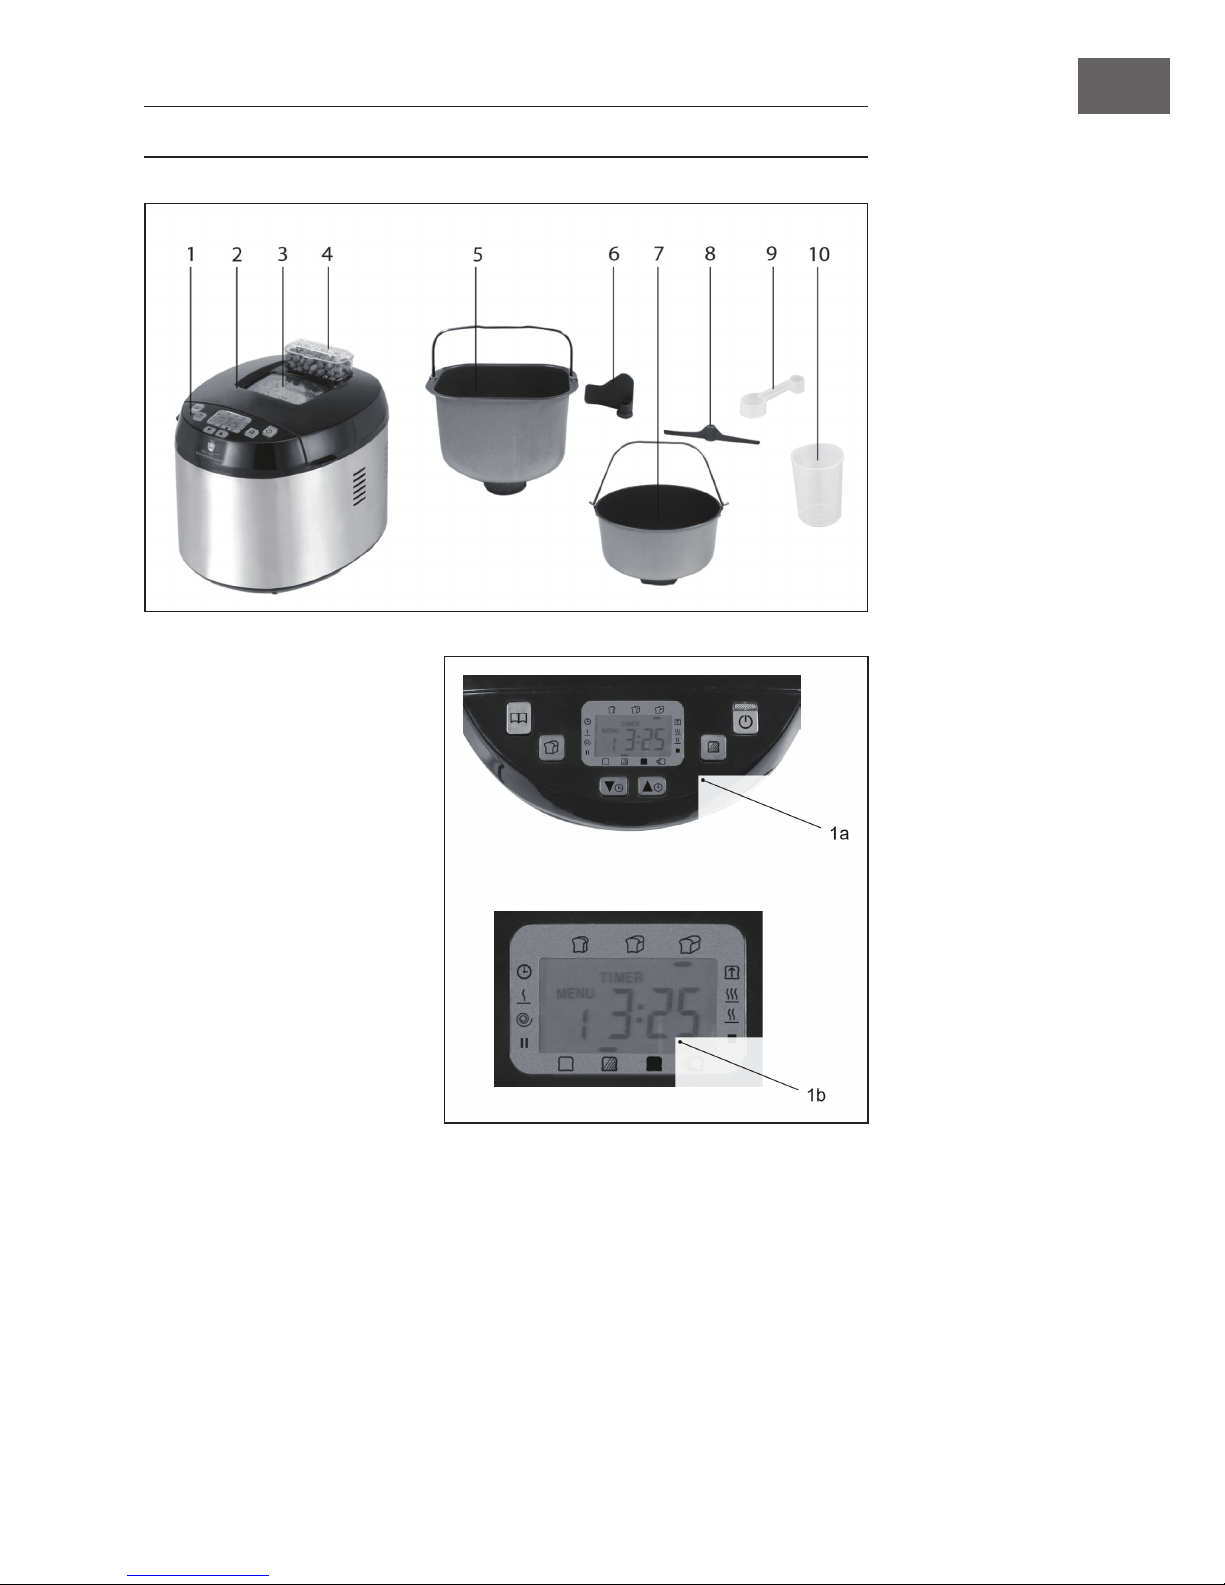
1 Bedienfeld und Display
2 Deckel
3 Fenster
4 Zutatenspender
5 Brotbackform
6 Knethaken
7 Kuchenbackform
8 Rührhaken
9 Messlöffel
10 Messbecher
Page 6
6
DE
ANZEIGEN UND FUNKTIONSTASTEN
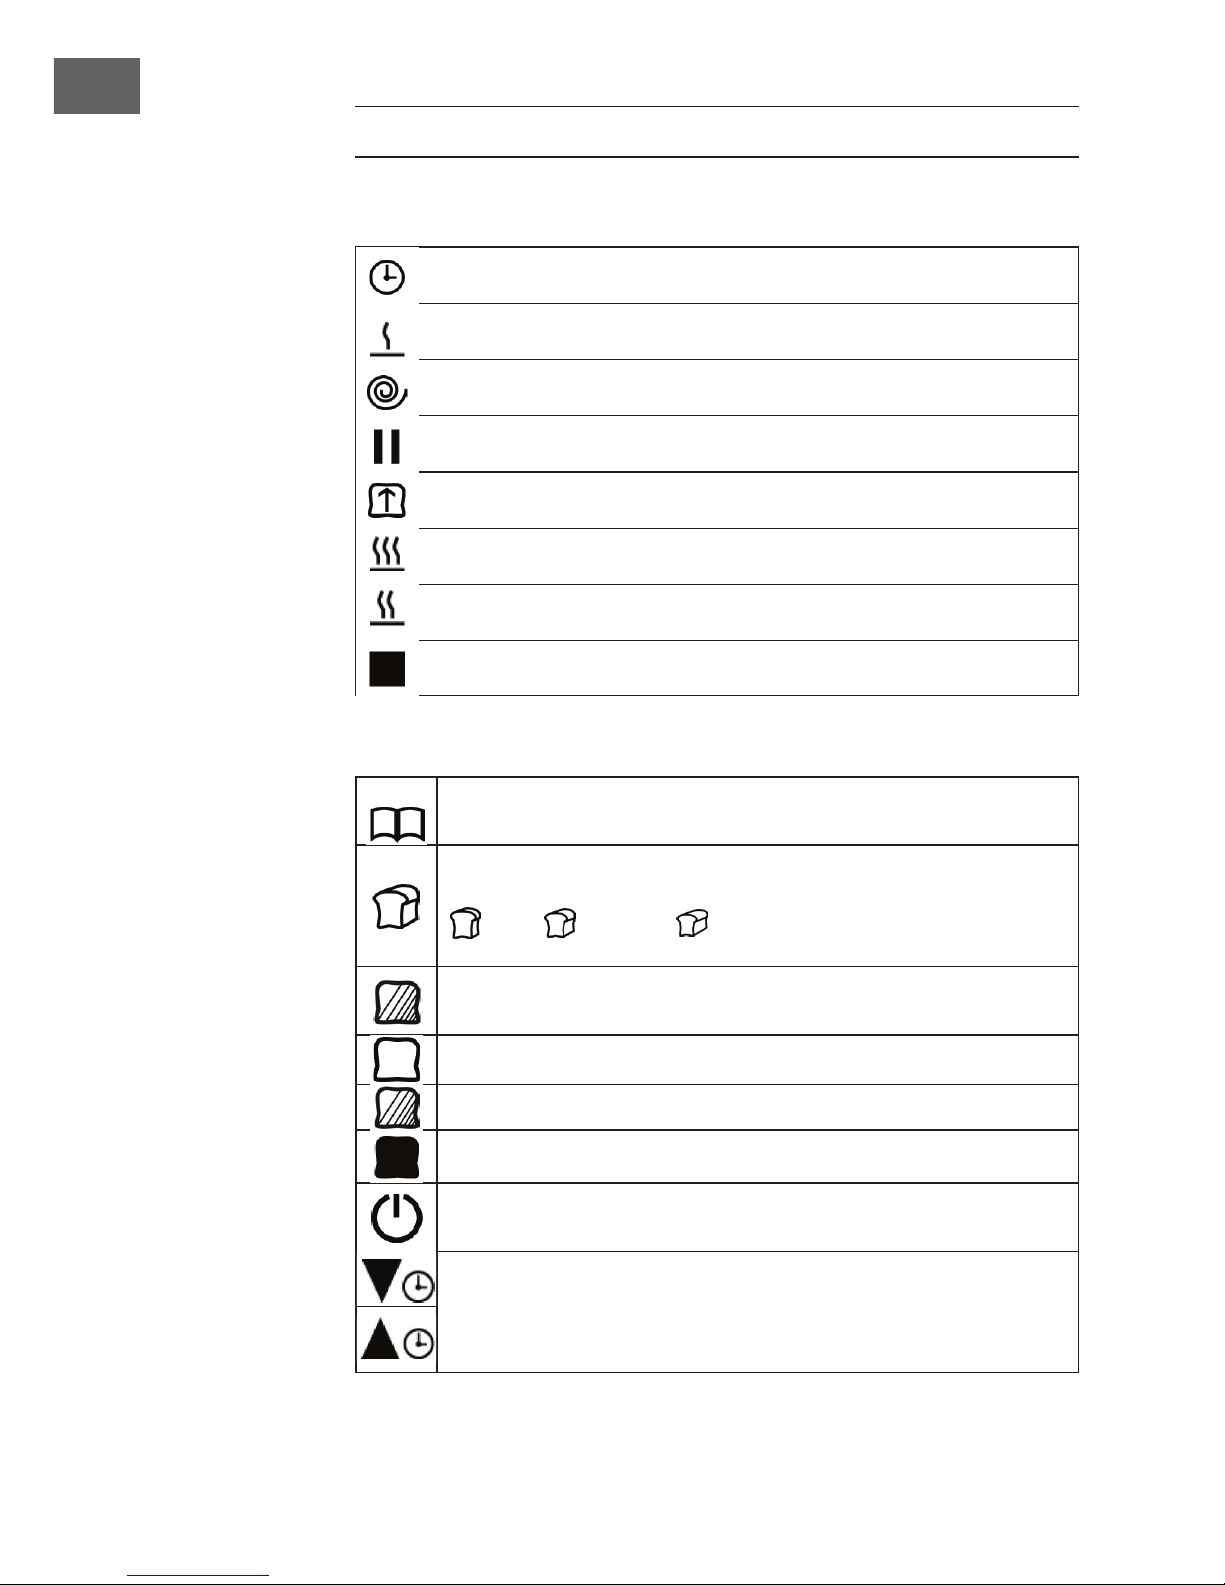
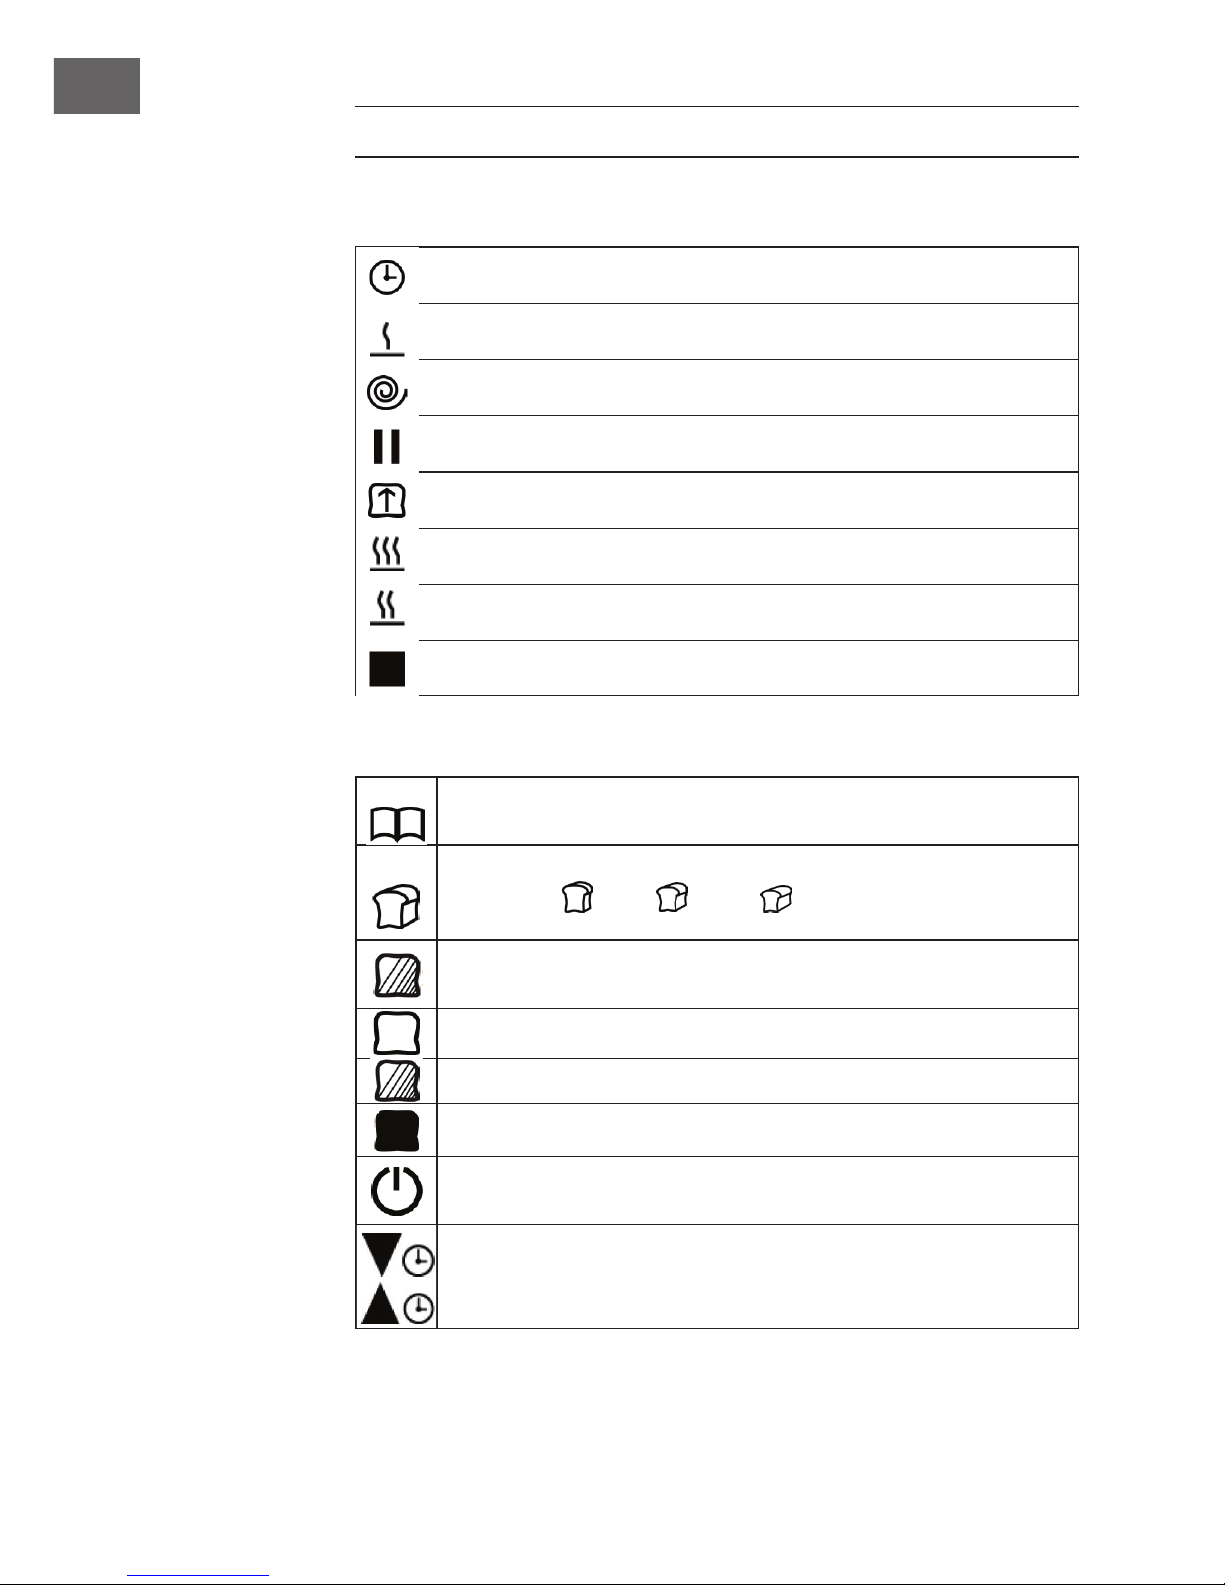
Anzeigen und Backphasen
Timer
Das Gerät heizt vor
Teig wird geknetet
Teig ruht
Teig geht auf
Der Teig wird gebacken
Das fertige Produkt wird warmgehalten
Programmende
Funktionstasten
MENÜ: Benutzen sie diese Taste, um eines von 12 Programmen
auszuwählen. Das eingestellte Programm erscheint im Display (MENU 1-12).
GEWICHT: Benutzen Sie diese Taste, um das Gewicht des fertigen Brotes
einzustellen. Sie können zwischen verschiedenen Gewichten wählen:
450g, 680g oder 900g. Das eingestellte Gewicht wird im
Display unterstrichen dargestellt.
BRÄUNUNGSGRAD: Benutzen Sie diese Taste, um den Bräunungsgrad
für die Programme 1-4 einzustellen.
Bräunungsgrad: Leichte Bräunung
Bräunungsgrad: Mittlere Bräunung
Bräunungsgrad: Starke Bräunung
START/STOP: Benutzen Sie diese Taste, um das eingestellte Programm zu
starten. Um das Programm anzuhalten, halten Sie die Taste gedrückt.
TIMER: Drücken Sie diese Tasten, um den Timer in 10-Minuten-Schritten zu
verringern oder zu erhöhen. Wenn der Backprozess beendet ist, erscheint
die eingegebene Zeit. Die Maximal maximal einstellbare Zeit beträgt 15
Stunden.
Page 7
7
DE
Beispiel: Der Timer zeigt 6:30 an. Das bedeutet, dass der Backprozess in 6 Stunden
und 30 Minuten beendet sein wird. Wenn Sie das Programm mit der Start-Taste
starten, zählt der Timer herunter. Ein Pfeil auf der rechten oder linken Seite des
Displays zeigt die aktuelle Backphase an. Nach 6 Stunden und 30 Minuten ist das
Brot fertig gebacken.
INBETRIEBNAHME
Vor dem ersten Gebrauch
• Entfernen Sie da komplette Verpackungsmaterial.
• Reinigen Sie das Gerät und alle Teile, die in Kontakt mit Lebensmitteln kommen.
Genaue Hinweise zur Reinigung nden Sie im Kapitel Reinigung und Pege.
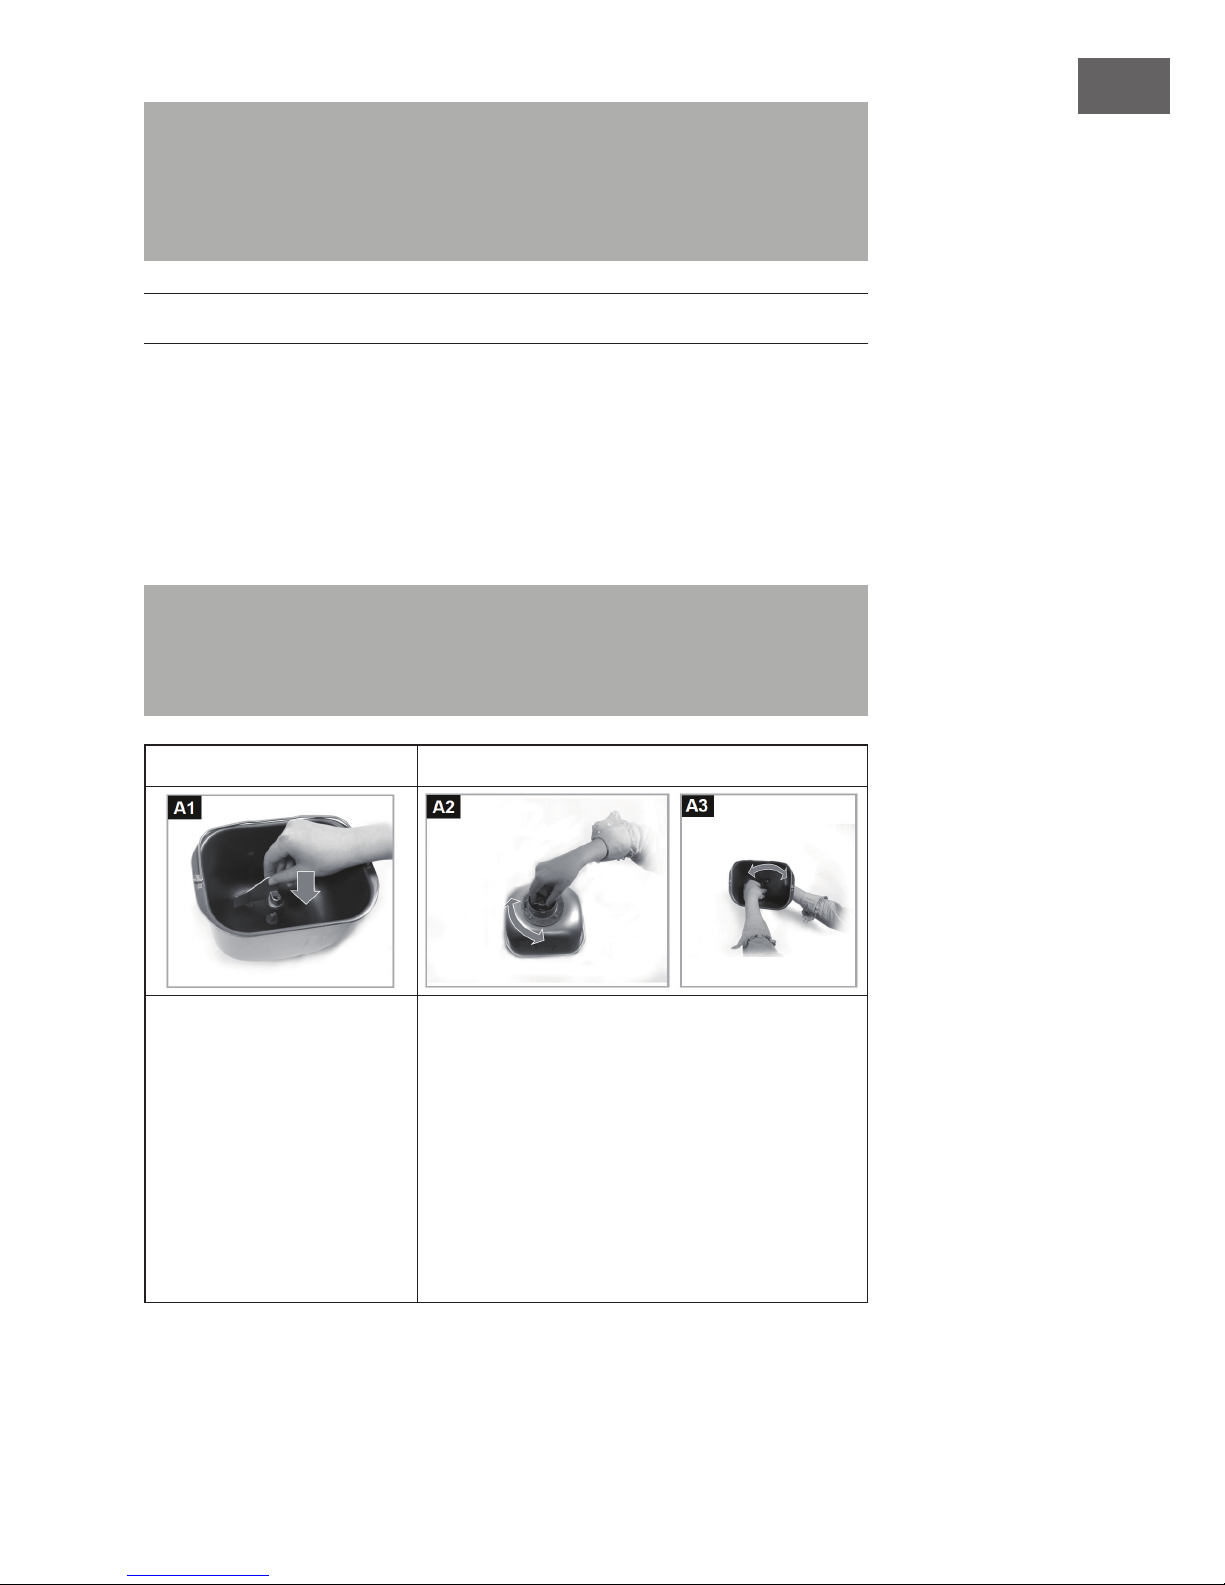
Knethaken einsetzen und entfernen
Hinweis: Der Begriff „Backform“ wird in dieser Anleitung sowohl für die
Brotbackform, als auch für die Kuchenbackform benutzt. Um die Lesbarkeit zu
verbessern, wird die Verwendung beider Formen bewusst vermieden. Eine spezische
Backform wird nur erwähnt, wenn Sie erforderlich ist.
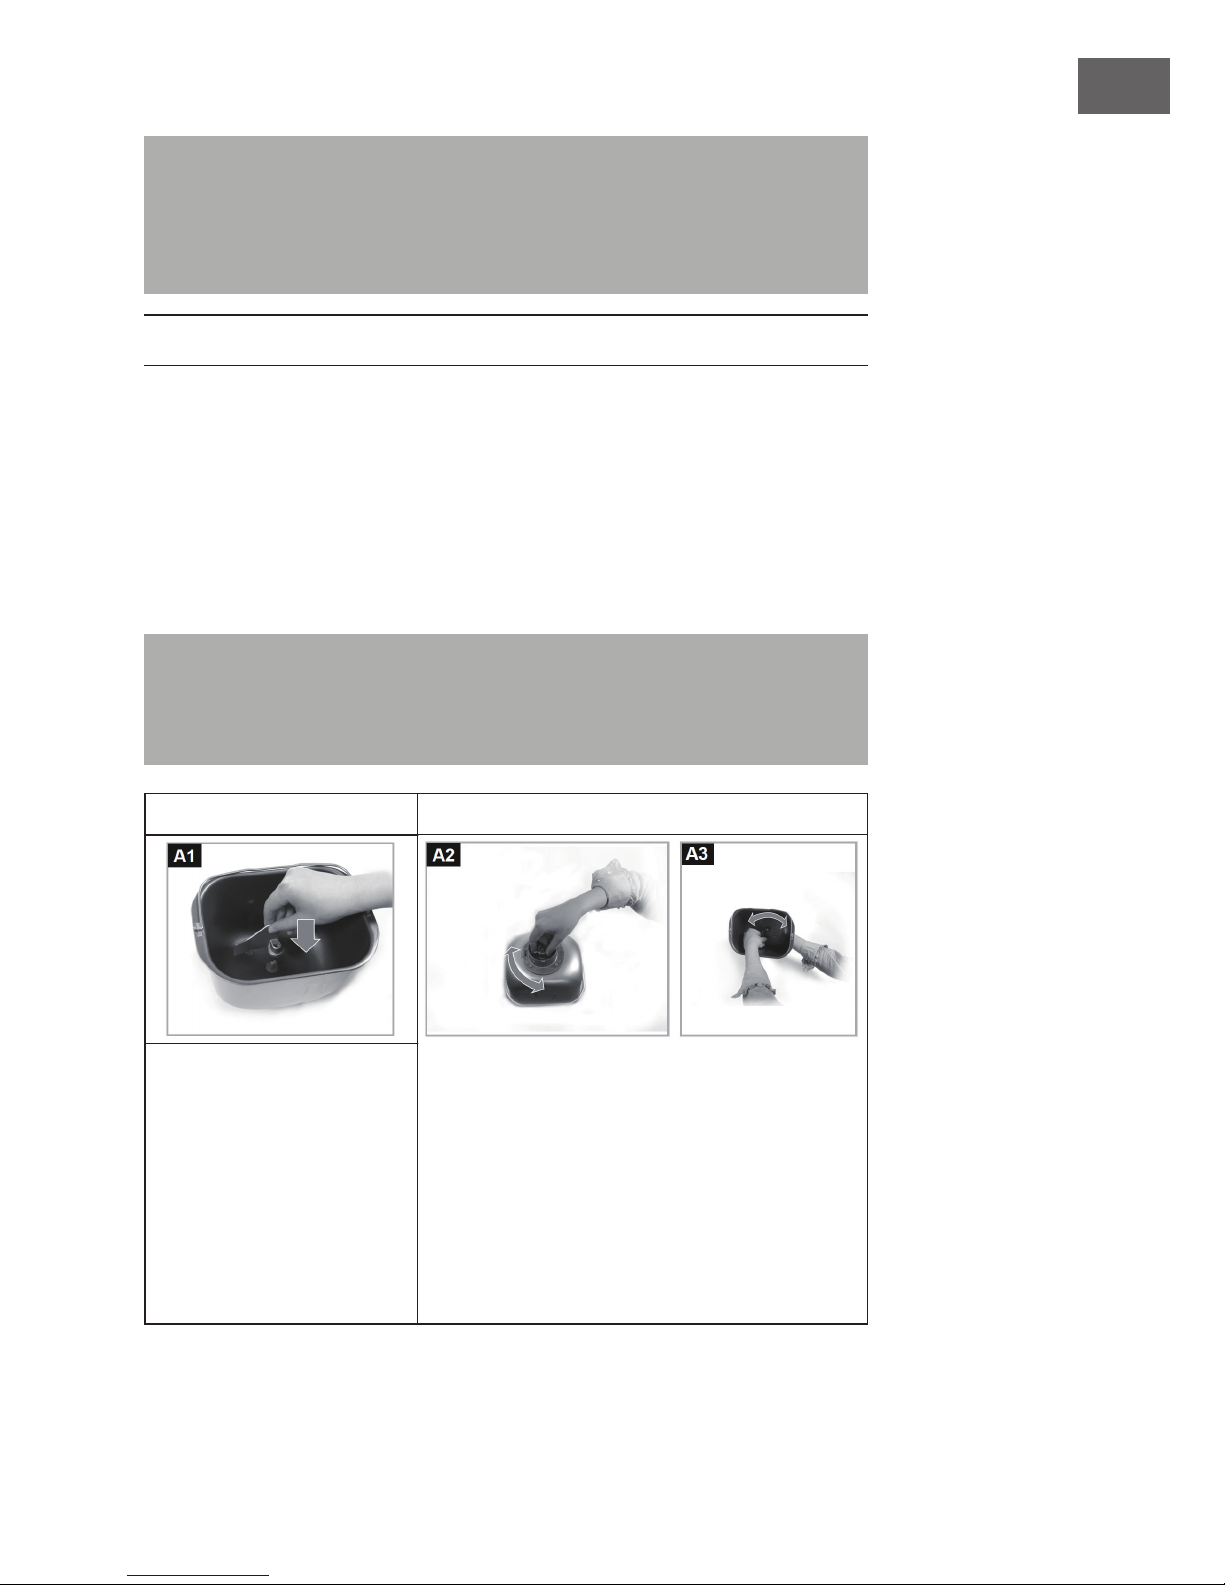
Einsetzen Entfernen
Drücken Sie den Knethaken
oder Rührhaken auf die
Motorspindel in der Mitte der
Backform. Haken und Spindel
sind an einer Seite ach und
passen nur aufeinander,
wenn diese Seiten aneinander
ausgerichtet werden. Die
Motorspindel ist mit einer
Flügelmutter unten an der
Backform befestigt.
Halten Sie die Flügelmutter an der Unterseite
mit einer Hand und den Haken mit der anderen
Hand fest. Ziehen Sie den Haken mit einer leichten
Drehbewegung von der Spindel, während Sie die
Flügelmutter in die andere Richtung drehen.
Page 8
8
DE
Hinweis: Sie können den Haken nach dem letzten Knetvorgang im gewählten
Backprogramm entfernen, so dass nach dem Backen kein Loch im Brot zurückbleibt.
Besprenkeln Sie Ihre Hände mit ein wenig Mehl und heben Sie den Teig an, damit Sie
den Haken entfernen können.
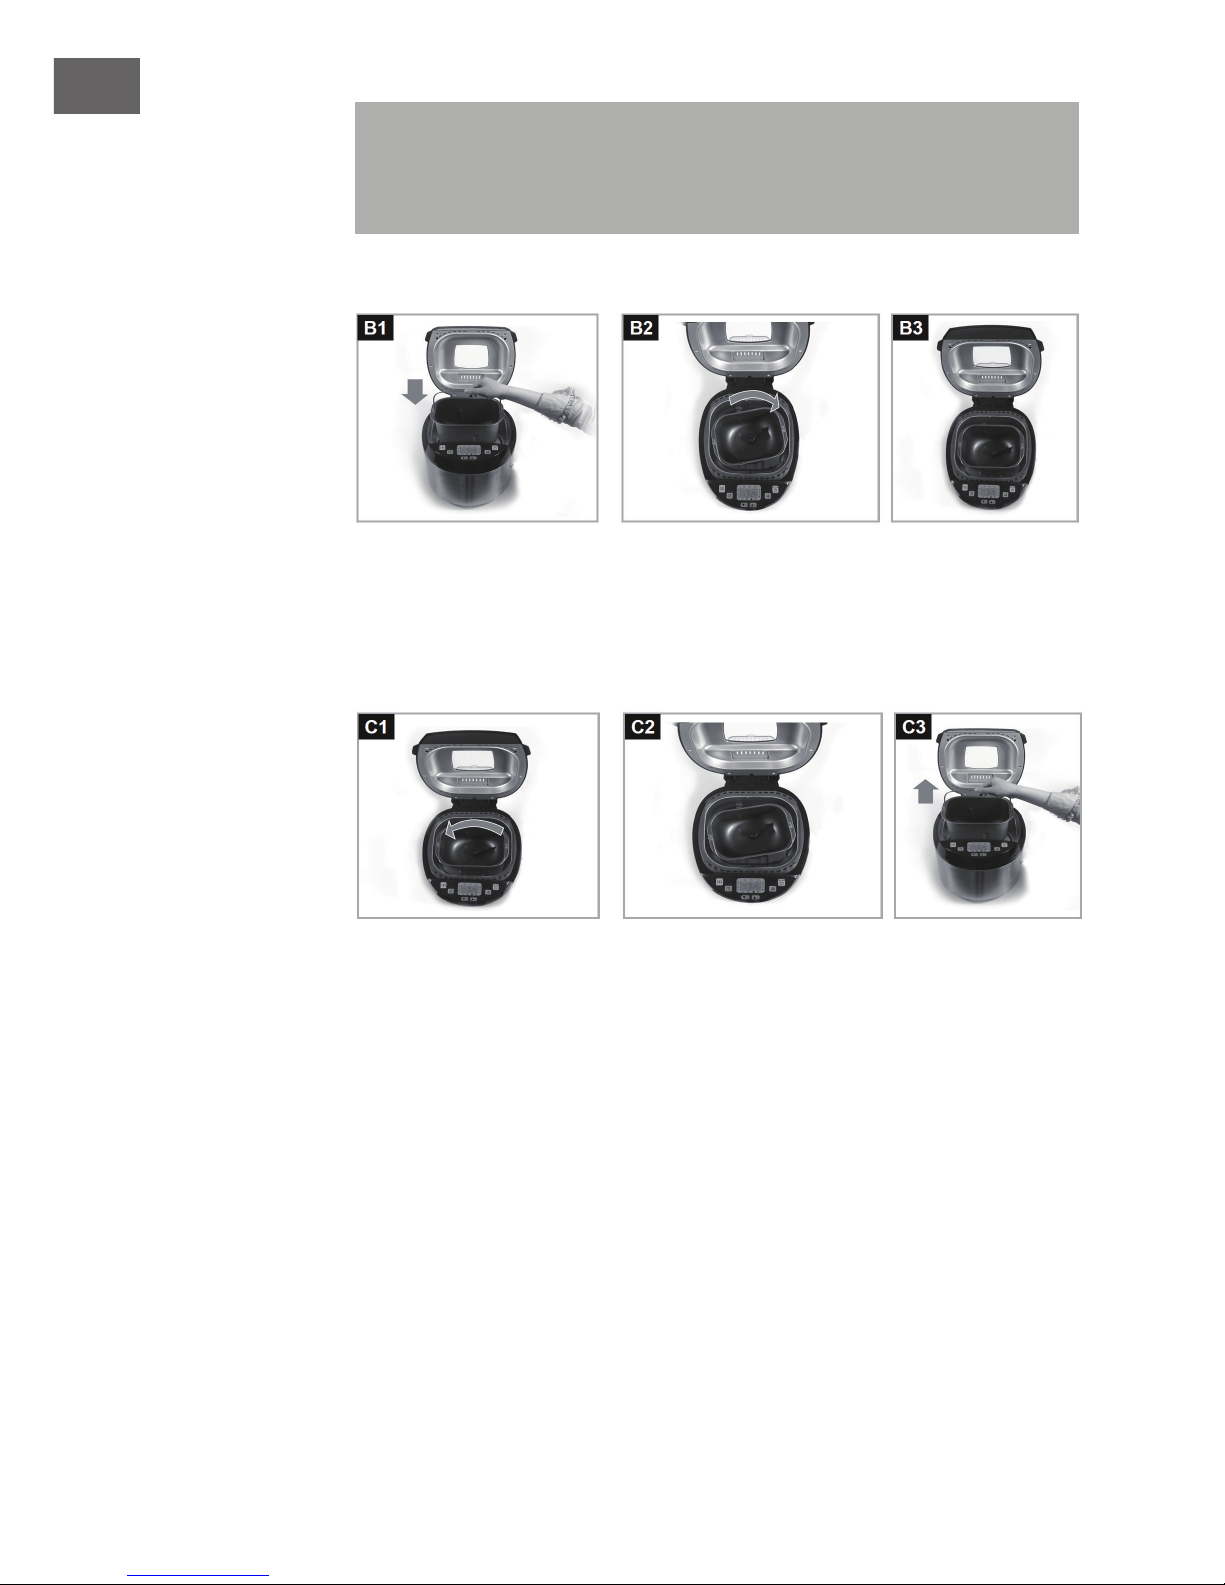
Backform einsetzen
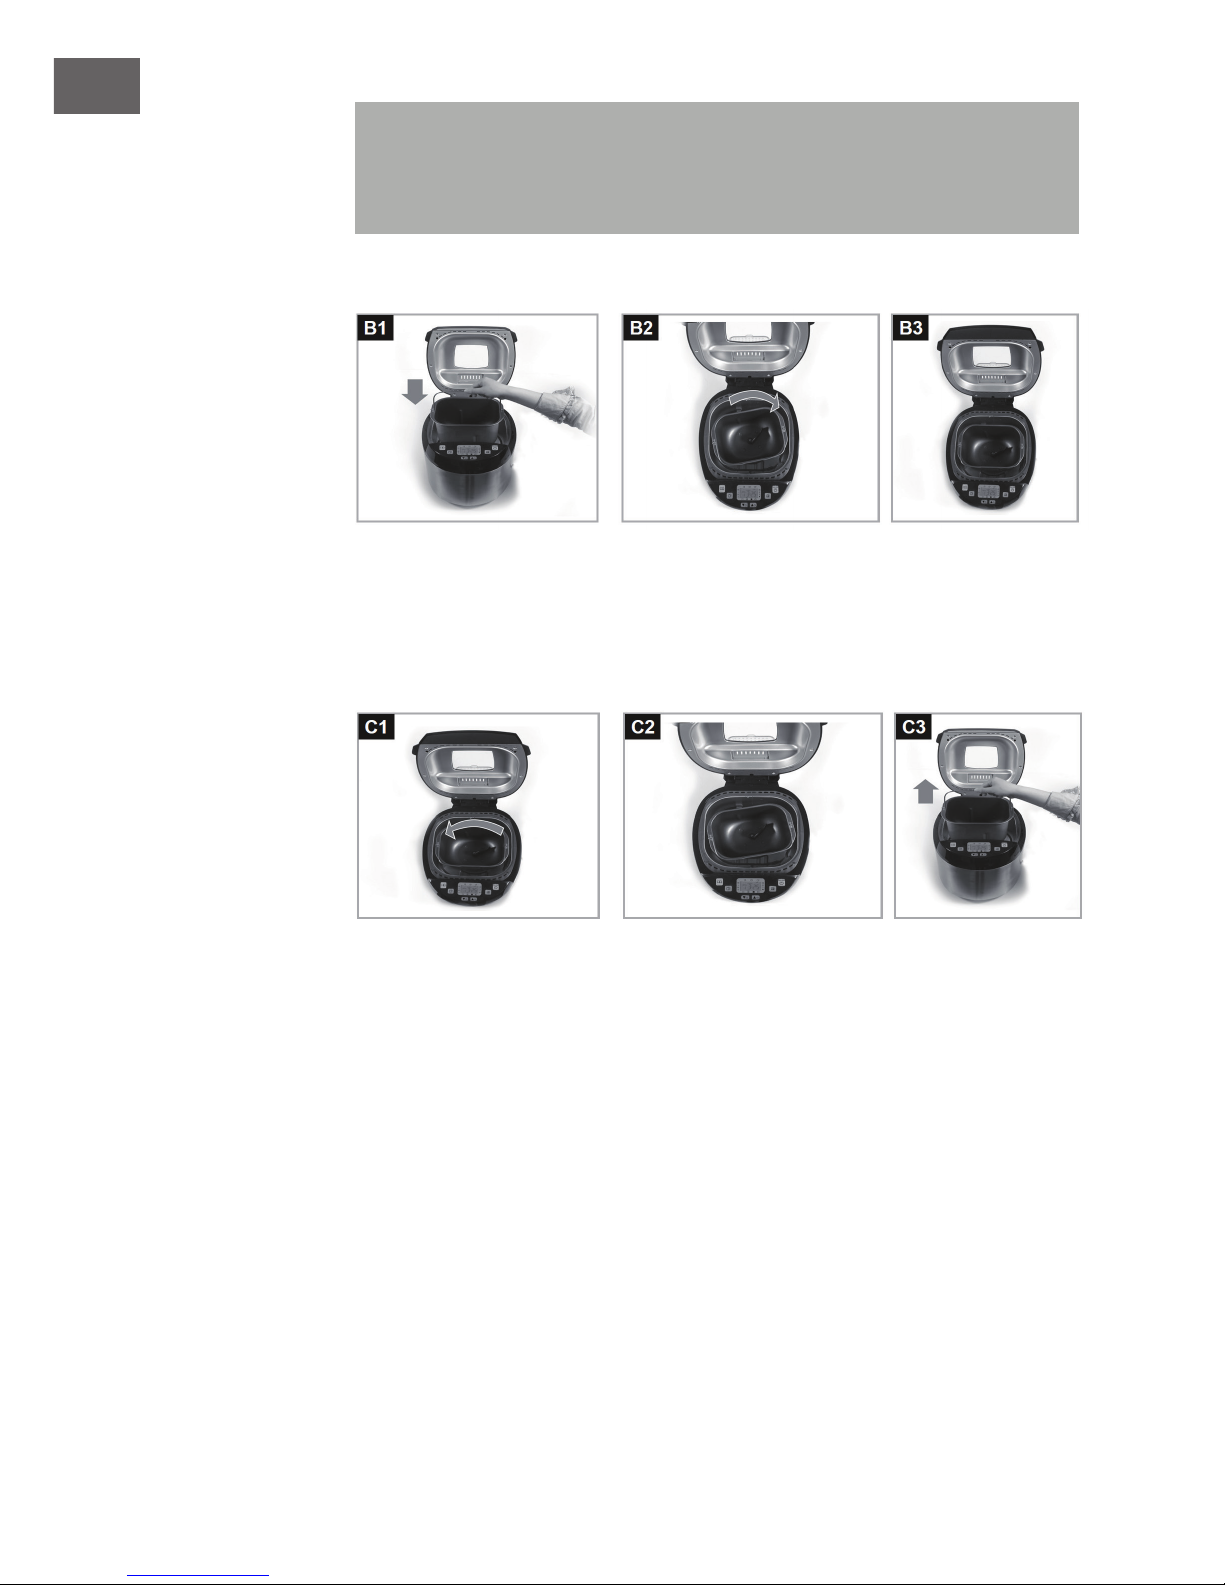
Setzen Sie zuerst den Haken auf die Spindel in der Backform. Drehen Sie die Backform
leicht und setzen Sie sie in das Gerät ein. Drehen Sie die Form im Uhrzeigersinn, bis sie
einrastet und fest sitzt.
Backform entfernen
Öffnen Sie den Deckel. Halten Sie die Backform am Griff fest und drehen Sie sie gegen
den Uhrzeigersinn, bis es nicht mehr weitergeht. Heben Sie die Backform aus dem
Gerät.
Page 9

9
DE
BEDIENUNG
Allgemeine Bedienung
1 Nehmen Sie die Backform aus dem Gerät und befestigen Sie den benötigten
Haken auf der Motorspindel in der Backform.
2 Geben Sie die entsprechende Menge Backzutaten in die Backform. Halten Sie sich
dabei genau an Ihr Rezept oder an die Anleitung der Fertigbackmischung.
Tipp: Benutzen Sie zu Abmessen der Backzutaten den mitgelieferten Messbecher
oder den Messlöffel. Wenn Sie Flüssigkeiten abmessen, stellen Sie den Becher auf
einen ebenen Untergrund und blicken Sie auf Höhe des Bechers auf die Skala.
3 Befestigen Sie die Backform im Gerät.
4 Schließen Sie den Deckel.
5 Stecken Sie den Stecker in die Steckdose.
6 Drücken Sie auf die MENÜ-Taste und wählen Sie ein Backprogramm aus.
7 Drücken Sie auf die GEWICHT-Taste und wählen Sie das gewünschte Brotgewicht.
8 Drücken Sie auf die BRÄUNUNGSGRAD-Taste und wählen Sie den gewünschten
Bräunungsgrad der Brotkruste aus.
9 Falls der Backprozess verzögert starten soll, drücken Sie auf die TIMER-Tasten und
stellen Sie ein, wann das Brot fertig sein soll.
10 Drücken Sie auf die START/STOP-Taste, um das Programm zu starten.
Hinweis: Sobald Sie das Programm mit der START/STOP-Taste gestartet haben, sind
alle Tastenkombinationen gesperrt.
Das Gerät beginnt nun den Teig entsprechend dem gewählten Programm zu verarbeiten.
Ein Pfeil auf der rechten oder linken Seite des Displays zeigt die aktuelle Backphase an.
Hinweis: Wenn Sie das Programm komplett abbrechen möchten, halten Sie die
START/STOP-Taste mindestens 2 Sekunden lang gedrückt.
Wenn die Backzeit abgelaufen ist ertönt ein Signal und die Warmhalte-Phase beginnt
(gilt nur für die Programme 1-6, 10 und 11).
Während der Warmhaltephase können Sie jederzeit die Backform entnehmen. Verlassen
Sie das Programm, indem Sie die START-STOP-Taste mindestens 2 Sekunden lang
gedrückt halten. Ziehen Sie dann den Stecker aus der Steckdose und entnehmen Sie die
Form mit Ofenhandschuhen. Lassen Sie das Brot abkühlen, bevor Sie es anschneiden.
Page 10
10
DE
Wichtige Hinweise zum Knethaken
• Entfernen Sie den haken aus dem Brotlaib. Bevor Sie das Brot anschneiden.
• Sie können den Haken nach dem letzten Knetvorgang im gewählten
Backprogramm entfernen, so dass nach dem Backen kein Loch im Brot zurückbleibt.
Besprenkeln Sie Ihre Hände mit ein wenig Mehl und heben Sie den Teig an, damit
Sie den Haken entfernen können.
MENÜ UND PROGRAMME
Drücken Sie auf die MENÜ-Taste, um eines der folgenden 12 programme auszuwählen:
Menü 1: Basisprogramm
Für Mischbrot. Es können verschiedenen Zutaten, wie Kürbiskerne, Schinkenwürfel oder
Röstzwiebeln hinzugegeben werden. Dieses Programm wird in der Regel am häu gsten
verwendet.
Menü 2: Weißbrot
Für helles Brot aus Weizenmehl mit einer knusprigen Kruste.
Menü 3: Vollkornbrot
Wählen Sie dieses Programm wenn Sie Brote mit Vollkornweizenmehl backen. Das
programm beginnt mit Vorheizen, damit die Zutaten vor dem Kneten leicht erwärmt
werden.
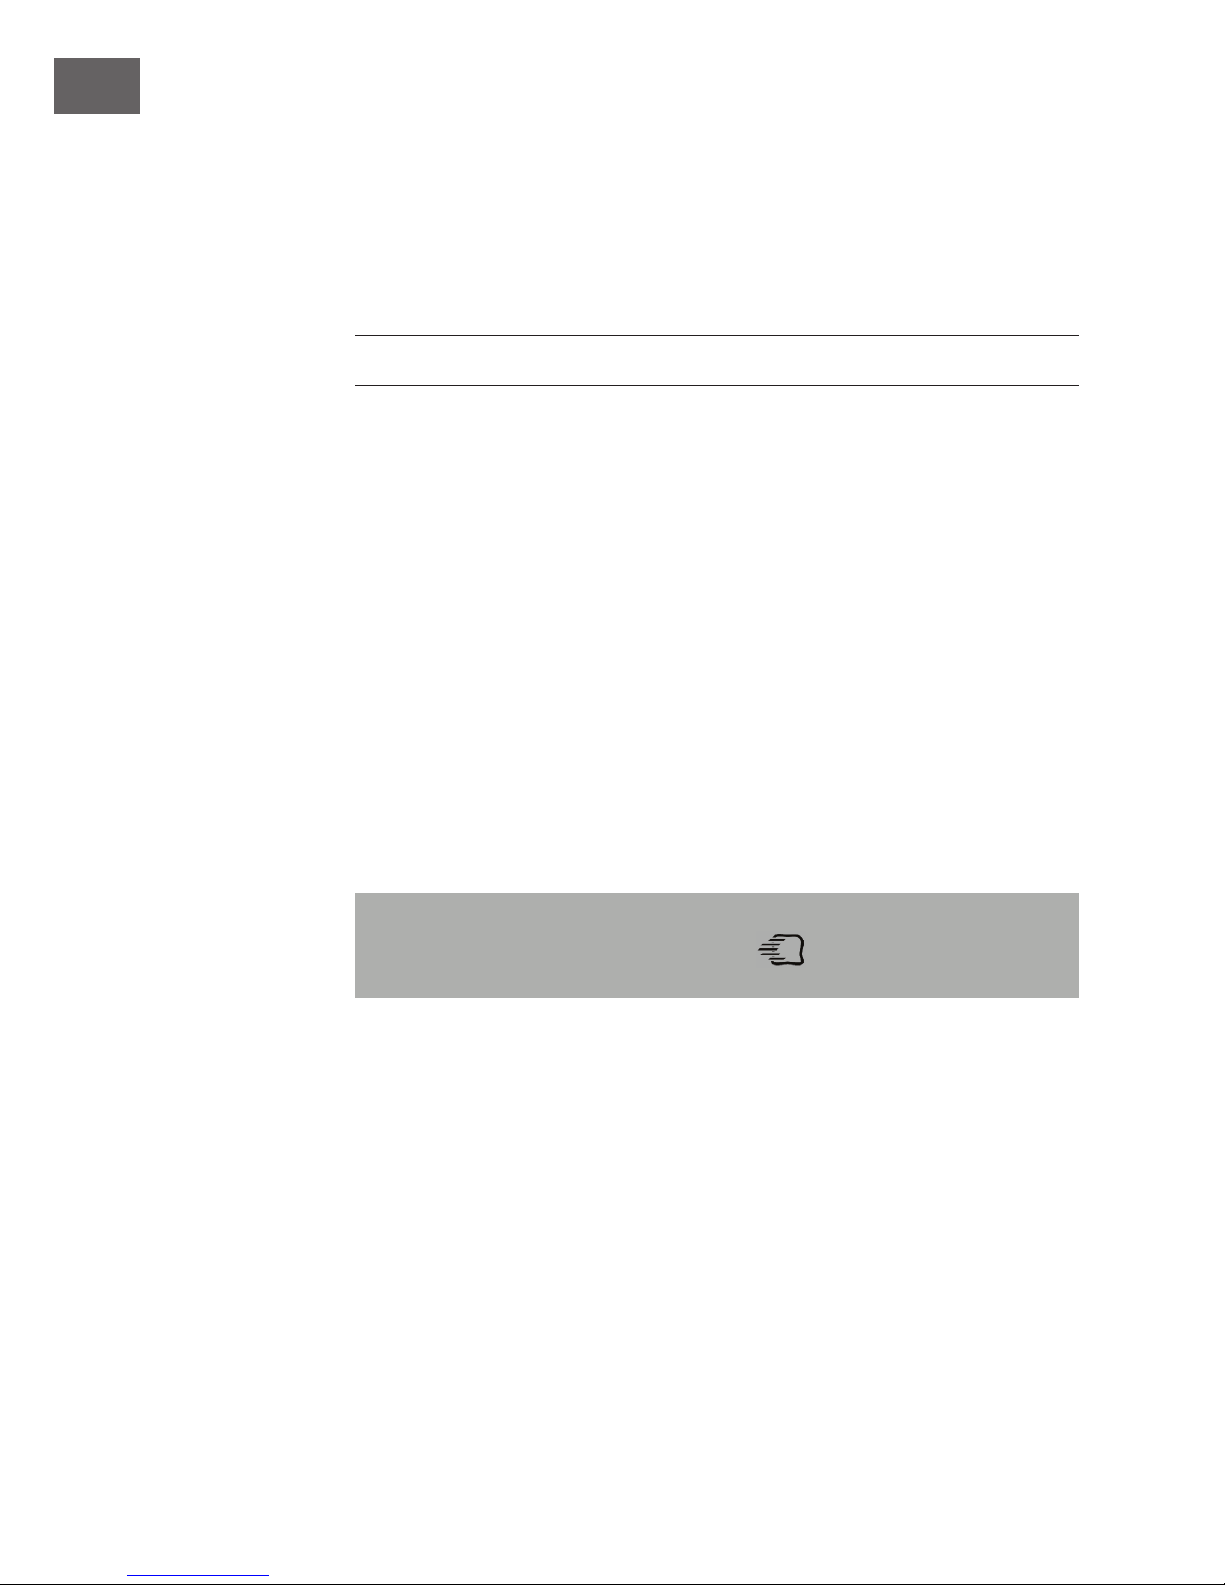
Hinweis: Um die Programme 1-3 zu verkürzen, benutzen Sie die
BRÄUNUNGSGRAD-Taste, um die Einstellung
auszuwählen. Verwenden Sie
in diesem Fall lauwarmes Wasser.
Menü 4: Süßes Brot
Das Programm (Süß) eignet sich für Rezepte, die etwas mehr Fett und Zucker enthalten
oder Zutaten wie Schokolade, Rosinen oder Nüsse.
Menü 5: Kurzbackprogramme
Dieses Programm erlaubt es die Backzeit für Mischbrot und Weißbrot zu verkürzen.
Die Backzeit für Mischbrot (Menü 1) beträgt 3:25 Stunden, mit Menü 5 aber nur 1:20
Stunden. In Programm 5 wird die Ruhezeit verkürzt, daher müssen die Flüssigkeiten vor
dem Beginn aufgewärmt werden, da der Teig mit kalter Flüssigkeit nicht aufgeht. Die
Flüssigkeit sollte aber nicht zu heiß wein, andernfalls kann die Hefe nicht reagieren.
Page 11

11
DE
Menü 6: Glutenfreies Brot
Zum Backen von Broten mit glutenfreiem Mehl oder glutenfreien Backmischungen.
Menü 7: Pizzateig
Zum Kneten von Pizzateig. Geben Sie alle Zutaten in die Backform und das Gerät
produziert einen geschmeidigen Pizzateig. Sie brauchen den Teig nur noch ausrollen
und die Pizzazutaten darauf zu verteilen.
Menü 8: Nudelteig
Das Gerät produziert innerhalb kurzer Zeit einen geschmeidigen Nudelteig.
Menü 9: Marmelade
Mit diesem Programm können Sie verschiedene Arten von Marmelade produzieren. Sie
müssen die Marmelade dann nur noch in Gläser füllen.
Menü 10: Backen ohne Kneten und Reis kochen
Für backfertigen Teig. Der Teig wird in diesem Programm nicht geknetet. Das Programm
eignet sich ebenfalls zum Reiskochen: Geben Sie einen Teil Reis und 2 Teile Wasser
in die Backform. Benutzen Sie die TIMER-Tasten (Pfeile), um die gewünschte Zeit
einzustellen. Sie können das Programm jederzeit unterbrechen, indem Sie die START/
STOP-Taste mindesten 2 Sekunden lang gedrückt halten.
Menü 11: Kuchen
Zum Kuchenbacken. Benutzen Sie für dieses Programm die Kuchenbackform und den
Rührhaken.
Menü 12: Risotto
Benutzen Sie diese Programm, um Risotto in der Brotbackform zu kochen. Setzen Sie den
Rührhaken in die Brotbackform ein und starten Sie Programm 12. Während der ersten Phase
werden die Zwiebeln und der Reis gebräunt. Nachdem die Phase abgeschlossen wird ertönt
ein Signalton. Geben Sie dann die Brühe hinzu und lassen Sie das Programm laufen.
Hinweis: Achten Sie auf die Zutatenmengen, die auf der Risottopackung angegeben
sind. Wir empfehlen Ihnen 3 Teile Brühe auf 1 Teil Reis. Nachdem das Programm
abgelaufen ist, können Sie das Risotto mit Wein Butter und Parmesan verfeinern.
Geben Sie diese Zutaten aber erst nach Programmende hinzu.
Page 12
12
DE
SPEZIELLE FUNKTIONEN
Timer einstellen
Hinweis: Der Timer kann für alle Programme, bis auf Programm 10 und 12 gestellt
werden. In Programm 10 wird mit den TIMER-Tasten (Pfeile) die Backzeit / Kochzeit
eingestellt (1:10, 1:20, 1:30).
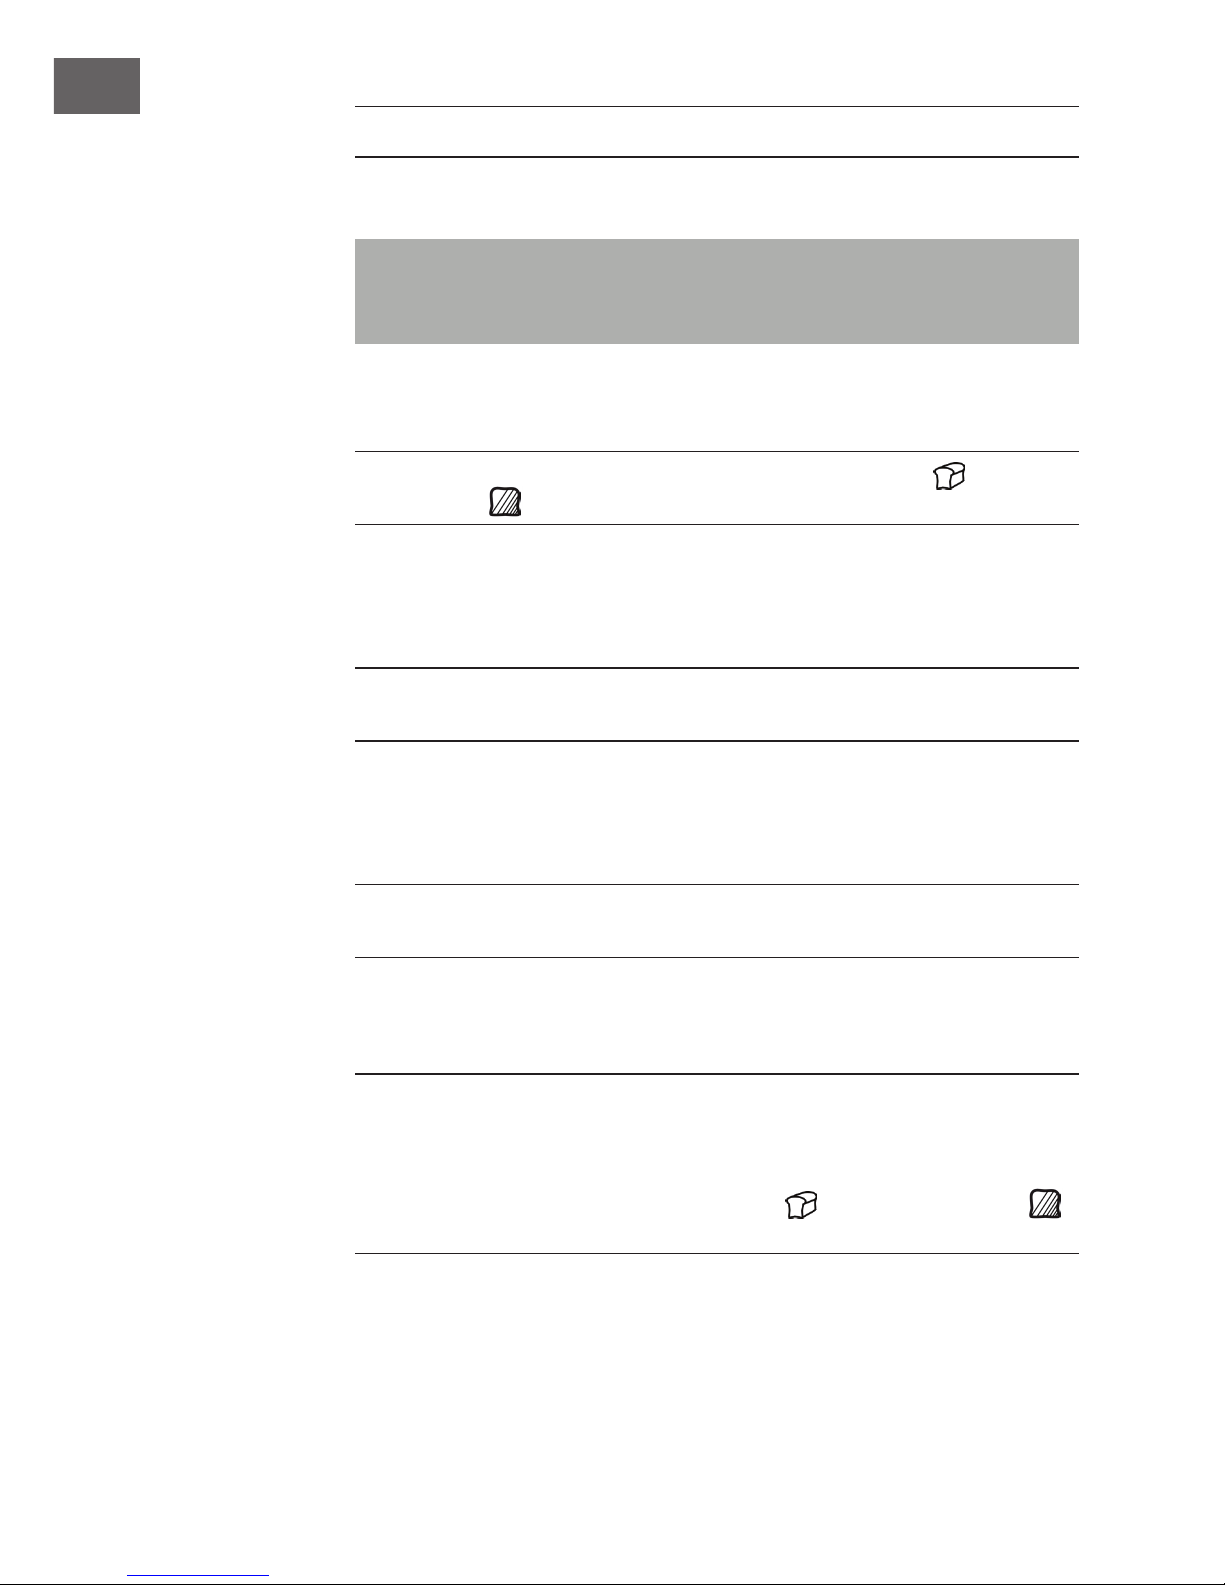
1 Drücken Sie auf die MENÜ-Taste, die GEWICHT-Taste und die
BRÄUNUNGSGRAD-Taste und stellen Sie die gewünschten Werte ein.
Im Beispiel wurden folgende Werte ausgewählt: Menü 1, Brotgewicht
(900g) und
Bräunungsgrad (mittel). Die angezeigte Backzeit auf dem Display beträgt [3:25].
2 Benutzen Sie die TIMER-Tasten, um die verzögerte Startzeit einzustellen. Mit jedem
Tastendruck wird die Zeit in 10-Minuten-Schritten angepasst. Der Timer kann auf
maximal 15 Stunden (inklusive Backzeit) eingestellt werden.
Beispiel: Mit jedem Tastendruck wird die Zeit erhöht: 3:35 (voreingestellt) > 3:40 > 3:50 >
4:00 > etc. Falls das Brot in 6 Stunden fertig sein soll, geben Sie 6:00 ein.
3 Starten Sie das Programm, indem Sie auf START/STOP drücken. Der Doppelpunkt
der Zeitanzeige beginnt zu blinken und das Programm startet so, dass das Brot zu
der von Ihnen eingestellten zeit fertig gebacken ist.
Beispiel: Die angezeigte Zeit im Display beträgt [6:00] und wird heruntergezählt. Wenn
die Zeit bei [3:25] angelangt ist startet das Programm automatisch.
4 Nachdem die Zeit abgelaufen und das Brot fertig gebacken ist, können Sie die
Backform aus dem Gerät nehmen.
Beispiel: Nach 6 Stunden ist das Programm komplett durchgelaufen und das Brot
fertig. Das Display zeigt [00:00] an und die Warmhaltephase beginnt. Sie können
das Brot sofort entnehmen oder sie lassen es noch kurz im Gerät ruhen. Am Ende der
Warmhaltephase kehrt das Display zu den ursprünglichen Einstellungen zurück und
zeigt die folgenden Werte an: Menü 1, Brotgewicht
(900g), Bräunungsgrad
(mittel) und Backzeit [3:25].
Page 13

13
DE
Wichtige Hinweise zum Backen
• Bei warmem oder feuchtem Wetter kann der Teig zu schnell aufgehen, so dass eine
verzögerte Startzeit von mehr als 2 Stunden unter Umständen zu lang sein kann.
• Um zu verhindern, dass die Hefe zu schnell aufgeht, geben Sie das Mehl vor allen
anderen Zutaten in die Backform. Bilden Sie eine kleine Mulde im Mehl und geben
Sie die Hefe in die Mulde.
• Wählen Sie keine zu lange Startzeitverzögerung, wenn Sie mit verderblichen
Lebensmitteln, wie Milch oder Eiern arbeiten.
Warmhaltefunktion
Die Warmhaltefunktion sorgt dafür, dass das Brot nach dem Backen keine Feuchtigkeit
annimmt. Zum Ende der Programme 1-6, 10 und 11 wird das fertige Produkt eine
bestimmte Zeit lang warmgehalten. Im Display erscheint [00:00] und ein Signalton
ertönt. Wenn Sie das Brot während der Warmhaltephase entnehmen möchten, halten
Sie die START/STOP-Taste mindestens 2 Sekunden lang gedrückt.
Zutatenspender
Der Zutatenspender erlaubt es Ihnen zum Ende des Knetprozesses trockenen Zutaten,
wie Kürbiskerne oder Rosinen hinzuzugeben. Die Klappe unten am Spender geht zum
Ende des Knetprozesses (Programme 1-7) automatisch auf. Das Öffnen der Klappe
erfolgt mit einem hörbaren Klicken, begleitet von Signaltönen. Während den Prozessen,
die bei den Programmen 8-12 ablaufen, bleibt die Klappe des Spenders geschlossen.
Hinweis: Die genauen Öffnungszeiten der Klappe in den einzelnen Programmen
entnehmen Sie bitte den Tabellen im Anhang.
• Achten Sie darauf, den Spender nicht zu überfüllen. Andernfalls können sich die
Zutaten verkeilen und fallen nicht in die Backform. Achten Sie auf die genaue
Zutatenmenge in den Rezepten.
• Kleine Zutaten, wie Sesamsamen, können durch das Gitter der Klappe fallen.
Öffnen Sie in diesem Fall den Deckel und geben Sie die Zutaten direkt in die
Backform, sobald das Signal für die Klappenöffnung ertönt. Gleiches gilt für
Zutaten, die schmelzen oder verkleben können, wie Schokolade, Käse oder
Fruchtstücke.
• Reinigen Sie den Spender nach jeder Benutzung. Andernfalls kann es sein, dass die
Klappe verklebt und sich nicht öffnet.
Hinweis: Wenn sich die Klappe öffnet, ertönen mehrere kurze Signaltöne. Zu diesem
Zeitpunkt können Sie auch den Deckel des Geräts öffnen und Zutaten direkt in die
Backform hinzugeben.
Page 14
14
DE
• Wenn der Backprozess beendet ist, nehem Sie den Zutatenspender aus dem Gerät.
Reinigen Sie ihn, schließen Sie die Klappe und setzen Sie den Spender wieder in
das Gerät ein.
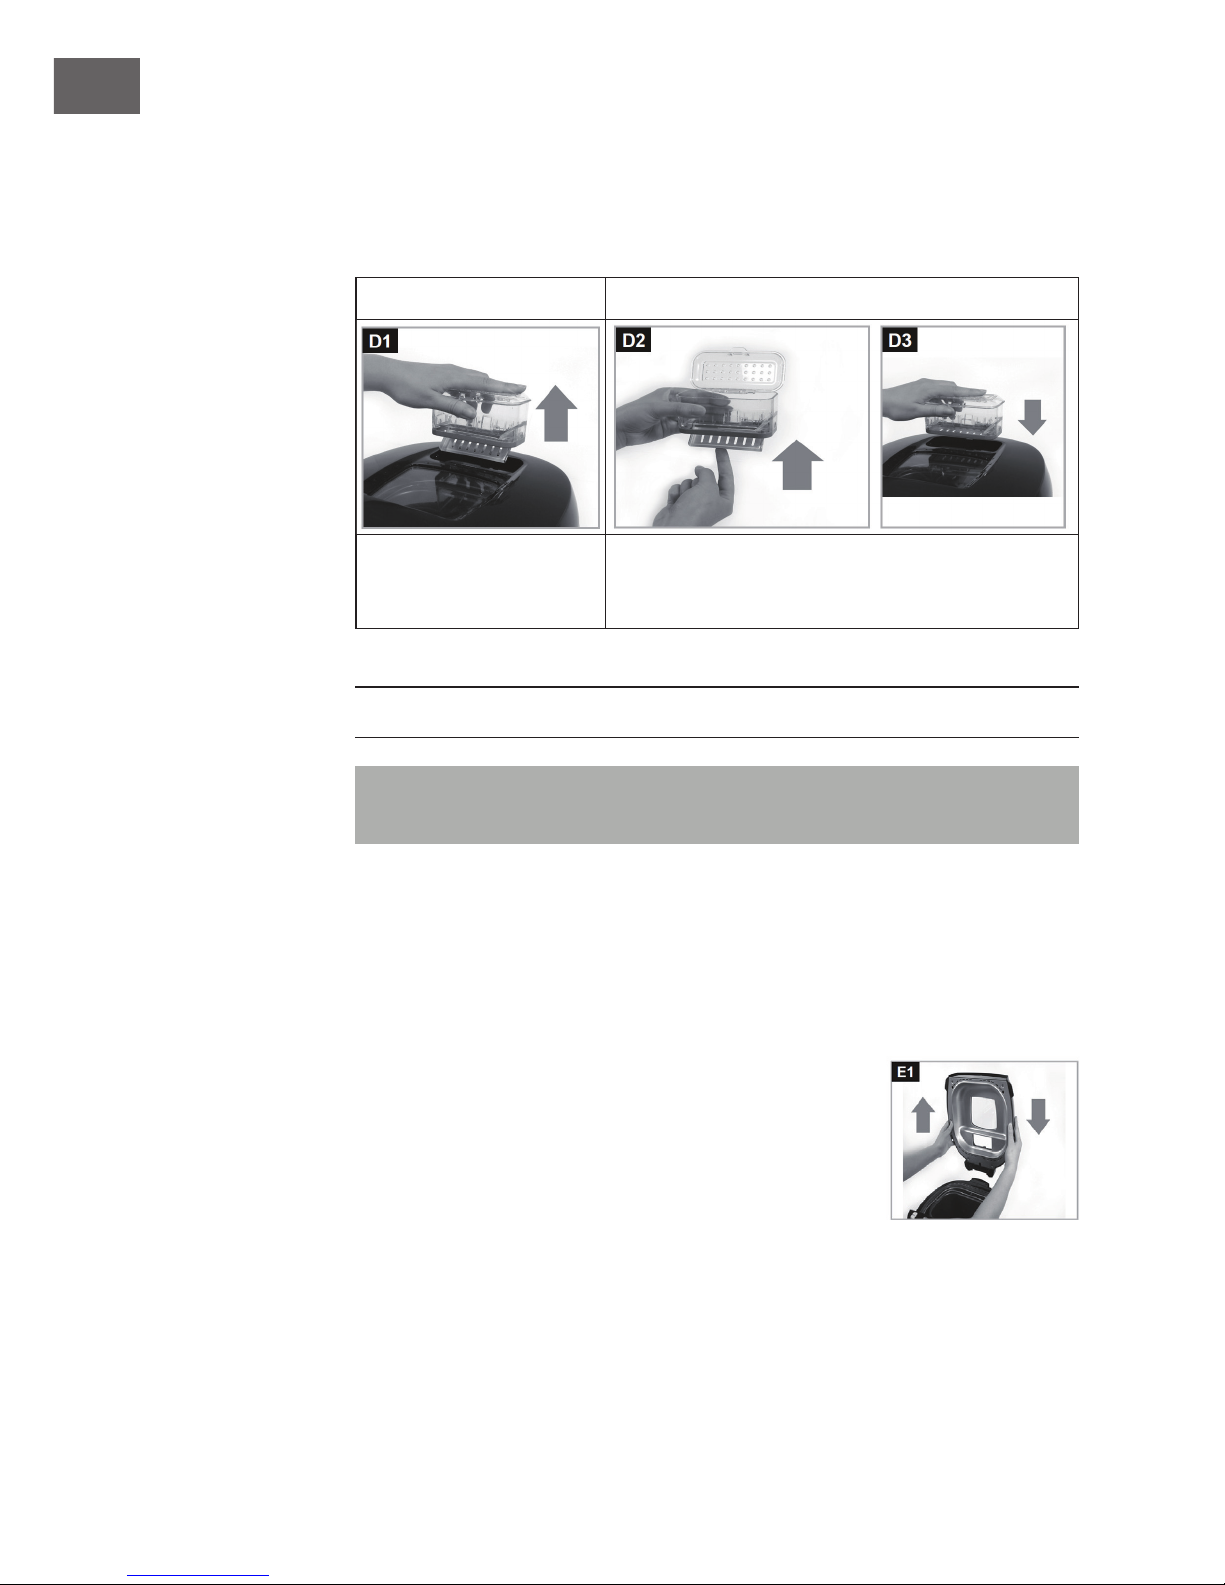
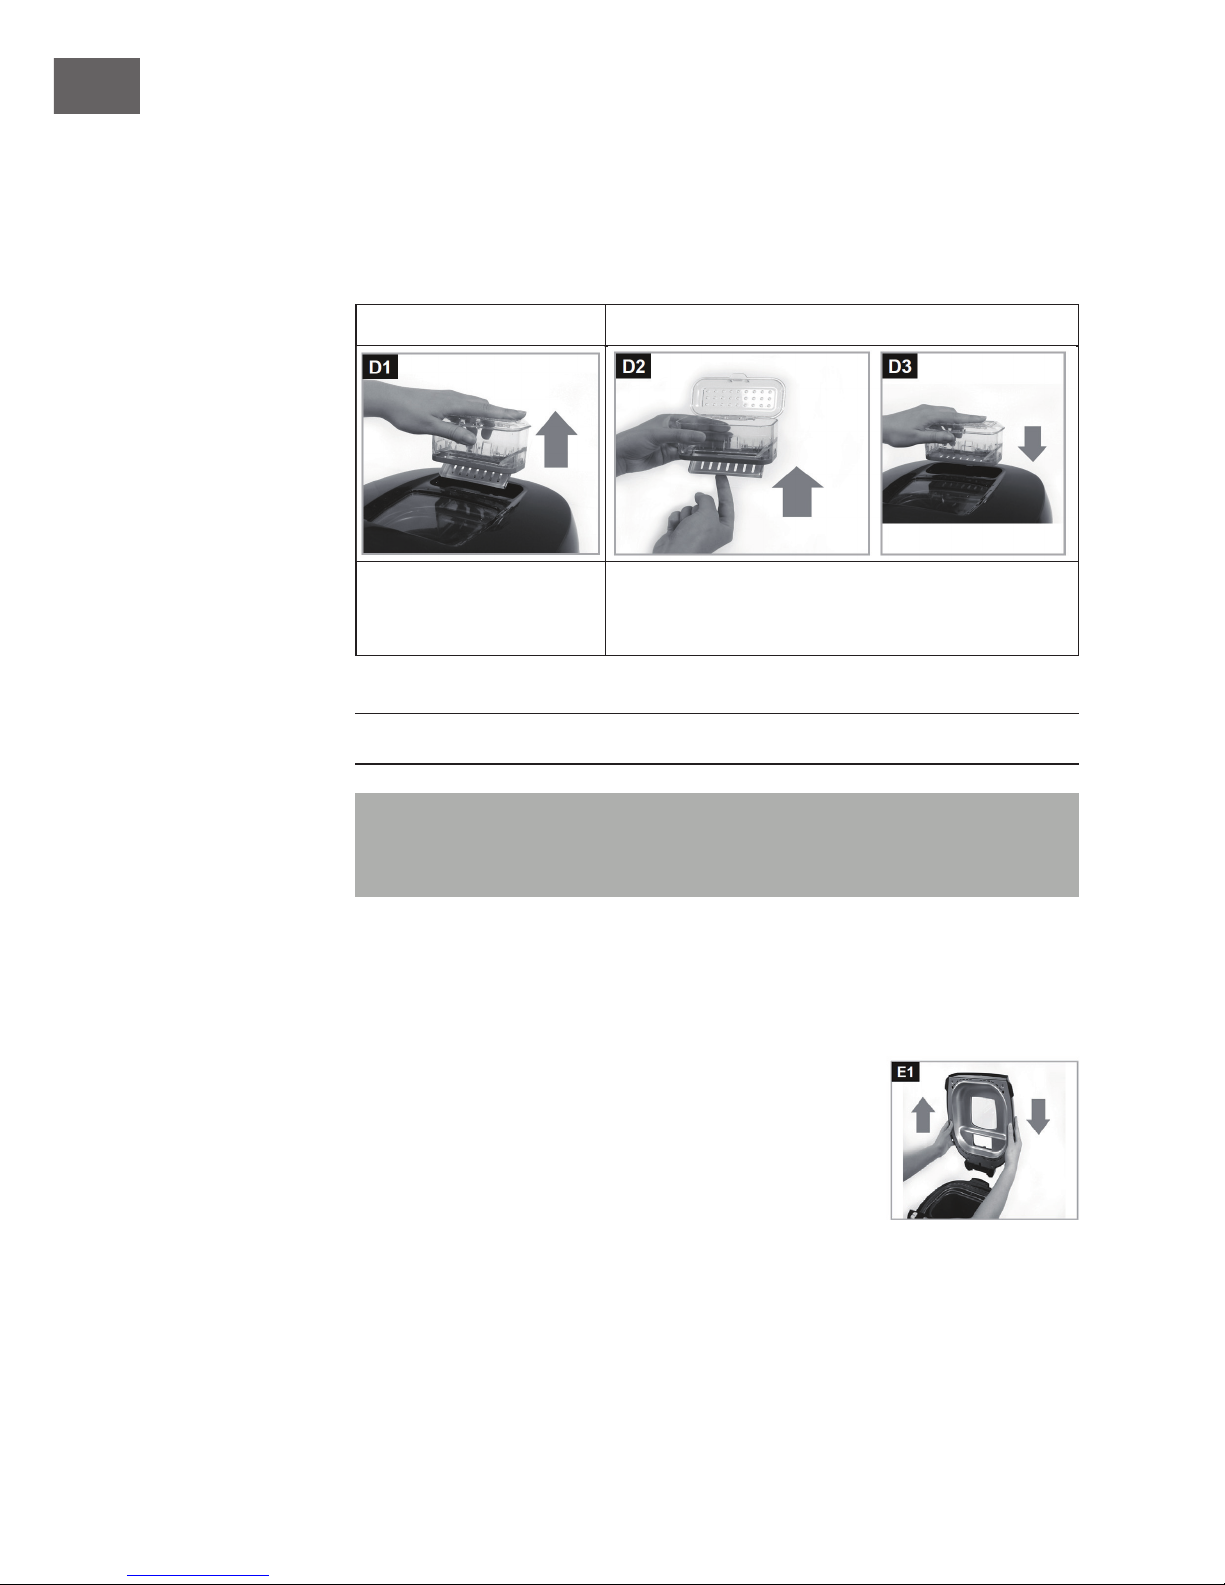
Zutatenspender entnehmen und einsetzen
Entnehmen Einsetzen
Ziehen Sie den
Zutatenspender nach oben
aus dem Gerät.
Schließen Sie nach der Reinigung die untere Klappe
und setzen Sie den Spender wieder ein, indem Sie ihn
ins Gerät drücken, bis er einrastet.
REINIGUNG UND PFLEGE
HINWEIS: Schalten Sie das Gerät aus und ziehen Sie vor der Wartung oder
Reinigung den Stecker aus der Steckdose, um Stromschläge zu vermeiden.
Gerät verstauen
Wenn Sie das Gerät länger nicht benutzen, reinigen Sie es wie in diesem Kapitel
beschrieben. Verstauen Sie das Gerät und alle Zubehörteile an einem trockenen,
sauberen, frostfreien Ort, an dem es vor direktem Sonnenlicht geschützt ist.
Deckel abnehmen und Gerät reinigen
Reinigen Sie das Gerät nach jedem Gebrauch. Zur leichteren
Reinigung lässt sich der Deckel abnehmen. Öffnen Sie den
Deckel komplett und ziehen Sie ihn nach oben aus dem
Gerät. Wischen Sie das Gehäuse und den Innenraum mit
einem feuchten Lappen ab.
Page 15
15
DE
• Die anderen Geräteteile können Sie mit warmem Wasser und etwas Spülmittel
reinigen. Reigen Sie die Backformen und die Haken von Hand, reinigen Sie sie
nicht im Geschirrspüler! Benutzen Sie zur Reinigung keine scharfen Reiniger oder
Scheuermittel, um die Beschichtung nicht zu beschädigen.
• Lassen Sie alle Teile komplett trocknen.
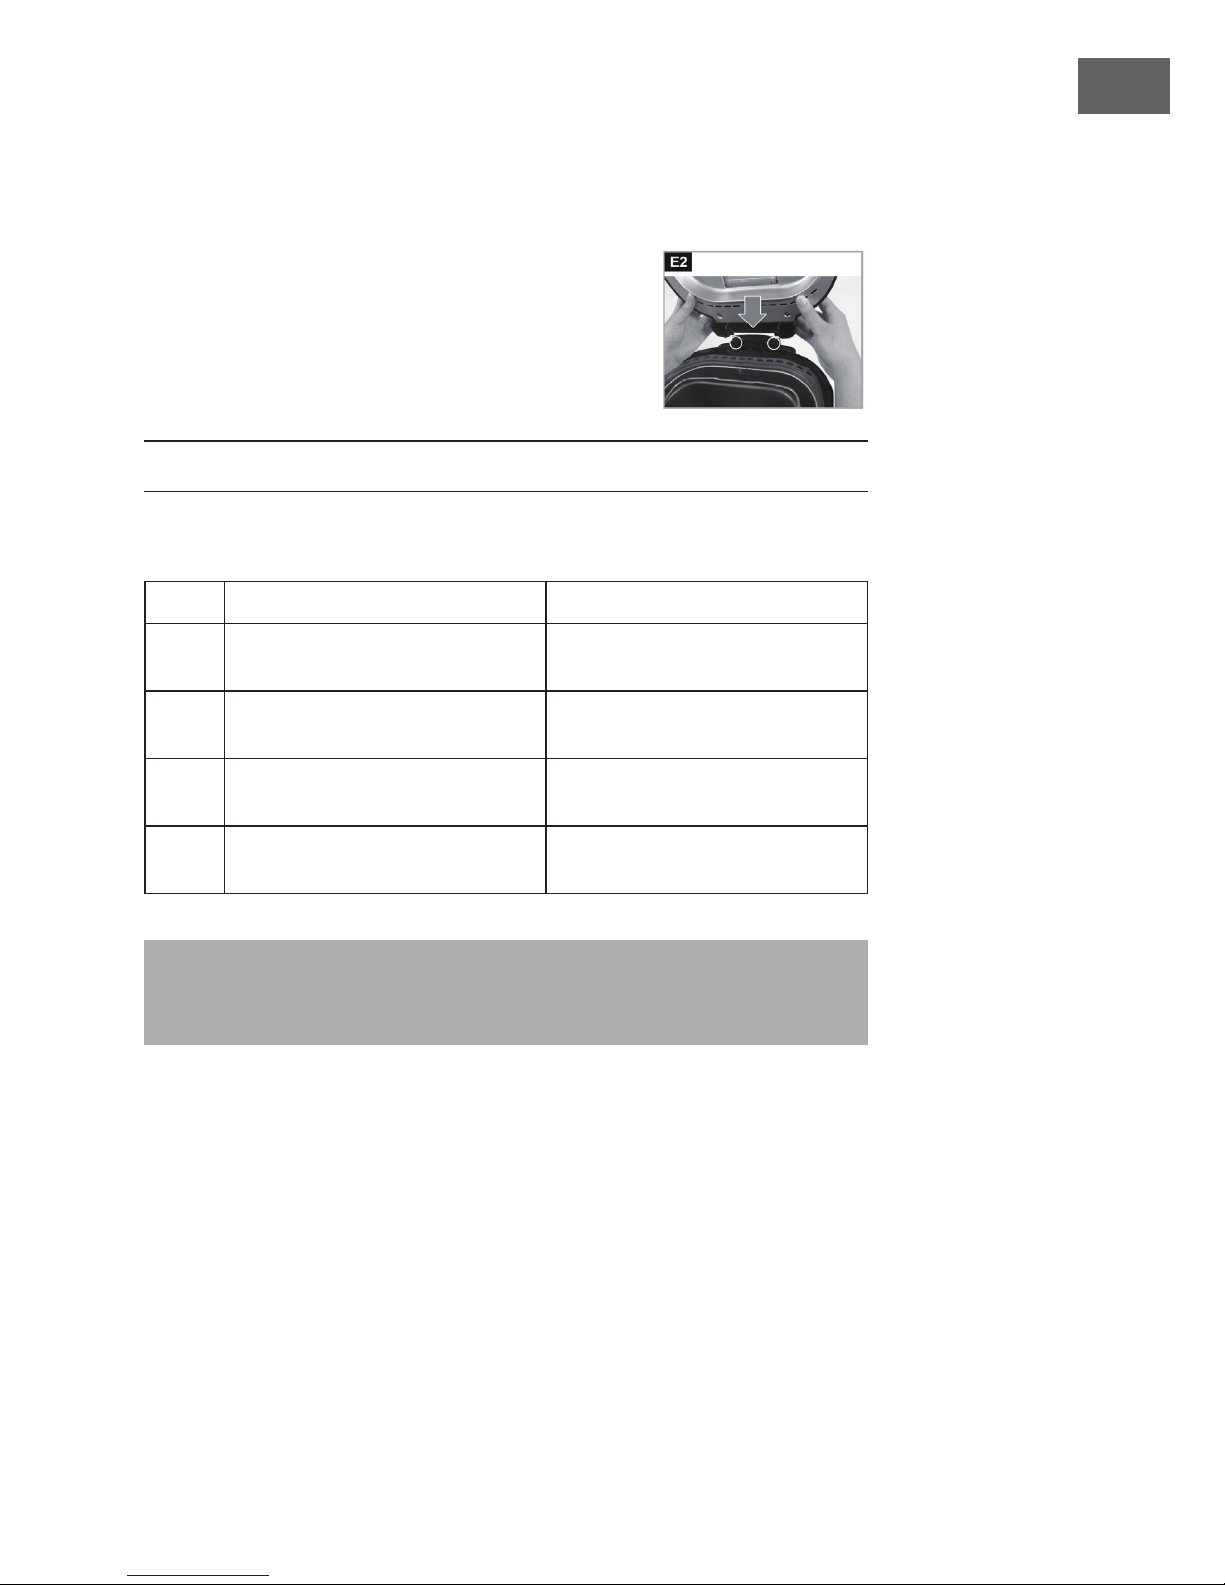
Deckel aufsetzen
Setzen Sie nach der Reinigung den Deckel wieder auf.
Halten Sie ihn dazu aufrecht und drücken Sie die Laschen in
die Aufnahmen am Gerät (siehe Markierungen).
FEHLERSUCHE UND FEHLERBEHEBUNG
Fehlermeldungen
Fehler Mögliche Ursache Lösungsansatz
E00 Das Gerät ist zu kalt. Warte Sie bis sich das Gerät auf
Raumtemperatur aufgewärmt hat.
E01 Das Gerät ist zu warm, nachdem
der Backprozess beendet wurde.
Warten Sie, bis sich das Gerät
abgekühlt hat.
EEE Der Temperatursensor ist kaputt. Wenden Sie sich zur Reparatur an
einen Fachbetrieb.
HHH Kurzschluss innerhalb des Geräts. Wenden Sie sich zur Reparatur an
einen Fachbetrieb.
Falls Sie den Fehler nicht selbst beheben können, kontaktieren Sie den Kundendienst.
Bevor Sie anrufen, notieren Sie sich bitte das Modell, die Seriennummer und das
Kaufdatum des Geräts. Der Kundendienst benötigt diese Informationen.
Page 16
16
DE
HINWEISE ZUR ENTSORGUNG
Bendet sich die linke Abbildung (durchgestrichene Mülltonne
auf Rädern) auf dem Produkt, gilt die Europäische Richtlinie
2012/19/EU. Diese Produkte dürfen nicht mit dem normalen
Hausmüll entsorgt werden. Informieren Sie sich über die
örtlichen Regelungen zur getrennten Sammlung elektrischer
und elektronischer Gerätschaften. Richten Sie sich nach
den örtlichen Regelungen und entsorgen Sie Altgeräte nicht
über den Hausmüll. Durch die regelkonforme Entsorgung
der Altgeräte werden Umwelt und die Gesundheit ihrer
Mitmenschen vor möglichen negativen Konsequenzen
geschützt. Materialrecycling hilft, den Verbrauch von
Rohstoffen zu verringern.
Page 17
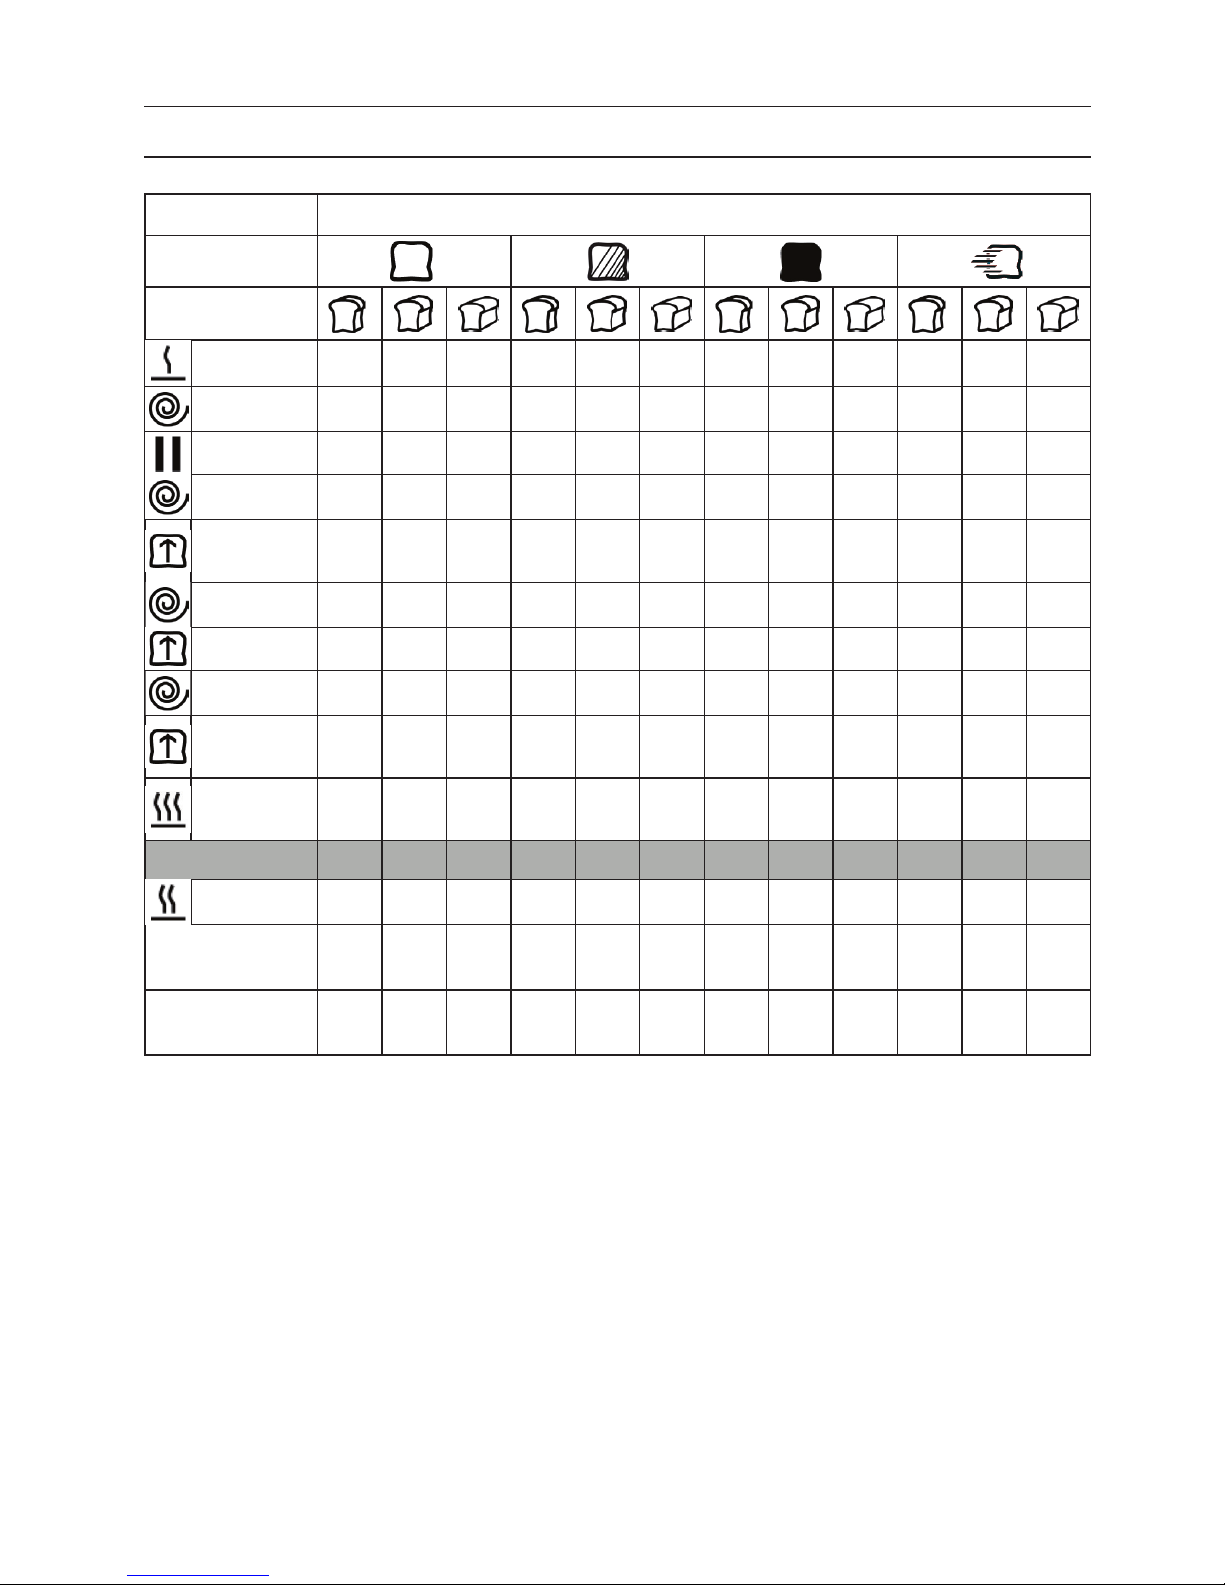
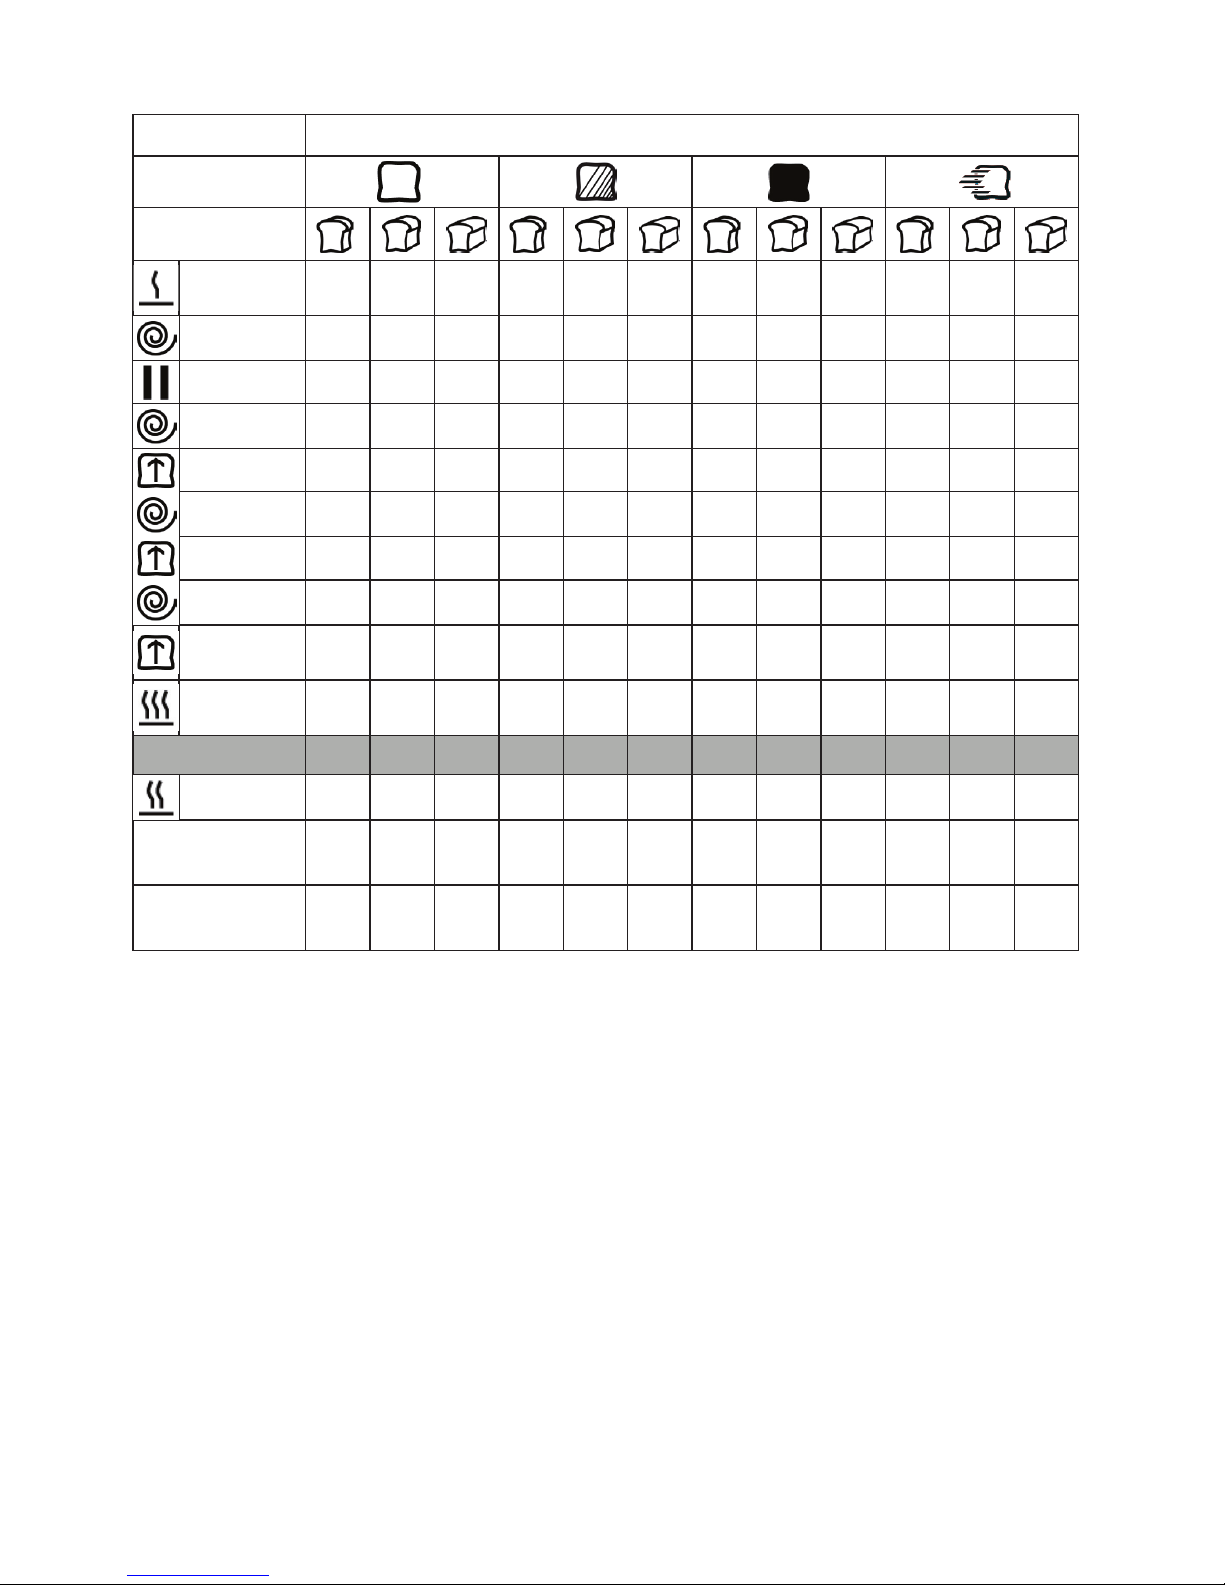
ANHANG: PROGRAMMZEITEN
Menü 1 Basisprogramm
Bräunungsgrad
Gewicht
Vorheizen - - - - - - - - - - - -
Kneten
5 min 5 min 5 min 5 min 5 min 5 min 5 min 5 min 5 min 5 min 5 min 5 min
Ruhen
5 min 5 min 5 min 5 min 5 min 5 min 5 min 5 min 5 min 5 min 5 min 5 min
Kneten
20 min 20 min 20 min 20 min 20 min 20 min 20 min 20 min 20 min 20 min 20 min 20 min
Aufgehen
40
min
40
min
40
min
40
min
40
min
40
min
40
min
40
min
40
min
15 min 15 min 15 min
Kneten
10 s 10 s 10 s 10 s 10 s 10 s 10 s 10 s 10 s 10 s 10 s 10 s
Aufgehen
25 min 25 min 25 min 25 min 25 min 25 min 25 min 25 min 25 min 9 min 9 min 9 min
Kneten
10 s 10 s 10 s 10 s 10 s 10 s 10 s 10 s 10 s 10 s 10 s 10 s
Aufgehen
50
min
50
min
50
min
50
min
50
min
50
min
50
min
50
min
50
min
30
min
30
min
30
min
Backen
46
min
51 min
58
min
48
min
53
min
60
min
53
min
58
min
65
min
48
min
53
min
60
min
Programmdauer
3:11 3:16 3:23 3:13 3:18 3:25 3:18 3:23 3:30 2:12 2:17 2:24
Warmhalten
1 h 1 h 1 h 1 h 1 h 1 h 1 h 1 h 1 h 1 h 1 h 1 h
Öffnungzeit des
Zutatenspenders
2:51 2:56 3:03 2:53 2:58 3:05 2:58 3:03 3:10 1:52 1:57 2:04
Maximal
einstellbarer Timer
15:00 15:00 15:00 15:00 15:00 15:00 15:00 15:00 15:00 15:00 15:00 15:00
Page 18
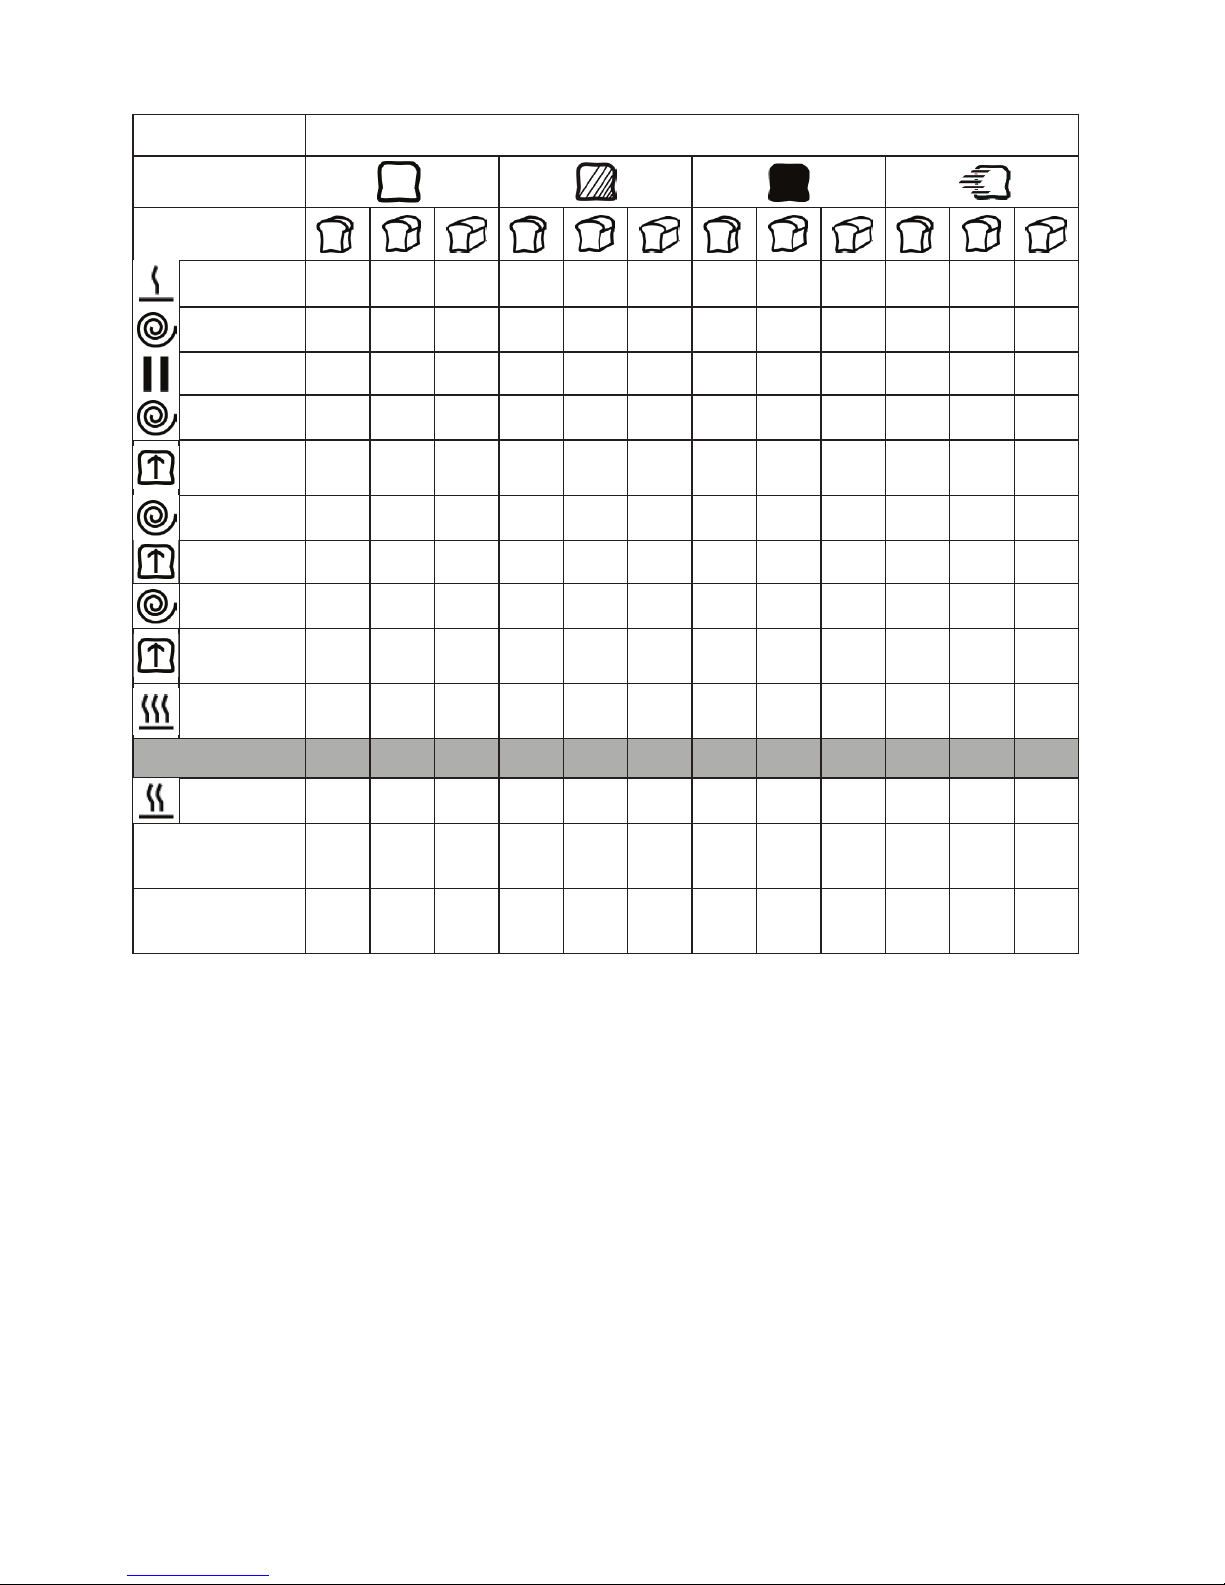
Menü 2 Weißbrot
Bräunungsgrad
Gewicht
Vorheizen - - - - - - - - - - - -
Kneten
5 min 5 min 5 min 5 min 5 min 5 min 5 min 5 min 5 min 5 min 5 min 5 min
Ruhen
5 min 5 min 5 min 5 min 5 min 5 min 5 min 5 min 5 min 5 min 5 min 5 min
Kneten
20 min 20 min 20 min 20 min 20 min 20 min 20 min 20 min 20 min 20 min 20 min 20 min
Aufgehen
39 min 39 min 39 min 39 min 39 min 39 min 39 min 39 min 39 min
30
min
30
min
30
min
Kneten
10 s 10 s 10 s 10 s 10 s 10 s 10 s 10 s 10 s 10 s 10 s 10 s
Aufgehen
31 min 31 min 31 min 31 min 31 min 31 min 31 min 31 min 31 min 15 min 15 min 15 min
Kneten
10 s 10 s 10 s 10 s 10 s 10 s 10 s 10 s 10 s 5 s 5 s 5 s
Aufgehen
60
min
60
min
60
min
60
min
60
min
60
min
60
min
60
min
60
min
30
min
30
min
30
min
Backen
48
min
50
min
53
min
50
min
52 min
55
min
55
min
57 min
60
min
50
min
52 min
55
min
Programmdauer
3:28 3:30 3:33 3:30 3:32 3:35 3:35 3:37 3:40 2:35 2:37 2:40
Warmhalten
1 h 1 h 1 h 1 h 1 h 1 h 1 h 1 h 1 h 1 h 1 h 1 h
Öffnungzeit des
Zutatenspenders
3:08 3:10 3:13 3:10 3:12 3:15 3:15 3:17 3:20 2:15 2:17 2:20
Maximal
einstellbarer Timer
15:00 15:00 15:00 15:00 15:00 15:00 15:00 15:00 15:00 15:00 15:00 15:00
Page 19
Menü 3 Vollkornbrot
Bräunungsgrad
Gewicht
Vorheizen
30
min
30
min
30
min
30
min
30
min
30
min
30
min
30
min
30
min
5 min 5 min 5 min
Kneten
5 min 5 min 5 min 5 min 5 min 5 min 5 min 5 min 5 min 5 min 5 min 5 min
Ruhen
5 min 5 min 5 min 5 min 5 min 5 min 5 min 5 min 5 min 5 min 5 min 5 min
Kneten
15 min 15 min 15 min 15 min 15 min 15 min 15 min 15 min 15 min 15 min 15 min 15 min
Aufgehen
49 min 49 min 49 min 49 min 49 min 49 min 49 min 49 min 49 min 24 min 24 min 24 min
Kneten
10 s 10 s 10 s 10 s 10 s 10 s 10 s 10 s 10 s 10 s 10 s 10 s
Aufgehen
26 min 26 min 26 min 26 min 26 min 26 min 26 min 26 min 26 min 11 min 11 min 11 min
Kneten
10 s 10 s 10 s 10 s 10 s 10 s 10 s 10 s 10 s 10 s 10 s 10 s
Aufgehen
45
min
45
min
45
min
45
min
45
min
45
min
45
min
45
min
45
min
35 min 35 min 35 min
Backen
48
min
50
min
53
min
50
min
52 min
55
min
55
min
57 min
60
min
50
min
52 min
55
min
Programmdauer
3:43 3:45 3:48 3:45 3:47 3:50 3:50 3:52 3:55 2:30 2:32 2:35
Warmhalten
1 h 1 h 1 h 1 h 1 h 1 h 1 h 1 h 1 h 1 h 1 h 1 h
Öffnungzeit des
Zutatenspenders
2:58 3:00 3:03 3:00 3:02 3:05 3:05 3:07 3:10 2:10 2:12 2:15
Maximal
einstellbarer Timer
15:00 15:00 15:00 15:00 15:00 15:00 15:00 15:00 15:00 15:00 15:00 15:00
Page 20
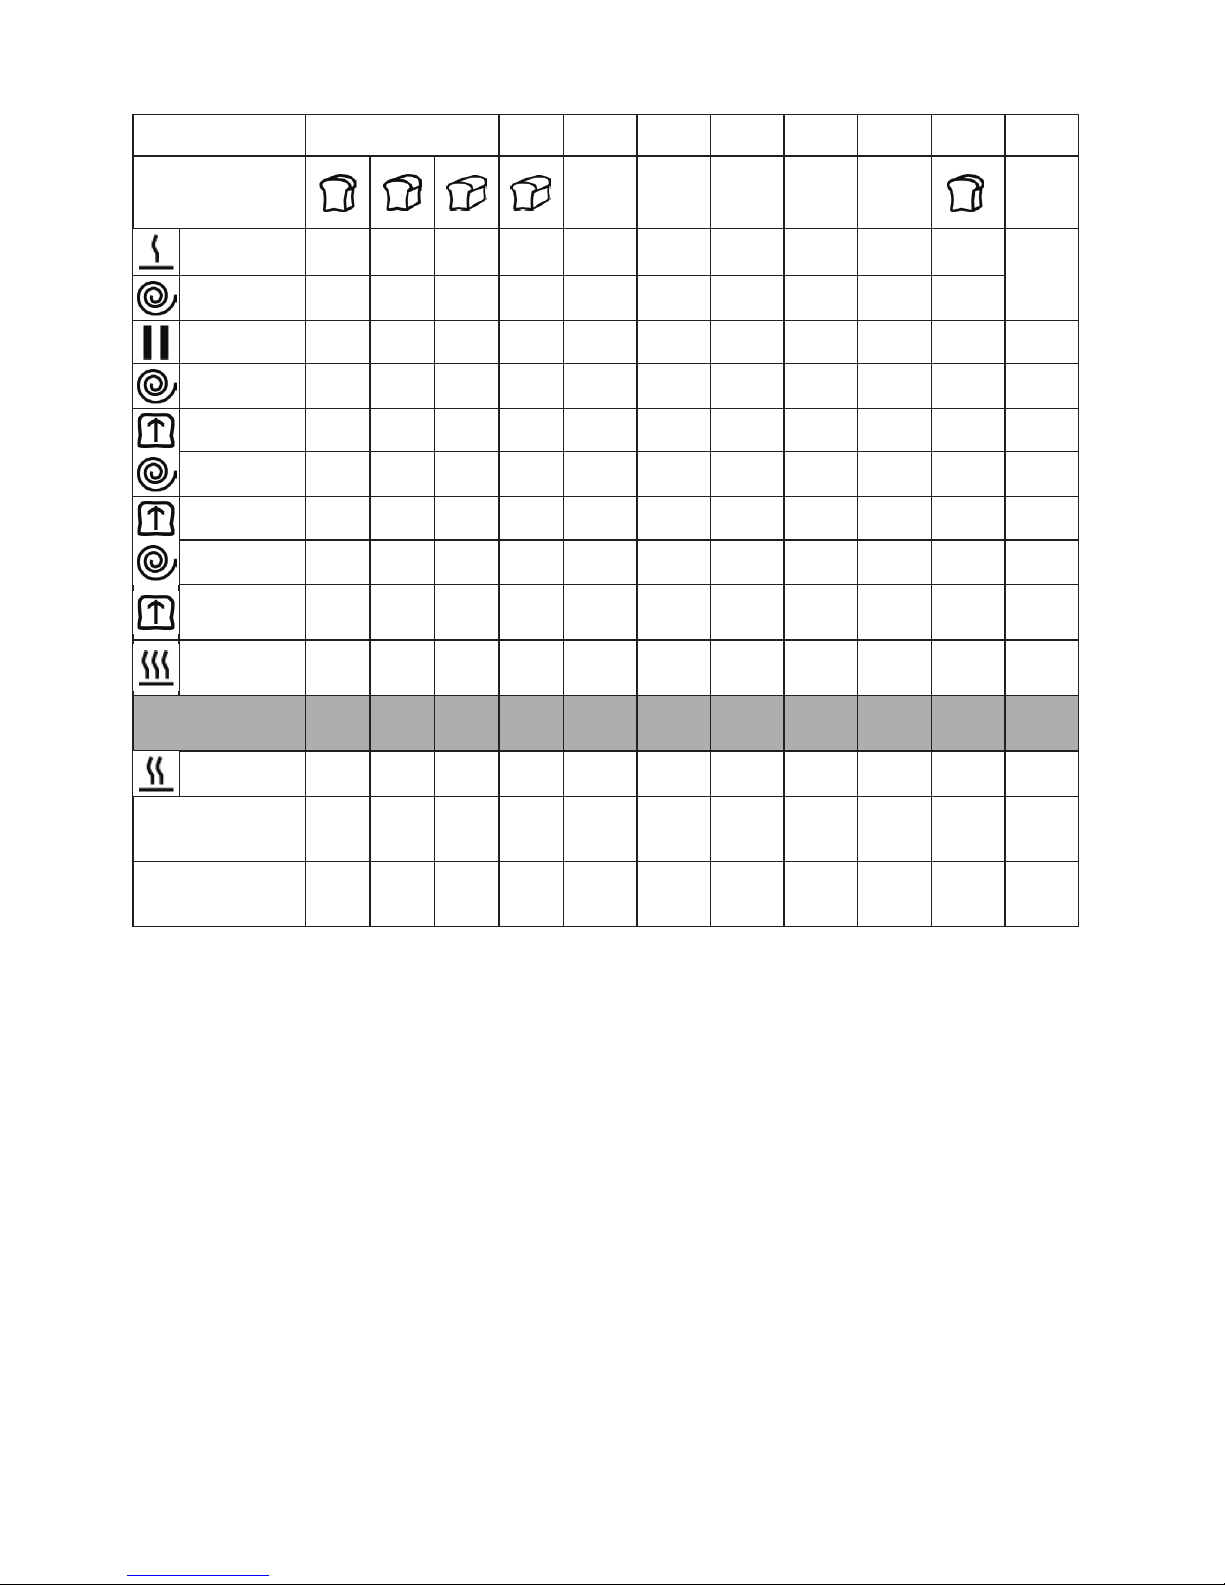
Menü 4 5 6 7 8 9 10 11 12
Gewicht
- - - - - -
Vorheizen
- - - - - - - - - -
15 min
Kneten
5 min 5 min 5 min 5 min 5 min 5 min 3 min 5 min - 5 min
Ruhen
5 min 5 min 5 min - - 5 min - - - - -
Kneten
20 min 20 min 20 min 15 min 10 min 20 min 11 min 10 min - 15 min -
Aufgehen
39 min 39 min 39 min 12 min - 60 min - - - - -
Kneten
10 s 10 s 10 s - - - - - - - -
Aufgehen
26 min 26 min 26 min - - - - - - - -
Kneten
5 s 5 s 5 s - - - - - - - -
Aufgehen
30
min
30
min
30
min
- 60 min - - - - - -
Backen
50
min
55
min
60
min
48
min
55 min - - 70 min
60 -90
min
75 min 55 min
Programmdauer
2:55 3:00 3:05 1:20 2:10 1:30 00:14 1:25
1:001:30
1:35 1:10
Warmhalten
1 h 1 h 1 h 1 h 1 h - - - 1 h 22 min -
Öffnungzeit des
Zutatenspenders
2:57 3:02 3:07 1:10 2:05 1:10 - - - - -
Maximal
einstellbarer Timer
15:00 15:00 15:00 15:00 15:00 15:00 15:00 15:00 - 15:00 -
Page 21
21
EN
Dear Customer,
Congratulations on purchasing this equipment. Please read this manual carefully and
take care of the following hints to avoid damages. Any failure caused by ignoring the
mentioned items and cautions mentioned in the instruction manual are not covered by
our warranty and any liability.
CONTENT
Technical Data21
Declaration of Conformity21
Safety Instructions22
Product Description23
Symbols and Key Functions24
Getting Started25
Operation27
Menu and Programs28
Special Functions30
Care and Cleaning32
Troubleshooting33
Hints on Disposal34
Appendix: Program Times35
TECHNICAL DATA
Item number 10032101
Power supply 230 V ~ 50 Hz
Power consumtion 650 W
DECLARATION OF CONFORMITY
Producer:
Chal-Tec GmbH, Wallstraße 16, 10179 Berlin, Germany.
This product is conform to the following European
Directives:
2014/30/EU (EMC)
2014/35/EU (LVD)
2011/65/EU (RoHS)
English
Español
Français
Italiano
Page 22

22
EN
SAFETY INSTRUCTIONS
• This appliance can be used by children aged from 8 years and above and persons
with reduced physical, sensory or mental capabilities or lack of experience and
knowledge if they have been given supervision or instruction concerning use of
the appliance in a safe way and understand the hazards involved. Children shall
not play with the appliance. Cleaning and user maintenance shall not be made by
children unless they are older than 8 and supervised. Keep the appliance and its
cord out of reach of children.
• If the supply cord is damaged, it must be replaced by the manufacturer, its service
agent or similarly qualied persons in order to avoid a hazard.
• CAUTION: Hot surfaces. Do not touch hot surfaces. Use handles or knobs, Do not
let cord hang over edge of table or hot surface.
• The appliances are not intended to be operated by means of an external timer or separate
remote-control system.
• Clean surfaces in contact with food.
• Before use, check that the voltage of wall outlet corresponds to the one shown on
the rating plate.
• To protect against electric shock do not immerse cord, plugs, or housing in water or
other liquid.
• Unplug from outlet when not in use, before putting on or taking off parts, and
before cleaning.
• Do not place on or near a hot gas or electric burner, or in a heated oven.
• Extreme caution must be used when moving an appliance containing hot oil or
other hot liquids.
• Do not touch any moving or spinning parts of the machine when baking.
• Never switch on the appliance without properly placed bread pan lled
ingredients.
• Never beat the bread pan on the top or edge to remove the pan, this may damage
the bread pan.
• Always attach plug to appliance rst, then plug cord into the wall outlet. to
disconnect, turn any control to OFF, then remove plug from wall outlet.
• The appliance is not intended to be operated by means of an external timer or
separate remote-control system.
• Do not operate the unit without bread pan placed in the chamber to avoid
damaging the appliance.
Page 23
23
EN
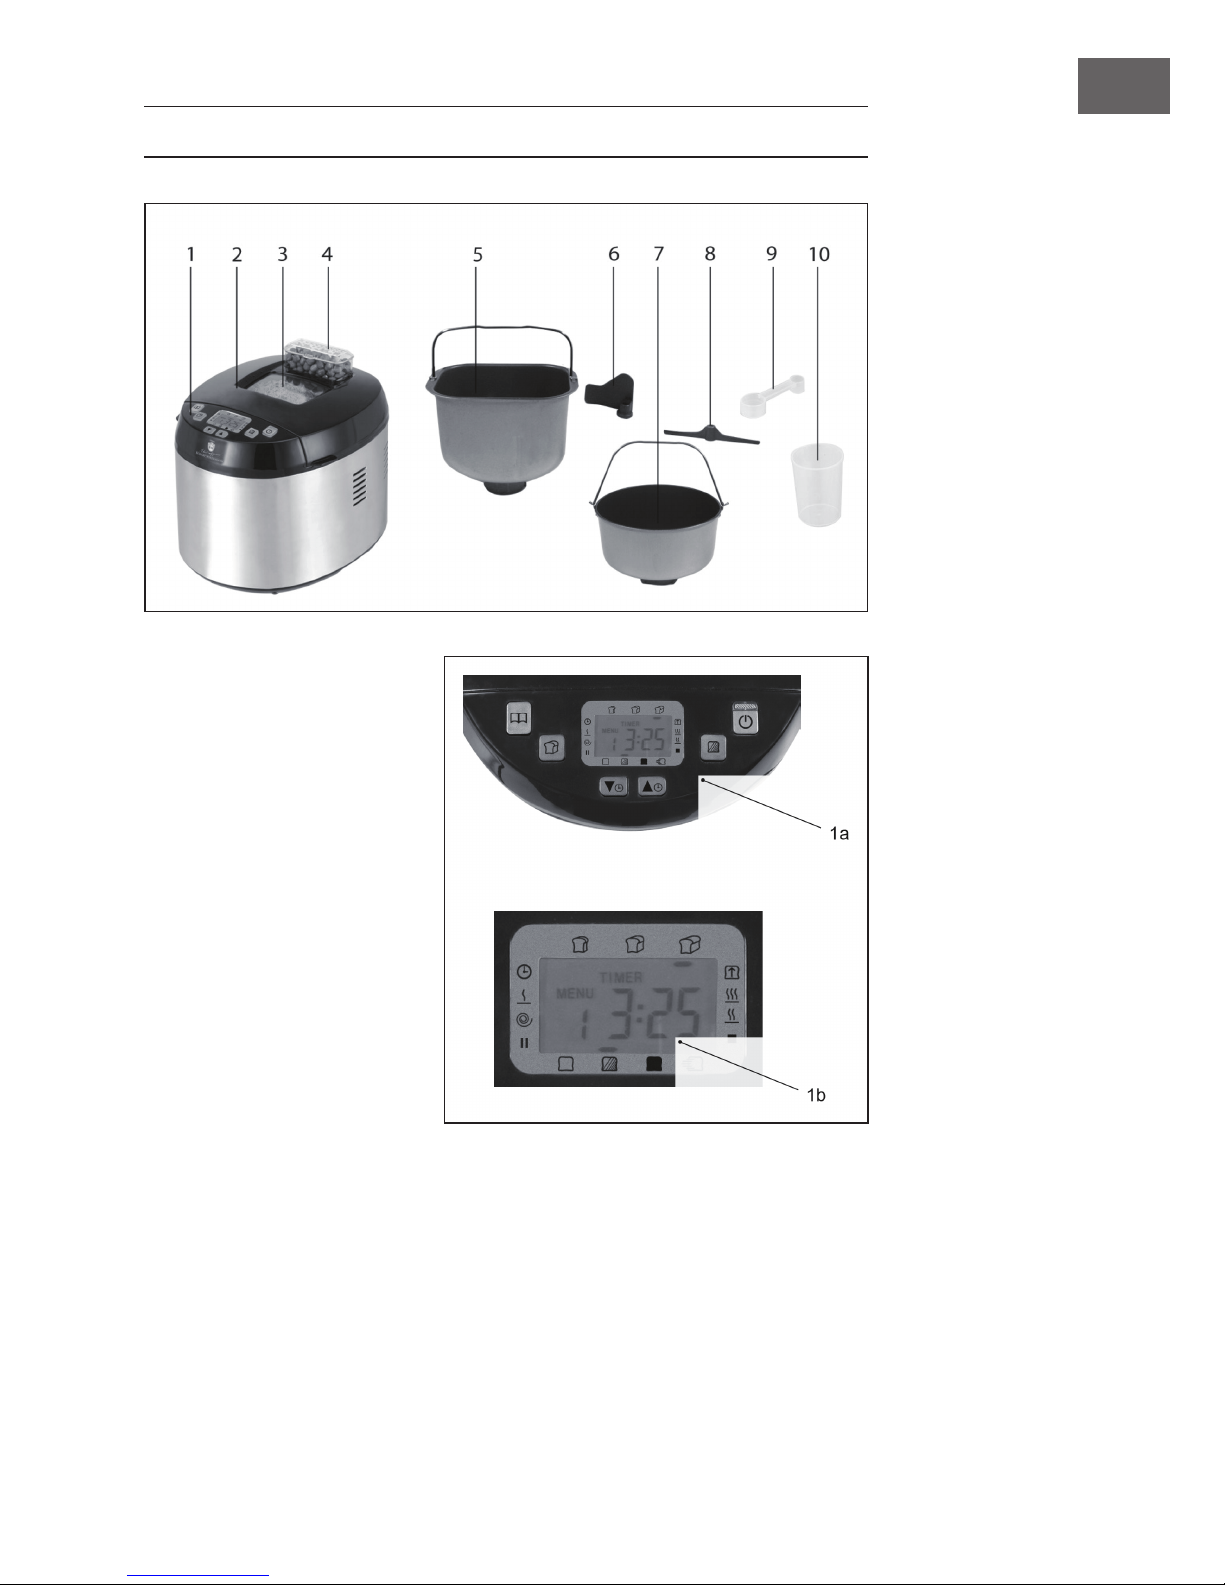
PRODUCT DESCRIPTION
1 Control panel and display
2 Lid
3 Window
4 Ingredients dispenser
5 Bread baking mould
6 Kneading hook
7 Cake baking mould
8 Stirring hook
9 Measuring spoon
10 Measuring cup
Page 24
24
EN
SYMBOLS AND KEY FUNCTIONS
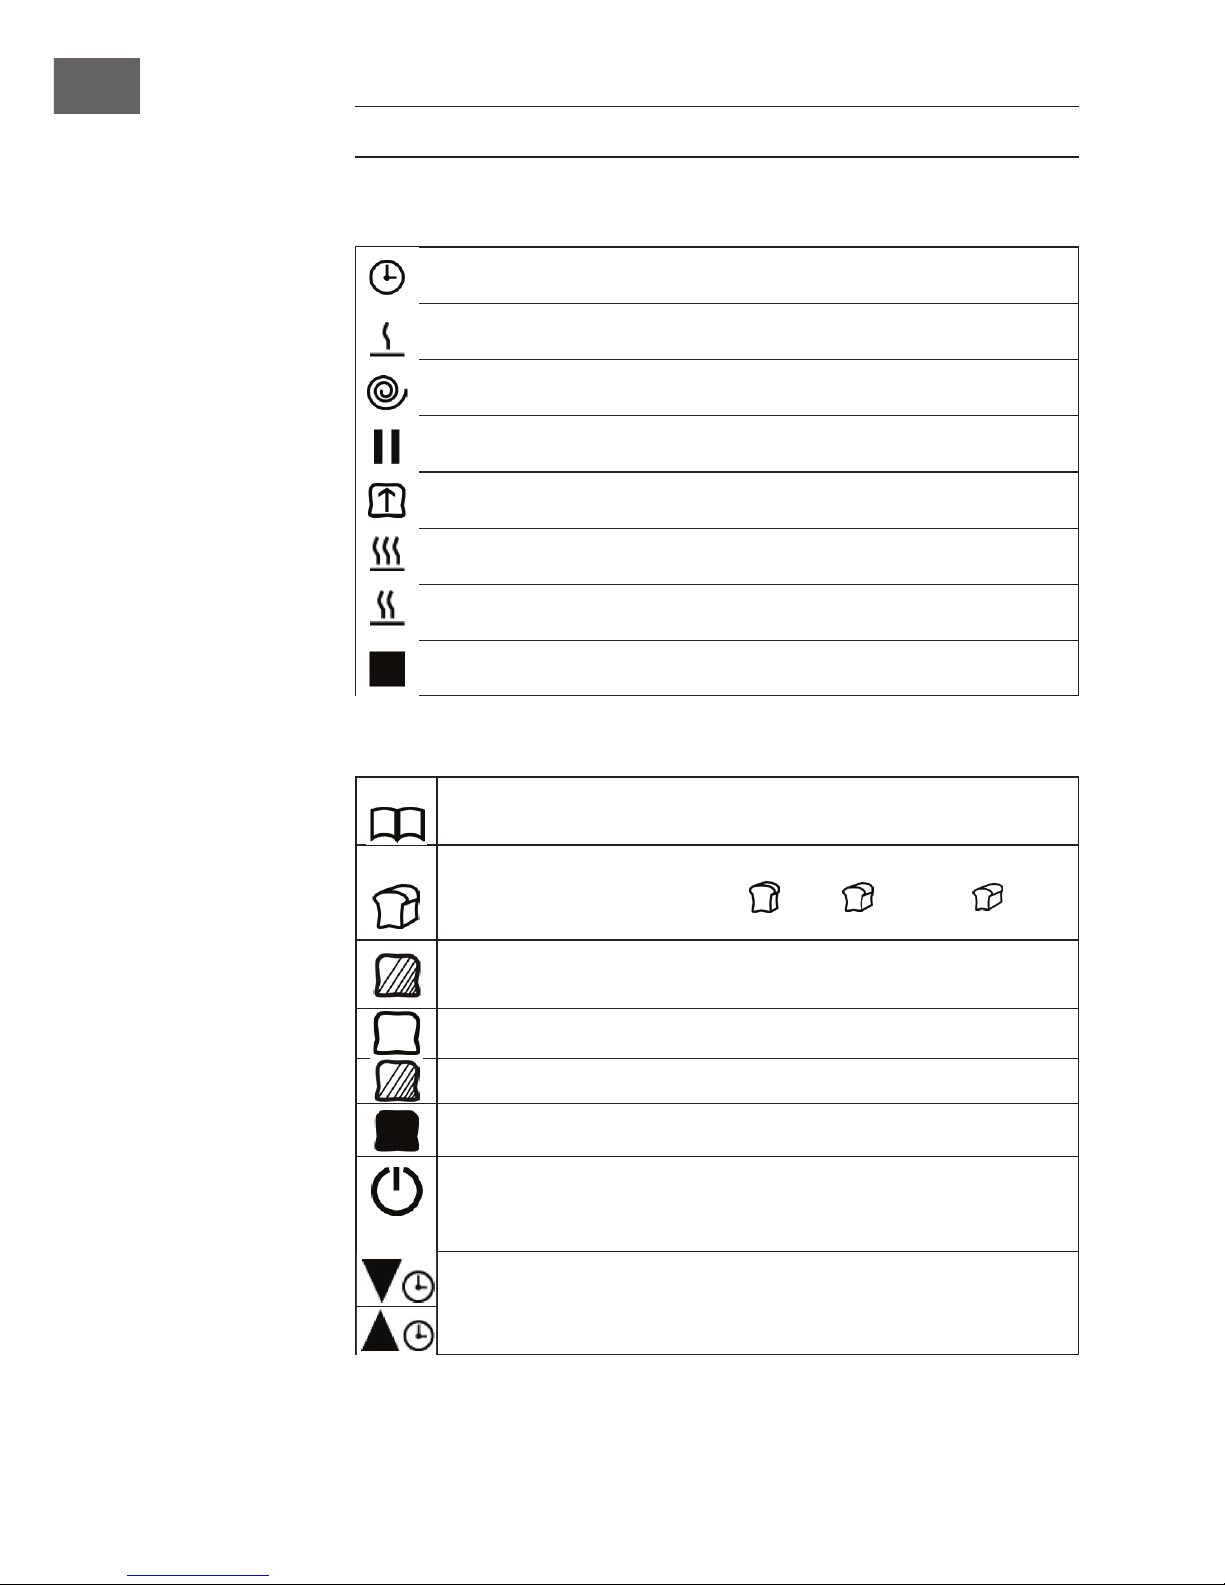
Symbols and phase of baking programme
Timer
Preheating the bread maker
Kneading the dough
Resting the dough
Dough rising
Baking the dough
Keeping the nished product warm
End of the programme
Key functions
MENU: Use this button to select from the 12 preset programmes. The set
programme appears in the display under Menu (baking programme 1-12).
WEIGHT: Use this button to set the weight of the nished bread. You can
choose between three different sizes: 450g, 680g oder 900g.
The set weight is underlined in the display.
BROWNING LEVEL: Use this button to select one of three different
browning levels for pro- grammes 1-4.
Browning level: light
Browning level: medium
Browning level: dark
START/STOP: Use this button to start the selected programme. To stop
the programme, press and hold down this button for approximately two
seconds.
TIMER: Use these buttons to increase or decrease the timer of
the appliance in 10-minute steps. Be aware that the set time indicates when
the baking process is completed. The maximum possible setting is 15 hours.
Page 25
25
EN
Example: the timer displays 6:30. That means that the baking process will be
completed in 6 hours and 30 minutes. If you start the programme with the START/STOP
button, the timer runs backwards. The bread will be baked in 6 hours and 30 minutes.
A triangle on the left or right of the display indicates the current phase of the baking
programme.
GETTING STARTED
Before rst use
• Remove all packaging materials and protective foils from the product and the
accessories before using it for the rst time.
• Clean the appliance and the accessories used as described in the section Care
and Cleaning.
Inserting and removing the kneading/stirring hook
Note: When the term „baking mould“ is used in this user manual, it refers to both the
bread baking mould and the cake baking mould. To improve readability, the use of
both forms was deliberately avoided. A specic baking mould is only stated when
only that type of is required.
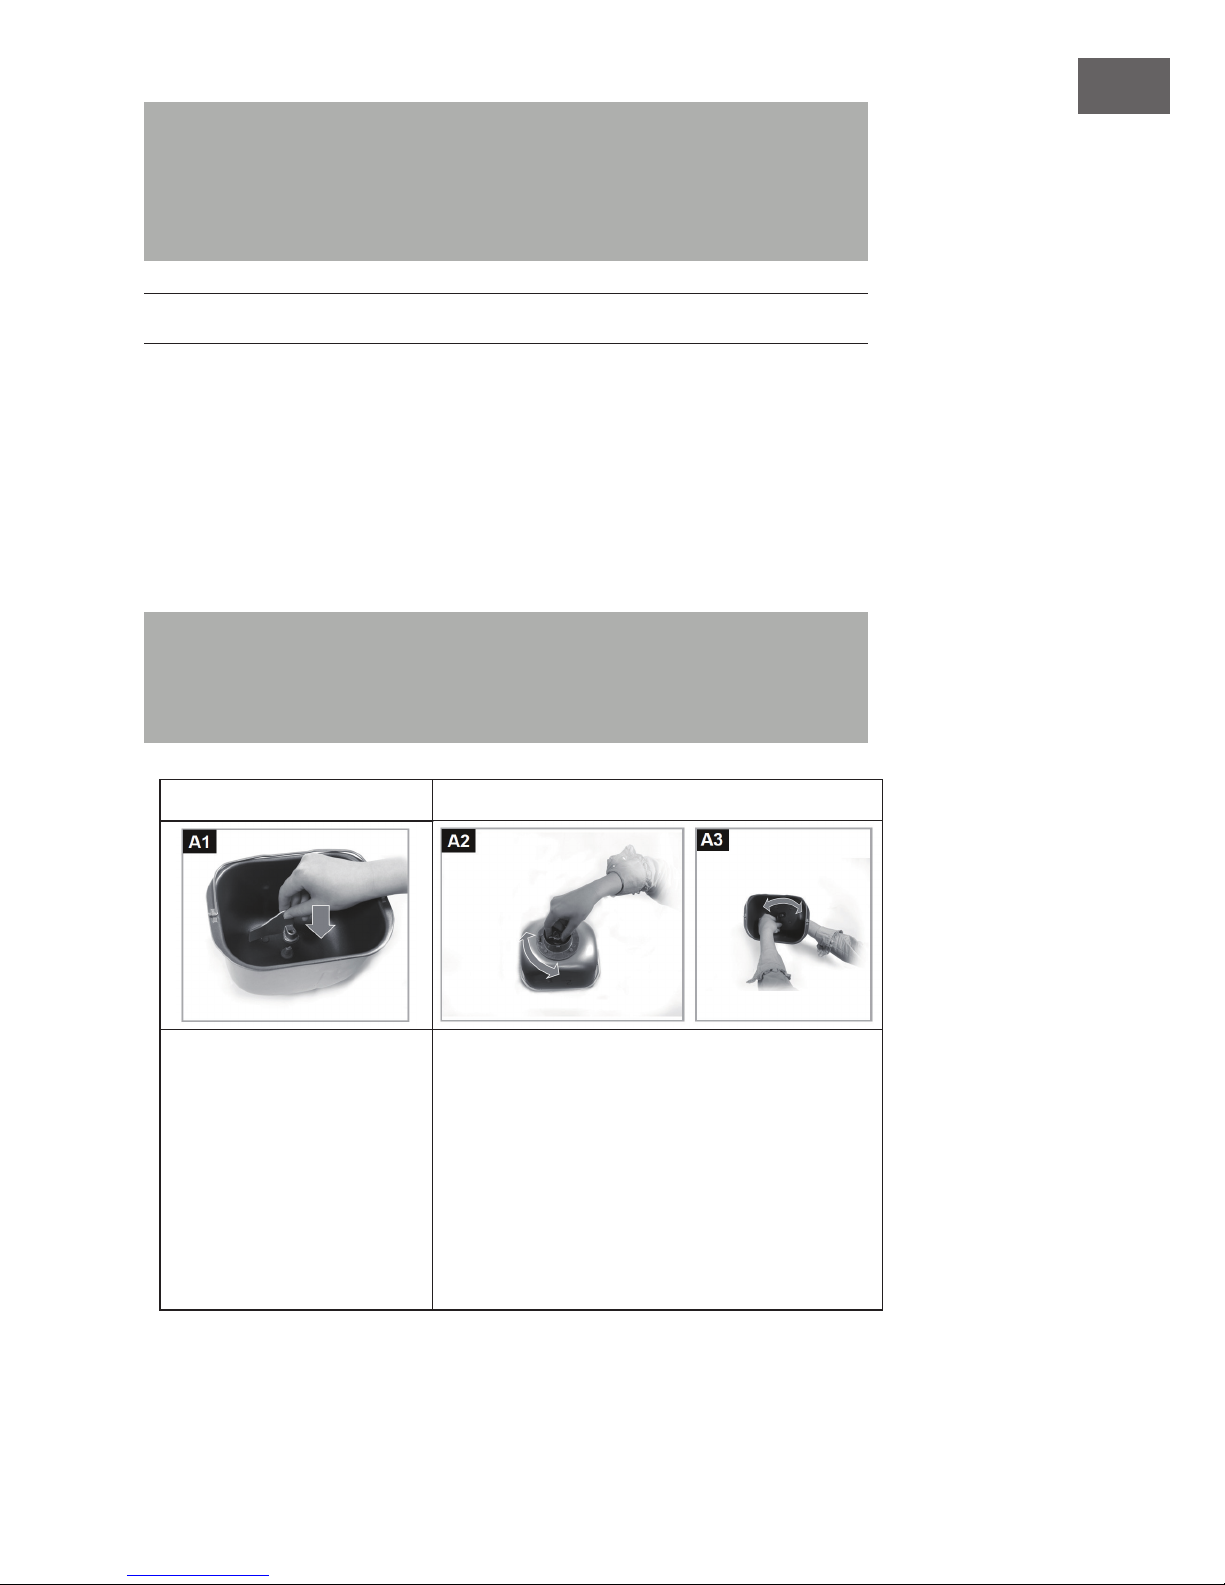
Insert Remove
Push the kneading/stirring
hook onto the drive spindle
in the middle of the baking
mould base. Hook and pin
have at surfaces and only t
together when these surfaces
are aligned. The drive spindle
is held by a wing nut on
the underside of the baking
mould.
Hold the wing nut on the underside of the baking
mould rmly with one hand and the kneading/
stirring hook rmly with the other. Pull the kneading/
stirring hook off the drive spindle with a slight turning movement while simultaneously turning the wing
nut in the opposite direction.
Page 26
26
EN
Note: You can remove the kneading/stirring hook after the nal kneading process
in the selected baking programme so that there is no hole in the bread after baking.
Sprinkle a little our onto your hands and lift the dough in order to pull the kneading/
stirring hook upwards out of the baking mould.
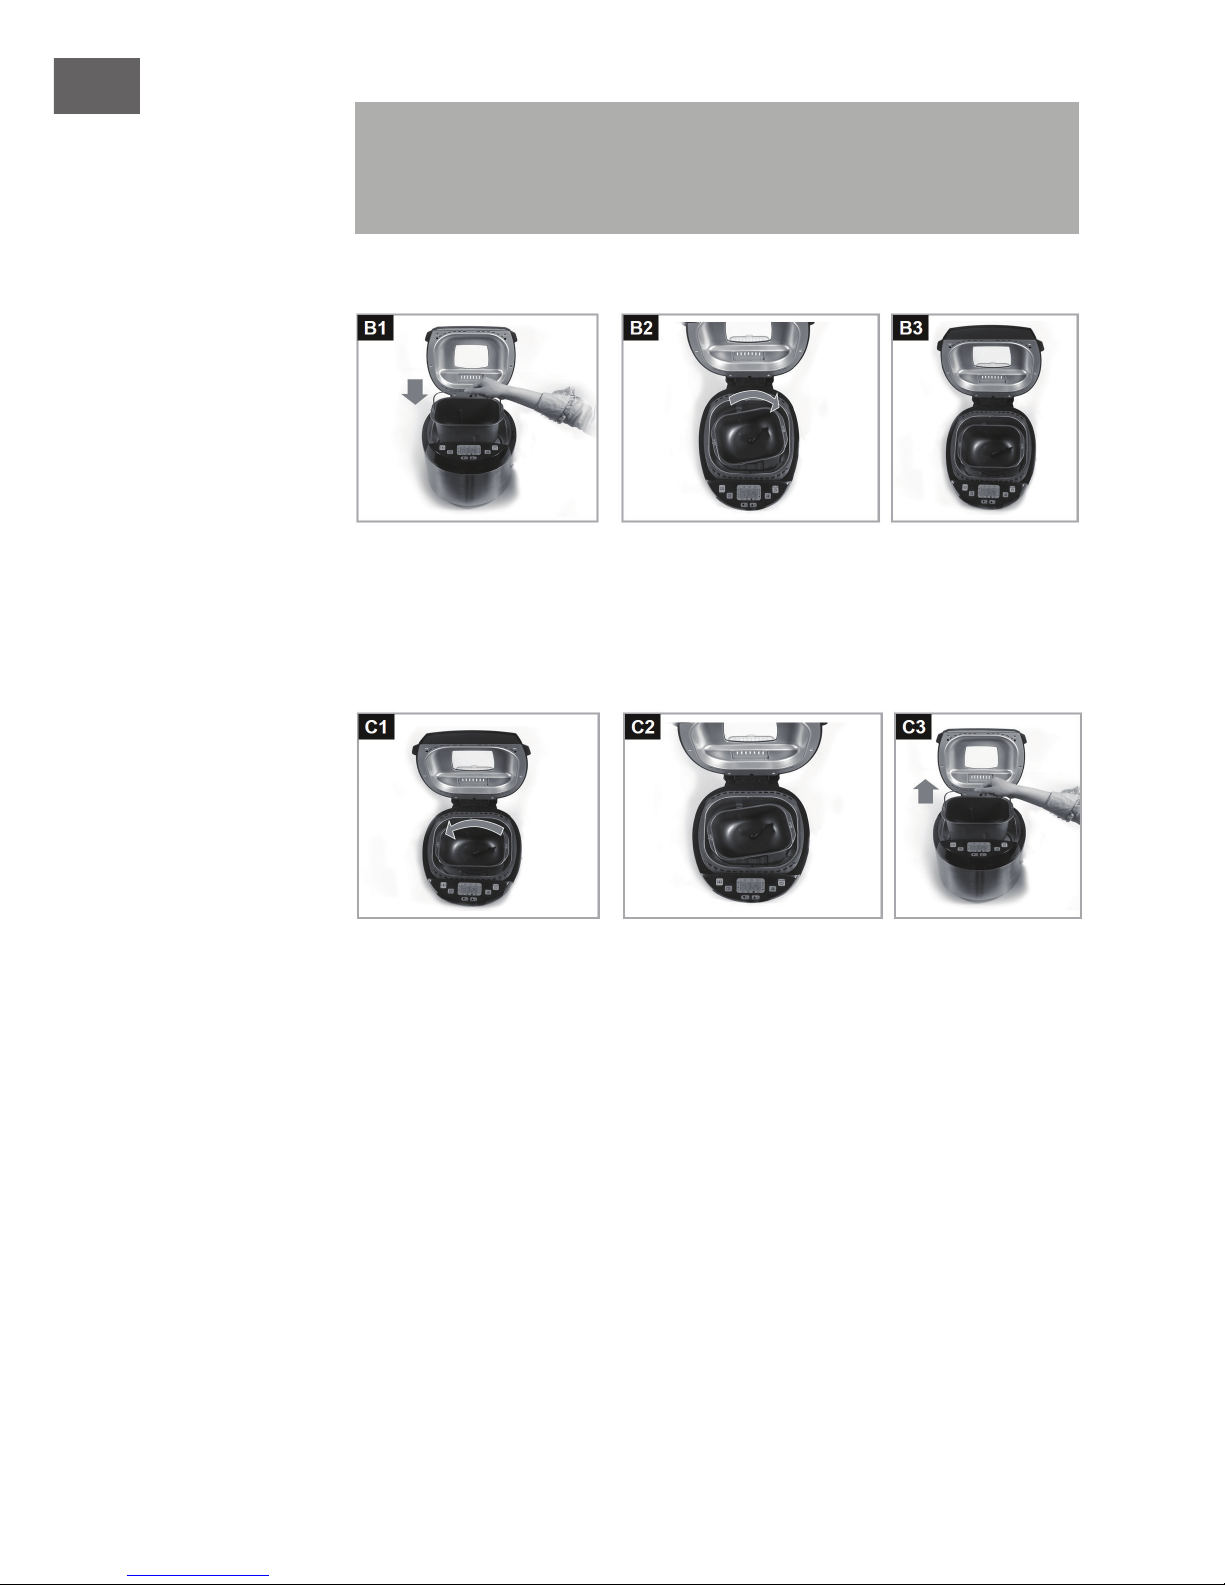
Inserting the baking mould
First push the kneading/stirring hook onto the drive spindle of the baking mould. Turn the
baking mould slightly and insert it into the appliance. Turn the baking mould clockwise
until it snaps in.
Removing the baking mould
Open the cover of the appliance. Use the handle to turn the baking mould anticlockwise
until it stops. Lift the baking mould out of the appliance.
Page 27

27
EN
OPERATION
Basic Operation
1 Remove the baking mould from the appliance and if necessary, push the kneading/
stirring hook onto the drive spindle in the base of the baking mould
2 Pour the previously measured baking ingredients into the baking mould. Use the
baking instructions in the recipe book or on the packaging of the selected bread
baking mixture as a guide.
Tip: You can use the measuring cup and measuring spoon supplied for measuring the
baking ingredients. For liquids, place the measuring cup on a at surface and check
the lling level at eye level.
3 Insert the baking mould into the appliance (see section Inserting and removing the
baking mould and kneading/stirring hook).
4 Close the lid.
5 Insert the plug into a mains socket.
6 Use the MENU button to select a suitable baking programme.
7 Use the WEIGHT button to set the bread weight.
8 Use the BROWNING LEVEL button to select the browning level of the bread crust.
9 If you wish to delay starting of the baking process, use TIMER buttons to set the
period of time to complete bread baking.
10 Press the START/STOP button to start the programme
Note: As soon as you have pressed the button, all other button combinations are
inhibited.
The appliance begins processing of the selected baking programme. The baking
progress is indicated by the triangle on the left or right side of the display.
Note: You can cancel the programme sequence by pressing the START/STOP button
for two seconds.
An acoustic signal is emitted repeatedly at the end of the baking time. The keep-warm
phase begins (menus 1-6, 10 and 11 only).
You can also take the baking mould out of the appliance during the keep- warm phase.
Quit the programme sequence by pressing and holding down the START/STOP button
for approx. two seconds and pulling the plug out of the mains socket.
Page 28
28
EN
Hints on the kneading/stirring hook
• Pull the kneading/stirring hook out of the bread after baking and before cutting the
bread.
• You can also remove the kneading/ stirring hook after the last kneading cycle of
the selected baking pro- gramme so that it does not leave a hole in the bread after
baking. Sprin- kle a little our onto your hands and lift out the bread dough so that
you can pull the kneading/stirring hook upwards out of the baking mould.
MENU AND PROGRAMS
Use the MENU button to select between 12 preset programmes:
Menu 1: Basic
Baking brown bread. You can add other ingredients to improve the taste such as
pumpkin seeds, bacon or roasted onions. This is the most frequently used pro- gramme.
Menu 2: White bread
Baking white bread. The classic variant is wheat bread, a light bread with a crisp crust.
Menu 3: Wholemeal bread
Wholemeal bread is often made from crushed or ground wholemeal cereal. The
programme starts with preheating, i.e. the ingredients are warmed before kneading.
Note: To shorten menus 1, 2 or 3, use the BROWNING LEVEL button to select the
setting
. In this case, lukewarm water should be added.
Menu 4: Sweet bread
Sweet breads are frequently made with milk and ingredients such as chocolate akes,
raisins or nuts can be added to taste.
Menu 5: Short baking programme
This programme enables you to shorten the baking time for brown and white bread.
The baking time for brown bread with menu 1 is 3 hours and 25 minutes but only 1
hour and 20 minutes with menu 5. Time is saved from the dough resting phases. For
this menu, it is therefore recommended to warm up the required liquids in advance. The
dough cannot rise properly when using cold liquids. If the liquid is too hot, the yeast
cannot ferment.
Page 29

29
EN
Menu 6: Gluten-free bread
For baking gluten-free products using gluten-free ours or our blends.
Menu 7: Pizza dough
For kneading pizza dough. Pour all ingre- dients into the bread baking mould and the
appliance produces a smooth pizza dough. You then only need to roll out the dough,
add the toppings and bake.
Menu 8: Pasta dough
The programme produces a smooth pasta dough in a very short time.
Menu 9: Jam
Preparing jams. This programme enables you to produce different types of jam. You then
only need to pour the hot jam into the jars.
Menu 10: Baking without kneading and cooking rice
For baking ready-mixed dough; the dough is not kneaded in this programme. This
programme is also suitable for cook- ing rice: add one part rice and just under 2 parts
water to the bread baking mould (e.g. 1 cup of rice and 1¾ cups of water). The baking
or cooking time can be varied using the TIMER buttons (1:10; 1:20; 1:30). You can
interrupt the programme at any time by pressing and holding the START/STOP button
down for two seconds.
Menu 11: Cake
For making sponge cakes. Use the cake baking mould with the stirring hook for this
programme.
Menu 12: Risotto
Use this programme to prepare risotto in the bread baking mould. Insert the stirring
tool and start programme 12. During the rst programme phase, onions, oil and rice
are browned. A signal is emitted after this phase is completed. Now add the broth and
allow the programme to run.
Note: Pay attention to the quantities stated on the risotto packaging. We recommend
a ratio of at least 3 parts broth to 1 part rice. After completion of the programme,
you can rene the risotto with white wine, butter and parmesan cheese. Stir these in-
gredients after completing the programme
Page 30
30
EN
SPECIAL FUNCTIONS
Timer
Note: The timer can be used for all menus except menu 10 and 12. Only the baking
time of menu 10 can be changed using TIMER buttons (1:10; 1:20; 1:30).
1 First select the desired menu (MENU button), the bread weight (WEIGHT button)
and the browning level (BROWNING LEVEL button).
The following setting was selected: Menu 1, Bread weight
(900g) and Browning
level (medium). The baking time on the display is [3:25].
2 Use buttons and to set the desired delay time. Each press of the button changes
the displayed time by 10 minutes. You can set a maximum time of 15 hours
(including baking time).
Example: Each button press changes the time on the display: 3:25 – 3:30 – 3:40 –
3:50 – 4:00 etc. If the bread is to be ready in 6 hours, press the TIMER button until 6:00
appears in the display
3 Start the programme by pressing the button. The colon on the display start ashing
and the set time counts down. The baking programme starts automatically when the
start of the baking time is reached.
Example: The displayed time is 6:00, the colon is ashing. When 3:25 is reached, the
baking programme starts automatically.
4 After the set period of time has elapsed, the bread is nished and the baking mould
can be removed from the appliance.
Example: After 6 hours incl. baking programme, the bread is nished. The display changes
to 00:00 and the keep-warm phase starts. You can take the bread out of the appliance
or leave it in the appliance during the keep-warm phase. At the end of the keep-warm
phase, the display returns to the original setting: Menu 1, Bread weight
(900g) and
Browning level (medium). The baking time on the display is [3:25].
Page 31

31
EN
Important hints on baking
• During warm or humid weather, the dough may rise too quickly and a delay time of
more than two hours may be too long.
• To prevent the yeast rising too fast, add the our to the mould last of all, form a
small hollow in the our and place the yeast into the hollow.
• Do not set long delay times if you are working with perishable foodstuffs (milk,
eggs, etc.).
Keep-warm function
For example, the keep-warm function prevents the bread from absorbing mois- ture. At
the end of programmes 1-6, 10 and 11, the nished product is kept warm for a certain
time. „00:00“ appears in the display and an acoustic signal is emitted intermittently.
If you wish to remove the nished bread during the keep-warm phase, switch off the
appliance by pressing and holding the START/STOP button down for two seconds.
Ingredients dispenser
The ingredients dispenser allows you to add dry ingredients such as pumpkin seeds
or raisins to the dough towards the end of the kneading process. The bottom ap of
the dispenser opens automatically during baking programmes 1-7. Flap opening is
indicated by clearly audible clicking and several acoustic signals. The ingredients
dispenser does not open during baking pro- grammes 8–12 (pasta dough, jam, baking
without kneading, cake, risotto).
Note: Details on the time when the ingre- dients dispenser opens in each indi- vidual
programme can be obtained from the table in the appendix.
• Make sure that you do not overll the dispenser, otherwise the ingredients may
become wedged and will not drop into the baking mould. Pay attention to the
quantities specied in the recipes.
• Small-sized ingredients such as sesame seeds can drop through the grate at the
ottom of the dispenser. In this case, open the cover of the bread maker and add the
seeds directly to the baking mould when the acoustic signal for the opening of the
dispenser is emitted. Proceed in the same way for ingredients that can melt or stick
(chocolate, cheese, pieces of fruit, etc.).
• Clean the dispenser after each use. Soiling can also prevent the ap at the bottom
of the dispenser from opening.
Note: Short acoustic signals indicate when the ap at the bottom of the dispenser
opens. At this point, you can also open the cover of the bread maker to add the
ingredients directly into the baking mould.
Page 32
32
EN
• When the baking process is complete, lift the ingredients dispenser out of the
appliance, clean it, close the ap in the base and reinsert the dispenser into the
appliance.
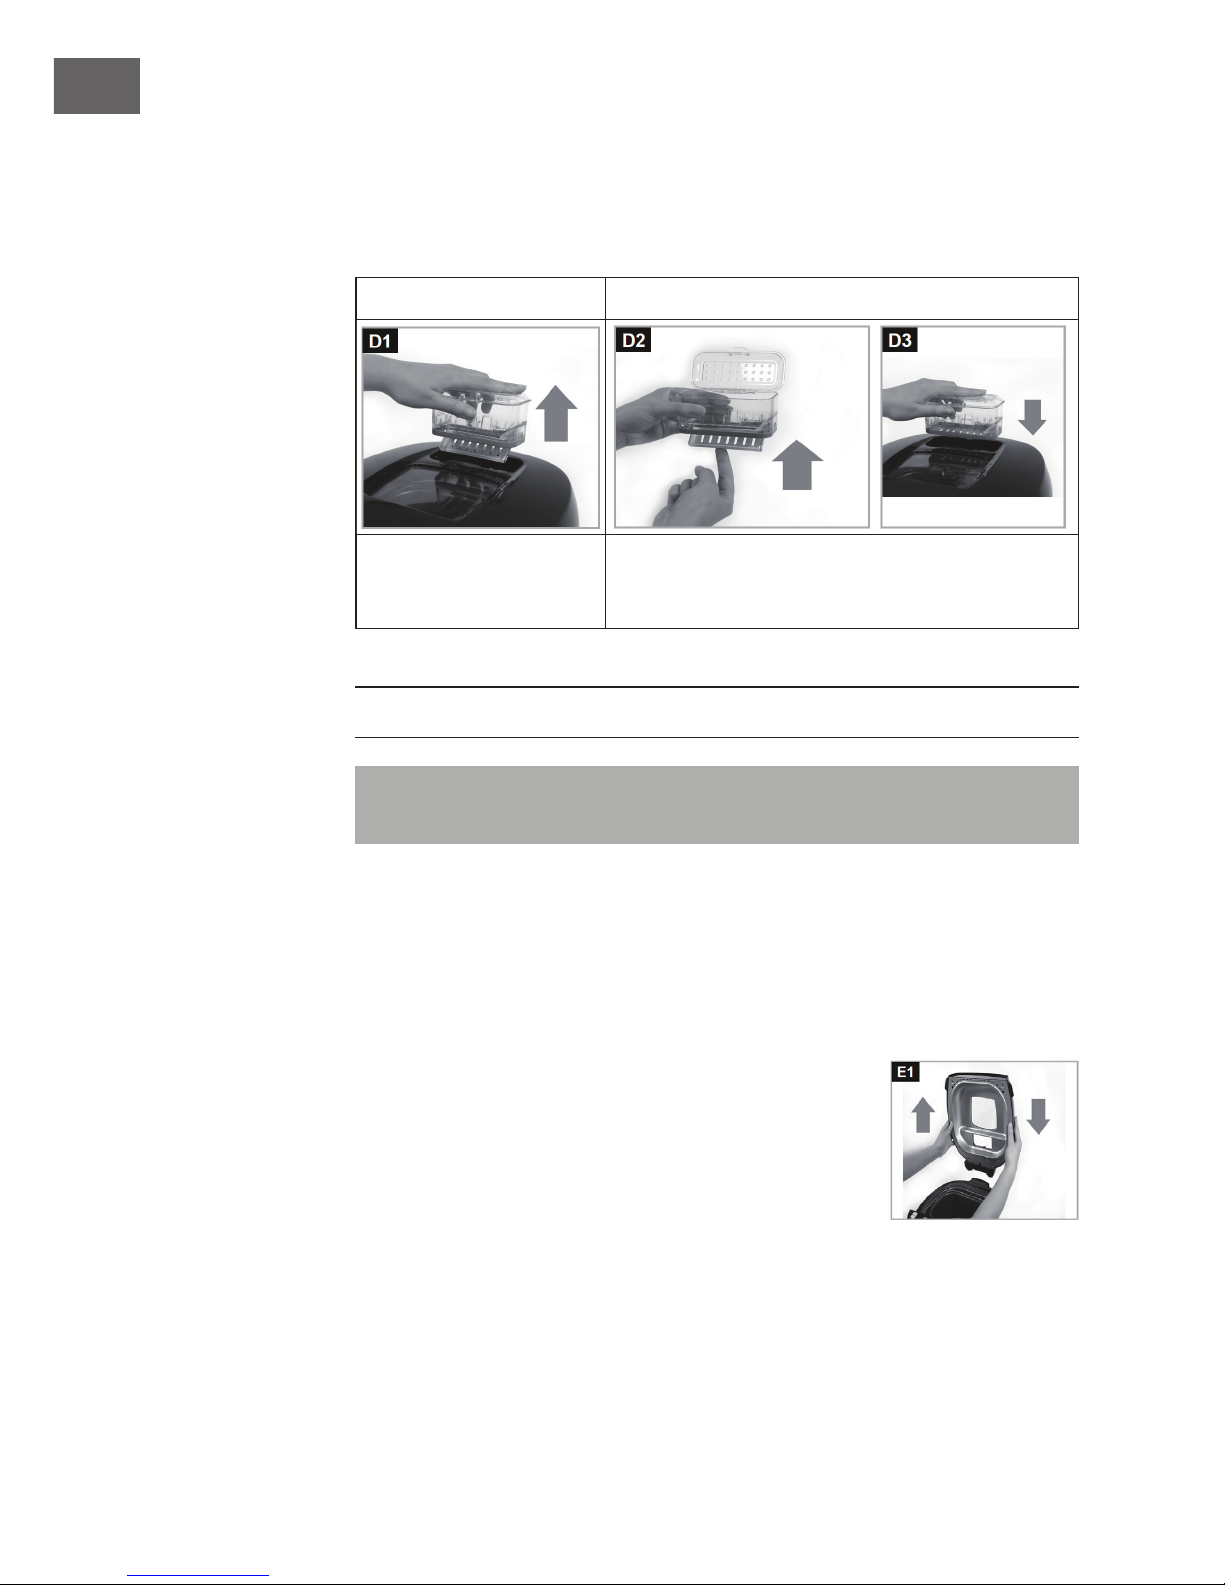
Removing and inserting the ingredients dispenser
Remove Insert
To remove the ingredients
dispenser, lift it rmly out of
the appliance.
To insert the dispenser, push the base ap until it closes
and locks. Press the ingredients dispenser into the
appliance until it audibly snaps in.
CARE AND CLEANING
NOTE: Turn off the unit, and unplug it from the wall outlet before maintenance or
cleaning to avoid electric shock.
Storage
If you do not intend to use the appliance for a longer period of time, clean it as described in the section Cleaning and care. Store the appliance and all accessory parts at
a dry, clean and frost-free location, which is protected against direct sunlight.
Removing the lid and cleaning
Clean the appliance after each use. To simplify cleaning, the
lid of the ap- pliance can be removed. Lift the lid until it is
upright and pull it upwards out of the appliance (image E1).
Page 33
33
EN
• Wipe the appliance and the inside of the housing using a damp cloth.
• Other parts used can be cleaned in warm dishwater. Cleaning the bread or cake
forms or the stirring tools in a dishwasher is not recommended. In addition, the
ceramic coating is very sensitive to strongly acidic cleaning agents.
• Allow time for the appliance to dry completely.
Replacing the lid
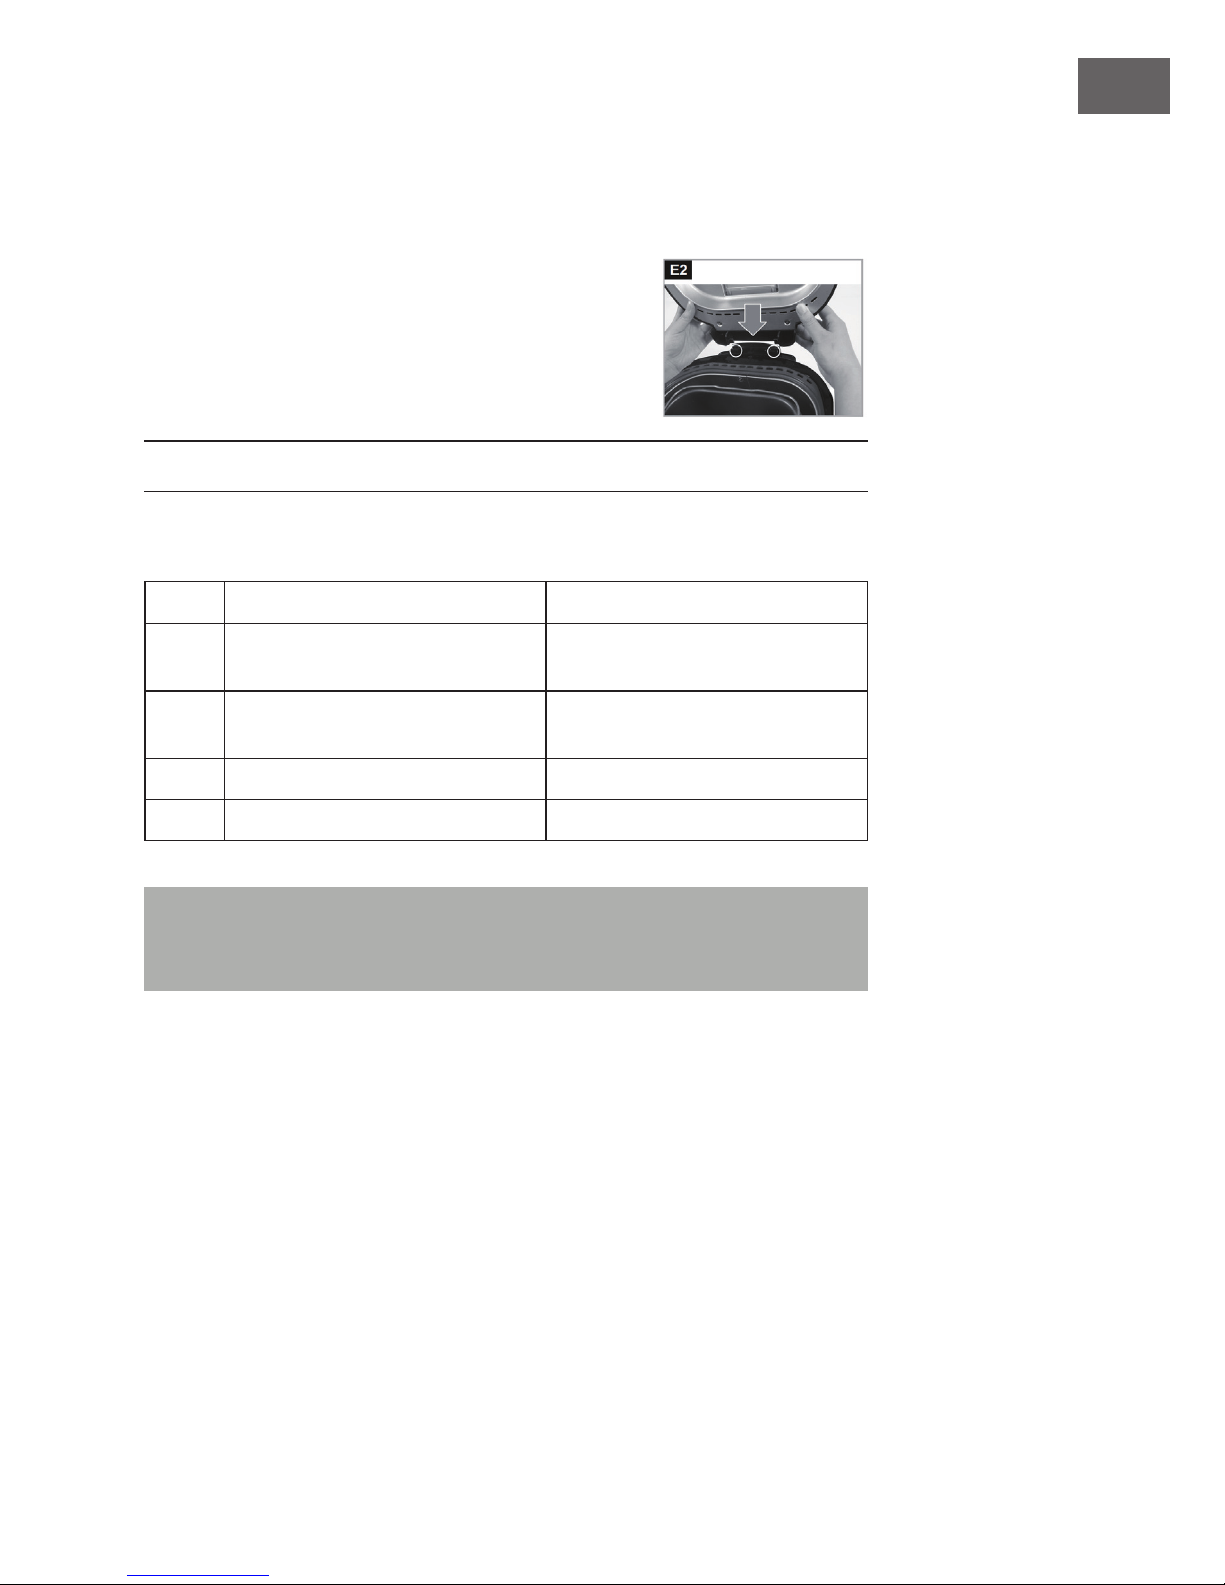
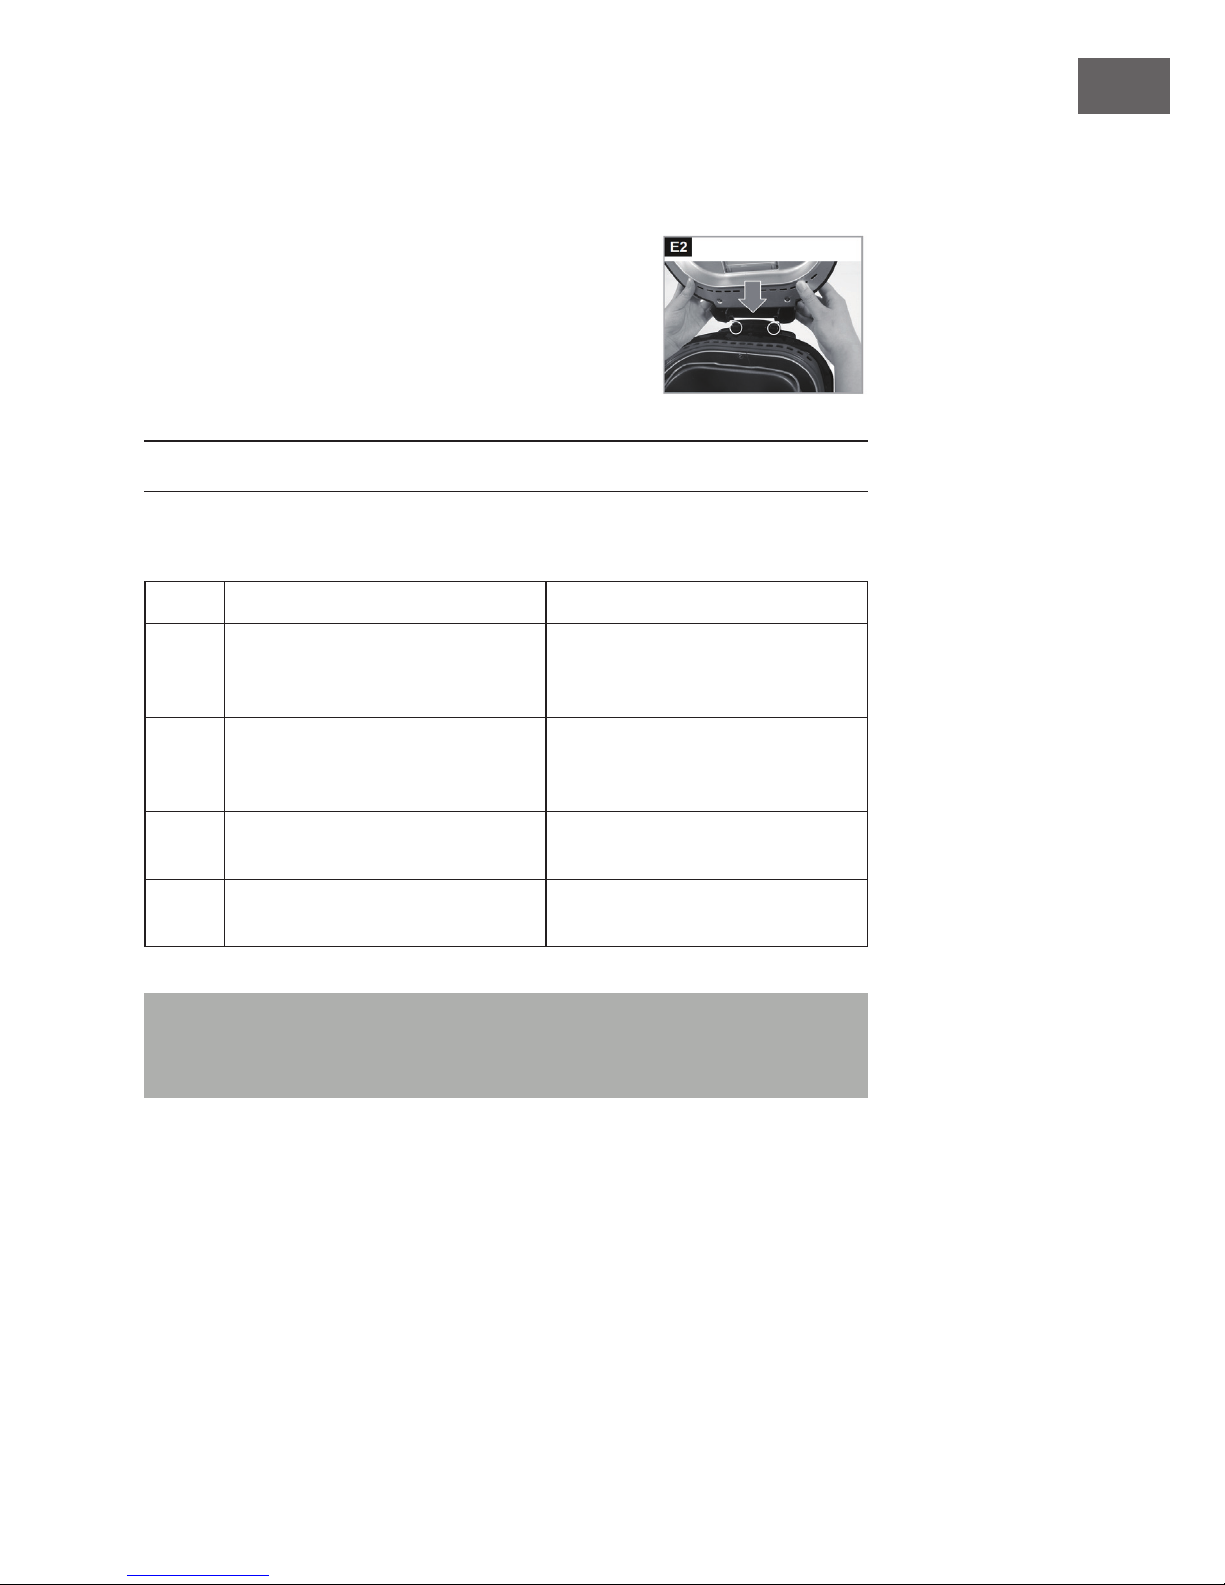
After cleaning, replace the lid (image E2). Hold the lid
upright and push the latches of the lid into the recesses in the
housing (see markings).
TROUBLESHOOTING
Error Codes
Fault Possible Cause Suggested Solution
E00 Appliance is too cold. Wait until the appliance has
reached room tem- perature.
E01 Appliance is still too warm af- ter the
last baking programme.
Wait until the appliance has cooled
down.
EEE Temperature sensor open. Call customer service.
HHH Short-circuit in temperature sensor. Call customer service.
If you are unable to identify or solve the problem, contact your local Service centre.
Before telephoning, make a note of the model, serial number and purchase date of
your machine, the Servie Center will require this information.
Page 34
34
EN
HINTS ON DISPOSAL
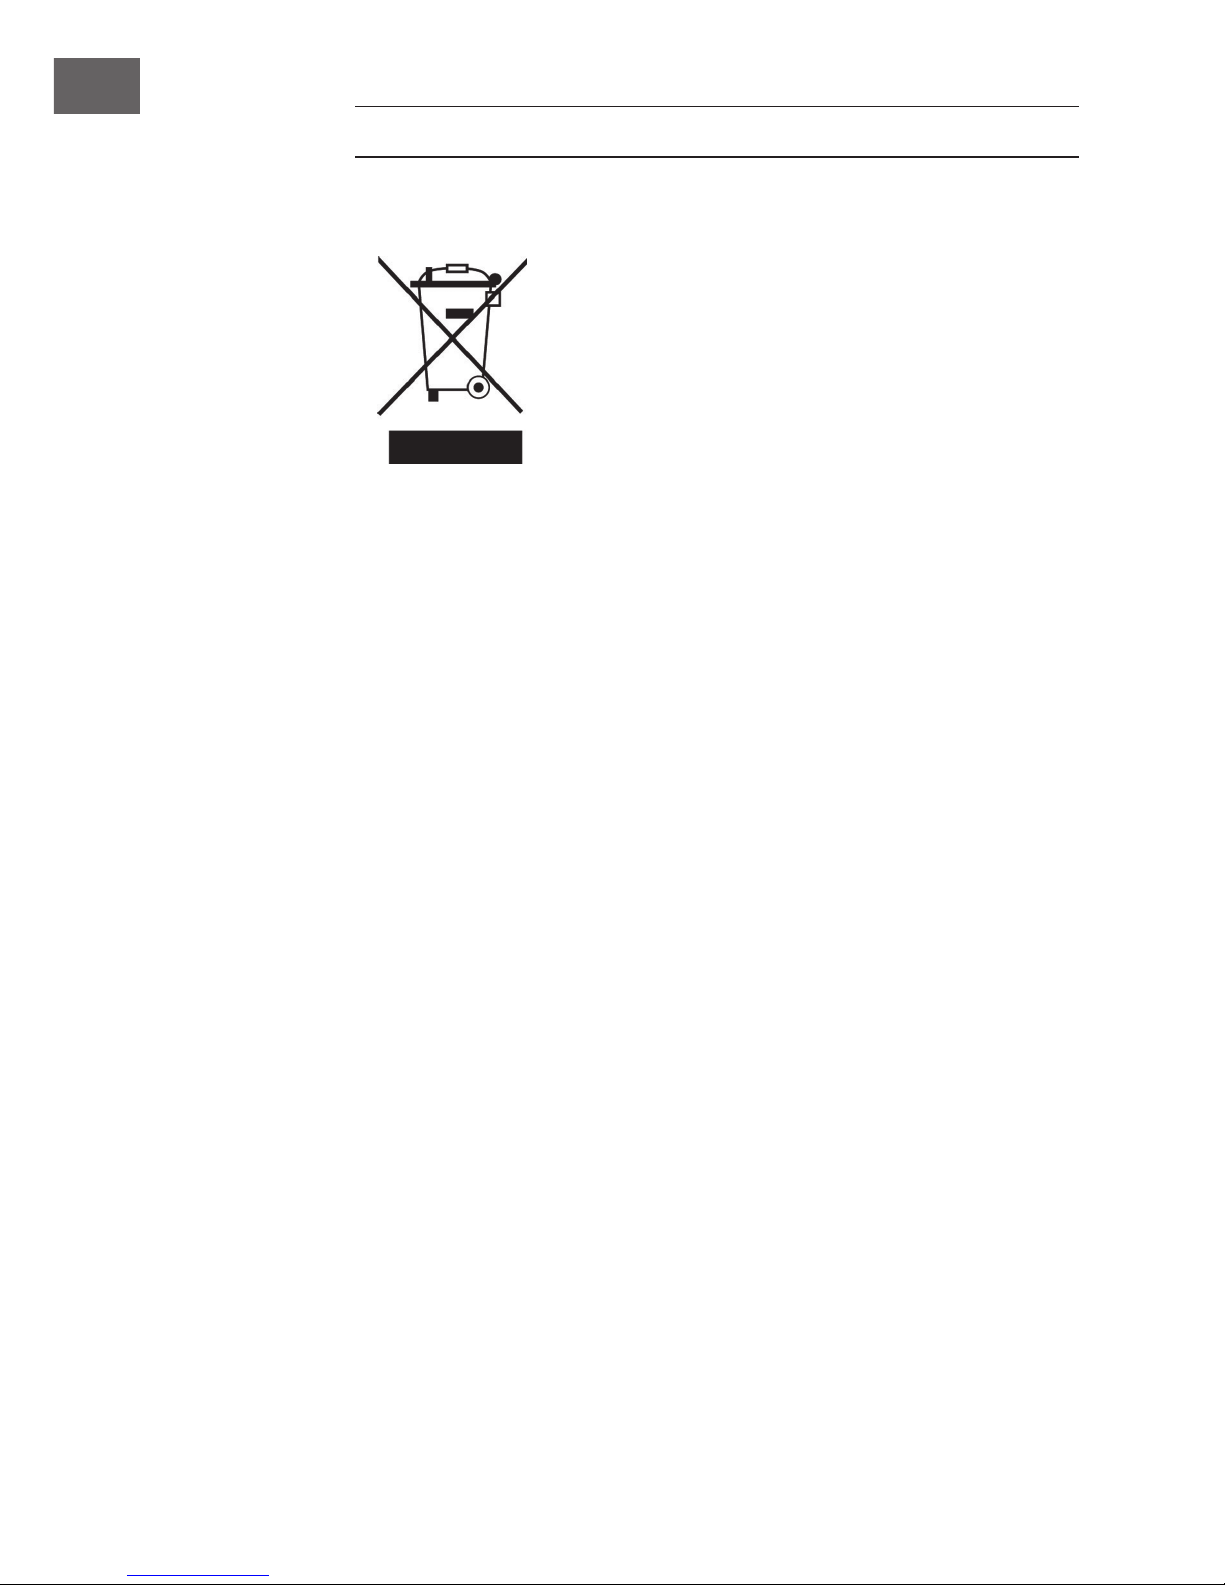
According to the European waste regulation 2012/19/
EU this symbol on the product or on its packaging indicates
that this product may not be treated as household waste.
Instead it should be taken to the appropriate collection point
for the recycling of electrical and electronic equipment. By
ensuring this product is disposed of correctly, you will help
prevent potential negative consequences for the environment
and human health, which could otherwise be caused by
inappropriate waste handling of this product. For more
detailled information about recycling of this product, please
contact your local council or your household waste disposal
service.
Page 35
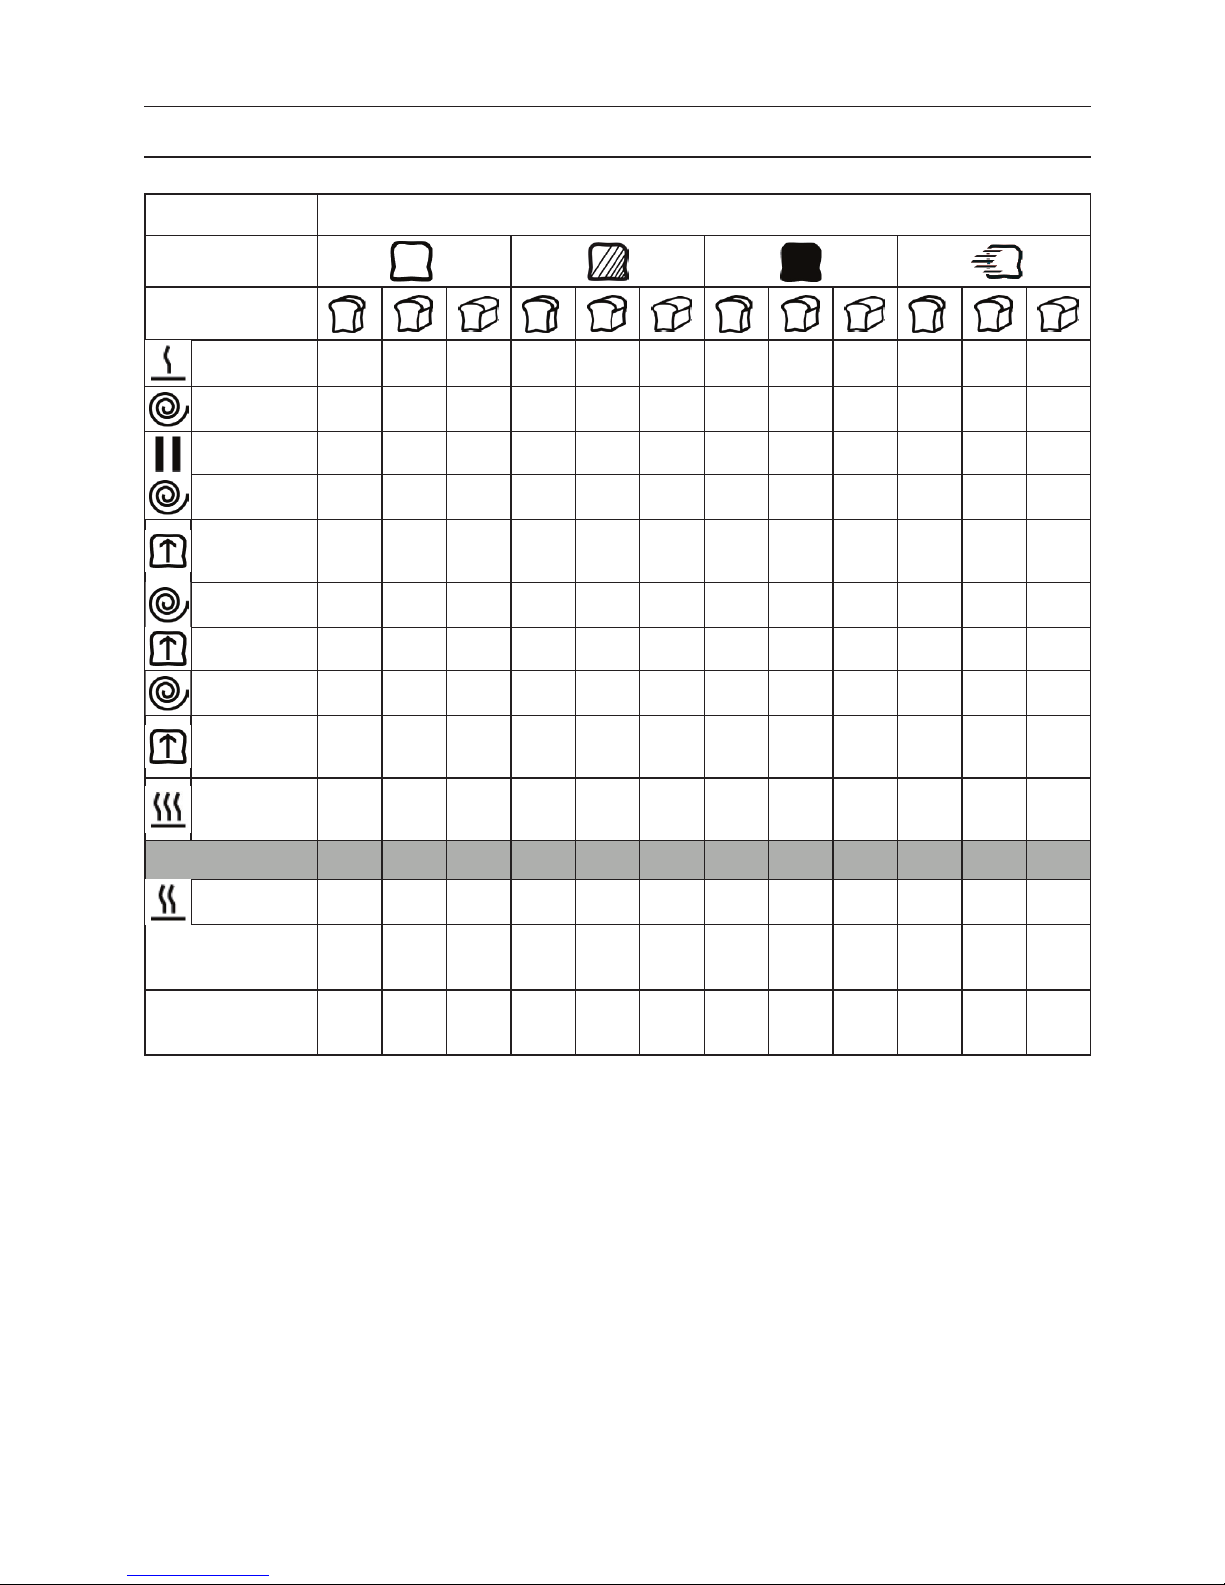
APPENDIX: PROGRAM TIMES
Menu 1 Basic
Browning level
Weight
Preheating - - - - - - - - - - - -
Kneading
5 min 5 min 5 min 5 min 5 min 5 min 5 min 5 min 5 min 5 min 5 min 5 min
Resting
5 min 5 min 5 min 5 min 5 min 5 min 5 min 5 min 5 min 5 min 5 min 5 min
Kneading
20 min 20 min 20 min 20 min 20 min 20 min 20 min 20 min 20 min 20 min 20 min 20 min
Rising
40
min
40
min
40
min
40
min
40
min
40
min
40
min
40
min
40
min
15 min 15 min 15 min
Kneading
10 s 10 s 10 s 10 s 10 s 10 s 10 s 10 s 10 s 10 s 10 s 10 s
Rising
25 min 25 min 25 min 25 min 25 min 25 min 25 min 25 min 25 min 9 min 9 min 9 min
Kneading
10 s 10 s 10 s 10 s 10 s 10 s 10 s 10 s 10 s 10 s 10 s 10 s
Rising
50
min
50
min
50
min
50
min
50
min
50
min
50
min
50
min
50
min
30
min
30
min
30
min
Baking
46
min
51 min
58
min
48
min
53
min
60
min
53
min
58
min
65
min
48
min
53
min
60
min
Program duration
3:11 3:16 3:23 3:13 3:18 3:25 3:18 3:23 3:30 2:12 2:17 2:24
Keep warm
1 h 1 h 1 h 1 h 1 h 1 h 1 h 1 h 1 h 1 h 1 h 1 h
Ingredients dispenser
opens
2:51 2:56 3:03 2:53 2:58 3:05 2:58 3:03 3:10 1:52 1:57 2:04
Max. programme
sequence delay
15:00 15:00 15:00 15:00 15:00 15:00 15:00 15:00 15:00 15:00 15:00 15:00
Page 36
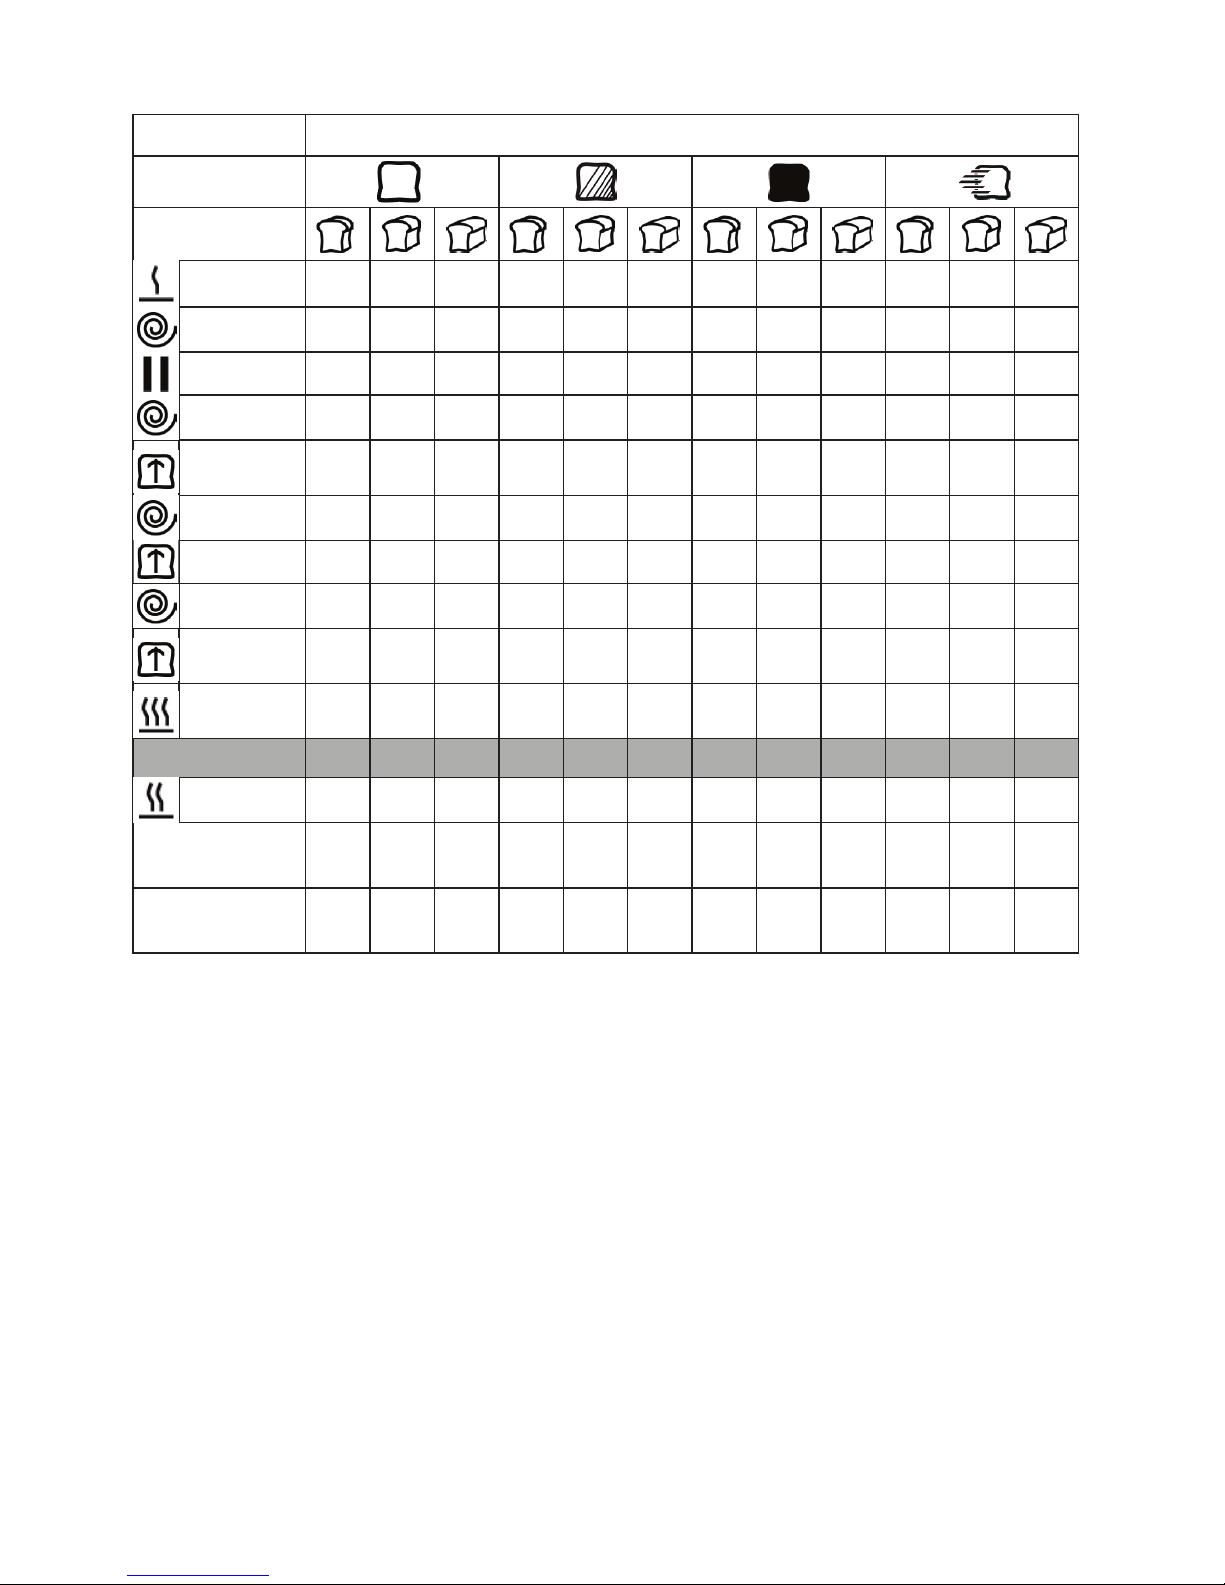
Menu 2 White bread
Browning level
Weight
Preheating - - - - - - - - - - - -
Kneading
5 min 5 min 5 min 5 min 5 min 5 min 5 min 5 min 5 min 5 min 5 min 5 min
Resting
5 min 5 min 5 min 5 min 5 min 5 min 5 min 5 min 5 min 5 min 5 min 5 min
Kneading
20 min 20 min 20 min 20 min 20 min 20 min 20 min 20 min 20 min 20 min 20 min 20 min
Rising
39 min 39 min 39 min 39 min 39 min 39 min 39 min 39 min 39 min
30
min
30
min
30
min
Kneading
10 s 10 s 10 s 10 s 10 s 10 s 10 s 10 s 10 s 10 s 10 s 10 s
Rising
31 min 31 min 31 min 31 min 31 min 31 min 31 min 31 min 31 min 15 min 15 min 15 min
Kneading
10 s 10 s 10 s 10 s 10 s 10 s 10 s 10 s 10 s 5 s 5 s 5 s
Rising
60
min
60
min
60
min
60
min
60
min
60
min
60
min
60
min
60
min
30
min
30
min
30
min
Baking
48
min
50
min
53
min
50
min
52 min
55
min
55
min
57 min
60
min
50
min
52 min
55
min
Program duration
3:28 3:30 3:33 3:30 3:32 3:35 3:35 3:37 3:40 2:35 2:37 2:40
Keep warm
1 h 1 h 1 h 1 h 1 h 1 h 1 h 1 h 1 h 1 h 1 h 1 h
Ingredients dispenser
opens
3:08 3:10 3:13 3:10 3:12 3:15 3:15 3:17 3:20 2:15 2:17 2:20
Max. programme
sequence delay
15:00 15:00 15:00 15:00 15:00 15:00 15:00 15:00 15:00 15:00 15:00 15:00
Page 37
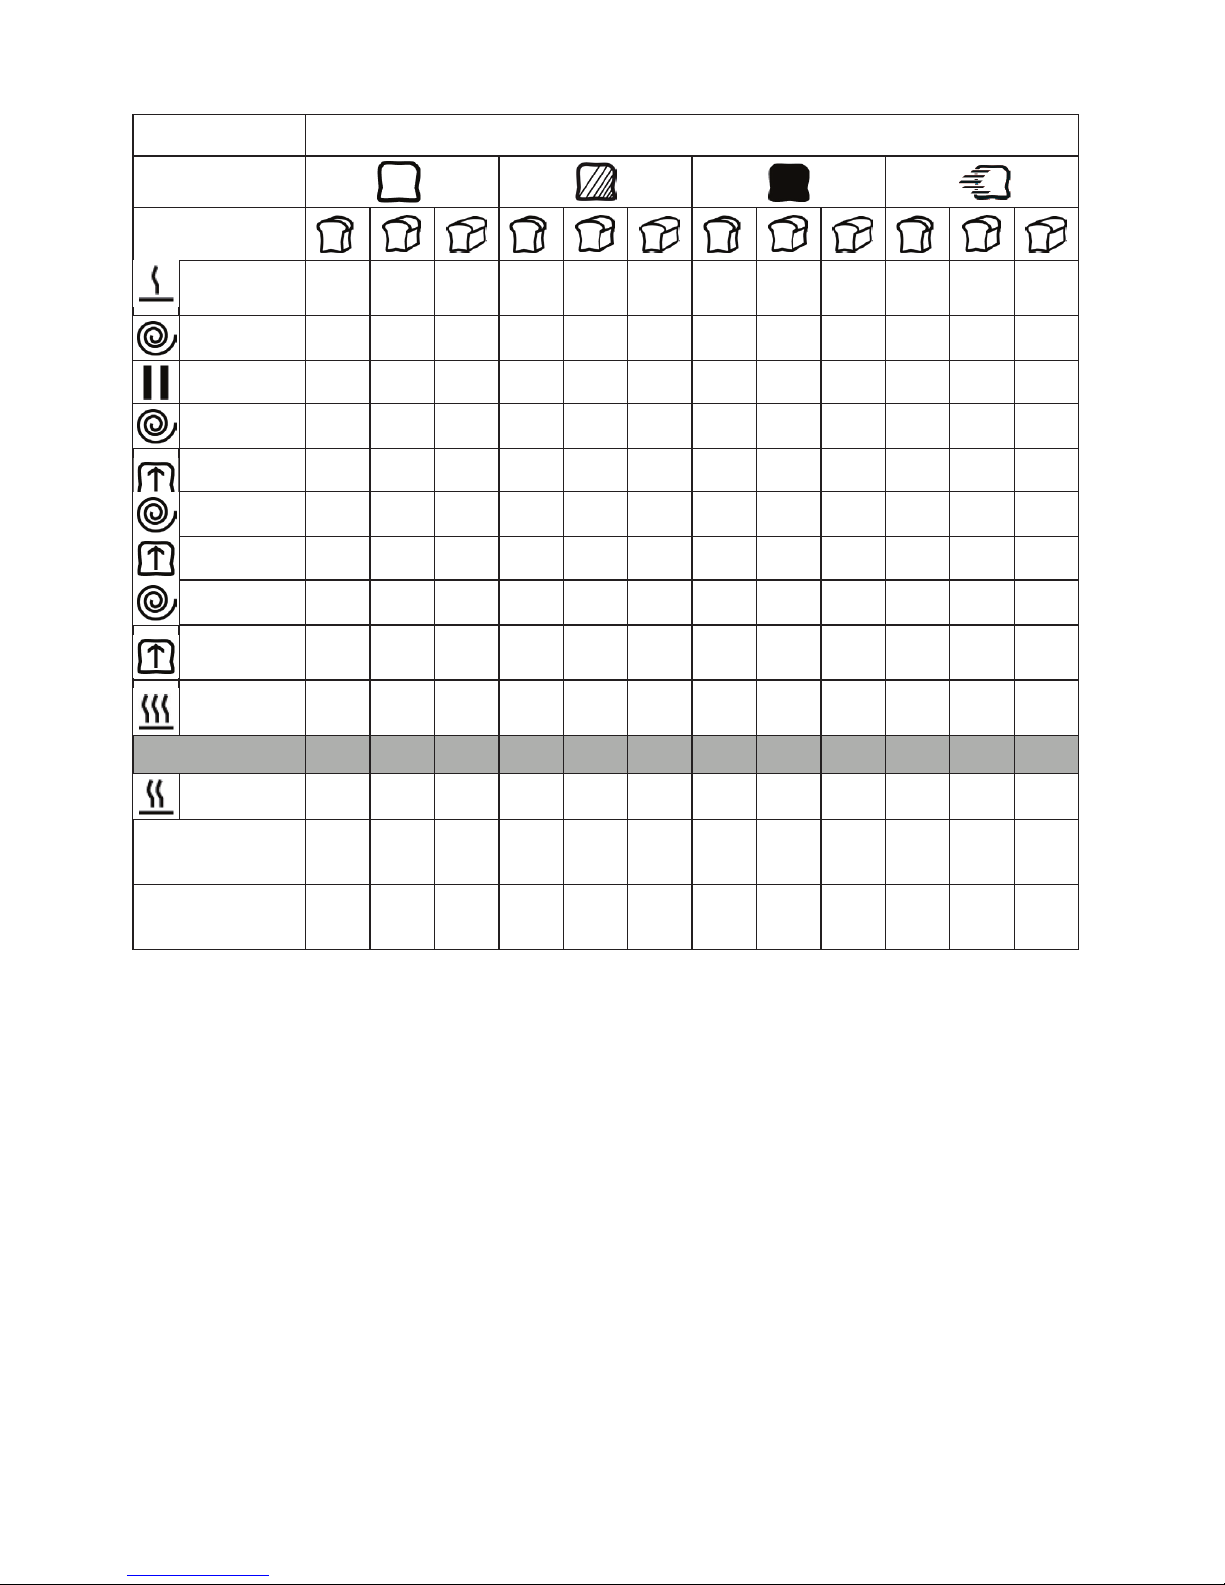
Menu 3 Wholemeal bread
Browning level
Weight
Preheating
30
min
30
min
30
min
30
min
30
min
30
min
30
min
30
min
30
min
5 min 5 min 5 min
Kneading
5 min 5 min 5 min 5 min 5 min 5 min 5 min 5 min 5 min 5 min 5 min 5 min
Resting
5 min 5 min 5 min 5 min 5 min 5 min 5 min 5 min 5 min 5 min 5 min 5 min
Kneading
15 min 15 min 15 min 15 min 15 min 15 min 15 min 15 min 15 min 15 min 15 min 15 min
Rising
49 min 49 min 49 min 49 min 49 min 49 min 49 min 49 min 49 min 24 min 24 min 24 min
Kneading
10 s 10 s 10 s 10 s 10 s 10 s 10 s 10 s 10 s 10 s 10 s 10 s
Rising
26 min 26 min 26 min 26 min 26 min 26 min 26 min 26 min 26 min 11 min 11 min 11 min
Kneading
10 s 10 s 10 s 10 s 10 s 10 s 10 s 10 s 10 s 10 s 10 s 10 s
Rising
45
min
45
min
45
min
45
min
45
min
45
min
45
min
45
min
45
min
35 min 35 min 35 min
Baking
48
min
50
min
53
min
50
min
52 min
55
min
55
min
57 min
60
min
50
min
52 min
55
min
Program duration
3:43 3:45 3:48 3:45 3:47 3:50 3:50 3:52 3:55 2:30 2:32 2:35
Keep warm
1 h 1 h 1 h 1 h 1 h 1 h 1 h 1 h 1 h 1 h 1 h 1 h
Ingredients dispenser
opens
2:58 3:00 3:03 3:00 3:02 3:05 3:05 3:07 3:10 2:10 2:12 2:15
Max. programme
sequence delay
15:00 15:00 15:00 15:00 15:00 15:00 15:00 15:00 15:00 15:00 15:00 15:00
Page 38
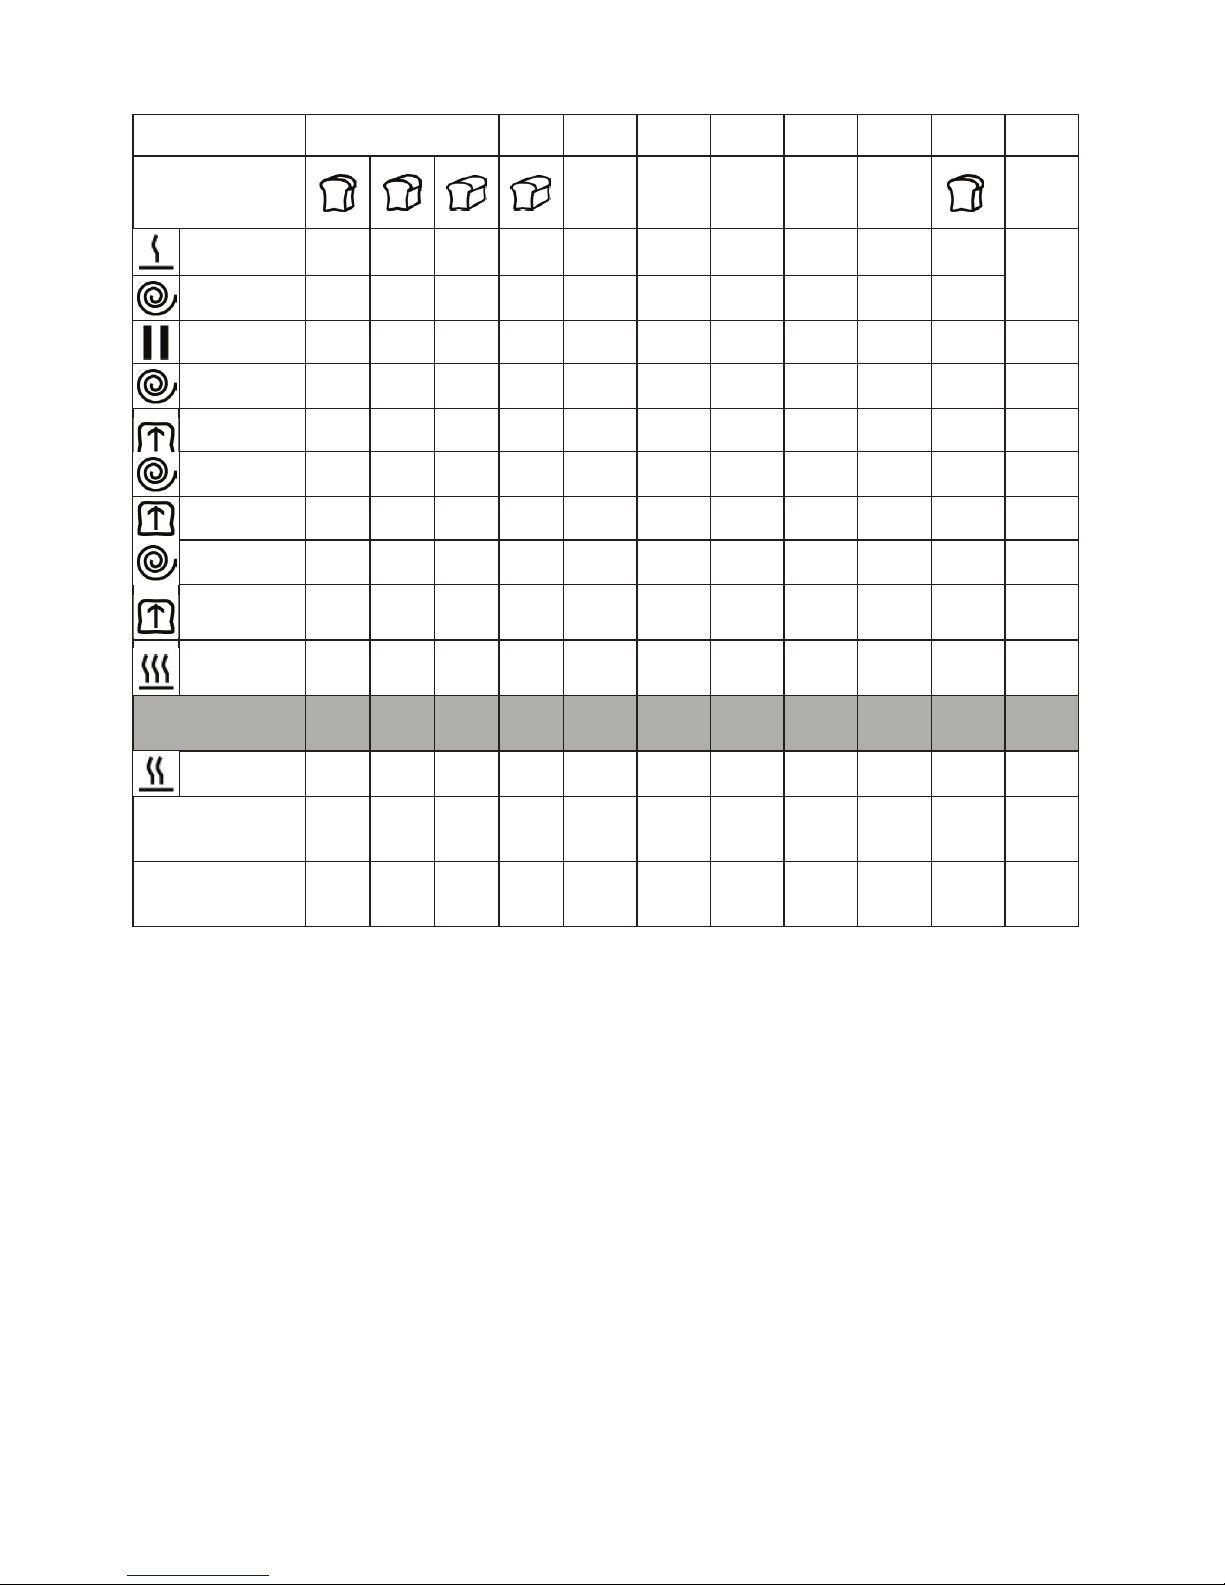
Menu 4 5 6 7 8 9 10 11 12
Weight
- - - - - -
Preheating
- - - - - - - - - -
15 min
Kneading
5 min 5 min 5 min 5 min 5 min 5 min 3 min 5 min - 5 min
Resting
5 min 5 min 5 min - - 5 min - - - - -
Kneading
20 min 20 min 20 min 15 min 10 min 20 min 11 min 10 min - 15 min -
Rising
39 min 39 min 39 min 12 min - 60 min - - - - -
Kneading
10 s 10 s 10 s - - - - - - - -
Rising
26 min 26 min 26 min - - - - - - - -
Kneading
5 s 5 s 5 s - - - - - - - -
Rising
30
min
30
min
30
min
- 60 min - - - - - -
Baking
50
min
55
min
60
min
48
min
55 min - - 70 min
60 -90
min
75 min 55 min
Program duration
2:55 3:00 3:05 1:20 2:10 1:30 00:14 1:25
1:001:30
1:35 1:10
Keep warm
1 h 1 h 1 h 1 h 1 h - - - 1 h 22 min -
Ingredients dispenser
opens
2:57 3:02 3:07 1:10 2:05 1:10 - - - - -
Max. programme
sequence delay
15:00 15:00 15:00 15:00 15:00 15:00 15:00 15:00 - 15:00 -
Page 39
39
ES
Estimado cliente:
Le felicitamos por la adquisición de este producto. Lea atentamente el siguiente manual
y siga cuidadosamente las instrucciones de uso con el n de evitar posibles daños.
La empresa no se responsabiliza de los daños ocasionados por un uso indebido del
producto o por haber desatendido las indicaciones de seguridad.
ÍNDICE DE CONTENIDOS
Datos técnicos39
Declaración de conformidad39
Indicaciones de seguridad40
Descripción del aparato41
Indicadores y funciones de los botones42
Puesta en marcha43
Utilización45
Menús y programas46
Funciones especiales48
Limpieza y cuidado50
Detección y resolución de problemas51
Retirada del aparato52
Anexo: tiempos de los programas53
DATOS TÉCNICOS
Número de artículo 10032101
Suministro eléctrico 230 V ~ 50 Hz
Potencia 650 W
DECLARACIÓN DE CONFORMIDAD
Fabricante:
Chal-Tec GmbH, Wallstraße 16, 10179 Berlín (Alemania).
Este producto cumple con las siguientes directivas
europeas:
2014/30/UE (EMC)
2014/35/UE (baja tensión)
2011/65/UE (refundición RoHS)
Page 40

40
ES
INDICACIONES DE SEGURIDAD
• Los niños mayores de 8 años y las personas con discapacidades físicas o psíquicas
solamente podrán utilizar el aparato si han sido previamente instruidas sobre su
uso y conocen las indicaciones de seguridad.
• Si el cable de alimentación o el enchufe están dañados, deberán ser sustituidos por
el fabricante, un servicio técnico autorizado o una persona igualmente cualicada.
• Durante el funcionamiento del aparato, no toque las supercies calientes. Utilice
solamente el regulador. No deje que el cable de alimentación quede colgando de
la supercie de trabajo.
• No conecte el aparato a tomas de corriente manejadas por control remoto ni con
temporizador.
• Lave todas las supercies que entrarán en contacto con los alimentos.
• Antes de utilizar el aparato, compruebe la tensión en la placa técnica del mismo.
Conecte el aparato solamente a tomas de corriente que se adecuen a la tensión
del mismo.
• No sumerja el aparato completamente en agua u otro líquido para limpiarlo.
• Desconecte el enchufe cuando no utilice el aparato durante un periodo
prolongado de tiempo antes de montar o desmontar piezas o de limpiar el
aparato.
• No coloque el aparato cerca de fuentes de calor ni hornos.
• Mueva el aparato con precaución cuando contenga aceite u otro líquido calientes.
• No toque ninguna pieza en movimiento durante el funcionamiento del aparato.
• No encienda el aparato si no ha colocado ningún alimento en el molde para el
pan.
• No golpee el molde ni el marco para retirar el pan, podría deformarlos.
• Conecte el cable de alimentación primero al aparato y a continuación a la toma
de corriente. No encienda ni apague el aparato conectando o desconectando el
enchufe, apáguelo primero en el interruptor.
• No encienda el aparato si no ha colocado el molde en su interior; de lo contrario,
podría averiarlo.
Page 41
41
ES
DESCRIPCIÓN DEL APARATO
1 Panel de control
2 Tapa
3 Ventana
4 Dispensador de ingredientes
5 Molde para pan
6 Gancho amasador
7 Molde para bizcocho
8 Mezclador
9 Cuchara medidora
10 Vaso medidor
Page 42
42
ES
INDICADORES Y FUNCIONES DE LOS BOTONES
Indicadores y fases del horneado
Temporizador
El aparato está calentándose
Se está amasando la masa
Se remueve la masa
La masa está subiendo
La masa se está horneando
El producto listo está manteniendo su temperatura
Fin de programa
Botones de función
MENÚ: Utilice este botón para seleccionar uno de los 12 programas. El
programa seleccionado aparece en el display (MENU 1-12).
PESO: Utilice este botón para regular el peso del pan. Puede elegir entre
varios pesos: 450g, 680g o 900g. El peso seleccionado se
representa en el display subrayado.
GRADO DE TUESTE: Utilice este botón para regular el grado de tueste
para los programas 1-4.
Grado de tueste: Tueste ligero
Grado de tueste: Tueste medio
Grado de tueste: Tueste fuerte
START/STOP: Utilice este botón para iniciar el programa seleccionado.
Para detener el programa, mantenga pulsado el botón.
TEMPORIZADOR: Pulse el botón para reducir o aumentar el temporizador
en intervalos de 10 minutos. Cuando el proceso de horneado esté listo,
aparece el tiempo indicado. El tiempo máximo regulable es de 15 horas.
Page 43
43
ES
Ejemplo: El temporizador muestra 6:30. Esto quiere decir que el proceso de
horneado terminará en 6 horas y 30 minutos. Si inicia el programa con el botón
Start, el temporizador comienza la cuenta atrás. Una echa en la parte derecha o
izquierda del display muestra la fase actual de horneado. Tras 6 horas y 30 minutos,
el pan estará listo.
PUESTA EN MARCHA
Antes del primer uso
• Retire todo el material de embalaje.
• Limpie el aparato y todas las piezas que vayan a entrar en contacto con los
alimentos. Encontrará las indicaciones exactas de limpieza en la sección Limpieza
y cuidado.
Colocar y retirar gancho amasador
Advertencia: El término „molde“ se utiliza en este manual tanto para referirse al
molde del pan como al molde de bizcocho. Para mejorar la uidez del texto, se
evitará de manera intencionada el uso de ambos términos. Se nombrará cada uno
de los moldes cuando sea preciso.
Colocar Retirar
Presione el gancho amasador
o removedor contra el eje del
motor situado en el centro
del molde. El gancho y el eje
son planos por una cara y
solo encajan entre sí cuando
ambos lados se orientan entre
sí. El eje del motor está jado
al molde con una tuerca de
mariposa.
Mantenga sujeta la tuerca de mariposa en la parte
inferior con una mano y el gancho con la otra. Tire
del gancho con un giro ligero del eje mientras gira
la tuerca de mariposa en la otra dirección.
Page 44
44
ES
Advertencia: Puede retirar el gancho tras el último proceso de amasado en el
programa de horneado seleccionado para evitar que tras el horneado no quede un
oricio en medio del pan. Espolvoree las manos con un poco de harina y levante la
masa para poder retirar el gancho.
Colocar molde
Coloque primero el gancho sobre el eje del molde. Gire el molde ligeramente e
introdúzcalo en el aparato. Gire el molde en el sentido de las agujas del reloj hasta que
encaje completamente.
Retirar molde
Abra la tapa. Mantenga sujeto el molde por el asa y gírelo en el sentido contrario de
las agujas del reloj hasta el tope. Levante el molde por el aparato.
Page 45

45
ES
UTILIZACIÓN
Utilización general
1 Extraiga el molde del aparato y je el gancho necesario en el eje del motor del
molde.
2 Introduzca la cantidad de ingredientes correspondiente en el molde. Cíñase a la
receta o a las instrucciones de la mezcla.
Consejo: Utilice el vaso o cuchara de medición para medir cada uno de los
ingredientes. Si intenta medir una determinada cantidad de líquido con ayuda del
vaso medidor, colóquelo sobre una supercie plana y lea la escala.
3 Fije el molde al aparato.
4 Cierre la tapa.
5 Conecte el enchufe a la toma de corriente.
6 Pulse el botón Menú y seleccione un programa de horneado.
7 Pulse el botón PESO y seleccione el peso deseado.
8 Pulse el botón de grado de tueste y seleccione el tueste deseado para la corteza
del pan.
9 Si el proceso de horneado debe comenzar más adelante, presione el botón de
TEMPORIZADOR e indique cuándo debe estar listo el pan.
10 Pulse el botón START/STOP para iniciar el programa.
Advertencia: En cuanto se haya iniciado el programa con el botón START/STOP, se
bloquearán todas las combinaciones de botones.
El aparato comienza a procesar la masa según el programa correspondiente. Una
echa en la parte derecha o izquierda del display muestra la fase actual de horneado.
Advertencia: Si desea interrumpir por completo el programa, mantenga el botón
START/STOP pulsado durante 2 segundos.
Cuando haya transcurrido el tiempo de horneado, suena una señal y comienza la fase
de mantenimiento de calor (solo se aplica a los programas 1-6, 10 y 11).
Durante la fase de mantenimiento de calor, puede retirar en cualquier momento el
molde. Abandone el programa manteniendo pulsado el botón START/STOP durante
2 segundos. Desconecte el enchufe de la toma de corriente y retire el molde utilizando
guantes de cocina. Deje que el pan se enfríe antes de cortarlo.
Page 46
46
ES
Indicaciones importantes sobre el gancho de amasado
• Retire el gancho de la hogaza de pan antes de cortar el pan.
• Puede retirar el gancho tras el último proceso de amasado en el programa de
horneado seleccionado para evitar que tras el horneado no quede un ori cio en
medio del pan. Espolvoree las manos con un poco de harina y levante la masa
para poder retirar el gancho.
MENÚS Y PROGRAMAS
Pulse el botón Menú para seleccionar uno de los siguientes 12 programas:
Menú 1: Programa básico
Para pan de mezcla. Pueden añadirse distintos ingredientes, como semillas de
calabaza, daditos de jamón o cebolla. Este programa suele ser el más utilizado.
Menú 2: Pan blanco
Para pan blanco de harina de trigo con corteza crujiente.
Menú 3: Pan multicereales
Seleccione este programa para hornear pan con harina integral. El programa comienza
con el precalentado para que los ingredientes se calienten ligeramente antes de
amasarlos.
Advertencia: Para acortar los programas 1-3, utilice el botón GRADO DE TUESTE
para seleccionar los ajustes
. En este caso, utilice agua tibia.
Menú 4: Pan dulce
El programa (dulce) está recomendado para recetas que contienen grasas y azúcar o
ingredientes como chocolate, pasas o frutos secos.
Menú 5: Programa de horneado rápido
Este programa le permite reducir el tiempo de horneado para pan de mezcla y pan
blanco. El tiempo de horneado para pan de mezcla (menú 1) es de 3h 25 min, pero
con el menú 5 es de solo 1h 20 min. En el programa 5 se reduce el tiempo de reposo,
por lo que los líquidos deben calentarse antes del proceso, pues la masa no sube con
líquidos fríos. No obstante, los líquidos no deben estar demasiado calientes o pueden
no reaccionar a la levadura.
Page 47

47
ES
Menú 6: Pan sin gluten
Para hornear pan con harina sin gluten o mezclas sin gluten.
Menú 7: Masa para pizza
Para amasar masa para pizza. Añada todos los ingredientes al molde y el aparato crea
una masa para pizza. Solo necesitará estirar la masa y añadir los ingredientes de la
pizza.
Menú 8: Masa para pasta
El aparato crea en poco tiempo masa para pasta.
Menú 9: Mermelada
Con este programa puede procesar distintos tipos de mermelada. Solo debe rellenar
los vasos con mermelada cuando esté lista.
Menú 10: Hornear sin amasar y hervir arroz
Para masa preparada. La masa no se amasa en este programa. El programa también
puede utilizarse para hervir arroz: Añada 1 parte de arroz por 2 de agua al molde.
Utilice los botones del temporizador (echas) para regular el tiempo deseado. Puede
interrumpir el programa en cualquier momento pulsando el botón START/STOP al
menos durante 2 segundos.
Menú 11: Bizcocho
Para hornear bizcochos. Utilice el molde para bizcocho y el gancho removedor para
este programa.
Menú 12: Risotto
Utilice este programa para preparar risotto en el molde para pan. Coloque el gancho
removedor en el molde para pan e inicie el programa 12. Durante la primera fase se
dorarán la cebolla y el arroz. Cuando haya concluido dicha fase, sonará un pitido.
Añada el caldo y continúe con el programa.
Advertencia: Tenga en cuenta la cantidad de los ingredientes que se indican en
el envase del risotto. Le recomendamos 3 partes de caldo por 1 parte de arroz.
Cuando haya concluido el programa, puede sazonar el risotto con mantequilla, vino
y parmesano. Añada estos ingredientes una vez nalizado el programa.
Page 48
48
ES
FUNCIONES ESPECIALES
Ajustar el temporizador
Advertencia: El temporizador para todos los programas puede ajustarse en un rango
de 10 a 12 minutos. En el programa 10 se regula con los botones del temporizador
(echas) el tiempo de horneado/cocción (1:10, 1:20, 1:30).
1 Pulse el botón de MENÚ, el botón de PESO y el de GRADO DE TUESTE y ajuste los
valores correspondientes.
En el ejemplo se escogen los siguientes valores: Menú 1, peso del pan
(900g) y
grado de tueste (medio). El tiempo de horneado mostrado aparece en el display
[3:25].
2 Utilice los botones del temporizador para regular el tiempo de inicio programado.
Cada vez que pulse el botón se ajusta el tiempo en intervalos de 10 minutos. El
temporizador puede ajustarse en un máximo de 15 horas (tiempo de horneado
incluido).
Ejemplo: Cada vez que pulse el botón, el tiempo aumenta: 3:35 (predeterminado) >
3:40 > 3:50 > 4:00 > etc. Si el pan debe estar listo en 6 horas, introduzca 6:00.
3 Inicie el programa pulsando el botón START/STOP. Los dos puntos del indicador de
tiempo comienzan a parpadear y el programa se inicia para que el pan esté horneado
a la hora que ha indicado.
Ejemplo: El tiempo introducido aparece en el display [6:00] y se inicia una cuenta atrás.
Con el tiempo llegue a [3:25], el programa se inicia automáticamente.
4 Una vez transcurrido el tiempo y el pan esté horneado, puede retirar el molde del
aparato.
Ejemplo: Tras 6 horas, el programa habrá nalizado y el pan estará listo. El display
muestra [00:00] y se inicia la fase de mantenimiento de calor. Puede retirar el pan
enseguida o dejarlo reposar en el aparato. Al nalizar la fase de mantenimiento de
calor, el display regresa a los ajustes originales y muestra los siguientes valores: Menú
1, peso del pan
(900g), grado de tueste (medio) y tiempo de horneado
[3:25].
Page 49

49
ES
Indicaciones importantes sobre el horneado
• Con un clima cálido o húmedo, la masa puede subir demasiado rápido, por lo que
un tiempo de inicio programa superior a 2 horas puede ser demasiado largo.
• Para evitar que la levadura suba demasiado rápido, añada la harina al molde
antes que el resto de ingredientes. Forme un oricio en la harina y añada la
levadura.
• No elija un tiempo de inicio programado demasiado largo si utiliza alimentos
perecederos, como leche o huevos.
Función de mantenimiento de calor
La función de mantenimiento de calor garantiza que el pan no presente humedad tras
el horneado. Al nalizar los programas 1-6, 10 y 11, el producto listo se mantendrá
caliente durante un tiempo determinado. En el display aparece [00:00] y suena un
pitido. Si desea retirar el pan durante la fase de mantenimiento de calor, mantenga el
botón START/STOP pulsado durante 2 segundos.
Dispensador de ingredientes
El dispensador de ingredientes le permite añadir al nalizar el proceso de amasado
ingredientes secos, como semillas de calabaza o pasas. La compuerta situada bajo el
dispensador se abre automáticamente al nalizar el proceso de amasado (programas
1-7). La abertura de la compuerta se realiza con un clic audible acompañado de un
pitido. Durante el proceso que se lleva a cabo en los programas 8-12, la compuerta
permanece cerrada.
Advertencia: Los tiempos de apertura exactos de la compuerta aparecen en cada
uno de los programas indicados en las tablas del anexo.
• Asegúrese de no sobrecargar el dispensador. De lo contrario, los ingredientes
podrían atascarse y no caerían en el molde. Garantice una cantidad de
ingredientes exacta en las recetas.
• Los ingredientes pequeños, como semillas de sésamo, puede caer por la rejilla. En
este caso, abra la compuerta y añada los ingredientes directamente en el molde
en cuanto suene la señal de apertura de la tapa. Se aplica el mismo proceso para
ingredientes que pueden derretirse o pegarse, como chocolate, queso o trozos de
frutas.
• Limpie el dispensador después de cada uso. De lo contrario, es posible que la tapa
se quede pegada y no se abra.
Advertencia: Cuando la compuerta se abra, sonarán varios pitidos cortos. En este
punto también puede abrir la compuerta y añadir los ingredientes directamente en
el molde.
Page 50
50
ES
•
• Cuando haya nalizado el proceso de horneado, extraiga el dispensador de
alimentos del aparato. Límpielo, cierre la compuerta y coloque el dispensador de
nuevo en el aparato.
Colocar y retirar dispensador de alimentos
Retirar Colocar
Tire del dispensador de
ingredientes hacia arriba
para extraerlo.
Tras la limpieza, cierre la compuerta inferior y coloque
de nuevo el dispensador presionándolo contra el
aparato hasta que encaje.
LIMPIEZA Y CUIDADO
ADVERTENCIA: Apague el aparato y desconecte el enchufe de la toma de corriente
antes de realizar labores de limpieza o mantenimiento para evitar descargas
eléctricas.
Guardar el aparato
Si no utiliza el aparato durante un periodo prolongado de tiempo, límpielo como se
indica en esta sección. Conserve el aparato y todos sus accesorios en un lugar seco,
limpio y sin escarcha y que no se vea expuesto a la luz directa del sol.
Retirar la tapa y limpiar el aparato
Limpie el aparato después de cada uso. Para facilitar la
limpieza, puede retirar la tapa. Abra la tapa completamente
y tire de ella hacia arriba. Limpie la carcasa y el interior con
un paño húmedo.
Page 51
51
ES
• El resto de piezas pueden lavarse con agua tibia y un poco de lavavajillas. Lave
los moldes y los ganchos a mano, nunca en el lavavajillas. No utilice productos
abrasivos para evitar dañar la supercie del aparato.
• Deje que todas las piezas se sequen completamente.
Colocar la tapa
Coloque la tapa tras la limpieza. Manténgala en posición
vertical y presione las patillas hacia el aparato (véanse
marcas).
DETECCIÓN Y RESOLUCIÓN DE PROBLEMAS
Avisos de error
Error Posible causa Solución propuesta
E00 El aparato está demasiado frío Espere a que el aparato se haya
calentado hasta la temperatura
ambiente.
E01 El aparato está demasiado caliente
después de haber nalizado el
proceso de horneado.
Espere hasta que se enfríe.
EEE El sensor de temperatura está
averiado.
Contacte con un servicio técnico
para reparar el aparato.
HHH Cortocircuito en el interior del
aparato.
Contacte con un servicio técnico
para reparar el aparato.
Si no puede resolver el programa usted mismo, contacte con el servicio de atención
al cliente. Antes de llamar, anote el modelo, el número de serie y la fecha de compra
del producto. El servicio de atención al cliente necesitará esta información.
Page 52
52
ES
RETIRADA DEL APARATO
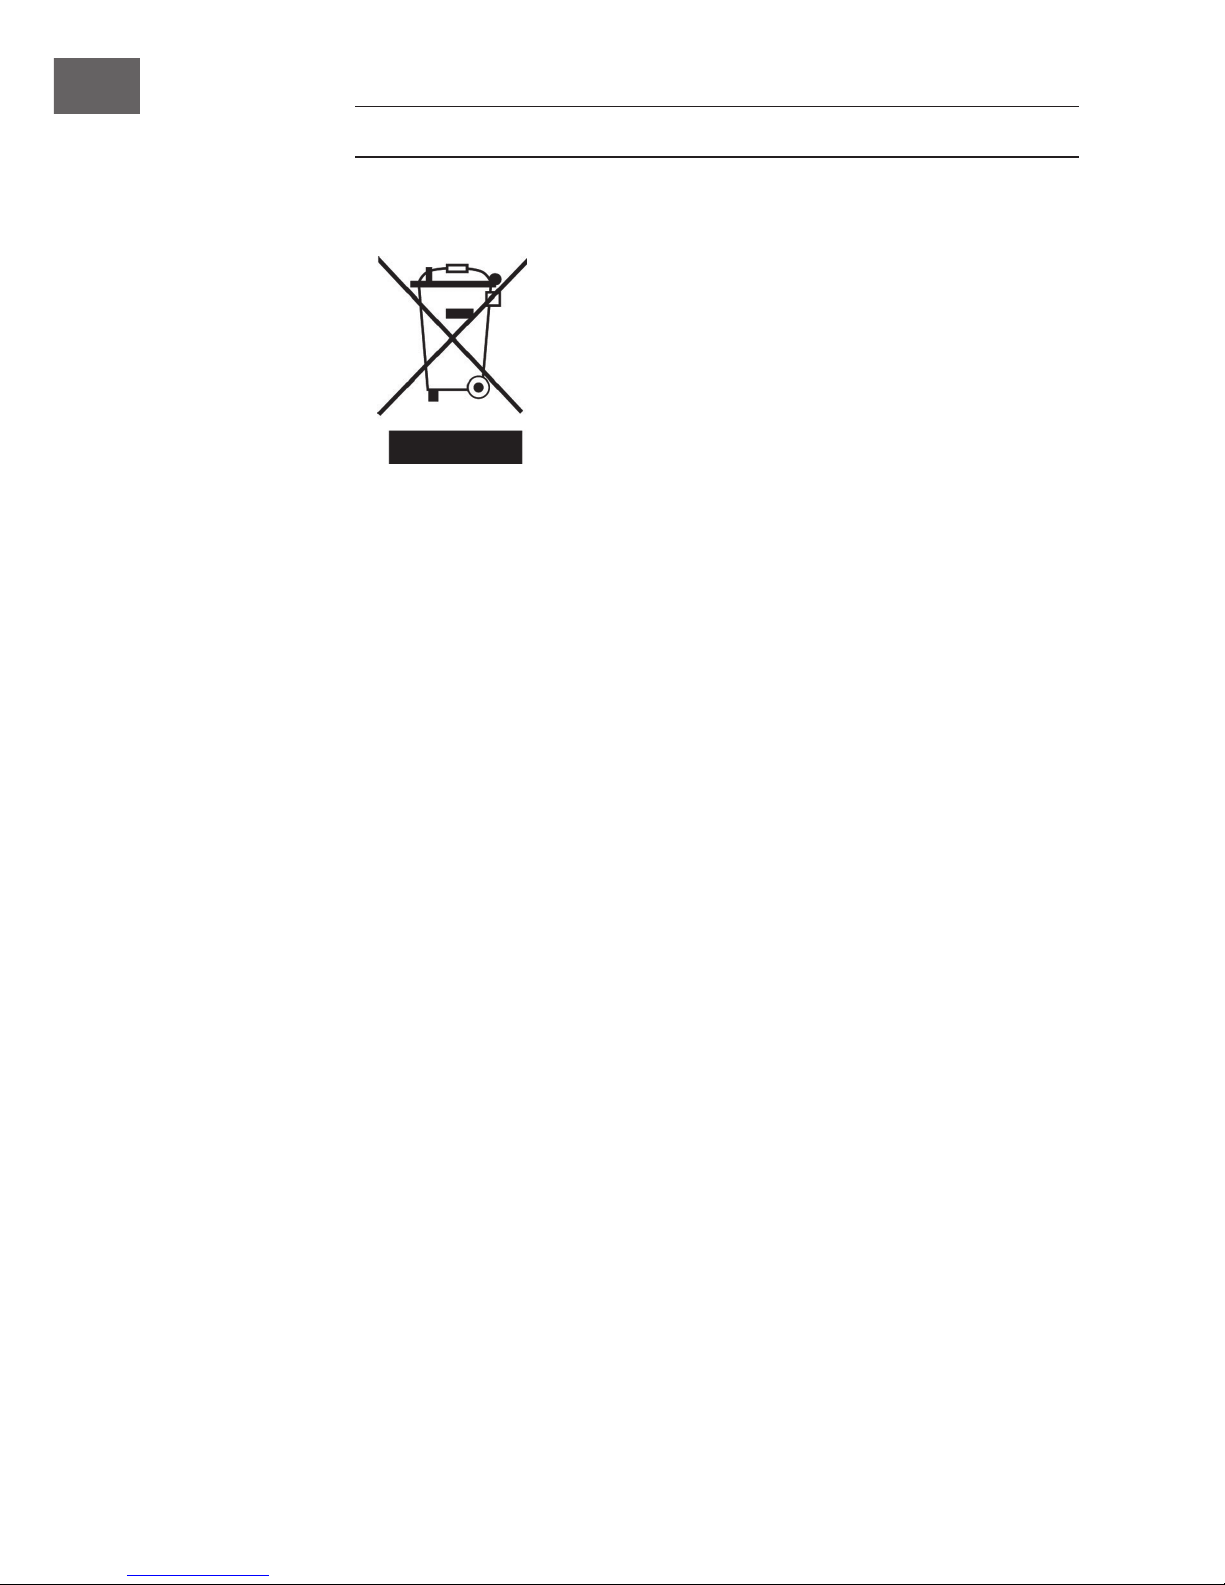
Si el aparato lleva adherida la ilustración de la izquierda (el
contenedor de basura tachado) entonces rige la normativa
europea, directiva 2012/19/UE. Este producto no debe
arrojarse a un contenedor de basura común. Infórmese
sobre las leyes territoriales que regulan la recogida separada
de aparatos eléctricos y electrónicos. Respete las leyes
territoriales y no arroje aparatos viejos al cubo de la basura
doméstica. Una retirada de aparatos conforme a las leyes
contribuye a proteger el medio ambiente y a las personas a
su alrededor frente a posibles consecuencias perjudiciales
para la salud. El reciclaje ayuda a reducir el consumo de
materias primas.
Page 53
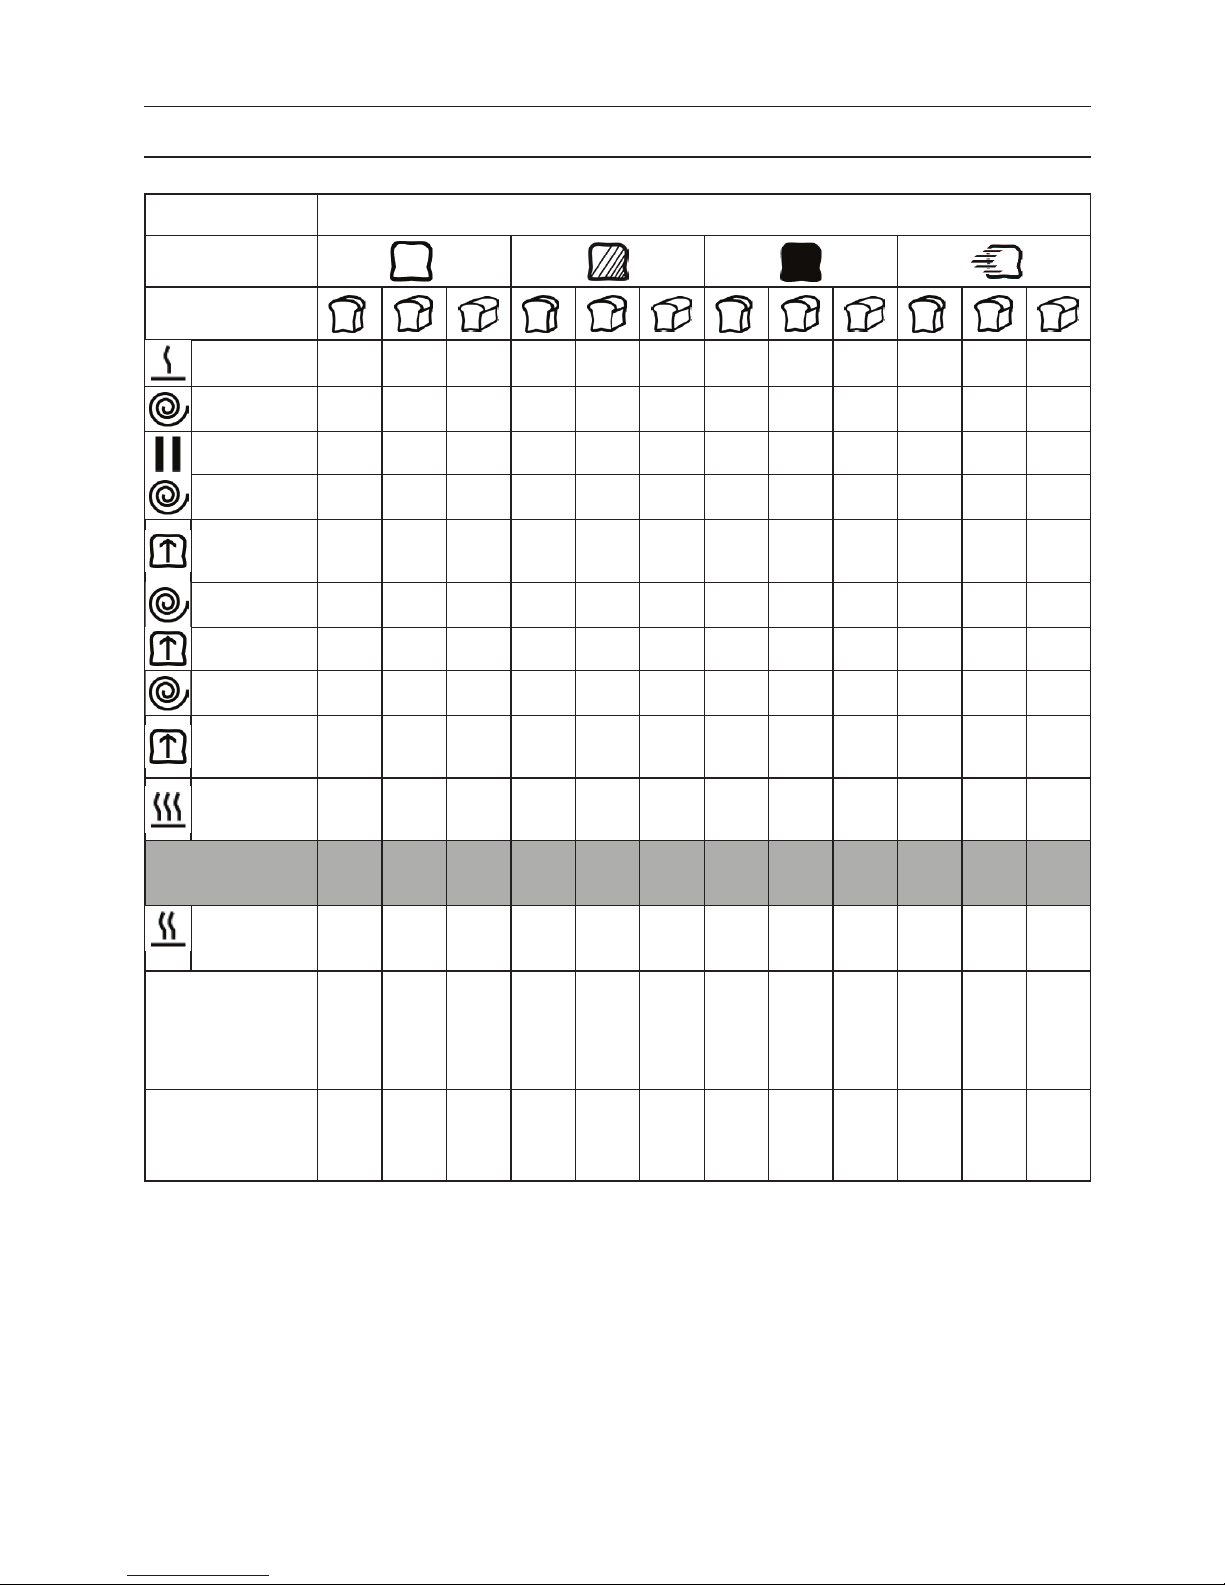
ANEXO: TIEMPOS DE LOS PROGRAMAS
Menú 1 Programa básico
Grado de tueste
Peso
Precalentar - - - - - - - - - - - -
Amasar
5 min 5 min 5 min 5 min 5 min 5 min 5 min 5 min 5 min 5 min 5 min 5 min
Remover
5 min 5 min 5 min 5 min 5 min 5 min 5 min 5 min 5 min 5 min 5 min 5 min
Amasar
20 min 20 min 20 min 20 min 20 min 20 min 20 min 20 min 20 min 20 min 20 min 20 min
Subir
40
min
40
min
40
min
40
min
40
min
40
min
40
min
40
min
40
min
15 min 15 min 15 min
Amasar
10 s 10 s 10 s 10 s 10 s 10 s 10 s 10 s 10 s 10 s 10 s 10 s
Subir
25 min 25 min 25 min 25 min 25 min 25 min 25 min 25 min 25 min 9 min 9 min 9 min
Amasar
10 s 10 s 10 s 10 s 10 s 10 s 10 s 10 s 10 s 10 s 10 s 10 s
Subir
50
min
50
min
50
min
50
min
50
min
50
min
50
min
50
min
50
min
30
min
30
min
30
min
Hornear
46
min
51 min
58
min
48
min
53
min
60
min
53
min
58
min
65
min
48
min
53
min
60
min
Duración del
programa
3:11 3:16 3:23 3:13 3:18 3:25 3:18 3:23 3:30 2:12 2:17 2:24
Mantener
caliente
1 h 1 h 1 h 1 h 1 h 1 h 1 h 1 h 1 h 1 h 1 h 1 h
Momento de
apertura del
dispensador de
ingredientes
2:51 2:56 3:03 2:53 2:58 3:05 2:58 3:03 3:10 1:52 1:57 2:04
Temporizador
máximo
programable
15:00 15:00 15:00 15:00 15:00 15:00 15:00 15:00 15:00 15:00 15:00 15:00
Page 54
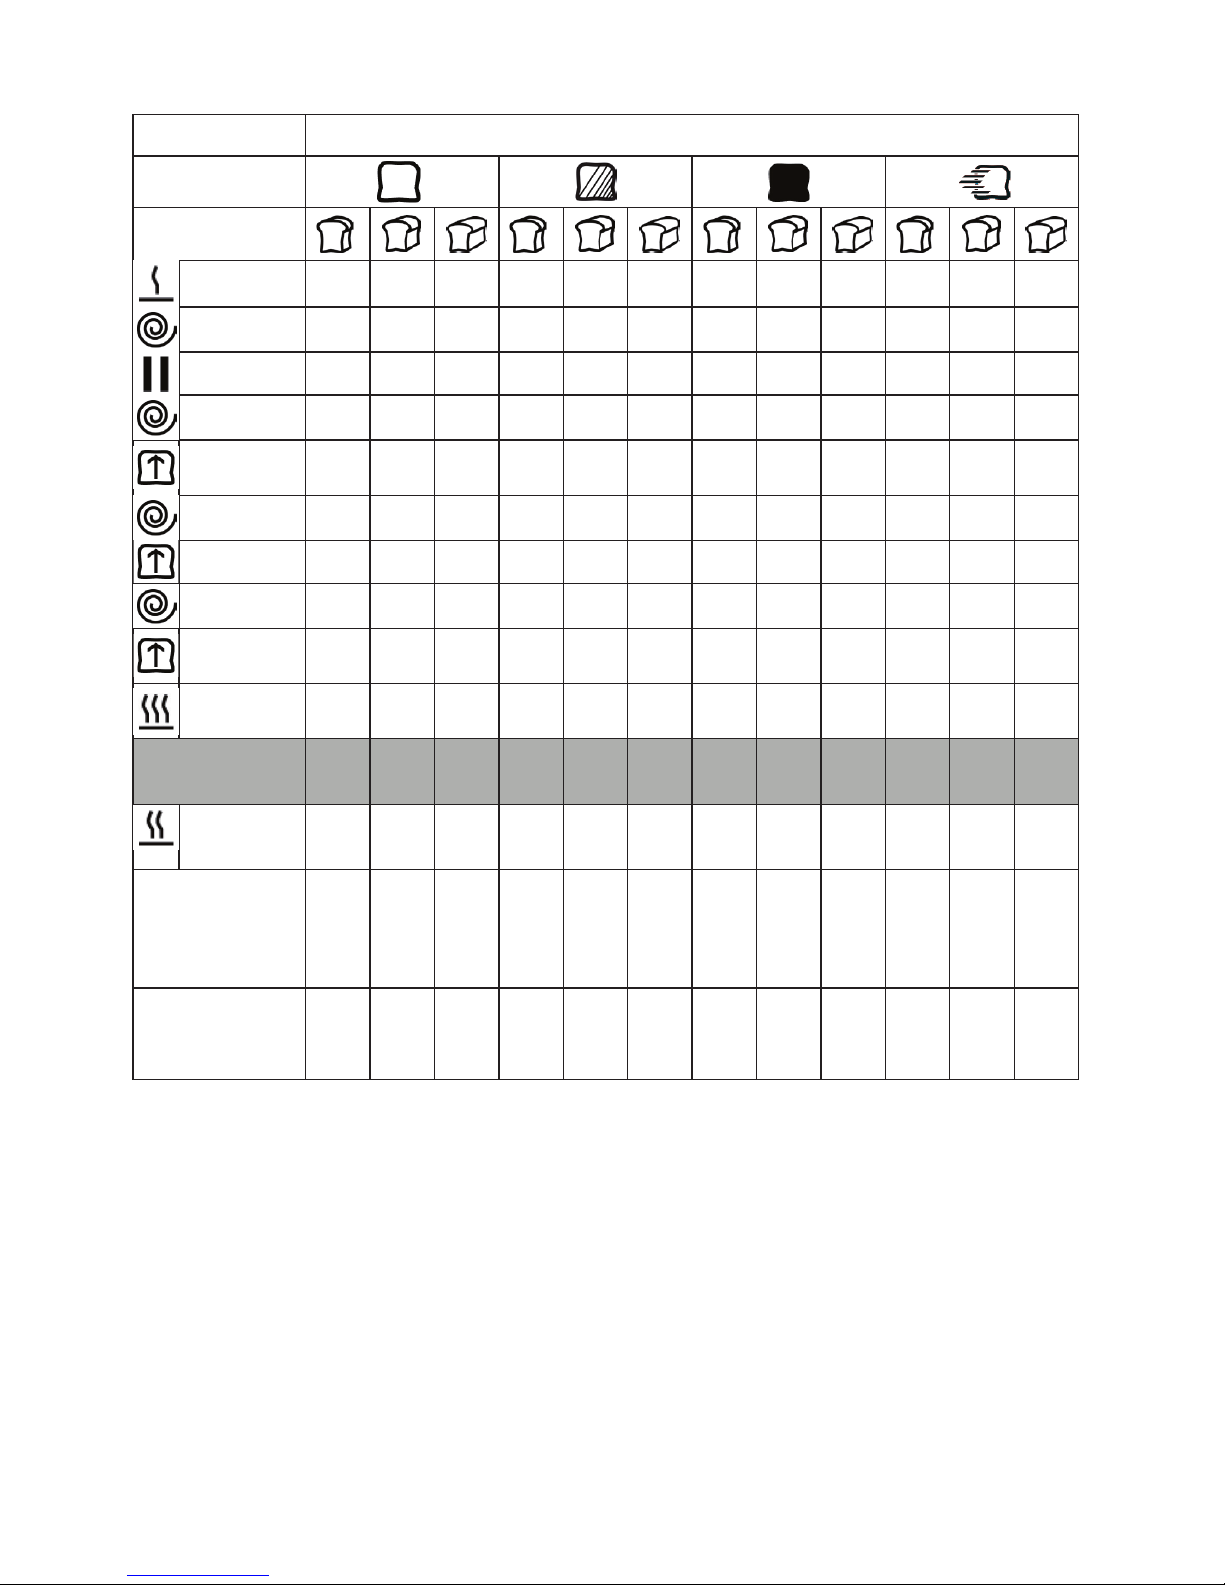
Menú 2 Pan blanco
Grado de tueste
Peso
Precalentar - - - - - - - - - - - -
Amasar
5 min 5 min 5 min 5 min 5 min 5 min 5 min 5 min 5 min 5 min 5 min 5 min
Remover
5 min 5 min 5 min 5 min 5 min 5 min 5 min 5 min 5 min 5 min 5 min 5 min
Amasar
20 min 20 min 20 min 20 min 20 min 20 min 20 min 20 min 20 min 20 min 20 min 20 min
Subir
39 min 39 min 39 min 39 min 39 min 39 min 39 min 39 min 39 min
30
min
30
min
30
min
Amasar
10 s 10 s 10 s 10 s 10 s 10 s 10 s 10 s 10 s 10 s 10 s 10 s
Subir
31 min 31 min 31 min 31 min 31 min 31 min 31 min 31 min 31 min 15 min 15 min 15 min
Amasar
10 s 10 s 10 s 10 s 10 s 10 s 10 s 10 s 10 s 5 s 5 s 5 s
Subir
60
min
60
min
60
min
60
min
60
min
60
min
60
min
60
min
60
min
30
min
30
min
30
min
Hornear
48
min
50
min
53
min
50
min
52 min
55
min
55
min
57 min
60
min
50
min
52 min
55
min
Duración del
programa
3:28 3:30 3:33 3:30 3:32 3:35 3:35 3:37 3:40 2:35 2:37 2:40
Mantener
caliente
1 h 1 h 1 h 1 h 1 h 1 h 1 h 1 h 1 h 1 h 1 h 1 h
Momento de
apertura del
dispensador de
ingredientes
3:08 3:10 3:13 3:10 3:12 3:15 3:15 3:17 3:20 2:15 2:17 2:20
Temporizador
máximo
programable
15:00 15:00 15:00 15:00 15:00 15:00 15:00 15:00 15:00 15:00 15:00 15:00
Page 55
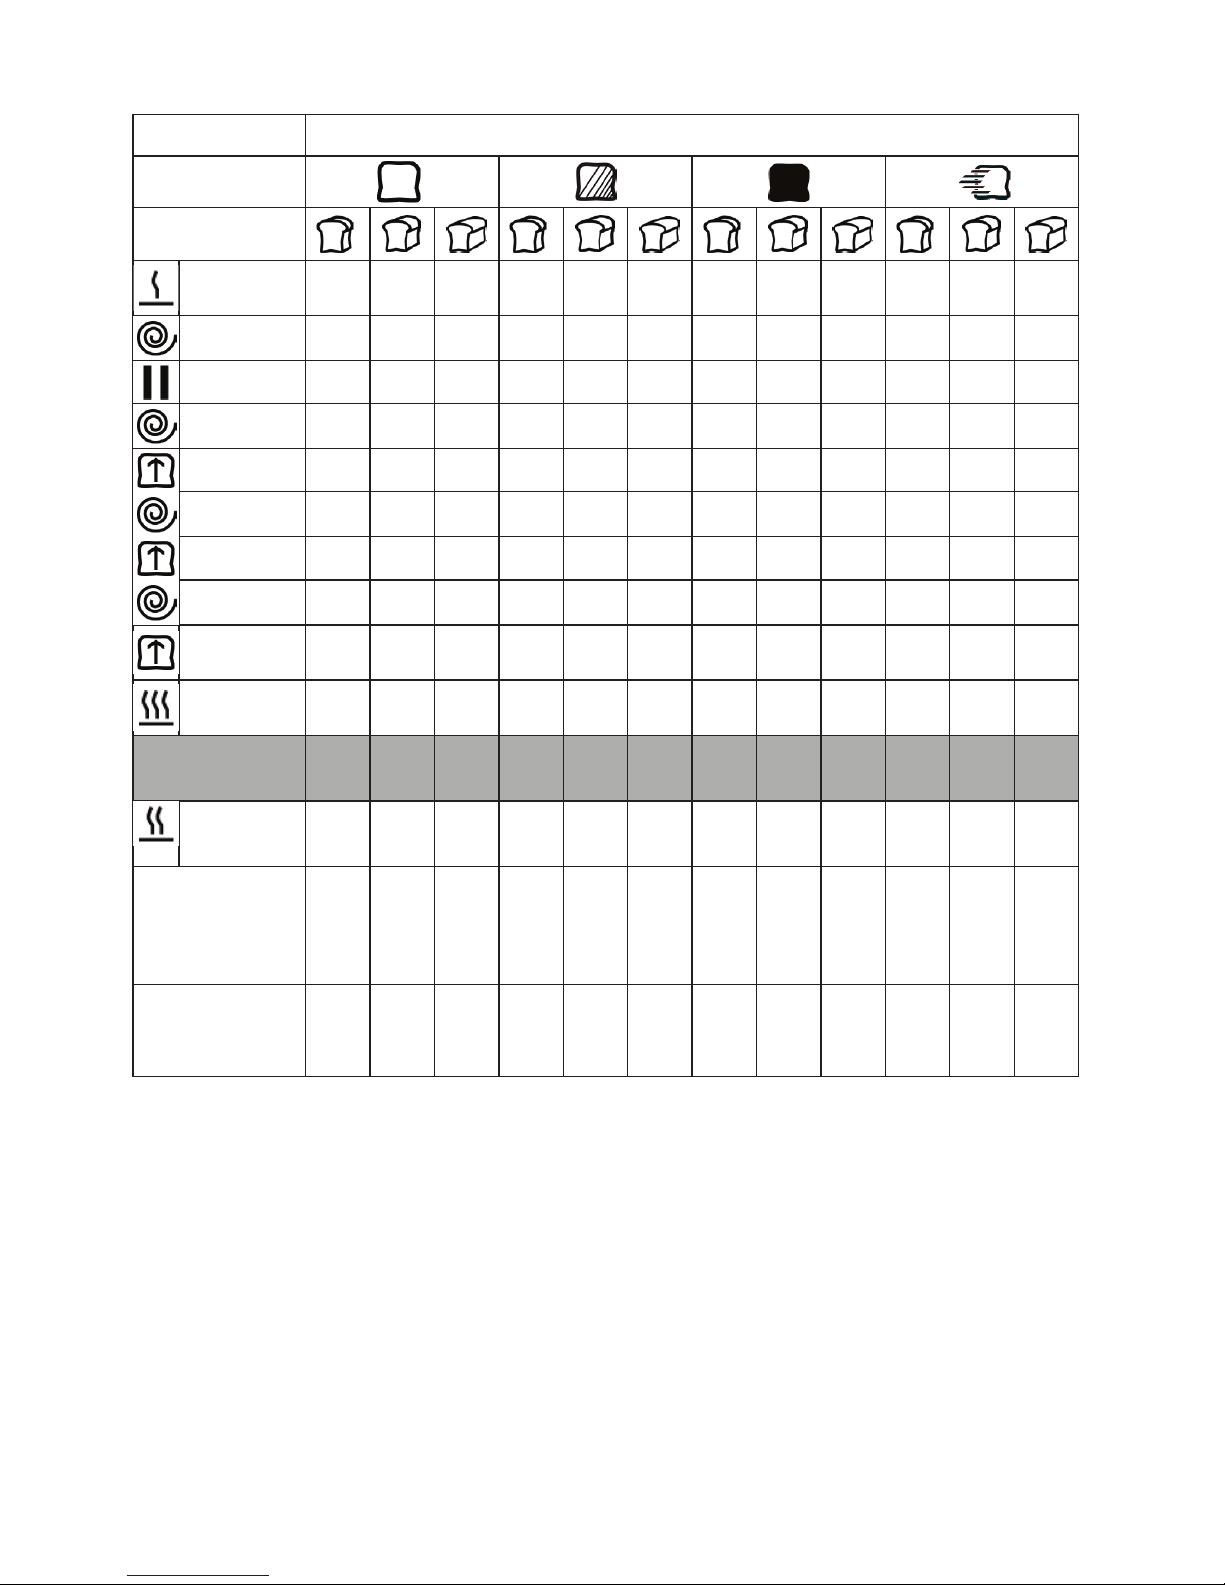
Menú 3 Pan multicereales
Grado de tueste
Peso
Precalentar
30
min
30
min
30
min
30
min
30
min
30
min
30
min
30
min
30
min
5 min 5 min 5 min
Amasar
5 min 5 min 5 min 5 min 5 min 5 min 5 min 5 min 5 min 5 min 5 min 5 min
Remover
5 min 5 min 5 min 5 min 5 min 5 min 5 min 5 min 5 min 5 min 5 min 5 min
Amasar
15 min 15 min 15 min 15 min 15 min 15 min 15 min 15 min 15 min 15 min 15 min 15 min
Subir
49 min 49 min 49 min 49 min 49 min 49 min 49 min 49 min 49 min 24 min 24 min 24 min
Amasar
10 s 10 s 10 s 10 s 10 s 10 s 10 s 10 s 10 s 10 s 10 s 10 s
Subir
26 min 26 min 26 min 26 min 26 min 26 min 26 min 26 min 26 min 11 min 11 min 11 min
Amasar
10 s 10 s 10 s 10 s 10 s 10 s 10 s 10 s 10 s 10 s 10 s 10 s
Subir
45
min
45
min
45
min
45
min
45
min
45
min
45
min
45
min
45
min
35 min 35 min 35 min
Hornear
48
min
50
min
53
min
50
min
52 min
55
min
55
min
57 min
60
min
50
min
52 min
55
min
Duración del
programa
3:43 3:45 3:48 3:45 3:47 3:50 3:50 3:52 3:55 2:30 2:32 2:35
Mantener
caliente
1 h 1 h 1 h 1 h 1 h 1 h 1 h 1 h 1 h 1 h 1 h 1 h
Momento de
apertura del
dispensador de
ingredientes
2:58 3:00 3:03 3:00 3:02 3:05 3:05 3:07 3:10 2:10 2:12 2:15
Temporizador
máximo
programable
15:00 15:00 15:00 15:00 15:00 15:00 15:00 15:00 15:00 15:00 15:00 15:00
Page 56
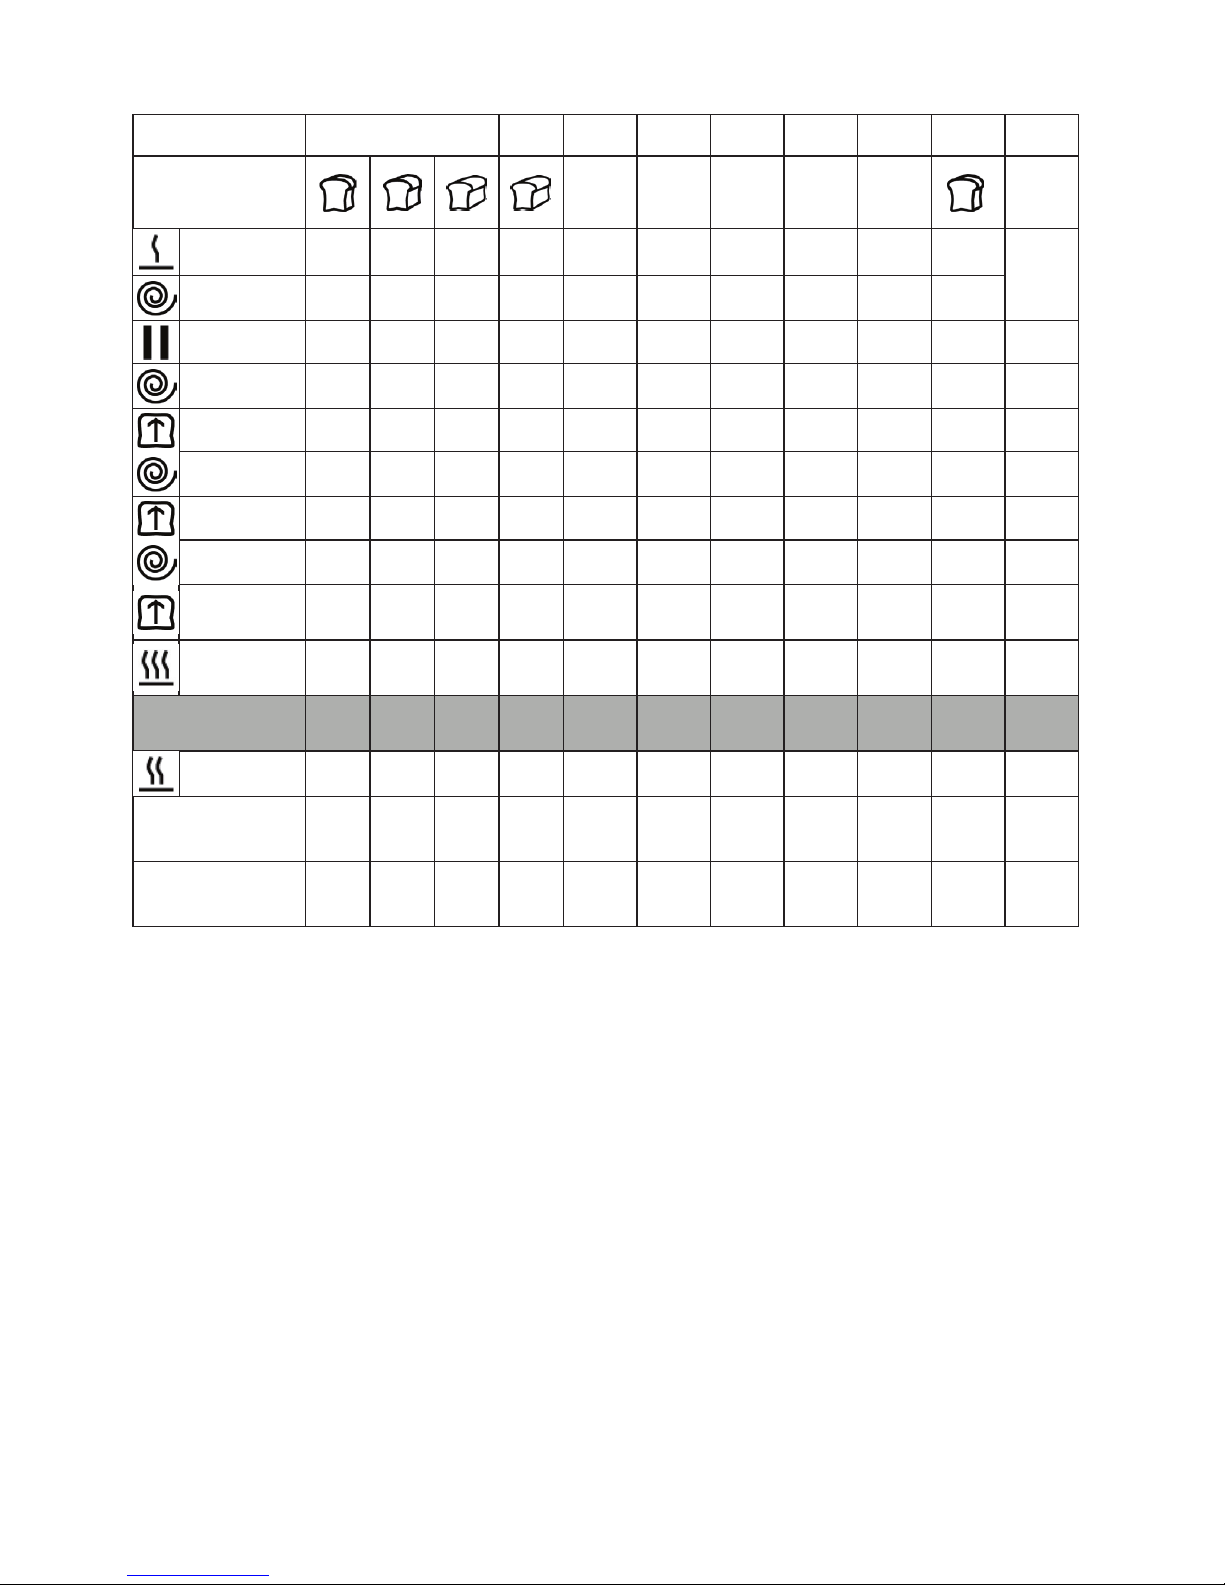
Menü 4 5 6 7 8 9 10 11 12
Gewicht
- - - - - -
Vorheizen
- - - - - - - - - -
15 min
Kneten
5 min 5 min 5 min 5 min 5 min 5 min 3 min 5 min - 5 min
Ruhen
5 min 5 min 5 min - - 5 min - - - - -
Kneten
20 min 20 min 20 min 15 min 10 min 20 min 11 min 10 min - 15 min -
Aufgehen
39 min 39 min 39 min 12 min - 60 min - - - - -
Kneten
10 s 10 s 10 s - - - - - - - -
Aufgehen
26 min 26 min 26 min - - - - - - - -
Kneten
5 s 5 s 5 s - - - - - - - -
Aufgehen
30
min
30
min
30
min
- 60 min - - - - - -
Backen
50
min
55
min
60
min
48
min
55 min - - 70 min
60 -90
min
75 min 55 min
Programmdauer
2:55 3:00 3:05 1:20 2:10 1:30 00:14 1:25
1:001:30
1:35 1:10
Warmhalten
1 h 1 h 1 h 1 h 1 h - - - 1 h 22 min -
Öffnungzeit des
Zutatenspenders
2:57 3:02 3:07 1:10 2:05 1:10 - - - - -
Maximal
einstellbarer Timer
15:00 15:00 15:00 15:00 15:00 15:00 15:00 15:00 - 15:00 -
Page 57
57
FR
Cher client,
Toutes nos félicitations pour l’acquisition de ce nouvel appareil. Veuillez lire
attentivement les instructions suivantes de branchement et d’utilisation an d’éviter
d’éventuels dommages. Le fabricant ne saurait être tenu pour responsable des
dommages dus au non-respect des consignes de sécurité et à la mauvaise utilisation de
l’appareil.
SOMMAIRE
Fiche technique57
Déclaration de conformité57
Consignes de sécurité58
Aperçu de l’appareil59
Afchages et touches de fonctions60
Mise en service61
Utilisation 63
Menu et programmes64
Fonctions spéciales66
Nettoyage et entretien68
Identication et résolution des problèmes69
Conseils pour le recyclage70
Annexe : durées des programmes71
FICHE TECHNIQUE
Numéro d’article 10032101
Alimentation 230 V ~ 50 Hz
Puissance 650 W
DÉCLARATION DE CONFORMITÉ
Fabricant :
Chal-Tec GmbH, Wallstraße 16, 10179 Berlin, Allemagne.
Ce produit est conforme aux directives européennes
suivantes :
2014/30/UE (CEM)
2014/35/UE (LVD)
2011/65/UE (RoHS)
Page 58

58
FR
CONSIGNES DE SÉCURITÉ
• Les enfants à partir de 8 ans ainsi que les personnes dont les capacités physiques,
mentales ou sensorielles sont réduites peuvent utiliser l’appareil uniquement s’ils
ont assimilé les consignes d’utilisation et de sécurité de l’appareil transmises par la
personne responsable de leur sécurité.
• Si le câble secteur ou la che sont endommagés, faites-les remplacer par le
fabricant un service professionnel agréé ou une personne de qualication
équivalente.
• Ne touchez aucune surface chaude pendant le fonctionnement. Utilisez uniquement
les boutons de réglage. Ne faites pas pendre le câble secteur sur le rebord du plan
de travail.
• Ne branchez pas l’appareil sur une minuterie externe ou une prise de courant
télécommandée.
• Nettoyez toutes les surfaces qui seront au contact des aliments.
• Avant l’utilisation, vériez la tension mentionnée sur la plaque signalétique de
l’appareil. Branchez l’appareil uniquement sur des prises fournissant la tension
correspondant à celle de l’appareil.
• Pour le nettoyage, ne plongez jamais l’appareil entièrement dans l’eau ni dans
aucun autre liquide.
• Lorsque vous n’utilisez pas l’appareil pendant une période prolongée ou avant de
le nettoyer, d’installer des éléments ou de les retirer, débranchez toujours la che.
• N’installez pas l’appareil à proximité d’une cuisinière ou d’un four.
• Déplacez l’appareil avec précaution lorsqu’il contient de l’huile ou des liquides
chauds.
• Pendant le fonctionnement, ne touchez aucun élément mobile.
• N’allumez pas l’appareil lorsque le moule à pain ne contient aucun ingrédient.
• Ne tapez pas sur le moule à pain ou sur le rebord pour faire sortir le pain, vous
risquez d’endommager le moule.
• Branchez d’abord le câble sur l’appareil, puis branchez la che dans la prise.
Eteignez d’abord l’appareil, puis retirez la che de la prise.
• N’allumez pas l’appareil si le moule à pain n’est pas installé, vous risquez
d’endommager l’appareil.
Page 59
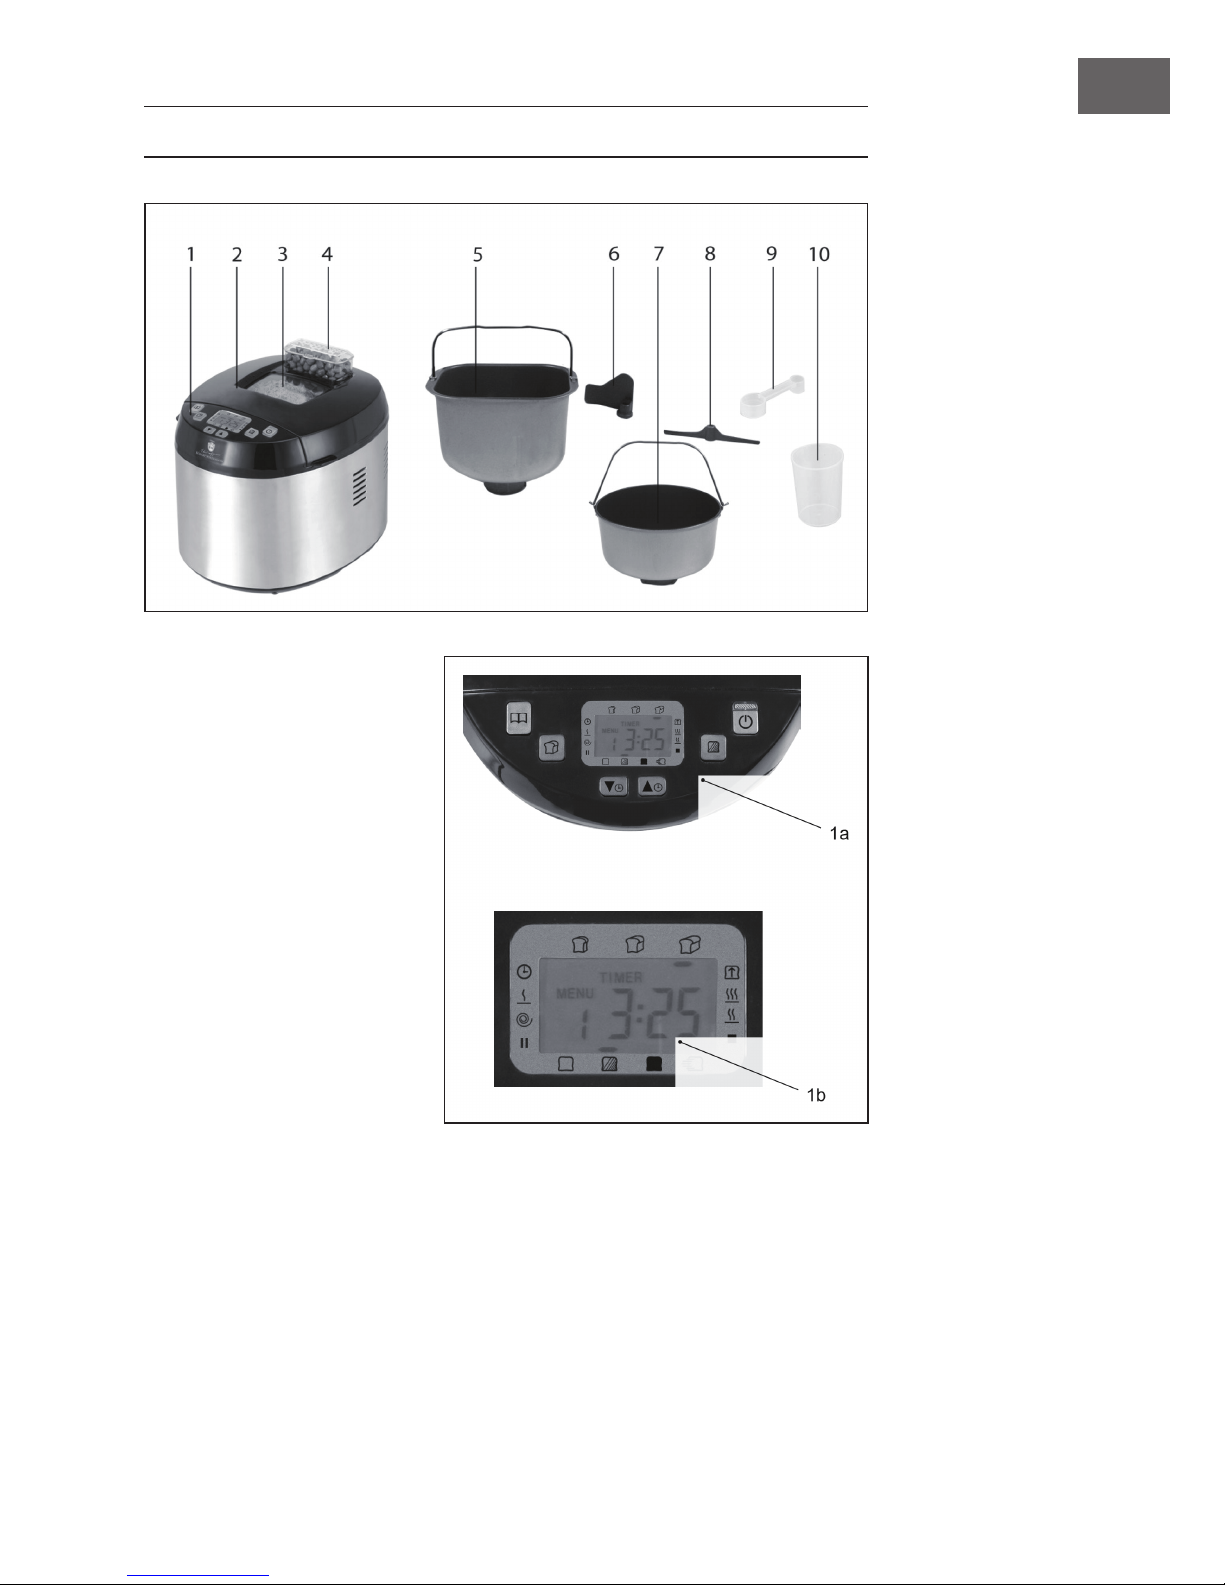
59
FR
APERÇU DE L’APPAREIL
1 Panneau de commande
et écran
2 Couvercle
3 Vitre
4 Verseuse d’ingrédients
5 Moule à pain
6 Crochets à pétrir
7 Moule à gâteau
8 Crochets mélangeurs
9 Cuillère doseuse
10 Verre gradué
Page 60
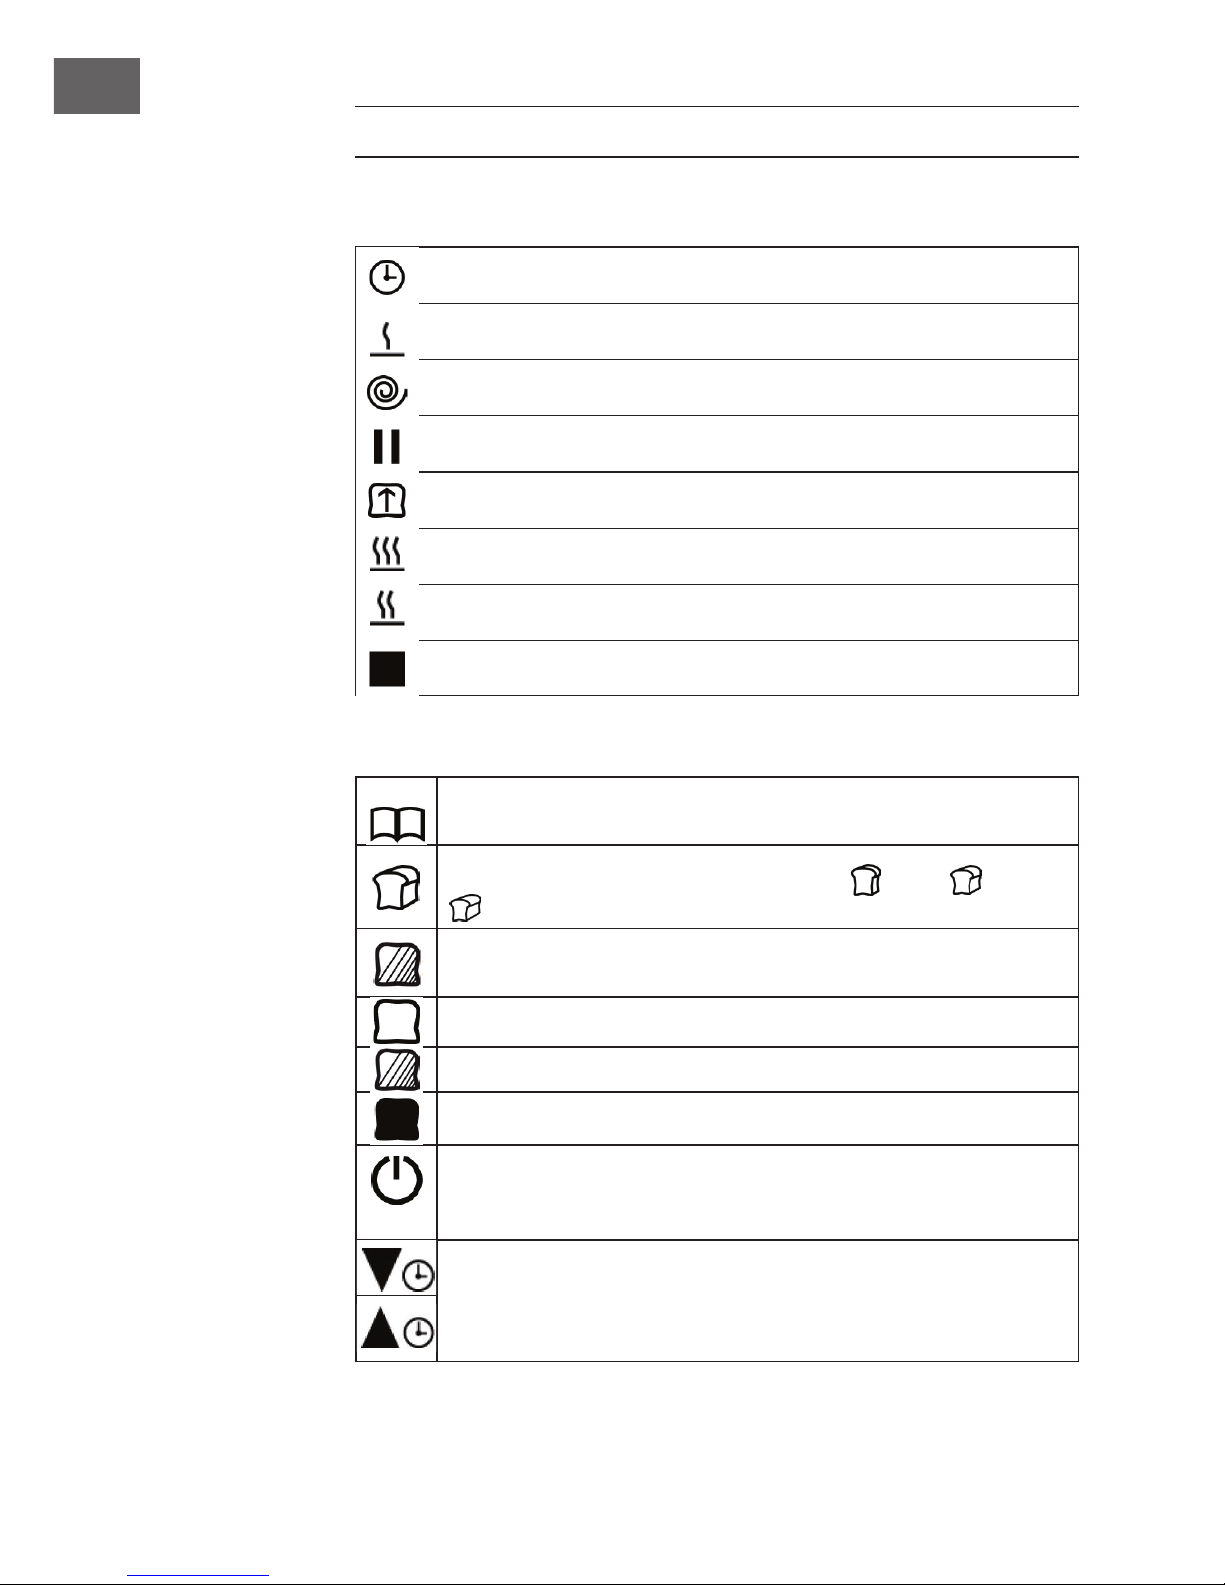
60
FR
AFFICHAGES ET TOUCHES DE FONCTIONS
Afchages et phases de préparation
Minuterie
L’appareil préchauffe
La pâte est en pétrissage
La pâte se repose
La pâte lève
La pâte est en cours de cuisson
Le produit est prêt et maintenu au chaud
Fin de programme
Touches de fonctions
MENU : utilisez cette touche pour choisir un des 12 programmes. Le
programme sélectionné apparaît à l’écran (MENU 1-12).
Vous pouvez choisir parmi les valeurs suivantes : 450 g, 680 g ou
900 g. le poids réglé sera souligné à l’écran.
DEGRÉ DE BRUNISSAGE : utilisez cette touche pour régler le degré de
brunissage avec les programmes 1-4.
Degré de brunissage: léger brunissage
Degré de brunissage: brunissage moyen
Degré de brunissage: fort brunissage
START/STOP : utilisez cette touche pour démarrer le programme
sélectionné. Pour mettre le programme en pause, maintenez la touche
enfoncée.
TIMER : appuyez sur ces touches pour réduire ou augmenter la durée de
la minuterie par crans de 10 minutes. Lorsque le processus de cuisson est
terminé, la durée choisie s’afche. La durée maximale réglable est de 15
heures.
Page 61
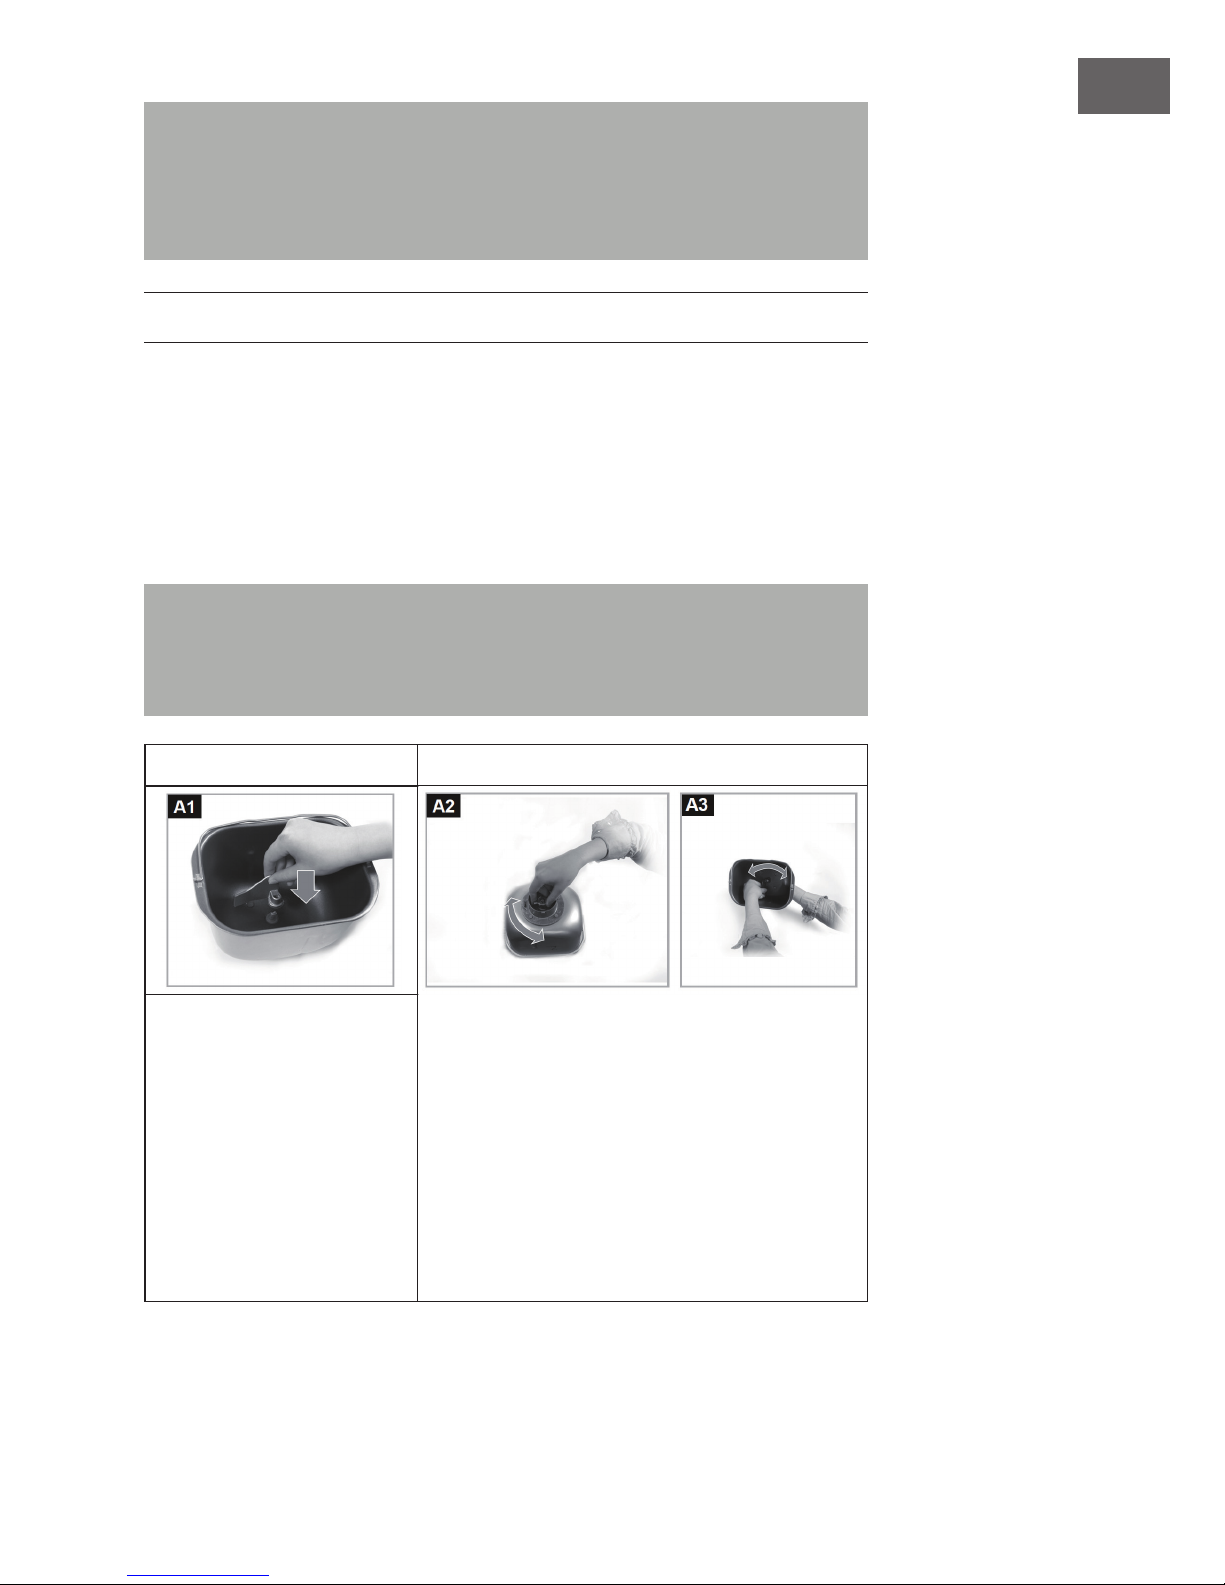
61
FR
Exemple : la minuterie afche 6:30. Cela signie que le processus de cuisson sera
terminé dans 6 heures et 30 minutes. Si vous démarrez le programme avec la touche
Start, le compte à rebours de la minuterie commence. Une èche à gauche ou à
droite de l’écran indique la phase de préparation en cours. Le pain sera prêt au bout
de 6 heures et 30 minutes.
MISE EN SERVICE
Avant la première utilisation
• Retirez tous les éléments d’emballage.
• Nettoyez l’appareil et tous les éléments qui seront au contact des aliments. Vous
trouverez des conseils précis pour le nettoyage au chapitre Nettoyage et entretien.
Installer et retirer les crochets de pétrissage
Remarque : le terme „moule de cuisson“ est employé dans ce guide pour désigner
le moule à pain ou le moule à gâteau. Pour améliorer la lisibilité, l’emploi de deux
termes est délibérément évité. Le terme spécique ne sera employé que lorsque ce
sera nécessaire.
Installation Démontage
Enfoncez les crochets de
pétrissage ou crochets
mélangeurs sur l’axe du
moteur au centre du moule.
Les crochets et l’axe ont un
côté plat et ne s’adaptent
l’un à l’autre que si ces deux
faces sont orientées l’une vers
l’autre. L’axe du moteur est xé
à sa base sur le moule avec
un écrou papillon.
Maintenez d’une main l’écrou papillon sur la face
inférieure et les crochets de l’autre main. Serrez les
crochets en tournant légèrement l’axe, pendant que
vous serrez l’écrou papillon dans l’autre sens.
Page 62
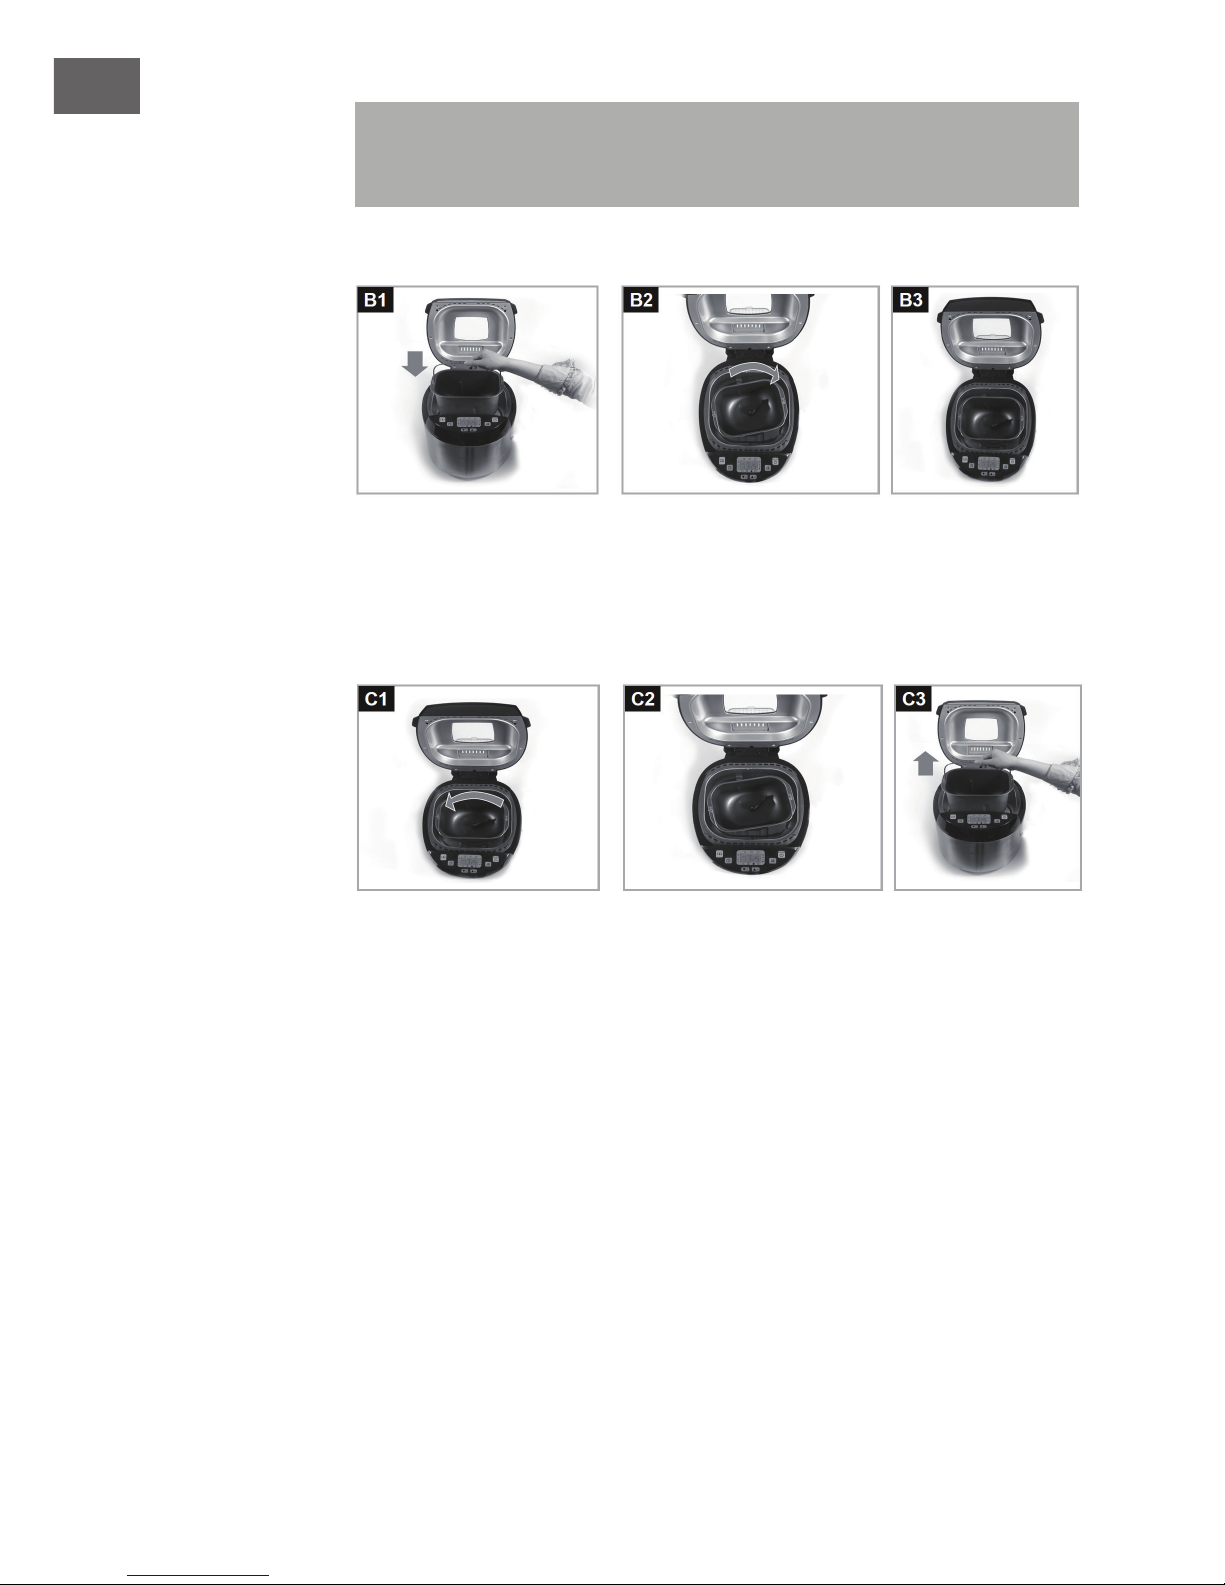
62
FR
Remarque : vous pouvez retirer les crochets après le dernier pétrissage du
programme sélectionné, an de ne pas laisser de trou dans la pâte. Saupoudrez un
peu de farine sur vos mains et soulevez la pâte pour pouvoir retirer les crochets.
Installation du moule
Installez d’abord les crochets sur l’axe dans le moule. Tournez légèrement le moule et
installez-la dans l’appareil. Tournez le moule en sens horaire jusqu’à ce qu’il s’enclenche
et soit bien xé.
Retirer le moule
Ouvrez le couvercle. Tenez le moule par la poignée et tournez-le jusqu’en butée en sens
anti horaire. Soulevez le moule pour le sortir de l’appareil.
Page 63

63
FR
UTILISATION
Fonctionnement général
1 Sortez le moule de l’appareil et xez les crochets nécessaires sur l’axe du moteur
dans le moule.
2 Versez les quantités d’ingrédients nécessaires dans le moule. Respectez
scrupuleusement votre recette ou les instructions de votre mélange prêt à l‘emploi.
Astuce : pour mesurer les ingrédients, utilisez le verre gradué fourni ou la cuillère
doseuse. Pour mesurer des liquides, posez le verre gradué sur une surface plane et
mettez-vous au niveau du verre pour regarder l’échelle graduée.
3 Fixez le moule dans l’appareil.
4 Fermez le couvercle.
5 Branchez la che dans la prise.
6 Appuyez sur la touche MENU et choisissez un programme de préparation.
7 Appuyez sur la touche POIDS et sélectionnez le poids de pain voulu.
8 Appuyez sur la touche DEGRÉ DE BRUNISSAGE et choisissez le degré de
brunissage de la croûte du pain.
9 Si le démarrage du processus de préparation doit être différé, appuyez sur la
touche TIMER et réglez l’heure à laquelle le pain devra être prêt.
10 Appuyez sur la touche START/STOP pour démarrer le programme.
Remarque : une fois que vous avez démarré le programme avec la touche START/
STOP, toutes les combinaisons de touches sont inopérantes.
L’appareil commence maintenant à travailler la pâte en fonction du programme choisi.
Une èche du côté gauche ou droit de l’écran indique la phase de préparation en
cours.
Remarque : si vous souhaitez annuler le programme, maintenez la touche START/
STOP au moins 2 secondes.
Lorsque la durée de la préparation est écoulée, un signal retentit et la phase de maintien
au chaud débute (valable uniquement pour les programmes 1-6, 10 et 11).
Pendant la phase de maintien au chaud vous pouvez à tout moment retirer le moule.
Quittez le programme en maintenant la touche START-STOP au moins 2 secondes.
Retirez ensuite la che de la prise et retirez le moule avec des maniques. Laissez refroidir
le pain avant de le couper.
Page 64

64
FR
Conseils importants concernant les crochets de pétrissage
• Retirez les crochets de la miche de pain avant de le couper.
• Vous pouvez retirer les crochets de la pâte une fois le dernier pétrissage du
programme terminé, a n de ne pas laisser de trou dans la pâte. Saupoudrez vos
mains avec un peu de farine et soulevez la pâte a n de pouvoir retirer les crochets.
MENU ET PROGRAMMES
Appuyez sur la touche MENU pour choisir l’un des 12 programmes suivants :
Menu 1 : programme de base
Pour le pain bis. Vous pouvez ajouter différents ingrédients tels que des graines
de potiron, des dés de jambon ou des oignons frits. Ce programme est le plus
généralement le plus utilisé.
Menu 2 : pain blanc
Pour du pain blanc à la farine de blé avec une croûte craquante.
Menu 3 : pain complet
Choisissez ce programme pour faire du pain avec de la farine de blé complète. Le
programme commence par un préchauffage a n que les ingrédients soient légèrement
réchauffés avant le pétrissage.
Remarque : pour raccourcir les programmes 1-3, utilisez la touche DEGRÉ DE
BRUNISSAGE
pour choisir le réglage. Utilisez de l’eau tiède dans ce cas.
Menu 4 : pain sucré
Le programme (sucré) convient pour les recettes qui contiennent un peu plus de graisse
et de sucre ou qui utilisent des ingrédients tels que le chocolat, des raisins secs ou des
noisettes.
Menu 5 : programme court
Ce programme permet de réduire la durée de préparation pour le pain bis et le pain
blanc.
La cuisson du pain bis (Menu 1) dure normalement 3:25 heures mais seulement 1:20
heures avec le menu 5. Le programme 5 réduit le temps de repos, raison pour laquelle
les liquides doivent être préchauffés avant de commencer le programme, car la pâte ne
pourra pas lever avec des ingrédients froids. Les liquides ne doivent toutefois pas être
trop chauds car la levure ne pourrait plus agir.
Page 65

65
FR
Menu 6 : pain sans gluten
Pour préparer des pains sans ou des mélanges prêts à l’emploi sans gluten.
Menu 7 : pâte à pizza
Pour le pétrissage de pâte à pizza. Versez tous les ingrédients dans le moule et
l’appareil produira une pâte à pizza souple. Il ne vous reste plus qu’à étendre la pâte et
à y ajouter vos ingrédients à pizza.
Menu 8 : pâte à nouilles
L’appareil produit une pâte à nouilles souple en un temps réduit.
Menu 9 : conture
Ce programme vous permet de produire différentes sortes de contures. Vous n’aurez
plus qu’à verser celles-ci dans des pots.
Menu 10 : cuire sans pétrir et cuisson du riz
Pour les pâtes prêtes à cuire. Dans ce programme il n’y a pas de pétrissage de la pâte.
Le programme convient également pour la cuisson du riz : versez une mesure de riz et 2
mesures d’eau dans le moule. Utilisez les touches TIMER (èches) pour régler la durée
voulue. Vous pouvez à tout moment interrompre le programme en maintenant la touche
START/ STOP au moins 2 secondes.
Menu 11 : gâteaux
Pour la cuisson des gâteaux. Pour ce programme, utilisez le moule à gâteaux et les
crochets mélangeurs.
Menu 12 : risotto
Utilisez ce programme pour cuire du risotto dans le moule à pain. Installez les crochets
mélangeurs dans le moule à pain et démarrez le programme 12. Pendant la première
phase les oignons et le riz sont dorés. Un signal sonore est émis à la n de cette phase.
Ajoutez alors le bouillon et laissez le programme se poursuivre.
Remarque : respectez les quantités d’ingrédients mentionnées sur le paquet de risotto.
Nous vous recommandons d’utiliser 3 volumes de bouillon pour 1 volume de riz. Une
fois le programme terminé, vous pouvez agrémenter le risotto avec du vin du beurre
et du parmesan. Toutefois, n’ajoutez ces ingrédients qu’après la n du programme.
Page 66
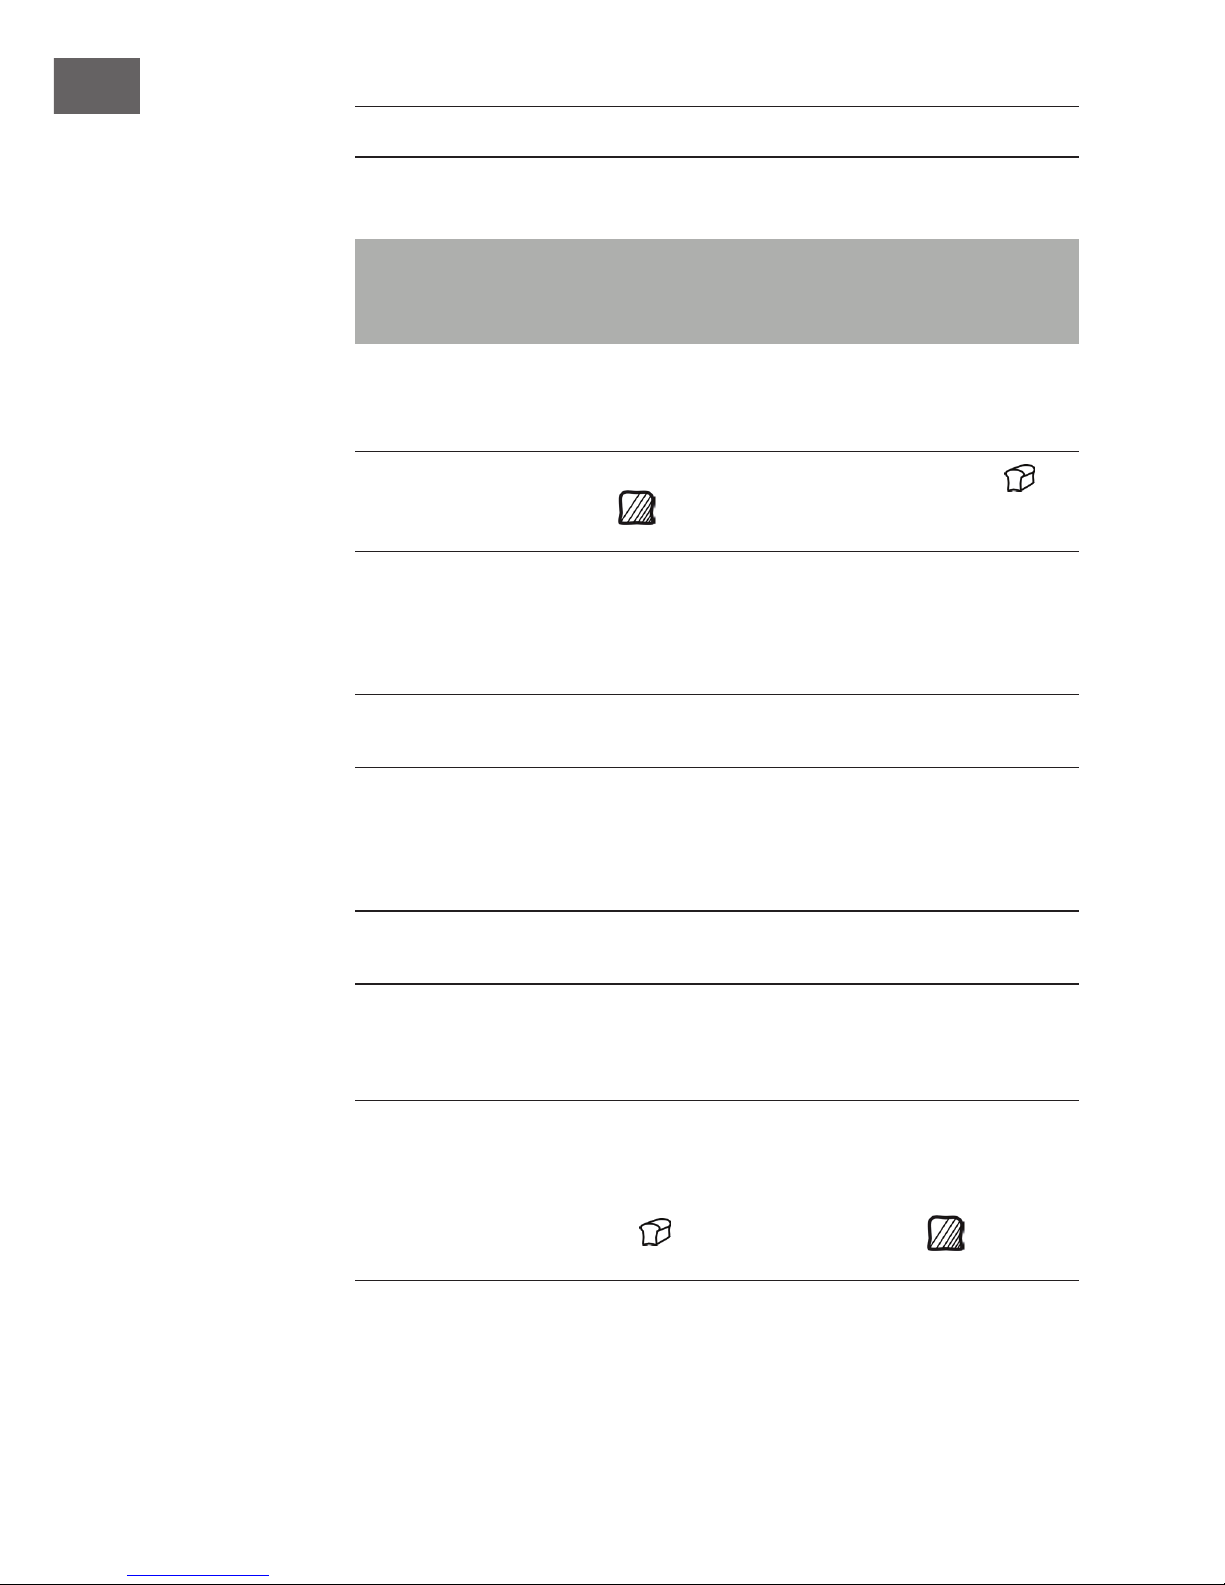
66
FR
FONCTIONS SPÉCIALES
Réglage de la minuterie
Remarque : la minuterie peut être utilisée avec tous les programmes sauf les
programmes 10 et 12. Pour le programme 10 la durée de préparation / cuisson est
réglée à l’aide des touches échées TIMER (1:10, 1:20, 1:30).
1 Appuyez sur la touche MENU, la touche POIDS et la touche DEGRÉ DE
BRUNISSAGE et réglez les valeurs désirées.
Vous pourriez par exemple saisir les valeurs suivantes : Menu 1, poids du pain
(900g) et degré de brunissage (moyen). La durée de préparation afchée est de
[3:25].
2 Utilisez les touches TIMER pour régler un démarrage différé. A chaque appui sur
la touche vous ajoutez un intervalle de 10 minutes. La minuterie peut être réglée
jusqu’à 15 heures au maximum (durée de cuisson comprise).
Exemple : à chaque appui sur la touche la durée augmente : 3:35 (préréglage) > 3:40
> 3:50 > 4:00 > etc. si le pain doit être prêt dans 6 heures, saisissez 6:00.
3 Démarrez le programme en appuyant sur la touche START/STOP. Les deux points
de l’afchage se mettent à clignoter et le programme commencera de façon à ce
que le pain soit prêt pour l’heure que vous avez demandée.
Exemple : la durée afchée à l’écran est de [6:00] et le compte à rebours est en cours.
Lorsque la durée atteindra [3:25] , le programme débutera automatiquement.
4 Lorsque le temps est écoulé et que le pain est prêt, vous pouvez retirer le moule de
l’appareil.
Exemple : le programme se termine au bout de 6 heures et le pain est prêt. L’écran
indique [00:00] et la phase de maintien au chaud commence. Vous pouvez récupérer
le pain immédiatement ou bien le laisser encore un peu reposer. A la n de la phase
de maintien au chaud, l’écran retourne aux réglages précédents et afche les valeurs
suivantes : Menu 1, poids du pain
(900g), degré de brunissage (moyen) et
temps de cuisson [3:25].
Page 67

67
FR
Consignes importantes concernant la cuisson
• Lorsqu’il fait chaud ou humide il se peut que la pâte lève trop vite, de sorte
qu’un démarrage différé de plus de 2 heures peut être trop long dans certaines
circonstances.
• Pour éviter que la levure lève trop vite, versez la farine en premier dans le moule,
avant tous les autres ingrédients. Creusez un petit puits dans la farine et versez-y la
levure.
• Ne choisissez pas un démarrage trop différé lorsque vous travaillez des ingrédients
périssables tels que le lait ou les œufs.
Fonction de maintien au chaud
La fonction de maintien au chaud empêche le pain de s’humidier à la n de la cuisson.
A la n des programmes 1-6, 10 et 11, le produit terminé est conservé au chaud
pendant une durée précise. L’écran afche [00:00] et un signal sonore est émis. Si vous
souhaitez retirer le pain pendant la phase de maintien au chaud, maintenez la touche
START/STOP au moins 2 secondes.
Distributeur d’ingrédients
Le distributeur d’ingrédients vous permet d’ajouter des ingrédients secs à la n du
processus de pétrissage, tels que des graines de potiron ou des raisins secs. Le clapet
à la base du distributeur s’ouvre automatiquement à la n de la phase de pétrissage
(programmes 1-7). A l’ouverture du clapet vous pouvez entende un clic accompagné
d’un signal sonore. Pendant les phases des programmes 8-12, le clapet du distributeur
reste fermé.
Remarque : les moments précis d’ouverture du clapet vous sont indiqués pour chaque
programme dans le tableau en annexe.
• Veillez à ne pas trop remplir le distributeur. Les ingrédients risqueraient de se
coincer et de ne pas tomber dans le moule. Respectez scrupuleusement les
quantités indiquées dans votre recette.
• Les petits ingrédients tels que les graines de sésame peuvent passer à travers
la grille du clapet. Dans ce cas, ouvrez le couvercle et versez les ingrédients
directement dans le moule, dès que le signal d’ouverture du clapet retentit. Il en va
de même pour les ingrédients qui fondent ou qui collent, tels que le chocolat, le
fromage ou les morceaux de fruits.
• Nettoyez le distributeur après chaque utilisation. Faute de quoi, le clapet risque de
se coller et de ne plus pouvoir s’ouvrir.
Remarque : lorsque le clapet s’ouvre, plusieurs signaux sonores brefs sont émis. A ce
moment, vous pouvez aussi ouvrir le couvercle de l’appareil et verser les ingrédients
directement dans le moule.
Page 68
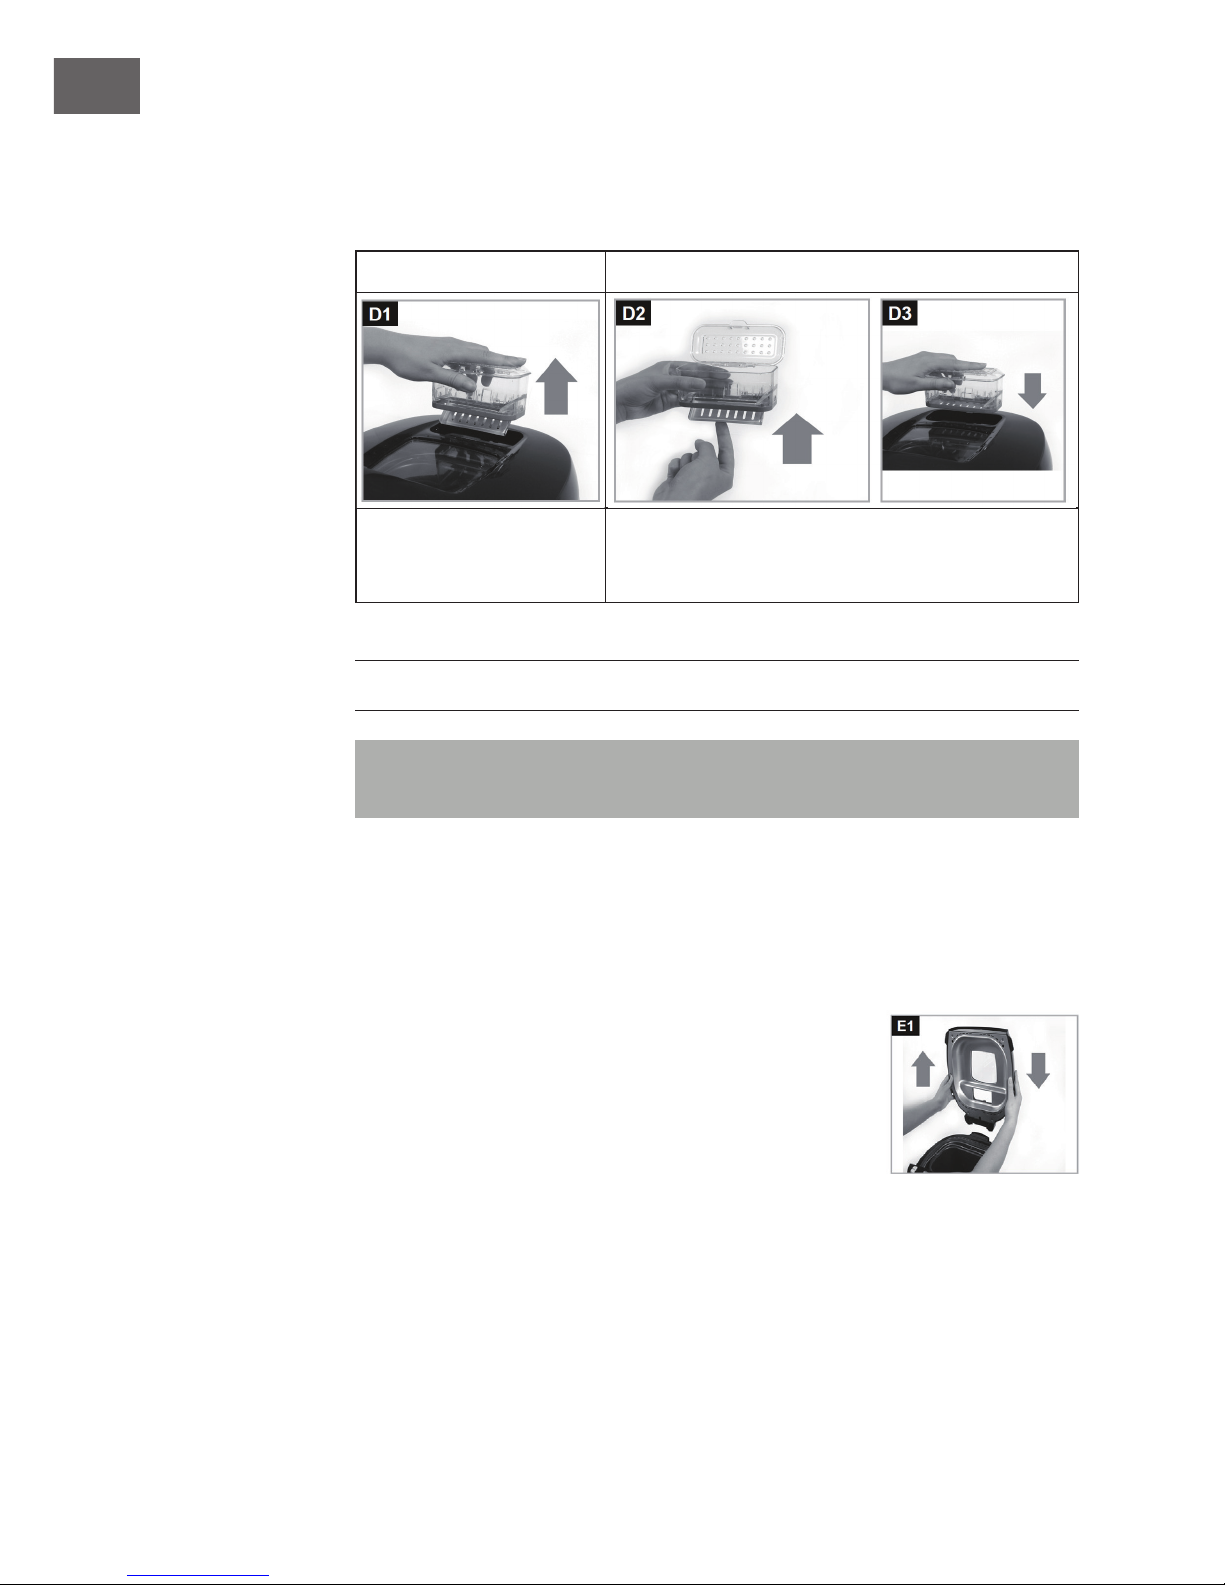
68
FR
• A la n du processus de cuisson, retirez le distributeur d’ingrédients de l’appareil.
Nettoyez-le, fermez le clapet et réinstallez le distributeur dans l’appareil.
Retirer et installer le distributeur d’ingrédients
Démontage Installation
Soulevez le distributeur
d’ingrédients pour le retirer
de l’appareil.
Après le nettoyage, fermez le clapet inférieur et
remettez le distributeur en place en l’enfonçant dans
l’appareil jusqu’à ce qu’il s’enclenche.
NETTOYAGE ET ENTRETIEN
REMARQUE : éteignez l’appareil et débranchez la che de la prise avant tout
entretien ou nettoyage pour éviter les risques d’électrocution.
Rangement de l’appareil
Si vous n’utilisez pas l’appareil pendant une période prolongée, nettoyez-le en suivant
les indications de ce chapitre. Rangez l’appareil et tous les éléments dans un endroit sec
et propre à l’abri du gel et de l’ensoleillement.
Retirer le couvercle pour nettoyer l’appareil
Nettoyez l’appareil après chaque utilisation. Pour faciliter
le nettoyage, retirez le couvercle. Ouvrez complètement le
couvercle et soulevez-le pour le sortir de l’appareil. Essuyez
le boîtier et l’intérieur de l’appareil avec un chiffon humide.
Page 69
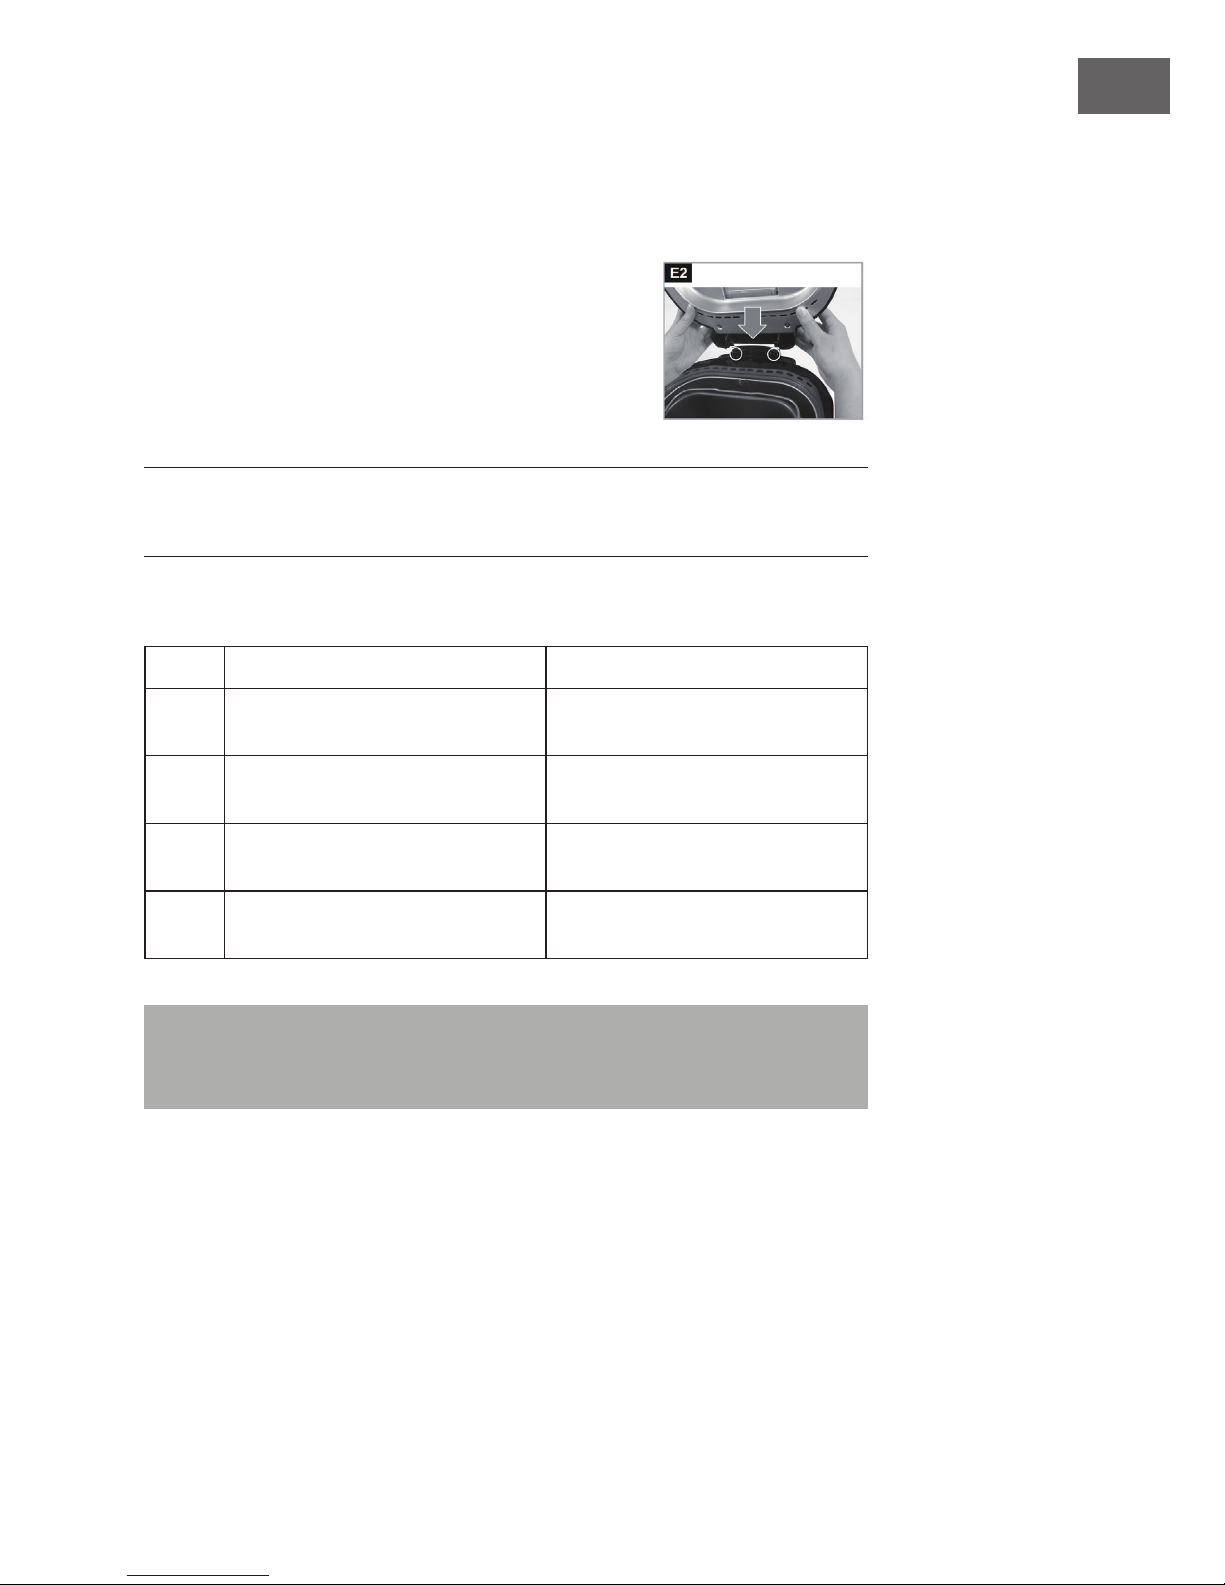
69
FR
• Les autres éléments de l’appareil se lavent à l’eau chaude avec un peu de liquide
vaisselle. Nettoyez les moules et les crochets à la main, ne les mettez pas au lave-
vaisselle ! pour le nettoyage, n’utilisez aucun produit agressif ou abrasif, an de ne
pas endommager le revêtement.
• Laissez tous les éléments sécher complètement.
Installer le couvercle
Après le nettoyage, remettez le couvercle en place. Pour
cela, tenez-le bien droit et appuyez les languettes dans les
logements de l’appareil (voir les marquages repères).
IDENTIFICATION ET RÉSOLUTION DES
PROBLÈMES
Codes erreurs
Erreur Cause possible Solution
E00 L’appareil est trop froid. Attendez que l’appareil se mette à
température ambiante.
E01 L’appareil est trop chaud à la n du
processus de cuisson.
Attendez que l’appareil se
refroidisse.
EEE Le capteur de température est en
panne.
Adressez-vous à un spécialiste pour
la réparation.
HHH Court-circuit à l’intérieur de
l’appareil.
Adressez-vous à un spécialiste pour
la réparation.
Si vous ne pouvez pas résoudre vous-même le problème, contactez le service client.
Avant de téléphoner, veuillez noter le modèle, le numéro de série et la date d’achat
de l’appareil. Le service client aura besoin de ces informations.
Page 70
70
FR
CONSEILS POUR LE RECYCLAGE
Le pictogramme ci-contre apposé sur le produit signie que
la directive européenne 2012/19/UE s‘applique (poubelle
à roues barrée d’une croix). Ces produits ne peuvent être
jetés dans les poubelles domestiques courantes. Renseignezvous concernant les règles appliquées pour la collecte
d’appareils électriques et électroniques. Conformez-vous
aux réglementations locales et ne jetez pas vos anciens
produits avec les ordures ménagères. Le respect des règles
de recyclage des vieux produits aide à la protection de
l’environnement et de la santé de votre entourage contre
les conséquences négatives possibles. Le recyclage des
matériaux aide à réduire l’utilisation des matières premières.
Page 71
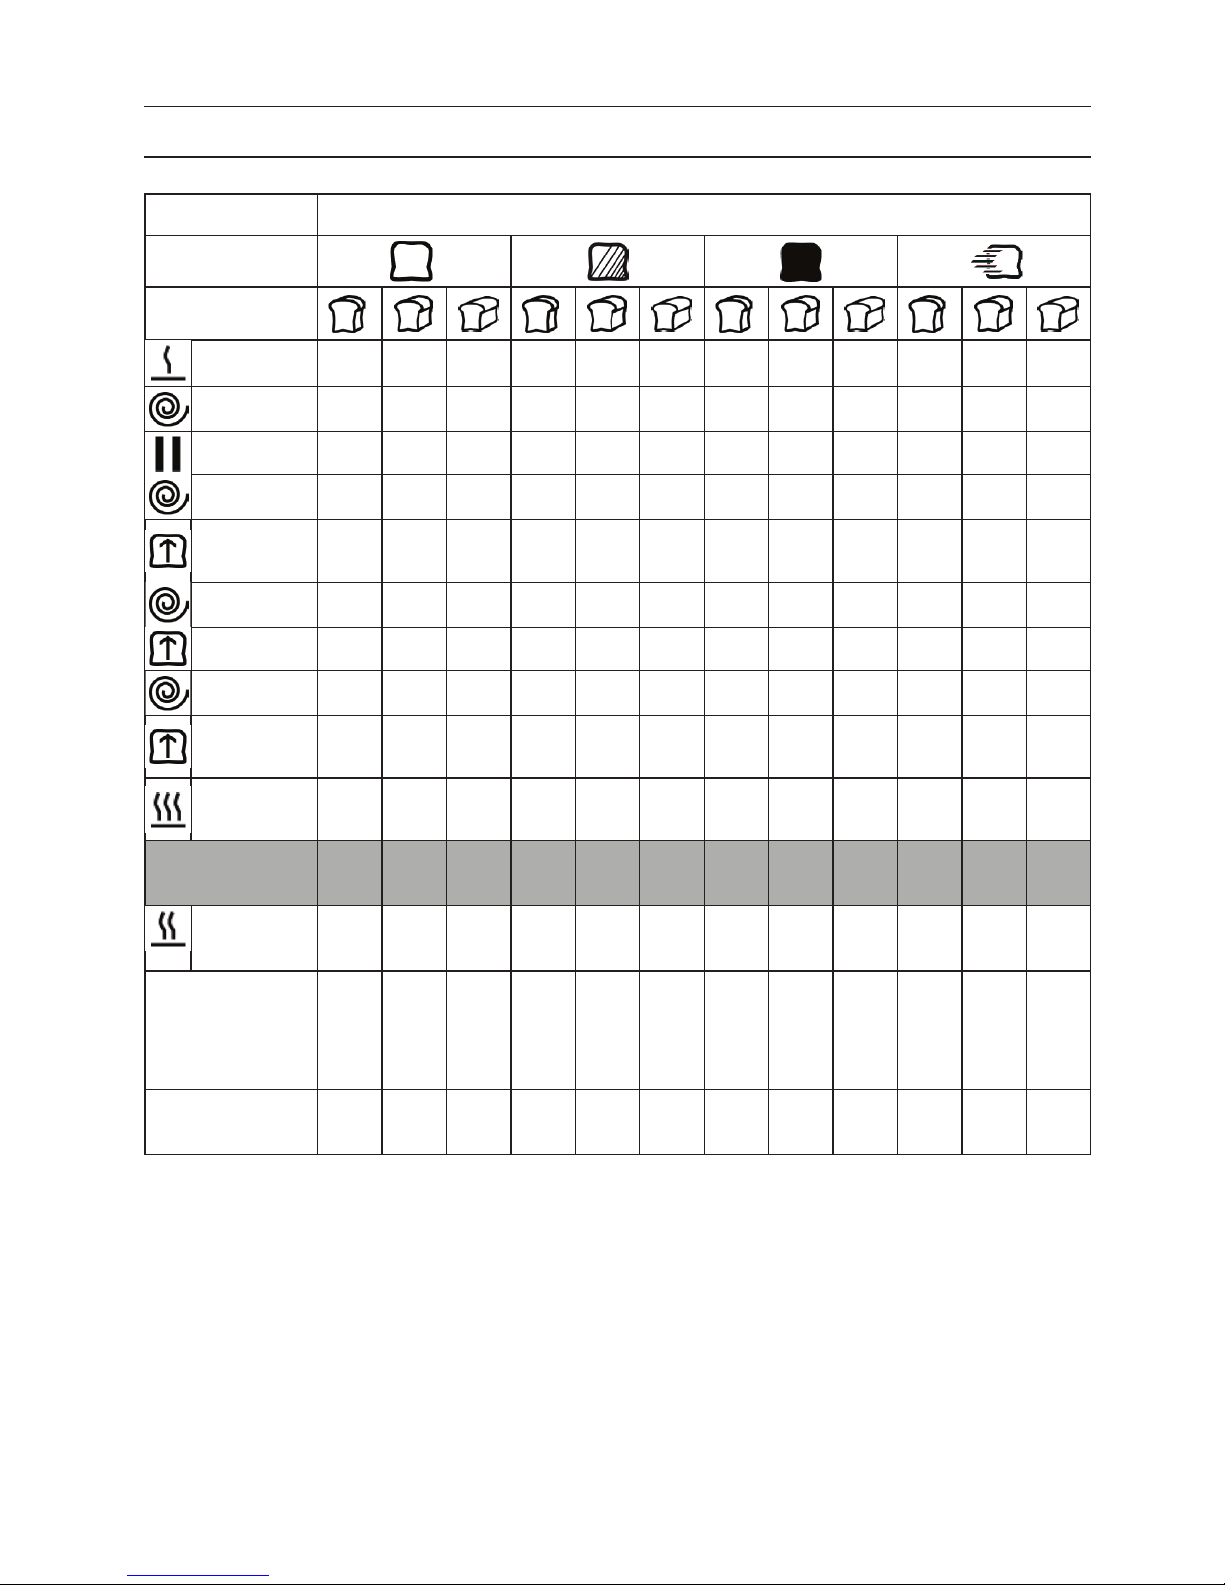
ANNEXE : DURÉES DES PROGRAMMES
Menu 1 Programme de base
Degré de brunissage
Poids
Préchauffage - - - - - - - - - - - -
Pétrissage
5 min 5 min 5 min 5 min 5 min 5 min 5 min 5 min 5 min 5 min 5 min 5 min
Repos
5 min 5 min 5 min 5 min 5 min 5 min 5 min 5 min 5 min 5 min 5 min 5 min
Pétrissage
20 min 20 min 20 min 20 min 20 min 20 min 20 min 20 min 20 min 20 min 20 min 20 min
Levée
40
min
40
min
40
min
40
min
40
min
40
min
40
min
40
min
40
min
15 min 15 min 15 min
Pétrissage
10 s 10 s 10 s 10 s 10 s 10 s 10 s 10 s 10 s 10 s 10 s 10 s
Levée
25 min 25 min 25 min 25 min 25 min 25 min 25 min 25 min 25 min 9 min 9 min 9 min
Pétrissage
10 s 10 s 10 s 10 s 10 s 10 s 10 s 10 s 10 s 10 s 10 s 10 s
Levée
50
min
50
min
50
min
50
min
50
min
50
min
50
min
50
min
50
min
30
min
30
min
30
min
Cuisson
46
min
51 min
58
min
48
min
53
min
60
min
53
min
58
min
65
min
48
min
53
min
60
min
Durée des
programmes
3:11 3:16 3:23 3:13 3:18 3:25 3:18 3:23 3:30 2:12 2:17 2:24
Maintien au
chaud
1 h 1 h 1 h 1 h 1 h 1 h 1 h 1 h 1 h 1 h 1 h 1 h
Moments
d’ouverture
du distributeur
d’ingrédients
2:51 2:56 3:03 2:53 2:58 3:05 2:58 3:03 3:10 1:52 1:57 2:04
Durée maximale de
la minuterie
15:00 15:00 15:00 15:00 15:00 15:00 15:00 15:00 15:00 15:00 15:00 15:00
Page 72
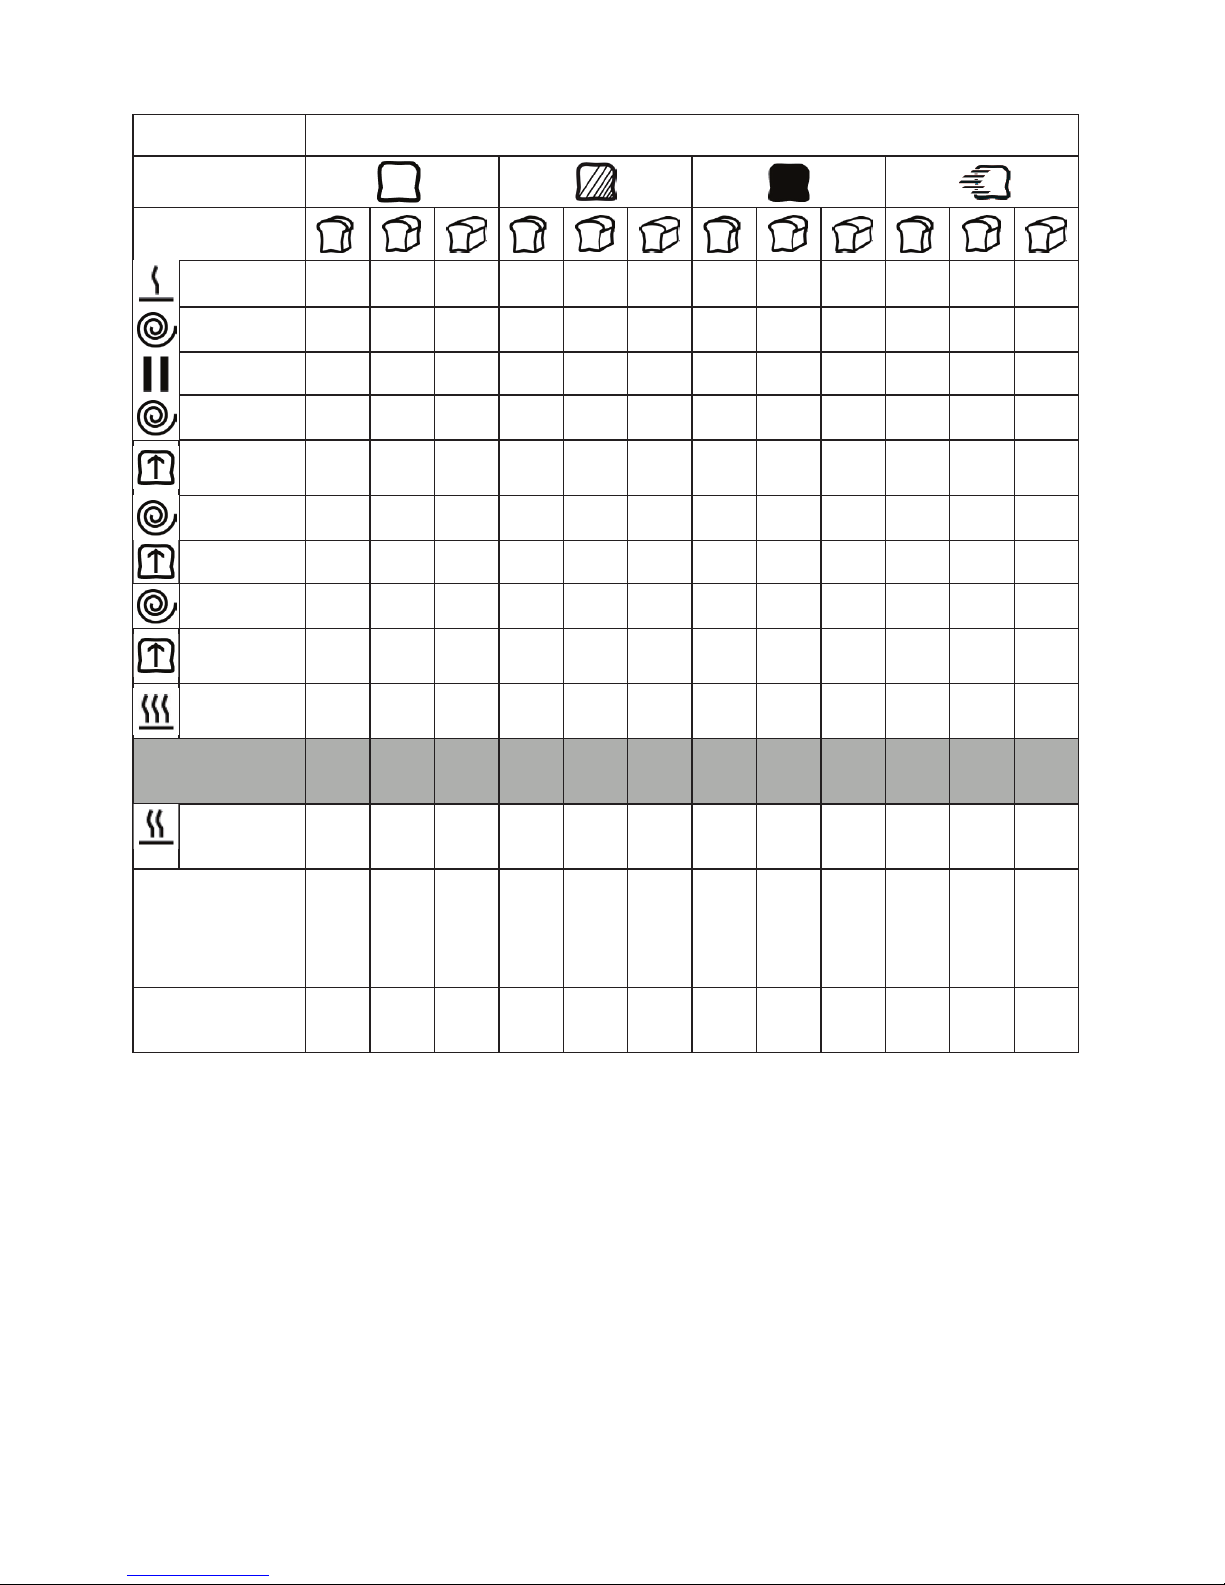
Menu 2 Pain blanc
Degré de brunissage
Poids
Préchauffage - - - - - - - - - - - -
Pétrissage
5 min 5 min 5 min 5 min 5 min 5 min 5 min 5 min 5 min 5 min 5 min 5 min
Repos
5 min 5 min 5 min 5 min 5 min 5 min 5 min 5 min 5 min 5 min 5 min 5 min
Pétrissage
20 min 20 min 20 min 20 min 20 min 20 min 20 min 20 min 20 min 20 min 20 min 20 min
Levée
39 min 39 min 39 min 39 min 39 min 39 min 39 min 39 min 39 min
30
min
30
min
30
min
Pétrissage
10 s 10 s 10 s 10 s 10 s 10 s 10 s 10 s 10 s 10 s 10 s 10 s
Levée
31 min 31 min 31 min 31 min 31 min 31 min 31 min 31 min 31 min 15 min 15 min 15 min
Pétrissage
10 s 10 s 10 s 10 s 10 s 10 s 10 s 10 s 10 s 5 s 5 s 5 s
Levée
60
min
60
min
60
min
60
min
60
min
60
min
60
min
60
min
60
min
30
min
30
min
30
min
Cuisson
48
min
50
min
53
min
50
min
52 min
55
min
55
min
57 min
60
min
50
min
52 min
55
min
Durée des
programmes
3:28 3:30 3:33 3:30 3:32 3:35 3:35 3:37 3:40 2:35 2:37 2:40
Maintien au
chaud
1 h 1 h 1 h 1 h 1 h 1 h 1 h 1 h 1 h 1 h 1 h 1 h
Moments
d’ouverture
du distributeur
d’ingrédients
3:08 3:10 3:13 3:10 3:12 3:15 3:15 3:17 3:20 2:15 2:17 2:20
Durée maximale de
la minuterie
15:00 15:00 15:00 15:00 15:00 15:00 15:00 15:00 15:00 15:00 15:00 15:00
Page 73
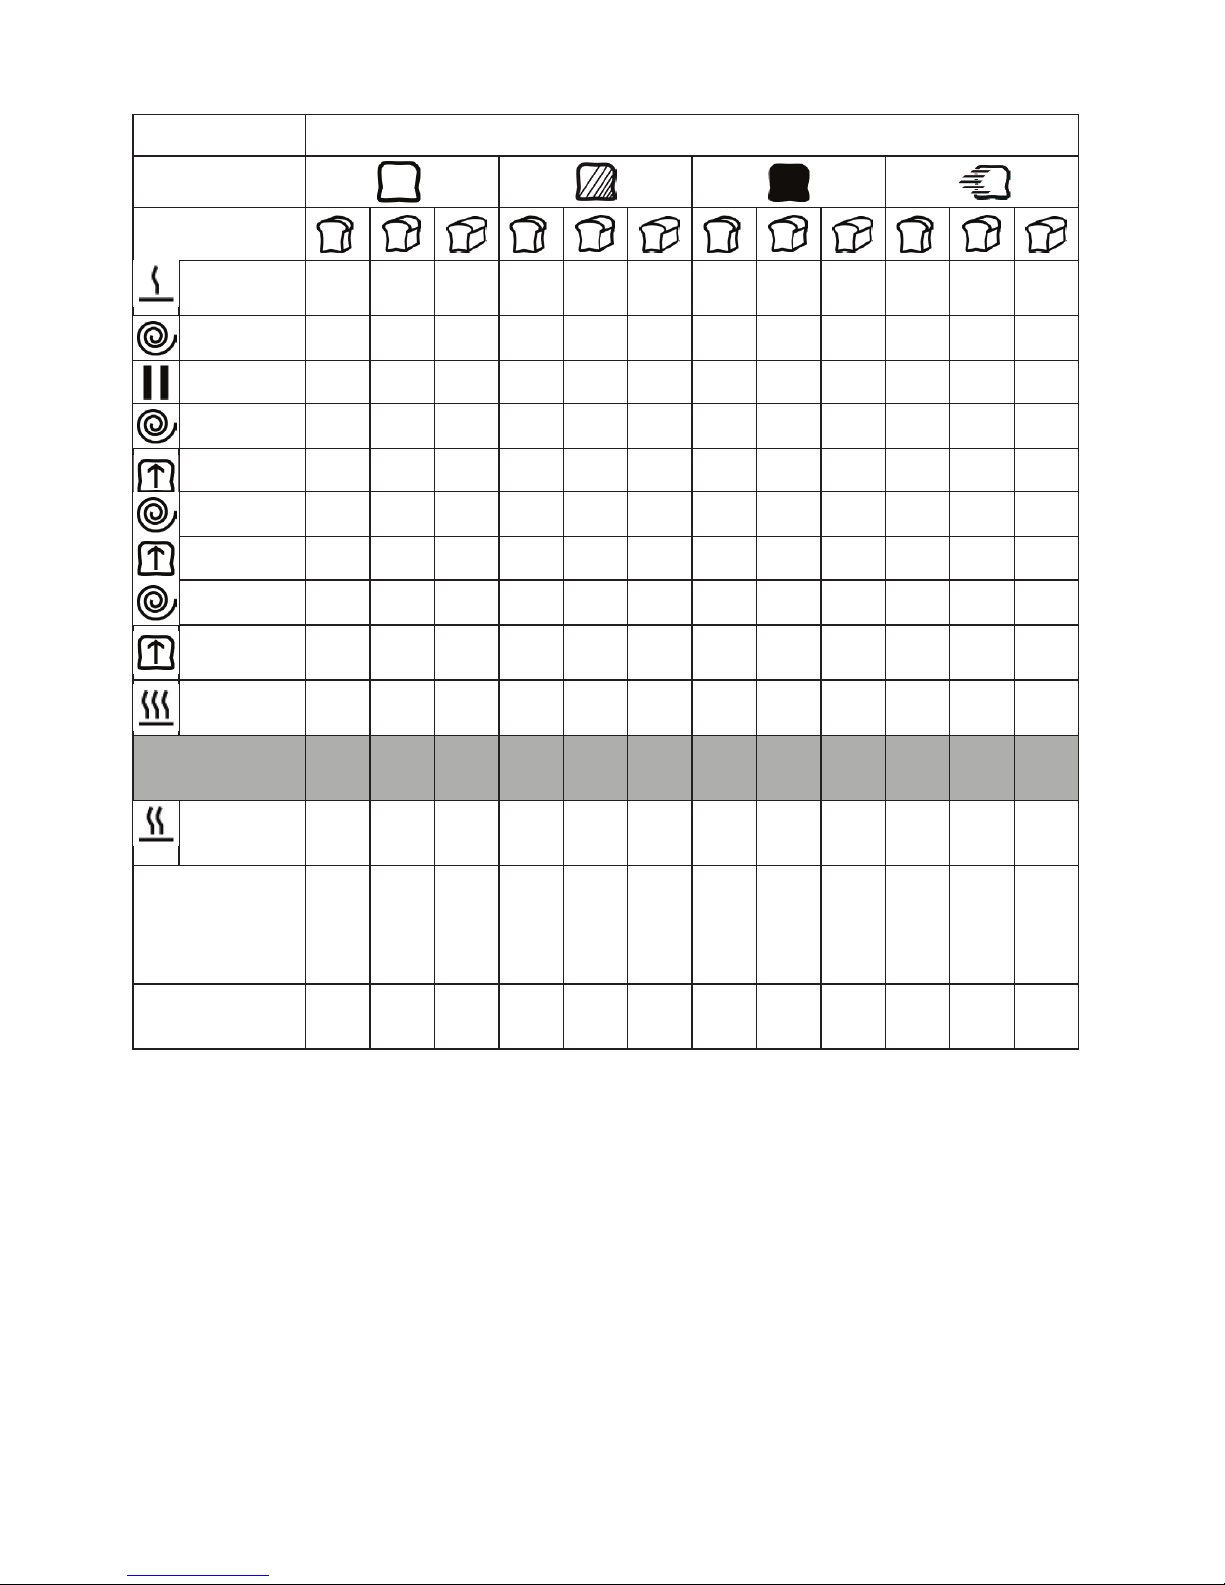
Menu 3 Pain complet
Degré de brunissage
Poids
Préchauffage
30
min
30
min
30
min
30
min
30
min
30
min
30
min
30
min
30
min
5 min 5 min 5 min
Pétrissage
5 min 5 min 5 min 5 min 5 min 5 min 5 min 5 min 5 min 5 min 5 min 5 min
Repos
5 min 5 min 5 min 5 min 5 min 5 min 5 min 5 min 5 min 5 min 5 min 5 min
Pétrissage
15 min 15 min 15 min 15 min 15 min 15 min 15 min 15 min 15 min 15 min 15 min 15 min
Levée
49 min 49 min 49 min 49 min 49 min 49 min 49 min 49 min 49 min 24 min 24 min 24 min
Pétrissage
10 s 10 s 10 s 10 s 10 s 10 s 10 s 10 s 10 s 10 s 10 s 10 s
Levée
26 min 26 min 26 min 26 min 26 min 26 min 26 min 26 min 26 min 11 min 11 min 11 min
Pétrissage
10 s 10 s 10 s 10 s 10 s 10 s 10 s 10 s 10 s 10 s 10 s 10 s
Levée
45
min
45
min
45
min
45
min
45
min
45
min
45
min
45
min
45
min
35 min 35 min 35 min
Cuisson
48
min
50
min
53
min
50
min
52 min
55
min
55
min
57 min
60
min
50
min
52 min
55
min
Durée des
programmes
3:43 3:45 3:48 3:45 3:47 3:50 3:50 3:52 3:55 2:30 2:32 2:35
Maintien au
chaud
1 h 1 h 1 h 1 h 1 h 1 h 1 h 1 h 1 h 1 h 1 h 1 h
Moments
d’ouverture
du distributeur
d’ingrédients
2:58 3:00 3:03 3:00 3:02 3:05 3:05 3:07 3:10 2:10 2:12 2:15
Durée maximale de
la minuterie
15:00 15:00 15:00 15:00 15:00 15:00 15:00 15:00 15:00 15:00 15:00 15:00
Page 74
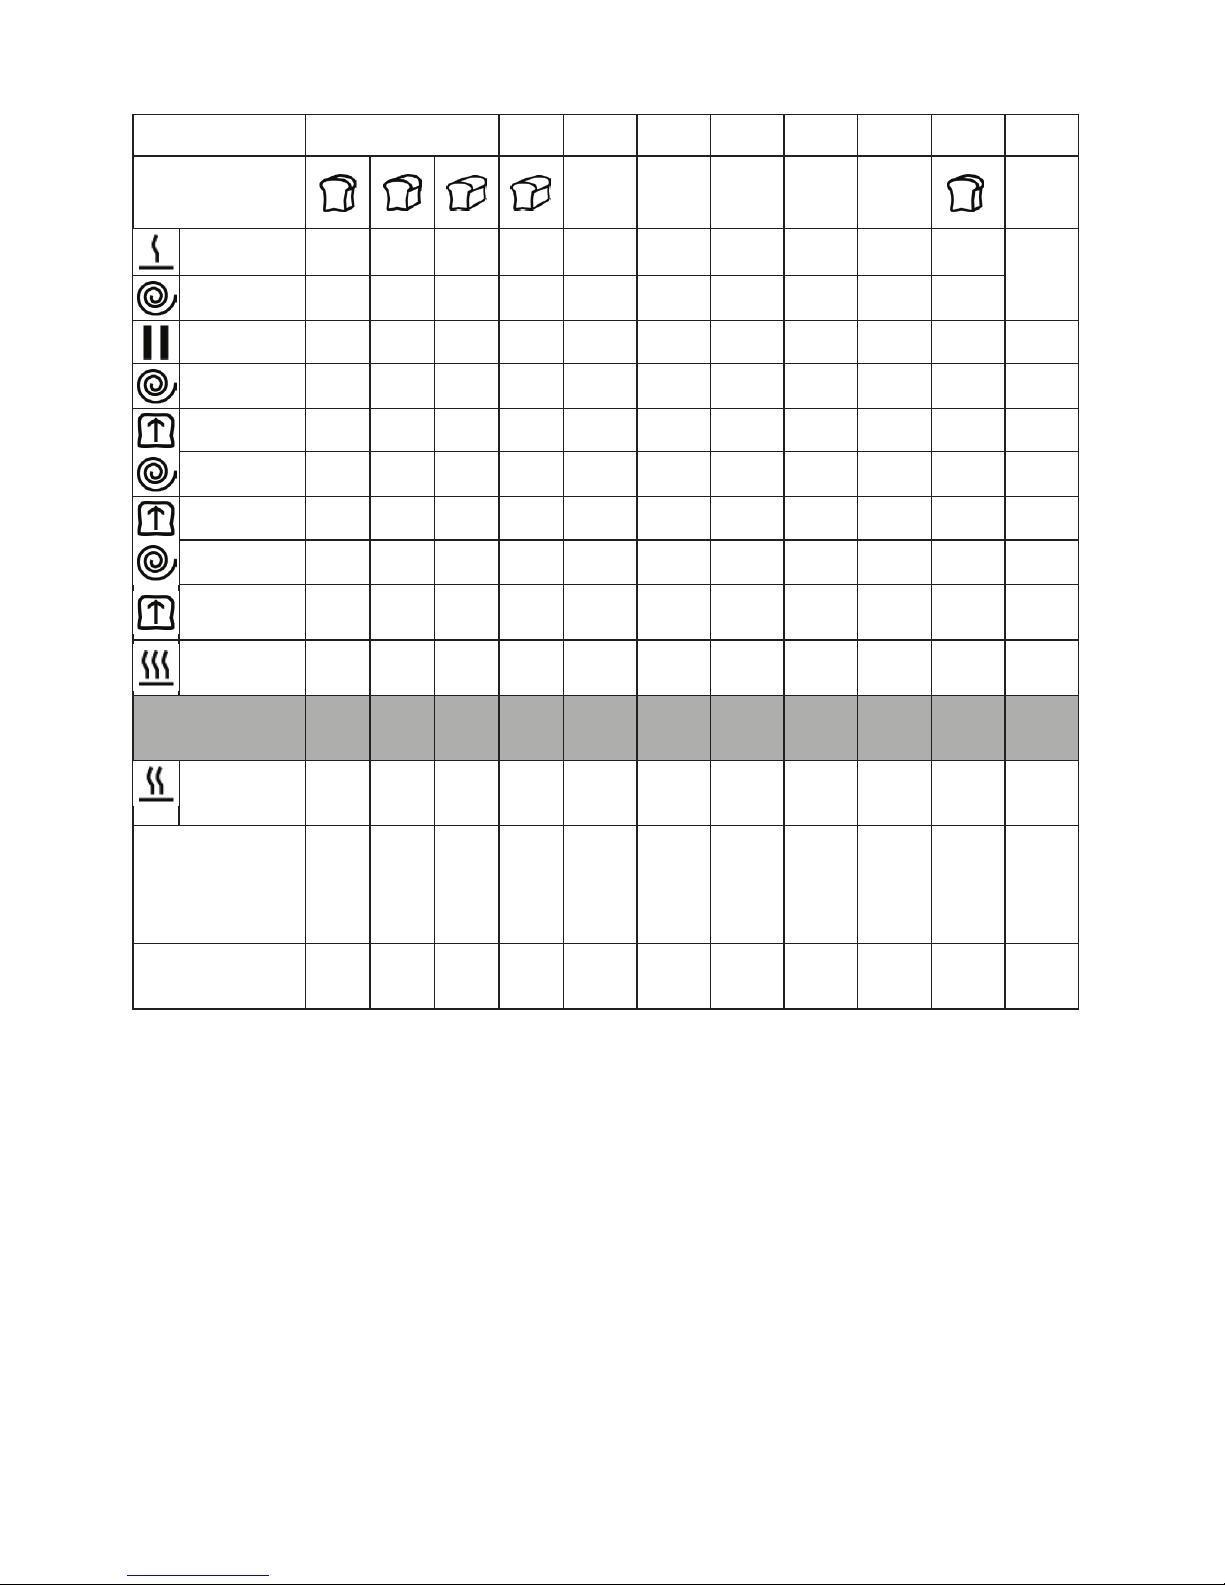
Menu 4 5 6 7 8 9 10 11 12
Poids
- - - - - -
Préchauffage
- - - - - - - - - -
15 min
5 min 5 min 5 min 5 min 5 min 5 min 3 min 5 min - 5 min
Pétrissage
5 min 5 min 5 min - - 5 min - - - - -
Repos
20 min 20 min 20 min 15 min 10 min 20 min 11 min 10 min - 15 min -
Pétrissage
39 min 39 min 39 min 12 min - 60 min - - - - -
Levée
10 s 10 s 10 s - - - - - - - -
Pétrissage
26 min 26 min 26 min - - - - - - - -
Levée
5 s 5 s 5 s - - - - - - - -
Pétrissage
30
min
30
min
30
min
- 60 min - - - - - -
Levée
50
min
55
min
60
min
48
min
55 min - - 70 min
60 -90
min
75 min 55 min
Durée des
programmes
2:55 3:00 3:05 1:20 2:10 1:30 00:14 1:25
1:001:30
1:35 1:10
Maintien au
chaud
1 h 1 h 1 h 1 h 1 h - - - 1 h 22 min -
Moments
d’ouverture
du distributeur
d’ingrédients
2:57 3:02 3:07 1:10 2:05 1:10 - - - - -
Durée maximale de
la minuterie
15:00 15:00 15:00 15:00 15:00 15:00 15:00 15:00 - 15:00 -
Page 75
75
IT
Gentile cliente,
La ringraziamo per aver acquistato il nostro prodotto. La preghiamo di leggere
attentamente le seguenti istruzioni e di seguirle per evitare eventuali danni. Si declina
ogni responsabilità per danni derivati da una mancata osservazione delle avvertenze di
sicurezza e da un uso improprio del dispositivo.
INDICE
Dati tecnici75
Dichiarazione di conformità75
Avvertenze di sicurezza76
Descrizione del prodotto77
Spie e tasti funzione78
Messa in funzione79
Utilizzo81
Funzioni speciali84
Pulizia e manutenzione86
Ricerca e risoluzione dei problemi87
Smaltimento88
Appendice: tempi dei programmi89
DATI TECNICI
Articolo numero 10032101
Alimentazione 230 V ~ 50 Hz
Potenza 650 W
DICHIARAZIONE DI CONFORMITÀ
Produttore:
Chal-Tec GmbH, Wallstraße 16, 10179 Berlino, Germania.
Questo prodotto è conforme alle seguenti direttive
europee:
2014/30/UE (EMC)
2014/35/UE (LVD)
2011/65/UE (RoHS)
English
Español
Français
Italiano
Page 76

76
IT
AVVERTENZE DI SICUREZZA
• I bambini maggiori di 8 anni e le persone con capacità siche, sensoriali o mentali
ridotte possono utilizzare il dispositivo solo se attentamente sorvegliate o ben
istruite relativamente all’utilizzo del dispositivo stesso da parte di un supervisore
responsabile della loro sicurezza.
• Se il cavo di alimentazione o la spina sono danneggiati, farli sostituire dal
produttore, da un centro assistenza autorizzato o da un tecnico qualicato.
• Non toccare le superci calde mentre il dispositivo è in funzione. Utilizzare solo le
manopole. Non fare pendere il cavo di alimentazione dal piano di lavoro.
• Non collegare il dispositivo ad un timer esterno o ad una presa con telecomandato.
• Pulire tutte le superci a contatto con gli alimenti.
• Prima dell‘uso, vericare la tensione sulla targhetta del dispositivo. Collegare il
dispositivo solo ad una presa che corrisponde alla tensione indicata.
• Non immergere il dispositivo in acqua o in altri liquidi.
• Staccare la spina in caso di inutilizzo del dispositivo, prima di rimuovere e di
inserire i componenti e prima della pulizia.
• Non posizionare il dispositivo vicino a fornelli o a forni.
• Spostare il dispositivo con cautela se contiene olio caldo o liquidi caldi.
• Non toccare i componenti in movimento mentre il dispositivo è in funzione.
• Non mettere in funzione il dispositivo senza ingredienti nello stampo.
• Non sbattere lo stampo per rimuovere il pane poiché potrebbe danneggiarsi.
• Collegare prima il connettore al dispositivo e poi inserire la spina nella presa.
Spegnere il dispositivo prima di staccare la spina dalla presa.
• Non mettere in funzione il dispositivo se lo stampo non è inserito nel dispositivo,
altrimenti il dispositivo potrebbe danneggiarsi.
Page 77
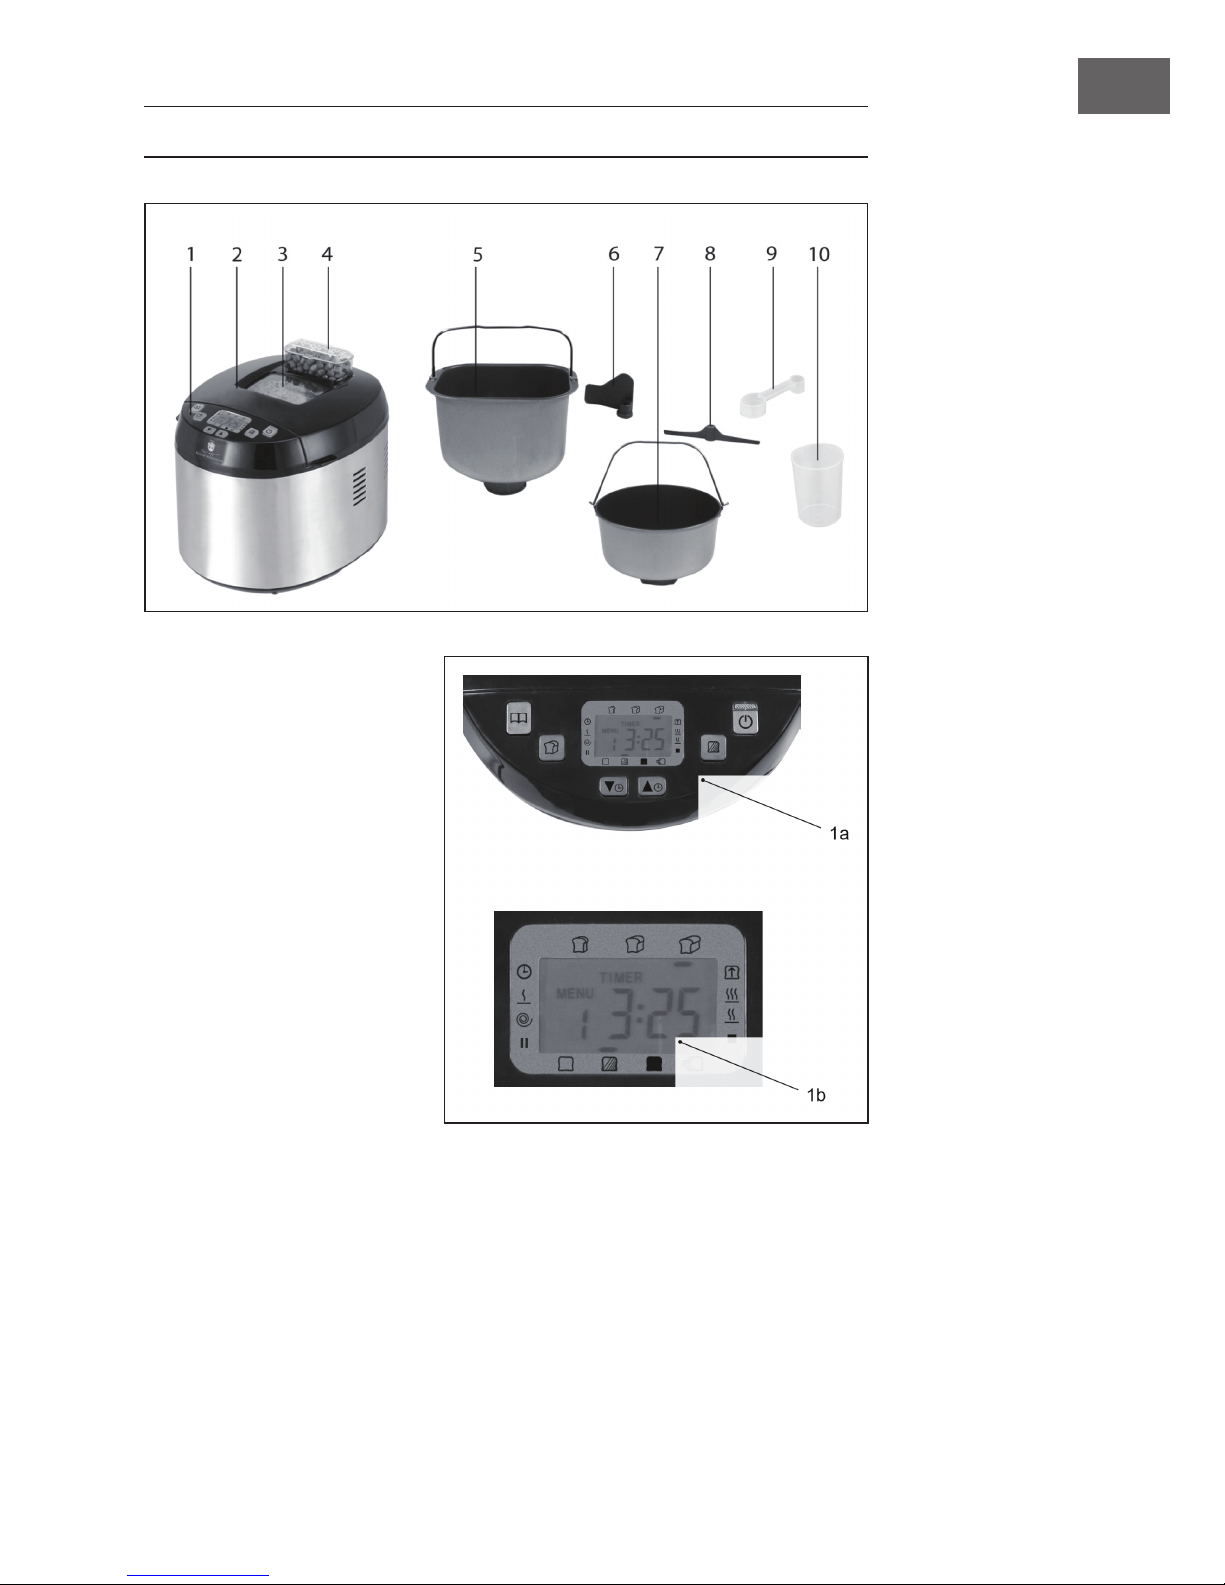
77
IT
DESCRIZIONE DEL PRODOTTO
1 Pannello dei comandi
e display
2 Coperchio
3 Finestrella
4 Erogatore ingredienti
5 Stampo pane
6 Gancio impastatore
7 Stampo torta
8 Frusta
9 Cucchiaio dosatore
10 Misurino
Page 78
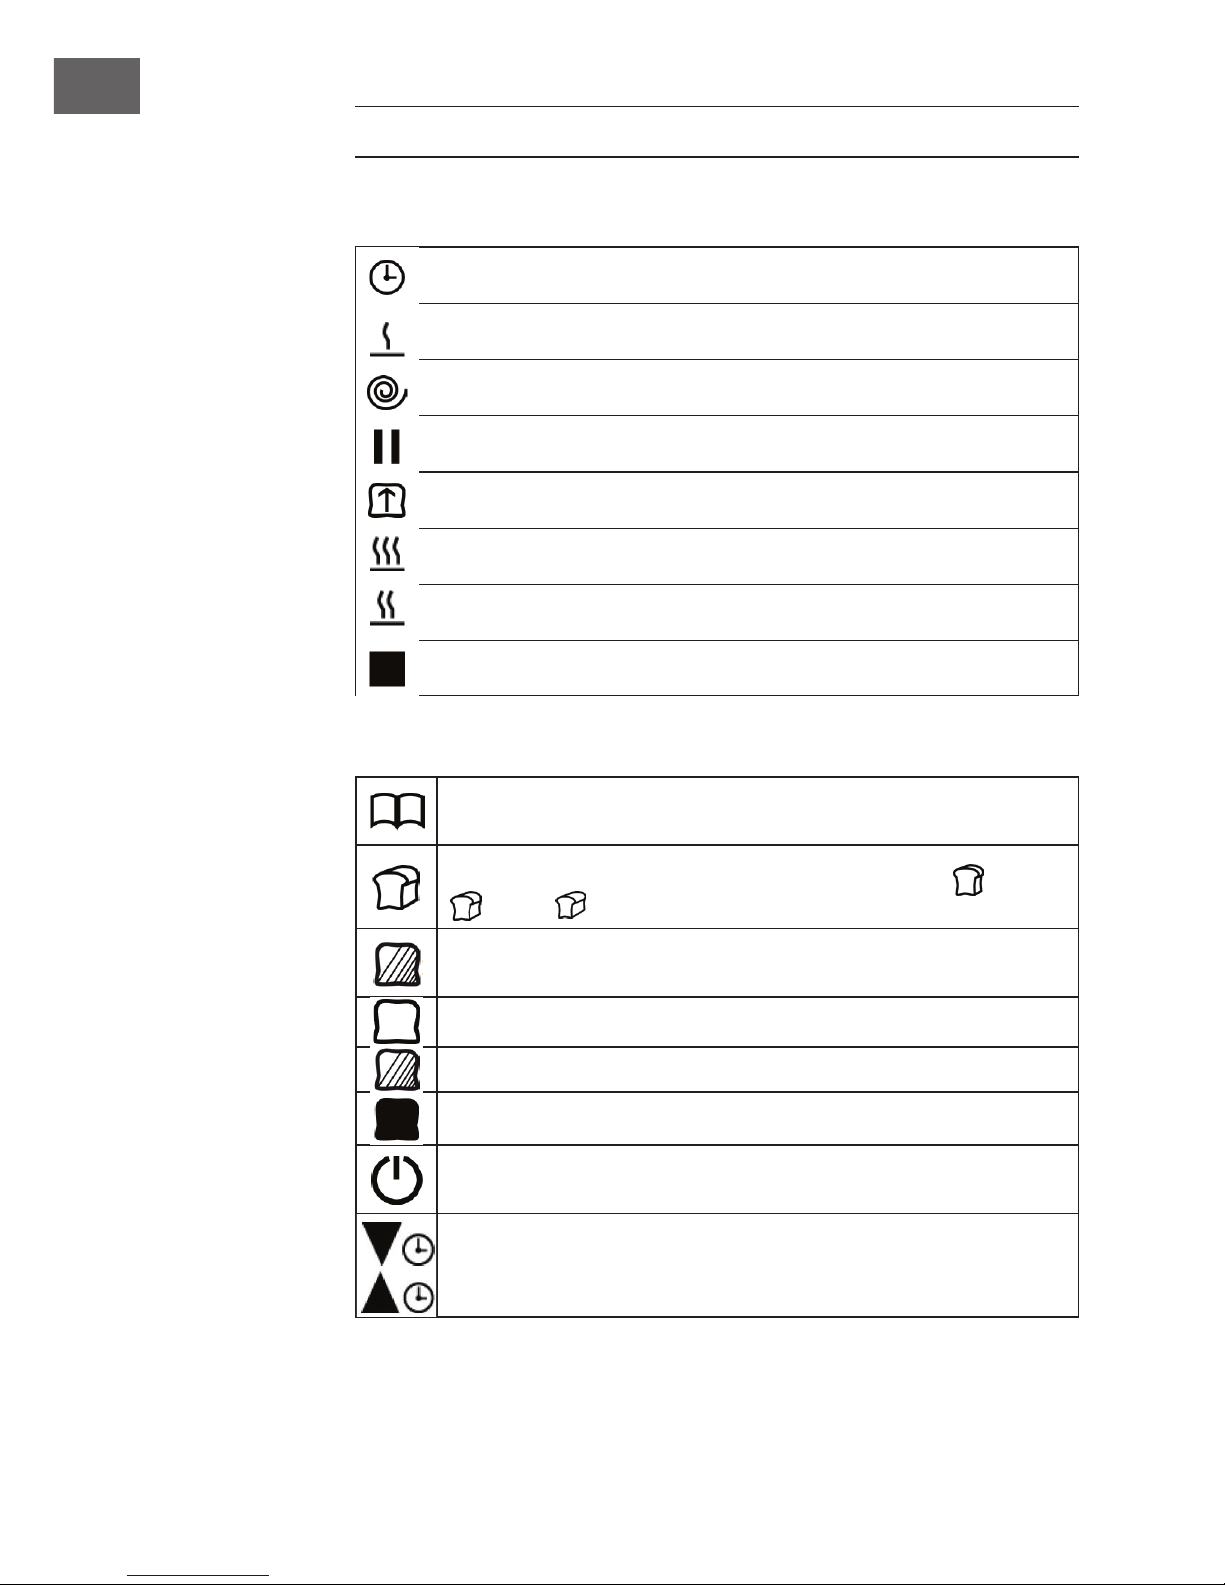
78
IT
SPIE E TASTI FUNZIONE
Spie e fasi di cottura
Timer
Preriscaldamento
Preparazione dell´impasto
Impasto a riposo
Lievitazione dell´impasto
Cottura dell´impasto
L´impasto pronto viene mantenuto in caldo
Termine del programma
Tasti funzione
MENU: utilizzare questo tasto per selezionare uno dei 12 programmi. Il
programma impostato appare sul display (MENU 1-12).
PESO: utilizzare questo tasto per impostare il peso del pane: 450g,
680g o 900g. Il peso impostato viene evidenziato sul display.
GRADO DI DORATURA: utilizzare questo tasto per impostare il grado di
doratura per i programmi 1-4.
Grado di doratura: doratura chiara
Grado di doratura: doratura media
Grado di doratura: doratura scura
START/STOP: utilizzare questo tasto per avviare il programma
selezionato. Per arrestare il programma, tenere premuto il tasto.
TIMER: premere questo tasto per aumentare o diminuire il timer a
incrementi di 10 minuti. Al termine del processo di cottura, appare il tempo
inserito. Il tempo massimo impostabile è di 15 ore.
Page 79
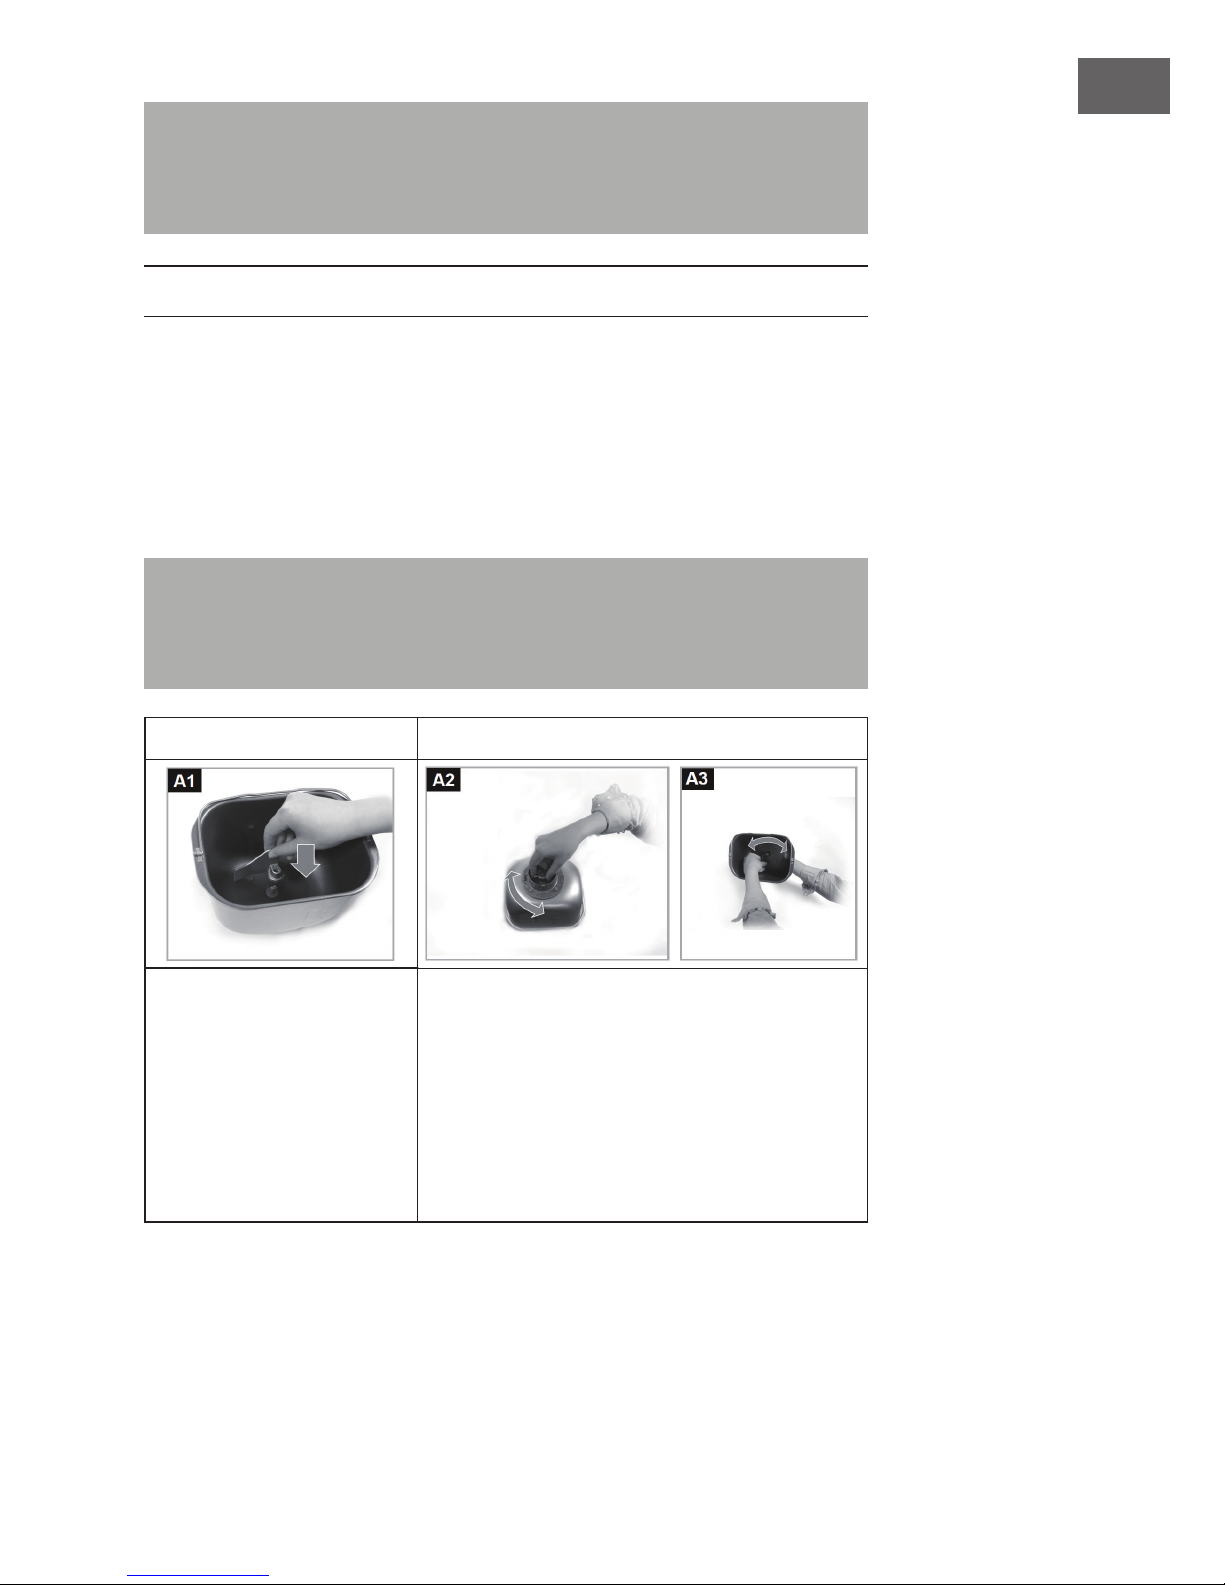
79
IT
Esempio: il timer indica 06:30. Ciò signica che la cottura sarà completata in 6 ore
e 30 minuti. Appena si avvia il programma con il tasto Start, il timer inizia il conto
alla rovescia. Una freccia sul lato destro o sinistro del display indica la fase di cottura
attuale. Dopo 6 ore e 30 minuti, il pane è pronto.
MESSA IN FUNZIONE
Avvertenze per il primo utilizzo
• Rimuovere completamente il materiale di imballaggio.
• Pulire il dispositivo e tutti i componenti a contatto con gli alimenti. Per istruzioni più
dettagliate relative alla pulizia, vedere la sezione Pulizia e manutenzione.
Utilizzare e rimuovere il gancio impastatore
Nota: il termine „stampo“ viene utilizzato in questo manuale sia per lo stampo del
pane sia per lo stampo della torta. Per migliorare la leggibilità, l‘uso di entrambe le
forme è volutamente evitato. Se è necessario l´uso di uno stampo specico, questo
verrà menzionato.
Inserimento Rimozione
Premere il gancio impastatore
o la frusta sul mandrino
al centro dello stampo. Il
gancio e il mandrino hanno
una supercie piatta e
combaciano tra di loro. Il
mandrino è ssato con un
dado nella parte inferiore
dello stampo.
Con una mano afferrare il dado posto sulla parte
inferiore e con l´altra mano afferrare il gancio.
Estrarre il gancio dal mandrino con un leggero
movimento rotatorio e nel mentre ruotare il dado
nell´altra direzione.
Page 80
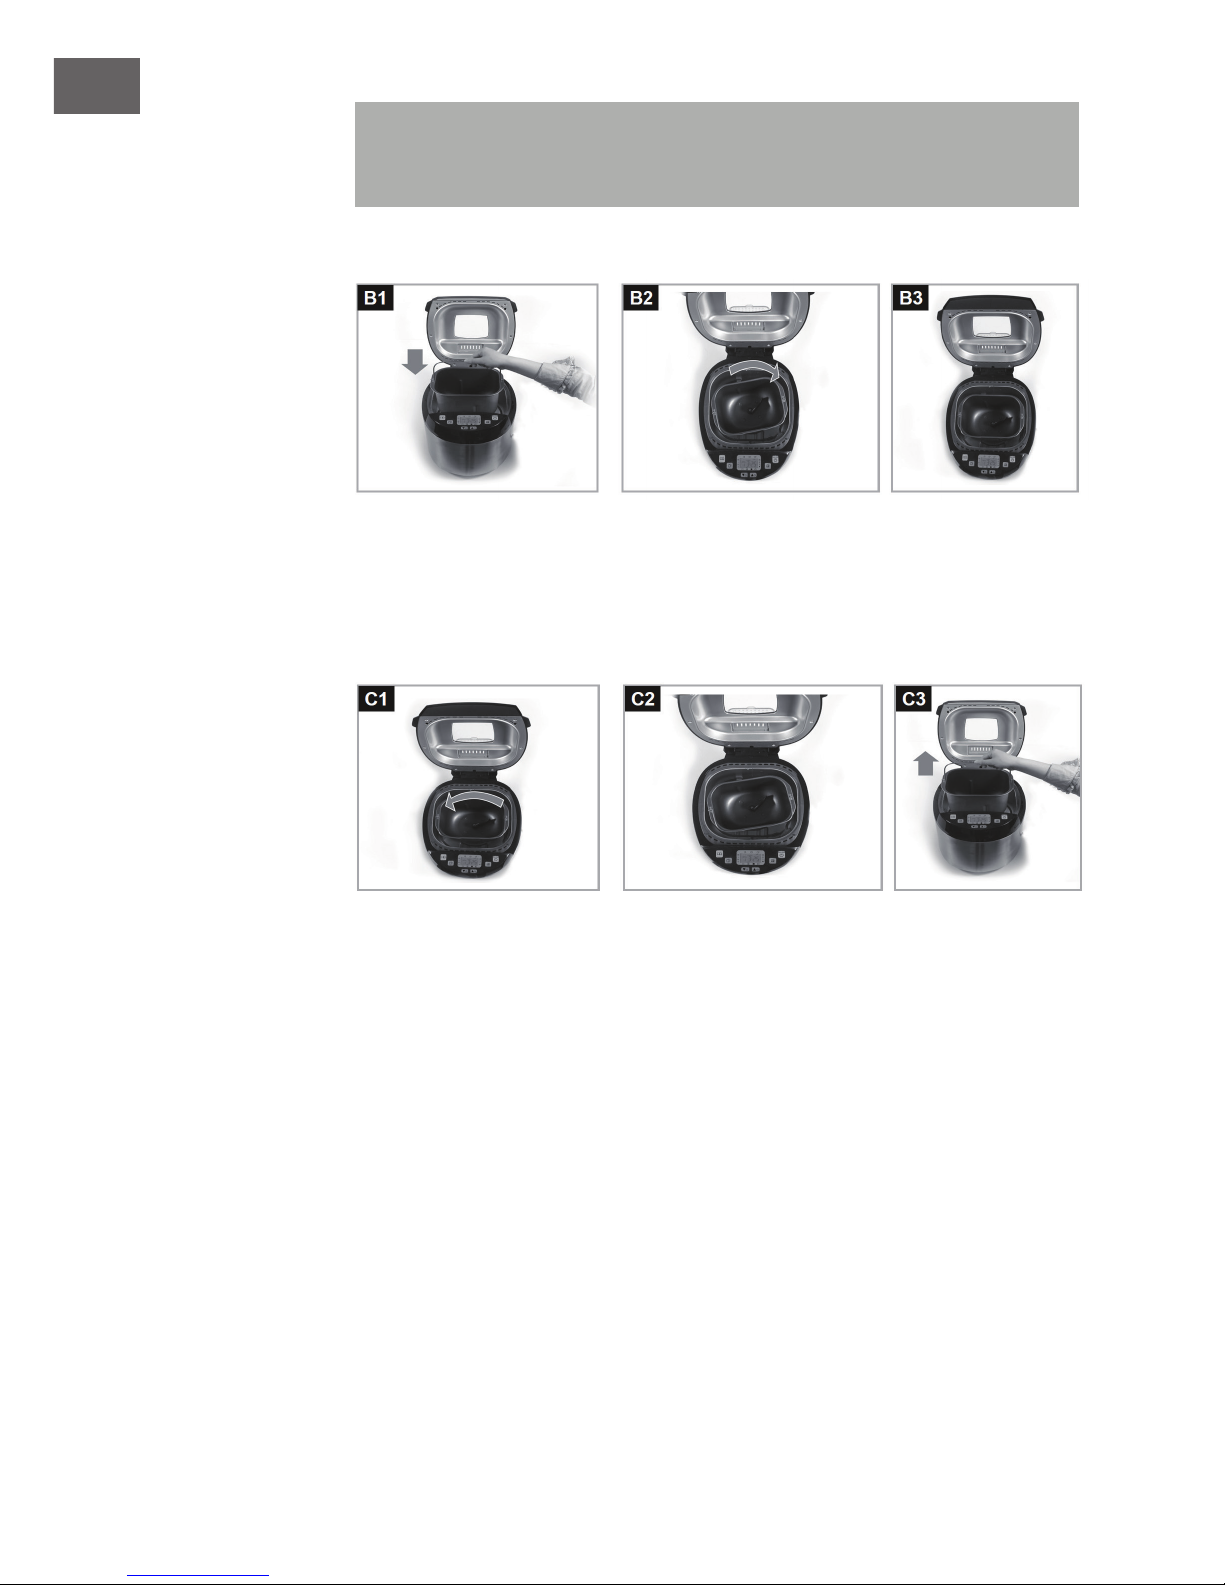
80
IT
Nota: rimuovere il gancio dopo l‘ultimo impasto afnché dopo la cottura non
rimangano buchi. Cospargere le mani con un po‘ di farina e sollevare l´impasto in
modo da poter rimuovere il gancio.
Inserire lo stampo
Per prima cosa mettere il gancio sul mandrino nello stampo. Ruotare leggermente lo
stampo e inserirlo nel dispositivo. Ruotare lo stampo in senso orario no allo scatto e al
corretto posizionamento.
Rimuovere lo stampo
Aprire il coperchio. Afferrare lo stampo tramite l´impugnatura e ruotarlo in senso
antiorario no alla ne. Rimuovere lo stampo.
Page 81

81
IT
UTILIZZO
Funzionamento generale
1 Rimuovere lo stampo dal dispositivo e ssare il gancio impastatore o la frusta sul
mandrino posto nello stampo.
2 Introdurre la giusta quantità di ingredienti nello stampo. Per fare ciò seguire la
ricetta.
Suggerimento: per pesare gli ingredienti servirsi del misurino o del cucchiaio
dosatore inclusi nella consegna. Per i liquidi, posizionare il misurino su una supercie
piana e guardare il livello sulla scala graduata.
3 Fissare lo stampo nel dispositivo.
4 Chiudere il coperchio.
5 Inserire la spina nella presa.
6 Premere il tasto MENU e selezionare un programma.
7 Premere il tasto WEIGHT e selezionare il peso desiderato del pane.
8 Premere il tasto BROWNING LEVEL e selezionare il livello di doratura desiderato
della crosta del pane.
9 Per impostare l´avvio ritardato del processo di cottura, premere il tasto TIMER e
impostare il tempo di preparazione del pane.
10 Premere il tasto START/STOP per avviare il programma.
Nota: una volta che il programma è stato avviato con il tasto START/STOP, tutte le
combinazioni dei tasti sono bloccate.
Il dispositivo inizia a lavorare l´impasto in base al programma selezionato. La fase di
cottura attuale è indicata sul display da una freccia sul lato destro o sinistro.
Nota: per interrompere completamente il programma, tenere premuto per almeno 2
secondi il tasto START/STOP.
Al termine della cottura, viene emesso un segnale acustico e inizia la fase di
mantenimento in caldo (vale solo per i programmi 1-6, 10 e 11).
Durante la fase di mantenimento in caldo, è possibile togliere lo stampo in qualsiasi
momento. Uscire dal programma premendo il tasto START-STOP per almeno 2 secondi.
Staccare la spina dalla presa e rimuovere lo stampo utilizzando guanti da forno. Far
raffreddare il pane prima di tagliarlo.
Page 82

82
IT
Note importanti sul gancio impastatore
• Rimuovere il gancio prima di tagliare il pane.
• È possibile rimuovere il gancio dopo l‘ultimo processo af nché dopo la cottura non
rimangano buchi. Cospargere le mani con un po‘ di farina e sollevare l´impasto
per poter rimuovere il gancio.
MENU E PROGRAMMI
Premere il tasto MENU per selezionare uno dei 12 programmi seguenti:
Menu 1: programma di base
Per pane misto. Possono essere aggiunti ingredienti diversi come semi di zucca,
prosciutto tagliato a dadini o cipolle. Questo programma è generalmente il più
utilizzato.
Menu 2: Pane bianco
Per pane chiaro fatto con farina di grano e con una crosta croccante.
Menu 3: Pane integrale
Selezionare questo programma per fare il pane con la farina integrale. Il programma
inizia con il preriscaldamento: gli ingredienti vengono leggermente riscaldati prima
dell´impasto.
Nota: per accorciare i programmi 1-3, utilizzare il tasto BROWNING LEVEL per
selezionare l‘impostazione
. Utilizzare acqua tiepida.
Menu 4: Pane dolce
Questo programma è adatto per ricette che contengono zucchero o ingredienti come
cioccolato, uvetta o noci.
Menu 5: programmi brevi
Questo programma consente di accorciare il tempo di cottura per il pane misto e per il
pane bianco. Il tempo di cottura per il pane misto (Menu 1) è di 3:25, con il Menu 5 è
di 1:20. Nel programma 5, il periodo di riposo viene ridotto, pertanto i liquidi devono
essere riscaldati prima dell´inizio, poiché l´impasto non lievita con liquido freddo. Il
liquido non deve essere troppo caldo, altrimenti il lievito non può reagire.
Page 83

83
IT
Menu 6: pane senza glutine
Per fare il pane con farina senza glutine o con impasti senza glutine.
Menu 7: impasto per pizza
Per impastare la pizza. Introdurre tutti gli ingredienti nello stampo e il dispositivo
produce un impasto liscio. Stendere l‘impasto e distribuire gli ingredienti per la pizza.
Menu 8: impasto per pasta
Il dispositivo produce in breve tempo un impasto liscio per la pasta.
Menu 9: marmellata
Con questo programma è possibile produrre diversi tipi di marmellata. In seguito si deve
solo introdurre la marmellata nei barattoli.
Menu 10: impasto pronto e riso
Per impasto già pronto. Con questo programma l‘impasto non viene lavorato. Il
programma è adatto anche per cuocere il riso: introdurre nello stampo una tazza di
riso e versare due tazze di acqua. Utilizzare i tasti TIMER (freccia) per impostare il
tempo desiderato. È possibile interrompere il programma in qualsiasi momento tenendo
premuto il tasto START/STOP per almeno 2 secondi.
Menu 11: Torta
Per cuocere le torte. Utilizzare per questo programma lo stampo della torta e il gancio
impastatore.
Menu 12: Risotto
Utilizzare questo programma per cucinare il risotto nello stampo. Posizionare il gancio
impastatore nello stampo e avviare il programma 12. Durante la prima fase, le cipolle e
il riso diventano dorati. Al termine viene emesso un segnale acustico. Quindi aggiungere
il brodo e lasciare in funzione il programma.
Nota: prestare attenzione alle quantità di ingredienti indicate sulla confezione del
risotto. Si consiglia di introdurre 3 tazze di brodo per 1 tazza di riso. Al termine del
programma, è possibile aggiungere burro e parmigiano. Introdurre questi ingredienti
solo dopo la ne del programma.
Page 84
84
IT
FUNZIONI SPECIALI
Impostare il timer
Nota: il timer può essere impostato per tutti i programmi ad eccezione dei programmi
10 e 12. Nel programma 10 il tempo di cottura (1:10, 1:20, 1:30) si imposta con i
tasti TIMER (frecce).
1 Premere il tasto MENU, il tasto WEIGHT e il tasto BROWNING LEVEL e impostare i
valori desiderati.
Nell‘esempio sono stati selezionati i seguenti valori: Menu 1, peso del pane
(900g) e grado di doratura (medio). Il tempo di cottura che appare sul display è
di [3:25].
2 Utilizzare il tasto TIMER per impostare l´avvio ritardato. Ad ogni pressione del tasto
il tempo aumenta a incrementi di 10 minuti. Il timer può essere impostato no ad un
massimo di 15 ore (compreso il tempo di cottura).
Esempio: ad ogni pressione del tasto si aumenta il tempo: 03:35 (predenito)> 03:40>
03:50> 04:00> ecc. Se il pane deve essere pronto tra 6 ore digitare 06:00.
3 Avviare il programma premendo START/STOP. Il doppio punto della spia del
tempo inizia a lampeggiare e il programma si avvia. Il pane sarà pronto in base al
tempo impostato.
Ad esempio il tempo indicato sul display è [6:00] ed inizia il conto alla rovescia.
Quando il tempo arriva a [03:25] il programma si avvia automaticamente.
4 Quando il tempo è scaduto e il pane è pronto, rimuovere lo stampo.
Esempio: dopo 6 ore, il programma è terminato e il pane è pronto. Sul display compare
[00:00] e inizia la fase di riscaldamento. È possibile rimuovere immediatamente il
pane o lasciarlo ancora per un po´ a riposo nel dispositivo. Al termine della fase di
riscaldamento, il display ritorna alle impostazioni originali e indica i seguenti valori:
Menu 1, peso del pane
(900g), grado di doratura (medio) e tempo di
cottura [3:25].
Page 85

85
IT
Note importanti per la cottura
• Nella stagione calda o umida, l´impasto può lievitare troppo in fretta, pertanto
l´avvio ritardato di più di 2 ore in alcune circostanze potrebbe essere troppo lungo.
• Per evitare una lievitazione troppo rapida, aggiungere nello stampo la farina prima
di tutti gli altri ingredienti. Fare un piccolo foro nella farina e introdurre il lievito.
• Non selezionare un avvio ritardato troppo lungo in caso di lavorazione di alimenti
deperibili come il latte o le uova.
Funzione di mantenimento in caldo
La funzione di mantenimento in caldo consente al pane di non assorbire umidità dopo
la cottura. Al termine dei programmi 1-6, 10 e 11, il prodotto nito viene mantenuto
in caldo per un po’. Sul display appare [00:00] e viene emesso un segnale acustico.
Per rimuovere il pane durante la fase di mantenimento in caldo, tenere premuto il tasto
START/STOP per almeno 2 secondi.
Erogatore di ingredienti
L´erogatore di ingredienti consente di aggiungere ingredienti secchi come semi di
zucca o uvetta alla ne dell´impasto. Lo sportello in basso si apre automaticamente
alla ne dell´impasto (programmi 1-7). L´apertura dello sportello avviene con un
clic accompagnato da un segnale acustico. Per quanto riguarda i programmi 8-12, lo
sportello resta chiuso.
Nota: gli orari esatti di apertura dello sportello sono indicati nei singoli programmi
nella tabella allegata.
• Non riempire eccessivamente l´erogatore. In caso contrario, gli ingredienti
possono restare incastrati e non cadere nello stampo. Rispettare le quantità esatte
di ingredienti indicate nelle ricette.
• Gli ingredienti di piccole dimensioni come ad esempio i semi di sesamo possono
cadere attraverso la griglia nella parte inferiore. In questo caso aprire il coperchio
e introdurre gli ingredienti direttamente nello stampo una volta che si sente il
segnale per l‘apertura dello sportello. Lo stesso vale per gli ingredienti che possono
sciogliersi o incollarsi, come pezzi di cioccolato, il formaggio o la frutta.
• Pulire l‘erogatore dopo ogni uso. In caso contrario, è possibile che lo sportello si
blocchi e non si apra.
Nota: quando si apre lo sportello, vengono emessi dei brevi segnali acustici. A
questo punto, è possibile anche aprire il coperchio del dispositivo e aggiungere gli
ingredienti direttamente nello stampo.
Page 86
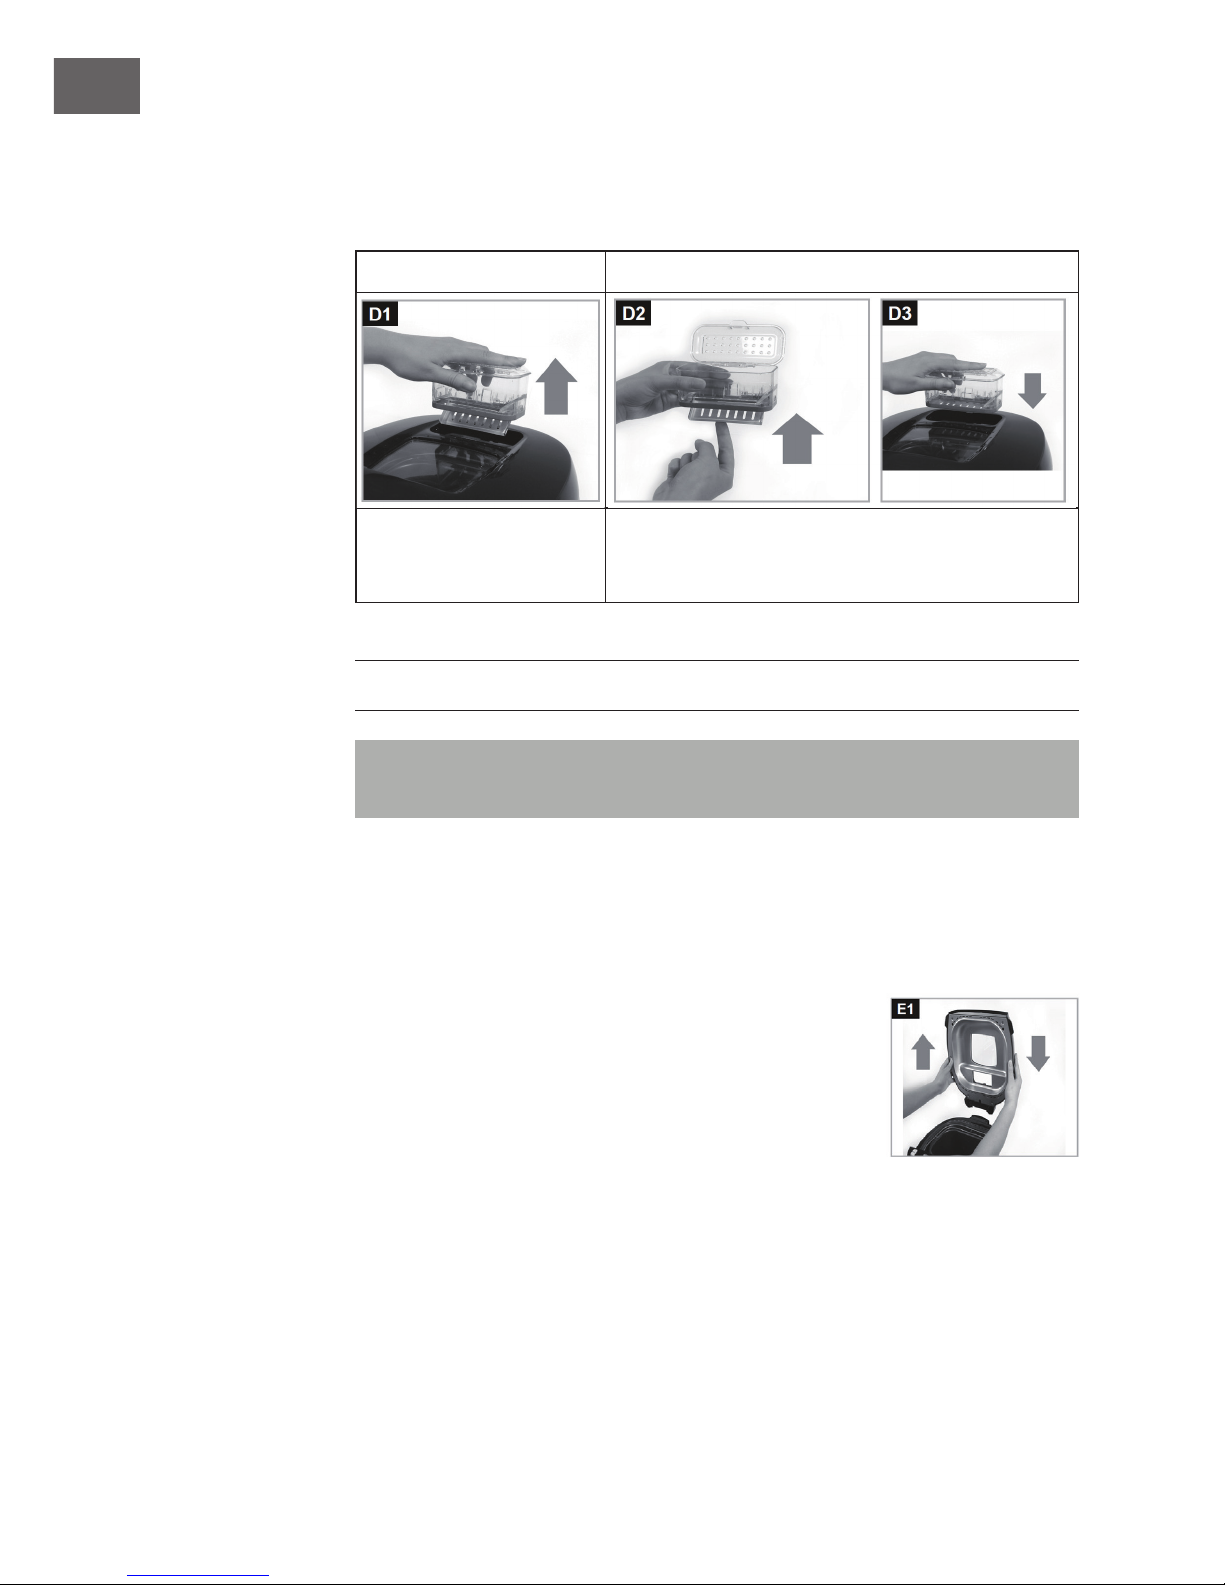
86
IT
• Al termine del processo di cottura, rimuovere l´erogatore dal dispositivo. Pulirlo,
chiudere lo sportello e mettere il distributore di nuovo nel dispositivo.
Rimuovere e inserire l´erogatore di ingredienti
Rimozione Inserimento
Estrarre l´erogatore
tirandolo verso l´alto.
Dopo la pulizia chiudere lo sportello inferiore e inserire
di nuovo l´erogatore premendolo nel dispositivo no
allo scatto.
PULIZIA E MANUTENZIONE
NOTA: spegnere il dispositivo e staccare la spina prima di eseguire la manutenzione
o la pulizia per evitare il pericolo di scosse elettriche.
Conservare il dispositivo
In caso di inutilizzo prolungato, pulire il dispositivo come descritto in questa sezione.
Conservare il dispositivo e tutti gli accessori in un luogo asciutto, pulito e privo di
ghiaccio protetto dalla luce diretta del sole.
Togliere il coperchio e pulire il dispositivo
Pulire il dispositivo dopo ogni utilizzo. Per facilitare la
pulizia, rimuovere il coperchio. Aprire completamente il
coperchio ed estrarlo tirandolo verso l´alto. Asciugare la
parte esterna ed interna con un panno umido.
Page 87
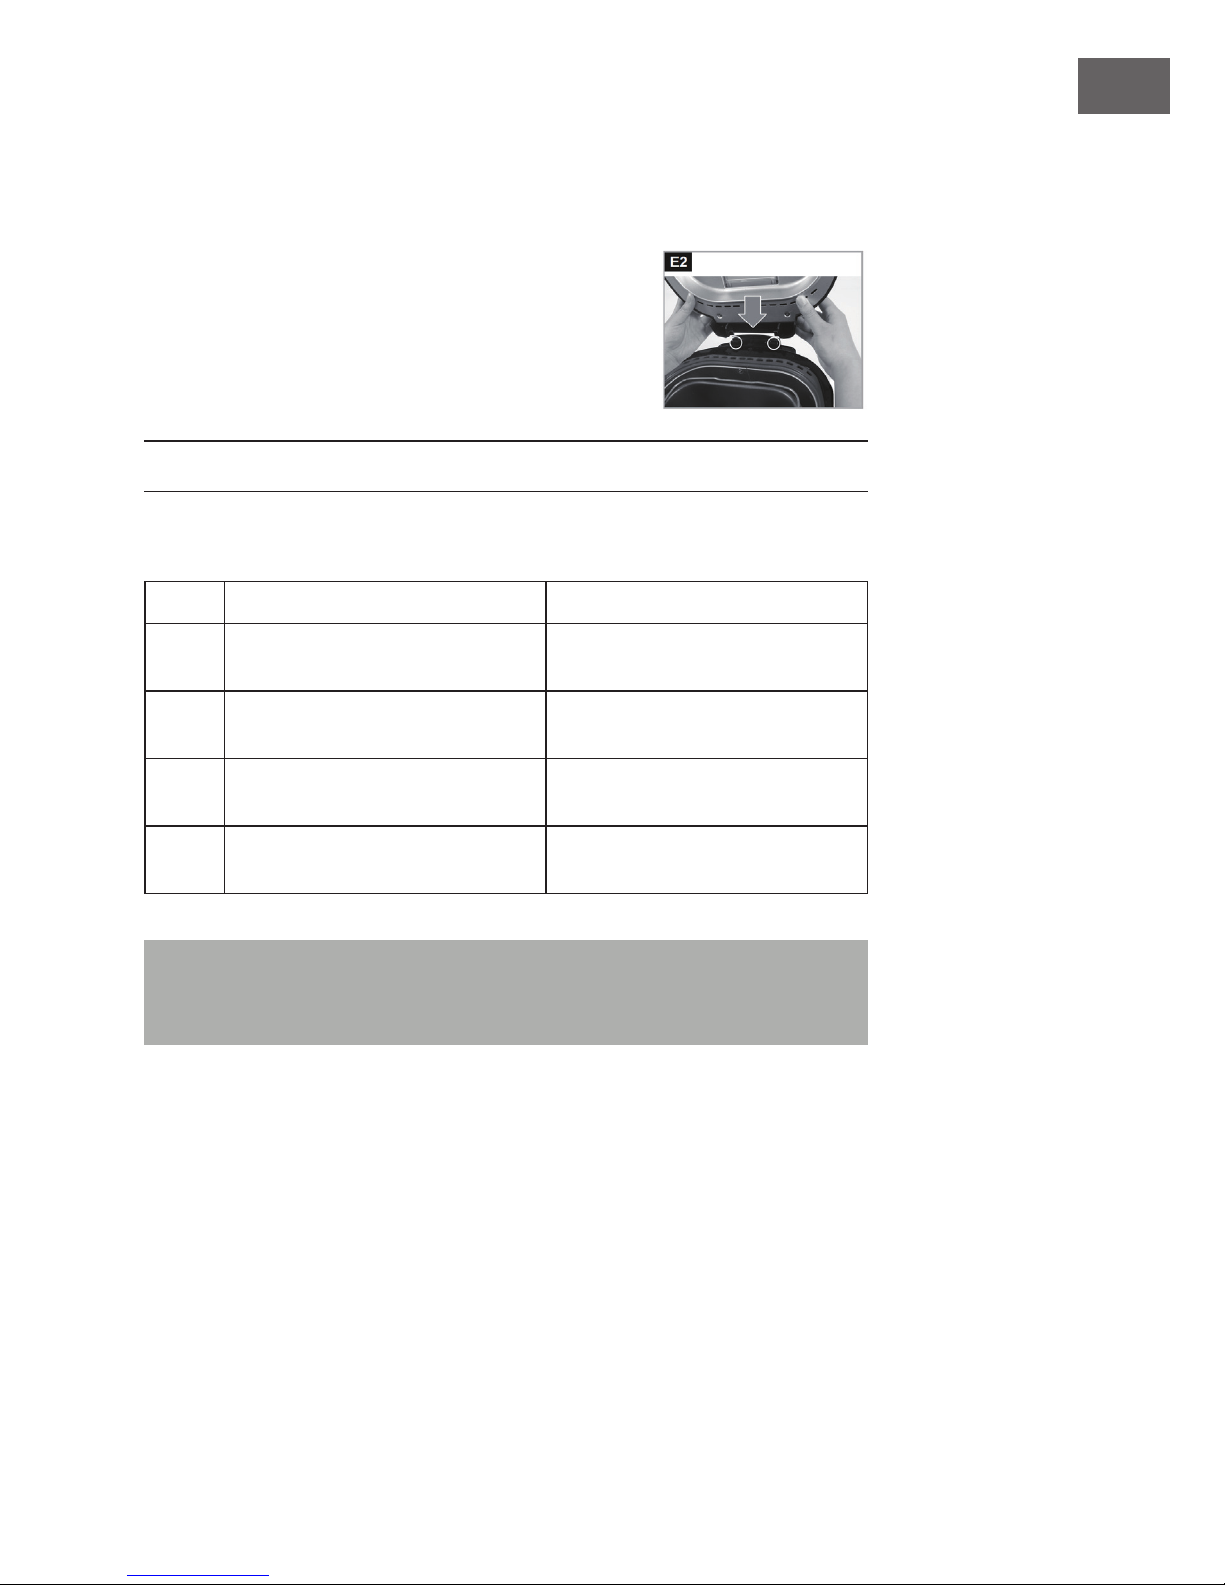
87
IT
• Gli altri componenti possono essere lavati con acqua tiepida e con un po´ di
detersivo. Lavare a mano gli stampi e i ganci, non lavarli mai in lavastoviglie! Non
utilizzare detergenti abrasivi o aggressivi per evitare di danneggiare le superci.
• Far asciugare completamente tutti i componenti.
Mettere il coperchio
Dopo la pulizia mettere il coperchio. Per fare ciò tenere il
coperchio in posizione verticale e premere le linguette nelle
fessure del dispositivo (vedere i segni).
RICERCA E RISOLUZIONE DEI PROBLEMI
Messaggi di errore
Errore Causa possibile Soluzione
E00 Il dispositivo è troppo freddo. Attendere che il dispositivo abbia
raggiuto la temperatura ambiente.
E01 Al termine del processo di cottura il
dispositivo è troppo caldo.
Attendere che il dispositivo si sia
raffreddato.
EEE Il sensore della temperatura è rotto. Rivolgersi ad un tecnico per la
riparazione.
HHH Corto circuito all´interno del
dispositivo.
Rivolgersi ad un tecnico per la
riparazione.
Se non si riesce a risolvere il problema, contattare il servizio clienti. Prima di
chiamare, annotare il modello, il numero di serie e la data di acquisto del dispositivo.
Il servizio clienti necessita di queste informazioni.
Page 88
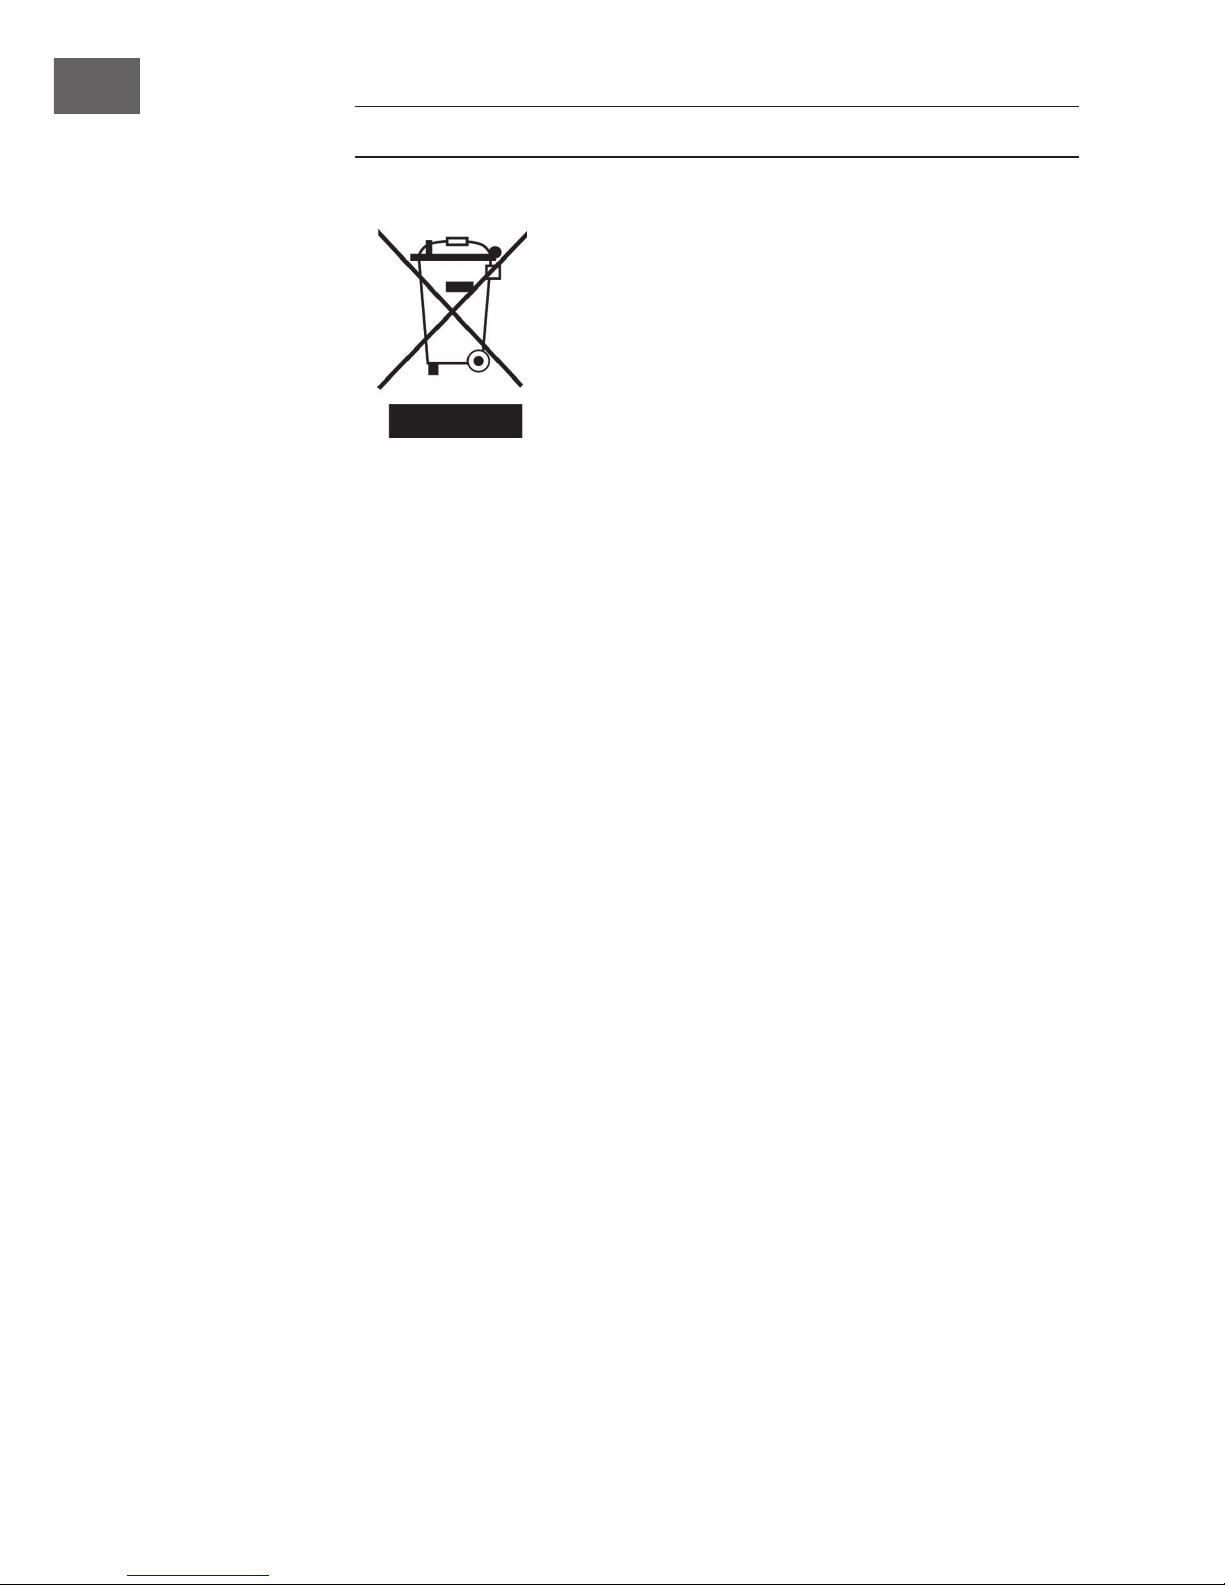
88
IT
SMALTIMENTO
Se sul prodotto è presente la gura a sinistra (il cassonetto
dei riuti mobile sbarrato), si applica la direttiva europea
2012/19/UE. Questi prodotti non possono essere smaltiti con
i riuti normali. Informarsi sulle disposizioni vigenti in merito
alla raccolta separata di dispositivi elettrici ed elettronici.
Non smaltire i vecchi dispositivi con i riuti domestici. Grazie
al corretto smaltimento dei vecchi dispositivi, si proteggono
il pianeta e la salute delle persone da possibili conseguenze
negative. Il riciclo di materiali aiuta a ridurre il consumo di
materie prime.
Page 89
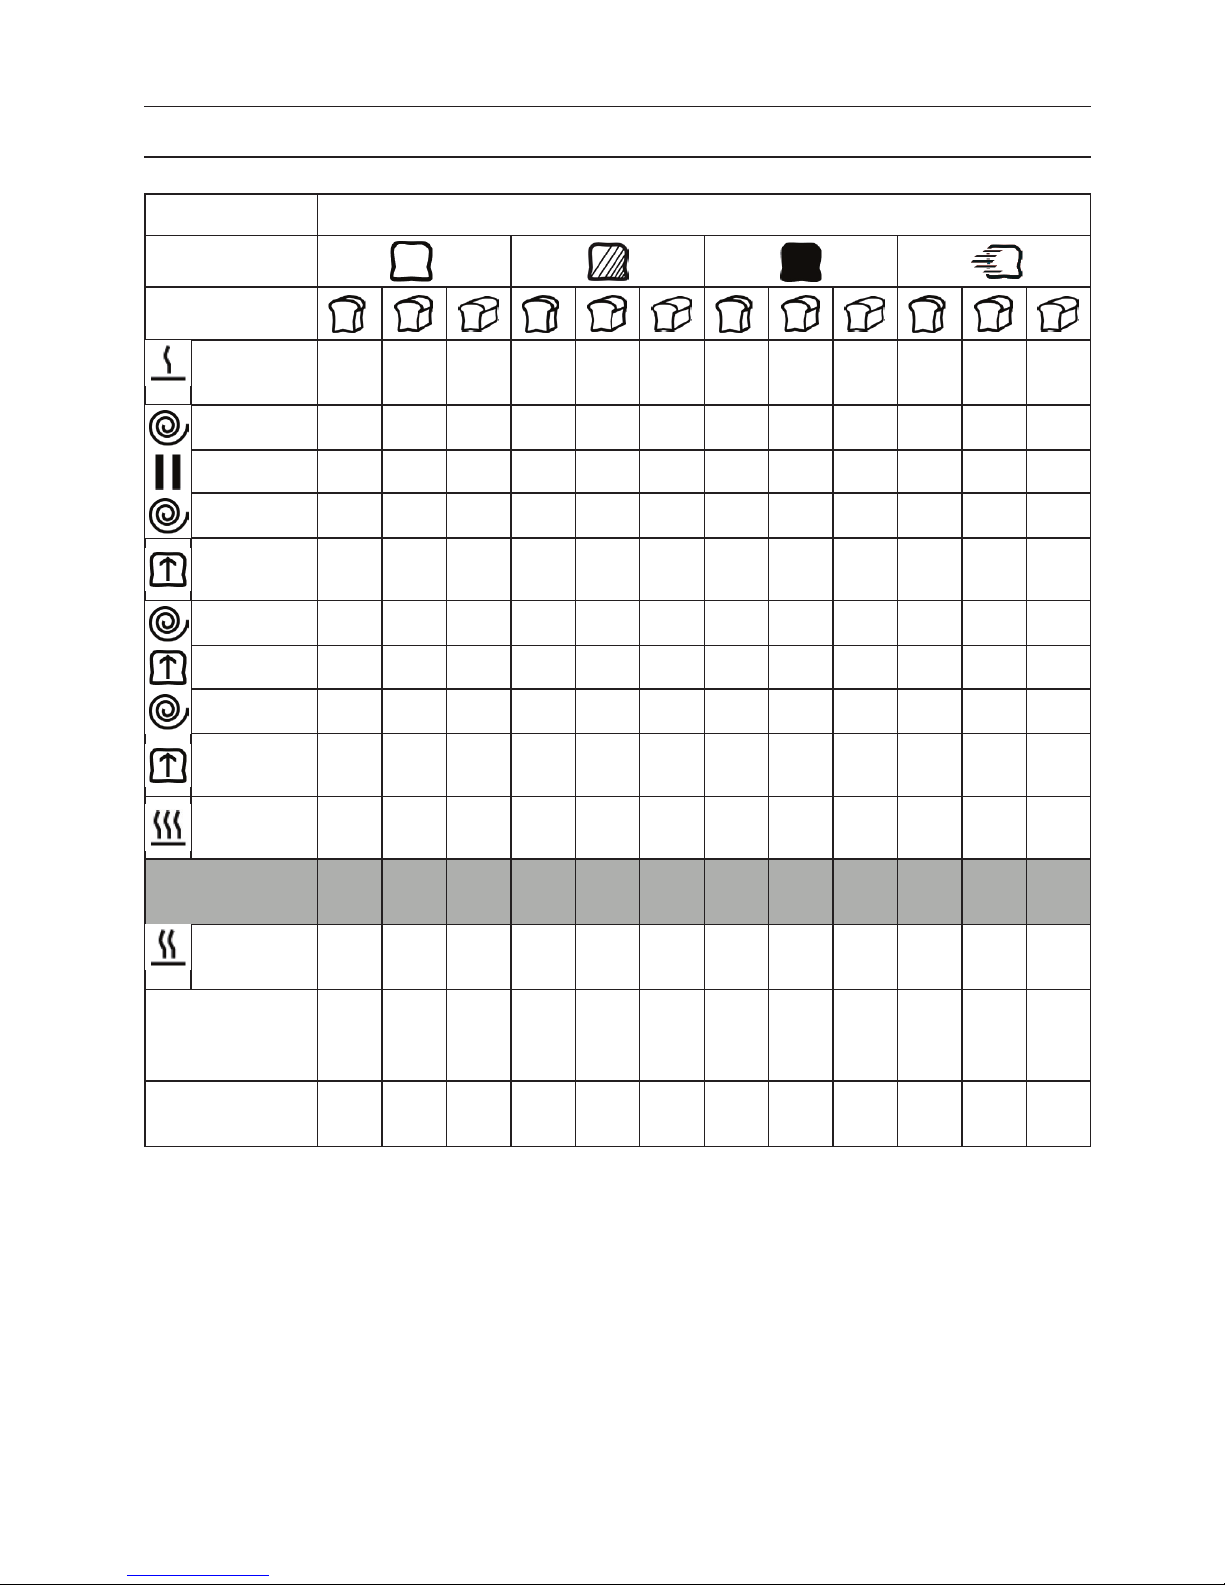
APPENDICE: TEMPI DEI PROGRAMMI
Menu 1 Programma base
Grado di doratura
Peso
Preriscaldamento
- - - - - - - - - - - -
Impasto
5 min 5 min 5 min 5 min 5 min 5 min 5 min 5 min 5 min 5 min 5 min 5 min
Riposo
5 min 5 min 5 min 5 min 5 min 5 min 5 min 5 min 5 min 5 min 5 min 5 min
Impasto
20 min 20 min 20 min 20 min 20 min 20 min 20 min 20 min 20 min 20 min 20 min 20 min
Lievitazione
40
min
40
min
40
min
40
min
40
min
40
min
40
min
40
min
40
min
15 min 15 min 15 min
Impasto
10 s 10 s 10 s 10 s 10 s 10 s 10 s 10 s 10 s 10 s 10 s 10 s
Lievitazione
25 min 25 min 25 min 25 min 25 min 25 min 25 min 25 min 25 min 9 min 9 min 9 min
Impasto
10 s 10 s 10 s 10 s 10 s 10 s 10 s 10 s 10 s 10 s 10 s 10 s
Lievitazione
50
min
50
min
50
min
50
min
50
min
50
min
50
min
50
min
50
min
30
min
30
min
30
min
Cottura
46
min
51 min
58
min
48
min
53
min
60
min
53
min
58
min
65
min
48
min
53
min
60
min
Durata del
programma
3:11 3:16 3:23 3:13 3:18 3:25 3:18 3:23 3:30 2:12 2:17 2:24
Mantenimento
in caldo
1 h 1 h 1 h 1 h 1 h 1 h 1 h 1 h 1 h 1 h 1 h 1 h
Tempo di apertura
dell´erogatore degli
ingredienti
2:51 2:56 3:03 2:53 2:58 3:05 2:58 3:03 3:10 1:52 1:57 2:04
Timer massimo
impostabile
15:00 15:00 15:00 15:00 15:00 15:00 15:00 15:00 15:00 15:00 15:00 15:00
Page 90
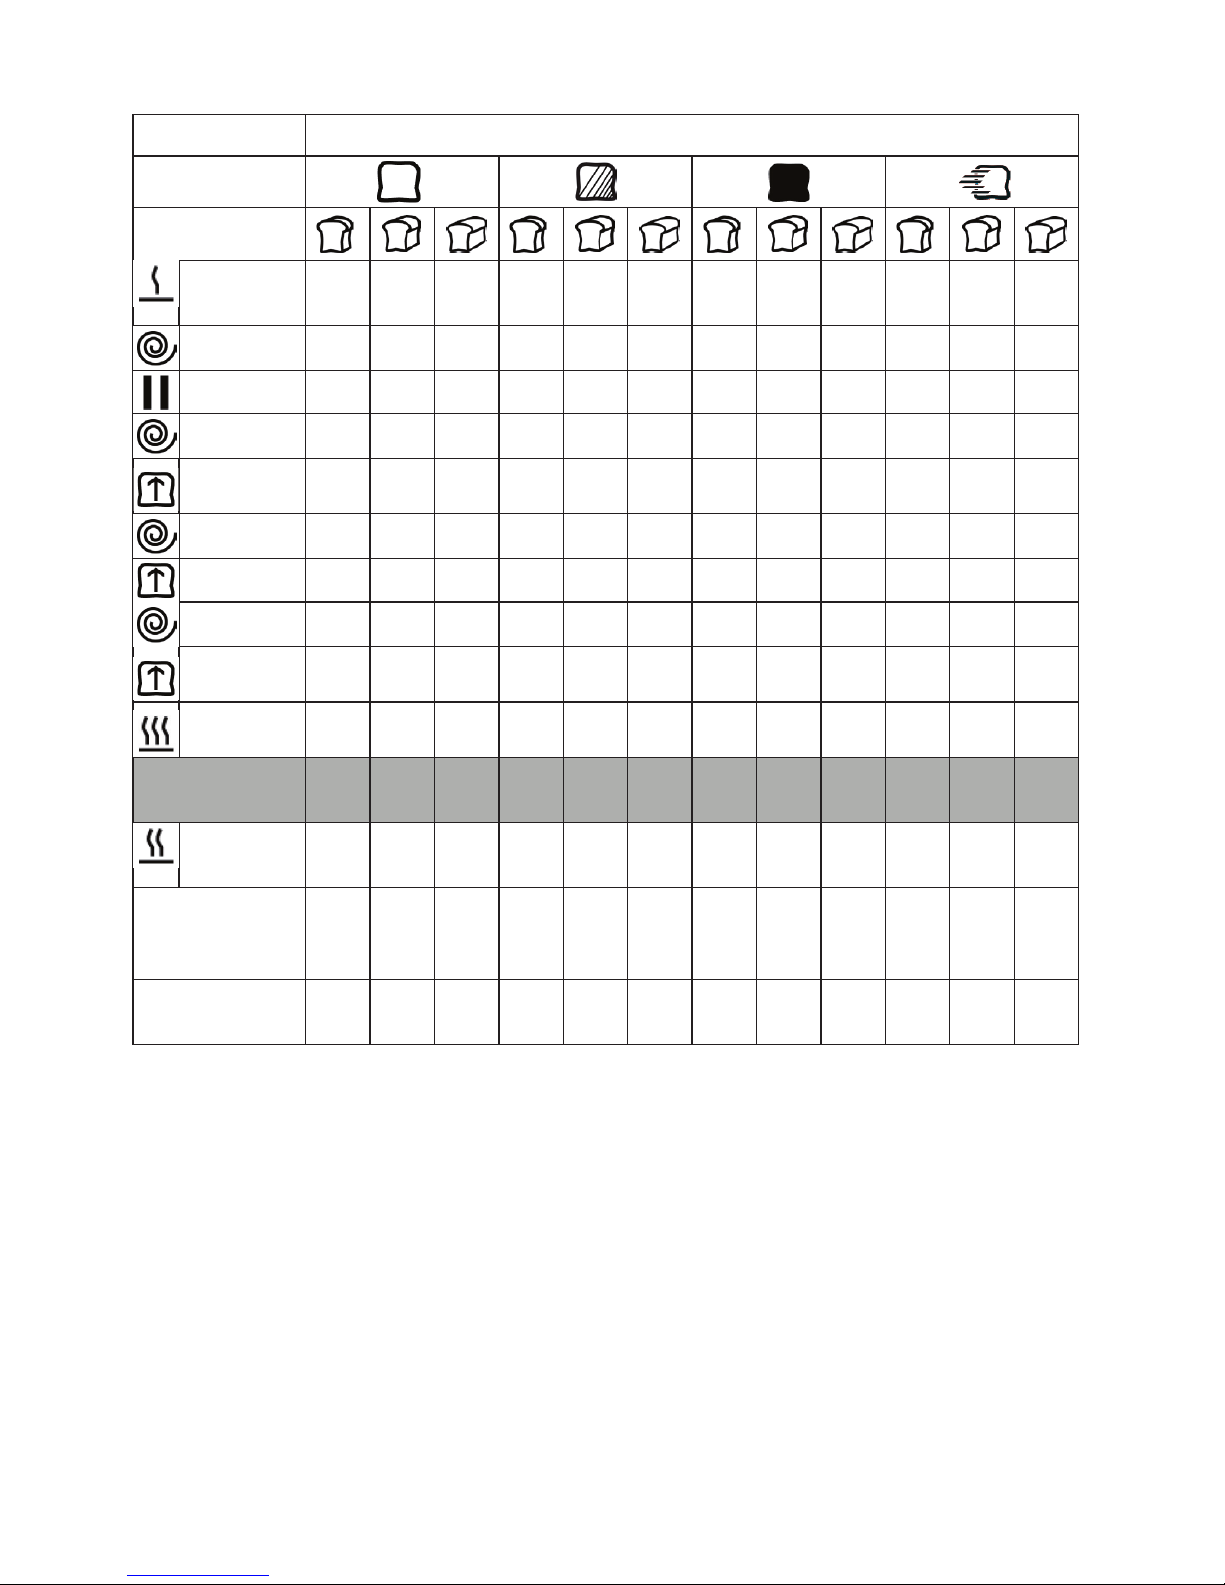
Menu 2 Pane bianco
Grado di doratura
Peso
Preriscaldamento
- - - - - - - - - - - -
Impasto
5 min 5 min 5 min 5 min 5 min 5 min 5 min 5 min 5 min 5 min 5 min 5 min
Riposo
5 min 5 min 5 min 5 min 5 min 5 min 5 min 5 min 5 min 5 min 5 min 5 min
Impasto
20 min 20 min 20 min 20 min 20 min 20 min 20 min 20 min 20 min 20 min 20 min 20 min
Lievitazione
39 min 39 min 39 min 39 min 39 min 39 min 39 min 39 min 39 min
30
min
30
min
30
min
Impasto
10 s 10 s 10 s 10 s 10 s 10 s 10 s 10 s 10 s 10 s 10 s 10 s
Lievitazione
31 min 31 min 31 min 31 min 31 min 31 min 31 min 31 min 31 min 15 min 15 min 15 min
Impasto
10 s 10 s 10 s 10 s 10 s 10 s 10 s 10 s 10 s 5 s 5 s 5 s
Lievitazione
60
min
60
min
60
min
60
min
60
min
60
min
60
min
60
min
60
min
30
min
30
min
30
min
Cottura
48
min
50
min
53
min
50
min
52 min
55
min
55
min
57 min
60
min
50
min
52 min
55
min
Durata del
programma
3:28 3:30 3:33 3:30 3:32 3:35 3:35 3:37 3:40 2:35 2:37 2:40
Mantenimento
in caldo
1 h 1 h 1 h 1 h 1 h 1 h 1 h 1 h 1 h 1 h 1 h 1 h
Tempo di apertura
dell´erogatore degli
ingredienti
3:08 3:10 3:13 3:10 3:12 3:15 3:15 3:17 3:20 2:15 2:17 2:20
Timer massimo
impostabile
15:00 15:00 15:00 15:00 15:00 15:00 15:00 15:00 15:00 15:00 15:00 15:00
Page 91
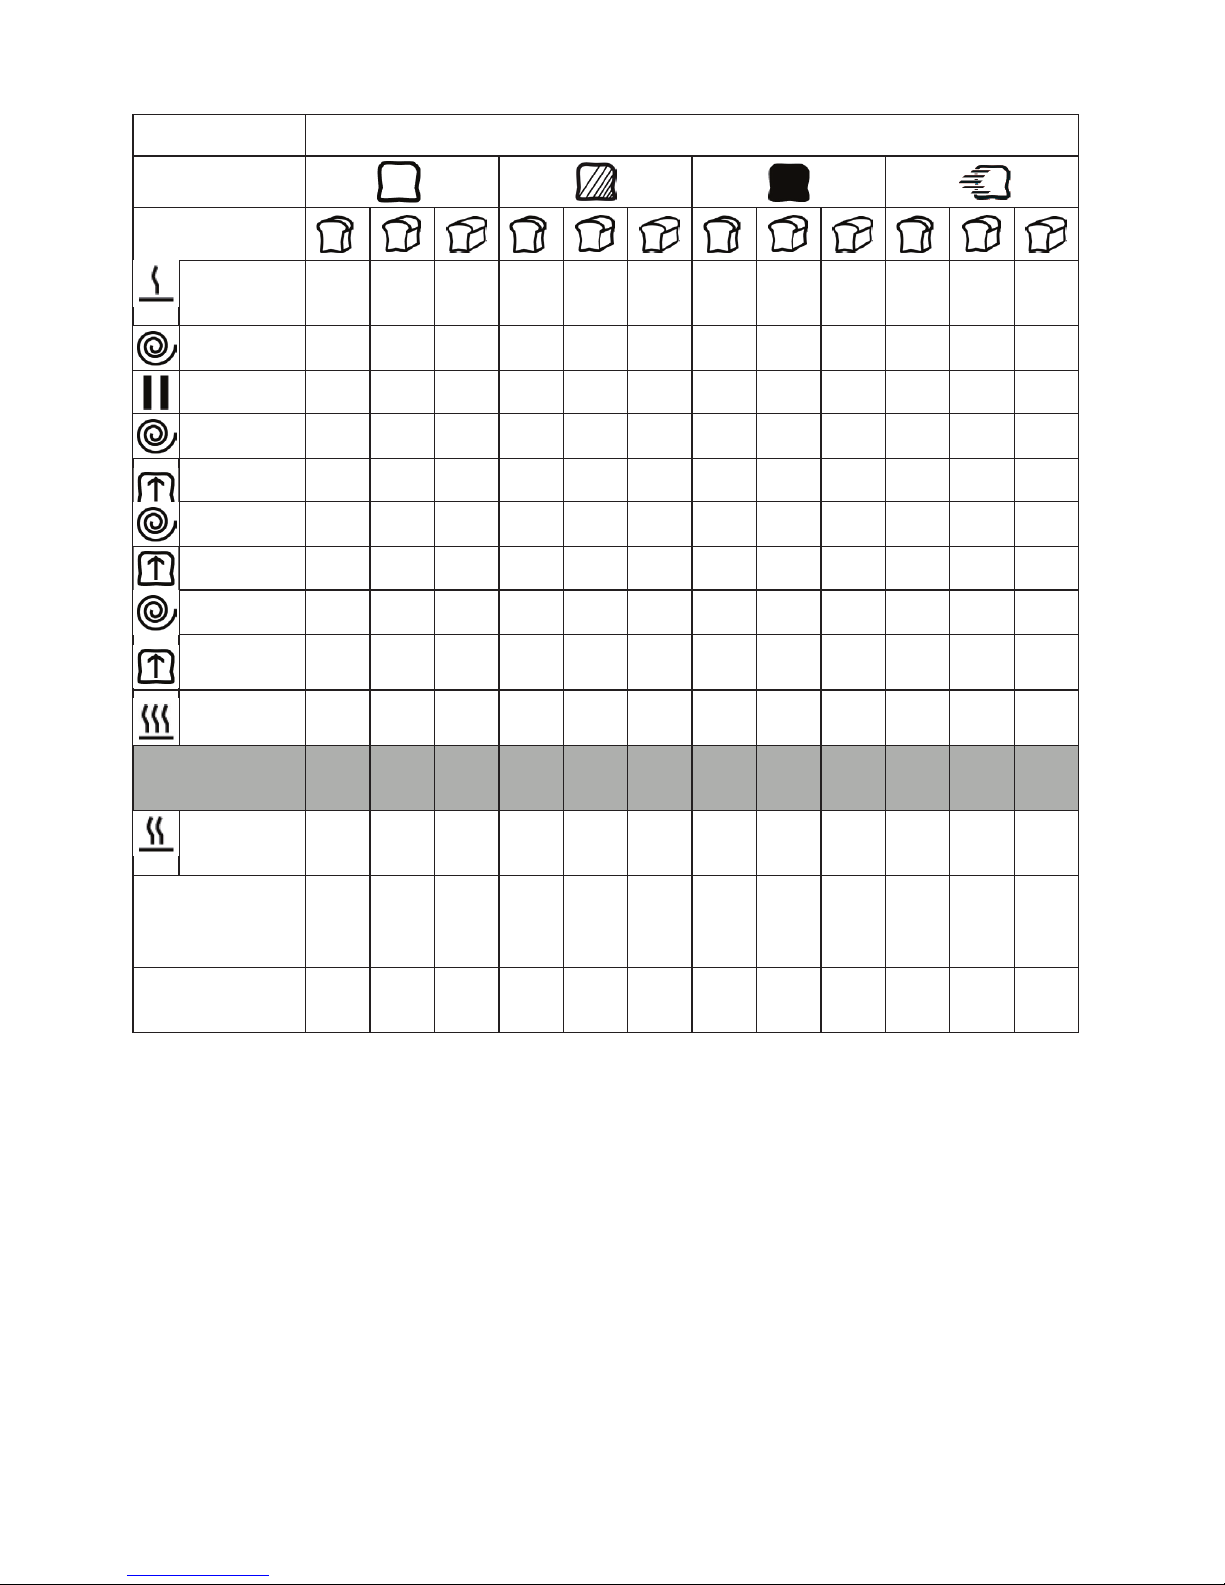
Menu 3 Pane integrale
Grado di doratura
Peso
Preriscaldamento
30
min
30
min
30
min
30
min
30
min
30
min
30
min
30
min
30
min
5 min 5 min 5 min
Impasto
5 min 5 min 5 min 5 min 5 min 5 min 5 min 5 min 5 min 5 min 5 min 5 min
Riposo
5 min 5 min 5 min 5 min 5 min 5 min 5 min 5 min 5 min 5 min 5 min 5 min
Impasto
15 min 15 min 15 min 15 min 15 min 15 min 15 min 15 min 15 min 15 min 15 min 15 min
Lievitazione
49 min 49 min 49 min 49 min 49 min 49 min 49 min 49 min 49 min 24 min 24 min 24 min
Impasto
10 s 10 s 10 s 10 s 10 s 10 s 10 s 10 s 10 s 10 s 10 s 10 s
Lievitazione
26 min 26 min 26 min 26 min 26 min 26 min 26 min 26 min 26 min 11 min 11 min 11 min
Impasto
10 s 10 s 10 s 10 s 10 s 10 s 10 s 10 s 10 s 10 s 10 s 10 s
Lievitazione
45
min
45
min
45
min
45
min
45
min
45
min
45
min
45
min
45
min
35 min 35 min 35 min
Cottura
48
min
50
min
53
min
50
min
52 min
55
min
55
min
57 min
60
min
50
min
52 min
55
min
Durata del
programma
3:43 3:45 3:48 3:45 3:47 3:50 3:50 3:52 3:55 2:30 2:32 2:35
Mantenimento
in caldo
1 h 1 h 1 h 1 h 1 h 1 h 1 h 1 h 1 h 1 h 1 h 1 h
Tempo di apertura
dell´erogatore degli
ingredienti
2:58 3:00 3:03 3:00 3:02 3:05 3:05 3:07 3:10 2:10 2:12 2:15
Timer massimo
impostabile
15:00 15:00 15:00 15:00 15:00 15:00 15:00 15:00 15:00 15:00 15:00 15:00
Page 92
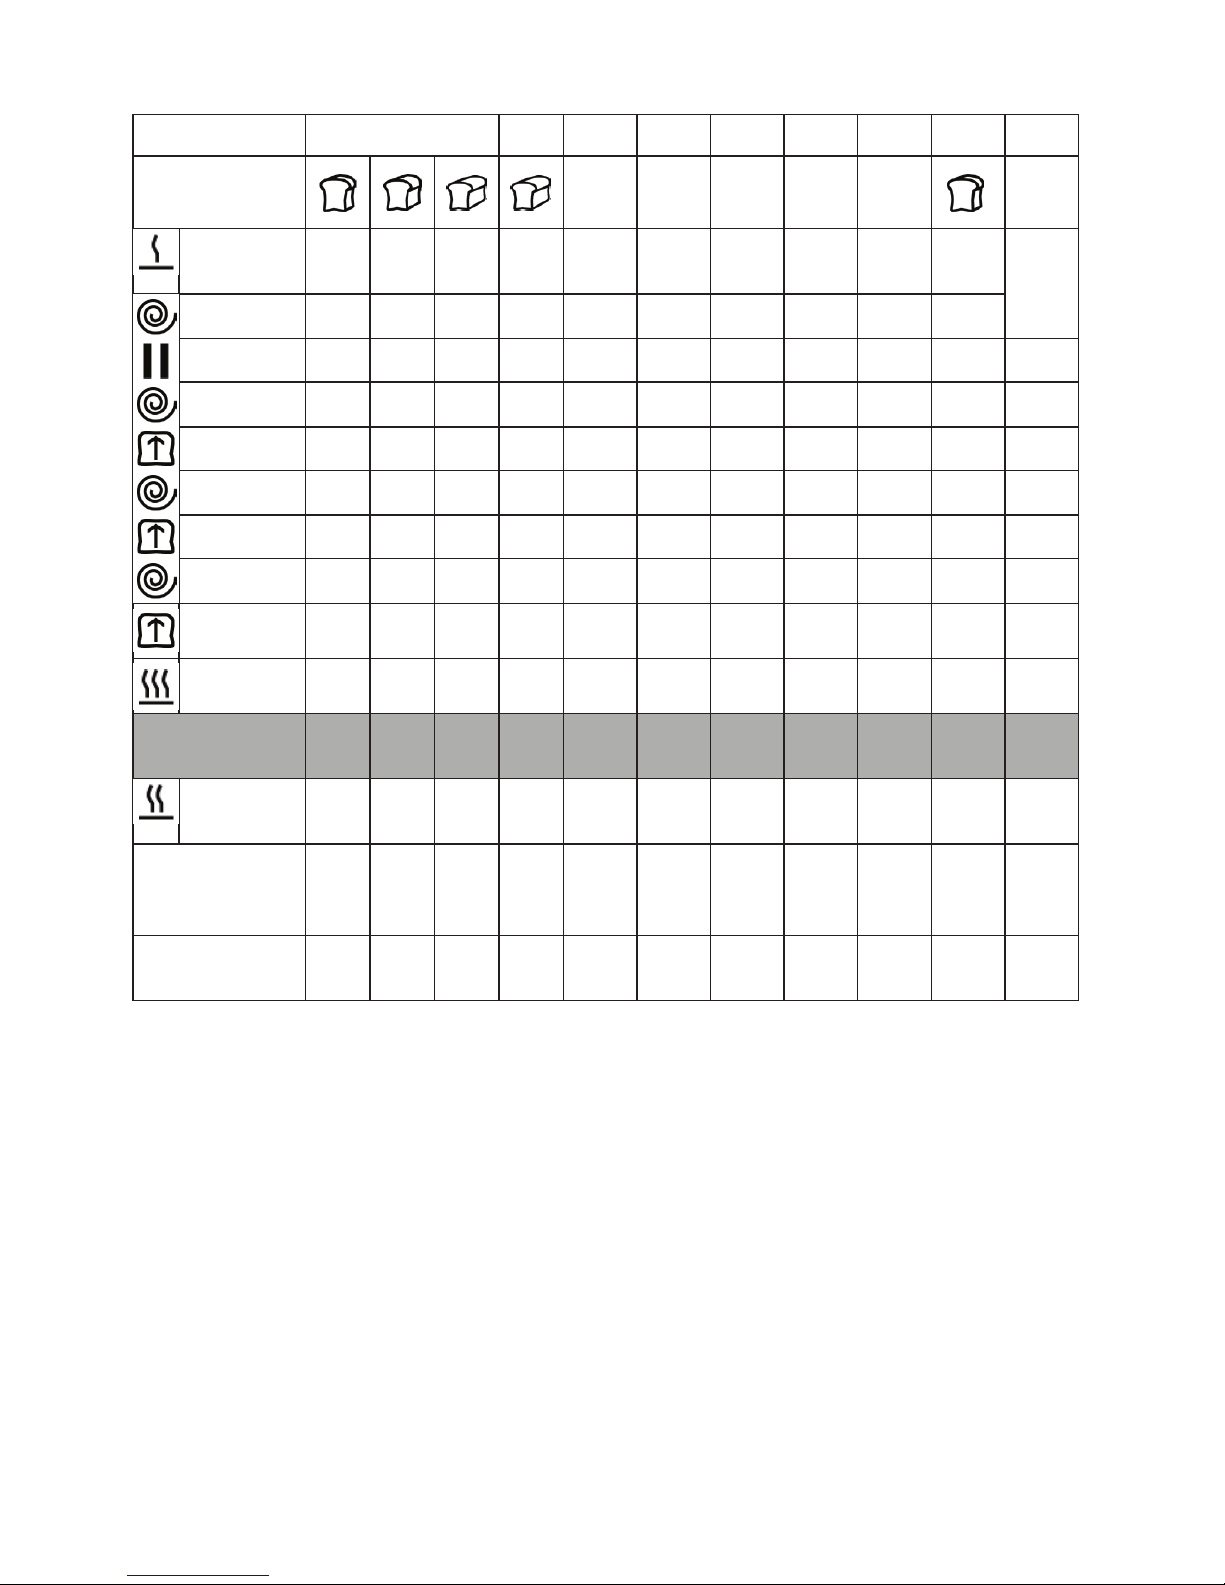
Menu 4 5 6 7 8 9 10 11 12
Peso
- - - - - -
Preriscaldamento
- - - - - - - - - -
15 min
Impasto
5 min 5 min 5 min 5 min 5 min 5 min 3 min 5 min - 5 min
Riposo
5 min 5 min 5 min - - 5 min - - - - -
Impasto
20 min 20 min 20 min 15 min 10 min 20 min 11 min 10 min - 15 min -
Lievitazione
39 min 39 min 39 min 12 min - 60 min - - - - -
Impasto
10 s 10 s 10 s - - - - - - - -
Lievitazione
26 min 26 min 26 min - - - - - - - -
Impasto
5 s 5 s 5 s - - - - - - - -
Lievitazione
30
min
30
min
30
min
- 60 min - - - - - -
Cottura
50
min
55
min
60
min
48
min
55 min - - 70 min
60 -90
min
75 min 55 min
Durata del
programma
2:55 3:00 3:05 1:20 2:10 1:30 00:14 1:25
1:001:30
1:35 1:10
Mantenimento
in caldo
1 h 1 h 1 h 1 h 1 h - - - 1 h 22 min -
Tempo di apertura
dell´erogatore degli
ingredienti
2:57 3:02 3:07 1:10 2:05 1:10 - - - - -
Timer massimo
impostabile
15:00 15:00 15:00 15:00 15:00 15:00 15:00 15:00 - 15:00 -
Page 93

Page 94

Page 95

Page 96

 Loading...