

Page 1
10032062 10032063
Elektrische Heizung
Panel Heater
Page 2

Page 3

3
DE
Technische Daten 3
Sicherheitshinweise 4
Geräteübersicht 6
Montage 7
Betrieb 8
Hinweise zur Entsorgung 9
TECHNISCHE DATEN
Artikelnummer 10032062 10032063
Stromversorung 220 -240 V~ 50/60 Hz
Leistung 1500 W 2000 W
Sehr geehrter Kunde,
wir gratulieren Ihnen zum Erwerb Ihres Gerätes. Lesen Sie die folgenden Hinweise
sorgfältig durch und befolgen Sie diese, um möglichen Schäden vorzubeugen. Für
Schäden, die durch Missachtung der Hinweise und unsachgemäßen Gebrauch
entstehen, übernehmen wir keine Haftung.
INHALT
Page 4
4
DE
SICHERHEITSHINWEISE
Lesen Sie die Sicherheitshinweise sorgfältig durch und bewahren Sie sie zum
Nachschlagen auf.
Um die Gefahr von Bränden, Stromschlägen, Verbrennungen und anderen Verletzungen
vorzubeugen, ist es wichtig. bei der Verwendung von Geräten grundlegende
Maßnahmen zu ergreifen.
Allgemeine Sicherheitshinweise
• Die auf dem Gerät angegebene Spannung muss zur Spannung der
Stromversorgung passen. Verwenden Sie einen angemessenen Leitungsquerschnitt.
• Lufteinlass und -auslass des Gerätes dürfen unter keinen Umständen verdeckt
werden.
• Bewegen Sie das Heizgerät während des Betriebs nicht. Ziehen Sie den
Netzstecker, wenn das Gerät nicht in Betrieb ist.
• Betreiben Sie das Gerät nicht, wenn das Gerät oder der Netzstecker beschädigt
sind.
Besondere Sicherheitshinweise
• Nehmen Sie das Gerät aus der Verpackung und überprüfen Sie, ob das Gerät
unbeschädigt ist.
• Lassen Sie Kinder nicht mit Teilen der Verpackung spielen (z. B. Plastiktüten).
• Wenn das Gerät in der Nähe von Kindern oder gebrechlichen Personen verwendet
wird, ist genaue Aufsicht geboten.
• Betreiben Sie das Gerät nicht mit einem beschädigten Netzkabel, Netzstecker oder
nachdem das Gerät eine Fehlfunktion hatte, fallen gelassen wurde oder in einer
Weise beschädigt wurde.
• Vergessen Sie nicht, das Gerät auszuschalten, bevor Sie den Netzstecker ziehen.
• Gewährleisten Sie, dass das Netzkabel völlig ausgerollt verlegt ist, bevor Sie das
Gerät verwenden.
• An einigen Stellen wird der Heizstrahler sehr heiß. Fassen Sie das Gerät am Griff
an, wenn Sie es umstellen.
• Verwenden Sie das Gerät nicht in Bereichen wie Garagen, wo Benzin, Farbe oder
andere brennbare Stoffe verwendet oder aufbewahrt werden.
• Verwenden Sie das Gerät nicht in der Nähe von Möbeln, Tieren, Garten und
anderen brennbaren Gegenständen. Halten Sie diese brennbaren Gegenstände
mindestens 1 Meter zur allen Seiten entfernt.
• Verlegen Sie das Netzkabl nicht unter dem Teppich, Teppichbrücken oder Möbeln.
• Stellen Sie das Heizgerät nicht auf einen dicken bzw. Langhaarteppich, auf dem
die Lüftungsöffnungen blockiert werden.
• Stromschlaggefahr: Setzen Sie das Gerät oder das Netzkabel nicht Regen,
Feuchtigkeit oder Flüssigkeiten aus.
• Benutzen Sie das Gerät nicht in der unmittelbaren Nähe von Wasser (z. B. einer
Badewanne, Wasserbecken, Schwimmbecken usw), wo es wahrscheinlich ist, dss
es zu Eintauchen oder Spritzern kommt.
Page 5

5
DE
• Schalten Sie das Gerät aus und ziehen Sie den Netzstecker, wenn Sie das Gerät
nicht verwenden. Fassen Sie den Netzstecker an, statt am Netzkabel zu ziehen.
• Eine häuge Ursache für Überhitzungen sind Staubansammlungen und Staub und
Fusseln, die in das Gerät dringen. Entfernen Sie diese Ansammlungen regelmäßig.
Ziehen Sie dazu den Netzstecker, lassen Sie das Gerät abkühlen und reinigen Sie
es, wie es im einschlägigen Kapitel beschrieben ist.
• Achten Sie darauf, dass in der Nähe keine anderen elektrischen Geräte betrieben
werden.
• Vermeiden Sie die Verwendung eines Netzkabels, da dies überhitzen kann und
eine Brandgefahr darstellt.
• Verwenden Sie das Gerät ausschließlich bestimmungsgemäß.
• Verwenden Sie das Heizgerät nicht im Freien. Nur für den Innengebrauch.
• Lassen Sie das Gerät nicht unbeaufsichtigt, wenn es eingeschaltet ist.
• Legen Sie auf das Gerät keine Gegenstände. Bedecken Sie die Lüftungsöffnungen
nicht mit Gegenständen. Betreiben Sie das Gerät nicht nahe an Wänden,
Vorhängen usw. Decken Sie das Gerät nicht ab, wenn es in Betrieb ist.
• Stellen Sie das Heizgerät nicht direkt unter Wandsteckdosen.
• Die Verwendung von Zubehör, das nicht vom Hersteller empfohlen oder vertrieben
wird, kann zu Beschädigungen des Eigentums oder zu Personenschäden führen.
• Dieses Gerät ist ausschließlich für den Betrieb im Heimbereich bestimmt.
• Verwenden Sie das Heizgerät ausschließlich wie in dieser Bedienungsanleitung
beschrieben. Andere Verwendungen, die nicht vom Hersteller empfohlen wurden,
können Sie einem Brand, Stromschlag oder Personenverletzungen führen.
Page 6
6
DE
GERÄTEÜBERSICHT
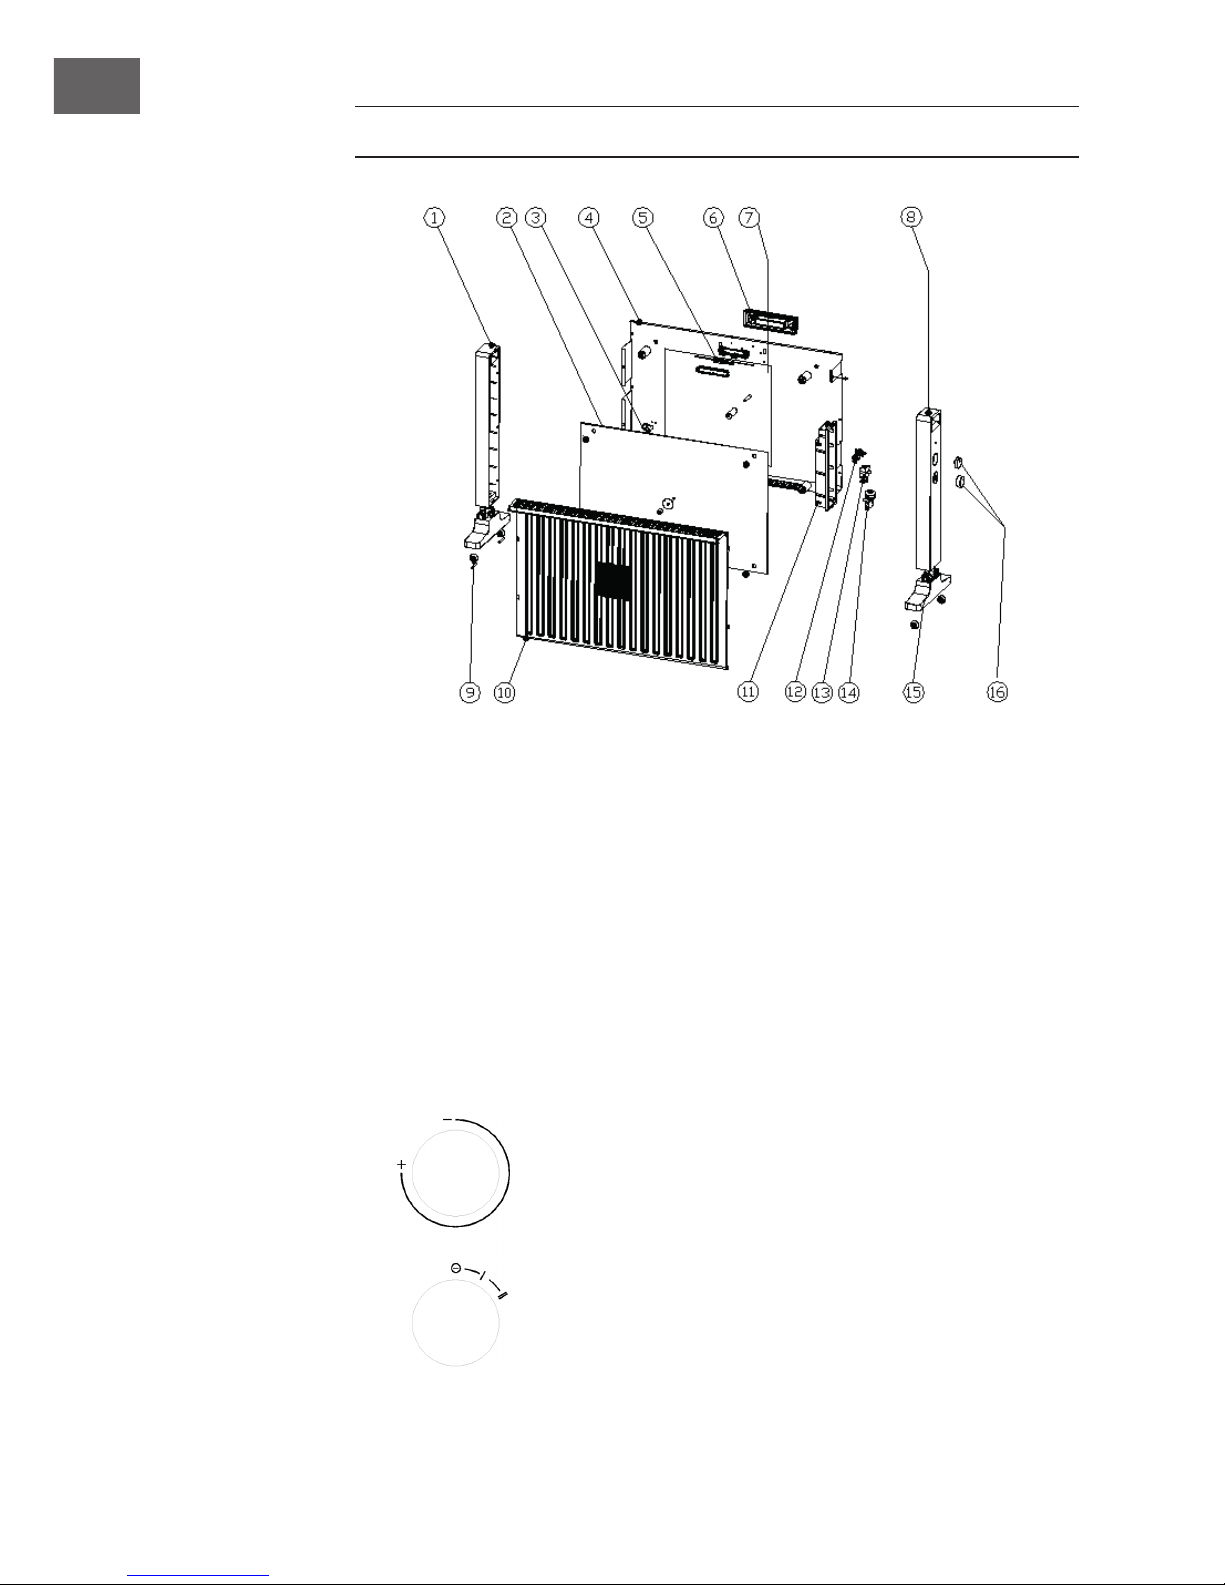
1 Linke Tragesäule
2 Heizelement
3 Halterung
4 Rückwand
5 Thermostat
6 Wandhalterung
7 Reektorfolie
8 Rechte Tragesäule
9 Rollen
10 Schutzschirm
11 Wasserfeste Abdeckung
12 Temperaturwahlschalter
13 Schalter
14 Umkippschutz-Schalter
15 Füße
16 Drehknopf
Bedienfeld
Page 7
7
DE
MONTAGE
Freistehend
Öffnen Sie die Packung und entnehmen Sie das Gerät. Überzeugen Sie sich davon,
dass das Gerät in einem guten Zustand ist.
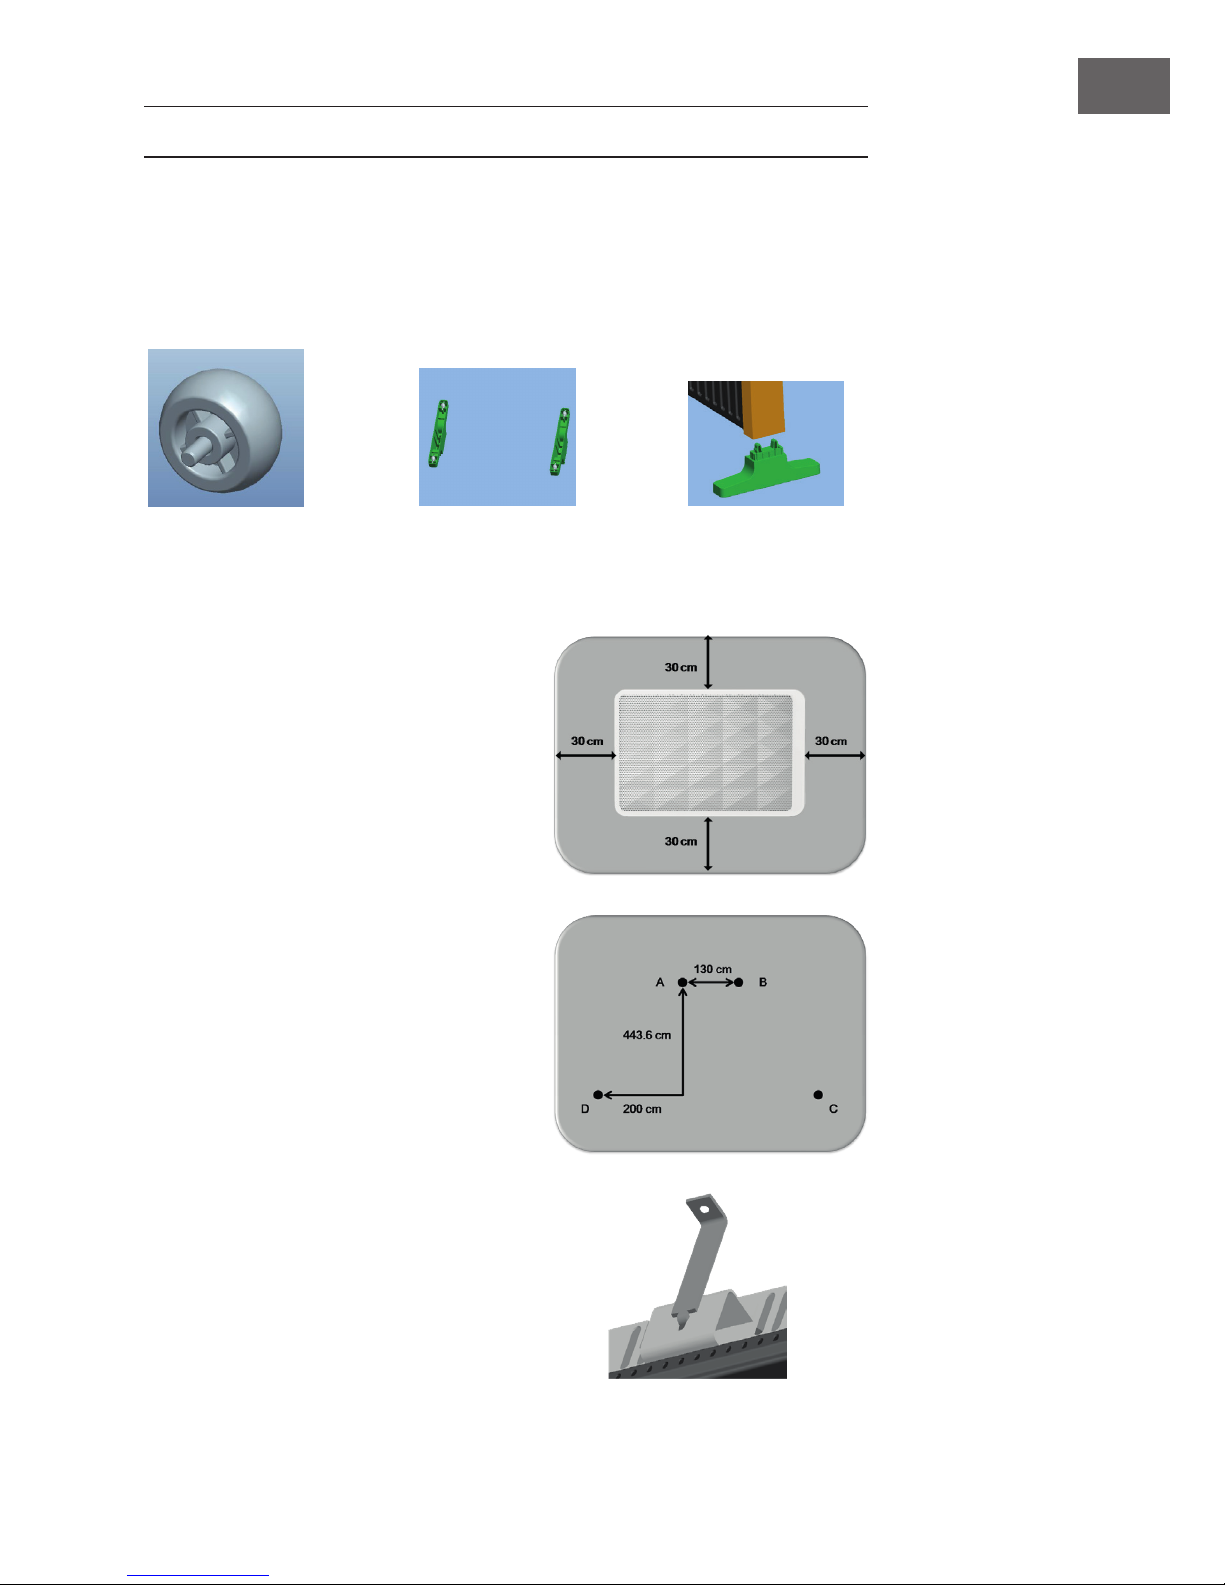
Montieren Sie die Räder und die Füße wie im Bild unten.
Montage der Rollen Die Rollen an die
Füße anbringen.
Die Füße an den
Säulen anbringen.
Wandmontage
Wenn Sie das Gerät an der Wand
montieren, entfernen Sie Tragesäulen.
Beachten Sie die Abstände zur Wand.
(Siehe Bild rechts).
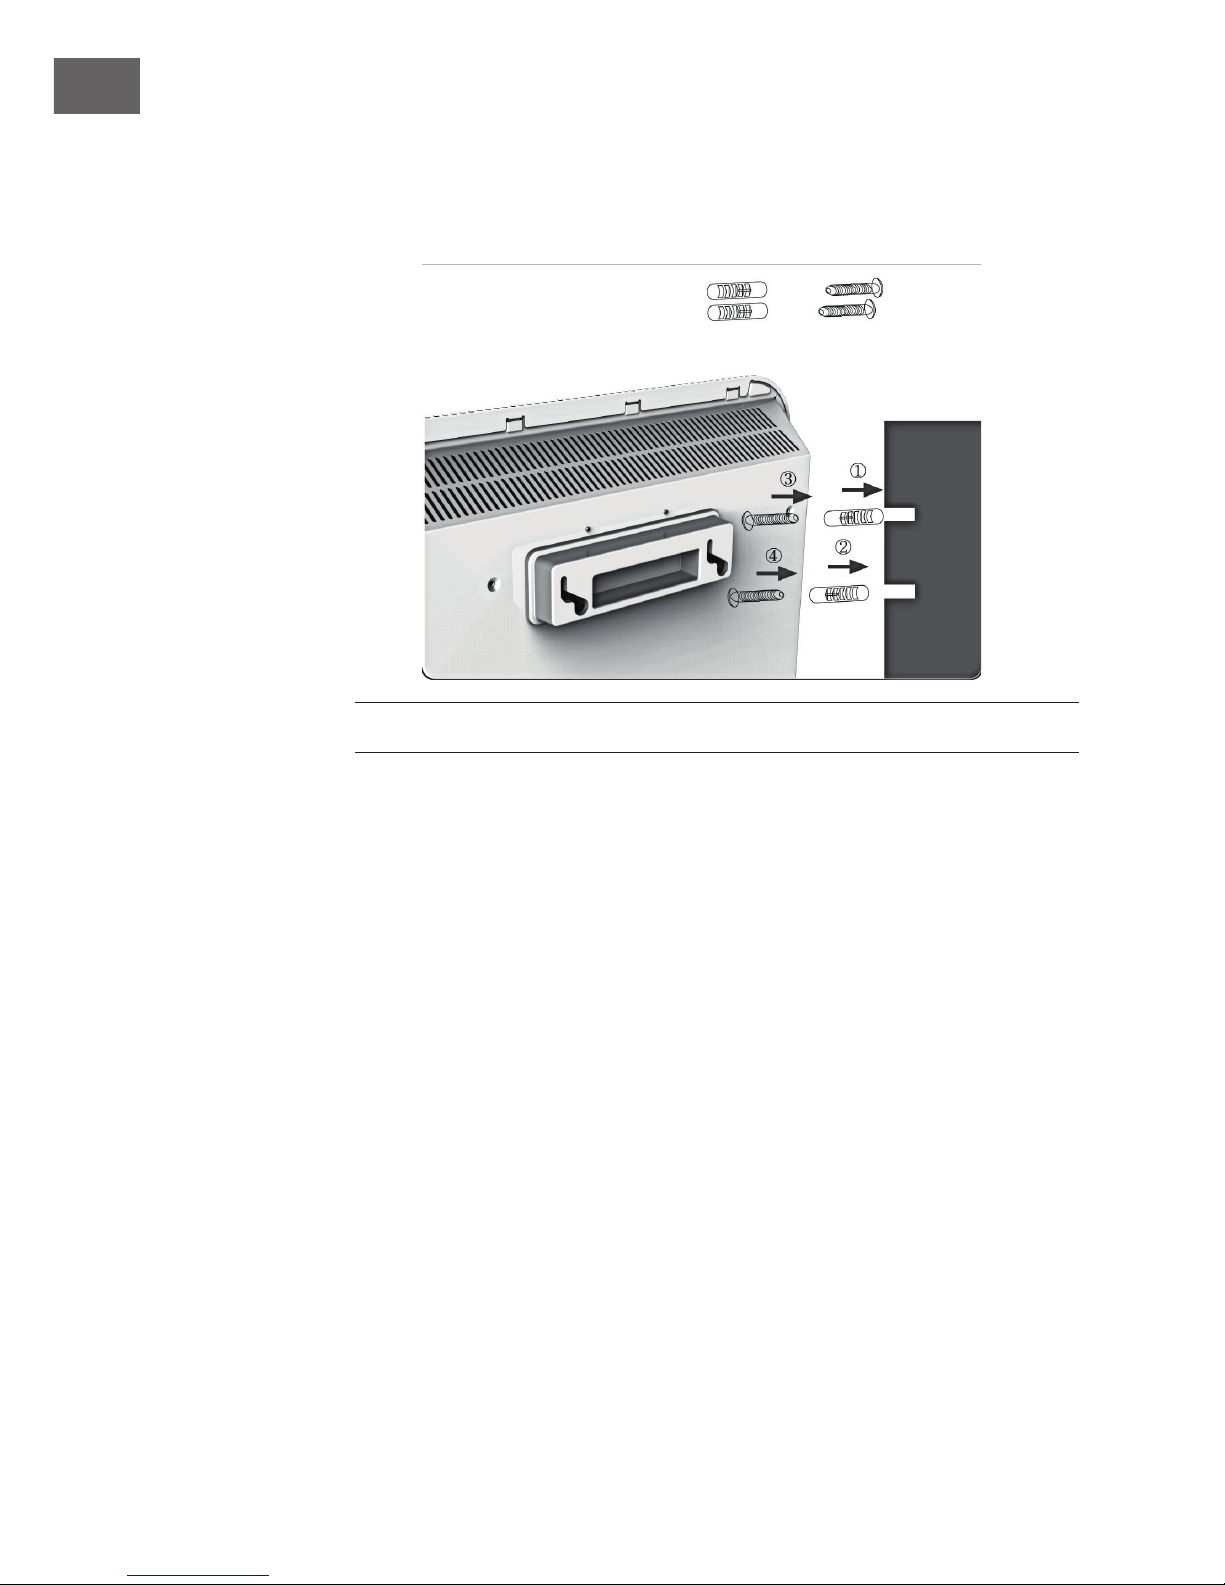
Bohren Sie in die And 3 Löcher (A) (B) (C)
oder (D). Der Durchmesser muss 6 mm
betragen und das Loch 30 mm tief sein.
(Benötigte Abstände siehe Bild rechts.)
• Stopfen Sie die Dübel in die Bohrlöcher.
• Befestigen Sie Schrauben in den Dübeln
(Loch A + B). Die Schrauben müssen 5
mm aus den Bohrungen ragen, um die
Heizung anzuhängen.
• Montieren Sie die Halterung am
Heizkörper
Page 8
8
DE
• Führen Sie die Löcher der Halterung über die Halteschrauben an der Wand.
BETRIEB
• Schalten Sie den Schalter im Standby-Modus auf LOW (niedrige Heizstufe) oder
HIGH (hohe Heizstufe). Stellen Sie den Temperaturregler auf MAX. Die Heizung
geht in Betrieb.
• Bei niedriger Heizstufe wärmt die Heizung mit 750 W (Art.1032062) bzw. 1000
W (Art. 1032063).
• Auf hoher Heizstufe wärmt die Heizung mit 1500 W (Art.1032062) bzw. 2000 W
(Art. 1032063).
• Drehen Sie die Regler wieder in die ursprüngliche Pos
Page 9
9
DE
Konformitätserklärung
Hersteller: Chal-Tec GmbH, Wallstraße 16, 10179 Berlin, Deutschland
Dieses Produkt entspricht den folgenden Europäischen Richtlinien:
2011/65/EU (RoHS)
2014/30/EU (EMV)
2014/35/EU (LVD)
Bendet sich die linke Abbildung (durchgestrichene Mülltonne auf
Rädern) auf dem Produkt, gilt die Europäische Richtlinie 2012/19/
EU. Diese Produkte dürfen nicht mit dem normalen Hausmüll entsorgt
werden. Informieren Sie sich über die örtlichen Regelungen zur
getrennten Sammlung elektrischer und elektronischer Gerätschaften.
Richten Sie sich nach den örtlichen Regelungen und entsorgen
Sie Altgeräte nicht über den Hausmüll. Durch die regelkonforme
Entsorgung der Altgeräte werden Umwelt und die Gesundheit Ihrer
Mitmenschen vor möglichen negativen Konsequenzen geschützt.
Materialrecycling hilft, den Verbrauch von Rohstoffen zu verringern.
Das Produkt enthält Batterien, die der Europäischen Richtlinie
2006/66/EG unterliegen und nicht mit dem normalen Hausmüll
entsorgt werden dürfen. Bitte informieren Sie sich über die örtlichen
Bestimmungen zur gesonderten Entsorgung von Batterien. Durch
regelkonforme Entsorgung schützen Sie die Umwelt und die
Gesundheit Ihrer Mitmenschen vor negativen Konsequenzen
HINWEISE ZUR ENTSORGUNG
Page 10
10
DE
Technical Data 11
Safety Instructions 12
Product Description 14
Controls 15
Operation 16
Maintenance and Cleaning 17
Disposal Considerations 18
TECHNICAL DATA
Item number 10032062 10032063
Power supply 220 -240 V~ 50/60 Hz
Max. power consumption 1500 W 2000 W
Dear Customer,
Congratulations on purchasing this equipment. Please read this manual carefully and
take care of the following hints on installation and use to avoid technical damages.
Any failure caused by ignoring the items and cautions mentioned in the operation and
installation instructions are not covered by our warranty and any liability.
CONTENTS
Page 11
11
EN
SAFETY INSTRUCTIONS
Please read these instructions carefully and keep for future reference.
In order to prevent the risks of a re, an electrical shock, burns and other injuries, it is
imperative to observe basic safety measures when using electrical appliances.
General safety instructions
• The specied voltage must match the mains voltage. Use an adequate wire cross-
section.
• The appliance air inlet and outlet openings must not be obstructed in any way!
• Never move the heater during operating, always unplug heater when not in use.
• Never use the appliance if the appliance or cord is damaged. The appliance may
only be opened up and repaired by authorized qualied personnel.
Special safety instructions
• Remove the unit from its packaging and check to make sure it is in good condition
before using.
• Do not let children play with parts of the packing ( such as plastic bags)
• Close supervision is necessary when the product is used by or near children or
inrm persons. Do not allow children to use it as a toy.
• Do not operate any product with a damaged cord or plug, or after the product
malfunctions, or is dropped or appears damaged in any way. Return the complete
product to the place of purchase for inspection, repair or replacement.
• Before unplugging the power cord, be sure to turn the power off. When touching
the unit, be sure your hands are dry to prevent electrical shock.
• Ensure the cord is fully extended before use and arrange it so that it is not in contact
with any part of the heater.
• In use, some parts of the heater are hot. When moving, hold the heater only by the
handle provided.
• Do not use the heater in areas such as garages where petrol, paint or other
ammable substances are used or stored.
• Do not use near or point the heater to furniture, animals, curtains or other
inammable objects. Keep combustible materials such as furniture, bedding and
any other combustible materials at least 1 metre from the front and sides, and from
the rear of the heater.
• Do not place the cord under carpet or cover with throw rugs or furniture. Arrange
the cord so that it cannot be tripped over.
• Do not place the heater on bedding or on thick and long pile carpet where the
openings may be blocked.
• To reduce the risk of electric shock, do not immerse or expose the product or
exible cord to rain, moisture or any liquid other than those necessary for correct
operation of the product.
• This product should not be used in the immediate vicinity of water, such as bathtub,
washbowls, bathroom swimming pool etc. where the likelihood of immersion or
splashing could occur.
Page 12

12
EN
• Switch off and unplug from outlet when not in use, before assembling or
disassembling parts and before cleaning. Remove by grasping the plug - do not
pull on the cord.
• A common cause of overheating is deposits of dust and uff entering the heater.
Ensure these deposits are removed regularly by unplugging the heater, allowing it
to cool and cleaning as described in the Care, Cleaning and Storage section.
• Be sure that no other high current appliances are plugged into the same circuit with
your heater as an overload can occur.
• Avoid the use of an extension cord as the extension cord may overheat and cause a
risk of re.
• Do not use the appliance for other than its intended use.
• Do not use outdoors. FOR INDOOR USE ONLY.
• Do not leave the appliance unattended when switched on.
• Do not place objects on the product or allow objects to obstruct the inlet or outlet
openings, or operate in close proximity to walls or curtains, etc. Do not cover the
unit when in operation.
• Do not locate the heater immediately below a socket-outlet.
• The use of attachments or accessories not recommended or sold by the product
distributor may cause personal or property hazards or injuries.
• This product is intended for normal domestic/household use only.
• Use this heater as described in this manual. Any other uses, not recommended by
the manufacturer, may cause re, electric shock, or injury to persons and may void
the warranty
Page 13
13
EN
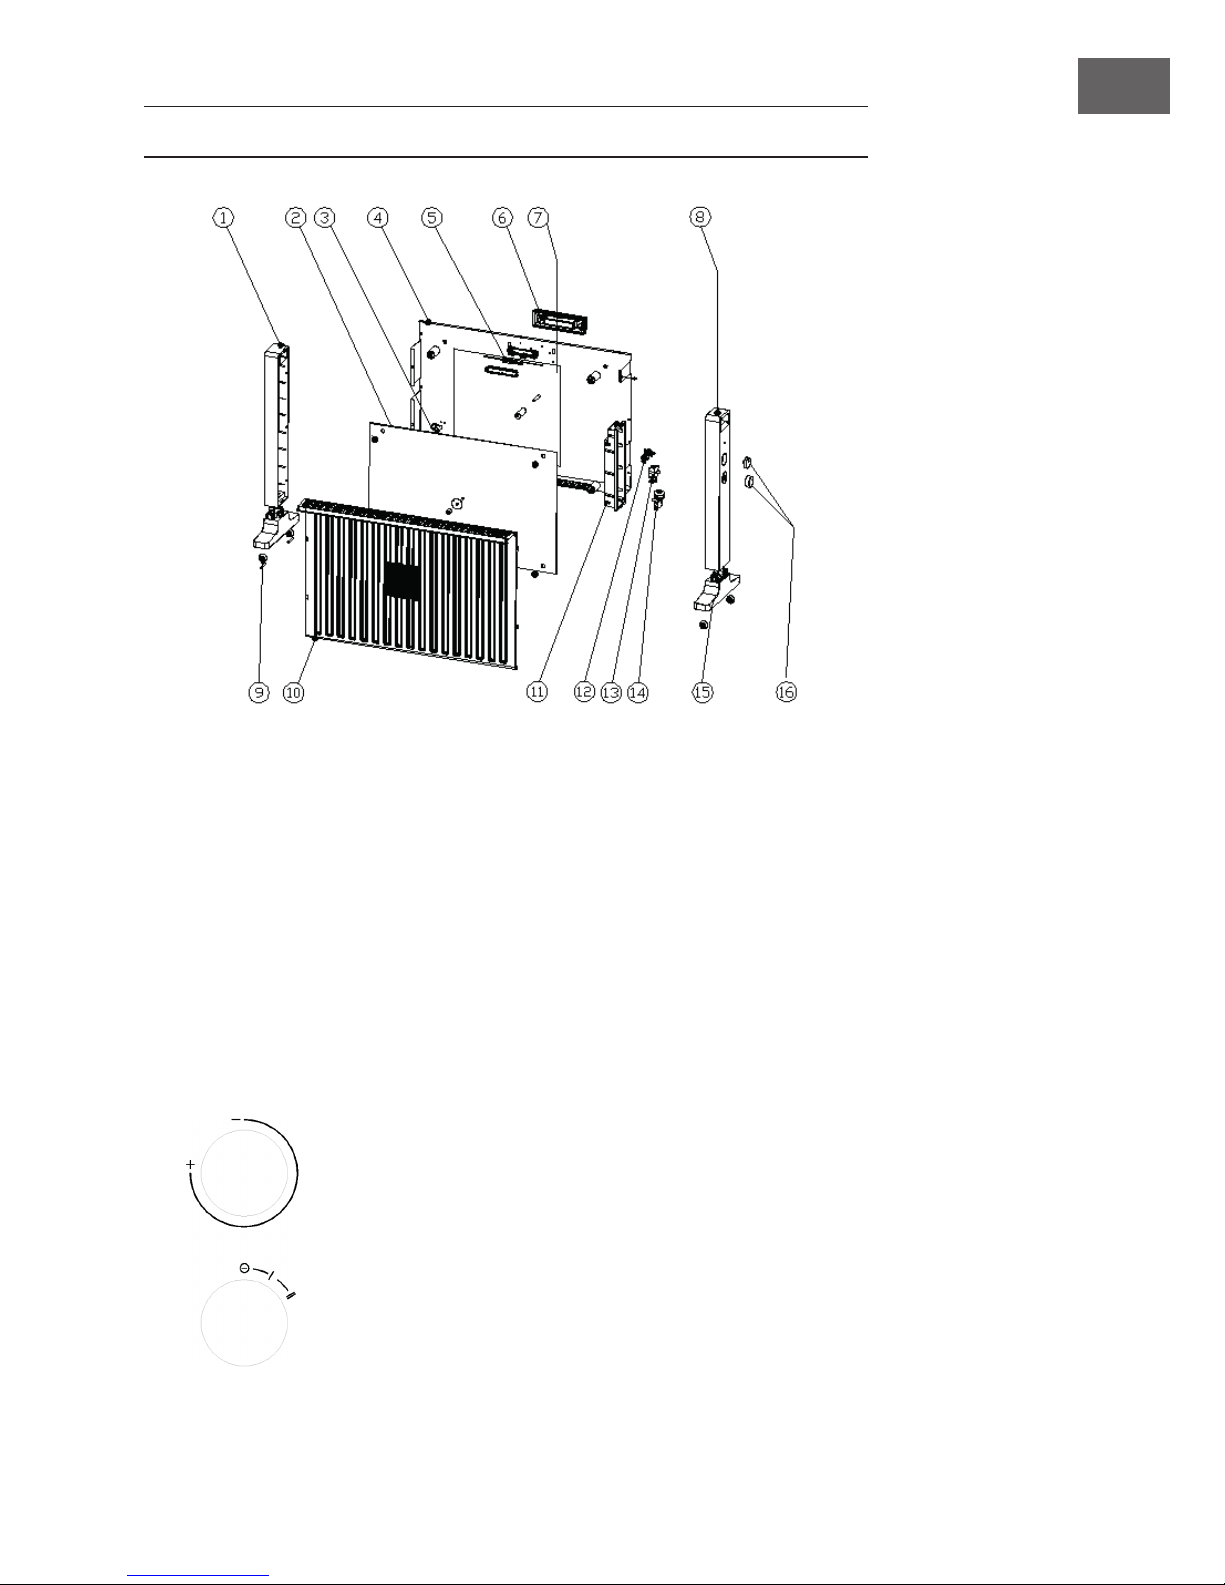
PRODUCT OVERVIEW
1 Left shell
2 Mica heating element
3 Line holder
4 Back cover
5 Thermostat element
6 Wall-mounted handle
7 Silver paper
8 Right shell
9 Castor
10 Protecting screening
11 Waterproof cover
12 Temperature adjusting switch
13 Optional switch
14 Tip-over switch
15 Base
16 Rotary knob
Control panel
Page 14
14
EN
INSTALLATION
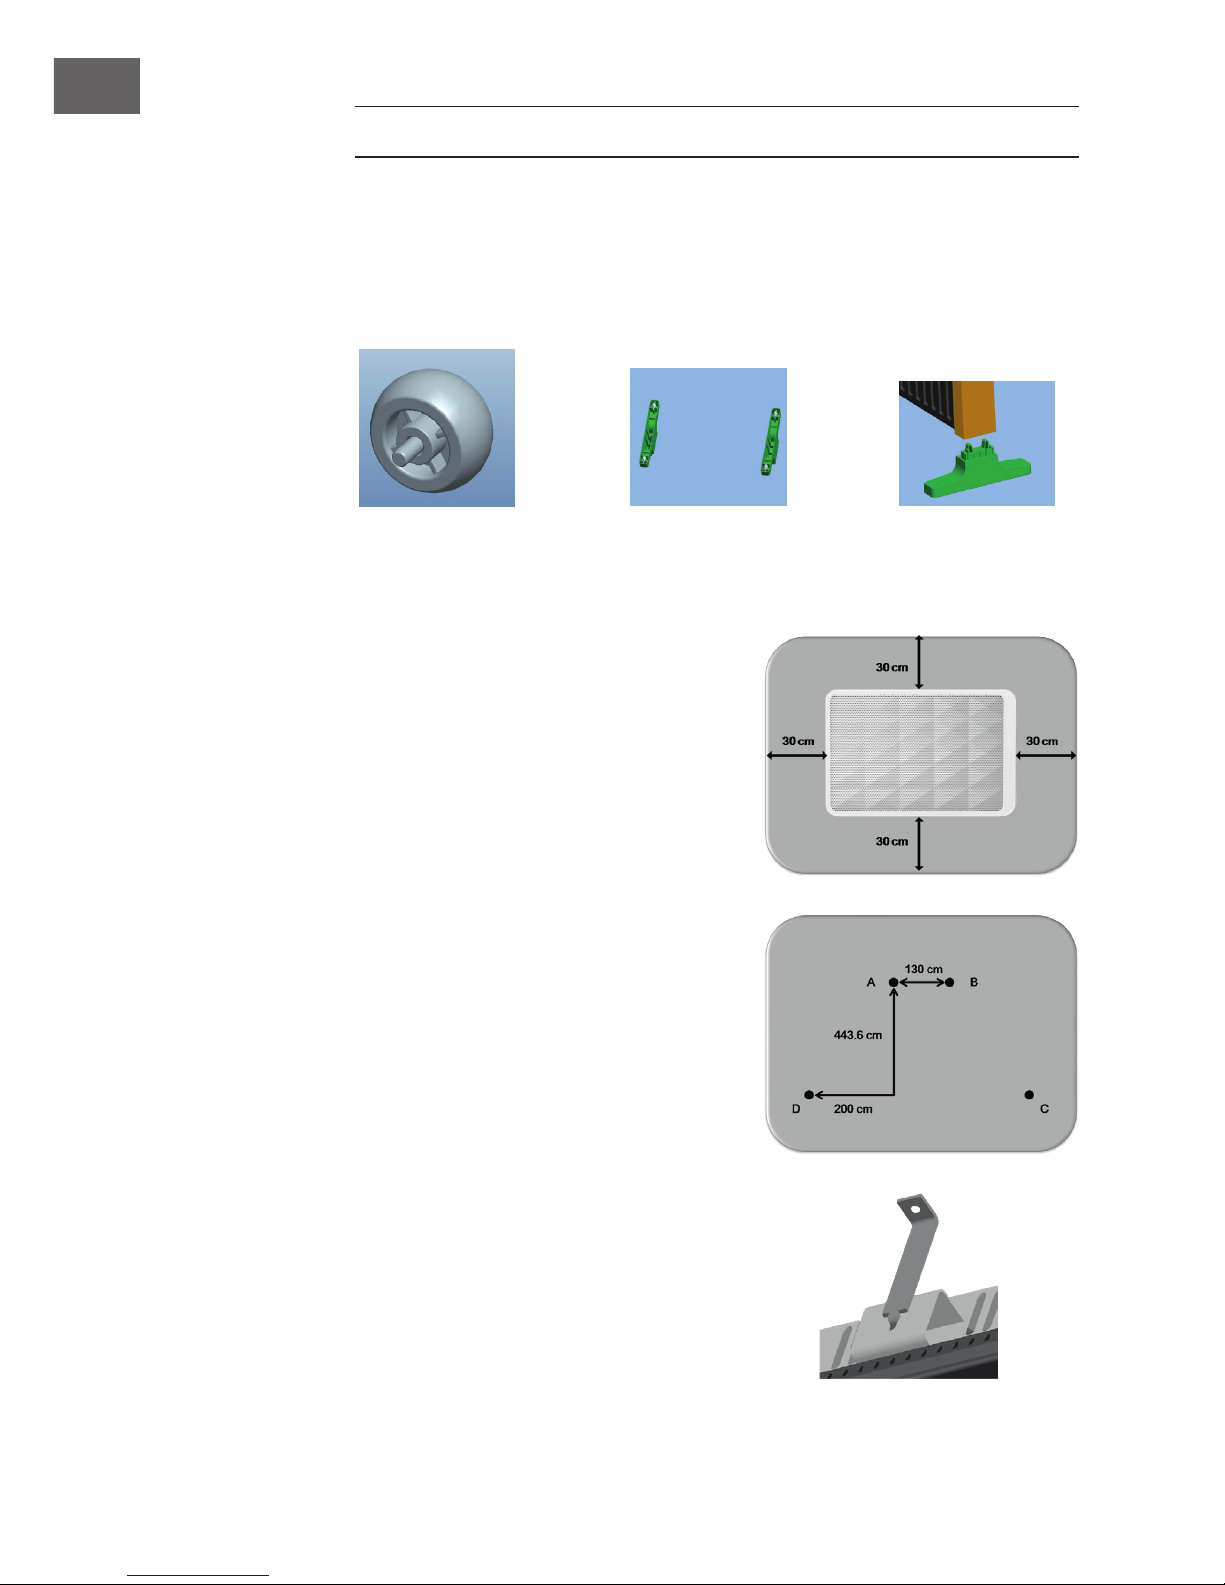
Free standing
Open packaging to take out the body, conrm the product is in good condition
Fix the wheels and base as the below pictures.
Castor assembly Fix the castors to the
base.
Fix the shell to base.
Wall mounting
When you need to install it on the wall,
please take away the holder
Make sure the distance can meet the
requirements as picture on the right.
Drill three holes – (A), (B), (C or D) - in the
wall, and make the diameter of hole as 6
mm, depth as 30 mm. The distance can meet
the requirements as Pic.
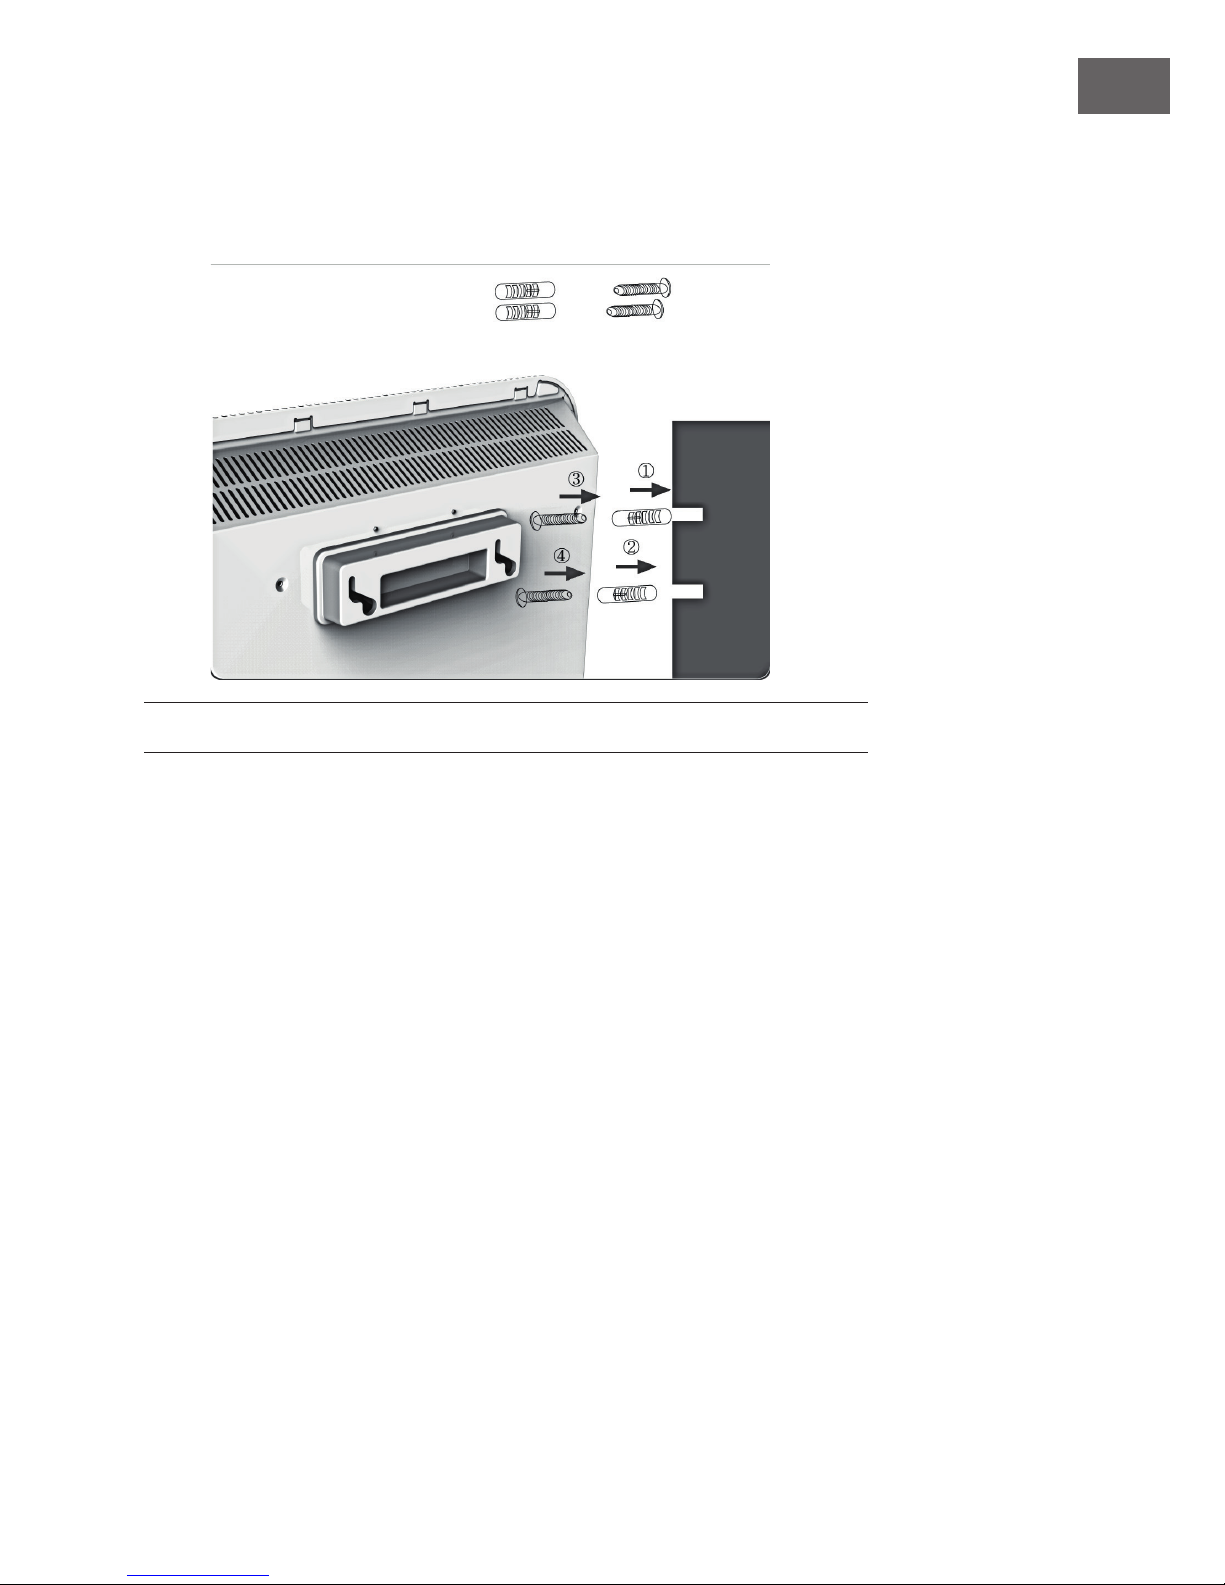
• Fix the rubber plug into the three holes
• Fix the screws into the rubber plugs
(hole A & hole B). Make the length of
outside screws as 5 mm, to hang the
heater
• Install the bracket on the heater as
picture on the right. Insert a screw into
the hole of the bracket.
Page 15
15
EN
Fix the screw in to the rubber plug (hole C or hole D)
OPERATION
• In standby state, turn the power switch to “Low” or “High”, and turn the
temperature-setting switch to the max, the heater will start to work. When the power
switch is “Low”, the power is 750W (Item.1032062) or1000 W (Item. 1032063).
• When “High” the power is 1500W (Item.1032062) or2000 W (Item. 1032063).
• Turn the power switch to original position, the heater will stop.
Page 16
16
EN
Declaration of Conformity
Producer: Chal-Tec GmbH, Wallstraße 16, 10179 Berlin, Germany
This product is conform to the following European Directives:
2011/65/EU (RoHS)
2014/30/EU (EMC)
2014/35/EU (LVD)
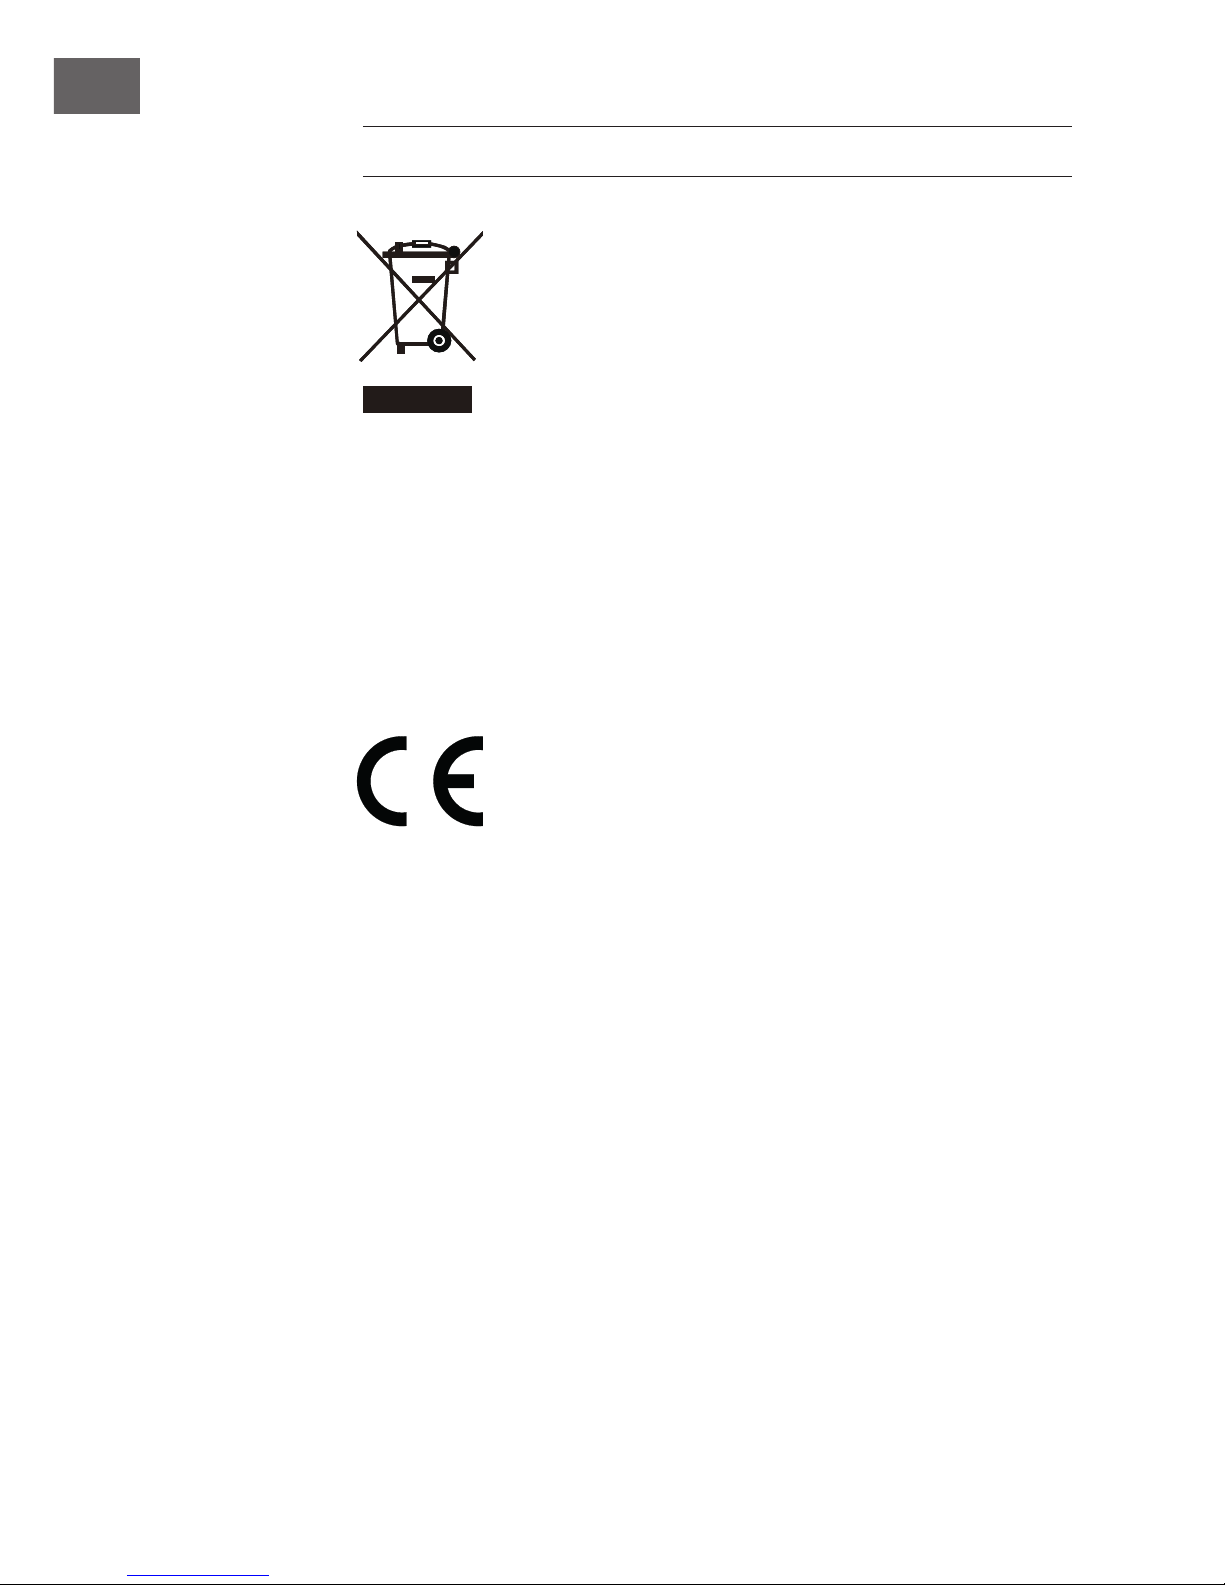
According to the European waste regulation 2012/19/EU this
symbol on the product or on its packaging indicates that this product
may not be treated as household waste. Instead it should be taken
to the appropriate collection point for the recycling of electrical
and electronic equipment. By ensuring this product is disposed of
correctly, you will help prevent potential negative consequences for
the environment and human health, which could otherwise be caused
by inappropriate waste handling of this product. For more detailed
information about recycling of this product, please contact your local
council or your household waste disposal service.
Your product contains batteries covered by the European Directive.
2006/66/EC, which cannot be disposed of with normal household
waste. Please check local rules on separate collection of batteries.
The correct disposal of batteries helps prevent potentially negative
consequences on the environment and human health.
DISPOSAL CONSIDERATIONS
Page 17

17
EN
Page 18

18
EN
Page 19

Page 20
Page 21
21FR21
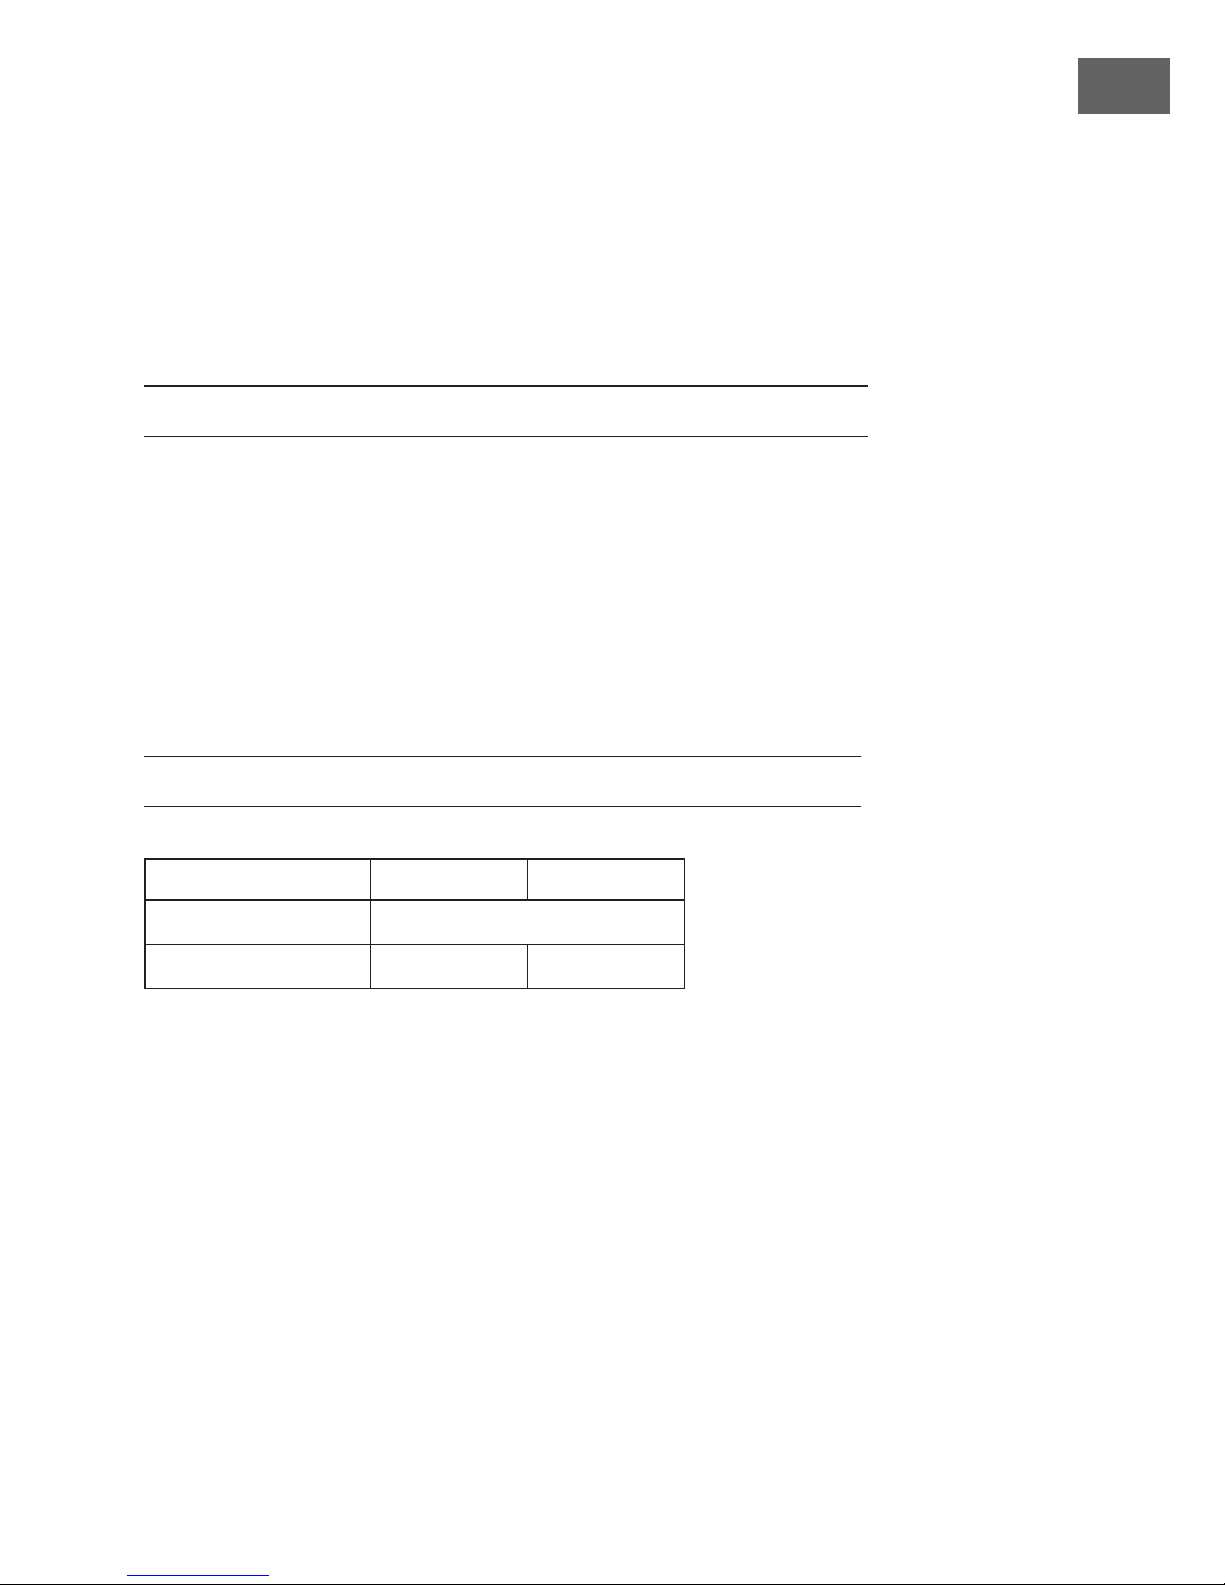
Fiche technique 21
Consignes de sécurité 22
Aperçu de l'appareil 24
Installation 25
Fonctionnement 26
Conseils pour le reclyclage 27
FICHE TECHNIQUE
Numéro d’article 10032062 10032063
Alimentation 220-240 V~ 50/60 Hz
Puissance 1500 W 2000 W
Chère cliente, cher client,
Toutes nos félicitations pour l’acquisition de ce nouvel appareil. Veuillez lire
attentivement les instructions suivantes de branchement et d’utilisation an d’éviter
d’éventuels dommages. Le fabricant ne saurait être tenu pour responsable des
dommages dus au non-respect des consignes de sécurité et à la mauvaise utilisation de
l’appareil.
SOMMAIRE
Page 22
22FR22
CONSIGNES DE SÉCURITÉ
Lisez attentivement les consignes de sécurité et conservez-les pour vous y référer
ultérieurement.
Pour éviter les risques d‘incendie, d‘électrocution, de brûlures et autres blessures, il
est important de respecter des mesures de précaution de base lors de l‘utilisation de
l‘appareil.
Consignes générales de sécurité
• La tension indiquée sur l‘appareil doit correspondre à la tension de l‘alimentation
électrique. Utilisez une section de câble appropriée.
• L‘entrée et la sortie d‘air de l‘appareil ne doivent en aucun cas être recouvertes.
• Ne déplacez pas le radiateur pendant le fonctionnement. Débranchez la prise
d‘alimentation lorsque l‘appareil n‘est pas utilisé.
• Ne faites pas fonctionner l‘appareil si l‘appareil ou la che d‘alimentation sont
endommagés.
Consignes de sécurité particulières
• Retirez l‘appareil de l‘emballage et vériez si l‘appareil n‘est pas endommagé.
• Ne laissez pas les enfants jouer avec des éléments d‘emballage (sacs en plastique
par ex).
• Lorsque l‘appareil est utilisé à proximité d‘enfants ou de personnes vulnérables, une
surveillance étroite est requise.
• N‘utilisez pas l‘appareil avec un câble d‘alimentation ou une prise d‘alimentation
endommagés, ou après un dysfonctionnement de l‘appareil, une chute ou une
détérioration quelconque.
• N‘oubliez pas de mettre l‘appareil hors tension avant de débrancher le câble
d‘alimentation.
• Assurez-vous que le câble d‘alimentation est complètement déroulé avant d‘utiliser
l‘appareil.
• Certains endroits du radiateur sont très chauds. Prenez l‘appareil par la poignée
lorsque vous le déplacez.
• N‘utilisez pas l‘appareil dans des endroits tels que les garages, où de l‘essence, de
la peinture ou d‘autres combustibles sont utilisés ou stockés.
• N‘utilisez pas l‘appareil à proximité de meubles, d‘animaux, de jardins ou d‘objets
inammables. Tenez les objets inammables à au moins 1 mètre de tous les côtés.
• Ne faites pas passer le câble d‘alimentation sous un tapis, une descente de lit ou
un meuble.
• Ne placez pas le radiateur sur un tapis épais ou à poils longs qui obstruerait les
ouvertures de ventilation.
• Risque d‘électrocution : N‘exposez pas l‘appareil ou le câble d‘alimentation à la
pluie, à l‘humidité ou à des liquides.
• N‘utilisez pas l‘appareil à proximité immédiate de l‘eau (par ex. une baignoire, un
bassin, une piscine, etc.) où il y a des risques d‘immersion ou d‘éclaboussures.
• Mettez l‘appareil hors tension et débranchez le câble d‘alimentation lorsqu‘il n‘est
pas utilisé. Tenez la che elle-même et ne tirez pas sur le câble d‘alimentation.
Page 23

23FR23
• Les amas de poussière, les moutons et les peluches qui pénètrent dans l‘appareil
sont une cause fréquente de surchauffe. Supprimez ces amas régulièrement.
Débranchez le câble d‘alimentation, laissez l‘appareil refroidir et nettoyez-le
comme décrit dans le chapitre correspondant.
• Assurez-vous qu‘aucun autre appareil électrique n‘est utilisé à proximité.
• Évitez d‘utiliser une rallonge car elle pourrait surchauffer et présenter un risque
d‘incendie.
• Utilisez l‘appareil aux ns prévues uniquement.
• N‘utilisez pas le chauffage à l‘extérieur. Pour usage intérieur seulement.
• Ne laissez pas l‘appareil sans surveillance lorsqu‘il est allumé.
• Ne placez aucun objet sur l‘appareil. Ne couvrez pas les ouvertures de ventilation
avec des objets. N‘utilisez pas l‘appareil à proximité de murs, de rideaux, etc. Ne
couvrez pas l‘appareil pendant son fonctionnement.
• Ne placez pas l‘appareil de chauffage directement sous une prise murale.
• L‘utilisation d‘accessoires non recommandés ou vendus par le fabricant peut
entraîner des dommages matériels ou des blessures corporelles.
• Cet appareil est destiné à un usage domestique uniquement
• Utilisez le radiateur uniquement de la façon décrite dans ce mode d‘emploi.
D‘autres utilisations non recommandées par le fabricant pourraient entraîner un
incendie, un choc électrique ou des blessures corporelles.
Page 24
24FR24
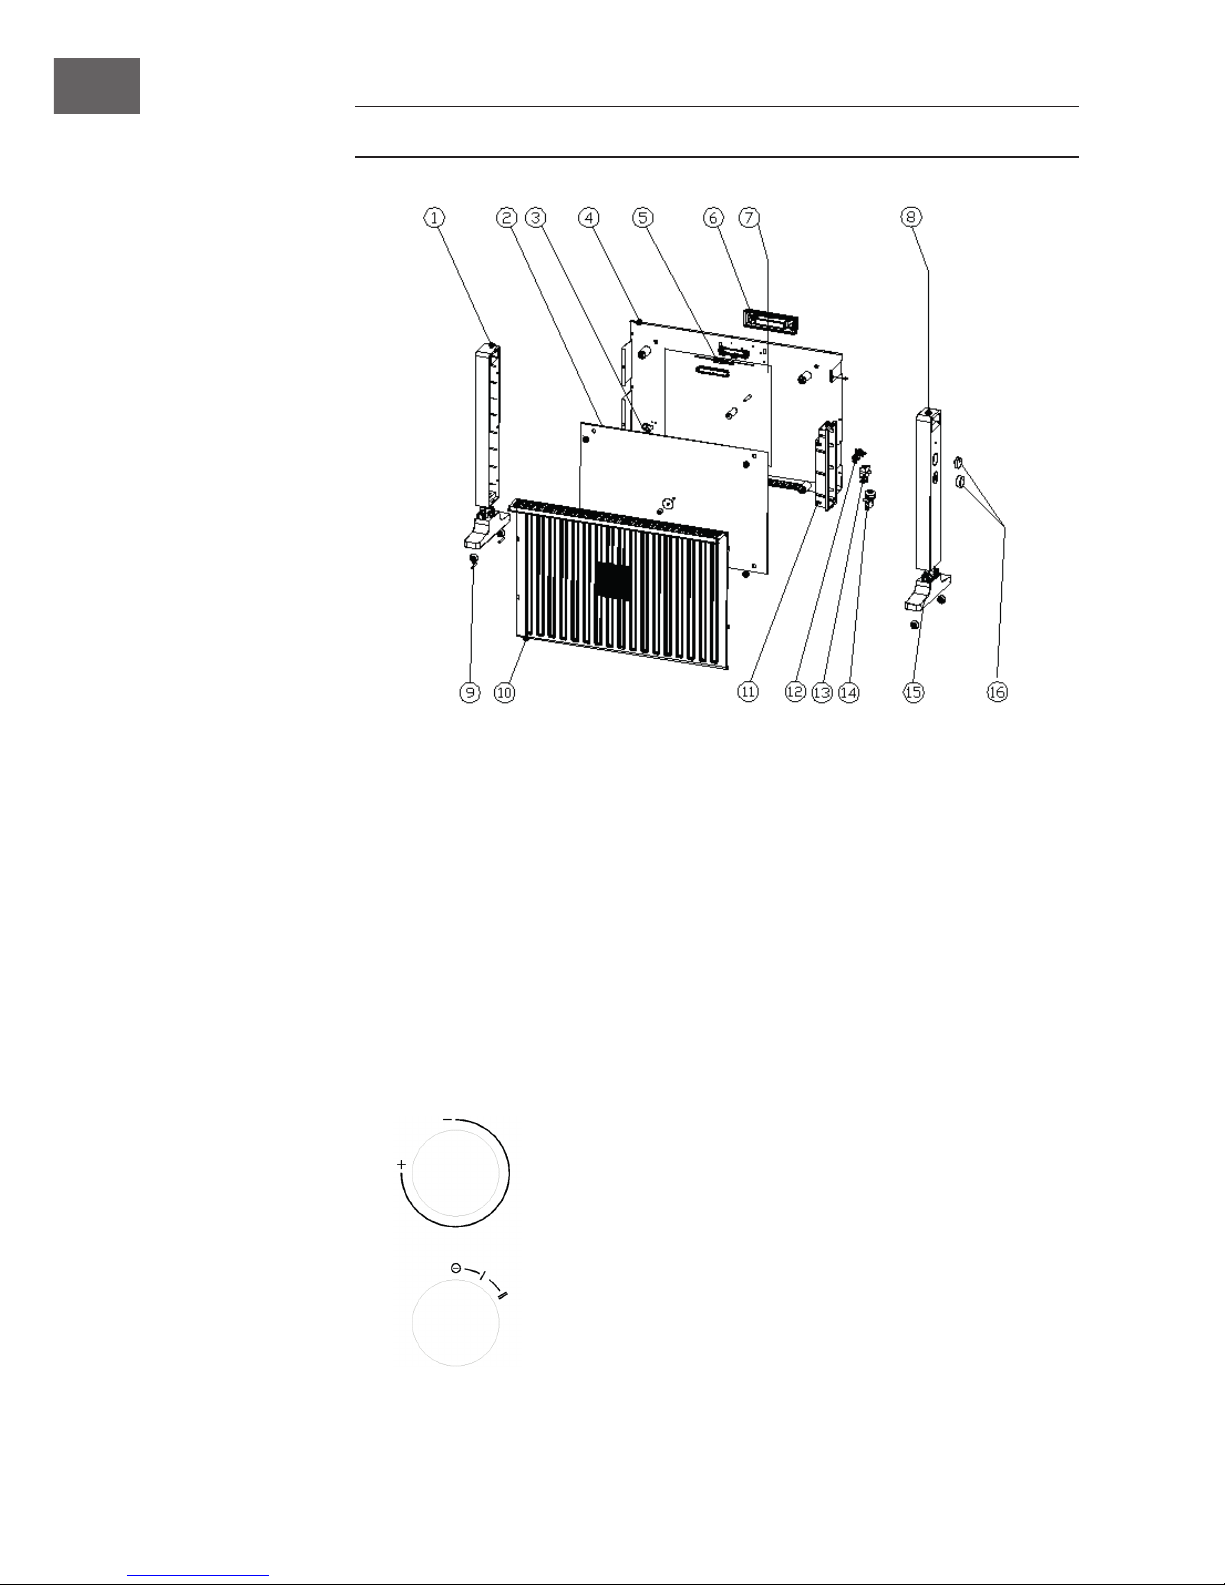
APERÇU DE L'APPAREIL
1 Colonne support de gauche
2 Corps de chauffe
3 Support
4 Paroi arrière
5 Thermostat
6 Support mural
7 Film réecteur
8 Colonne support de droite
9 Roulettes
10 Ecran de protection
11 Couvercle étanche
12 Sélecteur de température
13 Interrupteur
14 Protection anti basculement
15 Pieds
16 Bouton rotatif
Panneau de commande
Page 25
25FR25
INSTALLATION
Pose libre
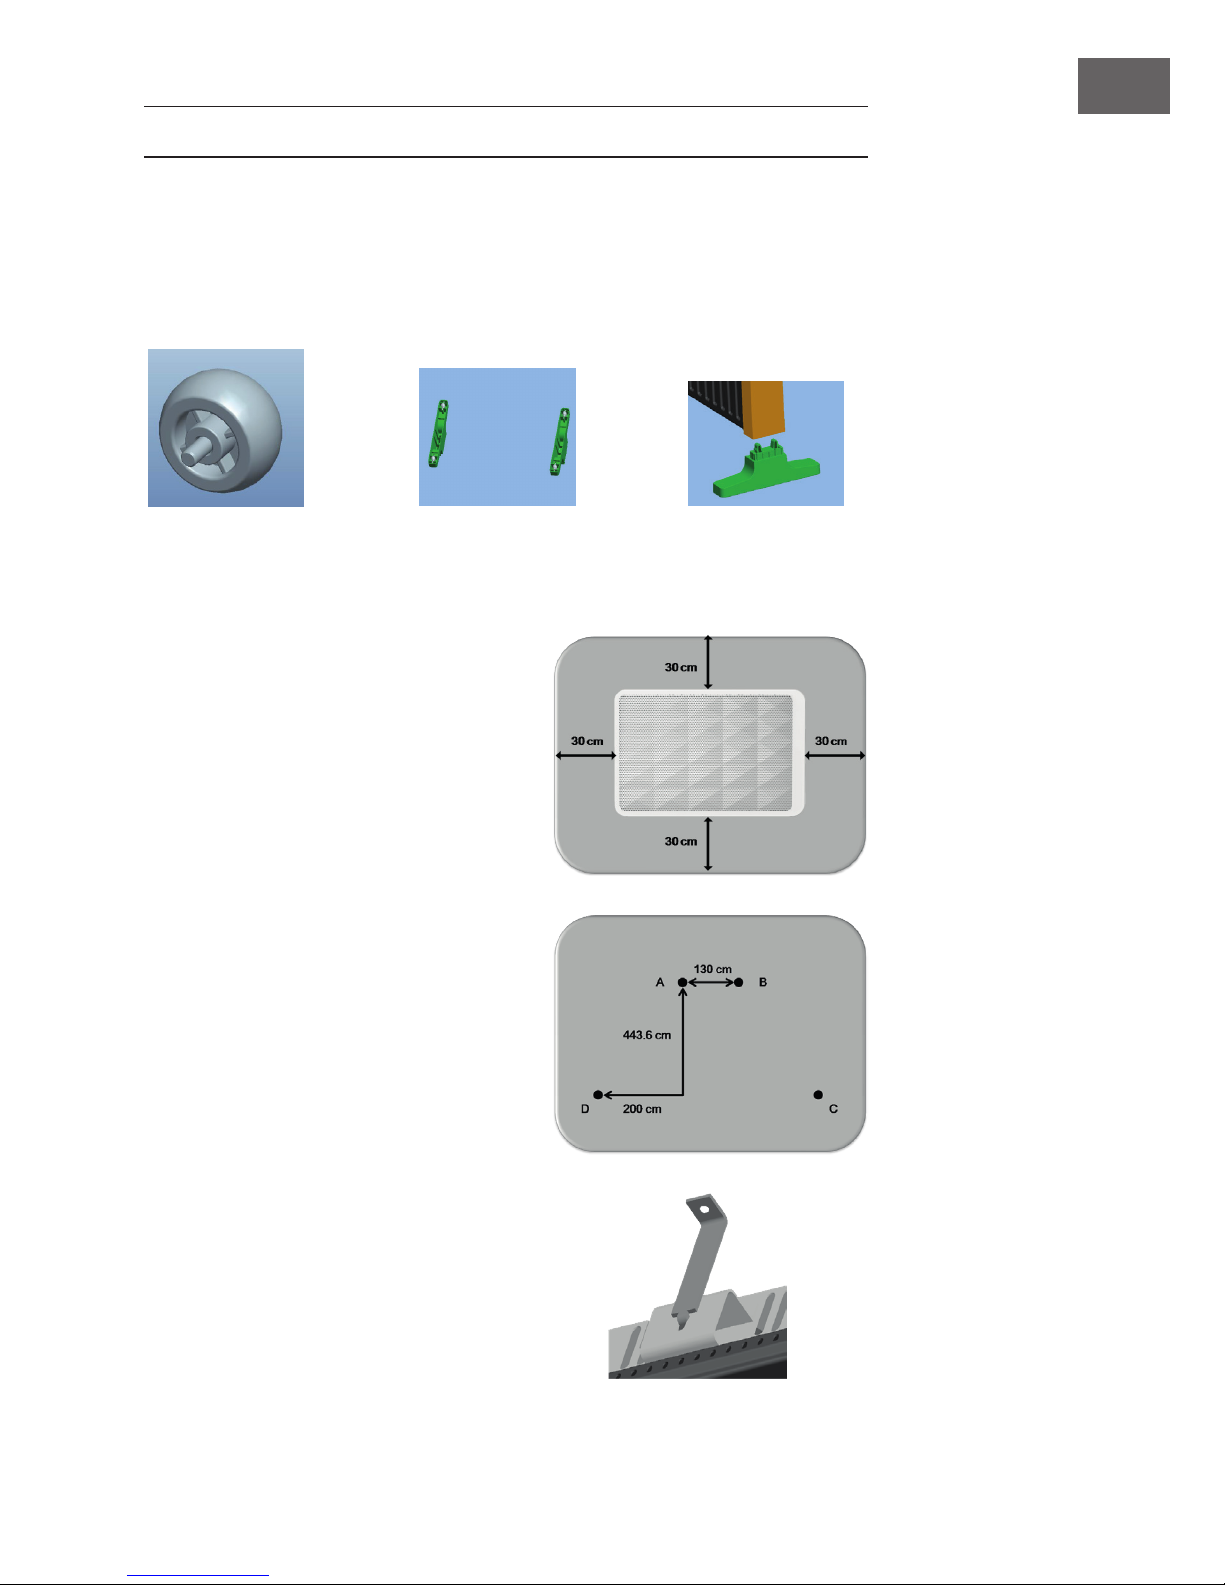
Ouvrez le paquet et sortez l'appareil. Assurez-vous que l'appareil est en bon état.
Montez les roues et les pieds comme indiqué ci-dessous.
Montage des
roulettes
Montez les roulettes
sur les pieds
Montez les pieds sur
les colonnes.
Montage mural
Si vous montez l'appareil sur le mur, retirez
les colonnes supports.
Notez les distances au mur. (Voir l'image à
droite).
Percez 3 trous dans le mur (A) (B), et (C)
ou (D). Le diamètre doit être de 6 mm et le
trou doit avoir une profondeur de 30 mm.
(Distances requises voir l'image sur la droite.)
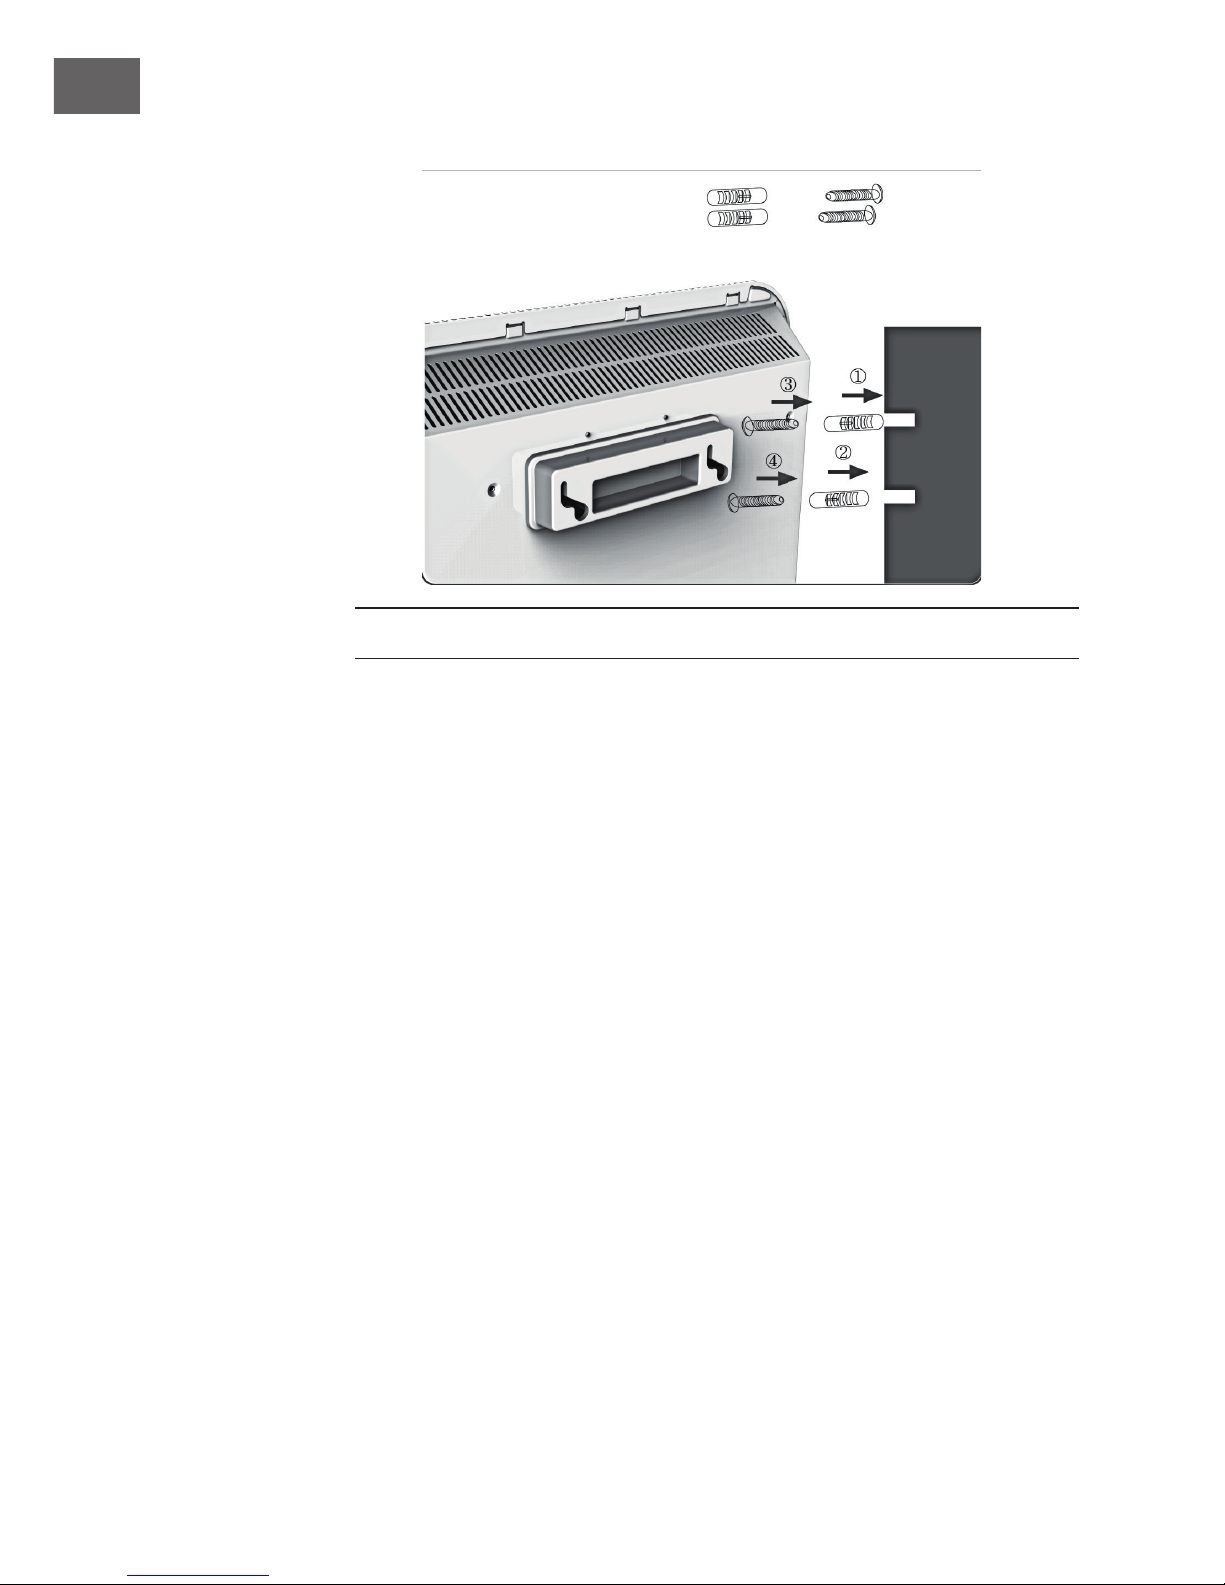
• Enfoncez les chevilles dans les trous
percés.
• Fixez les vis dans les chevilles (trou A
+ B). Les vis doivent dépasser de 5 mm
des trous pour attacher le radiateur.
• Montez le support sur le radiateur
Page 26
26FR26
FONCTIONNEMENT
• En mode veille, réglez le commutateur sur LOW (réglage de chaleur faible) ou
HIGH (réglage de chauffage élevé). Réglez le contrôle de température sur MAX. Le
radiateur démarre.
• A faible puissance, le radiateur chauffe à 750 W (Art.1032062) ou 1000 W
(Article 1032063).
• À puissance élevée, le radiateur chauffe jusqu'à 1500 W (Art.1032062) ou
2000W (Article 1032063).
• Remettez les commandes dans leur position d'origine.
Page 27
27FR27
Déclaration de conformité
Fabricant : Chal-Tec GmbH, Wallstraße 16, 10179 Berlin, Allemagne
Ce produit est conforme aux directives européennes suivantes :
2011/65/UE (RoHS)
2014/30/UE (CEM)
2014/35/UE (LVD)
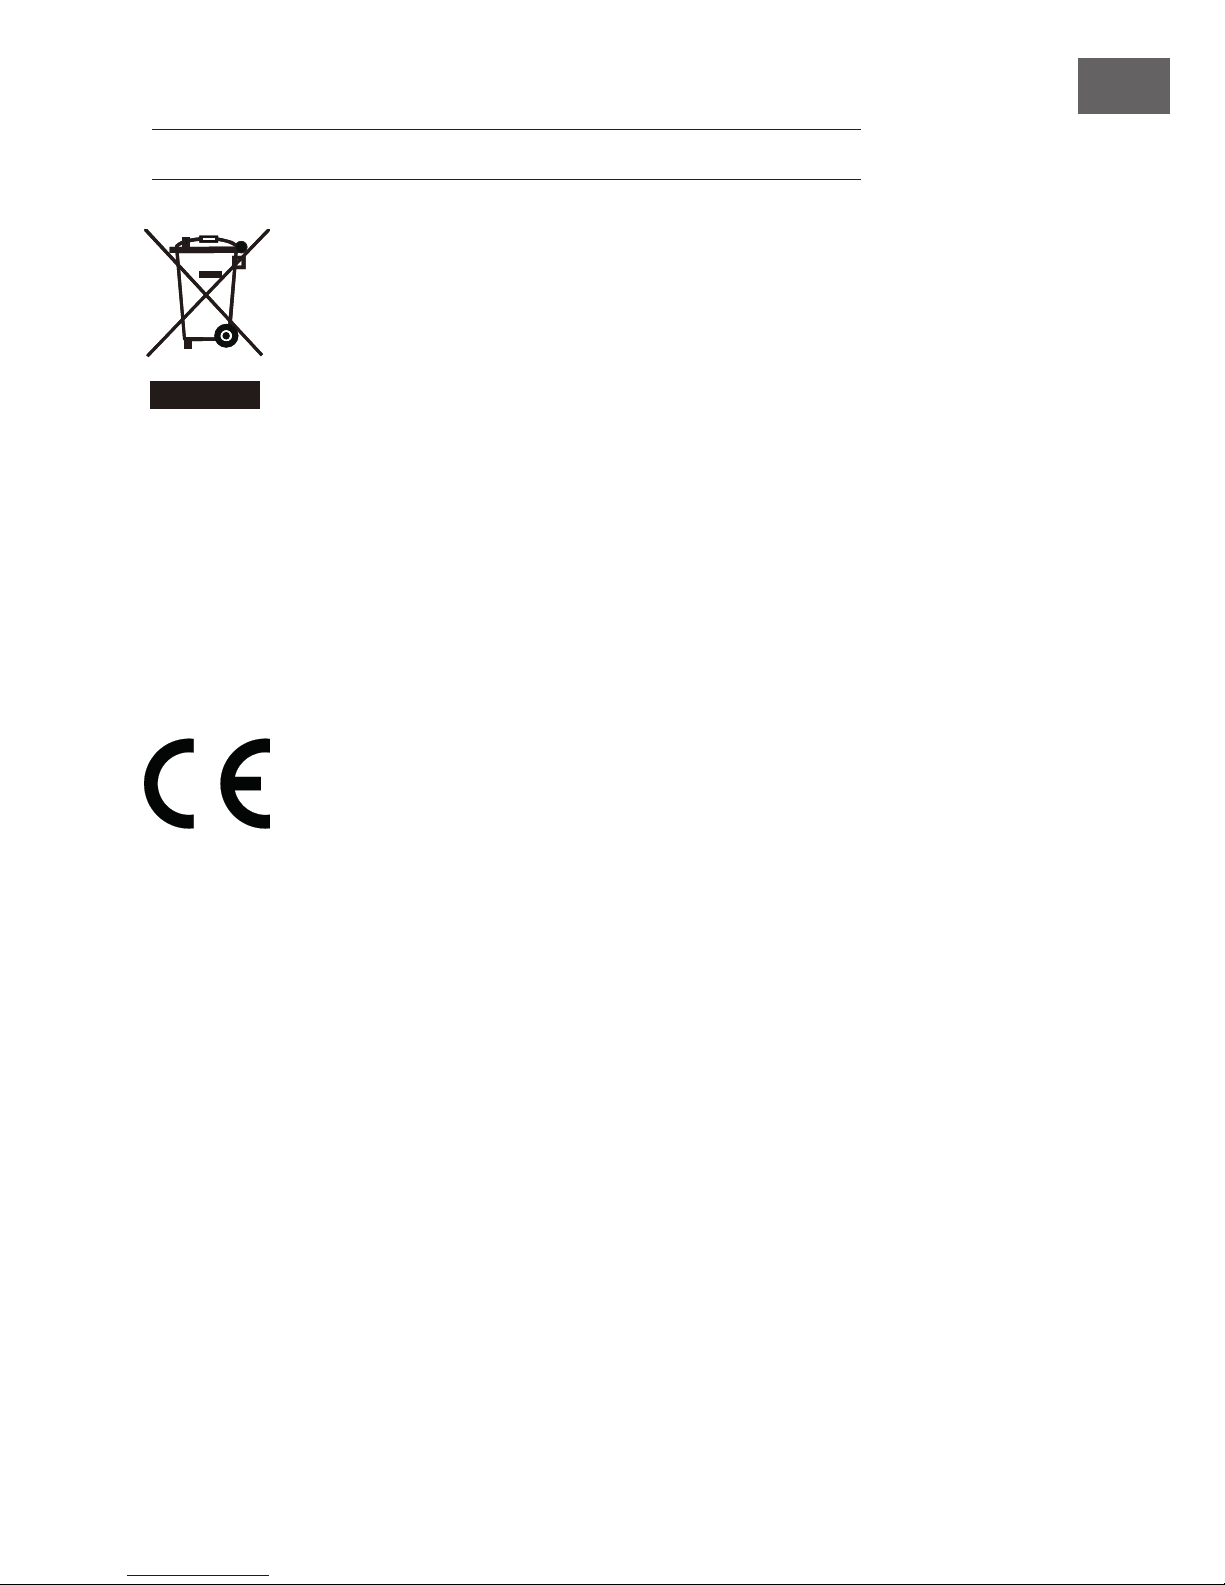
Le pictogramme ci-contre apposé sur le produit signie que la directive
européenne 2012/19/UE s‘applique (poubelle à roues barrée
d’une croix). Ces produits ne peuvent être jetés dans les poubelles
domestiques courantes. Renseignez-vous concernant les règles
appliquées pour la collecte d’appareils électriques et électroniques.
Conformez-vous aux réglementations locales et ne jetez pas vos
anciens produits avec les ordures ménagères. Le respect des règles de
recyclage des vieux produits aide à la protection de l’environnement
et de la santé de votre entourage contre les conséquences négatives
possibles. Le recyclage des matériaux aide à réduire l’utilisation des
matières premières.
Le produit contient des piles qui sont soumises à la directive
européenne 2006/66/CE et ne doivent pas être jetées dans les
poubelles à ordures ménagères. Veuillez-vous informer sur les
réglementations locales en vigueur pour le recyclage des piles. En
respectant les règles de recyclage vous participez activement à la
protection de l’environnement et à la préservation de la santé de vos
proches.
CONSEILS POUR LE RECLYCLAGE
Page 28

28
FR
Page 29

29
FR
Page 30

30
FR
Page 31

Page 32
 Loading...