

Page 1

Uhrenbeweger
Watch Winder
Watch winder para relojes automáticos
Remontoir de montres
Caricaorologio
10032007
Page 2

Page 3
Sehr geehrter Kunde,
wir gratulieren Ihnen zum Erwerb Ihres Gerätes. Lesen Sie die folgenden Hinweise
sorgfältig durch und befolgen Sie diese, um möglichen Schäden vorzubeugen. Für
Schäden, die durch Missachtung der Hinweise und unsachgemäßen Gebrauch
entstehen, übernehmen wir keine Haftung.
INHALTSVERZEICHNIS
Technische Daten 3
Konformitätserklärung 3
Geräteübersicht4
Bedienung4
Hinweise zur Entsorgung5
TECHNISCHE DATEN
Artikelnummer 10032007
Stromversorgung (Netzadapter) 4 V / 550 mAh
KONFORMITÄTSERKLÄRUNG
DE
Hersteller:
Chal-Tec GmbH, Wallstraße 16, 10179 Berlin, Deutschland.
Dieses Produkt entspricht den folgenden Europäischen
Richtlinien:
2014/30/EU (EMV)
2014/35/EU (LVD)
2011/65/EU (RoHS)
3
Page 4
DE
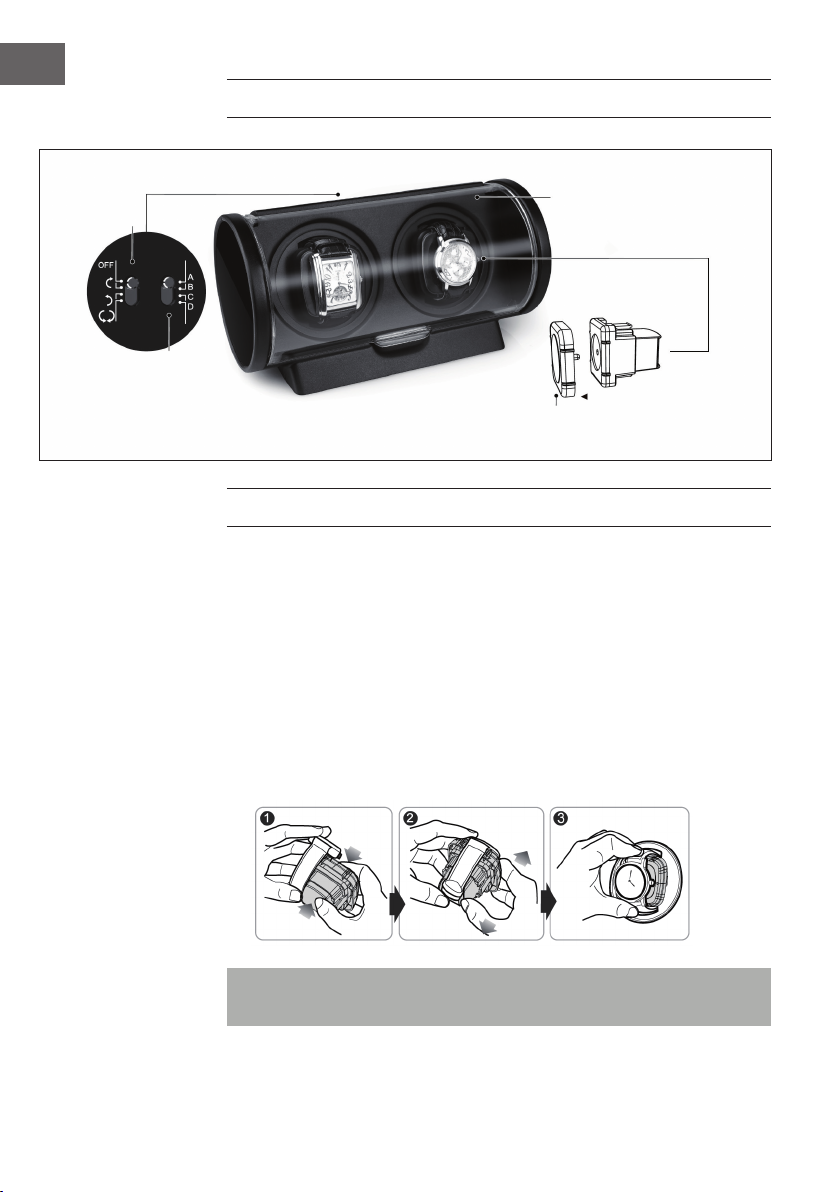
GERÄTEÜBERSICHT
Ein/Aus
Schalter
ModusSchalter
Abdeckung
Uhrenkissen
Für größere Uhren,
Verlängerung für
große Uhren
stecken Sie den
Verlängerung auf das
Uhrenkissen
BEDIENUNG
1 Stecker Sie das Adapterkabel in den Adapteranschluss am Gerät und stecken Sie
den Stecker in die Steckdose.
2 Öffnen Sie die vordere Abdeckung und verwenden Sie Ihren Zeigenger und
Daumen, um das Uhrenkissen auf beiden Seiten des Kissens zu lösen (siehe
Pfeilmarkierung). Ziehen Sie das Uhrenkissen heraus.
3 Befestigen Sie die Uhr auf dem Kissen, indem Sie die Feder an der Rückseite
drücken, die Uhr um das Kissen legen und die Feder wieder loslassen.
4 Nachdem Sie die Uhr auf dem Kissen befestigt haben, befestigen Sie das Kissen
wieder im Uhrendreher. Drücken Sie es hinein, bis es mit einem Klicken einrastet
und fest im Gerät sitzt.
5 Verwenden Sie den Modus-Schalter am Gerät, um einen der Dreh-Modi
auszuwählen.
Hinweis: Mit dem Ein/Aus-Schalter schalten Sie das Gerät ein und aus. Mit dem
Modus-Schalter bestimmen Sie die Drehbewegung des Uhrendrehers.
4
Page 5
Dreh-Modi
• Modus A: 650 Umdrehungen/Tag. 5 Minuten Uhrendrehung, danach 79 Minuten
Pause, im ständigen Wechsel.
• Modus B: 900 Umdrehungen/Tag. 5 Minuten Uhrendrehung, danach 56 Minuten
Pause, im ständigen Wechsel.
• Modus C: 1200 Umdrehungen/Tag. 5 Minuten Uhrendrehung, danach 41 Minuten
Pause, im ständigen Wechsel.
• Modus D: 1500 Umdrehungen/Tag. 5 Minuten Uhrendrehung, danach 32
Minuten Pause, im ständigen Wechsel.
Wichtige Hinweise
• Wenn Sie das Gerät länger nicht benutzen, schalten Sie es aus.
• Schalten Sie das Gerät aus, bevor Sie das Uhrenkissen entnehmen.
• Benutzen Sie nur den mitgelieferten Netzadapter.
• Ziehen Sie den Adapter aus der Steckdose, wenn Sie das Gerät nicht benutzen.
• Bewegen Sie das Gerät nicht, während es in betrieb ist.
HINWEISE ZUR ENTSORGUNG
Bendet sich die linke Abbildung (durchgestrichene Mülltonne
auf Rädern) auf dem Produkt, gilt die Europäische Richtlinie
2012/19/EU. Diese Produkte dürfen nicht mit dem normalen
Hausmüll entsorgt werden. Informieren Sie sich über die
örtlichen Regelungen zur getrennten Sammlung elektrischer
und elektronischer Gerätschaften. Richten Sie sich nach
den örtlichen Regelungen und entsorgen Sie Altgeräte nicht
über den Hausmüll. Durch die regelkonforme Entsorgung
der Altgeräte werden Umwelt und die Gesundheit ihrer
Mitmenschen vor möglichen negativen Konsequenzen
geschützt. Materialrecycling hilft, den Verbrauch von
Rohstoffen zu verringern.
DE
5
Page 6
EN
Dear Customer,
Congratulations on purchasing this equipment. Please read this manual carefully and
take care of the following hints to avoid damages. Any failure caused by ignoring the
mentioned items and cautions mentioned in the instruction manual are not covered by
our warranty and any liability.
CONTENT
Technical Data6
Declaration of Conformity6
Product Description7
Operation7
Hints on Disposal8
TECHNICAL DATA
Item number 10032007
Power supply (AC adapter) 4 V / 550 mAh
DECLARATION OF CONFORMITY
Producer:
Chal-Tec GmbH, Wallstraße 16, 10179 Berlin, Germany.
This product is conform to the following European
Directives:
2014/30/EU (EMC)
2014/35/EU (LVD)
2011/65/EU (RoHS)
6
Page 7
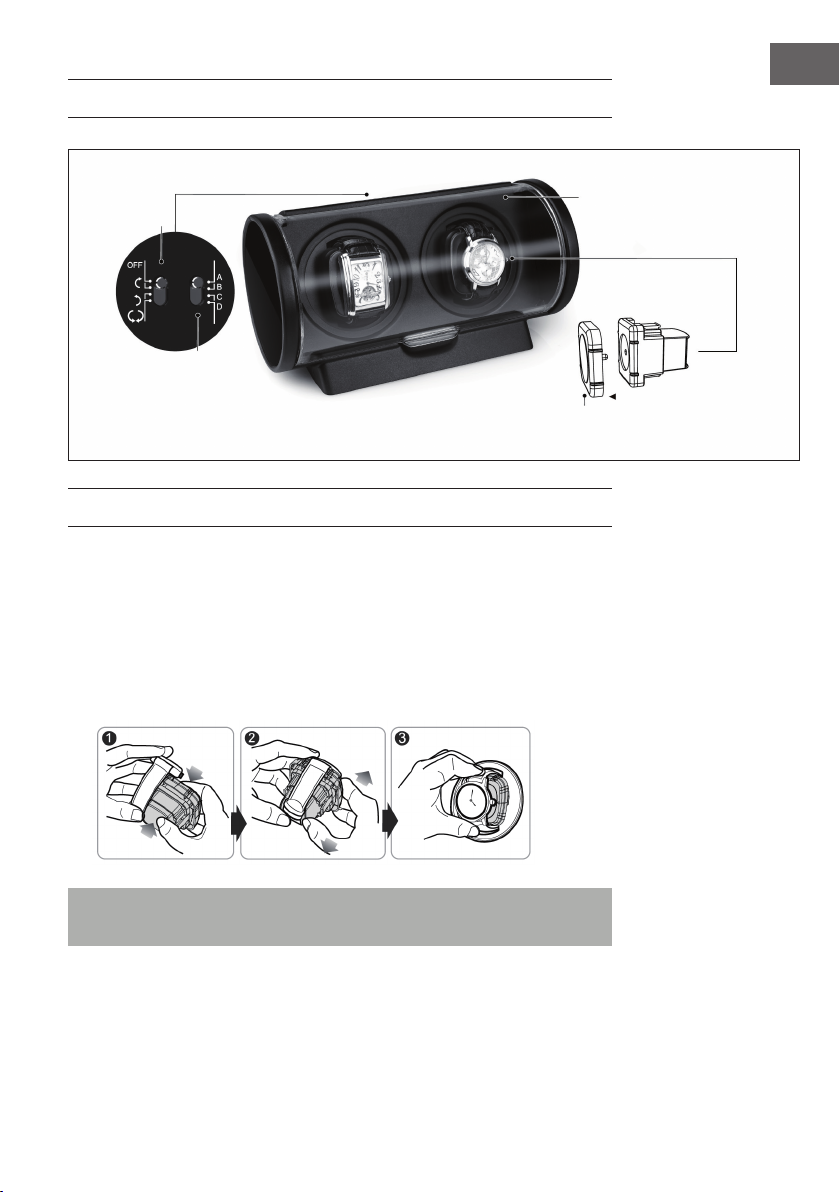
PRODUCT DESCRIPTION
EN
Power
switch
TPD switch
Pillow extender
(for big watches)
OPERATION
1 Insert the adapter into the adapter port and plug it into the electrical outlet.
2 Open the front cover, then use your index nger and thumb to hold the watch
pillow from the two sides of the pillow hitch marked with two arrows. With some
force, pull out the watch pillow.
3 Place the watch on the pillow by pushing in the spring on the back of the pillow,
then put your watch around the pillow and let go of the spring.
4 Once the watch is on the pillow, place the pillow back into the winder.
5 Use the switches on the unit to select as below:
Cover
Watch pillow
Put the watch pillow
extender on the watch
pillow for larger sized
wrist watch.
Note: Use Power switch to select winder rotating direction or turn off the unit. Use TPD
switch to select the TPD you wanted.
7
Page 8
EN
TPD (Turns Per Day) Modes
• Mode A: 650TPD, rotates 5 minutes, rest 79 minutes and then repeat.
• Mode B: 900TPD, rotates 5 minutes, rest 56 minutes and then repeat.
• Mode C: 1200TPD, rotates 5 minutes, rest 41 minutes and then repeat.
• Mode D: 1500TPD, rotates 5 minutes, rest 32 minutes and then repeat.
Important Hints
• If you do not use this product for a long time, please switch off the unit.
• Make sure to turn the unit off completely before attempting to pull out the watch
pillow.
• Please use the AC adapter supplied with the unit.
• Remove the adapter when the winder is not in use.
• Don’t shake the watch winder when the winder is in operation.
HINTS ON DISPOSAL
According to the European waste regulation 2012/19/EU this
symbol on the product or on its packaging indicates that this
product may not be treated as household waste. Instead it should
be taken to the appropriate collection point for the recycling of
electrical and electronic equipment. By ensuring this product is
disposed of correctly, you will help prevent potential negative
consequences for the environment and human health, which
could otherwise be caused by inappropriate waste handling of
this product. For more detailled information about recycling of
this product, please contact your local council or your household
waste disposal service.
8
Page 9
Estimado cliente:
Le felicitamos por la adquisición de este producto. Lea atentamente el siguiente manual
y siga cuidadosamente las instrucciones de uso con el n de evitar posibles daños.
La empresa no se responsabiliza de los daños ocasionados por un uso indebido del
producto o por haber desatendido las indicaciones de seguridad.
ÍNDICE DE CONTENIDOS
Datos técnicos9
Declaración de conformidad9
Descripción del aparato10
Utilización10
Retirada del aparato11
DATOS TÉCNICOS
Número de artículo 10032007
Suministro eléctrico (adaptador de red) 4 V / 550 mAh
DECLARACIÓN DE CONFORMIDAD
ES
Fabricante:
Chal-Tec GmbH, Wallstraße 16, 10179 Berlín (Alemania).
Este producto cumple con las siguientes directivas
europeas:
2014/30/UE (EMC)
2014/35/UE (baja tensión)
2011/65/UE (refundición RoHS)
9
Page 10
ES
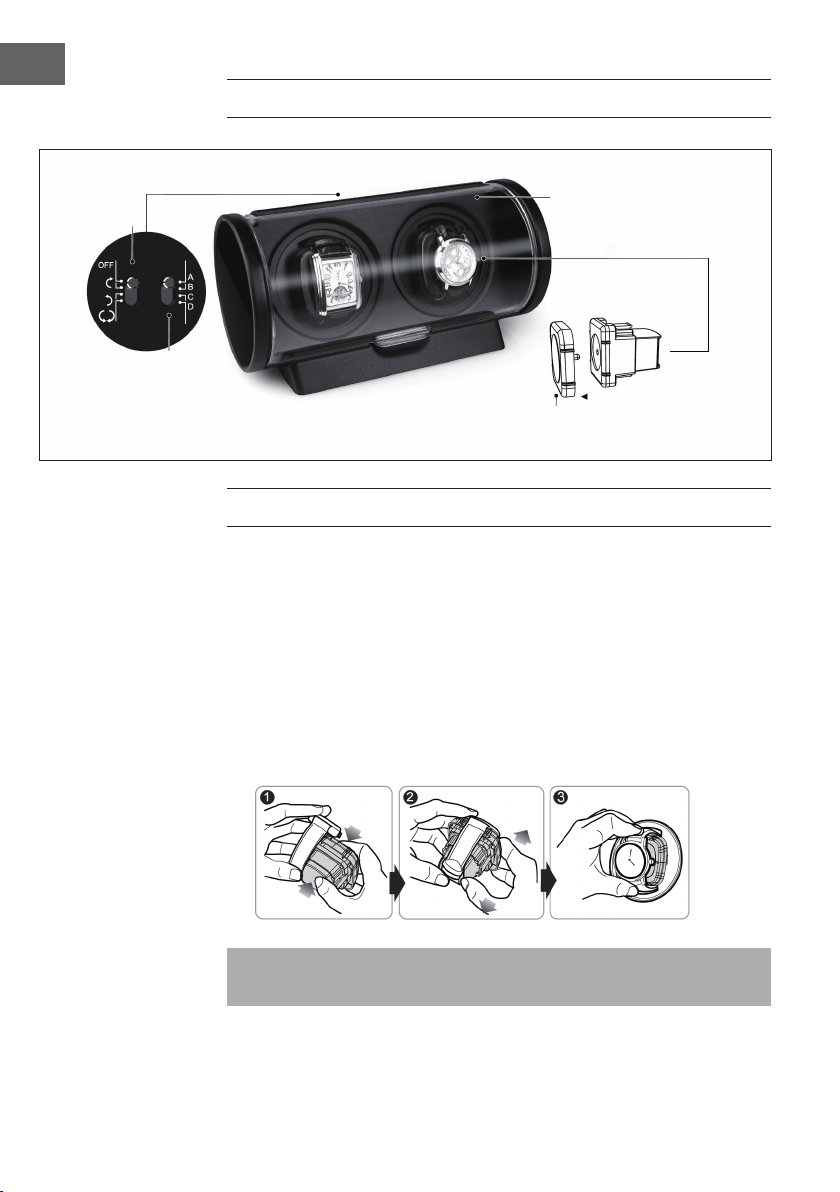
DESCRIPCIÓN DEL APARATO
Interruptor
on/off
Interruptor
de modo
Cubierta
Almohadillas para
el reloj
Para relojes de mayor
Alargardor para
relojes de mayor
tamaño
tamaño, encaje el
alargador en la
almohadilla.
UTILIZACIÓN
1 Conecte el cable del adaptador a su conector del aparato y el enchufe, a la toma
de corriente.
2 Abra la cubierta delantera y utilice el dedo índice y el pulgar para soltar la
almohadilla para el reloj de ambos lados (véanse echa de dirección). Extraiga la
almohadilla.
3 Fije el reloj a la almohadilla presionando el muelle contra la parte trasera,
colocando el reloj sobre la almohadilla y volviendo a soltar el muelle.
4 Después de haber jado el reloj a la almohadilla, je esta última al watch winder.
Presiónela hacia adentro hasta que encaje con un clic.
5 Utilice el interruptor Modo del aparato para seleccionar uno de los tres modos de
rotación.
Advertencia: Con el interruptor on/off puede encender y apagar el aparato. Con el
interruptor de Modo, puede determinar el movimiento de rotación del watch winder.
10
Page 11
Modos de rotación
• Modo A: 650 giros/día 5 minutos de rotación, a continuacón 79 minutos de
pausa, con repetición continua del ciclo.
• Modo B: 900 giros/día 5 minutos de rotación, a continuacón 56 minutos de
pausa, con repetición continua del ciclo.
• Modo C: 1200 giros/día 5 minutos de rotación, a continuacón 41 minutos de
pausa, con repetición continua del ciclo.
• Modo D: 1500 giros/día 5 minutos de rotación, a continuacón 32 minutos de
pausa, con repetición continua del ciclo.
Indicaciones importantes
• Si no utiliza el aparato durante un periodo prolongado de tiempo, apáguelo.
• Apague el aparato antes de extraer la almohadilla.
• Utilice solamente el adaptador incluido.
• Desconecte el enchufe de la toma de corriente cuando no utilice el aparato.
• No mueva el aparato si este se encuentra en funcionamiento.
RETIRADA DEL APARATO
Si el aparato lleva adherida la ilustración de la izquierda (el
contenedor de basura tachado) entonces rige la normativa
europea, directiva 2012/19/UE. Este producto no debe
arrojarse a un contenedor de basura común. Infórmese
sobre las leyes territoriales que regulan la recogida separada
de aparatos eléctricos y electrónicos. Respete las leyes
territoriales y no arroje aparatos viejos al cubo de la basura
doméstica. Una retirada de aparatos conforme a las leyes
contribuye a proteger el medio ambiente y a las personas a
su alrededor frente a posibles consecuencias perjudiciales
para la salud. El reciclaje ayuda a reducir el consumo de
materias primas.
ES
11
Page 12
FR
Cher client,
Toutes nos félicitations pour l’acquisition de ce nouvel appareil. Veuillez lire
attentivement les instructions suivantes de branchement et d’utilisation an d’éviter
d’éventuels dommages. Le fabricant ne saurait être tenu pour responsable des
dommages dus au non-respect des consignes de sécurité et à la mauvaise utilisation de
l’appareil.
SOMMAIRE
Fiche technique12
Déclaration de conformité12
Aperçu de l’appareil13
Utilisation13
Conseils pour le recyclage14
FICHE TECHNIQUE
Numéro d’article 10032007
Alimentation (adaptateur secteur) 4 V / 550 mAh
DÉCLARATION DE CONFORMITÉ
Fabricant :
Chal-Tec GmbH, Wallstraße 16, 10179 Berlin, Allemagne.
Ce produit est conforme aux directives européennes
suivantes :
2014/30/UE (CEM)
2014/35/UE (LVD)
2011/65/UE (RoHS)
12
Page 13
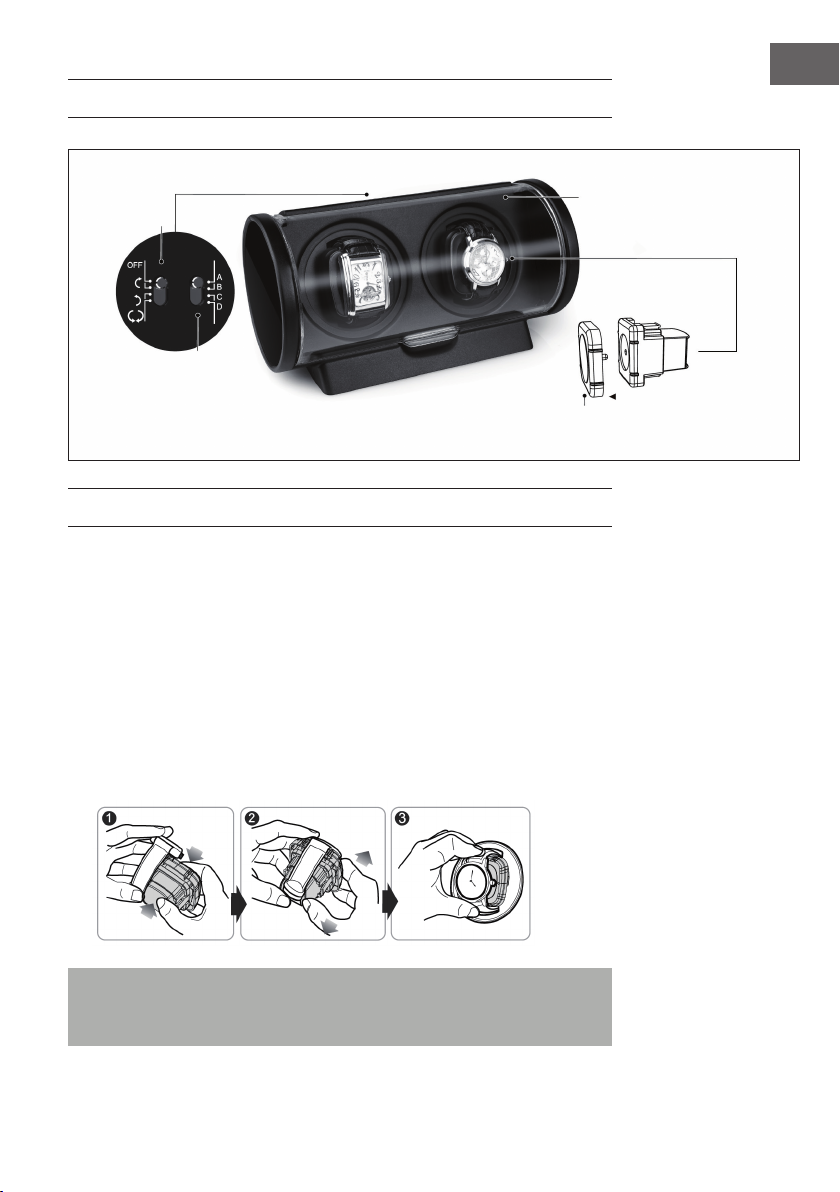
APERÇU DE L’APPAREIL
FR
Interrupteur
de marche/
arrêt
Sélecteur
de mode
Extension pour les
grandes montres
Cache
Coussins de montres
UTILISATION
1 Branchez le câble de l’adaptateur dans la prise de l’adaptateur sur l’appareil puis
branchez la che dans la prise.
2 Ouvrez le cache avant et utilisez vos index et vos pouces pour desserrer le coussin
de montre des deux côtés du coussin (voir èches d’indication). Extrayez le coussin
de montre.
3 Fixez la montre sur le coussin en tirant les ressorts au dos, en posant la montre sur le
coussin et en relâchant les ressorts.
4 Après avoir xé la montre sur le coussin, rexez le coussin lui-même sur le
présentoir pivotant. Enfoncez-le dedans jusqu’à ce qu’il s’enclenche et tienne bien
dans l’appareil.
5 Utilisez le sélecteur de mode de l’appareil pour choisir un des modes pivotants de
présentation.
Pour les montres de plus
grande taille, mettez
l’extension sur le coussin
de montre.
Remarque : allumez et éteignez l’appareil avec l’interrupteur de marche/arrêt.
Le sélecteur de mode vous permet de choisir les mouvements de présentation du
présentoir de montre.
13
Page 14
FR
Modes de rotation
• Mode A : 650 tours/jour. 5 minutes de rotation, puis 79 minutes de pause, et ainsi
de suite.
• Mode B : 900 tours/jour. 5 minutes de rotation, puis 56 minutes de pause, et ainsi
de suite.
• Mode C : 1200 tours/jour. 5 minutes de rotation, puis 41 minutes de pause, et ainsi
de suite.
• Mode D : 1500 tours/jour. 5 minutes de rotation, puis 32 minutes de pause, et
ainsi de suite.
Remarques importantes
• Eteignez l’appareil si vous ne l’utilisez pas pendant une période prolongée.
• Eteignez l’appareil avant de retirer le coussin de montre.
• Utilisez uniquement l’adaptateur secteur fourni.
• Débranchez l’adaptateur de la prise lorsque vous n’utilisez pas l’appareil.
• Ne déplacez pas l’appareil pendant qu’il fonctionne.
CONSEILS POUR LE RECYCLAGE
Le pictogramme ci-contre apposé sur le produit signie que
la directive européenne 2012/19/UE s‘applique (poubelle
à roues barrée d’une croix). Ces produits ne peuvent être
jetés dans les poubelles domestiques courantes. Renseignezvous concernant les règles appliquées pour la collecte
d’appareils électriques et électroniques. Conformez-vous
aux réglementations locales et ne jetez pas vos anciens
produits avec les ordures ménagères. Le respect des règles
de recyclage des vieux produits aide à la protection de
l’environnement et de la santé de votre entourage contre
les conséquences négatives possibles. Le recyclage des
matériaux aide à réduire l’utilisation des matières premières.
14
Page 15
Gentile cliente,
La ringraziamo per aver acquistato il nostro prodotto. La preghiamo di leggere
attentamente le seguenti istruzioni e di seguirle per evitare eventuali danni. Si declina
ogni responsabilità per danni derivati da una mancata osservazione delle avvertenze di
sicurezza e da un uso improprio del dispositivo.
INDICE
Dati tecnici15
Dichiarazione di conformità15
Descrizione del prodotto16
Utilizzo16
Smaltimento17
DATI TECNICI
Articolo numero 10032007
Alimentazione (adattatore di rete) 4 V / 550 mAh
DICHIARAZIONE DI CONFORMITÀ
IT
Produttore:
Chal-Tec GmbH, Wallstraße 16, 10179 Berlino, Germania.
Questo prodotto è conforme alle seguenti direttive
europee:
2014/30/UE (EMC)
2014/35/UE (LVD)
2011/65/UE (RoHS)
15
Page 16
IT
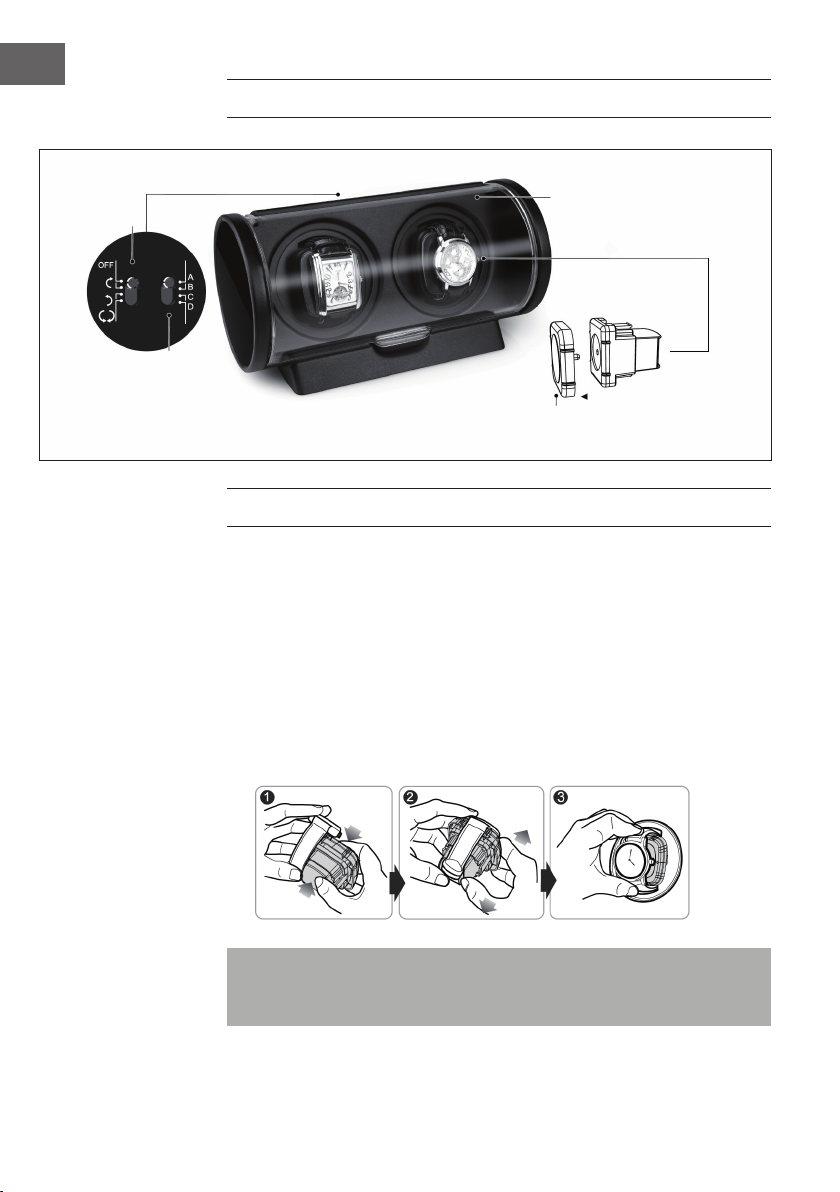
DESCRIZIONE DEL PRODOTTO
Interruttore
on/off
Interruttore
modalità
Coperchio
Cuscinetto
Per orologi grandi, inserire
Prolunga per
orologi grandi
la prolunga sul cuscinetto
UTILIZZO
1 Inserire il cavo dell´adattatore nell´attacco sul dispositivo e inserire la spina nella
presa.
2 Aprire il coperchio frontale. Afferrare con le dita entrambi i lati del cuscinetto ed
estrarlo (vedere la freccia).
3 Fissare l‘orologio sul cuscinetto premendo la molla sul retro, sistemare l‘orologio
intorno al cuscinetto e rilasciare la molla.
4 Dopo aver ssato l‘orologio sul cuscinetto, ssare di nuovo il cuscinetto nel
carica orologio. Premere il cuscinetto nché non scatta in posizione ed è ssato
correttamente nel carica orologio.
5 Utilizzare l´interruttore di modalità sul dispositivo per selezionare una delle
modalità di rotazione.
Nota: tramite l´interruttore on/off è possibile accendere e spegnere il dispositivo.
Con l´interruttore della modalità è possibile impostare le rotazioni del carica
orologio.
16
Page 17
Rotazioni
• Modalità A: 650 rotazioni/giorno. 5 minuti di rotazione, 79 minuti di pausa, il
ciclo si ripete.
• Modalità B: 900 rotazioni/giorno. 5 minuti di rotazione, 56 minuti di pausa, il
ciclo si ripete.
• Modalità C: 1200 rotazioni/giorno. 5 minuti di rotazione, 41 minuti di pausa, il
ciclo si ripete.
• Modalità D: 1500 rotazioni/giorno. 5 minuti di rotazione, 32 minuti di pausa, il
ciclo si ripete.
Note importanti
• Spegnere il dispositivo in caso di inutilizzo prolungato.
• Spegnere il dispositivo prima di rimuovere il cuscinetto.
• Utilizzare solo l‘adattatore incluso nella consegna.
• Rimuovere l‘adattatore dalla presa quando non il dispositivo non è in uso.
• Non spostare il dispositivo mentre è in funzione.
SMALTIMENTO
Se sul prodotto è presente la gura a sinistra (il cassonetto
dei riuti mobile sbarrato), si applica la direttiva europea
2012/19/UE. Questi prodotti non possono essere smaltiti con
i riuti normali. Informarsi sulle disposizioni vigenti in merito
alla raccolta separata di dispositivi elettrici ed elettronici.
Non smaltire i vecchi dispositivi con i riuti domestici. Grazie
al corretto smaltimento dei vecchi dispositivi, si proteggono
il pianeta e la salute delle persone da possibili conseguenze
negative. Il riciclo di materiali aiuta a ridurre il consumo di
materie prime.
IT
17
Page 18

Page 19

Page 20

 Loading...