

Page 1

Well Air Fry
Heißluftfritteuse
Hot Air Fryer
10031968 10031969
Page 2

Page 3

Sehr geehrter Kunde,
wir gratulieren Ihnen zum Erwerb Ihres Gerätes. Lesen Sie die folgenden Hinweise
sorgfältig durch und befolgen Sie diese, um möglichen Schäden vorzubeugen. Für
Schäden, die durch Missachtung der Hinweise und unsachgemäßen Gebrauch
entstehen, übernehmen wir keine Haftung.
INHALT
Technische Daten 3
Sicherheitshinweise 4
Geräteübersicht 6
Betrieb 7
Wartung 11
Fehlerbehebung 12
Hinweise zur Entsorgung 14
TECHNISCHE DATEN
DE
Artikelnummer 10031968 10031969
Stromversorgung 220 -240 V~ 50/60 Hz
3
Page 4

DE
SICHERHEITSHINWEISE
• Tauchen Sie das Gehäuse und die Heizelemente mit den elektronischen Teilen nicht
in Wasser und spülen Sie sie nicht unter einem Wasserhahn ab.
• Geben Sie das Frittiergut immer in den Korb, damit es nicht mit den Heizelemenen
in Kontakt kommt.
• Decken Sie die Lüftungsöffnungen nicht ab, während das Gerät in Betrieb ist.
• Füllen Sie den Topf nicht mit Öl, da dies eine Brandgefahr darstellt.
• Berühren Sie während der Benutzung das Gerät nicht in Innenbereich.
• Dieses Gerät ist nicht für die Verwendung durch Personen vorgesehen (Kinder
eingeschlossen), die verminderte körperliche, sensorische oder geistige Fähigkeiten
haben oder nicht über ausreichende Erfahrung und Kenntnisse verfügen; es sei
denn sie haben von einer Person, die für ihre Sicherheit verantwortlich ist, Anleitung
für den Gebrauch des Gerätes erhalten oder werden von dieser beaufsichtigt.
• Überprüfen Sie vor dem Anschluss des Geräts, ob die auf dem Gerät angegebene
Spannung mit der Spannung in Ihrem Haushalt übereinstimmt.
• Verwenden Sie das Gerät nicht, wenn der Netzstecker, das Netzkabel oder das
Gerät selbst beschädigt sind.
• Wenn der Netzstecker beschädigt ist, muss er von qualizierten Fachleuten
repariert werden, um Gefahren abzuwenden.
• Kinder dürfen nicht mit dem Gerät spielen.
• Die Reinigung und Wartung darf von Kindern nicht ohne Aufsicht durchgeführt
werden. Halten Sie das Gerät und das Kabel außerhalb der Reichweite von
Kindern, die jünger als 8 Jahre sind, wenn das Gerät ein- oder ausgeschaltet wird.
• Halten Sie das Netzkabel von heißen Oberächen fern.
• Schließen Sie den Netzstecker nicht mit nassen Händen an. Bedienen Sie das
Gerät ebenfalls nicht mit nassen Händen.
• Verbinden Sie das Gerät nur mit einer geerdeten Steckdose. Achten Sie stets
darauf, dass der Stecker richtig in die Steckdose gesteckt wird.
• Schließen Sie das Gerät niemals an einen externen Timer oder separates
Fernbedienungssystem an, um eine gefährliche Situation zu vermeiden.
• Stellen Sie das Gerät nicht auf oder in der Nähe von brennbaren Materialien wie
Tischdecke oder Vorhang.
• Stellen Sie das Gerät nicht an eine Wand oder gegen andere Geräte. Lassen Sie
mindestens 10cm freien Platz auf der Rückseite und den Seiten und 10cm freien
Raum über dem Gerät. Stellen Sie keine Gegenstände auf das Gerät.
• Verwenden Sie das Gerät nicht für andere Zwecke als in diesem Handbuch
beschrieben.
• Lassen Sie das Gerät nicht unbeaufsichtigt laufen.
• Beim Heißluftbraten wird Heißdampf durch die Luftaustrittsöffnungen freigegeben.
Halten Sie Ihre Hände und Gesicht in einem sicheren Abstand vom Dampf und von
den Luftaustrittsöffnungen. Achten Sie auch auf heißen Dampf und Luft, wenn Sie
die Pfanne aus dem Gerät entfernen.
• Die zugänglichen Flächen können während des Gebrauchs heiß werden.
• Nach dem Gebrauch des Gerätes ist die Metallabdeckung innen sehr heiß,
vermeiden Sie das heiße Metall nach dem Kochen zu berühren.
• Sofort den Netzstecker ziehen, wenn dunkler Rauch aus dem Gerät kommt.
4
Page 5

Warten Sie bis die Rauchentwicklung aufhört, bevor Sie die Pfanne aus dem Gerät
entfernen.
• Das Gerät auf eine waagerechte, ebene und stabile Fläche stellen.
• Dieses Gerät ist nur für den normalen Hausgebrauch bestimmt. Es ist nicht für den
Einsatz in Umgebungen wie Personalküchen von Geschäften, Büros, Bauernhöfen
oder anderen Arbeitsumgebungen gedacht. Es ist auch nicht beabsichtigt, von
Kunden in Hotels, Motels, Bed & Breakfasts und anderen Wohnumgebungen
genutzt zu werden.
• Ziehen Sie nach dem Gebrauch immer das Gerät aus der Steckdose.
• Lassen Sie das Gerät für etwa 30 Minuten abkühlen bevor Sie es anfassen oder
reinigen.
• Versichern Sie sich, dass die in diesem Gerät vorbereiteten Zutaten goldgelb statt
dunkel oder braun erscheinen. Entfernen Sie verbrannte Reste.
• Das Gerät hat einen Mikroschalter auf der Innenseite, d.h. wenn Sie die Pfanne
während des Kochens herausziehen, wird das Gerät automatisch abgeschaltet.
Überhitzungsschutz
• Das Gerät verfügt über einen Überhitzungsschutz. Wenn das
Innentemperaturregelsystem außer Kraft ist, wird der Überhitzungsschutz
automatisch eingeschaltet, das Gerät ist nicht mehr betriebsbereit.
• Netzstecker ziehen. Erst nachdem das Gerät vollständig abgekühlt ist, sollte die
• RESET-Taste an der Unterseite des Gerätes (neben dem Typenschild) betrieben
werden, um die Fritteuse wieder verwenden zu können.
• Bitte verwenden Sie dazu ein spitzes Objekt (siehe nachfolgende Abbildungen).
Automatische Abschaltung
• Dieses Gerät ist mit einem Timer ausgestattet. Wenn der Timer auf 0 gezählt hat,
erzeugt das Gerät einen Klingelton und schaltet sich automatisch ab. Um das Gerät
manuell auszuschalten, drehen Sie den Timer-Knopf gegen den Uhrzeigersinn auf
0.
• Hinweis: Wenn Sie während des Kochens die Pfanne herausziehen, wird das Gerät
auch automatisch ausgeschaltet. (Timer wird weiter zählen).
DE
Elektromagnetiches Feld (EMF)
• Dieses Gerät erfüllt alle Normen der elektromagnetischen Felder (EMF). Bei
ordnungsgemäßer Handhabung und gemäß den Anweisungen in dieser
Bedienungsanleitung kann das Gerät auf der Grundlage wissenschaftlicher
Erkenntnisse, gefahrlos benutzt werden.
5
Page 6
DE
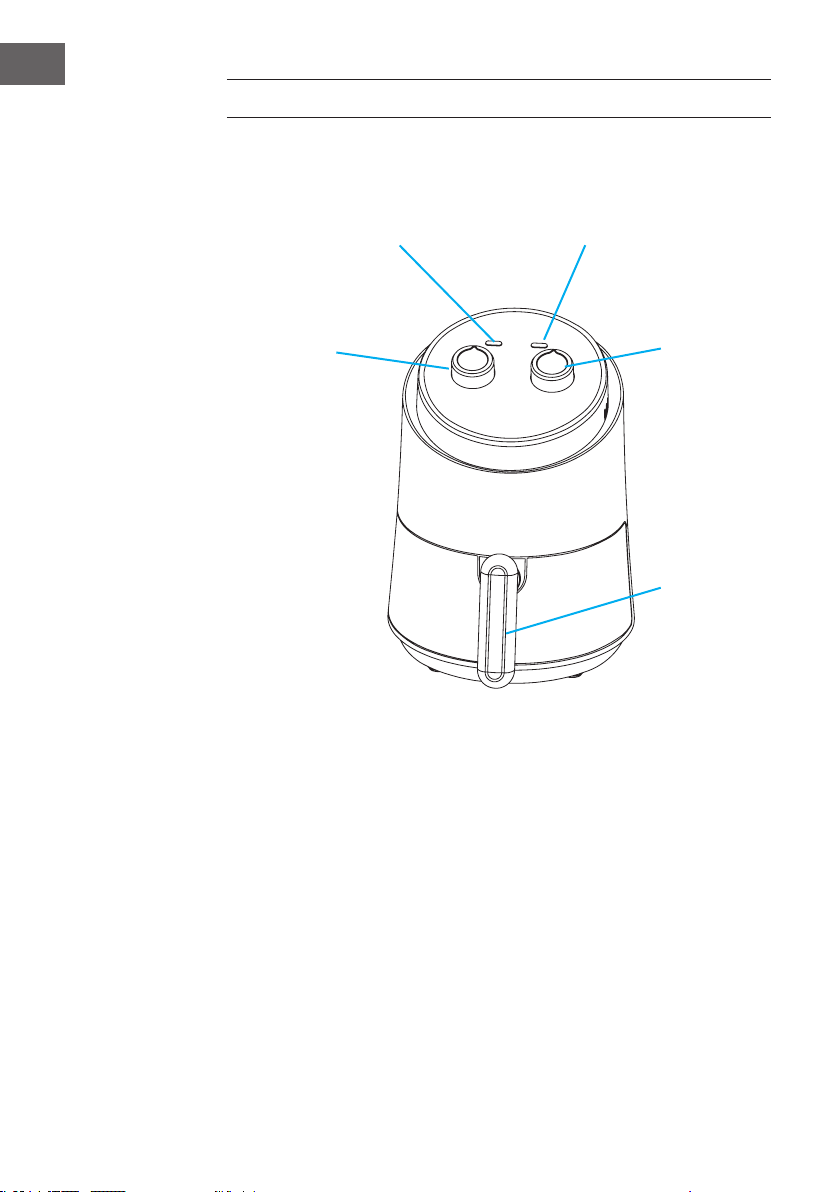
GERÄTEÜBERSICHT
Temperaturregler
Heizlampe
Ein/Aus-Lampe
Timer/
Leistungsstufenregler
Korb-Griff
6
Page 7

BETRIEB
Vor der ersten Benutzung
1. Entfernen Sie das Verpackungsmaterial.
2. Entfernen Sie vom Gerät Aufkleber und Schilder.
3. Reinigen Sie den Korb und den Topf vollständig mit heißem Wasser und etwas
Spülmittel und einem nicht scheuernden Schwamm.
4. Das Gerät innen und außen mit einem feuchten Tuch reinigen. Die Heißluftfritteuse
funktioniert mit heißer Luft. Füllen Sie kein Öl oder Bratfett in den Topf.
Vorbereitung
1. Stellen Sie das Gerät auf eine stabile, ebene Fläche. Benutzen Sie das Gerät nicht
auf Flächen, die nicht hitzebeständig sind.
2. Setzen Sie den Korb richtig in den Topf.
3. Setzen Sie den Topf in das Gerät ein.
Hinweis: Der Topf muss richtig in das Gerät eingesetzt werden, sonst funktioniert das
Gerät nicht.
4. Den Netzstecker in eine Steckdose einstecken.
Den Topf nicht mit Öl oder einer anderen Flüssigkeit füllen.
Keine Gegenstände auf das Gerät stellen.
Nichts in die Luftöffnungen auf den beiden Seiten des Geräts stecken. Das
Hindernis unterbricht sonst die Luftzirkulation und wirkt sich auf das Ergebnis des
Heißluftfrittierens aus.
DE
Verwendung des Geräts
Die Heißluftfritteuse kann viele verschiedene Zutaten zubereiten. Sehen Sie im Kapitel
Einstellungen
Heißluftfrittieren
1. Schließen Sie den Netzstecker an eine Steckdose an.
2. Nehmen Sie den Topf vorsichtig aus dem Gerät.
3. Geben Sie die Zutaten hinein.
Hinweis: Befüllen Sie den Korb nicht über die empfohlene Menge hinaus (siehe unter
Einstellungen
4. Schieben Sie den Topf wieder richtig in die Heißlufritteuse zurück.
Vorsicht: Den Topf während und kurze Zeit nach der Benutzung nicht berühren, da er
sehr heiß wird. Den Topf ausschließlich am Griff anfassen.
5. Drehen Sie den Temperaturregler auf die gewünschte Temperatur (für die richtigen
nach.
), da dies die Qualität des Ergebnisse beeinusst.
Verwenden Sie das Gerät nie ohne den Topf. Wenn der Topf sich nicht richtig
einsetzen lässt, funktioniert das Gerät nicht richtig.
Temperaturen siehe
Einstellungen
)
7
Page 8

DE
6. Legen Sie die benötigte Garzeit und die Zutaten fest, .
7. Um das Gerät einzuschalten, drehen Sie Zeitregler in die benötigte Stellung.
Zur Garzeit 3 Minuten hinzufügen, wenn das Gerät kalt ist.
Hinweis: Wenn Sie wollen, können Sie das Gerät ohne Zutaten vorheizen. In dem Fall,
drehen Sie den Zeitregler auf über 3 Minuten und warten, bis die Heizlampe ausgeht
(nach ca. 3 Minuten). Befüllen Sie dann den Korb und drehen die den Zeitregler in die
gewünschte Stellung.
a. Die Betriebslampe und die Heizlampe gehen an.
b. Der Timer zählt bis zur voreingestellten Zeit nach unten.
c. Während des Garvorgangs schaltet die Heizlampe sich immer wieder ein und aus,
was anzeigt, dass das Heizelement an und aus geht, um die eingestellte Temperatur
zu halten.
d. Auf dem Boden der Topfes sammelt sich überschüssiges Öl.
8. Einige Zutaten müssen zwischendurch geschüttelt werden. Zum Schütteln, den Topf
aus dem Gerät herausnehmen, und schütteln. Den Topf wieder einsetzen und mit
dem Frittieren fortfahren.
Vorsicht: Während des Schüttelns nicht den Knopf am Korb drücken.
Hinweis: Um das Gewicht zu verringern, können Sie den Korb aus dem Topf nehmen
und nur den Korb schütteln. Dazu den Topf aus dem Gerät nehmen, auf eine
hitzebeständige Fläche abstellen und dann den Knopf am Griff drücken.
Tipp: Wenn Sie den Timer auf die Hälfte der Zubereitungszeit stellen, hören Sie das
Timersignal, wenn Sie die Zutaten schütteln müssen. Dies bedeutet allerdings, dass Sie
den Timer erneut auf die verbleibende Garzeit einstellen müssen.
Tipp: Wenn Sie den Timer auf die volle Garzeit einstellen, gibt es kein Timersignal, das
vor dem Ende des Garvorgangs klingelt. Sie können den Topf jederzeit herausnehmen,
um den Zustand des Garguts zu überprüfen. Das Gerät schaltet sich automatisch ab und
nimmt den Betrieb wieder auf, wenn der Topf wieder in das Gerät eingesetzt wird. Der
Timer zählt aber immer weiter herunter.
9. Wenn der Timer klingelt, ist die Zubereitungszeit verstrichen. Nehmen Sie den Topf
aus dem Gerät und setzen ihn auf einen hitzebeständige Fläche.
Hinweis: Sie können das Gerät auch per Hand ausschalten. Dazu drehen Sie den
Temperaturregler auf 0 und ziehen den Topf danach direkt heraus.
10. Überprüfen Sie, ob das Gargut fertig ist. Sollten das Gargut noch nicht fertig
sein, einfach den Topf wieder in das Gerät schieben und den Timer auf einige
zusätzliche Minuten einstellen.
11 . Um die Zutaten herauszunehmen (z. B. Pommes frites), den Knopf am Korb drücken
und den Korb aus dem Topf nehmen.
Den Korb nicht zusammen mit dem Topf auf den Kopf stellen, da sonst
8
Page 9

überschüssiges Öl aus dem Topf auf die Zutaten tropft.
Nach dem Frittieren sind der Topf und die Zutaten heiß.
Je nach Art der Zutaten, kann Dampf aus dem Topf kommen. Nach dem Frittieren
sind der Topf und der innere Metalldeckel heiß. Nicht berühren!
12. Leeren Sie den Korb in eine Schüssel oder einen Teller.
Tipp: Um große oder zerbrechliche Zutaten herauszunehmen, benutzen Sie
Zangen.
13. Wenn eine Portion fertig ist, ist die Heißluftfritteuse für eine weitere Fuhre fertig.
Einstellungen
Die Tabelle weiter unten ist eine Hilfe für die wesentlichen Einstellungen.
Hinweis: Beachten Sie, dass diese Einstellungen Richtwerte sind. Zutaten unterscheiden
sich in Herkunft, Größe, Form und Erzeuger. Wir garantieren nicht die optimalen
Einstellungen für Ihr Gargut. Da die schnelle Heißlufttechnik die Luft im Inneren des
Geräts beständig aufheizt, unterbricht das kurzzeitige Herausziehen des Topfes
während des Heißluftbetriebs den Garvorgang.
Tipps
• Kleinere Zutaten benötigen gewöhnlich eine kürzere Garzeit als größere Zutaten.
• Eine größere Menge an Gargut benötigen eine etwas längere Garzeit als eine
kleinere Menge.
• Das Durchschütteln kleinerer Zutaten in der Zubereitungszeit optimieren das
Ergebnis und hilft, die ungleichmäßige Garung von Zutaten zu verhindern.
• Geben Sie etwas Öl hinzu, um ein knuspriges Ergebnis zu erzielen. Rösten Sie die
Zutaten in der Heißluftfritteuse, nachdem Sie Öl hinzugegeben haben.
• Bereiten Sie keine allzu fettigen Zutaten wie Würstchen in der Heißluftfritteuse zu.
• Snacks, die in einem Ofen zubereitet werden können, gelingen auch in der
Heißluftfritteuse.
• Die optimale Menge, um knusprige Pommes frites zuzubreiten ist 500 Gramm.
• Vorbereiteten Teig verwenden, um gefüllte Snacks schnell und einfach zuzubereiten.
• Eine Backform in den Topf geben, wenn Sie einen Kuchen backen oder Quiche,
zerbrechliche Teile oder gefüllte Stücke zubereiten.
• Die Heißluftfritteuse kann auch verwendet werden, um Speisen wieder
aufzuwärmen. Zum Aufwärmen die Temperatur auf 150 °C und 10 Minuten stellen.
DE
9
Page 10
DE
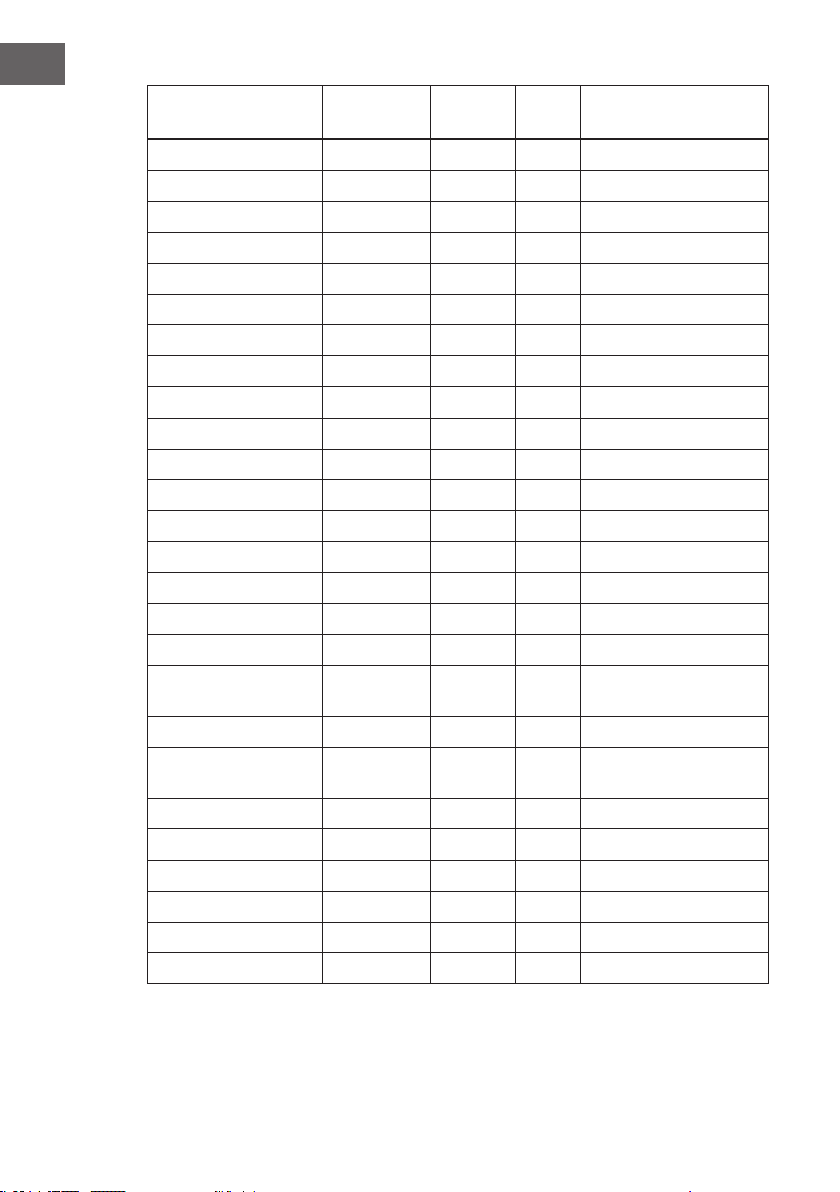
Gargut Min Max
(Gramm)
Kartoffeln&Frites
Dünne Tiefkühlfritten 300-700 9-16 200 schütteln
Dicke Tiefekühlfritten 300-700 11-20 200 schütteln
Selbstgem. Fritten 300-800 16-10 200 +
Kartoffelecken 300-800 18-22 18 0 +
Kartoffelwürfel 300-750 12-18 18 0 +
Rösti 250 15- 18 180 schütteln
Kartoffelgratin 500 15-18 200 schütteln
Fleisch & Geügel
Steak 100-500 8-12 180
Schweinekoteletts 100-500 10-14 18 0
Hamburger 100-500 7-14 180
Würstchen 100-500 13-15 200
Unterschenkel 100-500 18-22 18 0
Hähnchenbrust 100-500 10-15 18 0
Snacks
Frühlingrollen 100-400 8-10 200 schütteln
Hähnchenteile
(tiefgekühlt)
Fischstäbchen (tiefgek.) 100-400 6-10 200
Panierter Backkäse
(tiefgekühlt)
Gefülltes Gemüse 100-400 10 160
Backen
Kuchen 400 20-25 160
Quiche 300 20-22 18 0
Mufns 300 15 -18 200
Süße Snacks 400 20 160
100-500 6-10 200 schütteln
100-400 8-10 180
Zeit
(Min)
Temp
(°C)
Sonstige Infos
1/2
Teel. Öl; schütteln
1/2
Teel. Öl; shake
1/2
Teel. Öl; shake
10
Page 11

Selbstgemachte Pommes frites
Zum Herstellen selbstgemachter Pommes frites nachfolgende Schritte befolgen
1. Kartoffeln schälen und in Stifte schneiden.
2. Die Kartoffelstifte gründlich waschen und mit einem Küchentuch trocknen.
3. Einen halben Teelöffel Olivenöl und die Kartoffelstifte in eine Schüssel geben.
Mischen, bis die Kartoffelstifte mit Öl benetzt sind.
4. Die Stifte mit den Fingern oder Besteck aus der Schüssel nehmen, so dass das
überschüssige Öl in der Schüssel zurückbleibt. Die Stifte in den Korb legen.
Hinweis: Die Schüssel nicht kippen, um alle Fritten auf einmal in den Korb zu schütten,
damit kein überschüssiges Öl auf den Topfboden gelangt.
5. Die Kartoffelstifte nach der Anleitung in diesem Kapitel heißluftfrittieren.
WARTUNG
Reinigung
Reinigen Sie das Gerät nach jedem Gebrauch.
Berühren Sie zum Reinigen nicht das heiße Metall auf der Innenseite kurz nach dem
Frittieren.
Lassen Sie das Gerät vor der Reinigung abkühlen!
1. Topf und der Korb: Kein Küchenbesteck oder Scheuerschwämme verwenden, da
dies die Antihaftbeschichtung beschädigt.
Den Netzstecker aus der Wandsteckdose ziehen und das Gerät abkühlen lasen.
Hinweis: Den Topf herausnehmen, damit das Gerät sich schneller abkühlt.
2. Das Äußere mit einem feuchten Tuch trocknen.
3. Den Topf und den Korb mit heißem Wasser reinigen. Etwas Spülmittel verwenden.
DE
Sie können eine Fett lösende Flüssigkeit verwenden, um verbleibenden Schmutz zu
reinigen.
Tipp: Falls sich am Korb oder am Boden des Topfes Schmutz festgesetzt hat, den Topf mit
heißem Wasser und etwas Spülmittel füllen. Den Korb in den Topf geben und und den
Topf und den Korb ca. 10 Minuten einweichen lassen.
4. Das Geräteinnere mit heißem Wasser und einem nicht-scheuernden Schwamm
reinigen.
5. Das Heizelement mit einer Reinigungsbürste reinigen, um Lebensmittelreste zu
entfernen.
Lagerung
1. Den Netzstecker ziehen und das Gerät abkühlen lassen.
2. Achten Sie darauf, dass alle Teile sauber und trocken sind.
3. Bewahren Sie die Heißluftfritteuse an einem sauberen und trockenem Ort auf.
11
Page 12

DE
FEHLERBEHEBUNG
Problem Ursache Lösung
Das Gerät
funktioniert nicht.
Die Zutaten
sind nach der
Zubereitung
nicht gar.
Die Zutaten werden
ungleichmäßig
gegart.
Der Netzstecker ist
nicht eingesteckt.
Der Timer ist nicht
eingestellt.
Der Topf wurde
nicht korrekt in das
Gerät gesetzt.
Die Überhitzungsschutz
wurde ausgelöst.
Die Menge der Zutaten
im Korb ist zu groß.
Die eingestellte Temperatur
ist zu niedrig.
Die Garzeit ist zu kurz.
Bestimmte Zutaten müssen
während des Garvorgangs
geschüttelt werden.
Schließen Sie den Netzstecker
an eine Steckdose an.
Drehen Sie den Zeitregler
auf die benötigte Garzeit.
Setzen Sie den Topf richtig
in das Gerät ein.
Verwenden Sie einen scharfen
Gegenstand, mit den ResetKnopf auf der Unterseite
des Geräts zu betätigen.
Geben Sie kleinere Portionen
in den Korb. Kleinere Mengen
werden gleichmäßiger gegart.
Drehen Sie den
Temperaturregler in die
benötigte Temperatur..
Drehen Sie den
Temperaturregler in die
richtige Position.
Zutaten, die oben liegen
(z. B. Pommes frites) müssen
nach der Hälfte der Garzeit
geschüttelt werden.
Frittierte Snacks
sind nicht richtig
knusprig, wenn
sie aus der
Heißluftfritteuse
kommen.
Der Korb lässt sich
nicht richtig ins
Gerät schieben.
12
Sie haben Snacks
verwendet, die in einer
herkömmlichen Fritteuse
zubereitet werden müssen.
Im Korb benden sich
zu viele Zutaten.
Im Korb benden sich
zu viele Zutaten.
Der Korb wurde
nicht richtig in den
Topf eingesetzt.
Verwenden Sie OfenSnacks oder bestreichen
Sie die Snacks mit etwas
Öl, um ein knusprigeres
Ergebnis zu bekommen.
Überfüllen Sie den Korb nicht.
Schieben Sie den Korb in
den Topf hinein, bis Sie
ein Klicken vernehmen.
Page 13

Problem Ursache Lösung
Wenn Sie fettreiche Zutaten
zubereiten, gelangt eine große
Menge Öl in den Topf. Das
Öl verursacht weißen Rauch
und der Topf kann heißer
werden als gewöhnlich. Dies
beeinträchtigt nicht das Gerät
oder das Frittierergebnis.
Der weiße Rauch wird durch
sich erhitzendes Fett im
Topf verursacht. Reinigen
Sie den Topf nach jedem
Gebrauch sorgfältig.
Verwenden Sie frische
Kartoffeln und achten Sie
darauf, dass sie während
des Frittierens ihre feste
Konsistenz beibehalten.
Die Kartoffelstifte richtig spülen,
um die Stärke zu entfernen.
Achten Sie darauf, die
Kartoffelstifte richtig zu trocken,
bevor Sie Öl hinzufügen.
Schneiden Sie die Kartoffelstife
kleiner, um ein knusprigeres
Ergebnis zu erzielen.
Fügen Sie etwas Öl hinzu,
damit es knuspriger wird.
Weißer Rauch tritt
aus dem Gerät.
Frische Pommes
werden
ungleichmäßig
braun.
Frische Pommes
frites werden
nicht knusprig.
Das Gargut ist fettig.
Der Topf enthält immer
noch Fettrückstände von
der vorherigen Benutzung.
Sie verwenden nicht die
richtige Kartoffelsorte.
Sie haben die
Kartoffelstifte vor
dem Frittieren nicht
richtig abgespült.
Die Knusprigkeit der
Pommes frites hängt
von der Menge Öl
und dem Wassergehält
der Kartoffeln ab.
DE
13
Page 14

DE
Rost
Topf
HINWEISE ZUR ENTSORGUNG
Bendet sich die linke Abbildung (durchgestrichene Mülltonne auf
Rädern) auf dem Produkt, gilt die Europäische Richtlinie 2012/19/EU.
Diese Produkte dürfen nicht mit dem normalen Hausmüll entsorgt
werden. Informieren Sie sich über die örtlichen Regelungen zur
getrennten Sammlung elektrischer und elektronischer Gerätschaften.
Richten Sie sich nach den örtlichen Regelungen und entsorgen
Sie Altgeräte nicht über den Hausmüll. Durch die regelkonforme
Entsorgung der Altgeräte werden Umwelt und die Gesundheit Ihrer
Mitmenschen vor möglichen negativen Konsequenzen geschützt.
Materialrecycling hilft, den Verbrauch von Rohstoffen zu verringern.
Konformitätserklärung
Hersteller: Chal-Tec GmbH, Wallstraße 16, 10179 Berlin, Deutschland
Dieses Produkt entspricht den folgenden Europäischen Richtlinien:
2011/65/EU (RoHS)
2014/30/EU (EMV)
2014/35/EU (LVD)
14
Page 15

Dear Customer,
Congratulations on purchasing this equipment. Please read this manual carefully and
take care of the following hints on installation and use to avoid technical damages.
Any failure caused by ignoring the items and cautions mentioned in the operation and
installation instructions are not covered by our warranty and any liability.
CONTENTS
Technical Data 15
Product Overview 18
Operation 19
Maintenance 23
Troubleshooting 24
Disposal Considerations 26
TECHNICAL DATA
Item number 10031968 10031969
Power supply 220 -240 V~ 50/60 Hz
EN
15
Page 16

EN
• Never immerse the housing, which contains electrical components and the heating
elements, in water nor rinse under the tap.
• Do not let any water or other liquid enter the appliance to prevent electric shock.
• lways put the ingredients to be fried in the basket, to prevent it from coming into
contact with the heating elements.
• Do not cover the air inlet and the air outlet openings while the appliance is
operating.
• Do not ll the pan with oil as this may cause a re hazard.
• Never touch the inside of the appliance while it is operating.
• This appliance is not intended for use by persons (including children younger 8)
with reduced physical, sensory or mental capabilities, or lack of experience and
knowledge, unless they have been given supervision or instruction concerning the
use of appliance by a person responsible for their safety.
• Check if the voltage indicated on the appliance corresponds to the local mains
voltage before you connect the appliance.
• Do not use the appliance if the plug, the mains cord or the appliance itself is
damaged.
• If the mains cord is damaged, you must have it replaced by the manufacturer, its
service agent or similarly qualied persons in order to avoid a hazard.
• Children should be supervised to ensure that they do not play with the appliance.
Cleaning and user maintenance shall not be made by children unless they are older
than 8 and supervised.
• Keep the appliance and its mains cord out of the reach of children younger than 8
when the appliance is switched on or is cooling down.
• Keep the mains cord away from hot surfaces.
• Do not plug in the appliance or operate the control panel with wet hands.
• Only connect the appliance to an earthed wall socket. Always make sure that the
plug is inserted into the wall socket properly.
• Never connect this appliance to an external timer switch or separate remote-control
system in order to avoid a hazardous situation.
• Do not place the appliance on or near combustible materials such as a tablecloth
or curtain.
• Do not place the appliance against a wall or against other appliances. Leave
at least 10cm free space on the back and sides and 10cm free space above the
appliance. Do not place anything on top of the appliance.
• Do not use the appliance for any other purpose than described in this manual.
• Do not let the appliance operate unattended.
• During hot air frying, hot steam is released through the air outlet openings. Keep
your hands and face at a safe distance from the steam and from the air outlet
openings. Also be careful of hot steam and air when you remove the pan from the
appliance.
• The accessible surfaces may become hot during use.
• After using the appliance, the metal cover inside is very hot, avoid to contact the hot
metal inside after cooking.
• Immediately unplug the appliance if you see dark smoke coming out of the
appliance. Wait for the smoke emission to stop before you remove the pan from the
appliance.
• Place the appliance on a horizontal, even and stable surface.
16
Page 17

• This appliance is intended for normal household use only. It is not intended for
use in environments such as staff kitchens of shops, ofces, farms or other work
environments. Nor is it intended to be used by clients in hotels, motels, bed and
breakfasts and other residential environments.
• If the appliance is used improperly or for professional or semi-professional
purposes or if it is not used according to the instructions in the user manual, the
guarantee becomes invalid and we could refuse any liability for damage caused.
• Always unplug the appliance after use.
• Let the appliance cool down for approx. 30 minutes before you handle or clean it.
• Make sure the ingredients prepared in this appliance come out golden-yellow
instead of dark or brown. Remove burnt remnants.
• The appliance with the micro switch inside, when pull out the pan during cooking,
the appliance will be shut-off power automatically.
Overheating Protection
• The appliance with overheating protection system, if the inner temperature control
system invalid, the overheating protection is automatically turned on, the appliance
is no longer ready to be used.
• Unplug the mains cord. Only after the appliance has been left to cool down
completely should the RESET button at the bottom of the machine (beside the rating
label) be operated in order to use the air fryer again.
• Please use a pointed object for this purpose (refer to the gures hereinafter).
Automatic switch-off
• This appliance is equipped with a timer. When the timer has counted down to 0, the
appliance produces a bell sound and switches off automatically. To switch off the
appliance manually, turn the timer knob counterclockwise to 0.
• Note: If pull out the pan during cooking, the appliance will be switched off
automatically, too. (Timer still in counting down).
EN
Electromagnetic elds (EMF)
• This appliance complies with all standards regarding electromagnetic elds (EMF).
If handled properly and according to the instructions in this user manual, the
appliance is safe to use based on scientic evidence available today.
17
Page 18

EN
PRODUCT OVERVIEW
Temperature
control knob
Heat up light
Power on light
Timer/
Power knob
Basket handle
18
Page 19

OPERATION
Before rst use
1. Remove all packaging material.
2. Remove any stickers or labels from the appliance.
3. Thoroughly clean the basket and pan with hot water, some washing-up liquid and a
non-abrasive sponge.
4. Wipe the inside and outside of the appliance with a moist cloth. This is an air fryer
that works on hot air. Do not ll the pan with oil or frying fat
Preparing for use
1. Place the appliance on a stable, horizontal and level surface. Do not place the
appliance on non-heat-resistant surfaces.
2. Place the basket in the pan properly.
3. Put the pan into the machine.
Note: the pan MUST be put into the appliance properly, otherwise the appliance does
not work!
4. Pull the mains cord and plug into the earthed wall socket.
Do not ll the pan with oil or any other liquid.
Do not put anything on top of the appliance.
Do not put anything on the air-inlet on the two sides of the appliance, this disrupts
the airow and affects the hot air frying result.
Using the appliance
The air fryer can prepare a large range of ingredients. Pls refer to the section “settings”
table herein after and the using guidance gures at last page.
EN
Hot air frying
1. Put the mains plug into an earthed wall socket.
2. Carefully pull the pan out of the air fryer.
3. Put the ingredients in the basket.
Note: Never ll the basket in full or exceed the recommended amount (see section
‘Settings’ in this chapter), as this could affect the quality of the end result.
4. Slide the pan back into the air fryer properly.
Never use the pan without the basket in It. If the pan cannot be xed into the air
fryer properly, the appliance will not work.
Caution: Do not touch the pan during and some time after use, as it gets very hot. Only
hold the pan by the handle.
5. Turn the temperature control knob to the required temperature. See section’ Settings’
in this chapter to determine the right temperature.
6. Determine the required preparation time for the ingredient (see section ‘Settings’ in
19
Page 20

EN
this chapter).
7. To switch on the appliance, turn the timer knob to the required preparation time.
Add 3 minutes to the preparation time when the appliance is cold.
Note: If you want, you can also let the appliance preheat without any ingredients inside.
In that case, tum the timer knob to more than 3 minutes and wait until the heating-up
light goes out (after approx. 3 minutes). Then ll the basket and turn the timer knob to the
required preparation time.
a. The power-on light and the heating-up light go on.
b. The timer starts counting down the set preparation time.
c. During the hot air frying process, the heating-up light comes on and goes out
from time to time. This indicates that the heating element is switched on and off to
maintain the set temperature.
d. Excess oil from the ingredients is collected on the bottom of the pan.
8. Some ingredients require shaking half. Nay through the preparation time (see
section 'Settings' in this chapter). To shake the ingredients, pull the pan out of the
appliance by the handle and shake it. Then slide the pan back into the air fryer and
continue to cook.
Caution: Do not press the button of the handle during shaking.
Tip: To reduce the weight, you can remove the basket from the pan and shake the basket
only. To do so, pull the pan out of the appliance, place it on a heat-resistant surface and
press the button of the handle.
20
Tip: If you set the timer to half the preparation time, you hear the timer bell when you
have to shake the ingredients. However, this means that you have to set the timer again
to the remaining preparation time after shaking.
Tip: If you set the timer to full preparation time, there is no timer bell during cooking
before nishing, you can pull out. the pan at any time to check the ingredients cooking
condition, the power will shut down automatically and resume after slide the pan back
into the appliance(timer always counts down in this situation).
9. When you hear the timer bell, the set preparation time has elapsed. Pull the pan out
of the appliance and place it on a heat-resistant surface.
Note: You can also switch off the appliance manually. To do this, turn the temperature
control knob to 0, or pull out the pan directly.
10. Check if the ingredients are ready. If the ingredients are not ready yet, simply slide
the pan back into the appliance and set the timer to a few extra minutes.
11 . To remove small ingredients (e.g. fries), press the basket release button and lift the
basket out of the pan.
Do not turn the basket upside down with the pan still attached to it, as any excess
oil that has collected on the bottom of the pan will leak onto the ingredients.
Page 21

After hot air frying, the pan and the Ingredients are hot. Depending on the type of
the ingredients in the air fryer, steam may escape from the pan.
After hot air frying, the pan and the inside metal cover are hot, avoid to touch is
needed.
12. Empty the basket into a bowl or onto a plate.
Tip: To remove large or fragile ingredients, use a pair of tongs to lift the ingredients
out of the basket
13. When a batch of ingredients is ready, the air fryer is instantly ready for preparing
another batch.
Settings
This table below helps you to select the basic settings for the ingredients you want to
prepare.
Note: Keep in mind that these settings are indications. As ingredients differ in origin,
size, shape as well as brand, we cannot guarantee the best setting for your ingredients.
Because the rapid hot air technology instantly reheats the air inside the appliance,
pulling the pan briey out of the appliance during hot air frying barely disturbs the
process.
Tips
• Smaller ingredients usually require a slightly shorter preparation time than larger
ingredients.
• A larger amount of ingredients only requires a slightly longer preparation time, a
smaller amount of ingredients only requires a slightly shorter preparation time.
• Shaking smaller ingredients halfway through the preparation time optimizes the end
result and can help prevent unevenly fried ingredients.
• Add some oil to fresh potatoes for a crispy result. Fry your ingredients in the air fryer
within a few minutes after you added the oil.
• Do not prepare extremely greasy ingredients such as sausages in the air fryer.
• Snacks that can be prepared in a oven can a/so be prepared in the air fryer.
• The optimal amount for preparing crispy fries is 500 grams.
• Use pre-made dough to prepare lled snacks quickly and easily. Pre-made dough
also requires a shorter preparation time than home-made dough.
• Place a baking tin or oven dish in the airfryer basket if you want to bake a cake or
quiche or if you want to fry fragile ingredients or lled ingredients.
• You can also use the air fryer to reheat ingredients. To reheat ingredients, set the
temperature to 150 °C for up to 10 minutes.
EN
21
Page 22

EN
Food Min-max
amount
Potatos & fries
Thin frozen fries 300-700 9-16 200 shake
Thick frozen fries 300-700 11-20 200 shake
Home-made fries 300-800 16-10 200 Add 1 /2 tbsp of oil; shake
Home-made potato
wedges
Home-made potato
cubes
Rosti 250 15 -18 18 0 shake
Potato gratin 500 15 -18 200 shake
Meat & Poultry
Steak 100-500 8-12 180
Pork chops 100-500 10-14 18 0
Hamburger 100-500 7-14 180
Sausage roll 100-500 13-15 200
Drumsticks 100-500 18-22 180
Chicken breast 100-500 10-15 18 0
Snacks
Spring rolls 100-400 8-10 200 shake
Frozen chicken
nuggets
Frozen sh ngers 100-400 6-10 200
Frozen
breadcrumbed
cheese snacks
Stuffed vegetables 100-400 10 160
Baking
Cake 400 20-25 160
Quiche 300 20-22 180
Mufns 300 15 -18 200
Sweet snacks 400 20 160
300-800 18-22 18 0 Add 112 tbsp of oil; shake
300-750 12-18 18 0 Add 112 tbsp of oil; shake
100-500 6-10 200 shake
100-400 8-10 180
Time
(min)
° C Extra information
22
Page 23

Making home-made fries
To make home-made fries, follow the steps below.
1. Peel the potatoes and cut them into sticks.
2. Wash the potato sticks thoroughly and dry them with kitchen paper.
3. Pour 1/2 tablespoon of olive oil in a bowl, put the sticks on top and mix until the
sticks are coated with oil.
4. Remove the sticks from the bowl with your ngers or a kitchen utensil so that excess
oil stays behind in the bowl. Put the sticks in the basket.
Note: Do not tilt the bowl to put all the sticks in the basket in one go, to prevent excess
oil from ending up on the bottom of the pan.
5. Fry the potato sticks according to the instructions in this chapter.
MAINTENANCE
Cleaning
Clean the appliance after every use.
Don't touch the hot metal inside before cleaning while just after frying.
Cool down the appliance is needed before cleaning!
1. The pan and the basket, do not use metal kitchen utensils or abrasive cleaning
materials to clean them, as this may damage the non-stick coating.
Remove the mains plug from the wall socket and let the appliance cool down.
Note: Remove the pan to let the air fryer cool down more quickly.
2. Wipe the outside of the appliance with a moist cloth.
3. Clean the pan and the basket with hot water, some washing-up liquid and a nonabrasive sponge.
EN
You can use a degreasing liquid to remove any remaining dirt.
Tip: If dirt is stuck to the basket or the bottom of the pan, ll the pan with hot water with
some washing-up liquid. Put the basket in the pan and let the pan and the basket soak
far approximately 10 minutes.
4. Clean the inside of the appliance with hot water and non-abrasive sponge.
5. Clean the heating element with a cleaning brush to remove any food residues.
Storage
1. Unplug the appliance and let it cool down.
2. Make sure all parts are clean and dry.
3. Put the air fryer on the clean and dry place.
23
Page 24

EN
TROUBLESHOOTING
Problem Possible Cause Solution
The air fryer does
not work.
The ingredients
fried with the air
fryer are not done.
The ingredients are
fried unevenly in
the air fryer.
Fried snacks are
not crispy when
they come out of
the air fryer.
I cannot slide the
pan into the
appliance property.
The appliance is
not plugged in.
You have not set the timer.
The pan is not put into
the appliance properly.
The overheating
protection is turned on.
The amount of ingredients
in the basket is too big.
The set temperature is
too low.
The preparation
time is too short.
Certain types of
ingredients need to be
shaken halfway through
the preparation time.
You used a type of snacks
meant to be prepared in
a traditional deep fryer.
There are too much
ingredients in the basket.
Put the mains plug in an
earthed wall socket.
Turn the timer knob to the
required preparation time to
switch on the appliance.
Slide the pan into the
appliance properly.
Use a pointed object to
press the RESET button at the
bottom of the appliance.
Put smaller batches of
ingredients in the basket.
Smaller batches are
fried more evenly.
Turn the temperature
control knob to the required
temperature setting (see
section 'settings' in chapter
'Using the appliance').
Turn the timer knob to the
required preparation time
(see section 'Settings' in
chapter' Using the
appliance').
Ingredients that lie on top of or
across each other (e.g. fries)
need to be shaken halfway
through the preparation
time. See section 'Settings' in
chapter 'Using the appliance'.
Use oven snacks or lightly
brush some oil onto the
snacks for a crispier result.
24
Page 25

Problem Possible Cause Solution
I cannot slide the
pan into the
appliance property.
White smoke
comes out of the
appliance.
Fresh fries are fried
unevenly in the air
fryer.
Fresh fries are not
crispy when they
come out of the air
fryer.
There are too much
ingredients in the
basket.
The basket is not placed
in the pan correctly.
You are preparing
greasy ingredients.
The pan still contains
grease residues from
previous use.
You did not use the
right potato type.
You did not rinse the
potato sticks properly
before you fried them.
The crispiness of the fries
depends on the amount of
oil and water in the fries.
Do not ll the basket
beyond in full, refer to the
"Setting" table above.
Push the basket down into the
pan until you hear a click.
When you fry greasy
ingredients in the air fryer,
a large amount of oil will
leak into the pan. The oil
produces white smoke and the
pan may heat up more than
usual. This does not affect the
appliance or the end result.
White smoke is caused by
grease heating up in the pan.
Make sure you clean the pan
property after each use.
Use fresh potatoes and
make sure they stay
rm during frying.
Rinse the potato sticks
properly to remove starch
from the outside of the sticks.
Make sure you dry the potato
sticks properly before you
add the oil. Cut the potato
sticks smaller for a crispier
result. Add slightly more
oil for a crispier result.
EN
25
Page 26

EN
DISPOSAL CONSIDERATIONS
According to the European waste regulation 2012/19/EU this
symbol on the product or on its packaging indicates that this product
may not be treated as household waste. Instead it should be taken
to the appropriate collection point for the recycling of electrical
and electronic equipment. By ensuring this product is disposed of
correctly, you will help prevent potential negative consequences for
the environment and human health, which could otherwise be caused
by inappropriate waste handling of this product. For more detailed
information about recycling of this product, please contact your local
council or your household waste disposal service.
26
Declaration of Conformity
Producer: Chal-Tec GmbH, Wallstraße 16, 10179 Berlin, Germany
This product is conform to the following European Directives:
2011/65/EU (RoHS)
2014/30/EU (EMC)
2014/35/EU (LVD)
Page 27

Chère cliente, cher client,
Toutes nos félicitations pour l’acquisition de ce nouvel appareil. Veuillez lire
attentivement les instructions suivantes de branchement et d’utilisation an d’éviter
d’éventuels dommages. Le fabricant ne saurait être tenu pour responsable des
dommages dus au non-respect des consignes de sécurité et à la mauvaise utilisation de
l’appareil.
SOMMAIRE
Fiche technique 27
Consignes de sécurité 28
Product Overview 30
Fonctionnement 31
Maintenance 35
Résolution des problèmes 36
Conseils pour le recyclage 38
FICHE TECHNIQUE
Numéro d'aticle 10031968 10031969
Alimentation 220 -240 V~ 50/60 Hz
FR
27
Page 28

FR
CONSIGNES DE SÉCURITÉ
• Ne plongez pas le corps de l’appareil ou les éléments chauffants contenant les
composants électroniques dans l’eau et ne les rincez pas sous un robinet.
• Placez toujours les aliments dans le panier an qu’ils n’entrent pas en contact avec
les éléments chauffants.
• Ne couvrez pas les ouvertures de ventilation lorsque l’appareil est en marche.
• Ne remplissez pas le récipient avec de l’huile, car cela pourrait provoquer un
risque d’incendie.
• Ne touchez pas l’intérieur de l’appareil pendant son utilisation.
• Cet appareil n’est pas destiné à être utilisé par des personnes (y compris des
enfants) qui ont des capacités physiques, sensorielles ou mentales réduites ou qui
n’ont pas sufsamment d’expérience et de connaissances, à moins d’être instruit ou
supervisé par une personne responsable de leur sécurité.
• Avant de connecter l’appareil, vériez que la tension indiquée sur l’appareil
correspond à celle de votre domicile.
• N’utilisez pas l’appareil si la che d’alimentation, le câble d’alimentation ou
l’appareil lui-même sont endommagés.
• Si la che d’alimentation est endommagée, elle doit être réparée par un personnel
qualié pour éviter tout danger.
• Les enfants ne doivent pas jouer avec l’appareil.
• Le nettoyage et l’entretien ne doivent pas être effectués par des enfants sans
surveillance. Gardez l’appareil et le câble hors de portée des enfants de moins de
8 ans lorsque l’appareil est allumé ou éteint.
• Tenez le câble d’alimentation à l’écart des surfaces chaudes.
• Ne branchez pas la che avec les mains mouillées. De même, n’utilisez pas
l’appareil avec les mains mouillées.
• Branchez l’appareil uniquement sur une prise de courant mise à la terre. Assurez-
vous toujours que la che est correctement insérée dans la prise.
• Ne connectez jamais l’appareil à une minuterie externe ou à un système de
télécommande séparé pour éviter une situation dangereuse.
• Ne placez pas l’appareil sur ou près de matériaux inammables tels qu’une nappe
ou un rideau.
• Ne placez pas l’appareil contre un mur ou d’autres équipements. Laissez au moins
10 cm d’espace libre à l’arrière et sur les côtés et 10 cm d’espace libre au-dessus.
Ne posez aucun objet sur l’appareil.
• N’utilisez pas l’appareil à d’autres ns que celles décrites dans ce manuel.
• Ne laissez pas l’appareil sans surveillance.
• La cuisson à l’air chaud libère de la vapeur chaude à travers les ouvertures de
sortie d’air. Gardez vos mains et votre visage à une distance de sécurité des
ouvertures de vapeur et d’air. Faites également attention à la vapeur chaude et à
l’air lorsque vous retirez la cuve de l’appareil.
• Les surfaces accessibles peuvent devenir chaudes pendant l’utilisation.
• Après utilisation de l’appareil, le couvercle métallique à l’intérieur est très chaud,
évitez de toucher le métal chaud après la cuisson.
• Débranchez immédiatement l’appareil si de la fumée noire en sort.
•
28
Page 29

• Attendez que la fumée s’arrête avant de retirer la cuve de l’appareil.
• Placez l’appareil sur une surface plane, horizontale et stable.
• Cet appareil est destiné à un usage domestique normal seulement. Il n’est pas
destiné à être utilisé dans des environnements tels que les cuisines du personnel
dans les magasins, les bureaux, les fermes ou d’autres environnements de travail.
Il n’est pas non plus destiné à être utilisé par les clients dans les hôtels, motels,
chambres d’hôtes et autres lieux de vie.
• Débranchez toujours l’appareil après utilisation.
• Laissez l’appareil refroidir pendant environ 30 minutes avant de le manipuler ou de
le nettoyer.
• Assurez-vous que les ingrédients préparés dans cet appareil soient de couleur
jaune doré après cuisson et non foncés ou bruns. Enlevez les résidus de brûlé.
• L’appareil possède un microcontact à l’intérieur, ainsi, si vous sortez la cuve
pendant la cuisson, l’appareil s’éteint automatiquement.
Protection anti-surchauffe
• L’appareil possède une protection contre la surchauffe. Si le système de contrôle de
la température intérieure est désactivé, la protection contre la surchauffe s’allumera
automatiquement et l’appareil ne sera pas utilisable.
• Débranchez l’appareil du secteur. Après le refroidissement complet de l’appareil,
utilisez le bouton RESET situé sur la face inférieure de l’appareil (à côté de la
plaque signalétique) an de pouvoir réutiliser la friteuse.
• Veuillez utiliser un objet pointu (voir les images suivantes)).
Arrêt automatique
• Cet appareil est équipé d’une minuterie. Lorsque la minuterie revient à 0, l’appareil
sonne et s’éteint automatiquement. Pour éteindre l’appareil manuellement, tournez
le bouton de la minuterie dans le sens inverse des aiguilles d’une montre pour le
remettre à 0.
• Remarque : Si vous retirez la cuve pendant la cuisson, l’appareil s’éteindra aussi
automatiquement. (La minuterie continuera à compter).
FR
Champ électromagnétique (EMF)
• Cet appareil est conforme à toutes les normes relatives aux champs
électromagnétiques (EMF). S’il est manipulé correctement et conformément aux
instructions de ce manuel, l’appareil peut être utilisé en toute sécurité sur la base de
connaissances scientiques.
29
Page 30

FR
PRODUCT OVERVIEW
Réglage de la
température
Heat up light
Témoin de chauffage
Témoin de
marche/arrêt
Poignée du
panier
30
Page 31

FONCTIONNEMENT
Avant la première utilisation
1. Retirez le matériau d’emballage.
2. Retirez les étiquettes et les signes de l’appareil.
3. Nettoyez complètement le panier et la cuve avec de l’eau chaude et un peu de
détergent et une éponge non abrasive.
4. Nettoyez l’appareil à l’intérieur et à l’extérieur avec un chiffon humide. La friteuse
à air chaud fonctionne avec de l’air chaud. Ne versez pas d’huile ou de graisse à
frire dans la cuve.
Préparation
1. Placez l’appareil sur une surface plane et stable. N’utilisez pas l’appareil sur des
surfaces qui ne sont pas résistantes à la chaleur.
2. Mettez le panier correctement dans la cuve.
3. Insérer la cuve dans l’appareil.
Remarque : la cuve doit être correctement installée dans l’appareil pour que celui-ci
puisse fonctionner normalement.
4. Branchez la che dans une prise. Ne remplissez pas le pot avec de l’huile ou
un autre liquide. Ne placez aucun objet sur l’appareil. Ne mettez rien dans les
bouches d’aération des deux côtés de l’appareil pour ne pas les obstruer. L’obstacle
interromprait la circulation d’air et affecterait le résultat de la friture à air chaud.
Utilisation de l’appareil
La friteuse chaude peut préparer de nombreux ingrédients différents. Veuillez vous
référer à la section Paramètres.
FR
Friture à l’air chaud
1. Branchez la che dans une prise.
2. Retirez la cuve de la friteuse avec précaution.
3. Placez-y les ingrédients..
Remarque : Ne remplissez pas le panier au-delà de la quantité recommandée (voir
Paramètres) car cela affecterait la qualité des résultats.
4. Remettez la cuve dans la friteuse à air chaud correctement. N’utilisez jamais
l’appareil sans la cuve. Si la cuve ne s’adapte pas correctement, l’appareil ne
fonctionnera pas correctement.
Attention : Ne touchez pas la cuve pendant et peu après l’utilisation car elle devient très
chaude. Prenez-la seulement par la poignée.
5. Tournez le bouton de contrôle pour régler la température désirée (voir les réglages
pour les températures correctes).
6. Déterminez le temps de cuisson et les ingrédients requis.
7. Pour allumer l’appareil, tournez la minuterie sur la position requise.
31
Page 32

FR
Ajoutez 3 minutes au temps de cuisson lorsque l’appareil est froid.
Remarque : Si vous le souhaitez, vous pouvez préchauffer l’appareil sans aucun
ingrédient. Dans ce cas, réglez la minuterie sur plus de 3 minutes et attendez que le
témoin de chauffe s’éteigne (au bout de 3 minutes environ). Puis remplissez le panier et
réglez la minuterie.
a. Le témoin de marche et le témoin de chauffage s'allument.
b. La minuterie compte à rebours la durée prédénie.
c. Pendant la cuisson, le témoin de chauffe s’allume et s’éteint à plusieurs reprises,
indiquant que l’élément chauffant est allumé et éteint pour maintenir la température
réglée.
d. L’excès d’huile s’accumule au fond de la cuve.
8. Certains ingrédients doivent être secoués de temps en temps. Pour secouer, retirer le
pot de l’appareil et agiter. Remettez le pot et continuez à frire.
Attention : pendant que vous agitez la cuve, n’appuyez pas sur le bouton du panier.
Remarque : Pour réduire le poids, vous pouvez sortir le panier de la cuve et secouer
uniquement le panier. Pour ce faire, retirez la cuve de l’appareil, placez-la sur une
surface résistante à la chaleur puis appuyez sur le bouton de la poignée.
Astuce : Si vous réglez la minuterie à la moitié du temps de cuisson, vous entendrez
le signal de la minuterie lorsque vous devez secouer les ingrédients. Cependant, vous
devez régler à nouveau la minuterie sur le temps de cuisson restant.
32
Astuce : Si vous réglez la minuterie sur le temps de cuisson complet, il n’y aura pas
de sonnerie de minuterie avant la n de la cuisson. Vous pouvez retirer la cuve à tout
moment pour vérier l’état des aliments. L’appareil s’éteint automatiquement et reprend
son fonctionnement lorsque la cuve est reposée sur l’appareil. Cependant, la minuterie
poursuit son compte à rebours.
9. Lorsque la minuterie sonne, le temps de préparation est écoulé. Sortez la cuve de
l’appareil et placez-la sur une surface résistante à la chaleur.
Remarque : Vous pouvez également éteindre l’appareil à la main. Pour ce faire, tournez
le contrôle de la température à 0 puis tirez la cuve directement.
10. Check if the ingredients are ready. If the ingredients are not ready yet, simply slide
the pan back into the appliance and set the timer to a few extra minutes.
11 . Pour retirer les ingrédients (par ex frites), appuyez sur le bouton du panier et retirez
le panier de la cuve.
Ne pas retourner le panier avec la cuve pour ne pras renverser l’excès d’huile sur
les ingrédients.
12. Après la friture, la cuve et les ingrédients sont chauds.
13. Selon le type d’ingrédients, de la vapeur peut sortir de la cuve. Après la friture, la
cuve et le couvercle métallique interne sont chauds. N’y touchez pas !
Page 33

14. Videz le panier dans un bol ou une assiette.
Conseil: Pour retirer les ingrédients volumineux ou fragiles, utilisez une pince.
15. Lorsqu’une portion est terminée, la friteuse à air chaud est prête pour une autre
cuisson.
Réglages
Le tableau ci-dessous vous aidera pour les paramètres essentiels.
Remarque : Notez que ces paramètres sont des valeurs standard. Les ingrédients
diffèrent par l’origine, la taille, la forme et le producteur. Nous ne garantissons pas les
réglages optimaux pour vos ingrédients. Étant donné que la technologie de l’air chaud
est rapide et chauffe constamment l’air à l’intérieur de l’appareil, le retrait rapide du pot
pendant le fonctionnement de l’air chaud arrête le processus de cuisson.
Astuces
• Les ingrédients plus petits nécessitent généralement un temps de cuisson plus court
que les ingrédients plus gros.
• Une plus grande quantité de nourriture nécessite un temps de cuisson légèrement
plus long qu’une quantité plus petite.
• Secouer de plus petits ingrédients pendant le temps de préparation optimisera le
résultat et aidera à prévenir la cuisson inégale des ingrédients.
• Ajoutez de l’huile pour obtenir une nition croustillante. Faites rôtir les ingrédients
dans la friteuse à air chaud après avoir ajouté de l’huile.
• Ne préparez pas d’ingrédients trop gras, tels que des saucisses dans la friteuse à
air chaud.
• Des collations pouvant être préparées dans un four peuvent également être
préparées dans la friteuse à air chaud.
• La quantité optimale pour répartir les frites croustillantes est de 500 grammes.
• Utilisez une pâte préparée pour cuire des collations fourrées rapidement et
facilement.
• Mettez un plat allant au four dans la cuve lorsque vous préparez un gâteau ou des
quiches, des morceaux fragiles ou des morceaux de farce.
• La friteuse à air chaud peut également être utilisée pour réchauffer les aliments.
Pour réchauffer, réglez la température à 150°C pendant 10 minutes.
FR
33
Page 34

FR
Produit Min Max
(grammes)
Pommes de terre &
frites
Frites surgelées nes 300-700 9-16 200 secouer
Frites surgelées épaisses 300-700 11-20 200 secouer
Frites maison 300-800 16-10 200 + 1/2 CàC d'huile ; secouer
Pommes de terre coupées 300-800 18-22 18 0 + 1/2 CàC d'huile ; secouer
Pommes de terre en dés 300-750 12-18 180 + 1/2 CàC d'huile ; secouer
Rissolées 250 15 - 18 180 secouer
Gratin de pommes de terre 500 15 -18 200 secouer
Viande & volailles
Steak 100-500 8-12 180
Côtes de porc 100-500 10-14 180
Hamburger 100-500 7-14 180
Saucisses 100-500 13-15 200
Cuisses de poulet 100-500 18-22 18 0
Blancs de poulet 100-500 10-15 180
Snacks
Rouleaux de printemps 100-400 8-10 200 secouer
Découpes de poulet
(surge-lées)
Poissons panés (surgelés) 100-400 6-10 200
Fromage pané (surgelé) 100-400 8-10 18 0
Légumes farcis 100-400 10 160
Cuisson au four
Gâteaux 400 20-25 160
Quiche 300 20-22 180
Mufns 300 15 -18 200
Snacks sucrés 400 20 160
100-500 6-10 200 secouer
Durée
(min)
Temp
° C
Autres infos
34
Page 35

Frites maison
Pour préparer des frites maison, suivez les étapes ci-dessous :
1. Épluchez les pommes de terre et coupez-les en frites.
2. Bien laver les frites et sécher avec un torchon.
3. Verser une demi-cuillère à café d'huile d'olive et les frites de pommes de terre dans
un bol. Mélanger jusqu'à ce que les bâtonnets de pommes de terre soient mouillés
d'huile.
4. Retirez les frites du bol avec vos doigts ou vos couverts an que l'excès d'huile reste
dans le bol. Mettez les frites dans le panier.
Remarque : Ne pas renverser le bol pour mettre toutes les frites à la fois dans le panier,
an de ne pas verser d'huile en même temps dans la cuve.
5. Faites cuire les frites à l'air chaud en suivant les instructions de ce chapitre.
MAINTENANCE
Nettoyage
Nettoyez l'appareil après chaque utilisation.
Pour le nettoyage, ne touchez pas le métal chaud à l'intérieur peu après la friture.
Laissez l'appareil refroidir avant de le nettoyer !
1. Cuve et panier : n'utilisez pas d'ustensiles de cuisine ou de tampons à récurer car
cela endommagerait le revêtement antiadhésif. Débranchez la che de la prise et
laissez l'appareil refroidir. Remarque : Retirez la cuve pour permettre à l'appareil de
refroidir plus rapidement.
2. Séchez l'extérieur avec un chiffon humide.
3. Nettoyez la cuve et le panier avec de l'eau chaude. Utilisez un peu de détergent..
FR
Vous pouvez utiliser un liquide dégraissant pour nettoyer toute saleté restante.
Astuce : S'il y a de la saleté sur le panier ou dans le fond de la cuve, remplissez la cuve
avec de l'eau chaude et un peu de détergent. Mettez le panier dans la cuve et laissez
tremper la cuve et le panier pendant environ 10 minutes.
4. Nettoyez l'intérieur de l'appareil avec de l'eau chaude et une éponge non abrasive.
5. Nettoyez l'élément chauffant avec une brosse de nettoyage pour enlever les résidus
d'aliments.
Entreposage
1. Débranchez la prise et laissez l'appareil refroidir.
2. Assurez-vous que toutes les pièces sont propres et sèches.
3. Entreposez la friteuse à air chaud dans un endroit propre et sec.
35
Page 36

FR
RÉSOLUTION DES PROBLÈMES
Problème Cause Solution
L'appareil ne
fonctionne pas.
Les ingré-dients ne
sont pas cuits en n
de préparation.
Les ingrédients sont
cuits inéga-lement.
Les snacks frits ne
sont pas croustillants
à la sortie de la
friteuse à air chaud.
Difcile de
mettre le panier
correc-tement
dans l'appareil.
La che n'est spas
branchée.
La minuterie n'est
pas réglée.
La cuve est mal placée
dans l'appareil.
La protection anti
surchauffe s'est
déclen-chée.
Il y a trop d'ingrédients dans le panier.
La température est
réglée trop bas.
La durée de cuisson
est trop courte.
Certains ingrédients
doivent être secoués
pendant la cuisson.
Vous avez utilisé des
snacks qui doivent
être cuits dans une
friteuse conventionnelle.
Trop d'ingrédients
dans le panier.
Trop d'ingrédients
dans le panier.
Le panier est mal
placé dans la cuve.
Branchez la che
dans une prise.
Tournez le bouton de
réglage sur la durée de
cuisson nécessaire.
Installez correctement la
cuve dans l'appareil.
Utilisez un objet pointu
pour utiliser le bouton
de réinitialisation situé
au bas de l'appareil.
Mettez de petites portions dans
le pa-nier. Les petites quantités
sont cuites plus uniformément.
Tournez le bouton pour régler
la tempé-rature nécessaire.
Réglez convenablement la
température de cuisson.
Les ingrédients qui sont en
haut (par ex frites) doivent
être secoués à mi-cuisson.
Utilisez des snacks pour le four
ou saupoudrez les collations
avec un peu d'huile pour
obtenir un ni croustil-lant.
Ne remplissez pas
trop le panier.
Enfoncez le panier dans la
cuve jusqu'à entendre un clic.
36
Page 37

Problème Cause Solution
Lorsque vous préparez
des ingré-dients riches en
matières grasses, une grande
quantité d'huile pénètre dans
la cuve. L'huile provoque
une fumée blanche et la
cuve peut de-venir plus
chaude que d'habitude.
Cela n'affecte pas l'appareil
ni le résultat de la friture.
La fumée blanche est causée
par le chauffage de la graisse
dans la cuve. Nettoyez
soigneusement la cuve
après chaque utilisation.
Utilisez des pommes de
terre fraîches et assurezvous qu'elles conservent
leur consistance ferme
pendant la cuisson.
Rincez les frites correctement
pour retirer l'amidon.
Veillez à bien sécher les frites
avant d'ajouter de l'huile. Faites
des frites plus petites pour
un résultat plus croustillant.
Ajoutez un peu d'huile pour
les rendre plus croustillantes.
L'appareil émet de
la fumée blanche.
Les frites fraîches
sont inégalement
dorées.
Les frites fraîches
ne sont pas
croustillantes.
Les aliments sont cuits.
La cuve contient toujours des résidus de
graisse provenant d'une
utilisation antérieure.
Vous n'utilisez pas
la bonne variété de
pommes de terre.
Vous n'avez pas rincé
correcte-ment les frites
avant de les faire cuire.
Le croustillant des frites
dépend de la quantité
d'huile et de la teneur en
eau des pommes de terre.
FR
37
Page 38

FR
grille
cuve
CONSEILS POUR LE RECYCLAGE
Le pictogramme ci-contre apposé sur le produit signie que la
directive européenne 2012/19/UE s‘applique (poubelle à roues
barrée d’une croix). Ces produits ne peuvent être jetés dans les
poubelles domestiques courantes. Renseignez-vous concernant
les règles appliquées pour la collecte d’appareils électriques et
électroniques. Conformez-vous aux réglementations locales et
ne jetez pas vos anciens produits avec les ordures ménagères.
Le respect des règles de recyclage des vieux produits aide à la
protection de l’environnement et de la santé de votre entourage
contre les conséquences négatives possibles. Le recyclage des
matériaux aide à réduire l’utilisation des matières premières.
38
Déclaration de conformité
Producer: Chal-Tec GmbH, Wallstraße 16, 10179 Berlin, Germany
Fabricant : Chal-Tec GmbH, Wallstraße 16, 10179 Berlin,
Allemagne
Ce produit est conforme aux directives européennes suivantes :
2011/65/UE (RoHS)
2014/30/UE (CEM)
2014/35/UE (LVD)
Page 39

Page 40

 Loading...