

Page 1
Kochautomat
10030355 10030356
Page 2

Sehr geehrter Kunde,
wir gratulieren Ihnen zum Erwerb Ihres Gerätes. Lesen Sie die folgenden Hinweise sorgfältig durch und befolgen Sie diese, um möglichen Schäden vorzubeugen. Für Schäden, die durch Missachtung der Hinweise und
unsachgemäßen Gebrauch entstehen, übernehmen wir keine Haftung.
Inhaltsverzeichnis
Technische Daten 2
Sicherheitshinweise 2
Geräteübersicht 3
Bedienfeld 4
Inbetriebnahme und Bedienung 4
Reinigung und Pflege 7
Fehlersuche und Fehlerbehebung 8
Hinweise zur Entsorgung 8
Konformitätserklärung 8
Rezepte 9
Technische Daten
Artikelnummer 10030355, 10030356
Stromversorgung 220-240 V ~ 50-60 Hz
Sicherheitshinweise
• Lesen Sie sich alle Hinweise vor der Benutzung sorgfältig durch.
• Fassen Sie keine heißen Oberflächen an, benutzen Sie nur die Griffe und Regler.
• Stellen Sie das Gerät auf eine ebene, hitzebeständige Oberfläche.
• Stromschlaggefahr! Tauchen Sie das Netzkabel, den Stecker oder das Gerät niemals in Wasser oder andere
Flüssigkeiten.
• Benutzen Sie das Gerät om Anwesenheit von Kindern nur unter Aufsicht.
• Ziehen Sie den Strecker, bevor Sie das Gerät reinigen. Lassen Sie das Gerät komplett abkühlen, bevor Sie
Teile Abnehmen oder Oberflächen reinigen.
• Reparaturen dürfen nur von Fachpersonal ausgeführt werden und sind erforderlich, wenn das Gerät beschädigt wurde, Netzkabel oder Stecker beschädigt sind, Flüssigkeiten darauf ausgelaufen oder Objekte darauf
gefallen sind, wenn das Gerät Nässe oder Feuchtigkeit ausgesetzt oder fallen gelassen wurde oder nicht
ordnungsgemäß funktioniert.
• Benutzen Sie nur Zubehör, das vom Hersteller ausdrücklich empfohlen wird.
• Benutzen Sie das Gerät nur in Innenräumen.
• Achten Sie darauf, dass das Kabel keine heißen Oberflächen berührt oder von der Arbeitsfläche hängt.
• Stellen Sie das Gerät nicht in die Nähe von Öfen oder Herden.
• Benutzen Sie das Gerät nur zum genannten Zweck.
2
Page 3
• Seien Sie extrem vorsichtig, wenn Sie das Gerät bewegen während sich heißes Wasser oder andere heiße
Flüssigkeiten darin befinden.
• Achten Sie darauf, dass Sie das Dampfauslass-Ventil an der Oberseite nicht berühren oder abdecken, damit
Sie sich nicht am heißen Dampf verbrühen.
• Schließen Sie das Gerät nur an Steckdosen an, die der Spannung des Geräts entsprechen.
• Ziehen sie den Stecker nicht am Kabel aus der Steckdose, sondern halten Sie ihn beim Abziehen mit der
Hand fest.
• Schließen Sie das Gerät nicht an Steckdosen, an die bereits andere Küchengeräte angeschlossen sind. Verwenden Sie immer eine separate Steckdose, um Kurzschlüsse zu vermeiden.
• Versichern Sie sich vor dem Kochen, dass die Außenseite der inneren Pfanne trocken ist, damit das Geät
nicht beschädigt wird und ordnungsgemäß funktioniert.
• Seien Sie vorsichtig wenn Sie den Deckel öffnen. Heißer Dampf könnte austreten und zu Verbrennungen führen.
• Um Verformungen zu vermeiden, verwenden Sie sie innere Pfanne nicht zum Braten auf einem Herd oder
Gaskocher.
• Um das Gerät auszuschalten, ziehen Sie den Stecker aus der Steckdose.
• Um einen Stromschlag oder Kurzschluss zu vermeiden, kochen Sie nur in der inneren Pfanne.
• Kinder, physisch und körperlich eingeschränkte Menschen sollten das Gerät nur benutzen, wenn sie vorher
von einer Aufsichtsperson ausführlich mit den Funktionen und den Sicherheitsvorkehrungen vertraut gemacht wurden. Achten Sie darauf, dass Kinder nicht mit dem Gerät spielen.
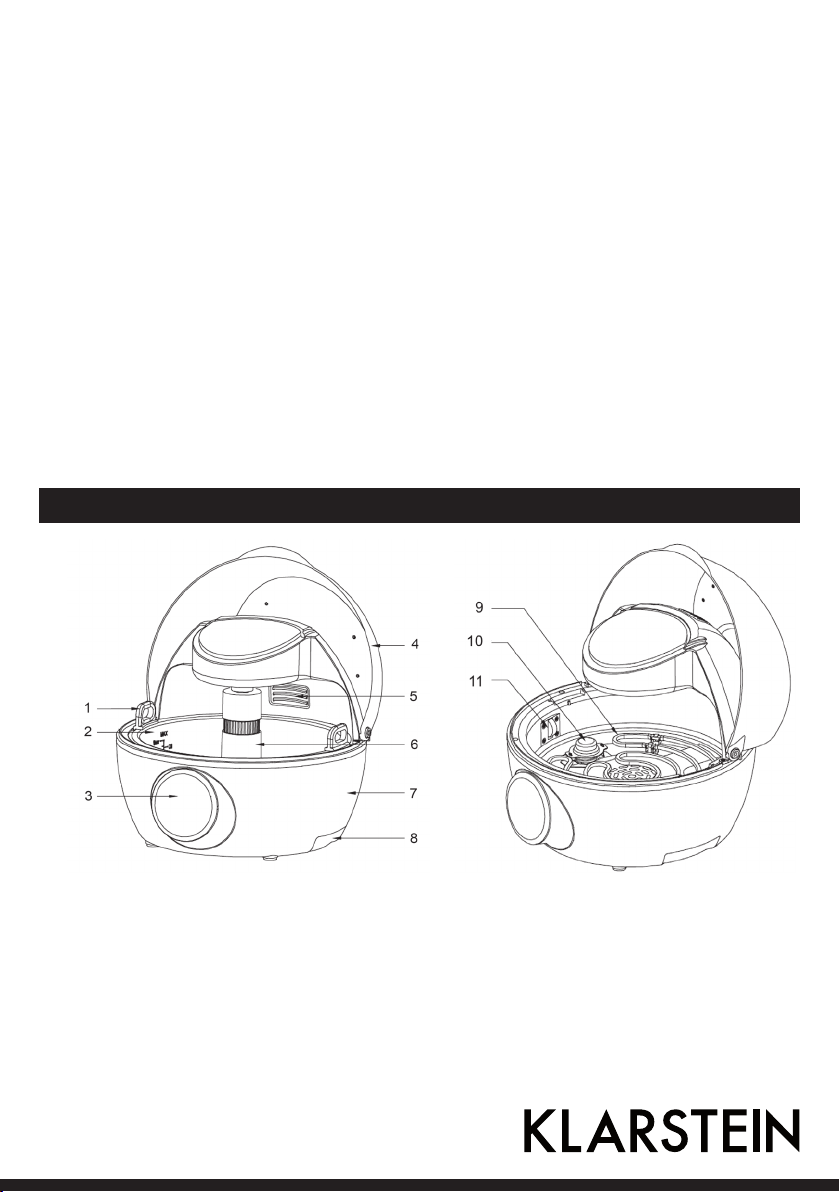
Geräteübersicht
1 Pfannengriffe 4 Deckel 7 Gehäuse 10 NTC Sensor
2 Entnehmbare Pfanne 5 Dampfauslass 8 Griff 11 Micro-Schalter
3 Bedienfeld 6 Entnehmbarer Rührstab 9 Heizelement
3
Page 4

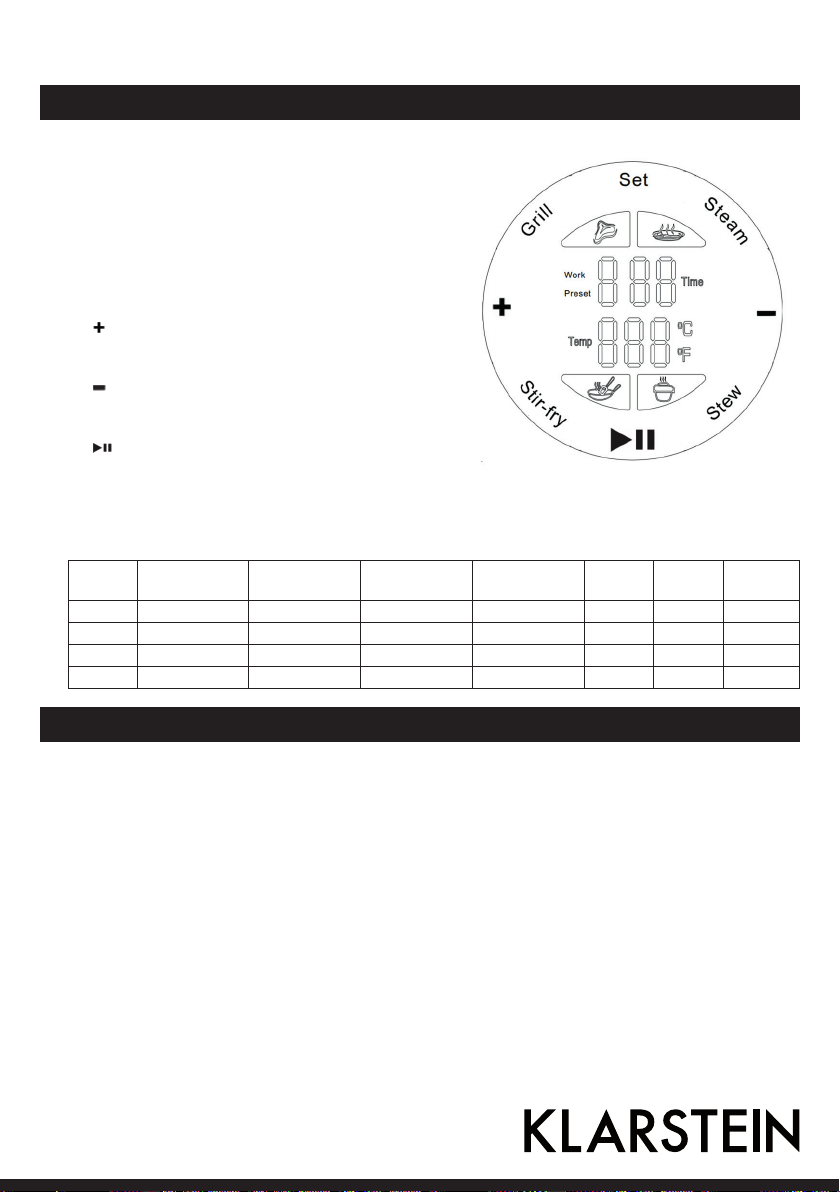
Bedienfeld
• Grill: Drücken Sie diese Taste, zum Grillen, Rösten,
Toasten und Backen von Pizza und Kuchen.
• Stir-fry: Zum Braten von Reis, Kartoffeln, Pommes,
Gemüse, Meeresfrüchten, Pasta. Ebenso geeignet für
die Herstellung von Popcorn und zum Kaffeerösten.
• Steam: Zum Dünsten von Gemüse oder Reis.
• Stew: Für Eintöpfe, für langsames Garen, Schmoren,
zum Kochen von Suppen, Porridge oder Risotto.
• Set: Zum Einstellen von Temperatur, Zeit und voreingestellten Modi.
• [ ] Taste: Zeit oder Temperatur erhöhen, nachdem
ein Modus ausgewählt wurde. Einstellbare Werte, siehe Tabelle unten.
• [ ] Taste: Zeit oder Temperatur verringern, nachdem
ein Modus ausgewählt wurde. Einstellbare Werte, siehe Tabelle unten.
• [ ] Taste: taste drücken, um die eingestellte Funktion
zu starten oder zu unterbrechen. Hinweis: Sie können
Funktionen während des Betriebs jederzeit unterbrechen.
Mögliche Einstellungen
Taste Einstellbare Zeit Voreinstellung
(Zeit)
Grill 0:01-1:00 0:20 100-200 °C 220 °C an ja nein
Stir-fry 0:01-1:00 0:30 50-220 °C 220 °C an ja ja
Stew 0:01-8:00 1:00 50-90 °C 90 °C an ja ja
Steam 0:01-1:00 0:30 90-100 °C 100 °C an ja nein
Einstellbare
Temperatur
Voreinstellung
(Temperatur)
Heiz-
element
Heißluft Rührmotor
Inbetriebnahme und Bedienung
Vor dem ersten Betrieb
• Lesen Sie sich alle Hinweise sorgfältig durch.
• Entfernen Sie das komplette Verpackungsmaterial und überprüfen Sie das Gerät auf Beschädigungen.
• Entsorgen Sie das Verpackungsmaterial, damit Kinder nicht damit spielen und sich verletzen.
• Waschen Sie den Deckel, den Rührstab und die Pfanne in warmem Wasser ab. Spülen Sie die Teile mit klarem Wasser ab und trocknen Sie die Teile sorgfältig ab.
• Wischen Sie die Gerätebasis mit einem feuchten Lappen ab. Benutzen Sie keine Lösemittel oder Scheuerschwämme. Tauchen Sie sie Basis, das Kabel und den Stecker niemals in Wasser.
4
Page 5
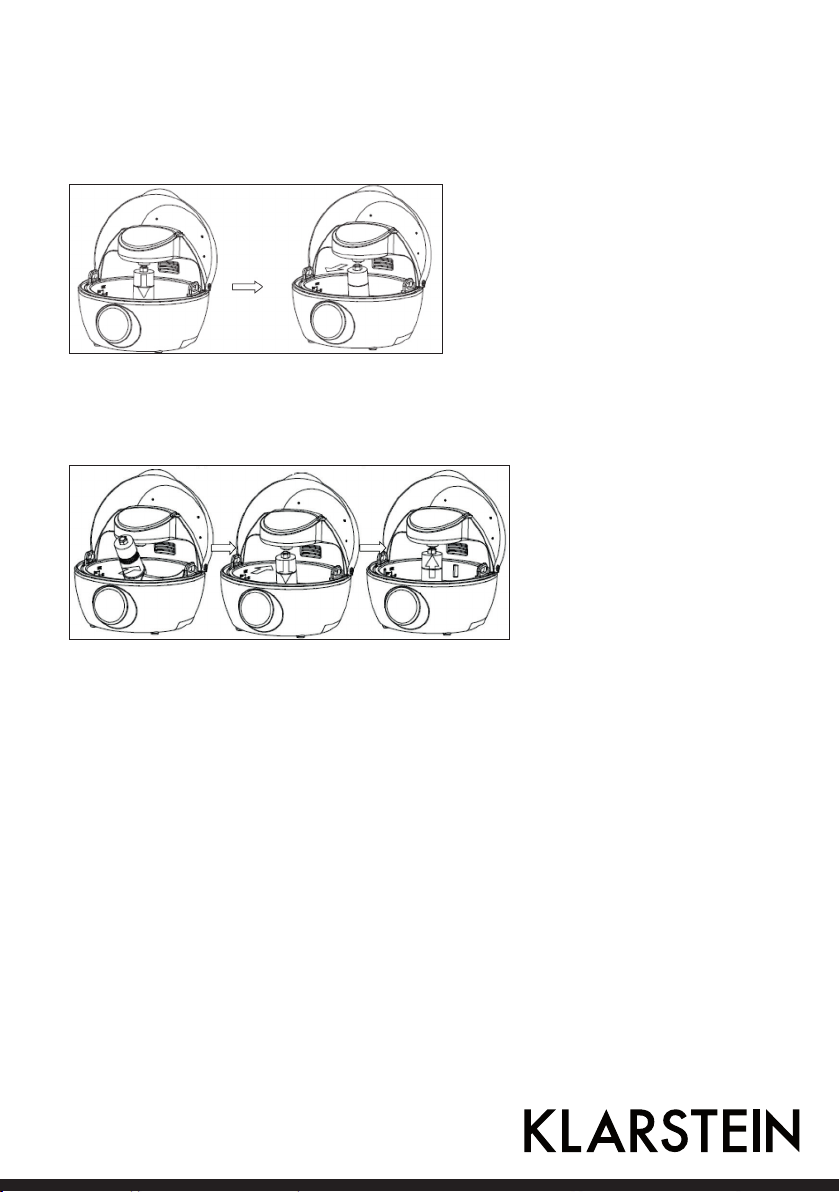
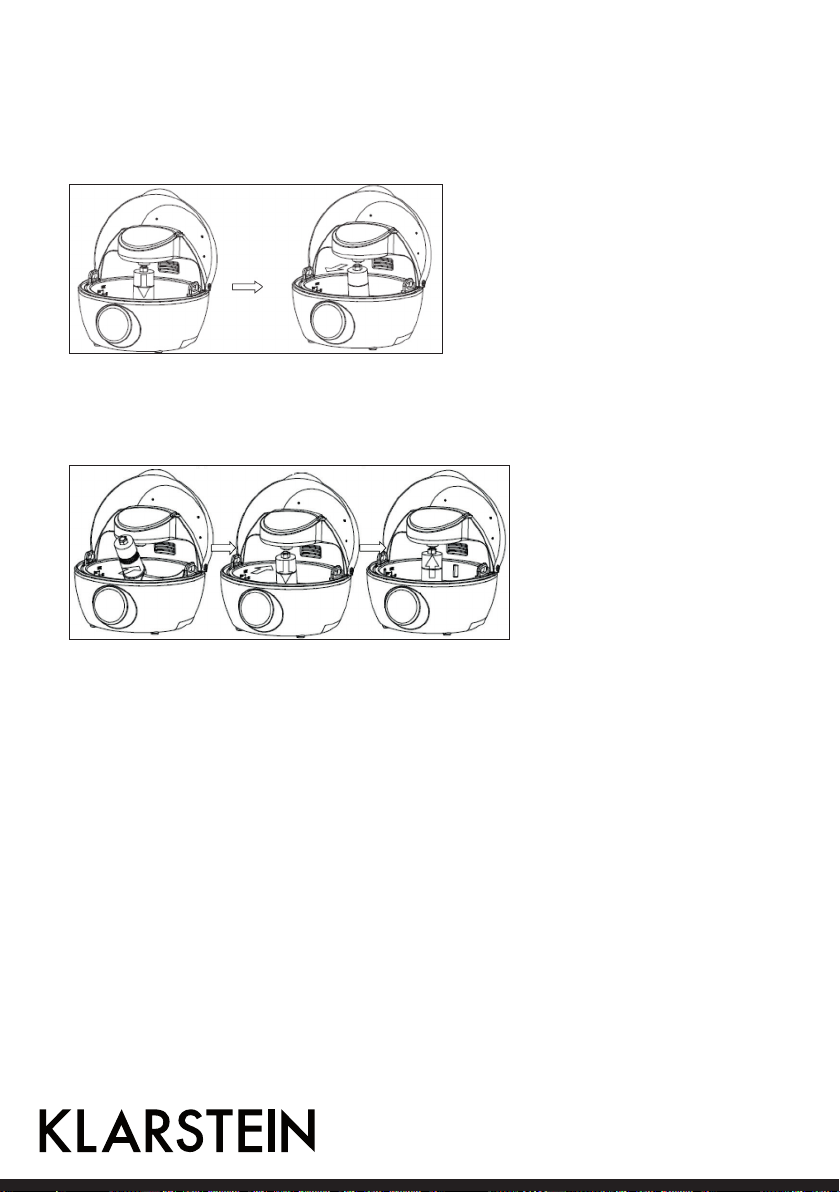
So bauen Sie das Gerät auseinander
Halten Sie den oberen Teil des Rührstabs fest und drücken Sie ihn herunter. Er löst sich vom Antrieb, wie auf
der Grafik dargestellt. Sobald sich der Rührstab vom Antrieb gelöst hat, können Sie ihn entnehmen:
So bauen Sie das Gerät zusammen
Wiederholen Sie die eben genanten Schritte in der umgekehrten Reihenfolge:
So bedienen Sie das Gerät
1. Befüllen Sie die Pfanne mit dem Essen, das Sie kochen möchten und platzieren Sie sie im Gerät. Richten Sie
die Pfanne beim Einsetzen an den Schlitzen in der Gerätebasis aus und drehen Sie sie.
Wichtiger Hinweise:
• Wenn Sie Wasser für die Stew/Steam-Funktion einfüllen, achten Sie darauf, die MAX-Markierung in der
Pfanne nicht zu überschreiten.
• Wenn Sie die Pfanne samt Flüssigkeit aus dem Gerät entnehmen, achten Sie darauf, dass die Flüssigkeit
nicht überschwappt und in die Gerätebasis läuft. Sie könnte das Gerät sonst beschädigen oder einen Kurzschluss auslösen.
2. Stecken Sie den Stecker in die Steckdose. Die Symbole auf dem bedienfeld leuchten gedimmt auf, das Licht
auf der oberen Abedeckung leuchtet hell.
3. Drücken sie eine der Funktionstasten Grill, Steam, Stir-fry oder Stew, je nachdem welche Funktion sie benutzen möchten. Das entsprechende Symbol neben der gewählten Funktion geht an. das Display zeigt die
voreingestellte Zeit und Temperatur an.
5
Page 6

4. Falls Sie die eingestellte Zeit und Temperatur übernehmen möchten, drücken Sie auf die [ ] Taste. Das
Gerät startet, das Symbol leuchtet hell und der Timer zählt die Zeit automatisch herunter.
5. Nachdem die eingestellt zeit abgelaufen ist ertönt ein 10-facher Piepton, um sie darauf aufmerksam zu
machen, dass der Kochprozess abgeschlossen ist.
Hinweise:
• Das Gerät enthält einen eingebauten Micro-Schalter (siehe Geräteübersicht). Falls die Pfanne nicht eingesetzt ist geht das Gerät nicht an (das Bedienfeld ist zwar beleuchtet aber die Tasten lassen sich nicht benutzen). Falls Sie die Pfanne während des Kochprozesses entnehmen, hält das Gerät automatisch an. Drücken
Sie erneut auf die [ ] Taste, um mit dem Kochprozess fortzufahren, nachdem Sie die Pfanne wieder
eingesetzt haben.
• Wenn Sie die Steam-Funktion benutzen müssen sie möglicherweise während des Kochens etwas Wasser
in die Pfanne nachfüllen.
• Heben Sie den Deckel sehr vorsichtig an, es kann heißer Dampf austreten.
• Falls das Wasser währen der Steam/Stew-Funktion komplett verdampft, hält das Gerät automatisch an,
damit es sich nicht überhitzt. Lassen Sie es erst komplett abkühlen und füllen Sie Wasser nach, bevor Sie
mit dem Kochen fortfahren.
• Falls Sie die Stir-fry/Grill-Funktion mit 100 °C beendet haben und sofort in den Stream/Stew-Modus
wechseln, geht der Überhitzungsschutz an und die Tastenfunktionen werden blockiert. Lassen Sie das Gerät
erst abkühlen, bevor Sie eine der anderen Funktionen verwenden.
Zeit und Temperatur ändern
Falls Sie Zeit und Temperatur nach Ihren Wünschen anpassen möchten, gehen Sie wie folgt vor:
1. Drücken Sie einmal auf die Set-Taste, die Temperaturanzeige blinkt. Drücken Sie zweimal auf die Set-Taste,
„Work“ und die Zeitanzeige blinken. Drücken Sie dreimal auf die Set-Taste, „Preset“ (verzögerter Start) und
die Zeitanzeige blinken.
2. Während eine der Anzeigen blinkt, benutzen Sie die [+] Taste, um die Zeit oder die Temperatur zu erhöhen.
3. Während eine der Anzeigen blinkt, benutzen Sie die [-] Taste, um die Zeit oder die Temperatur zu verringern.
4. Nachdem Sie die gewünschten Werte eingestellt haben, beginnt die Einstellung nach 5 Sekunden zu blinken. Die Einstellungen werden dann übernommen und das Gerät ist bereit.
5. Drücken Sie auf die [ ] Taste, um den Kochprozess zu starten. WICHTIG: drücken Sie die Taste nicht wenn
sie den Kochprozess verzögert starten, das Gerät geht automatisch an, nachdem der Timer für den verzögerten Start abgelaufen ist.
6
Page 7

Verzögerten Start (Preset) einstellen
• Während der Kochprozess läuft lässt sich der verzögerte Start nicht einstellen. Halten Sie den Prozess mit
der [ ] Taste an und stellen Sie die Werter wie im vorigen Absatz erklärt ein.
• Verzögerte Startzeiten unter 10 Stunden werden im Format _:_ _ (z. B. 5:30) angezeigt. Verzögerte Startzeiten über 10 Stunden werden im Format _ _ H (z. B. 10 H) angezeigt und können nur stundenweise verstellt
werden. Die längste verzögerte Startzeit beträgt 24 Stunden.
• 5 Sekunden, nachdem Sie die Zeit für den verzögerten Start eingestellt haben geht der Timer an. Das Display zeigt abwechselnd die verbleibende Zeit bis zum Start und die Kochzeit an. Nachdem die Zeit für den
verzögerten Start abgelaufen ist, startet das Gerät automatisch den Kochprozess im ausgewählten Modus.
Hilfreiche Tipps
• Wenn Sie die [+] oder [-] Taste einmal kurz drücken, ändert sich die Temperatur in 5 °C-Schritten, die Kochzeit ändert sich in 1 Minuten-Schritten. Die Zeit für den verzögerten Start ändert sich in 5-Minuten-Schritten, über 10 Stunden in 1-Stunden-Schritten.
• Wenn Sie die [+] oder [-] Taste länger drücken, ändert sich die Temperatur in 5 °C-Schritten, die Kochzeit
ändert sich in 5 Minuten-Schritten. Die Zeit für den verzögerten Start ändert sich in 10-Minuten-Schritten,
über 10 Stunden in 1-Stunden-Schritten.
• Während des Kochprozesses können Sie Zeit und Temperatur jederzeit ändern. Drücken Sie dazu auf die
Set-Taste, wählen Sie den gewünschten Modus und benutzen Sie die [+] und [-] Taste, um die Werte wie
gewünscht anzupassen.
• Nach 60 Sekunden wird die Anzeige abgedimmt, falls Sie die Tasten nicht länger berühren.
• Das Licht auf der oberen Abdeckung bleibt die ganze Zeit über an, während das Gerät läuft. Im StandbyModus geht es nach 2 Minuten aus.
Reinigung und Pflege
Lassen Sie das Gerät nach jedem Gebrauch zuerst komplett abkühlen, bevor Sie Teile abnehmen oder das
Gerät reinigen. Reinigen Sie das Gerät nach jedem Gebrauch.
1. Ziehen Sie den Stecker aus der Steckdose und lassen Sie das Gerät abkühlen. Wenn Sie die Pfanne entnehmen kühlt das Gerät schneller ab.
2. Wischen Sie die Außen- und Innenseite (speziell die obere Abedeckung) mit einem feuchten Lappen ab und
wischen Sie mit einem trockenen Tuch nach.
3. Reinigen Sie die Pfanne und den Rührstab mit heißem Wasser, etwas Spülmittel und einem weichen
Schwamm. Benutzen Sie keine Topfschwämme, um die Oberflächenbeschichtung nicht zu beschädigen.
Falls der Schmutz sehr fest sitzt, füllen Sie einen Topf mit heißem Wasser und lassen Sie die Pfanne und
den Rührstab eine Weile einweichen.
Gerät verstauen
• Versichern Sie sich dass das Gerät ausgeschaltet und alle Teile sauber und trocken sind.
• Verstauen Sie das Gerät an einem sauberen, trockenen Ort, zu dem Kinder keinen Zugang haben.
7
Page 8

Fehlersuche und Fehlerbehebung
Fehler Mögliche Ursache Lösungsansatz
Das Bedienfeld ist nicht
beleuchtet.
Das Gerät läuft nicht. Die Pfanne wurde nicht richtig
Die Fehlermeldung E1 wir
angezeigt.
Die Fehlermeldung E2 wir
angezeigt.
Die Fehlermeldung E3 wir
angezeigt.
Kein Strom. Versichern Sie sich dass der Stecker
eingesteckt ist und die Steckdose
funktioniert.
Versichern Sie sich, dass die Pfanne richtig
eingesetzt.
Sie haben soeben die Grill/Stir-
fry-Funktion beendet und haben
direkt darauf die Steam/StewFunktion gestartet.
Der Thermo-Sensor ist
aufgefallen.
Der Thermo-Sensor ist kaputt. Wenden Sie sich an den Kundendienst
Das Gerät hat sich auf über 250
°C erhitzt.
ins Gerät eingesetzt ist.
Halten Sie das Gerät an und lassen
Sie es abkühlen. Starten Sie dann die
gewünschte Funktion.
Wenden Sie sich an den Kundendienst
oder ein Fachgeschäft.
oder ein Fachgeschäft.
Ziehen Sie den Stecker und lassen Sie das
Gerät komplett abkühlen. Starten Sie es
dann erneut.
Hinweise zur Entsorgung
Befindet sich die linke Abbildung (durchgestrichene Mülltonne auf Rädern) auf dem Produkt, gilt die Europäische Richtlinie 2002/96/EG. Diese Produkte dürfen nicht mit dem
normalen Hausmüll entsorgt werden. Informieren Sie sich über die örtlichen Regelungen
zur getrennten Sammlung elektrischer und elektronischer Gerätschaften. Richten Sie sich
nach den örtlichen Regelungen und entsorgen Sie Altgeräte nicht über den Hausmüll.
Durch die regelkonforme Entsorgung der Altgeräte werden Umwelt und die Gesundheit
ihrer Mitmenschen vor möglichen negativen Konsequenzen geschützt. Materialrecycling
hilft, den Verbrauch von Rohstoffen zu verringern.
Konformitätserklärung
Hersteller: Chal-Tec GmbH, Wallstraße 16, 10179 Berlin, Deutschland.
Dieses Produkt entspricht den folgenden Europäischen Richtlinien:
2014/30/EU (EMV)
2014/35/EU (LVD)
2011/65/EU (RoHS)
8
Page 9

Rezepte
Dieses Symbol zeigt an, dass Sie für das Rezept den Rührstab benötigen. Setzen Sie vor der
Zubereitung den Rührstab wie im Kapitel „Inbetriebnahme und Bedienung“ beschrieben ins
Gerät ein, bevor Sie mit der Zubereitung beginnen.
Wir empfehlen Ihnen die Rezepte ganz nach ihrem Geschmack mit Salz und Pfeffer zu würden. Wir empfehlen Ihnen außerdem Fisch und Fleisch vor der Zubereitung vorzuwürzen.
Japanischer Sushi-Reis
Portionen: 4-8
Temperatur: Voreinstellung
Zeit: Voreinstellung
Zutaten:
300 g Sushi-Reis, gewaschen
360 ml Wasser
80 ml Sushi-Essig
Curry-Reis
Portionen: 4
Temperatur: Voreinstellung
Zeit: Voreinstellung
Zutaten:
250 g Basmati-Reis
600 ml Gemüsebrühe
2 EL Currypaste
Zubereitung:
1. Geben Sie den Reis und das Wasser in die innere Pfanne.
2. Setzen Sie die Pfanne ins Gerät ein.
3. Wählen Sie die Steam-Funktion.
4. Übernehmen Sie die voreingestellte Zeit und Temperatur
und starten Sie das Gerät.
5. Nach dem Kochen ist der Reis weich und hat die Flüssigkeit
komplett aufgesaugt.
6. Entnehmen Sie die Pfanne solange der reis noch warm
ist und mischen Sie den Sushi-Essig mit einem Holzlöffel
unter. Der Reis ist nun fertig.
7. Lassen Sie das Gerät komplett abkühlen, bevor Sie es
reinigen.
Zubereitung:
1. Geben Sie alle Zutaten in die innere Pfanne.
2. Setzen Sie die Pfanne ins Gerät ein.
3. Wählen Sie die Steam-Funktion.
4. Übernehmen Sie die voreingestellte Zeit und Temperatur
und starten Sie das Gerät.
5. Nach dem Kochen ist der Reis weich und hat die Flüssigkeit
komplett aufgesaugt.
6. Lassen Sie das Gerät komplett abkühlen, bevor Sie es
reinigen.
Tipp: Servieren Sie den Reis zu Fleisch, Fisch oder geröstetem
Gemüse. Geben Sie nach belieben Cashewkerne oder Rosinen
hinzu.
9
Page 10

Süßer Kokos-Reis mit Mangos
Portionen: 4
Temperatur: Voreinstellung
Zeit: Voreinstellung
Zutaten:
125 g Arborio-Reis
400 ml Milch
400 ml Kokosmilch
1 EL Puderzucker
1 EL Kokosraspeln
Geröstetes Wintergemüse
Portionen: 4-6
Temperatur: Voreinstellung
Zeit: Voreinstellung
Zutaten:
200 g Pastinaken
100 g Sellerie
200 g Kürbis
1 Zwiebel, in Spalten
1 EL Olivenöl
1 EL Rosmarin, gehackt
1 EL Thymian, gehackt
Salz und Pfeffer
Zubereitung:
1. Geben Sie alle Zutaten in die innere Pfanne.
2. Setzen Sie die Pfanne ins Gerät ein.
3. Wählen Sie die Steam-Funktion.
4. Übernehmen Sie die voreingestellte Zeit und Temperatur
und starten Sie das Gerät.
5. Nach dem Kochen ist der Reis weich und hat die Flüssigkeit
komplett aufgesaugt.
6. Lassen Sie das Gerät komplett abkühlen, bevor Sie es
reinigen.
Tipp: Servieren Sie den Reis zu Fleisch, Fisch oder geröstetem
Gemüse. Geben Sie nach Belieben Cashewkerne oder Rosinen hinzu.
Zubereitung:
1. Pastinaken, Sellerie und Kürbis schälen und in 2 cm große
Würfel schneiden.
2. Olivenöl, Rosmarin, Thymian, Salz und Pfeffer in eine
Schüssel geben und gut verrühren.
3. Die Gemüsewürfel hinzugeben und mit den Gewürzen vermischen.
4. Setzen Sie die Pfanne ins Gerät ein und installieren Sie
den Rührstab.
5. Verteilen Sie das Gemüse gleichmäßig in der Pfanne.
6. Wählen Sie die Stir-fry-Funktion.
7. Übernehmen Sie die voreingestellte Zeit und Temperatur
und starten Sie das Gerät.
8. Wenn das Gemüse fertig ist, ist es leicht braun, außen
knusprig und innen weich.
9. Wenn der Kochprozess beendet ist, schalten Sie das Gerät
aus. Lassen Sie das Gerät komplett abkühlen, bevor Sie es
reinigen.
Tipp: Die Garzeit hängt immer von der Größe der Stücke ab.
Sie können das Röstgemüse ganz nach Ihren Vorlieben würzen und verfeinern.
10
Page 11

Mediterranes Gemüse
Portionen: 4-6
Temperatur: Voreinstellung
Zeit: Voreinstellung
Hinweis: Testen Sie das Gemüse
nach der Hälfte der Zeit und entnehmen Sie es, wenn es den gewünschten Biss hat.
Zutaten:
500 g gemischtes Gemüse
1 EL Olivenöl
Kräuter und Gewürze
Zubereitung:
1. Schneiden Sie das Gemüse (Paprika, Zwiebel, Aubergine,
Tomaten, Kürbis oder ähnliches) in 5 cm große Stücke. Mischen Sie das Öl und die gewünschten Gewürze darunter.
2. Setzen Sie die Pfanne ins Gerät ein und installieren Sie
den Rührstab.
3. Verteilen Sie das Gemüse gleichmäßig in der Pfanne.
4. Wählen Sie die Stir-fry-Funktion.
5. Übernehmen Sie die voreingestellte Zeit und Temperatur
und starten Sie das Gerät.
6. Wenn das Gemüse fertig ist, ist es leicht braun, außen
knusprig und innen weich.
7. Servieren Sie das Gemüse mit Parmesan und knusprigem
Brot.
8. Lassen Sie das Gerät komplett abkühlen, bevor Sie es
reinigen.
Tipp: Versuchen Sie das Gemüse gleichmäßig zu schneiden,
damit es gleichmäßig durchgart. Geben Sie nach Belieben
dünn geschnittene Tomaten hinzu.
Pellkartoffeln mit Knoblauch und Rosmarin
Portionen: 2-4
Temperatur: 180 °C
Zeit: 20 Minuten
Zutaten:
8-10 kleine Kartoffeln
½ EL Olivenöl
1 EL Rosmarin, gehackt
2 Knoblauchzehen, gehackt
Salz und Pfeffer
Zubereitung:
1. Waschen Sie die Kartoffeln und trocknen Sie sie ab.
2. Mischen Sie das Olivenöl, Knoblauch, Salz und Pfeffer in
einer großen Schüssel.
3. Geben Sie die Kartoffeln hinzu und vermischen Sie alles
sorgfältig.
4. Setzen Sie die Pfanne ins Gerät ein und installieren Sie
den Rührstab.
5. Verteilen Sie die Kartoffeln gleichmäßig in der Pfanne.
6. Wählen Sie die Stir-fry-Funktion.
7. Stellen Sie 180 °C und 20 Minuten ein und starten Sie das
Gerät.
8. Wenn die Kartoffeln fertig sind, sind sie leicht braun, außen
knusprig und innen weich.
9. Wenn der Kochprozess beendet ist, schalten Sie das Gerät
aus. Lassen Sie das Gerät komplett abkühlen, bevor Sie es
reinigen.
11
Page 12

Gebratene Schweinelende mit Ingwer und Honig
Portionen: 4
Temperatur: Voreinstellung
Zeit: erst 5, dann 10 Minuten
Zutaten:
2 EL Kornstärke
2 EL Sojasauce
1 EL Honig
250 g Schweinelende
1 Prise Ingwer
2 Knoblauchzehen, gehackt
100 g Zuckerschoten
1 TL Sesamsamen
1 EL Sonnenblumenöl
Ingwer-Chili-Garnelen
Portionen: 4-6
Temperatur: Voreinstellung
Zeit: 8-10 Minuten
Zutaten:
500 g Riesengarnelen
4 cm Stücken Ingwer, gehackt
1 Chili, gehackt
1 EL Sojasauce
Limettensaft
Zubereitung:
1. Das Fleisch in mundgerechte Stücke zerteilen.
2. Honig, Sojasauce und Kornstärke verrühren und beiseite
stellen.
3. Setzen Sie die Pfanne ins Gerät ein und installieren Sie
den Rührstab.
4. Wählen Sie die Stir-fry-Funktion.
5. Übernehmen Sie die voreingestellte Temperatur, stellen
Sie als Zeit 5 Minuten ein und starten Sie das Gerät.
6. Geben Sie nach 5 Minuten die restlichen Zutaten hinzu
und stellen Sie die zeit auf 10 Minuten. Starten Sie das
Gerät erneut.
7. Wenn der Piepton ertönt und der Kochprozess beendet
ist überprüfen Sie ob das Fleisch gar ist. Geben Sie dann
die Mischung aus Sojasauce, Honig und Stärke hinzu und
mischen Sie alles sorgfältig durch. Servieren Sie Reis oder
Nudeln dazu.
8. Lassen Sie das Gerät abkühlen, bevor Sie es reinigen.
Tipp: Die Garzeit hängt immer von der Größe der Stücke ab.
Garen Sie das Fleisch, bis es Ihrer Vorliebe entspricht und die
gewünschte Bräune aufweist. Sie können das Gericht auch mit
anderen Fleischsorten, wie beispielsweise Huhn zubereiten.
Zubereitung:
1. Ingwer, Sojasauce, Limettensaft und Chili in einer Schüssel
verrühren. Die Garnelen hinzugeben und alles gut vermischen. Die Garnelen 30 Minuten lang in der Marinade ziehen lassen.
2. Setzen Sie die Pfanne ins Gerät ein und installieren Sie
den Rührstab.
3. Verteilen Sie die Garnelen gleichmäßig in der Pfanne.
4. Wählen Sie die Stir-fry-Funktion.
5. Übernehmen Sie die voreingestellte Temperatur, stellen
Sie als Zeit 8 Minuten ein und starten Sie das Gerät.
6. Die fertigen Garnelen haben farbe angenommen und
einen festen Biss. Die tatsächliche Kochzeit hängt von der
Größe der Garnelen ab.
7. Lassen Sie das Gerät abkühlen, bevor Sie es reinigen.
12
Page 13

Geröstete Sommerfrüchte
Portionen: 2-4
Temperatur: 200 °C
Zeit: 20 Minuten
Zutaten:
Verschiedene Sommerfrüchte,
wie Nektarinen, Aprikosen,
Pflaumen, Kirschen und Pfirsiche,
in gleich große Stücke geschnitten
1 EL Puderzucker
1 EL Honig, dünnflüssig
Zubereitung:
1. Bereiten Sie die Früchte vor, indem Sie sie entsteinen und
entsprechend ihrer Größe vierteln oder achteln.
2. Setzen Sie die Pfanne ins Gerät ein und installieren Sie
den Rührstab.
3. Legen Sie das Obst mit der Schnittfläche nach oben in die
Pfanne und geben Sie Puderzucker und Honig darüber.
4. Wählen Sie die Stir-fry-Funktion.
5. Stellen Sie 200 °C und 20 Minuten ein und starten Sie das
Gerät.
6. Wenn die Früchte fertig sind, haben sie Farbe angenommen aber behalten noch ihre Form.
7. Wenn der Kochprozess beendet ist, schalten Sie das Gerät
aus. Lassen Sie das Gerät komplett abkühlen, bevor Sie es
reinigen.
Tipp: Testen Sie die Früchte nach der Hälfte der Zeit und passen Sie die Zeit entsprechend an, falls nötig.
Geröstete Ananas und Kokosnuss
Portionen: 2-4
Temperatur: Voreinstellung
Zeit: 15-20 Minuten
Zutaten:
1 reife Ananas
1 EL Honig, dünnflüssig
Kokosflocken, ungesüßt
Zubereitung:
1. Schälen Sie die Ananas und vierteln Sie sie. Entfernen Sie
den Kern und schneiden sie jedes Viertel 2-3 Mal durch, je
nachdem wie große Sie die Stücke mögen.
2. Setzen Sie die Pfanne ins Gerät ein und installieren Sie
den Rührstab.
3. Verteilen Sie die Stücke gleichmäßig in der Pfanne.
4. Geben Sie den Honig und die Kokosflocken darüber.
5. Wählen Sie die Stir-fry-Funktion.
6. Übernehmen Sie die voreingestellte Temperatur, stellen
Sie als Zeit 15 Minuten ein und starten Sie das Gerät.
7. Wenn die Ananas fertig ist hat sie etwas Farbe angenommen.
8. Wenn der Kochprozess beendet ist, schalten Sie das Gerät
aus. Lassen Sie das Gerät komplett abkühlen, bevor Sie es
reinigen.
Tipp: Servieren Sie die Ananasstücke zu Eis oder Keksen.
13
Page 14

Perfekte hausgemachte Kartoffelchips
Portionen: 2
Temperatur: 160 °C (Vorrösten)
und 200 °C (Rösten)
Zeit: 20-25 Minuten
Zutaten:
600 g Kartoffeln
Öl und Plastikbeutel
Zubereitung:
1. Schälen Sie die Kartoffeln und schneiden Sie sie in 8 mm
dicke Scheiben.
2. Weichen Sie die Kartoffeln 20 Minuten in Wasser ein, um
die Stärke zu entfernen.
3. Trocknen Sie die Chips sorgfältig ab.
4. Geben Sie die Chips zusammen mit etwas Öl in den
Plastikbeutel und schütteln Sie ihn durch, bis sich das Öl
gleichmäßig verteilt hat.
5. Setzen Sie die Pfanne ins Gerät ein und installieren Sie
den Rührstab.
6. Verteilen Sie die Chips in der Pfanne.
7. Wählen Sie die Stir-fry-Funktion.
8. Stellen Sie die Temperatur auf 160 °C und den Timer auf
5 Minuten (Vorrösten).
9. Sobald das Vorrösten abgeschlossen ist, stellen Sie die
Temperatur auf 200 °C und die zeit auf 20 Minuten und
starten Sie das Gerät.
10. Die fertigen Chips sind goldbraun und knusprig. Überprü-
fen Sie die Chips und passen Sie die Zeit an, falls nötig.
11. Servieren Sie die Chips umgehend, solange sie noch
knusprig sind.
12. Lassen Sie das Gerät abkühlen, bevor Sie es reinigen.
Pommes mit Chicken Nuggets
Portionen: 2
Temperatur: Voreinstellung
Zeit: Voreinstellung
Zutaten:
200 g Tiefkühlpommes
200 g Chicken Nuggets
Zubereitung:
1. Setzen Sie die Pfanne ins Gerät ein und installieren Sie
den Rührstab. Verteilen Sie die Pommes und die Chicken
Nuggets gleichmäßig in der Pfanne.
2. Wählen Sie die Stir-fry-Funktion und starten Sie das
Gerät.
3. Die Chicken Nuggets sind fertig, wenn sie außen gold-
braun. Sollten die Nuggets nach der abgelaufenen Zeit
noch nicht durch sein, passen Sie die Garzeit entsprechend an.
4. Servieren Sie das Essen direkt nach dem Kochen, wenn
die Pommes und die Nuggets knusprig sind.
5. Lassen Sie das Gerät abkühlen, bevor Sie es reinigen.
Tipp: Die tatsächliche Garzeit hängt von der Größe der verwendeten Chicken Nuggets ab.
14
Page 15

Mediterrane Chicken Nuggets
Portionen: 8 Nuggets
Temperatur: Voreinstellung
Zeit: Voreinstellung
Zutaten:
Panade:
2 Scheiben Weißbrot
1 EL Paprikapulver
2 Eiweiß
Nugget-Mix:
½ Paprika, rot
1 Knoblauchzehe
2 EL Pesto, rot
1 EL Petersilie, gehackt
1 Eigelb
1 EL Olivenöl
200 g Hühnerbrust
Salz und Pfeffer
Zubereitung:
1. Mixen Sie das Weißbrot mit dem Paprikapulver, bis es
krümelig ist und stellen sie die Brösel auf einem Teller
beiseite.
2. Geben Sie die Zutaten für die Nuggets in einen Zerkleine-
rer und mixen sie den Nugget-Mix bis alles gut vermischt
ist. Teilen Sie die Mischung in 8 Portionen auf, formen
Sie zuerst Bällchen und drücken Sie diese dann flach.
3. Bedecken Sie die einzelnen Nuggets zuerst mit Eiweiß
und dann mit den Brotkrumen. Achten Sie darauf, dass
die Nuggets gut mit Brotkrumen bedeckt sind.
4. Setzen Sie die Pfanne ins Gerät ein und installieren Sie
den Rührstab.
5. Wählen Sie die Stir-fry-Funktion und starten Sie das
Gerät.
6. Wenn die Nuggets fertig sind, sind sie außen goldbraun
und knusprig.
7. Entnehmen Sie die Nuggets mit einer Zange, damit das
überschüssiges Fett in der Pfanne verbleibt.
8. Lassen Sie das Gerät abkühlen, bevor Sie es reinigen.
Tipp: Die tatsächliche Kochzeit hängt von der Dicke der
Nuggets ab. Kochen Sie die Nuggets so lange, bis sie die gewünschte Farbe und Konsistenz haben.
15
Page 16

Gebratene Rinderlende mit Brokkoli
Portionen: 4
Temperatur: Voreinstellung
Zeit: 5 und 8 Minuten
Zutaten:
200 g Brokkoliröschen
2x 300 g Rinderlende, zerkleinert
2 EL Koriander, gemahlen
1 EL Sesamöl
4 Frühlingszwiebeln
1 Knoblauchzehe, gehackt
1 Stück Ingwer, gehackt
3 EL Sojasauce
Salz und Pfeffer
Lamm- und Linsencurry
Portionen: 4
Temperatur: Voreinstellung
Zeit: 10 Minuten (Braten) und
1,5 Stunden (Schmoren)
Zutaten:
2 EL Sonnenblumenöl
500 g Lamm, zerkleinert
2 Zwiebeln, gehackt
3 knoblauchzehen, gehackt
3 El Currypaste
400 g Tomaten, gehackt
150 g Linsen, rot
1 EL Salz
Zubereitung:
1. Geben Sie die Brokkoliröschen in einen Topf und bede-
cken Sie sie mit kochendem Wasser. Lassen Sie die Röschen 10 Minuten lang ziehen und gießen Sie sie dann ab.
2. Geben Sie die kleingeschnittene Rinderlende, Koriander,
Knoblauch, Ingwer, Frühlingszwiebeln, Sesamöl, Salz und
Pfeffer in eine Schüssel und vermischen Sie alles.
3. Setzen Sie die Pfanne ins Gerät ein und installieren Sie
den Rührstab.
4. Verteilen Sie das Fleisch gleichmäßig in der Pfanne.
5. Übernehmen Sie die voreingestellte Temperatur und
stellen Sie als Zeit 5 Minuten ein. Starten Sie das Gerät.
6. Geben Sie nach 5 Minuten die Brokkoliröschen dazu und
stellen sie als Zeit 8 Minuten ein. Starten Sie das Gerät
erneut.
7. Testen Sie das Fleisch nach den 8 Minuten. Kochen Sie
das Fleisch solange, bis es die gewünschte Konsistenz
und Bräune hat. Geben Sie zum Schluss die Sojasauce
hinzu und servieren Sie das Fleisch mit Reis oder Nudeln.
8. Lassen Sie das Gerät abkühlen, bevor Sie es reinigen.
Zubereitung:
1. Setzen Sie die Pfanne ins Gerät ein und installieren Sie
den Rührstab.
2. Verteilen Sie Öl, Zwiebel, Knoblauch und die Lammstü-
cke gleichmäßig in der Pfanne.
3. Wählen sie die Stir-fry Funktion, übernehmen Sie die
voreingestellte Temperatur, stellen Sie als Zeit 10 Minuten ein und starten Sie das Gerät.
4. Wenn der Kochprozess abgeschlossen ist, ist das Lamm
leicht braun und die Zwiebeln sind weich.
5. Geben Sie die restlichen Zutaten hinzu und vermischen
Sie alles vorsichtig.
6. Wählen Sie nun die Stew-Funktion, übernehmen Sie
die Temperatur, stellen Sie als Zeit 1,5 Stunden ein und
starten Sie das Gerät.
7. Zum Ende des Kochprozesses ist das Fleisch zart und die
Linsen weich. Schalten Sie das Gerät aus.
8. Lassen Sie das Gerät abkühlen, bevor Sie es reinigen.
16
Page 17

Eintopf mit Huhn und Speck
Portionen: 4-6
Temperatur: Voreinstellung
Zeit: 10 Minuten (Braten) und
2 Stunden (Schmoren)
Zutaten:
12 Hühnerstücke
150 g Speckstreifen
2 Zwiebeln, gehackt
4 Karotten, dick geschnitten
2 Lauchstangen, dünn geschnitten
400 g Tomaten, gehackt
1 Würfel Hühnerbrühe
500 ml Wasser
75 ml Weißwein
2 Lorbeerblätter
Gewürze nach Wahl
Chili con Carne
Portionen: 4-6
Temperatur: Voreinstellung
Zeit: 10 Minuten (Braten) und
1,5 Stunden (Schmoren)
Zutaten:
750 g Hackfleisch
2 Zwiebeln, gehackt
400 g Beaked Beans
400 g Chilibohnen
400 g Tomaten, gehackt
1 Würfel Rinderbrühe
150 ml Wasser
1 El Chiliflocken
Gewürze nach Wahl
Zubereitung:
1. Setzen Sie die Pfanne ins Gerät ein und installieren Sie
den Rührstab.
2. Verteilen Sie die zwiebeln und die Hühnerstücke gleich-
mäßig in der Pfanne.
3. Wählen sie die Stir-fry Funktion, übernehmen Sie die
voreingestellte Temperatur, stellen Sie als Zeit 10 Minuten ein und starten Sie das Gerät.
4. Nach dem Kochen ist das Hühnerfleisch leicht gebräunt
und die zwiebeln sind weich.
5. Verteilen Sie die restlichen zutaten in der Pfanne und
mischen sie alles vorsichtig durch.
6. Wählen Sie die Stew-Funktion, übernehmen Sie die
voreingestellte Zeit und Temperatur und starten Sie das
Gerät.
7. Schalten Sie das Gerät nach dem Kochen aus.
8. Entnehmen Sie die Pfanne und entfernen Sie die Lor-
beerblätter, vor dem Servieren.
9. Lassen Sie das Gerät abkühlen, bevor Sie es reinigen.
Zubereitung:
1. Setzen Sie Pfanne und Rührstab ins Gerät ein.
2. Verteilen Sie Hackfleisch und Zwiebeln in der Pfanne.
3. Wählen sie die Stir-fry Funktion, übernehmen Sie die
voreingestellte Temperatur, stellen Sie als Zeit 10 Minuten ein und starten Sie das Gerät.
4. Nach dem Kochen ist das Hackfleisch leicht braun und
die Zwiebeln sind weich.
5. Verteilen Sie die restlichen Zutaten gleichmäßig.
6. Wählen Sie nun die Stew-Funktion, übernehmen Sie
die Temperatur, stellen Sie als Zeit 1,5 Stunden ein und
starten Sie das Gerät.
7. Schalten Sie das Gerät nach dem Kochen aus.
8. Entnehmen Sie die Pfanne und servieren Sie das Chili.
9. Lassen Sie das Gerät abkühlen, bevor Sie es reinigen.
17
Page 18

Der perfekte Haferbrei
Portionen: 2-4
Temperatur: Voreinstellung
Zeit: 20 Minuten
Zutaten:
100 g feine Haferflocken
650 ml Milch oder Wasser
Zum Servieren:
Blaubeeren und Honig
Zubereitung:
1. Setzen Sie die Pfanne ins Gerät ein und installieren Sie
den Rührstab.
2. Geben Sie Milch oder Wasser und die Haferflocken in die
Pfanne.
3. Wählen Sie die Stew-Funktion.
4. Übernehmen Sie die Temperatur und stellen sie als Zeit
20 Minuten ein. Starten Sie das Gerät.
5. Nach dem Kochen haben die Haferflocken die komplette
Flüssigkeit aufgenommen.
6. Verteilen Sie den Haferbrei auf Schüsseln und servieren
Sie ihn mit Honig und Blaubeeren.
7. Lassen Sie das Gerät abkühlen, bevor Sie es reinigen.
Schweinelende mit Senf und Apfel
Portionen: 2
Temperatur: Voreinstellung
Zeit: Voreinstellung
Zutaten:
2 Lendensteaks
1 großer Apfel, in Scheiben
½ rote Zwiebel, in Scheiben
½ EL Ganzkornsenf
2 EL Essig oder Apfelsaft
½ EL Olivenöl
Gewürze nach Wahl
Zubereitung:
1. Mischen Sie die Apfel und Zwiebelscheiben mit Öl und
Gewürzen ihrer Wahl in einer Schüssel. Geben Sie die
Mischung in die Pfanne.
2. Reiben Sie die Lendensteaks beidseitig mit Senf ein und
legen Sie sie auf die Mischung in der Pfanne.
3. Setzen Sie die Pfanne ins Gerät und wählen Sie die Grill-
Funktion.
4. Übernehmen Sie Zeit und Temperatur und starten Sie
das Gerät. Drehen Sie die Steaks während des Garprozesses einmal um, damit sie gleichmäßig braun werden.
5. Nach dem Kochen sollte sich das Fleisch fest anfühlen
und leicht gebräunt sein.
6. Schalten Sie das Gerät nach dem Kochen aus.
7. Lassen Sie das Gerät abkühlen, bevor Sie es reinigen.
Tipp: Die tatsächliche Garzeit hängt von der Dicke und Größe
der Fleischstücke ab. Passen Sie die Garzeit falls nötig an.
18
Page 19

Teriyaki-Lachssteaks
Portionen: 2-4
Temperatur: 200 °C
Zeit: 10-12 Minuten
Zutaten:
2-4 Lachssteaks
Teriyakisauce
Zubereitung:
1. Marinieren Sie den Lachs mindestens 30 Minuten oder
2. Lassen Sie den Lachs abtropfen und fangen Sie die Mari-
3. Setzen Sie die Pfanne ins Gerät und wählen Sie die Grill-
4. Stellen Sie die Temperatur auf 200 °C und die Zeit auf
5. Nach dem Kochen sollte sich der Lachs fest anfühlen und
6. Schalten Sie das Gerät nach dem Kochen aus.
7. Lassen Sie das Gerät abkühlen, bevor Sie es reinigen.
Tipp: Die tatsächliche Garzeit hängt von der Dicke und Größe der Lachssteaks ab. Passen Sie die Garzeit falls nötig an.
Servieren Sie die Steaks mit Zitronenscheiben und Kräutern.
Fleischbällchen oder Burger
Portionen: 25-30 Fleischbällchen
oder 4 Burger
Temperatur: Voreinstellung
Zeit: 15 Minuten (Fleischbällchen)
oder 20 Minuten (Burger)
Zutaten:
150 g Hackfleisch
150 g Schweinswürstchen
Petersilie, gehackt
1 EL Pesto
Gewürze nach Wahl
Zubereitung:
1. Geben Sie alle Zutaten in eine Küchenmaschine oder ei-
2. Bestäuben Sie Ihre Hände mit Mehl und formen Sie wal-
3. Geben Sie die Bällchen in die Pfanne und achten Sie dar-
4. Wählen Sie die Grill-Funktion. Übernehmen Sie die
5. Drehen Sie die Bällchen oder Burger während des Koch-
6. Nach dem Kochen sollten die Bällchen außen braun und
7. Schalten Sie das Gerät nach dem Kochen aus.
8. Lassen Sie das Gerät abkühlen, bevor Sie es reinigen.
über Nacht in der Teriyakisauce.
nade auf. Sie wird hinterher über den Lachs gegeben.
Funktion.
10 Minuten und starten Sie das Gerät.
etwas Farbe angenommen haben.
nen Zerkleinerer und mixen Sie sie bis eine glatte Masse
entstanden ist.
nussgroße Bällchen oder Burger, bis die Mischung aufgebraucht ist.
auf, dass zwischen den einzelnen Bällchen etwas Platz ist.
Setzen Sie die Pfanne ins Gerät.
Temperatur, setzen Sie die Zeit auf 15 Minuten (Fleischbällchen) oder 20 Minuten (Burger) und starten Sie das
Gerät.
prozesses einmal um, damit sie gleichmäßig bräunen.
knusprig sein.
19
Page 20

Schellfisch mit Kräuterkruste
Portionen: 2
Temperatur: 200 °C
Zeit: 15 Minuten
Zutaten:
2 Schellfisch-Filets (ohne Haut)
Kräuterkruste:
2 Scheiben dunkel oder helles
Brot, zerkrümelt sowie Petersilie
und Dill.
1 EL Olivenöl
Gewürze nach Wahl
Kabeljau in Prosciutto
Portionen: 4
Temperatur: 200 °C
Zeit: 15 Minuten
Zutaten:
4 hautlose Kabeljau-Filets
8 Scheiben Prosciutto
Gewürze nach Wahl
Saft einer Zitrone
Zubereitung:
1. Geben Sie alle zutaten für die Kruste in einen Zerkleinerer
und mixen Sie sie, bis feine Brotkrumen entstanden sind.
2. Bedecken Sie den Fisch mit der Kräuterkruste.
3. Legen Sie den Fisch in die Pfanne.
4. Setzen Sie die Pfanne ins Gerät und wählen Sie die Grill-
Funktion.
5. Stellen Sie die Temperatur auf 200 °C und die zeit auf 15
Minuten und starten Sie das Gerät.
6. Nach dem Kochen sollte sich der Fisch fest anfühlen und
die Kräuterkruste Farbe bekommen haben.
7. Schalten Sie das Gerät nach dem Kochen aus.
8. Lassen Sie das Gerät abkühlen, bevor Sie es reinigen.
Tipp: Die tatsächliche Garzeit hängt von der Dicke und Größe
der Filets ab. Passen Sie die Garzeit falls nötig an.
Zubereitung:
1. Bereiten Sie die Kabeljau-Filets vor, indem Sie sie mit Zi-
tronensaft beträufeln und wickeln sie jedes Filet in Prosciutto.
2. Legen Sie den Fisch in die Pfanne und setzen Sie die
Pfanne ins Gerät.
3. Wählen Sie die Grill-Funktion, stellen sie 200 °C und als
Zeit 15 Minuten ein und starten Sie das Gerät.
4. Nach dem Kochen fühlt sicher der Fisch fest an.
5. Schalten Sie das Gerät nach dem Kochen aus.
6. Lassen Sie das Gerät abkühlen, bevor Sie es reinigen.
Tipp: Die tatsächliche Garzeit hängt von der Dicke und Größe
der Filets ab. Passen Sie die Garzeit falls nötig an. Das Gericht
schmeckt auch sehr gut mit Lachsfilets.
20
Page 21

Brathähnchen
Portionen: 2-4
Temperatur: Voreinstellung
Zeit: 60 Minuten (20 Minuten pro
500 g) plus 20 Minuten
Zutaten:
1 Hähnchen (etwa 1,5 kg)
12 kleine Kartoffeln, gewaschen
1 El Öl
Gewürze nach Wahl
1 EL gemischte Kräuter
Käsige Pizzaecken
Portionen: 4
Temperatur: Voreinstellung
Zeit: Voreinstellung
Zutaten:
1 Packung fertiger Pizzateig
1 Packung fertige Pizzasauce
50 g Käse
Zubereitung:
1. Reiben Sie das Hähnchen mit Gewürzen, Kräutern und Öl
ein.
2. Verteilen Sie Kartoffeln und Hähnchen gleichmäßig in der
Pfanne und setzen Sie die Pfanne ins Gerät.
3. Wählen Sie die Grillfunktion.
4. Übernehmen Sie die Temperatur und stellen Sie die zeit
auf 60 Minuten. Starten Sie das Gerät.
5. Nach dem Kochen haben das Hähnchen und Kartoffeln
eine gebräunte, knusprige Haut.
6. Schalten Sie das Gerät nach dem Kochen aus.
7. Lassen Sie das Hähnchen noch 10 Minuten im Gerät
ruhen, bevor Sie es servieren.
8. Lassen Sie das Gerät abkühlen, bevor Sie es reinigen.
Tipp: Die tatsächliche Garzeit hängt von der Größe der Hähnchens ab. Passen Sie die Garzeit falls nötig an.
Zubereitung:
1. Rollen Sie den Pizzateig auf einer bemehlten Arbeitsplat-
te aus.
2. Teilen Sie die Pizza in 4 Stücke und geben sie über jedes
Stück etwas Pizzasauce und etwas Käse.
3. Verteilen Sie die Stücke in der Pfanne.
4. Setzen Sie die Pfanne ins Gerät.
5. Wählen Sie die Grill-Funktion. Übernehmen Sie Zeit und
Temperatur und starten Sie das Gerät.
6. Nach dem Kochen sollte der Pizzaboden knusprig sein.
7. Entnehmen Sie die Pizza und lassen Sie sie auf einem Ku-
chengitter abkühlen.
8. Schalten Sie das Gerät nach dem Kochen aus.
9. Lassen Sie das Gerät abkühlen, bevor Sie es reinigen.
Tipp: Sie können die Pizzaecken auch mit weiteren Zutaten
belegen aber überfüllen Sie sie nicht. Die Grill-Funktion eignet
sich auch zur Zubereitung tiefgefrorener Fertigpizzen.
21
Page 22

Blaubeer-Schoko-Muffins
Portionen: 6-8
Temperatur: 180 °C
Zeit: 20 Minuten
Zutaten:
Mischen:
75 g Mehl
1,5 EL Backpulver
3 EL Puderzucker
Verrühren:
1 kleines Ei
75 ml Milch
Restliche Zutaten:
50 ml Pflanzenöl
75 g frische Blaubeeren
50 g dunkle Schokolade, gehackt
Käse-Scones
Portionen: 6
Temperatur: Voreinstellung
Zeit: Voreinstellung
Zutaten:
200 g Self Raising Flour (spezielle
Mehlsorte mit Backpulver)
1 Prise Salz
1 TL Ganzkornsenf
100 g würziger Käse
50 g Margarine
1 Ei verrührt mit 75 ml Milch
4 cm Ausstecher, rund
Zubereitung:
1. Geben Sie die Mehlmischung und die Eiermischung in
eine Schüssel und verrühren Sie alles zu einem glatten
Teig. Rühren Sie die Schokolade und die Blaubeeren unter.
2. Befüllen Sie Muffinförmchen mit dem Teig und stellen
Sie die gefüllten Förmchen in die Pfanne. Setzen Sie die
Pfannen ins Gerät und wählen Sie die Grill-Funktion.
3. Stellen Sie die Temperatur auf 180 °C und die zeit auf 20
Minuten und starten Sie das Gerät.
4. Nach dem kochen sind die Muffins leicht gebräunt und
fast. Entnehmen Sie die Muffins und lassen Sie sie auf einem Kuchengitter abkühlen.
5. Lassen Sie das Gerät abkühlen, bevor Sie es reinigen.
Tipp: Falls sie Förmchen aus Papier nehmen, verwenden Sie
immer zwei auf einmal, um sicherzugehen, dass der Teig nicht
ausläuft. Befüllen Sie die Förmchen maximal zu ¾ mit teig.
Zubereitung:
1. Vermischen Sie alle trockenen Zutaten. Geben Sie den
Senf und den Eier-Mix hinzu und vermischen Sie alles zu
einem glatten teig.
2. Kneten Sie den Teig auf einer bemehlten Arbeitsplatte,
rollen Sie ihn 2 cm dick aus und stechen Sie die Scones
aus.
3. Legen Sie die Scones in die Pfanne und bestreichen Sie
sie mit etwas Milch oder verquirltem Ei.
4. Setzen Sie die Pfanne ins Gerät.
5. Wählen Sie die Grill-Funktion.
6. Übernehmen Sie Zeit und Temperatur und starten Sie das
Gerät.
7. Nach dem Kochen haben die Scones etwas Farbe ange-
nommen, sind aufgegangen und fassen sich fest an. Nehmen Sie die Scones aus der Pfanne und lassen Sie sie auf
einem Kuchengitter abkühlen.
8. Lassen Sie das Gerät abkühlen, bevor Sie es reinigen.
22
Page 23

Gestürzter Ananas-Kuchen
Portionen: 2-4
Temperatur: 180 °C
Zeit: 20-25 Minuten
Zutaten:
Biskuit:
50 g Self Raising Flour (spezielle
Mehlsorte mit Backpulver)
50 g Puderzucker
50 g Margarine
1 EL gemahlene Mandeln
1 Ei
1 EL Wasser
Einige Tropfen Vanille-Essenz
Belag:
1 kleine Ananas, in Ringen
4-6 g glasierte Kirschen, halbiert
1 EL Zucker
Tarte Tatin
Portionen: 2-4
Temperatur: Voreinstellung
Zeit: Voreinstellung
Zutaten:
1 fertiger Blätterteig
2 große Äpfel
30 g Butter, in Flöckchen
30 g Puderzucker
Zubereitung:
1. Biskuit: geben Sie alle Zutaten in eine Schüssel und
schlagen Sie sie mit dem Handmixer 1 Minute lang zu
einem cremigen Teig.
2. Belag: Legen Sie die Ananasringe und die Kirschen in
eine mit Backpapier ausgelegte kleine Kastenform. Verteilen Sie den Zucker darüber.
3. Geben Sie die Teigmischung über die Ananas und vertei-
len Sie sie gleichmäßig.
4. Stellen Sie die Kastenform in die Pfanne und setzen Sie
die Pfanne in das Gerät.
5. Wählen Sie die Grill-Funktion. Stellen Sie die zeit auf 180 °C
und die Zeit auf 20 Minuten und starten Sie das Gerät.
6. Nach dem Backen sollte der Teig leicht gebräunt sein.
Stecken sie zum Test einen Zahnstocher hinein und
ziehen Sie ihn wieder heraus. Wenn kein teig daran klebt
ist der Kuchen fertig.
7. Schalten Sie das Gerät nach dem Backen aus.
8. Bedecken Sie die Kastenform mit einem großen Teller
und drehen Sie sie um, so dass die Ananas nun oben auf
dem Kuchenteig liegt.
Zubereitung:
1. Schneiden Sie den Blätterteig so zu, dass er in eine runde
Kuchenform passt (mit 18 cm Durchmesser).
2. Schälen Sie die Äpfel, entkernen Sie sie und schneiden
Sie jeden Apfel in 12 Scheiben.
3. Verteilen Sie die Butterflöckchen in der Kuchenform,
stäuben Sie den Puderzucker darüber und verteilen Sie
die Apfelscheiben kreisförmig, überlappend darauf.
4. Drücken Sie den Teig auf die Apfelscheiben und drücken
Sie die Kante am Rand der Kuchenform fest.
5. Setzen Sie die Kuchenform in die Pfanne und setzen Sie
die Pfanne dann ins Gerät.
6. Wählen Sie die Grill-Funktion und übernehmen Sie Zeit
und Temperatur und starten Sie das Gerät.
7. Schalten Sie das Gerät nach dem Backen aus.
8. Bedecken Sie die Kuchenform nach dem Backen mit
einem großen Teller und stürzen Sie die Tarte darauf.
9. Lassen Sie das Gerät abkühlen, bevor Sie es reinigen.
23
Page 24

Einfacher Biskuit-Kuchen oder Biskuit-Törtchen
Portionen: 1 Kuchen (18 cm) oder
8-10 Törtchen
Temperatur: 180 °C
Zeit: 20-25 Minuten (Kuchen)
oder 15 Minuten (Törtchen)
Zutaten:
100 g Self Raising Flour (spezielle
Mehlsorte mit Backpulver)
100 g Puderzucker
100 g Margarine
2 Eier
1 EL Wasser
Einige Tropfen Vanille-Essenz
Glasur und Dekoration:
6 EL Puderzucker verrührt mit
1 El Wasser und einige Smarties
oder bunte Zuckerstreusel
Zubereitung:
1. Biskuit: geben Sie alle Zutaten in eine Schüssel und
schlagen Sie sie mit dem Handmixer 1 Minute lang zu
einem cremigen Teig.
2. Geben Sie den in eine 18 cm große, mit Backpapier
ausgekleidete Kuchenform oder in Muffinförmchen.
Befüllen Sie die Förmchen nur zu ¾ mit Teig. Setzen Sie
die Kuchenform oder die Förmchen in die Pfanne und
setzen Sie die Pfanne ins Gerät.
3. Wählen Sie die Grill-Funktion. Stellen Sie als Temperatur
180 °C ein und als Zeit 15-20 Minuten, je nachdem ob
sie einen Kuchen oder Törtchen backen. Starten Sie das
Gerät.
4. Nach dem Backen sind die Törtchen leicht gebräunt und
der teig gibt leicht nach. Falls die Törtchen oder der Kuchen nicht fertig sind, backen Sie sie weitere 5 Minuten.
5. Schalten Sie das Gerät nach dem Backen aus.
6. Entnehmen Sie den Kuchen / die Törtchen nach dem
Backen und lassen Sie sie auf einem Kuchengitter
abkühlen.
7. Bereiten Sie in der Zwischenzeit die Glasur zu, indem Sie
die Zutaten vermischen.
8. Geben Sie die Glasur über den Kuchen bzw. die Törtchen
und dekorieren Sie sie mit Smarties oder bunten Zuckerstreuseln.
9. Lassen Sie das Gerät abkühlen, bevor Sie es reinigen.
Tipp: Falls die Glasur zu dickflüssig ist, geben sie nach und
nach noch Wasser hinzu, bis sie streichfähig ist.
24
Page 25

Dear Customer,
Congratulations on purchasing this equipment. Please read this manual carefully and take care of the following
hints to avoid damages. Any failure caused by ignoring the mentioned items and cautions mentioned in the
instruction manual are not covered by our warranty and any liability.
Contents
Technical Data 25
Safety Instructions 25
Product Description 26
Control Panel 27
Use and Operation 27
Cleaning and Care 30
Troubleshooting 31
Hints in Disposal 31
Declaration of Conformity 31
Recipes 32
Technical Data
Item number 10030355, 10030356
Power supply 220-240 V ~ 50-60 Hz
Safety Instructions
• Important: Read all instructions carefully before first use.
• Do not touch hot surfaces. Use the handles pls.
• Use only on a level, dry and heat-resistant surface.
• To protect against electrical shock, do not immerse cord, plug or the appliance in water or any other liquid.
• Close supervision is necessary when the appliance is used by or near children.
• Unplug from outlet when not in use and before cleaning. Allow unit to cool before putting on or taking off
parts and before cleaning the appliance.
• Do not operate any appliance with a damaged cord or plug or after the appliance malfunctions or has been
damaged in any manner. Return the appliance to the nearest authorized service facility for examination,
repair or adjustment.
• The use of accessory attachments not recommended by the appliance manufacturer may result in fire,
electrical shock or injury.
• Do not use outdoors.
• Do not let cord touch hot surfaces or hang over the edge of a counter or table.
• Do not place on or near a hot burner or in a heated oven.
• Do not use the appliance for other than its intended use.
25
Page 26
• Extreme caution must be used when moving the appliance containing hot water or other liquids.
• Do not touch, cover or obstruct the steam vent on the top of the appliance as it is extremely hot and may
cause scalding.
• Use only with the AC power outlet as mentioned on the rating label.
• Always unplug from the base of the wall outlet. Never pull on the cord.
• The appliance should be operated on a separate electrical circuit from other operating appliances. If the
electrical circuit is overloaded with other appliances, the appliance may not operate properly.
• Always make sure the outside of the inner cooking pan is dry prior to use. If the cooking pan is returned to
appliance when wet, it may damage or cause the product to malfunction.
• Use extreme caution when opening the lid during or after cooking. Hot steam will escape and may cause
scalding.
• To prevent damage or deformation, do not use the inner pan on a stovetop or burner.
• To disconnect, remove the plug from wall outlet.
• To reduce the risk of electrical shock, cook only in the removable pan provided.
• This appliance is not intended for use by persons (including children) with reduced physical, sensory or mental capabilities unless they have been given supervision or instruction concerning the use of the appliance
by a person responsible for their safety. Children should be supervised to ensure they do not play with the
appliance.
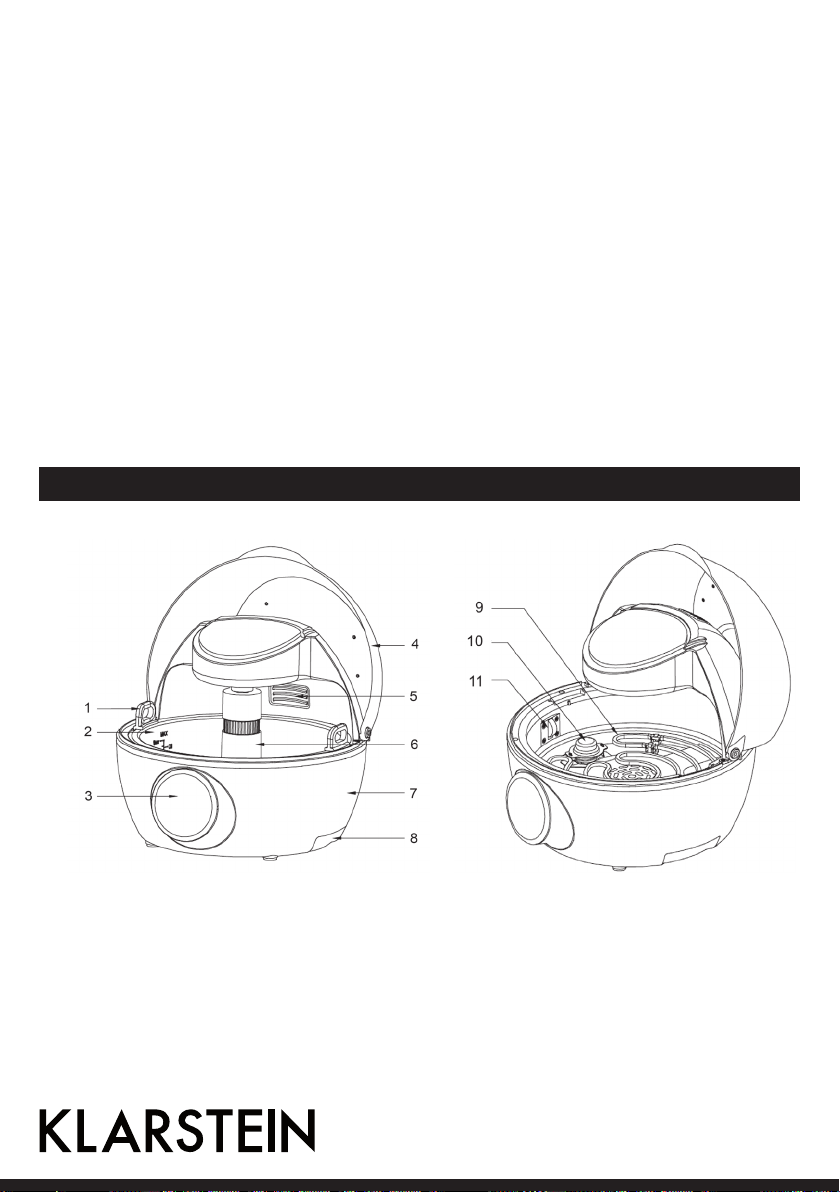
Product Description
1 Pan Handles 4 Lid 7 Housing 10 NTC Sensor
2 Removable Pan 5 Hot air outlet 8 handle 11 Micro switch
3 Control Panel 6 Removable Sriring Rod 9 Heating element
26
Page 27
Control Panel
• Grill: Press this button for function of grill, BBQ, roast,
broil, toast, baking cake or pizza.
• Stir-fry: Press this button for function of frying rice,
potatoes, French chips, vegetables, salad, sea foods,
pasta, sauté, making popcorn, roasting coffee.
• Steam: Function of steaming, cooking rice.
• Stew: For stew, slow cooking, and braise, soup-making,
congee, porridge.
• Set: Select the temperature, time & preset time mode.
[ ]: Add the time or temperature based on default
one after you selected the mode. The adjusting range
pls refer to above settings.
• [ ]: Reduce the time or temperature based on default one after you selected the mode. The adjusting
range pls refer to above settings.
• [ ]: Press this button, the selected function will start
or pause. You can pause anytime during working process.
Settings of the control buttons
Buttons Time
Adjust Range
Grill 0:01-1:00 0:20 100-200 °C 220 °C on yes no
Stir-fry 0:01-1:00 0:30 50-220 °C 220 °C on yes yes
Stew 0:01-8:00 1:00 50-90 °C 90 °C on yes yes
Steam 0:01-1:00 0:30 90-100 °C 100 °C on yes no
Default Time Temp.
Adjust Range
Default Temp. Heating
Element
Hot Air Stirring
Use and Operation
Before first Use
• Read all instructions and important safeguards.
• Remove all packaging materials and make sure items are received in good condition.
• Tear up all plastic bags as they can pose a risk to children.
• Wash the lid, stirring rod and pan in warm, soapy water. Rinse and dry the outside of the pan thoroughly
before returning to cook robot.
• Wipe body clean with a damp cloth.
• Do not use abrasive cleaners or scouring pads.
• Do not immerse the cook robot base, cord or plug in water at any time.
27
Motor
Page 28
How to disassemble the stirring rod
Hold the top part of the stirring rod, then press down, it will came out from the top driving rod, refer to below
graphics. After the top part of the stirring rod out from it, then you can take it out:
How to assemble the stirring rod
Assemble into the appliance: reverse the above steps:
How to Use
1. Put the pan with food you want to cook into the appliance in right position (or you can preheat the pan first
without food inside), to do this, turn around the pan and fit it into the slots on the main body.
Importan Hints:
• During filling in water for Steam/Stew function or oil for frying function into the pan for cooking, don’t exceed the suggested MAX line of the pan.
• Taking care of the pan when put it into the appliance or taking out from it, if filled in with soup or any liquid
inside the pan, ensure the liquid won’t pour or leak into the main body! That may damage the appliance and
cause electric shock!
2. Insert the plug into the socket. Then the four symbols of cooking on the control panel will light on dimly; the
light on the top cover will light on brightly.
3. Press the function button of “Grill/Stir-fry/Stew/Steam” according to your food required, the symbol near
this button will flash and it appears the default time and temperature.
28
Page 29

4. If the default temperature and time is just your desired one, then press the button of “ ”, it will start to
work right now, and the symbol will light on brightly, timer will count down automatically.
5. After the cooking time runs out, ten beeps will ring to remind you the cooking process is done.
Important Notes
• This appliance equipped with micro switch inside (see graphic above “Product Description”). It won’t work
if without pan inside (the panel will still light on but buttons no function); if taking out of the pan during
cooking process, the cooking process will be paused automatically, and need to press the button “ ” to
resume after return the pan into the appliance.
• During doing Steam function, you need to add some water into the pan and put a steam rack on it, then put
your food on a dish or directly onto the rack.
• Take care the hot steam when open the lid!
• If the water in the pan got dry during “Steam/Stew” function is running, it will automatically stop the process to avoid any further overheating. Cool down first to resume it.
• If you just finished the mode of Stir-fry/Grill in temperature over 100°C, and want to change into Stew/
Steam function right away, the overheating protection will work on, the functions won’t start and ten beeps
will ring. To do this, cool it first.
How to adjust the time (Work or Preset) and temperature
If you need to adjust the temperature and time you desired, then pls follow the below steps:
1. Press the “Set” button one time, the temperature numbers will flash; press two times, the symbol of “Work”
& time numbers will flash; press three times, the symbol of “Preset” & time numbers will flash;
2. During flash, press the “+” button to add the temperature and time you desire;
3. During flash, press the “—” button to reduce the temperature and time you desire;
4. After set the desired temperature and time, the relevant setting will flash in 5 seconds, then the settings will
be set and ready to start working.
5. Then press the button “ ”, it will start to cook as your desired temperature and time. (Do not press the
button “ ” when you want to preset cooking time, as it will be activated automatically after the preset
time running out)
29
Page 30

About “Preset” time function:
• During working process, the “Preset” time function is not workable, and you need to stop first (press the
button “ ”), then reset it as the steps mentioned above.
• Preset time under 10 hours, it will appears in format of “ _: _ _” such as “5:30”; preset time in 10 hours or
above, can only be adjusted in 1 hour each, and it will only appear “_ _ H” such as “10H”, and the longest
preset time is 24 hours.
• During stand-by mode, the preset time can’t be in 0, otherwise the preset time is valid.
• The preset time will be activated after set in 5 seconds, then the work time and the preset time will appear
alternately. After the preset time runs out, it will start to work under the selected function mode automatically.
• Short press the button of “+” or “—”, temperature will add or reduce in 5°C each; Cooking time will add or reduce in 1 minute each; Preset time will add or reduce in 5 minutes each (if longer than 10 hours, it will change
by 1 hour each).
• Long press the button of “+” or “—”, temperature will add or reduce in 5°C each; Cooking time will add or
reduce in 5 minutes each; Preset time will add or reduce in 10 minutes each (if longer than 10 hours, it will
change by 1 hour each).
• During working process, you can adjust the work time and temperature, too, to do this, press the “Set” button first to choose the mode, then press the buttons of “+” or “—” to adjust it.
• The screen will be dimmed after 60s if no further actions after plugged in, for electric power saving purpose.
• The light on the top cover will turn on all the time during working mode; and will light out in 2 minutes during
standby or after pressed any button.
Cleaning and Care
Clean the appliance after every use. Cool down the appliance is needed before cleaning.
1. Remove the mains plug from the socket and let the appliance cool down; Note: take out the pan to let the
appliance cool down more quickly.
2. Wipe the outside and inside (especially the liner of top cover) of the appliance with a moist cloth, then dry
with a soft cloth.
3. Clean the pan and the stirring rod with hot water, some washing-up liquid and a non-abrasive sponge, you
can use a degreasing liquid to remove any remaining dirt. DO NOT use any abrasive or caustic cleaning
agents or scouring pads as these may damage the surface of the appliance. Note: the pan and the stirring
rod is dishwasher-proof, can be washed in dishwasher machine. Tip: If dirt is stuck to the pan or the stirring
rod, fill the pan with hot water with some washing-up liquid. Put the stirring rod in the pan and let the pan
and the stirring rod soak for approximately 10 minutes.
Storage and environment
• Make sure the appliance is unplugged, all parts are clean and dry;
• Put the appliance on the clean and dry place out of reach of children.
• Do not throw away the appliance with the normal household waste at the end of its life, but hand it in at an
official collection point for recycling. By doing this, you help to preserve the environment.
30
Page 31

Troubleshooting
Problem Possibly Cause Solutions
The control panel is not
illuminated
The unit will not operate The pan is not located in the
The code E1 is shown in
the LED display
The code E2 is shown in
the LED display
The code E3 is shown in
the LED display
No power Make sure the appliance is plugged in.
Check your socket is switched on or try
another socket.
Ensure the pan is located correctly into
appliance correctly
Just finished the Grill/Stir-fry
function in temperature over
100°C and want to change into
Steam/Stew function right away
The thermal sensor disconnected
or failed
The thermal sensor short circuit Contact your Service Support line for
The appliance over heated to 250
°C during dry heating
the position.
Stop the appliance to cool it first, then
restart
Contact your Service Support line for
assistance
assistance
Unplug the appliance and let it cool
down, then can be resume
Hints on Disposal
According to the European waste regulation 2002/96/EG this symbol on the product
or on its packaging indicates that this product may not be treated as household waste.
Instead it should be taken to the appropriate collection point for the recycling of electrical
and electronic equipment. By ensuring this product is disposed of correctly, you will help
prevent potential negative consequences for the environment and human health, which
could otherwise be caused by inappropriate waste handling of this product. For more detailled information about recycling of this product, please contact your local council or your
household waste disposial service.
Declaration of Conformity
Producer: Chal-Tec GmbH, Wallstraße 16, 10179 Berlin, Germany.
This product is conform to the following European Directives:
2014/30/EU (EMC)
2014/35/EU (LVD)
2011/65/EU (RoHS)
31
Page 32

Recipes
This symbols is to remind you that the Stirring rod attachment is required to make the specific
recipe when using the Low Fat Air Fryer. Please put the rod into the machine before you start
with the recipe.
We advise that each recipe (when appropriate) is seasoned to your own specific taste with Salt and Pepper. We
also suggest that meats and fish are seasoned before cooking if appropriate.
Sushi Rice
Serves: 4 - 8
Set temp: Default
Set time: Default
Ingredients:
300 g Sushi rice, washed
360 ml Water
80 ml Sushi vinegar
Savoury Rice
Serves: 4
Set temp: Default
Set time: Default
Ingredients:
250 g Basmati rice
600 ml Vegetable stock
2 tbs Curry paste
Directions:
1. Put the all the ingredients for the Japanese rice into the removable pan.
2. Place the removable pan in the Low Fat Air Fryer.
3. Select: Steam function. Select: TEMPERATURE default and
TIME default. Start cooking.
4. When cooked the rice will be tender and the liquid absorbed.
5. Leave the rice in the Low Fat Air Fryer for another 10 mins to
steam and then serve or use for Sushi Rice.
6. Sushi Rice: While the rice is still warm remove the pan from
the Low Fat Air Fryer and add the sushi vinegar and fold
it into the rice with a wooden spoon, the sushi rice is now
ready to use.
7. Allow the Low Fat Air Fryer to cool before cleaning as per
User Manual instructions.
Directions:
1. Place all the ingredients into the removable pan.
2. Place the removable pan in the Low Fat Air Fryer.
3. Select: Steam function. Select: TEMPERATURE default and
TIME default. Start cooking.
4. When cooked the rice will be tender and the liquid absorbed.
5. Allow the Low Fat Air Fryer to cool before cleaning as per
User Manual instructions.
Tips: This is delicious served with spiced meat or fish dishes or
roast vegetables. A handful of raisins and cashew nuts can be
stirred in before serving.
32
Page 33

Sweet Coconut Rice with Mangoes
Serves: 4
Set temp: Default
Set time: Default
Ingredients:
125 g Arborio rice
400 ml Milk
400 ml Coconut milk
1 tbs Caster sugar
1 tbs Shredded coconut toasted
Roast Winter Vegetables
Serves: 4 as a main 6 as a side
Set temp: Default 220°C
Set time: Default 20 mins
Ingredients:
200 g Parsnips, cut in 2 cm cubes
200 g Celeriac, cut in 2 cm cubes
200 g Pumpkin, cut in 2cm cubes
1 red Onion, cut into wedges
1 tbs Olive oil
1 tbs Freshly chopped rosemary
1 tbs Freshly chopped thyme
Sea salt and ground black pepper
Directions:
1. Mix the milks, rice and sugar together.
2. Place the removable pan in the Low Fat Air Fryer.
3. Place the milk and rice mixture into the removable pan.
4. Select: Steam function. Select: TEMPERATURE default and
TIME default. Start cooking.
5. When cooked the rice will be tender and the liquid absorbed.
6. Pour into bowls and serve topped with the mangoes and
a drizzle of runny honey and sprinkle of toasted coconut.
7. Allow the Low Fat Air Fryer to cool before cleaning as per
User Manual instructions.
Tips: This is delicious served with the roasted summer fruits or
pineapple (See recipes).
Directions
1. Prepare the vegetables.
2. Put the olive oil, rosemary, thyme, salt and pepper in a mixing bowl and combine well.
3. Add the vegetable cubes and coat them thoroughly with
the mixture.
4. Place the removable pan in the Low Fat Air Fryer and fit the
stirring rod.
5. Place the vegetable mixture evenly into the removable pan.
6. Select: Stir fry function.
7. Default TEMPERATURE 220°C and TIME default 20 mins.
Start cooking.
8. When cooked the vegetables will have started to brown, will
be crisp on the outside and soft in the middle.
9. When cooking is complete switch off. Allow the Low Fat Air
Fryer to cool before cleaning as per User Manual instructions.
Tips: Cooking time may vary depending on the size of the vegetables. Any favourite seasonal vegetables can be used and
the seasoning varied to meet your tastes.
33
Page 34

Mediterranean Vegetables
Serves: 4 - 6
Set temp: Default
Set time: Default
Note: you will need to check the
vegetables half way through to
ensure they are cooked to suit
your preference.
Ingredients:
A mix of vegetables cut into 5cm
cubes approx. 500g (Peppers,
Courgettes, Onion, Aubergine, Tomatoes, Butternut squash)
1 tsp olive oil
Herbs and seasoning
Directions
1. To prepare the vegetables: chop into equal sizes and mix in a
bowl with the oil and seasoning until well coated.
2. Place the removable pan into the Low Fat Air Fryer and fit
the stirring rod.
3. Select: Stir fry function. Select: TEMPERATURE default and
TIME default. Start to cook.
4. When cooked the vegetables will have started to colour and
be tender.
5. When cooking is complete switch off.
6. Serve in bowls with a topping of grated cheese and crusty
bread.
7. Allow the Low Fat Air Fryer to cool before cleaning as per
User Manual instructions.
Tips: Try and cut the vegetables to a similar size to help with even
cooking. The addition of tinned chopped tomatoes will give you a
“Wetter” finished dish with a good Mediterranean feel!
Jacket Potatoes with Garlic and Rosemary
Serves: 2 - 4
Set temp: 180°C
Set time: 20 mins
Ingredients:
8 – 10 Small potatoes, scrubbed
½ tbs Olive oil
1 tbs Freshly chopped rosemary
2 cloves Garlic sliced
Sea salt and ground black pepper
Directions:
1. Wash the new potatoes and pat dry on kitchen paper.
2. Put the olive oil, rosemary, garlic and salt and pepper in a
mixing bowl and combine well.
3. Add the potatoes and coat them well with the mixture.
4. Place the removable pan into the Low Fat Air Fryer and fit
the stirring rod.
5. Place the potatoes into the removable pan.
6. Select: Stir fry function.
7. Adjust TEMPERATURE 180°C and set the TIME to 20 mins.
Start cooking.
8. When cooked they will have started to brown, will be crisp
on the outside and soft in the middle.
9. When cooking is complete switch off.
10. Allow the Low Fat Air Fryer to cool before cleaning as per
User Manual instructions.
34
Page 35

Stir Fry Pork with Ginger and Honey
Serves: 4
Set temp: Default
Set time: 5 and 10 minutes
Ingredients:
2 tbs Cornflour
2 tbs Soy Sauce
1 tbs Honey
250 g Pork tenderloin, cut in pieces
Pinch Fresh ginger finely chopped
2 Garlic cloves finely chopped
1 Green pepper sliced
100 g Mange tout
1 tsp Sesame seeds
1 tbs Sunflower oil
Ginger Chilli Prawns
Serves: 4 - 6
Set temp: Default
Set time: 8 - 10 mins
Ingredients:
500 g King prawns
4 cm cube Fresh grated
1 Fresh chilli finely chopped
1 tbs Soy Sauce
Juice of lime
Directions
1. Prepare all the ingredients.
2. Mix the honey, Soy Sauce and cornflour together and set to
one side. Place the removable pan in the Low Fat Air Fryer
and fit the stirring rod. Add the oil and pork to the pan.
3. Select: Stir Fry function.
4. Select: TEMPERATURE default and adjust the TIME to
5mins. Start cooking.
5. After 5 minutes add the rest of the ingredients and set the
TIME to 10 mins. Start cooking.
6. When the beep sounds and the cooking is finished, check
the meat is done to suit your preference and then add the
Soy Sauce, honey and cornflour mixture stir through quickly
and serve with the noodles or rice.
7. Allow the Low Fat Air Fryer to cool before cleaning as per
User Manual instructions.
Tips: Remember cooking time may vary depending on the
size of the ingredients so check time to ensure the pork is
cooked, and is the colour and texture that suits your taste.
Directions
1. Mix the ginger, soya, lime juice and chilli together in a small
bowl and coat the prawns well with the mixture allowing
them to marinate for at least 30 mins in the fridge.
2. Place the removable pan in the Low Fat Air Fryer and fit the
stirring rod.
3. Place the marinated prawns evenly into the removable pan.
4. Select: Stir fry function.
5. Select: TEMPERATURE default and set the TIME to 8 mins.
Start cooking.
6. When cooked the prawns will have started to colour and be
firm to the bite.
7. Allow the Low Fat Air Fryer to cool before cleaning as per
User Manual instructions.
35
Page 36

Roast Summer Fruits
Serves: 2 - 4
Set temp: 180°C
Set time: 20 mins
Ingredients:
A selection of summer fruits such
as: Nectarines, apricots, plums,
cherries and peaches, halved or
quartered to make them all similar
in size.
1 tbs Demerara sugar
1 tbs Runny honey
Directions:
1. To prepare the fruits, stone them and cut into halves or quarters, depending on the size of the pieces you wish to serve.
2. Place the removable pan in the Low Fat Air Fryer and fit the
stirring rod.
3. Arrange the fruits cut side uppermost in the removable pan
and sprinkle with sugar and honey.
4. Select: Stir fry function. Adjust: TEMPERATURE 180°C and
set the TIME to 20 mins. Start to cook.
5. When cooked the fruit will have started to colour, they will
be soft yet still hold
their shape.
6. When cooking is complete switch off.
7. Allow the Low Fat Air Fryer to cool before cleaning as per
User Manual instructions.
Tips: Check the cooking of the fruits half way through and adjust time if needed.
Roast Pineapple and Coconut
Serves: 2 - 4
Set temp: Default
Set time: 15 - 20 mins
Ingredients:
1 Small ripe pineapple
1 tsp Runny honey
Sprinkle of desiccated coconut
Directions:
1. To prepare the pineapple: peel and cut into quarters, remove
the core and cut each quarter into 2 or 3 length ways, depending on the size of the pieces you wish to serve.
2. Place the removable pan in the Low Fat Air Fryer and fit the
stirring rod.
3. Place pineapple evenly into removable pan.
4. Drizzle a little honey over the pineapple pieces and sprinkle
with the coconut.
5. Select: Stir fry function.
6. Select: TEMPERATURE default and set the TIME to 15 mins.
Start to cook.
7. When cooked the pineapple will have started to colour.
8. When cooking is complete switch off.
9. Allow the Low Fat Air Fryer to cool before cleaning as per
User Manual instructions.
Tips: Serve with a coconut ice cream and shortbread type biscuits.
36
Page 37

The Perfect Homemade Chip
Serves: 2
Set temp: 160°C (pre frying) for 5
mins and then 200°C
Set time: 20 - 25 mins
Ingredients:
2 Large potatoes (600 g)
1 tsp. Oil
Plastic food bag
Directions:
1. Peel the potatoes for the most even results cut with a chip
cutter, or into 8 mm thick chip strips. Soak the potato chips
for at least 20 mins in cold water to remove the excess
starch. Dry very well in a clean tea towel.
2. Place the chips in the plastic bag with the oil and shake well
until the chips are evenly coated with the oil.
3. Place the removable pan in the Low Fat Air Fryer and fit the
stirring rod. 6. Place the chips into the removable pan.
4. Select: Stir fry function. Adjust: TEMPERATURE 160°C, TIMER to 5 mins. Start PRE COOKING.
5. When Pre Cooking is complete select: TEMPERATURE
200°C, TIMER to 20 mins. Start cooking.
6. When cooked the chips will be crisp and golden, but do check
they are done to your liking and adjust the time accordingly.
Serve and eat immediately to ensure a good crisp chip!
7. Allow the Low Fat Air Fryer to cool before cleaning as per
User Manual instructions.
Oven Chips with Chicken Nuggets
Serves: 2
Set temp: Stir fry Default
Set time: Stir Fry Default
Ingredients:
200 g Thick cut frozen chips
200 g Chicken nuggets
Directions:
1. Put the chips and nuggets straight into the removable pan
with the stirring rod fitted; make sure food is equally distributed.
2. Select: Stir fry default and start cooking.
3. When cooked the chips and nuggets will be crisp and golden, but do check they are done to your liking and adjust
the time accordingly.
4. Serve and eat immediately to ensure a good crisp chip!
5. Allow the Low Fat Air Fryer to cool before cleaning as per
User Manual instructions.
37
Tips: Remember cooking time may vary depending on the
size and type of chips/nuggets used, so check the meat is properly cooked and adjust the time to ensure they are the colour
and texture that suits your taste.
Page 38

Mediterranean Chicken Nuggets
Serves: Makes 8 nuggets
Set temp: Default
Set time: Default
Ingredients:
Breadcrumb mix:
2 slices White bread
1 tsp Paprika
For coating:
2 Egg whites lightly beaten
Chicken nugget mix:
½ Red pepper, diced
1 clove Garlic finely chopped
2 tsp Red pesto
1 tbs Flat leaf parsley, chopped
Salt and pepper to taste
1 Egg yolk
1 tbs Olive oil
200 g Chicken breast, in pieces
Directions:
1. Prepare the breadcrumb mix by processing the ingredients
together to form a crumbly mixture, put on a plate.
2. Prepare the chicken nuggets by putting all the ingredients
into a food processor and “Blitz” until all the ingredients are
well minced and combined.
3. Divide the chicken mixture into 8 equal pieces and shape
into balls and then press into nuggets.
4. Coat each nugget first with egg white and then bread
crumbs, make sure they are well coated.
5. Place the removable pan in the Low Fat Air Fryer and fit the
stirring rod.
6. Place the nuggets carefully in the removable pan, make sure
they are evenly distributed.
7. Select: Stir fry function.
8. Select: Stir fry default setting and start cooking.
9. When cooked they will be golden brown and crisp on the
outside.
10. Remove the chicken nuggets with tongs so any fat is left in
the bottom of the pan.
11. Allow the Low Fat Air Fryer to cool before cleaning as per
User Manual instructions.
Tips: Remember cooking time may vary depending on the
size of the chicken nuggets so check time to ensure the chicken texture that suits your taste.
38
Page 39

Beef and Broccoli Stir Fry
Serves: 4
Set temp: Stir fry Default
Set time: 5 and 8 minutes
Ingredients
200 g Broccoli spears
2 x 300 g Sirloin, sliced
2 tsp Coriander seeds, crushed
1 tbs Sesame seed oil
4 Spring onions thinly sliced
1 Clove garlic, finely chopped
Thumb size piece of root ginger,
finely chopped
3 tbs Soy Sauce
Seasoning: salt and pepper
Lamb and Lentil Curry
Serves: 4
Set temp: Default
Set time: Stir fry 10 mins and Stew
1½ hours Stirring rod required
Ingredients:
2 tbs Sunflower oil
500 g Lamb neck fillets, trimmed
and cut into chunks
2 Onions roughly chopped
3 Garlic cloves, finely chopped
3 tbs Curry paste
400 g Tin of chopped tomatoes
150 g Red lentils
1 tsp Salt
Directions:
1. Place the broccoli spears in a heat proof bowl and cover
them with boiling water, leave for 10 mins and then drain.
2. Put the sliced steak, coriander seeds, crushed garlic, ginger,
spring onions, sesame seed oil and seasoning in a bowl and
mix well together.
3. Place the removable pan in the Low Fat Air Fryer and fit the
stirring rod.
4. Add the meat mix evenly to the pan.
5. Select: TEMPERATURE default and adjust the TIME to 5
mins. Start cooking
6. After 5 minutes add the broccoli spears and set the TIME to
8 mins. Start cooking.
7. When the beep sounds and cooking is finished, check the
meat is done to suit your preference and then add the Soy
Sauce, stir through quickly and serve with the noodles or rice.
8. Allow the Low Fat Air Fryer to cool before cleaning as per
User Manual instructions.
Directions:
1. Place the removable pan in the Low Fat Air Fryer and fit the
stirring rod.
2. Put the oil, onion, garlic and the lamb pieces evenly into
the pan.
3. Select: Stir Fry function: TEMPERATURE default and adjust
the TIME to 10 mins. Start cooking.
4. When cooking is completed, the lamb will have started to
brown and the onions soften.
5. Add the rest of the ingredients evenly to the pan and stir
gently to combine
6. Select: Stew function: TEMPERATURE default and adjust
TIME to 1½ hours. Start cooking.
7. When cooking is complete the lamb will be tender and the
lentils soft. Switch off.
8. Allow the Low Fat Air Fryer to cool before cleaning as per
User Manual instructions.
39
Page 40

One Pot Chicken and Bacon Stew
Serves: 4 - 6
Set temp: Default
Set time: Stir fry 10 mins and
Stew default 2 hours
Ingredients:
12 Pieces of chicken
150 g Lardons
2 Medium size onions, chopped
4 Medium carrots thickly sliced
2 Leeks thickly sliced
12 potatoes scrubbed and halved
400 g Tin of chopped tomatoes
1 Chicken stock cube
500 ml Water
75 m white wine or cider
2 Bay leaves & Seasoning
Chilli Con Carne
Serves: 4 - 6
Set temp: Default
Set time: Stir fry 10 mins and
Stew 1 hr 30 mins
Ingredients:
750 g Mince beef
2 Medium size onions, chopped
400 g Tin of baked beans
400 g Tin of beans in chilli sauce
400 g Tin of chopped tomatoes
1 Beef stock cube
150 ml Water
1 tsp Chilli flakes (or to suit taste)
Seasoning
Directions:
1. Place the removable pan in the Low Fat Air Fryer and fit the
stirring rod.
2. Put the onion and the chicken pieces evenly into the pan.
3. Select: Stir Fry function: TEMPERATURE default and adjust
the TIME to 10 mins Start cooking.
4. When cooking is completed, the chicken will have started to
brown and the onions soften.
5. Add the rest of the ingredients evenly to the pan and stir
gently to combine.
6. Select: Stew function: TEMPERATURE default and the TIME
to default, start cooking.
7. When cooking is complete switch off.
8. Remove the pan and then remove the bay leaves before
serving the stew.
9. Allow the Low Fat Air Fryer to cool before cleaning as per
User Manual instructions.
Directions:
1. Place the removable pan in the Low Fat Air Fryer and fit the
stirring rod.
2. Put the onion and the mincemeat evenly into the pan.
3. Select: Stir Fry function: TEMPERATURE default and adjust
the TIME to 10 mins Start cooking.
4. When cooking is completed, the meat will have started to
brown and the onions soften.
5. Add the rest of the ingredients evenly to the pan and stir
gently to combine.
6. Select: Stew function: TEMPERATURE default and adjust
the TIME to 1 hr 30 mins.
7. When cooking is complete switch off.
8. Remove the pan and serve the chilli.
9. Allow the Low Fat Air Fryer to cool before cleaning as per
User Manual instructions.
40
Page 41

Perfect Porridge
Serves: 2 - 4
Set temp: Default
Set time: 20 mins
Ingredients:
100 g Good quality porridge oats
650 ml Milk or water
To Serve: Blueberries and runny
honey to serve.
Directions:
1. Place the removable pan in the Low Fat Air Fryer and fit the
stirring rod.
2. Place the milk/water and porridge oats into the removable
pan.
3. Select: Stew function.
4. Select: TEMPERATURE default and TIME 20 mins. Start
cooking
5. When cooked the porridge oats will be tender and the liquid
absorbed.
6. Pour into bowls and serve topped with the blueberries and
a drizzle of runny honey.
7. Allow the Low Fat Air Fryer to cool before cleaning as per
User Manual instructions.
Mustard Pork Loin Steak with Apple
Serves: 2
Set temp: Default
Set time: Default
Ingredients:
2 Pork loin steaks or chops
1 Large apple thinly sliced
½ Red onion thinly sliced
½ tbs Wholegrain mustard
2 tbs Cider or apple juice
½ tsp Olive oil
Seasoning
Directions:
1. In a bowl mix the apples, onions, oil, seasoning and cider or
apple juice and tip into the removable tray.
2. Rub both sides of the pork steaks with the whole grain mustard and place on top of the apple mixture.
3. Place the removable pan into the Low Fat Air Fryer.
4. Select: Grill function.
5. Select: TEMPERATURE default and TIME default. Start
cooking.
6. It is advisable to turn the pork steaks half way through cooking for a more even colouration.
7. When cooked the steak/chop will feel firm and the fat will
have coloured.
8. When cooking is complete switch off.
9. Allow the Low Fat Air Fryer to cool before cleaning as per
User Manual instructions.
Tips: You will need to adjust times to suit your preference and
the size and thickness of your pork steaks.
41
Page 42

Teriyaki Salmon
Serves: 2 - 4
Set temp: 200°C
Set time: 10-12 mins
Ingredients:
2- 4 Salmon fillets
Teriyaki sauce
Meat Balls or Burgers
Serves: makes 25 / 30 meat balls
and 4 burgers
Set temp: Default
Set time: 15 mins per batch of
meat balls 20 mins for burgers
Ingredients:
150 g Minced beef
150 g Good pork sausages
Handful of chopped parsley
1 tbs Pesto
Seasoning
Directions
1. Marinade the salmon.
2. Place the marinated and drained salmon into the removable pan (keep the left over marinade to pour over the fish at
the end).
3. Place the removable pan in the Low Fat Air Fryer.
4. Select: Grill function.
5. Adjust: TEMPERATURE 200°C and adjust the time to 10
mins. Start cooking.
6. When cooked the salmon will feel firm and the flesh will
flake and it will have slightly coloured.
7. When cooking is complete switch off.
8. Allow the Low Fat Air Fryer to cool before cleaning as per
User Manual instructions.
Tips: You will need to adjust the time according to the size of
the fillets. You can vary the marinade to suit your taste.
Directions:
1. Put all the ingredients in a food processor and process until
smooth.
2. Dust your hands with flour and shape the mixture into walnut size balls or burgers repeat until all the mixture shaped.
Put on a plate and rest in the fridge.
3. Place the meat balls into the removable pan, well spaced so
you may need to cook in batches.
4. Place the removable pan into the Low Fat Air Fryer.
5. Select: Grill function.
6. Select: TEMPERATURE default and the TIME to 15 mins for
meat balls and 20 mins for burgers. Start cooking.
7. It is advisable to turn half way through cooking for a more
even colouration.
8. When cooked they will have started to brown and be slightly crisp on the outside.
9. When cooking is complete switch off.
10. Allow the Low Fat Air Fryer to cool before cleaning as per
User Manual instructions.
42
Page 43

Herb Crusted Haddock/Cod
Serves: 2
Set temp: 200°C
Set time: 15 mins
Ingredients:
2 Skinless unsmoked Cod fillets
Herb crust:
2 Slices of brown or white bread
made into bread crumbs
Handful of herbs such as parsley
and dill
Rind and juice or ½ a lemon
1 tbs Olive oil
Seasoning
Cod Wrapped in Prosciutto
Serves: 4
Set temp: 200°C
Set time: 15 mins
Ingredients:
4 Skinless cod fillets
8 Slices of prosciutto
Seasoning
Juice of 1 lemon
Directions:
1. Prepare the herb crust by putting all the herb crust ingredients into a processor and processing until a fine sticky
crumb is created.
2. Top the fish with the herb crumb mix.
3. Place the fish in the removable pan.
4. Put the removable pan in the Low Fat Air Fryer.
5. Select: Grill function.
6. Select: TEMPERATURE 200°C and the TIME to 15 mins.
Start cooking.
7. When cooked the Haddock will feel firm and the flesh will
flake and the herb crust will have slightly coloured.
8. When cooking is complete switch off.
9. Allow the Low Fat Air Fryer to cool before cleaning as per
User Manual instructions.
Tips: You will need to adjust the time according to the size of
the fillets.
Directions:
1. Prepare the Cod by seasoning and drizzling with the lemon
juice and wrapping each fillet in the prosciutto.
2. Place the Fish in the removable pan.
3. Place the removable pan in the Low Fat Air Fryer.
4. Select: Grill function.
5. Select: TEMPERATURE 200°C and the TIME to 15 mins.
Start cooking.
6. When cooked the Cod will feel firm and the flesh will flake.
7. When cooking is complete switch off.
8. Allow the Low Fat Air Fryer to cool before cleaning as per
User Manual instructions.
43
Tips: You will need to adjust the time according to the size of
the fillets. You can add additional seasoning such as chopped
herbs to the fish before wrapping in the prosciutto.
Page 44

Roast Chicken
Serves: 2 - 4
Set temp: Default
Set time: 60 mins (20 mins per
500 g) plus an extra 20 mins.
Ingredients:
I Chicken approx. 1.5 kg in weight
cut in quarters to fit into the
removable pan
12 Small new potatoes, scrubbed
1 tbs Oil
Seasoning
1 tsp Mixed dried herbs
Cheesy Pizza Slice
Serves: 4
Set temp: Default
Set time: Default
Ingredients:
1 sheet Ready rolled pizza base
Ready made pizza sauce
50 g Cheese
Directions:
1. Rub the seasoning, herbs and oil into the chicken.
2. Place the potatoes and prepared chicken evenly into the removable pan and place into the Low Fat Air Fryer.
3. Select: Grill function.
4. Select: TEMPERATURE default and adjust the TIME to 60
mins. Start cooking.
5. When cooked the chicken and potatoes will have a golden
crisp skin and the chicken will have a core temperature of
70°C.
6. When cooking is complete switch off.
7. Allow the chicken to rest for at least 10 mins before removing from the pan to serve.
8. Allow the Low Fat Air Fryer to cool before cleaning as per
User Manual instructions.
Tips: Make sure the chicken has reached a core temperature
of 70°C for 2 mins. Curry powder can be used in place of the
herbs to give the chicken a little more “kick”!
Directions:
1. Place the pizza dough sheet onto a lightly floured surface.
2. Cut into 4 and spread a thin layer of pizza sauce and sprinkle
on a layer of cheese.
3. Place in the removable pan.
4. Place the pan in the Low Fat Air Fryer.
5. Select: Grill function.
6. Select: TEMPERATURE default and TIME default. Start cooking.
7. When cooked they will have started to brown and the pastry
will be slightly crisp on the outside. Place on a cooling tray
and serve with a green salad.
8. When cooking is complete switch off.
9. Allow the Low Fat Air Fryer to cool before cleaning as per
User Manual instructions.
Tips: Do not overfill the pizza bases. You may wish to add
other ingredients to the pizza slices such as cooked ham or
pepperoni. The Low Fat Air Fryer on GRILL function is also ideal for cooking readymade pizza, just follow the instructions on
the packaging.
44
Page 45

Blueberry and Chocolate Muffins
Serves: 6 - 8
Set temp: Default
Set time: 20 mins
Ingredients:
Put together:
75 g Plain flour
1 ½ tsp Baking powder
3 tbs Golden caster sugar
Whisk together:
1 small egg &
75ml/3 fl oz milk
50ml/2 fl oz Vegetable oil
75g/3oz Fresh blueberries
50g/2 oz Dark chocolate chopped into gravel size pieces
Cheese Scones
Serves: 6
Set temp: Default
Set time: Default
Ingredients:
200 g Self Raising Flour
Pinch of salt
1 Tsp Whole grain mustard
50 g Margarine
100 g strong cheese grated
1 egg beaten together with 75ml milk
4cm cutter (Baking tray to fit in
removable pan)
Directions:
1. Prepare the muffins by pouring the oil, milk and egg mixture
into the flour adding the baking powder and sugar mixture
and stirring in the chocolate and blueberries to make a soft
cake mixture. Do not over mix.
2. Place the filled muffin cases into the removable pan in the
Low Fat Air Fryer.
3. Select: Grill function.
4. Select: TEMPERATURE 180 and TIME default 20 mins.
Start cooking.
5. When cooked they will have started to colour and be firm to
the touch, remove from the removable pan and place onto
a cooling tray.
6. Allow the Low Fat Air Fryer to cool before cleaning as per
User Manual instructions.
Tips: Use doubled up muffin cases for better support during
cooking. Do not fill the muffin cases more than ¾ full.
Directions:
1. Prepare the scones by rubbing in all the dry ingredients to
form bread crumbs.
2. Stir in the mustard and the egg and milk mix to form a soft
dough.
3. On a lightly floured surface gently and lightly knead dough.
Roll out into 2 cm thick and cut out the scones.
4. Place on the baking tray and glaze with a little milk or beaten
egg.
5. Put the baking tray into the removable pan and the pan into
the Low Fat Air Fryer.
6. Select: Grill function.
7. Select: TEMPERATURE default and TIME default 20 mins,
Start cooking.
8. When cooked they will have started to colour and be well
risen and firm to the touch, remove from the removable
pan and place onto a cooling tray.
9. Allow the Low Fat Air Fryer to cool before cleaning as per
User Manual instructions.
45
Page 46

Pineapple Upside Down Cake
Serves: 2 - 4
Set temp: 180°C
Set time: 20 - 25 mins
Ingredients:
Sponge:
50 g Self raising flour
50 g Caster sugar
50 g Margarine
1 tbs Ground almonds (optional)
1 Egg
1 tsp Water
Few drops vanilla essence
Topping:
1 Small tin pineapple rings or
fresh pineapple pieces
4-6 g Glace cherries, cut in half
1 tsp Demerara sugar
Tarte Tatin
Serves: 2 - 4
Set temp: Default
Set time: Default
Ingredients:
1 Sheet of ready rolled puff pastry
2 Large firm eating apples
30 g Butter cut into small slices
30 g Golden caster sugar
Directions:
1. Sponge: Make the sponge by putting all the ingredients into
a mixing bowl and beating with an electric mixer for 1 min
until creamy, light and smooth.
2. Topping: Arrange the pineapple rings/pieces and cherries in
the base of the lined tin and sprinkle with the tsp of sugar.
3. Spoon the cake mixture on top of the pineapple and spread
gently to fit the tin.
4. Place the tin in the removable pan.
5. Place the pan in the Low Fat Air Fryer.
6. Select: Grill function.
7. Adjust: TEMPERATURE 180°C and adjust the TIME to 20
mins. Start cooking.
8. When cooked the sponge will be springy to the touch and a
light golden brown and if tested with a skewer it will come
out clean.
9. When cooking is complete switch off.
10. After cooking place a plate on top of the tin
Directions:
1. Prepare the pastry by cutting it out to fit the tin, 7”/18cm.
2. Prepare the apples by peeling, coring and then slicing each
fruit into 12.
3. Put the butter slices in the tin, sprinkle the sugar over the
butter and arrange the apple slices on top in a circular and
overlapping pattern.
4. Cover the apple with the pastry and press it down firmly
along the inside edge of the cake tin.
5. Place into the removable pan.
6. Place the removable pan into the Low Fat Air Fryer.
7. Select: Grill function.
8. Select: TEMPERATURE default and TIME default. Start cooking.
9. When cooking is complete switch off.
10. After cooking remove the Tarte Tatin by placing a plate
over the cake tin and flip it onto the plate, so the tart drops
onto the plate. Serve hot.
11. Allow the Low Fat Air Fryer to cool before cleaning as per
User Manual instructions.
46
Page 47

Single Layer Sponge Cake or Fairy Cakes
Serves: Makes 18cm cake or 8-10
fairy cakes
Set temp: 180°C
Set time: 20 - 25 mins for sponge
15 mins for fairy cakes
Ingredients:
Sponge:
100 g Self raising flour
100 g Caster sugar
100 g Margarine
2 Eggs
1 tsp Water
Few drops vanilla essence
Topping:
Glace Icing made with 6 tbs icing
sugar mixed to a thick paste with 1
tbs water. Decorate with Smarties
or chocolate buttons.
Directions:
1. Sponge: Make the sponge by putting all the ingredients into
a mixing bowl and beating with an electric mixer for 1 min
until creamy, light and smooth.
2. Spoon the cake mixture into prepared cake tin or fairy ca-
ses and fill ¾ full, place into the removable pan (you may
need to cook the fairy cakes in 2 batches).
3. Place the removable pan in the Low Fat Air Fryer.
4. Select: Grill function.
5. Adjust: TEMPERATURE 180°C and adjust the TIME to
15/20 mins. Start cooking.
6. When cooked the sponge will be springy to the touch and
golden brown, if not cooked put on for a further 5 mins.
7. When cooking is complete switch off.
8. After cooking turn the sponge/fairy cakes out onto a coo-
ling rack.
9. Make the glace icing.
10. Once cooled decorate to suit your taste.
11. Allow the Low Fat Air Fryer to cool before cleaning as per
User Manual instructions.
Tips: Use a well-greased cake tin, or a circle of baking parchment in the base. Or 8-10 fairy cake cases, doubled up. Add
water slowly to the icing in order to get the desired consistency for coating the top of the cake/fairy cakes.
47
Page 48

Chère cliente, cher client,
Toutes nos félicitations pour l’acquisition de ce nouvel appareil. Veuillez lire attentivement et respecter les
instructions de ce mode d’emploi afin d’éviter d’éventuels dommages. Nous ne saurions être tenus pour responsables des dommages dus au non-respect des consignes et à la mauvaise utilisation de l’appareil.
Sommaire
Fiche technique 48
Consignes de sécurité 48
Aperçu de l’appareil 49
Panneau de commande 50
Mise en marche et utilisation 50
Nettoyage et entretien 52
Identification et résolution des problèmes 54
Information sur le recyclage 54
Déclaration de conformité 54
Recettes 55
Fiche technique
Numéro d’article 10030355, 10030356
Alimentation électrique 220-240 V ~ 50-60 Hz
Consignes de sécurité
• Lire attentivement ce mode d’emploi avant d’utiliser l’appareil.
• Ne pas toucher les surfaces chaudes de l’appareil, utiliser uniquement les poignées et les boutons de réglage.
• Poser l’appareil sur une surface plane et résistante à la chaleur.
• Risques d’électrocution ! Ne jamais plonger le cordon d’alimentation, la fiche d’alimentation ou l’appareil dans
l’eau ou tout autre liquide.
• Utiliser l’appareil en présence d’enfants que s’ils sont sous surveillance.
• Débrancher l’appareil avant de le nettoyer. Laisser l’appareil refroidir entièrement avant de retirer des pièces
ou d’en nettoyer les surfaces.
• Les réparations doivent être effectuées uniquement par un personnel spécialisé et sont obligatoires si
l’appareil est endommagé, si le cordon ou la fiche d’alimentation sont endommagés, si un liquide s’y est infiltré ou si des objets sont tombés dessus, si l’appareil est exposé à des liquides ou à l’humidité, s’il est tombé
ou s’il présente des dysfonctionnements.
• Utiliser uniquement les accessoires spécialement conçus par le fabricant pour éviter tout risque d'incendie,
d'électrocution ou de blessure.
• Utiliser l’appareil uniquement en intérieur.
• Veiller à ce que le câble ne touche aucune surface chaude ou ne pende pas d’un plan de travail.
• Ne pas placer l’appareil à proximité d’un four ou d’une cuisinière.
• Utiliser l’appareil uniquement aux fins prévues.
48
Page 49

• Déplacer l’appareil avec grande prudence lorsque celui-ci contient de l’eau brûlante ou tout autre liquide
chaud.
• Veiller à ne pas toucher ou recouvrir la soupape située sur le dessus de l’appareil afin de ne pas se brûler au
contact de la vapeur chaude.
• Brancher l’appareil uniquement à une prise dont la tension correspondant à celle de l’appareil.
• Ne pas tirer sur le cordon d’alimentation pour débrancher la fiche, mais tenir celle-ci fermement pour le faire.
• Ne pas brancher l’appareil à des prises qui alimentent déjà d’autres appareils de cuisine
• . Toujours utiliser une prise séparée pour éviter tout court-circuit.
• S’assurer avant la cuisson que les surfaces extérieures de la poêle interne sont sèches pour éviter
d’endommager l’appareil et de provoquer des dysfonctionnements.
• Ouvrir le couvercle avec prudence. De la vapeur chaude peut s’échapper et provoquer des brûlures.
• Pour éviter des déformations, ne pas utiliser la poêle interne pour faire des fritures sur une cuisinière électrique ou à gaz.
• Pour éteindre l’appareil, débrancher la fiche de la prise.
• Pour éviter toute décharge électrique ou tout court-circuit, cuire uniquement dans la poêle interne.
• Les enfants ainsi que les personnes aux capacités physiques et mentales réduites ne doivent pas utiliser
l’appareil à moins d’avoir assimilé dans le détail les consignes d'utilisation et de sécurité données par la personne chargée de les surveiller. Ne pas laisser les enfants jouer avec l’appareil.
Aperçu de l’appareil
1 Poignée de poêle 4 Couvercle 7 Boîtier 10 Capteur NTC
2 Poêle amovible 5 Sortie de vapeur 8 Poignée 11 Micro interrupteur
3 Panneau de commande 6 Bâton mélangeur amovible 9 Élément
49
Page 50

Panneau de commande
• Grill : appuyer sur cette touche pour griller, torréfier,
toaster et cuire des pizzas et des gâteaux au four.
• Stir-fry : pour faire revenir du riz, des pommes de terre,
des frites, des légumes, des fruits de mer, des pâtes.
Cette fonction sert également à produire des popcorns et à torréfier du café.
• Steam : pour cuire des légumes ou du riz à la vapeur.
• Stew : pour les pots-au-feu, la cuisson lente, à l’étuvée,
pour la préparation de soupe, de porridge ou de risotto.
• Set : Pour régler la température, la durée et les modes
par défaut.
• Touche [ ] : : augmente la durée ou la température
une fois le mode sélectionné. Valeurs réglables, cf. tableau ci-dessous.
• Touche [ ] : diminue la durée ou la température une
fois le mode sélectionné. Valeurs réglables, cf. tableau
ci-dessous.
• Touche [ ] : appuyer sur cette touche pour démarrer
ou interrompre la fonction sélectionnée. Remarque :
il est à tout moment possible d’interrompre les fonctions pendant le fonctionnement de l’appareil.
Paramètres possibles
Touche Durée
réglable
Grill 0:01-1:00 0:20 100-200 °C 220 °C allumé oui non
Stir-fry 0:01-1:00 0:30 50-220 °C 220 °C allumé oui oui
Stew 0:01-8:00 1:00 50-90 °C 90 °C allumé oui oui
Steam 0:01-1:00 0:30 90-100 °C 100 °C allumé oui non
Réglage par
défaut (durée)
Température
réglable
Réglage par défaut
(température)
Élément
chauffant
Air chaud Moteur de
mélange
Mise en marche et utilisation
Avant la première mise en marche
• Lire minutieusement toutes les instructions du mode d’emploi.
• Retirer tous les éléments d’emballage et inspecter l’appareil pour déceler d’éventuels dégâts.
• Jeter les éléments d’emballage pour éviter que les enfants ne jouent avec et ne se blessent.
• Nettoyer le couvercle, le bâton mélangeur et la poêle à l’eau chaude. Rincer les éléments à l’eau claire et les
sécher minutieusement.
• Nettoyer le socle de l’appareil avec une éponge humide. Ne pas utiliser de solvant ou d’éponge abrasive. Ne
jamais plonger le socle, le câble et la fiche dans l’eau
50
Page 51

Voici comment démonter l’appareil
Maintenir fermement la partie supérieure du bâton mélangeur et exercer une pression dessus vers le bas. Il
se désolidarise alors du moteur, comme illustré ci-dessous. Une fois que le bâton mélangeur s’est détaché du
moteur, il est possible de l’enlever :
Voici comment remonter l’appareil
Répéter les étapes décrites ci-dessus dans le sens inverse.
Comment utiliser l’appareil
1. Remplir la poêle avec les aliments à faire cuire et installer la poêle dans l’appareil. Bien positionner celle-ci
sur les fentes du socle et la tourner.
Consignes importantes :
• Lorsque de l’eau est versée dans la poêle pour la fonction Stew/Steam, veiller à ne pas excéder le repère
MAX.
• Au moment de sortir la poêle contenant du liquide de l’appareil, veiller à ce que le liquide ne déborde pas et
ne pénètre dans le socle de l’appareil. Cela pourrait l’endommager ou provoquer un court-circuit.
2. Brancher la fiche dans la prise. Les symboles du panneau de commande s’allument faiblement, tandis que la
lumière sur le dessus du couvercle s’allume clairement.
3. Appuyer sur une des touches de commande Grill, Steam, Stir-Fry ou Stew, selon la fonction utilisée. Le symbole correspondant à la fonction sélectionnée s’allume. L’écran affiche la durée et la température par défaut.
51
Page 52

4. Pour valider la durée et la température sélectionnées, appuyer sur la touche [ ]. L’appareil démarre, le
symbole s’allume clairement et le minuteur commence le décompte automatiquement.
5. Une fois le temps écoulé, un bip sonore retentit 10 fois de suite pour avertir que la cuisson est terminée.
Remarques :
• L’appareil comporte un micro-interrupteur intégré (cf. aperçu de l’appareil). Si la poêle n’est pas installée,
l’appareil ne se met pas en marche (le panneau de commande est certes allumé mais les touches ne peuvent
pas être activées. Si la poêle est retirée pendant la cuisson, l’appareil s’éteint automatiquement. Appuyer de
nouveau sur la touche [ ] pour reprendre la cuisson après avoir réinstallé la poêle.
• Lorsque la fonction Steam est utilisée, il est nécessaire de rajouter un peu d’eau dans la poêle pendant la
cuisson.
• Soulever le couvercle avec précaution, de la vapeur d’eau est susceptible de s’échapper.
• Si l’eau s’évapore complètement pendant l’utilisation de la fonction Steam/Stew, l’appareil s’éteint automatiquement pour éviter qu’il ne surchauffe. Laisser l’appareil refroidir complètement et rajouter de l’eau avant
de reprendre la cuisson.
• Si la fonction Stir-fry/Grill vient de se terminer à 100 °C et que le mode Stream/Stew est immédiatement activé, la protection contre la surchauffe s’allume et les touches de commande sont bloquées. Laisser
d'abord l’appareil refroidir avant d’utiliser les autres fonctions.
Modifier la durée et la température
Pour ajuster la durée et la température à sa guise, procéder comme suit :
1. Appuyer une fois sur la touche Set, l’affichage de la température clignote. Appuyer deux fois sur la touche
Set, « Work » et l’affichage de la durée clignotent. Appuyer trois fois sur la touche Set, « Preset » (démarrage
différé) et l’affichage de la durée clignotent.
2. Pendant que l’affichage clignote, utiliser la touche [+] pour augmenter la température.
3. Pendant que l’affichage clignote, utiliser la touche [-] pour diminuer la température.
4. Une fois la valeur souhaitée sélectionnée, le paramétrage se met à clignoter après 5 secondes. Les réglages
sont alors validés et l’appareil est prêt.
5. Appuyer sur la touche [ ] pour démarrer la cuisson. IMPORTANT : ne pas appuyer sur la touche pour le
démarrage différé, car l’appareil se met automatiquement en marche une fois que le décompte du minuteur
pour le démarrage différé est écoulé.
52
Page 53

Régler le démarrage différé (Preset)
• Pendant la cuisson, il n’est pas possible de régler le démarrage différé. Arrêter la cuisson avec la touche [
] et modifier les valeurs comme décrit dans le paragraphe précédent.
• Les démarrages différés sous 10 heures s’affichent au format _:_ _ (par ex. 5:30). Les démarrages différés
au-delà de 10 heures s’affichent au format _ _ (par ex. 10 H) et seules les heures peuvent être modifiées. Le
démarrage différé le plus lointain possible dans le temps est de 24 heures.
• Le minuteur est activé 5 secondes après que le temps du démarrage différé ait été réglé. L’écran affiche alternativement le temps restant avant le démarrage et le temps de cuisson. Une fois le temps de décompte
pour le démarrage différé est écoulé, l’appareil démarre automatiquement la cuisson dans le mode sélectionné.
Conseils pratiques
• Appuyer brièvement sur la touche [+] ou [-] permet de modifier la température par paliers de 5 °C et de
modifier la durée par paliers de 1 minute. La durée précédant un démarrage différé peut être modifiée par
tranches de 5 minutes, et au-delà de 10 heures par paliers de 1 heure.
• Appuyer longuement sur la touche [+] ou [-] permet de modifier la température par paliers de 5 °C et de
modifier la durée par paliers de 1 minute. La durée précédant un démarrage différé peut être modifiée par
tranches de 5 minutes, et au-delà de 10 heures par paliers de 1 heure.
• Il est à tout moment possible de modifier la durée et la température pendant la cuisson. Pour cela, appuyer
sur la touche Set, sélectionner le mode souhaité et utiliser les touches [+] et [-] pour ajuster les valeurs à sa
convenance.
• L’affichage s’estompe après 60 secondes si plus aucune touche n’est actionnée dans ce laps de temps.
• La lumière du dessus de l’appareil reste tout le temps allumée pendant le fonctionnement de l’appareil. Elle
s’éteint après 2 minutes en mode veille.
Nettoyage et entretien
Laisser d’abord l’appareil refroidir complètement avant d’en retirer des parties ou de le nettoyer. Nettoyer
l’appareil après chaque utilisation.
1. Débrancher la fiche de la prise et laisser l’appareil refroidir. L’appareil refroidit plus vite lorsque la poêle en est
retirée.
2. Nettoyer les surfaces extérieures et intérieures (particulièrement le dessus) avec une éponge humide et
essuyer avec un chiffon sec.
3. Nettoyer la poêle et le bâton mélangeur à l’eau chaude, un peu de liquide vaisselle et une éponge souple. Ne
pas utiliser d’éponge abrasive pour ne pas endommager le revêtement des surfaces. Si la saleté adhère trop,
remplir un récipient d’eau chaude et y faire tremper la poêle et le bâton mélangeur pendant un moment.
Rangement de l’appareil
• S’assurer que l’appareil est éteint et que toutes les parties sont propres et sèches.
• Ranger l’appareil dans un endroit propre, sec et inaccessible aux enfants.
53
Page 54

Identification et résolution des problèmes
Problème Cause possible Solution
Le panneau de commande
ne s’allume pas.
L’appareil ne fonctionne
pas.
Le message d’erreur E1
s’affiche
Le message d’erreur E2
s’affiche
Le message d’erreur E3
s’affiche
Pas de courant. S’assurer que la fiche est branchée et que
la prise fonctionne.
La poêle n’a pas été correctement
installée.
La fonction Grill/Stirfry
est terminée et la fonction
Steam/Stew a été enclenchée
directement après.
Le capteur thermique est en
panne.
Le capteur thermique est cassé. Contacter le service client ou une
L’appareil a chauffé au-delà de
250 °C.
S’assurer que la poêle a été correctement
installée dans l’appareil.
Arrêter l’appareil et le laisser refroidir. Puis
démarrer la fonction souhaitée.
Contacter le service client ou une
entreprise spécialisée.
entreprise spécialisée.
Débrancher l’appareil et le laisser
complètement refroidir. Puis le remettre
en marche
Information sur le recyclage
Vous trouverez sur le produit l’image ci-contre (une poubelle sur roues, barrée d'une croix),
ce qui indique que le produit se trouve soumis à la directive européenne 2002/96/CE.
Renseignez-vous sur les dispositions en vigueur dans votre région concernant la collecte
séparée des appareils électriques et électroniques. Respectez-les et ne jetez pas les appareils usagés avec les ordures ménagères. La mise au rebut correcte du produit usagé permet de préserver l’environnement et la santé. Le recyclage des matériaux contribue à la
préservation des ressources naturelles.
Déclaration de conformité
Fabricant : Chal-Tec GmbH, Wallstraße 16, 10179 Berlin, Allemagne.
Ce produit est conforme aux directives européennes suivantes :
2014/30/UE (CEM)
2014/35/UE (LVD)
2011/65/UE (RoHS)
54
Page 55

Recettes
Ce symbole indique que le bâton mélangeur est nécessaire pour cette recette. Monter le bâton
mélangeur dans l’appareil comme décrit dans la section « Mise en marche et utilisation » avant
de commencer la préparation.
Il est recommandé d’adapter l’assaisonnement en sel et poivre de la recette selon ses propres préférences. Il
est conseillé, par ailleurs, de pré-assaisonner le poisson et la viande avant la cuisson.
Sushis japonais au riz
Portions : 4-8
Température : par défaut
Durée : par défaut
Ingrédients :
300 g de riz à sushi lavé
360 ml d’eau
80 ml de vinaigre pour sushi
Riz au curry
Prtions : 4
Température : par défaut
Durée : par défaut
Ingrédients :
250 g de riz basmati
600 ml de bouillon de légume
2 càs de pâte de curry
Préparation :
1. Verser le riz et l’eau dans la poêle interne.
2. Placer la poêle dans l’appareil.
3. Sélectionner la fonction Steam.
4. Sélectionner la durée et la température par défaut et démarrer l’appareil.
5. En fin de cuisson, le riz est mou et a complètement absorbé
le liquide.
6. Sortir la poêle tant que le riz est encore chaud et y incorporer le vinaigre pour sushi avec une cuiller en bois. Le riz est
maintenant prêt.
7. Laisser l’appareil refroidir complètement avant de le nettoyer.
Préparation :
1. Verser tous les ingrédients dans la poêle interne.
2. Placer la poêle dans l’appareil.
3. Sélectionner la fonction Steam.
4. Sélectionner la durée et la température par défaut et démarrer l’appareil.
5. En fin de cuisson, le riz est mou et a complètement absorbé
le liquide.
6. Laisser l’appareil refroidir complètement avant de le nettoyer.
Conseils : servir le riz pour accompagner de la viande, du poisson ou des légumes grillés. Ajouter à sa guise des noix de cajou
ou des raisins secs.
55
Page 56

Riz au lait de coco et à la mangue
Portions : 4
Température : par défaut
Durée : par défaut
Ingrédients :
125 g de riz arborio
400 ml de lait
400 ml de lait de coco
1 càs de sucre glace
1 càs de noix de coco râpée
Poêlée de légumes d’hiver
Portions : 4-6
Température : par défaut
Durée : par défaut
Ingrédients :
200 g de panais
100 g de céleri
200 g de citrouille
1 oignon, en segments
1 càs d’huile d’olive
1 càs de romarin haché
1 càs de thym haché
Sel et poivre
Préparation :
1. Verser tous les ingrédients dans la poêle interne.
2. Placer la poêle dans l’appareil.
3. Sélectionner la fonction Steam.
4. Sélectionner la durée et la température par défaut et démarrer l’appareil.
5. En fin de cuisson, le riz est mou et a complètement absorbé
le liquide.
6. Laisser l’appareil refroidir complètement avant de le nettoyer.
Conseils : servir le riz pour accompagner de la viande, du poisson ou des légumes grillés. Ajouter à sa guise des noix de cajou
ou des raisins secs.
Préparation :
1. Éplucher le panais, le céleri et la citrouille et les couper en
dés d’une grosseur de 2 cm.
2. Verser l’huile d’olive, le romarin, le thym, le sel et le poivre
dans un saladier et bien mélanger.
3. Ajouter les légumes en dés et mélanger avec les herbes
aromatiques.
4. Placer la poêle dans l’appareil et installer le bâton mélangeur.
5. Répartir les légumes dans la poêle de manière homogène.
6. Sélectionner la fonction Stir-Fry.
7. Sélectionner la durée et la température par défaut et démarrer l’appareil.
8. Les légumes sont prêts lorsqu’ils sont légèrement brunis,
croquants à l’extérieur et mous à l’intérieur.
9. Lorsque la cuisson est terminée, l’appareil s’éteint. Laisser
l’appareil refroidir complètement avant de le nettoyer.
Conseils : le temps de cuisson dépend toujours de la grosseur
des morceaux. Il est possible d’épicer et d’assaisonner les légumes grillés à sa guise.
56
Page 57

Légumes méditerranéens
Portions : 4-6
Température : par défaut
Durée : par défaut
Conseil : goûter les légumes à mi-
cuisson et les sortir lorsqu’ils ont la
consistance souhaitée.
Ingrédients :
500 g de légumes variés
1 càs d’huile d’olive
Herbes et épices
Préparation :
1. Couper les légumes (poivrons, oignons, aubergines, tomates, citrouille ou équivalent) en morceaux de 5 cm. Y mélanger l’huile et les herbes aromatiques souhaitées.
2. Placer la poêle dans l’appareil et installer le bâton mélangeur.
3. Répartir les légumes dans la poêle de manière homogène.
4. Sélectionner la fonction Stir-Fry.
5. Sélectionner la durée et la température par défaut et démarrer l’appareil.
6. Les légumes sont prêts lorsqu’ils sont légèrement brunis,
croquants à l’extérieur et mous à l’intérieur.
7. Servir les légumes avec du parmesan et du pain croquant.
8. Laisser l’appareil refroidir complètement avant de le nettoyer.
Conseils : essayer de couper les légumes de la même taille
pour qu’ils cuisent de manière homogène. Ajouter au choix
des tomates coupées fines.
Pommes de terre en robe de chambre à l’ail et au romarin
Portions : 2-4
Température : 180 °C
Durée : 20 minutes
Ingrédients :
8-10 petites pommes de terre
½ càs d’huile d’olive
1 càs de romarin haché
2 gousses d’ail hachées
Sel et poivre
Préparation :
1. Nettoyer les pommes de terre et les sécher.
2. Mélanger l’huile d’olive, l’ail, le sel et le poivre dans un grand
saladier.
3. Ajouter les pommes de terre et mélanger minutieusement
le tout.
4. Placer la poêle dans l’appareil et installer le bâton mélangeur.
5. Répartir les pommes de terre dans la poêle de manière homogène.
6. Sélectionner la fonction Stir-Fry.
7. Effectuer un réglage de 180 °C et 20 minutes et démarrer
l’appareil.
8. Les pommes de terre sont prêtes lorsqu’elles sont légèrement brunies, croquantes à l’extérieur et molles à l’intérieur.
9. L’appareil s’éteint lorsque la cuisson est terminée. Laisser
l’appareil refroidir complètement avant de le nettoyer.
57
Page 58

Filet de porc au gingembre et au miel
Portions : 4
Température : par défaut
Durée : d’abord 5 puis 10 minutes
Ingrédients :
2 càs de farine de maïs
2 càs de sauce soja
1 càs de miel
250 g de filet de porc
1 pincée de poudre de gingembre
2 gousses d’ail hachées
100 g de petits pois mange-tout
1 càc de graines de sésame
1 càs d’huile de tournesol
Préparation :
1. Découper la viande en morceaux faciles à ingérer.
2. Mélanger le miel, la sauce soja et la farine de maïs et réserver.
3. Placer la poêle dans l’appareil et installer le bâton mélangeur.
4. Sélectionner la fonction Stir-Fry.
5. Sélectionner la température par défaut, une durée de 5 minutes et démarrer l’appareil.
6. Ajouter les ingrédients restants après 5 minutes et régler la
durée sur 10 minutes. Démarrer de nouveau l’appareil.
7. Lorsque le bip sonore retentit et que la cuisson est terminée, vérifier que la viande est cuite. Puis ajouter le mélange
de sauce soja, miel et farine de maïs et bien mélanger le
tout. Servir avec du riz ou des pâtes.
8. Laisser l’appareil refroidir avant de le nettoyer.
Conseils : le temps de cuisson dépend toujours de la grosseur
des morceaux. Cuire la viande selon ses préférences de sorte
à ce qu’elle obtienne le degré de brunissement souhaité. Il est
également possible de préparer ce plat avec d’autres sortes de
viande, comme par exemple du poulet.
Crevettes au gingembre et au piment
Portions : 4-6
Température : par défaut
Durée : 8-10 minutes
Ingrédients :
500 g de crevettes géantes
Morceaux de gingembre de 4 cm
1 piment haché
1 càs de sauce soja
Jus de citron vert
Préparation :
1. Mélanger le gingembre, la sauce soja, le jus de citron vert
et le piment dans un saladier. Ajouter les crevettes et bien
mélanger le tout. Laisser les crevettes mariner pendant 30
minutes.
2. Placer la poêle dans l’appareil et installer le bâton mélangeur.
3. Répartir les crevettes dans la poêle de manière homogène.
4. Sélectionner la fonction Stir-Fry.
5. Sélectionner la température par défaut, régler la durée sur 8
minutes et démarrer l’appareil.
6. Les crevettes se colorent à la cuisson et durcissent. Le
temps de cuisson réel dépend de la taille des crevettes.
7. Laisser l’appareil refroidir avant de le nettoyer.
58
Page 59

Fruits estivaux grillés
Portions : 2-4
Température : 200 °C
Durée : 20 minutes
Ingrédients :
Divers fruits d’été, comme des
nectarines, des abricots, des prunes, des cerises et des pêches,
coupées en morceaux de taille
égale
1 càs de sucre glace
1 càs de miel liquide
Préparation :
1. Préparer les fruits en les dénoyautant et en les coupant en
4 ou en 8 en fonction de leur taille.
2. Placer la poêle dans l’appareil et installer le bâton mélangeur.
3. Introduire les fruits dans la poêle avec leur surface coupée
vers le haut, saupoudrer de sucre glace et recouvrir de miel.
4. Sélectionner la fonction Stir-fry.
5. Effectuer un réglage sur 200 °C et 20 minutes et démarrer
l’appareil.
6. Les fruits sont prêts lorsqu’ils ont pris de la couleur tout en
gardant le même aspect.
7. Éteindre l’appareil lorsque la cuisson est terminée. Laisser
l’appareil refroidir complètement avant de le nettoyer.
Conseils : goûter les fruits à mi-cuisson et ajuster le temps de
cuisson si nécessaire.
Ananas et noix de coco grillés
Portions : 2-4
Température : par défaut
Durée : 15-20 minutes
Ingrédients :
1 ananas mûr
1 càs de miel liquide
Flocons de noix de coco non sucrés
Préparation :
1. Éplucher l’ananas et le couper en quatre. Retirer le cœur et
couper chaque quartier en 2 ou en 3, en fonction de la taille
des morceaux souhaitée.
2. Placer la poêle dans l’appareil et installer le bâton mélangeur.
3. Répartir les morceaux dans la poêle de manière homogène.
4. Ajouter le miel et les flocons de noix de coco par-dessus.
5. Sélectionner la fonction Stir-fry.
6. Sélectionner la température par défaut, régler la durée sur
15 minutes et démarrer l’appareil.
7. L’ananas est prêt lorsqu’il a pris de la couleur.
8. L’appareil s’éteint lorsque la cuisson est terminée. Laisser
l’appareil refroidir complètement avant de le nettoyer.
59
Conseils : servir les morceaux d’ananas avec de la glace ou des
biscuits.
Page 60

Parfaites chips de pommes de terre maison
Portions : 2
Température : 160 °C (pré-tor-
réfaction) et 200 °C (torréfaction)
Durée : 20-25 minutes
Ingrédients :
600 g de pommes de terre
Huile et sac plastique
Préparation :
1. Éplucher les pommes de terre et les couper en tranches
2. Faire tremper les pommes de terre dans l’eau pendant 20
3. Sécher minutieusement les chips.
4. Mettre les chips dans le sac plastique avec un peu d’huile
5. Placer la poêle dans l’appareil et installer le bâton mélan-
6. Bien répartir les chips dans la poêle.
7. Sélectionner la fonction Stir-fry.
8. Régler la température sur 160 °C et le minuteur sur 5 mi-
9. Une fois que la torréfaction est terminée, régler la tem-
10. Les chips sont prêtes lorsqu’elles ont doré et qu’elles sont
11. Servir les chips immédiatement tant qu’elles sont croustillantes.
12. Laisser l’appareil refroidir avant de le nettoyer.
Nuggets de poulet avec frites
Portions : 2
Température : par défaut
Durée : par défaut
Ingrédients :
200 g de frites congelées
200 g de nuggets de poulet
Préparation :
1. Placer la poêle dans l’appareil et installer le bâton mélangeur. Répartir les frites et le poulet dans la poêle de manière
homogène.
2. Sélectionner la fonction Stir-fry et démarrer l’appareil.
3. Les nuggets au poulet sont prêts lorsqu’ils sont bruns-dorés. Si les nuggets ne sont pas encore cuits une fois le temps
de cuisson écoulé, ajuster le temps de cuisson en conséquence.
4. Servir la nourriture immédiatement après la cuisson, tant
que les frites et les nuggets sont encore croustillants.
5. Laisser l’appareil refroidir complètement avant de le nettoyer.
épaisses de 8 mm.
minutes pour éliminer l’amidon.
et le secouer jusqu’à ce que l’huile se soit bien répartie.
geur.
nutes. (pré-torréfaction)
pérature sur 200 °C et la durée sur 20 minutes puis démarrer l’appareil.
croustillantes. Goûter les chips et ajuster la durée si nécessaire.
Conseils : le temps réel de cuisson dépend de la taille des nuggets de poulet utilisés.
60
Page 61

Nuggets de poulet méditerranéens
Portions : 8
Température : par défaut
Durée : par défaut
Ingrédients :
2 tranches de pain blanc
1 càs de poudre de paprika
2 blancs d’oeuf
Mélange de nugget :
½ poivron rouge
1 gousse d’ail
2 càs de pesto rouge
1 càs de persil haché
1 jaune d’œuf
1 càs d’huile d’olive
200 g de blanc de poulet
Sel et poivre
Préparation :
1. Mixer le pain blanc avec la poudre de paprika jusqu’à le
rendre friable et placer les miettes sur une assiette.
2. Ajouter les ingrédients pour nuggets dans un broyeur et
mixer le mélange pour nuggets jusqu’à obtenir un mélange homogène. Séparer le mélange en 8 portions, former
d’abord des boulettes puis les aplatir.
3. Recouvrir chaque nugget de blanc d’œuf puis de panure.
Veiller à ce que toute la surface des nuggets soit recouverte
de miettes de pain.
4. Placer la poêle dans l’appareil et installer le bâton mélangeur.
5. Sélectionner la fonction Stir-fry et démarrer l’appareil.
6. Les nuggets sont prêts lorsqu’ils sont dorés et croustillants.
7. Sortir les nuggets à l’aide d’une pince afin que le surplus de
graisse reste dans la poêle.
8. Laisser l’appareil refroidir avant de le nettoyer.
Conseils : le temps réel de cuisson dépend de la grosseur des
nuggets. Cuire les nuggets aussi longtemps que nécessaire
pour qu’ils aient la couleur et la consistance souhaitée.
61
Page 62

Filet de bœuf frit au brocoli
Portions : 4
Température : par défaut
Durée : 5 et 8 minutes
Ingrédients :
200 g de tiges de brocoli
2 x 300 g de filet de bœuf en petits dés
2 càs de coriandre moulue
1 càs d’huile de sésame
4 oignons nouveaux
1 gousse d’ail hachée
1 morceau de gingembre haché
3 càs de sauce soja
Sel et poivre
Curry d’agneau aux lentilles
Portions : 4
Température : par défaut
Durée : 10 minutes (friture) et 1,5
heure (vapeur)
Ingrédients :
2 càs d’huile de tournesol
500 g d’agneau en dés
2 oignons hachés
3 gousses d’ail hachées
3 càs de pâte de curry
400 g de tomates hachées
150 g de lentilles rouges
1 càs de sel
Préparation :
1. Mettre les brocolis dans une poêle et recouvrir d’eau bouillante. Laisser les tiges tremper dans l’eau pendant 10 minutes puis jeter l’eau.
2. Mettre les filets de bœuf découpés, la coriandre, l’ail, le gingembre, les oignons nouveaux, l’huile de sésame, le sel et le
poivre dans un saladier et mélanger le tout.
3. Placer la poêle dans l’appareil et installer le bâton mélangeur.
4. Répartir la viande dans la poêle de manière homogène.
5. Sélectionner la température par défaut et régler la durée sur
5 minutes. Démarrer l’appareil.
6. Après 5 minutes, ajouter les tiges de brocoli et régler la durée sur 8 minutes. Démarrer de nouveau l’appareil.
7. Goûter la viande après 8 minutes. Cuire la viande jusqu’à ce
qu’elle obtienne la consistance et le brunissement souhaités. Ajouter enfin la sauce soja et servir la viande avec du riz
et des pâtes.
8. Laisser l’appareil refroidir avant de le nettoyer.
Préparation :
1. Placer la poêle dans l’appareil et installer le bâton mélangeur.
2. Répartir l’huile, les oignons, l’ail et les morceaux d’agneau de
manière homogène dans la poêle.
3. Sélectionner la fonction Stir-fry, sélectionner la température par défaut, régler la durée sur 10 minutes et démarrer
l’appareil.
4. Lorsque la cuisson est terminée, l’agneau est légèrement
bruni et l’oignon est mou.
5. Ajouter les ingrédients restants et bien mélanger le tout
avec précaution.
6. Sélectionner à présent la fonction Stew, sélectionner la
température par défaut, régler la durée sur 1,5 heure et démarrer l’appareil.
7. A la fin de la cuisson, la viande doit être tendre et les lentilles doivent être molles. Éteindre l’appareil.
8. Laisser l’appareil refroidir avant de le nettoyer.
62
Page 63

Pot-au-feu au poulet et au lard
Portions : 4-6
Température : par défaut
Durée : 10 minutes (friture) et 2
heures (vapeur)
Ingrédients :
12 morceaux de poulet
150 g de bacon
2 oignons hachés
4 carottes grossièrement coupées
2 poireaux coupés fins
400 g de tomates hachées
1 bouillon cube au poulet
500 ml d’eau
75 ml de vin blanc
2 feuilles de laurier
Épices au choix
Chili con carne
Portions : 4-6
Température : par défaut
Durée : 10 minutes (friture) et 1,5
heure (vapeur)
Ingrédients :
750 g de viande hachée
2 oignons hachés
400 g de haricots blancs à la sauce tomate
400 g de piment
400 g de tomates hachées
1 bouillon cube au bœuf
150 ml d’eau
1 càs de flocons de piment
Épices au choix
Préparation :
1. Placer la poêle dans l’appareil et installer le bâton mélangeur.
2. Répartir les oignons et les morceaux de poulet dans la
poêle de manière homogène.
3. Sélectionner la fonction Stir-fry, sélectionner la température par défaut, régler la durée sur 10 minutes et démarrer
l’appareil.
4. Lorsque la cuisson est terminée, le poulet est légèrement
bruni et l’oignon est mou.
5. Ajouter les ingrédients restants et bien mélanger le tout
avec précaution.
6. Sélectionner à présent la fonction Stew, sélectionner la
température et la durée par défaut et démarrer l’appareil.
7. Éteindre l’appareil après la cuisson.
8. Retirer la poêle et enlever les feuilles de laurier avant de
servir.
9. Laisser l’appareil refroidir avant de le nettoyer.
Préparation :
1. Placer la poêle et le bâton mélangeur dans l’appareil.
2. Répartir la viande hachée et les oignons dans la poêle.
3. Sélectionner la fonction Stir-fry, sélectionner la température par défaut, régler la température sur 10 minutes et démarrer l’appareil.
4. Après la cuisson, la viande hachée est légèrement brunie et
les oignons sont mous.
5. Répartir les ingrédients restants de manière homogène.
6. Sélectionner la fonction Stew, sélectionner la température par défaut, régler la durée sur 1,5 heure et démarrer
l’appareil.
7. Éteindre l’appareil après la cuisson.
8. Retirer la poêle et servir avec du piment.
9. Laisser l’appareil refroidir avant de le nettoyer.
63
Page 64

La bouillie d’avoine parfaite
Portions : 2-4
Température : par défaut
Durée : 20 minutes
Ingrédients :
100 g de flocons d’avoine fins
650 ml de lait ou d’eau
Servir avec :
Des myrtilles ou du miel
Préparation :
1. Placer la poêle et le bâton mélangeur dans l’appareil.
2. Verser du lait ou de l’eau ainsi que les flocons d’avoine dans
la poêle.
3. Sélectionner la fonction Stew.
4. Sélectionner la température par défaut et régler la durée sur
20 minutes. Démarrer l’appareil.
5. Après la cuisson, les flocons d’avoine ont complètement
absorbé le liquide.
6. Répartir les flocons d’avoine dans des bols et les servir avec
du miel et des myrtilles.
7. Laisser l’appareil refroidir avant de le nettoyer.
Filet de porc à la moutarde et aux pommes
Portions : 2
Température : par défaut
Durée : 10 minutes (friture) et 1,5
heure (vapeur)
Ingrédients :
2 filets de porc
1 grosse pomme en tranches
½ oignon rouge en tranches
½ càs de moutarde à gros grains
2 càs de vinaigre ou de jus de
pomme
½ càs d’huile d’olive
Épices au choix
Préparation :
1. Mélanger les pommes et les tranches d’oignon dans un saladier avec l’huile et les épices de son choix. Verser ensuite
le mélange dans la poêle.
2. Frotter chaque face des filets de porc avec la moutarde et
placer ceux-ci dans le mélange de la poêle.
3. Placer la poêle dans l’appareil et sélectionner la fonction
Grill.
4. Sélectionner la durée et la température et démarrer
l’appareil. Retourner les steaks une fois pendant la cuisson
5. La viande doit être ferme après la cuisson et être légèrement brunie.
6. Éteindre l’appareil après la cuisson.
7. Laisser l’appareil refroidir avant de le nettoyer.
Conseils : le temps réel de cuisson dépend de l’épaisseur et
de la grosseur des morceaux de viande. Ajuster le temps de
cuisson si nécessaire.
64
Page 65

Darnes de saumon grillées à la sauce teriyaki
Portions : 2-4
Température : 200 °C
Durée : 10-12 minutes
Ingrédients :
2-4 darnes de saumon
Sauce teriyaki
Préparation :
1. Faire mariner le saumon pendant au moins 30 minutes ou
toute une nuit dans la sauce teriyaki.
2. Égoutter le saumon et recueillir le jus de la marinade. Il servira à arroser le saumon par la suite.
3. Placer la poêle dans l’appareil et sélectionner la fonction
Grill.
4. Régler la température sur 200 °C et la durée sur 10 minutes
puis démarrer l’appareil.
5. Après la cuisson, le saumon doit être ferme et avoir prise
des couleurs.
6. Éteindre l’appareil après la cuisson.
7. Laisser l’appareil refroidir avant de le nettoyer.
Conseils : le temps réel de cuisson dépend de l’épaisseur de
la taille des darnes de saumon. Ajuster le temps de cuisson
si nécessaire. Servir les darnes avec des rondelles de citron et
des herbes.
Boulettes de viande ou burgers
Portions : 25-30 boulettes ou
4 burgers
Température : par défaut
Durée : 15 minutes (boulettes de
viande) ou 20 minutes (burger)
Ingrédients :
150 g de viande hachée
150 g de saucisses de porc
Persil haché
1 càs de pesto
Épices au choix
Préparation :
1. Verser tous les ingrédients dans un robot ménager ou un
broyeur et les mixer jusqu’à l’obtention d’un pâte lisse.
2. Recouvrir ses mains de farine et former des boulettes de la
taille de noix ou des burgers, jusqu’à épuisement du mélange.
3. Introduire les boulettes dans la poêle et veiller à maintenir un espace entre chaque boulette. Placer la poêle dans
l’appareil.
4. Sélectionner la fonction Grill. Sélectionner la température
par défaut, régler la durée sur 15 minutes (boulettes de viande) ou 20 minutes (burger) et démarrer l’appareil.
5. Retourner une fois les boulettes ou le burger pendant la
cuisson afin d’obtenir un brunissement homogène.
6. Après la cuisson, les boulettes doivent être brunies et
croustillantes à l’extérieur.
7. Éteindre l’appareil après la cuisson.
8. Laisser l’appareil refroidir avant de le nettoyer.
65
Page 66

Haddock en croûte aux herbes
Portions : 2
Température : 200 °C
Durée : 15 minutes
Ingrédients :
2 filets de haddock (écaillé)
Croûte aux herbes :
2 tranches de pain foncé ou blanc
émiettées de même que du persil
et de l’aneth
1 càs d’huile d’olive
Épices au choix
Cabillaud au prosciutto
Portions : 4
Température : 200 °C
Durée : 15 minutes
Ingrédients :
4 filets de cabillaud écaillés
8 tranches de prosciutto
Épices au choix
Jus d’un citron
Préparation :
1. Verser tous les ingrédients pour la croûte dans un broyeur et
les mixer jusqu’à l’obtention d’une fine chapelure.
2. Recouvrir le poisson de la croûte aux herbes.
3. Déposer le poisson dans la poêle.
4. Placer la poêle dans l’appareil et sélectionner la fonction
Grill.
5. Régler la température sur 200 °C et la durée sur 15 minutes
et démarrer l’appareil.
6. Le poisson doit être ferme après la cuisson et la croûte aux
herbes doit avoir bruni.
7. Éteindre l’appareil après la cuisson.
8. Laisser l’appareil refroidir avant de le nettoyer.
Conseils : le temps réel de cuisson dépend de l’épaisseur et de
la taille du filet. Ajuster la durée de cuisson si nécessaire.
Préparation :
1. Préparer le filet de cabillaud en l’arrosant de jus de citron et
enrouler chaque filet de prosciutto.
2. Mettre le poisson dans la poêle et placer la poêle dans
l’appareil.
3. Sélectionner la fonction Grill, régler la température sur 200
°C et la durée sur 15 minutes puis démarrer l’appareil.
4. Le poisson doit être ferme après la cuisson.
5. Éteindre l’appareil après la cuisson.
6. Laisser l’appareil refroidir avant de le nettoyer.
Conseils : le temps réel de cuisson dépend de l’épaisseur et
de la taille du filet. Ajuster la durée de cuisson si nécessaire. Le
plat est également savoureux avec du filet de saumon.
66
Page 67

Poulet rôti
Portions : 2-4
Température : par défaut
Durée : 60 minutes (20 minutes
pour 500 g) plus 20 minutes
Ingrédients :
1 poulet (environ 1,5 kg)
12 petites pommes de terre lavées
1 càs d’huile
Épices au choix
1 càs d’herbes aromatiques
variées
Parts de pizza au fromage
Portions : 4
Température : par défaut
Durée : par défaut
Ingrédients :
1 paquet de pâte à pizza fin prête
1 paquet de sauce tomate fin
prête
50 g de fromage
Préparation :
1. Frotter le poulet avec des épices, des herbes aromatiques et
de l’huile.
2. Répartir les pommes de terre et le poulet dans la poêle de
manière homogène.
3. Sélectionner la fonction Grill.
4. Sélectionner la température par défaut et régler la durée sur
60 minutes. Démarrer l’appareil.
5. L’extérieur du poulet et des pommes de terre est brunie et
croustillante après la cuisson.
6. Éteindre l’appareil après la cuisson.
7. Laisser le poulet reposer 10 minutes de plus dans l’appareil
avant de le servir.
8. Laisser l’appareil refroidir avant de le nettoyer.
Conseils : le temps réel de cuisson dépend de la taille du poulet. Ajuster la durée de cuisson si nécessaire.
Préparation :
1. Rouler la pâte à pizza sur un plan de travail enfariné
2. Couper la pizza en 4 parts et verser sur chaque part un peu
de sauce à pizza et un peu de fromage.
3. Répartir les parts dans la poêle.
4. Placer la poêle dans l’appareil.
5. Sélectionner la fonction Grill. Sélectionner la durée et la
température par défaut et démarrer l’appareil.
6. La pâte de la pizza doit être croustillante après la cuisson.
7. Sortir les pizzas et les laisser refroidir sur une grille à gâteaux.
8. Éteindre l’appareil après la cuisson.
9. Laisser l’appareil refroidir avant de le nettoyer.
67
Conseils : il est possible de garnir les parts de pizza avec
d’autres ingrédients mais ne pas les surcharger non plus. La
fonction Grill sert aussi à la cuisson des pizzas congelées prépréparées.
Page 68

Muffins au chocolat et aux myrtilles
Portions : 6-8
Température : 180 °C
Durée : 20 minutes
Ingrédients :
Mélanger :
75 g de farine
1,5 càs de levure chimique
3 càs de sucre glace
Battre :
1 petit œuf
75 ml de lait
Autres ingrédients :
50 ml d’huile végétale
75 g de myrtilles fraiches
50 g de chocolat noir en morceaux
Scones au fromage
Portions : 6
Température : par défaut
Durée : par défaut
Ingrédients :
200 g de farine auto-levante
(sorte de farine spéciale avec
levure chimique)
1 pincée de sel
1 càc de moutarde à gros grains
100 g de fromage aux herbes
50 g de margarine
1 œuf battu avec 75 ml de lait
Démouleur rond de 4 cm
Préparation :
1. Verser le mélange de farine et le mélange d’œufs dans un
bol et mélanger le tout pour obtenir une pâte lisse. Incorporer le chocolat et les myrtilles.
2. Remplir les moules à muffins avec la pâte et placer les
moules remplis dans la poêle. Placer la poêle dans l’appareil
et sélectionner la fonction Grill.
3. Régler la température sur 180 °C et la durée sur 20 minutes
puis démarrer l’appareil.
4. Les muffins sont légèrement brunis et fermes. Sortir les
muffins et les laisser refroidir sur une grille à gâteaux.
5. Laisser l’appareil refroidir avant de le nettoyer.
Conseils : si les moules sont des moules en papier, en utiliser
deux superposés pour s’assurer que la pâte ne le perce pas.
Remplir chaque moule au maximum à ¾ de pâte.
Préparation :
1. Mélanger tous les ingrédients secs. Ajouter la moutarde et
le mélange d’œufs et mélanger le tout en une pâte lisse.
2. Pétrir la pâte sur un plan de travail enfariné, la rouler sur une
épaisseur de 2 cm et percer un trou dans les scones.
3. Placer les scones dans la poêle et les badigeonner d’un peu
de lait ou d’œuf battu.
4. Placer la poêle dans l’appareil.
5. Sélectionner la fonction Grill.
6. Sélectionner la durée et la température par défaut et démarrer l’appareil.
7. Les scones ont bruni après la cuisson, ont gonflé et se sont
affermis. Sortir les scones de la poêle et les laisser refroidir
sur une grille à gâteaux.
8. Laisser l’appareil refroidir avant de le nettoyer.
68
Page 69

Gâteau renversé à l’ananas
Portions : 2-4
Température : 180 °C
Durée : 20-25 minutes
Ingrédients :
Génoise :
50 g de farine auto-levante (sorte de
farine spéciale avec levure chimique)
50 g de sucre glace
50 g de margarine
1 càs d’amandes moulus
1 œuf
1 càs d’eau
Quelques gouttes d’essence de
vanille
Garniture :
1 petit ananas en anneaux
4-6 g de cerises glacées coupées
en moitiés, 1 càs de sucre
Tarte Tatin
Portions : 2-4
Température : par défaut
Durée : par défaut
Ingrédients :
1 pâte feuilletée toute prête
2 grosses pommes
30 g de beurre en morceaux
30 g de sucre glace
Préparation :
1. Génoise : verser tous les ingrédients dans un bol et battre
le tout avec un batteur pendant 1 minute jusqu’à obtention
d’une pâte crémeuse.
2. Garniture : disposer les anneaux d’ananas et les cerises dans
un moule à cake recouvert de papier de cuisson. Saupoudrer de sucre.
3. Verser la pâte mélangée sur les ananas et la répartir de manière homogène.
4. Placer le moule à cake dans la poêle et placer la poêle dans
l’appareil.
5. Sélectionner la fonction Grill. Régler la température sur 180
°C et la durée sur 20 minutes puis démarrer l’appareil.
6. La pâte doit être légèrement brunie après la cuisson. Pour
tester la cuisson, y plonger un cure-dent et le ressortir. Si la
pâte n’y reste pas collée, cela signifie que le gâteau est prêt.
7. Éteindre l’appareil après la cuisson.
8. Couvrir le moule à cake avec une grande assiette et la retourner de sorte à ce que l’ananas se retrouve sur le dessus
de la génoise.
Préparation :
1. Couper la pâte feuilletée de sorte à ce qu’elle s’adapte à la
taille du moule à gâteau (d’un diamètre de 18 cm).
2. Éplucher les pommes, les épépiner et découper chaque
pomme en 12 tranches.
3. Répartir les morceaux de beurre dans le moule à gâteau,
saupoudrer le tout de sucre glace et disposer les tranches
de pomme en cercle tout en les superposant légèrement.
4. Recouvrir les pommes avec la pâte et bien appuyer sur la
pâte au bord du moule à gâteau.
5. Placer le moule à gâteau dans la poêle et placer la poêle
dans l’appareil.
6. Sélectionner la fonction Grill et sélectionner la température
et la durée par défaut puis démarrer l’appareil.
7. Éteindre l’appareil après la cuisson.
8. Couvrir le moule à gâteau avec une grande assiette après la
cuisson et retourner la tarte.
9. Laisser l’appareil refroidir avant de le nettoyer.
69
Page 70

Gâteau à génoise ou tartelettes à génoise
Portions : 1 génoise (18 cm) ou
8-10 tartelettes
Température : 180 °C
Durée : 20-25 minutes (gâteau)
ou 15 minutes (tartelettes)
Ingrédients :
100 g de farine auto-levante (sorte de farine spéciale avec levure
chimique)
100 g de sucre glace
100 g de margarine
2 œuf
1 càs d’eau
Quelques gouttes d’essence de
vanille
Glaçage et décoration :
6 càs de sucre glace et plusieurs
Smarties ou vermicelles en sucre
Préparation :
1. Génoise : verser tous les ingrédients dans un bol et les battre avec un batteur pendant 1 minute jusqu’à obtention d’une
pâte crémeuse.
2. La verser dans un moule à gâteau de 18 cm ou dans des
moules à muffin recouverts de papier de cuisson. Remplir le
moule de pâte aux ¾ uniquement. Placer le moule à gâteau
ou les petits moules dans la poêle et placer la poêle dans
l’appareil.
3. Sélectionner la fonction Grill. Régler la température sur 180
°C et la durée sur 15-20 minutes, en fonction que l’on cuise
un gâteau ou des tartelettes. Démarrer l’appareil.
4. Les tartelettes sont légèrement dorées après la cuisson et la
pâte s’affaisse légèrement. Si les tartelettes ou le gâteau ne
sont pas prêts, cuire 5 minutes supplémentaires.
5. Éteindre l’appareil après la cuisson.
6. Sortir le gâteau/les tartelettes après la cuisson et les laisser
refroidir sur une grille à gâteau.
7. Pendant ce temps, préparer le glaçage en mélangeant les
ingrédients.
8. Verser le glaçage sur le gâteau ou les tartelettes et les décorer avec des Smarties ou des vermicelles en sucre.
9. Laisser l’appareil refroidir avant de le nettoyer.
Conseils : Si le glaçage est trop épais, ajouter de l’eau petit à
petit jusqu’à ce qu’il soit possible d’étaler le mélange.
70
Page 71

Gentile cliente,
La ringraziamo per aver acquistato il nostro prodotto. La preghiamo di leggere attentamente le seguenti istruzioni e di seguirle per evitare eventuali danni. Non ci assumiamo alcuna responsabilità per danni derivati da una
mancata osservazione delle avvertenze di sicurezza e da un uso improprio del dispositivo.
Indice
Dati tecnici 71
Avvertenze di sicurezza 71
Descrizione del prodotto 72
Pannello dei comandi 73
Messa in funzione e utilizzo 73
Pulizia e manutenzione 76
Ricerca e risoluzione dei problemi 77
Smaltimento 77
Dichiarazione di conformità 77
Ricette 78
Dati tecnici
Articolo numero 10030355, 10030356
Alimentazione 220-240 V ~ 50-60 Hz
Avvertenze di sicurezza
• Prima dell’uso leggere attentamente tutte le istruzioni.
• Non toccare le superfici calde bensì solo le impugnature e le manopole.
• Posizionare il dispositivo su una superficie piana e resistente al calore.
• Pericolo di scosse elettriche! Non immergere il cavo di alimentazione, la spina o il dispositivo stesso in acqua
o in altri liquidi.
• Sorvegliare i bambini se si utilizza il dispositivo in loro presenza.
• Staccare la spina dalla presa prima di eseguire ogni operazione di pulizia. Far raffreddare completamente il
dispositivo prima di rimuovere i componenti o di pulire le superfici.
• Le riparazioni devono essere eseguite esclusivamente da personale qualificato e sono necessarie se il dispositivo stesso, il cavo di alimentazione o la spina sono danneggiati, se sono stati versati liquidi sopra di esso,
se sono caduti oggetti sopra di esso oppure se il dispositivo è stato esposto all’umidità, è caduto oppure non
funziona correttamente.
• Utilizzare solo gli accessori consigliati dal produttore.
• Utilizzare il dispositivo solo in ambienti interni.
• Assicurarsi che il cavo di alimentazione non tocchi le superfici calde o che non penda dalla superficie di
lavoro.
71
Page 72

• Non collocare il dispositivo vicino a forni o fornelli.
• Utilizzare il dispositivo solo per lo scopo previsto.
• Spostare con la massima cautela il dispositivo se all’interno contiene acqua calda e altri liquidi caldi.
• Non coprire o ostruire la valvola di uscita del vapore posta sulla parte superiore per evitare di scottarsi con
il vapore caldo.
• Collegare il dispositivo solo a prese che corrispondono alla tensione indicata sulla targhetta identificativa.
• Non tirare il cavo per staccare la spina bensì estrarre sempre la spina alla base.
• Non collegare il dispositivo ad una presa alla quale sono già collegati altri apparecchi. Utilizzare sempre una
presa separata, per evitare il pericolo di corto circuito.
• Prima della cottura assicurarsi che la padella interna sia asciutta per garantire il corretto funzionamento del
dispositivo e per non danneggiarlo.
• Aprire il coperchio con cautela. Il vapore caldo potrebbe fuoriuscire e causare ustioni.
• Non utilizzare la padella interna su fornelli da cucina poiché potrebbe deformarsi.
• Per spegnere il dispositivo staccare la spina dalla presa.
• Per evitare il pericolo di scosse elettriche o di corto circuito utilizzare solo la padella interna.
• I bambini, le persone con capacità fisiche, mentali o sensoriali ridotte possono utilizzare il dispositivo solo
se un supervisore ha prima spiegato loro le funzioni e le avvertenze di sicurezza. Prestare attenzione che i
bambini non giochino con il dispositivo.
Descrizione del prodotto
1 Impugnatura padella 4 Coperchio 7 Alloggiamento 10 Sensore NTC
2 Padella rimovibile 5 Uscita vapore 8 Impugnatura 11 Micro interruttore
3 Pannello dei comandi 6 Pala mescolatrice
rimovibile
9 Elemento riscaldante
72
Page 73

Pannello dei comandi
• Grill: funzione adatta per grigliare, arrostire, tostare e
preparare pizze o torte.
• Stir-fry: funzione adatta per preparare riso, patate,
patatine fritte, verdura, frutti di mare. La funzione è
adatta anche per preparare popcorn e tostare il caffè.
• Steam: funzione adatta per cuocere a vapore la verdura o il riso.
• Stew: funzione adatta per una cottura più lunga, per
preparare zuppe, porridge e risotti.
• Set: funzione per impostare la temperatura, il tempo e
le modalità predefinite.
• Tasto [ ]: [ ]: aumentare il tempo o la temperatura
dopo aver selezionato una modalità. Nella tabella sottostante sono indicati i valori impostabili
• Tasto [ ]: diminuire il tempo o la temperatura dopo
aver selezionato una modalità. Nella tabella sottostante sono indicati i valori impostabili.
• Tasto [ ]: premere il tasto per avviare o interrompere
la funzione impostata. Nota: è possibile interrompere
le funzioni in qualsiasi momento mentre il dispositivo
è in funzione.
Impostazioni
Tasto Tempo
impostabile
Grill 0:01-1:00 0:20 100-200 °C 220 °C acceso si no
Stir-fry 0:01-1:00 0:30 50-220 °C 220 °C acceso si si
Stew 0:01-8:00 1:00 50-90 °C 90 °C acceso si si
Steam 0:01-1:00 0:30 90-100 °C 100 °C acceso si no
Tempo
predefinito
Temperatura
impostabile
Temperatura
predefinita
Elemento
riscaldante
Aria calda Motore pala
mescolatrice
Messa in funzione e utilizzo
Avvertenze per il primo utilizzo
• Leggere attentamente tutte le istruzioni.
• Rimuovere completamente il materiale di imballaggio e verificare che il dispositivo non sia danneggiato.
• Smaltire il materiale di imballaggio per evitare che i bambini giochino con esso e si facciano male.
• Lavare in acqua calda il coperchio, la pala mescolatrice e la padella. Sciacquare i componenti e asciugarli con
cura.
• Lavare la base del dispositivo con un panno umido. Non utilizzare solventi o abrasivi. Non immergere in
acqua la base, il cavo di alimentazione e la spina.
73
Page 74

Rimuovere la pala mescolatrice
Afferrare la parte superiore della pala mescolatrice e premerla verso il basso. La pala mescolatrice si stacca
dall’albero motore come mostrato nella figura: ora è possibile rimuoverla.
Assemblare la pala mescolatrice
Ripetere i passaggi descritti sopra al contrario:
Utilizzare il dispositivo
1. Introdurre nella padella gli alimenti da cuocere. Inserire la padella nel dispositivo: allinearla alle scanalature
poste sulla base e ruotarla.
Nota importante:
• Non oltrepassare il segno MAX sulla padella quando si versa l’acqua per la funzione Stew/Steam.
• Se si rimuove la padella con liquido all’interno, prestare attenzione che il liquido non trabocchi e che non
finisca nella base del dispositivo. In caso contrario il dispositivo potrebbe danneggiarsi e comportare il pericolo di corto circuito.
2. Inserire la spina nella presa. I simboli sul pannello dei comandi si spengono e la spia sul coperchio superiore
si accende.
3. Premere uno dei tasti funzione Grill, Steam, Stir-fry oppure Stew, in base alla funzione che si desidera utilizzare. Il simbolo corrispondente accanto alla funzione selezionata si accende. Il display indica il tempo e la
temperatura predefiniti.
74
Page 75

4. Per confermare il tempo e la temperatura impostati, premere il tasto [ ]. Il dispositivo si avvia, il simbolo
si accende e il timer inizia il conto alla rovescia.
5. Allo scadere del tempo impostato, il dispositivo emette 10 segnali acustici per segnalare all’utente che il
tempo è scaduto.
Note:
• Il dispositivo è dotato di un micro interruttore (vedere la descrizione del prodotto). Se la padella non è inserita, il dispositivo non si accende (il pannello dei comandi si accende ma i tasti non sono utilizzabili). Se si
rimuove la padella durante ls cottura, il dispositivo si arresta automaticamente. Premere il tasto [ ] per
proseguire la cottura dopo aver inserito di nuovo la padella.
• Versare un po’ di acqua nella padella durante la cottura quando si utilizza la funzione Steam.
• Sollevare il coperchio con cautela poiché potrebbe fuoriuscire vapore caldo.
• Se durante la funzione Steam/Stew l’acqua evapora completamente, il dispositivo si arresta automaticamente per evitare lo surriscaldamento. Far raffreddare completamente il dispositivo e aggiungere l’acqua
prima di continuare con la cottura.
• Se la funzione Stir-fry/Grill è appena terminata ad una temperatura di 100°C e si passa subito alla modalità
Steam/Stew, si attiva la protezione contro lo surriscaldamento e i tasti si bloccano. Far raffreddare il dispositivo prima di utilizzare altre funzioni.
Modificare il tempo e la temperatura
Per regolare il tempo e la temperatura, procedere nel seguente modo:
1. Premere una volta il tasto Set e la temperatura lampeggia. Premere due volte il tasto Set e l’ora lampeggia.
Premere tre volte il tasto Set e “Preset” (Start programmato) e l’ora lampeggiano.
2. Mentre uno dei valori lampeggia, utilizzare il tasto [+] per aumentare il tempo o la temperatura.
3. Mentre uno dei valori lampeggia, utilizzare il tasto [-] per diminuire il tempo o la temperatura.
4. Dopo aver impostato i valori desiderati, l’impostazione inizia a lampeggiare dopo 5 secondi. Le impostazioni
vengono memorizzate e il dispositivo è pronto per l’uso.
5. Premere il tasto [ ] per avviare la cottura. IMPORTANTE: se è stato impostato lo Start programmato il
dispositivo si avvia automaticamente allo scadere del tempo impostato.
75
Page 76

Impostare lo Start programmato (Preset)
• Durante il processo di cottura non è possibile impostare lo Start programmato. Arrestare il processo di cottura con il tasto [ ] e impostare i valori come descritto nella sezione precedente.
• Lo Start programmato al di sotto delle 10 ore viene indicato nel formato _:_ _ (ad es. 5:30). Lo Start programmato al di sopra delle 10 ore viene indicato nel formato _ _ (ad es. 10 h). Inoltre lo Start programmato
può essere spostato solo di ora in ora. Lo Start programmato più lungo è di 24 ore.
• Il timer si avvia 5 secondi dopo aver impostato lo Start programmato. Sul display compaiono alternandosi
il tempo rimanente e il tempo di cottura. Allo scadere del tempo, il dispositivo avvia automaticamente il
processo di cottura nella modalità prescelta.
Consigli utili
• Premendo brevemente il tasto [+] oppure [-] si modifica la temperatura a intervalli di 5°C, mentre il tempo
di cottura si modifica a intervalli di 1 minuto. Il tempo per lo Start programmato si modifica a intervalli di 5
minuti, al di sopra delle 10 ore a intervalli di 1 ora.
• Tenendo premuto il tasto [+] oppure [-], la temperatura si modifica a intervalli di 5°C, mentre il tempo di
cottura si modifica a intervalli di 5 minuti. Il tempo per lo Start programmato si modifica a intervalli di 10
minuti, sopra le 10 ore a intervalli di 1 ora.
• Durante il processo di cottura è possibile modificare in qualsiasi momento l’ora e la temperatura. Premere il
tasto Set, selezionare la modalità desiderata e utilizzare il tasto [+] e [-] per regolare i valori.
• Dopo 60 secondi, in caso di inattività, l’illuminazione del display si attenua.
• L’illuminazione sul coperchio superiore resta accesa tutto il tempo mentre il dispositivo è in funzione. Invece
in modalità standby si spegne dopo 2 minuti.
Pulizia e manutenzione
Far raffreddare completamente il dispositivo dopo ogni utilizzo, prima di rimuovere dei componenti o prima di
qualsiasi operazione di pulizia. Pulire il dispositivo dopo ogni utilizzo.
1. Staccare la spina dalla presa e far raffreddare il dispositivo. Rimuovere la padella affinché il dispositivo si
raffreddi più rapidamente.
2. Lavare la parte esterna ed interna (soprattutto il coperchio superiore) con un panno umido e asciugare con
cura.
3. Lavare la padella e la pala mescolatrice con acqua calda e un po’ di detersivo. Non utilizzare pagliette in
acciaio per evitare di danneggiare le superfici del dispositivo. Per rimuovere lo sporco più ostinato lasciare in
ammollo la padella e la pala mescolatrice in acqua calda.
Conservare il dispositivo
• Assicurarsi che il dispositivo sia spento e che tutti i componenti siano puliti e asciutti.
• Conservare il dispositivo in un luogo pulito e asciutto lontano dalla portata dei bambini.
76
Page 77

Ricerca e risoluzione dei problemi
Problema Causa possibile Soluzione
Il pannello dei comandi
non si accende.
Il dispositivo non funziona. La padella non è inserita
Codice di errore E1. Il sensore termico è disconesso. Rivolgersi al servizio clienti oppure ad un
Codice di errore E2. Il sensore termico è rotto. Rivolgersi al servizio clienti oppure ad un
Codice di errore E3. Il dispositivo si è surriscaldato
Assenza di corrente. Assicurarsi che la spina sia inserita nella
presa e che la presa sia funzionante.
Assicurarsi che la padella sia inserita
correttamente.
Al termine della funzione
Grill/Stir-fry è stata avviata
direttamente la funzione Steam/
Stew.
sopra i 250°C.
correttamente nel dispositivo.
Arrestare il dispositivo e farlo raffreddare.
Ora avviare la funzione desiderata.
tecnico competente.
tecnico competente.
Staccare la spina dalla presa e far
raffreddare il dispositivo completamente.
Riavviare il dispositivo.
Smaltimento
Se sul prodotto è presente la figura a sinistra (il cassonetto dei rifiuti mobile sbarrato), si
applica la direttiva europea 2002/96/CE. Questi prodotti non possono essere smaltiti con
i rifiuti normali. Informarsi sulle disposizioni vigenti in merito alla raccolta separata di dispositivi elettrici ed elettronici. Non smaltire i vecchi dispositivi con i rifiuti domestici. Grazie
al corretto smaltimento dei vecchi dispositivi, si proteggono il pianeta e la salute delle persone da possibili conseguenze negative. Il riciclo di materiali aiuta a ridurre il consumo di
materie prime.
77
Dichiarazione di conformità
Produttore: Chal-Tec GmbH, Wallstraße 16, 10179 Berlino, Germania.
Questo prodotto è conforme alle seguenti direttive europee:
2014/30/UE (EMC)
2014/35/UE (LVD)
2011/65/UE (RoHS)
Page 78

Questo simbolo indica che per la ricetta è necessaria la pala mescolatrice. Inserire la pala mescolatrice prima della preparazione come descritto nella sezione “Messa in funzione e utilizzo”.
Si consiglia di condire le varie ricette con sale e pepe a piacimento. Si consiglia inoltre di insaporire prima della preparazione il pesce e la carne.
Riso per sushi giapponese
Ricette
Porzioni: 4-8
Temperatura: predefinita
Tempo: predefinito
Ingredienti:
300 g di riso per sushi
360 ml di acqua
80 ml di aceto per sushi
Riso al curry
Porzioni: 4
Temperatura: predefinita
Tempo: predefinito
Ingredienti:
250 g di riso basmati
600 ml di brodo vegetale
2 cucchiaini di curry
Preparazione:
1. Mettere il riso e l’acqua nella padella interna.
2. Inserire la padella nel dispositivo.
3. Selezionare la funzione Steam.
4. Confermare il tempo e la temperatura predefiniti e avviare
il dispositivo.
5. Al termine della cottura il riso diventa morbido e ha assorbito completamente l’acqua.
6. Rimuovere la padella quando il riso è ancora caldo e mescolare con l’aceto per il sushi utilizzando un cucchiaino in legno. Il riso ora è pronto.
7. Far raffreddare completamente il dispositivo prima di pulirlo.
Preparazione:
1. Introdurre tutti gli ingredienti nella padella interna.
2. Inserire la padella nel dispositivo.
3. Selezionare la funzione Steam.
4. Confermare il tempo e la temperatura predefiniti e avviare
il dispositivo.
5. Al termine della cottura il riso diventa morbido e ha assorbito completamente il liquido.
6. Far raffreddare completamente il dispositivo prima di pulirlo.
Consiglio: servire il riso con carne, pesce oppure con verdure.
Aggiungere a piacimento semi di anacardi o uvetta.
78
Page 79

Riso al cocco con mango
Porzioni: 4
Temperatura: predefinita
Tempo: predefinita
Ingredienti:
125 g di riso arborio
400 ml di latte
400 ml di latte al cocco
1 cucchiaino di zucchero a velo
1 cucchiaino di cocco grattugiato
Verdure invernali grigliate
Porzioni: 4-6
Temperatura: predefinita
Tempo: predefinita
Ingredienti:
200 g di pastinaca
100 g di sedano
200 g di zucca
1 cipolla
1 cucchiaino di olio di oliva
1 cucchiaino di rosmarino, tritato
1 cucchiaino di timo, tritato
Sale e pepe
Preparazione:
1. Introdurre tutti gli ingredienti nella padella interna.
2. Inserire la padella nel dispositivo.
3. Selezionare la funzione Steam.
4. Confermare il tempo e la temperatura predefiniti e avviare
il dispositivo.
5. Al termine della cottura il riso diventa morbido e ha assorbito completamente il liquido.
6. Far raffreddare completamente il dispositivo prima di pulirlo.
Consiglio: servire il riso con carne, pesce oppure con verdure.
Aggiungere a piacimento frutta estiva.
Preparazione:
1. Sbucciare la pastinaca, il sedano e la zucca e tagliare a cubetti di 2 cm.
2. Introdurre in una ciotola l’olio di oliva, il rosmarino, il timo, il
sale e il pepe e mescolare bene.
3. Aggiungere la verdura tagliata a cubetti e le spezie.
4. Inserire la padella nel dispositivo e assemblare la pala
mescolatrice.
5. Distribuire la verdura in maniera uniforme nella padella.
6. Selezionare la funzione Stir-fry.
7. Confermare il tempo e la temperatura predefiniti e avviare
il dispositivo.
8. Quando la verdura è pronta diventa croccante all’esterno e
morbida all’interno.
9. Al termine della cottura, spegnere il dispositivo e farlo raffreddare completamente prima di pulirlo.
Nota: il tempo di cottura dipende dalla grandezza delle verdure. Condire le verdure a piacimento.
79
Page 80

Verdure mediterranee
Porzioni: 4-6
Temperatura: predefinita
Tempo: predefinito
Nota: controllare le verdure a
metà cottura e toglierle quando
hanno raggiunto il grado di cottura
desiderato.
Ingredienti:
500 g di verdure miste
1 cucchiaio di olio di oliva
Erbe e spezie
Preparazione:
1. Tagliare le verdure (peperoni, cipolle, melanzane, pomodo-
2. Inserire la padella nel dispositivo e installare la pala mesco-
3. Distribuire le verdure in maniera uniforme nella padella.
4. Selezionare la funzione Stir-fry.
5. Confermare il tempo e la temperatura predefiniti e avviare
6. Quando le verdure sono pronte diventano leggermente
7. Servire le verdure con parmigiano e pane.
8. Far raffreddare completamente il dispositivo prima di pulirlo.
Consiglio: per una cottura uniforme tagliare le verdure della
stessa grandezza. Aggiungere a piacimento pomodori tagliati
a fette sottili.
Patate con aglio e rosmarino
Porzioni: 2-4
Temperatura: 180°C
Tempo: 20 minuti
Ingredienti:
8-10 patate piccole
½ cucchiaio di olio di oliva
1 cucchiaio di rosmarino, tritato
2 spicchi di aglio, tritati
Sale e pepe
Preparazione:
1. Lavare le patate e asciugarle.
2. Mescolare l’olio di oliva, l’aglio, il sale e il pepe in una ciotola
3. Aggiungere le patate e mescolare.
4. Inserire la padella nel dispositivo e assemblare la pala
5. Distribuire le patate in maniera uniforme nella padella.
6. Selezionare la funzione Stir-fry.
7. Impostare 180°C e 20 minuti e avviare il dispositivo.
8. Le patate sono pronte quando all’esterno sono dorate e
9. Al termine della cottura, spegnere il dispositivo. Far raffred-
ri, zucca) in pezzi da 5 cm di grandezza. Mescolare con olio
e con le spezie desiderate.
latrice.
il dispositivo.
scure, all’esterno diventano croccante e all’interno morbide.
grande.
mescolatrice.
croccanti e all’interno morbide.
dare completamente il dispositivo prima di pulirlo.
80
Page 81

Filetto di maiale con zenzero e miele
Porzioni: 4
Temperatura: predefinita
Tempo: inizialmente 5 minuti, in
seguito 10 minuti
Ingredienti:
2 cucchiai di amido di mais
2 cucchiai di salsa di soia
1 cucchiaio di miele
250 g di filetto di maiale un po‘ di
zenzero
2 spicchi di aglio, tritati
100 g di piselli
1 cucchiaino di semi di sesamo
1 cucchiaio di olio di semi di girasole
Preparazione:
1. Tagliare la carne a pezzi piccoli.
2. Mischiare il miele, la salsa di soia e l’amido di mais e metterli
da parte.
3. Inserire la padella nel dispositivo e assemblare la pala
mescolatrice.
4. Selezionare la funzione Stir-fry.
5. Confermare la temperatura predefinita, impostare 5 minuti
e avviare il dispositivo.
6. Dopo 5 minuti aggiungere gli ingredienti rimanenti e impostare il tempo a 10 minuti. Avviare di nuovo il dispositivo.
7. Al termine del processo di cottura viene emesso un segnale acustico: controllare che la carne sia cotta. Aggiungere la
miscela di salsa di soia, miele e amido di mais e mescolare.
Servire con riso o pasta.
8. Far raffreddare il dispositivo prima di pulirlo.
Consiglio: il tempo di cottura dipende sempre dalla grandezza
degli ingredienti. Cuocere la carne fino al raggiungimento della
cottura desiderata. È possibile preparare il piatto utilizzando
altri tipi di carne come ad esempio il pollo.
Gamberetti al chili e allo zenzero
Porzioni: 4-6
Temperatura: predefinita
Tempo: 8-10 minuti
Ingredienti:
500 g di gamberetti grandi
4 cm di pezzi di zenzero, tritato
1 peperoncino, tritato
1 cucchiaio si salsa di soia
Succo di lime
Preparazione:
1. Mescolare in una ciotola zenzero, salsa di soia, succo di lime
e peperoncino. Aggiungere i gamberetti e mescolare il tutto.
Far marinare i gamberetti per 30 minuti.
2. Inserire la padella nel dispositivo e assemblare la pala
mescolatrice.
3. Distribuire i gamberetti in maniera uniforme nella padella.
4. Selezionare la funzione Stir-fry.
5. Confermare la temperatura predefinita, impostare 8 minuti
e avviare il dispositivo.
6. I gamberetti sono pronti quando prendono colore. Il tempo
di cottura effettivo dipende dalla grandezza dei gamberetti.
7. Far raffreddare il dispositivo prima di pulirlo.
81
Page 82

Frutta estiva grigliata
Porzioni: 2-4
Temperatura: 200 °C
Tempo: 20 minuti
Ingredienti:
Frutta estiva a scelta, come albicocche, prugne, ciliegie e pesche,
tagliate a pezzi della stessa grandezza.
1 cucchiaio di zucchero a velo
1 cucchiaio di miele
Cocco e ananas grigliati
Porzioni: 2-4
Temperatura: predefinita
Tempo: 15-20 minuti
Ingredienti:
1 ananas
1 cucchiaio di miele, fluido
Fiocchi di cocco non zuccherati
Preparazione:
1. Preparare la frutta rimuovendo i noccioli e tagliandola in
quattro o in otto parti.
2. Inserire la padella nel dispositivo e assemblare la pala
mescolatrice.
3. Mettere nella padella la frutta con la parte tagliata rivolta
verso l’alto e cospargere lo zucchero a velo e il miele.
4. Selezionare la funzione Stir-fry.
5. Impostare 200°C e 20 minuti e avviare il dispositivo.
6. Quando la frutta è pronta, prende colore e mantiene la sua
forma.
7. Al termine della cottura, spegnere il dispositivo. Far raffreddare completamente il dispositivo prima di pulirlo.
Consiglio: controllare la frutta a metà cottura e regolare il tempo se necessario.
Preparazione:
1. Sbucciare l’ananas e tagliarla in quattro parti. Rimuovere il
nocciolo e tagliare a sua volta ogni pezzo 2-3 volte.
2. Inserire la padella nel dispositivo e assemblare la pala
mescolatrice.
3. Distribuire gli ingredienti in maniera uniforme nella padella.
4. Cospargere il miele e i fiocchi di cocco.
5. Selezionare la funzione Stir-fry.
6. Confermare la temperatura predefinita, impostare il tempo
a 15 minuti e avviare il dispositivo.
7. L’ananas è pronta quando prende colore.
8. Al termine della cottura, spegnere il dispositivo e farlo raffreddare completamente prima di pulirlo.
Consiglio: servire l’ananas con gelato o con biscotti.
82
Page 83

Patatine fatte in casa
Porzioni: 2
Temperatura: inizialmente 160°C
e in seguito 200°C
Tempo: 20-25 minuti
Ingredienti:
600 g di patate
Olio e un sacchetto in plastica
Preparazione:
1. Sbucciare le patate e tagliarle a fette con spessore di 8 mm.
2. Mettere le patate in ammollo per 20 minuti in acqua per
rimuovere l’amido.
3. Asciugare con cura le patatine.
4. Mettere nel sacchetto in plastica le patatine con un po’ di
olio e scuoterlo in modo che l’olio si distribuisca in maniera
uniforme.
5. Inserire la padella nel dispositivo e assemblare la pala
mescolatrice.
6. Distribuire le patatine nella padella.
7. Selezionare la funzione Stir-fry.
8. Impostare la temperatura a 160°C e il timer a 5 minuti (preriscaldare).
9. Ora impostare la temperatura a 200°C e il tempo a 20 minuti e avviare il dispositivo.
10. Le patatine sono pronte quando diventano dorate e croccanti.
Controllare le patatine e se necessario regolare il tempo.
11. Servire le patatine immediatamente.
12. Far raffreddare il dispositivo completamente prima di pulirlo.
Patatine con chicken nuggets
Porzioni: 2
Temperatura: predefinita
Tempo: predefinita
Ingredienti:
200 g di patatine fritte surgelate
200 g di chicken nuggets
Preparazione:
1. Inserire la padella nel dispositivo e assemblare la pala
mescolatrice. Distribuire le patatine fritte e i chicken nugget
in maniera uniforme nella padella.
2. Selezionare la funzione Stir-fry e avviare il dispositivo.
3. I chicken nuggets sono pronti quando diventano dorati. Se
allo scadere del tempo i nugget non sono ancora pronti, regolare il tempo di cottura.
4. Servire gli alimenti subito dopo la cottura quando le patatine e i nugget sono croccanti.
5. Far raffreddare il dispositivo prima di pulirlo.
83
Consiglio: il tempo di cottura effettivo dipende dalla grandezza dei chicken nuggets utilizzati.
Page 84

Chicken nugget mediterranei
Porzioni: 8 nuggets
Temperatura: predefinita
Tempo: predefinito
Ingredienti:
Impanatura:
2 fette di pane bianco
1 cucchiaio di polvere di peperone
2 albumi
Mix nugget
½ peperone, rosso
1 spicchio di aglio
2 cucchiai di pesto, rosso
1 cucchiaio di prezzemolo, tritato
1 tuorlo d’uovo
1 cucchiaio di olio di oliva
200 g di petto di pollo
Sale e pepe
Preparazione:
1. Frullare il pane bianco con la polvere di peperone e mettere
da parte il preparato.
2. Introdurre gli ingredienti per i nuggets in un frullatore e frullare. Distribuire la miscela in 8 porzioni, arrotondarle e poi
appiattirle.
3. Cospargere sui nuggets prima il tuorlo e poi il pangrattato.
4. Inserire la padella nel dispositivo e assemblare la pala
mescolatrice.
5. Selezionare la funzione Stir-fry e avviare il dispositivo.
6. I nuggets sono pronti quando all’esterno diventano dorati e
croccanti.
7. Rimuovere i nuggets con una pinza in modo che il grasso in
eccesso rimanga nella padella.
8. Far raffreddare il dispositivo prima di pulirlo.
Consiglio: il tempo di cottura effettivo dipende dallo spessore
dei nuggets. Cuocere i nuggets fino al raggiungimento del colore e della consistenza desiderati.
84
Page 85

Carne di manzo con broccoli
Porzioni: 4
Temperatura: predefinita
Tempo: 5 e 8 minuti
Ingredienti:
200 g di broccoli
2 x 300 g di carne di manzo, tagliata
2 cucchiai di coriandolo, macinato
1 cucchiaio di olio di sesamo
4 cipolle primavera
1 spicchio di aglio, tritato
1 pezzo di zenzero, tritato
3 cucchiai di salsa di soia
Sale e pepe
Preparazione:
1. Introdurre i broccoli in una pentola e coprire con acqua. La-
2. Introdurre la carne, il coriandolo, l’aglio, lo zenzero, le cipol-
3. Inserire la padella nel dispositivo e assemblare la pala
4. Distribuire la carne in maniera uniforme nella padella.
5. Confermare la temperatura predefinita e impostare 5 mi-
6. Dopo 5 minuti introdurre i broccoli e impostare 8 minuti.
7. Assaggiare la carne dopo 8 minuti. Cuocere la carne fino a
8. Far raffreddare il dispositivo prima di pulirlo.
Agnello e lenticchie al curry
Porzioni: 4
Temperatura: predefinita
Tempo: 10 minuti (arrostire) e 1,5
ore (brasare)
Ingredienti:
2 cucchiai di olio di semi di girasole
500 g di agnello, tagliato
2 cipolle, tritate
3 spicchi di aglio, tritati
3 cucchiai di curry
400 g di pomodori, tritati
150 g di lenticchie rosse
1 cucchiaio di sale
Preparazione:
1. Inserire la padella del dispositivo e assemblare la pala
2. Distribuire nella padella l’olio, le cipolle, l’aglio e la carne in
3. Selezionare la funzione Stir-fry, confermare la temperatura
4. Al termine della cottura, la carne è leggermente dorata e le
5. Aggiungere gli ingredienti rimanenti e mescolare.
6. Selezionare la funzione Stew, confermare la temperatura,
7. Al termine della cottura la carne è tenera e le lenticchie
8. Far raffreddare il dispositivo prima di pulirlo.
sciare cuocere i broccoli per 10 minuti e poi scolare l’acqua.
le, l’olio di sesamo, il sale e il pepe in una ciotola e mischiare
tutto.
mescolatrice.
nuti come tempo. Avviare il dispositivo.
Avviare il dispositivo.
quando ha raggiunto la consistenza e la doratura desiderati.
Infine aggiungere la salsa di soia e servire la carne con riso o
pasta.
mescolatrice.
maniera uniforme.
predefinita, impostare 10 minuti e avviare il dispositivo.
cipolle sono morbide.
impostare 1,5 ore e avviare il dispositivo.
morbide. Spegnere il dispositivo.
85
Page 86

Zuppa con pollo e speck
Porzioni: 4-6
Temperatura: predefinita
Tempo: 10 minuti (arrostire) e 2
ore (brasare)
Ingredienti:
12 pezzi di pollo
150 g di speck
2 cipolle, tritate
4 carote, tagliate
2 porri, tagliati
400 g di pomodoro, tritati
1 dado di brodo di pollo
500 ml di acqua
75 ml di vino bianco
2 foglie di alloro
Spezie a scelta
Chili con carne
Porzioni: 4-6
Temperatura: predefinita
Tempo: 10 minuti (arrostire) e 1,5
ore (brasare)
Ingredienti:
750 g di carne macinata
2 cipolle, tritate
400 g di fagioli
400 g di fagioli in salsa chili
400 g di pomodori, tritati
1 dado di carne
150 ml di acqua
1 cucchiaio di fiocchi di chili
Spezie a scelta
Preparazione:
1. Inserire la padella nel dispositivo e assemblare la pala
mescolatrice.
2. Distribuire nella padella l’olio, le cipolle, l’aglio e la carne in
maniera uniforme.
3. Selezionare la funzione Stir-fry, confermare la temperatura
predefinita, impostare 10 minuti di tempo e avviare il dispositivo.
4. Al termine della cottura, la carne è dorata e le cipolle sono
morbide.
5. Introdurre gli ingredienti restanti e mischiare tutto.
6. Selezionare la funzione Stew, confermare il tempo e la
temperatura e avviare il dispositivo.
7. Spegnere il dispositivo al termine della cottura.
8. Rimuovere le foglie di alloro prima di servire.
9. Far raffreddare il dispositivo prima di pulirlo.
Preparazione:
1. Inserire la padella nel dispositivo e assemblare la pala
mescolatrice.
2. Distribuire nella padella la carne macinata e le cipolle.
3. Selezionare la funzione Stir-fry, confermare la temperatura
predefinita, impostare 10 minuti di tempo e avviare il dispositivo.
4. Al termine della cottura la carne macinata è dorata e le cipolle sono morbide.
5. Aggiungere gli ingredienti rimanenti.
6. Selezionare la funzione Stew, confermare la temperatura,
impostare 1,5 ore e avviare il dispositivo.
7. Spegnere il dispositivo al termine della cottura.
8. Rimuovere la padella e servire.
9. Far raffreddare il dispositivo prima di pulirlo.
86
Page 87

Zuppa d’avena
Porzioni: 2-4
Temperatura: predefinita
Tempo: 20 minuti
Ingredienti:
100 g di fiocchi di avena
650 ml di latte o di acqua
Servire con:
Mirtilli o miele
Preparazione:
1. Inserire la padella nel dispositivo e assemblare la pala
mescolatrice.
2. Introdurre nella padella latte o acqua e i fiocchi di avena.
3. Selezionare la funzione Stew.
4. Confermare la temperatura e impostare 20 minuti. Avviare
il dispositivo.
5. Al termine della cottura i fiocchi di avena hanno assorbito
completamente il liquido.
6. Servire la zuppa di avena con miele e mirtilli.
7. Far raffreddare il dispositivo prima di pulirlo.
Filetto di maiale con senape e mela
Porzioni: 2
Temperatura: predefinita
Tempo: predefinito
Ingredienti:
2 filetti di maiale
1 mela grande, tagliata a fette
½ cipolla rossa, a fette
½ cucchiaio di senape
2 cucchiai di aceto o di succo di
mela
½ cucchiaio di olio di oliva
Spezie a scelta
Preparazione:
1. Mettere la mela e la cipolla in una ciotola con olio e spezie a
scelta. Introdurre il preparato nella padella.
2. Insaporire i filetti di maiale da entrambi i lati con la senape e
mettere nella padella.
3. Mettere la padella nel dispositivo e selezionare la funzione
grill.
4. Confermare il tempo e la temperatura e avviare il dispositivo. Girare la carne per una cottura uniforme.
5. Al termine della cottura la carne è leggermente dorata.
6. Al termine della cottura spegnere il dispositivo.
7. Far raffreddare il dispositivo prima di pulirlo.
Consiglio: il tempo di cottura effettivo dipende dallo spessore
e dalla grandezza della carne. Se necessario regolare il tempo
di cottura.
87
Page 88

Filetti di salmone in salsa teriyaki
Porzioni: 2-4
Temperatura: 200 °C
Tempo: 10-12 minuti
Ingredienti:
2-4 filetti di salmone
Salsa teriyaki
Preparazione:
1. Marinare il salmone almeno 30 minuti nella salsa teriyaki.
2. Far gocciolare il salmone e conservare la marinata che servirà in seguito per insaporire il salmone.
3. Inserire la padella nel dispositivo e selezionare la funzione
grill.
4. Impostare la temperatura a 200°C e il tempo a 10 minuti e
avviare il dispositivo.
5. Al termine della cottura il salmone prende colore.
6. Al termine della cottura spegnere il dispositivo.
7. Lasciare raffreddare il dispositivo prima di pulirlo.
Consiglio: il tempo di cottura effettivo dipende dallo spessore
e dalla grandezza dei filetti di salmone. Regolare il tempo di
cottura se necessario.
Polpette di carne o hamburger
Porzioni: 25-30 polpette oppure
4 hamburger
Temperatura: predefinita
Tempo: 15 minuti (polpette di car-
ne) oppure 20 minuti (hamburger)
Ingredienti:
150 g di carne macinata
150 g di salsiccia
Prezzemolo, tritato
1 cucchiaio di pesto
Spezie a piacimento
Preparazione:
1. Introdurre tutti gli ingredienti in un robot da cucina o in un
frullatore e miscelare fino ad ottenere un composto fluido.
2. Mettere un po’ di farina nelle mani e formare le polpette o
gli hamburger.
3. Mettere le polpette nella padella lasciando un po’ di spazio
tra le singole polpette. Inserire la padella nel dispositivo.
4. Selezionare la funzione grill. Confermare la temperatura,
impostare 15 minuti (polpette di carne) oppure a 20 minuti
(hamburger) e avviare il dispositivo.
5. Girare di tanto in tanto le polpette o gli hamburger per una
cottura uniforme.
6. Al termine della cottura le polpette sono dorate e croccanti.
7. Spegnere il dispositivo al termine della cottura.
8. Lasciare raffreddare il dispositivo prima di pulirlo.
88
Page 89

Merluzzo in crosta alle erbe
Porzioni: 2
Temperatura: 200°C
Tempo: 15 minuti
Ingredienti:
2 filetti di merluzzo (senza pelle)
Crosta alle erbe:
2 fette di pane, sbriciolato, prezzemolo e aneto.
1 cucchiaio di olio di oliva
Spezie a scelta
Preparazione:
1. Introdurre tutti gli ingredienti per la crosta in un frullatore e
miscelare.
2. Coprire il pesce con la crosta alle erbe.
3. Mettere il pesce nella padella.
4. Mettere la padella nel dispositivo e selezionare la funzione
grill.
5. Impostare la temperatura a 200°C e il tempo a 15 minuti e
avviare il dispositivo.
6. Al termine della cottura la crosta alle erbe prende colore.
7. Al termine della cottura spegnere il dispositivo.
8. Far raffreddare il dispositivo prima di pulirlo.
Consiglio: il tempo di cottura effettivo dipende dallo spessore
e dalla grandezza dei filetti. Se necessario regolare il tempo
di cottura.
Merluzzo avvolto in prosciutto
Porzioni: 4
Temperatura: 200°C
Tempo: 15 minuti
Ingredienti:
4 filetti di merluzzo senza pelle
8 fette di prosciutto
Spezie a piacimento
Succo di limone
Preparazione:
1. Preparare i filetti di merluzzo spremendo un po’ di limone e
avvolgere ogni filetto con prosciutto.
2. Mettere il pesce nella padella e inserire la padella nel dispositivo.
3. Selezionare la funzione grill, impostare 200°C e 15 minuti e
avviare il dispositivo.
4. Controllare che il pesce sia cotto.
5. Spegnere il dispositivo al termine della cottura.
6. Lasciare raffreddare il dispositivo prima di pulirlo.
89
Consiglio: il tempo di cottura effettivo dipende dallo spessore
e dalla grandezza dei filetti. Se necessario regolare il tempo di
cottura. In alternativa preparare il piatto con filetti di salmone.
Page 90

Pollo arrosto
Porzioni: 2-4
Temperatura: predefinita
Tempo: 60 minuti (20 minuti
ogni 500 g) più 20 minuti
Ingredienti:
1 pollo (circa 1,5 kg)
12 patate piccole, lavate
1 cucchiaio di olio
Spezie a piacimento
1 cucchiaio di erbe miste
Tranci di pizza al formaggio
Porzioni: 4
Temperatura: predefinita
Tempo: predefinito
Ingredienti:
1 confezione di impasto per pizza
pronto
1 confezione di sugo per pizza
pronto
50 g di formaggio
Preparazione:
1. Insaporire il pollo con spezie, erbe e olio.
2. Distribuire in maniera uniforme le patate e il pollo nella padella e inserire la padella nel dispositivo.
3. Selezionare la funzione grill.
4. Confermare la temperatura e impostare a 60 minuti. Avviare il dispositivo.
5. Al termine della cottura il pollo e le patate sono croccanti e
dorate.
6. Al termine della cottura spegnere il dispositivo.
7. Lasciare riposare nel dispositivo il pollo ancora per 10 minuti prima di servirlo.
8. Lasciare raffreddare il dispositivo prima di pulirlo.
Consiglio: il tempo di cottura effettivo dipende dalla grandezza del pollo. Se necessario regolare il tempo di cottura.
Preparazione:
1. Arrotolare l’impasto della pizza su una superficie infarinata.
2. Dividere la pizza in 4 parti e cospargere un po’ di formaggio.
3. Mettere i pezzi di pizza nella padella.
4. Mettere la padella nel dispositivo.
5. Selezionare la funzione grill. Confermare il tempo e la temperatura e avviare il dispositivo.
6. Al termine della cottura la pizza diventa croccante.
7. Rimuovere la pizza e lasciarla raffreddare.
8. Spegnere il dispositivo al termine della cottura.
9. Lasciare raffreddare il dispositivo prima di pulirlo.
Consiglio: è possibile farcire la pizza con altri ingredienti tuttavia non eccedere con l’aggiunta di ingredienti. La funzione grill
è adatta anche alla preparazione di pizze surgelate.
90
Page 91

Muffin al cioccolato e ai mirtilli
Porzioni: 6-8
Temperatura: 180°C
Tempo: 20 minuti
Ingredienti:
Mescolare:
75 g di farina
1,5 cucchiai di lievito
3 cucchiai di zucchero a velo
Frullare:
1 uovo piccolo
75 ml di latte
Altri ingredienti:
50 ml di olio vegetale
75 g di mirtilli freschi
50 g di cioccolato fondente,
spezzettato
Scones al formaggio
Porzioni: 6
Temperatura: predefinita
Tempo: predefinito
Ingredienti:
200 g di Self Raising Flour (speciale tipo di farina con lievito)
1 pizzico di sale
1 cucchiaio di senape
100 g di formaggio
50 g di margarina
1 uovo sbattuto con 75 ml di latte
Formina da 4 cm, rotonda
Preparazione:
1. Introdurre la farina e le uova in una ciotola e mescolare fino
ad ottenere un impasto cremoso. Aggiungere il cioccolato e
i mirtilli.
2. Distribuire l’impasto nelle formine per i muffin e introdurle
nella padella. Mettere la padella nel dispositivo e selezionare la funzione grill.
3. Impostare la temperatura a 180°C e il tempo a 20 minuti e
avviare il dispositivo.
4. Al termine della cottura i muffin sono leggermente dorati.
Togliere i muffin e lasciarli raffreddare.
5. Far raffreddare il dispositivo prima di pulirlo.
Consiglio: se si utilizzano formine di carta, utilizzarne sempre
due per un muffin in modo che l’impasto non fuoriesca. Non
riempire le formine oltre i ¾ della loro capacità.
Preparazione:
1. Mescolare tutti gli ingredienti. Aggiungere la senape e la
miscela di uova e mischiare fino ad ottenere un impasto
cremoso.
2. Impastare su una superficie infarinata, formare un rotolo
spesso 2 cm con l’impasto e formare gli scones con le formine.
3. Mettere gli scones nella padella e spennellarli con un po’ di
latte e con un uovo sbattuto.
4. Inserire la padella nel dispositivo.
5. Selezionare la funzione grill.
6. Confermare il tempo e la temperatura e avviare il dispositivo.
7. Al termine della cottura gli scones prendono colore. Togliere gli scones e farli raffreddare.
8. Far raffreddare il dispositivo prima di pulirlo.
91
Page 92

Torta di ananas
Porzioni: 2-4
Temperatura: 180°C
Tempo: 20-25 minuti
Ingredienti:
Impasto:
50 g Self Raising Flour (speciale
tipo di farina con lievito)
50 g di zucchero a velo
50 g di margarina
1 cucchiaio di mandorle macinate
1 uovo
1 cucchiaio di acqua
qualche goccia di estratto di
vaniglia
1 ananas piccola a fette
4-6 g di ciliegie glassate, tagliate
a metà
1 cucchiaio di zucchero
Tarte tatin
Porzioni: 2-4
Temperatura: predefinita
Tempo: predefinito
Ingredienti:
1 rotolo di pasta sfoglia pronto
2 mele grandi
30 g di burro
30 g di zucchero a velo
Preparazione:
1. Impasto: mettere tutti gli ingredienti in una ciotola e miscelare con un frullatore per 1 minuto fino ad ottenere un
impasto cremoso.
2. Mettere le fette di ananas e le ciliegie in una teglia rivestita
con carta forno. Cospargere sopra lo zucchero.
3. Distribuire l’impasto sopra l’ananas in maniera uniforme.
4. Mettere la teglia nella padella e mettere la padella nel dispositivo.
5. Selezionare la funzione grill. Impostare 180°C e 20 minuti e
avviare il dispositivo.
6. Al termine della cottura l’impasto deve essere leggermente
dorato. Infilare uno stuzzicadenti: se l’impasto non si incolla
è pronto.
7. Al termine della cottura spegnere il dispositivo.
8. Coprire la teglia con un piatto e capovolgere la teglia in
modo che le fette di ananas si trovino sulla parte superiore.
Preparazione:
1. Tagliare la pasta sfoglia della misura di una teglia (diametro
18 cm).
2. Sbucciare le mele, rimuovere i semi e tagliare ogni mela in
12 fette.
3. Distribuire il burro nella teglia, cospargere lo zucchero a velo
e distribuire sopra le mele in cerchio.
4. Coprire la pasta sfoglia con le mele.
5. Mettere la teglia nella padella e inserire la padella nel dispositivo.
6. Selezionare la funzione grill, confermare il tempo e la temperatura e avviare il dispositivo.
7. Spegnere il dispositivo al termine della cottura.
8. Rimuovere la tarte tatin mettendo un piatto sopra la teglia e
rovesciarla nel piatto.
92
Page 93

Pan di spagna o cupcakes
Porzioni: 1 pan di spagna (18 cm)
oppure 8-10 cupcakes
Temperatura: 180°C
Tempo: 20-25 minuti (pan di
spagna)
oppure 15 minuti (cupcakes)
Ingredienti:
100 g di Self Raising Flour (farina
con lievito)
100 g di zucchero a velo
100 g di margarina
2 uova
1 cucchiaio di acqua
Qualche goccia di essenza di
vaniglia
Glassa e decorazioni:
6 cucchiai di zucchero a velo
mescolati con 1 cucchiaio di acqua
e smarties o cioccolato
Preparazione:
1. Pan di spagna: mettere tutti gli ingredienti in una ciotola e
miscelarli con un frullatore per 1 minuto fino ad ottenere un
impasto cremoso.
2. Introdurre l’impasto in una teglia rivestita con carta da forno
oppure in formine per muffin. Riempire le formine solo di
¾. Mettere la teglia o le formine nella padella e inserire la
padella nel dispositivo.
3. Selezionare la funzione grill. Impostare la temperatura a
180°C e il tempo a 15-20 minuti. Avviare il dispositivo.
4. Al termine della cottura, i cupcakes sono leggermente dorati. Se i cupcakes o il pan di spagna non sono pronti, lasciarli
cuocere ancora per 5 minuti.
5. Spegnere il dispositivo al termine della cottura.
6. Far raffreddare il pan di spagna / i cupcakes.
7. Nel frattempo preparare la glassa e mescolare gli ingredienti.
8. Mettere la glassa sopra il pan di spagna o i cupackes e decorare con smarties o cioccolato.
9. Far raffreddare il dispositivo prima di pulirlo.
Consiglio: se la glassa è troppo spessa, aggiungere acqua a
poco a poco fino a farla diventare più cremosa.
93
Page 94

Estimado cliente,
Le felicitamos por la adquisición de este producto. Lea atentamente el siguiente manual y siga cuidadosamente las instrucciones de uso con el fin de evitar posibles daños. La empresa no se responsabiliza de los daños
ocasionados por un uso indebido del producto o por haber desatendido las indicaciones de seguridad.
Índice
Datos técnicos 94
Indicaciones de seguridad 94
Descripción del aparato 95
Panel de control 96
Puesta en marcha y uso 96
Limpieza y cuidado 99
Detección y resolución de problemas 100
Indicaciones para la retirada del aparato 100
Declaración de conformidad 100
Recetas 101
Datos técnicos
Número de artículo 10030355, 10030356
Suministro eléctrico 220-240 V ~ 50-60 Hz
Indicaciones de seguridad
• Lea atentamente estas indicaciones antes de utilizar el aparato.
• No toque las superficies calientes. Utilice solamente las asas y el regulador.
• Coloque el aparato en una superficie plana y resistente al calor.
• Riesgo de descarga eléctrica No sumerja el aparato, el cable de alimentación ni el enchufe en agua ni en
ningún otro líquido.
• En presencia de niños, utilice el aparato solamente si estos están bajo supervisión.
• Desconecte el enchufe antes de limpiar el aparato. Deje que el aparato se seque por completo antes de
limpiar su superficie o de desmontar piezas.
• Las reparaciones deberán ser realizadas por personal autorizado y serán necesarias si el aparato se ha visto
dañado, si el cable de alimentación o el enchufe están averiados, si se han vertido líquidos o se han dejado
caer objetos sobre el aparato, si el aparato se ha visto expuesto al agua o a la humedad o si el propio aparato
se ha dejado caer o no funciona correctamente.
• Utilice exclusivamente los accesorios recomendados por el fabricante.
• Utilice este aparato solamente en espacios interiores.
• Asegúrese de que el cable de alimentación no entra en contacto con superficies calientes ni queda colgando
de la superficie de trabajo.
• No coloque el aparato cerca de hornos y hornillos.
• Utilice este aparato solamente con el fin para el cual ha sido concebido.
94
Page 95

• Tome precauciones cuando mueva el aparato con contenido en su interior, especialmente cuando contenga
líquidos calientes.
• No toque ni cubra la válvula de salida de vapor situada en la parte superior del aparato para evitar quemarse
con el vapor caliente.
• Conecte el aparato solamente a tomas de corriente que se adecuen a la tensión del mismo.
• Para desconectar el aparato no tire del cable, sino del cuerpo del enchufe.
• No conecte el aparato a tomas de corriente en la que ya se encuentren conectados otros dispositivos. Utilice
siempre una toma de corriente individual para evitar cortocircuitos.
• Antes de comenzar el proceso de cocción, asegúrese de que la parte exterior de la olla interior está seca. Así
el aparato no se dañará y podrá funcionar correctamente.
• Tenga cuidado cuando levante la tapa. El vapor caliente expedido podría provocarle quemaduras.
• Para evitar deformaciones, no utilice el recipiente interior para freír en un hornillo ni en una cocina de gas.
• Desconecte el enchufe de la toma de corriente para apagar el aparato.
• Para evitar una descarga eléctrica o un cortocircuito, utilice el aparato solo con el recipiente interior en su
sitio.
• Los niños mayores de 8 años y las personas con discapacidades físicas o psíquicas solamente podrán utilizar
el aparato si han sido previamente instruidas sobre su uso y conocen las indicaciones de seguridad. Asegúrese de que los niños no juegan con el aparato.
Descripción del aparato
1 Asas del recipiente 4 Tapa 7 Estructura 10 Sensor NTC
2 Recipiente extraíblle 5 Salida de vapor 8 Asa 11 Micro interruptor
3 Panel de control 6 Removedor extraíble 9 Resistencia
95
Page 96

Panel de control
• Grill: pulse el botón para preparar a la parrilla, asar, tostar y hornear pizzas y bizcochos.
• Stir-fry: para sofreír arroz, patatas, verduras, mariscos
y pasta. También puede utilizarse para preparar palomitas y para tostar el café.
• Steam: preparar verduras o arroz al vapor.
• Stew: para preparar guisos, cocinar a fuego lento, preparar estofados, sopas, caldos o risottos.
• Set: ajuste de temperatura, tiempo y modo predeterminado.
• Botón [ ]: aumentar tiempo o temperatura una vez
haya seleccionado un modo. Valores ajustables, consulte la siguiente tabla.
• Botón [ ]: reducir tiempo o temperatura una vez
haya seleccionado un modo. Valores ajustables, consulte la siguiente tabla.
• Botón [ ]: pulse el botón para iniciar la función se-
leccionada o para interrumpirla. Advertencia: Durante
el funcionamiento del aparato, puede interruptir las
funciones en cualquier momento.
Configuración disponible
Botón Tiempo
ajustable
Grill 0:01-1:00 0:20 100-200 °C 220 °C on sí no
Stir-fry 0:01-1:00 0:30 50-220 °C 220 °C on sí sí
Stew 0:01-8:00 1:00 50-90 °C 90 °C on sí sí
Steam 0:01-1:00 0:30 90-100 °C 100 °C on sí no
Tiempo
predeterminado
Temperatura
ajustable
Temperatura
predeterminada
Resistencia Aire
caliente
Remove-
dor
Puesta en marcha y uso
Antes del primer uso
• Lea atentamente estas indicaciones.
• Retire todo el material de embalaje y compruebe que el aparato no presenta ningún daño.
• Deseche el material de embalaje para evitar que los niños jueguen con él y se provoquen lesiones.
• Lave la tapa, el removedor y el recipiente en agua tibia. Enjuague todas las piezas con agua limpia y séquelas
completamente.
• Limpie la base con un paño húmedo. No utilice disolventes ni esponjas abrasivas. No sumerja el cable de
alimentación ni el enchufe en agua.
96
Page 97

Cómo desmontar el aparato
Sujete la parte superior del removedor y presiónelo hacia abajo. Se soltará del motor tal y como se representa
en la imagen. Cuando el removedor se haya soltado del motor, puede extraerlo:
Cómo montar el aparato
Repita los pasos detallados anteriormente en orden inverso:
Cómo utilizar el aparato
1. Llene el recipiente con los alimentos que desea preparar y colóquelo dentro del aparato. Oriente el recipiente siguiendo las ranuras en la base del aparato y gírelo.
Indicaciones importantes:
• Si introduce agua para las funciones Stew/Steam, recuerde no sobrepasar la marca MAX del recipiente.
• Si retira el recipiente del aparato con líquidos en su interior, asegúrese de que los líquidos no rebosan ni se
filtran a la base del aparato. Podría averiar el aparato o provocar un cortocircuito.
2. Conecte el enchufe en la toma de corriente. Los símbolos del panel del control se iluminarán y la luz de la
tapa superior se encenderá.
3. Pulse uno de los botones de función Grill, Steam, Stir-fry o Stew dependiendo de la función que desea
utilizar. El símbolo correspondiente junto a la función seleccionada se ilumina. El display muestra el tiempo
y la temperatura predeterminados.
97
Page 98

4. Si desea aceptar el tiempo y la temperatura predeterminados, pulse el botón [ ]. El aparato se pone
en marcha, el símbolo se ilumina y el temporizador comienza una cuenta atrás automática con el tiempo
seleccionado.
5. Cuando haya transcurrido el tiempo, el aparato emitirá 10 pitidos para avisarle de que el proceso de cocción
ha finalizado.
Advertencia:
• El aparato contiene un micro interruptor integrado (consulte la descripición del aparato). Si el recipiente no
está colocado, el aparato no se encenderá (el panel de control se ilumina igualmente pero los botones no
podrán utilizarse). Si retira el recipiente durante el proceso de cocción, el aparato se detiene automáticamente. Pulse de nuevo el botón [ ] para continuar con el proceso de cocción una vez haya colocado de
nuevo el recipiente.
• Cuando utilice la función Steam, es posible que deba añadir un poco de agua al recipiente durante la cocción.
• Levante la tapa con mucho cuidado, podría salir vapor caliente.
• Si el agua se evapora por completo durante las funciones Steam/Stew, el aparato se detiene automáticamente para evitar un sobrecalentamiento. Deje que el aparato se enfríe por completo y rellene más agua
antes de continuar con el proceso.
• Si ha finalizado la función Stir-fry / Grill a 100 °C y cambiado directamente a las funciones Steam/Stew, se
activará la función de protección contra sobrecalentamiento y los botones quedarán bloqueados. Deje que
el aparato se enfríe antes de utilizar otra función.
Modificar el tiempo y la temperatura
Si desea configurar el tiempo y la temperatura de manera personalizada, siga estos pasos:
1. Pulse una vez el botón Set y el indicador de temperatura parpadea. Pulse dos veces el botón Set y el indicador de tiempo y «Work» parpadean. Pulse tres veces el botón Set y «Preset» (inicio con temporizador) y el
indicador de tiempo parpadean.
2. Mientras parpadea uno de los indicadores, pulse el botón [+] para aumentar el tiempo o la temperatura.
3. Mientras parpadea uno de los indicadores, pulse el botón [-] para reducir el tiempo o la temperatura.
4. Cuando haya configurado los valores deseados, la configuración parpadea durante 5 segundos. A continuación, se aceptarán los cambios y el aparato estará listo para su funcionamiento.
5. Pulse el botón [ ] para iniciar el proceso de cocción. IMPORTANTE: no pulse el botón si ha activado el inicio programado; el aparato se enciende automáticmaente cuando haya transcurrido el tiempo configurado
para su inicio.
98
Page 99

Configurar inicio programado (Preset)
• Durante el proceso de cocción no podrá configurar un inicio programado. Mantenga pulsado el botón [ ]
y configure los valores como se detalla en el apartado anterior.
• Los tiempos de inicio programado inferiores a 10 horas se muestran en el formato _:_ _ (p. ej. 5:30). Los
tiempos de inicio programado superiores a 10 horas se muestran en el formato _ _ H (p. ej. 10 H) y solo
pueden ajustarse en intervalos de una hora. El tiempo máximo de inicio programado es de 24 horas.
• El temporizador se activará 5 segundos después de ajustar el tiempo para el inicio programado. El display
alternará el tiempo restante para el inicio y el tiempo de cocción. Cuando haya transcurrido el tiempo para
el inicio programado, el aparato se pone en marcha automáticamente en el modo seleccionado.
Consejos de utilidad
• Pulse el botón [+] o [-] para modificar la temperatura en intervalos de 5 °C. El tiempo de cocción variará en
intervalos de 5 minutos. El tiempo para el inicio programado se puede modificar en intervalos de 10 minutos
y por encima de las 10 horas programadas solamente en intervalos de 1 hora.
• Mantenga pulsados los botones [+] o [-] para modificar la temperatura en intervalos de 5 °C. El tiempo de
cocción variará en intervalos de 1 minuto. El tiempo para el inicio programado se puede modificar en intervalos de 5 minutos y por encima de las 10 horas programadas solamente en intervalos de 1 hora.
• Durante el proceso de cocción puede modificar el tiempo y la temperatura en cualquier momento. Pulse el
botón Set, seleccione el modo deseado y utilice los botones [+] y [-] para configurar los valores de acuerdo
con sus preferencias.
• Tras 60 segundos la pantalla se atenuará si no realiza ninguna acción.
• La luz de la tapa superior permanece encendida mientras el aparato se encuentre en marcha. En modo
standby se apagará transcurridos 2 minutos.
Limpieza y cuidado
Deje que el aparato se enfríe por completo antes de desmontar las piezas y de limpiarlas. Limpie el aparato
después de cada uso.
1. Desconecte el enchufe y deje que este se enfríe por completo. El aparato se enfriará más rápidamente si
retira el recipiente.
2. Limpie el interior y el exterior (sobre todo la tapa superior) con un paño húmedo y pase a continuación un
paño seco.
3. Limpie el recipiente y el removedor con agua caliente, un poco de lavavajillas y una esponja suave. No utilice
salvauñas, podría dañar el recubrimiento de las superficies. Si la suciedad está incrustada, rellene un cuenco
con agua caliente y deje que el recipiente y el removedor queden a remojo unos minutos.
Guardar el aparato
• Asegúrese de que el aparato está apagado y todas sus piezas están limpias y secas.
• Guarde el aparato en un lugar fresco y seco al que los niños no puedan acceder.
99
Page 100

Detección y resolución de problemas
Problema Posible causa Solución propuesta
El panel de control no se
ilumina.
El aparato no funciona. El recipiente no se ha colocado
Aviso de error E1 en
pantalla.
Aviso de error E2 en
pantalla.
Aviso de error E3 en
pantalla.
No hay electricidad. Asegúrese de que el enchufe está
conectado correctamente y de que la
toma de corriente cuenta con suministro
eléctrico.
Asegúrese de que el recipiente está
correctamente.
Las funciones Grill/ Stir-fry han
finalizado y ha seleccionado
inmediatamente después las
funciones Steam/Stew.
El sensor térmico se ha activado. Contacte con el servicio de atención al
El sensor térmico se ha averiado. Contacte con el servicio de atención al
El aparato se ha calentado por
encima de 250 °C.
colocado correctamente en el aparato.
Detenga el aparato y deje que se enfríe. A
continuación, inicie la función deseada.
cliente o con un servicio técnico.
cliente o con un servicio técnico.
Desconecte el enchufe y deje que el
aparato se enfríe por completo. Inicie de
nuevo el aparato.
Indicaciones para la retirada del aparato
Si el aparato lleva adherida la ilustración de la izquierda (el contenedor de basura tachado)
entonces rige la normativa europea, directiva 2002/96/CE. Este producto no debe arrojarse a un contenedor de basura común. Infórmese sobre las leyes territoriales que regulan
la recogida separada de aparatos eléctricos y electrónicos. Respete las leyes territoriales
y no arroje aparatos viejos al cubo de la basura doméstica. Una retirada de aparatos conforme a las leyes contribuye a proteger el medio ambiente y a las personas a su alrededor
frente a posibles consecuencias perjudiciales para la salud. El reciclaje ayuda a reducir el
consumo de materias primas.
Declaración de conformidad
Fabricante: Chal-Tec GmbH, Wallstraße 16, 10179 Berlín (Alemania).
Este producto cumple con las siguientes directivas europeas:
2014/30/UE (EMC)
2014/35/UE (baja tensión)
2011/65/UE (refundición RoHS)
100
 Loading...