

Page 1
Standventilator
10029428
Page 2
Sehr geehrter Kunde,
wir gratulieren Ihnen zum Erwerb Ihres Klarstein Gerätes. Lesen Sie die folgenden Anschluss- und Anwendungshinweise sorgfältig durch und befolgen Sie diese, um möglichen technischen Schäden vorzubeugen.
Für Schäden, die durch Missachtung der Sicherheitshinweise und unsachgemäßen Gebrauch entstehen,
übernehmen wir keine Haftung.
Inhalt
Technische Daten . . . . . . . . . . . . . . . . . . . . . . . . . . . . . . . . . . . . . . . . . . . . . . .2
Safety Instructions . . . . . . . . . . . . . . . . . . . . . . . . . . . . . . . . . . . . . . . . . . . . . .3
Geräteübersicht . . . . . . . . . . . . . . . . . . . . . . . . . . . . . . . . . . . . . . . . . . . . . . . . .4
Aufstellung. . . . . . . . . . . . . . . . . . . . . . . . . . . . . . . . . . . . . . . . . . . . . . . . . . . .4
Bedienung . . . . . . . . . . . . . . . . . . . . . . . . . . . . . . . . . . . . . . . . . . . . . . . . . . . .5
Reinigung und Wartung . . . . . . . . . . . . . . . . . . . . . . . . . . . . . . . . . . . . . . . . . . . .6
Hinweise zur Entsorgung . . . . . . . . . . . . . . . . . . . . . . . . . . . . . . . . . . . . . . . . . . . 7
Konformitätserklärung . . . . . . . . . . . . . . . . . . . . . . . . . . . . . . . . . . . . . . . . . . . .7
Technische Daten
Artikelnummer 10029428
Stromversorgung 220 V~ 50 Hz
Leistungsaufnahme 45 W
Gewicht (Netto) 4,2 kg
Schwenkgrad 90 Grad
2
Page 3

Sicherheitshinweise
• Verwenden Sie das Gerät bestimmungsgemäß: Das Gerät dient dem Ventilieren von Innenräumen.
• Überprüfen Sie die auf dem Typenschild angegebene Nennspannung. Dieses Gerät ist für einen Stromanschluss mit 220 V/ 50 Hz geeignet. Achten Sie darauf, dass der Stromanschluss in Ihrem Haushalt zur
Nennspannung des Gerätes passt. Gewährleisten Sie, dass der Raum, in dem der Ventilator betriebenen
wird, einen Rauchmelder hat.
• Verwenden Sie mit diesem Ventilator kein Verlängerungskabel. Stecken Sie das Gerät nicht in eine Steckerleiste. Die Verwendung dieser Vorrichtungen kann zu einer Stromschlag- oder Brandgefahr führen.
• Stecken Sie Ihre Finger nicht durch die Gitterabdeckung.
• Dieses Gerät ist kein Spielzeug. Lassen Sie Kinder damit nicht spielen.
• Lassen Sie Haare, Gardinen, Tischdecken, Kleidung und andere Gegenstände in der Nähe die Luftschlitze
des Ventilators nicht verdecken oder dort hineingelangen. Dies kann zu Schäden oder Verletzungen führen.
• Verwenden Sie den Ventilator, wenn das Netzkabel defekt ist. Prüfen Sie das Netzkabel in regelmäßigen
Abständen. Wenn das Netzkabel defekt ist, muss es vom Hersteller, dem Kundendienst oder einer ähnlich
qualifizierten Person ausgetauscht werden, um Risiken zu vermeiden.
• Verwenden Sie das Gerät nicht, wenn es heruntergefallen oder beschädigt ist. Falls die Rotorblätter beschädigt wurden, müssen sie vom Hersteller bzw. Kundendienst ausgetauscht werden, um Risiken zu vermeiden.
• Verwenden Sie dieses Gerät nicht im Freien und auch nicht im gewerblichen, industriellen oder landwirtschaftlichen Bereich. Das Gerät ist nur für den Hausgebrauch bestimmt.
• Verwenden Sie das Gerät nicht in einer feuchten Umgebung wie z. B. im Badezimmer.
• Stellen Sie den Ventilator nicht neben ein Fenster oder dort hin, wo es Regen oder Feuchtigkeit ausgesetzt
ist. Das kann zu einer elektrischen Gefährdung führen.
• Verlegen Sie das Netzkabel nicht unter Gegenständen wie Teppichen, Vorlegern und Läufern. Verlegen Sie
das Netzkabel nicht in Durchgangsbereichen, wo die Gefahr besteht, darüber zu stolpern.
• Ziehen Sie nach dem Gebrauch den Netzstecker. Achten Sie darauf dass das Gerät vorher ausgeschaltet ist.
• Betreiben Sie das Gerät nicht in einem Bereich, in dem Benzin, Farben, entflammbare Flüssigkeiten oder
explosive Chemikalien verwendet oder gelagert werden.
• Versuchen Sie nicht, das Gerät zu reparieren oder auseinanderzunehmen. Dies führt zu einem Garantieverlust und kann zu einem Personen- oder Sachschaden führen. Es befinden sich keine durch den Anwender zu wartenden Teile im Inneren des Gehäuses.
• Die Fernbedienung anderer Geräte kann den Ventilator stören und umgekehrt. Falls dies vorkommt, stellen Sie den Ventilator an einem anderen Ort auf.
• Stellen Sie den Ventilator außerhalb der Reichweite von Kindern auf.
3
Page 4
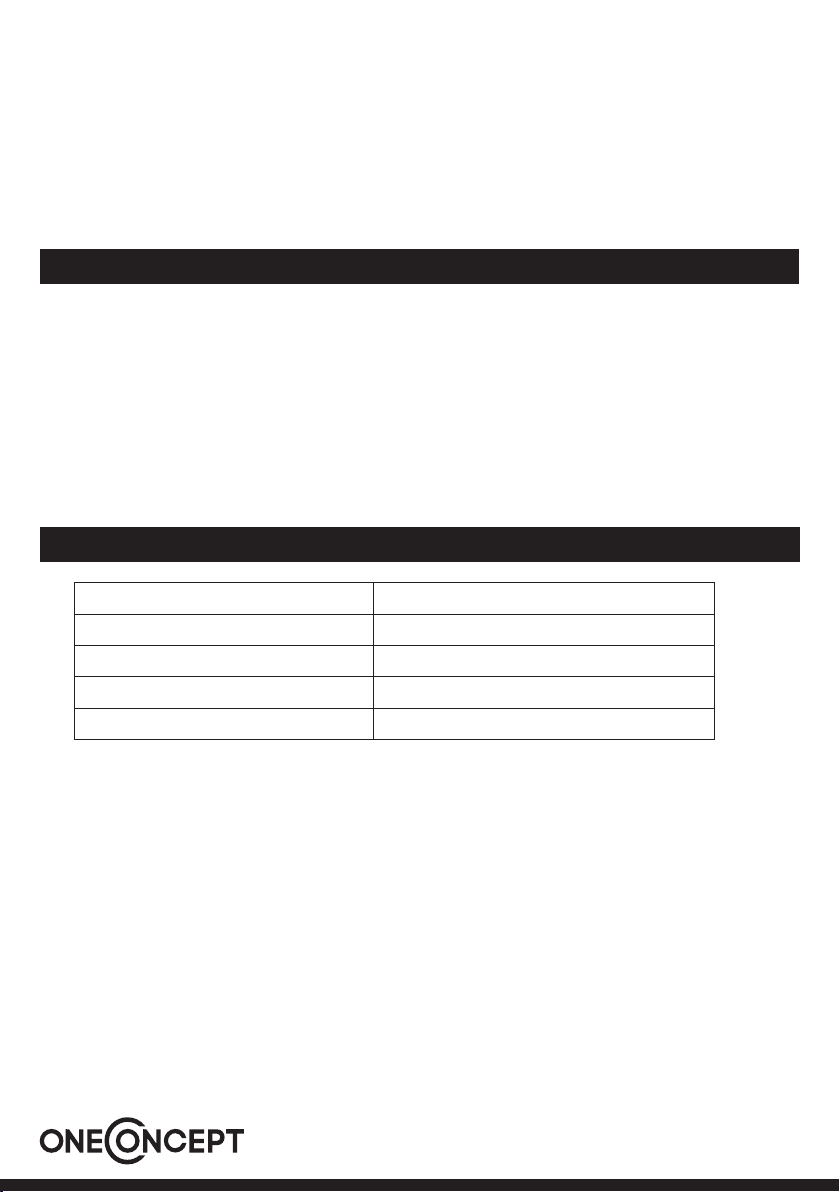
1 Bedienfeld
2 Anzeige
3 Vordere Abdeckung
4 Hintere Abedeckung
5 Schutzgitter
6 Säule
7 Standfuß
8 Fernbedienung
Geräteübersicht
4
Page 5
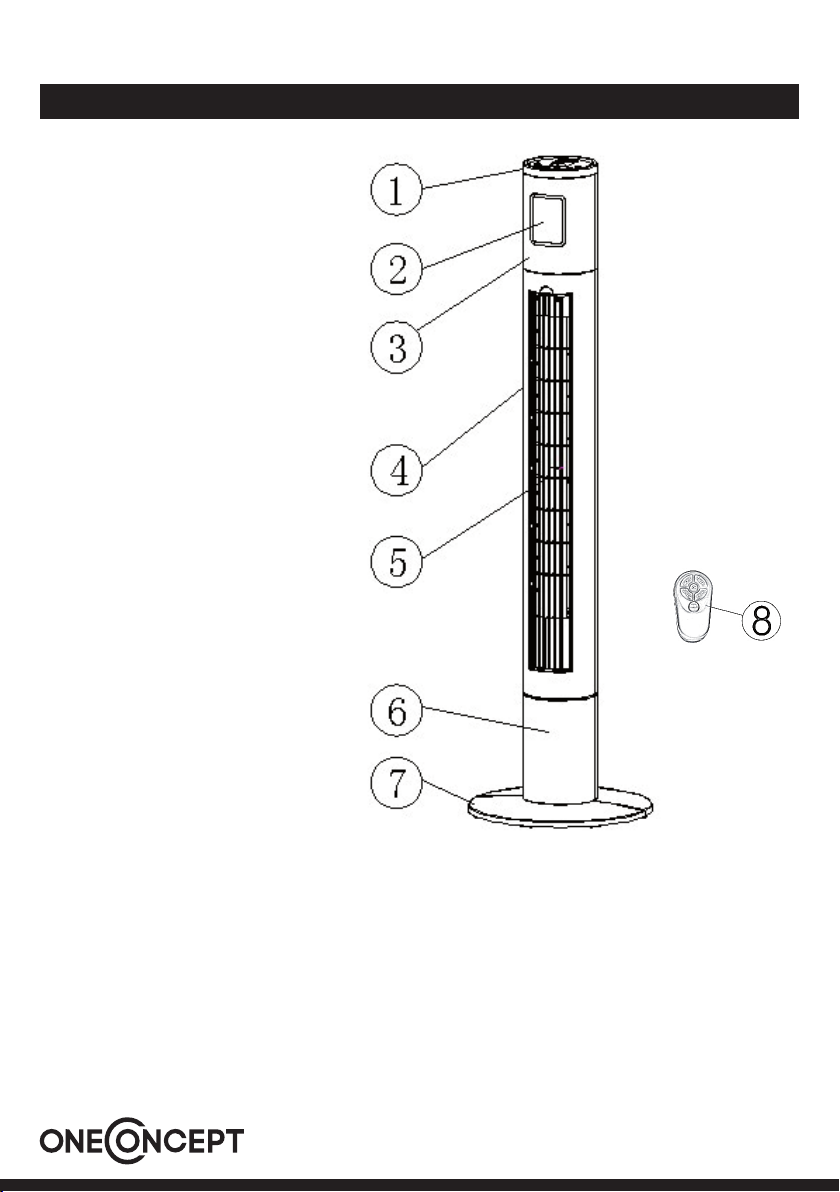
Aufstellung
1. Nehmen Sie alle Teile des Gerätes aus der Verpackung.
2. Verlegen Sie das Netzkabel durch die Mitte der beiden
Standfußteile.
3. Setzen Sie den Standfuß zusammen. Haken Sie dazu
den einen Teil des Standfußes in die Halterungen des
anderen Teils ein.
4. Stellen Sie den Körper des Turmventilators auf den
Kopf. Setzen Sie den Standfuß auf den Körper. Achten
Sie darauf, dass die Säule fest im Standfuß sitzt.
5. Verschrauben Sie den Standfuß mit den
mitgelieferten Schrauben auf die Säule.
6. Verlegen Sie das Netzkabel durch die Führung der
Gehäusrückseite.
7. Richten Sie den Turm wieder auf. Das Gerät ist zur
Verwendung bereit.
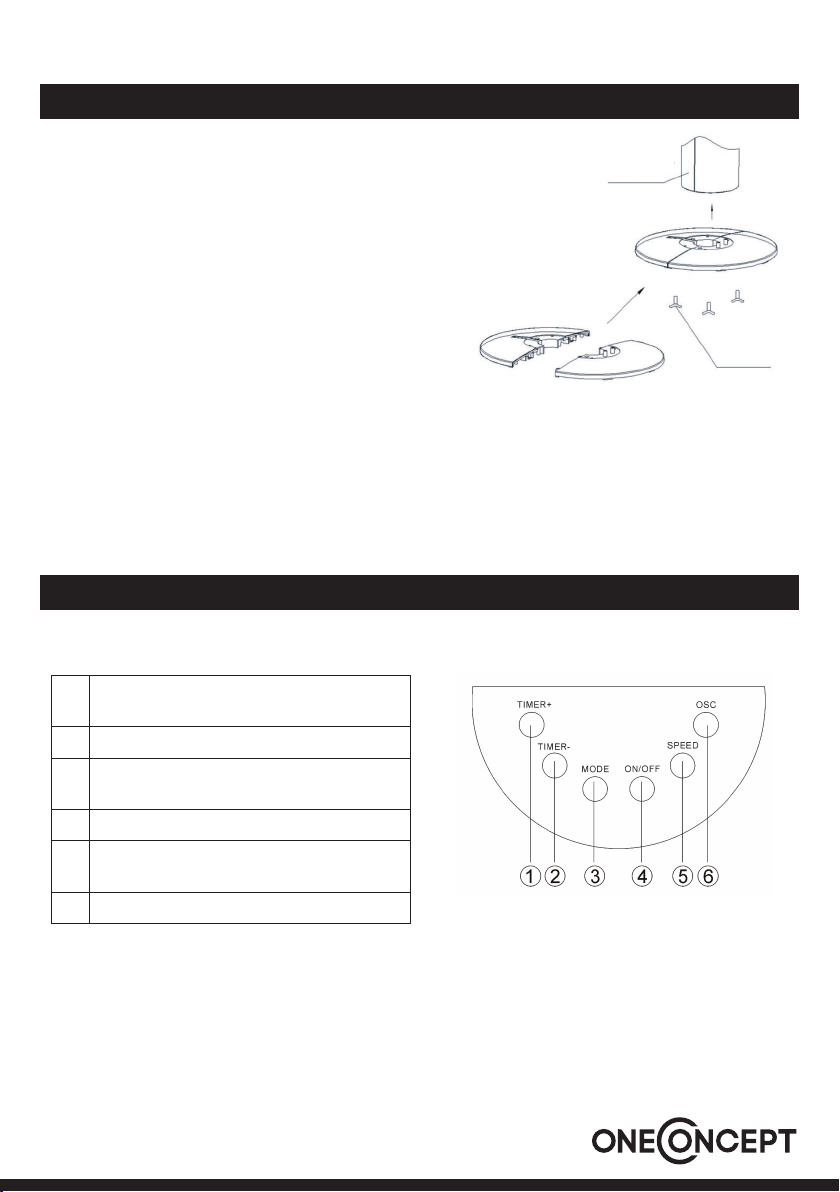
Bedienung
Bedienung über das Bedienfeld am Gerät
1 Aktivieren des Timers. Bei jedem Tastendruck
wird die Zeit um eine Stunde erhöht.
2 Deaktivieren des Timers.
3 Wahl von drei Modi (Schlaf, Natur, Normal).
Der gewählte Modus erscheint in der Anzeige.
4 Ein/Aus-Schalter
5 Wahl von drei Stufen (niedrig, mittel, hoch).
Die gewählte Stufe erscheint in der Anzeige.
6 Ein- und Ausschalten der Schwenkbewegung
Säule
Schrauben
5
Page 6
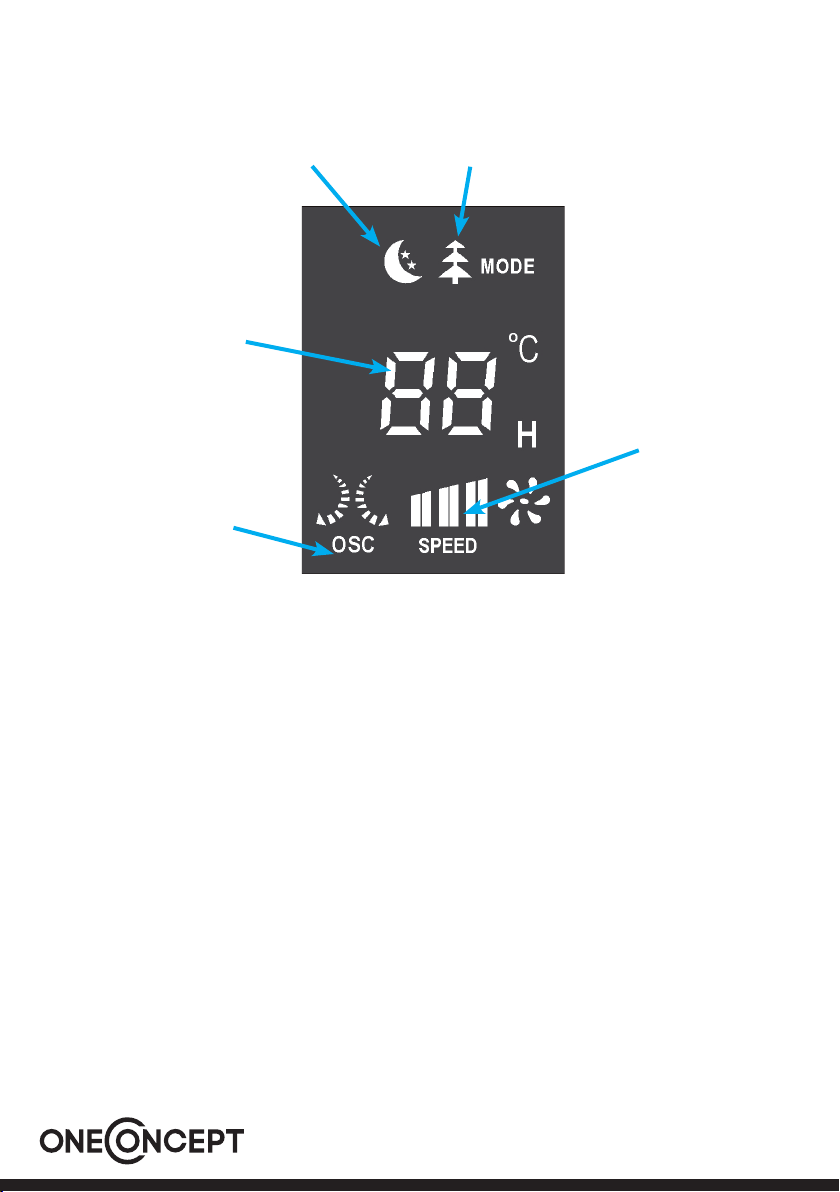
Anzeigefeld
Natürlicher Wind
Anzeige der Raumtemperatur
oder des Timers
Schlafwind
Geschwindigkeitsstufe
Schwenkmodus
Fernbedienung
Hinweise zur Fernbedienung
• Halten Sie die Fernbedienung in Richtung des Infrarot-Empfängers am Gerät.
• Blockieren Sie nicht die Sichtlinie zwischen der Fernbedienung und dem Empfänger.
• Die Fernbedienung darf nicht in einem Raum benutzt werden, in dem schwere Maschinen laufen.
• Behandeln Sie die Fernbedienung mit Sorgfalt. Lassen Sie die Fernbedienung nicht auf den Boden fallen.
Schlagen Sie damit nicht gegen harte Gegenstände.
Hinweise zu den Batterien
• Nehmen Sie die Batterien aus dem Batteriefach, wenn Sie die Fernbedienung über einen längeren Zeitraum
nicht verwenden.
• Die Fernbedienung benötigt drei Micro-Batterien (LR03). Sie sollten neu sein und gleichzeitig ersetzt wer-
den, wenn sie leer sind.
• Reinigen Sie vor dem Einlegen die Kontakte an den Batterien und im Batteriefach.
• Achten Sie beim Einlegen auf die richtige Polung. Plus und Minus müssen mit den Zeichnungen am Batte-
riefach übereinstimmen.
6
Page 7
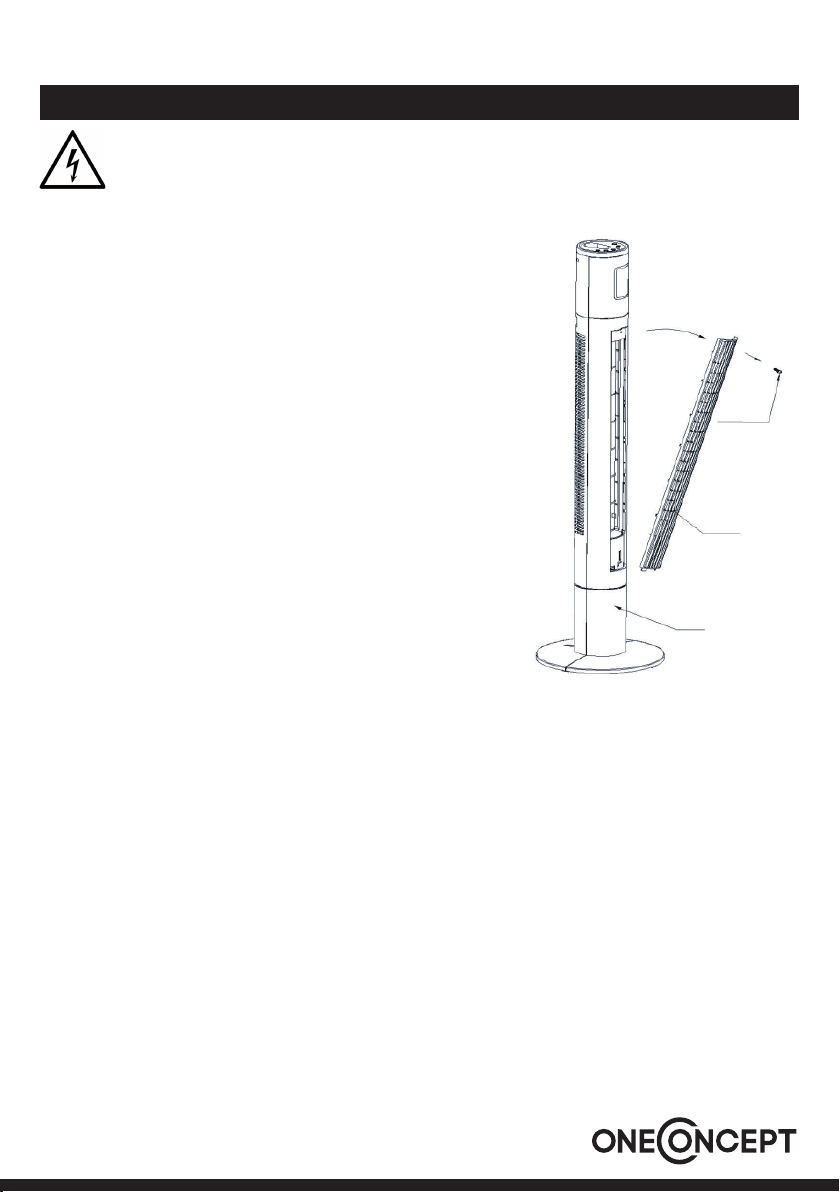
Reinigung und Wartung
Gefahr: Es besteht die Gefahr eines Stromschlags
Lassen Sie kein Wasser ins Innere des Gerätes laufen.
Reinigung
1. Ziehen Sie vor der Reinigung immer den Netzstecker.
2. Entfernen Sie den Staub, indem Sie entlang der Vorderseite des
Ventilators saugen und auf der Rückseite, wo die Kunststoffgitter
die Luftzufuhr abdecken. Rohrputzer oder Staubwedel eignen
sich ebenso.
3. Wischen Sie die Oberfläche des Ventilators gelegentlich mit
einem feuchten Tuch (nicht triefend) und trocknen Sie die
Oberfläche gründlich mit einem weichen, trockenen Tuch, bevor
Sie das Gerät in Betrieb nehmen.
4. Verwenden Sie beim Reinigen keine scharfen Reiniger oder
Stoffe. Dies führt zu einer Beschädigung.
5. Lösen Sie die Schraube am Frontgitter. Öffnen Sie das Gitter,
um das Ventilatorrad vorsichtig zu reinigen (Siehe Bild).
Aufbewahrung
• Reinigen Sie den Ventilator sorgfältig wie oben beschrieben.
• Legen Sie das Gerät zur Aufbewahrung vorsichtig in den Originalkarton oder decken Sie es ab, um es vor Staub zu schützen.
• Lagern Sie es an einem trockenen Ort.
• Lassen Sie den Netzstecker während der Aufbewahrung nie eingesteckt.
• Wickeln Sie das Netzkabel nicht fest um das Gerät und setzen das Netzkabel an der Eintrittsstelle zum
Gerät keinen Belastungen aus, da es sonst fasert oder bricht.
Schraube
Gitter
Säule
7
Page 8
Hinweise zur Entsorgung
Befindet sich die linke Abbildung (durchgestrichene Mülltonne auf Rädern) auf dem Produkt, gilt die Europäische Richtlinie 2002/96/EG. Diese Produkte dürfen nicht mit dem
normalen Hausmüll entsorgt werden. Informieren Sie sich über die örtlichen Regelungen
zur getrennten Sammlung elektrischer und elektronischer Gerätschaften. Richten Sie sich
nach den örtlichen Regelungen und entsorgen Sie Altgeräte nicht über den Hausmüll.
Durch die regelkonforme Entsorgung der Altgeräte werden Umwelt und die Gesundheit
ihrer Mitmenschen vor möglichen negativen Konsequenzen geschützt. Materialrecycling
hilft, den Verbrauch von Rohstoffen zu verringern.
Das Produkt enthält Batterien, die der Europäischen Richtlinie 2006/66/EG unterliegen
und nicht mit dem normalen Hausmüll entsorgt werden dürfen. Bitte informieren Sie
sich über die örtlichen Bestimmungen zur gesonderten Entsorgung von Batterien. Durch
regelkonforme Entsorgung schützen Sie die Umwelt und die Gesundheit Ihrer Mitmenschen vor negativen Konsequenzen.
Konformitätserklärung
Hersteller: Chal-Tec GmbH, Wallstraße 16, 10179 Berlin, Deutschland
Dieses Produkt entspricht den folgenden Europäischen Richtlinien:
2004/108/EG (EMV)
2006/95/EG (LVD)
2011/65/EU (RoHS)
2012/206/EU (EVPG)
8
Page 9
Dear Customer,
Congratulations on purchasing this equipment. Please read this manual carefully and take care of the following hints on installation and use to avoid technical damages. Any failure caused by ignoring the items
and cautions mentioned in the operation and installation instructions are not covered by our warranty and
any liability.
Contents
Technical Data . . . . . . . . . . . . . . . . . . . . . . . . . . . . . . . . . . . . . . . . . . . . . . . . .9
Safety Instructions . . . . . . . . . . . . . . . . . . . . . . . . . . . . . . . . . . . . . . . . . . . . . . 10
Device . . . . . . . . . . . . . . . . . . . . . . . . . . . . . . . . . . . . . . . . . . . . . . . . . . . . . 11
Installation . . . . . . . . . . . . . . . . . . . . . . . . . . . . . . . . . . . . . . . . . . . . . . . . . . . 12
Operation . . . . . . . . . . . . . . . . . . . . . . . . . . . . . . . . . . . . . . . . . . . . . . . . . . . 12
Cleaning and Maintenance . . . . . . . . . . . . . . . . . . . . . . . . . . . . . . . . . . . . . . . . . 14
Disposal Considerations . . . . . . . . . . . . . . . . . . . . . . . . . . . . . . . . . . . . . . . . . . 15
Declaration of Conformity . . . . . . . . . . . . . . . . . . . . . . . . . . . . . . . . . . . . . . . . . 15
Technical Data
Item number 10029428
Power supply 240 V 50 Hz
Wattage 30 W
Weight 4.2 kg
Oscillation 90 degrees
9
Page 10

Safety Instructions
• Use this fan only as described in this manual.
• Check the voltage indicated on the rating plate. This fan is designed for a 2220 V-50 Hz electric supply.
Make certain the power source conforms to these electric requirements. Make sure the room where this
fan will be used has a working smoke detector.
• Do not use an electrical extension cord with this fan. Do not plug the fan into a power strip. The use of such
devices may create electric and/or fire hazards.
• Do not force your fingers through the front case. Do not allow any foreign objects through the front case..
• This product is not a toy. Do not allow children to tamper with the fan.
• Be careful not to allow hair, curtains, tablecloth, clothes or other nearby objects block the airways of the fan
or to enter the openings of the fan. This can cause damage and/or injuries.
• Do not use this or any fan if the cord is found to be or becomes damaged. Periodically check the electric
cable of this fan. If the electric cable is damaged, it must be replaced by the manufacturer, its after-sales
service or by a similar qualified person in order to avoid danger.
• Do not use this fan if it falls and/or becomes damaged in any way. If the fan becomes damaged, it must
be replaced by the manufacturer, its after-sales service or by a similar qualified person in order to avoid
danger.
• Do not use this fan outside, or in any commercial, industrial or agricultural setting. This fan is only for residential use. Do not use this fan with any solid state speed control devices.
• Do not use this fan in a damp area such as bathroom.
• Do not use this fan on a window, ledge, or on any unstable platform. The fan should only be used standing
on its base. Never lay the fan on its side.
• Do not use this fan next to a window or anywhere where exposure to rain or moisture is possible. This may
create an electrical hazard.
• Do not place the electrical cord under any objects, such as carpets, throw rugs or runners. Do not place
electrical cord in areas of foot traffic where there is a risk of stumbling or tripping over it.
• The fan must always be unplugged when not in use. Before unplugging the fan, first ensure it has been
turned off.
• Do not operate the fan in an area where gasoline, paint supplies or any flammable liquids or explosive
chemicals are used or stored.
• Do not try to repair or disassemble this fan. Doing so will void the warranty and may result in damage and/
or personal injury. There are no end-user serviceable parts.
• Remote control devices for other appliances may interfere with this fan and vice-versa. If this occurs,
move the fan to another location.
• This fan is not suitable for use in agricultural facilities and hazardous locations. This fan does not meet the
requirements of NEC Article 547-7 and 500 (2002).
• Keep this fan and all electrical appliances out of reach from children at all times.
10
Page 11

1 Top control panel
2 FND Display
3 Front cover
4 Back cover
5 Grille
6 Column
7 Base
8 Remote control
Device
11
Page 12

Installation
1. Remove all items of packing from the tower fan.
2. Pass the power cord through the middle of the two
base pieces
3. Position base piece onto the support posts of the
other base piece to create the base assembly.
4. Turn the tower body upside down position the base
assembly onto the pedestal tube. Ensure that the
pedestal tube is sitting flush in the base assembly.
5. Screw the base assembly onto the pedestal tube with
the supplied screws.
6. Position the power cord into the provided cord track
in the rear base.
7. Turn the tower fan back to upright position. It is now
ready for use.
Operation
Operation via the top control panel
1 Press this button to activate the timer. Each
time the button is pressed the timer will be
increased by 1 hour up to a maximum of 12
hours.
2 Press this button to deactivate the timer.
3 Choose from 3 comfort settings (HIGH, MED,
LOW) by pressing this button until the speed
you want is indicated on the FND display.
4 Press this button to turn the fan on or off.
5 Choose from 3 different breeze patterns
(Sleep, Nature, Normal) by pressing this button until the type of breeze desired is indicated on the FND display.
6 Press the oscillation button to activate the
oscillation function for widespread breeze
distribution. Press again to turn the oscillation
function off
12
Page 13

Display
Natural wind
Display room temperature or timer
Sleep wind
Speed
Oscillation
Remote control
Guidelines for using the remote control
• The remote control must be pointed towards the receiver on the fan in order to work.
• The remote control may not operate in a room where heavy machine is operating.
• Do not block the line of sight between the remote control and the receiver.
• Handle the remote control with care. Do not drop the remote control on the floor or bang it against hard
objects..
Guidelines for use of batteries
• If the remote control will not be used for a long period of time, remove the batteries from the battery com-
partment.
• The remote control uses two AAA batteries, both of which should be new and replaced at the same time
when they run out.
• Clean battery contacts and also those of the device prior to battery installation
• Ensure the batteries are installed correctly with regard to polarity, matching +/- sides of the battery to cor-
responding indications on the remote control.
• Remove used and dead/discharged batteries promptly.
13
Page 14

Cleaning and Maintenance
Danger: Risk of electrical shock
Do not allow water to run into the interior of the fan.
Cleaning
1. Always disconnect the cord from the electrical outlet before
cleaning your fan.
2. Dust may be removed by using a vacuum cleaner along the back
of the fan where the plastic grille covers the air intake, and along
the front grille cover. A pipe cleaner or flexible duster may also
be used.
3. Wipe the exterior surfaces of the fan occasionally with a damp
cloth (not dripping wet) and dry thoroughly with a soft dry cloth
before operating the fan.
4. Do not use harsh cleaners or materials to clean this unit, doing
so will cause damage.
5. Unscrew the screw in front of fan grille, open the grille to clean
the fan wheel softly. Please see below picture .
Storage
• Follow cleaning instructions 1-4 above.
• Retain the original packaging to store your fan.
• Always store in a dry place.
• Never store while still plugged in.
• Never wrap cord tightly around the fan or put any stress on the
cord where it enters the fan as it could cause the cord to fray or break.
Screw
Grid
Fan body
14
Page 15

Disposal Considerations
According to the European waste regulation 2002/96/EC this symbol on the product
or on its packaging indicates that this product may not be treated as household waste.
Instead it should be taken to the appropriate collection point for the recycling of electrical
and electronic equipment. By ensuring this product is disposed of correctly, you will help
prevent potential negative consequences for the environment and human health, which
could otherwise be caused by inappropriate waste handling of this product. For more detailed information about recycling of this product, please contact your local council or
your household waste disposal service.
Your product contains batteries covered by the European Directive. 2006/66/EC, which
cannot be disposed of with normal household waste. Please check local rules on separate
collection of batteries. The correct disposal of batteries helps prevent potentially negative
consequences on the environment and human health.
Declaration of Conformity
Producer: Chal-Tec GmbH, Wallstraße 16, 10179 Berlin, Deutschland
This product is conform to the following European Directives:
2004/108/EC (EMC)
2006/95/EC (LVD)
2011/65/EU (RoHS)
2012/206/EU (ErP)
15
Page 16

Gentile cliente,
La ringraziamo per aver acquistato il nostro dispositivo. La preghiamo di leggere attentamente le seguenti
istruzioni e di seguirle per evitare eventuali danni. Non ci assumiamo alcuna responsabilità per danni derivati
da una mancata osservazione delle avvertenze di sicurezza e da un uso improprio del dispositivo.
Indice
Dati tecnici . . . . . . . . . . . . . . . . . . . . . . . . . . . . . . . . . . . . . . . . . . . . . . . . . . . 16
Avvertenze di sicurezza . . . . . . . . . . . . . . . . . . . . . . . . . . . . . . . . . . . . . . . . . . . 17
Descrizione del prodotto . . . . . . . . . . . . . . . . . . . . . . . . . . . . . . . . . . . . . . . . . . 18
Installazione . . . . . . . . . . . . . . . . . . . . . . . . . . . . . . . . . . . . . . . . . . . . . . . . . . 19
Utilizzo . . . . . . . . . . . . . . . . . . . . . . . . . . . . . . . . . . . . . . . . . . . . . . . . . . . . . 19
Pulizia e manutenzione . . . . . . . . . . . . . . . . . . . . . . . . . . . . . . . . . . . . . . . . . . . 21
Smaltimento . . . . . . . . . . . . . . . . . . . . . . . . . . . . . . . . . . . . . . . . . . . . . . . . .22
Dichiarazione di conformità . . . . . . . . . . . . . . . . . . . . . . . . . . . . . . . . . . . . . . . . 22
Dati tecnici
Numero articolo 10029428
Alimentazione 220 V~ 50 Hz
Potenza 45 W
Peso (netto) 4,2 kg
Oscillazione 90 gradi
16
Page 17

Avvertenze di sicurezza
• Utilizzare il dispositivo esclusivamente per lo scopo al quale è destinato ovvero ventilare gli ambienti interni.
• Collegare il dispositivo ad una presa la cui tensione è conforme a quella indicata sulla targhetta identificativa (220 V / 50 Hz). Assicurarsi che la stanza nella quale il dispositivo viene messo in funzione sia dotata
di rilevatore di fumo.
• Non utilizzare prolunghe. Non collegare il dispositivo ad una presa multipla per evitare il pericolo di scosse
elettriche o incendio.
• Non infilare le dita nella griglia.
• Il dispositivo non è un giocattolo. Assicurarsi che i bambini non giochino con il dispositivo.
• Tenere lontano dal dispositivo capelli, tende, tovaglie, abiti e altri oggetti per evitare danni o lesioni.
• Non utilizzare il ventilatore se il cavo di alimentazione è danneggiato. Controllare regolarmente che il cavo
sia in buone condizioni. In caso contrario, farlo sostituire dal produttore, dal servizio clienti o da un tecnico
qualificato, per evitare rischi.
• Non utilizzare il dispositivo se è caduto o se è danneggiato. Se le pale rotanti sono danneggiate, farle sostituire dal produttore.
• Non utilizzare il dispositivo all’aperto o in ambiti commerciali, industriali o agricoli. Il dispositivo è destinato
esclusivamente ad un utilizzo domestico.
• Non utilizzare il dispositivo in ambienti umidi come ad esempio il bagno.
• Non collocare il dispositivo vicino ad una finestra oppure in punti dove è esposto alla pioggia o all’umidità.
• Non dislocare il cavo di alimentazione sotto tappeti. Non dislocare il cavo in una zona di passaggio per
evitare che qualcuno vi possa inciampare.
• Dopo l’utilizzo, disinserire la spina dalla presa. Assicurarsi di aver spento il dispositivo.
• Non mettere in funzione il dispositivo in luoghi dove vengono utilizzati o conservati benzina, vernici, materiali infiammabili o prodotti chimici esplosivi.
• Non tentare né di riparare il dispositivo né di smontarlo. Ciò comporta la perdita della garanzia e danni a
cose o a persone. Nessun componente all’interno del dispositivo necessita di manutenzione.
• Il telecomando di altri dispositivi può causare interferenze e viceversa. In caso ciò si verifichi, cambiare la
collocazione del ventilatore.
• Tenere il ventilatore fuori dalla portata dei bambini.
17
Page 18

1 Pannello dei comandi
2 Display
3 Parte frontale
4 Retro
5 Griglia
6 Colonna
7 Base di appoggio
8 Telecomando
Descrizione del prodotto
18
Page 19

Installazione
1. Togliere dalla confezione tutti i componenti.
2. Far passare il cavo di alimentazione attraverso le due
parti della base di appoggio.
3. Assemblare le due parti della base di appoggio. Per
fare ciò, incastrare una parte con l’altra tramite le
apposite scanalature.
4. Mettere l’unità in posizione verticale. Collocare l’unità
sulla base di appoggio prestando attenzione che la
colonna sia ben fissata sulla base.
5. Avvitare la base d’appoggio sulla colonna utilizzando
le viti incluse nella consegna.
6. Dislocare il cavo di alimentazione nell’apposito
alloggiamento sul retro.
7. Mettere il ventilatore in posizione verticale. Il
dispositivo è pronto per l’uso.
Utilizzo
Utilizzo tramite il pannello dei comandi sul dispositivo
1 Attivare il timer. Ad ogni pressione di tasto, il
tempo aumenta di un’ora.
2 Disattivare il timer.
3 Selezionare una delle tre modalità (Sleep, Na-
ture, Normal)
4 Interruttore on/off
5 Selezionare uno dei tre livelli (basso, medio,
alto). Il livello selezionato appare sul display.
6 Attivare/disattivare l’oscillazione.
Colonna
Viti
19
Page 20

Display
Modalità notturna
Indicazione della temperatura
della stanza o del timer
Vento naturale
Livello di velocità
Oscillazione
Telecomando
Istruzioni per il telecomando
• Dirigere il telecomando verso il ricevitore a infrarossi del dispositivo.
• Non collocare oggetti tra il telecomando e il ricevitore.
• Non utilizzare il telecomando in una stanza dove sono in funzione macchinari pesanti.
• Maneggiare il telecomando con cura. Non farlo cadere a terra e non sbatterlo contro oggetti duri.
Note sulle pile
• Rimuovere le pile dall’apposito vano in caso di inutilizzo prolungato del telecomando.
• Il telecomando necessita di tre micro pile AAA (LR03). Le pile devono essere nuove e devono essere sostituite quando sono scariche.
• Prima di inserire le pile, pulire i contatti sulle pile e all‘interno del vano.
• Quando si inseriscono le pile, prestare attenzione alla corretta polarità. Più e meno devono coincidere con i
segni più e meno sul vano pile.
20
Page 21

Pulizia e manutenzione
Attenzione: pericolo di scosse elettriche
Non far penetrare acqua all’interno del dispositivo.
Pulizia
1. Disinserire la spina dalla presa prima di ogni operazione di
pulizia.
2. Rimuovere la polvere aspirandola lungo la parte frontale del
ventilatore e sul retro. Si può utilizzare anche uno spolverino.
3. Pulire la superficie del ventilatore con un panno umido (non
gocciolante). Prima di mettere in funzione il dispositivo,
asciugare con cura le superfici con un panno morbido e asciutto.
4. Non utilizzare detergenti o sostanze aggressive per la pulizia.
Questo può comportare danni.
5. Allentare la vite sulla griglia anteriore. Aprire la griglia per pulire la
pala (vedere la figura).
Viti
Conservazione
• Pulire il ventilatore con cura come descritto sopra.
• Riporre il dispositivo nella confezione originale oppure coprirlo
per proteggerlo dalla polvere.
• Conservarlo in un luogo asciutto.
• Disinserire la spina prima di conservare il dispositivo.
• Non avvolgere troppo stretto il cavo intorno al dispositivo e non
sovraccaricare il cavo per evitare di danneggiarlo.
Griglia
Colonna
21
Page 22

Smaltimento
Se sul prodotto è presente la figura a sinistra (il cassonetto dei rifiuti mobile sbarrato), si
applica la direttiva europea 2002/96/CE. Questi prodotti non possono essere smaltiti
con i rifiuti normali. Informarsi sulle disposizioni vigenti in merito alla raccolta separata
di dispositivi elettrici ed elettronici. Non smaltire i vecchi dispositivi con i rifiuti domestici.
Grazie al corretto smaltimento dei vecchi dispositivi, si proteggono il pianeta e la salute
delle persone da possibili conseguenze negative. Il riciclo di materiali aiuta a ridurre il consumo di materie prime.
Il prodotto contiene batterie che in base alla direttiva europea 2006/66/CE non possono
essere smaltite con i normali rifiuti domestici. Informarsi sulle disposizioni vigenti relative
alla raccolta differenziata delle batterie. Grazie al corretto smaltimento dei vecchi dispositivi, si proteggono il pianeta e la salute delle persone da possibili conseguenze negative.
Dichiarazione di conformità
Produttore: Chal-Tec GmbH, Wallstraße 16, 10179 Berlino, Germania.
Questo prodotto è conforme alle seguenti direttive europee:
2004/108/EC (EMC)
2006/95/EC (LVD)
2011/65/EU (RoHS)
2012/206/EU (ErP)
22
Page 23

Chère cliente, cher client,
Toutes nos félicitations pour l’acquisition de ce nouvel appareil. Veuillez lire attentivement et respecter les
instructions de ce mode d’emploi afin d’éviter d’éventuels dommages. Nous ne saurions être tenus pour responsables des dommages dus au non-respect des consignes et à la mauvaise utilisation de l’appareil.
Sommaire
Fiche technique . . . . . . . . . . . . . . . . . . . . . . . . . . . . . . . . . . . . . . . . . . . . . . . . 23
Consignes de sécurité . . . . . . . . . . . . . . . . . . . . . . . . . . . . . . . . . . . . . . . . . . . . 24
Aperçu de l’appareil . . . . . . . . . . . . . . . . . . . . . . . . . . . . . . . . . . . . . . . . . . . . .25
Installation . . . . . . . . . . . . . . . . . . . . . . . . . . . . . . . . . . . . . . . . . . . . . . . . . . . 26
Utilisation . . . . . . . . . . . . . . . . . . . . . . . . . . . . . . . . . . . . . . . . . . . . . . . . . . .26
Nettoyage et entretien . . . . . . . . . . . . . . . . . . . . . . . . . . . . . . . . . . . . . . . . . . .28
Information sur le recyclage . . . . . . . . . . . . . . . . . . . . . . . . . . . . . . . . . . . . . . . . 29
Déclaration de conformité . . . . . . . . . . . . . . . . . . . . . . . . . . . . . . . . . . . . . . . . . 29
Fiche technique
Numéro d’article 10029428
Alimentation électrique 220 V~ 50 Hz
Puissance 45 W
Poids (net) 4,2 kg
Degré d’oscillation 90 Grad
23
Page 24

Consignes de sécurité
• Utiliser l’appareil conformément à l’usage prévu : l’appareil sert à la ventilation des intérieurs.
• Vérifier la tension nominale fournie sur la plaquette signalétique. Cet appareil a été conçu pour fonctionner
sur une alimentation de 220 V / 50 Hz. Veiller à ce que l’alimentation électrique correspond aux valeurs de
tension. S’assurer que la pièce où fonctionne l’appareil est équipée d’un détecteur de fumée.
• Ne pas utiliser de rallonge avec ce ventilateur. Ne pas brancher cet appareil à une multiprise. L’utilisation de
ce dispositif peut causer des risques d’électrocution ou d’incendie.
• Ne pas introduire ses doigts dans les fentes d’aération.
• Cet appareil n’est pas un jouet. Empêcher les enfants de jouer avec.
• Ne pas recouvrir les fentes d’aération du ventilateur avec des cheveux, des rideaux, des nappes de table,
des vêtements ou d’autres objets. Cela peut provoquer des dégâts ou des blessures.
• Ne pas utiliser le ventilateur si le cordon d’alimentation est défectueux. Vérifier régulièrement l’état du cordon d’alimentation. Si le cordon d’alimentation est défectueux, le faire remplacer par le fabricant, le service
client ou un professionnel qualifié pour se prémunir de tout danger.
• Ne pas utiliser l’appareil si celui-ci est tombé ou a été endommagé. Si les pales de rotor sont endommagées, le faire remplacer par le fabricant ou le service client pour se prémunir de tout danger.
• Ne pas utiliser l’appareil en extérieur, ni dans des espaces commerciaux, industriels ou agricoles. L’appareil
est exclusivement destiné à un usage domestique.
• Ne pas utiliser l’appareil dans un environnement humide comme par exemple une salle de bains.
• Ne pas installer le ventilateur près d’une fenêtre ou à un endroit exposé à la pluie ou à l’humidité. Cela peut
entraîner un danger d’ordre électrique.
• Ne pas faire passer le cordon d’alimentation sous des objets comme des tapis, des paillassons ou des tapis
de couloir. Ne pas faire passer le cordon d’alimentation dans des lieux de passage pour éviter que des
personnes trébuchent dessus.
• Débrancher l’appareil après utilisation. Veiller à éteindre préalablement l’appareil.
• Ne pas faire fonctionner l’appareil dans un lieu où de l’essence, de la peinture, des liquides inflammables
ou des produits chimiques explosifs sont utilisés ou entreposés. Ne pas essayer de réparer ou de démonter
l’appareil soi-même. Cela engendrerait l’annulation de la garantie et serait susceptible de provoquer des
dommages matériels et des dommages à personnes. Le boîtier ne contient aucune pièce devant être
entretenue par l‘utilisateur.
• La télécommande d’autres appareils peuvent perturber le ventilateur et inversement. Si cela survient, placer le ventilateur à un autre endroit.
• Tenir le ventilateur hors de la portée des enfants.
24
Page 25

1 Panneau de commande
2 Affichage
3 Protection avant
4 Protection arrière
5 Grille de protection
6 Colonne
7 Pied
8 Télécommande
Aperçu de l’appareil
25
Page 26

Installation
1. Sortir toutes les pièces de l’appareil de leur emballage.
2. Faire passer le cordon d’alimentation au milieu des
deux parties du pied.
3. Assembler les deux parties du pied. Pour ce faire,
encastrer les deux parties au niveau des points
d’attache.
4. Retourner verticalement la colonne du ventilateur.
Installer le pied sur la colonne. Veiller à ce que la
colonne soit bien fixée au pied.
5. Visser le pied à la colonne au moyen des vis fournies.
6. Faire passer le cordon d’alimentation par la rainure
située à l’arrière de l’appareil.
7. Redresser la colonne. L’appareil est prêt à l’emploi.
Utilisation
Utilisation du panneau de commande de l’appareil
1 Activation du minuteur. Chaque pression sur
la touche augmente le temps d’une heure.
2 Désactivation du minuteur.
3 Sélection de trois modes (sommeil, nature,
normal). Le mode sélectionné apparaît sur
l’affichage.
4 Bouton marche/arrêt
5 Sélection de trois niveaux (bas, intermédiaire,
haut). Le niveau sélectionné apparaît sur l’affichage.
6 Activation et désactivation de la fonction
d’oscillation.
Colonne
Vis
26
Page 27

Écran d’affichage
Affichage de la température
ambiante et du minuteur
Vent nocturne
Vent naturel
Niveaux de vitesse
Mode d’oscillation
Télécommande
Remarques sur la télécommande
• Pointer la télécommande en direction du capteur infrarouge de l’appareil.
• Ne pas placer d’obstacle entre la télécommande et le capteur.
• La télécommande ne doit pas être utilisée dans une pièce où fonctionnent des machines lourdes.
• Utiliser la télécommande avec précaution. Ne pas laisser la télécommande tomber au sol. Ne pas la frapper
contre des objets durs.
Remarques sur les piles
• Sortir les piles du compartiment des piles en cas d’inutilisation prolongée de la télécommande.
• La télécommande nécessite des micropiles (LR03). Elles doivent être neuves et remplacées en même
temps une fois vides.
• Nettoyer les bornes électriques des piles et du compartiment avant de les y introduire.
• Respecter les polarités au moment de les introduire. Les bornes plus et moins doivent correspondre avec
celles du compartiment des piles.
27
Page 28

Nettoyage et entretien
Danger : il existe des risques d’électrocution
Ne pas laisser de l’eau s’infiltrer à l’intérieur de l’appareil..
Nettoyage
1. Toujours débrancher l’appareil avant de le nettoyer.
2. Aspirer la poussière accumulée à l’avant du ventilateur et à
l’arrière, à l’endroit où la grille en plastique recouvre l’entrée d’air.
Il est également possible d’utiliser une brosse de nettoyage ou
un plumeau.
3. Essuyer régulièrement la surface du ventilateur à l’aide d’un
chiffon humide (non trempé) puis la sécher soigneusement avec
un chiffon doux et sec avant de remettre l’appareil en marche.
4. Ne pas utiliser de produit d’entretien ou de substance agressifs
pour nettoyer l’appareil. Cela pourrait l’endommager.
5. Enlever les vis de la grille avant. Ouvrir la grille pour nettoyer
avec précaution la roue du ventilateur (cf. image).
Rangement
• Nettoyer le ventilateur comme indiqué ci-dessus.
• Mettre l’appareil dans son carton d’origine afin de l’entreposer ou
le recouvrir pour le protéger de la poussière.
• Le ranger dans un endroit sec.
• Ne jamais laisser l’appareil branché une fois rangé.
• Ne pas serrer le cordon d’alimentation en l’enroulant autour de
l’appareil et ne pas poser de poids sur le câble, surtout à l’endroit
de son raccord avec le ventilateur pour éviter qu’il ne s’effiloche ou ne se détériore.
Vis
Grille
Colonne
28
Page 29

Information sur le recyclage
Vous trouverez sur le produit l’image ci-contre (une poubelle sur roues, barrée d‘une croix),
ce qui indique que le produit se trouve soumis à la directive européenne 2002/96/CE.
Renseignez-vous sur les dispositions en vigueur dans votre région concernant la collecte
séparée des appareils électriques et électroniques. Respectez-les et ne jetez pas les appareils usagés avec les ordures ménagères. La mise au rebut correcte du produit usagé
permet de préserver l’environnement et la santé. Le recyclage des matériaux contribue à
la préservation des ressources naturelles.
Ce produit contient des piles qui sont soumises à la directive européenne 2006/66/CE
selon laquelle elles ne doivent pas être éliminées avec les ordures ménagères. Renseignez-vous sur les dispositions en vigueur concernant la mise en rebut séparée des piles.
La mise en rebut correcte du produit usagé permet de préserver l’environnement et la
santé.
Déclaration de conformité
Fabricant : Chal-Tec GmbH, Wallstraße 16, 10179 Berlin, Allemagne.
Ce produit est conforme aux directives européennes suivantes :
2004/108/CE (CEM)
2006/95/CE (LVD)
2011/65/UE (RoHS)
2012/206/UE (ErP)
29
 Loading...