

Page 1
10029123 10029124
BBQ-Ofen
Page 2

2
Sehr geehrter Kunde,
wir gratulieren Ihnen zum Erwerb Ihres Gerätes. Lesen Sie die folgenden Hinweise sorgfältig durch und befolgen Sie diese, um möglichen Schäden vorzubeugen. Für Schäden, die durch Missachtung der Hinweise und
unsachgemäßen Gebrauch entstehen, übernehmen wir keine Haftung.
Sicherheitshinweise
• Lesen Sie sich alle Hinweise sorgfältig durch und bewahren Sie die Anleitung zum Nachschlagen gut auf.
• Benutzen Sie das Gerät nur im Haushalt und nicht für kommerzielle Zwecke.
• Das Gerät darf nur im Freien benutzt werden, benutzen Sie es nicht in Innenräumen.
• Halten Sie Kinder vom Gerät fern, wenn das Gerät an ist.
• Lassen Sie das Feuer nicht aus den Augen.
• Um einer Kohlenmonoxidvergiftung vorzubeugen, lassen Sie das Gerät nicht auf engstem Raum schwelen
oder abkühlen.
• Stellen Sie das Gerät nicht unter Markisen, Sonnenschirme oder Pavillons.
• Verwenden Sie zum Befeuern oder kein Benzin, Spiritus, Feuerzeugbenzin, Alkohol oder andere ähnliche
Chemikalien.
• Wir empfehlen Ihnen Eierkohle zum Befeuern zu verwenden, da sie länger brennt und weniger Asche erzeugt, die den Luftstrom behindern könnte.
• Wenn Sie den Deckel bei hohen Temperaturen öffnen, heben Sie ihn nur leicht an, damit Ihnen die heiße
Luft nicht auf einen Schlag entgegen kommt und sie sich nicht verletzen.
• Stellen Sie das Gerät nicht auf Holzplanken oder andere brennbare Oberflächen wie trockenes Gras, Holzspäne, Blätter oder dekorative Rinde.
• Lassen Sie um das Gerät mindestens 2 m Platz zu brennbaren Gegenständen.
• Benutzen Sie das Gerät nicht als Ofen.
• Das Gerät wird während des Betriebs sehr heiß, bewegen Sie es nicht, während es in betrieb ist.
• Fassen Sie das Gerät und Geräteflächen nur mit Topflappen oder Ofenhandschuhen an.
• Lassen Sie das Gerät vollständig abkühlen, bevor Sie er verstauen.
• Überprüfen Sie das Gerät regelmäßig auf Schäden und tauschen Sie es aus, falls nötig.
Zusammenbau
Schritt 1
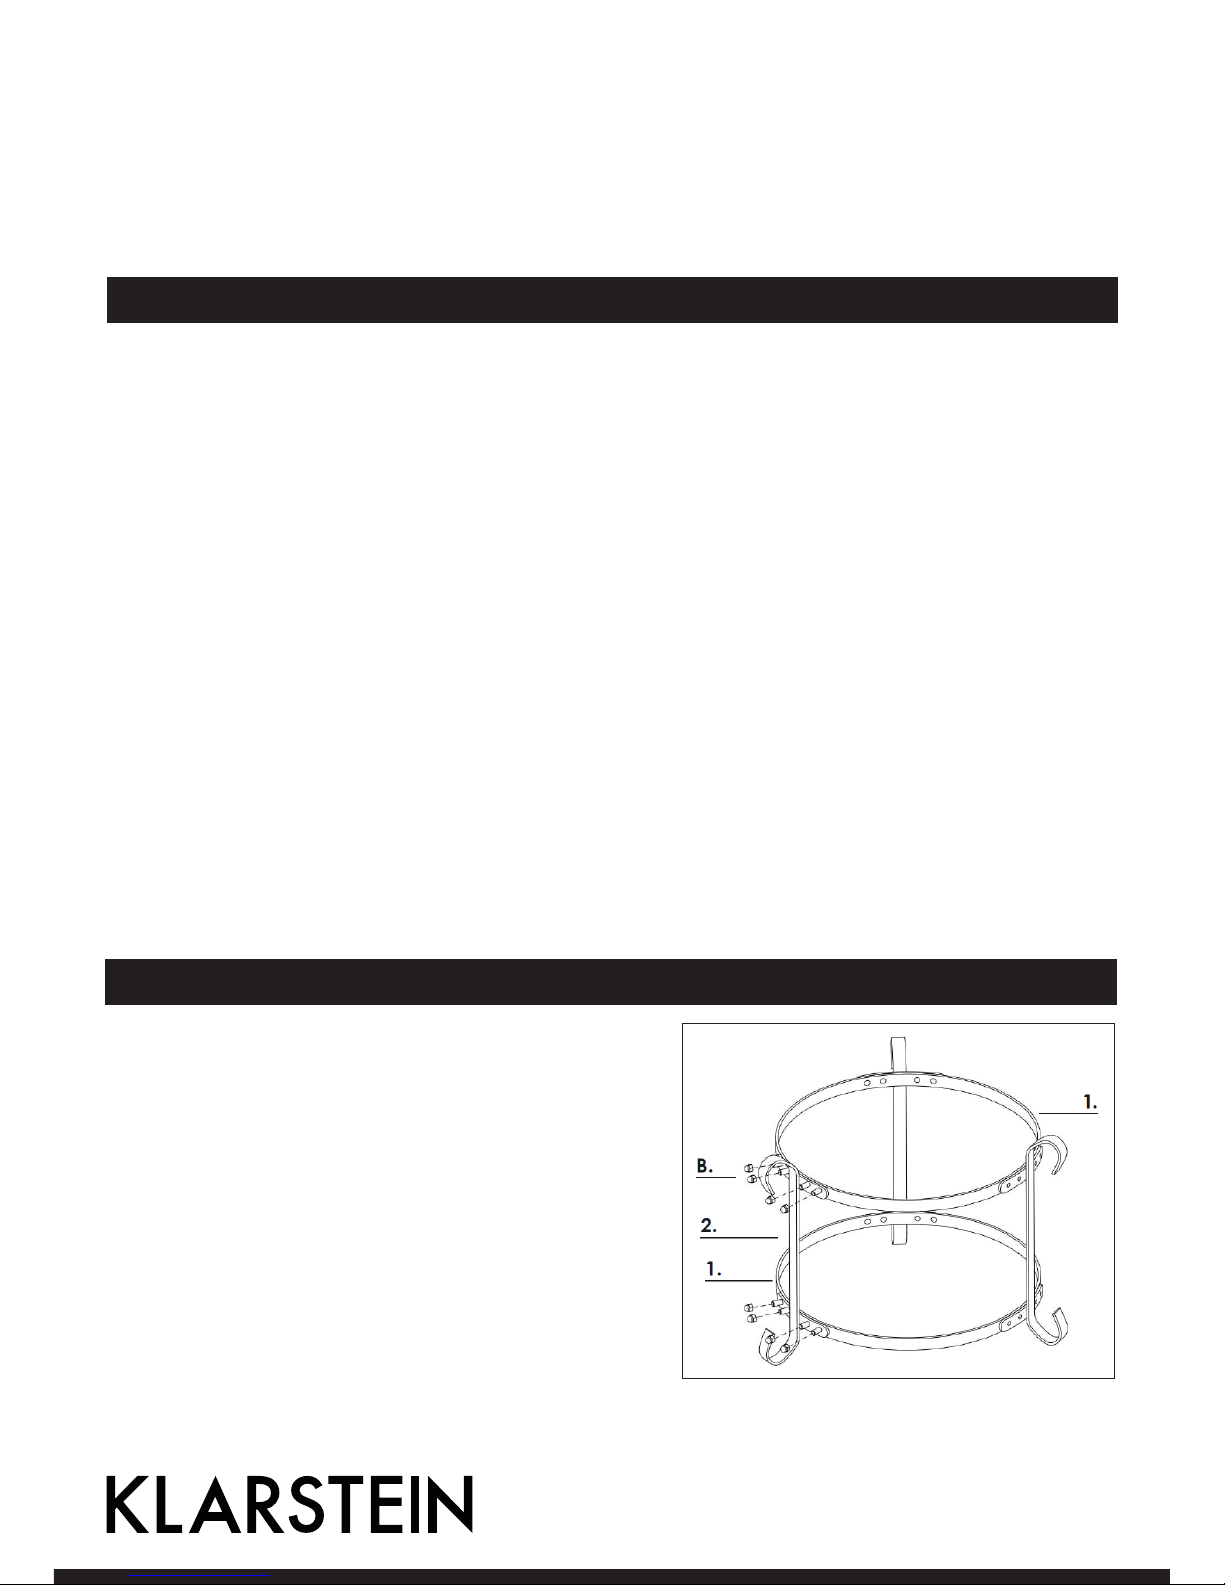
Befestigen Sie die Halterung (2) an beiden Ringen (1). Befestigen Sie die Halterung mit 8 Schrauben und 8 Muttern (B).
Schritt 2
Befestigen Sie die anderen beiden Halterungen auf die
gleiche Art. Richten Sie sich dabei nach dem Bild rechts.
Page 3

3
Schritt 3
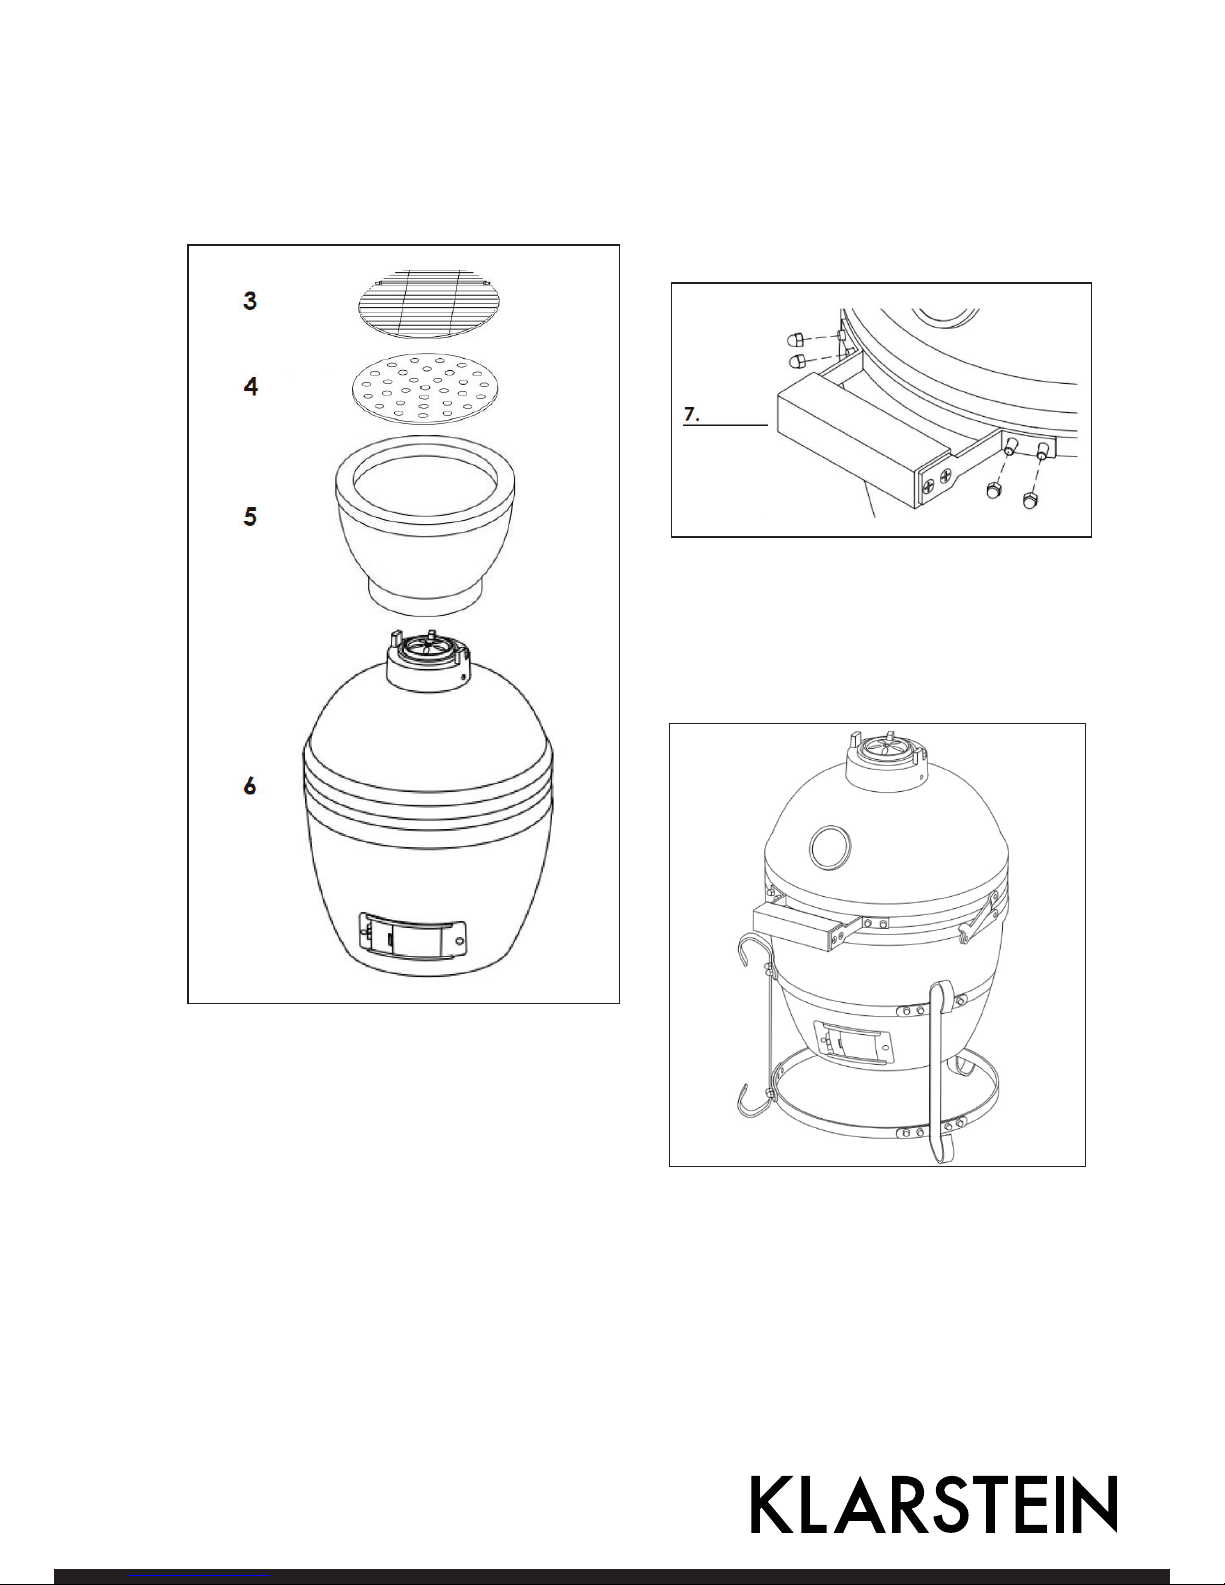
Heben Sie den Deckel vom Ofen und setzen Sie
die Feuerschale (5), die Kohleplatte (4) und den
Grillrost (3) in den Ofen ein (siehe Bild unten).
Setzen Sie den Deckel danach wieder auf.
Schritt 4
Richten Sie die Löcher des Handgriffs an den
vorinstallierten Schrauben am Deckel aus und
gefestigen Sie den Griff mit 4 Muttern. Verfahren Sie ebenso mit dem anderen Griff.
Schritt 5
Stellen Sie den Ofen so auf den Ständer, dass
der untere Abzug nach vorne zeigt und sie ihn
problemlos öffnen und schließen können.
Sobald der Grill sicher auf dem Ständer steht,
gleichen Sie ihn mit einer Wasserwaage aus, um
sicherzugehen, dass die Grillfläche eben ist. Sie
können den Grill nun benutzen. Lesen Sie sich
vorher die Bedienungsanleitung sorgfältig durch.
Page 4

4
Bedienung
Feuer löschen
Wenn Sie das Feuer löschen möchten, geben Sie keinen weiteren Brennstoff hinzu und schließen Sie alle
Lüftungsöffnungen und den Deckel, damit das Feuer erstickt. Verwenden Sie zum Löschen kein Wasser, da es
die Keramik beschädigen könnte.
Wartung
Ziehen Sie die Schrauben regelmäßig nach und Ölen Sie den Ständer mindestens 2 Mal im Jahr.
Feuer anzünden und Bedienung des Grills
• Stellen Sie das Gerät auf einem ebenen, festen und hitzebeständigen Untergrund auf, fernab von brennbaren Gegenständen.
• Lassen Sie um den Grill herum und über dem Grill mindestens 2 m Platz zu anderen Gegenständen.
• Um ein Feuer zu entfachen, geben Sie etwas zusammengeknüllte Zeitung zusammen mit Grillanzünder auf
die Kohleplatte und bedecken Sie das Ganze mit 2-3 Handvoll Eierkohle.
• Verwenden Sie zum Befeuern oder kein Benzin, Spiritus, Feuerzeugbenzin, Alkohol oder andere ähnliche
Chemikalien. Öffnen Sie den unteren Abzug und entzünden Sie das Zeitungspapier mit einem langen Feuerzeug oder einem Sicherheitsstreichholz. Sobald sich das Feuer entzündet hat, lassen Sie den Abzug und
den Deckel 10 Minuten lang geöffnet, damit sich ein kleines Glutbett bilden kann.
• Wir empfehlen Ihnen in dieser Zeit das Feuer nicht zu schüren oder die Kohlen zu wenden, damit sie gleichmäßig durchbrennen können.
• Sobald das Feuer entfacht ist, verwenden Sie unbedingt Ofenhandschuhe, wenn Sie die Keramik oder die
Grilloberfläche anfassen.
• Halten Sie sich bezüglich Temperatur und Garzeit an die Gartabelle (siehe unten).
Kohle nachfüllen
Bei geschlossenen Lüftungsöffnungen, hält der Grill die hohe Temperatur über mehrere Stunden. Falls Sie sie
mehr Zeit benötigen (weil Sie z. B. große Fleischstücke im Rauch garen) müssen Sie unter Umständen Kohle
nachlegen. Öffnen Sie die Deckel ganz langsam und vorsichtig, legen Sie zusätzliche Kohle nach und fahren
Sie mit dem Grillen fort.
Gartabelle
Langsames Garen / Smoken (110-135 °C) Oberer Auslass Unterer Auslass
Rinderbrust 2 Std. pro 500 g
Pulled Pork 2 Std. pro 500 g
Ganzes Huhn 3-4 Std. pro 500 g
Rippchen 3-5 Std. pro 500 g
Rostbraten 9+ Std. pro 500 g
Hinweis: Schwarz = geschlossen / Weiß = offen
Page 5

5
Grillen / anrösten (160-180 °C) Oberer Auslass Unterer Auslass
Fisch 15-20 Min.
Schweinefilet 15-30 Min.
Hühnchenteile 30-45 Min.
Ganzes Huhn 1-1,5 Std.
Lammkeule 3-4 Std.
Truthahn 2-4 Std.
Schinken 2-5 Std.
Scharf anrösten (260-370 °C) Oberer Auslass Unterer Auslass
Steak 5-8 Min.
Schweinekotelett 6-10 Min.
Burger 6-10 Min.
Würstchen 6-10 Min.
Geräteübersicht und Lieferumfang
Hersteller: Chal-Tec GmbH, Wallstraße 16, 10179 Berlin, Deutschland.
Page 6
6
Dear Customer,
Congratulations on purchasing this equipment. Please read this manual carefully and take care of the following
hints to avoid damages. Any failure caused by ignoring the mentioned items and cautions mentioned in the
instruction manual are not covered by our warranty and any liability.
Safety Instructions
• Read all the safety and operating instructions carefully and retain them for future reference.
• This product is intended for outdoor use only. Do not use indoors.
• Always keep children and pets at a safe distance from the oven when in use.
• Never leave a burning fire unattended.
• Danger of carbon monoxide poisoning. Never light this product, let it smoulder or cool down in confined spaces.
• Do not use this product in a tent, caravan, car, cellar, loft or boat.
• Do not use under any awnings, parasols or gazebos.
• Fire hazard – hot embers may emit while in use.
• Caution - do not use petrol, white spirit, lighter fluid, alcohol or other similar chemicals for lighting or relighting.
• It is highly recommended that you use lump charcoal in your oven. It burns for longer and produces less ash
which can restrict the airflow.
• Important: when opening the lid at high temperatures it is essential to lift the lid only slightly, allowing air to
enter slowly and safely, preventing any backdraft or flare-ups that may cause injury.
• Do not use the oven on decking or any other flammable surfaces such as dry grass, wood chips, leaves or
decorative bark.
• Ensure that the oven is positioned at least 2 metres away from flammable items.
• Do not use this oven as a furnace.
• Attention: this product will become very hot, do not move it during operation.
• Always use heat resistant gloves when handling hot ceramics or cooking surfaces.
• Allow the unit to cool down completely before moving or storing.
• Always inspect the unit prior to use for fatigue and damage and replace as and when necessary.
Assembling
Step 1
Attach one bracket piece (2) to the two brace rings (1).
Secure the bracket to each brace ring using the 8x screws
(A) with the 8x dome-headed nuts (B).
Step 2
Continue to attach the other brackets to the brace rings by
aligning screw holes, and using the screws (A) and dome
headed nuts (B). Please reference the above diagram.
Page 7
7
Step 3
On the side, add the firebox (5), charcoal plate (4)
and cooking grill (3) inside of the oven. Please
reference the diagram below.
Step 4
To attach the handle (7) to the lid align the bolt
holes of the handle to pre-installed bolts on
the lid. Secure the handle (7) with the 4x preattached dome headed nuts .
Step 5
Place the grill on the stand with the
bottom vent facing to the front of the stand,
allowing the vent to open and close without
any interruption
When the grill is securely placed on the stand,it
is recommended to place a level on the cooking
grill to ensure there is a flat cooking surface. The
Grill is now ready to use. Please ensure that grill
curing instructions are read thoroughly prior to
use.
Page 8

8
Use and Operation
Extinguishing
To extinguish unit – stop adding fuel and close all the vents and the lid to allow the fire to die natuarally. Do not
use water to extinguish the charcoals as this could damage the ceramic oven.
Maintenance
Tighten the bands and oil the hinge 2 times a year or more if needed.
Lighting, Usage and Care Information
• Ensure the oven is positioned on a permanent, flat, level, heat resistant non-flammable surface away from
flammable items.
• Ensure the oven has a minimum of 2m overhead clearance and has a minimum 2 m clearance from other
surrounding items.
• To start a fire place rolled up newspaper with some lighter cubes or solid firelighters on the charcoal plate in
the base of the oven. Then place 1 or 2 handfuls of lump charcoal over the top of the newspaper.
• Do not use petrol, white spirit, lighter fluid, alcohol or other similar chemicals for lighting or relighting.
• Open the bottom vent and light the newpaper using a long nosed lighter or safety matches. Once it has
caught, leave the bottom vent and lid open for about 10 minutes to build a small bed of hot embers.
• It is recommended you don’t stoke or turn the coals once they are alight. This allows the charcoals to burn
more uniformly and efficiently.
• Once alight only use heat resistant gloves when handling hot ceramics or cooking surfaces.
• See below for cooking instuctions depending on temperature and duration.
Refuelling
With the vents closed, the oven stays at a high temperature for several hours. If you require a longer
cooking time (e.g when roasting a whole joint or slow smoking), it may be necessary to add more charcoal.
Just add some additional charcoal and continue.
Gartabelle
Slow cook / Smoke (110-135 °C) Top vent Bottom vent
Beef Brisket 2 h per 500 g
Pulled Pork 2 h per 500 g
Whole Chicken 3-4 h per 500 g
Ribs 3-5 h per 500 g
Roasts 9+ h per 500 g
Note: Black = closed / White = opened
Page 9

9
Grill / Roast (160-180 °C) Top vent Bottom vent
Fish 15-20 Min.
Pork Tenderloin 15-30 Min.
Chicken Pieces 30-45 Min.
Whole Chicken 1-1,5 Std.
Leg of a lamb 3-4 Std.
Turkey 2-4 Std.
Ham 2-5 Std.
Sear (260-370 °C) Top vent Bottom vent
Steak 5-8 Min.
Pork Chops 6-10 Min.
Burgers 6-10 Min.
Sausages 6-10 Min.
Part List
Producer: Chal-Tec GmbH, Wallstraße 16, 10179 Berlin, Germany.
Page 10

10
Estimado cliente:
Le felicitamos por la adquisición de este producto. Lea atentamente el siguiente manual y siga cuidadosamente
las instrucciones de uso con el fin de evitar posibles daños. La empresa no se responsabiliza de los daños
ocasionados por un uso indebido del producto o por haber desatendido las indicaciones de seguridad.
Indicaciones de seguridad
• Lea atentamente todas las indicaciones y conserve este manual de instrucciones para futuras consultas.
• Este aparato está concebido para uso doméstico, no comercial.
• Este aparato está indicado para su uso en exteriores, no en interiores.
• Mantenga a los niños alejados si el aparato está encendido.
• No deje el aparato en marcha sin supervisión.
• Para evitar una intoxicación por monóxido de carbono, no deje que el aparato quede humeando o
enfriándose en espacios confinados.
• No coloque el aparato bajo toldos, sombrillas ni cenadores.
• No utilice gasolina, bebidas alcohólicas ni otros químicos similares para encender o mantener el fuego.
• Le recomendamos utilizar trozos de carbón vegetal para encender el fuego, pues este arde durante más
tiempo y genera poca ceniza.
• Si abre la tapa con la parrilla a temperatura alta, levántela levemente para que el aire caliente no salga
inesperadamente y le ocasione lesiones.
• No coloque el aparato sobre tablones de madera ni otras superficies inflamables como hierba seca, virutas
de madera, hojas u otros elementos decorativos de madera.
• Mantenga una distancia de al menos 2 m entre el aparato y objetos inflamables.
• No utilice el aparato como caldera.
• El aparato alcanza temperaturas muy elevadas durante su funcionamiento, no lo mueva mientras está
encendido.
• Toque el aparato y su superficie con guantes de cocina o un paño.
• Deje que el aparato se enfríe completamente antes de guardarlo.
• Compruebe el aparato regularmente para detectar posibles averías y repárelo si fuera necesario.
Montaje
Paso 1
Fije el soporte (2) a ambos anillos (1). Asegure el soporte
con 8 tornillos y 8 tuercas (B).
Paso 2
Fije los otros dos soportes del mismo modo. Siga la
ilustración de la derecha.
Page 11

11
Paso 3
Levante la tapa del horno y coloque el cajón para
las cenizas (5), el recipiente para el carbón (4) y
la parrilla (3) dentro de la barbacoa (consulte la
ilustración inferior). Vuelva a colocar la tapa.
Paso 4
Oriente los orificios del asa a los tornillos
preinstalados en la tapa y fíjelos con la ayuda
de cuatro tuercas. Siga el mismo procedimiento
para el otro asa.
Paso 5
Coloque la barbacoa en los soportes de tal
manera que el compartimento inferior se oriente
hacia adelante y pueda abrirlo y cerrarlo sin
problemas.
Cuando haya colocado la barbacoa correctamente
sobre los soportes, compruebe con un nivel que
la superficie de instalación no está inclinada. El
horno ya está listo para su uso. Antes de ponerlo
en marcha, lea este manual.
Page 12

12
Utilización
Apagar el fuego
Si desea apagar el fuego, no introduzca más material combustible dentro del horno y cierre todos los orificios
de ventilación y la tapa para ahogar el fuego. No utilice agua, podría dañar la cerámica.
Mantenimiento
Apriete los tornillos con frecuencia y lubrique las bisagras al menos 2 veces al año.
Encender el fuego y utilizar la parrilla
• Coloque el aparato en una superficie plana, resistente al calor y lejos de objetos inflamables.
• Deje 2 m de distancia alrededor y encima del aparato con respecto a otros objetos.
• Para encender el fuego, coloque unos trozos de papel de periódico junto con pastillas de encendido para
parrillas sobre el recipiente para el carbón y cúbralo con 2-3 piezas de carbón vegetal.
• No utilice gasolina, bebidas alcohólicas ni otros productos químicos para encender o mantener el fuego.
Abra el compartimento inferior y encienda el papel de periódico con un encendedor largo o una cerilla de
seguridad. Cuando el fuego se haya encendido, deje el compartimento y la tapa abiertos durante 10 minutos
para formar las brasas.
• Le recomendamos no atizar el fuego ni mover el carbón para que las brasas sean lo más homogéneas
posible.
• Cuando el fuego esté listo, utilice guantes de cocina para tocar las partes de cerámica o la superficie de la
barbacoa.
• Siga los tiempos de cocción y temperatura de la tabla disponible a continuación.
Añadir más carbón
Con las ranuras de ventilación cerradas, la parrilla puede mantener la temperatura durante varias horas. Si
necesita más tiempo (por ejemplo, porque necesita ahumar una pieza de carne) deberá añadir más carbón.
Abra la tapa lentamente y, con cuidado, añada los trozos de carbón para continuar con el asado.
Tabla de cocción
Asado a fuego lento / ahumado (110-135 °C) Salida superior Salida inferior
Carne de ternera 2 horas por cada 500 g
Cerdo desmenuzado
(pulled pork)
2 horas por cada 500 g
Pollo entero 3-4 horas por cada 500 g
Costilla 3-5 horas por cada 500 g
Asados +9 horas por cada 500 g
Indicación: Negro = cerrado / blanco = abierto
Page 13

13
Asar / tostar (160-180 °C) Salida superior Salida inferior
Pescado 15-20 min
Filete de cerdo 15-30 min
Parte de pollo 30-45 min
Pollo entero 1-1,5 horas
Pata de cordero 3-4 horas
Pavo 2-4 horas
Cerdo 2-5 horas
Asado muy pasado (260-370 °C) Salida superior Salida inferior
Filete 5-8 min
Chuleta de cerdo 6-10 min
Hamburguesa 6-10 min
Salchichas 6-10 min
Descripción del aparato y contenido del paquete
Fabricante: Chal-Tec GmbH, Wallstraße 16, 10179, Berlín (Alemania).
Page 14

14
Chère cliente, cher client,
Toutes nos félicitations pour l’acquisition de ce nouvel appareil. Veuillez lire attentivement et respecter les
instructions de ce mode d’emploi afin d’éviter d’éventuels dommages. Nous ne saurions être tenus pour responsables des dommages dus au non-respect des consignes et à la mauvaise utilisation de l’appareil.
Consignes de sécurité
• Veuillez lire attentivement ce mode d’emploi, et conservez-le pour pouvoir vous y référer ultérieurement.
• Cet appareil a été conçu pour un usage domestique et non à des fins commerciales.
• L’appareil doit être utilisé exclusivement en extérieur, ne jamais l’utiliser à l’intérieur.
• Tenir les enfants éloignés de l’appareil lorsque celui-ci est allumé.
• Garder toujours un œil attentif sur le feu.
• Pour prévenir toute intoxication au monoxyde de carbone, ne pas laisser l’appareil couver ou refroidir dans
un espace confiné.
• Ne pas installer l’appareil sous une marquise, un parasol ou un barnum.
• Ne pas utiliser d’essence, d’alcool à brûler, de white spirit, d’alcool ou autres produits chimiques similaires
pour attiser le feu.
• Pour attiser le feu, il est recommandé d’utiliser du charbon de bois, car il brûle plus longtemps et produit
moins de cendres, lesquelles pourraient faire obstacle à l’écoulement de l’air.
• Par hautes températures, soulever doucement le couvercle pour éviter que l’air chaud ne s’échappe tout d’un
coup en direction de l’utilisateur et ne le blesse.
• Ne pas installer l’appareil sur des planches en bois ou sur tout autre type de surface inflammable comme de
l’herbe sèche, des bûchettes, des feuilles ou des écorces décoratives.
• Placer l’appareil à une distance minimale de 2 m des objets inflammables.
• Ne pas utiliser cet appareil comme fourneau.
• L’appareil peut devenir extrêmement chaud pendant son fonctionnement. Ne pas le déplacer lorsqu’il est
allumé. Toucher les surfaces de l’appareil uniquement avec des maniques ou des gants de cuisine.
• Laisser l’appareil refroidir complètement avant de le ranger.
• Contrôler régulièrement l’appareil pour vérifier qu’il n’est pas endommagé, et le remplacer si nécessaire.
Assemblage
Étape 1
Fixer un des montants (2) aux deux cerceaux (1). Les fixer
avec 8 vis et 8 écrous (B).
Étape 2
Fixer les deux autres montants de la même manière. Suivre le modèle ci-contre.
Page 15

15
Étape 3
Soulever le couvercle du four et installer la
vasque (5), le plateau à charbon (4) et le grill (3)
dans le four (cf. illustration ci-dessous). Puis replacer le couvercle.
Étape 4
Aligner les trous de la poignée (7) sur les vis préinstallées du couvercle et fixer la poignée (7)
avec 4 écrous. Procéder de même avec l’autre
poignée.
Étape 5
Placer le four sur le socle de telle manière à ce que la
bouche d’aération inférieure soit dirigée vers l’avant
et à ce qu’elle soit facile à ouvrir et à fermer.
Une fois que le four est fixé sur le socle, le mettre
à niveau à l’aide d’un niveau à bulle pour s’assurer
que le grill est à niveau. Le grill est à présent prêt
à l’emploi. Avant de l’utiliser, lire minutieusement
le mode d’emploi.
Page 16

16
Utilisation
Éteindre le feu
Pour éteindre le feu, ne pas ajouter de combustible et fermer toutes les ouvertures d’aération ainsi que le
couvercle, afin d’étouffer le feu. Ne pas verser d’eau pour éteindre le feu, car cela pourrait endommager la
céramique.
Entretien
Resserrer régulièrement les vis et graisser le socle au moins 2 fois par an.
Allumage d’un feu et utilisation du grill
• Disposer l’appareil sur un support plat, fixe et résistant à la chaleur, loin de tout objet inflammable.
• Dégager l’environnement immédiat du grill de tout autre objet, dans un rayon de 2 m.
• Pour allumer un feu, placer quelques boules de papier journal ainsi que des allume-feu sur le plateau à
charbon et recouvrir le tout avec 2-3 bonnes poignées de charbon de bois.
• Ne pas utiliser d’essence, d’alcool à brûler, de white spirit, d’alcool ou tout autre produit chimique similaire
pour allumer un feu. Ouvrir la bouche d’aération inférieure et mettre le feu au papier journal à l’aide d’un long
briquet ou d’une longue allumette. Dès que le feu a pris, laisser la bouche d’aération et le couvercle ouverts
pendant 10 minutes pour permettre de former un lit de braises.
• Pendant ce temps, il est déconseillé de remuer le feu ou de retourner le charbon afin de permettre une
combustion homogène.
• Une fois le feu allumé, il faut absolument utiliser des maniques pour toucher la céramique et la surface du
four.
• Se reporter au tableau de cuisson pour les températures et les temps de cuisson (cf. ci-dessous).
Rajouter du charbon de bois
Lorsque les bouches d’aération sont fermées, le grill maintient une température élevée pendant plusieurs heures. Dans le cas où plus de temps est nécessaire (pour les cuissons lentes et le fumage de gros morceaux de
viande par ex.), il faut rajouter du charbon de bois pour que la cuisson au grill se poursuive.
Tableau de cuisson
Cuisson lente / Fumage (110-135 °C) Aération supérieure Aération inférieure
Poitrine de bœuf 2 h pour 500 g
Effiloché de porc braisé 2 h pour 500 g
Poulet entier 3-4 h pour 500 g
Côtes 3-5 h pour 500 g
Rôtis 9 h et + pour 500 g
N.B. : noir = fermé / blanc = ouvert
Page 17

17
Grillade légère (160-180 °C) Oberer Auslass Unterer Auslass
Poisson 15-20 min.
Escalope de porc 15-30 min.
Morceaux de poulet 30-45 min.
Poulet entier 1-1,5 h
Gigot d’agneau 3-4 h
Dindon 2-4 h
Jambon 2-5 h
Grillade intense (260-370 °C) Aération supérieure Aération inférieure
Steak 5-8 min.
Côtelette de porc 6-10 min.
Burger 6-10 min.
Saucisse 6-10 min.
Aperçu de l’appareil et contenu de l’emballage
Fabricant : Chal-Tec GmbH, Wallstraße 16, 10179 Berlin, Allemagne.
Page 18

18
Gentile cliente,
La ringraziamo per aver acquistato il nostro dispositivo. La preghiamo di leggere attentamente le seguenti istruzioni e di seguirle per evitare eventuali danni. Non ci assumiamo alcuna responsabilità per danni derivati da una
mancata osservazione delle avvertenze di sicurezza e da un uso improprio del dispositivo.
Avvertenze di sicurezza
• Leggere attentamente tutte le avvertenze di sicurezza e conservare il manuale per consultazioni future.
• Il dispositivo è destinato esclusivamente ad un utilizzo domestico e in ambienti simili.
• Il dispositivo può essere utilizzato esclusivamente all‘aperto, non utilizzarlo in ambienti chiusi.
• Tenere i bambini lontano dal dispositivo quando questo è in funzione.
• Non lasciare il dispositivo incustodito quando questo è in funzione.
• Per evitare l‘avvelenamento da monossido di carbonio, non far raffreddare il dispositivo in uno spazio ristretto.
• Non collocare il dispositivo sotto tende, ombrelloni o gazebo.
• Non utilizzare benzina, alcool, accendini o sostanze chimiche per accendere il fuoco.
• Si consiglia di utilizzare la carbonella per accendere il fuoco perché brucia più a lungo e produce meno cenere che potrebbe ostacolare il flusso d‘aria.
• Sollevare il coperchio lentamente e con la massima cautela in modo da non scottarsi con il calore ed evitare
lesioni.
• Non posizionare il dispositivo su superfici in legno o su altre superfici infiammabili, come erba secca, trucioli
di legno o foglie.
• Lasciare intorno al dispositivo almeno 2 m di spazio libero con oggetti infiammabili.
• Non utilizzare il dispositivo come forno.
• Il dispositivo diventa molto caldo durante il funzionamento, non spostarlo mentre è in funzione.
• Toccare il dispositivo e le sue superfici solo utilizzando presine o guanti da forno.
• Far raffreddare completamente il dispositivo prima di conservarlo.
• Verificare regolarmente che il dispositivo non sia danneggiato. In questo caso, rivolgersi ad un centro assistenza specializzato.
Assemblaggio
Fase 1
Fissare il supporto (2) su entrambi gli anelli (1) utilizzando 8
viti e 8 dadi (B).
Fase 2
Fissare gli altri due supporti nello stesso modo. Per
l’assemblaggio, fare riferimento alla figura a destra.
Page 19

19
Fase 3
Assemblare il forno (5), la piastra (4) e la griglia (3)
al dispositivo (vedi figura sotto). Fare riferimento
alla figura sottostante
Fase 4
Per fissare il manico al coperchio, allineare i fori
del manico alle viti preinstallate sul coperchio.
Fissare il manico utilizzando 4 dadi. Seguire la
stessa procedura per fissare l‘altro manico.
Fase 5
Collocare il dispositivo sul supporto con il foro di
sfiato inferiore posizionato frontalmente in modo
si possa aprire e chiudere senza problemi.
Una volta che il dispositivo è saldamente fissato
sul supporto, assicurarsi che la griglia sia stabile.
Ora è possibile utilizzare il dispositivo. Si prega di leggere attentamente le istruzioni prima
dell’utilizzo.
Page 20

20
Utilizzo
Spegnere il fuoco
Per spegnere il fuoco, non continuare ad alimentare il fuoco con la carbonella e chiudere gli sfiati e il coperchio
in modo da soffocare il fuoco. Non spegnere il fuoco con l‘acqua poiché potrebbe danneggiare la ceramica.
Manutenzione
Controllare regolarmente che le viti siano ben serrate e lubrificare il supporto almeno 2 volte l‘anno.
Accendere il fuoco e utilizzo del dispositivo
• Collocare il dispositivo su una superficie piana, stabile e resistente al calore lontano da oggetti facilmente
infiammabili.
• Lasciare attorno e sopra il dispositivo almeno 2 m di spazio libero con altri oggetti.
• Per accendere il fuoco, mettere sulla piastra qualche foglio di giornale e legnetti accendifuoco. Coprire il tutto
con 2-3 manciate di carbonella.
• Non utilizzare benzina, alcool, accendini o altre sostanze chimiche per accendere il fuoco. Aprire lo sfiato
inferiore e accendere il fuoco utilizzando un accendino lungo o un fiammifero. Una volta che il fuoco si è
acceso, lasciare lo sfiato e il coperchio aperti per 10 minuti, in modo che si possa formare la brace.
• A questo punto non alimentare il fuoco e non girare la brace in modo che questa possa bruciare in modo
uniforme.
• Una volta che il fuoco è acceso, utilizzare guanti da forno per toccare le superfici del dispositivo.
• Consultare la tabella in basso per la temperatura e il tempo di cottura.
Aggiungere carbonella
Se si chiudono gli sfiati, il dispositivo mantiene una temperatura elevata per diverse ore. Se si necessita di più
tempo per la cottura degli alimenti, aggiungere altra carbonella. Aprire il coperchio lentamente e con cautela,
aggiungere la carbonella e continuare a grigliare.
Tempi di cottura
Cottura lenta/affumicata (110-135°C) Sfiato superiore Sfiato inferiore
Manzo 2 ore per 500 g
Maiale 2 ore per 500 g
Pollo intero 3-4 ore per 500 g
Costole 3-5 ore per 500 g
Arrosto 9+ ore per 500 g
Nota: nero = chiuso / bianco = aperto
Page 21

21
Grigliare/arrostire (160-180°C) Sfiato superiore Sfiato inferiore
Pesce 15-20 minuti
Filetto di maiale 15-30 minuti
Parti di pollo 30-45 minuti
Pollo intero 1-1,5 ore
Cosciotto d’agnello 3-4 ore
Tacchino 2-4 ore
Prosciutto 2-4 ore
Arrostire (260-370°C) Sfiato superiore Sfiato inferiore
Bistecca 5-8 minuti
Cotoletta di maiale 6-10 minuti
Hamburger 6-10 minuti
Wurstel 6-10 minuti
Descrizione prodotto e consegna
Produttore: Chal-Tec GmbH, Wallstraße 16, 10179 Berlino, Germania.
 Loading...