

Page 1
Zitruspresse orange
10008166 10008167 10008168
10028043
Eismaschine
Page 2

2
Sehr geehrter Kunde,
wir gratulieren Ihnen zum Erwerb Ihres Klarstein Gerätes. Lesen Sie die folgenden Anschluss- und
Anwendungshinweise sorgfältig durch und befolgen Sie diese, um möglichen technischen Schäden
vorzubeugen. Für Schäden, die durch Missachtung der Sicherheitshinweise und unsachgemäßen Gebrauch entstehen, übernehmen wir keine Haftung.
Inhaltsverzeichnis
Technische Daten 2
Sicherheitshinweise 2
Geräteübersicht und Funktionstasten 3
Bedienung und Funktionen 4
Eisrezepte 5
Reinigung und Pege 7
Hinweise zur Entsorgung 7
Konformitätserklärung 7
Technische Daten
Artikelnummer 10028043
Stromversorgung 220-240 V ~ 50-60 Hz
Leistung 135 W
Abmessungen 400 mm (B) x 260 mm (T) x 275 mm (H)
Fassungsvermögen 1.2 L
Sicherheitshinweise
Lesen Sie sich alle Hinweise sorgfältig durch und bewahren Sie die Bedienungsanleitung zum Nachschlagen gut auf.
• Prüfen Sie vor der Benutzung die Spannung auf der Geräteplakette und schließen Sie das Gerät
nur an Steckdosen an, die der Spannung des Geräts entsprechen.
• Falls das Netzkabel beschädigt ist, muss es vom Hersteller, einem autorisierten Fachbetrieb oder
einer ähnlich qualizierten Person ersetzt werden.
• Drehen Sie das Gerät nicht auf den Kopf und neigen Sie es nicht mehr als 45°.
• Tauchen Sie das Gerät nie komplett in Wasser oder andere Flüssigkeiten und achten Sie drauf, dass
Stecker und Netzkabel nicht nass werden.
• Ziehen Sie den Stecker aus der Steckdose, wenn Sie das Gerät nicht mehr benutzen oder reinigen.
• Lassen Sie um das Gerät herum 8 cm Platz, um ausreichende Luftzirkulation zu gewährleisten.
• Benutzen Sie nur Zubehör, das vom Hersteller ausdrücklich dafür zugelassen ist.
• Kinder, physisch und körperlich eingeschränkte Menschen sollten das Gerät nur benutzen, wenn
sie vorher von einer Aufsichtsperson ausführlich mit den Funktionen und den Sicherheitsvorkehrungen vertraut gemacht wurden. Achten Sie darauf, dass Kinder nicht mit dem Gerät spielen.
• Benutzen Sie das Gerät nicht in der Nähe von Flammen, heißen Kochplatten oder Öfen.
• Schalten Sie das Gerät nicht mehrmals hintereinander ein und aus. Warten Sie mindestens 5 Minuten, bevor sie das Gerät wieder einschalten, um den Kompressor nicht zu beschädigen.
• Stecken Sie keine Bleche oder andere Objekt ins Gerät, um Feuer und Kurzschlüsse zu vermeiden.
• Wenn Sie das Eis entnehmen, schlagen Sie nicht gegen den Behälter oder den Rand des Behälters,
um ihn nicht zu beschädigen.
• Schalten Sie das Gerät erst ein, wenn Sie den Behälter und das Rührmesser angebracht haben.
Page 3
• Die Temperatur für Zutaten beträgt 25±5°C. Kühlen Sie die Zutaten nicht vor, andernfalls könnte
das Messer blockieren, bevor die Eiscreme fertig zubereitet ist.
• Entfernen Sie das Rührmesser nicht, solange es in Betrieb ist.
• Verwenden Sie das Gerät nicht im Freien.
• Reinigen Sie das Gerät nicht mit Scheuerpulver oder Scheuerschwämmen.
• Bewahren Sie im Gerät keine explosiven Substanzen auf, wie beispielsweise Sprühdosen mit leicht
entzündlichen Treibgasen.
• Das Gerät ist nicht für den kommerziellen Gebrauch, sondern nur für Gebrauch im Haushalt und
in ähnlichen Umgebungen vorgesehen.
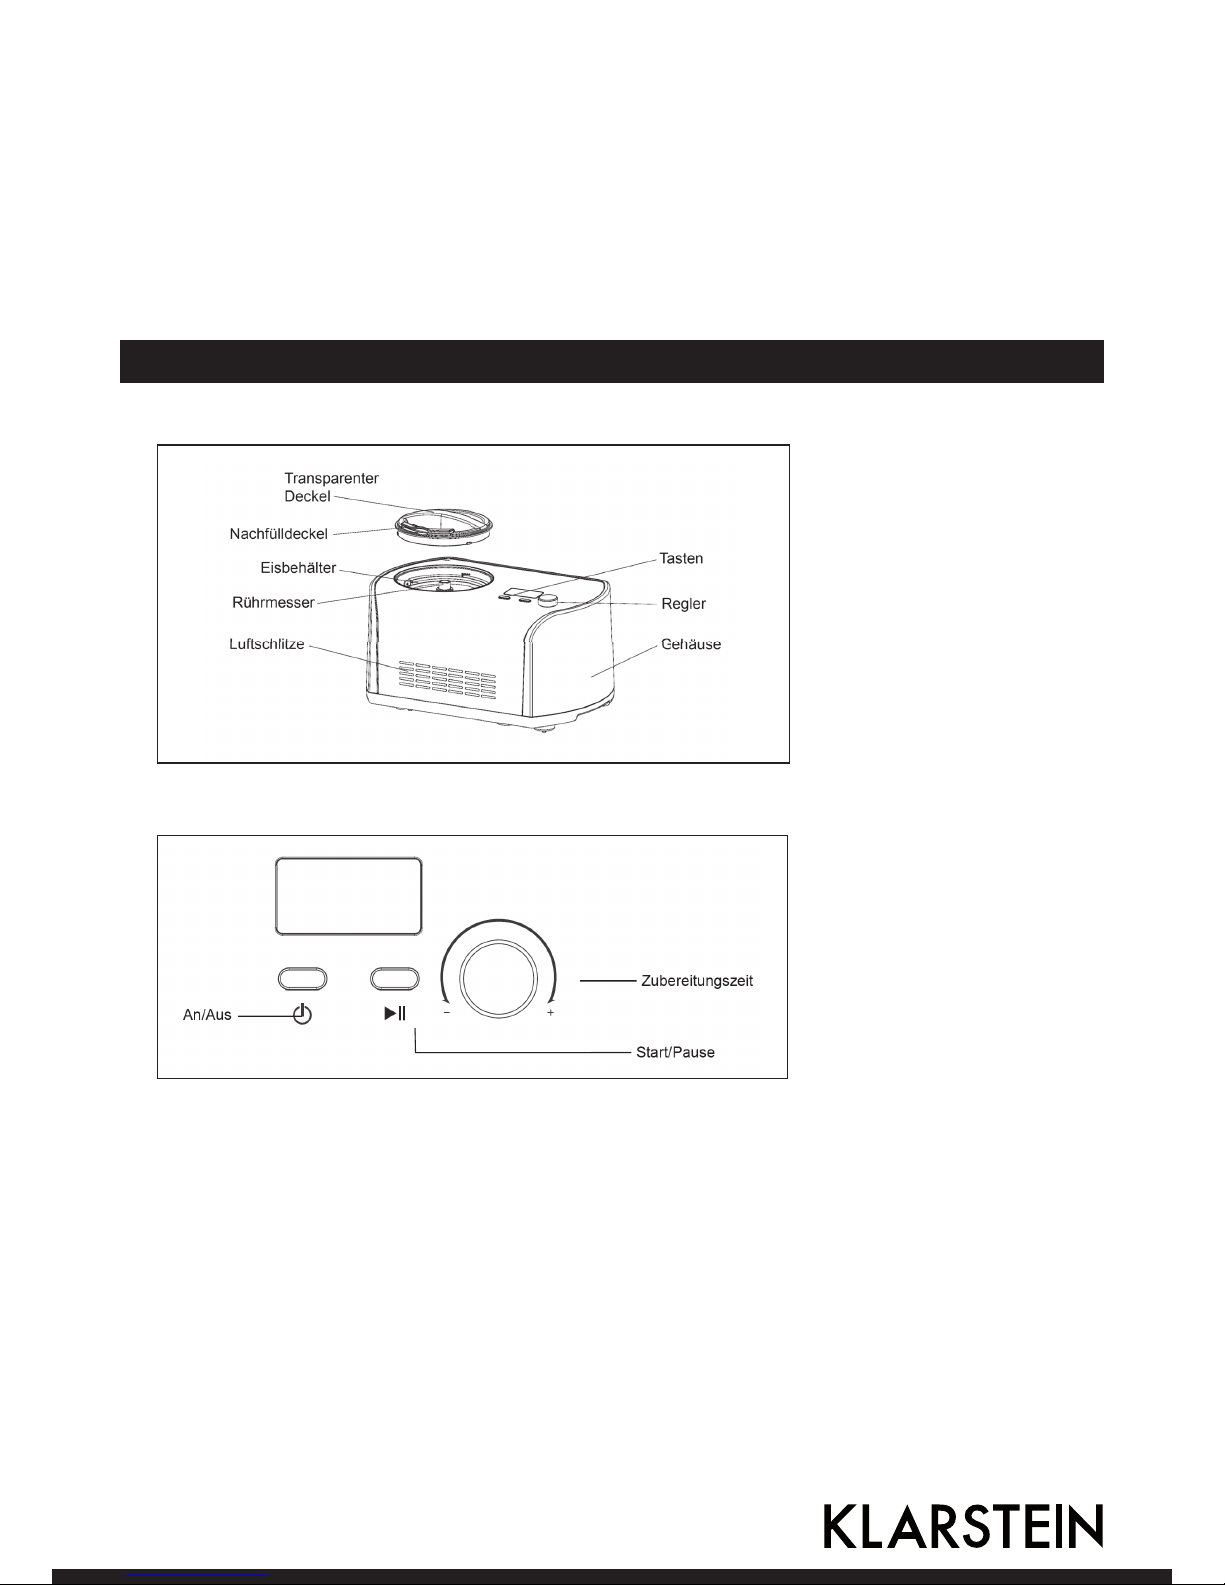
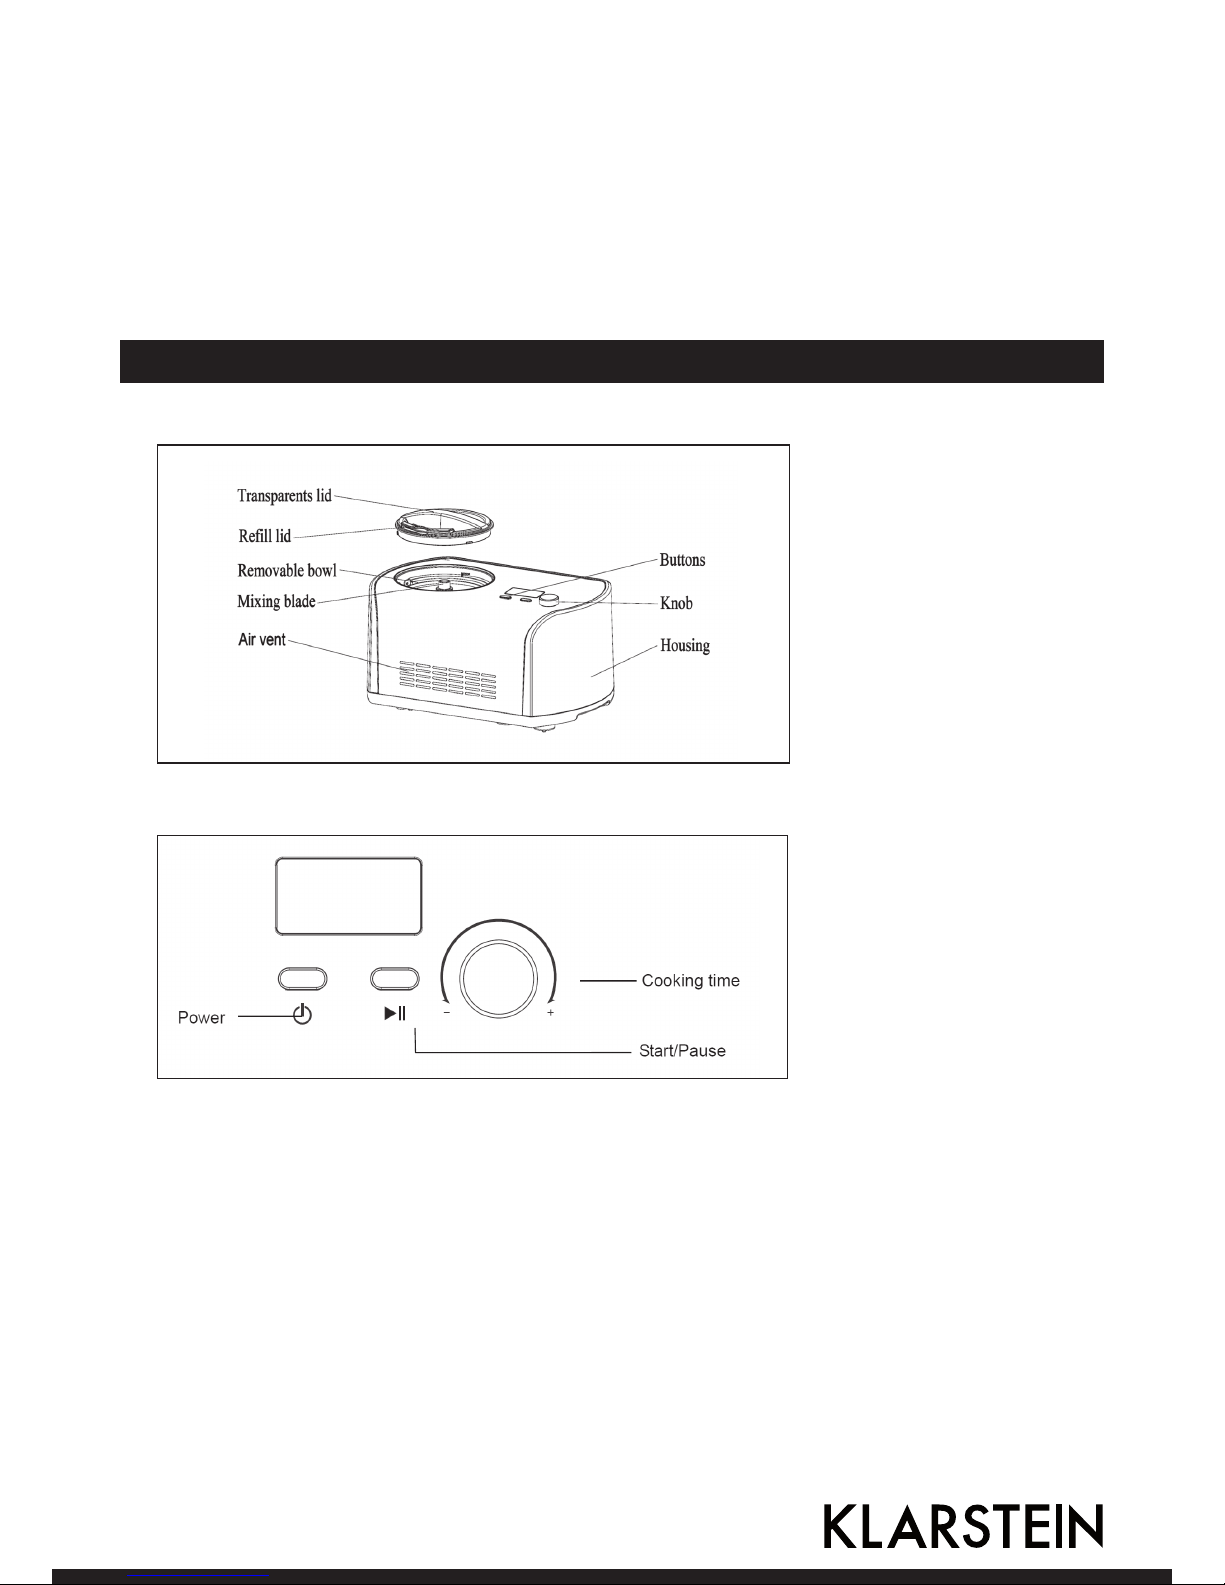
Geräteübersicht und Funktionstasten
Geräteübersicht
Funktionstasten
An/Aus Drücken Sie auf die Taste, um das Gerät einzuschalten. Das Gerät be ndet
sich dann im Standby-Zustand. Drücken Sie während des Betriebs auf die
Taste, um das Gerät auszuschalten.
Zubereitungszeit Nachdem Sie die Zutaten in den Eisbehälter gegeben haben, drehen Sie am
Regler, um die Zubereitungszeit einzustellen.
Start/Pause Nachdem Sie Menü und Zeit eingestellt haben, drücken Sie auf die Taste,
um die Zubereitung zu starten. Drücken Sie während des Betriebs auf die
Taste, pausiert das Gerät und der Timer.
3
Page 4

Bedienung und Funktionen
Eismaschine reinigen und vorbereiten
Bevor Sie das Gerät erstmalig benutzen, reinigen Sie alle Teile, die in Kontakt mit der Eiscreme kommen. Dazu zählen die feste Schüssel, der herausnehmbare Behälter, das Rührmesser, der transparente Deckel, der Nachfülldeckel und der Löffel. Stellen Sie die Eismaschine aufrecht auf eine ebene
Ober äche, damit der Kompressor mit bestmöglicher Leistung arbeiten kann.
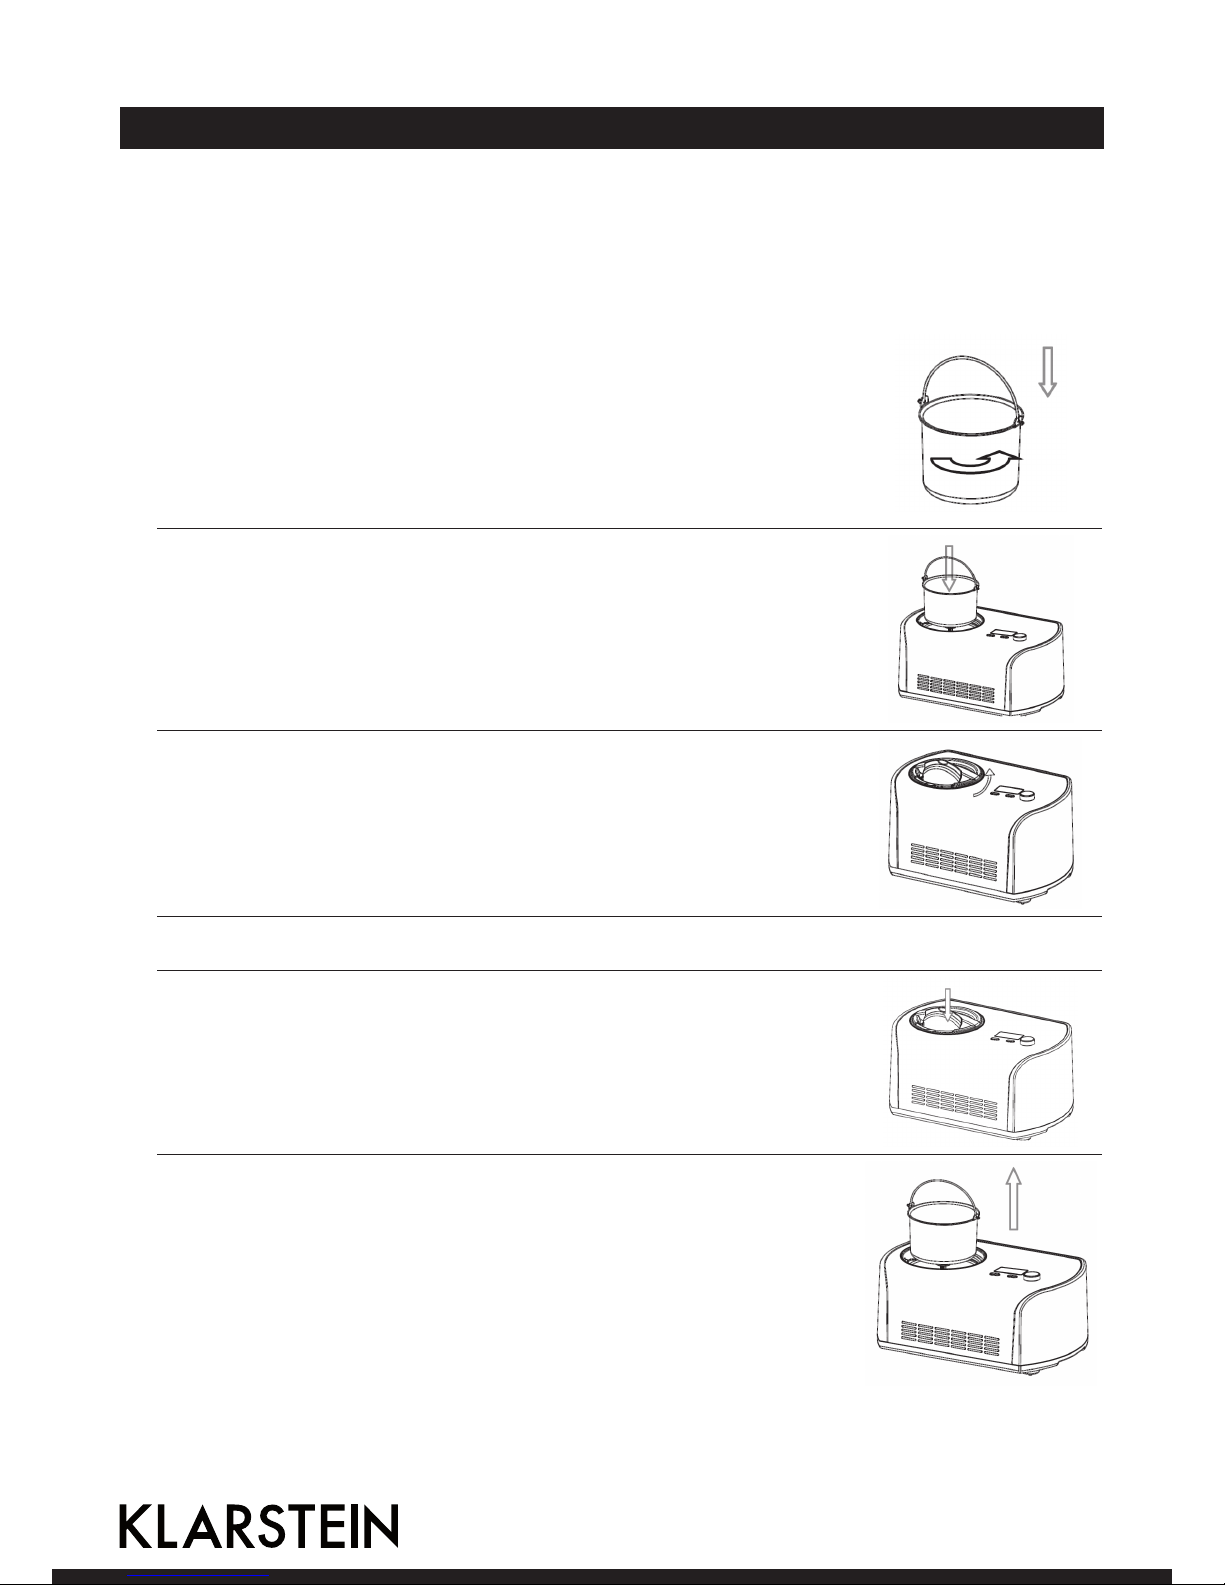
Schritt 1
Bereiten Sie die Zutaten gemäß der Zutatenliste im Rezeptteil der Bedienungsanleitung zu. Sie müssen den Eisbehälter vorher nicht extra kühlen. Das Gerät verfügt über
einen eingebauten Kompressor, der die Zutaten während
der Eiszubereitung kühlt. Füllen Sie die vorbereiteten Zutaten zusammen mit etwas warmem Wasser in den herausnehmbaren Behälter und verrühren Sie sie gut.
Schritt 2
Setzen Sie den Eisbehälter in die Eismaschine ein und drehen Sie ihn leicht herum, bis er fest mit der festen Schüssel
verbunden ist.
Schritt 3
Setzen Sie das Rührmesser in den herausnehmbare Behälter ein und achten Sie darauf, dass das der Unterteil des
Messers fest mit der Motorenführung verbunden ist. Setzen
Sie den transparenten Deckel auf die Eismaschine und
schrauben Sie ihn gegen den Uhrzeigersinn fest.
Schritt 4
Drücken Sie auf die An/Aus-Taste, um das Gerät einzuschalten. Stellen Sie mit dem
Regler die Zubereitungszeit ein. Drücken Sie auf Start/Pause um die Zubereitung zu
starten.
Schritt 5
Benutzen Sie den Nachfülldeckel um während der Eiszubereitung weitere Zutaten hinzuzufügen.
Schritt 6
Nachdem die Zubereitung beendet ist, schalten Sie das
Gerät aus und entnehmen Sie den Eisbehälter.
4
Page 5

Kühlhaltefunktion
Um zu verhindern, dass das Eis nach der Zubereitung schmilzt, startet die nach der Zubereitung
automatisch die Kühlhaltefunktion. Das Eis wird 1 Stunde lang gekühlt. Eine Stunde später wechselt
das Gerät in den Standby-Modus.
Motorschutzfunktion
Wenn die Eiscreme hart wird, kann es sein, dass der Motor blockiert. Falls das passiert, hält das Gerät
automatisch an und erfasst die Temperatur, um zu verhindern, dass sich der Motor überhitzt.
Wichtige Hinweise zur Eiszubereitung
Um Überlaufen und unnötige Reste zu vermeiden, versichern Sie sich, dass die die Menge der Zutaten maximal 60% des Fassungsvermögens ausmacht. Die Eiscreme dehnt sich während der Zubereitung aus.
Eisrezepte
Vanilleeis
Zutaten:
200 ml Vollmilch
100 ml Kristallzucker
150 ml Sahne (gekühlt)
1-2 Teelöffel Vanillearoma
Zubereitung:
Mischen Sie Milch und Zucker in einer Rührschüssel. Verrühren
Sie beides auf niedriger Stufe mit dem Handmixer, bis sich der
Zucker aufgelöst hat. Fügen Sie dann die Sahne und das Vanillearoma hinzu und vermischen Sie alle Zutaten. Schalten Sie die
Eismaschine ein, füllen Sie die Mischung in den Eisbehälter und
mixen Sie die Mischung etwa 30-40 Minuten, bis sie dick ist.
Varianten: Mint Chip
Lassen Sie das Vanillearoma weg und ersetzen Sie es durch 1-1 ½
Teelöffel Pfefferminzaroma. Hacken Sie Zartbitterschokolade in
kleine Stücke und fügen Sie die Schokostücke in den letzten 5
Minuten vor Ende der Zubereitungszeit hinzu.
Butter-Pekannuss
Schmelzen Sie 1 Stück gesalzene Butter in einer 26 cm breiten
Pfanne. Fügen Sie 200 ml grobgehackte Pekannüsse und 1 Teelöffel Salz hinzu. Kochen Sie die Mischung bei mittlerer Hitze bis
die Nüsse leicht braun sind und rühren Sie dabei regelmäßig um.
Nehmen Sie die Pfanne vom Herd und sieben Sie die Mischung
durch (die Butter können Sie für andere Zwecke verwenden).
Lassen Sie die Nüsse komplett abkühlen und fügen Sie sie in den
letzten 5 Minuten vor Ende der Zubereitungszeit hinzu.
Cookies & Cream
Fügen Sie 150 ml grobgehackte Cookies oder Ihre grobgehackten Lieblingskekse in den letzten 5 Minuten vor Ende der Zubereitungszeit hinzu.
5
Page 6

Schokoladeneis
Zutaten:
200 ml Vollmilch
100 ml Kristallzucker
240 g Zartbitterschokolade
200 ml Sahne (gekühlt)
1 Teelöffel Vanillearoma
Zubereitung:
Erhitzen Sie die Milch auf dem Herd oder in der Mikrowelle, bis
sie am Rand Blasen schlägt. Zerkleinern Sie die Schokolade zusammen mit dem Zucker in einem Mixer mit Metallmesser, bis
die Schokolade feingehackt ist. Fügen Sie die warme Milch hinzu
und mixen sie weiter, bis sie eine glatte Masse erhalten. Schütten Sie die Masse in eine mittelgroße Schüssel und lassen Sie sie
komplett erkalten. Fügen Sie die Sahne und das Vanillearoma
hinzu. Schalten Sie die Eismaschine ein, füllen Sie die Masse in
den Eisbehälter und mixen Sie die Mischung etwa 30-40 Minuten, bis sie dick ist.
Varianten: Schoko-Mandel
Fügen sie ½ Teelöffel Mandelaroma zusammen mit dem Vanillearoma hinzu. Fügen 100-150 ml gehackte Mandeln oder Schokomandeln in den letzten 5-10 Minuten vor Ende der Zubereitungszeit hinzu
Schoko-Cookie
Fügen Sie einen 100 ml grobgehackte Cookies in den letzten 5
Minuten vor Ende der Zubereitungszeit hinzu.
Schoko-Marshmallow-Strudel
Wenn Sie das fertige Eis zum Einfrieren umfüllen, bedecken Sie
es mit Ein paar Klecksen Schokosoße und ein paar Klecksen
Marshmallow-Creme.
Frisches Erdbeereis
Zutaten:
250 g frische Erdbeeren
1 ½ Teelöffel Zitronensaft
100 ml Zucker
200 ml Vollmilch
200 ml Sahne
1 Teelöffel Vanillearoma
Zubereitung:
Geben Sie die kleingeschnittenen Erdbeeren zusammen mit
dem frisch gepressten Zitronensaft und der Hälfte des Zuckers
in eine kleine Schüssel. Rühren Sie vorsichtig um und lassen
Sie die Erdbeeren 2 Stunden lang eiweichen. Nehmen Sie eine
mittelgroße Schüssel. Verrühren Sie die Milch und die andere
Hälfte des Zuckers 1-2 Minuten lang mit einem Handmixer oder
Schneebesen, bis sich der Zucker aufgelöst hat. Fügen Sie dann
die Sahne, den kompletten gesammelten Saft von den Erdbeeren und das Vanillearoma hinzu. Schalten Sie die Eismaschine
an, füllen Sie die Mischung in den Eisbehälter und mixen Sie
sie etwa 30-40 Minuten, bis sie dick ist. Geben Sie die Erdbeerstücke in den letzten 5 Minuten vor Ende der Zubereitungszeit
hinzu.
Hinweis: Die Eiscreme ist von Natur aus hellrosa. Falls der Farbton des Eises dunkler sein soll, fügen Sie Lebensmittelfarbe hinzu, bis das Eis die gewünschte Farbe hat.
6
Page 7
Frisches Zitronensorbet
Zutaten:
300 ml Zucker
300 ml Wasser
200 ml Zitronensaft
1 Esslöffel Zitronenschalen
Zubereitung:
Mischen Sie den Zucker mit dem Wasser in einem kleinen Topf
und lassen Sie die Mischung aufkochen. Lassen Sie die Mischung
dann auf niedriger Hitze 3-5 Minuten köcheln, bis sich der Zucker aufgelöst hat. Lassen Sie die Mischung dann vollständig
abkühlen. Fügen Sie dann den frisch gepressten Zitronensaft
und die feingehackte Zitronenschale hinzu und verrühren Sie
alles sorgfältig. Schalten Sie die Eismaschine ein, füllen Sie die
Mischung in den Eisbehälter und mixen Sie sie etwa 30-40 Minuten, bis sie dick ist.
Geeister Schoko-Joghurt
Zutaten:
200 ml Vollmilch
180 g Zartbitterschokolade
400 ml Vanillejoghurt
50 ml Zucker
Zubereitung:
Mixen Sie Milch und gehackte Schokolade 20-30 Sekunden lang
in einem Mixer mit Metallklinge, bis Sie eine glatte Masse erhalten. Fügen Sie Joghurt und Zucker hinzu und mixen Sie die Mischung weitere 15 Sekunden lang. Schalten Sie die Eismaschine
an, füllen Sie die Mischung ein und mixen Sie sie etwa 50-60
Minuten, bis sie dick ist.
Reinigung und Pfl ege
1. Schalten Sie das Gerät aus und ziehen Sie den Stecker aus der Steckdose.
2. Entfernen Sie das Rührmesser und wischen Sie es mit einem feuchten Lappen ab.
3. Entfernen Sie den herausnehmbaren Behälter und reinigen Sie ihn mit einem feuchten Lappen.
4. Wischen Sie den transparenten Deckel und den Nachfülldeckel mit einem feuchten Lappen ab.
5. Entfernen Sie Schmutz am Gerät oder andere Flecken mit einem feuchten Lappen. Achten Sie
darauf, dass das Kabel, der Stecker und die Lüftung nicht nass werden und tauchen Sie das Gerät
nicht komplett in Wasser oder andere Flüssigkeiten.
6. Trocknen Sie alle Teile sorgfältig ab und setzen Sie sie wieder ein.
Entsorgung und Konformitätserklärung
Be ndet sich die linke Abbildung (durchgestrichene Mülltonne auf Rädern) auf dem
Produkt, gilt die Europäische Richtlinie 2002/96/EG. Diese Produkte dürfen nicht mit
dem normalen Hausmüll entsorgt werden. Informieren Sie sich über die örtlichen
Regelungen zur getrennten Sammlung elektrischer und elektronischer Gerätschaften. Richten Sie sich nach den örtlichen Regelungen und entsorgen Sie Altgeräte
nicht über den Hausmüll. Durch die regelkonforme Entsorgung der Altgeräte werden
Umwelt und die Gesundheit ihrer Mitmenschen vor möglichen negativen Konsequenzen geschützt. Materialrecycling hilft, den Verbrauch von Rohstoffen zu verringern.
Hersteller: CHAL-TEC Vertriebs- + Handels GmbH, Wallstraße 16, 10179 Berlin.
Dieses Produkt entspricht den folgenden Europäischen Richtlinien:
2004/108/EG (EMV)
2011/65/EU (RoHS)
2006/95/EG (LVD)
7
Page 8
8
Dear Customer,
Congratulations on purchasing this Klarstein equipment. Please read this manual carefully and take
care of the following hints on installation and use to avoid technical damages. Any failure caused by
ignoring the mentioned items and cautions mentioned in the operation and installation instructions
are not covered by our warranty and any liability.
Contents
Technical Data 8
Safety Instructions 8
Product Description and Controls 9
Use and Functions 10
Ice Cream Recipes 11
Cleaning and Care 13
Disposal Considerations 13
Declaration of Conformity 13
Technical Data
Item number 10028043
Power supply 220-240 V ~ 50-60 Hz
Power 135 W
Dimensions 400 mm (W) x 260 mm (D) x 275 mm (H)
Capacity 1.2 L
Safety Instructions
Read all the safety and operating instructions carefully and retain them for future reference.
• Ensure the voltage is compliant with the voltage range stated on the rating label, and ensure the
earthing of the socket is in good condition.
• If the supply cord is damaged, it must be replaced by the manufacturer or its service agent or a
similarly qualied person in order to avoid a hazard.
• Do not upend this product or incline it over a 45° angle.
• To protect against risk of electric shock, do not pour water on cord, plug and ventilation, immerse
the appliance in water or any other liquid.
• Unplug the appliance after using or before cleaning.
• Keep the appliance 8cm from other objects to ensure the good heat releasing.
• Do not use the accessories which are not recommended by Manufacturer.
• This appliance can be used by children aged from 8 years and above and persons with reduced
physical, sensory or mental capabilities or lack of experience and knowledge if they have been
given supervision or instruction concerning use of the appliance in a safe way and understand the
hazards involved. Children shall not play with the appliance. Cleaning and user maintenance shall
not be made by children without supervision. Children should be supervised to ensure that they
do not play with the appliance.
• Do not use the appliance close by ames, hot plates or stoves.
• Do not switch on the power button frequently (ensure 5min. interval at least) to avoid the damage
of compressor.
• Metal sheet or other electric objects are not allowed to be inserted into the appliance to avoid re
and short circuit.
• When take out the ice cream, do not knock the barrel or edge of barrel to protect the barrel from
damage.
Page 9
• Do not switch on the power before install well the barrel or blender blade.
• The initial temperature of the ingredients is 25±5°C. Do not put the ingredients into freezer for prefreeze, as it will easily make the blender blade blocked before the ice cream is in good condition.
• Do not remove the blender blade when the appliance is on working.
• Do not use outdoors.
• Never clean with scouring powders or hard implements.
• Do not store explosive substances such as aerosol cans with a ammable propellant in this appliance.
• This appliance is intended to be used in household and similar applications.
Product Description and Controls
Product Description
Controls
Power After plug on, the machine will enter into standby mode. Then touch this
power button to enter into the setting mode. Touch this button during operation, the machine will power off.
Cooking time Once the pre-prepared materials have been put into removable bowl, turn-
ing this knob can select the working time.
Start/Pause After setting the menu and time, press this button to start the working
mode. During operation, to press this button, the mixing will pause and the
time countdown will pause as well.
9
Page 10
Use and Functions
Making Ice Cream
Before use, thoroughly wash all parts that will be contacted with the ice cream (including the xed
bowl, removable bowl, mixing blade, transparent lid, measuring cup and spoon). Be sure the power
cord is unplugged. Always place the Ice Cream Maker upright on a at surface in order that the build-
in compressor can provide best performance.
Step 1
Prepare ingredients from your own recipe or from the recipe
booklet here. Note: You do not need to freeze the bowl for
hours in a freezer in advance, as this machine has a BUILTIN COMPRESSOR that freezes the ingredients in operation
thus ensure the output of ice cream. Pour the well prepared
ingredients and warm water into the removable bowl, then
have a uniform mixing (See picture).
Step 2
Put the removable bowl into the machine and slightly turn
around the bowl to make it tted well with the xed bowl.
Step 3
Place the mixing blade into the removable bowl and keep
the mixing blade bottom hole tted well with the motor
axis. Then put the transparent lid onto the machine and
lock it anticlockwise (See picture).
Step 4
Touch the Power button. Turn the Cooking time knob to choose the working time.
Touch the Start/Pause button to start working.
Step 5
You can add the favorite ingredients by opening the re ll
cover during ICE cream making (See below picture).
Step 6
After the operation is over, turn off the machine rst, then
pull the removable bowl out.
10
Page 11

Keep Cool Function
To avoid melting when the ice cream is not placed well in time, the following design is supported: Af-
ter the ice cream is nished and without any other operation, the machine will start up the keep cool
function automatically, which can keep cool for 1 hour. One hour later, machine will enter standby state.
Motor Self-protection Function
When the ice cream becomes harder, the mixing motor might be blocked. Then the motor protection
device makes the mixing motor stop working by detecting its temperature to ensure the life of the
motor.
Controlling the Volume of the Ingredients
To avoid overow and waste, please make sure that the ingredients do not exceed 60% of capacity
of the removable bowl (Ice cream expands when being formed).
Ice Cream Recipes
Vanilla Ice Cream
Ingredients:
200 ml whole milk
100 ml granulated sugar
150 ml heavy cream (chilled)
1-2 teaspoons vanilla extract
Method:
In a medium bowl, use a hand mixer or a whisk to combine the
milk and granulated sugar until the sugar is dissolved, about 1-2
minutes on low speed. Stir in the heavy cream and vanilla to
taste. Turn machine on, pour mixture into freezer bowl through
ingredient spout and let mix until thickened, about 30-40
minutes.
Variations: Mint Chip
Replace the vanilla with 1 to 1 ½ teaspoons pure peppermint
extract (to taste). Chop your favorite bittersweet or semisweet chocolate bar into tiny uneven pieces. Add the chopped
chocolate during the last 5 minutes of mixing.
Butter Pecan
Melt 1 stick unsalted butter in a 10-inch skillet. Add 200 ml
roughly chopped pecans and 1 teaspoon kosher salt. Cook
over medi-um-low heat, stirring frequently until the pecans
are lightly browned. Remove from the heat, strain (the butter
will have a pecan avor and may be reserved for another use).
Allow the pecans to cool completely. Add the toasted buttered
pecans during the last 5 minutes of mixing.
Cookies & Cream
Add 150 ml coarsely chopped cookies or your favorite candy
(chocolate chip, Oreos, Mint Oreos, etc.) during the last 5 minutes of mixing.
11
Page 12

Chocolate Ice Cream
Ingredients:
200 ml whole milk
100 ml granulated sugar
240 g bittersweet chocolate
200 ml heavy cream
1 teaspoon vanilla extract
Method:
Heat the whole milk until it is just bubbling around the edges
(this may be done on the stovetop or in a microwave). In a
blender or food processor tted with the metal blade, pulse to
process the sugar with the chocolate until the chocolate is very
nely chopped. Add the hot milk, process until well blended and
smooth. Transfer to a medium bowl and let the chocolate mixture cool completely. Stir in the chilled heavy cream and vanilla
to taste. Turn the machine on, pour mixture into freezer bowl
through ingredient spout and let mix until thickened, about 30-40
minutes.
Variations: Chocolate Almond
Add ½ teaspoon pure almond extract along with the vanilla. Add
100-150 ml chopped toasted almonds or chopped chocolatecoated almonds during the last 5-10 minutes of freezing.
Chocolate Cookie
Add 100 ml chopped cookies during the last 5 minutes of freezing.
Chocolate Marshmallow Swirl
When removing the ice cream to a container for freezing, layer
it with dollops of your favorite chocolate sauce and scoops of
marshmallow crème (uff).
Fresh Strawberry Ice Cream
Ingredients:
250 g fresh strawberries
1 ½ teaspoon lemon juice
100 ml sugar
200 ml whole milk
200 ml heavy cream
1 teaspoon vanilla extract
Method:
In a small bowl, combine the strawberries with the lemon juice
and half of the sugar; stir gently and allow to the strawberries
to macerate in the juices for 2 hours. In a medium bowl, use a
hand mixer or a whisk to combine the milk, and the other half
of the granulated sugar until the sugar is dissolved, about 1-2
minutes on low speed. Stir in the heavy cream plus any accumulated juices from the strawberries and vanilla. Turn the machine
on, pour mixture into freezer bowl through ingredient spout and
let mix until thickened, about 30-40 minutes. Add the sliced
strawberries during the last 5 minutes of freezing.
Note: this ice cream will have a „natural“ appearance of very
pale pink; if a deeper pink is desired, sparingly add drops of red
food coloring until desired color is achieved.
12
Page 13

Fresh Lemon Sorbet
Ingredients:
300 ml sugar
300 ml water
200 ml lemon juice
1 tablespoon lemon zest
Method:
Combine the sugar and water in a medium saucepan and bring
to a boil over medium-high heat. Reduce heat to low and simmer
without stirring until the sugar dissolves, about 3–5 minutes.
Cool completely. When cool, add the lemon juice and zest; stir
to combine. Turn the machine on, pour the lemon mixture into
freezer bowl through ingredient spout and mix until thickened,
about 30–40 minutes.
Chocolate Frozen Yogurt
Ingredients:
200 ml whole milk
180 g bittersweet chocolate
400 ml vanilla yoghurt
50 ml sugar
Method:
Combine the milk and chocolate in a blender or food processor
tted with the metal blade and process until well blended and
smooth, 20–30 seconds. Add the yogurt and sugar; process until
smooth, about 15 seconds. Turn the machine ON, pour mixture
into freezer bowl through ingredient spout and let mix until thickened, about 50–60 minutes.
Cleaning and Care
1. The plug must be removed before cleaning to avoid electric shock.
2. Take out the mixing blade, wipe it with a dampened cloth.
3. Take out the removable bowl, clean it with a dampened soft cloth.
4. Wipe the transparent lid and re ll lid with a dampened cloth.
5. Remove the dirty on the body or other places with a dampened cloth, and do not pour water on
cord, plug and ventilation, immerse the appliance in water or any other liquid.
6. Allow drying thoroughly with a dry cloth, then return the component to the home position.
Disposal and Declaration ofConformity
According to the European waste regulation 2002/96/EC this symbol on the product
or on its packaging indicates that this product may not be treated as household waste. Instead it should be taken to the appropriate collection point for the recycling of
electrical and electronic equipment. By ensuring this product is disposed of correctly, you will help prevent potential negative consequences for the environment and
human health, which could otherwise be caused by inappropriate waste handling of
this product. For more detailled information about recycling of this product, please
contact your local council or your household waste disposial service.
Producer: CHAL-TEC Vertriebs- + Handels GmbH, Wallstraße 16, 10179 Berlin.
This product is conform to the following European Directives:
2004/108/EC (EMC)
2011/65/EU (RoHS)
2006/95/EC (LVD)
13
Page 14

14
Gentile Cliente,
La ringraziamo per aver acquistato il nostro dispositivo. La preghiamo di leggere con cura le seguenti
istruzioni d’installazione e utilizzo del dispositivo e di seguirle per evitare eventuali danni. Non ci assumiamo alcuna responsabilità per danni derivati da una mancata osservazione delle avvertenze per
la sicurezza e da un uso improprio del dispositivo.
Indice
Dati tecnici 14
Avvertenze di sicurezza 14
Descrizione del prodotto e tasti funzione 15
Utilizzo e funzioni 16
Ricette 17
Pulizia e manutenzione 19
Avvertenze per lo smaltimento 19
Dichiarazione di conformità 19
Dati tecnici
Numero articolo 10028043
Alimentazione 220-240 V ~ 50-60 Hz
Potenza 135 W
Dimensioni 400 mm (L) x 260 mm (P) x 275 mm (A)
Capacità 1.2 L
Avvertenze di sicurezza
Leggere attentamente tutte le indicazioni di sicurezza e conservare il presente libretto d’istruzioni per
consultazioni future.
• Prima di accendere il dispositivo, controllare la tensione sulla targhetta identicativa e collegare il
dispositivo solo a prese con tensione corrispondente a quella indicata.
• Nel caso in cui il cavo di rete sia danneggiato, questo deve essere sostituito dal produttore, da un
centro assistenza specializzato o da una persona qualicata.
• Non capovolgere il dispositivo e non inclinarlo più di 45°.
• Non immergere il dispositivo in acqua o in altri liquidi e prestare attenzione che la spina e il cavo
di rete non si bagnino.
• Staccare la spina dalla presa in caso di inutilizzo prolungato o prima di pulirlo.
• Lasciare 8 cm di spazio intorno al dispositivo, per garantire un’adeguata circolazione dell’aria.
• Utilizzare solo accessori autorizzati dal produttore.
• I bambini, le persone con limiti sici e mentali dovrebbero usare il dispositivo solo se un superviso-
re ha prima illustrato loro le funzioni e le avvertenze di sicurezza. Prestare attenzione che i bambini
non giochino con il dispositivo.
• Non utilizzare il dispositivo nelle vicinanze di amme vive, fornelli accesi o forni.
• Non accendere e spegnere il dispositivo più volte consecutive. Attendere almeno 5 minuti prima di
riaccendere il dispositivo per non danneggiare il compressore.
• Non inlare oggetti nel dispositivo per evitare il pericolo d’incendio o di corto circuito.
• Rimuovere con la massima cautela il gelato dal contenitore per danneggiarlo.
• Accendere il dispositivo solamente dopo aver inserito il contenitore e la lama per mescolare.
Page 15

• La temperatura per gli ingredienti è di 25±5°C. Non preraffreddare gli ingredienti, altrimenti la
lama per mescolare potrebbe bloccarsi prima di terminare la preparazione.
• Rimuovere la lama per mescolare solo quando questa non è più in funzione.
• Non utilizzare il dispositivo all’aperto.
• Non pulire il dispositivo con polveri o spugne abrasive.
• Non conservare all’interno del dispositivo sostanze esplosive come ad esempio bombolette spray
contenenti gas propellenti.
• Il dispositivo non è destinato ad un uso commerciale, ma esclusivamente per un uso domestico e
in ambienti simili.
Descrizione del prodotto e funzione dei tasti
Descrizione del prodotto
Funzione dei tasti
Accensione/
Spegnimento
Per accendere il dispositivo, premere il tasto di accensione/spegnimento.
Ora il dispositivo si trova in modalità standby. Per spegnere il dispositivo,
premere il tasto mentre il dispositivo è in funzione.
Tempo di
preparazione
Una volta inseriti gli ingredienti nel contenitore del gelato, premere il tasto
apposito per impostare il tempo di preparazione.
Start/Pause Dopo aver impostato il tempo, premere il tasto Start/Pause per avviare il
processo di preparazione. Per mettere in pausa il dispositivo e il timer, premere il tasto apposito mentre il dispositivo è in funzione.
15
Page 16

Utilizzo e funzioni
Preparazione della macchina del gelato
Prima di utilizzare il dispositivo per la prima volta, pulire tutti i componenti che vengono a contatto
con il gelato, ovvero il recipiente sso, il contenitore rimovibile, il coperchio trasparente, il coperchio
di riempimento, il misurino e il cucchiaio. Collocare la macchina del gelato in posizione verticale e su
una super cie piana, per garantire una prestazione ottimale del compressore.
Fase 1
Preparare gli ingredienti seguendo le indicazioni contenute
nel ricettario del presente manuale. Non raffreddare il contenitore del gelato prima dell’utilizzo. Il dispositivo dispone
di un compressore integrato che raffredda gli ingredienti
durante la preparazione del gelato. Introdurre gli ingredienti nel contenitore estraibile, aggiungere un po’ di acqua
calda e mescolare.
Fase 2
Inserire il contenitore del gelato nel dispositivo e avvitarlo
con cautela no al suo completo inserimento nel recipiente
sso.
Fase 3
Inserire la lama per mescolare nel contenitore estraibile
e prestare attenzione che la parte inferiore della lama sia
ben ssata con l’asse del motore. Mettere il coperchio tras-
parente sulla macchina e avvitarlo in senso antiorario.
Fase 4
Premere il tasto di accensione/spegnimento per accendere il dispositivo. Impostare
il tempo di preparazione tramite la manopola. Premere Start/Pause per avviare la
preparazione.
Fase 5
Utilizzare il coperchio di riempimento per aggiungere altri
ingredienti durante la preparazione del gelato.
Fase 6
Al termine della preparazione, spegnere il dispositivo ed estrarre il contenitore del gelato.
16
Page 17

Funzione di mantenimento in freddo
Per evitare che il gelato si sciolga una volta terminata la preparazione, il dispositivo attiva automaticamente la funzione di mantenimento in freddo per un’ora. Trascorsa un’ora, il dispositivo passa alla
modalità standby.
Funzione di protezione del motore
Se il gelato diventa duro, ciò può essere dovuto al fatto che il motore sia bloccato. In questo caso,
il dispositivo si arresta automaticamente e stabilizza la temperatura per evitare che il motore si surriscaldi.
Importanti indicazioni per la preparazione del gelato
Per evitare di preparare quantità di gelato eccessive, assicurarsi che la quantità degli ingredienti non
superi il 60% della capacità del contenitore. Il gelato aumenta di volume durante la preparazione.
Ricette
Gelato alla vaniglia
Ingredienti:
200 ml di latte intero
100 g di zucchero
cristallizzato
150 ml di panna da cucina
1-2 cucchiaini di estratto
di vaniglia
Preparazione:
Mischen Sie Milch und Zucker in einer Rührschüssel. Verrühren
Sie beides auf niedriger Stufe mit dem Handmixer, bis sich der
Zucker aufgelöst hat. Fügen Sie dann die Sahne und das Vanillearoma hinzu und vermischen Sie alle Zutaten. Schalten Sie die
Eismaschine ein, füllen Sie die Mischung in den Eisbehälter und
mixen Sie die Mischung etwa 30-40 Minuten, bis sie dick ist.
Varianti: Menta e cioccolato:
Sostituire l’aroma alla vaniglia con un cucchiaino/un cucchiaino
e mezzo di estratto di menta. Spezzettare il cioccolato fondente
e aggiungerlo 5 minuti prima che termini la preparazione del
gelato.
Noci pecan e burro
Sciogliere un pezzo di burro non salato in una padella larga 26
cm. Aggiungere 200 g di noci pecan tritate grossolanamente e
un cucchiaino di sale. Cuocere il composto a fuoco medio nché
le noci diventano leggermente dorate e girarle regolarmente.
Togliere la padella dal fornello e setacciare il composto (il burro
avrà il sapore delle noci pecan e può essere riutilizzato). Far
raffreddare completamente le noci e aggiungerle 5 minuti prima
che termini la preparazione del gelato.
Biscotti & crema
Aggiungere 150 g di biscotti tritati grossolanamente quando
mancano 5 minuti al termine della preparazione del gelato.
17
Page 18

Gelato al cioccolato
Ingredienti:
200 ml di latte intero
100 g di zucchero
cristallizzato
240 g di cioccolato fondente
200 ml di panna da cucina
1 cucchiaino di estratto
di vaniglia
Preparazione:
Portare il latte a ebollizione. Spezzettare il cioccolato e miscelar-
lo con lo zucchero in un frullatore dotato di lama in metallo nché il cioccolato è tritato nemente. Aggiungere il latte caldo e
continuare a mescolare no ad ottenere una glassa cremosa ed
omogenea. Versare la glassa in un recipiente di media grandezza e farla raffreddare completamente. Aggiungere la panna e
l’estratto di vaniglia. Accendere la macchina del gelato, versare
la glassa nel contenitore del gelato e miscelarla per 30-40 minuti
nché diventa densa.
Varianti: Mandorle al cioccolato
Aggiungere ½ cucchiaino di estratto di mandorla unito all’estratto
di vaniglia. Aggiungere 100-150 g di mandorle tostate e tritate
o di mandorle al cioccolato 5-10 minuti prima che termini la preparazione del gelato.
Biscotti al cioccolato
Aggiungere 5 minuti prima che termini la preparazione del gelato, 100 g di biscotti tritati grossolanamente.
Cioccolato e marshmallow
Cospargere il gelato pronto con una cucchiaiata di crema di cioccolato e crema di marshmallow prima di congelarlo.
Gelato alla fragola
Ingredienti:
250 g di fragole fresche
1 cucchiaino e ½ di succo
di limone
100 g di zucchero
200 ml di latte intero
200 ml di panna
1 cucchiaio si estratto
di vaniglia
Preparazione:
Mettere in un recipiente le fragole sminuzzate, il succo di limone appena spremuto e 50 g di zucchero. Mescolare con cura e
far inzuppare le fragole per due ore. Prendere un recipiente di
media grandezza. Mescolare il latte e i restanti 50 g di zucchero
per 1-2 minuti utilizzando un frullatore o una frusta, nché lo
zucchero si è sciolto. Aggiungere la panna, il succo e l’estratto
di vaniglia. Accendere la macchina del gelato, introdurre il composto nel contenitore del gelato e mescolare per 30-40 minuti
nché questo diventa denso.
Nota: Il gelato avrà un colore rosa chiaro. Nel caso in cui si desideri un colore più scuro, aggiungere un colorante per alimenti
no a ottenere il colore desiderato.
18
Page 19

Sorbetto al limone fresco
Ingredienti:
300 g di zucchero
300 ml di acqua
200 ml di succo di limone
1 buccia di limone
Preparazione:
Mescolare zucchero e acqua in un pentolino e portare a ebollizio-
ne. Lasciare il composto sul fuoco a amma bassa per 3-5 minuti
nché lo zucchero si è sciolto. Poi far raffreddare completamente
il composto. Aggiungere il succo di limone appena spremuto e
la buccia di limone tagliata nemente e mescolare. Accendere la
macchina del gelato, aggiungere il composto nel contenitore del
gelato e mescolare per 30-40 minuti nché diventa denso.
Yogurt al cioccolato
Ingredienti:
200 ml di latte intero
180 g di cioccolato fondente
400 ml di yogurt alla vaniglia
50 g di zucchero
Preparazione:
Mescolare il latte e il cioccolato spezzettato per 20-30 secondi
utilizzando un frullatore con lama in metallo no ad ottenere una
glassa cremosa ed omogenea. Aggiungere lo yogurt e lo zucchero e mescolare per altri 15 secondi. Accendere la macchina
del gelato, versare la glassa e mescolare per circa 50-60 minuti
nché diventa densa.
Pulizia e manutenzione
1. Spegnere il dispositivo e staccare la spina dalla presa.
2. Rimuovere la lama per mescolare e lavarla con un panno umido.
3. Rimuovere il contenitore estraibile e pulirlo con un panno umido.
4. Pulire il coperchio trasparente e il coperchio di riempimento con un panno umido.
5. Rimuovere lo sporco o altre macchie sul dispositivo con un panno umido. Prestare attenzione che
il cavo, la spina e le fessure di aereazione non si bagnino e non immergere il dispositivo in acqua
o in altri liquidi.
6. Asciugare tutti i componenti e reinserirli.
Smaltimento e dichiarazione di conformità
Se sul prodotto è presente la gura a sinistra (il cassonetto mobile sbarrato), si appli-
ca la direttiva europea 2002/96/CE. Questi prodotti non possono essere smaltiti con i
ri uti normali. Informarsi sulle disposizioni vigenti sulla raccolta separata di dispositivi
elettrici e elettronici. Non smaltire i vecchi dispositivi con i ri uti domestici. Grazie al
corretto smaltimento dei vecchi dispositivi si proteggono il pianeta e la salute delle
persone da possibili conseguenze negative. Il riciclo di materiali aiuta a diminuire il
consumo di materie prime.
Produttore: CHAL-TEC Vertriebs- + Handels GmbH, Wallstraße 16, 10179 Berlino.
Questo prodotto è conforme alle seguenti direttive europee:
2004/108/CE (EMC)
2011/65/UE (RoHS)
2006/95/CE (LVD)
19
Page 20

20
Chère cliente, cher client,
Toutes nos félicitations pour l’acquisition de ce nouvel appareil Klarstein. Veuillez lire attentivement
les instructions de branchement et d’utilisation an d’éviter d’éventuels dommages techniques. Le
fabricant ne saurait être tenu pour responsable des dommages dus au non-respect des consignes de
sécurité et à la mauvaise utilisation de l’appareil.
Sommaire
Données techniques 20
Consignes de sécurité 20
Aperçu de l’appareil et touches de fonctions 21
Utilisation et fonctions 22
Recettes de glace 23
Entretien et nettoyage 25
Informations sur le recyclage 25
Déclaration de conformité 25
Données techniques
Numéro d’article 10028043
Alimentation électrique 220-240 V ~ 50-60 Hz
Puissance 135 W
Dimensions (L x P x H) 400 mm x 260 mm x 275 mm
Capacité 1,2 litre
Consignes de sécurité
Veuillez lire attentivement toutes les indications et conservez ce mode d’emploi soigneusement pour
pouvoir le consulter à tout moment.
• Brancher l’appareil à une prise dont la tension correspond à celle indiquée sur la plaque signalé-
tique de l’appareil.
• Si le cordon d’alimentation est endommagé, le faire remplacer par le fabricant, un atelier autorisé
ou un professionnel qualié.
• Ne pas retourner l’appareil et ne pas l‘incliner à plus de 45°.
• Ne pas faire tremper l’appareil complétement dans l’eau ou tout autre liquide. S’assurer de ne pas
mouiller le cordon d’alimentation et la che.
• Débrancher l’appareil lorsqu’il ne va pas être utilisé pendant une période prolongée ou pour le nettoyer.
• Maintenir un espace libre de 8 centimètres autour de l’appareil pour assurer une ventilation sufsante.
• Utiliser seulement les accessoires recommandés par le fabricant.
• Les enfants ainsi que les personnes dont les capacités physiques et mentales sont réduites doivent
utiliser l’appareil uniquement après avoir été entièrement sensibilisés aux consignes de sécurité
et aux fonctions de l’appareil par une personne responsable de leur sécurité. Veiller à ce que les
enfants ne jouent pas avec l’appareil.
• Ne pas utiliser l’appareil à proximité de ammes, de plaques électriques chaudes ou de fours.
• Ne pas allumer et éteindre l’appareil plusieurs fois de suite. Attendre au moins 5 minutes avant de
rallumer l’appareil pour ne pas endommager le compresseur.
• Ne pas introduire d’objets (métalliques ou non) dans l’appareil pour éviter tout risque d’incendie
et de court-circuit.
• Pour extraire la glace, ne pas donner de coup sur l’appareil ou sur les bords du récipient pour ne
pas les endommager.
• Ne pas allumer l’appareil avant d’avoir installé le récipient et les lames.
Page 21

• La température des aliments doit être de 25 ± 5 °C. Ne pas pré-congeler les aliments avant de
préparer la glace, ou les lames pourraient se bloquer.
• Ne pas retirer les lames lorsque l’appareil est en fonctionnement.
• Ne pas utiliser l’appareil en extérieur.
• Ne pas nettoyer l’appareil avec de la poudre abrasive ou avec une éponge abrasive.
• Ne pas stocker de substances explosives dans l’appareil telles que des bombes aérosols contenant
du gaz facilement in ammable.
• L’appareil n’a pas été conçu pour un usage commercial, mais pour un usage domestique ou dans
un environnement similaire.
Aperçu de l’appareil et touches de fonction
Aperçu de l’appareil
Touches de fonction
Marche/arrêt Appuyer sur cette touche pour allumer l‘appareil. Il entre alors en mode
veille. Lorsque l’appareil est en marche, appuyer sur cette touche pour
l’éteindre.
Temps de
préparation
Une fois les aliments dans la cuve, tourner le bouton de réglage pour ajuster le temps de préparation.
Démarrer/pause Une fois le menu et la minuterie réglés, appuyer sur cette touche pour
lancer la préparation. Lorsque l’appareil est en marche, appuyer sur cette
touche pour interrompre le minuteur.
21
Page 22

Utilisation et fonctions
Nettoyer et préparer la turbine à glace
Avant la première utilisation de l’appareil, nettoyer tous les éléments entrant en contact avec la
crème glacée, c’est-à-dire, la cuve xe, la cuve amovible, la pale, le couvercle transparent, le cou-
vercle de remplissage, le doseur et la cuillère. Placer l’appareil en position verticale sur une surface
plane, pour permettre au compresseur la meilleure performance possible.
Étape 1
Préparer les aliments comme indiqué dans la liste des ingrédients de la section « Recettes » de ce mode d’emploi. Il
n’est pas nécessaire de faire refroidir la cuve à glace préalablement. L’appareil dispose d’un compresseur intégré qui
refroidit les aliments pendant la préparation de la glace.
Insérer les ingrédients préalablement préparés avec un peu
d’eau tiède dans la cuve amovible et bien mélanger.
Étape 2
Placer la cuve à glace dans la machine et la tourner légèrement jusqu’à ce qu’elle s’enclenche dans la cuve xe.
Étape 3
Placer la pale dans la cuve amovible et s’assurer que la
partie inférieure de la pale s’enclenche bien dans l’axe du
moteur. Placer le couvercle sur l’appareil et le visser dans le
sens inverse des aiguilles d’une montre.
Étape 4
Appuyer sur la touche Marche/arrêt pour allumer l’appareil. Régler le temps de préparation à l’aide du bouton de réglage. Appuyer sur la touche Démarrer/pause pour
lancer la préparation.
Étape 5
Utiliser le couvercle remplissage pour ajouter des ingrédi-
ents pendant le fonctionnement de l’appareil.
Étape 6
Une fois la préparation terminée, éteindre l’appareil et
retirer la cuve à glace.
22
Page 23

Fonction maintien du froid
Pour éviter que la glace ne fonde après la préparation, la fonction maintien du froid se met automatiquement en marche. La glace est maintenue au froid pendant une heure puis l’appareil passe en
mode veille.
Fonction protection du moteur
Lorsque la glace devient ferme, il est possible que le moteur se bloque. Si cela arrive, l’appareil
s’arrête automatiquement et garde la température pour éviter que le moteur ne surchauffe.
Consignes importantes concernant la préparation de glace
Pour éviter tout débordement et gâchis, s’assurer que la quantité des ingrédients ne dépasse pas 60
% de la capacité totale de la cuve. La crème glacée augmente de volume pendant la préparation.
Recettes de glace
Glace à la vanille
Ingrédients :
200 ml de lait entier
100 ml de sucre blanc
150 ml de crème (froide)
1-2 cuillères à café
d’extrait de vanille
Préparation :
Mélanger le lait et le sucre dans un saladier. Mélanger à l’aide
d’un batteur, à basse vitesse, jusqu’à ce que le sucre soit dissout.
Ajouter la crème et l’extrait de vanille puis mélanger tous les ingrédients. Allumer l’appareil, verser le mélange dans la cuve et
lancer la turbine pendant environ 30 à 40 minutes, jusqu’à ce
que le mélange devienne ferme.
Variantes : Mint Chip
Ajouter de 1 à 1 ½ cuillère à café d’extrait de menthe au lieu de
l’extrait de vanille. Couper du chocolat noir en petits morceaux
et les ajouter 5 minutes avant la n du temps de préparation.
Beurre – noix de pécan
Faire fondre du beurre salé dans une poêle de 26 cm de diamètre. Ajouter 200 ml de noix de pécan hachées et une cuillère à
café de sel. Faire cuire le mélange à feu moyen jusqu’à ce que
les noix brunissent légèrement. Remuer de temps à autre. Retirer la poêle du feu puis ltrer le mélange (le beurre peut être
réutilisé). Laisser les noix complétement refroidir et les ajouter 5
minutes avant la n du temps de préparation de la glace.
Cookies & Cream
Ajouter 150 ml de cookies hachés ou de votre biscuit préféré 5
minutes avant la n du temps de préparation de la glace.
23
Page 24

Glace au chocolat
Ingrédients :
200 ml de lait entier
100 ml de sucre blanc
240 g de chocolat noir
200 ml de crème (froide)
1 cuillère à café d’extrait
de vanille
Préparation :
Faire chauffer le lait dans une casserole ou au four à microondes, jusqu’à ce qu’il produise des bulles sur rebords. Couper
le chocolat en petits morceaux puis les mixer avec le sucre à
l’aide d’un mixeur avec un bol mixeur en métal, jusqu’à ce que
le chocolat soit bien broyé. Ajouter le lait chaud et mixer une
nouvelle fois jusqu’à obtenir un mélange lisse. Verser le mélange
dans un saladier de taille moyenne et le laisser complètement
refroidir. Ajouter ensuite la crème et l’extrait de vanille. Allumer
l’appareil, verser le mélange dans la cuve et lancer la turbine
pendant environ 30 à 40 minutes, jusqu’à ce que le mélange
devienne ferme.
Variantes : Choco – amandes
Ajouter ½ cuillère à café d’extrait d’amande en plus de l’extrait
de vanille. Ajouter 100-150 ml d’amandes broyées ou d’amandes
au chocolat 5 à 10 minutes avant la n du temps de préparation.
Choco – cookies
Ajouter 100 ml de cookies broyés 5 minutes avant la n du
temps de préparation.
Choco – tourbillon de marshmallow
Avant de placer la glace au congélateur, tapisser avec une bonne
cuillérée de votre sauce de chocolat préférée et une bonne cuillérée de crème de marshmallow.
Glace à la fraise
Ingrédients :
250 g de fraises fraîches
1 ½ cuillère à café de jus
de citron
100 ml de sucre blanc
200 ml de lait entier
200 ml de crème
1 cuillère à café d’extrait
de vanille
Préparation :
Couper les fraises en petits morceaux puis les placer dans un
petit saladier. Ajouter le jus de citron fraîchement pressé et la
moitié du sucre. Remuer délicatement et laisser les fraises ma-
riner pendant 2 heures. Verser dans un saladier moyen le lait
et l’autre moitié du sucre et mélanger pendant 1 à 2 minutes
à l’aide d’un batteur ou d’un fouet, jusqu’à ce que le sucre soit
dissout. Ajouter ensuite la crème, la totalité du jus des fraises
et l’extrait de vanille. Allumer l’appareil, verser le mélange dans
la cuve et lancer la turbine pendant environ 30 à 40 minutes,
jusqu’à ce que le mélange devienne ferme. Ajouter les morceaux
de fraise 5 minutes avant la n du temps de préparation.
Hinweis: Die Eiscreme ist von Natur aus hellrosa. Falls der Farbton des Eises dunkler sein soll, fügen Sie Lebensmittelfarbe hinzu, bis das Eis die gewünschte Farbe hat.
24
Page 25

Sorbet au citron
Ingrédients :
300 ml de sucre blanc
300 ml d’eau
200 ml de jus de citron
1 cuillère à soupe de zeste
de citron
Préparation :
Mélanger le sucre et l’eau dans une petite casserole et porter
à ébullition. Le laisser ensuite frémir à feu doux pendant 3 à
5 minutes, jusqu’à ce que le sucre soit dissout. Laisser le mé-
lange complètement refroidir. Ajouter ensuite le jus de citron
fraîchement pressé et le zeste haché nement et mélanger délicatement. Allumer l’appareil, verser le mélange dans la cuve et
lancer la turbine pendant environ 30 à 40 minutes, jusqu’à ce
que le mélange soit ferme.
Yaourt glacé au chocolat
Ingrédients :
200 ml de lait entier
180 g de chocolat noir
400 ml de yaourt à la vanille
50 ml de sucre
Préparation :
Mixer le lait et le chocolat haché pendant 20 à 30 secondes dans
un mixeur possédant un bol en métal, jusqu’à obtenir un mélan-
ge homogène. Ajouter le yaourt et le sucre puis mixer pendant
15 secondes. Allumer l’appareil, verser le mélange dans la cuve
et lancer la turbine pendant environ 50 à 60 minutes, jusqu’à ce
que le mélange soit ferme
Nettoyage et entretien
1. Éteindre l’appareil et le débrancher.
2. Retirer la pale et l’essuyer avec un chiffon humide.
3. Retirer la cuve amovible et la nettoyer avec un chiffon humide.
4. Nettoyer le couvercle transparent et le couvercle de remplissage avec un chiffon humide.
5. Retirer les excédents et les taches de l’appareil avec un chiffon humide. Veiller à ne pas mouiller
cordon d’alimentation, la che et les fentes de ventilation. Ne pas plonger l’appareil complète-
ment dans de l’eau ou d’autres liquides.
6. Bien sécher les éléments avant de les remettre en place.
Recyclage et déclaration de conformité
Vous trouverez sur le produit l’image ci-contre (une poubelle sur roues, barrée d‘une
croix), ce qui indique que le produit se trouve soumis à la directive européenne
2002/96/CE. Renseignez-vous sur les dispositions en vigueur dans votre région concernant la collecte séparée des appareils électriques et électroniques. Respectez-les
et ne jetez pas les appareils usagés avec les ordures ménagères. La mise en rebut
correcte du produit usagé permet de préserver l’environnement et la santé. Le recyclage des matériaux contribue à la préservation des ressources naturelles.
Fabricant: CHAL-TEC Vertriebs- + Handels GmbH, Wallstraße 16, 10179 Berlin.
Ce produit est conforme aux directives européennes suivantes :
2004/108/CE (CEM)
2011/65/UE(RoHS)
2006/95/CE (LVD)
25
Page 26

26
Estimado cliente:
Le felicitamos por la adquisición de este producto. Lea atentamente el siguiente manual y siga
cuidadosamente las instrucciones de uso con el n de evitar posibles daños. La empresa no se
responsabiliza de los daños ocasionados por un uso indebido del producto o por haber desatendido
las indicaciones de seguridad.
Índice
Datos técnicos 26
Indicaciones de seguridad 26
Vista general del aparato y botones de función 27
Uso y funciones 28
Recetas de helados 29
Limpieza y cuidado 31
Indicaciones para la retirada del aparato 31
Declaración de conformidad 31
Datos técnicos
Número de artículo 10028043
Suministro eléctrico 220-240 V ~ 50-60 Hz
Potencia 135 W
Dimensiones 400 mm (ancho) x 260 mm (largo) x 275 mm (alto)
Capacidad 1,2 litros
Indicaciones de seguridad
Lea atentamente estas indicaciones y conserve el manual de instrucciones para consultas posteriores.
• Antes de utilizar el aparato, compruebe la tensión del mismo en la placa técnica y conéctelo a
tomas de corriente que se adecuen a esos valores.
• Si el cable de alimentación está dañado deberá ser reparado por un servicio técnico autorizado o
una persona igualmente cualicada.
• No vuelque el aparato ni lo incline más de 45°.
• Nunca sumerja el aparato completamente en agua ni en ningún otro líquido y asegúrese de que ni
el enchufe ni el cable de alimentación se mojan.
• Desenchufe el aparato cuando no lo utilice o al limpiarlo.
• Deje una distancia de 8 cm alrededor de la máquina para garantizar suciente ventilación.
• Utilice accesorios expresamente recomendados por el fabricante.
• Las personas, incluidos niños, con discapacidades físicas, psíquicas o sensoriales o carentes de la
experiencia y conocimiento necesarios no podrán utilizar el aparato salvo que estén bajo supervisión
o hayan sido previamente instruidas sobre su utilización y las indicaciones de seguridad y se hayan
familiarizado con sus funciones. No deje que los niños jueguen con el aparato.
• No utilice el aparato cerca de fuentes de ignición ni fogones u hornos calientes.
• No apague y encienda el aparato varias veces seguidas. Espere durante al menos 5 minutos antes
de encender el aparato de nuevo para no dañar el compresor.
• No introduzca chapas ni otros objetos eléctricos en el aparato para evitar un incendio o un
cortocircuito.
• Al sacar el helado no golpee el recipiente ni el canto del mismo para no dañarlo.
• Encienda el aparato cuando haya colocado el recipiente y la pala mezcladora.
Page 27

• La temperatura inicial de los ingredientes es de 25±5 °C. No congele previamente los ingredientes,
podría bloquear la pala mezcladora antes de que el helado esté listo.
• No retire la pala mezcladora mientras esté en funcionamiento.
• No utilice este aparato al aire libre.
• No limpie el aparato con polvos o esponjas abrasivas.
• No almacene en el aparato sustancias explosivas, como sprays con gases propulsores in amables.
• Este aparato no está indicado para un uso comercial, sino doméstico o similar.
Descripción del aparato y botones de función
Descripción del aparato
Botones de función
On/Off Pulse este botón para encender el aparato, que pasará automáticamente al
modo standby. Pulse el botón con la máquina en marcha para apagarla.
Tiempo de
preparación
Una vez haya introducido los ingredientes en el recipiente, gire el regulador
para ajustar el tiempo de preparación.
Start/Pause Cuando haya ajustado la hora y el menú, pulse este botón para iniciar la
preparación. Pulse el botón con el aparato en marcha para pausarlo.
27
Page 28

Uso y funciones
Limpiar y preparar la heladera
Antes de utilizar el aparato por primera vez, limpie todas las piezas que están en contacto con el
helado: el recipiente jo, el recipiente extraíble, la pala mezcladora, la tapa transparente, la tapa de
llenado, el vaso medidor y la cuchara. Ponga la máquina recta en una super cie plana para que el
compresor pueda trabajar en condiciones óptimas.
Paso 1
Prepare los ingredientes de acuerdo con las recetas que
aparecen en la siguiente sección de este manual. No es necesario enfriar el recipiente con antelación. El aparato cuenta
con un compresor incorporado que enfría los ingredientes
durante la preparación del helado. Mezcle los ingredientes
con un poco de agua tibia en el recipiente extraíble y remueva la mezcla.
Paso 2
Coloque el recipiente en la heladera y gírelo ligeramente
hasta que haya quedado encajado en el recipiente jo.
Paso 3
Coloque la pala mezcladora en el recipiente extraíble y
asegúrese de que la parte de abajo de la pala se encaja en
el eje del motor. Coloque la tapa transparente en la heladera y enrósquela en el sentido contrario de las agujas del
reloj.
Paso 4
Pulse el botón on/off para encender el aparato. Ajuste el tiempo de preparación con
ayuda del regulador. Pulse Start/Pause para poner en marcha la heladera.
Paso 5
Utilice la tapa de llenado para añadir más ingredientes du-
rante la preparación del helado.
Schritt 6
Cuando haya terminado con la preparación, apague el
aparato y retire el recipiente extraíble.
28
Page 29

Función de mantenimiento de frío
Para evitar que el helado se derrita tras la preparación, la función de mantenimiento de frío se inicia
inmediatamente después de que el helado esté listo. El helado se mantendrá frío durante una hora.
Transcurrido ese tiempo el aparato pasará al modo standby.
Función de protección del motor
Si el helado se endurece demasiado, el motor puede bloquearse. En este caso, el aparato se detendrá
automáticamente y detectará su temperatura para evitar que el motor se sobrecaliente.
Indicaciones importantes para la preparación de helado
Para evitar que el helado se derrame o que la cantidad de helado sea excesiva, asegúrese de que la
cantidad de ingredientes que introduce en el recipiente no supera el 60 % de la capacidad del mismo.
El helado crecerá en volumen durante la preparación.
Recetas de helados
Helado de vainilla
Ingredientes:
200 ml de leche entera
100 ml de azúcar
150 ml de nata (fría)
1-2 cucharaditas de
aroma de vainilla
Preparación:
Mezcle la leche y el azúcar en un bol con una batidora a baja potencia durante 1-2 minutos hasta que el azúcar se haya disuelto.
Añada a continuación la nata y el aroma de vainilla y remueva.
Encienda la heladera, vierta la mezcla en el recipiente de la
máquina y deje que se mezcle durante 30-40 minutos hasta que
adquiera una textura consistente.
Variantes: Menta y chocolate
En lugar de utilizar el aroma de vainilla, añada 1-1 ½ cucharaditas de aroma de menta. Desmenuce cholocate amargo en
trocitos y añádalos en los últimos 5 minutos de la preparación
del helado.
Mantequilla y pacanas
Schmelzen Sie 1 Stück gesalzene Butter in einer 26 cm breiten
Pfanne. Fügen Sie 200 ml grobgehackte Pekannüsse und 1 Teelöffel Salz hinzu. Kochen Sie die Mischung bei mittlerer Hitze bis
die Nüsse leicht braun sind und rühren Sie dabei regelmäßig um.
Nehmen Sie die Pfanne vom Herd und sieben Sie die Mischung
durch (die Butter können Sie für andere Zwecke verwenden).
Lassen Sie die Nüsse komplett abkühlen und fügen Sie sie in den
letzten 5 Minuten vor Ende der Zubereitungszeit hinzu.
Cookies y crema
Añada 150 ml de cookies desmenuzadas u otras galletas en los
últimos 5 minutos de preparación del helado.
29
Page 30

Helado de chocolate
Ingredientes:
200 ml de leche entera
100 ml de azúcar
240 g de chocolate amargo
200 ml de nata
1 cucharadita de aroma de
vainilla
Preparación:
Caliente la leche en la cocina o en el microondas hasta que comience a burbujear. Pique el chocolate junto con el azúcar en
una batidora provista de una cuchilla de metal hasta que haya
quedado todo triturado. Añada la leche y remueva la mezcla
hasta conseguir una masa blanda y homogénea. Pase la mezcla a un recipiente grande y deje que se enfríe. Añada la nata
y el aroma de vainilla. Encienda la heladera, vierta la masa y
mézclela durante 30-40 minutos hasta que adquiera una textura
consistente.
Variantes: Chocolate y almendras
Añada media cucharadita de aroma de almendra junto con el
aroma de vainilla. Añada 100-150 ml de almendra picada o al-
mendra cubierta de chocolate en los últimos 5-10 minutos de
proceso.
Cookies de chocolate
Añada 100 ml de cookies desmenuzadas en los últimos 5 minutos de proceso.
Nube y chocolate
Cuando prepare el helado para meterlo en el congelador, cúbralo
con un par de cucharaditas de salsa de chocolate y otras dos de
crema de nube.
Helado de fresa natural
Variantes:
250 g de fresas
1 ½ cucharadita de zumo de
limón
100 ml de azúcar
200 ml de leche entera
200 ml de nata
1 cucharadita de aroma de
vainilla
Preparación:
Mezcle las fresas con el zumo de limón recién exprimido y la
mitad del azúcar en un cuenco pequeño. Remuévalo todo y deje
macerar las fresas 2 horas. Coja un bol mediano. Mezcle la leche con la otra mitad del azúcar durante 1-2 minutos con una
batidora de mano o con unas varillas hasta que el azúcar se
disuelva. Añada la nata, el jarabe de las fresas y el aroma de
vainilla. Encienda la heladera, vierta la mezcla en el recipiente y
mézclelo durante 30-40 minutos hasta que adquiera una textura
consistente. Añada la fresa picada 5 minutos antes de sacar el
helado del congelador.
Consejo: el helado natural será rosa claro. Si desea un color
más oscuro, añada colorante alimenticio hasta conseguir el color
deseado.
30
Page 31

Sorbete de limón
Ingredientes:
300 ml de azúcar
300 ml de agua
200 ml de zumo de limón
1 cucharadita de ralladura
de limón
Preparación:
Mezcle el azúcar con el agua en una cacerola pequeña y ponga
la mezcla al fuego durante 3-5 minutos a fuego medio hasta que
el azúcar se haya disuelto. Deje que la mezcla se enfríe por com-
pleto. Añada el zumo y la ralladura de limón y remúevalo todo.
Encienda la heladera, vierta la mezcla y remueva durante 30-40
minutos hasta que adquiera una textura consistente.
Yogur helado de chocolate
Ingredientes:
200 ml de leche entera
180 g de chocolate amargo
400 ml de yogur de vainilla
50 ml de azúcar
Preparación:
Remueva la leche y el chocolate picado durante 20-30 segundos
con una batidora que tenga cuchilla de metal hasta que consiga
una mezcla homogénea. Añada el yogur y el azúcar y remueva
la mezcla durante 15 segundos. Encienda la heladera, vierta la
mezcla y remueva durante 50-60 minutos hasta conseguir una
textura consistente.
Limpieza y cuidado
1. Apague y desenchufe el aparato antes de limpiarlo.
2. Retire la pala de mezclar y límpiela con un paño húmedo.
3. Retire el recipiente extraíble y límpielo con un paño húmedo.
4. Limpie la tapa transparente y la tapa de llenado con un paño húmedo.
5. Retire la suciedad del aparato con un paño húmedo. Asegúrese de que el cable, el enchufe y las
ranuras de ventilación no se mojan. Nunca sumerja el aparato completamente en agua ni en
ningún otro líquido.
6. Seque todas las partes con cuidado y vuelva a montar la heladera.
Retirada y declaración de conformidad
Si el aparato lleva adherida la ilustración de la izquierda (el contenedor de basura
tachado) entonces rige la normativa europea, directiva 2002/96/CE. Este producto
no debe arrojarse a un contenedor de basura común. Infórmese sobre las leyes
territoriales que regulan la recogida separada de aparatos eléctricos y electrónicos.
Respete las leyes territoriales y no arroje aparatos viejos al cubo de la basura domé-
stica. Una retirada de aparatos conforme a las leyes contribuye a proteger el medio
ambiente y a las personas a su alrededor frente a posibles consecuencias perjudiciales para la salud. El reciclaje ayuda a reducir el consumo de materias primas.
Fabricante: CHAL-TEC Vertriebs- + Handels GmbH, Wallstraße 16, 10179 Berlín.
Este producto cumple con las siguientes directivas europeas:
2004/108/CE (EMC)
2011/65/UE (refundición RoHS 2)
2006/95/CE (baja tensión)
31
 Loading...