

Page 1

Zitruspresse orange
Slow Juicer
10008166 10008167 10008168
10028001
10028002
Page 2
Sehr geehrter Kunde,
Wir gratulieren Ihnen zum Erwerb Ihres Klarstein Gerätes. Lesen Sie die folgenden Anschluss- und
Anwendungshinweise sorgfältig durch und befolgen Sie diese, um möglichen technischen Schäden
vorzubeugen. Für Schäden, die durch Missachtung der Sicherheitshinweise und unsachgemäßen Gebrauch entstehen, übernehmen wir keine Haftung.
Inhaltsverzeichnis
Technische Daten 2
Sicherheitshinweise 3
Geräteübersicht und Zubehör 3
Vor dem ersten Gebrauch 4
Zusammenbau und Inbetriebnahme 4
Reinigung und P ege 6
Fehlersuche und Fehlerbehebung 7
Hinweise zur Entsorgung 7
Konformitätserklärung 7
Technische Daten
Artikelnummer 10028001, 10028002
Stromversorgung 220 V ~ 50 Hz
Leistung 150 W
Betriebszeit im Dauerbetrieb ≤ 10 Minuten
Zeitintervall Benutzungsdauer ≥ 10 Minuten
Sicherheitshinweise
Lesen Sie sich alle Hinweise sorgfältig durch und bewahren Sie die Bedienungsanleitung zum Nachschlagen gut auf.
• Schließen Sie das Gerät nur an Steckdosen an, die der Spannung des Geräts (220 V) entsprechen.
• Falls das Netzkabel beschädigt ist lassen Sie es vom Hersteller oder einem quali zierten Fachbe-
trieb reparieren. Versuchen Sie nicht das Kabel selbst zu reparieren.
• Überprüfen Sie ob das Netzkabel, der Stecker, der Saft lter, die Förderschnecke oder irgendein
anderes Teil beschädigt ist. Falls ein Teil beschädigt ist, nehmen Sie den Entsafter umgehend außer
Betrieb wenden Sie sich an unseren Kundendienst oder lassen Sie das Teil von einem quali zier-
ten Fachbetrieb ersetzen. Versuche Sie nicht Geräte- oder Zubehörteile selbst zu reparieren, Sie
könnten sich verletzen.
• Versichern Sie sich, dass der Entsafter, der Einfülltrichter und alle anderen abnehmbaren Teile an
der richtigen Stelle sitzen, bevor Sie den Stecker in die Steckdose stecken.
WARNUNG
Verletzungsgefahr! Schieben Sie Essen niemals mit den Fingern oder anderen Gegenständen
in den Einfüllschacht, benutzen Sie immer den mitgelieferten Einfüllschieber. Berühren Sie
während des Betriebs nicht die Förderschnecke oder andere bewegliche Teile.
• Benutzen Sie das Gerät nicht in der Nähe von Hitzequellen.
• Waschen Sie die Zubehörteile nicht in der Spülmaschine oder in sehr heißem Wasser ab.
• Schneiden Sie Obst und Gemüse vor dem Entsaften kleine Stücke. Diese sollten so klein sein, dass sie
in den Einfüllschacht passen. Entfernen Sie vor dem Entsaften Kerne, harte Samen, Haut oder Schale.
• Ziehen Sie den Stecker, wenn Sie das Gerät länger nicht benutzen, Teile entfernen oder es reinigen. Lassen Sie das Gerät nicht ohne Inhalt laufen und überfüllen Sie es nicht.
• Verfärbungen am Sieb, dem Einfülltrichter und an den Plastikteilen sind nach mehrmaligem Entsaf-
ten normal, beein ussen nicht die Qualität und sind auch nicht gesundheitsschädlich.
2
Page 3
• Das Gerät ist mit einem intelligenten Schutzschalter ausgestattet, der das Gerät nach 20 Minuten
Dauerbetrieb automatisch ausschaltet. Lassen Sie den Motor 20-30 Minuten lang abkühlen, bevor
Sie es wieder in Betrieb nehmen.
• Das Gerät hat eine integrierte Strombegrenzung, die dem Schutz des Motors dient. Steigt die
Stromstärke beim Entsaften harter Zutaten über 1,3 A stoppt der Motor automatisch und ein Piepton ertönt.
• Falls während des Betriebs zu der Strom unterbrochen wird, stoppt der Motor automatisch. Schalten Sie das Gerät in diesem Fall aus und starten Sie den Rückwärtsgang, um Rückstände zu entfernen. Starten Sie das Gerät danach wieder im Vorwärtsgang und achten Sie darauf, ob das Gerät
wieder normal läuft. Falls das Gerät wieder aussetzt, reinigen Sie die Förderschnecke und fahren
Sie mit dem Entsaften fort.
• Füllen Sie kein heißes Wasser über 80°C ein und desinzieren Sie das Gerät nicht. Alle Geräteteile,
die Kontakt mit Lebensmitteln erfüllen die Zertizierungsanforderungen der Nahrungsmittelindustrie für Hygiene.
• Tauchen Sie das Netzkabel, den Stecker und die Geräte-Basis nicht in Wasser oder andere Flüssig-
keiten und spülen Sie die Teile auch nicht unter ießenden Wasser ab.
• Benutzen Sie zur Reinigung keine Stahlwolle oder chemische Reiniger, sie könnten das Gerät damit
beschädigen.
• Um die Gefahr eines Stromschlags bei einer Störung oder Fehlfunktion zu verringern, muss das
Gerät an eine geerdete Steckdose angeschlossen werden. Falls Sie sich nicht sicher sind, ob Ihre
Steckdose den Anforderungen entspricht, lassen Sie sich von einem Elektriker beraten.
• Schließen Sie das Gerät nur an Steckdosen an, die der angegeben Spannung des Geräts entsprechen.
• Kinder, physisch und körperlich eingeschränkte Menschen sollten das Gerät nicht benutzen. Bewahren Sie das Gerät außerhalb der Reichweite von Kindern auf.
Geräteübersicht und Zubehör
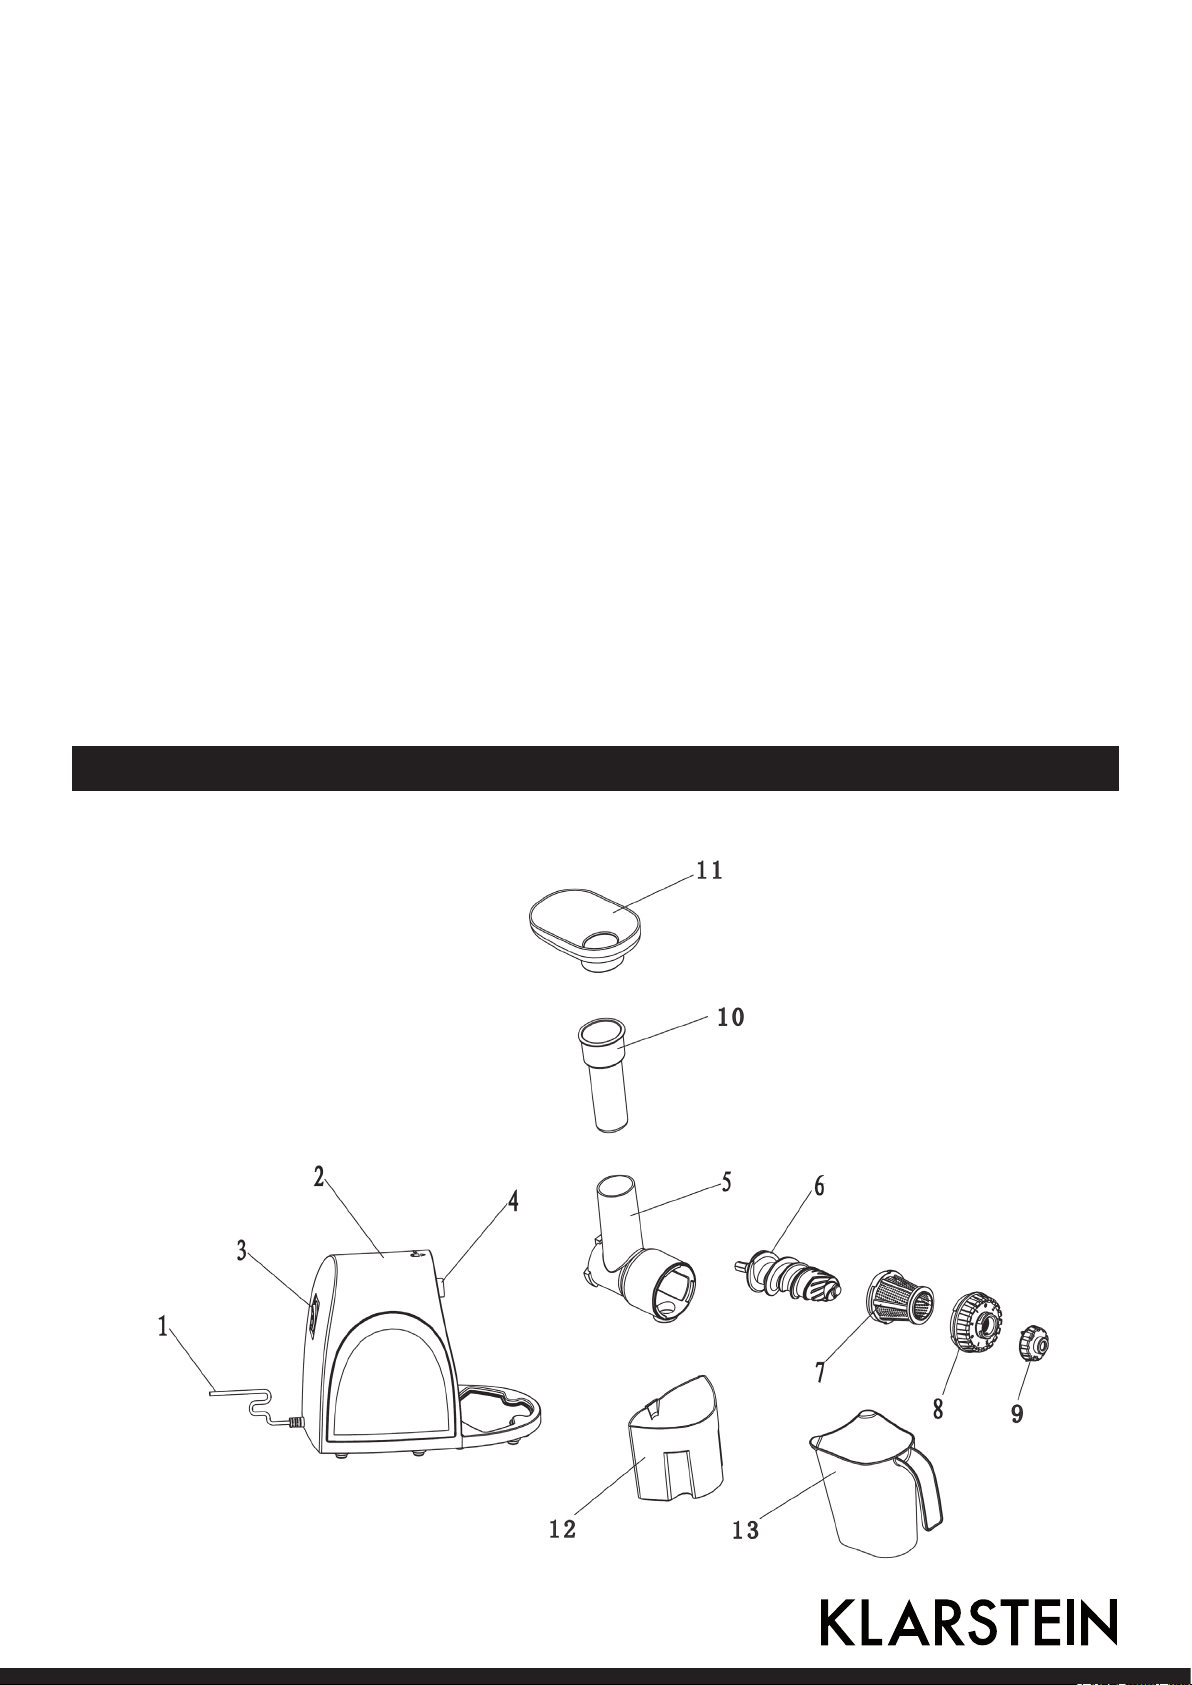
1 Netzkabel
2 Gerätebasis
3 Hauptschalter
4 Verriegelung
5 Entsafter
6 Förderschnecke
7 Saftlter mit eingebautem Sieb
8 Sicherheitskappe
9 Saftaufsatz
10 Einfüllschieber
11 Trichter
12 Saftbehälter
13 Fruchteischbehälter
Page 4
Vor dem ersten Gebrauch
Bevor Sie das Gerät erstmalig benutzen, reinigen Sie alle Teile, die Kontakt mit Lebensmitteln haben.
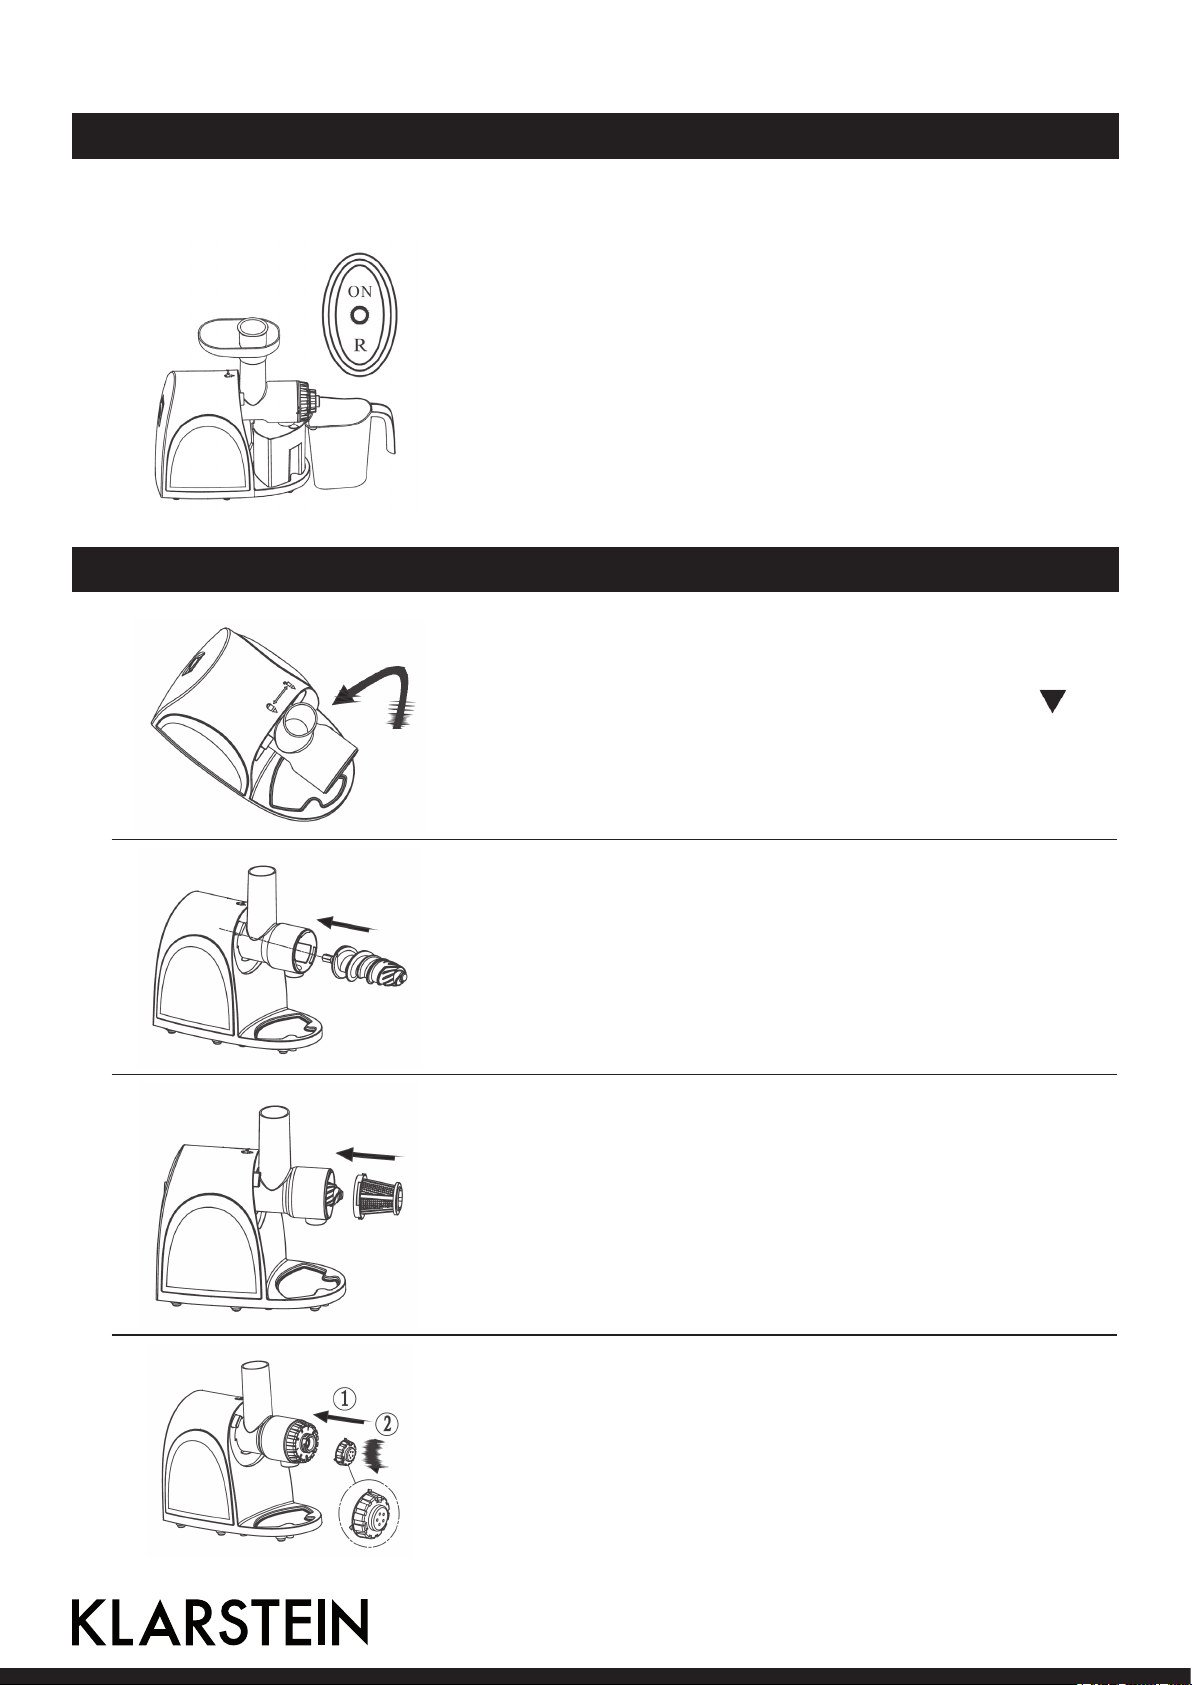
So benutzen Sie den Schalter:
ON: Normaler Betrieb
O: STOP/Gerät anhalten
R: Rückwärtsgang
Benutzen Sie den Rückwärtsgang zum Lösen der Rückstände,
wenn der Entsafter blockiert ist. Halten Sie dafür die R-Taste 3
Sekunden lang gedrückt. Die Förderschnecke läuft nun rückwärts.
Sobald Sie die Taste wieder loslassen, stoppt die Schnecke. Drücken Sie auf ON, um normal fortzufahren.
Zusammenbau und Inbetriebnahme
Verbinden Sie den Entsafter mit der Gerätebasis:
Halten Sie den Entsafter so, dass die Markierung
1
das geönete Schloss mit Dreieck an der Gerätebasis zeigt.
Stecken Sie den Entsafter in die Gerätebasis und drehen
Sie ihn gegen den Uhrzeigersinn, bis er mit einem Klick
einrastet.
Richten Sie die Förderschnecke so aus, dass das breite
2
Ende auf das Loch im Motorblock zeigt und setzen Sie die
Förderschnecke ein.
Drücken Sie das breite Ende des Saftlters auf das hinte-
3
re Ende des Entsafters. Richten Sie die Klemmschlitze am
Saftlter an den Klammern des Entsafters aus.
auf
Verbinden Sie die Sicherheitskappe fest mit dem Entsafter.
Drücken Sie die Kappe dafür horizontal in den Entsafter.
4
Drehen Sie dann die Sicherheitskappe gegen den Uhrzeigersinn fest.
4
Page 5
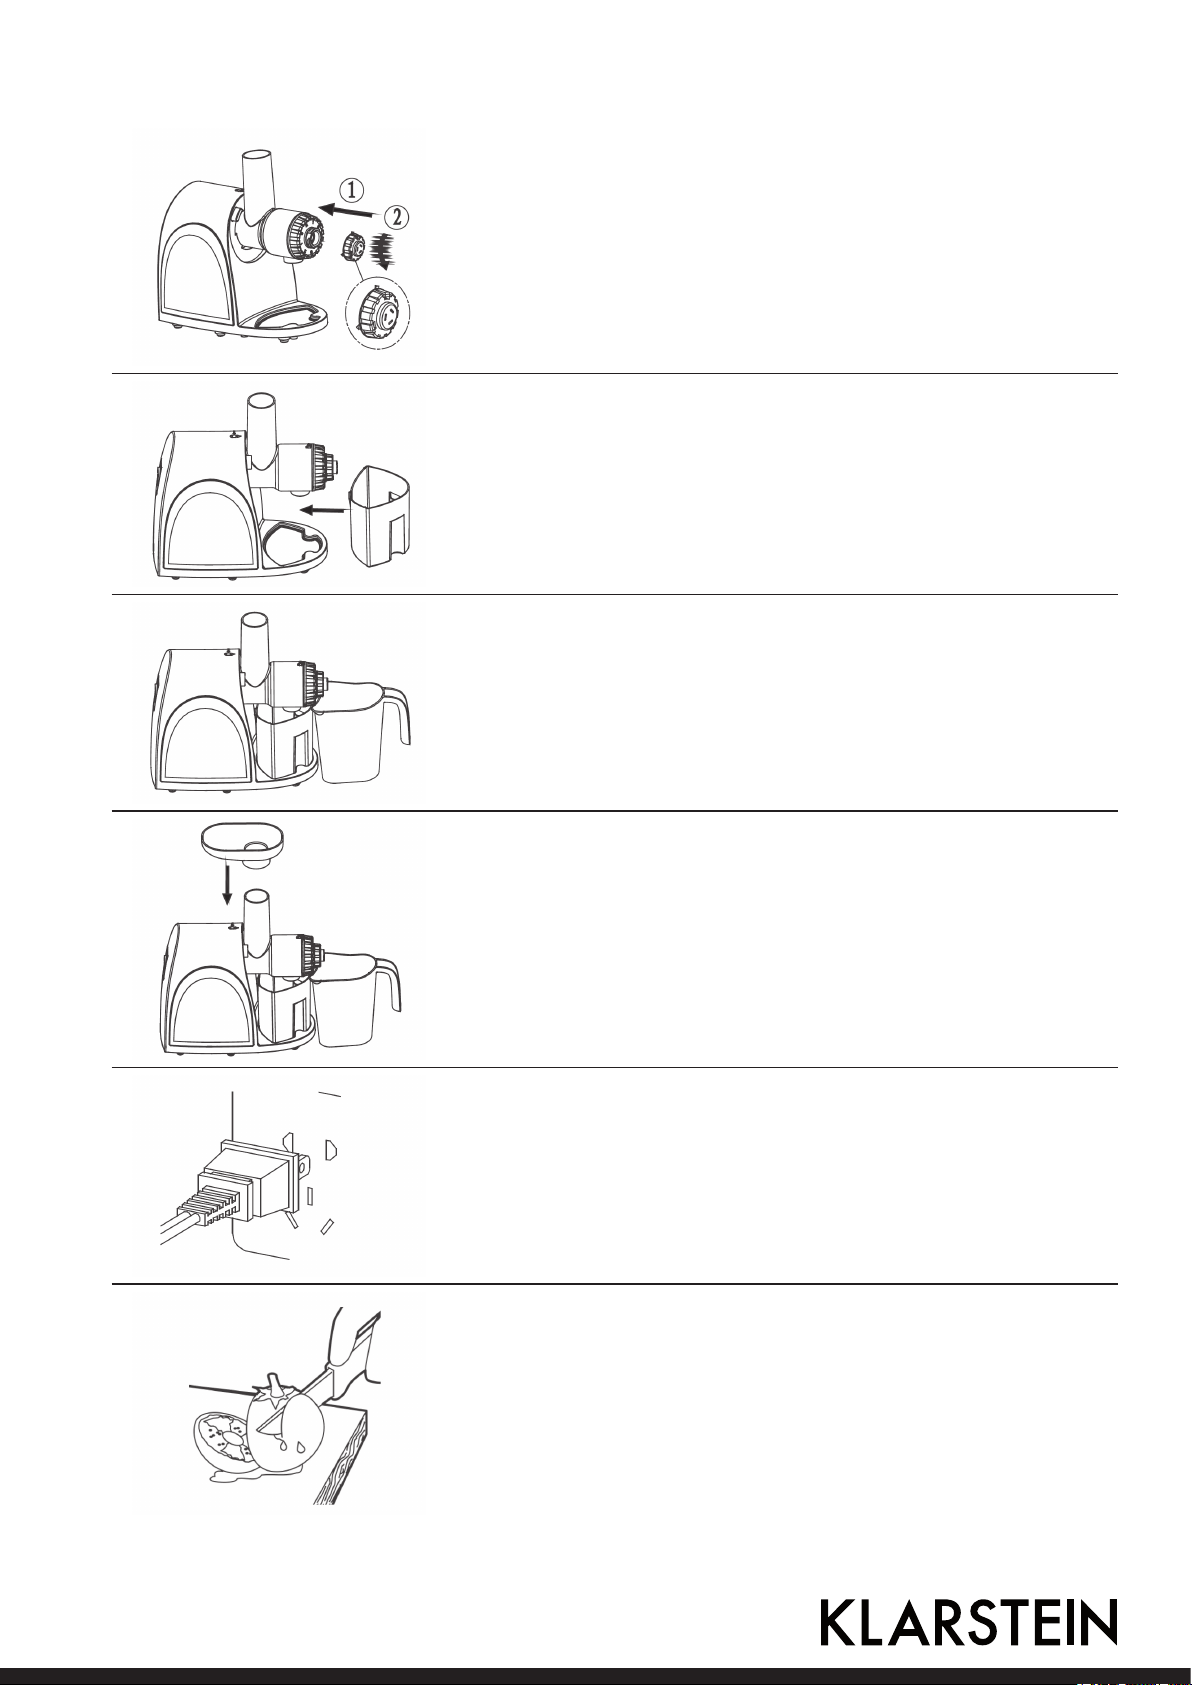
Verbinden Sie den Saftaufsatz mit der Sicherheitskappe.
5
Drücken Sie den Aufsatz horizontal in die Sicherheitskappe
und drehen Sie den Aufsatz gegen den Uhrzeigersinn fest.
Setzen Sie den Saftbehälter in die Aussparung auf der Ge-
6
rätebasis unterhalb des Saftauslasses.
Stellen Sie den Fruchteischbehälter unten den Resteaus-
7
lass des Entsafters, der sich beim Saftauslass bendet.
Setzen Sie den Trichter auf das obere Ende des Einfüll-
8
schachts. Der Trichter erleichtert das Einfüllen vorbereiteter
oder kleinerer Zutaten, wie Trauben oder Beeren.
Achten Sie darauf, dass der Schalter am Gerät auf OFF
9
steht, bevor Sie den Stecker anschließen.
Schneiden Sie Obst und Gemüse vor dem Entsaften kleine
Stücke und legen Sie diese auf dem Trichter ab. Die Stücke
10
sollten so klein sein, dass sie in den Einfüllschacht passen.
Entfernen Sie vor dem Entsaften Kerne, harte Samen. Haut
oder Schale.
Page 6
Nachdem Sie den Schalter auf ON gestellt haben, beginnt
das Gerät etwa 10 Minuten lang zu laufen. Fassen Sie den
11
Schalter nicht mit Nassen Händen an, um Stromschläge zu
vermeiden.
Geben Sie die Saftzutaten in den Einfüllschacht und drücken Sie sie mit dem Einfüllschieber herunter. Drücken Sie
den Schieber fest herunter aber drücken Sie nicht zu stark.
Schieben Sie Essen niemals mit den Fingern oder anderen
12
Gegenständen in den Einfüllschacht, benutzen Sie immer
den mitgelieferten Einfüllschieber. Wenn Saft- oder Frucht-
eischbehälter voll sind, schalten Sie das Gerät aus, ziehen
Sie den Stecker und entfernen Sie den Saft und die Rückstände, bevor Sie mit dem Entsaften fortfahren.
Wenn Sie alle Zutaten verarbeitet sind und kein Saft mehr aus dem Saftauslass kommt, schalten
Sie das Gerät aus und ziehen Sie den Stecker. Entfernen Sie den Saftbehälter nicht, bevor die Förderschnecke zum Stehen gekommen ist. Trinken Sie den Saft möglichst gleich, da er mit der Zeit
Geschmack und Vitamine verliert. Entfernen Sie die Rückstände zeitnah.
Reinigung und Pege
• Schalten Sie das Gerät vor der Reinigung aus und ziehen Sie den Stecker aus der Steckdose.
• Reinigen Sie das Gerät direkt nach der Benutzung.
• Waschen Sie die Gerätebasis nicht mit Wasser ab, entfernen Sie Flecken mit einem Baumwolltuch.
• Achten Sie beim Verstauen des Geräts darauf, dass es trocken und sauber ist.
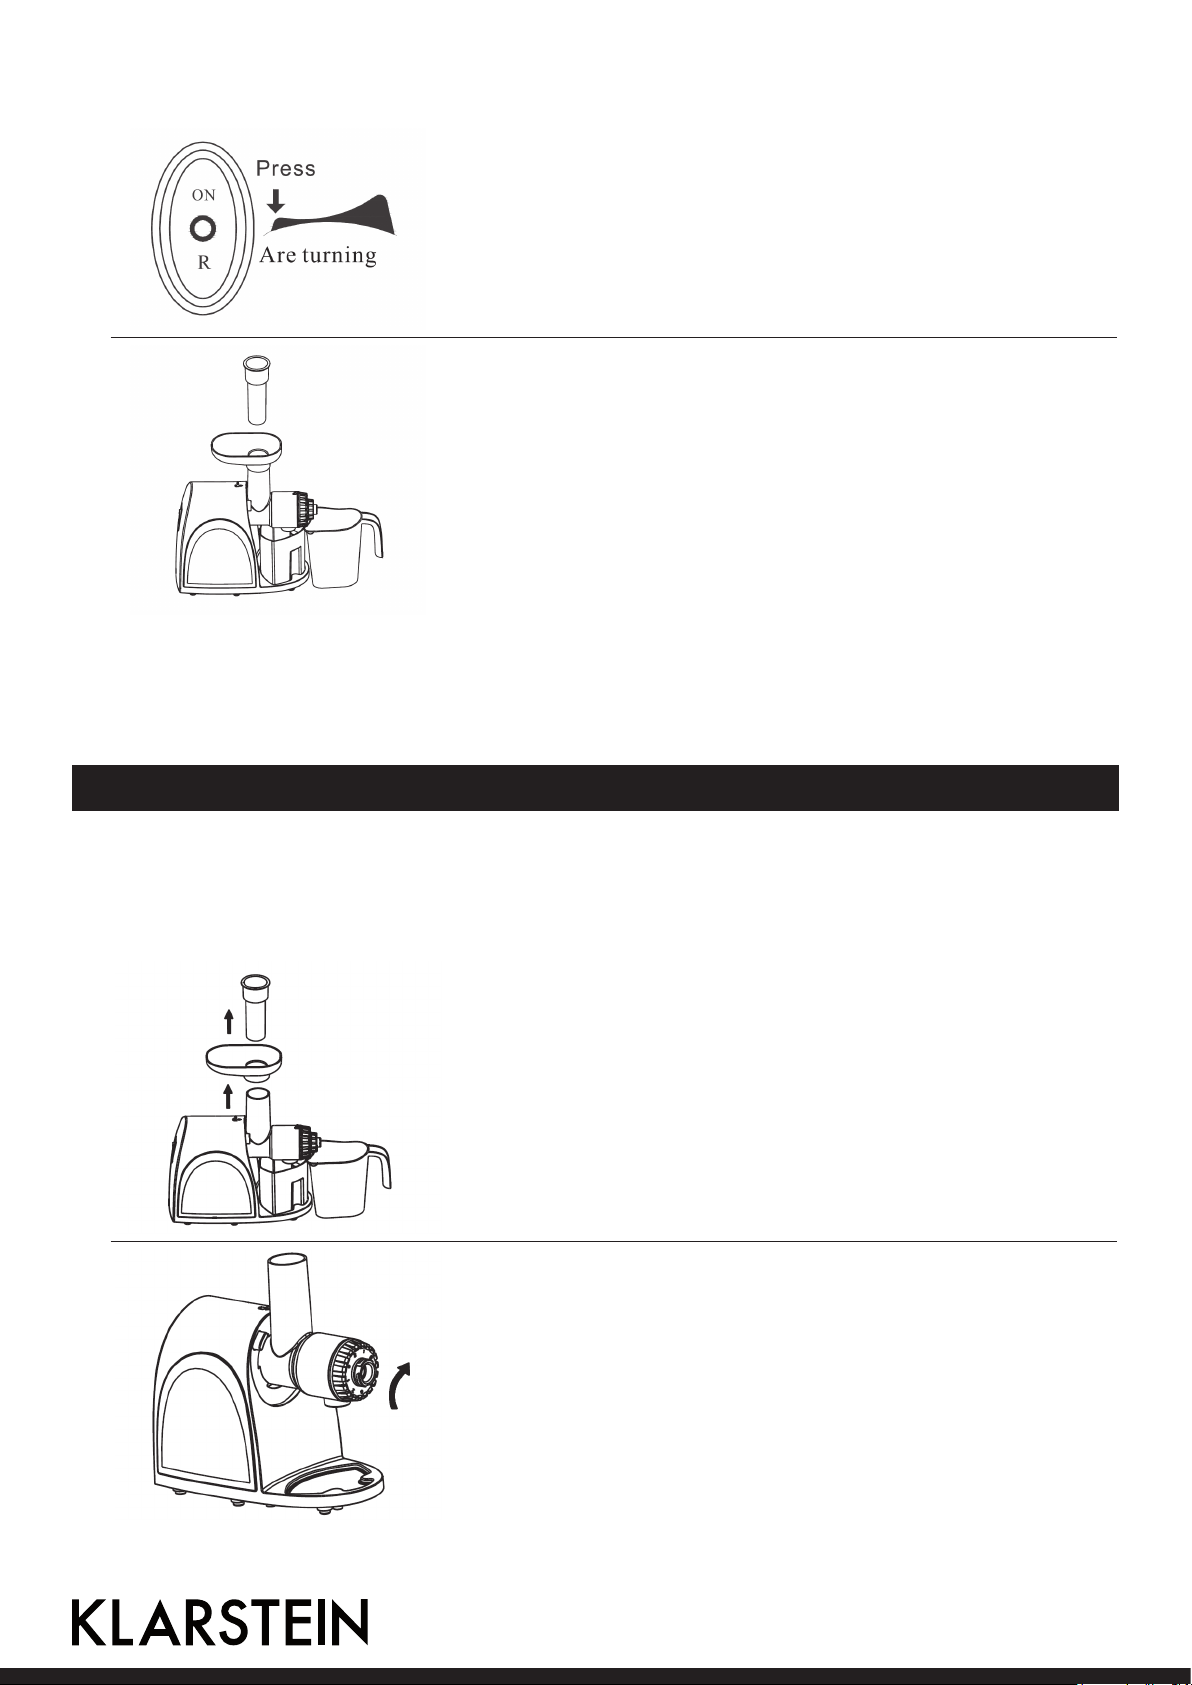
• Nehmen Sie das Gerät zur Reinigung folgendermaßen auseinander:
1 Entfernen Sie den Einfüllschieber und den Trichter.
Drücken Sie auf die Verriegelung an der Oberseite der Gerätebasis und drehen gleichzeitig Sie die komplette Entsaf-
2
ter-Einheit im Uhrzeigersinn heraus (Die Einheit lässt sich
nur entfernen, wenn die Verriegelung gedrückt wird).
6
Page 7

Nachdem Sie die Entsafter-Einheit entfernt haben lösen Sie
den Saftaufsatz, die Sicherheitskappe, den Saft lter und
3
die Förderschnecke in der angegebenen Reihenfolge. Wa-
schen Sie alle lösbaren Teile unter ießendem Wasser ab
und trocknen Sie sie sorgfältig.
Fehlersuche und Fehlerbehebung
Viele Fehler können Sie einfach selbst beheben. Bevor Sie sich an den Kundenservice wenden gehen
sie zunächst die folgende Liste durch.
Fehler Mögliche Ursache Lösung
Das Gerät geht nicht
an, obwohl es angeschaltet ist und der
Stecker eingesteckt
ist.
Der Motor riecht bei
der ersten Benutzung unangenehm.
Das Gerät hält während des Betriebs
an.
Während der Benutzung sind Geräusche zu hören.
Stecker und Steckdose haben keinen richtigen Kontakt
zueinander.
Das ist normal. Falls der Motor auch nach mehrmaliger Be-
Zu wenig Strom. Überprüfen Sie den Stromanschluss.
Zu viele Zutaten im Entsaf-
ter.
Das Gerät läuft bereits über
einen längeren Zeitraum.
Die Förderschnecke und der
Saft lter sind nicht richtig
eingebaut.
Der Motor ist beschädigt. Lassen Sie das Gerät von einem Fachbetrieb
Stecken Sie den Stecker erneut in die
Steckdose.
Verwenden Sie eine andere Steckdose und
versuchen Sie es erneut.
Lassen Sie das Gerät von einem Fachbetrieb
überprüfen.
nutzung unangenehm riecht, lassen Sie das
Gerät von einem Fachbetrieb überprüfen.
Ziehen Sie den Stecker und entfernen Sie
überschüssige Zutaten
Der Motor fährt nach einer kurzen Pause mit
dem Entsaften fort.
Installieren Sie die Förderschnecke und den
Saft lter erneut.
überprüfen
7
Entsorgung und Konformitätserklärung
Be ndet sich die linke Abbildung (durchgestrichene Mülltonne auf Rädern) auf dem
Produkt, gilt die Europäische Richtlinie 2002/96/EG. Diese Produkte dürfen nicht mit
dem normalen Hausmüll entsorgt werden. Informieren Sie sich über die örtlichen
Regelungen zur getrennten Sammlung elektrischer und elektronischer Gerätschaften. Richten Sie sich nach den örtlichen Regelungen und entsorgen Sie Altgeräte
nicht über den Hausmüll. Durch die regelkonforme Entsorgung der Altgeräte werden
Umwelt und die Gesundheit ihrer Mitmenschen vor möglichen negativen Konsequen-
zen geschützt. Materialrecycling hilft, den Verbrauch von Rohsto en zu verringern.
Hersteller: CHAL-TEC GmbH, Wallstraße 16, 10179 Berlin.
Dieses Produkt entspricht den folgenden Europäischen Richtlinien:
2014/30/EU (EMV)
2014/35/EU (LVD)
2011/65/EU (RoHS)
Page 8

Dear Customer,
Congratulations on purchasing this Klarstein equipment. Please read this manual carefully and take
care of the following hints on installation and use to avoid technical damages. Any failure caused by
ignoring the mentioned items and cautions mentioned in the operation and installation instructions
are not covered by our warranty and any liability.
Contents
Technical Data 8
Safety Instructions 8
Product Description and Accessory 9
Before rst Use 10
Assembling and Use 10
Cleaning and Care 12
Troubleshooting 13
Environment Concerns 13
Declaration of Conformity 13
Technical Data
Item number 10028001, 10028002
Rated voltage 220 V ~ 50 Hz
Rated power 150 W
Continuous operating time ≤ 10 min.
Time interval ≥ 10 min.
Safety Instructions
Read all the safety and operating instructions carefully and retain them for future reference.
Be sure the input voltage of this appliance before using: AC220V 50Hz
Be sure to disconnect the power before disassembling or adjusting any part of the product.
The appliance has Y connection. If its power cord is damaged, please contact our customer service
department or have it directly replaced at a service center designated by us to avoid dangers. Do not
dismantle and repair it by yourself.
Before use, please check if the power cord, the plug, the juice strainer, the juicing screw and any
other part is damaged. If any damage, STOP using the appliance and contact our customer service
department promptly. Do not dismantle and repair it by yourself, otherwise dangers may happen.
Be sure the juicing body, hopper and other detachable parts installed in right place before connecting
power supply.
WARNING
Do not push food with ngers, or other objects (like knife), always use the enclosed Food
Pusher for pushing food. When the product is working, it strictly prohibits any touch on the
juicing screw and other moving parts in order to avoid injury or product damage.
• Cut food ingredients into small pieces with sizes tting the inlet port of the juicing body. Do not
extract the vegetables or fruits before removing the cores, hard seeds or thick skin or shells.
• Unplug from outlet when not in use, before putting on or taking o parts, and before cleaning.
• Prohibited an idle running or overload.
• Dyeing of the strainer, inlet port and other plastic parts after juicing some fruits and vegetables is
normal and will neither a ect food eating nor harmful to health.
8
Page 9

• Cut food ingredients into small pieces with sizes tting the inlet port of the juicing body. Do not
extract the vegetables or fruits before removing the cores, hard seeds or thick skin or shells.
• Unplug from outlet when not in use, before putting on or taking o parts, and before cleaning.
• Prohibited an idle running or overload.
• Dyeing of the strainer, inlet port and other plastic parts after juicing some fruits and vegetables is
normal and will neither aect food eating nor harmful to health.
• Equipped with an Intelligent Protective IC, the appliance will stop automatically after 20 minutes of
continuous running. In this case, wait for 20 to 30 minutes before continuous use until the motor
has cooled down to prolong the life span of the appliance.
• The appliance with current limiting design, if juicing hard ingredients ( such as carrots), when the
current exceeds 1.3A, the motor will stop working with „Beep beep“ hints. This is to protect the
motor.
• During operations, if the appliance appears limit protection or stall causes the motor stops automatically, it should be turned o the power, then start the reversal function to retreat the ingredients. After that, restart the power switch „Forward“ button to make the appliance work properly
again. If the appliance still stall, then cleaning ingredients within the juicing screw and continue
to use.
• Not allowed over 80°C hot water and microwave disinfection, so as to avoid damage. All the parts
in contact with food complied with food hygiene certication materials.
• To protect against risk of electric shock, re or personal injury, do not immerse power cord, plug
and motor base in water or any form of liquid, neither rinse under tap water.
• Do not use steel wool or any chemical cleaner to clean the appliance. Otherwise is may change the
col or of the appliance or could result in a re.
• This appliance is not intended for use by persons (including children) with reduced physical, sensory or mental capabilities, or lack of experience and knowledge. Put the appliance at a place
unreachable to children.
Product Description and Accessory
1 Power cord
2 Main body
3 Power switch
4 Lock
5 Juicing body
6 Juicing screw
7 Juice strainer with meshed strainer
8 Juicing body cap
9 Juicing button
10 Food pusher
11 Hopper
12 Juice cup
13 Pulp container
Page 10

Before rst Use
Before using the appliance for the rst time, clean these parts which may contact with food ingredients thoroughly.
Control button operation instructions:
Button ON: For normal use
Button O: Close and stop
Button R: Reverse function
Use the reverse function when pulp discharge is blocked or the
motor is clocked (Press and hold „R“ for about 3 seconds, the
juicing screw will begin to reverse. After „R“ button is released,
the juicing screw will stop reversing. If press the „On“ button
again at this time, the juicing screw will return to normal work).
Assembling and Use
Connect the juicing body and the main body:
Align the mark on the juicing body with the mark „unlock triangular sign“ on the main body and then put the
1
juicing body into the main body (the three clips on the
juicing body will realize alignment). Then turn the juicing
body anticlockwise. When there is a click, it means that the
connection is nished
Align the polygonal shaft of juicing screw with the polygo-
2
nal shaft hole of the motor mounted in the drive unit
Fit the larger-opening end of the juice strainer into the tail
of the juicing screw and push it while the three clips of
3
the juice strainer align with the three clamping slots in the
juicing body. (The juice strainer is used with the juicing
button hereinafter, this function is used for juicing.)
Push the juicing body cap into the juicing body horizontally
while the three clips on the juicing body cap are stagge-
4
red from the three clips on the juicing body. Then turn the
juicing body cap anticlockwise until the gures „1“ and „2“
on it are on the right above positions.
10
Page 11

Push the juicing button into the juicing body cap horizontally while the three clips on the inner periphery of the
juicing button are staggered from the three clips on the
5
juicing body cap. Then turn the juicing button anticlockwise
until the triangular projection on the edge of the juicing
button aligns with the „2“ position on the juicing body cap.
Put the juice cup in the corresponding groove on the main
6
body and have its opening align with the bottom of the juice
outlet of the juicing body.
Put the pulp container below the pulp outlet of the juicing
7
body and close to the juice cup.
Install the hopper on the upper end of the inlet port of the
juicing body. The hopper can make feeding of food ingre-
8
dients more convenient, particularly when small-particle
food ingredients like grapes and strawberries are processed.
Connect the power supply for use of the appliance (make
9
sure the switch is on the „OFF“ position before the power
supply is connected).
Wash vegetables and fruits, cut them into small pieces tting the size of the inlet port and put them on the hopper.
When extracting the juice, follow the methods in the safety
10
instructions strictly. Before extracting vegetables or fruits
with cores, hard seeds or thick skin or shells, remove their
cores, hard seeds or thick skin or shells rst.
Page 12

After the „ON‘‘ button of the switch is pressed, the appliance
will begin to run. Interval ≤ 10 minutes. Do not touch the
11
power switch with wet hands, otherwise an electric shock or
leakage accident or a re accident may happen.
Put food ingredients into the inlet port on the juicing body
and then push the food ingredients with the food pusher.
Do not push the food ingredients violently but with a proper
force enough to cut o the food ingredients. (Never put n-
12
gers or other objects into the inlet port on the juicing body.
After the pulp container or the juice cup is full, disconnect
the power supply and remove the pulp or pour the juice
before continuing to use the appliance).
After food ingredient processing is nished and there is no more juice owing out from the juice
outlet, switch o the power switch and disconnect the power supply. Do not take the juice cup away
from the juice outlet until both the juicing screw and the juice strainer have completely stopped. (The
extracted juice should be drunk at once. If it is exposed in air for some time, its avor and nutrition
will be both aected.) Do not store pulp for a long time.
Cleaning and Care
• Before cleaning the appliance, DO switch o and disconnect the power supply.
• After use, clean the appliance promptly.
• Do not wash the main body with water but wipe the stains on with a cotton cloth.
• Before storing the appliance, make sure it is clean and dry.
• Following the below steps to clean the appliance after dismantling it:
1 Take down the food pusher and the hopper.
Press the lock on the upper-side of the juicing body and
turn the juicing body clockwise at the same time to take out
2
the juicing body. (The juicing body cannot be dismantled if
the lock is not pressed.)
12
Page 13

After taking down the juicing body, take down the juicing
button, the juicing body cap, the juice strainer and the
3
juicing screw in order. The detachable parts may be ushed
with clean water.
Troubleshooting
Certain problems can be solved easily without calling out an engineer. Before conacting your local
Service Centre, please carry out the checks listed underneath.
Fault Cause analysis Fault elimination
After the power supply is connected and
the power switch is
on, the appliance
fails to run.
There is a bad smell
from the motor in
the rst several
times of use.
The appliance stops
during use.
There is noise in
are not properly ins
use.
The power plug and the power socket have poor contact.
This is an normal phenomenon.
The voltage is too low. Check if the voltage is too low.
There are too many food
ingredients in it.
The appliance has run for a
too long time.
The juicing screw and the
juice strainer are not properly installed.
The motor in the main body
is damaged.
Insert the power plug again.
Replace the power socket and try it again.
Send the appliance to the nearest service
center of our company for detection.
If there is still a bad smell after the
appliance has been used for multiple times,
send the appliance to the nearest service
center of our company for detection.
Disconnect the power supply and take
out the surplus food ingredients.
It is a normal phenomenon. The motor
will resume operation after some time of
pause.
Install the juicing screw and the juice
strainer properly.
Send the appliance to the nearest service
center of our company for detection.
13
Disposal and Declaration of Conformity
According to the European waste regulation 2002/96/EG this symbol on the product
or on its packaging indicates that this product may not be treated as household waste. Instead it should be taken to the appropriate collection point for the recycling of
electrical and electronic equipment. By ensuring this product is disposed of correctly, you will help prevent potential negative consequences for the environment and
human health, which could otherwise be caused by inappropriate waste handling of
this product. For more detailled information about recycling of this product, please
contact your local council or your household waste disposial service.
Producer: CHAL-TEC GmbH, Wallstraße 16, 10179 Berlin.
This product is conform to the following European Directives:
2014/30/EU (EMC)
2014/35/EU (LVD)
2011/65/EU (RoHS)
Page 14

Chère cliente, cher client,
Toutes nos félicitations pour l’acquisition de ce nouvel appareil. Veuillez lire attentivement les inst-
ructions de branchement et d’utilisation a n d’éviter d’éventuels dommages techniques. Le fabricant
ne saurait être tenu pour responsable des dommages dus au non-respect des consignes de sécurité
et à la mauvaise utilisation de l’appareil.
Contents
Technical Data 8
Safety Instructions 8
Product Description and Accessory 9
Before rst Use 10
Assembling and Use 10
Cleaning and Care 12
Troubleshooting 13
Environment Concerns 13
Declaration of Conformity 13
Données techniques
Numéro d'article 10028001, 10028002
Alimentation : 220 V ~ 50 Hz
Puissance 150 W
Durée de fonctionnement ≤ 10 min.
Intervalle de temps pour chaque période d'utilisation ≥ 10 min.
Indications de sécurité
• Lisez toutes les indications attentivement et conservez cette notice d‘utilisation a n de pouvoir la
consulter au besoin.
• Ne branchez l‘appareil que sur des prises murales correspondant à la tension indiquée sur l‘appareil.
• Si le cordon d‘alimentation est endommagé, faites-le réparer par le fabricant ou par un technicien
quali é. N‘essayez pas de réparer le câble vous-même.
• Véri ez bien que ni le câble secteur, ni la prise, ni le ltre à jus, ni la vis de convoyage, ni tout au-
tre élément ne sont endommagés. En cas d‘endommagement d‘un des éléments, mettez l‘appareil
immédiatement hors tension et adressez-vous à notre service clientèle ou faites réparer l‘appareil
par un service technique quali é. N‘essayez jamais de réparer l‘appareil ni ses accessoires vous-
mêmes; vous risqueriez de vous blesser.
• Assurez-vous que la base de l‘extracteur, l‘entonnoir et tous les autres éléments amovibles sont
bien en place avant de brancher la che sur la prise secteur.
AVERTISSEMENT
Risque de blessure ! Ne poussez jamais les aliments ni d‘autres objets dans la fente de
remplissage avec les doigts ; utilisez toujours le poussoir. Pendant le fonctionnement de
l‘appareil, ne touchez ni la vis de convoyage, ni aucun autre élément amovible de l‘appareil.
• N‘utilisez pas l‘appareil à proximité de sources de chaleur.
• Ne nettoyez pas les accessoires au lave-vaisselle ni dans de l‘eau très chaude.
• Découpez vos fruits et légumes en petits morceaux avant de les presser. Ils doivent être su sament
petits pour rentrer dans la fente de remplissage. Retirez tout noyau ainsi que toute graine dure,
peau ou coque avant le pressage.
• Débranchez l‘appareil avant toute non-utilisation prolongée, ainsi que lors du nettoyage de l‘appareil
ou lorsque vous en retirez des éléments.
• Ne faites jamais tourner l‘appareil à vide et ne le surchargez pas.
14
Page 15

• Il est normal après plusieurs pressages que la passoire, l‘entonnoir et autres éléments plastiques
se décolorent. Ceci n‘aecte en rien la qualité du jus et ne nuit pas à la santé
• L‘appareil est équipé d‘un dispositif de court-circuit intelligent qui éteint l‘appareil automatiquement après 20 minutes d‘utilisation continue. Laissez le moteur refroidir pendant 20 à 30 minutes
avant de l‘utiliser de nouveau.
• L‘appareil dispose d‘une limitation de courant intégrée qui sert à protéger le moteur. Si l‘intensité
du courant dépasse 1,3 A lors du pressage d‘ingrédients durs, le moteur s‘arrêtera automatiquement et l‘appareil émettra un bip.
• En cas d‘interruption du courant pendant le fonctionnement de l‘appareil, le moteur s‘arrêtera
automatiquement. Dans ce cas, éteignez puis rallumez l‘appareil et lancez la marche arrière an
de retirer les restes. Relancez ensuite l‘appareil en marche avant et vériez bien qu‘il fonctionne
normalement. Si l‘appareil s‘arrête de nouveau, nettoyez la vis de convoyage et poursuivez ensuite le pressage.
• Ne remplissez pas l‘appareil d‘eau à plus de 80°C et ne désinfectez pas l‘appareil. Tous les éléments de l‘appareil rentrant en contact avec les aliments répondent aux normes hygiéniques de
l‘industrie alimentaire.
• Ne plongez pas le cordon d‘alimentation, la prise ni le socle de l‘appareil dans de l‘eau et ne nettoyez pas les éléments non amovibles de l‘appareil à l‘eau courante.
• N‘utilisez aucune laine d‘acier ni de nettoyants chimiques pour nettoyer l‘appareil - ceux-ci peuvent l‘endommager.
• An de réduire le risque d‘électrocution lors d‘un dysfonctionnement ou d‘une panne de l‘appareil,
celui-ci doit être branché sur une prise mise à terre. En cas de doute quant à la conformité de votre
prise secteur, consultez un électricien
• Ne branchez l‘appareil que sur des prises murales correspondant à la tension indiquée sur l‘appareil.
• L‘appareil ne doit être utilisé ni par des enfants, ni par des personnes aux capacités physiques ou
mentales réduites. Conservez l‘appareil hors de la portée des enfants.
Aperçu de l‘appareil
Page 16

1 Cordon d‘alimentation
2 Base de l‘appareil : contient le bloc moteur
3 Interrupteur principal : STOP, marche avant et marche arrière.
4 Verrouillage : empêche l‘extracteur de se détacher de la base lors du fonctionnement. Main-
tenez le verrouillage enfoncé pour retirer l‘extracteur de la base.
5 Extracteur : l‘extracteur est le cœur de l‘appareil. Les fruits et légumes entrent dans l‘extracteur
via la partie supérieure pour y être broyés et pressés.
6 Vis de convoyage : achemine les morceaux de fruits et les broie contre le ltre à jus.
7 Filtre à jus avec passoire intégrée : le ltre travaille avec la vis de convoyage pour séparer le
jus des restes broyés.
8 Bouchon de sécurité : vissé sur la partie ouverte de l‘extracteur à des ns de sécurité.
9 Embout à jus
10 Poussoir : sert à insérer les éléments dans la fente de remplissage.
11 Entonnoir : pour la conversation des morceaux de fruits et légumes.
12 Réservoir de jus : recueille le jus.
13 Réservoir de pulpe: recueille les restes.
Avant la première utilisation
Avant la première utilisation de l‘appareil, nettoyez-en tous les éléments rentrant en contact avec
les aliments.
Comment utiliser l‘interrupteur:
ON: Fonctionnement normal
O: Bouton STOP/Arrêt de l‘appareil
R: Marche arrière. Utilisez cette fonction pour retirer les restes en
cas de blocage de l‘extracteur. Pour cela, maintenez le bouton R
enfoncé pendant 3 secondes. La vis de nettoyage fera alors mar-
che arrière. Dès que vous relâchez le bouton, la vis s‘arrêtera.
Appuyez sur ON pour relancer l‘appareil en marche avant.
Assemblage et mise en service
Fixez l‘extracteur sur la base de l‘appareil :
Faites tourner la marque [B] sur l‘extracteur de telle sorte
à ce qu‘elle pointe vers le cadenas ouvert avec triangle sur
1
la base de l‘appareil.
Placez l‘extracteur sur la base de l‘appareil et faites-le pivoter dans le sens contraire des aiguilles d‘une montre
jusqu‘à ce qu‘il s‘emboîte avec un clic.
16
Page 17

Disposez la vis de nettoyage de telle sorte que le bout large
2
pointe vers le trou dans le bloc moteur et mettez la vis de
nettoyage en place.
Placez le bout large du ltre à jus sur la partie arrière de
3
l‘extracteur. Faites pointer la fente de serrage de l‘extracteur
vers les agrafes de l‘extracteur.
Vissez bien le bouchon de sécurité sur l‘extracteur. Pour
ce faire, placez-la à l‘horizontale sur l‘extracteur. Fixez-la
4
ensuite en la faisant pivoter dans le sens contraire des aiguilles d‘une montre.
Attachez l‘embout pour jus sur le bouchon de sécurité.
5
Placez-le à l‘horizontale sur le bouchon de sécurité et faitesle pivoter dans le sens contraire des aiguilles d‘une montre.
Placez le réservoir à jus dans l‘encoche prévue à cet eet
6
sur la base de l‘appareil en-dessous de la sortie du jus.
Placez le réservoir à pulpe en-dessous de la sortie à pulpe
7
de l‘extracteur ; celle-ci est située en-dessous de la sortie
à jus.
Page 18

Placez l‘entonnoir sur la partie supérieure de la fente de
8
remplissage. L‘entonnoir facilite avant tout l‘insertion
d‘aliments plus petits tels que les raisins ou les baies.
Assurez-vous que l‘interrupteur de l‘appareil est bien placé
9
sur OFF avant de brancher le cordon d‘alimentation.
Découpez vos fruits et légumes en petits morceaux et
placez-les dans l‘entonnoir. Ils doivent être susamment
10
petits pour rentrer dans la fente de remplissage. Retirez
tout noyau ainsi que toute graine dure, peau ou coque
avant le pressage.
Une fois l‘interrupteur placé sur ON, l‘appareil se mettra à
fonctionner pendant 10 minutes environ. Ne touchez pas
11
l‘appareil avec des mains humides an d‘éviter tout risque
d‘électrocution.
Placez les ingrédients dans la fente de remplissage en vous
aidant du poussoir pour les insérer. Appuyez le poussoir
avec fermeté mais sans trop de force. Ne poussez jamais
les aliments ni d‘autres objets dans la fente de remplissage
12
avec les doigts ; utilisez toujours le poussoir. Lorsque les
réservoirs à jus ou à pulpe sont pleins, éteignez l‘appareil,
débranchez-le et retirez le jus et la pulpe avant de poursuivre le pressage.
Lorsque tous les ingrédients ont été pressés et qu‘aucun jus de sort ne sort de la sortie jus, éteignez
l‘appareil et débranchez-le. Ne retirez pas le réservoir à jus avant que la vis de convoyage ne se soit
complètement arrêtée. Consommez le jus de préférence rapidement, celui-ci perdant son goût et ses
vitamines avec le temps. Retirez les restes rapidement.
18
Page 19

Nettoyage et entretien
• Eteignez l‘appareil avant de le nettoyer et retirez la che de la prise secteur.
• Nettoyez l‘appareil immédiatement après utilisation.
• Ne lavez pas la base à l‘eau ; essuyez toute tache avec un chion en coton.
• Vériez bien que l‘appareil est sec et propre avant de le ranger.
• Avant de nettoyer l‘appareil, retirez-en les éléments de la manière suivante :
1 tirez le poussoir et l‘entonnoir.
Appuyez sur le verrouilleur situé sur le dessus de la base de
l‘appareil tout en pivotant l‘unité d‘extraction dans le sens
2
des aiguilles d‘une montre. (L‘extracteur ne peut seulement
être retiré que lorsque vous appuyez sur le verrouilleur.)
Une fois l‘extracteur retiré, détachez l‘embout à jus, le bou-
chon de sécurité, le ltre à jus et la vis de convoyage dans
3
l‘ordre indiqué. Nettoyez tous les éléments amovibles à
l‘eau courante et séchez-les soigneusement.
Page 20

Dépannage
Vous pouvez résoudre de nombreux dysfonctionnements vous-même. Veuillez consulter cette liste
avant de vous adresser au service clientèle. Si vous ne pouvez résoudre le problème vous-même,
contactez votre service clientèle. Avant votre appel, veuillez noter le modèle, le numéro de série et
la date d‘achat de l‘appareil. Le service clientèle aura besoin de ces informations.
Panne Cause possible Solution
L'appareil est branché sur la prise
secteur et allumé,
mais ne démarre
pas.
Le moteur émet une
odeur désagréable
lors de la première
utilisation.
L‘appareil s‘arrête
de fonctionner pendant l‘utilisation.
La che n'est pas branchée
correctement dans la prise.
Ceci est normal. Si l'odeur persiste après plusieurs utili-
Courant insu sant.
Trop d‘ingrédients présents
dans l‘extracteur.
Rebranchez la che dans la prise secteur.
Utilisez une autre prise et essayez de nouveau.
Faites inspecter l'appareil par un service
technique quali é.
sations, faites inspecter l'appareil par un
service technique quali é.
Véri ez le branchement.
Débranchez l‘appareil et retirez les ingrédients en trop.
L‘appareil émet des
bruits pendant le
pressage.
Protection de l’environnement
Vous trouverez sur le produit l’image ci-contre (une poubelle sur roues, barrée d‘une
croix), ce qui indique que le produit se trouve soumis à la directive européenne 2002/96/
CE. Renseignez-vous sur les dispositions en vigueur dans votre région concernant la
collecte séparée des appareils électriques et électroniques. Respectez-les et ne jetez pas
les appareils usagés avec les ordures ménagères. La mise en rebut correcte du produit
usagé permet de préserver l’environnement et la santé. Le recyclage des matériaux
contribue à la préservation des ressources naturelles.
L‘appareil est en fonctionnement depuis plus de 20
minutes.
La vis de convoyage et le lt-
re à jus ne sont pas installés
correctement.
Le moteur est endommagé.
Le moteur reprendra après une courte pause.
Réinstallez la vis de convoyage et le ltre à
jus.
Faites inspecter l‘appareil par un service
technique quali é.
Déclaration de conformité
Fabricant : CHAL-TEC GmbH, Wallstraße 16, 10179 Berlin- Allemagne
Ce produit est conforme aux directives européennes suivantes :
2014/30/UE (CEM)
2014/35/UE (LVD)
2011/65/UE (RoHS)
20
 Loading...