

Page 1

Zitruspresse orange
Säulenven lator
10008166 10008167 10008168
10027944 10027946
10027947
Page 2

Sehr geehrter Kunde,
wir gratulieren Ihnen zum Erwerb Ihres Klarstein Gerätes. Lesen Sie die folgenden Anschluss- und
Anwendungshinweise sorgfältig durch und befolgen Sie diese, um möglichen technischen Schäden
vorzubeugen. Für Schäden, die durch Missachtung der Sicherheitshinweise und unsachgemäßen Gebrauch entstehen, übernehmen wir keine Haftung.
Inhaltsverzeichnis
Technische Daten 2
Sicherheitshinweise 2
Geräteübersicht 3
Montage und Inbetriebnahme 3
Bedienung und Funktionstasten 4
Reinigung und Pege 4
Hinweise zur Entsorgung 5
Konformitätserklärung 5
Technische Daten
Artikelnummer 10027944, 10027946, 10027947
Stromversorgung 220-240 V ~ 50-60 Hz
Leistung 40 W
Gewicht 2.4 kg
Abmessungen 800 mm (H) x 225 mm (B) x 225 mm (T)
Sicherheitshinweise
Lesen Sie sich alle Hinweise sorgfältig durch und bewahren Sie die Bedienungsanleitung zum Nachschlagen gut auf.
• Benutzen Sie das Gerät nur wie in der Bedienungsanleitung angegeben. Missbrauch kann zu Elekt-
roschocks, Bränden oder Personenschäden führen. Modizieren Sie das Gerät nicht und versuchen
Sie nicht das Gerät selbst zu reparieren.
• Entfernen Sie alles Verpackungsmaterial und überprüfen Sie vor der Benutzung, ob das Gerät beschädigt ist. Sollte das Gerät beschädigt sein, kontaktieren Sie den Hersteller. Achten Sie darauf,
dass Kinder nicht mit den Verpackungsmaterialien spielen, sie könnten sich verletzen.
• Kinder, physisch und körperlich eingeschränkte Menschen sollten das Gerät nur benutzen, wenn
sie vorher von einer Aufsichtsperson ausführlich mit den Funktionen und den Sicherheitsvorkehrungen vertraut gemacht wurden. Achten Sie darauf dass Kinder nicht mit dem Gerät spielen und
benutzen Sie das Gerät in Anwesenheit von Kindern nur unter Aufsicht.
• Um die Gefahr eines Stromschlags bei einer Störung oder Fehlfunktion zu verringern, muss das
Gerät an eine geerdete Steckdose angeschlossen werden. Schließen Sie das Gerät nur an Steckdosen an, die der Spannung des Geräts entsprechen.
• Benutzen Sie das Gerät nicht zusammen mit einem externen Timer, einer Mehrfachsteckdose oder
ferngesteuerten Steckdosen, andernfalls könnte es zu Bränden kommen.
• Ziehen Sie das Gerät nicht am Netzkabel aus der Steckdose. Halten Sie den Stecker dabei mit der
Hand fest.
• Lassen Sie das Netzkabel nicht unter brennbaren Materialien verlaufen und verlegen Sie es so,
dass keiner darüber stolpert.
• Schieben Sie keine Objekte in die Lüftungsöffnungen, sie könnten das Gerät beschädigen. Achten
Sie darauf, dass die Lüftungsöffnungen während des Betriebs nicht blockiert sind. Stellen Sie das
Gerät nicht auf Wiche Untergründe, wie Bettdecken, sie könnten die Lüftungsöffnungen blockieren.
• Lassen Sie das Gerät im Betrieb nicht unbeaufsichtigt und ziehen Sie den Stecker, wenn Sie es
nicht benutzen, reinigen oder bewegen.
2
Page 3
• Halten Sie Haare, Gardinen, Tischwäsche und Kleidung während des Betriebs fern vom Ventilator,
damit sie nicht in den Lufteinlass gesaugt werden.
• Stellen Sie das Gerät nicht in der Nähe von entzündlichen oder chemischen Stoffen auf.
• Benutzen Sie das Gerät nur in Innenräumen.
• Dieses Gerät eignet sich nicht für nasse Umgebungen, wie Badezimmer. Stellen Sie das Gerät so
auf, dass es nicht in eine Wanne oder einen Wasserbehälter fallen kann.
• Benutzen Sie das Gerät nicht im Freien und stellen Sie es nicht in die Nähe von Fenstern oder in
direktes Sonnenlicht.
• Stellen Sie das Gerät auf einen ebenen, festen Untergrund, bevor Sie es benutzen. Das Gerät
muss immer aufrecht auf der Basis stehen.
• Um Elektroschocks zu vermeiden, ziehen Sie vor dem Reinigen immer den Stecker aus der Steckdose.
• Falls das Netzkabel beschädigt ist muss es vom Hersteller, einem Fachbetrieb oder einer ähnlich
qualizierten Person ersetzt werden.
• Decken Sie das Gerät nicht ab, damit es nicht überhitzt.
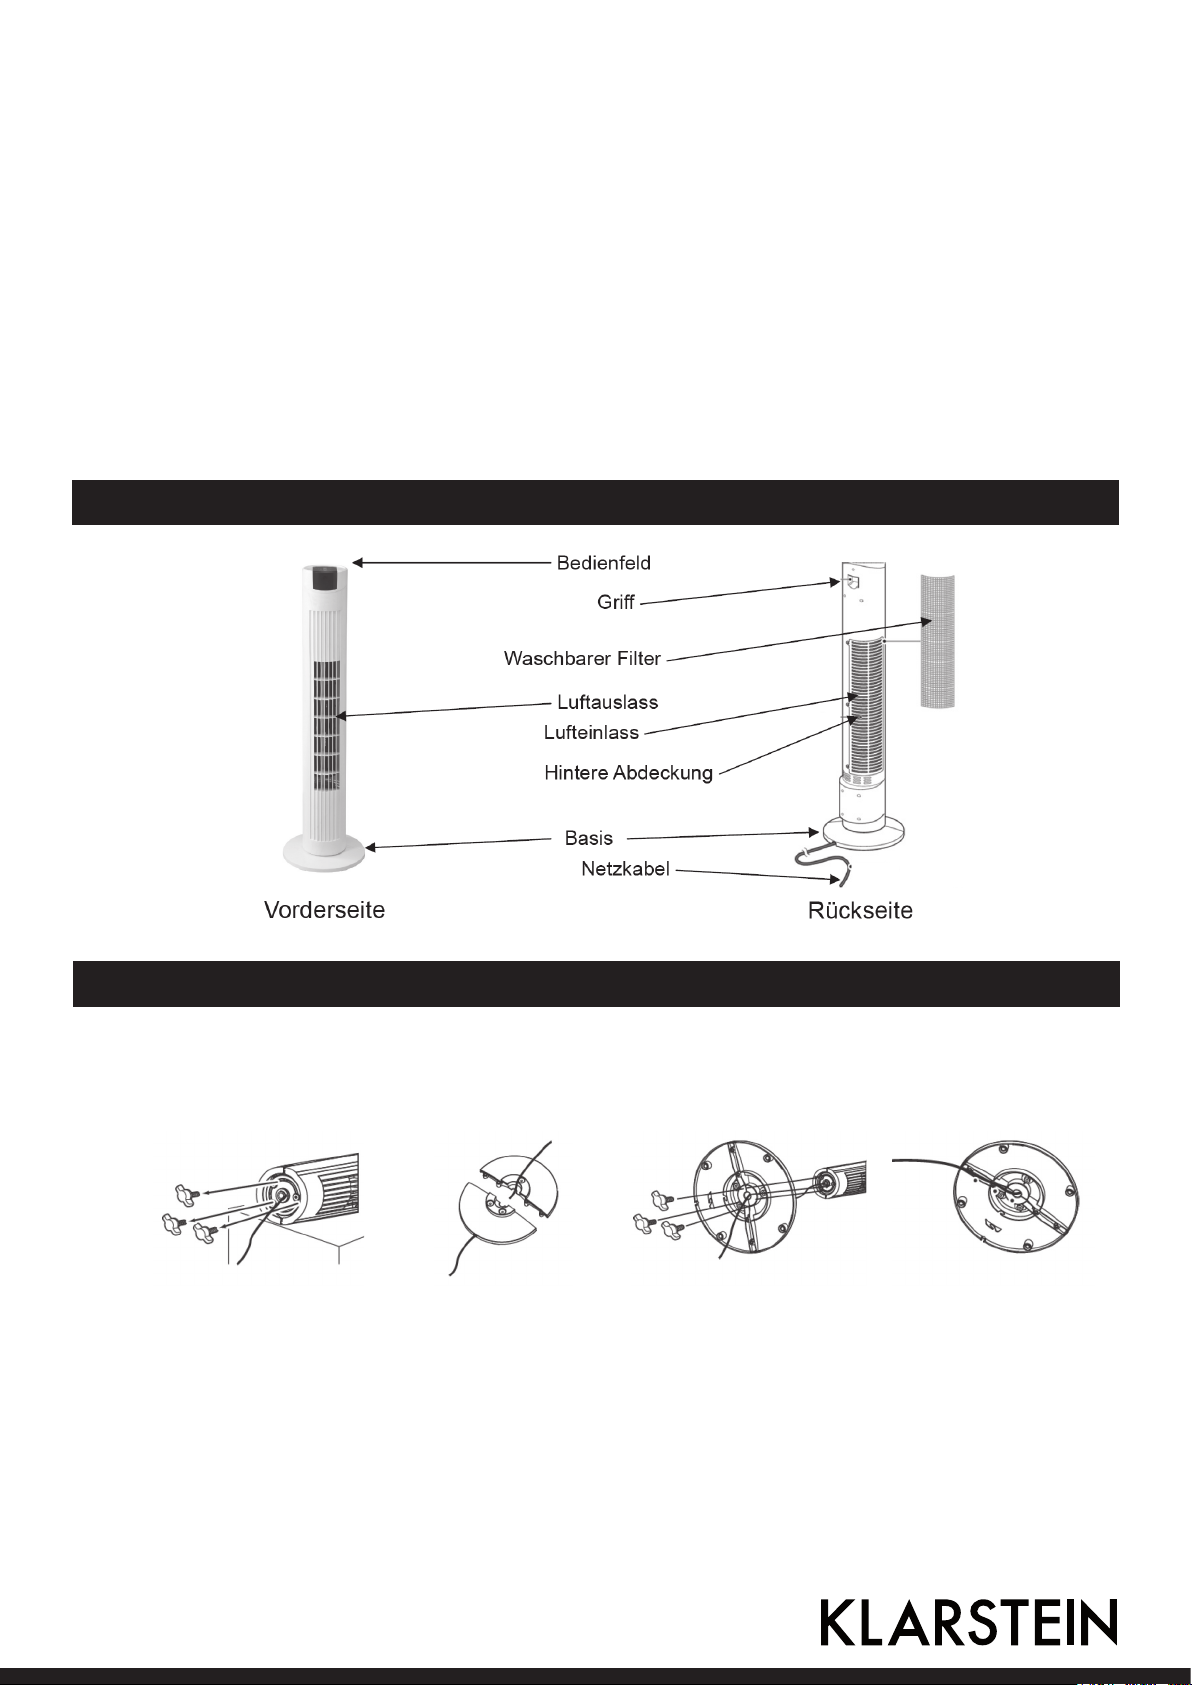
Geräteübersicht
Montage und Inbetriebnahme
1. Nehmen Sie das Gerät aus dem Karton, entfernen Sie den Plastiksack und entrollen Sie das Kabel.
2. Bringen Sie die Basis an der Unterseite des Ventilators an:
A B C D
Entfernen Sie die 3
Flügelschrauben von
der Unterseite des
Ventilators.
Legen Sie das Netzkabel zwischen die 2
Hälften der Basis und
schieben Sie die Hälften zusammen.
Drücken Sie die Basis
in die Unterseite des
Ventilators und richten
Sie die Löcher aneinander aus. Befestigen
Sie die Basis mit den
3 Flügelschrauben.
Befestigen Sie das
Netzkabel an den 2
Klammern und führen Sie es durch den
Kabelkanal.
Page 4
3. Stellen Sie das Gerät auf einen ebenen, festen und trockenen Untergrund.
4. Stecken Sie den Stecker in die Steckdose und schalten Sie das Gerät ein. Die Blaue Kontrollleuchte leuchtet auf und ein Piepton ertönt.
Hinweis: Für die Fernbedienung benötigen Sie eine Batterie. Um die Knopfzelle einzusetzen oder zu
wechseln, drücken Sie den Clip auf der Rückseite der Fernbedienung nach innen und entfernen Sie
die Klappe. Setzen Sie die Batterie ein und schließen Sie die Klappe wieder.
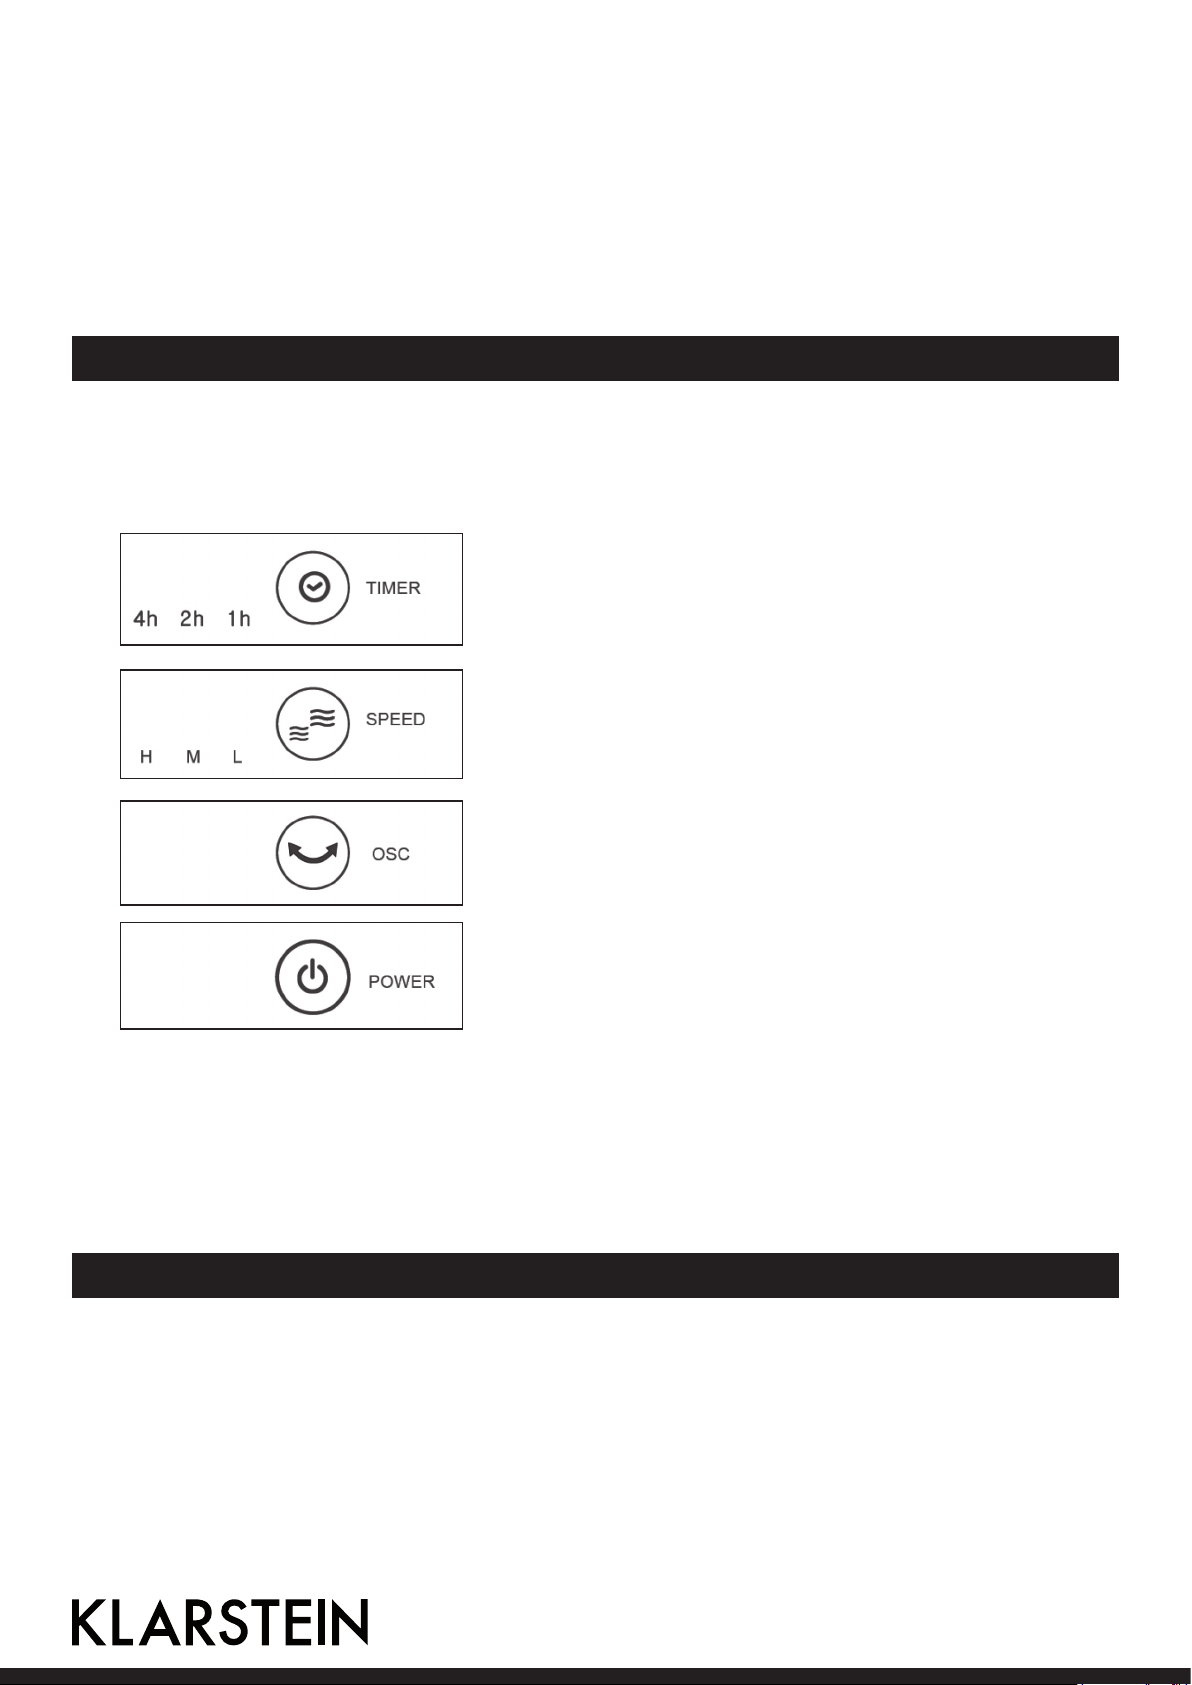
Bedienung und Funktionstasten
Funktionstasten
Das Gerät verfügt über 4 Funktionstasten. Die Tasten nden Sie auf dem Bedienfeld oben am Ventilator und auf der Fernbedienung.
Drücken Sie mehrfach auf die Timer-Taste, um den Timer in
1-Stunden Schritten zu programmieren. Wenn Sie bei 7 sind,
springt der Timer beim nächsten Tastendruck auf 0. Während
der Timer aktiv ist können sie die anderen Tasten weiterhin benutzen. Sobald die Zeit abgelaufen ist geht das Gerät aus.
Der Ventilator läuft standardmäßig mit niedriger Geschwindigkeit (L). Drücken Sie mehrfach auf die Taste, um die Geschwindigkeit auf Mittel (M) oder Hoch (H) zu stellen. Die
Kontrollleuchte auf dem Display zeigt die eingestellte Geschwindigkeit an.
Drücken Sie auf die OSC-Taste, um die Schwenk-Funktion
einzuschalten. Drücken Sie ein weiteres Mal auf die Taste, um
die Funktion wieder auszuschalten
Drücken Sie auf die Power-Taste, um das Gerät einzuschalten.
Die Kontrollleuchte unter Speed zeigt, dass sich der Ventilator
mit niedriger Geschwindigkeit dreht. Drücken Sie ein weiteres
Mal auf die Taste, um den Ventilator auszuschalten.
So bedienen Sie den Ventilator
1. Stecken Sie den Stecker in die Steckdose und drücken Sie auf die Power-Taste.
2. Wählen Sie eine Geschwindigkeit, indem Sie mehrfach auf die Speed-Taste drücken.
3. Falls gewünscht, drücken Sie auf die OSC-Taste, um die Schwenk-Funktion einzuschalten.
4. Falls gewünscht, drücken Sie auf die Timer-Taste und wählen Sie eine Zeit für den Timer.
5. Um das Gerät auszuschalten, drücken Sie auf die Power-Taste.
Reinigung und Pege
Wichtig: Um Stromschläge zu vermeiden, ziehen Sie vor der Reinigung den Stecker aus der Steckdose und tauchen Sie das Gerät niemals komplett in Wasser.
• Reinigen Sie das Gerät mindestens einmal im Monat, um Staubablagerungen zu entfernen.
• Reinigen Sie die Geräteoberäche mit einem feuchten, weichen Lappen. Versichern Sie sich, dass
das Gerät komplett trocken ist, bevor Sie den Stecker wieder einstecken.
• Benutzen Sie zur Reinigung kein Benzin, Verdünner, scharfe Reiniger oder Ähnliches, Sie könnten
das Gerät beschädigen.
4
Page 5
• Öffnen Sie die Abdeckung an der Rückseite und entnehmen Sie den Filter. Waschen Sie ihn unter
ießendem Wasser und trocknen Sie ihn sorgfältig ab. Setzen Sie ihn danach wieder ein und schlie-
ßen Sie die Abdeckung. Öffnen Sie die Abdeckung nur zu diesem und zu keinem anderen Zweck.
• Verstauen Sie das Gerät zusammen mit der Bedienungsanleitung an einem trockenen, kühlen Ort.
Hinweise zur Entsorgung
Be ndet sich die linke Abbildung (durchgestrichene Mülltonne auf Rädern) auf dem
Produkt, gilt die Europäische Richtlinie 2002/96/EG. Diese Produkte dürfen nicht mit
dem normalen Hausmüll entsorgt werden. Informieren Sie sich über die örtlichen
Regelungen zur getrennten Sammlung elektrischer und elektronischer Gerätschaften. Richten Sie sich nach den örtlichen Regelungen und entsorgen Sie Altgeräte
nicht über den Hausmüll. Durch die regelkonforme Entsorgung der Altgeräte werden
Umwelt und die Gesundheit ihrer Mitmenschen vor möglichen negativen Konsequenzen geschützt. Materialrecycling hilft, den Verbrauch von Rohstoffen zu verringern.
Das Produkt enthält Batterien, die der Europäischen Richtlinie 2006/66/EG unterliegen und nicht mit
dem normalen Hausmüll entsorgt werden dürfen. Bitte informieren Sie sich über die örtlichen Bestimmungen zu gesonderten Entsorgung von Batterien. Durch regelkonforme Entsorgung schützen
Sie die Umwelt und die Gesundheit ihrer Mitmenschen vor negativen Konsequenzen.
Konformitätserklärung
Hersteller: Chal-Tec GmbH, Wallstraße 16, 10179 Berlin.
Dieses Produkt entspricht den folgenden Europäischen Richtlinien:
2012/206/EU (EVPG)
2004/108/EG (EMV)
2011/65/EU (RoHS)
2006/95/EG (LVD)
5
Page 6
Dear Customer,
Congratulations on purchasing this Klarstein equipment. Please read this manual carefully and take
care of the following hints on installation and use to avoid technical damages. Any failure caused by
ignoring the mentioned items and cautions mentioned in the operation and installation instructions
are not covered by our warranty and any liability.
Contents
Technical Data 6
Safety Instructions 6
Product Description 7
Mounting the Unit 7
Use and Controls 8
Cleaning and Care 8
Disposal Considerations 9
Declaration of Conformity 9
Technical Data
Item number 10027944, 10027946, 10027947
Power supply 220-240 V ~ 50-60 Hz
Power 40 W
Weight 2.4 kg
Dimensions 800 mm (H) x 225 mm (W) x 225 mm (D)
Safety Instructions
Read all the safety and operating instructions carefully and retain them for future reference.
• Use this tower fan only as described in this manual. Any other use not recommended by the ma-
nufacturer may
• cause re, electrical shock, or injury to persons. Do not modify this appliance. Do not try to repair
this appliance – there are no user serviceable parts within.
• Remove the packaging and ensure that the appliance is undamaged (keep packing box for later
storage). In case of doubt do not use the appliance and contact Omega Altise Service. Do not let
children play with any parts of the packaging.
• This appliance is not intended for use by persons (including children) with reduced physical, senso-
ry or mental capabilities, or lack of experience or knowledge, unless they have been given supervision or instruction concerning the use of the appliance by a person responsible for their safety.
Children should be supervised to ensure that they do not play with the appliance. Extreme caution
is necessary when the tower fan is used by or near children or individuals with decreased mental
and physical capacity and whenever the tower fan is left operating unattended.
• Before you use the appliance, check if the voltage marked on the rating label corresponds to the
mains in your home. The appliance must be connected to a grounded power supply.
• Do not use this appliance with a programmer, timer or any other device that switches the appliance
on automatically, since a re risk exists if the appliance is covered or positioned incorrectly.
• Do not pull the power cord to disconnect with the power source. Always grasp the plug to pull it out.
• Do not run power cords under rugs or other combustible materials. Do not place power cords in
areas where they can be a tripping hazard. Do not operate directly below a power outlet.
• Do not insert any objects into the appliance as it may cause an electric shock or re or damage to
the appliance. Do not block or tamper with the appliance in any manner while it is in operation. To
prevent a possible re, do not cover the appliance in any manner. Do not place on soft surfaces,
like a bed, where openings may become blocked.
• Do not leave the appliance unattended. Always unplug the appliance when not in use. Take care
that it is not obstructed when oscillating.
6
Page 7

• Keep materials such as hair, net curtains, tablecloths & clothes away from the openings of the tower fan, as material may be sucked into the appliance causing injury, damage to property or the
appliance.
• The appliance has hot and arcing or sparking parts inside. It must NOT be used in potentially dangerous locations such as ammable, explosive, chemical-laden, corrosive, salty or wet atmospheres. This appliance is intended for general indoor domestic use ONLY.
• This appliance is not intended for use in wet or damp locations. Never locate it where it may fall
into a bathtub or other water container.
• Do not use the tower fan outdoors. Do not use close to windows or in direct sunlight.
• Always place the appliance on at, stable surfaces before use. Always place the appliance vertically on its base.
• To avoid danger of electric shock, unplug from outlet when not in use and before cleaning. If the
supply cord is damaged, it must be replaced by the manufacturer, its Service Agent or similarly
qualied persons in order to avoid a hazard. In order to avoid overheating, do not cover the appliance.
Product Desciption
Mounting the Unit
1. Carefully remove the appliance from the plastic bag and the carton, and unwind the cord.
2. Assemble the base of the fan onto the bottom of the body:
A B C D
Remove the 3 thumb
screws on the bottom
of the main body.
Place the power cord
between the two
halves of the base and
bring them together
(plug end should be
on the side of the
base feet).
Push the base into
the bottom of the fan
body and align the 3
holes. Attach using
the 3 thumb screws.
Fix the cord to the underside of the base in
the 2 small clips and
through the slot that
exits close to the rear
of the appliance.
Page 8

3. Place the appliance onto a stable, at and dry surface.
4. Plug the cord set into a 220-240V~A.C. 50Hz earthed electrical outlet. Turn the power on at the
electrical outlet. The blue Power indicator (next to the Power button) will light up and a beep will
sound.
Note: The remote control uses battery. To replace, push clip at bottom of remote inwards & pull out
battery holder, replace battery and push holder back in.
Use and Controls
Controls
There are 4 control buttons on the control panel (top of tower fan body) and the remote control.
A timer can be set for 0-7 hours (in 1 hour increments). Press
this button to cycle up from 1 to 7 and then back to 0 (selected
timer option is displayed on the control panel – add the times up
to determine the full time). All other buttons continue to work
while the timer is in operation. To stop the timer function, set the
time to 0. Once the time has elapsed, the fan will turn off.
Speed button: Once the fan is running (low), press the Speed
button once to increase the fan speed to medium. Pressing
again will increase the speed to high, and once more will return the fan speed to low. The set speed is indicated on the
control panel display.
OSC button: Once the fan is running, pressing the OSC button
will start the tower fan oscillating (OSC indicator on control
panel will light up). Press a second time to stop the oscillation.
Power button: Once the power has been connected, press this
button to start the tower fan on low speed (the low (L) speed
indicator will light up). Press again to turn off the fan.
Operating the Fan
1. With the power cord plugged in, turn the tower fan on by pressing the power button once.
2. Choose a fan speed by pressing the speed button.
3. If required, turn on the oscillation with the OSC button.
4. If required, set up the timer by pressing the timer button (a sequence of 0-7 hours).
5. Turn the tower fan off by pressing the power button a second time.
Cleaning and Care
Important: Always unplug the cord before moving or servicing, do not immerse appliance in water!
• The fan should be cleaned periodically (at least once a month depending on the build-up of dust).
• Clean the body of the tower fan with a soft damp cloth. Always make sure that the appliance is
completely dry before connecting back to the mains supply.
• Do not use gasoline, benzene, thinner, harsh cleaners, etc. as they will damage the tower fan.
NEVER use ALCOHOL OR SOLVENTS.
8
Page 9

• Open the rear cover and take out the mesh lter. Wash under water, rinse & dry. Replace lter &
close rear cover. Do not disassemble the fan in any other manner.
• STORAGE: Store the tower fan with these instructions in the original packaging, in a cool, dry
place.
Disposal Considerations
According to the European waste regulation 2002/96/EC this symbol on the product
or on its packaging indicates that this product may not be treated as household waste. Instead it should be taken to the appropriate collection point for the recycling of
electrical and electronic equipment. By ensuring this product is disposed of correctly, you will help prevent potential negative consequences for the environment and
human health, which could otherwise be caused by inappropriate waste handling of
this product. For more detailled information about recycling of this product, please
contact your local council or your household waste disposial service.
Your product contains batteries covered by the European Directive. 2006/66/EC, which cannot be
disposed of with normal household waste. Please check local rules on separate collection of batteries.
The correct disposal of batteries helps prevent potentially negative consequences on the environment and human health.
Declaration of Conformity
Producer: Chal-Tec GmbH, Wallstraße 16, 10179 Berlin.
This product is conform to the following European Directives:
2012/206/EU (ErP)
2004/108/EC (EMC)
2011/65/EU (RoHS)
2006/95/EC (LVD)
9
Page 10

Gentile Cliente,
La ringraziamo per aver acquistato un dispositivo Klarstein. La preghiamo di leggere con cura le
seguenti istruzioni di installazione e utilizzo del dispositivo e di seguirle per evitare eventuali danni
tecnici. Non ci assumiamo alcuna responsabilità per i danni scaturiti da una mancata osservazione
delle norme di sicurezza e da un utilizzo improprio del dispositivo.
Indice
Dati tecnici 10
Avvertenze di sicurezza 10
Descrizione del prodotto 11
Montaggio e installazione 11
Uso e tasti funzione 12
Pulizia e manutenzione 12
Avviso per lo smaltimento 13
Dichiarazione di conformità 13
Dati tecnici
Numero dell´articolo 10027944, 10027946, 10027947
Alimentazione 220-240 V ~ 50-60 Hz
Potenza 40 W
Peso 2.4 kg
Dimensioni 800 mm (H) x 225 mm (B) x 225 mm (T)
Avvertenze di sicurezza
Leggere attentamente tutte le indicazioni e conservare il presente libretto di istruzioni in modo da
poterlo consultare in futuro.
• Utilizzare il dispositivo solo nelle modalità indicate nel presente libretto di istruzioni. Un utilizzo er-
rato può causare elettrochoc, incendi o danni alle persone. Non apportare modiche al dispositivo
e non tentare di ripararlo da soli.
• Togliere il materiale di imballaggio e vericare prima dell´utilizzo se il dispositivo è danneggiato.
Nel caso in cui il dispositivo dovesse essere danneggiato, contattare il produttore. Prestare attenzione a non lasciare che i bambini giochini con il materiale di imballaggio in quanto potrebbero
farsi male.
• I bambini e le persone disabili dovrebbero utilizzare il dispositivo solo se questi sono stati istruiti da
un supervisore sulle funzioni e sulle norme di sicurezza da osservare. Prestare attenzione a non lasciare che i bambini giochino con il dispositivo e utilizzarlo con la massima cautela in loro presenza.
• Per ridurre il pericolo di folgorazione durante un guasto o un malfunzionamento, il dispositivo deve
essere collegato ad una presa a terra. Collegare il dispositivo solo a prese che corrispondono al
voltaggio del dispositivo.
• Non utilizzare il dispositivo insieme ad un timer esterno, ad una presa multipla o a prese con tele-
comando, altrimenti potrebbero vericarsi degli incendi.
• Non staccare il dispositivo dalla presa afferrando il cavo di rete. Afferrare la spina con la mano.
• Non lasciare scorrere il cavo di rete sotto materiali inammabili e posizionarlo in modo tale che
nessuno vi possa inciampare.
• Non inlare oggetti nelle fessure per l´areazione in quanto potrebbero danneggiare il dispositivo.
Prestare attenzione che le fessure per l´areazione non siano bloccate quando il dispositivo è in
funzione. Non posizionare il dispositivo su superci morbide, ad esempio coperte, in quanto potrebbero bloccare le fessure per l´areazione.
• Non lasciare il dispositivo incustodito quando è in funzione e staccare la spina quando non viene
utilizzato, quando viene pulito o spostato.
10
Page 11

• Tenere capelli, tende, tovaglie e vestiti lontano dal ventilatore quando questo è in funzione in modo
che queste non vengano aspirate nella fessura di aereazione.
• Non posizionare il dispositivo in prossimità di materiali inammabili o chimici.
• Utilizzare il dispositivo solo in ambienti interni.
• Il presente dispositivo non è adatto per ambienti umidi come il bagno. Posizionare il dispositivo in
modo che non possa cadere nella vasca o in contenitori d´acqua.
• Non utilizzare il dispositivo all´aperto e non posizionarlo in prossimità di nestre o alla luce diretta
del sole.
• Posizionare il dispositivo su una base solida e piana prima del suo utilizzo. Il dispositivo deve essere sempre in posizione verticale sulla base.
• Per evitare elettroshock, staccare sempre la spina dalla presa prima di pulire il dispositivo.
• Nel caso in cui il cavo di rete risulti essere danneggiato, questo deve essere sostituito dal produt-
tore, da un´azienda specializzata o da una persona qualicata.
• Non coprire il dispositivo per evitare che si surriscaldi.
Descrizione del prodotto
Montaggio e installazione
1. Togliere il dispositivo dalla scatola, rimuovere l’involucro di plastica e srotolare il cavo.
2. Applicare la base alla parte inferiore del ventilatore:
A B C D
Rimuovere le 3 viti ad
alette dalla parte inferiore del ventilatore.
Posizionare il cavo di
rete tra le due metà
della base e unirle.
Premere la base nella
parte inferiore del
ventilatore e allineare
i fori l’uno con l’altro.
Fissare la base con le
3 viti ad alette.
Fissare il cavo di rete
ai due clip e farlo
passare attraverso il
canale del cavo.
Page 12

3. Posizionare il dispositivo su una base piana, solida e asciutta.
4. Inlare la spina nella presa e accendere il dispositivo. La spia blu inizierà a lampeggiare e si attiverà un segnale acustico.
Avvertenza: Per utilizzare il telecomando sono necessarie le batterie. Per inserire la pila o cambiarla,
premere il clip sulla parte inferiore del telecomando verso l’interno e rimuovere l’aletta. Inserire la
batteria e chiudere di nuovo l’aletta.
Uso e tasti funzione
Tasti funzione
Il dispositivo dispone di 4 tasti funzione. I tasti si trovano sul panello di controllo situato sulla parte
superiore del ventilatore e sul telecomando.
Premere più volte il tasto Timer per programmare il timer a
intervalli di un’ora. Se il timer è posizionato su 7, premendo
di nuovo il tasto questo si posizionerà su 0. Mentre il timer è
attivo, è possibile utilizzare altri tasti. Allo scadere del tempo il
dispositivo si spegne.
Una volta acceso il ventilatore funziona ad una velocità
standard bassa (L). Premere più volte il tasto per selezionare
la velocità e impostarla su media (M) o alta (H). La spia di
controllo sul display mostra la velocità selezionata.
Premere il tasto OSC per attivare la funzione di oscillazione.
Per disattivare la funzione premere di nuovo il tasto.
Per accendere il dispositivo premere il tasto Power. La spia di
controllo posizionata su Speed segnala che il ventilatore gira
a una velocità bassa. Premere di nuovo il tasto per spegnere
il ventilatore.
Ecco come utilizzare il ventilatore:
1. Inlare la spina nella presa e premere il tasto Power.
2. Selezionare una velocità, premendo più volte il tasto Speed.
3. Se desiderato premere il tasto OSC per attivare la funzione di oscillazione.
4. Se desiderato premere il tasto Timer e selezionare un tempo per il timer.
5. Per spegnere il dispositivo, premere il tasto Power.
Pulizia e manutenzione
Importante: Per evitare folgorazioni, togliere la spina dalla presa prima di pulire il dispositivo e non
immergere mai il dispositivo nell’acqua.
• Pulire il dispositivo almeno una volta al mese in modo da eliminare depositi di polvere.
• Pulire la supercie del dispositivo con un panno umido e morbido. Assicurarsi che il dispositivo sia
completamente asciutto prima di inserire di nuovo la spina nella presa.
• Non pulire con benzina, diluenti e prodotti abrasivi o prodotti simili in quanto il dispositivo potrebbe
danneggiarsi.
12
Page 13

• Aprire il coperchio nella parte inferiore e togliere il ltro. Lavarlo sotto l’acqua corrente e asciugarlo
con cura. Aprire il coperchio solo ed esclusivamente per questo scopo.
• Conservare il dispositivo e il libretto di istruzioni in luogo fresco e asciutto.
Avviso per lo smaltimento
Se sul prodotto è presente la gura a sinistra (il bidone dei ri uti con le ruote), si ap-
plica la direttiva europea 2002/96/EG. Questi prodotti non possono essere smaltiti con
i ri uti normali. Informarsi sulle disposizioni vigenti e non smaltire i vecchi dispositivi
con i ri uti domestici. Grazie al corretto smaltimento dei vecchi dispositivi si protegge il
pianeta e la salute delle persone da possibili conseguenze negative. Il riciclo di materiali
aiuta a diminuire il consumo di materie prime.
Il prodotto contiene batterie che sono soggette alla direttiva europea 2006/66/EG e non possono
essere smaltite con i normali ri uti domestici. Preghiamo di informarvi sulle regolamentazioni vi-
genti sullo smaltimento delle batterie. Grazie al corretto smaltimento dei vecchi dispositivi si tutela
l’ambiente e la salute delle persone da conseguenze negative.
Dichiarazione di conformità
Produttore: Chal-Tec GmbH, Wallstraße 16, 10179 Berlin.
Questo prodotto corrisponde alle seguenti direttive europee:
2012/206/EU (ErP)
2004/108/EC (EMC)
2011/65/EU (RoHS)
2006/95/EC (LVD)
13
Page 14

Chère cliente, cher client,
Toutes nos félicitations pour l’acquisition de ce nouvel appareil. Veuillez lire attentivement et respec-
ter les instructions de ce mode d’emploi an d’éviter d’éventuels dommages. Nous ne saurions être
tenus pour responsables des dommages dus au non-respect des consignes et à la mauvaise utilisation de l’appareil.
Sommaire
Fiche technique 14
Consignes de sécurité 14
Aperçu de l’appareil 15
Montage et mise en marche 15
Utilisation et touches de commande 16
Nettoyage et entretien 16
Information sur le recyclage 17
Déclaration de conformité 17
Fiche technique
Numéro d’article 10027944, 10027946, 10027947
Alimentation électrique 220-240 V ~ 50-60 Hz
Puissance 40 W
Poids 2.4 kg
Dimensions 800 mm (H) x 225 mm (B) x 225 mm (T)
Consignes de sécurité
Veuillez lire attentivement ce mode d’emploi, et conservez-le pour pouvoir vous y référer ultérieurement.
• Utiliser l’appareil uniquement en suivant les instructions du mode d’emploi. Une mauvaise utilisation de l’appareil peut provoquer des décharges électriques, des incendies ou des dommages
corporels. Ne pas effectuer de modication sur l’appareil et ne pas essayer de le réparer soi-même.
• Retirer tous les éléments d‘emballage et vérier avant d‘utiliser l‘appareil qu‘il n‘est pas endomma-
gé. Si l‘appareil est endommagé, contacter le fabricant. Veiller à ce que les enfants ne jouent pas
avec les éléments d‘emballage, ils pourraient se blesser.
• Les enfants ainsi que les personnes aux capacités physiques et mentales réduites ne doivent pas
utiliser l’appareil à moins d’avoir assimilé dans le détail les consignes d‘utilisation et de sécurité
données par la personne chargée de les surveiller. Veiller à ne pas laisser les enfants jouer avec
l’appareil et l’utiliser en leur présence uniquement s’ils sont sous surveillance.
• Pour réduire les risques d’électrocution en cas de défaillance technique ou de dysfonctionnement,
brancher l’appareil à une prise de terre. Brancher l’appareil uniquement à des prises dont la tension correspond à celle supportée par l’appareil.
• Ne pas utiliser l‘appareil avec une minuterie externe, une multiprise ou une prise de courant télécommandée pour éviter tout risque d‘incendie.
• Ne pas débrancher l‘appareil en tirant sur le cordon d’alimentation. Tirer sur la che d’alimentation
en la tenant fermement.
• Ne pas faire passer le cordon d’alimentation au-dessus de matières inammables et le disposer de
telle manière à ce qu’il ne fasse trébucher personne.
• Ne pas introduire d’objet dans les ouvertures d’aération, cela pourrait endommager l’appareil.
Veiller à ne pas bloquer les ouvertures d’aération pendant le fonctionnement de l’appareil. Ne pas
installer l’appareil sur des surfaces souples, comme par exemple une couverture de lit, car cela
pourrait bloquer les ouvertures d’aération.
• Ne pas laisser l’appareil en marche sans surveillance et le débrancher après utilisation, avant de
le nettoyer ou de le déplacer.
14
Page 15

• Les cheveux, les rideaux, les nappes de table ou les vêtements doivent être tenus à l’écart du
ventilateur pendant son fonctionnement pour éviter qu’ils ne soient aspirés dans l’entrée d’air.
• Ne pas installer l’appareil à proximité de matières inammables ou chimiques.
• Utiliser l’appareil uniquement à l’intérieur.
• Cet appareil n’est pas adapté pour les environnements humides, comme par exemple les salles de
bains. Installer l’appareil de sorte à ce qu’il ne puisse pas tomber dans une baignoire ou dans un
conteneur d’eau.
• Ne pas utiliser l’appareil en extérieur et ne pas le placer près de fenêtres ou à la lumière directe du soleil.
• Installer l’appareil sur une surface plane et solide avant de l’utiliser. L’appareil doit toujours se
dresser d’aplomb sur son socle.
• Pour éviter toute électrocution, débrancher l’appareil avant de le nettoyer.
• Si le cordon d‘alimentation est endommagé, il doit être remplacé par le fabricant, une entreprise
spécialisée habilitée ou une personne présentant une qualication analogue.
• Ne pas couvrir l’appareil pour empêcher qu’il ne surchauffe.
Aperçu de l’appareil
Montage et mise en marche
1 Sortir l’appareil du carton, enlever le revêtement en plastique et dérouler le câble.
2. Installer le socle sous le ventilateur :
A B C D
Retirer les 3 vis à
ailettes du dessous du
ventilateur.
3. Installer l’appareil sur une surface plane, dure et sèche.
Faire passer le cordon
d’alimentation entre
les deux moitiés du
socle et assembler les
deux moitiés.
Introduire la base du
ventilateur dans le
socle en alignant les
trous de vissage. Fixer
le socle avec les 3 vis
à ailettes.
Fixer le cordon
d’alimentation aux
deux attaches et le
faire passer le long du
conduit de câble.
Page 16

4. Brancher l’appareil à la prise et le mettre en marcher. Le voyant lumineux bleu s’illumine et un
bip sonore retentit.
Remarque : la télécommande nécessite une pile. Pour installer la pile bouton ou la remplacer, ap-
puyer vers l’intérieur sur le clip situé à l’arrière de la télécommande et retirer le rabat. Insérer la pile
et refermer le rabat.
Utilisation et touches de commande
Touches de commande
L’appareil dispose de 4 touches de commande. Les touches se trouvent sur le panneau de commande
sur le dessus du ventilateur ainsi que sur la télécommande.
Appuyer plusieurs fois sur la touche « Timer » pour programmer le minuteur par paliers de 1 heure. Lorsque le minuteur
indique 7, la prochaine pression sur cette touche fait repasser
l’afchage à 0. Les autres touches peuvent être utilisées même
lorsque le minuteur est actif.
Le ventilateur fonctionne par défaut à vitesse basse (L). Appuyer plusieurs fois sur cette touche pour régler la vitesse
sur Intermédiaire (M) ou Haute (H). Le témoin lumineux de
l’afchage indique la vitesse sélectionnée.
Appuyer sur la touche « OSC » pour activer la fonction de rotation. Appuyer de nouveau sur cette touche pour désactiver
cette fonction.
Appuyer sur la touche marche/arrêt pour mettre l’appareil en
marche. Le témoin lumineux de vitesse indique que le ventilateur tourne à vitesse basse. Appuyer de nouveau sur cette
touche pour éteindre le ventilateur.
Comment utiliser le ventilateur
1. Brancher l’appareil à une prise électrique et appuyer sur la touche « Power » (marche/arrêt).
2. Choisir une vitesse en appuyant plusieurs fois sur la touche « Speed ».
3. Au besoin, appuyer sur la touche « OSC » pour activer la fonction de rotation.
4. Au besoin, appuyer sur la touche « Timer » et sélectionner le temps du minuteur.
5. Pour éteindre l’appareil, appuyer sur la touche « Power » (marche/arrêt).
Nettoyage et entretien
Important : pour éviter toute électrocution, débrancher l’appareil de la prise électrique et ne jamais
le plonger entièrement dans l’eau.
• Nettoyer l’appareil au moins une fois par mois pour enlever les dépôts de poussière.
• Nettoyer les surfaces de l’appareil avec une éponge humide et douce. S’assurer que l’appareil est
complètement sec avant de le rebrancher.
• Pour nettoyer l’appareil, ne pas utiliser d’essence, de diluant ou de détergent puissant ou équiva-
lent an de ne pas l’endommager.
16
Page 17

• Ouvrir la protection à l’arrière de l’appareil et retirer le ltre. Le laver sous un let d’eau et le sé-
cher minutieusement. Ouvrir la protection uniquement dans ce but et non à d’autres ns.
• Entreposer l’appareil avec son mode d’emploi dans un endroit sec et frais.
Information sur le recyclage
Vous trouverez sur le produit l’image ci-contre (une poubelle sur roues, barrée d‘une
croix), ce qui indique que le produit se trouve soumis à la directive européenne
2002/96/CE. Renseignez-vous sur les dispositions en vigueur dans votre région concernant la collecte séparée des appareils électriques et électroniques. Respectez-les
et ne jetez pas les appareils usagés avec les ordures ménagères. La mise au rebut
correcte du produit usagé permet de préserver l’environnement et la santé. Le recyclage des matériaux contribue à la préservation des ressources naturelles.
Ce produit contient des piles qui sont soumises à la directive européenne 2006/66/CE selon laquelle
elles ne doivent pas être éliminées avec les ordures ménagères. Renseignez-vous sur les dispositions
en vigueur concernant la mise en rebut séparée des piles. La mise en rebut correcte du produit usagé
permet de préserver l’environnement et la santé.
Déclaration de conformité
Fabricant : Chal-Tec GmbH, Wallstraße 16, 10179 Berlin, Allemagne.
Ce produit est conforme aux directives européennes suivantes :
2012/206/UE (ErP)
2004/108/CE (CEM)
2011/65/UE (RoHS)
2006/95/CE (LVD)
17
 Loading...