

Page 1

10027094 10027095 10032201
Mikrowelle
Microwave
Microondas
Micro-onde
Microonde
Page 2

Page 3
3
DE
Sehr geehrter Kunde,
wir gratulieren Ihnen zum Erwerb Ihres Gerätes. Lesen Sie die folgenden Hinweise
sorgfältig durch und befolgen Sie diese, um möglichen Schäden vorzubeugen. Für
Schäden, die durch Missachtung der Hinweise und unsachgemäßen Gebrauch entstehen,
übernehmen wir keine Haftung. Scannen Sie den QR-Code, um Zugriff auf die aktuellste
Bedienungsanleitung und weitere Informationen rund um das Produkt zu erhalten.
INHALTSVERZEICHNIS
Sicherheitshinweise4
Geräteübersicht und Bedienfeld6
Bedienung und Funktionen7
Geeignetes Geschirr15
Anwendungs-Tipps16
Kindersicherung17
Reinigung und Pege17
Hinweise zur Entsorgung18
TECHNISCHE DATEN
Artikelnummer 10027094, 10027095, 10032201
Stromversorgung 230 V ~ 50 Hz
KONFORMITÄTSERKLÄRUNG
Hersteller:
Chal-Tec GmbH, Wallstraße 16, 10179 Berlin, Deutschland.
Dieses Produkt entspricht den folgenden Europäischen
Richtlinien:
2014/30/EU (EMV)
2014/35/EU (LVD)
2011/65/EU (RoHS)
2009/125/EG (ErP)
English 19
Español 35
Français 51
Italiano 76
10027094
10027095
10032201
Page 4

4
DE
SICHERHEITSHINWEISE
Lesen Sie sich alle Hinweise sorgfältig durch und bewahren Sie die Bedienungsanleitung
zum Nachschlagen gut auf. Um die Gefahr eines Stromschlags bei einer Störung oder
Fehlfunktion zu verringern, muss das Gerät an eine geerdete Steckdose angeschlossen
werden. Schließen Sie das Gerät nur an Steckdosen an, die der angegeben Spannung
des Geräts entsprechen.
Um die Gefahr von Bränden im Garraum zu reduzieren:
• Überhitzen Sie das Essen nicht.
• Entfernen Sie Metallverschlüsse und Klammern von Papier- oder Plastiktüten, bevor
Sie sie in Mikrowelle legen.
• Erhitzen Sie kein Öl oder Frittierfett in der Mikrowelle, da sich die Temperatur nur
schwer kontrollieren lässt.
• Reinigen Sie die Mikrowelle nach jeder Benutzung mit einem feuchten Lappen und
wischen Sie mit einem trockenen Lappen nach, um Schmutz und Fettspritzer zu
entfernen. Angesammelte Schmutzreste könnten sich überhitzen und entzünden.
• Sollten sich Materialien in der Mikrowelle entzünden oder rauchen, lassen Sie die
Mikrowellentür geschlossen, schalten Sie das Gerät aus und entfernen Sie den Stecker.
• Wenn Sie Essen in Plastikbehältern erhitzen lassen Sie es nicht aus den Augen, falls
sich das Essen entzündet.
Um die Explosionen oder nachträglichem Sieden vorzubeugen:
• Erhitzen Sie Flüssigkeiten nicht in verschlossenen Behältern, da diese zur Explosion
neigen. Dazu zählen auch Babyäschchen mit einem Schaubverschluss.
• Benutzen Sie zum Kochen Gefäße mit einer weiten Öffnung und entfernen Sie
heiße Flüssigkeiten nicht sofort. Warten sie etwas, bis Sie sie aus der Mikrowelle
entnehmen, damit Sie sich nicht an nachträglich siedenden Flüssigkeiten verbrühen.
• Kartoffeln, Würstchen und Maronen sollten vor dem Erhitzen geschält oder
eingeschnitten werden. Rohe und hartgekochte Eier in der Schale dürfen nicht in der
Mikrowelle gegart werden, da Sie selbst nach dem Erhitzen noch explodieren können.
• Mischen Sie den Inhalt von Babyäschchen und Gläsern mit Babybrei gut durch
und überprüfen Sie vor dem Füttern die Temperatur, um Verbrennungen zu
vermeiden.
• Falls das Netzkabel beschädigt ist, muss es vom Hersteller, einem autorisierten
Fachbetrieb oder einer ähnlich qualizierten Person ersetzt werden.
• Nach dem Kochen ist der verwendete Behälter sehr heiß. Benutzen Sie
Ofenhandschuhe, wenn Sie ihn entnehmen, damit sie sich nicht an austretendem
Wasserdampf verbrühen.
• Öffnen Sie Deckel von Essen und Popcorntüten auf der von ihnen abgewandten
Seite, damit sie sich nicht ihr Gesicht verbrennen.
Page 5

5
DE
Um den Drehteller vor Glasbruch zu schützen:
• Lassen Sie den Drehteller abkühlen, bevor Sie ihn reinigen.
• Stellen Sie kein heißes Essen oder heiße Behälter auf den kalten Drehteller.
• Stellen Sie kein gefrorenes Essen oder gefrorene Behälter auf den heißen Drehteller.
Allgemeine Sicherheitshinweise
• Achten Sie darauf, dass das Kochgeschirr die Wände der Mikrowelle nicht berührt.
• Benutzen Sie nur Behälter, die mikrowellentauglich sind.
• Verstauen Sie kein Essen oder andere Dinge in der Mikrowelle.
• Benutzen Sie die Mikrowelle nicht ohne Inhalt, andernfalls könnte sie Schaden
nehmen.
• Wenn Sie die Mikrowelle benutzen, lassen Sie sie in Anwesenheit von Kindern nicht
unbeaufsichtigt.
• Benutzen Sie nur vom Hersteller angegebene Zubehörteile.
• Benutzen Sie die Mikrowelle nur in Innenräumen.
• Wenn die Tür oder die Dichtungen beschädigt sind, benutzen Sie die Mikrowelle
nicht weiter, sondern lassen Sie sie von einem Fachbetrieb reparieren.
• Versuchen Sie nicht das Gerät selbst zu reparieren. Reparaturen dürfen nur von
geschulten Fachkräften durchgeführt werden.
• Falls Rauch entsteht, ziehen Sie den Stecker und halten Sie die Tür der Mikrowelle
geschlossen, um mögliche Flammen zu ersticken.
• Das Erhitzen von Flüssigkeiten kann zu plötzlichem Sieden führen. Passen Sie auf,
wenn den Behälter entnehmen.
• Benutzen Sie zur Reinigung der Tür keine Scheuermittel oder Metallschaber, damit
sie das Glas nicht zerkratzen oder zersplittern.
• Benutzen Sie das Gerät nicht mit einem externen Timer oder einer ferngesteuerten
Steckdose.
• Das Gerät ist nicht für den kommerziellen Gebrauch, sondern nur für Gebrauch im
Haushalt und in ähnlichen Umgebungen vorgesehen.
• Das Gerät dient dazu Essen und Getränke zu erhitzen. Das Erwärmen von
Kleidung, Hausschuhen, Wärmekissen und Schwämmen kann zu Verletzungen,
Bränden oder Feuer führen.
• Kinder, physisch und körperlich eingeschränkte Menschen sollten das Gerät nur
benutzen, wenn sie vorher von einer Aufsichtsperson ausführlich mit den Funktionen
und den Sicherheitsvorkehrungen vertraut gemacht wurden. Achten Sie darauf,
dass Kinder nicht mit dem Gerät spielen.
• Verwenden Sie zur Reinigung keinen Dampfstrahler.
• Fassen Sie Geräteteile, Tür und Heizelemente im Inneren während des Betriebs
nicht an, sie können sehr heiß werden.
Page 6

6
DE
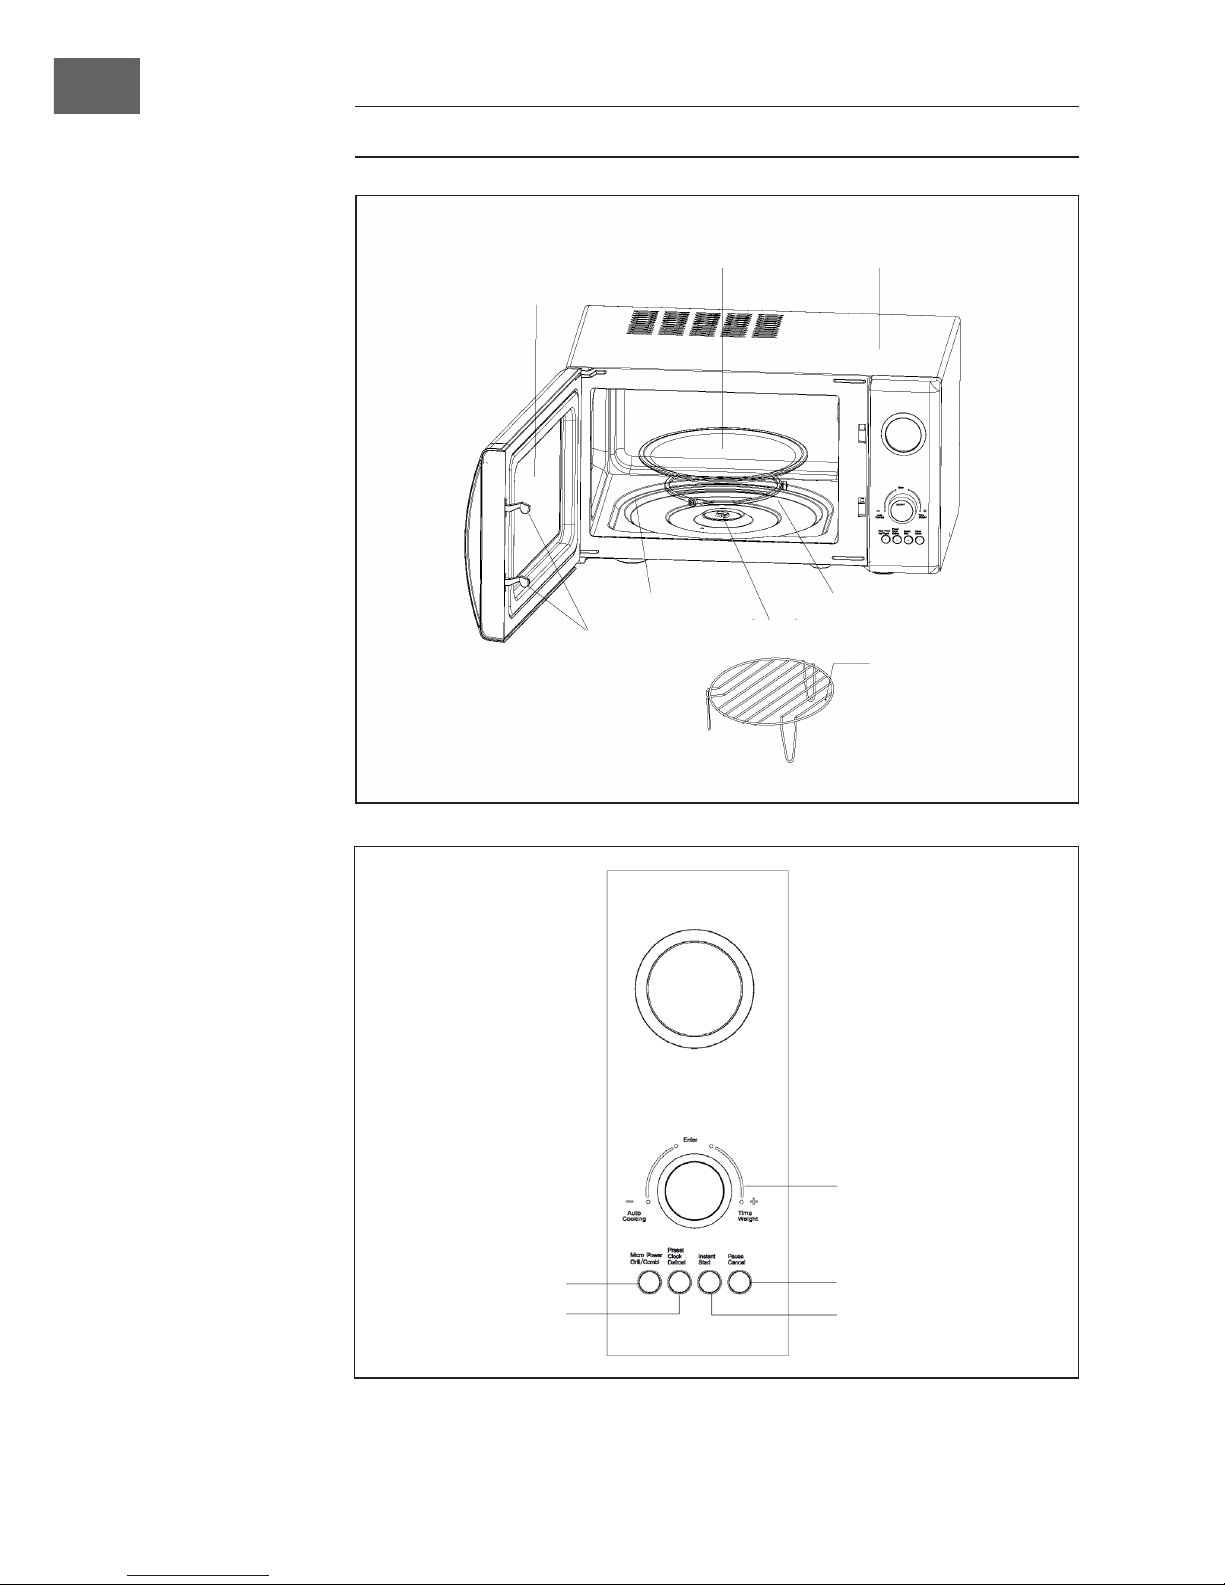
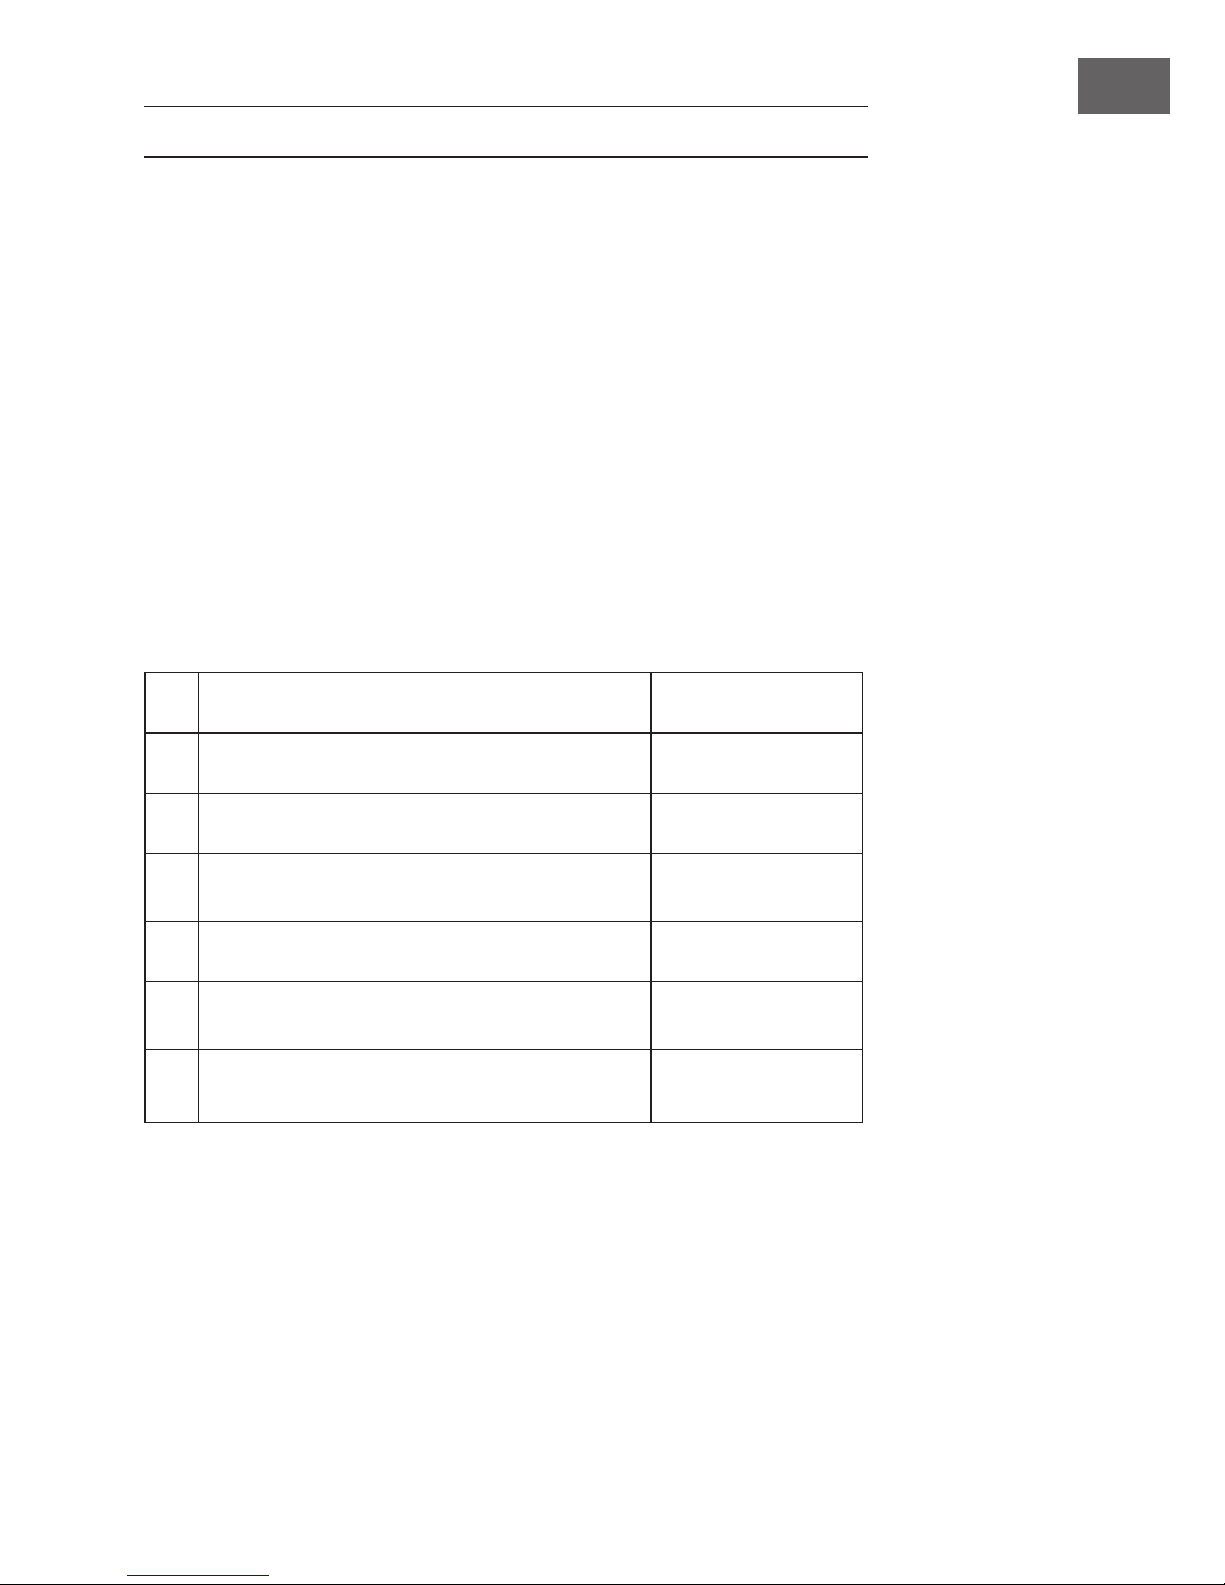
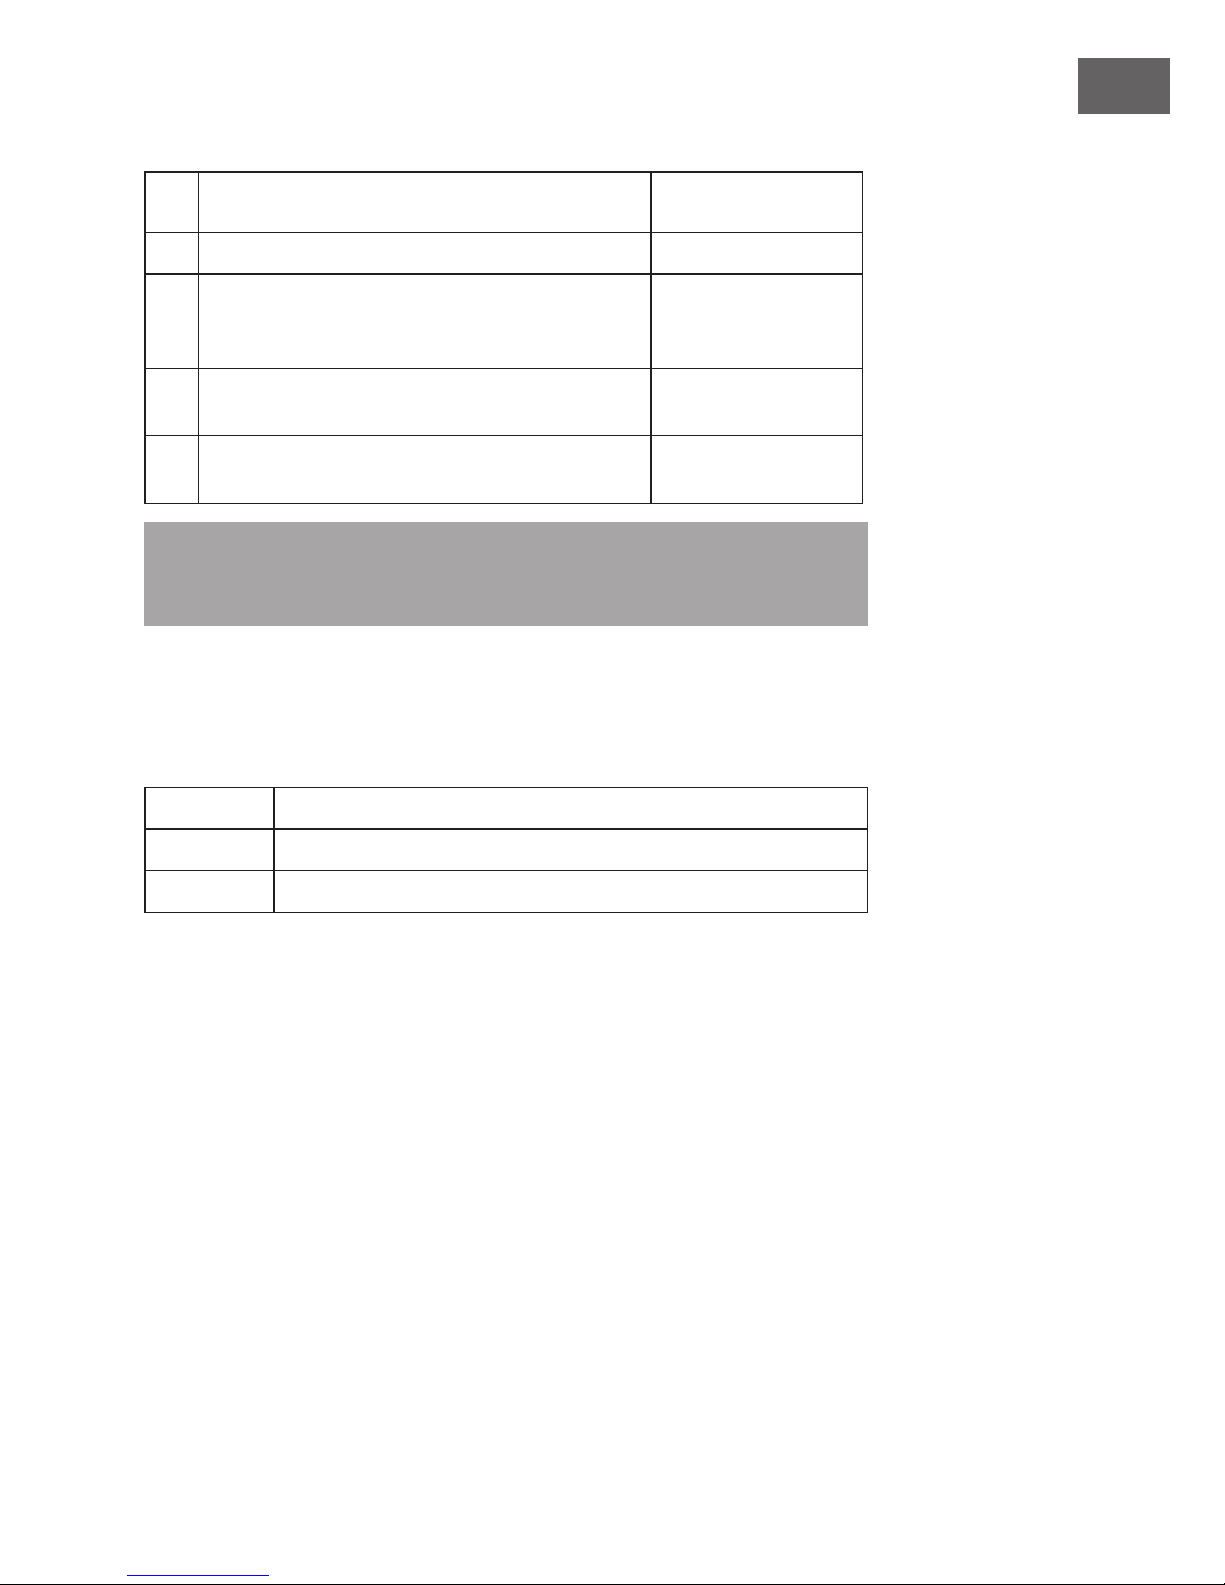
GERÄTEÜBERSICHT UND BEDIENFELD
Drehscheibe Gehäuse
Sichtfenster
Rotationsring
Gittergestell
Türverschluss
Vertiefung
Drehachse
Wählen Sie mit dem
Drehrad Kochdauer
und Gewicht aus
ODER das Auto-Menü
1x drücken: Kochvorgang
wird angehalten
2x drücken: Einstellungen
werden verworfen
Einstellen der Leistung
Einstellen der Uhrzeit
ODER Defrost-Menü
Start
Page 7

7
DE
BEDIENUNG UND FUNKTIONEN
Nach dem Einstecken des Netzsteckers blinkt das LED-Lämpchen dreimal. Anschließend
blinkt auf dem Display fortwährend „:“. Sie können nun die Auswahl des Programmes
sowie die Zeiteinstellung vornehmen.
1. Signalton
Sobald das eingestellte Programm absolviert wurde, erscheint auf dem Display „END“
und 3 Pieptöne ertönen. Sofern Sie nicht „Pause“ oder die „Cancel“-Taste drücken oder
die Gerätetür öffnen, ertönt der Signalton im 3-Minuten-Takt.
2. Zeiteinstellungen
Sie können mit den Tasten „Preset“ „Clock“ und „Defrost“die aktuelle Zeit bzw. die
Programmlaufzeit einstellen.
Beispiel: Zeit-Einstellung auf 12:30
Schritte Displayanzeige
1
Anzeige blinkt nach dem Einschalten.
:
2
Halten Sie die Taste Preset Clock Defrost für 3
Sekunden gedrückt.
0:00
3
Wählen Sie mit dem Auto Cooking/Time Weight –
Drehrad die gewünschte Stunde aus.
12:00
4
Drücken Sie nochmals kurz die Taste Preset Clock
Defrost.
12:00
5
Wählen Sie mit dem Auto Cooking/Time Weight
Drehknopf die gewünschte Minute aus.
12:30
6
Drücken Sie nochmals kurz die Taste Preset Clock
Defrost oder warten Sie 5 Sekunden damit die
Auswahl übernommen wird.
Page 8

8
DE
3. Mikrowellen-Leistung und Grill-Funktion
Mit dieser Funktion können Sie die Einstellungen für das Kochen oder Grillen von
Lebensmitteln vornehmen. Drücken Sie die Micro Power Grill/Combi – Taste, worauf
auf der LED-Anzeige wechselweise 100P-80P-60P-40P-20P-G-C.1-C.2 erscheint.
100P
Hohe Leistung — 100% Mikrowellenleistung. Geeignet für schnelles
und vollständiges
Erhitzen.
80P
Mittelhohe Leistung — 80% Mikrowellenleistung. Geeignet für
mittelschnelles Erhitzen.
60P
Mittlere Leistung — 60% Mikrowellenleistung. Geeignet zum Erwärmen
von Gerichten.
40P
Mittlere bis niedrige Leistung — 40% Mikrowellenleistung. Geeignet
zum Auftauen gefrorener Lebensmittel.
20P
Niedrige Leistung — 20% Mikrowellenleistung. Geeignet zum
Warmhalten von Gerichten.
G
Grill-Funktion: das Heizelement wird während der ausgewählten
Dauer aufgeheizt. Geeignet zum Grillen von dünnen Fleischscheiben,
Würsten oder Chicken Wings. Mit der Grillfunktion erzielen Sie nach
Wunsch eine goldbraune Färbung.
C1
Kombination von Grill und Mikrowelle. 30% Mikrowellenbetrieb und
zu 70% der eingestellten Dauer wird der Grillmodus aktiviert.
C2
Kombination von Grill und Mikrowelle. 55% Mikrowellen-Betrieb und
zu 45% der eingestellten Dauer wird der Grillmodus aktiviert.
Wichtige Hinweise:
• Nehmen Sie das Gerät niemals ohne Inhalt in Betrieb.
• Wenn Sie das Essen während des Betriebes wenden, drücken Sie 1x kurz die
Instant Start – Taste, um das ausgewählte Programm fortzusetzen.
• Falls Sie das Essen vor dem programmierten Ende entnehmen möchten, drücken
Sie 1x die Pause Cancel – Taste, um das gewählte Programm zu beenden und
eine versehentliche Fortsetzung des Programms ei der nächsten Anwendung zu
vermeiden.
Page 9
9
DE
Beispiel: 10 Minuten Mikrowellenbetrieb im P80 – Programm
Schritte Displayanzeige
1
Anzeige blinkt nach dem Einschalten.
:
2
Wählen Sie die gewünschte Mikrowellenleistung
durch mehrmaliges Drückder der Power Grill /
Combi – Taste.
80P
3
Wählen Sie die gewünschte Programmdauer mittels
des Auto Cooking /Time Weight Drehknopfs aus.
10:00
4
Drücken Sie die Instant.Start – Taste. Auf der
Anzeige wird daraufhin die verbleibende Laufzeit
angezeigt.
Hinweis: Sie können die Programmlaufzeit während des Betriebes ändern. Es wird
zudem empfohlen, das Essen nach der Hälfte der Laufzeit zu wenden. Drücken Sie
1x die Taste Instant Start um das Programm fortzusetzen.
4. Auftaufunktion
Mit dieser Funktion können Sie tiefgefrorene Lebensmittel auftauen. Drücken Sie die
Taste Preset Clock Defrost. Auf der Anzeige wird daraufhin abwechselnd d.1, d.2 und
d.3 angezeigt.
d.1
Zum Auftauen von Fleisch - Gewicht von 0,1 bis zu 2kg.
d.2
Zum Auftauen von Geügel - Gewicht von 0,2 bis zu 3kg
d.3
Zum Auftauen von Meeresfrüchten - Gewicht von 0,1 bis zu 0,9kg.
Wichtige Hinweise:
• Wenden Sie die Lebensmittel während des Vorganges um ein gleichmäßiges
Ergebnis zu erzielen.
• Das Auftauen von Lebensmitteln dauert in der Regel länger als das Erhitzen.
• Sobald Sie die aufzutauenden Lebensmittel mühelos mit einem Messer schneiden
können, ist der Auftauprozess abgeschlossen.
• Die Mikrowellen können bei den meisten Lebensmitteln ca. 4 cm tief eindringen.
• Aufgetaute Lebensmittel sollten so schnell wie möglich verzehrt werden und nicht
wieder eingefroren werden.
Page 10

10
DE
Beispiel: Auftauen von 400 g Geügel
Schritte Displayanzeige
1
Anzeige blinkt nach dem Einschalten.
:
2
Drücken Sie mehrmals die Taste Preset Clock Defrost
bis Sie bei der gewünschten Fleischart angekommen
sind.
d.2
3
Wählen Sie mit dem Auto Cooking /Time – Drehrad
das Gewicht der aufzutauenden Lebensmittel.
0.4
4
Starten Sie das Programm durch Drücken der Instant
Start – Taste.
5:16
5
Nach der Hälfte der Laufzeit ertönt 2x der
Signalton. Wenden Sie nun die aufzutauenden
Lebensmittel, um ein ideales Ergebnis zu erzielen.
Öffnen Sie die Tür wenden Sie die Lebensmittel.
Schließen Sie daraufhin die Tür und drücken Sie
nochmals die Instant Start – Taste um das
Auftauprogramm fortzusetzen.
5. Auto-Programm
Das Gerät verfügt über Standard-Programme für einfache Bedienung. Drehen Sie bei
blinkender LED-Anzeige den Auswahlknopf gegen den Uhrzeigersinn, woraufhin die
Programme A.1, A.2 bis A.12 angezeigt werden. Wählen Sie das gewünschte AutoProgramm mit der Enter – Taste und wählen Sie jetzt das Gewicht des Gerichtes.
Wählen Sie das passende Menü entsprechend Art und Gewicht der Lebensmittel und
beachten Sie die Angaben in der Tabelle auf der nächsten Seite, für ein optimales
Ergebnis.
Page 11

11
DE
Display Art Gewicht
A.1
Popcorn
2 Optionen (3.0Oz [ca. 85g] und 3.5Oz
[ca. 100g])
A.2
Kartoffeln
2 Auswahlmöglichkeiten (0.45kg und
0.65kg)
A.3
Gemüse 5 Optionen (0,1 – 0,2 ------ 0,5 kg)
A.4
Fleisch 6 Optionen (0,2 – 0,3 ------ 0,7 kg)
A.5
Fisch 6 Optionen (0,2 – 0,3 ------ 0,7 kg)
A.6
Geügel 6 Optionen (0,2 - 0,3 ------ 0,7 kg)
A.7
Aufwärmen 5 Optionen (0,2 – 0,4 ------ 1.0 kg
A.8
Getränke 2 Optionen (250ml und 500ml)
A.9
Reis 5 Optionen (0,1 - 0,2 ------ 0,5 kg)
A.10
Pasta
5 Optionen (0,1 - 0, 2 ------ 0 kg)
A . 11
Brot
5 Optionen (0,1 - 0,2 ------ 0,5 kg)
A. 12
Pizza
2 Optionen (1 Stück und 2 Stücke)
Wichtige Hinweise:
• Wenn Sie im Standy-Modus den Drehknopf als erstes entgegen des Uhrzeigersinns
drehen, gelangen Sie zur Einstellung der Auto-Programme. Drehen Sie den
Drehknopf zunächst im Uhrzeigersinn, gelangen Sie zu den Zeit-Einstellungen bei
der Standard-Einstellung „100% Mikrowellenleistung“.
• Die vorgegebene Laufzeit bei den Auto-Programmen basiert auf einer Temperatur
der Lebensmittel vor dem Erhitzen von 20-25° C. Höhere oder niedrigere
Temperaturen beeinussen die tatsächlich benötigte Laufzeit.
• Das Ergebnis hängt maßgeblich von Temperatur, Gewicht und Zustand der
verwendeten Lebensmittel ab. Passen Sie die Programmlaufzeit an, wenn Sie
Abweichungen von der oben aufgeführten Liste bemerken.
Page 12
12
DE
Beispiel: Aufwärmen von 400 g Fisch
Schritte Displayanzeige
1
Anzeige blinkt nach dem Einschalten.
:
2
Drehen Sie den Auswahlknopf entgegen dem
Uhrzeigersinn bis zum gewünschten AutoProgramm.
A.5
3
Wählen Sie das Programm durch Drücken der
Enter-Taste.
A.5
4
Bestimmen Sie mit dem Auto Cooking /Time
Weight-Drehknopf das Gewicht.
0.4
5
Starten Sie das Programm durch Drücken der
Instant.Start-Taste.
10:00
6. Programmierter Start
Wenn Sie ein Programm nicht sofort sondern zu einer festgelegten Zeit starten wollen,
können Sie mit dieser Funktion das gewünschte Programm und die gewünschte Startzeit
vorwählen wodurch das ausgewählte Programm zur vorgegebener Zeit automatisch
startet. Die Auswahl besteht aus zwei Schritten: Einstellen der aktuellen Zeit. Einstellen
des Programmes und Laufzeit.
Page 13
13
DE
Beispiel: Jetzt ist es 12:30 Uhr, wenn Sie hoffen, dass die Mikrowelle
automatisch mit 100P Mikrowellenleistung für 9 Minuten und 30 Sekunden um
14:20 Uhr kocht.
Schritte Displayanzeige
1
Anzeige blinkt nach dem Einschalten.
:
1.1
Halten Sie die Preset Clock Defrost – Taste für drei
Sekunden gerückt
0:00
1.2
Wählen Sie die Stunde der aktuellen Uhrzeit mittels
des Auto Cooking /Time Weight – Drehknopfes.
12:00
1.3
Drücken Sie die Preset Clock Defrost – Taste erneut
um die Stunden-Auswahl zu
bestätigen.
12:00
1.4
Wählen Sie nun die Minuten der aktuellen Uhrzeit
mit dem Auto Cooking /Time Weight – Drehknopf.
12:30
1.5
Drücken Sie 1x die Preset Clock Defrost – Taste
oder warten Sie 5 Sekunden um die Eingabe zu
bestätigen.
12:30
2
Wählen Sie das Programm und die Laufzeit.
2.1
Wählen Sie die Mikrowellenleistung durch Drücken
der Taste Micro Power Grill/Combi.
100P
2.2
Wählen Sie die Laufzeit durch Drehen des Auto
Cooking /Time Weight – Drehknopfes.
9:30
2.3
Drücken und Halten Sie die Preset Clock Defrost –
Taste für 3 Sekunden um zur
aktuellen Uhrzeit zu gelangen.
3
Stellen die gewünschte Startzeit wie bei den
Schritten 1.2, 1.3 und 1.4 ein.
4
Drücken Sie die Preset Clock Defrost - Taste um
das zeitverzögerte Programm zu bestätigen.
Das Programm wurde nun aktiviert und wird zur
programmierten Zeit ausgeführt.
5
Sie können die eingestellte Startzeit durch Drücken
der Preset Clock Defrost - Taste überprüfen.
Page 14

14
DE
7. Multi-Sequenz-Modus
Manche Rezepte verlangen nach verschiedenen Koch-Modi und Zeiteinstellungen
um das beste Ergebnis zu erzielen. Sie können Ihr personalisiertes Programm wie folgt
zusammestellen:
Beispiel: Sie wollen Ihr Gericht für 3 Minuten mit 100% Mikrowellenleistung
erhitzen und anschließend für 9 Minuten grillen. In diesem Fall handelt es sich
um eine 2-Sequenz-Programmierung.
Schritte Displayanzeige
1
100% Mikrowellenleistung für 3 Minuten
1.1
Drücken Sie die Micro Power Grill/Combi - Taste
um die Mikrowellenleistung
auszuwählen.
100P
1.2
Wählen Sie die Laufzeit mittels dem Auto Cooking/
Time Weight – Drehknopf.
3:00
2
Grillen für 9 Minuten
2.1
Wählen Sie das gewünschte Programm mit der
Micro Power Grill/Combi – Taste.
G
2.2
Wählen Sie die gewünschte Laufzeit mit dem Auto
Cooking /Time Weight -
Drehknopf.
9:00
3
Starten Sie das Programm durch Drücken der Instant
Start -Taste.
Wichtige Hinweise:
• Sobald das Mikrowellen-Programm beendet ist, wird das Gerät automatisch die
Grillfunktion einschalten.
• Es können bis zu vier Programmsequenzen eingestellt werden. Gehen Sie dabei wie
oben beschrieben vor.
Page 15

15
DE
GEEIGNETES GESCHIRR
Grundsätzlich sind Behälter und Geschirr aus hitzeresistentem Keramik, Glas oder
Kunststoff für Mikrowellen geeignet.
Hinweis: Verwenden Sie niemals Gegenstände aus Metall im Mikrowellen- oder im
Kombi-Betrieb.
Material Mikro Grill Kombi Anmerkung
Hitzebeständiges
Keramik
Ja Ja Ja
Benutzen Sie keine
Keramikgegenstände
mit Metallverzierungen.
Hitzebeständiger
Kunststoff
Ja Nein Nein
Nicht für längeren
Mikrowellen-Betrieb
geeignet.
Hitzebeständiges
Glas
Ja Ja Ja
Kunststofffolie Ja Nein Nein
Sollte nicht zum Erhitzen
von Fleisch verwendet
werden.
Grillrost Nein Ja Ja
Metallbehälter Nein Nein Nein
Nicht im Mikrowellengerät zu verwenden.
Metall kann nicht von
Mikrowellen durchdrungen
werden.
Lackfolie Nein Nein Nein
Schlechte Hitzebeständigkeit. Nicht für hohe
Temperaturen geeignet.
Holz Nein Nein Nein
Schlechte Hitzebeständigkeit. Nicht für hohe
Temperaturen geeignet.
Page 16

16
DE
ANWENDUNGS-TIPPS
Beachten Sie folgende Hinweise um optimale Resultate zu erzielen:
Anordnung der Speisen im Gerät:
Legen Sie dickere Teile Ihrer Speisen an den Rand des Drehtellers und dünnere Teile
in die Mitte. Verteilen Sie die Speisen gut und legen Sie sie nach Möglichkeit nicht
übereinander.
Programmlaufzeit:
Wählen Sie zunächst besser eine kürzere Laufzeit. Überprüfen Sie das Ergebnis nach
Ablauf und verlängern Sie die Laufzeit falls nötig. Zu lange Laufzeiten kann zu Rauchoder Feuerentwicklung und generell zu einem schlechten Ergebnis führen.
Gleichmäßiges Erhitzen der Speisen:
Speisen wie Hühncheneisch, Steaks oder andere Fleischscheiben sollten während
der Zubereitung gewendet werden. Abhängig von der Art der Lebensmittel ist es
empfehlenswert, die Speisen ein- oder zweimal während der Zubereitung vom Rand hin
zur Mitte des Drehtellers zu verlagern.
Abkühlen lassen:
Lassen Sie die Speisen während des vollständigen Programmablaufs im Gerät und
lassen Sie sie vor der Entnahme leicht abkühlen.
Überprüfen des Gar-Zustandes:
Sowohl die Farbe als auch die Konsistenz der Speisen geben Aufschluss darüber, ob
die Lebensmittel vollständig gar bzw. erhitzt ist. Anzeichen hierfür sind z.B.:
• Von allen Teilen der Speisen entströmt Dampf und nicht nur von vereinzelten Ecken.
• Von Geügel lassen sich Knochen leicht lösen.
• Es sind keine Blutreste zu sehen bei Schweineeisch oder Geügel.
• Zubereiteter Fisch ist nicht mehr glasig und lässt sich leicht mit einer Gabel zerteilen.
Hinweis zu Kunststoffgeschirr:
Um Schäden am Drehteller bzw. am Drehring zu vermeiden, legen Sie bitte einen
hitzebeständigen Teller aus Porzellan o.Ä. unter, wenn Sie Kunststoffgeschirr bzw. kein
hitzebeständiges Material im Gerät verwenden.
Hinweis zu Kochbeuteln aus Kunststoff:
Achten Sie bei der Zubereitung von von Lebensmitteln mit einem hochen Fettanteil in
einem dafür vorgesehenen Kochbeutel darauf, dass die Speisen möglichst nicht mit dem
Beutel in Kontakt geraten. Dieser könnte sonst schmelzen.
Hinweis zu Mikrowellengeschirr:
Manches für den Einsatz in Mikrowellen vorgesehene Geschirr kann für Speisen mit
hohem Fett- oder Zuckeranteil ungeeignet sein. Achten Sie zudem unbedingt darauf, die
angegebenen Heizzeiten des Geschirrs nicht zu überschreiten.
Page 17

17
DE
KINDERSICHERUNG
Mit dieser Funktion können Sie das Bedienpanel sperren – etwa bei der Reinigung oder
um zu verhindern, dass Kinder das Gerät unbeaufsichtigt bedienen. In diesem Modus
sind sämtliche Tasten deaktiviert.
1 Um die Kindersicherung zu aktivieren, drücken und halten Sie die Taste Pause/
Cancel für 3 Sekunden.
2 Um die Kindersischerung zu deaktivieren, drücken und halten Sie die Taste Pause/
Cancel für 3 Sekunden.
REINIGUNG UND PFLEGE
• Reinigen Sie das Gerät regelmäßig und entfernen Sie stets etwaige Essensreste
oder Spritzer.
• Schalten Sie das Gerät aus und ziehen den Netzstecker aus der Steckdose.
• Reinigen Sie das Innere des Gerätes mit einem milden, verdünnten Reinigungsmittel
sowie lauwarmen Wasser und einem weichen Tuch.
• Reinigen Sie die äußere Gehäuseoberäche mit einem milden, verdünnten
Reinigungsmittel sowie lauwarmen Wasser und einem weichen Tuch.
• Trocknen Sie innere und äußere Flächen mit einem weichen Tuch.
• Nutzen Sie keine üchtigen Mittel wie z.B. Insektensprays in Verbindung mit dem
Gerät.
• Nach längerer Anwendungsdauer können unangenehme Gerüche im Ofen
auftreten. Folgende Mittel könne Abhilfe schaffen:
• Legen Sie einige Zitronenscheiben in eine Tasse und schalten Sie das Gerät mit
voller Leistung für 2 bis 3 Minuten ein.
• Stellen Sie eine Tasse mit rotem Tee in das Gerät und schalten Sie dieses für 2 bis 3
Minuten bei voller Leistung ein.
• Legen Sie einige Stücke Orangenschale in das Gerät un schalten Sie dieses bei
voller Leistung für 2 bis 3 Minuten ein.
Page 18
18
DE
HINWEISE ZUR ENTSORGUNG
Bendet sich die linke Abbildung (durchgestrichene Mülltonne
auf Rädern) auf dem Produkt, gilt die Europäische Richtlinie
2012/19/EU. Diese Produkte dürfen nicht mit dem normalen
Hausmüll entsorgt werden. Informieren Sie sich über die
örtlichen Regelungen zur getrennten Sammlung elektrischer
und elektronischer Gerätschaften. Richten Sie sich nach
den örtlichen Regelungen und entsorgen Sie Altgeräte nicht
über den Hausmüll. Durch die regelkonforme Entsorgung
der Altgeräte werden Umwelt und die Gesundheit ihrer
Mitmenschen vor möglichen negativen Konsequenzen
geschützt. Materialrecycling hilft, den Verbrauch von
Rohstoffen zu verringern.
Page 19
19
EN
10027094
10027095
10032201
Dear Customer,
Congratulations on purchasing this equipment. Please read this manual carefully and
take care of the following hints to avoid damages. Any failure caused by ignoring the
mentioned items and cautions mentioned in the instruction manual are not covered by our
warranty and any liability. Scan the QR code to get access to the latest user manual and
other information about the product.
CONTENT
Safety Instructions20
Overview and Control Panel22
Operation and Functions23
Suitable Dishes31
Cooking Tips32
Child Lock Function33
Hints on Disposal34
TECHNICAL DATA
Item number 10027094, 10027095, 10032201
Power supply 230 V ~ 50 Hz
DECLARATION OF CONFORMITY
Producer:
Chal-Tec GmbH, Wallstraße 16, 10179 Berlin, Germany.
This product is conform to the following European
Directives:
2014/30/EU (EMC)
2014/35/EU (LVD)
2011/65/EU (RoHS)
2009/125/EC (ErP)
Page 20

20
EN
SAFETY INSTRUCTIONS
Read all the safety and operating instructions carefully and retain them for future
reference. Make sure the voltage in your living area corresponding to the one shown on
the rating label of the appliance. And the wall socket is properly grounded.
To reduce the risk of re in the oven cavity:
• Do not overcook the food.
• Remove wire twist ties from paper or plastic bags before placing bags in the oven.
• Do not heat oil or fat for deep drying as the temperature of oil cannot be controlled.
• After use wipe the waveguide cover with a damp cloth, followed by dry cloth to
remove any food splashes and grease.
• Built up grease may overheat and begin to cause smoke or catch re.
• If materials inside the oven should smoke or ignite, keep oven door closed, turn
oven off and disconnect the power supply.
• When heating food in plastic or paper containers, keep an eye on the oven due to
the possibility of ignition.
To reduce the risk of explosion and sudden boiling:
• Liquids and other foods must not be heated in sealed container since they are liable
to explode; Baby bottles tted with a screw cap or teat are considered to be sealed
containers.
• Use the wide mouthed container to cook liquid, and the cooked liquid should not
be removed out immediately. Several moments should be waited before removing.
In order to avoid possible hazards caused by delayed eruptive boiling of liquids.
• Potatoes, sausage and chestnut should be peeled or pierced before cooking. Eggs
in their shell, whole hard boiled eggs should not be heated in microwave ovens
since they may explode, even after microwave heating has ended.
• The contents of feeding bottles and baby food jars are to be stirred or shaken and
the temperature is to be checked before consumption, in order to avoid burns.
• If the supply cord is damaged, it must be replaced by the manufacturer or its service
agent or a qualied technician in order to avoid a shock hazard.
• After cooking, the container is very hot. Using gloves to take out the food and avoid
steam burns by directing steam away from the face and hands.
• Slowly lift the furthest edge of dishes cover and microwave plastic wrap and
carefully open popcorn and oven cooking bags away from the face.
Page 21

21
EN
To prevent the turntable from breaking:
• Let the turntable cool down before cleaning.
• Do not place hot foods or utensils on the cold turntable.
• Do not place frozen foods or utensils on the hot turntable.
General Instructions
• Make sure the utensils do not touch the interior walls during cooking. Only use
utensils that are suitable for use in microwave ovens. Do not store food or any other
things inside the oven.
• Do not operate the oven without any liquid or food inside the oven. This would do
damage the oven.
• When the appliance is operated in the combination mode, children should only use
the oven under adult supervision due to the temperatures generated.
• Any accessories not recommended by the manufacturer may cause injuries to
persons.
• Do not use outdoors.
• If the door or door seals are damaged or the oven is malfunctioned, the oven must
not be operated until it has been repaired by a competent person;
• It is hazardous for anyone other than a competent person to carry out any service or
repair operation that involves the removal of a cover which gives protection against
exposure to microwave energy.
• If smoke is emitted, switch off or unplug the appliance and keep the door closed in
order to stie any ames.
• Microwave heating of beverages can result in delayed eruptive boiling; therefore
care must be taken when handling the container.
• Do not use harsh abrasive cleaners or sharp metal scrapers to clean the oven door
glass since they can scratch the surface, which may result in shattering of the glass.
• The appliances are not intended to be operated by means of an external timer or
separate remote control system.
• This appliance is intended to be used in household and similar applications, such
as: Staff kitchen areas in shops, ofces and other working environments; Farm
houses; By clients in hotels, motels and other residential environments; Bed and
breakfast type environments.
• The microwave oven is intended for heating food and beverages. Drying of food or
clothing and heating of warming pads, slippers, sponges, damp cloth and similar may
lead to risk of injury, ignition or re.
• This appliance can be used by children aged from 8 years and above and persons
with reduced physical, sensory or mental capabilities or lack of experience and
knowledge if they have been given supervision or instruction concerning use of the
appliance in a safe way and understand the hazards involved. Children shall not
play with the appliance.
• A steam cleaner is not to be used.
• The door or the outer surface may get hot when the appliance is operating.
• During use the appliance becomes hot. Care should be taken to avoid touching
heating elements inside the oven.
Page 22
22
EN
OVERVIEW AND CONTROL PANEL
Turntable Housing
Window
Rotating ring
Rack
Interlock
Cavity
Rotating axis
Turn the Rotary
encoder to select
cooking time and
weight OR select the
Auto menu
Press once: cooking stops
Press twice: settings are
discarded
Power setting
Setting the time OR
Defrost menu
Start
Page 23
23
EN
OPERATION AND FUNCTIONS
The LED ashes 3 times when plugged in power supply. Then it ashes “:”, prompting
you to input the cooking menu and time.
1. Auto reminder
When your preset cooking procedure have nished, the LED Display will show End and
three beeps sound will be heard to prompt you to take out food. If you do not press
Pause. Cancel button once or open the door, the beep will be sounded at an interval of
3 minutes.
2. Clock setting
Preset.Clock.Defrost button make it available for you to input current or preset time
when “:” ashes onto LED display after plugged in, or try to skip it over to continue if
unnecessary.
Example: to set 12:30
Steps Display
1
After power-up, the colon ashes
:
2
Hold Preset.Clock.Defrost button three seconds
0:00
3
Turn Auto Cooking/Time.Weight knob to set exact
hours.
12:00
4
Press Preset.Clock.Defrost button once again.
12:00
5
Turn Auto Cooking/Time.Weight knob to set exact
minutes.
12:30
6
Press Preset.Clock.Defrost button once again or wait
for 5 seconds, and the numbers will go steadily.
Page 24

24
EN
3. Microwave power and grill cooking
This function is for cooking or grilling food. Press Micro Power.Grill/Combi button, LED
cycles to show 100P—80P—60P—40P—20P—G—C.1—C.2
100P
High power—100% microwave power. Applicable for quick and
thorough cooking
80P
Medium High power—80% microwave power. Applicable for medium
express cooking
60P
Medium power—60% microwave power. Applicable for steaming
food
40P
Medium Low power—40% microwave power. Applicable for
defrosting food
20P
Low power— 20% microwave power. Applicable for keeping warm
G
Grill, the heat element will be energized during operation time. Which
is applicable for rolling thin meats or pork, sausage, chicken wing as
good brown color can be obtained
C1
Combination of Grill and microwave cooking. 30% of time microwave
output and 70% of time grilling
C2
Combination of Grill and microwave cooking. 55% of time microwave
output and 45% of time grilling
Important notes:
• Never operate the oven empty.
• If you turn the food during operation, press the Instant.Start button once and the
preset cooking procedure will continue.
• If you intend to remove the food before the preset time, you must press Pause.
Cancel button once to clear the preset procedure to avoid unintended operation of
next time use.
Page 25
25
EN
Example: To cook at P80 for 10 minutes.
Steps Display
1
After power-up, the colon ashes
:
2
Select the desired microwave power by pressing
Micro Power.Grill/Combi button
consecutively
80P
3
Set cooking time by turning Auto Cooking /Time.
Weight knob
10:00
4
Press Instant. Start button and LED will count down
to show running time.
Note: You may change the cooking time during cooking. And it is recommended
turning the food halfway, after you turn the food. Press Instant.Start button once to
continue.
4. Defrost
This function use for defrost food; press the Preset.Clock.Defrost button and the LED
display will cycle to show d.1 d.2 d.3.
d.1
For defrosting meat, the weight range from 0.1 to 2.0 kg.
d.2
For defrosting poultry, the weight range from 0.2 to 3.0kg.
d.3
For defrosting seafood, the weight range from 0.1 to 0.9kg.
Important notes:
• It is necessary to turn over the food during operation to obtain uniform effect.
• Usually defrosting will need longer time than that of cooking the food.
• If the food can be cut by knife, the defrosting process can be considered
completed.
• Microwave penetrates around 4cm into most food
• Defrosted food should be consumed as soon as possible, it is not advised to put
back to fridge and freeze again.
Page 26

26
EN
Example: To defrost 0.4 kg poultry
Steps Display
1
After power-up, the colon ashes
:
2
Press Preset.Clock.Defrost button to set the food kind.
d.2
3
Turn Auto Cooking /Time. Weight knob to set the
defrost weight
0.4
4
Start cooking by pressing Instant.Start button
5:16
5
In half way during defrosting 3 beep sound will be
heard two times to prompt you turn over the food.
Open the door and turn over the food. Then close
the door. Press Instant.Start button again to continue
defrosting
5. Auto cooking
The oven has default cooking menu for simple operation. When the LED ash colon, turn
the knob in a anticlockwise direction and LED will cycle to show A.1,A.2 …… A.12. After
setting auto cooking menu, pressing Enter button is available to set the cooking weight.
Choose the appropriate menu according to the food type and weight and strictly
observe the directions in below table, otherwise the cooking effect will be largely
inuenced.
Page 27

27
EN
Display Food Weight
A.1
Popcorn All together there are two choices (3.0 Oz and 3.5 Oz)
A.2
Potato All together there are two choices (0.45 kg and 0.65 kg)
A.3
Vegetable All together there are ve choices (0.1 0.2------0.5 kg)
A.4
Meat All together there are six choices (0.2 0.3------0.7 kg)
A.5
Fish All together there are six choices (0.2 0.3------0.7 kg)
A.6
Chicken All together there are six choices (0.2 0.3------0.7 kg)
A.7
Reheat All together there are ve choices (0.2 0.4------1.0 kg)
A.8
Beverage All together there are two choices (250 ml and 500 ml)
A.9
Rice All together there are ve choices (0.1 0.2------0.5 kg)
A.10
Pasta All together there are ve choices (0.1 0.2------0.5k g)
A . 11
Bread All together there are ve choices (0.1 0.2------0.5 kg)
A. 12
Pizza All together there are two choices (1 share and 2 share)
Important notes:
• In standby state, turn the knob in anticlockwise direction rstly to enter setting auto
cooking state, if the knob is turned in clockwise direction rstly, it will enter time
setting, and its default model is 100% micro power.
• The temperature of food before cooking would be 20-25℃. Higher or lower
temperature of the food before cooking would require increase or decrease of
cooking time.
• The temperature, weight and shape of food will largely inuence the cooking effect.
If any deviation has been found to the factor noted on above menu, you can adjust
the cooking time for best result.
Page 28

28
EN
Example: Steam 0.4kg sh
Steps Display
1
After power-up, the colon ashes
:
2
Turn the knob in anticlockwise to set the desired
cooking menu
A.5
3
Press Enter button to afrm
A.5
4
Turn Auto Cooking /Time. Weight knob to set the
weight
0.4
5
Start cooking by pressing Instant.Start button
10:00
6. Automatic starting (delayed function)
If you do not want the menu to be started immediately, you can preset the cooking menu
and time and the preset menu will be automatically started at your set time. The setting
will consist of 2 steps:
1 Setting the current Clock;
2 Setting the cooking menu and time.
Page 29

29
EN
Example: Now it is 12:30 Clock, if you hope that the microwave oven will
automatically start cooking with 100P microwave power for 9 minutes and 30
seconds at 14:20
Steps Display
1
After power-up, the colon ashes
:
1.1
Hold Preset.Clock.Defrost button three seconds
0:00
1.2
Set hours by turning Auto Cooking /Time. Weight
knob
12:00
1.3
Press Preset.Clock.Defrost button again to conrm
hours
12:00
1.4
Set minutes by turning Auto Cooking /Time. Weight
knob
12:30
1.5
Press Preset.Clock.Defrost button once or waiting for
5 seconds, and the numbers will go steady.
12:30
2
Set the cooking menu and time
2.1
Select cooking power by pressing Micro Power.
Grill/Combi button
100P
2.2
Turn Auto Cooking /Time. Weight knob to set
cooking time
9:30
2.3
Press and hold Preset.Clock.Defrost button for 3
seconds to return to current clock.
3
Set the time you expect to start. Repeat the steps of
1.2, 1.3, 1.4
4
Press Preset.Clock.Defrost button to conrm the
delayed menu. Now the
program has been activated. And the menu will be
started at 14:20.
5
You may check the preset starting time by pressing
Preset.Clock.Defrost
button.
Page 30

30
EN
7. Multi-sequence cooking
To obtain best cooking result, some recipes call for different cook mode and time. You
may program your personalized menu as follow:
Example: You want cook food with 100P microwave for 3 minutes then grill for
9 minutes. This is 2 sequence setting.
Steps Display
1
100P microwave for 3min
1.1
Press Micro Power. Grill/Combi button to select
power level.
100P
1.2
Turn Auto Cooking/Time. Weight knob to set
cooking time.
3:00
2
Grill for 9min
2.1
Press Micro Power.Grill/Combi button to select
desired grill menu
G
2.2
Turn Auto Cooking /Time. Weight knob to set
cooking time.
9:00
3
Start cooking by pressing Instant.Start button
Important notes:
• When microwave 100 power cooking is nished, microwave oven will begin grill
operation automatically.
• Max 4 sequences can be set per time, repeat the steps.
Page 31

31
EN
SUITABLE DISHES
It is strongly recommended to use the containers which are suitable and safe for
microwave cooking. Generally speaking, the containers which are made of heat-
resistant ceramic, glass or plastic are suitable for microwave cooking.
Note: Never use the metal containers for microwave cooking and combination
cooking as spark is likely to occur. You can take the reference of below table.
Material of
container
Mikro Grill Combi Notes
Heat-resistant
ceramic
Yes Yes Yes
Never use the ceramics
which are decorated
with metal rim or glazed
Heat-resistant
plastic
Yes No No
Can not be used for
long time microwave
cooking
Heat-resistant
glass
Yes Yes Yes
Plastic lm Yes No No
It should not be used
when cooking meat or
chops as the over-
temperature may do
damage to the lm
Grill rack No Yes Yes
Metal
container
No No No
It should not be used
in microwave oven.
Microwave can not
penetrate through
metal.
lacquer No No No
Poor heat-resistant. Can
not be used for Hightemperature cooking
Bamboo wood
and paper
No No No
Poor heat-resistant. Can
not be used for Hightemperature cooking
Page 32

32
EN
COOKING TIPS
The following factors may affect the cooking result:
Food arrangement
Place thicker areas towards outside of dish, the thinner part towards the Centre and
spread it evenly. Do not overlap if possible.
Cooking time length
Start cooking with a short time setting, evaluate it after it times out and extend it
according to the actual need. Over cooking may result in smoke and burns.
Cooking food evenly
Food such as chicken, hamburger or steak should be turned once during cooking.
Depending on the type of food, if applicable, stir it from outside to centre of dish once or
twice during cooking
Allow standing time
After cooking times out, leave the food in the oven for an adequate length of time, this
allows it to complete its cooking cycle and cooling it down in a gradual manner
Whether the food is done
• Color and hardness of food help to determine if it is done, these include:
• Steam coming out from all parts of food, not just the edge
• Joints of poultry can be moved easily
• Pork or poultry shows no signs of blood
• Fish is opaque and can be sliced easily with a fork
Browning dish
When using a browning dish or self-heating container, always place a heat-resistant
insulator such as a porcelain plate under it to prevent damage to the turntable and
rotating ring.
Microwave safe plastic wrap
When cooking food with high fat content, do not allow the plastic wrap come into
contact with food as it may melt
Microwave safe plastic cookware
Some microwave safe plastic cookware might not be suitable for cooking foods with
high fat and sugar content. Also, the preheating time specied in the dish instruction
manual must not be exceeded
Page 33

33
EN
CHILD LOCK FUNCTION
Use this feature to lock the control panel when you are cleaning or so that children can
not use the oven unsupervised. All the buttons are rendered inoperable in this mode.
• To set child lock, press and hold Pause/Cancel button about 3 seconds.
• To cancel child lock, press and hold Pause/Cancel button about 3 seconds.
CLEANING AND CARE
• It is hazardous for anyone other than a competent person to carry out any service
or repair operation that involves the removal of a cover which gives protection
against exposure to microwave energy.
• Remove the power cord from the wall outlet before cleaning. Don‘t immerse the
appliance in water or other uids when cleaning.
• Failure to maintain the oven in a clean condition could lead to deterioration of the
surface that could adversely affect the life of the appliance and possibly result in a
hazardous situation.
• The oven should be cleaned regularly and any food deposits removed
• Details for cleaning door seals, cavities and adjacent parts.
• Never use hard detergent, gasoline, abrasive powder or metal brush to clean any
part of the appliance.
• Do not remove the waveguide cover.
When the microwave oven has been used for a long time, there may be some strange
odors exist in oven, Following 3 methods can get rid of them:
• Place several lemon slices in a cup, then heat with high power for 2-3 min.
• Place a cup of red tea in oven, then heat with high power.
• Put some orange peel into oven, and then heat them with high power for 1 minute.
Note: Only allow children to use the oven without supervision when adequate
instructions have been given so that the child is able to use the oven in a safe way
and understands the hazards of improper use;
Page 34

34
EN
HINTS ON DISPOSAL
According to the European waste regulation 2012/19/EU this
symbol on the product or on its packaging indicates that this
product may not be treated as household waste. Instead it should
be taken to the appropriate collection point for the recycling of
electrical and electronic equipment. By ensuring this product is
disposed of correctly, you will help prevent potential negative
consequences for the environment and human health, which
could otherwise be caused by inappropriate waste handling of
this product. For more detailled information about recycling of
this product, please contact your local council or your household
waste disposal service.
Page 35

35
ES
Estimado cliente:
Le felicitamos por la adquisición de este producto. Lea atentamente el siguiente manual
y siga cuidadosamente las instrucciones de uso con el n de evitar posibles daños.
La empresa no se responsabiliza de los daños ocasionados por un uso indebido del
producto o por haber desatendido las indicaciones de seguridad. Escanee el código
QR para obtener acceso al manual de usuario más reciente y otra información sobre el
producto.
ÍNDICE DE CONTENIDOS
Indicaciones de seguridad36
Descripción del aparato y panel de control 38
Uso y funciones39
Vajilla adecuada47
Consejos de uso48
Bloqueo para niños49
Limpieza y cuidado49
Retirada del aparato50
DATOS TÉCNICOS
Número de artículo
10027094, 10027095, 10032201
Suministro eléctrico
230 V ~ 50 Hz
DECLARACIÓN DE CONFORMIDAD
Fabricante:
Chal-Tec GmbH, Wallstraße 16, 10179 Berlín (Alemania).
Este producto cumple con las siguientes directivas
europeas:
2014/30/UE (EMC)
2014/35/UE (baja tensión)
2011/65/UE (refundición RoHS)
2009/125/CE (ErP)
10027094
10027095
10032201
Page 36

36
ES
INDICACIONES DE SEGURIDAD
Lea atentamente todas las indicaciones y conserve este manual para consultas
posteriores. Para reducir el riesgo de una descarga eléctrica producido por una avería
o un fallo en el funcionamiento, el aparato deberá conectarse a una toma de corriente
con toma de tierra. Conecte el aparato solamente a tomas de corriente que se adecuen
a la tensión del mismo.
Para reducir el riesgo de incendios en el interior del aparato:
• No sobrecaliente los alimentos.
• Retire los cierres de metal y las pinzas de las bolsas de plástico y papel antes de
colocar el microondas.
• No caliente aceite ni grasa para freír en el microondas, pues la temperatura no
puede controlarse fácilmente.
• Limpie el microondas con un paño húmedo y pase un paño seco a continuación
después de cada uso para eliminar la suciedad y las salpicaduras de grasa. Los
restos de suciedad acumulados pueden sobrecalentarse y entrar en combustión.
• Si los materiales entran en combustión o humean dentro del microondas, deje la
puerta del mismo cerrada, apague el aparato y desconecte el enchufe.
• Si calienta la comida en recipientes de plástico, manténgala bajo supervisión para
evitar que entre en combustión.
Para evitar explosiones y una ebullición posterior:
• No caliente los líquidos en recipientes cerrados, pues tienden a explotar. Entre
estos se encuentran los biberones y los tapones de rosca.
• Para la cocción, utilice recipientes con una abertura amplia y no retire los líquidos
enseguida. Espere un poco antes de retirar la comida del microondas para no
quemarse con los líquidos que tengan una ebullición tardía.
• Las patatas, salchichas y castañas deben pelarse y cortarse antes de calentarse.
Los huevos crudos y duros en su cáscara no deben introducirse en el microondas,
pues pueden explotar tras el calentamiento.
• Mezcle bien el contenido de los biberones y vasos con papilla y compruebe antes
de alimentar al bebé la temperatura para evitar quemaduras.
• Si el cable de alimentación está dañado, deberá ser sustituido por el fabricante, un
servicio técnico autorizado o una persona igualmente cualicada.
• Tras la cocción, el recipiente utilizado estará muy caliente. Utilice guantes de
protección cuando lo retire para evitar escaldarse con el vapor de agua generado.
• Abra la tapa de la comida y las bolsas de palomitas por el lado opuesto a usted
para evitar escaldarse el rostro.
Page 37

37
ES
Para proteger el plato giratorio de roturas:
• Deje que el plato giratorio se enfríe por completo antes de limpiarlo.
• No coloque alimentos o recipientes muy calientes sobre el plato giratorio frío.
• No coloque comida o recipientes congelados sobre el plato giratorio caliente.
Advertencias generales de seguridad
• Asegúrese de que la vajilla no toque las paredes del microondas.
• Utilice solamente recipientes aptos para microondas.
• No guarde alimentos ni otros objetos en el microondas.
• No utilice el microondas sin contenido; de lo contrario, podría sufrir daños.
• Si utiliza el microondas, no lo deje sin supervisión en presencia de niños.
• Utilice solamente recambios originales indicados por el fabricante.
• Utilice el microondas solamente en espacios interiores.
• Si la puerta o las juntas están dañadas, no continúe utilizando el microondas,
contacte en su lugar con un servicio técnico para su reparación.
• No intente reparar el aparato usted mismo. Las reparaciones deberán ser
realizadas por personal técnico cualicado.
• Si se forma humo, desconecte el enchufe y mantenga la puerta del microondas
cerrada para evitar alimentar a posibles llamas.
• El calentamiento de líquidos puede provocar una ebullición repentina. Tome
precauciones al retirar el recipiente.
• Para la limpieza de la puerta, no utilice productos abrasivos o rascadores de metal
para evitar rascar o astillar el cristal.
• No conecte el aparato a tomas de corriente manejadas por control remoto ni con
temporizador.
• Este aparato no ha sido concebido para un uso comercial, sino doméstico o para
entornos similares.
• El aparato ha sido concebido para calentar alimentos y bebidas. Calentar prendas
de ropa, zapatos, bolsas de agua y esponjas puede provocar lesiones, incendios
o fuego.
• Los niños y las personas con discapacidades físicas o psíquicas solamente podrán
utilizar el aparato si han sido previamente instruidas sobre su uso y conocen las
indicaciones de seguridad. Asegúrese de que los niños no jueguen con el aparato.
• No utilice productos a vapor para la limpieza.
• No toque las piezas del aparato, la puerta ni la resistencia durante su
funcionamiento, alcanza temperaturas muy elevadas.
Page 38

38
ES
DESCRIPCIÓN DEL APARATO Y PANEL DE
CONTROL
Plato giratorio Carcasa
Ventana de visión
Anilla giratoria
Soporte de rejilla
Cierre de
la puerta
Muesca
Eje giratorio
Con el regulador,
seleccione la
duracción de cocción
y el peso O el menú
automático
Pulsar 1 vez: Se detiene el
proceso de cocción
Pulsar 2 veces: Se eliminarán
los ajustes.
Ajuste de potencia
Ajuste de la hora O menú
descongelación
Inicio
Page 39

39
ES
USO Y FUNCIONES
Tras enchufar el aparato, la luz LED parpadea tres veces. A continuación, en el
display parpadea continuamente „:“. Es ahora cuando puede realizar la selección del
programa además del ajuste de tiempo.
1. Señal acústica
Cuando haya nalizado el programa seleccionado, en el display aparece „END“
y suenan tres señales acústicas. Si no pulsa el botón „Pause“ o „Cancel“ o abre la
puerta, sonará un pitido cada tres segundos.
2. Ajustes de tiempo
Puede congurar con los botones „Preset“, „Clock“ y „Defrost“ la hora actual y la
duración del programa.
Ejemplo: Conguración de la hora a alas 12:30
Pasos
Indicador del
display
1
El indicador parpadea tras encender el aparato.
:
2
Mantenga pulsado el botón Preset Clock Defrost
durante 3 segundos.
0:00
3
Selecione con el regulador Auto Cooking/Time
Weight la hora deseada.
12:00
4
Pulse de nuevo el botón Preset Clock Defrost.
12:00
5
Seleccione con el regulador Auto Cooking/Time
Weight los minutos deseados.
12:30
6
Pulse de nuevo el botón Preset Clock Defrost o
espere 5 segundos para que se acepte el ajuste.
Page 40

40
ES
3. Potencia del microondas y función grill
Con esa función puede realizar ajustar para cocinar o preparar alimentos con la
función grill. Pulse el botón Micro Power Grill/Combi y el indicador LED mostrará de
manera alterna 100P-80P-60P-40P-20P-G-C.1-C.2.
100P
Alta potencia — 100% potencia del microondas. Apropiado para un
calentamiento rápido y completo.
80P
Potencia media-alta — 80% potencia del microondas. Apto para un
calentamiento de rapidez intermedia.
60P
Potencia media — 60% potencia del microondas. Adecuado para
calentar alimentos.
40P
Potencia media-baja — 40% potencia del microondas. Apto para
descongelar alimentos congelados.
20P
Potencia baja — 20% potencia del microondas. Adecuado para
mantener calientes los alimentos.
G
Función grill: la resistencia se calienta durante el tiempo seleccionado.
Apto para preparar al grill letes nos de carne, salchichas o alitas
de pollo. Con la función grill consigue un tueste torado en el grado
deseado.
C1
Combinación de grill y microondas. 30 % de funcionamiento en modo
microondas y 70 % en modo grill para la duración seleccionada.
C2
Combinación de grill y microondas. 55 % de funcionamiento en modo
microondas y 45 % en modo grill para la duración seleccionada.
Indicaciones importantes
• Nunca ponga en marcha el microondas sin contenido en su interior.
• Si voltea los alimentos durante el funcionamiento, pulse una vez el botón Instant
Start para continuar con el programa seleccionado.
• Si desea retirar los alimentos antes del n programado, pulse una vez el botón
Pause Cancel para terminar el programa en marcha y para evitar una continuación
por accidente del programa para el próximo uso del aparato.
Page 41

41
ES
Ejemplo: 10 minutos de funcionamiento en microondas en el programa P80
Pasos
Indicador del
display
1
El indicador parpadea tras encender el aparato.
:
2
Seleccione la potencia deseada del microondas
pulsando varias veces el botón Power Grill/Combi.
80P
3
Seleccione la duración deseada del programa con
el regulador Auto Cooking/Time Weight.
10:00
4
Pulse el botón Instant.Start. En el display aparece el
tiempo restante de funcionamiento.
Nota: Puede modicar el tiempo del programa durante el funcionamiento. Además
se recomienda voltear los alimentos a mitad del proceso. Pulse una vez el botón
Instant Start para continuar con el programa.
4. Función descongelación
Con esta función puede descongelar alimentos ultracongelados. Pulse el botón Preset
Clock Defrost. En el display aparecen de manera alterna d.1, d.2 y d.3.
d.1
Para descongelar carne - Peso de 0,1 a 2 kg
d.2
Para descongelar carne de ave - Peso de 0,2 a 3 kg
d.3
Para descongelar marisco - Peso de 0,1 a 0,9 kg
Indicaciones importantes
• Voltee los alimentos durante el proceso para obtener un resultado homogéneo.
• La descongelación de alimentos suele durar más que el calentamiento de los
mismos.
• En cuanto pueda cortar sin dicultad el alimento a decongelar, habrá concluido el
proceso de descongelación.
• Las microondas pueden penetrar en la mayoría de alimentos hasta 4 cm.
• Los alimentos descongelados deben consumirse lo antes posible y nunca deben
volver a congelarse.
Page 42

42
ES
Ejemplo: Descongelar 400 g de carne de ave
Pasos
Indicador del
display
1
El indicador parpadea tras encender el aparato.
:
2
Pulse el botón Preset Clock Defrost varias veces
hasta que haya llegado al tipo de carne deseado.
d.2
3
Seleccione, con el regulador Auto Cooking/Time,
el peso del alimento que desea descongelar.
0.4
4
Inicie el programa pulsando el botón Instant Start.
5:16
5
Tras la mitad del tiempo del proceso, suena un
pitido dos veces. Voltee los alimentos para obtener
el resultado ideal. Abra la puerta y voltee los
alimentos. Cierre de nuevo la puerta y pulse de
nuevo el botón Instant Start para continuar con el
programa de descongelación.
5. Programa Auto
El aparato dispone de un programa estándar para un control sencillo. Gire el regulador
de selección con el LED parpadeando en el sentido contrario de las agujas del reloj y
aparecen los programas A.1, A.2 hasta A.12. Seleccione el programa auto deseado
con el botón Enter y seleccione el peso del alimento.
Seleccione el menú adecuado conforme al tipo y peso del alimento y siga las
indicaciones de la tabla en la página siguiente para obtener un resultado óptimo.
Page 43

43
ES
Display Tipo Peso
A.1
Palomitas
2 opciones (3.0Oz [aprox. 85g] y 3.5Oz
[aprox 100g])
A.2
Patatas
2 Opciones de selección (0,45 kg y 0,65
kg)
A.3
Verduras 5 Opciones (0,1 – 0,2 ------ 0,5 kg)
A.4
Carne 6 Opciones (0,2 – 0,3 ------ 0,7 kg)
A.5
Pescado 6 Opciones (0,2 – 0,3 ------ 0,7 kg)
A.6
Carne de ave 6 Opciones (0,2 – 0,3 ------ 0,7 kg)
A.7
Calentamiento 5 Opciones (0,2 – 0,4 ------ 1,0 kg)
A.8
Bebidas 2 Opciones (250 ml y 500 ml)
A.9
Arroz 5 Opciones (0,1 – 0,2 ------ 0,5 kg)
A.10
Pasta 5 opciones (0,1 - 0, 2 ------ 0 kg)
A . 11
Pan 5 Opciones (0,1 – 0,2 ------ 0,5 kg)
A. 12
Pizza 2 opciones (1 unidad y 2 unidades)
Indicaciones importantes
• Si gira el regulador en modo standby en el sentido contrario de las agujas del
reloj, accederá a los ajustes del programa Auto. Gire el regulador a continuación
en el sentido de las agujas del reloj y accederá a los ajustes de tiempo con el
ajuste estándar „100 % potencia de microondas“.
• El tiempo indicado trascurrido en los programas Auto se basa en una temperatura
del alimento antes del calentamiento de 20-25 °C. Una temperatura interior o
superior inuye en el tiempo real necesario.
• El resultado depende en gran medida de la temperatura, peso y estado de los
alimentos empleados. Ajuste el tiempo del programa si detecta divergencias de la
lista anterior.
Page 44

44
ES
Ejemplo: Calentar 400 g de pescado
Pasos
Indicador del
display
1
El indicador parpadea tras encender el aparato.
:
2
Gire el regulador en el sentido contrario a las
agujas del reloj hasta llegar al programa Auto
deseado.
A.5
3
Seleccione el programa pulsando el botón Enter.
A.5
4
Determine con el botón Auto Cooking/Time Weight
el peso.
0.4
5 0.4
Inicie el programa pulsando el botón Instant Start.
10:00
6. Inicio programado
Si no desea iniciar un programa inmediatamente, si no a una hora determinada,
puede preseleccionar con esta función el programa deseado y el tiempo de inicio
del programa para que se inicie a una hora determinada. La selección consta de dos
pasos: Congurar la hora actual. Congurar el programa y la duración del mismo.
Page 45

45
ES
Ejemplo: Ahora son las 12:30 h, cuando desea que el microondas se active
automáticamente a 100P de potencia durante 9 minutos y 30 segundos cuando
sean las 14:20 h.
Schritte Displayanzeige
1
El indicador parpadea tras encender el aparato.
:
1.1
Mantenga pulsado el botón Preset Clock Defrost
durante tres segundos
0:00
1.2
Seleccione las horas de la hora actual con el
regulador Auto Cooking/Time Weight.
12:00
1.3
Pulse de nuevo el botón Preset Clock Defrost para
conrmar la selección de las horas.
12:00
1.4
Seleccione los minutos de la hora actual con el
regulador Auto Cooking/Time Weight.
12:30
1.5
Pulse una vez el botón Preset Clock Defrost o espere
5 segundos para conrmar la selección.
12:30
2
Seleccione el programa y la duración.
2.1
Seleccione la potencia del microondas pulsando el
botón Micro Power Grill/Combi.
100P
2.2
Seleccione la duración deseada girando el
regulador Auto Cooking/Time Weight.
9:30
2.3
Mantenga pulsado el botón Preset Clock Defrost
durante tres segundos para acceder a la hora
actual.
3
Ajuste la hora de inicio deseada como se indica en
los pasos 1.2, 1.3 y 1.4.
4
Pulse el botón Preset Clock Defrost para conrmar
el programa con temporizador. El programa queda
activado y se ejecutará a la hora programada.
5
Puede comprobar el tiempo de inicio congurado
pulsando el botón Preset Clock Defrost.
Page 46

46
ES
7. Modo multi secuencia.
Muchas recetas necesitan distintos modos de cocción y ajustes de tiempo para obtener
el mejor resultado. Puede organizar su programa personalizado del siguiente modo:
Ejemplo: Quiere calentar su plato durante 3 minutos a una potencia del 100 %
y a continuación utilizar el grill durante 9 minutos. En este caso, se trata de un
programa de 2 secuencias.
Pasos
Indicador del
display
1
100 % de potencia de microondas durante 3
minutos
1.1
Pulse el botón Micro Power Grill/Combi para
seleccionar la potencia del microondas.
100P
1.2
Seleccione el tiempo de duración con el regulador
Auto Cooking/Time Weight.
3:00
2
Grill durante 9 minutos
2.1
Seleccione el programa deseado con el botón
Micro Power Grill/Combi.
G
2.2
Seleccione la duración deseada con el regulador
Auto Cooking/Time Weight.
9:00
3
Inicie el programa pulsando el botón Instant Start.
Indicaciones importantes
• En cuanto haya nalizado el programa del microondas, el aparato activa
automáticamente la función del grill.
• Pueden congurarse hasta cuatro secuencias de programas. Proceda como se ha
descrito anteriormente.
Page 47

47
ES
VAJILLA ADECUADA
Básicamente, son aptos aquellos recipientes y vajilla fabricados en cerámica, cristal o
plástico resistente al calor de las microondas.
Nota: Nunca utilice objetos de metal en el funcionamiento de microondas o
combinado.
Material Micro Grill Combi Observaciones
Cerámica resistente al calor
Sí Sí Sí
No utilice objetos de
cerámica con tachuelas
metálicas.
Plástico resistente
al calor
Sí No No
No apto para un funcionamiento prolongado
en modo microondas.
Vidrio resistente
al calor
Sí Sí Sí
Lámina de
plástico
Sí No No
No debe emplearse
para calentar carne.
Parrilla para el
grill
No Sí Sí
Recipientes
metálicos
No No No
No puede utilizarse en
microondas. El metal
no deja traspasar las
ondas.
Film No No No
Mala resistencia al
calor. No apto para
altas temperaturas.
Madera No No No
Mala resistencia al
calor. No apto para
altas temperaturas.
Page 48

48
ES
CONSEJOS DE USO
Siga estas indicaciones para obtener los mejores resultados:
Disposición de los alimentos en el aparato:
Coloque las partes más gruesas de sus platos en el borde del plato y las partes más
nas en el centro. Distribuya los alimentos bien y no los coloque unos encima de otros
si es posible.
Transcurso del programa:
Seleccione primero una duración corta. Compruebe el resultado tras la nalización
y alargue la duración si es necesario. Una duración demasiado prolongada puede
provocar formación de humo y normalmente un resultado deciente.
Calentar homogéneamente los alimentos:
Los alimentos como carne de pollo, letes u otros trozos de carne deben voltearse
durante el tiempo de preparación. En función del tipo de alimentos, se recomienda
moverlo una o dos veces durante la preparación, de los bordes al centro.
Dejar que se enfríe:
Deje los alimentos dentro del aparato durante toda la duración del programa y deje
que se enfríen antes de retirarlos.
Comprobar el grado de cocción:
En cuanto el color y la consistencia del alimento den una muestra de que el alimento se
ha calentado o cocinado completamente. Los signos son, p. ej.:
• De todas las partes del alimento sale vapor y no solo de las esquinas.
• La carne de ave se puede deshuesar bien.
• No hay restos de sangre en carne de cerdo o ave.
• El pescado preparado ya no está vidrioso y puede desmenuzarse bien con un
tenedor.
Indicaciones sobre la vajilla de plástico:
Para evitar daños en el plato giratorio o anilla giratoria, coloque un plato resistente
al calor de porcelana o similar debajo cuando utilice vajilla de plástico o material no
resistente al calor.
Nota sobre las bolsas de cocción de plástico:
Tenga cuidado cuando prepare alimentos con un gran contenido en grasa dentro de
una bolsa de cocción de que el alimento entre lo menos posible en contacto con la
bolsa. Esta podría derretirse.
Indicaciones sobre la vajilla para microondas:
Mucha de la vajilla prevista para uso en microondas puede ser inadecuada para platos
con alto contenido en grasa o azúcar. Nunca sobrepase el tiempo de calentamiento
indicado en la vajilla.
Page 49

49
ES
BLOQUEO PARA NIÑOS
Con esta función puede bloquear el panel de control - ya sea para la limpieza o para
evitar que los niños manejen el aparato accidentalmente. En este modo todos los
botones están bloqueados.
1 Mantenga pulsado el botón pause/cancel durante 3 segundos para activar el
bloqueo para niños.
2 Mantenga pulsado el botón pause/cancel durante 3 segundos para desactivar el
bloqueo para niños.
LIMPIEZA Y CUIDADO
• Limpie el aparato regularmente y retire todos los restos de comida o salpicaduras.
• Apague el aparato y desconecte el enchufe de la toma de corriente.
• Limpie el interior con agua tibia y un producto de limpieza neutro disuelto en el
agua y un paño suave.
• Limpie la supercie exterior con un limpiador neutro disuelto en agua tibia y con un
paño suave.
• Seque las supercies interiores y exterior con un paño suave.
• No utilice medios líquidos como sprays insecticidas en el aparato.
• Después de un tiempo de uso prolongado, pueden aparecer malos olores. Los
siguientes métodos pueden ser útiles:
• Coloque unas rodajas de limón en una taza y encienda el aparato a máxima
potencia de 2 a 3 minutos.
• Coloque una taza con té rojo en el aparato y enciéndalo durante 2 a 3 minutos a
máxima potencia.
• Coloque unas rodajas de naranja en el aparato y enciéndalo a máxima potencia
de 2 a 3 minutos.
Page 50

50
ES
RETIRADA DEL APARATO
Si el aparato lleva adherida la ilustración de la izquierda (el
contenedor de basura tachado) entonces rige la normativa
europea, directiva 2012/19/UE. Este producto no debe
arrojarse a un contenedor de basura común. Infórmese
sobre las leyes territoriales que regulan la recogida separada
de aparatos eléctricos y electrónicos. Respete las leyes
territoriales y no arroje aparatos viejos al cubo de la basura
doméstica. Una retirada de aparatos conforme a las leyes
contribuye a proteger el medio ambiente y a las personas a
su alrededor frente a posibles consecuencias perjudiciales
para la salud. El reciclaje ayuda a reducir el consumo de
materias primas.
Page 51

51
FR
Cher client,
Toutes nos félicitations pour l’acquisition de ce nouvel appareil. Veuillez lire attentivement les
instructions suivantes de branchement et d’utilisation an d’éviter d’éventuels dommages.
Le fabricant ne saurait être tenu pour responsable des dommages dus au non-respect des
consignes de sécurité et à la mauvaise utilisation de l’appareil. Scannez le code QR pour
avoir accès au dernier manuel de l‘utilisateur et à d‘autres informations sur le produit.
SOMMAIRE
Consignes de sécurité52
Aperçu de l‘appareil et panneau de commande54
Utilisation et fonctions55
Vaisselle adaptée63
Astuces d‘utilisation64
Verrouillage parental65
Nettoyage et entretien65
Conseils pour le recyclage66
FICHE TECHNIQUE
Numéro d’article
10027094, 10027095, 10032201
Alimentation électrique
230 V ~ 50 Hz
DÉCLARATION DE CONFORMITÉ
Fabricant :
Chal-Tec GmbH, Wallstraße 16, 10179 Berlin, Allemagne.
Ce produit est conforme aux directives européennes
suivantes :
2014/30/UE (CEM)
2014/35/UE (LVD)
2011/65/UE (RoHS)
2009/125/CE (ErP)
10027094
10027095
10032201
Page 52

52
FR
CONSIGNES DE SÉCURITÉ
Lisez attentivement toutes les consignes avant d’utiliser l’appareil et conservez le guide
d’utilisation pour vous y référer ultérieurement. Pour réduire le risque d’électrocution
en cas de défaillance technique ou de dysfonctionnement, l’appareil doit être relié à
une prise de terre. Branchez l’appareil uniquement sur des prises fournissant la tension
correspondant à celle de l’appareil.
Pour réduire les risques de feu à l’intérieur du four :
• Ne surchauffez pas vos plats.
• Retirez les fermetures et pinces en métal des sacs en plastique ou en papier avant
de les placer au four à micro-ondes.
• Ne surchauffez pas l’huile ou la graisse de friture dans le four à micro-ondes, car la
température sera difcilement contrôlable.
• Nettoyez le four à micro-ondes avec un chiffon humide après chaque utilisation
puis essuyez-le avec un chiffon sec pour éliminer les projections de graisses et les
salissures. Les restes agglutinés risquent de surchauffer et de prendre feu.
• Si des substances prennent feu ou se mettent à fumer à l’intérieur du four à micro-
ondes, laissez la porte du four fermée, éteignez l’appareil et débranchez la che
de la prise.
• Lorsque vous réchauffez un plat emballé dans un contenant plastique, surveillez-le
au cas où le plat prendrait feu.
Pour empêcher les explosions et l’ébullition post cuisson :
• Ne réchauffez pas des liquides dans des emballages fermés car ceux-ci ont
tendance à exploser. Sont concernées également les biberons avec bouchon à
visser.
• Pour la cuisson, utilisez des récipients à ouverture large et ne versez pas tout de
suite les liquides chauds. Attendez un peu lorsque vous les retirez du four à microondes pour ne pas vous brûler avec des liquides qui continuent à bouillir.
• Avant de les réchauffer, pelez ou percez les pommes de terre, les saucisses et les
marrons. Ne réchauffez pas les œufs crus ou durs et encore dans leur coquille au
four à micro-ondes, car ils peuvent encore exploser même après le réchauffage.
• Mélangez bien le contenu des biberons et des verres contenant des aliments pour
bébé et vériez leur température avant de les donner à un enfant pour éviter les
brûlures.
• Si le câble secteur ou la che sont endommagés, faites-les remplacer par le
fabricant, un spécialiste agréé ou une personne de qualication équivalente.
• Après la cuisson, le récipient contenant est très chaud. Utilisez des maniques
lorsque vous les retirez pour ne pas vous brûler avec la vapeur qui s’échappe.
• Ouvrez le couvercle des plats et des pochettes à popcorn vers le côté opposé pour
ne pas vous brûler au visage.
Page 53

53
FR
Pour protéger le plateau tournant contre les risques d’éclatement du verre :
• Laissez refroidir le plateau tournant avant de le nettoyer.
• Ne posez aucun aliment ou récipient chaud sur le plateau tournant froid.
• Ne posez aucun aliment ou récipient congelé sur le plateau tournant chaud.
Consignes de sécurité générales
• Veillez à ce que les ustensiles de cuisson n’entrent pas au contact des parois
internes du four à micro-ondes.
• Utilisez uniquement des récipients compatibles avec les fours à micro-ondes.
• N’entreposez aucun aliment ni d’autres objets à l’intérieur du four à micro-ondes.
• Ne faites pas fonctionner le four à micro-ondes à vide, vous risqueriez de
l’endommager.
• Lorsque vous utilisez le four à micro-ondes, ne le laissez pas sans surveillance en
présence d’enfants.
• Utilisez uniquement des accessoires recommandés par le fabricant.
• Utilisez le four à micro-ondes uniquement à l’intérieur.
• Si la porte ou le joint est endommagé, n’utilisez plus le four à micro-ondes mais
faites-le réparer par un professionnel.
• N’essayez pas de réparer l’appareil vous-même, les réparations ne doivent être
effectuées que par un professionnel.
• Si de la fumée se dégage, débranchez la che et maintenez la porte du four
fermée pour étouffer les éventuelles ammes.
• Le réchauffage d’aliments liquides peut provoquer une ébullition soudaine. Soyez
prudent lorsque vous retirez le récipient.
• Pour le nettoyage, n’utilisez aucun produit abrasif ni de grattoir métallique, an de
ne pas rayer ou casser le verre.
• N’utilisez pas l’appareil avec une minuterie externe ou avec une prise
télécommandée.
• L’appareil n’est pas destiné à une utilisation commerciale mais au cadre domestique
et dans des conditions similaires.
• L’appareil sert à réchauffer des aliments et des boissons. Le réchauffage de
vêtements, gants, coussins chauffants ou éponges risque de provoquer des
blessures, des brûlures ou des incendies.
• Les enfants et les personnes à mobilité ou capacité réduites ne doivent utiliser
l’appareil que s’ils ont été au préalable familiarisés avec les fonctions et les mesures
de sécurité par une personne responsable. Ne laissez pas les enfants jouer avec
l’appareil.
• Pour le nettoyage, n’utilisez aucun nettoyeur vapeur.
• Pendant le fonctionnement, ne touchez aucun élément intérieur de l’appareil, porte
ou élément chauffant, car ceux-ci peuvent être très chauds.
Page 54

54
FR
APERÇU DE L‘APPAREIL ET PANNEAU DE
COMMANDE
Plateau tournant Corps de l‘appareil
Fenêtre de contrôle
Anneau tournant
Cadre en treillis
Verrouillage de
porte
Renfoncement
Axe de rotation
A l‘aide du bouton
tournant, choisissez
la durée de cuisson et
le poids OU BIEN le
menu automatique
1x appui : la cuisson est mise
en pause
2x appuis : les réglages sont
supprimés
Réglage de la puissance
Réglage de l‘heure OU
menu Defrost
Démarrage
Page 55

55
FR
UTILISATION ET FONCTIONS
Après avoir branché la che d‘alimentation, la LED clignote trois fois. L‘afchage „:“
clignote continuellement. Vous pouvez maintenant choisir le programme ainsi que
procéder au réglage de la durée.
1. Signal sonore
Dès que le programme sélectionné est terminé, l‘écran afche „END“ et 3 bips
retentissent. Sauf si vous appuyez sur „Pause“ ou le bouton „Annuler“ ou ouvrez la
porte, le bip continue de retentir toutes les 3 minutes.
2. Réglage de la durée
Vous pouvez utiliser les boutons „Preset“ „Clock“ et „Defrost“ pour régler l‘heure
actuelle ou la durée du programme.
Exemple : réglage de la durée sur 12:30
Étapes Afchage
1
L'afchage clignote au démarrage.
:
2
Maintenez la touche Preset Clock Defrost pendant
3 secondes.
0:00
3
Choisissez l'heure voulue avec le bouton tournant
Auto Cooking/Time Weight.
12:00
4
Appuyez encore brièvement sur la touche Preset
Clock Defrost.
12:00
5
Réglez les minutes avec le bouton tournant Auto
Cooking/Time Weight.
12:30
6
Appuyez encore brièvement sur la touche Preset
Clock Defrost ou patientez 5 secondes pour que
votre choix soit pris en compte.
Page 56

56
FR
3. Performances du micro-ondes et fonction gril
Avec cette fonction, vous pouvez effectuer les réglages pour la cuisson ou la cuisson
au gril des aliments. Appuyez sur le bouton Micro Power Grill/Combi, l‘indicateur LED
afche alors successivement 100P-80P-60P-40P-20P-G-C.1-C.2.
100P
Forte puissance — 100% de puissance micro-ondes. Convient pour les
réchauffages raides et complets.
80P
Puissance moyenne — 80% de puissance micro-ondes. Convient pour
le chauffage à vitesse moyenne.
60P
Puissance moyenne — 60% de puissance micro-ondes. Convient pour
réchauffer des plats.
40P
Puissance moyenne à faible — 40% de puissance micro-ondes.
Convient pour décongeler des aliments surgelés.
20P
Faible puissance — 20% de puissance micro-ondes. Convient pour
maintenir des plats au chaud.
G
Fonction gril : l'élément chauffant fonctionne pendant la durée
sélectionnée. Convient pour griller des tranches de viande minces, des
saucisses ou des ailes de poulet. Avec la fonction gril, vous pouvez
obtenir une couleur dorée à votre convenance.
C1
Combinaison de gril et micro-ondes. 30% de fonctionnement en microondes et 70% de la durée en mode gril.
C2
Combinaison de gril et micro-ondes. 55% de en micro-ondes et 45%
de la durée en mode gril.
Remarques importantes :
• Ne faites jamais fonctionner l‘appareil à vide.
• Si vous retournez les aliments pendant le fonctionnement, appuyez une fois
brièvement sur le bouton Instant Start pour continuer le programme sélectionné.
• Si vous souhaitez retirer les aliments avant la n programmée, appuyez une fois
sur le bouton Pause Cancel pour quitter le programme sélectionné et éviter de
poursuivre accidentellement le programme lors de la prochaine utilisation.
Page 57

57
FR
Exemple : 10 minutes de fonctionnement en micro-ondes
avec le programme P80
Étapes Afchage
1
L'afchage clignote au démarrage.
:
2
Choisissez la puissance e micro-ondes voulue en
appuyant plusieurs fois sur la touche Power Gril /
Combi.
80P
3
Choisissez la durée de programme voulue à l'aide
du bouton tournant Auto Cooking /Time Weight.
10:00
4
Appuyez sur la touche Instant Start. La durée
restante s'afche à l'écran.
Remarque : vous pouvez modier la durée du programme pendant son exécution.
Il est de plus recommandé de retourner les aliments à mi-durée de programme.
Appuyez une fois sur la touche Instant Start pour poursuivre le programme.
4. Fonction décongélation
Cette fonction vous permet de décongeler des aliments surgelés. Appuyez sur la touche
Preset Clock Defrost. L‘afchage indique successivement d.1, d.2 et d.3.
d.1
Pour décongeler la viande – poids de 0,1 à 2kg.
d.2
Pour décongeler les volailles – poids de 0,2 à 3kg
d.3
Pour décongeler les fruits de mer – poids de 0,1 à 0,9kg.
Remarques importantes :
• Retournez les aliments pendant la cuisson pour obtenir un résultat homogène.
• La décongélation des aliments prend généralement plus de temps que le chauffage.
• Dès que vous pouvez facilement couper les aliments à décongeler avec un
couteau, la décongélation est terminée.
• Les micro-ondes peuvent pénétrer à environ 4 cm de profondeur dans la plupart
des aliments.
• Les aliments décongelés devraient être consommés le plus tôt possible et ne doivent
pas être recongelés.
Page 58

58
FR
Exemple : pour décongeler 400 g de volaille
Étapes Afchage
1
L'écran clignote au démarrage.
:
2
Appuyez sur le bouton Preset Clock Defrost plusieurs
fois jusqu'à ce que vous atteigniez le type de viande
désiré.
d.2
3
Avec la molette Auto Cooking/Time, sélectionnez le
poids de l'aliment à décongeler.
0.4
4
Démarrez le programme en appuyant sur la touche
Instant Start.
5:16
5
A la moitié du temps de cuisson, le bip retentit deux
fois. Retournez alors la nourriture à décongeler
pour un résultat idéal. Ouvrez la porte, retournez
la nourriture. Fermez ensuite la porte et appuyez à
nouveau sur le bouton Instant Start pour continuer le
programme de décongélation.
5. Programme auto
L‘appareil dispose de programmes standards pour une utilisation facile. Lorsque le
voyant LED clignote, tournez le bouton de sélection dans le sens antihoraire pour
afcher les programmes A.1, A.2 à A.12. Sélectionnez le programme Auto souhaité
avec la touche Entrée et sélectionnez le poids de votre plat.
Sélectionnez le menu approprié en fonction du type et du poids de l‘aliment et suivez
les informations dans le tableau de la page suivante pour obtenir le meilleur résultat.
Page 59

59
FR
Écran Aliment Poids
A.1
Popcorn
2 options (3.0Oz [ca. 85g] et
3.5Oz [ca. 100g])
A.2
Pommes de terre 2 choix possible (0.45kg et 0.65kg)
A.3
Légumes 5 options (0,1 – 0,2 ------ 0,5 kg)
A.4
Viande 6 options (0,2 – 0,3 ------ 0,7 kg)
A.5
Poisson 6 options (0,2 – 0,3 ------ 0,7 kg)
A.6
Volaille 6 options (0,2 - 0,3 ------ 0,7 kg)
A.7
Réchauffage 5 options (0,2 – 0,4 ------ 1.0 kg
A.8
Boisson 2 options (250ml et 500ml)
A.9
Reis 5 options (0,1 - 0,2 ------ 0,5 kg)
A.10
Pâte 5 options (0,1 - 0, 2 ------ 0 kg)
A . 11
Pain 5 options (0,1 - 0,2 ------ 0,5 kg)
A. 12
Pizza 2 options (1 pièce et 2 pièces)
Remarques importantes :
• Si vous tournez d‘abord le bouton rotatif dans le sens inverse des aiguilles
d‘une montre en mode veille, vous accèderez aux réglages des programmes
automatiques. Tournez d‘abord le bouton dans le sens des aiguilles d‘une montre
pour passer aux réglages de l‘heure avec le réglage par défaut „100% microondes“.
• La durée de fonctionnement par défaut dans les programmes Auto est basée
sur la température de l‘aliment avant de chauffer à partir de 20 à 25°C. Des
températures plus élevées ou plus basses affectent la durée de fonctionnement
requise.
• Le résultat dépend largement de la température, du poids et de l‘état de l‘aliment
utilisé. Ajustez la durée du programme si vous remarquez des écarts par rapport à
la liste ci-dessus.
Page 60

60
FR
Exemple : pour réchauffer 400 g de poisson
Étapes Afchage
1
L'écran clignote au démarrage.
:
2
Tournez le bouton de sélection en sens antihoraire
jusqu'au programme automatique désiré.
A.5
3
Sélectionnez le programme en appuyant sur la
touche Enter.
A.5
4
Déterminez le poids avec le bouton tournant Auto
Cooking /Time Weight.
0.4
5
Démarrez le programme en appuyant sur la touche
Instant.Start.
10:00
6. Démarrage programmé
Si vous ne voulez pas démarrer un programme immédiatement, mais à une heure
dénie, vous pouvez utiliser cette fonction pour présélectionner le programme et l‘heure
de début souhaités, ce qui fera démarrer le programme sélectionné automatiquement à
l‘heure spéciée. La sélection comprend deux étapes : réglage de l‘heure, et réglage du
programme et de la durée.
Page 61

61
FR
Exemple : il est 12:30, et vous voulez que le micro-ondes démarre
automatiquement avec la puissance 100P pour 9 minutes et 30 secondes à
14:20.
Étapes Afchage
1
L'écran clignote au démarrage.
:
1.1
Maintenez la touche Preset Clock Defrost pendant
trois secondes
0:00
1.2
Sélectionnez l'heure actuelle en utilisant le bouton
Auto Cooking/Time Weight.
14:00
1.3
Appuyez de nouveau sur la touche Preset Clock
Defrost pour conrmer le choix des heures.
14:00
1.4
Choisissez maintenant les minutes de l'heure actuelle
à l'aide du bouton tournant Auto Cooking /Time
Weight.
14:20
1.5
Appuyez 1x sur la touche Preset Clock Defrost ou
patientez 5 secondes pour conrmer votre saisie.
14:20
2
Sélectionnez le programme et la durée.
2.1
Sélectionnez la puissance du micro-ondes en
appuyant sur la touche Micro Power Grill/Combi.
100P
2.2
Sélectionnez la durée du programme en tournant le
bouton Auto Cooking /Time Weight.
9:30
2.3
Appuyez et maintenez la touche Preset Clock
Defrost pendant 3 secondes pour accéder à l'heure
actuelle.
3
Réglez l'heure de départ voulue comme aux étapes
1.2, 1.3 et 1.4.
4
Appuyez sur la touche Preset Clock Defrost pour
conrmer le programme de départ différé. Le
programme est maintenant activé et sera lancé à
l'heure prévue.
5
Vous pouvez contrôler l'heure de démarrage
programmée en appuyant sur le bouton Preset
Clock Defrost.
Page 62

62
FR
7. Mode multi séquences
Certaines recettes nécessitent des modes de cuisson et des réglages de temps
différents pour obtenir les meilleurs résultats. Vous pouvez composer votre programme
personnalisé comme suit :
Exemple : Vous voulez chauffer votre plat pendant 3 minutes à 100% de
puissance micro-ondes, puis le faire griller pendant 9 minutes. Dans ce cas, il
s‘agit d‘une programmation en 2 parties.
Étapes Afchage
1
100% de puissance de micro-ondes pendant 3
minutes
1.1
Appuyez sur la touche Micro Power Grill/Combi
pour sélectionner la puissance du micro-ondes.
100P
1.2
Sélectionnez la durée à l'aide du bouton tournant
Auto Cooking/ Time Weight.
3:00
2
Cuisson gril pendant 9 minutes
2.1
Sélectionnez le programme voulu à l'aide de la
touche Micro Power Grill/Combi.
G
2.2
Sélectionnez la durée voulue à l'aide du bouton
tournant Auto Cooking /Time Weight.
9:00
3
Démarrez le programme en appuyant sur la touche
Instant Start.
Remarques importantes :
• Dès que le programme micro-ondes est terminé, l‘appareil active automatiquement
la fonction gril.
• Vous pouvez régler jusqu‘à quatre séquences de programme. Procédez comme
décrit précédemment.
Page 63

63
FR
VAISSELLE ADAPTÉE
Fondamentalement, les récipients et les plats en céramique résistant à la chaleur, en
verre ou en plastique conviennent aux micro-ondes.
Remarque : n‘utilisez jamais d‘objets métalliques dans le micro-ondes ni en
fonctionnement combiné.
Matériau
Micro-
ondes
Gril Combiné Remarque
Céramique résistante à la chaleur
oui oui oui
N'utilisez pas d'objets
en céramique avec des
ornements en métal.
Plastique résistant
à la chaleur
oui non non
Ne convient pas pour
une cuisson longue.
Verre résistant à la
chaleur
oui oui oui
Film plastique oui non non
Ne devrait pas être
utilisé pour chauffer la
viande.
Grille de barbecue
non oui oui
Récipient métallique
non non non
Ne pas utiliser dans le
four à micro-ondes. Les
micro-ondes ne peuvent
pas pénétrer métal.
Film laqué non non non
Mauvaise résistance à
la chaleur. Ne convient
pas aux températures
élevées.
Bois non non non
Mauvaise résistance à
la chaleur. Ne convient
pas pour les hautes
températures.
Page 64

64
FR
ASTUCES D‘UTILISATION
Observez les instructions suivantes pour des résultats optimaux:
Disposition de la nourriture dans l‘appareil :
Placez les morceaux de nourriture plus épais sur le bord de la plaque tournante et des
morceaux plus minces vers le milieu. Répartissez bien la nourriture et ne l‘empilez pas si
possible.
Durée du programme :
Commencez par choisir une courte durée de cuisson. Vériez le résultat et prolongez
le temps de cuisson si nécessaire. Des durées de fonctionnement trop longues peuvent
conduire à un dégagement de fumée ou à un feu et, en général, à un résultat médiocre.
Réchauffage homogène des plats :
Les aliments tels que le poulet, les steaks ou autres tranches de viande doivent être
retournés en cours de cuisson. Selon le type de nourriture, il est conseillé de déplacer la
nourriture une ou deux fois pendant la cuisson du bord vers le centre du plateau tournant.
Laisser refroidir :
Laissez les aliments dans l‘appareil toute la durée du programme puis laissez-les
refroidir légèrement avant de les sortir.
Vérier le degré de cuisson :
La couleur et la consistance de la nourriture fournissent des informations pour savoir si la
nourriture est bien cuite ou chauffée. Les signes sont par exemple :
• La vapeur s‘échappe de toutes les parties de la nourriture, pas seulement d‘endroits
isolés.
• Les os se détachent facilement de la volaille.
• Il n‘y a pas de restes de sang dans le porc ou la volaille.
• Le poisson préparé n‘est plus vitreux et peut être facilement coupé à la fourchette.
Conseil pour la vaisselle en plastique :
Pour éviter d‘endommager le plateau tournant ou l‘anneau, veuillez placer dessous
une plaque résistante à la chaleur en porcelaine ou similaire lorsque vous utilisez de la
vaisselle en plastique ou un matériau non résistant à la chaleur dans l‘appareil.
Conseil pour les sachets de cuisson en plastique :
Lorsque vous préparez des aliments riches en matières grasses dans un sac de cuisson
spécial, assurez-vous que les aliments entrent le moins possible en contact avec le sac.
Cela pourrait le faire fondre.
Conseil pour la vaisselle de micro-ondes :
Certaines vaisselles destinées à être utilisées dans les micro-ondes peuvent ne pas
convenir aux aliments riches en graisse ou en sucre. Assurez-vous de ne pas dépasser
les temps de chauffage spéciés de la vaisselle.
Page 65

65
FR
VERROUILLAGE PARENTAL
Cette fonction vous permet de verrouiller le panneau de commande - par exemple,
pendant le nettoyage ou pour empêcher les enfants d‘utiliser l‘appareil sans
surveillance. Dans ce mode, tous les boutons sont désactivés.
1. Pour activer le verrouillage parental, appuyez sur le bouton Pause/Annuler et
maintenez-le pendant 3 secondes.
2. Pour désactiver le verrouillage parental, appuyez sur le bouton Pause/Annuler et
maintenez-le pendant 3 secondes.
NETTOYAGE ET ENTRETIEN
• Nettoyez l‘appareil régulièrement et retirez toujours les restes ou les éclaboussures.
• Éteignez l‘appareil et débranchez la che de la prise.
• Nettoyez l‘intérieur de l‘appareil avec un détergent doux dilué, de l‘eau tiède et un
chiffon doux.
• Nettoyez la surface extérieure du boîtier avec un savon doux dilué, de l‘eau tiède
et un chiffon doux.
• Séchez les surfaces intérieures et extérieures avec un chiffon doux.
• N‘utilisez pas d‘agents volatils, tels que sprays insecticides sur l‘appareil.
• Après une longue période d‘utilisation, des odeurs désagréables peuvent se
produire dans le four. Les remèdes suivants peuvent être utiles :
• Mettez quelques tranches de citron dans une tasse et faites fonctionner l‘appareil à
pleine puissance pendant 2 à 3 minutes.
• Mettez une tasse de thé rouge dans l‘appareil et faites-le fonctionner pendant 2 à
3 minutes à pleine puissance.
• Mettez quelques morceaux de peau d‘orange dans l‘appareil et faites-le
fonctionner pendant 2 à 3 minutes à pleine puissance.
Page 66

66
FR
CONSEILS POUR LE RECYCLAGE
Le pictogramme ci-contre apposé sur le produit signie que
la directive européenne 2012/19/UE s‘applique (poubelle
à roues barrée d’une croix). Ces produits ne peuvent être
jetés dans les poubelles domestiques courantes. Renseignezvous concernant les règles appliquées pour la collecte
d’appareils électriques et électroniques. Conformez-vous
aux réglementations locales et ne jetez pas vos anciens
produits avec les ordures ménagères. Le respect des règles
de recyclage des vieux produits aide à la protection de
l’environnement et de la santé de votre entourage contre
les conséquences négatives possibles. Le recyclage des
matériaux aide à réduire l’utilisation des matières premières.
Page 67

67
IT
Gentile cliente,
La ringraziamo per aver acquistato il nostro prodotto. La preghiamo di leggere
attentamente le seguenti istruzioni e di seguirle per evitare eventuali danni. Si declina
ogni responsabilità per danni derivati da una mancata osservazione delle avvertenze di
sicurezza e da un uso improprio del dispositivo. Scansione del codice QR per accedere
al manuale utente più recente e ad altre informazioni sul prodotto.
INDICE
Avvertenze di sicurezza68
Descrizione del prodotto e pannello dei comandi70
Utilizzo e funzioni71
Stoviglie idonee79
Consigli per l`utilizzo80
Blocco bambini81
Pulizia e manutenzione81
Smaltimento82
DATI TECNICI
Articolo numero
10027094, 10027095, 10032201
Alimentazione
230 V ~ 50 Hz
DICHIARAZIONE DI CONFORMITÀ
Produttore:
Chal-Tec GmbH, Wallstraße 16, 10179 Berlino, Germania.
Questo prodotto è conforme alle seguenti direttive
europee:
2014/30/UE (EMC)
2014/35/UE (LVD)
2011/65/UE (RoHS)
2010/1016/CE (ErP)
10027094
10027095
10032201
Page 68

68
IT
AVVERTENZE DI SICUREZZA
Leggere attentamente tutte le istruzioni e conservare il manuale per consultazioni
future. Per evitare il rischio di scosse elettriche in caso di malfunzionamento, collegare
il dispositivo ad una presa dotata di messa a terra. Collegare il dispositivo solo ad una
presa che corrisponde alla tensione indicata.
Per ridurre il rischio di incendi nella camera di cottura:
• Non cuocere eccessivamente gli alimenti.
• Rimuovere le chiusure e le clip metalliche da sacchetti di carta o di plastica prima di
introdurli nel forno a microonde.
• Non riscaldare olio o grasso di frittura nel microonde poiché la temperatura è
difcile da controllare.
• Dopo ogni uso pulire il forno a microonde con un panno umido per rimuovere lo
sporco. Inne asciugare. Eventuali residui accumulati potrebbero surriscaldarsi e
prendere fuoco.
• In caso di amme all´interno del forno a microonde, lasciare lo sportello chiuso,
spegnere il dispositivo e staccare la spina dalla presa.
• Se si riscaldano alimenti in contenitori di plastica, controllare costantemente il
microonde.
Per evitare esplosioni o ebollizione improvvisa:
• Non introdurre nel microonde contenitori chiusi per riscaldare i liquidi (come i
biberon con tappo a vite) in quanto tendono ad esplodere.
• Utilizzare contenitori con un‘ampia apertura e non rimuovere subito i liquidi caldi.
Attendere un po‘ prima di rimuoverli per evitare di scottarsi.
• Le patate, le salsicce e le castagne devono essere sbucciate o tagliate prima
della cottura. Non cuocere nel forno a microonde le uova crude e sode in quanto
possono esplodere anche dopo il riscaldamento.
• Dopo aver riscaldato alimenti per bambini, controllare che non siano troppo caldi
per evitare scottature.
• Se il cavo di alimentazione è danneggiato, farlo sostituire dal produttore, da un
centro assistenza autorizzato o da un tecnico qualicato.
• Dopo la cottura, il contenitore è molto caldo. Rimuoverlo con guanti da forno per
evitare di scottarsi.
• Aprire con la massima cautela il coperchio e i sacchetti di popcorn per evitare
scottature.
Page 69

69
IT
Evitare che il piatto girevole si rompa:
• Lasciare raffreddare il piatto girevole prima di pulirlo.
• Non poggiare piatti caldi o contenitori caldi sul piatto girevole freddo.
• Non inserire alimenti congelati o contenitori congelati sulla piastra girevole calda.
Avvertenze di sicurezza generali
• Assicurarsi che il contenitore non tocchi le pareti del microonde.
• Utilizzare solo contenitori adatti ad essere introdotti nel forno a microonde.
• Non conservare alimenti o altri oggetti nel forno a microonde.
• Non mettere in funzione il forno a microonde senza contenuto al suo interno,
altrimenti potrebbe danneggiarsi.
• Non lasciare incustodito il forno a microonde in presenza di bambini.
• Utilizzare solo gli accessori approvati dal produttore.
• Utilizzare il forno a microonde solo in ambienti interni.
• Se lo sportello o le guarnizioni sono danneggiate, non continuare ad utilizzare il
forno a microonde bensì farlo riparare da un tecnico.
• Non tentare di riparare il dispositivo da soli. Le riparazioni possono essere eseguite
solo da un tecnico qualicato.
• In caso di formazione di fumo, staccare la spina dalla presa e tenere chiuso lo
sportello del microonde per soffocare eventuali amme.
• Il riscaldamento di liquidi può comportare un´ebollizione improvvisa. Rimuovere
con cautela il contenitore.
• Non utilizzare prodotti abrasivi o raschietti metallici per pulire lo sportello altrimenti
il vetro può grafarsi o frantumarsi.
• Non utilizzare il dispositivo con un timer esterno o con una presa con telecomando.
• Il dispositivo non è per un uso commerciale bensì domestico e in ambienti similari.
• Il dispositivo serve a riscaldare alimenti e bevande. Riscaldare indumenti,
pantofole, cuscini e spugne può causare infortuni e incendi.
• Questo dispositivo non deve essere utilizzato da persone (compresi i bambini)
con capacità siche, sensoriali o mentali ridotte a meno che siano attentamente
sorvegliate o ben istruite relativamente all’utilizzo del dispositivo stesso da parte
di un supervisore responsabile della loro sicurezza. Assicurarsi che i bambini non
giochino con il dispositivo.
• Non utilizzare getti di vapore per la pulizia.
• Non toccare i componenti del dispositivo, lo sportello e gli elementi riscaldanti
all‘interno mentre il dispositivo è in funzione poiché diventano molto caldi.
Page 70

70
IT
DESCRIZIONE DEL PRODOTTO E PANNELLO DEI
COMANDI
Piatto rotante Alloggiamento
Finestra
Anello rotante
Griglia
Blocco sportello
Cavità
Asse rotante
Selezionare con la
rotellina la durata
di cottura e il peso
OPPURE il menu
automatico
Premere 1 volta: il
processo di cottura viene
arrestato, premere 2 volte:
le impostazioni vengono
cancellate
Impostazione della
potenza
Impostazione dell´ora
OPPURE del menu
Defrost
Start
Page 71

71
IT
UTILIZZO E FUNZIONI
Dopo aver inserito la spina, la spia a LED lampeggia tre volte. In seguito „:“ lampeggia
in modo permanente sul display. Ora è possibile selezionare il programma e impostare
l‘ora.
1. Suono acustico
Al termine del programma impostato, sul display appare „END“ e vengono emessi 3
segnali acustici. Se non si preme il tasto „Pause“ o „Cancel“ o non si apre lo sportello, il
segnale acustico viene emesso ogni 3 minuti.
2. Impostare l´ora
Con i tasti „Preset“ „Clock“ e „Defrost“, è possibile impostare la durata del programma.
Esempio: impostare l´ora sulle 12:30
Fasi Display
1
La spia lampeggia dopo l´accensione.
:
2
Tenere premuto per 3 secondi il tasto Preset Clock
Defrost.
0:00
3
Selezionare l'ora desiderata con la rotellina Auto
Cooking/Time Weight.
12:00
4
Premere di nuovo brevemente il tasto Preset Clock
Defrost.
12:00
5
Selezionare i minuti con la rotellina Auto Cooking/
Time Weight.
12:30
6
Premere di nuovo brevemente il tasto Preset Clock
Defrost oppure attendere 5 secondi che il valore
venga memorizzata.
Page 72

72
IT
3. Potenza del microonde e funzione grill
Questa funzione consente di effettuare impostazioni per cuocere o grigliare gli alimenti.
Premere il tasto Micro Power Grill/Combi e sul display a LED compare 100P-80P60P-40P-20P-G-C.1-C.2.
100P
Potenza elevata - 100% di potenza. Livello di potenza adatto per una
cottura rapida e completa.
80P
Potenza media - 80% di potenza. Livello di potenza adatto per una
cottura a velocità media.
60P
Potenza media - 60% di potenza. Livello di potenza adatto per
riscaldare gli alimenti.
40P
Potenza da media a bassa - 40% di potenza. Livello di potenza adatto
per scongelare gli alimenti surgelati.
20P
Bassa potenza - 20% di potenza. Livello di potenza adatto per
mantenere caldi gli alimenti.
G
Funzione grill: l´elemento riscaldante si attiva per la durata
selezionata. Funzione adatta per grigliare fettine sottili di carne,
salsicce o ali di pollo. Con questa funzione si ottiene una colorazione
dorata a piacere.
C1
Combinazione grill e forno a microonde. Il 30% del tempo la cottura
avviene a microonde e durante il restante 70% del tempo viene attivata
la modalità grill.
C2
Combinazione grill e microonde. Il 55% del tempo la cottura avviene
a microonde e il restante 45% del tempo la cottura avviene in modalità
grill.
Avvertenze importanti:
• Non mettere mai in funzione il dispositivo senza alimenti al suo interno.
• Per girare gli alimenti durante la cottura, premere brevemente il tasto Instant Start
per continuare il programma selezionato.
• Per rimuovere gli alimenti prima del termine programmato, premere una volta
il tasto Pause Cancel per terminare il programma selezionato ed evitare che il
programma riprenda all´utilizzo successivo.
Page 73

73
IT
Esempio: cottura a microonde per 10 minuti con il programma P80
Fasi Display
1
Il display lampeggia all'accensione.
:
2
Selezionare la potenza desiderata premendo più
volte il tasto Power Grill / Combi.
80 P
3
Selezionare la durata desiderata del programma
usando la manopola Auto Cooking /Time Weight.
10:00
4
Premere il tasto Instant Start. Il display visualizza il
tempo rimanente.
Nota: è possibile modicare la durata del programma mentre il dispositivo è in
funzione. Si raccomanda anche di girare gli alimenti a metà cottura. Premere una
volta il tasto Instant Start per continuare il programma.
4. Funzione di scongelamento
Con questa funzione è possibile scongelare gli alimenti surgelati. Premere il tasto Preset
Clock Defrost. Il display visualizza in alternanza d.1, d.2 e d.3.
d.1
Per scongelare la carne: peso da 0,1 a 2 kg.
d.2
Per scongelare il pollo - peso da 0,2 a 3 kg
d.3
Per scongelare i frutti di mare - peso compreso tra 0,1 e 0,9 kg.
Avvertenze importanti:
• Girare gli alimenti durante il processo per ottenere una cottura uniforme.
• Lo scongelamento degli alimenti di solito richiede più tempo della cottura.
• Quando gli alimenti si tagliano facilmente con un coltello, il processo di
scongelamento è completo.
• Le microonde possono penetrare nella maggior parte degli alimenti no ad una
profondità di circa 4 cm.
• Gli alimenti scongelati devono essere consumati il più presto possibile e non
devono essere ricongelati.
Page 74

74
IT
Esempio: scongelare 400 g di pollame
Fasi Display
1
La spia lampeggia dopo l'accensione.
:
2
Premere ripetutamente il tasto Preset Clock Defrost
no a selezionare il tipo di alimento.
d.2
3
Selezionare il peso degli alimenti da scongelare con
la rotellina Auto Cooking /Time.
0.4
4
Avviare il programma premendo il tasto Instant Start.
5:16
5
A metà del tempo, vengono emessi due segnali
acustici. Girare gli alimenti da scongelare per un
risultato ottimale. Aprire lo sportello e girare gli
alimenti. Quindi chiudere lo sportello e premere
di nuovo il tasto Instant Start per continuare con il
programma di scongelamento.
5. Programma automatico
Il dispositivo è dotato di programmi predeniti per un utilizzo semplice. Quando la spia
a LED lampeggia, ruotare la manopola in senso antiorario per visualizzare i programmi
da A.1, A.2 no a A.12. Selezionare con il tasto Enter il programma automatico
desiderato e il peso degli alimenti.
Selezionare il menu idoneo in base al tipo e al peso degli alimenti e fare riferimento alle
informazioni contenute nella tabella nella pagina seguente per ottenere risultati ottimali.
Page 75

75
IT
Display Tipo Peso
A.1
Popcorn
2 opzioni (3.0Oz [ca. 85g] e 3.5Oz [ca.
100g])
A.2
Patate 2 opzioni (0,45 kg e 0,65 kg)
A.3
Verdura 5 opzioni (0,1 - 0,2 ------ 0,5 kg)
A.4
Carne 6 opzioni (0,2 - 0,3 ------ 0,7 kg)
A.5
Pesce 6 opzioni (0,2 - 0,3 ------ 0,7 kg)
A.6
Pollo 6 opzioni (0,2 - 0,3 ------ 0,7 kg)
A.7
Riscaldare 5 opzioni (0,2 - 0,4 ------ 1,0 kg)
A.8
Bevande 2 opzioni (250ml e 500ml)
A.9
Riso 5 opzioni (0,1 - 0,2 ------ 0,5 kg)
A.10
Pasta 5 opzioni (0,1 - 0, 2 ------ 0 kg)
A . 11
Pane 5 opzioni (0,1 - 0,2 ------ 0,5 kg)
A. 12
Pizza 2 opzioni (1 pezzo e 2 pezzi)
Note importanti
• In modalità standby, ruotando la manopola in senso antiorario si accede alle
impostazioni dei programmi automatici. Ruotando la manopola in senso orario si
accede alle impostazioni dell´ora con l´impostazione standard „100% di potenza
„.
• La durata predenita per i programmi automatici si basa su una temperatura
degli alimenti di 20-25 °C prima della cottura. Temperature superiori o inferiori
inuiscono sul tempo necessario.
• Il risultato nale dipende in larga misura dalla temperatura, dal peso e dalle
condizioni dei prodotti alimentari utilizzati. Regolare la durata del programma in
caso si notino divergenze rispetto alla tabella di cui sopra.
Page 76

76
IT
Esempio: cuocere 400 g di pesce
Fasi Display
1
La spia lampeggia dopo l'accensione.
:
2
Ruotare la manopola in senso antiorario no a
raggiungere il programma automatico desiderato.
A.5
3
Selezionare il programma premendo il tasto Enter.
A.5
4
Usare la manopola Auto Cooking / Time Weight
per selezionare il peso.
A.5
5
Avviare il programma premendo il tasto Instant Start.
10:00
6. Avvio programmato
Se non si desidera avviare un programma immediatamente, bensì ad un orario
specico, con questa funzione è possibile selezionare il programma desiderato e
l‘ora di avvio desiderata: il programma si avvia automaticamente all‘ora selezionata.
La selezione avviene in due fasi: impostazione dell‘ora corrente, impostazione del
programma e della durata.
Page 77

77
IT
Esempio: ora sono le 12:30 e si desidera impostare la cottura automatica alle
14:20 ad una potenza di 100P per 9 minuti e 30 secondi.
Fasi Display
1
La spia lampeggia all'accensione.
:
1.1
Tenere premuto per tre secondi il tasto Preset Clock
Defrost.
0:00
1.2
Selezionare l'ora attuale usando la manopola Auto
Cooking /Time Weight.
12:00
1.3
Premere nuovamente il tasto Preset Clock Defrost per
confermare la selezione dell'ora.
12:00
1.4
Selezionare i minuti con la manopola Auto Cooking
/Time Weight.
12:30
1.5
Premere una volta il tasto Preset Clock Defrost
oppure attendere 5 secondi per confermare il
valore.
12:30
2
Selezionare il programma e la durata.
2.1
Selezionare la potenza del microonde premendo il
tasto Power Grill/Combi.
100P
2.2
Selezionare la durata ruotando la manopola Auto
Cooking /Time Weight.
9:30
2.3
Tenere premuto per 3 secondi il tasto Preset Clock
Defrost per accedere all'ora corrente.
3
Impostare l'ora di inizio desiderata come descritto ai
punti 1.2, 1.3 e 1.4.
4
Premere il tasto Preset Clock Defrost per confermare.
Il programma è stato attivato e si mette in funzione
all'ora programmata.
5
È possibile controllare l'ora di inizio impostata
premendo il tasto Preset Clock Defrost.
Page 78

78
IT
7. Modalità multisequenza
Alcune ricette richiedono diverse modalità di cottura e impostazioni di tempo per
ottenere risultati ottimali. Il programma personalizzato può essere combinato come
segue:
Esempio: si desidera cuocere la pietanza per 3 minuti al 100% di potenza e
poi grigliare per 9 minuti. In questo caso si tratta di una programmazione a 2
sequenze.
Fasi Display
1
100% di potenza per 3 minuti
1.1
Premere il tasto Micro Power Grill/Combi per
selezionare la potenza.
100 P
1.2
Selezionare la durata con la manopola Auto
Cooking/ Time Weight.
3:30
2
Grigliare per 9 minuti
2.1
Selezionare il programma desiderato con il tasto
Micro Power Grill/Combi.
G
2.2
Selezionare la durata con la manopola Auto
Cooking/ Time Weight.
9:00
3
Avviare il programma premendo il tasto Instant Start.
Note importanti:
• Al termine del programma, si attiva automaticamente la funzione grill.
• È possibile impostare no a quattro sequenze di programma. Procedere come
descritto sopra.
Page 79

79
IT
STOVIGLIE IDONEE
In linea generale sono idonei alla cottura a microonde i contenitori e le stoviglie
resistenti al calore in ceramica, in vetro o in plastica.
Nota: non utilizzare mai oggetti metallici in modalità microonde o combinata.
Materiale Micro Grill Combi Nota
Ceramica resistente al calore
Sì Sì Sì
Non utilizzare oggetti in
ceramica con decorazioni in metallo.
Plastica resistente
al calore
Sì No No
Non idonea per
una lunga cottura al
microonde.
Vetro termoresistente
Sì No No
Pellicola di
plastica
Sì No No
Non idonea per cuocere la carne.
Griglia No Sì Sì
Contenitore in
metallo
No No No
Non idoneo al microonde. Le microonde non
possono penetrare il
metallo.
Foglio laccato No No No
Scarsa resistenza al
calore. Non idoneo per
temperature elevate.
Legno No No No
Scarsa resistenza al
calore. Non idoneo per
temperature elevate.
Foglio laccato No No No
Scarsa resistenza al
calore. Non idoneo per
temperature elevate.
Legno No No No
Scarsa resistenza al
calore. Non idoneo per
temperature elevate.
Page 80

80
IT
CONSIGLI PER L`UTILIZZO
Per ottenere risultati ottimali, seguire le istruzioni riportate di seguito:
Sistemare gli alimenti:
Posizionare gli alimenti più spessi sul bordo del piatto girevole e gli alimenti più sottili al
centro. Sistemare bene gli alimenti e, se possibile, non sovrapporli.
Durata del programma:
Selezionare inizialmente un tempo inferiore a quello necessario per la cottura.
Controllare il risultato al termine ed eventualmente prolungare il tempo di cottura.
Una cottura troppo lunga può comportare fumo o incendi e, in generale, risultati non
ottimali.
Cottura uniforme degli alimenti:
Alimenti come pollo, bistecche o fettine di carne devono essere girati durante la cottura.
A seconda del tipo di alimento, si consiglia di spostare una o due volte l‘alimento dal
bordo al centro del piatto rotante durante la cottura.
Lasciare raffreddare:
Lasciare raffreddare gli alimenti durante l‘intera sequenza del programma e prima di
servirli.
Verica dello stato di cottura:
Sia il colore che la consistenza dell‘alimento indicano se questo è completamente cotto,
ad esempio:
• Il vapore fuoriesce da tutte le parti degli alimenti e non solo da qualche angolo.
• E´ possibile rimuovere facilmente le ossa dal pollo.
• Non ci sono residui di sangue nella carne.
• Il pesce può essere facilmente tagliato con una forchetta.
Nota sulle stoviglie in plastica:
In caso di utilizzo di stoviglie in plastica o in materiale non resistente al calore,
posizionare sotto un piatto resistente al calore in porcellana o simile per evitare danni al
piatto rotante o all‘anello rotante.
Nota sui sacchetti in plastica per cottura al forno:
Se si cuociono alimenti con un alto contenuto di grassi in un sacchetto idoneo per
cottura al forno, assicurarsi che gli alimenti non vengano a contatto con il sacchetto. In
caso contrario questo potrebbe sciogliersi.
Note sulle stoviglie per il microonde:
Alcune stoviglie per la cottura a microonde potrebbero non essere idonee per cucinare
alimenti ricchi di grassi o zuccheri. Non superare i tempi di cottura indicati nel manuale
delle stoviglie.
Page 81

81
IT
BLOCCO BAMBINI
Questa funzione consente di bloccare il pannello dei comandi, ad esempio durante la
pulizia o per impedire ai bambini di azionare il dispositivo. In questa modalità tutti i tasti
sono disattivati.
1 Per attivare il blocco di sicurezza, tenere premuto per 3 secondi il tasto Pause/
Cancel.
2 Tenere premuto per 3 secondi il tasto Pause/Cancel per disattivare il blocco di
sicurezza.
PULIZIA E MANUTENZIONE
• Pulire regolarmente il dispositivo e rimuovere sempre eventuali residui di alimenti.
• Spegnere il dispositivo e scollegare il cavo di alimentazione.
• Pulire l‘interno del dispositivo con un detergente delicato e diluito con acqua
tiepida. Utilizzare un panno morbido.
• Pulire le superci esterne con un detergente delicato e diluito, acqua tiepida e un
panno morbido.
• Asciugare le superci interne ed esterne con un panno morbido.
• Non utilizzare liquidi volatili, come ad es. insetticidi con il dispositivo.
• Dopo un lungo periodo di utilizzo possono vericarsi odori sgradevoli nel forno. I
seguenti rimedi potrebbero essere d‘aiuto:
• Mettere alcune fette di limone in una tazza e accendere il dispositivo a piena
potenza per 2 o 3 minuti.
• Mettere una tazza di tè rosso nel dispositivo e lasciarlo in funzione per 2 o 3 minuti
a piena potenza.
• Mettere alcuni pezzi di buccia d‘arancia nel dispositivo e lasciarlo in funzione a
piena potenza per 2 o 3 minuti.
Page 82

82
IT
SMALTIMENTO
Se sul prodotto è presente la gura a sinistra (il cassonetto
dei riuti mobile sbarrato), si applica la direttiva europea
2012/19/UE. Questi prodotti non possono essere smaltiti con
i riuti normali. Informarsi sulle disposizioni vigenti in merito
alla raccolta separata di dispositivi elettrici ed elettronici.
Non smaltire i vecchi dispositivi con i riuti domestici. Grazie
al corretto smaltimento dei vecchi dispositivi, si proteggono
il pianeta e la salute delle persone da possibili conseguenze
negative. Il riciclo di materiali aiuta a ridurre il consumo di
materie prime.
Page 83

Page 84

 Loading...