

Page 1

10013269 10013270
Luftreiniger
Air Cleaner
Puricateur d’air
Page 2

Page 3
3
DE
Sehr geehrter Kunde,
wir gratulieren Ihnen zum Erwerb Ihres Gerätes. Lesen Sie die folgenden Hinweise
sorgfältig durch und befolgen Sie diese, um möglichen Schäden vorzubeugen. Für
Schäden, die durch Missachtung der Hinweise und unsachgemäßen Gebrauch
entstehen, übernehmen wir keine Haftung.
INHALTSVERZEICHNIS
Sicherheitshinweise4
Geräteübersicht4
Bedienfeld5
Inbetriebnahme und Benutzung6
Fehlersuche und Fehlerbehebung7
Hinweise zur Entsorgung7
TECHNISCHE DATEN
Artikelnummer 10013269, 10013270
Stromversorgung 220-240 V ~ 50/60 Hz
Leistung 35 W
Luftuss 108 m
3
/h
Wellenlänge UV-Lampe 254 nm
KONFORMITÄTSERKLÄRUNG
Hersteller:
Chal-Tec GmbH, Wallstraße 16, 10179 Berlin, Deutschland.
Dieses Produkt entspricht den folgenden Europäischen
Richtlinien:
2014/30/EU (EMV)
2014/35/EU (LVD)
2011/65/EU (RoHS)
206/2012/EU (ErP)
English 9
Français 15
Español
Italiano
Page 4
4
DE
SICHERHEITSHINWEISE
• Ziehen Sie den Stecker aus der Steckdose, wenn Sie das Gerät länger nicht
benutzen.
• Entfernen Sie das komplette Verpackungsmaterial, bevor Sie das Gerät erstmalig
benutzen.
• Benutzen Sie das Gerät nicht in Küchen.
• Stecken Sie keine Gegenstände in den Lufteinlass und den Luftauslass.
• Schauen Sie nicht direkt in die UV-Lampe.
• Stellen Sie das Gerät mindestens 1,5 Meter entfernt von anderen elektrischen
Geräten auf.
• Stellen Sie das Gerät nicht unter einem Vorhang auf.
• Stellen Sie das Gerät so auf, dass Kinder es nicht erreichen.
• Benutzen Sie das Gerät nur in trockenen Innenräumen. Benutzen Sie es nicht in
feuchten Räumen oder im Freien.
• Ziehen Sie immer den Stecker aus der Steckdose, bevor Sie das Gerät reinigen
oder den Filter wechseln.
• Gießen Sie kein Wasser auf das Gerät und tauchen Sie das Gerät nicht in Wasser.
• Wenn Sie das Gerät zusammen mit einer Gasheizung benutzen, sorgen sie für
ausreichende Belüftung, damit sich kein Kohlenmonoxid anstaut.
• Stellen Sie das Gerät nicht in die Nähe einer Heizung oder anderer Wärmequellen.
• Falls das Gerät beschädigt ist, muss es vom Hersteller, einem autorisierten
Fachbetrieb oder einer ähnlich qualizierten Person repariert werden.
• Achten Sie darauf den Filter regelmäßig zu überprüfen und zu reinigen, damit das
Gerät volle Leistung bringt.
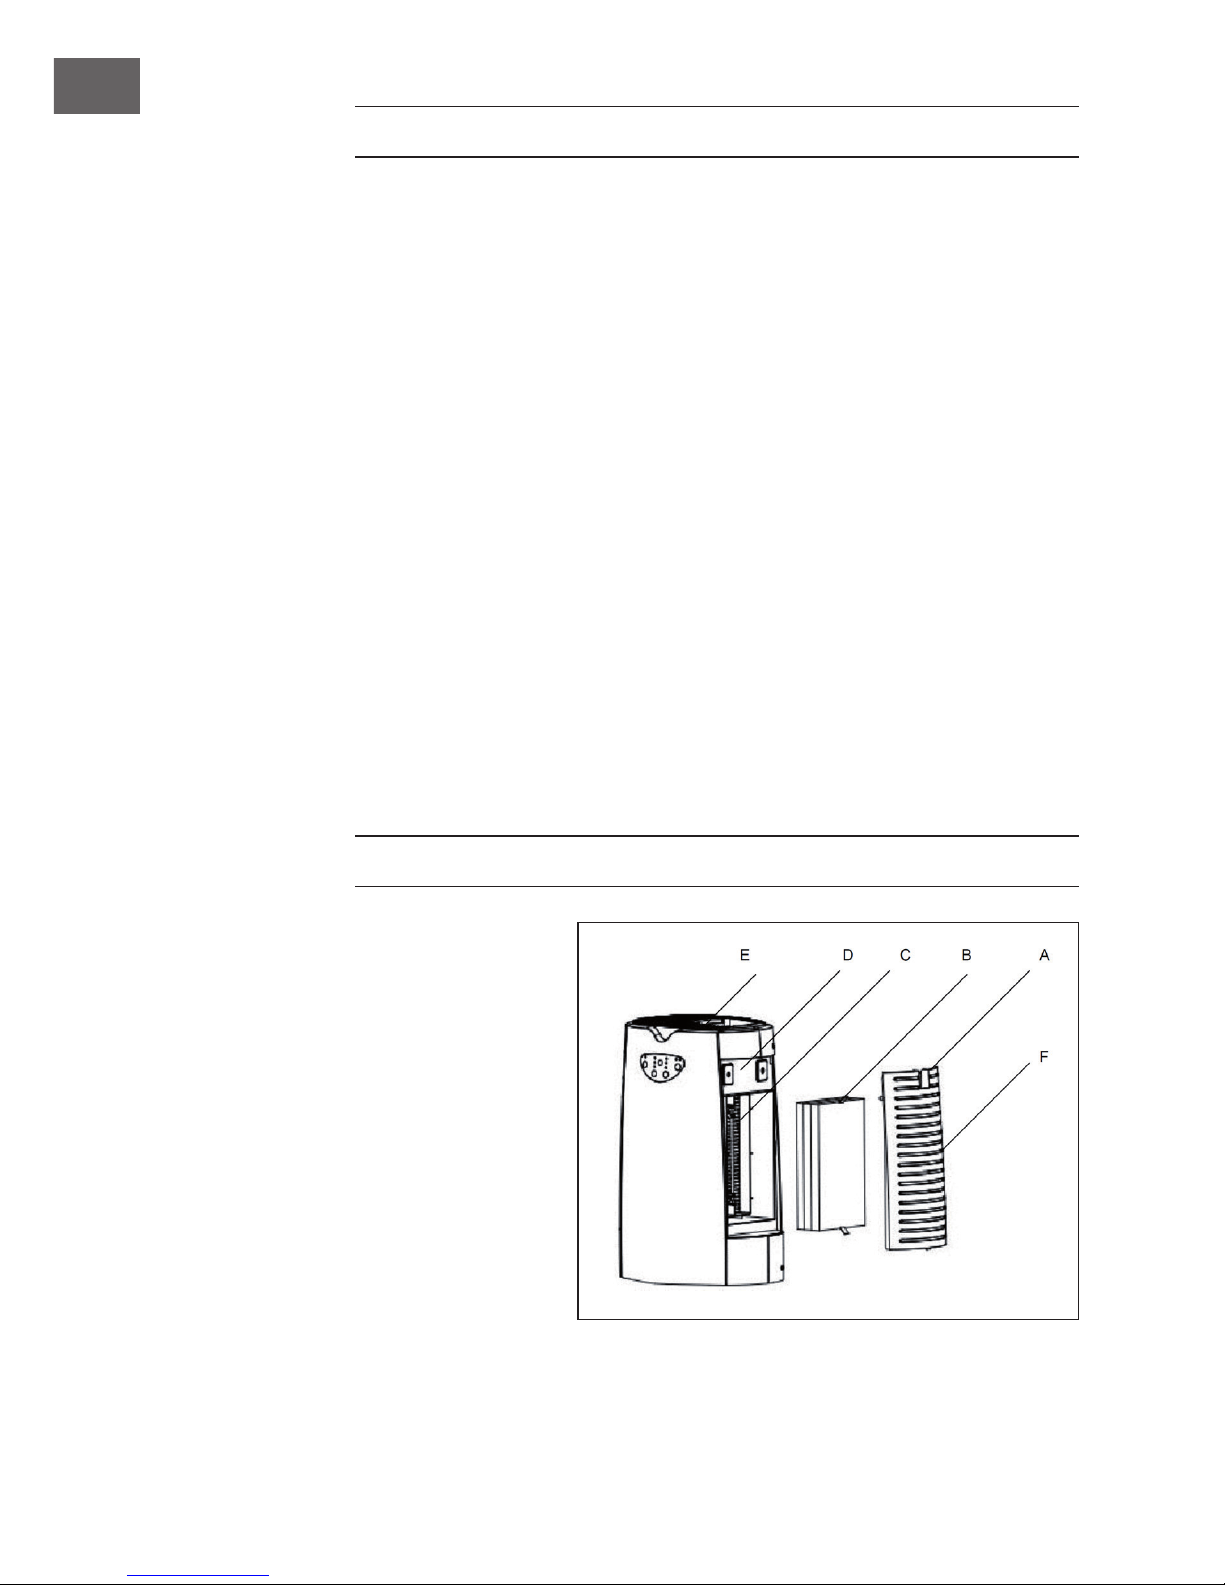
GERÄTEÜBERSICHT
A Griff zum öffnen der
Abdeckung
B 3 in1 Filter (HEPA-,
Aktivkohle- und PCO-
Filter )
C UV-Lampe(2 Stück)
D Magnetische Pads
E Luftauslas und
Luftionisator
F Lufteinlas und
Filterabdeckung
Page 5
5
DE
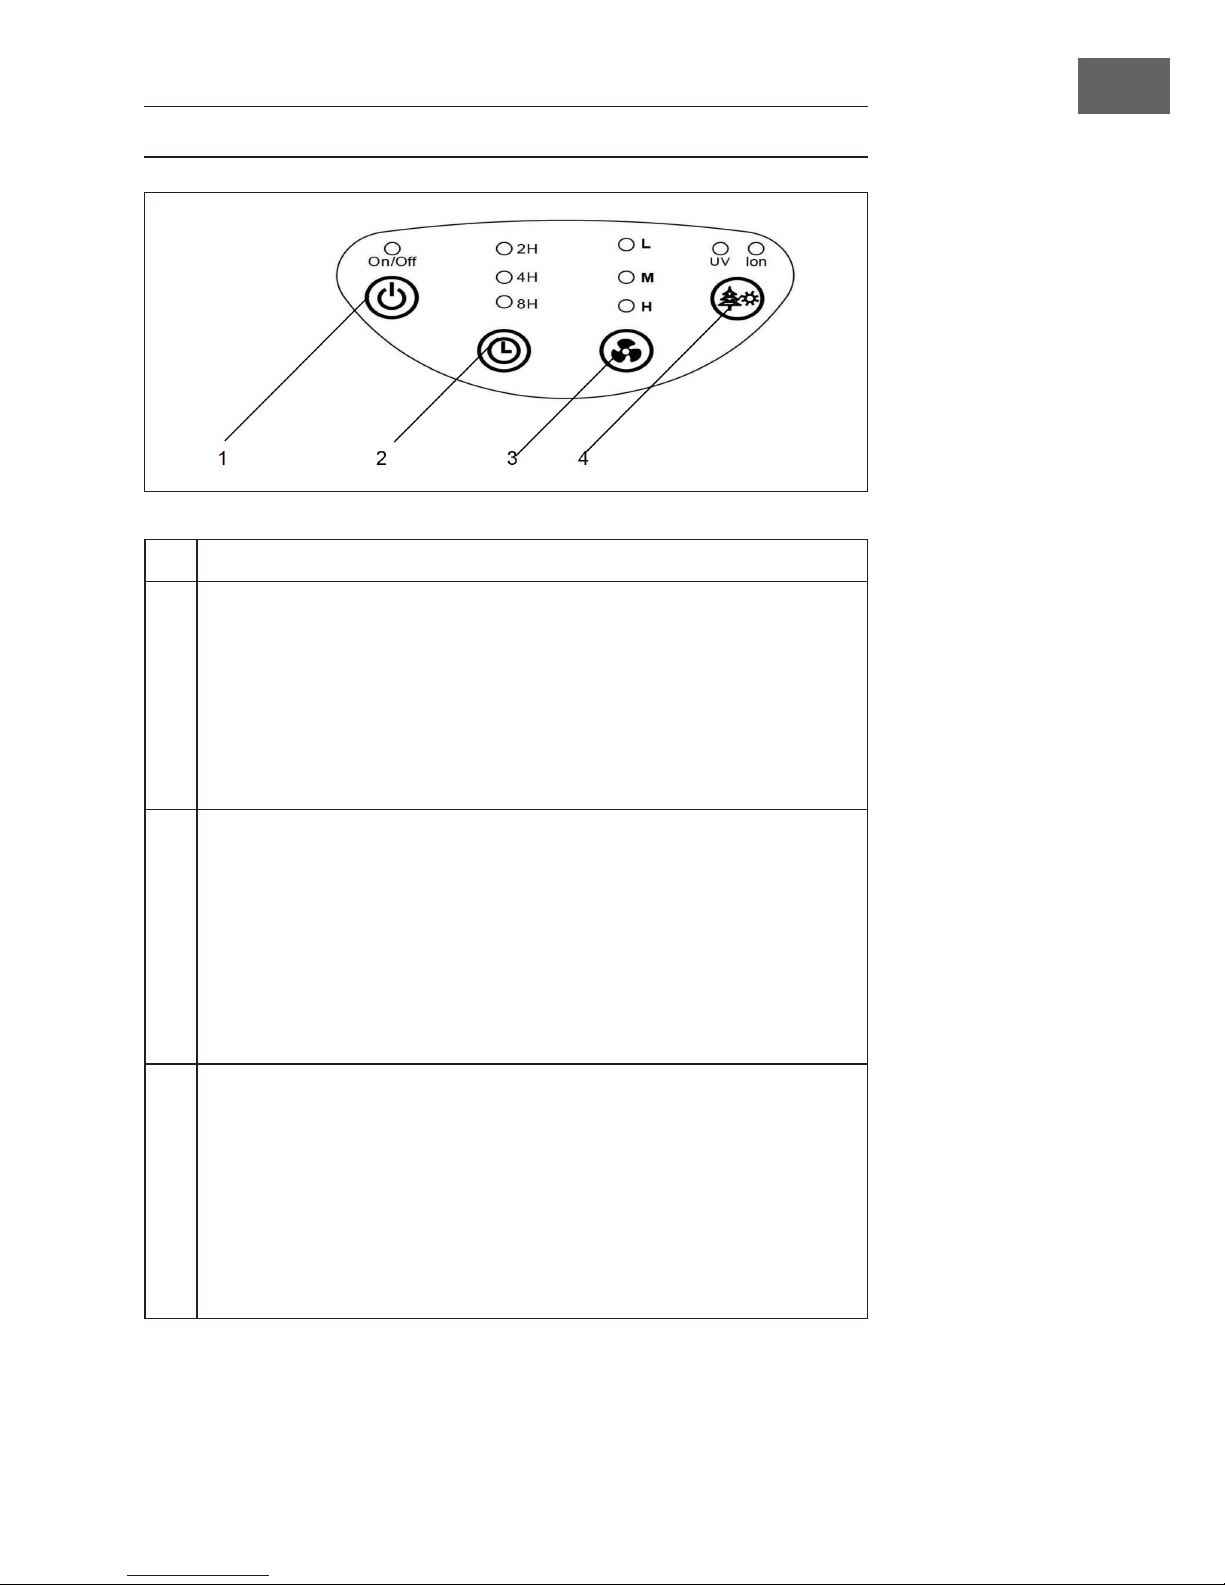
BEDIENFELD
1 Ein/Aus-Schalter
2 Schaltuhr-Knopf
• Das Gerät kann automatisch nach 2,4 oder 8 Stunden abgeschaltet
werden.
• Betätigen Sie diesen Knopf, um die gewünschte Abschaltzeit auszuwählen.
Ist der Timer aktiviert so leuchtet eine Kontrollleuchte auf.
• Wenn Sie die automatische Abschaltung nicht benötigen, drücken Sie die
Taste so lange bis die Kontrollleuchte erlischt.
3 Geschwindigkeitstaste
• Niedrige Geschwindigkeit
• Mittlere Geschwindigkeit
• Hohe Geschwindigkeit
Ist die gewünschte Geschwindigkeit eingestellt, so leuchtet eine Kontrollleuchte
auf. Hinweis: Bei der Erstnutzung des Gerätes empfehlen wir Ihnen
einen Durchlauf von 30 Minuten auf der höchsten Stufe.
4 Luftionisator und UV-Lampe
• Einmaliges Drücken: Ionisator und UV-Lampe sind an
• Zweimaliges Drücken: Ionisator ist aus und die UV-Lampe an
• Dreimaliges Drücken: Ionisator ist aus und die UV-Lampe aus
• Standardeinstellung: Ionisator ist an und die UV-Lampe aus
Hinweis: Bendet sich das Gerät nicht in Benutzung, schalten Sie es ab
und ziehen Sie den Stecker.
Page 6
6
DE
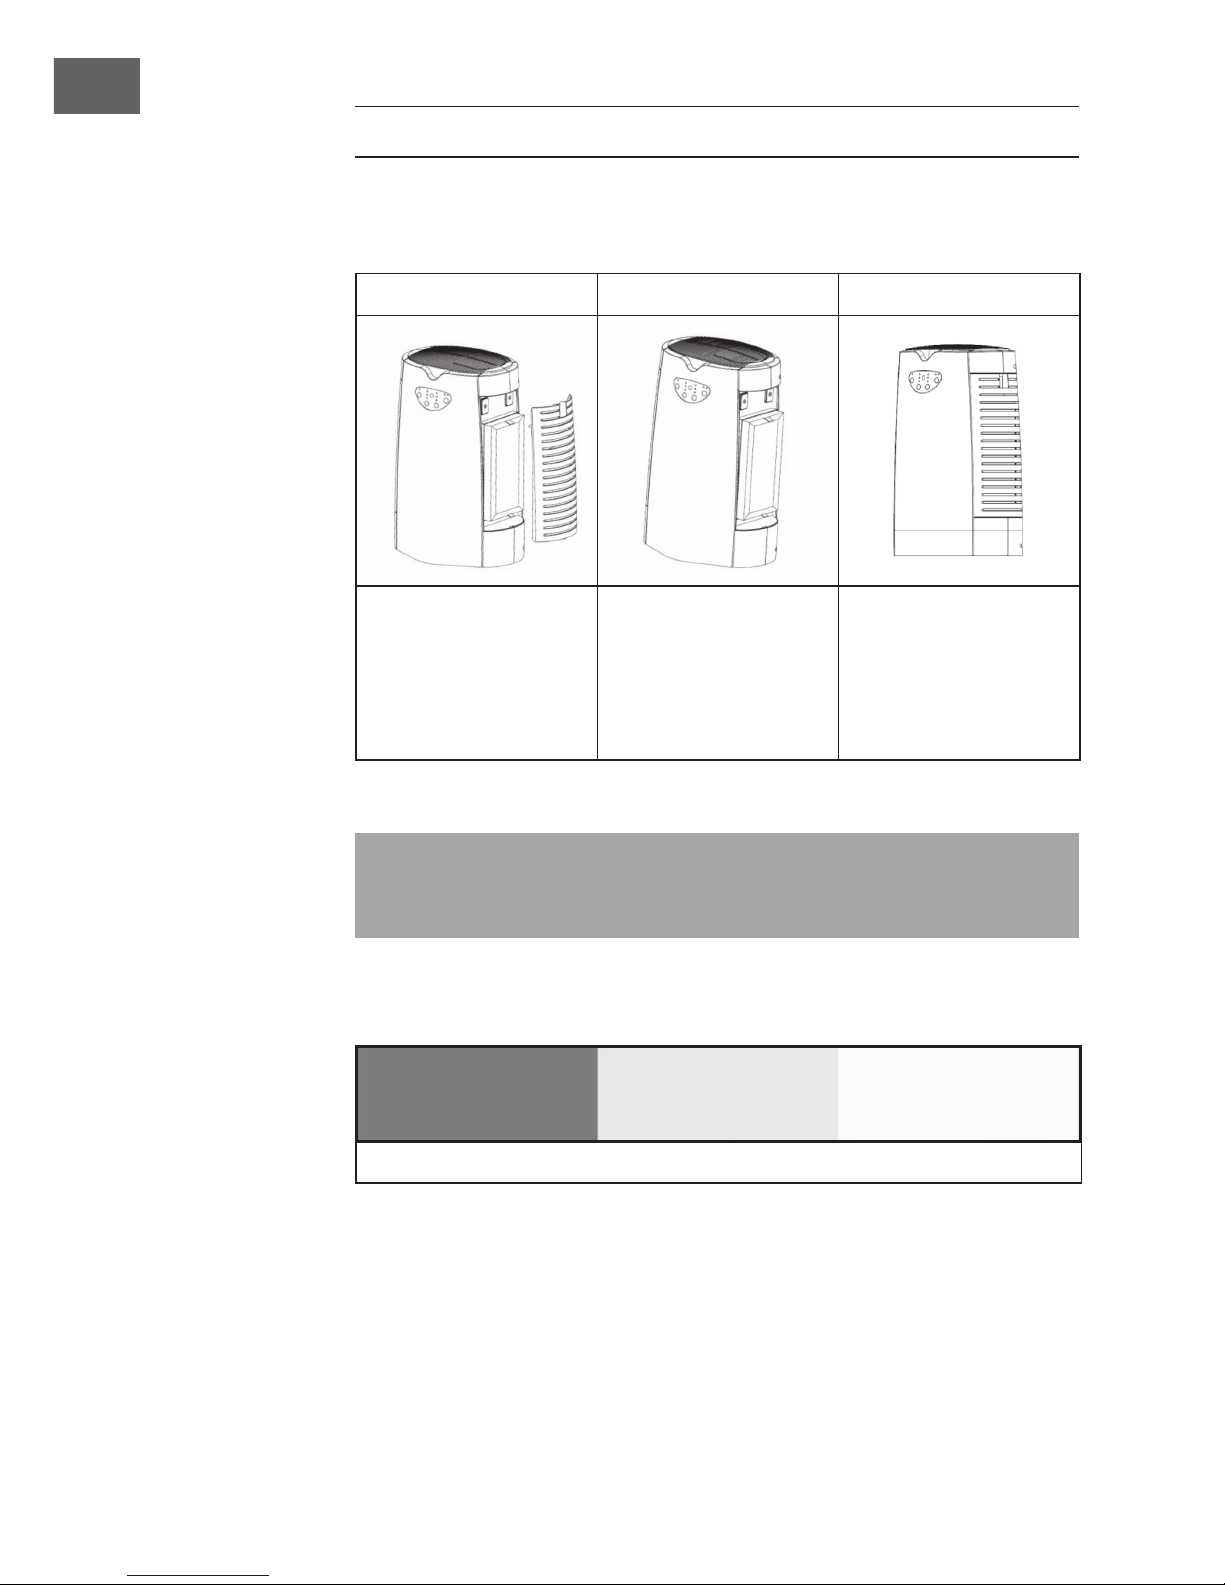
INBETRIEBNAHME UND BENUTZUNG
Schließen Sie das Gerät nicht an das Stromnetz an. Entfernen Sie jegwelche
Verpackung.
1 2 3
Öffnen Sie die
Filterabdeckung.
Setzen Sie vorsichtig den
Filter ein.
Setzen Sie die
Filterabdeckung wieder
ein. Stellen Sie das Gerät
an einem geeigneten Platz
auf und schließe Sie es an
das Stromnetz an.
Nach der Selben Methode können Sie auch die verschmutzen Filter ersetzen.
Hinweis: Versuchen Sie den 3 in1 Filter nicht zu waschen Sie, es ist kein
Mehrwegprodukt. Filter, der sich in der Abdeckung bendet kann mit dem
Staubsauger gereinigt werden und notfalls mit kaltem Wasser abgespült werden.
Normalerweise kann der 3 in 1 Filter zwischen 6 und 12 Monaten eingesetzt werden.
Überprüfen Sie den Verschmutzungsgrad des Filters mit Hilfe der folgenden Darstellung:
Filter ersetzen Akzeptabel Sauber
Page 7
7
DE
FEHLERSUCHE UND FEHLERBEHEBUNG
Problem Mögliche Ursache und Lösungsansatz
Unzureichende
Belüftung
Überprüfen Sie die Filter nach dem Verschmutzungsgrad .
Überprüfen Sie, ob die Lufteinlässe und –auslässe versperrt
sind.
Das Gerät startet
nicht
Überprüfen Sie die Stromversorgung und Sicherungen
Ungewöhnliche
Geräusche
Überprüfen Sie, ob irgendwelche Fremdkörper in Kontakt mit
dem Lüfter stehen.
Der 3 in 1 Filter ist stark verschmutzt und muss ersetzt werden.
Die Dichtungen wurden falsch eingesetzt.
Das Gerät steht auf einer nicht ebenen Oberäche
HINWEISE ZUR ENTSORGUNG
Bendet sich die linke Abbildung (durchgestrichene Mülltonne
auf Rädern) auf dem Produkt, gilt die Europäische Richtlinie
2012/19/EU. Diese Produkte dürfen nicht mit dem normalen
Hausmüll entsorgt werden. Informieren Sie sich über die
örtlichen Regelungen zur getrennten Sammlung elektrischer
und elektronischer Gerätschaften. Richten Sie sich nach
den örtlichen Regelungen und entsorgen Sie Altgeräte nicht
über den Hausmüll. Durch die regelkonforme Entsorgung
der Altgeräte werden Umwelt und die Gesundheit ihrer
Mitmenschen vor möglichen negativen Konsequenzen
geschützt. Materialrecycling hilft, den Verbrauch von
Rohstoffen zu verringern.
Page 8

Page 9

9
EN
Dear Customer,
Congratulations on purchasing this equipment. Please read this manual carefully and
take care of the following hints to avoid damages. Any failure caused by ignoring the
mentioned items and cautions mentioned in the instruction manual are not covered by
our warranty and any liability.
CONTENT
Safety Instructions10
Product Description10
Control Panel11
Use and Operation12
Troubleshooting13
Hints on Disposal13
TECHNICAL DATA
Item number 10013269, 10013270
Power supply 220-240 V ~ 50/60 Hz
Power consumtion 35 W
Air ow 108 m
3
/h
Wavelength UV light 254 nm
DECLARATION OF CONFORMITY
Producer:
Chal-Tec GmbH, Wallstraße 16, 10179 Berlin, Germany.
This product is conform to the following European
Directives:
2014/30/EU (EMC)
2014/35/EU (LVD)
2011/65/EU (RoHS)
206/2012/EU (ErP)
Page 10

10
EN
SAFETY INSTRUCTIONS
• Pull out the plug when not using the machine for a long time.
• Please take off the packing polybag of lter before using the machine.
• Do not use the air purier in kitchen.
• Do not put sundries in airow inlet and airow outlet.
• Do not look directly to the UV light.
• Place the machine in above 1.5 meters distance from electrical appliance, such as
television and computer.
• Do not place the machine beside curtain.
• Do not place the machine to where the children can touch.
• The machine can be only used in the indoor dry place, do not use it under the moist
environment, like the bathroom or outdoors.
• Unplug the plug when clean or change the lter.
• Do not pour water on the machine, nor soak the machine in water.
• When using the machine with gas appliance, please allow the indoor air to
circulate. Because this machine have no function of eliminating the carbon
monoxide.
• Do not place the machine in a heating objects, such as stoves, heaters etc.
• If the machine is broken, it must be repaired by the manufacturer or its service
provider or similarly qualied persons.
• The machine must be regularly checked, regularly clear the grime and replace the
lter elements, so that the purifying effect won`t be affected.
PRODUCT DESCRIPTION
A Handle to open the
lter
B 3 in 1 lter pads
(HEPA lter, Activated
carbon lter, PCO
lter)
C UV Lamp (254 nm)
D Magnetism pads
E Air outlet and Ionizer
F Air inlet grill and lter
cover
Page 11

11
EN
CONTROL PANEL
1 On/Off button
2 Timer button
• By pressing this button, the purier can be timed to operate for intervals of
2 hours, 4 hours and 8 hours, stopping automatically when the selected
operating time has elapsed.
• Press this button (Timer) to select the required operating time. A warning
light automatically indicates the remaining operating time.
• To select the continuous operating mode, press the button repeatedly until
there are no more amber indicator lights lit up.
3 Speed button
• Low speed
• Mid speed
• High speed
To change this speed, press on the SPEED/On button again. The red warning
light indicates the selected speed. Note: We suggest to use high speed in
30 minutes for rst time usage.
4 Ionizer and UV button
• 1st press: Ionizer and UV lamp on.
• 2nd press: Ionizer off and UV lamp on.
• 3rd press: Ionizer off and UV lamp off
• The default setting is Ionizer on and UV lamp is off. The purier will be
come back to default setting after the above 3 press
Important note: When the unit is not in use, switch it off and unplug it.
Page 12

12
EN
USE AND OPERATION
Remove the plastic protective wrapping for 3-in-1 lter pads (HEPA, active carbon and
PCO lters). After removing any plastic bags, reinstall the lters in accordance with the
instructions:
1 2 3
Open the lter cover. Carefully insert the lter. Reinstall the lter cover.
Place the unit in a suitable
place and connect it to the
mains.
Following the same method you can also replace the dirty lters.
Note: Do not try to wash the 3 in1 lter, it is not a reusable product. Filter located in
the cover can be cleaned with the vacuum cleaner and - if necessary - rinsed with
cold water.
To keep your unit operating at strong efciency, the set of lter pads should be replaced
regularly. As usual, the lter can last from 6 months to 12 months under normal
conditions of use.
Replacement level Accepted level Better level
Page 13

13
EN
TROUBLESHOOTING
Problem Possible cause and suggested solution
Insufcient air ow.
Check that the lters are clean.
Check for any obstructions in the air inlet and outlet.
Unit will not start. Check the power supply and electric fuses.
Excessive noise.
Check for any foreign objects in contact with the fan.
The lter may be clogged and ready for replacement.
The foam sealing gaskets have been installed incorrectly.
Uneven positioning.
HINTS ON DISPOSAL
According to the European waste regulation 2012/19/EU this
symbol on the product or on its packaging indicates that this
product may not be treated as household waste. Instead it should
be taken to the appropriate collection point for the recycling of
electrical and electronic equipment. By ensuring this product is
disposed of correctly, you will help prevent potential negative
consequences for the environment and human health, which
could otherwise be caused by inappropriate waste handling of
this product. For more detailled information about recycling of
this product, please contact your local council or your household
waste disposal service.
Page 14

Page 15

15
FR
Cher client,
Toutes nos félicitations pour l’acquisition de ce nouvel appareil. Veuillez lire attentivement
les instructions suivantes de branchement et d’utilisation an d’éviter d’éventuels
dommages. Le fabricant ne saurait être tenu pour responsable des dommages dus au nonrespect des consignes de sécurité et à la mauvaise utilisation de l’appareil.
SOMMAIRE
Consignes de sécurité16
Aperçu de l‘appareil16
Panneau de commande17
Mise en marche et utilisation18
Identication et résolution des problèmes19
Conseils pour le recyclage19
FICHE TECHNIQUE
Numéro d'article 10013269, 10013270
Alimentation 220-240 V ~ 50/60 Hz
Puissance 35 W
Flux d'air 108 m3/h
Longueur d'onde de la lampe à UV 254 nm
DÉCLARATION DE CONFORMITÉ
Fabricant :
Chal-Tec GmbH, Wallstraße 16, 10179 Berlin, Allemagne.
Ce produit est conforme aux directives européennes
suivantes :
2014/30/UE (CEM)
2014/35/UE (LVD)
2011/65/UE (RoHS)
206/2012/UE (ErP)
Page 16

16
FR
CONSIGNES DE SÉCURITÉ
• Débranchez la che de la prise si vous n‘utilisez pas l‘appareil pendant une
période prolongée.
• Retirez tous les matériaux d‘emballage avant d‘utiliser l‘appareil pour la première
fois.
• N‘utilisez pas l‘appareil dans une cuisine.
• N‘insérez pas d‘objets dans l‘entrée d‘air ou la sortie d‘air.
• Ne regardez pas directement vers la lampe à UV.
• Placez l‘appareil à au moins 1,5 mètre d‘un autre appareil électrique.
• Ne placez pas l‘appareil sous un rideau.
• Placez l‘appareil hors de portée des enfants.
• Utilisez l‘appareil uniquement dans des lieux intérieurs secs. Ne l‘utilisez pas dans
des pièces humides ou à l‘extérieur.
• Débranchez toujours l‘appareil avant de le nettoyer ou de changer le ltre.
• Ne versez pas d‘eau sur l‘appareil et ne plongez pas l‘appareil dans l‘eau.
• Lorsque vous utilisez l‘appareil avec un chauffage au gaz, assurez une ventilation
adéquate pour éviter l‘accumulation de monoxyde de carbone.
• Ne placez pas l‘appareil à proximité d‘un radiateur ou d‘autres sources de chaleur.
• Si l‘appareil est endommagé, il doit être réparé par le fabricant, un spécialiste
agréé ou une personne de qualication équivalente.
• Assurez-vous de vérier et de nettoyer périodiquement le ltre pour une
performance optimale.
APERÇU DE L‘APPAREIL
A Poignée pour ouvrir le
cache
B Filtre 3 en 1 (HEPA,
charbons actifs et
PCO)
C Lampe à UV (2
pièces)
D Pads magnétiques
E Sortie d‘air et ioniseur
d‘air
F Entrée d‘air et cache
du ltre
Page 17

17
FR
PANNEAU DE COMMANDE
1 Bouton de marche/arrêt
2 Bouton de minuterie
• L‘appareil peut être éteint automatiquement au bout de 2,4 ou 8 heures.
• Appuyez sur cette touche pour sélectionner l‘heure d‘arrêt désirée. Si la
minuterie est activée, un témoin s‘allume.
• Si vous n‘avez pas besoin de l‘arrêt automatique, appuyez sur la touche
jusqu‘à ce que le voyant s‘éteigne.
3 Touche de vitesse
• Vitesse faible
• Vitesse moyenne
• Vitesse rapide
Si la vitesse désirée est réglée, un voyant s‘allume. Remarque : Lorsque vous
utilisez l‘appareil pour la première fois, nous vous recommandons de le
faire fonctionner 30 minutes à vitesse maximum.
4 Ioniseur d‘air et lampe à UV
• Un appui : l‘ioniseur et la lampe à UV sont allumés
• Deux appuis : l‘ioniseur est éteint et la lampe à UV allumée
• Trois appuis : l‘ioniseur est éteint et la lampe à UV est éteinte
• Puissance standard : l‘ioniseur est allumé et la lampe à UV est éteinte
Remarque : si vous n‘utilisez pas l‘appareil, éteignez-le et débranchez
la che de la prise.
Page 18

18
FR
MISE EN MARCHE ET UTILISATION
Ne branchez pas l‘appareil sur le secteur. Enlever tous les emballages.
1 2 3
Ouvrez le cache du ltre. Insérez correctement le
ltre à l'intérieur.
Réinstallez le couvercle
du ltre. Placez l'appareil
dans un endroit approprié
et branchez-le au secteur.
Vous pouvez également utiliser la même méthode pour remplacer les ltres sales.
Remarque : N‘essayez pas de laver le ltre 3 en 1, il ne s‘agit pas d‘un produit
réutilisable. Le ltre situé dans le couvercle peut être nettoyé avec l‘aspirateur et, si
nécessaire, rincé à l‘eau froide.
En principe, le ltre 3 en 1 peut être utilisé entre 6 et 12 mois.Vériez le degré de
contamination du ltre en utilisant le schéma suivant :
Remplacer le ltre acceptable propre
Page 19

19
FR
IDENTIFICATION ET RÉSOLUTION DES
PROBLÈMES
Problème Cause possible et solution
Ventilation
insufsante
Contrôlez le degré d'encrassement du ltre.
Vériez que les entrée et sortie d'air ne sont pas obstruées.
L'appareil ne
démarre pas
Contrôlez l'alimentation et les fusibles
Bruits inhabituels
Vériez si des objets étrangers sont en contact avec le
ventilateur.
Le ltre 3 en 1 est très encrassé et doit être remplacé.
Les joints ont mal été installés.
L'appareil est posé sur une surface non plane.
CONSEILS POUR LE RECYCLAGE
Le pictogramme ci-contre apposé sur le produit signie que
la directive européenne 2012/19/UE s‘applique (poubelle
à roues barrée d’une croix). Ces produits ne peuvent être
jetés dans les poubelles domestiques courantes. Renseignezvous concernant les règles appliquées pour la collecte
d’appareils électriques et électroniques. Conformez-vous
aux réglementations locales et ne jetez pas vos anciens
produits avec les ordures ménagères. Le respect des règles
de recyclage des vieux produits aide à la protection de
l’environnement et de la santé de votre entourage contre
les conséquences négatives possibles. Le recyclage des
matériaux aide à réduire l’utilisation des matières premières.
Page 20

Page 21

Page 22

Page 23

Page 24

 Loading...